


 Loading...
Office 2003

© 2013 Turning Technologies, LLC. Portions Responsive Innovations, LLC, Microsoft Corporation
No part of this document may be reproduced or transmitted in any form or by any means, electronic or mechanical, for any purpose, without the express written permission of Turning Technologies, LLC. All rights reserved.
Turning Technologies, LLC, 255 West Federal Street, Youngstown, OH 44503
USA.
TurningPoint® is a registered trademark of Turning Technologies, LLC. Other trademarked product names mentioned in this manual are owned by their respective companies.
The following regulatory statements apply to radio frequency and infrared transmitters and receivers mentioned in this manual, including the ResponseCard RF, ResponseCard RF LCD, ResponseCard IR, ResponseCard XR, ResponseCard NXT and their respective receivers.
FCC Statement
This device complies with part 15 of the FCC Rules. Operation is subject to the following two conditions: (1) This device may not cause harmful interference, and
(2) this device must accept any interference received, including interference that may cause undesired operation.
Changes or modifications not expressly approved by the party responsible for compliance could void the user’s authority to operate the equipment.
IC Statement
This device complies with Industry Canada licence-exempt RSS standard(s). Operation is subject to the following two conditions: (1) this device may not cause interference, and (2) this device must accept any interference, including interference that may cause undesired operation of the device
Le présent appareil est conforme aux CNR d'Industrie Canada applicables aux appareils radio exempts de licence. L'exploitation est autorisée aux deux conditions suivantes : (1) l'appareil ne doit pas produire de brouillage, et (2) l'utilisateur de l'appareil doit accepter tout brouillage radioélectrique subi, même si le brouillage est susceptible d'en compromettre le fonctionnement.
TurningPoint for Office 2003 User Guide |
2 |

1 About TurningPoint . . . . . . . . . . . . . . . . . . . . . . . . . . . . . . .7
Product Introduction. . . . . . . . . . . . . . . . . . . . . . . . . . . . . . . . . . . . . . . . . . . . . . 8 System Requirements . . . . . . . . . . . . . . . . . . . . . . . . . . . . . . . . . . . . . . . . . . . . . 9 Requirements for Hardware . . . . . . . . . . . . . . . . . . . . . . . . . . . . . . . . . . . . 9 Requirements for Software . . . . . . . . . . . . . . . . . . . . . . . . . . . . . . . . . . . . . 9 Compatible Response Devices. . . . . . . . . . . . . . . . . . . . . . . . . . . . . . . . . . 9 Setup. . . . . . . . . . . . . . . . . . . . . . . . . . . . . . . . . . . . . . . . . . . . . . . . . . . . . . . . . . . . 10 Install TurningPoint . . . . . . . . . . . . . . . . . . . . . . . . . . . . . . . . . . . . . . . . . . . . . . 10 Configure Automatic Updates . . . . . . . . . . . . . . . . . . . . . . . . . . . . . . . . . . . . 11 Open TurningPoint with PowerPoint . . . . . . . . . . . . . . . . . . . . . . . . . . . . . 12 Tour of the TurningPoint Toolbar . . . . . . . . . . . . . . . . . . . . . . . . . . . . . . . . . 14 Customer Support Resources. . . . . . . . . . . . . . . . . . . . . . . . . . . . . . . . . . . . . 16 Online Assistance . . . . . . . . . . . . . . . . . . . . . . . . . . . . . . . . . . . . . . . . . . . . . 16 Customer Support . . . . . . . . . . . . . . . . . . . . . . . . . . . . . . . . . . . . . . . . . 16
2 Getting Started with TurningPoint . . . . . . . . . . . . . . . 17
Five Steps to Presentation Success. . . . . . . . . . . . . . . . . . . . . . . . . . . . . . . . 18 Step One: Create Presentation Slides . . . . . . . . . . . . . . . . . . . . . . . . . . . . . 18 Step Two: Set Up the Response Devices. . . . . . . . . . . . . . . . . . . . . . . . . . . 21 Step Three: Create a Participant List . . . . . . . . . . . . . . . . . . . . . . . . . . . . . . 26 Step Four: Run a Presentation Session. . . . . . . . . . . . . . . . . . . . . . . . . . . . 31 Step Five: Save Session Results . . . . . . . . . . . . . . . . . . . . . . . . . . . . . . . . . . . 33
3 Creating and Saving Slides. . . . . . . . . . . . . . . . . . . . . . . 35
Creating Slides. . . . . . . . . . . . . . . . . . . . . . . . . . . . . . . . . . . . . . . . . . . . . . . . . . . 36 Insert a Slide . . . . . . . . . . . . . . . . . . . . . . . . . . . . . . . . . . . . . . . . . . . . . . . . . . 36 Save the Presentation Slides. . . . . . . . . . . . . . . . . . . . . . . . . . . . . . . . . . . 37 Types of Slides . . . . . . . . . . . . . . . . . . . . . . . . . . . . . . . . . . . . . . . . . . . . . . . . . . . 38 Chart Slides . . . . . . . . . . . . . . . . . . . . . . . . . . . . . . . . . . . . . . . . . . . . . . . . 38 Competition Slides . . . . . . . . . . . . . . . . . . . . . . . . . . . . . . . . . . . . . . . . . 43 Template Slides . . . . . . . . . . . . . . . . . . . . . . . . . . . . . . . . . . . . . . . . . . . . 51 Special Slides . . . . . . . . . . . . . . . . . . . . . . . . . . . . . . . . . . . . . . . . . . . . . . 56 Insert Special Slides . . . . . . . . . . . . . . . . . . . . . . . . . . . . . . . . . . . . . . . . . . . . . . 65 Insert a Numeric Response Slide . . . . . . . . . . . . . . . . . . . . . . . . . . . . . . . 65 Insert a Priority Ranking Slide . . . . . . . . . . . . . . . . . . . . . . . . . . . . . . . . . . 67 Insert a Demographic Comparison Slide . . . . . . . . . . . . . . . . . . . . . . . 69 Insert a Comparative Links Slide . . . . . . . . . . . . . . . . . . . . . . . . . . . . . . . 70 Modify Slides . . . . . . . . . . . . . . . . . . . . . . . . . . . . . . . . . . . . . . . . . . . . . . . . . . . . 72 Designate a Demographic Slide . . . . . . . . . . . . . . . . . . . . . . . . . . . . . . . 73 Change Chart Types. . . . . . . . . . . . . . . . . . . . . . . . . . . . . . . . . . . . . . . . . . . 74 Enable Zero-based Polling. . . . . . . . . . . . . . . . . . . . . . . . . . . . . . . . . . . . . 76 Identify a Correct Answer from the Settings Window . . . . . . . . . . . 76 Identify a Correct Answer on a TurningPoint Slide . . . . . . . . . . . . . . 77 Use Keywords for Fill in the Blank Slides. . . . . . . . . . . . . . . . . . . . . . . . 79 Set Point Values from the Settings Window . . . . . . . . . . . . . . . . . . . . 80
TurningPoint for Office 2003 User Guide |
3 |

Set Point Values on a TurningPoint Slide . . . . . . . . . . . . . . . . . . . . . . . 86 Clear Answer Values from the Settings Window . . . . . . . . . . . . . . . . 88 Clear Answer Values on a TurningPoint Slide. . . . . . . . . . . . . . . . . . . 89 Use Speed Scoring . . . . . . . . . . . . . . . . . . . . . . . . . . . . . . . . . . . . . . . . . . . . 91 Create Picture Slides . . . . . . . . . . . . . . . . . . . . . . . . . . . . . . . . . . . . . . . . . . 92 Change Chart Colors . . . . . . . . . . . . . . . . . . . . . . . . . . . . . . . . . . . . . . . . . . 94 Make a PowerPoint Slide Interactive by Inserting a Chart . . . . . . . 98 Disable Auto Scale in Charts . . . . . . . . . . . . . . . . . . . . . . . . . . . . . . . . . .100
Add Objects . . . . . . . . . . . . . . . . . . . . . . . . . . . . . . . . . . . . . . . . . . . . . . . . . . . .102 Add an Answer Now Indicator . . . . . . . . . . . . . . . . . . . . . . . . . . . . . . . .103 Add a Countdown Indicator . . . . . . . . . . . . . . . . . . . . . . . . . . . . . . . . . .105 Add a Countdown Sound to a Countdown Indicator . . . . . . . . . .106 Add a Response Counter . . . . . . . . . . . . . . . . . . . . . . . . . . . . . . . . . . . . .108 Add a Correct Answer Indicator . . . . . . . . . . . . . . . . . . . . . . . . . . . . . .110 Add Text Messaging . . . . . . . . . . . . . . . . . . . . . . . . . . . . . . . . . . . . . . . . .111 Add Statistics Indicators. . . . . . . . . . . . . . . . . . . . . . . . . . . . . . . . . . . . . .113
4 Response Device and Settings Management . . . . . 115
Install Devices . . . . . . . . . . . . . . . . . . . . . . . . . . . . . . . . . . . . . . . . . . . . . . . . . .118 Install Infrared Response Device Receiver . . . . . . . . . . . . . . . . . . . . .118 Install Radio Frequency Response Device Receiver . . . . . . . . . . . .120 Obtain the ResponseWare Device Settings . . . . . . . . . . . . . . . . . . . .121 Response Device Management. . . . . . . . . . . . . . . . . . . . . . . . . . . . . . . . . .122 Add or Update Response Device Receivers . . . . . . . . . . . . . . . . . . .122 Enable ResponseWare. . . . . . . . . . . . . . . . . . . . . . . . . . . . . . . . . . . . . . . .123 Configure PresenterCard . . . . . . . . . . . . . . . . . . . . . . . . . . . . . . . . . . . . .125 Check Device Communication. . . . . . . . . . . . . . . . . . . . . . . . . . . . . . . .127 Identify the Number of Devices to be Used . . . . . . . . . . . . . . . . . . .129 Settings. . . . . . . . . . . . . . . . . . . . . . . . . . . . . . . . . . . . . . . . . . . . . . . . . . . . . . . .132 Response Device Settings . . . . . . . . . . . . . . . . . . . . . . . . . . . . . . . . .134 Presentation Settings . . . . . . . . . . . . . . . . . . . . . . . . . . . . . . . . . . . . .137 Slide Settings . . . . . . . . . . . . . . . . . . . . . . . . . . . . . . . . . . . . . . . . . . . . .146 Answer Settings. . . . . . . . . . . . . . . . . . . . . . . . . . . . . . . . . . . . . . . . . . .149
5 Track Participants and Teams . . . . . . . . . . . . . . . . . . . 150
Participant List Wizard . . . . . . . . . . . . . . . . . . . . . . . . . . . . . . . . . . . . . . . . . .151 Create a Participant List Using Participant List Wizard . . . . . . . . .151 Create a Participant List from a Learning Management System 157 Manage Participant Lists . . . . . . . . . . . . . . . . . . . . . . . . . . . . . . . . . . . . . . . .158 Modify a Participant List. . . . . . . . . . . . . . . . . . . . . . . . . . . . . . . . . . . . . .158 Verify Participants and Device IDs . . . . . . . . . . . . . . . . . . . . . . . . . . . .165 Delete a Participant List . . . . . . . . . . . . . . . . . . . . . . . . . . . . . . . . . . . . . .166 Print a Participant List . . . . . . . . . . . . . . . . . . . . . . . . . . . . . . . . . . . . . . . .168 Set Up Team Competitions. . . . . . . . . . . . . . . . . . . . . . . . . . . . . . . . . . . . . .169 Add Teams to a Participant List . . . . . . . . . . . . . . . . . . . . . . . . . . . . . . .169
TurningPoint for Office 2003 User Guide |
4 |

Real-Time Registration Tool . . . . . . . . . . . . . . . . . . . . . . . . . . . . . . . . . . . . .172
How to Use the Real-Time Registration Tool. . . . . . . . . . . . . . . . . . .172
6 Tools . . . . . . . . . . . . . . . . . . . . . . . . . . . . . . . . . . . . . . . . . . 174
Ranking Wizard . . . . . . . . . . . . . . . . . . . . . . . . . . . . . . . . . . . . . . . . . . . . . . . . .175 Create Slides with the Ranking Wizard . . . . . . . . . . . . . . . . . . . . . . . .176 Standards. . . . . . . . . . . . . . . . . . . . . . . . . . . . . . . . . . . . . . . . . . . . . . . . . . . . . . .182 Assign Standards Using a K-12 Standards List . . . . . . . . . . . . . . . . .182 Create a Custom Standards List . . . . . . . . . . . . . . . . . . . . . . . . . . . . . . .187 Assign Custom Standards to Slides . . . . . . . . . . . . . . . . . . . . . . . . . . .191 QuestionPoint . . . . . . . . . . . . . . . . . . . . . . . . . . . . . . . . . . . . . . . . . . . . . . . . . .195 Create Slides from QuestionPoint. . . . . . . . . . . . . . . . . . . . . . . . . . . . .195 Conditional Branching . . . . . . . . . . . . . . . . . . . . . . . . . . . . . . . . . . . . . . . . . .196 Set Up Conditional Branching . . . . . . . . . . . . . . . . . . . . . . . . . . . . . . . .196 Parser Documents . . . . . . . . . . . . . . . . . . . . . . . . . . . . . . . . . . . . . . . . . . . . . .201 Format QTI Documents. . . . . . . . . . . . . . . . . . . . . . . . . . . . . . . . . . . .201 Format XML Documents. . . . . . . . . . . . . . . . . . . . . . . . . . . . . . . . . . .202 Format Word Documents. . . . . . . . . . . . . . . . . . . . . . . . . . . . . . . . . .205 Format Excel Documents . . . . . . . . . . . . . . . . . . . . . . . . . . . . . . . . . .207 Import Slides . . . . . . . . . . . . . . . . . . . . . . . . . . . . . . . . . . . . . . . . . . . . . . . . . . .209 Import Slides with the TurningPoint Parser. . . . . . . . . . . . . . . . . . . .209 Import Slides from TestingPoint . . . . . . . . . . . . . . . . . . . . . . . . . . . . . .210
7 Run Presentations. . . . . . . . . . . . . . . . . . . . . . . . . . . . . . 212
Run a Presentation . . . . . . . . . . . . . . . . . . . . . . . . . . . . . . . . . . . . . . . . . . . . . .213 Establish the Presentation Settings . . . . . . . . . . . . . . . . . . . . . . . . . . .213 Run the Slide Show. . . . . . . . . . . . . . . . . . . . . . . . . . . . . . . . . . . . . . . . . . .217 View a Response Grid . . . . . . . . . . . . . . . . . . . . . . . . . . . . . . . . . . . . . . . .220 Use the Participant Monitor . . . . . . . . . . . . . . . . . . . . . . . . . . . . . . . . . .221 Add Slides During a Presentation Session . . . . . . . . . . . . . . . . . . . . .222 Use Data Slicing (View Results by Question) . . . . . . . . . . . . . . . . . . .225
8 Reports . . . . . . . . . . . . . . . . . . . . . . . . . . . . . . . . . . . . . . . . 227
View a Report . . . . . . . . . . . . . . . . . . . . . . . . . . . . . . . . . . . . . . . . . . . . . . . . . . .228 View a Report . . . . . . . . . . . . . . . . . . . . . . . . . . . . . . . . . . . . . . . . . . . . . . . .228 Types of Reports . . . . . . . . . . . . . . . . . . . . . . . . . . . . . . . . . . . . . . . . . . . . . . . .233 Results by Question Reports . . . . . . . . . . . . . . . . . . . . . . . . . . . . . . .234 Demographic Reports . . . . . . . . . . . . . . . . . . . . . . . . . . . . . . . . . . . . .235 Participant Results Reports . . . . . . . . . . . . . . . . . . . . . . . . . . . . . . . .236 Results by Participant Reports . . . . . . . . . . . . . . . . . . . . . . . . . . . . .237 Participant List Reports . . . . . . . . . . . . . . . . . . . . . . . . . . . . . . . . . . . .238 Standards Reports. . . . . . . . . . . . . . . . . . . . . . . . . . . . . . . . . . . . . . . . .239 Comparative Scoring Reports. . . . . . . . . . . . . . . . . . . . . . . . . . . . . .240 Team Scoring Reports . . . . . . . . . . . . . . . . . . . . . . . . . . . . . . . . . . . . .241 Percentile Reports. . . . . . . . . . . . . . . . . . . . . . . . . . . . . . . . . . . . . . . . .242
TurningPoint for Office 2003 User Guide |
5 |

Other Reports. . . . . . . . . . . . . . . . . . . . . . . . . . . . . . . . . . . . . . . . . . . . .242
9 Sessions . . . . . . . . . . . . . . . . . . . . . . . . . . . . . . . . . . . . . . . 245
Manage and Edit Sessions. . . . . . . . . . . . . . . . . . . . . . . . . . . . . . . . . . . . . . .246 Save Results from a Session . . . . . . . . . . . . . . . . . . . . . . . . . . . . . . . . . .246 Change the Default Save Location . . . . . . . . . . . . . . . . . . . . . . . . . . . .248 Continue a Previously Saved Session . . . . . . . . . . . . . . . . . . . . . . . . .250 Edit Session Data . . . . . . . . . . . . . . . . . . . . . . . . . . . . . . . . . . . . . . . . . . . .251 Delete Results from a Session. . . . . . . . . . . . . . . . . . . . . . . . . . . . . . . . .254
10Export . . . . . . . . . . . . . . . . . . . . . . . . . . . . . . . . . . . . . . . . 256
Export Session Data. . . . . . . . . . . . . . . . . . . . . . . . . . . . . . . . . . . . . . . . . . . . .257 Export Session Data as a CSV File . . . . . . . . . . . . . . . . . . . . . . . . . . . . . . . .264 Export Results Data to a Learning Management System (LMS) . . . .265 Merge Participant List. . . . . . . . . . . . . . . . . . . . . . . . . . . . . . . . . . . . . . . . . . .265 Merge Session Files . . . . . . . . . . . . . . . . . . . . . . . . . . . . . . . . . . . . . . . . . . . . .267 Extract Participant List . . . . . . . . . . . . . . . . . . . . . . . . . . . . . . . . . . . . . . . . . .269 Extract PowerPoint Presentation . . . . . . . . . . . . . . . . . . . . . . . . . . . . . . . .270 Extract Session Data as XML . . . . . . . . . . . . . . . . . . . . . . . . . . . . . . . . . . . . .271 E-mail Session . . . . . . . . . . . . . . . . . . . . . . . . . . . . . . . . . . . . . . . . . . . . . . . . . .273
A Frequently Asked Questions . . . . . . . . . . . . . . . . . . . . . . . . .275
TurningPoint for Office 2003 User Guide |
6 |

1About TurningPoint
Welcome to TurningPoint, the easiest, most powerful, fully interactive group response system available. For use with PowerPoint, TurningPoint enables an audience to use response devices to provide instant feedback to a speaker.
TurningPoint then gathers the responses and quickly translates the results into test scores, charts, and graphs. It also can store the data for future reference.
This chapter provides an overview of the product and includes the system requirements, installation instructions, and customer support resources.
TurningPoint for Office 2003 User Guide |
7 |

Product Introduction
Product Introduction
TurningPoint smoothly integrates with PowerPoint to create a more interactive and memorable presentation. TurningPoint was designed to run on Office 2003, Office 2007 and Office 2010. (Find additional information in System Requirements on page 9.)
Once installed, TurningPoint options are accessed through the TurningPoint Toolbar, which can be found in PowerPoint beneath the standard PowerPoint Toolbar. This toolbar displays the options to create interactive slides, set up and run a presentation, and generate reports.
Other TurningPoint features include participant monitoring and reporting tools. TurningPoint also provides the ability to connect to an educational institution’s WebCT, Blackboard or Sakai server or other LMS solution to streamline creating Participant Lists and reporting classroom results and grades.
Additionally, TurningPoint is available in multiple languages. Customers may download a language pack from www.TurningTechnologies.com.
TurningPoint for Office 2003 User Guide |
8 |

System Requirements
System Requirements
TurningPoint is designed to function on most computers; however, there are some hardware and software requirements:
Requirements for Hardware
The following hardware specifications are required before installing TurningPoint:
•Intel or AMD 600 MHz class processor (1 GHz or higher recommended)
•256 MB RAM (256 MB or more of “available” RAM recommended)
•60 MB hard disk space (an additional 32 MB is required if you do not have Microsoft .NET Framework 2.0 installed)
•1024x768 resolution at 32-bit color or higher
•Standard USB 1.1/2.0 port
•Ethernet or 802.11 compatible wireless network card (for ResponseWare use)
Requirements for Software
The following software applications are required before installing TurningPoint:
•Microsoft Windows 32-bit or 64-bit XP, Vista, or Windows 7.
•Microsoft Office XP, 2003, 2007, or 2010
•Microsoft .NET 2.0 or higher
Compatible Response Devices
The following response devices are compatible with TurningPoint.
•ResponseCard RF or IR
•ResponseCard XR
•ResponseCard NXT
•ResponseWare
TurningPoint for Office 2003 User Guide |
9 |

Setup
Setup
Install TurningPoint
Follow the steps below to install TurningPoint.
Before You Begin
Check the hardware and software specifications outlined in System Requirements on page 9.
To install TurningPoint software…
1Install TurningPoint in one of two ways:
•Download the latest edition of TurningPoint from the Turning Technologies web site.
The Turning Technologies web site is located at http://www.turningtechnologies.com. Click the Download button to the right of the screen and select the TurningPoint link. Complete the download request form and click Submit. Select the TurningPoint link on the next page and save the file to your computer. When the download is complete, double-click the setup icon to launch the InstallShield Wizard.
•Or install from a CD. Insert the CD into the computer. The InstallShield Wizard launches automatically.
2Click Next.
A window opens and displays the license agreement. Read the license agreement on the screen or click the Print button to send the text to a printer.
3Select the button labeled “I accept the terms in the license agreement” if you accept the terms.
Accepting the terms of the license agreement permits you to continue to install TurningPoint.
4Click Next.
A window opens and displays customer information entry fields.
5Enter your name and organization in the fields.
TurningPoint for Office 2003 User Guide |
10 |
Configure Automatic Updates
6Click Next.
A window opens and displays a message that the computer is ready to install TurningPoint.
7Click Install.
The computer installs TurningPoint and displays the Finish button on the page when the process is complete.
8Click Finish.
Select the Launch TurningPoint checkbox if you would like to immediately open the program or double-click the TurningPoint shortcut on the desktop to open the program.
Configure Automatic Updates
TurningPoint has a new update feature which allows you to update the software without having to uninstall it first. The update feature can also be configured to check for updates each time TurningPoint is opened.
Before You Begin
You must have an active internet connection to check for software updates.
To configure automatic updates...
1Open TurningPoint.
2Click Tools on the TurningPoint Toolbar and select Check for Updates.
TurningPoint for Office 2003 User Guide |
11 |

Open TurningPoint with PowerPoint
If a software update is available the version number is listed under Update.
TurningPoint Update Window
3 Click Update.
Tip
Check the box labeled “Automatically check for updates in the future” to have TurningPoint check for updates each time the application is opened.
4TurningPoint will download the update.
5When prompted, close PowerPoint.
After the updated has been downloaded and installed, TurningPoint will reopen.
Open TurningPoint with PowerPoint
After you install TurningPoint, you can configure it to open automatically when PowerPoint starts.
To toggle the option to automatically load TurningPoint...
1Double-click the TurningPoint icon.
2Click Tools on the TurningPoint Toolbar and select Settings.
3Select Presentation from the Settings Hierarchy.
A specific list of settings options displays in the menu.
TurningPoint for Office 2003 User Guide |
12 |

Open TurningPoint with PowerPoint
4Scroll down until you see the Misc settings.
5Select the Add-In always loaded setting.
A drop-down menu opens.
Settings Window: Add-In always loaded
6Choose either True or False.
Choosing True will have TurningPoint automatically load when PowerPoint is opened.
Choosing False means that TurningPoint does NOT automatically load when PowerPoint is opened; you must launch TurningPoint by using the TurningPoint.exe shortcuts created at the time of installation.
Note
TurningPoint uses False as the default setting for
Add-In always loaded.
7Click Done.
The Settings window closes and, depending on your selection, TurningPoint will either load or not load the next time you open PowerPoint.
TurningPoint for Office 2003 User Guide |
13 |

Tour of the TurningPoint Toolbar
Tour of the TurningPoint Toolbar
When you launch TurningPoint, PowerPoint opens and the TurningPoint Toolbar is displayed beneath the PowerPoint toolbars, as the following image depicts:
TurningPoint Toolbar
The following descriptions define the buttons that make up the tools in the TurningPoint 2008 Toolbar:
Information |
Allows you to view information about your TurningPoint Software. It also |
|
shows licensing information for the receiver you are using, and it provides |
|
a mechanism to supply feedback to Turning Technologies for support |
|
assistance. |
Reset |
Displays a menu of options to clear the current user response data to start |
|
a new session or reset individual slides for polling. Find information about |
|
polling the audience in Chapter 7: Run Presentations. |
Continue Prior Session |
Opens a previously saved session. A session is a run-through of a |
|
presentation where an audience has submitted responses to some or all |
|
of the questions. Find information about continuing a prior session in |
|
Chapter 9: Sessions. |
Save Session |
Stores the current session. Find information about saving sessions in |
|
Chapter 9: Sessions. |
Insert Slide |
Displays a menu of TurningPoint slide types that allows you to select from |
|
in order to create a presentation. Find information about TurningPoint |
|
slides in Chapter 3: Creating and Saving Slides. |
Convert to Picture Slide |
Assigns pictures as answers in place of text. Find information about |
|
picture slides in Chapter 3: Creating and Saving Slides. |
Insert Object |
Displays a menu of items to enhance a TurningPoint slide. Find |
|
information about slide options in Chapter 3: Creating and Saving Slides. |
TurningPoint for Office 2003 User Guide |
14 |

|
Tour of the TurningPoint Toolbar |
Tools |
Displays a menu of options to report, modify, track, and integrate |
|
TurningPoint presentations and sessions. |
Select Input Source |
Selects the input source to be used for collecting response data. These |
|
include Response Devices, Keyboard Keys (0-9), and Simulated Data. Find |
|
information about response devices in Chapter 4: Response Device and |
|
Settings Management. |
Participants |
Provides options to create, edit, and delete Participant Lists. Find |
|
information about these options in Chapter 5: Track Participants and |
|
Teams. |
Import |
Provides option to create TurningPoint presentations from other sources. |
|
Find more information about Importing in Chapter 6: Tools. |
Select a Participant List |
Used to associate a participant list with the current session. Find |
|
information about Participant Lists in Chapter 5: Track Participants and |
|
Teams. |
Turning Talk |
Opens the TurningTalk User Community, a social learning community for |
|
users of Turning Technologies products and services. |
Display TurningPoint Help |
Opens the help file. |
Toolbar Options |
Customizes the PowerPoint and TurningPoint toolbars. |
TurningPoint for Office 2003 User Guide |
15 |

Customer Support Resources
Customer Support Resources
If you have questions or concerns, additional resources are available online or by calling a Turning Technologies representative.
Online Assistance
Turning Technologies offers online assistance through its web site at
http://www.turningtechnologies.com.
Go to the Product Guides and Manuals section of the web site to find more information about using TurningPoint, such as the Quick Start Guide.
Go to the Product Training section of the Turning Technologies web site under Support to find:
•Tutorials
•Online Training
•Onsite Training
•Case Studies
•Presentations
Customer Support
Turning Technologies Customer Service Department offers technical support, which is available Monday - Friday, 7am - 9pm EST. From within the continental United States, call Customer Service toll-free at 1 866 746 3015. If calling from outside the United States, call +(1) 330 746 3015. Customer Service also may be reached via e-mail at support@turningtechnologies.com.
Mailing Address:
Turning Technologies 255 West Federal Street Youngstown, OH 44503
Turning Technologies offers complete TurningPoint training. Our trainers are available for onsite training at your location, or you may send your team to our training facility in Ohio.
Typical training sessions last from two to six hours, depending on your intended use of TurningPoint and skill level with Microsoft Office products. For Training Services, call 1 866 746 3015 for details.
TurningPoint for Office 2003 User Guide |
16 |

2Getting Started with TurningPoint
The process to create interactive presentations with TurningPoint is very simple. This chapter describes how to successfully build, deliver, and save the results of an interactive presentation in five easy steps.
TurningPoint for Office 2003 User Guide |
17 |

Five Steps to Presentation Success
Five Steps to Presentation Success
Creating an interactive presentation with TurningPoint can be accomplished in five easy steps.
Note
The steps below outline the suggested approach to presentation success; however, you are not required to perform the steps in this order, and you may omit steps that do not apply to you.
This section describes the five steps to success:
•Step One: Create Presentation Slides
•Step Two: Set Up the Response Devices
•Step Three: Create a Participant List
•Step Four: Run a Presentation Session
•Step Five: Save Session Results
Step One: Create Presentation Slides
Using TurningPoint to create an interactive presentation requires basic PowerPoint knowledge, such as creating slides. You can add TurningPoint objects to the slides to allow participants to interact with the presentation. TurningPoint’s objects include Answer Now prompts, Countdown and Response Counter shapes.
Before You Begin
Install TurningPoint on the machine to be used to run the presentation.
To create a simple slide…
1Click Insert Slide on the TurningPoint Toolbar.
A menu opens and displays a variety of pre-defined slides. Each slide can be used as-is or customized.
TurningPoint for Office 2003 User Guide |
18 |
Step One: Create Presentation Slides
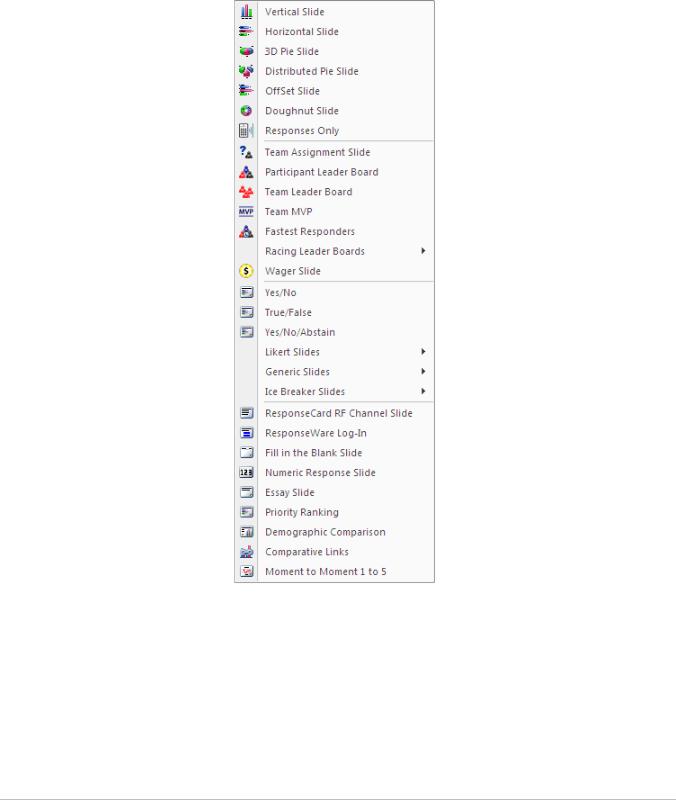
As you move your cursor over the entries in the Insert Slide menu, the slide name is highlighted. Find more information on slides in Types of Slides on page 38.
Insert Slide
2 Select Vertical Slide.
TurningPoint for Office 2003 User Guide |
19 |
Step One: Create Presentation Slides
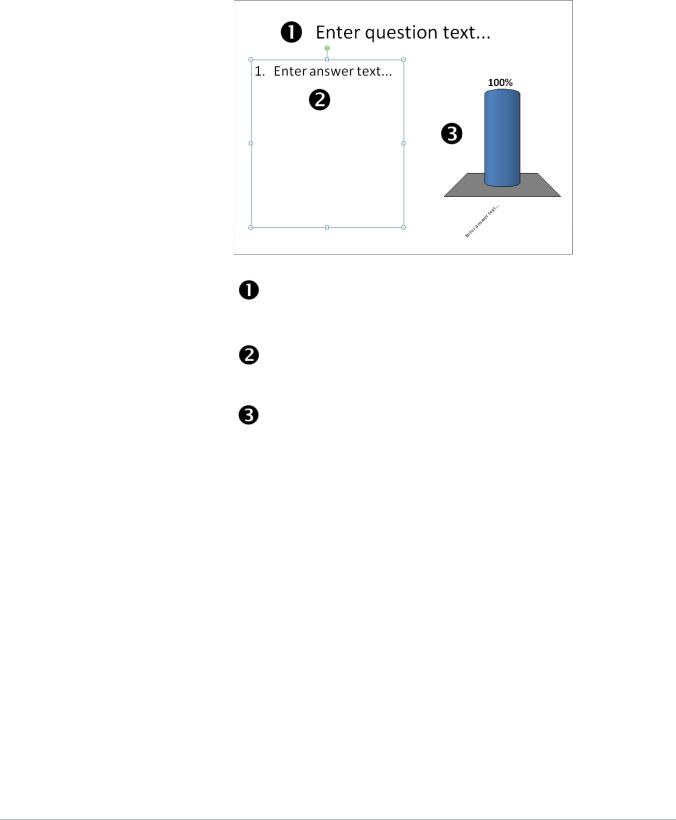
TurningPoint inserts a Vertical Slide. The slide contains a question, answer, and chart region.
Insert Vertical Slide
Question region - “Enter question text...”
Answer region - “Enter answer text...”
Chart region - This example is a vertical bar chart. Charts can be positioned anywhere on the slide.
3Select the Question region and type a question.
When you select the region, the text is highlighted. The highlighted text is replaced with the question that you enter.
4Select the answer region and enter the answers.
You can enter a maximum of ten answers per slide.
5Repeat step 1to 4to insert additional slides.
6Save your file from the PowerPoint Toolbar before exiting TurningPoint.
TurningPoint for Office 2003 User Guide |
20 |
Step Two: Set Up the Response Devices
Next Steps
Slides can be customized with a variety of animated feedback mechanisms. Find more information about these objects and other features in Chapter 3: Creating and Saving Slides.
Step Two: Set Up the Response Devices
Each audience participant uses a response device to respond to the questions asked during the presentation.
TurningPoint supports a variety of response devices including infrared and radio frequency ResponseCards as well as ResponseWare.
Note
TurningPoint supports only the ResponseCard family of keypads.
Before You Begin
TurningPoint must be installed on the computer to be used for the presentations. You also must have the USB Response Device Receivers and Response Devices available for testing.
To set up the response devices…
1Connect the device receiver to the USB port of the presentation computer.
Connect the USB Response Device Receiver to your computer. Windows detects the receiver and installs the proper drivers. The device is now ready for use.
Infrared and Radio Frequency Response Device Receivers
TurningPoint for Office 2003 User Guide |
21 |
Step Two: Set Up the Response Devices
If you are using a response device licensed for TurningPoint 2003 or 2006, you must upgrade the license code for the receiver. Contact your Account Executive to receive a new license code for TurningPoint version 4.0 and higher.
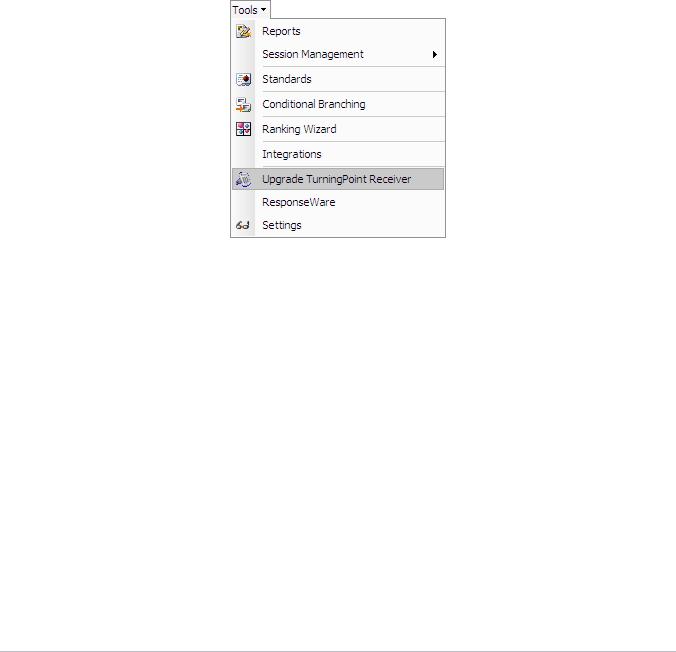
2If required, Upgrade your Response Device. Otherwise, go step 3.
If you have not already upgraded your response device receiver, you must complete this step.
a From the TurningPoint Toolbar, select Tools > Upgrade TurningPoint Receiver. Follow the on screen instructions.
Upgrade Response Device
3 From the TurningPoint Toolbar, select Tools > Settings.
TurningPoint for Office 2003 User Guide |
22 |
Step Two: Set Up the Response Devices
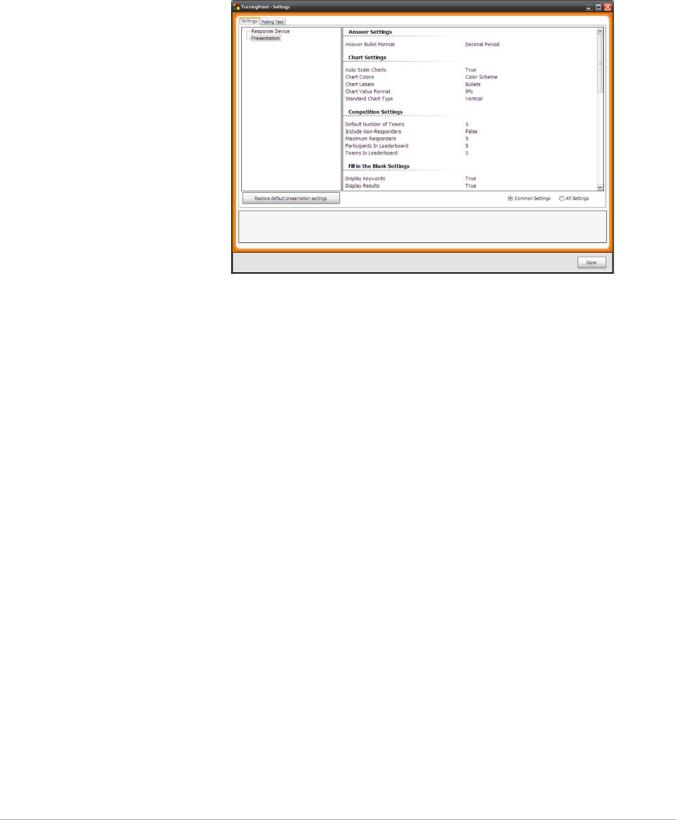
The TurningPoint Settings window opens, displaying two tabs: Settings and Polling Test.
Settings Window
4Select the Settings tab.
The Settings tab displays a Settings Hierarchy in the left pane and the available settings in the right pane.
5Select Response Device from the Settings Hierarchy.
TurningPoint for Office 2003 User Guide |
23 |

Step Two: Set Up the Response Devices
Settings for the Response Devices display in the right pane of the Settings window. Select All Settings to access additional settings.
Settings Window: Response Devices
Note
ResponseWare is a software version of a response device. ResponseWare must be identified for use during device setup as well. Find more information on device setup in Chapter 4: Response Device and Settings Management.
6Enter the number of expected devices.
You are only required to enter the number of expected devices when using Simulated Data, or a Response Counter.
TurningPoint limits the number of response devices that will be displayed in a Response Counter based upon the number of participants in the participant list.
Find more information on Response Counters in Add a Response Counter on page 108.
Note
Access the Response Device settings again when you need to change the number or type of devices being used with the presentations.
7Click Done.
The response devices are ready for use.
TurningPoint for Office 2003 User Guide |
24 |

Step Two: Set Up the Response Devices
Next Steps
Find more information about Response Devices and the Settings available in the TurningPoint User Guide in Chapter 4: Response Device and Settings Management.
If an audience member’s device is not being accepted, check the device’s ability to communicate. Radio Frequency and ResponseWare response devices provide on-screen confirmation that responses have been received. For infrared response devices, the use of a Response Counter, or Response Grid will help to alert you of a non-communicating device. Find more information in Add a Response Counter on page 108, orView a Response Grid on page 220.
To Check Device Communication...
1From the TurningPoint Toolbar, select Tools > Settings.
The TurningPoint Settings window opens, displaying two tabs: Settings and Polling Test.
2Select the Polling Test tab.
TurningPoint displays the Polling Test screen. Use this screen to verify that TurningPoint can receive responses from the devices.
Settings Window: Polling Test
3 Click Start Test.
TurningPoint for Office 2003 User Guide |
25 |

Step Three: Create a Participant List
TurningPoint is now ready to accept responses from the response devices. You can magnify the responses by placing a check mark in the box next to Magnify Values.
Polling Test: Magnify Responses
4Press a key on each response device to be used.
TurningPoint displays the Device ID, Channel, and the key entry from each response device in the order in which they were tested.
Polling Test: Response Device Test
5Click End Test.
6Click Done.
The response device testing is now complete.
Step Three: Create a Participant List
Participant Lists identify the members of the audience—students, trainees, survey respondents—who will use a response device during the presentation. The participant name and required information is stored along with the Device ID.
TurningPoint for Office 2003 User Guide |
26 |
Step Three: Create a Participant List
You may create multiple Participant Lists to be used with one interactive presentation. Doing so allows you to use the presentation with multiple audiences and track the session results per audience.
To create a Participant List…
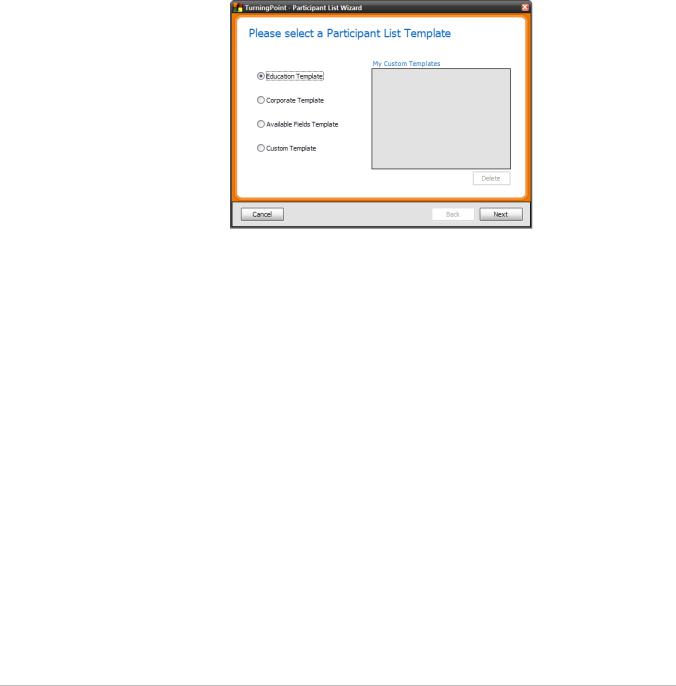
1Click Participants on the TurningPoint Toolbar and select Participant List Wizard.
2Select a template to be used for the new Participant List.
Participant List Wizard
Participant List template choices include:
•Education—contains standard student information used for K–12 and higher education presentations, such as name and student ID.
•Corporate—contains entries for the information most often used in corporate feedback meetings including name, company name, telephone numbers, etc.
•Available Fields—contains all information entries defined for use with TurningPoint.
•Custom—allows you to create a personalized Participant List and to name the template, or it allows you to select a previously created template from the list.
3 Click Next to continue.
TurningPoint for Office 2003 User Guide |
27 |
Step Three: Create a Participant List
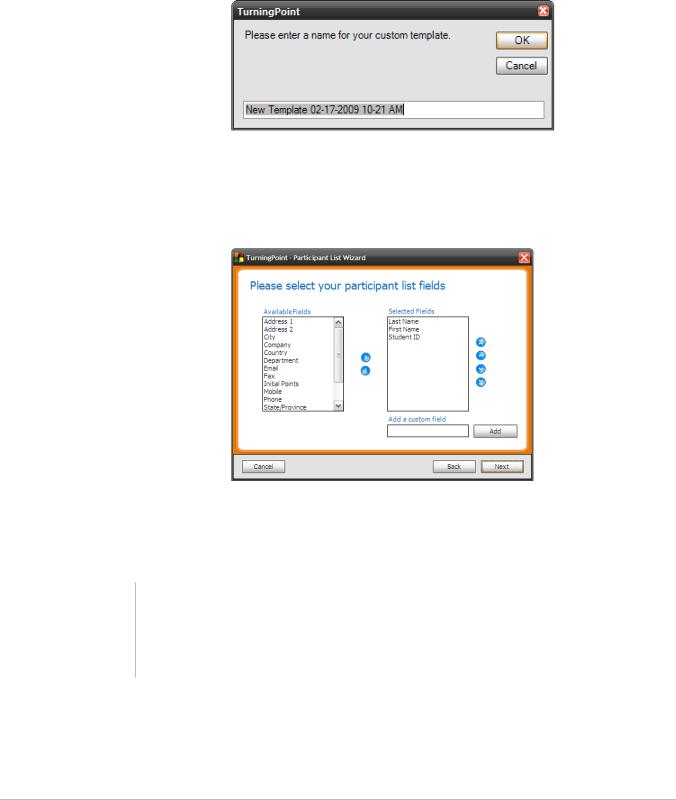
If you opted to create a new template, TurningPoint asks you to name the template. Enter a name and select the OK button.
Custom Template Name
TurningPoint displays the Participant List information entries (called fields). All entries that make up the template appear in the Selected Fields region on the right. Use this page to add, delete, or reorder the entries that make up the template.
Participant List: Add or Remove Fields
4Optionally, select the right (>) and left (<) arrow buttons to add or delete selected fields from the template.
Note
Find instructions to customize Participant List templates in Chapter 5: Track Participants and Teams.
5 Click Next to continue.
TurningPoint for Office 2003 User Guide |
28 |

Step Three: Create a Participant List
TurningPoint displays the Groups entry box. Use this screen to add groups to your Participant List. Groups provide categorization for team competitions and greater reporting opportunities.
Participant List Wizard: Add Groups
6 Optionally, enter a group name and click Add.
Tip
Make sure you select any groups that you want to include in team competitions.
TurningPoint displays all groups in the Included Groups box. Place a check mark next to the group name to include it in team competition. Find more information on team competitions in Set Up Team Competitions on page 169.
• Repeat this step to add additional groups.
7 Click Next.
TurningPoint for Office 2003 User Guide |
29 |
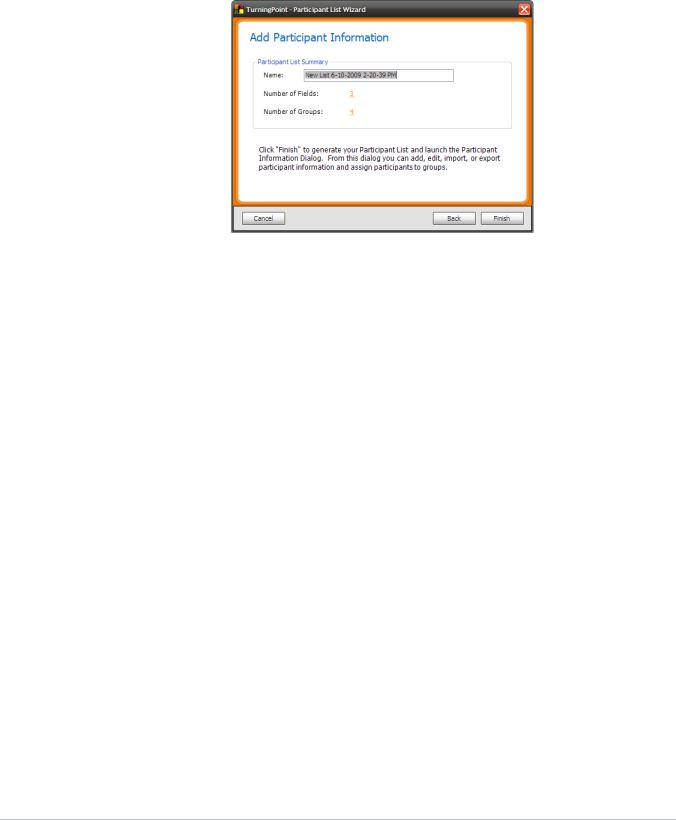
Step Three: Create a Participant List
TurningPoint displays the Participant List summary screen.
Participant List Wizard: Summary
8Optionally, edit the Participant File composition.
The settings you can change include the Participant List file name, number of fields, and number of groups. For file name, select the old file name and enter a new one in the box provided. For number of fields or number of groups, select the link next to the setting to be returned to the screen and make your edits.
9Click Finish to create the Participant List and save it to a file.
TurningPoint opens the Participant Information window where you can enter, edit, paste, or import data.
TurningPoint for Office 2003 User Guide |
30 |
Loading...