

123..
3,1,2..
C,A,B..
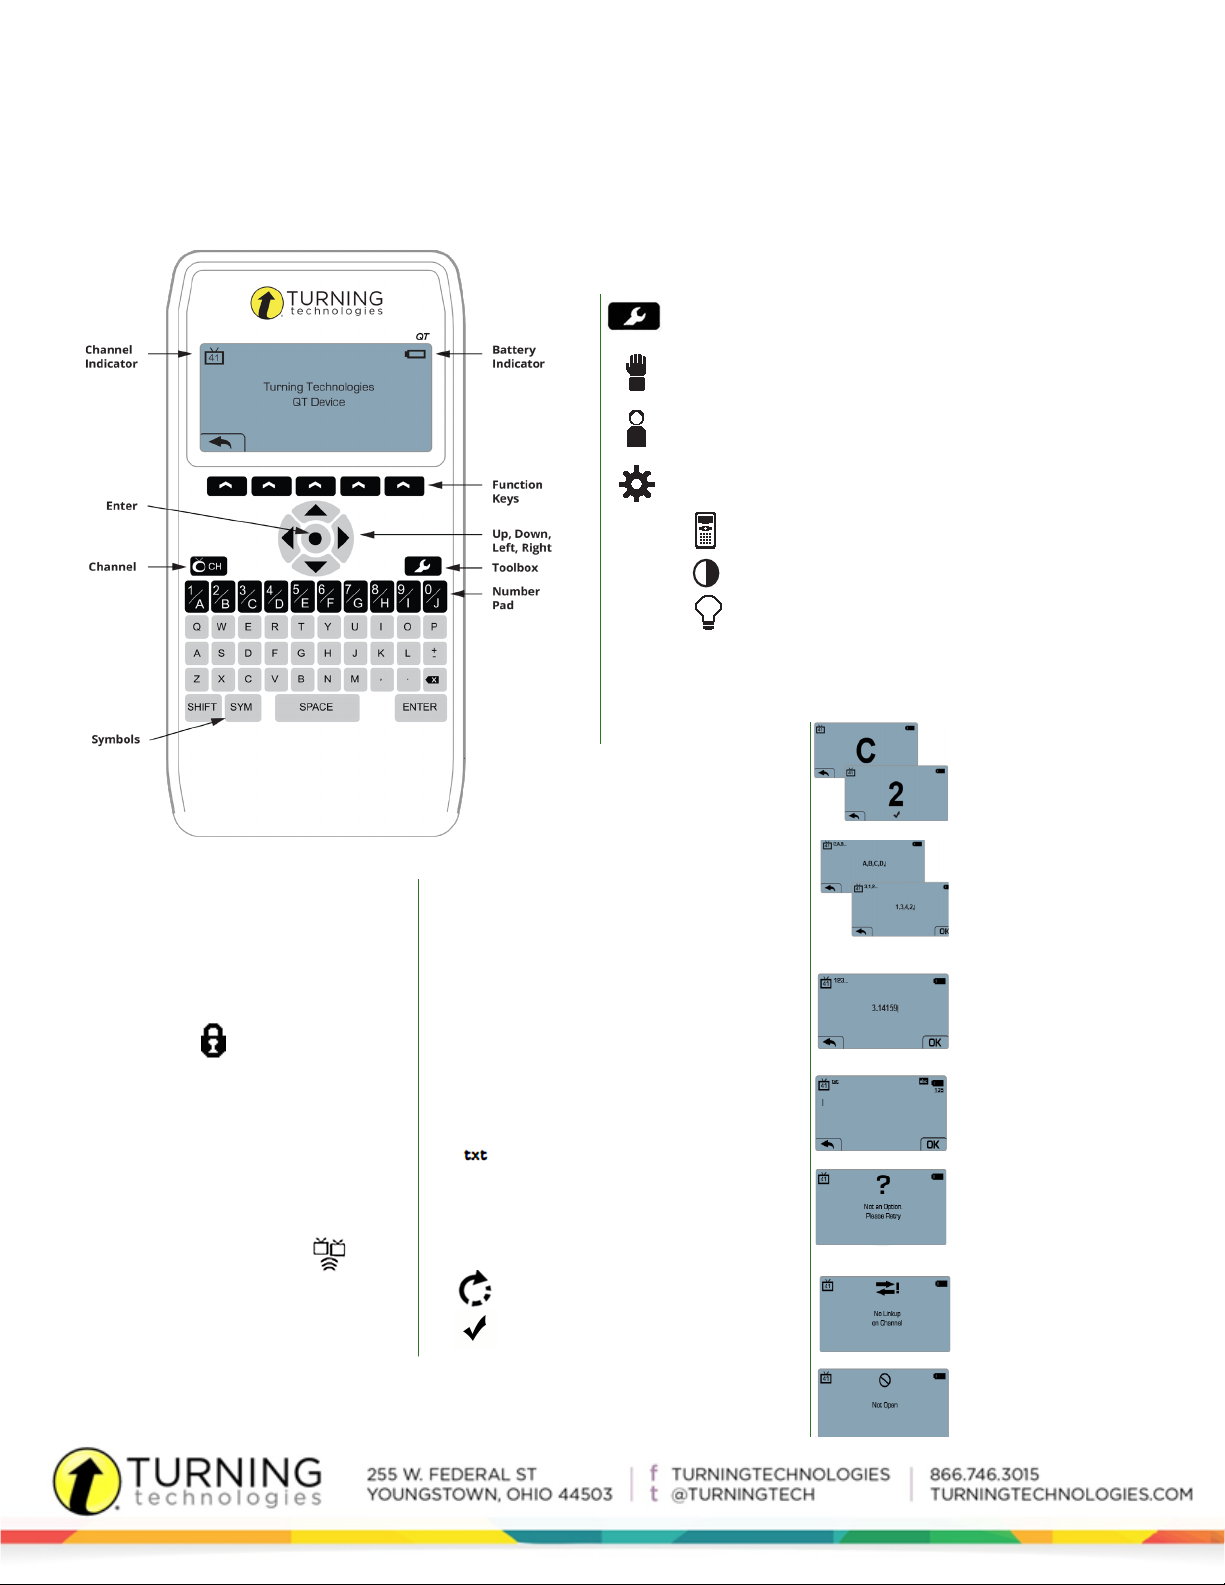
QT Device
Quick Start
Presentation Mode
The QT Device is an audience response device used when a presenter wants
to gather immediate feedback from the audience.
THE TOOLBOX
Send Message - Send a message to the presenter. The presenter is
unable to respond via the same method.
NOTE: The presenter may have this feature disabled in the software. If
disabled, you will see “Not Open” when trying to send a message.
Your ID - Assigns an alphanumeric identication to device.
Settings - Press the function key below OK to open the settings and use the
arrow keys to scroll through the options. The settings contain:
• Device Info - Displays the Device ID.
• Contrast - Press the left/right arrows to adjust the contrast of the
objects. Press OK to save.
• Brightness - Press the left/right arrows to adjust the backlight
luminosity of the LCD display on the QT Device. Press OK to save.
TIP: Expose the QT Device to natural or
artificial light to charge the “glow in the
dark” keyboard.
CHANGING THE CHANNEL
Use the steps below to manually set the channel or
use the Find Channels function to nd a receiver
within range.
WARNING: If the lock symbol appears next to
the channel number, the channel cannot be changed.
1. Press the Channel button.
2. Use the number pad to enter the new channel
number.
3. Once the channel number has been entered,
press OK.
FIND CHANNELS
Use the steps below to nd a receiver within range.
1. Press the Channel button.
2. Press the middle function key below
The QT Device scans for receiver(s) within range.
3. Use the arrows to scroll through available
channels.
4. Press OK to select the channel.
RESPONDING
During the presentation, the QT Device prompts
you to enter the proper response type. An indicator
appears in the top left side of the screen for special
question types.
Numeric Response question
Multiple Response question with
numeric answer values
Multiple Response question with
alpha answer values
Short Answer and Essay
question
When sending a response or when a response
is successfully received, an icon appears at the
bottom center of the screen. The following are
graphic representations of these icons:
The response is being sent.
The response was sent successfully.
EXAMPLE SCREENS
Single Response - Single
Response questions are multiple
choice questions, where only
one answer is selected. Once
the selection has been made, the
response is sent to the presenter.
Multiple Response - Multiple
Response questions have more
than one possible answer. Use the
number pad to enter your answer
choices and then press OK to
transmit your answer choices. Your
response may be alpha or numeric.
Numeric Response - Numeric
Response questions require a numeric
value to be entered. Use the number
pad to enter your answer and press OK
to submit your answer choice.
Essay and Short Answer - Essay
and Short Answer questions require
a text response. Once the text has
been entered, press OK to transmit
Invalid Response - If you
see this screen after sending
a response, it means that the
response was invalid. For example,
answer options are A - D, and you
submitted E as your answer choice.
Incorrect Channel - This screen
is to alert you that the QT Device
is not on the correct channel
or that the device is unable to
communicate with the receiver.
Polling Closed - This screen
indicates that polling is closed and
answers are not being accepted.
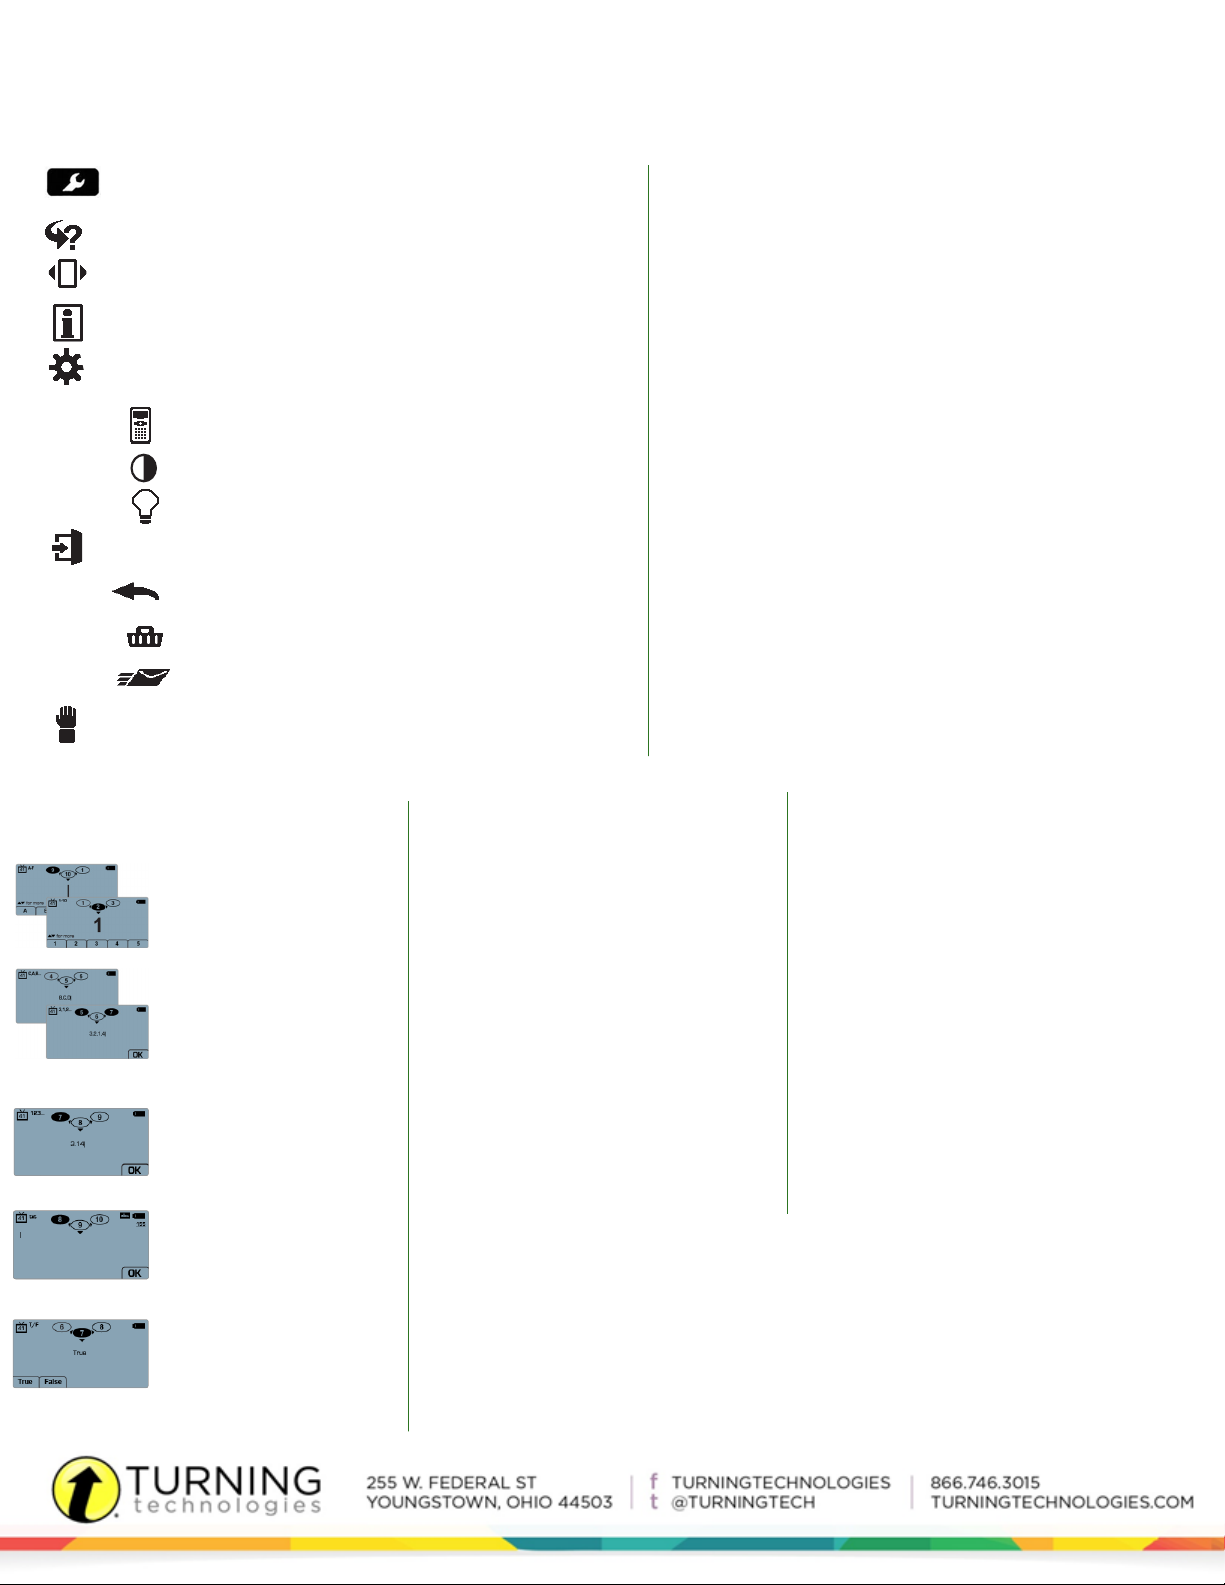
Quick Start
Test Mode
THE TOOLBOX
Go to Question - Select a specic question. Use the number pad to
enter a question number and press the function key below OK.
Skipped Question - View the next unanswered question.
Test Info - Displays the test name, version (if applicable) and
number of questions.
Settings - Press the function key below OK to open the settings and use
the right or left arrow keys to scroll through the options. The settings contain:
• Device Info - Displays the Device ID.
• Contrast - Press the left/right arrows to adjust the contrast of the
objects. Press OK to save.
• Brightness -
luminosity of the LCD display on the QT Device. Press OK to save.
Exit Test - Exits a test. Unanswered questions are displayed.
• Go Back Arrow - Return to Toolbox.
• Delete Test - Delete the test.
• Send Test - Send the test to the host computer.
Send Message - Send a message to the presenter. The presenter is
unable to respond via the same method.
Press the left/right arrows to adjust the backlight
CHANGING THE CHANNEL
Before logging into a test, the QT Device needs to be on the same
channel as the receiver.
1. Press the Channel button.
2. Use the number pad to enter the new channel number.
3. Once the channel number has been entered, press OK.
LOGGING INTO A TEST
1. Press a button on the QT Device to “wake up” the device.
2. The Welcome Screen is displayed followed by the Battery
Indicator Screen.
3. You may be prompted for Your ID.
a. Press the Backspace key to clear the information displayed.
b. Enter Your ID.
c. Press OK.
4. You may be prompted for Test Version.
a. Locate the Test Version number on the paper test.
b. Use the number pad to enter the Test Version.
c. Press OK.
5. The test name, version number (if applicable) and question count
are displayed.
6.
If the information displayed in the previous step is correct, press OK.
If the information is incorrect, press the back button (left function key).
Verify that the QT Device is on the correct channel and begin the
process from step 1.
You are now in Test Mode.
TAKING A TEST
Single Response - Press the
function key below your answer
choice. Up to ve answer choices
will be visible on the QT Device.
Press the up/down arrows to view
more choices. Answer choices can
be alpha or numeric.
Multiple Response - Use the
number pad to enter your
answer choices and then press
OK once you have made your
selection. Answer choices
can be alpha or numeric.
Numeric Response - Enter the
response using the number pad,
press OK once you have made
your selection.
Short Answer/Essay - Use the
keyboard to enter the answer
text and press OK once you
have made your selection. The
available number of remaining
characters is indicated in the
upper right of the screen.
True or False - Press the
function key below your answer.
NAVIGATING THROUGH QUESTIONS
Scrolling Through Questions
1. Use the left and right arrows to scroll back or
forward through the question rolodex.
Go To a Specic Question
1. Press the Toolbox key.
2. Select the Go to Question icon and press Enter.
3. Use the number pad to enter the question
number.
4. Press the Enter button.
FCC Statement:
This device complies with part 15 of the FCC Rules. Operation is subject to the following two conditions: (1) This device may not cause harmful
interference, and (2) this device must accept any interference received, including interference that may cause undesired operation.
IC Statement:
This device complies with Industry Canada licence-exempt RSS standard(s). Operation is subject to the following two conditions: (1) this device may
not cause interference, and (2) this device must accept any interference, including interference that may cause undesired operation of the device.
Le présent appareil est conforme aux CNR d’Industrie Canada applicables aux appareils radio exempts de licence. L’exploitation est autorisée aux
deux conditions suivantes: (1) l’appareil ne doit pas produire de brouillage, et (2) l’utilisateur de l’appareil doit accepter tout brouillage radioélectrique subi, même si le brouillage est susceptible d’en compromettre le fonctionnement.
SENDING A TEST
Use the Toolbox to send your test. To send your test
follow the steps below:
NOTE: When answering the last question of the
test, you will receive a message that the test
is complete or incomplete. If you receive this
message, skip to step 3.
1. Press the Toolbox key.
2. Use the arrow keys to highlight the Exit Test icon
and press Enter.
3. A message is displayed that the test is complete
or incomplete.
TIP: Press the function key below the Go Back
Arrow twice to return to the test to complete any
unanswered questions and review your answers.
4. Press the function key below Send Test to send
the test.
5. A message is displayed to conrm that you would
like to send the test.
6. Press the function key below OK.
The test is saved and sent to the host computer.
 Loading...