

Page 1

TurningPoint 5 for PC
User Guide
5.3
Page 2

TurningPoint 5 for PC 2
© 2014 Turning Technologies, LLC. All rights reserved.
Portions Responsive Innovations, LLC, Microsoft Corporation
No part of this document may be reproduced or transmitted in any form or by any means, electronic or mechanical, for any purpose,
without the express written permission of Turning Technologies, LLC. All rights reserved.
Turning Technologies, LLC, 255 West Federal Street, Youngstown, OH 44503 USA.
TurningPoint® is a registered trademark of Turning Technologies, LLC. Other trademarked product names mentioned in this manual
are owned by their respective companies.
The following regulatory statements apply to radio frequency and infrared transmitters and receivers mentioned in this manual,
including the ResponseCard RF, ResponseCard RF LCD, ResponseCard IR, ResponseCard XR, ResponseCard NXT, QT Device,
CPS IR, CPS Pulse, CPS Spark, Gen 2, PRS RF, PRS IR, DualBoard, Touch Board, Touch Board Plus, MeetingBoard, SchoolBoard,
iPannel, Mobi, MobiView, MobiKWIK, Mobi Learner, Mobi 360 and their respective receivers.
FCC Statement
This device complies with part 15 of the FCC Rules. Operation is subject to the following two conditions: (1) This device may not
cause harmful interference, and (2) this device must accept any interference received, including interference that may cause
undesired operation.
Changes or modifications not expressly approved by the party responsible for compliance could void the user’s authority to operate
the equipment.
IC Statement
This device complies with Industry Canada licence-exempt RSS standard(s). Operation is subject to the following two conditions: (1)
this device may not cause interference, and (2) this device must accept any interference, including interference that may cause
undesired operation of the device.
Le présent appareil est conforme aux CNR d'Industrie Canada applicables aux appareils radio exempts de licence. L'exploitation est
autorisée aux deux conditions suivantes : (1) l'appareil ne doit pas produire de brouillage, et (2) l'utilisateur de l'appareil doit accepter
tout brouillage radioélectrique subi, même si le brouillage est susceptible d'en compromettre le fonctionnement.
turningtechnologies.com/user-guides
Page 3

TurningPoint 5 for PC 3
TABLE OF CONTENTS
WELCOME TO TURNINGPOINT 5! 8
What’s New in TurningPoint 5
Technical Requirements
Requirements for Software and Hardware
Compatible Devices
Getting Started
Download and Setup
Downloading TurningPoint
Opening TurningPoint (Zipped File)
Installing TurningPoint (EXE File)
Configuring Automatic Updates
Device Setup
Changing the Channel on the Receiver
Locking the Receiver Channel
Setting Up ResponseWare
Testing the Polling Connections
Pairing a PresenterCard
Migrating Previous Turning Technologies Files
Importing Participant Lists
Importing Session Files
Importing Question Lists or Answer Keys
Converting TurningPoint 2008 Presentations
8
9
9
9
10
10
10
10
10
11
11
12
12
13
15
16
17
18
18
18
19
CONTENT 20
Managing Content
Organizing Content Into Folders
Exporting Content
Importing Content
Deleting Content
Refreshing Folder Content
Question Lists
Creating a New Question List
Question Types and Options
Multiple Choice
Short Answer
Numeric Response
True/False
Matching
Essay
Demographic Assignment
Priority Ranking
Editing Question List Content
Updating Question Preferences within the Question List Editor
Importing Questions into a Question List
20
20
20
21
21
22
22
22
23
24
25
26
27
28
29
30
30
31
34
34
turningtechnologies.com/user-guides
Page 4

TurningPoint 5 for PC 4
Applying New Question List Preferences to Existing Questions
Printing a Question List
Versions for Self-Paced Polling
Adding a Version
Editing a Version
Renaming a Version
Deleting a Version
Standards
Downloading Standards
Assigning Standards Using a Downloaded Standards List
Creating a Custom Standards List
Assigning Standards Using a Custom Standards List
35
35
36
36
37
38
38
39
39
40
41
42
PARTICIPANT LISTS 44
Creating Participant Lists
Manually Creating a Participant List
Downloading a Participant List from an Integration
Modifying Participant Lists
Editing Participant List Information
Importing a CSV or TXT File
Exporting to a CSV, HTML or Template File
Importing a Template File
Demographics
Adding Demographics to a Participant List
Editing Demographics in a Participant List
Removing Demographics from a Participant List
Managing Participant Lists
Changing a Participant List Name
Exporting Participant Lists
Importing Participant Lists
Duplicating a Participant List
Printing a Participant List
Deleting a Participant List
44
44
45
46
46
47
48
48
48
49
49
50
50
50
50
51
51
52
52
PREFERENCES 54
Opening the TurningPoint Preferences
Software
Administration
Shortcut Keys
Connections
Response Devices
PresenterCard
PresenterWare
RemotePoll
RemotePoll Monitor
PowerPoint
Charts
turningtechnologies.com/user-guides
54
55
55
56
56
57
57
58
58
59
59
59
Page 5

TurningPoint 5 for PC 5
Questions
Competitions
Presentation
Anywhere
Charts
Competitions
Presentation
Self-Paced
Login
60
62
63
63
64
64
65
68
68
POWERPOINT POLLING 70
Opening the PowerPoint Polling Environment
Content
Inserting a Polling Slide
Converting a PowerPoint Slide into a Multiple Choice Polling Slide
Converting a Multiple Choice Slide into a Demographic Slide
Slide Types and Slide Preferences
Objects
Inserting a Correct Answer Indicator
Inserting a Chart/Changing the Chart Type
Inserting an Animated Chart
Inserting a Countdown Timer
Inserting a Grid
Inserting a Prompt
Inserting a Response Counter
Inserting Stats
Competition
Import
Importing a Question List File
Tools
Comparative Links
Inserting a Comparative Link
Conditional Branching
Setting Up Conditional Branching
Convert to Picture
Converting a Text-based Slide to a Picture Slide
Demographic Comparison
Inserting a Demographic Comparison
Ranking Wizard
Creating Polling Slides with the Ranking Wizard
Standards
Polling
Resetting a PowerPoint Polling Session or Charts
Continuing a Prior PowerPoint Polling Session
Using the Real-Time Registration Tool
Running a Slide Show
The PowerPoint Polling Showbar
70
70
71
72
72
72
79
79
80
82
83
84
86
87
88
89
92
92
92
92
92
93
93
96
96
97
98
98
99
101
101
101
102
102
103
104
turningtechnologies.com/user-guides
Page 6

TurningPoint 5 for PC 6
Viewing a Response Grid
Using the Participant Monitor
Messaging
Inserting New Slides During the Presentation
Using Data Slicing
Saving a PowerPoint Polling Session
105
105
106
106
107
109
ANYWHERE POLLING 110
Polling
Running a Session
About the Anywhere Polling Showbar
About the Chart Window
Quick Poll Question Types
Marking a Question as Anonymous
Using the Real-Time Registration Tool
Messaging
Sessions
Saving an Anywhere Polling Session
Resetting an Anywhere Polling Session
Continuing a Prior Anywhere Polling Session
110
110
111
112
113
116
116
117
117
117
118
118
SELF-PACED POLLING 119
Setting Up Self-Paced Polling
Viewing the Compact Mode
Manually Setting a Timer
Polling
Self-Paced Polling
Viewing the Live Results Monitor
Sessions
Saving a Self-Paced Polling Session
Resetting a Self-Paced Polling Session
Continuing a Self-Paced Polling Session
119
120
120
120
120
121
122
122
123
123
INDIVIDUAL SESSION MANAGEMENT 124
Importing Sessions
Importing a ResponseCard AnyWhere Session
Exporting Sessions
Extracting Session Information
Creating a Participant List from an Auto Session
Merging Sessions
Deleting Sessions
Changing a Session Name
Editing a Session
RESULTS MANAGER 131
Overview
Opening the Results Manager Overview
Adding a Manual Grade Column
Reordering the Session Columns
turningtechnologies.com/user-guides
124
124
125
125
126
126
127
128
128
131
131
133
133
Page 7

TurningPoint 5 for PC 7
Overwriting Session Scores
Sessions
Excluding a Session
Setting Session Performance Points
Setting Attendance Points
Participants
Editing Participant Information
Viewing Grade Overview Information
Removing a Participant from a Single Session
Removing a Participant from the Participant List via Results Manager
Deleting a Removed Participant from Results Manager
Viewing Removed Participants
Reinstating a Participant
Devices
Saving Device IDs from the Real-Time Registration Tool
Adding or Removing Devices
Assigning an Unassigned Device
Viewing the Grade Overview for Unassigned Devices
Assigning a Single Session to a Participant
Export
Exporting a Participant Report
Exporting a Session to an Export Scheme
Exporting the Results Manager Overview
Integrations
Updating Participant Lists from an LMS
Exporting Sessions to an LMS Integration
Archiving
Archiving a Participant List
Restoring an Archived Participant List
134
134
134
135
135
136
136
137
138
138
139
140
140
141
142
142
143
144
144
145
145
146
146
147
147
148
148
149
149
REPORTS 150
Generating Reports
Exporting a Report
Saving and Printing a PDF Report
Results by Question
Results by Participant
Results Detail
Results by Demographic
Comparative Results
Session Log Report
CONTACT US 157
GLOSSARY 158
turningtechnologies.com/user-guides
150
151
151
152
153
154
154
155
156
Page 8

TurningPoint 5 for PC 8
WELCOME TO TURNINGPOINT 5!
TurningPoint combines all of the Turning Technologies legacy applications into one, user-friendly interface. Content creation,
participant lists, data management (Results Manager) and reports are in one central location. All three polling environments:
PowerPoint Polling (formerly TurningPoint), Anywhere Polling (formerly TurningPoint Anywhere) and Self-Paced Polling
(formerly TurningKey) are included.
Existing content such as question lists, participant lists and session files can be imported directly into the new software.
What’s New in TurningPoint 5
TurningPoint is Turning Technologies’ first, truly cross-platform, poll in ANY environment application.
l Simplifies user workflow and user experience for all current applications by consolidating them into one central interface
A robust HTML content editor that supports pictures, special characters, subscripts and superscripts
An equation editor
Simplifies the ability to create question lists for use in all three polling environments
Simplifies the ability to create, import and export participant lists from the new participant list editor
l Drag and drop functionality for CSV and TXT files
l Copy and paste functionality for Mac and PC
l Quickly import files downloaded from specific gradebooks and Learning Management Systems
A newly enhanced area to manage aggregate session data (formerly ResultsManager)
l Customized view by toggling data options
l Update participant lists downloaded from Learning Management Systems, export both single session and cumulative
grade columns
Device and data manipulation, allowing different devices to be used for individual sessions
A report interface that consolidates the 32 reports, traditionally available from Turning Technologies, into six new
customizable reports
l Available for all environments: PowerPoint Polling, Anywhere Polling and Self-Paced Polling
l Reports are customized by toggling information on and off in the data view
l All reports can be easily printed without formatting
l Export results to Excel, CSV and HTML for sharing and manual manipulation
turningtechnologies.com/user-guides
Page 9

TurningPoint 5 for PC 9
Technical Requirements
TurningPoint is designed to function on most computers; however, there are some basic hardware and software requirements.
Requirements for Software and Hardware
The following software and hardware specifications are required before using TurningPoint:
l Microsoft Windows® XP, Vista, 7 or 8
l Microsoft Office® 2003, 2007, 2010 or 2013 (for PowerPoint Polling and viewing exported reports in Excel)
l Microsoft .NET 3.5 SP1
l Intel or AMD 2GHz processor
l 512 MB RAM
l 120 MB hard disk space
l 1024 x 768 at 32-bit color or higher resolution, 100%DPI
l Standard USB 2.0 port (for USB-based hardware devices)
l Ethernet or 802.11 compatible wireless network card required if ResponseWare is in use
l Adobe® Flash® Player (for Animated 2D/3D charts)
l Adobe® Acrobat® Reader (for printing)
l Java™ 7 or later (for importing RTF, DOC, DOCX and QTI documents and exporting reports to Excel and CSV)
Compatible Devices
The following devices are compatible with TurningPoint:
l ResponseCard IR, RF and RF LCD (PowerPoint Polling and Anywhere Polling)
l ResponseCard XR and NXT (PowerPoint Polling, Anywhere Polling and Self-Paced Polling)
l QT Device (PowerPoint Polling, Anywhere Polling and Self-Paced Polling)
l PresenterCard (PowerPoint Polling and Anywhere Polling)
l ResponseWare (PowerPoint Polling and Anywhere Polling)
l PresenterWare (PowerPoint Polling and Anywhere Polling)
turningtechnologies.com/user-guides
Page 10

TurningPoint 5 for PC 10
Getting Started
To get started with TurningPoint, the software must be downloaded from www.turningtechnologies.com/downloads.
Uninstalling previous versions of Turning Technologies software is not necessary; however, only one version of the software
should be open at any given time.
Download and Setup
TurningPoint can be downloaded through the Turning Technologies website. After it has been downloaded, the file will need to
be unzipped or installed depending on the version that was downloaded.
Downloading TurningPoint
The TurningPoint software is accessible through the Turning Technologies website.
Prerequisites
Please verify that your computer meets the Technical Requirements on page 9 before downloading TurningPoint.
1
Go to www.turningtechnologies.com/downloads.
2
Click TurningPoint and then click the link to download the PC version.
Release notes are available in PDF format to the right of the download link.
3
Enter the required information and click Submit.
4
Click the link to start the download.
5
Save the file to a specified location.
Opening TurningPoint (Zipped File)
The zipped file must be extracted before TurningPoint can be opened.
1
Double-click the downloaded ZIP file.
2
Select the desired folder location and click Unzip.
3
Open the unzipped folder and double-click TurningPoint.exe.
TIP
Create a shortcut for TurningPoint.exe on the desktop for quicker access to the application.
DO NOT remove any files from the Application folder. The application will not function properly if
files are removed.
Installing TurningPoint (EXE File)
The Extraction Wizard installs the software onto your computer if the “install” version of TurningPoint was downloaded from the
Turning Technologies website.
1
Double-click the downloaded setup file.
2
Click Next.
A window opens and displays the license agreement. Read the license agreement on the screen or click the Print button
to send the text to a printer.
turningtechnologies.com/user-guides
Page 11

TurningPoint 5 for PC 11
3
Select the radio button labeled I accept the terms in the license agreement if you accept the terms.
4
Click Next.
5
Enter the name and organization in the fields provided and click Next.
A window opens and displays a message that the computer is ready to install TurningPoint.
6
Click Install.
The computer installs TurningPoint and displays the Finish button on the page when the process is complete.
7
Click Finish.
Select the Launch TurningPoint checkbox to immediately open the application, or double-click the TurningPoint shortcut
on the desktop to open the application.
Configuring Automatic Updates
Automatic updates provides users the option to update the software without first uninstalling it.
IMPORTANT
An internet connection must be available to check for software updates.
1
Open TurningPoint.
2
Click the TurningPoint logo located at the bottom of the Dashboard.
The About TurningPoint window is displayed.
3
Click Check For Updates.
If an update is available, TurningPoint will download the
update.
4
Optionally, check the box to automatically check for
updates.
NOTE
TurningPoint will check for updates each
time the application is opened. You may
experience a slight lag between the
application and the Turning Technologies
server.
To turn off automatic updates, click the Preferences icon in the lower right corner of the Dashboard. Select
Software from the left menu and uncheck Automatically Check for Updates.
Device Setup
Participants interact with TurningPoint through clickers (ResponseCards) that communicate through a receiver or the internet
with web enabled devices (ResponseWare).
This section provides instructions for:
Changing the Channel on the Receiver
Locking the Receiver Channel
Setting Up ResponseWare
Testing the Polling Connections
Pairing a PresenterCard
turningtechnologies.com/user-guides
Page 12
TurningPoint 5 for PC 12
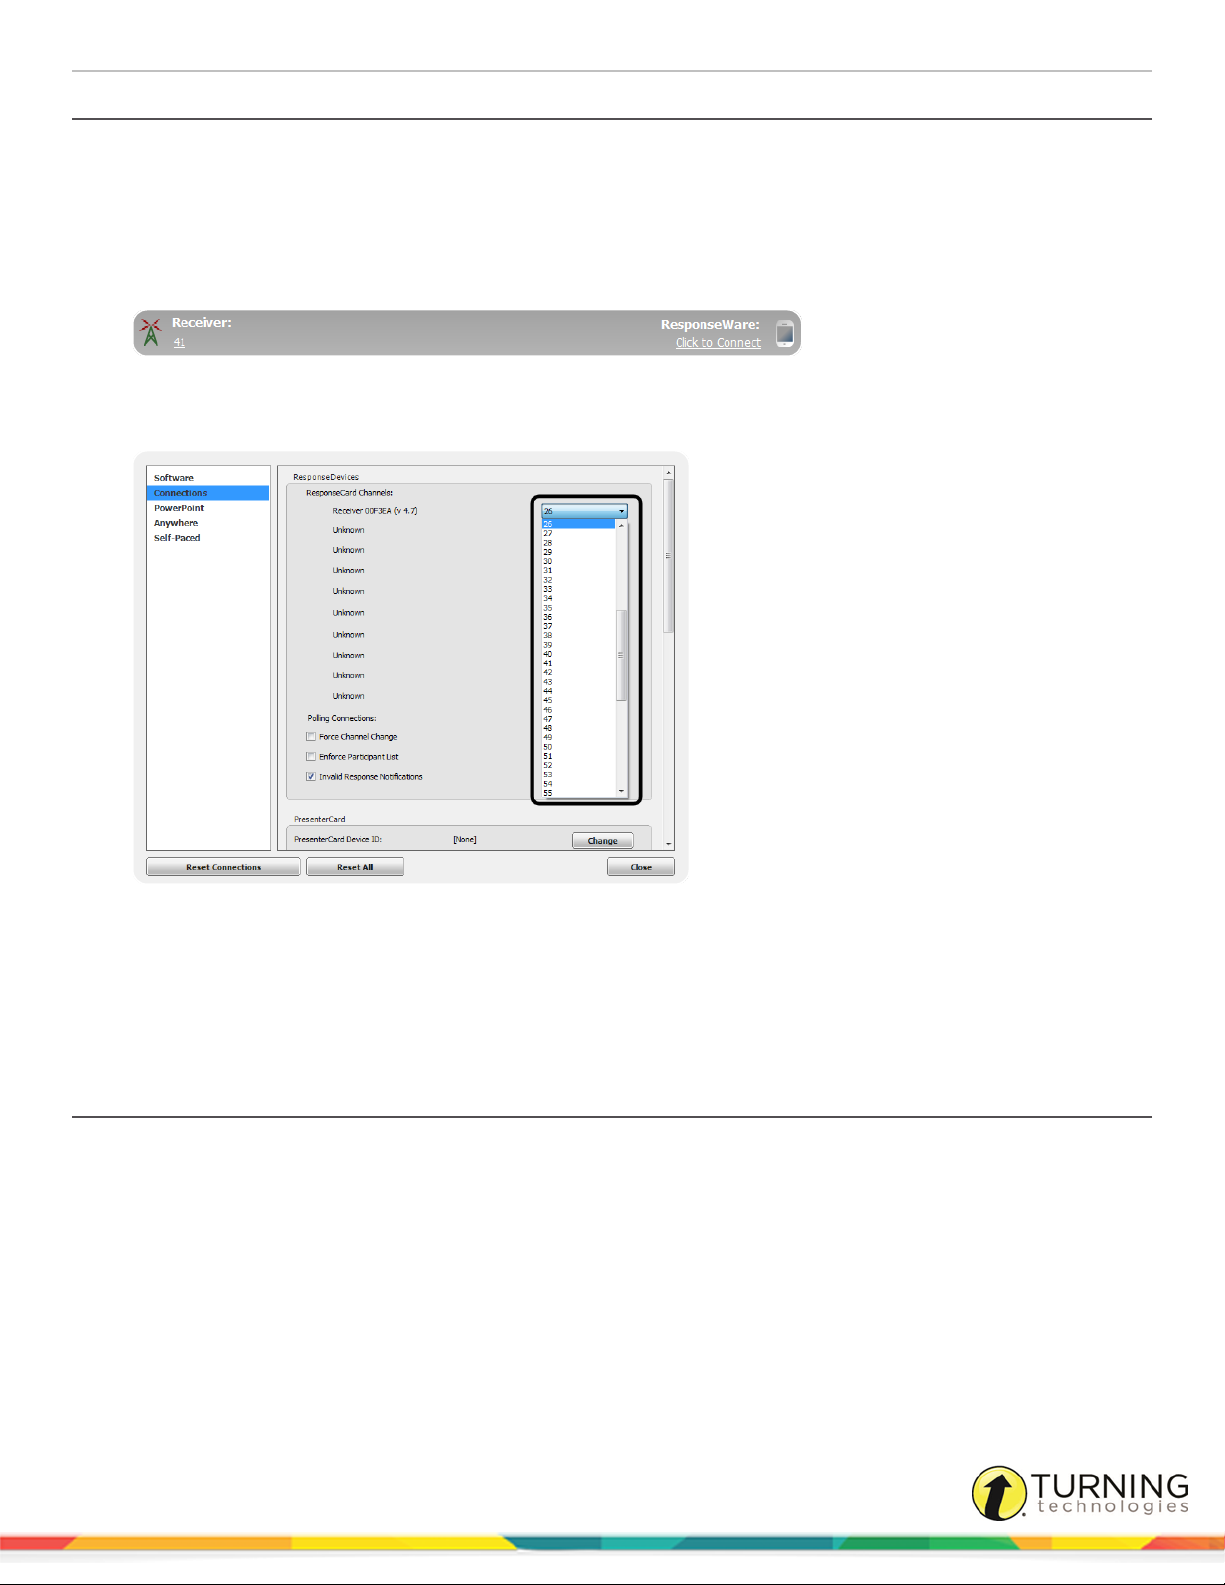
Changing the Channel on the Receiver
When the receiver is plugged in, it is automatically recognized by the computer. The default channel on the receiver is set to
41. Changing the channel allows multiple receivers to accept different sets of responses when in close proximity of one
another. The ResponseCards need to be set to the same channel as the receiver when polling.
1
Plug in the receiver and open TurningPoint.
2
Click the channel number below Receiver.
The Preferences window opens.
3
Select the channel number from the drop-down menu under ResponseCard Channels.
4
Click Close to return to the TurningPoint Dashboard.
Next Steps
Once the receiver has been setup, it is possible to begin Testing the Polling Connections on page 15. To test the polling
connections, the ResponseCards need to be set to the same channel as the receiver.
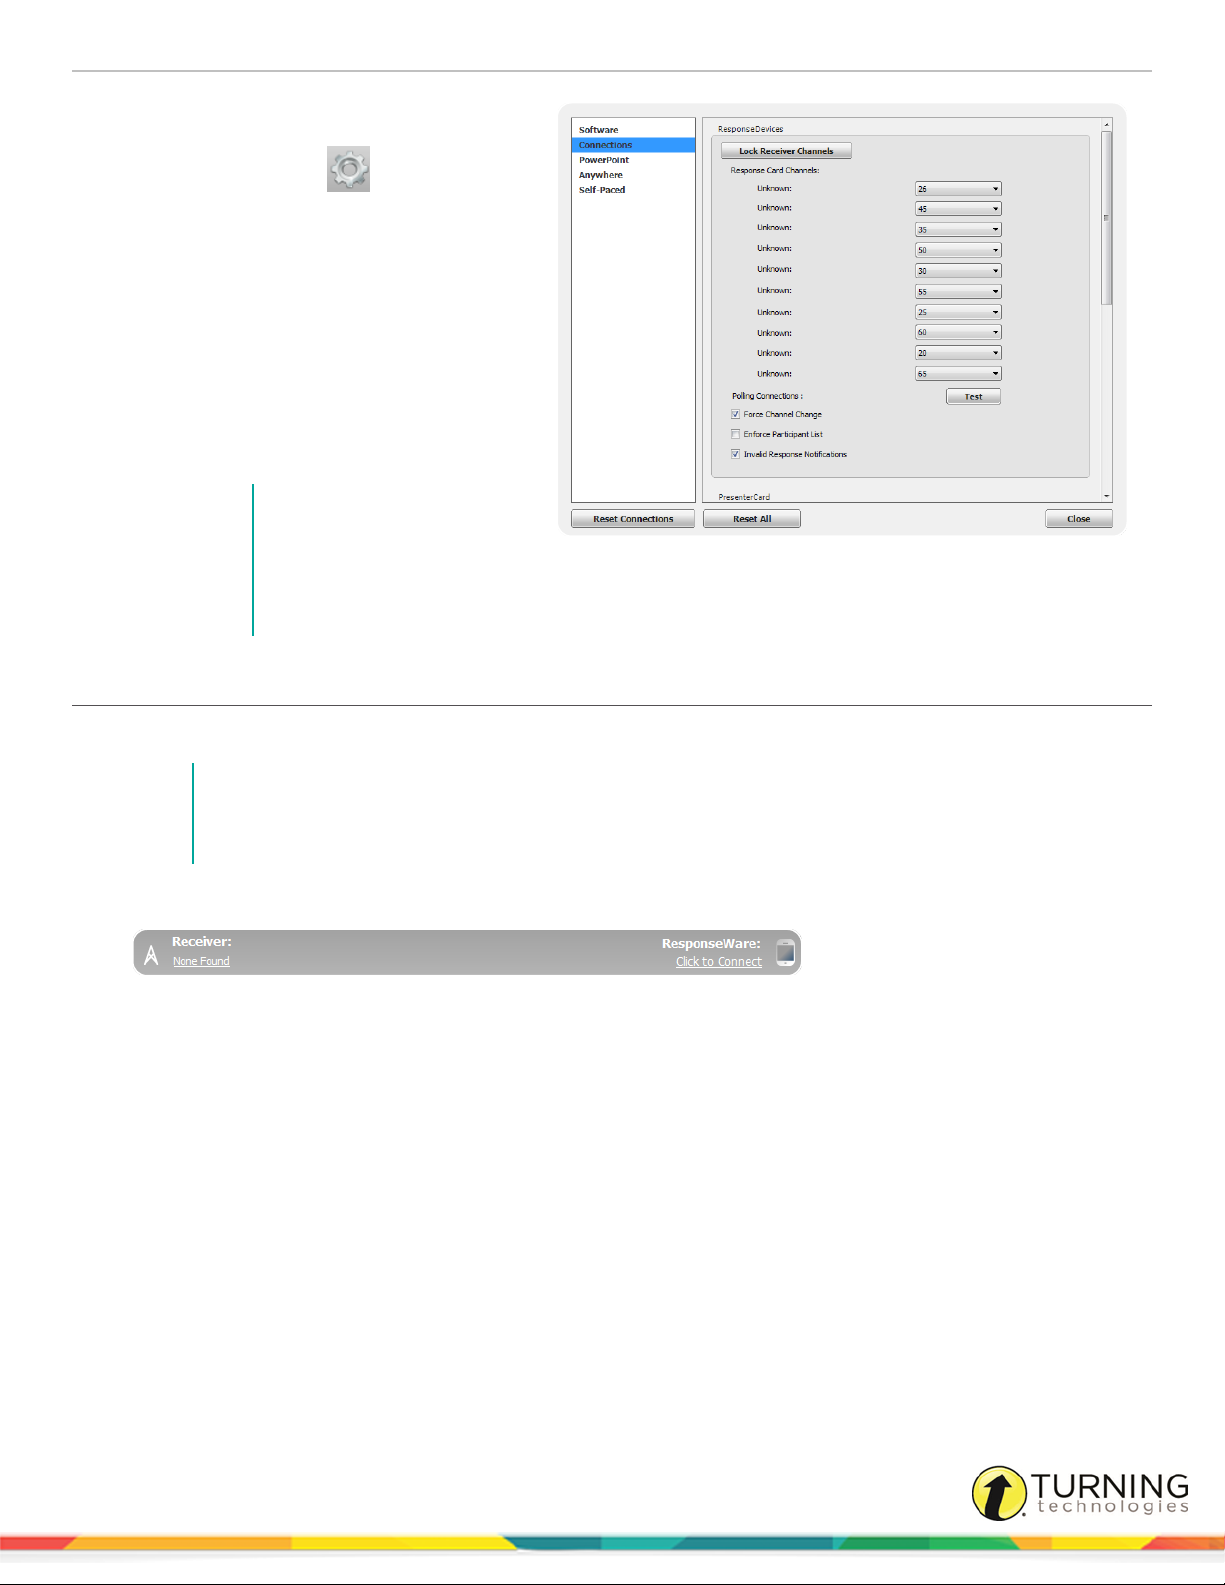
Locking the Receiver Channel
Administrators have the ability to lock the channel to prevent users from changing channels in shared environments.
turningtechnologies.com/user-guides
Page 13
TurningPoint 5 for PC 13
1
Open TurningPoint as the Administrator.
2
Click the Preferences icon in the
bottom right corner.
3
Select Connections from the left panel.
4
Under the ResponseDevices section,
select the desired channel and, optionally,
select Force Channel Change. The
Force Channel Change option, if selected,
allows the receiver channel to be
maintained once selected.
5
Click Lock Receiver Channels.
6
Click Close.
NOTE
To remove the channel
lock, run TurningPoint as
the Administrator and
select Unlock Receiver
Channels.
Setting Up ResponseWare
ResponseWare must be enabled for participants to use ResponseWare as a response device.
NOTE
ResponseWare is a virtual response solution that allows participants to respond through web-enabled
devices and applications available for smart phones and tablets. If you do not have a ResponseWare
account, skip this task.
1
Click Click to Connect below ResponseWare.
The ResponseWare window opens.
turningtechnologies.com/user-guides
Page 14
TurningPoint 5 for PC 14
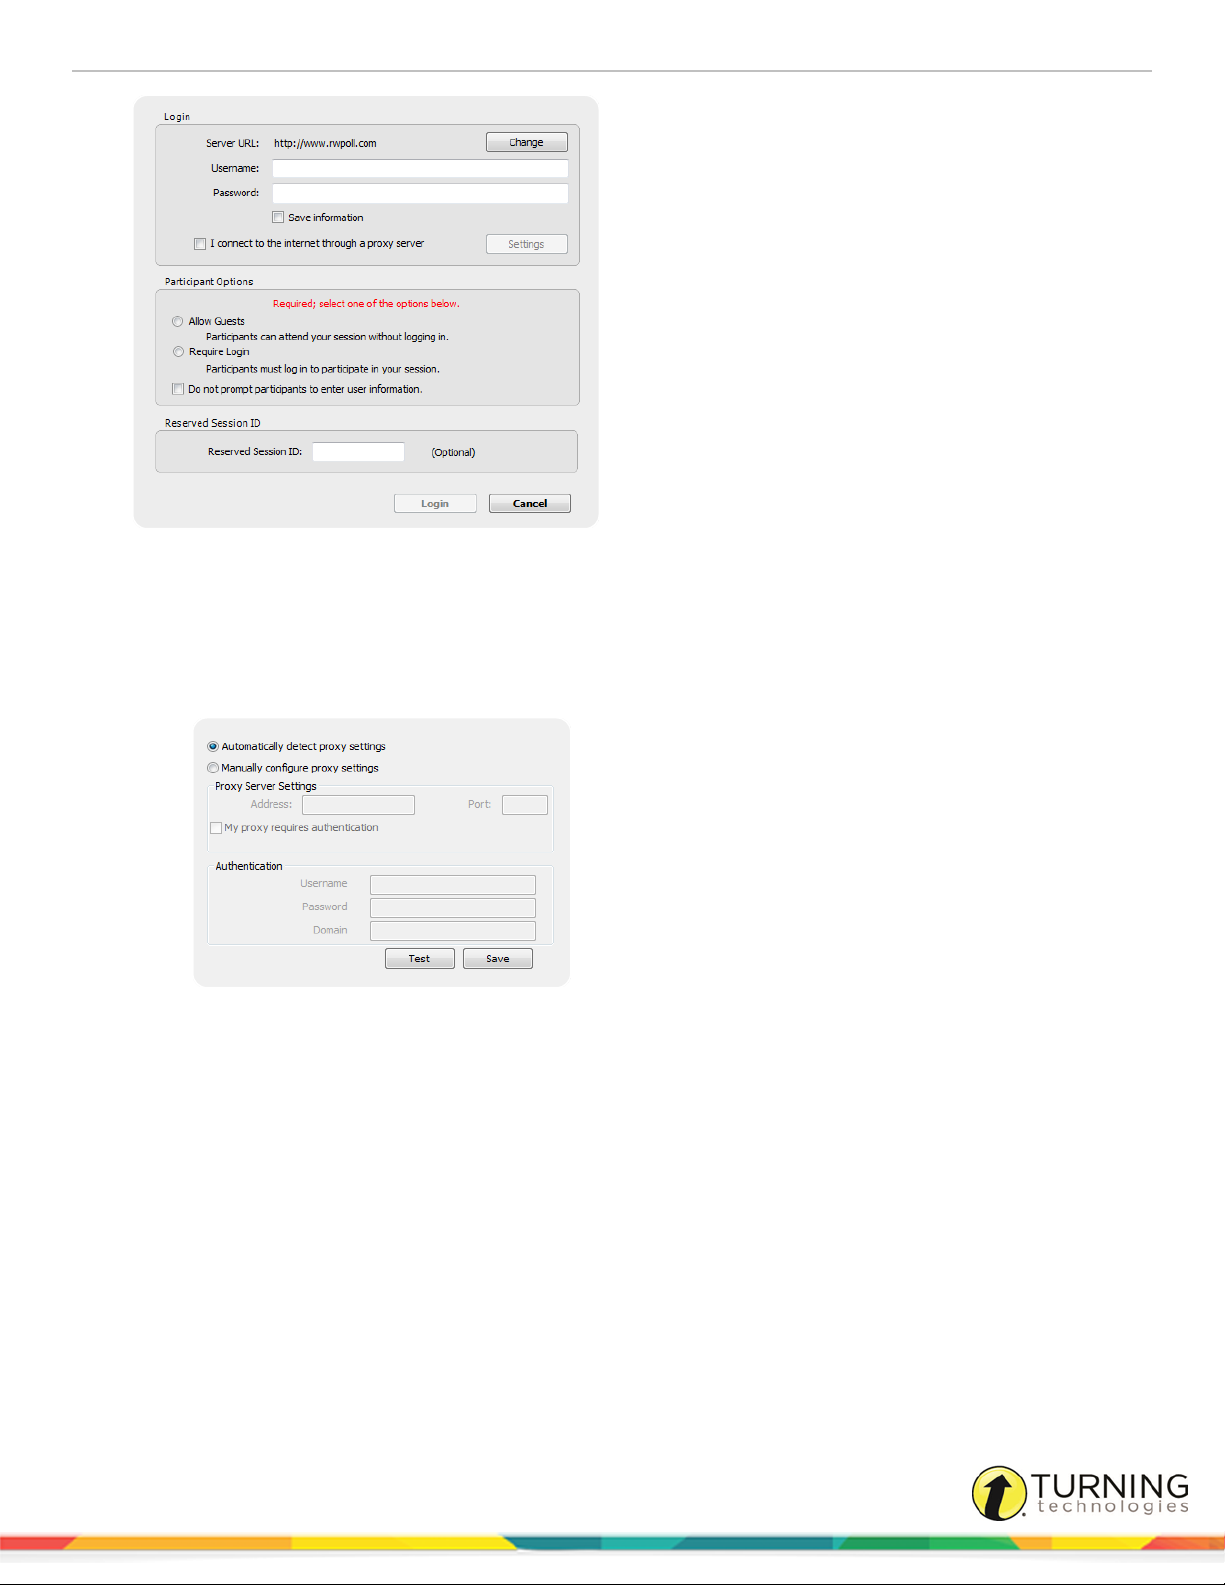
2
Enter your ResponseWare Username and password in the fields provided.
3
If connecting through a proxy server:
a
Check the box labeled I connect to the internet through a proxy server.
b
Click Settings.
The Proxy Settings window opens.
c
Select Automatically detect proxy settings or Manually configure proxy settings.
Manually configure proxy settings requires the proxy server address and port number to be entered in the
boxes provided.
d
If required, enter the Authentication Information in the fields provided.
e
Click Test to test the connection to the proxy server.
f
Click Save to save the settings and close the proxy settings window.
4
Select one of the following options:
l Allow Guests - Allows participants who do not have a Participant ResponseWare account to attend the
session.
l Require Login - Participants must log into the session with their Participant ResponseWare account.
Optionally, select Do not prompt participants to enter user information. If checked, participants will not be
prompted to enter their user information prior to joining the session.
turningtechnologies.com/user-guides
Page 15
TurningPoint 5 for PC 15
Optionally, enter the Reserved Session ID in the box provided.
NOTE
A reserved Session ID can be created through a Presenter ResponseWare account.
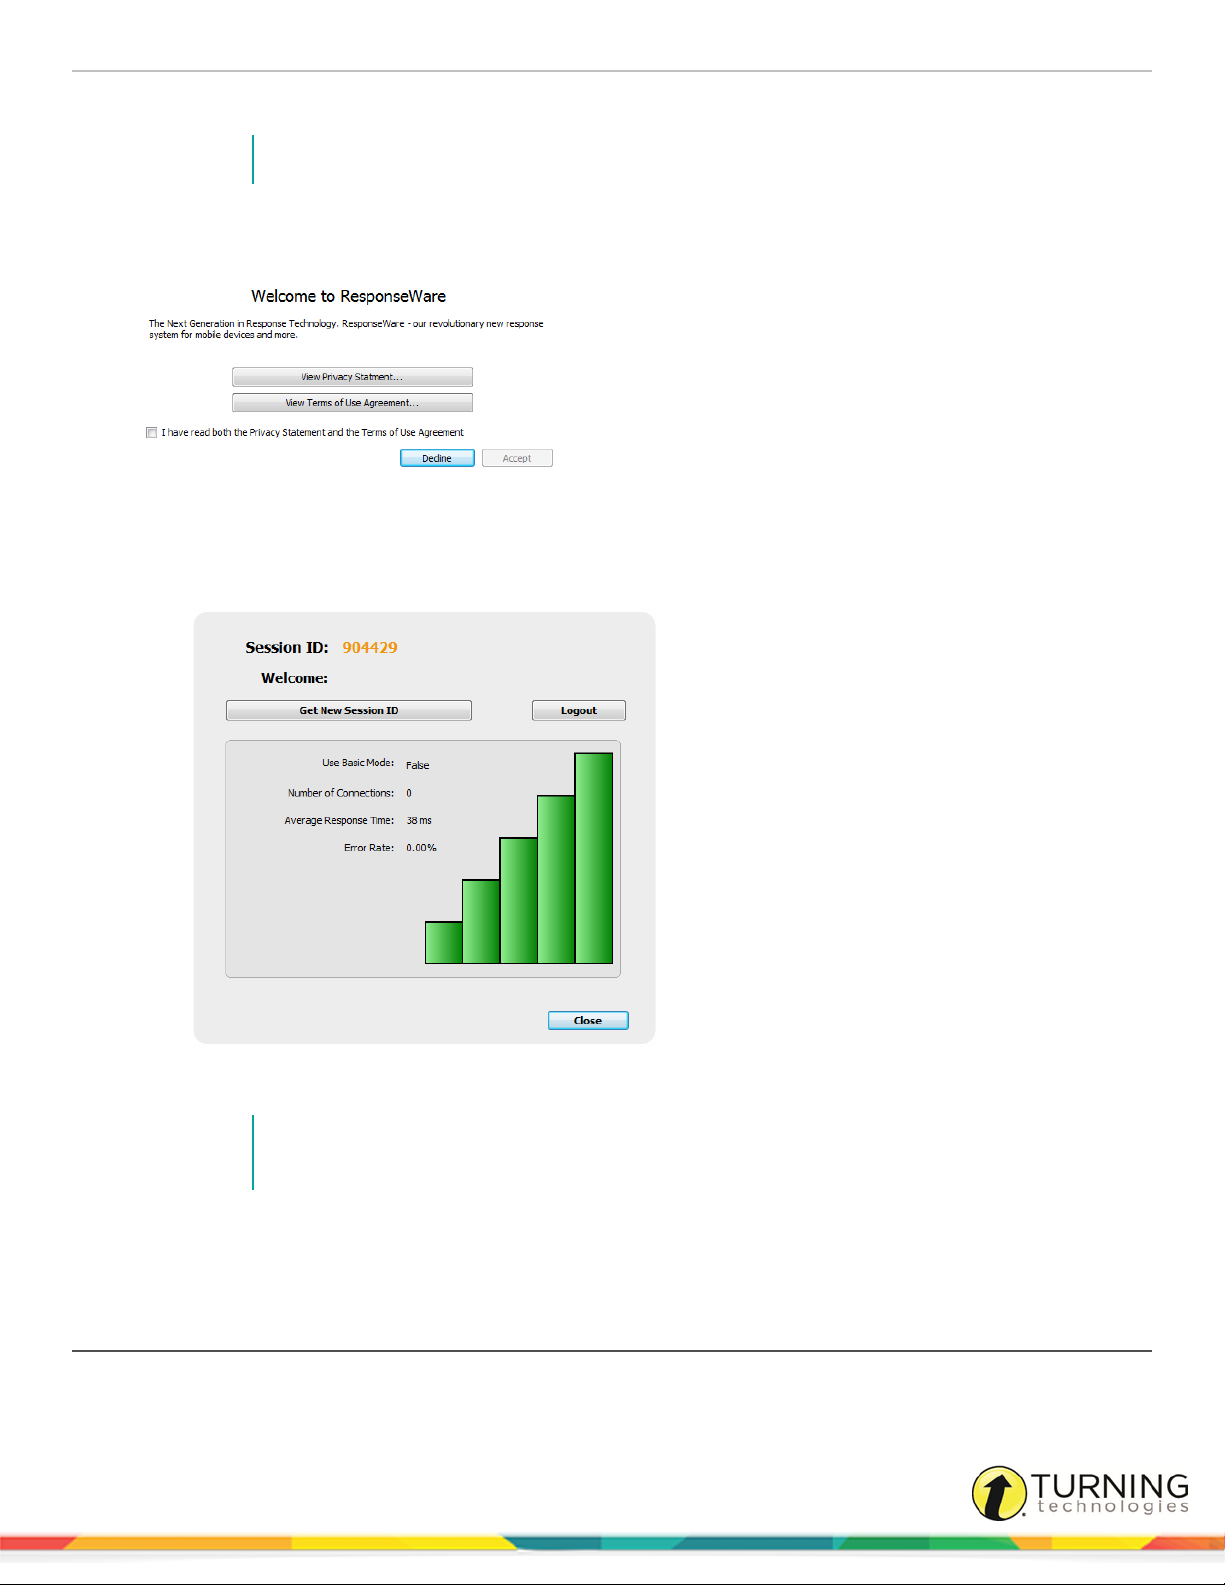
5
Click Login.
The License Agreement window opens the first time ResponseWare is enabled on a computer.
a
Select the box labeled I have read both the Privacy Statement and the Terms of Use Agreement.
b
Click Accept to accept the license agreement.
The ResponseWare window opens. The Session ID and connection information is displayed.
6
Click Close.
NOTE
It is possible to switch between polling environments without logging out of the current
ResponseWare session. Participants do not need to log out and join a new session.
The ResponseWare window does not need to be open for ResponseWare to be enabled. ResponseWare will remain
enabled until TurningPoint is closed. The next time the application is opened, you will need to login with your
ResponseWare credentials.
Testing the Polling Connections
The polling test is used to ensure that each response device can communicate with TurningPoint.
turningtechnologies.com/user-guides
Page 16
TurningPoint 5 for PC 16
Prerequisites
Ensure the receiver is properly installed (if using
ResponseCards) and the compatible response
device to be tested is available.
1
If using ResponseCards, plug in the
receiver, open TurningPoint and click the
channel number below Receiver. If using
ResponseWare, open TurningPoint and
click the Session ID below
ResponseWare.
The Preferences window opens.
2
Click Test.
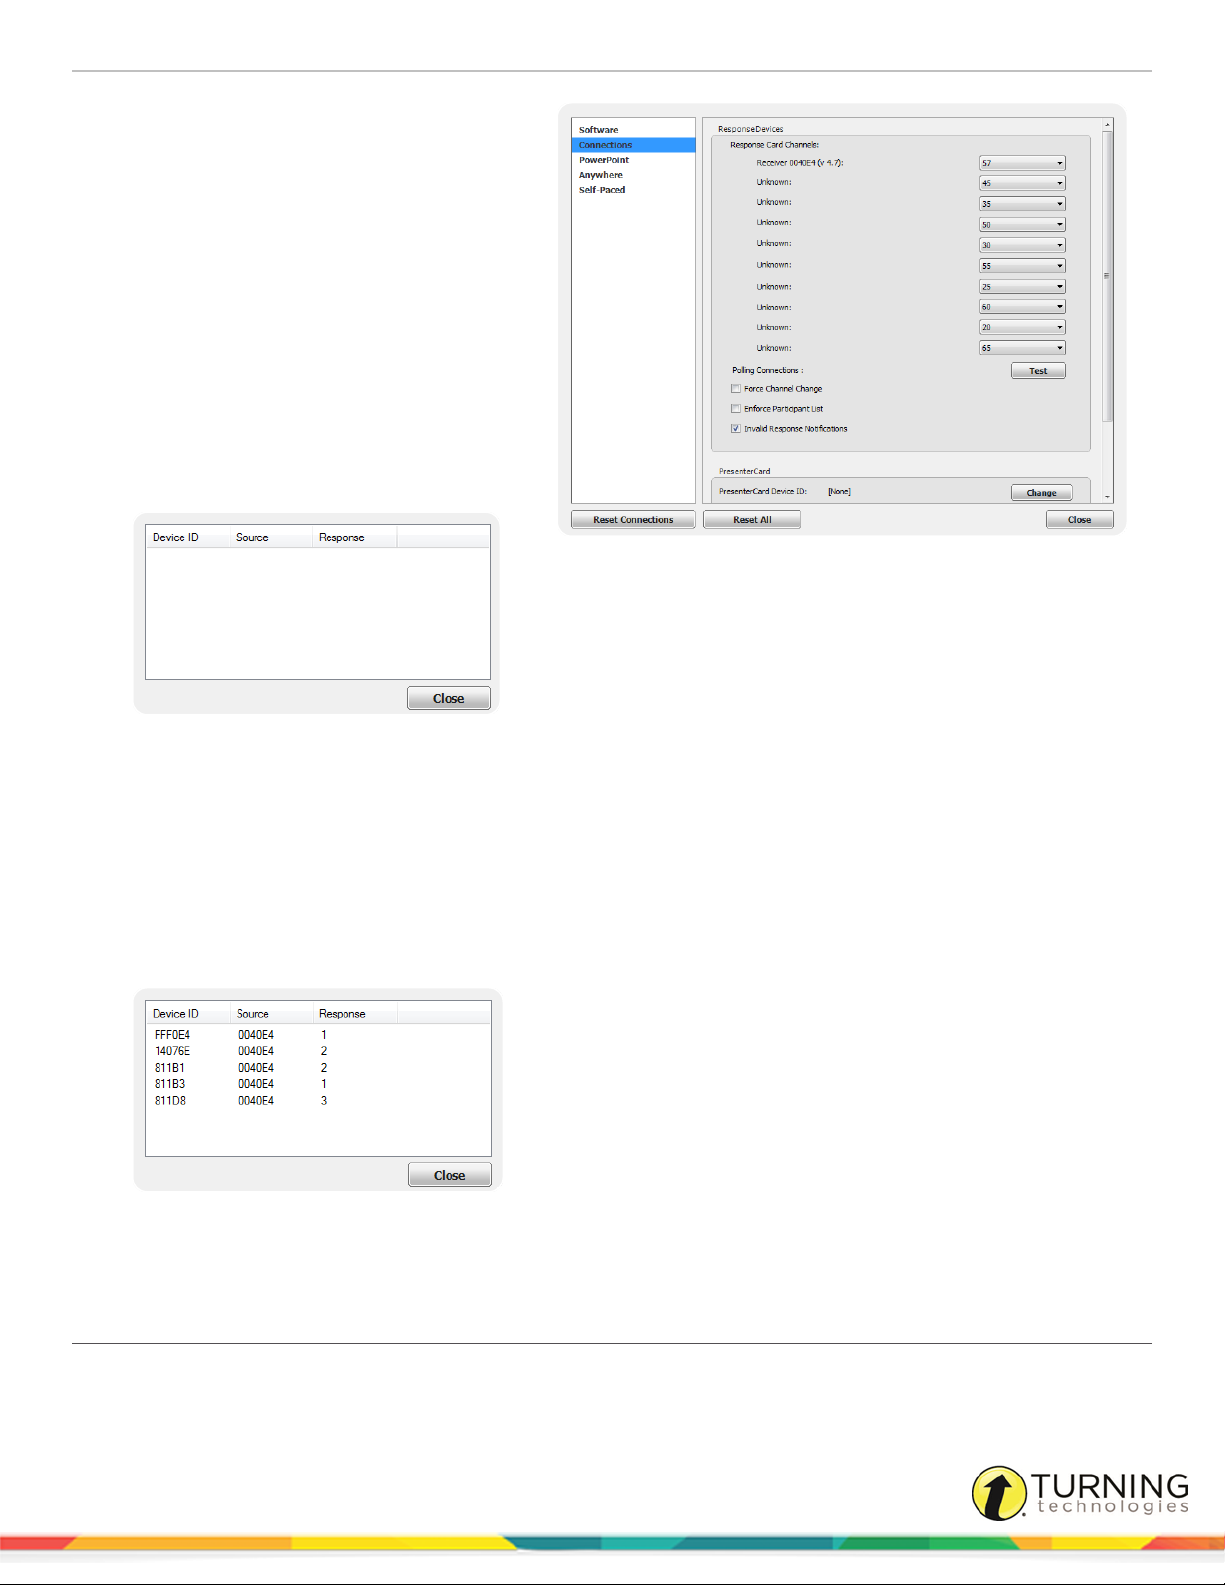
The Polling Test window opens.
There are three columns in the polling test window.
l Device ID - Displays the Device ID of the response device. A count of the devices that have responded are also
displayed next to the Device ID column header.
l Source - Displays the serial number of the receiver.
l Response - Displays the response sent from the response device.
3
Press a button on the response device.
For ResponseCard users, if the receiver and response device are set to the same channel, the response will appear in
the polling test. For ResponseWare users, the ResponseWare Device ID will appear in the polling test.
4
Click Close when finished with the polling test.
5
Click Close on the Preferences window.
Pairing a PresenterCard
A PresenterCard must be paired with TurningPoint before it can be used as a presentation device. If you do not have a
PresenterCard, skip this task.
turningtechnologies.com/user-guides
Page 17
TurningPoint 5 for PC 17
1
Plug in the receiver and open
TurningPoint.
2
Click the channel number below
Receiver.
The Preferences window opens.
3
Verify that the PresenterCard is
programmed to the same channel as the
receiver.
To change the channel on the
PresenterCard:
a
Press the Channel button on the
PresenterCard.
b
Use the Back or Forward buttons
to select the correct channel
number.
c
Press Channel to save the new
channel number.
4
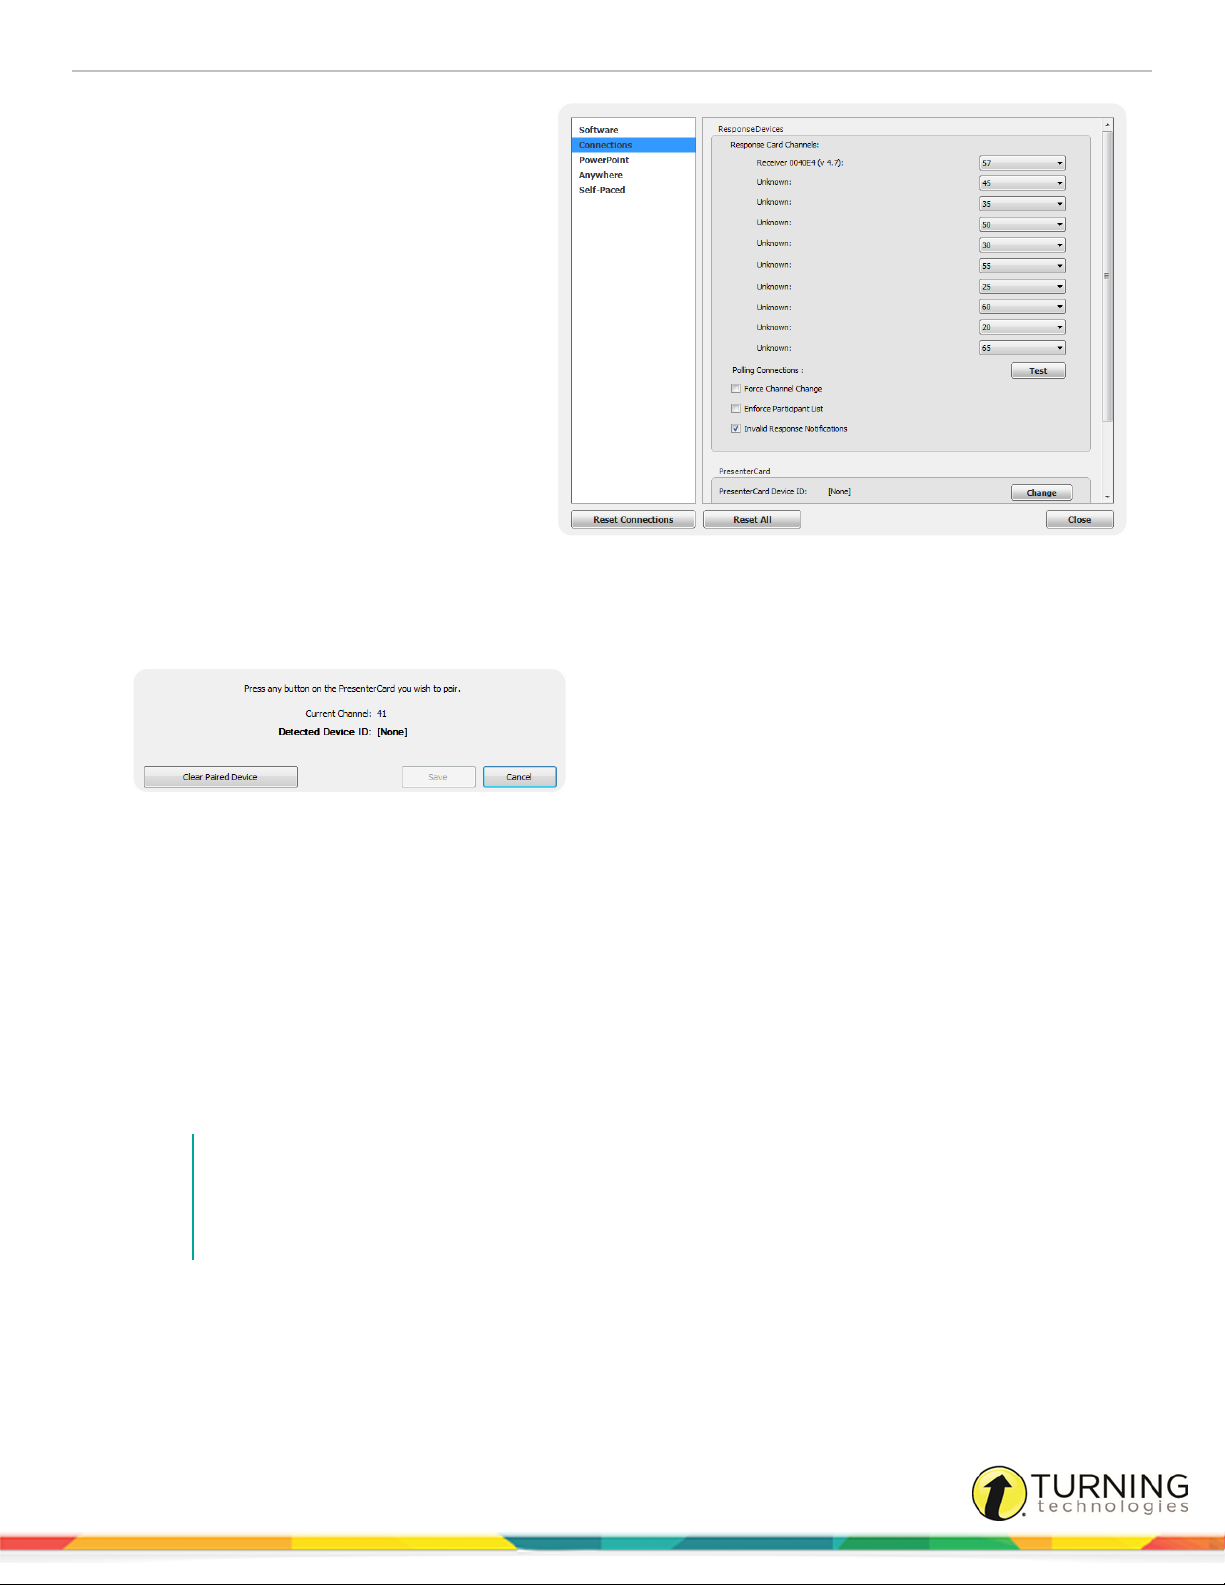
Scroll to the PresenterCard section and click Change next to PresenterCard Device ID.
The Pair PresenterCard window opens.
5
Press any button on the PresenterCard.
The Device ID of the PresenterCard is displayed next to Detected Device ID.
6
Click Save.
The PresenterCard can now be used with the PowerPoint Polling and Anywhere Polling environments.
For information on how to configure the programmable buttons, see PresenterCard on page 57.
Migrating Previous Turning Technologies Files
Questions lists, participant lists and session files created with previous Turning Technologies products can be imported into
TurningPoint.
NOTE
It is recommended to make copies of session files, participant lists, question lists and answer keys and
TurningPoint 2008 presentations before migrating them to TurningPoint. Once the files have been
converted to the new format, they cannot be used with previous versions of Turning Technologies
products.
This section covers the following tasks:
Importing Participant Lists
Importing Session Files
Importing Question Lists or Answer Keys
Converting TurningPoint 2008 Presentations
turningtechnologies.com/user-guides
Page 18

TurningPoint 5 for PC 18
Importing Participant Lists
Participant lists created with previous Turning Technologies products can be imported into TurningPoint. There is no need to
recreate existing participant lists.
1
Select the Manage tab.
2
Click the Participant List drop-down menu and select Import.
3
Click Choose File... and browse to the location of the participant list to be imported.
4
Select the participant list and click Open.
The participant list is now displayed in the left panel.
5
Repeat steps 2 - 4 to import additional participant lists.
Importing Session Files
Session files created with other Turning Technologies products may be copied into the TurningPoint Sessions folder.
TurningPoint will automatically convert them to the new format. The session files can also be converted using the import
function on the Manage tab.
1
Select the Manage tab.
2
Click the Session drop-down menu and select Import.
3
Browse to the location of the session.
4
Select the session or sessions and click Open.
5
Select one of the following options:
a
Convert and Replace - This option converts the session file to the new format and deletes the original session
file. The new session file is saved in the TurningPoint Sessions folder.
b
Convert and Keep - This option adds the session to the sessions list, but the file remains in its original location.
The file must remain in this location to view reports and edit the session. If the file is moved, it must be relocated
in the session overview screen.
The import summary displays the status of each session or sessions selected for import.
6
Click OK.
The session or sessions are displayed in the left panel.
Importing Question Lists or Answer Keys
Question lists and answer keys created in TurningPoint Anywhere and TurningKey can be imported into TurningPoint. There is
no need to recreate existing content.
1
Select the Content tab.
2
Click the Question List drop-down menu and select Import.
IMPORTANT
Answer key files (TKY) are considered question list files in this case.
3
Browse to the location of the file to be imported.
4
Select the question list and click Open.
A dialog box appears. Click Yes to convert the selected file to the new format.
turningtechnologies.com/user-guides
Page 19

TurningPoint 5 for PC 19
Next Steps
For more information about updating question list preferences, see Updating Question Preferences within the Question
List Editor on page 34.
Converting TurningPoint 2008 Presentations
Presentations created in TurningPoint 2008 can be converted to TurningPoint 5 and used for polling.
1
Open TurningPoint.
2
Click PowerPoint Polling.
PowerPoint opens with the TurningPoint ribbon/toolbar.
3
Open the TurningPoint 2008 presentation.
A warning message appears.
4
Click OK to continue the conversion.
The TurningPoint 2008 presentation is converted to the new format.
5
Save the presentation.
TIP
Save the PowerPoint presentation in the TurningPoint Content folder. The presentation is listed
in the Content section of the Polling tab for quick access.
turningtechnologies.com/user-guides
Page 20

TurningPoint 5 for PC 20
CONTENT
This chapter covers the following sections:
Managing Content
Question Lists
Standards
Managing Content
The TurningPoint Content tab allows a user to organize content into folders for all three polling environments. Content may be
in the form of question lists or PowerPoint presentations.
This section covers the following topics:
Organizing Content Into Folders
Exporting Content
Importing Content
Deleting Content
Refreshing Folder Content
Organizing Content Into Folders
Folders can be created to organize content. Once a folder is created, content items can be placed into the folder.
1
Select the Content tab.
2
Click the Folder drop-down menu and select New.
The New Folder window opens.
3
Enter a name for the folder in the box provided and click Save.
Folders are added to the top of the list in the left panel and sorted alphabetically.
4
Optionally, create a sub-folder.
a
Select a folder.
b
Click the Folder drop-down menu and select New.
c
Enter a name for the sub-folder in the box provided and click Save.
5
Repeat steps 2 - 4 to create additional folders or sub-folders.
6
To remove a folder, select the folder, click the Folder drop-down menu and select Delete.
WARNING
Deleting a folder will remove all files and sub-folders, including those not displayed in
TurningPoint. Click Delete to continue.
To place content into a folder, select the content and drag it to the desired folder.
Exporting Content
Question lists and PowerPoint presentations can be exported from TurningPoint. Exporting content creates a copy of the file in
the specified location. The file is not removed from its current location.
turningtechnologies.com/user-guides
Page 21

TurningPoint 5 for PC 21
1
Select the Content tab.
2
Click the Content drop-down menu and select Export.
The Export Question Lists window is displayed.
3
Check the content to be exported.
If desired, select the Export as Read-only check box.
This option, when checked, prevents shared users from
editing question lists.
To export all content from TurningPoint, click Select All.
NOTE
When exporting content, it is important to
remember that folder structure is exported
as well. For example, a folder named
“Practice” contains three question lists. If
a question list from “Practice” is exported,
a folder “Practice” is created and the
exported question list will be inside the
folder.
4
Click ... and navigate to the desired location.
5
Click OK.
6
Click Save.
Importing Content
The following file types can be imported into TurningPoint: question list files (TPQX and TPQ), answer key files from
TurningKey (TKY), QuestionPoint files (TQZ) and PowerPoint presentations (PPTX and PPT). When a file is imported, it is
copied from its current location to the Content folder in TurningPoint.
TIP
Drag and drop files and folders directly under the Content tab.
1
Select the Content tab.
2
Click the Content drop-down menu and select Import.
3
Select the file or files and click Open.
TIP
Select more than one file by holding down the Shift or Control keys.
Next Steps
To place content into a folder, select the content and drag it to the desired folder. For more information on folders, see
Organizing Content Into Folders on page 20.
Deleting Content
To delete content from TurningPoint, follow the steps below.
turningtechnologies.com/user-guides
Page 22

TurningPoint 5 for PC 22
1
Select the Content tab.
2
Select a content item.
3
Click the Content drop-down menu and select Delete.
A confirmation window is displayed.
4
Click Delete.
Alternatively, select a content item and press the Delete key on the keyboard or right-click to delete.
Refreshing Folder Content
The refresh option allows the user to update content display if changes to the content folders have been made outside of
TurningPoint on the local computer.
1
Select the Content tab.
2
Click the Folder drop-down menu and select Refresh.
Any content changes made in the folder structure outside of TurningPoint is displayed.
Question Lists
A question list is a file that contains questions and answers. For Anywhere Polling and Self-Paced Polling, content is created
through question lists. PowerPoint Polling can also utilize question lists; however, the traditional way of creating content in a
PowerPoint presentation remains the same. A single question list can be used to poll in all environments on both PC and Mac.
NOTE
For more information on creating a PowerPoint presentation as content, see Content on page 20.
Question lists and answer keys created with previous versions of Turning Technologies products can be imported into
TurningPoint. For more information, see Importing Content on page 21.
This section covers the following topics:
Creating a New Question List
Question Types and Options
Editing Question List Content
Updating Question Preferences within the Question List Editor
Importing Questions into a Question List
Applying New Question List Preferences to Existing Questions
Printing a Question List
Versions for Self-Paced Polling
Creating a New Question List
A question list can be used for PowerPoint Polling, Anywhere Polling and Self-Paced Polling. When creating a question list, the
preferences can be saved and used as a template for future question lists.
turningtechnologies.com/user-guides
Page 23
TurningPoint 5 for PC 23
1
Select the Content tab.
2
Click the Content drop-down menu, mouse over New and
select Question List.
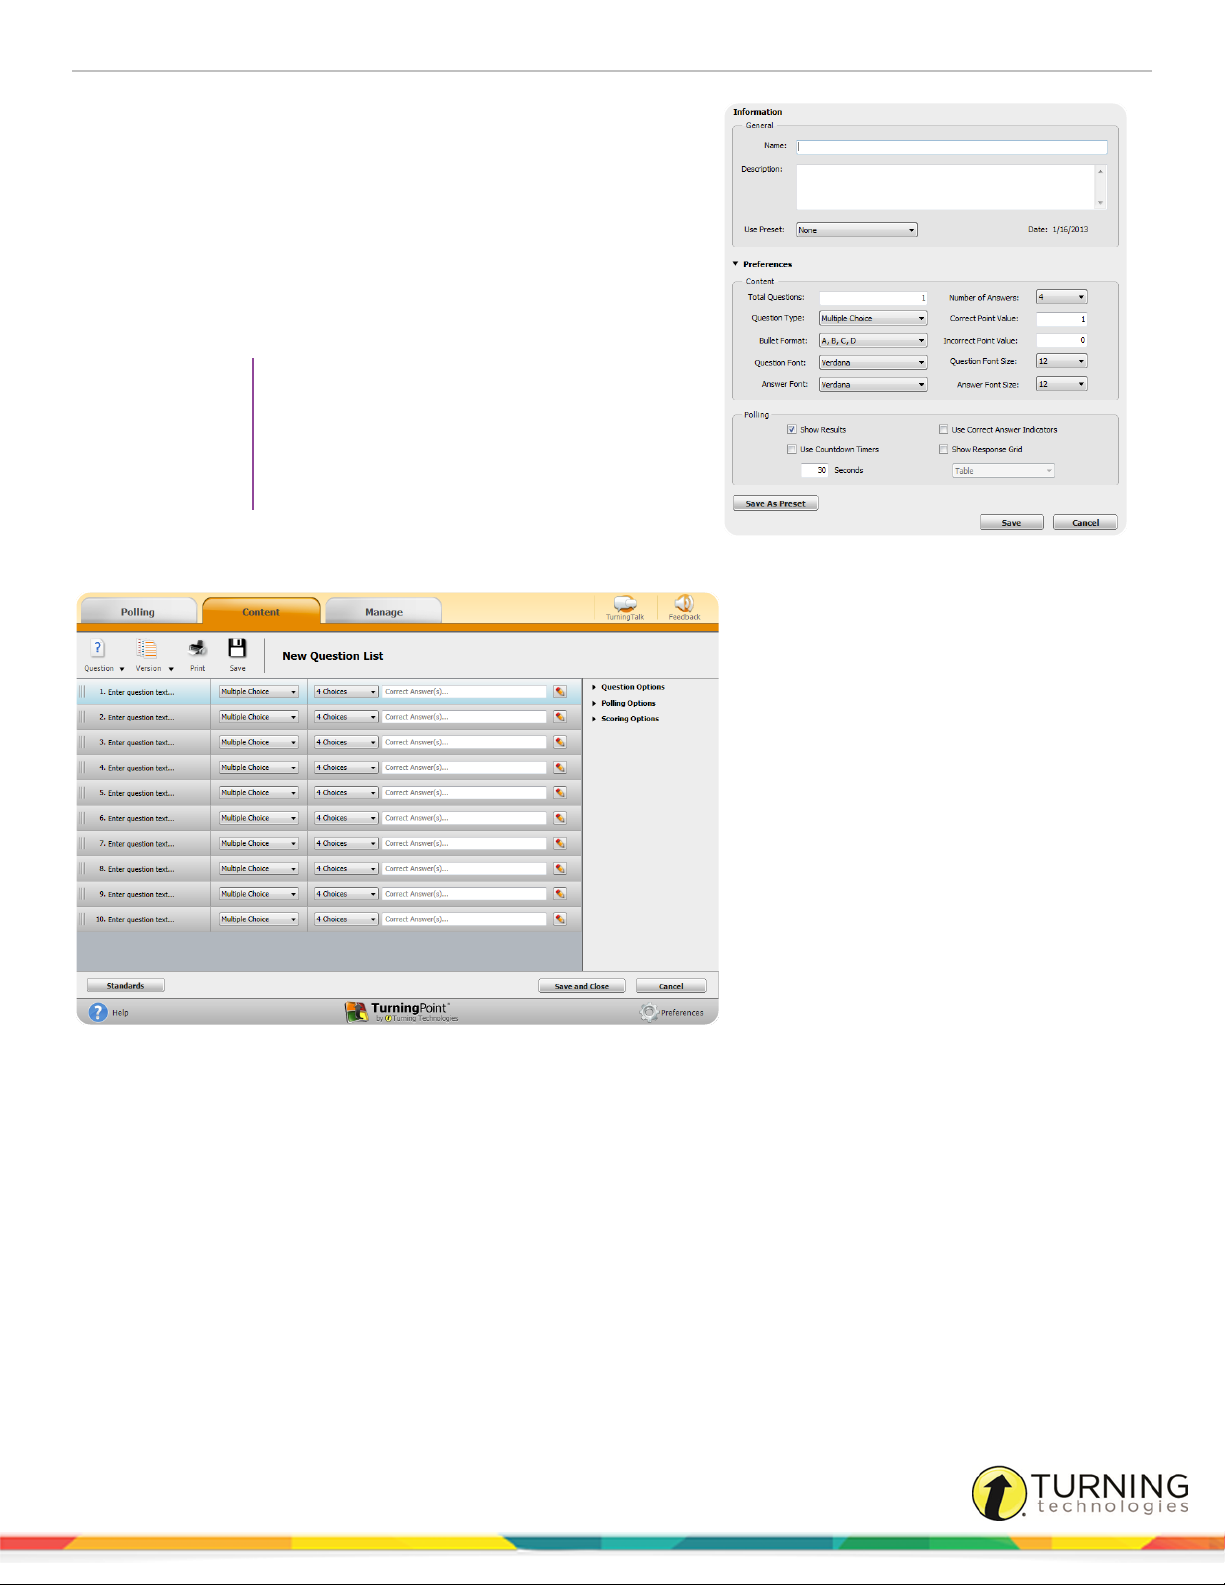
The Question List window opens.
3
Enter a name and a brief description for the question list.
4
Click the arrow next to Preferences to expand the window
and adjust the options as necessary in the Content and Polling
sections.
TIP
Save the preferences as a preset for other
question lists. Click Save as Preset, provide
a name, click Add and then Save. The next
time a question list is created, select the
name from the Use Preset drop-down menu.
5
Click Save.
The Question List Editor is displayed.
Next Steps
Now that a new question list has been created, the content, such as question text, answer text and correct answers, may be
entered.
Question Types and Options
The following sections explain each question type, how to set correct answers and the available question options.
There are several question types available:
turningtechnologies.com/user-guides
Page 24

TurningPoint 5 for PC 24
Multiple Choice
Short Answer
Numeric Response
True/False
Matching
Essay
Demographic Assignment
Priority Ranking
Multiple Choice
A multiple choice question may have up to 10 answer options.
Prerequisites
A new question list must be created or opened for editing. To open a question list for editing, select the Content tab, select a
question list and click Edit Question List on the Question List Overview screen.
1
Select a question from the question list.
2
Select Multiple Choice from the Question Type drop-down menu.
3
Select the number of possible answer choices from the Choices drop-down menu.
4
Enter the correct answer in the box provided.
NOTE
Each correct answer choice needs to be separated by a semicolon. For example, “a; c; d”.
Correct answers may also be assigned by selecting Correct from the drop-down menu next to the
answer choice bullet in the scoring options.
5
Adjust the Question, Polling and Scoring options as necessary.
Question Options
l Anonymous - A question marked anonymous does not track participant list information when polling.
l Bullet Format - The bullet format for the answer choices can be changed from the drop-down menu.
l Multiple Responses - Multiple responses allow participants to send more than one response to a question.
When this box is checked the following options may be set: Number of Responses, Allow Duplicates and All or
Nothing Scoring.
Polling Options
l Show Results - When checked, the chart is displayed after polling is closed.
l First Response Only - When checked, TurningPoint only accepts the first response sent by each participant.
l Correct Answer Indicator - A correct answer indicator allows participants to view the correct answer(s) after
polling has been closed.
l Countdown Timer - A countdown timer provides participants with a visual cue that polling is about to close as it
counts down to zero. When the countdown expires, the countdown timer disappears and polling is automatically
closed.
l Response Grid - A response grid displays participant names by default. As participants respond, the
corresponding box changes color. If polling with an auto list, it is recommended to change the response grid text
to Device ID Only. As participants respond, a Device ID appears in the box.
Scoring Options
turningtechnologies.com/user-guides
Page 25

TurningPoint 5 for PC 25
l Correct Point Value - The point value of the correct answer(s) can be set by entering a value in the box
provided.
l Incorrect Point Value - The point value of the incorrect answer(s) can be set by entering a value in the box
provided.
l Speed Scoring - When checked, point values will decrease relative to the time polling is kept open.
l Show Advanced Scoring - When checked, the answer value and the point value are both displayed. The point
value can be changed by entering a new value in the box provided.
Next Steps
Now that the question type and options have been defined, the question and answer text may be edited. For more information,
see Editing Question List Content on page 31.
Short Answer
A short answer question requires participants to respond with a phrase. Only participants using a ResponseCard XR,
ResponseCard NXT or ResponseWare may respond to a short answer question.
NOTE
A short answer response can have up to 160 characters in the PowerPoint and Anywhere Polling
environments. In the Self-Paced Polling environment, a short answer response can have up to 16
characters.
Prerequisites
A new question list must be created or opened for editing. To open a question list for editing, select the Content tab, select a
question list and click Edit Question List on the Question List Overview screen.
1
Select a question from the question list.
2
Select Short Answer from the Question Type drop-down menu.
3
Enter a keyword(s) for the correct answer in the box provided.
Multiple keywords should be separated with a semicolon.
NOTE
The following symbols are supported:
ResponseCard NXT as of firmware version 1.0.1:
. , ‘ “ ? @ # $ % ^ & * ( ) _ + - = / < > [ ] { } √ £ € E
ResponseCard XR as of firmware version 1.2.1:
. , + - * / % ( ) ^ @ ! & E √ €
4
Adjust the Question, Polling and Scoring Options as necessary.
Question Options
l Anonymous - A question marked anonymous does not track participant list information when polling.
Polling Options
l Show Results - When checked, the chart is displayed after polling is closed.
l First Response Only - When checked, TurningPoint only accepts the first response sent by each participant.
l Show Correct Keyword - After polling closes, the correct keyword(s) is displayed on the slide.
turningtechnologies.com/user-guides
Page 26

TurningPoint 5 for PC 26
l Countdown Timer - A countdown timer provides participants with a visual cue that polling is about to close as it
counts down to zero. When the countdown expires, the countdown timer disappears and polling is automatically
closed.
l Response Grid - A response grid displays participant names by default. As participants respond, the
corresponding box changes color. If polling with an auto list, it is recommended to change the response grid text
to Device ID Only. As participants respond, a Device ID appears in the box.
Scoring Options
l Correct Point Value - The point value of the correct answer(s) can be set by entering a value in the box
provided.
l Incorrect Point Value - The point value of the incorrect answer(s) can be set by entering a value in the box
provided.
l Speed Scoring - When checked, point values will decrease relative to the time polling is kept open.
l Answer Value - The answer value can be set by selecting Correct or No Value from the drop-down box.
l Correct Keyword(s) - Multiple keywords should be separated with a semicolon.
l Enforce Capitalization - When checked, the participant response must have proper capitalization to receive
credit.
Numeric Response
A numeric response question requires participants to respond with a numeric value. Only participants using a ResponseCard
XR, ResponseCard NXT or ResponseWare may respond to a numeric response question.
NOTE
A numeric response can have up to 16 characters in all three polling environments.
Prerequisites
A new question list must be created or opened for editing. To open a question list for editing, select the Content tab, select a
question list and click Edit Question List on the Question List Overview screen.
1
Select a question from the question list.
2
Select Numeric Response from the Question Type drop-down menu.
3
Enter a value for the correct answer in the box provided.
4
Optionally, enter a minimum and maximum value in the boxes provided. All responses within this range will be marked
correct.
5
Adjust the Question, Polling and Scoring Options as necessary.
Question Options
l Anonymous - A question marked anonymous does not track participant list information when polling.
Polling Options
l Show Results - When checked, the chart is displayed after polling is closed.
l First Response Only - When checked, TurningPoint only accepts the first response sent by each participant.
l Show Correct Answer - After polling closes, the correct answer is displayed on the slide.
l Countdown Timer - A countdown timer provides participants with a visual cue that polling is about to close as it
counts down to zero. When the countdown expires, the countdown timer disappears and polling is automatically
closed.
turningtechnologies.com/user-guides
Page 27

TurningPoint 5 for PC 27
l Response Grid - A response grid displays participant names by default. As participants respond, the
corresponding box changes color. If polling with an auto list, it is recommended to change the response grid text
to Device ID Only. As participants respond, a Device ID appears in the box.
Scoring Options
l Correct Point Value - The point value of the correct answer(s) can be set by entering a value in the box
provided.
l Incorrect Point Value - The point value of the incorrect answer(s) can be set by entering a value in the box
provided.
l Speed Scoring - When checked, point values will decrease relative to the time polling is kept open.
l Answer Value - The answer value can be set by selecting Correct or No Value from the drop-down box.
l Acceptable Value - Enter a specific value in the box provided.
l Acceptable Range - If a specific value is not required for a correct answer, a range can be set. Enter a minimum
value and a maximum value in the boxes provided.
Next Steps
Now that the question type values have been defined, the question text may be edited. For more information, see Editing
Question List Content on page 31.
True/False
A true/false question requires participants to respond with 1/A for true or 2/B for false.
Prerequisites
A new question list must be created or opened for editing. To open a question list for editing, select the Content tab, select a
question list and click Edit Question List on the Question List Overview screen.
1
Select a question from the question list.
2
Select True/False from the Question Type drop-down menu.
3
Select True, False or No Correct as the correct answer.
4
Adjust the Question, Polling and Scoring Options as necessary.
Question Options
l Anonymous - A question marked anonymous does not track participant list information when polling.
l Bullet Format - The bullet format for the answer choices can be changed from the drop-down menu.
Polling Options
l Show Results - When checked, the chart is displayed after polling is closed.
l First Response Only - When checked, TurningPoint only accepts the first response sent by each participant.
l Correct Answer Indicator - A correct answer indicator allows participants to view the correct answer(s) after
polling has been closed.
l Countdown Timer - A countdown timer provides participants with a visual cue that polling is about to close as it
counts down to zero. When the countdown expires, the countdown timer disappears and polling is automatically
closed.
l Response Grid - A response grid displays participant names by default. As participants respond, the
corresponding box changes color. If polling with an auto list, it is recommended to change the response grid text
to Device ID Only. As participants respond, a Device ID appears in the box.
Scoring Options
turningtechnologies.com/user-guides
Page 28

TurningPoint 5 for PC 28
l Correct Point Value - The point value of the correct answer(s) can be set by entering a value in the box
provided.
l Incorrect Point Value - The point value of the incorrect answer(s) can be set by entering a value in the box
provided.
l Speed Scoring - When checked, point values will decrease relative to the time polling is kept open.
l Select True or False as the correct answer. A value of No Correct can also be selected if there is no correct
answer.
Next Steps
Now that the question type and options have been defined, the question and answer text may be edited. For more information,
see Editing Question List Content on page 31.
Matching
Matching questions may have up to 10 answer choices. To set up a matching question, a list of matches is paired with a list of
choices. Participants submit the choices in the order they correspond to the matches.
Matching questions are NOT supported in the PowerPoint Polling environment.
Prerequisites
A new question list must be created or opened for editing. To open a question list for editing, select the Content tab, select a
question list and click Edit Question List on the Question List Overview screen.
1
Select a question from the question list.
2
Select Matching from the Question Type drop-down menu.
3
Select the number of matches from the Matches drop-down menu.
4
Select the number of choices from the Choices drop-down menu.
5
Enter the correct answers in the box provided.
NOTE
Each correct answer choice needs to be separated by a semicolon. For example, “a; c; d”.
Correct answers may also be assigned by selecting the correct answer choices that corresponds
to the matched item.
6
Adjust the Question, Polling and Scoring Options as necessary.
Question Options
l Anonymous - A question marked anonymous does not track participant list information when polling.
l Bullet Format - The bullet format for the answer choices can be changed from the drop-down menu.
l All or Nothing Scoring - When checked, the participant must choose each correct answer to receive points.
Polling Options
l Show Results - When checked, the chart is displayed after polling is closed.
l Countdown Timer - A countdown timer provides participants with a visual cue that polling is about to close as it
counts down to zero. When the countdown expires, the countdown timer disappears and polling is automatically
closed.
turningtechnologies.com/user-guides
Page 29

TurningPoint 5 for PC 29
l Response Grid - A response grid displays participant names by default. As participants respond, the
corresponding box changes color. If polling with an auto list, it is recommended to change the response grid text
to Device ID Only. As participants respond, a Device ID appears in the box.
Scoring Options
l Correct Point Value - The point value of the correct answer(s) can be set by entering a value in the box
provided.
l Incorrect Point Value - The point value of the incorrect answer(s) can be set by entering a value in the box
provided.
l Speed Scoring - When checked, point values will decrease relative to the time polling is kept open.
l Show Advanced Scoring - When checked, the answer value and the point value are both displayed. The point
value can be changed by entering a new value in the box provided.
Next Steps
Now that the question type and options have been defined, the question and answer text may be edited. For more information,
see Editing Question List Content on page 31.
Essay
Only participants using a ResponseCard XR, ResponseCard NXT or ResponseWare may respond to an essay question.
NOTE
An essay response can have up to 160 characters in all three environments.
Prerequisites
A new question list must be created or opened for editing. To open a question list for editing, select the Content tab, select a
question list and click Edit Question List on the Question List Overview screen.
1
Select a question from the question list.
2
Select Essay from the Question Type drop-down menu.
3
Adjust the Question and Polling Options as necessary.
Question Options
l Anonymous - A question marked anonymous does not track participant list information when polling.
Polling Options
l First Response Only - When checked, TurningPoint only accepts the first response sent by each participant.
l Countdown Timer - A countdown timer provides participants with a visual cue that polling is about to close as it
counts down to zero. When the countdown expires, the countdown timer disappears and polling is automatically
closed.
l Response Grid - A response grid displays participant names by default. As participants respond, the
corresponding box changes color. If polling with an auto list, it is recommended to change the response grid text
to Device ID Only. As participants respond, a Device ID appears in the box.
Scoring Options
l TurningPoint does not score essay slides. Manual score adjustments can be made in Results Manager.
Next Steps
Now that the question type has been defined, the question text may be edited. For more information, see Editing Question
List Content on page 31.
turningtechnologies.com/user-guides
Page 30

TurningPoint 5 for PC 30
Demographic Assignment
A demographic assignment question may have up to 10 answer choices. A demographic assignment question can also be
used to assign participants to teams for competitions.
Prerequisites
A new question list must be created or opened for editing. To open a question list for editing, select the Content tab, select a
question list and click Edit Question List on the Question List Overview screen.
1
Select a question from the question list.
2
Select Demographic Assignment from the Question Type drop-down menu.
3
Select the number of possible answer choices from the Choices drop-down menu.
4
Adjust the Demographic, Question and Polling Options as necessary.
Demographic Options
l Demographic Grouping - Categorize the demographic options for easier reporting.
l Use in Competition - The answer options become teams and can be used in team competitions. When
unchecked, the slide is no longer considered a Team Assignment slide.
l Save to Participant List - The competition information is saved to the current participant list.
Question Options
l Bullet Format - The bullet format for the answer choices can be changed from the drop-down menu.
Polling Options
l Show Results - When checked, the chart is displayed after polling is closed.
l First Response Only - When checked, TurningPoint only accepts the first response sent by each participant.
l Countdown Timer - A countdown timer provides participants with a visual cue that polling is about to close as it
counts down to zero. When the countdown expires, the countdown timer disappears and polling is automatically
closed.
l Response Grid - A response grid displays participant names by default. As participants respond, the
corresponding box changes color. If polling with an auto list, it is recommended to change the response grid text
to Device ID Only. As participants respond, a Device ID appears in the box.
Next Steps
Now that the question type has been defined, the question and answer text may be edited. For more information, see Editing
Question List Content on page 31.
Priority Ranking
Priority ranking questions may have up to 10 answer choices. Items are ranked by the participants and then scored based on
response weights.
Prerequisites
A new question list must be created or opened for editing. To open a question list for editing, select the Content tab, select a
question list and click Edit Question List on the Question List Overview screen.
1
Select a question from the question list.
2
Select Priority Ranking from the Question Type drop-down menu.
3
Select the number of choices and number of responses from the drop-down menus.
turningtechnologies.com/user-guides
Page 31

TurningPoint 5 for PC 31
4
Adjust the Question, Polling and Scoring Options as necessary.
Question Options
l Anonymous - A question marked anonymous does not track participant list information when polling.
l Bullet Format - The bullet format for the answer choices can be changed from the drop-down menu.
l Response Limit - The response limit dictates the number of answer choices a participant can select for a
specific question.
l Allow Duplicates - When checked, participants are permitted to select the same answer choice more than
once.
l Response Weights - Set the value for each response by selecting a value from the drop-down menu or enter a
value from 0 to 99999. Repeat for the remaining answers.
Polling Options
l Show Results - When checked, the chart is displayed after polling is closed.
l Countdown Timer - A countdown timer provides participants with a visual cue that polling is about to close as it
counts down to zero. When the countdown expires, the countdown timer disappears and polling is automatically
closed.
l Response Grid - A response grid displays participant names by default. As participants respond, the
corresponding box changes color. If polling with an auto list, it is recommended to change the response grid text
to Device ID Only. As participants respond, a Device ID appears in the box.
Next Steps
Now that the question type and options have been defined, the question and answer text may be edited. For more information,
see Editing Question List Content on page 31.
Editing Question List Content
Now that a question list has been created, question and answer text, question options, scoring options and polling options can
be assigned. The HTML Editor allows for advanced formatting of pictures, special characters, subscripts, superscripts and
hyperlinks. Questions can also be added, deleted or duplicated for quick authoring.
NOTE
For question lists to be used as answer keys, simply select a question type and assign a correct answer
for each question. Question and answer text is not necessary.
Prerequisites
A new question list must be created or opened for editing. To open a question list for editing, select the Content tab, select a
question list and click Edit Question List on the Question List Overview screen.
1
Select a question.
2
Select a question type and the corresponding question options from the drop-down menus. For more information on
the available question types, see Question Types and Options on page 23.
3
Optionally, set the Question, Scoring and Polling Options in the right panel. Click the arrow next to the category to view
the available options. For more information, see Question Types and Options on page 23.
NOTE
Polling options do not apply to Self-Paced Polling.
turningtechnologies.com/user-guides
Page 32

TurningPoint 5 for PC 32
4
Click the pencil icon to the right of the question.
The HTML Editor opens.
5
Select the question or answer text and enter the new text.
Use the HTML Editor toolbar to enhance the question or answer text.
a
The icons and drop-down menus on the first row of the toolbar are for text editing. Adjustments can be made to
text alignment, font, size, color, highlight, subscript, superscript and bullet options.
b
The icons on the second row of the toolbar include undo, redo, cut, copy, paste, indent and hyperlinks.
c
Click the Insert image icon to include a picture in the question or answer options.
d
Click the Insert custom character icon to select a special character.
e
Click the Insert horizontal ruler icon to include a line
separator in the question or answer options.
f
Click the Insert equation icon to include an equation in
the question or answer options.
The WIRIS Editor opens in Internet Explorer. It may be
necessary to click Allow blocked content in order to
view the equation editor. After the equation has been
created, click Accept to place the equation in the
question or answer text.
turningtechnologies.com/user-guides
Page 33

TurningPoint 5 for PC 33
TIP
Internet Explorer security settings can be adjusted to allow active content to run on the
computer. This will avoid the security prompt in the future.
6
Repeat step 5 for the remaining answer choices.
TIP
Click the magnifying glass to see how the question will appear on-screen for polling.
7
Click the left or right arrows at the bottom of the window to navigate to another question for editing.
8
Repeat steps 2 - 7 for the remaining questions.
9
Click Close to return to the question list.
10
Optionally, questions may be added, deleted, duplicated or rearranged within the question list.
a
b
c
d
11
Click Save and Close to save the question list.
Next Steps
To add a question, select a question, click Question on the toolbar and select Add. (Or, select a question and
press Ctrl+ N on the keyboard.) The new question will be added directly below the selected question.
To delete a question, select a question, click Question on the toolbar and select Delete. (Or, select the
question and press the Delete key on the keyboard.)
To duplicate a question, select a question, click Question on the toolbar and select Duplicate. (Or, select a
question and press Ctrl+ D on the keyboard.)
TIP
Duplicating questions can speed up the question list creation process if there are a
multitude of questions with similar formatting. When a question is duplicated, the question,
scoring and polling options are duplicated as well.
To rearrange the order of the questions, click the area to the left of the question number and drag the
question to the new location.
The question list is now ready to be used for PowerPoint Polling on page 70, Anywhere Polling on page 110 or Self-Paced
Polling on page 119.
turningtechnologies.com/user-guides
Page 34

TurningPoint 5 for PC 34
Updating Question Preferences within the Question List Editor
You can update question list preferences after a question list has
been saved or imported from older software versions.
Prerequisites
A saved question list is needed.
1
Select the Content tab.
2
Select a question list and click Edit Question List.
3
Click Question and select Update Question List
Preferences.
The Update Question List Preferences window is
displayed.
4
Edit preferences as necessary.
TIP
To update the question and answer font
and size of a particular question, click the
pencil icon next to that question.
5
Click Save.
6
Click Save and Close to save the edited question list.
Importing Questions into a Question List
Existing questions can be imported into a question list. Supported question types include other question lists, session files,
QuestionPoint files, RTF files or QTI files. The Java Runtime Environment is required for importing RTF, DOC, DOCX and QTI
documents.
A Word document must have question text formatted as Heading 1 and answer text formatted as Heading 2. Only multiple
choice questions can be imported. The question type may be changed after import.
A QTI document can be imported from Respondus® (3.5 - 4.0) (QTI XML zip file) or Examview® (5.1 - 7.0) (HTML file without
any fonts).
An RTF document can be imported from Examview® (7.0 - 8.0) (Style gallery: Default).
Prerequisites
A new question list must be created or opened for editing. To open a question list for editing, select the Content tab, select a
question list and click Edit Question List on the Question List Overview screen.
NOTE
The imported questions will take the preferences established for the question list, including fonts.
1
Click the Question icon and select Import.
turningtechnologies.com/user-guides
Page 35

TurningPoint 5 for PC 35
2
Select the desired file and click Open.
The Import Questions window is displayed.
3
Check the questions to be imported.
4
Optionally, select Apply to all versions to import the new
questions into all corresponding versions of the question list.
5
Click Import.
The imported questions are added to the bottom of the question
list.
TIP
To rearrange the order of the questions, click the
area to the left of the question number and drag the
question to the new location.
6
Optionally, repeat step 1 - 5 to import additional questions.
7
Click Save and Close to save the changes and return to the Question List Overview screen.
TIP
Session files saved from a previous version of Turning Technologies software can be imported
and converted to a question list. For more information, see Importing Session Files on page 18.
Applying New Question List Preferences to Existing Questions
Preference changes can be applied to an existing question list.
Prerequisites
A saved question list from a legacy version of TurningPoint or a question list created by another user is needed.
1
Click the Content drop-down menu, mouse over New and select Question List.
2
Name the Question List.
3
Adjust the Preferences and Polling sections as needed.
4
Click Save.
The Question List Editor opens.
5
Click the Question icon and select Import.
6
Select the desired file and click Open.
7
Check the questions to be imported.
8
Click Import.
9
Click Save and Close to save the changes and return to the Question List Overview screen.
Printing a Question List
There are three printing options available when printing a question list:
l Student Copy - The student copy contains the question and answer choices.
l Teacher Copy - The teacher copy contains all of the question and answer choices along with the correct answers and
turningtechnologies.com/user-guides
Page 36

TurningPoint 5 for PC 36
standards (if applicable).
l Answer Key - The answer key contains the correct answers.
Prerequisites
A new question list must be created or opened for editing. To open a question list for editing, select the Content tab, select a
question list and click Edit Question List on the Question List Overview screen.
1
From the Question List Editor toolbar, click Print.
The Question List Print Options window is displayed.
2
Optionally, select a version from the Version drop-down
menu.
NOTE
Only a teacher copy of the master version can
be printed.
3
Select Student Copy, Teacher Copy or Answer Key.
4
Click Print.
TIP
Click Preview to view the file before printing or
to save it as a PDF
5
Click Save and Close to return to the Question List Overview screen.
Versions for Self-Paced Polling
The Self-Paced Polling environment can accommodate multiple versions of a question list. A master list is generated which
allows for quick editing that is reflected in all versions of the question list.
A master list is NOT a separate, testable version of the question list.
The following topics are covered in this section:
Adding a Version
Editing a Version
Renaming a Version
Deleting a Version
Adding a Version
Question lists can be generated into different versions for Self-Paced Polling. A master list of the question list is generated for
quick editing of the question and answer choices.
NOTE
Versions containing more than 250 questions cannot be used for Self-Paced Polling.
A new question list must be created or opened for editing. To open a question list for editing, select the Content tab, select a
question list and click Edit Question List on the Question List Overview screen.
turningtechnologies.com/user-guides
Page 37

TurningPoint 5 for PC 37
1
Click the Version icon and select Add.
The Add Version window opens.
2
Enter a New Version Code. A version code must be a numeric
value.
When the participants take the Self-Paced Polling test they will be
prompted for a version code. The version code corresponds to the
question list version they received.
3
Select one of the following options:
Add with New Questions - A new version of the question list is created and the new questions are added to the master
list.
a
Enter the Number of Questions in the box provided.
b
Select the Default Question Type from the drop-down menu.
Add with Existing Questions - A new version of the question list is created with the questions from the master list.
a
Select the questions to be included in the new version.
b
Optionally, check the box to Randomize Questions.
c
Optionally, check the box to Randomize Answers.
4
Click Add Version.
The Version Warning dialog box is displayed.
5
Click OK to create the new version.
6
Optionally, repeat steps 1 - 5 to create
additional versions.
7
Click Save and Close to save the
changes and return to the Question List
Overview screen.
Editing a Version
Questions can be rearranged or removed from a specific version.
Prerequisites
A master list must be open. If a master list is not open, select the Content tab, select the master list and click Edit Question
List on the Question List Overview screen.
1
Select the version to be edited from the Version drop-down menu in the upper right corner of the question list editor.
2
From the Question List Editor toolbar, click Version and select Edit.
The Edit Version window is displayed.
turningtechnologies.com/user-guides
Page 38

TurningPoint 5 for PC 38
l The left panel (Available Questions) displays
questions from the master list that are not being
used in the current version.
l The right panel (Current Version) displays the
questions being used in the current version.
3
To remove a question from the current version:
a
Select a question from the Current Version panel.
b
Click the bottom arrow between the panels.
4
To add a question from the master list:
a
Select a question from the Available Questions
panel.
b
Click the upper arrow between the panels.
5
To rearrange the order of the questions in the current version:
a
Select the question to be moved from the Current Version panel.
b
Click the up arrow or down arrow to the right of the panel to move the question to the desired place in the list.
6
Click Save Edits to close the window and save the changes.
7
Optionally, repeat steps 1 - 6 to edit to additional versions.
8
Click Save and Close to save the changes and return to the Question List Overview screen.
Renaming a Version
To change the version name, follow the steps below.
Prerequisites
A question list with versions must be open. If a question list is not open, select the Content tab, select the master list and click
Edit Question List on the Question List Overview screen.
1
From the Question List Editor toolbar, click the Version icon and select Rename.
The Rename Versions window is displayed. All of the versions associated with the
question list are listed in the window.
2
Double-click the version name to be edited.
3
Enter the new version name and click OK.
4
Click Save and Close to save the changes and return to the Question List Overview
screen.
Deleting a Version
To delete a question list version, follow the steps below. A master list cannot be deleted.
A question list with versions must be open. If a question list is not open, select the Content tab, select the master list and
click Edit Question List on the Question List Overview screen.
1
Select the version to be edited from the Version drop-down menu in the upper right corner of the question list editor.
2
From the Question List Editor toolbar, click Version and select Delete.
The Delete Version confirmation box is displayed.
turningtechnologies.com/user-guides
Page 39

TurningPoint 5 for PC 39
3
Click Yes to delete the question list version.
4
Repeat steps 1 - 3 to delete additional question list versions.
5
Click Save and Close to return to the Question List Overview screen.
Standards
The Standards tool allows a user to download K-12 standards (per state or country, topic, subject, or grade level) or create a
custom standards list on which participants can be evaluated. For training, teaching or testing, standards help organize the
material in the question list or presentation into subject areas, competencies, or other standards which the participants should
meet.
This section covers the following topics:
Downloading Standards
Assigning Standards Using a Downloaded Standards List
Creating a Custom Standards List
Assigning Standards Using a Custom Standards List
Downloading Standards
Downloadable standards are available for the United States, Australia, Canada, Ireland and the United Kingdom. Common
Core Standards are also available. Downloaded standards are saved to the local computer and cannot be saved to a flash
drive.
NOTE
An active internet connection is required to download standards.
Prerequisites
A new question list must be created or opened for editing. To open a question list for editing, select the Content tab, select a
question list and click Edit Question List on the Question List Overview screen.
1
Click Standards on the bottom left of the Question List Editor screen.
The Standards screen is displayed.
turningtechnologies.com/user-guides
Page 40

TurningPoint 5 for PC 40
2
Click the Add/Remove/Update icon.
The Standards Selection window is opened.
3
Check the standard or standards to be
downloaded.
NOTE
To remove standards,
uncheck the box or boxes.
4
Click Save.
The selected standards are downloaded or
removed. Depending on the internet
connection, this may take a few moments.
Once finished, a confirmation box appears.
5
Click OK.
Next Steps
To associate downloaded standards with questions, follow the instructions in the next section, Assigning Standards Using
a Downloaded Standards List on page 40.
Assigning Standards Using a Downloaded Standards List
Once standards are downloaded, they can be assigned to questions in a question list. Standards may also be added to a
session in the session editor. For more information, see Editing a Session on page 128.
Prerequisites
A new question list must be created or opened for editing. To open a question list for editing, select the Content tab, select a
question list and click Edit Question List on the Question List Overview screen. At least one standard group must be
downloaded.
turningtechnologies.com/user-guides
Page 41

TurningPoint 5 for PC 41
1
Click Standards on the bottom left of the Question List Editor screen.
The Standards screen is displayed.
2
Select a State or Country from
the Select a State or Country
drop-down menu.
3
Select a Topic from the Select a
Topic drop-down menu.
4
Select a Subject from the Select
a Subject drop-down menu.
5
Select a Grade from the Select a
Grade drop-down menu.
All of the standards for the
selected state/country, topic,
subject and grade are displayed.
NOTE
TurningPoint will
remember these
selections for
future use.
6
Select a question from the left panel.
7
Select a standard from the list. Click the right arrow icon to apply the standard to the question.
8
Repeat steps 6 and 7 to assign standards to remaining questions.
9
To remove a standard from a question:
l Select the question and double-click the assigned standard.
l Click Clear All to remove all standards associated with the question.
10
When finished, click Close.
11
Click Save and Close to save the changes and return to the Question List Overview screen.
Creating a Custom Standards List
Custom standards can be created to suit a users specific needs.
A new question list must be created or opened for editing. To open a question list for editing, select the Content tab, select a
question list and click Edit Question List on the Question List Overview screen.
1
Click Standards on the bottom left of the Question List Editor screen.
The Standards screen is displayed.
turningtechnologies.com/user-guides
Page 42

TurningPoint 5 for PC 42
2
Select the Custom Standards tab.
l The drop-down menu displays the
current standards list associated
with the question list.
l The New icon allows a user to
create a custom standards list.
l The Import icon allows a user to
import a standards list from another
location on the computer or network.
l The Export icon allows a user to
export a standards list to another
location on the computer or network.
l The Delete icon allows a user to
delete a standards list. A standards
file can also be deleted by removing
it from the standards folder.
3
Click New.
4
Enter a name for the new standards list in the box provided and click Save.
TurningPoint creates the standards list in the standards folder.
The new standards list has a top-level (Parent) category with the same name as the list.
Categories arrange standards into a hierarchy.
5
To add a category or a standard:
a
Click Add Category or Add Standard.
b
Enter a name in the box provided and click Save.
c
Repeat steps a and b to add additional categories or standards.
6
Optionally, to delete a category or standard, select the category or standard and click Delete.
7
To edit a standard or category name, select the category or standard and click Edit. Enter a name in the box provided
and click Save.
8
Click Close when finished.
A confirmation box appears.
9
Click Yes to save the new standards list.
Next Steps
To associate standards with questions, follow the instructions in the next section, Assigning Standards Using a Custom
Standards List on page 42.
Assigning Standards Using a Custom Standards List
Once custom standards have been created, they can be assigned to questions in a question list. Standards may also be added
to a session in the session editor. For more information, see Editing a Session on page 128.
Prerequisites
A new question list must be created or opened for editing. To open a question list for editing, select the Content tab, select a
question list and click Edit Question List on the Question List Overview screen.A custom standards list is also necessary. For
more information on custom standards list, see Creating a Custom Standards List on page 41.
turningtechnologies.com/user-guides
Page 43

TurningPoint 5 for PC 43
1
Click Standards on the bottom left of the Question List Editor screen.
The Standards screen is displayed.
2
Select the Custom Standards tab.
3
Select a standards list in one of the following ways:
a
Select a standards list from the drop-down menu.
b
Click Import and select a standards list from another location.
4
Select a question from the left panel.
5
Select a standard from the list. Click the right arrow icon to apply the standard to the question.
6
Repeat steps 4 and 5 to assign standards to remaining questions.
7
To remove a standard from a question:
l Select the question and double-click the assigned standard.
l Click Clear All to remove all standards associated with the question list.
8
When finished, click Close.
9
Click Save and Close to save the changes and return to the Question List Overview screen.
turningtechnologies.com/user-guides
Page 44

TurningPoint 5 for PC 44
PARTICIPANT LISTS
A participant list is a list of participant names, User IDs, Device IDs and other custom categories. The use of a participant list
allows for detailed reporting on each participant from a session.
TurningPoint sessions are grouped based on the participant list with which they are associated. For more information on
participant list-based session management, see Results Manager on page 131.
This chapter covers the following sections:
Creating Participant Lists
Modifying Participant Lists
Demographics
Managing Participant Lists
Creating Participant Lists
Participant lists can be created by entering the participant information into TurningPoint or by downloading the information from
a Learning Management System (LMS).
This section covers both methods for creating a participant list.
Manually Creating a Participant List
Downloading a Participant List from an Integration
Manually Creating a Participant List
Participant lists created in TurningPoint can be used for PowerPoint Polling, Anywhere Polling and Self-Paced Polling.
1
Select the Manage tab.
2
Click the Participant List drop-down menu and select New.
The Create Participant List window opens.
turningtechnologies.com/user-guides
Page 45

TurningPoint 5 for PC 45
3
Name the participant list, select the Create Manually radio button and click Create List.
The Participant List Editor is displayed.
4
Select a cell and enter the participant information
relevant to that particular category. For example,
enter the participant’s last name under the Last
Name column.
TIP
If there is a CSV or TXT file that
already contains the participant
information, drag and drop the file
into the Participant List Editor. For
more information, see Importing a
CSV or TXT File on page 47.
It is also possible to copy and
paste text from an Excel file
directly into the Participant List
Editor.
5
Press Enter on the keyboard to add another participant.
6
When finished, click Save and Close to save the participant list and return to the Participant List Overview screen.
Next Steps
To edit existing participant list information, see Modifying Participant Lists on page 46.
Downloading a Participant List from an Integration
Participant information can be imported from a student roster in a Learning Management System (LMS).
NOTE
Importing from an LMS can only be used if the integration has been installed on the LMS server. Please
contact your IT Department to confirm that the LMS integration is installed and configured to operate with
TurningPoint.
To import a participant list with an exported file from an Integration, see
Importing Participant Lists on page 51.
1
Select the Manage tab.
2
Click the Participant List drop-down menu and select New.
The Create Participant List window opens.
3
Select the Download from Integration radio button and click Create
List.
The Connect to Integration window opens.
turningtechnologies.com/user-guides
Page 46

TurningPoint 5 for PC 46
4
Select the Integration from the Integration drop-down
menu.
5
Enter the Server Address, Username and Password in
the appropriate fields.
6
If applicable, select the Institution from the Select an
Institution drop-down menu.
7
Click Connect.
Optionally, click Remember this information to have the
Integration, Server Address and User Name stored for
future use.
The Import Participant List window opens.
8
Select the course or courses to import. Optionally, select the Select All checkbox to import all courses.
9
Click Import.
A confirmation box of the import is displayed.
10
Click OK.
The participant list is added to the left panel of the Participant List
Overview screen.
11
Select the participant list to view the participant information.
To edit participant list information, see Modifying Participant Lists on page 46.
WARNING
DO NOT alter the User ID when editing a participant list from an LMS. Editing the User ID may cause
errors when uploading the results to the LMS.
Modifying Participant Lists
After a participant list has been created, changes may be made to suit your specific needs.
WARNING
Modifying a participant list WILL alter data or scores in all associated session files.
This section covers the following topics:
Editing Participant List Information
Importing a CSV or TXT File
Exporting to a CSV, HTML or Template File
Importing a Template File
Editing Participant List Information
Follow these steps to make changes to an existing participant list.
1
Select the Manage tab.
2
Select a participant list and click Edit Participants.
The Participant List Editor is displayed.
turningtechnologies.com/user-guides
Page 47

TurningPoint 5 for PC 47
3
Select a cell and edit the participant information.
4
To add a participant, click the Participant icon and select Add.
5
To remove a participant, select the participant, click the Participant icon and select Remove.
6
To add a column, click the Column icon and select Add.
Select a header type.
l Custom - Enter a name for the column header in the box provided and click OK.
l Voting Weight - A participant vote is equal to one. A voting weight allows a participant’s vote to be weighted
heavier than a single vote. For example, a voting weight of “2” would be equal to two votes.
7
To remove or edit a column, select a cell within the column, click the Column icon and select Remove or Edit.
8
To use the find or replace feature, click Edit and select Find.
9
Click Save and Close to save the changes and return to the Participant List Overview screen.
Importing a CSV or TXT File
If participant information is stored in a CSV or TXT file, it can be imported directly into the Participant List Editor.
1
Select the Manage tab.
2
Select a participant list and click Edit Participants.
The Participant List Editor is displayed.
3
Click Participant, mouse over Import and select one of the following options:
l CSV - A comma-separated values (CSV) file contains tabular data (numbers and text) in plain-text form. An
Excel spreadsheet can be saved as a CSV file.
l TXT - A text file (TXT) is a computer file that stores a typed document as a series of alphanumeric characters
and does not contain special formatting.
4
Navigate to the desired file and click Open.
The Import File window opens.
A preview of the import is displayed in the bottom half of
the Import File window.
5
Select the delimiter type.
6
Check the box to the right of Contains Headers if the file
being imported has headers. Headers will be excluded
from the import.
7
If necessary, adjust the Starting Row or Starting
Column.
8
If the Device ID or User ID is in a column with a different
header name, select the column header from the
appropriate drop-down menu.
9
Click Import.
WARNING
Importing data will overwrite all data currently in the grid.
10
Click Yes to proceed.
The participant information is imported into the participant list.
11
Click Save and Close to save the changes and return to the Participant List Overview screen.
turningtechnologies.com/user-guides
Page 48

TurningPoint 5 for PC 48
Exporting to a CSV, HTML or Template File
To export a CSV, HTML or template file, follow the steps below.
1
Select the Manage tab.
2
Select a participant list and click Edit Participants.
The Participant List Editor is displayed.
3
Click Participant, mouse over Export and select one of the following options:
l CSV - A comma-separated values (CSV) file contains tabular data (numbers and text) in plain-text form. An
Excel spreadsheet can be saved as a CSV file by simply changing the file extension from .xls to .csv.
l HTML - An HTML file can be opened with an internet browser.
l Template - The template file (TPTX) contains all of the fields in the current participant list. Exporting a template
makes creating a new participant list with the same fields easier. For more information on how to import a
template into a participant list, see Importing a Template File on page 48 in the next section.
4
Provide a name for the file and click Save.
5
Click Save and Close to close the participant list and return to the Participant List Overview screen.
Next Steps
Now that a participant list has been exported as a CSV, HTML or template, it can be imported into another program such as a
gradebook.
Importing a Template File
Importing a template file will overwrite the existing columns.
1
Select the Manage tab.
2
Select a participant list and click Edit Participants.
The Participant List Editor is displayed.
3
Click Participant, mouse over Import and select Template.
4
Select the template file (TPTX) and click Open.
The template is applied to the current participant list.
5
Click Save and Close to save the changes and return to the Participant List Overview screen.
Demographics
Demographics can be assigned in a participant list for team competitions and detailed reporting on session data.
This section covers the following topics:
Adding Demographics to a Participant List
Editing Demographics in a Participant List
Removing Demographics from a Participant List
turningtechnologies.com/user-guides
Page 49

TurningPoint 5 for PC 49
Adding Demographics to a Participant List
Participant list demographics allow a user to assign participants to teams or other demographics. This information can be used
to display demographic results during a presentation or in the Results by Demographic report. The demographics will apply to
all sessions associated with the participant list.
1
Select the Manage tab.
2
Select a participant list and click Edit Participants.
The Participant List Editor is displayed.
3
Click the Demographic icon and select Add.
4
Enter the Demographic Grouping name.
The demographic grouping name allows for organization of demographic information.
EXAMPLE
Gender or region
5
Enter text for individual demographic Group Options.
EXAMPLE
Male, female; north, south
6
Click Add.
7
Repeat steps 5 and 6 until all group options have been added.
TIP
Set up different groups for different types of demographics in order to apply multiple demographic
filters in the demographic report.
8
Optionally, check Use for Competitions if the demographic will be used for team leader boards during the
presentation.
9
Click OK.
10
Assign a demographic for each participant from the drop-down menu in the Demographic column.
11
Click Save and Close to save the changes and return to the Participant List Overview screen.
Editing Demographics in a Participant List
Editing a demographic allows the demographic name to be changed along with the available demographic options.
1
Select the Manage tab.
2
Select a participant list and click Edit Participants.
The Participant List Editor is displayed.
3
Select a cell in the demographic column.
4
Click the Demographic icon and select Edit.
5
Change the demographic name, demographic options or set competition settings as necessary.
turningtechnologies.com/user-guides
Page 50

TurningPoint 5 for PC 50
6
Click OK.
7
Click Save and Close to save the changes and return to the Participant List Overview screen.
Removing Demographics from a Participant List
Follow the steps below to remove a demographic from a participant list.
1
Select the Manage tab.
2
Select a participant list and click Edit Participants.
The Participant List Editor is displayed.
3
Select a cell in the demographic column.
4
Click the Demographic icon and select Remove.
Managing Participant Lists
This section covers the following topics:
Changing a Participant List Name
Exporting Participant Lists
Importing Participant Lists
Duplicating a Participant List
Printing a Participant List
Deleting a Participant List
Changing a Participant List Name
A participant list name may be changed at any time. Participant list names are displayed under the Polling tab so that they are
easily identifiable for polling sessions.
1
Select the Manage tab.
2
Select a participant list and click the pencil icon at the top left of the Participant List Overview screen.
The Edit Participant List window opens.
3
Enter a name for the participant list in the box provided and click Save.
The new participant list name is displayed in the left panel.
Exporting Participant Lists
A participant list can be exported from TurningPoint for use on another computer.
1
Select the Manage tab.
2
Click the Participant List drop-down menu and select Export.
3
Select the participant list or participant lists to be exported.
4
Click ..., navigate to the save location and click OK.
turningtechnologies.com/user-guides
Page 51

TurningPoint 5 for PC 51
5
Click Save.
The selected participant list or participant lists are now saved to the selected location.
Next Steps
Now that a participant list has been exported, it can be imported into TurningPoint on another computer. To import a participant
list see the next section, Importing Participant Lists on page 51.
Importing Participant Lists
Exported participant lists can be imported into TurningPoint on another computer. Exported participant information from an
integration can also be imported as a participant list.
NOTE
Participant lists used in previous Turning Technologies products can be imported into TurningPoint.
1
Select the Manage tab.
2
Click the Participant List drop-down menu and select Import.
The Import Participant List window opens.
3
Select one of the following options:
l TurningPoint Participant List
l File from Integration - Select the scheme from the drop-down menu.
4
Click Choose File.
5
Select the file and click Open.
The participant list appears in the left panel.
Next Steps
To edit participant list information, see Modifying Participant Lists on page 46.
Duplicating a Participant List
Existing participant lists can be duplicated, allowing for quick replication of the list and data.
1
Select the Manage tab.
2
Select a participant list and click Edit Participants.
The Participant List Editor is displayed.
3
Click the Participant icon and select Duplicate List.
4
Enter a name for the duplicated list and click OK.
The new participant list is displayed in the Participant List Editor.
Next Steps
turningtechnologies.com/user-guides
Page 52

TurningPoint 5 for PC 52
To edit the participant list information, see Modifying Participant Lists on page 46.
Printing a Participant List
To print a participant list, follow the steps below.
1
Select the Manage tab.
2
Select a participant list and click Edit Participants.
The Participant List Editor is displayed.
3
Click the Print icon.
The Print Participant List window opens.
4
Select the fields to be printed.
5
Select the print orientation from the drop-down menu.
6
Click Print.
7
Optionally, a print preview can be displayed by clicking
Preview. The participant list can also be printed from the
Preview window.
8
Click Save and Close to close the participant list and return to
the Participant List Overview screen.
Deleting a Participant List
Participant lists that are no longer needed can be deleted from TurningPoint.
WARNING
TurningPoint sessions are grouped based on the participant list associated with them. Deleting a
participant list will delete all associated session file information.
1
Select the Manage tab.
2
Select the participant list to be deleted.
3
Click the Participant List drop-down menu and select Delete.
If a participant list does not contain associated session data, click Delete.
If a participant list does contain associated session data, a prompt is displayed with options for the session data.
a
Select one of the following options:
l Move Sessions to Auto - Remove the
participant list and move all sessions under
Auto.
l Remove Sessions from TurningPoint -
Remove the sessions from the list, but
leave the associated files in their current
location on the computer.
l Delete Sessions - Remove the sessions
from the list and move the associated files
to the Recycle BinTrash.
turningtechnologies.com/user-guides
Page 53

TurningPoint 5 for PC 53
WARNING
If Delete Sessions is selected, all session files will be placed in the Recycle Bin
and will be permanently removed from the system if the Recycle Bin is emptied.
b
Click OK.
turningtechnologies.com/user-guides
Page 54

TurningPoint 5 for PC 54
PREFERENCES
This chapter explains how to access the Preferences window within TurningPoint and all three polling environments.
The TurningPoint preferences are organized into five categories:
Opening the TurningPoint Preferences
Software
Connections
PowerPoint
Anywhere
Self-Paced
Opening the TurningPoint Preferences
The Preferences window opens in a new window on top of the TurningPoint Dashboard. Preferences can also be accessed
through any of the polling environments. When opening Preferences through a polling environment, the window opens with that
particular environment displayed.
1
Open TurningPoint.
2
Click the Preferences icon on the bottom right corner of the TurningPoint Dashboard.
The Preferences window opens.
3
Optionally, the Preferences window can be
accessed through any of the polling
environments.
l To open Preferences in the
PowerPoint polling environment,
click the Preferences icon on the
TurningPoint ribbon/toolbar.
l To open Preferences in the
Anywhere polling environment,
click the Options icon and select
Preferences.
l To open Preferences in the Self-
Paced polling environment, click
Tools on the menu bar and select
Preferences.
4
Adjust the preferences as necessary.
NOTE
Changes made in Preferences are automatically saved.
Click Reset All to revert all preferences back to their original state. Click the Reset button to
revert all preferences for individual categories back to their original state.
5
Click Close to close the Preferences window.
turningtechnologies.com/user-guides
Page 55

TurningPoint 5 for PC 55
Software
Software preferences apply to the overall TurningPoint software and are grouped into two sections:
Administration
Shortcut Keys
Administration
Administration settings refer to preferences that apply to the entire TurningPoint application.
Add-in Always Loaded
Allow User Messaging
Automatically Check
for Updates
Automatically Save
Sessions
Backup Sessions
Default Save Location
Language
Determines if the PowerPoint Polling environment automatically loads when PowerPoint is
open.
Allows participants to send feedback to the presenter. Only participants with ResponseCard
NXT or ResponseWare have the option to send feedback.
When checked, TurningPoint will notify the user that an updated version of the software is
available for download.
Sessions are automatically saved to the default save location when sessions are reset or the
polling environment is closed.
When checked, a backup session is automatically saved when a user does not save a session
file.
l Backup Session Purge - Backup sessions are automatically deleted after the user-
specified number of days.
Determines a custom location to save the session files.
Changes the TurningPoint language. TurningPoint supports the following languages: EnglishUS, French, German and Spanish.
turningtechnologies.com/user-guides
Page 56

TurningPoint 5 for PC 56
Reset Software
Options Upon Close
When checked, all preferences and software options (any items saved to memory) revert to their
original state when TurningPoint is closed. Administration and Response Devices preferences
are not affected.
Determines how TurningPoint handles session files when they are detected.
l Move Files to Directory - This option moves the session files from their original location
to the default session directory.
Session Import
Behavior
l Leave Files in Previous Location - This option adds the session file to the Manage tab
but does not move the session file. If the file is moved from that location at a later date, it
will need to be located to view reports or edit the session.
l Always Prompt - Every time new session files are detected TurningPoint prompts the
user to move the files or leave them in the previous location.
Shortcut Keys
TurningPoint allows for user-specified shortcut keys in PowerPoint Polling and Anywhere Polling.
To change the shortcut key click Change, press a button on the keyboard, select Ctrl, Shift or Alt.
Shortcut keys are available for the following software functions:
Repoll Slide (PP) The repoll function in the PowerPoint Polling environment.
Show/Hide Countdown
Timer (AW)
Play/Pause Countdown
Timer
Show/Hide Response
Grid
Show/Hide Connection
Information
This shortcut applies to the countdown timer in the Anywhere Polling environment.
This shortcut applies to the countdown timer in all three polling environments.
This shortcut applies to the response grid in the PowerPoint and Anywhere Polling environments.
This shortcut applies to the PowerPoint and Anywhere Polling environments.
Show/Hide Chart (AW) This shortcut applies to the chart window in the Anywhere Polling environment.
Show/Hide Presentation
Window
This shortcut applies to the PowerPoint and Anywhere Polling environments. In the PowerPoint
Polling environment the screen displays black.
Show/Hide Showbar (PP) This shortcut applies to the PowerPoint Polling environment.
Start/Stop Polling This shortcut applies to the Anywhere Polling environment.
Toggle Responses
This shortcut toggles the response count and percentages in the PowerPoint and Anywhere
Polling environments.
Connections
Connection preferences apply to response devices and are grouped into five sections:
turningtechnologies.com/user-guides
Page 57

TurningPoint 5 for PC 57
Response Devices
PresenterCard
PresenterWare
RemotePoll
RemotePoll Monitor
Response Devices
This section contains preferences for the response devices compatible with TurningPoint.
ResponseCard
Channels
Polling Connections
Force Channel Change
Enforce Participant List
Invalid Response
Notifications
Displays the Receiver ID and channels of the receivers connected to the computer. To change
the channel on the receiver, select the channel number from the drop-down menu.
The polling test is used to ensure that each response device can communicate with
TurningPoint. For instructions on how to test the polling connections, see Testing the Polling
Connections on page 15.
Determines whether TurningPoint will allow the receiver channel to be maintained once
connected. When checked, TurningPoint will force the receiver to change to the first available
channel slot.
When checked, responses from participants who are not in the loaded participant list will be
excluded. TurningPoint will accept all participant responses and append them to the end of the
participant list.
When checked, the ResponseCard sends a notification or flash indicating that the participant
chose an invalid response. This preference does NOT apply to ResponseCard IR.
PresenterCard
This section contains the preferences for pairing the PresenterCard with TurningPoint and setting the programmable buttons.
turningtechnologies.com/user-guides
Page 58

TurningPoint 5 for PC 58
PresenterCard Device
ID
PowerPoint
Programmable Button
1
PowerPoint
Programmable Button
2
PowerPoint
Programmable Button
3
Click Change to open the PresenterCard pairing window. The PresenterCard must be paired to
be compatible with TurningPoint. For pairing instructions, see Pairing a PresenterCard on page
16.
Select an option from the drop-down menu for the first programmable button.
Select an option from the drop-down menu for the second programmable button.
Select an option from the drop-down menu for the third programmable button.
PresenterWare
This section contains the preferences for enabling PresenterWare Support. PresenterWare setup must be completed through
either the PowerPoint Polling or Anywhere Polling Preferences.
Enable PresenterWare
Support
Check this option to enable PresenterWare Support via TurningPoint.
PresenterWare
Connection
Current IP Address
PresenterWare Port
Bonjour Name
Click Confirm. To enable this button, PresenterWare must be launched on your smart phone or
tablet.
Displays the presenting computer’s IP address to establish communication between the
PresenterWare software and TurningPoint.
Enter the presenting computer’s network port number. Default is 6090.
Optionally, enter your computer’s Bonjour name.
TIP
For more information about PresenterWare, including configuring a device,
please visit www.turningtechnologies.com/user-guides.
RemotePoll
This section contains the preferences for enabling RemotePoll.
Enable RemotePoll
Support
Current IP Address
Check this option to enable RemotePoll Support via TurningPoint.
Displays the presenting computer’s IP Address to establish communication between the
RemotePoll software and TurningPoint.
Enter the presenting computer’s network port number. Default is 1025.
RemotePoll Port
turningtechnologies.com/user-guides
TIP
For more information about RemotePoll, please visit
www.turningtechnologies.com/user-guides.
Page 59

TurningPoint 5 for PC 59
RemotePoll Monitor
This section contains the preferences for enabling the RemotePoll Monitor.
Enable RemotePoll
Monitor Support
Current IP Address
RemotePoll Port
Check this option to enable RemotePoll Monitor Support via TurningPoint.
Displays the presenting computer’s IP Address to establish communication between the
RemotePoll Monitor software and TurningPoint.
Enter the presenting computer’s network port number. Default is 2010.
PowerPoint
PowerPoint preferences only apply to the PowerPoint polling environment and are grouped into four sections:
Charts
Questions
Competitions
Presentation
NOTE
The Apply All button will apply the setting to question slides in the current presentation and all future
slides.
Charts
This section enables the user to view and change the chart preferences.
Automatically Format
Charts
turningtechnologies.com/user-guides
If checked, the charts will retain their default properties. If unchecked, the user has the option to
edit the chart properties by double-clicking on the chart and editing as necessary. Each chart
must be edited separately, however the general setting may be applied via Preferences.
Page 60

TurningPoint 5 for PC 60
Select a color scheme from the drop-down menu to determine what colors will be used during the
presentation. There are three options available.
Chart Colors
Defined Chart Colors
Defined Label Color
Chart Labels
Chart Values
Default Chart Type
Response Divisor
l PowerPoint Scheme - Uses the selected PowerPoint color scheme.
l Defined - Uses user defined chart colors.
l Correct/Incorrect - Applies green for correct answers and red for incorrect answers.
These are the colors that will display when Defined is the selected Chart Color. Click a color to
open the color palette and select a new color.
Determines the color of the chart label text. Click the color to open the color palette and select a
new color.
Determines if answer text or bullets will be displayed in the chart labels and legends.
Determines whether a response count (number of participants) or a percentage is displayed.
There are three formats for displaying the percentage: 0%, 0.0% and 0.00%.
Determines the default chart that is used when a slide is inserted into a presentation. To change
the chart type, simply select another one from the drop-down menu.
Determines whether the divisor used to calculate the percentages on a multiple response
question will be:
l the total number of responses received (responses)
l the total number of participants in the session’s participant list
l the total number of devices that responded
Show Results
Results Display
When checked, a chart is displayed when polling is closed.
Determines whether the results are displayed during polling or after polling. The during polling
option is only available for Office 2003 or Office 2010 users.
Questions
This section enables the user to view and change question preferences.
Accept First Response
Only
Bullet Format
Automatically Advance
After Objects
Automatically Open
Polling
When checked, TurningPoint only accepts the first response sent by each participant.
Determines the type of answer notation for polling slides. The available options include:
alphabetic uppercase [A, B, C, D], alphabetic lowercase [a, b, c, d], numeric starting at 1 [1, 2, 3,
4] or numeric starting at 0 [0, 1, 2, 3].
When checked, chart results will automatically display upon the completion of a countdown
timer or response counter.
When checked, polling automatically opens when the slide is shown. When unchecked, the slide
needs to be advanced to open polling.
turningtechnologies.com/user-guides
Page 61

TurningPoint 5 for PC 61
Determines if a countdown object will be automatically inserted on new slides.
l Countdown Seconds - Set the number of seconds a countdown object will display. The
Countdown Timer
acceptable range is 1 - 999. The default is set at 30 seconds.
l Countdown Sound - A sound file can be added to a countdown timer. To add a
countdown sound click ..., browse to the location of the sound file and click Open.
When checked, a response grid is automatically inserted onto each new polling slide. The
following settings are available for response grids:
l Response Grid Type - Determines the default response grid type. There are three
response grids available:
l The table grid displays numbered boxes that represent each participant in the
participant list. If polling with an auto list, the number of boxes displayed is
determined by the number of participants responding.
l The response grid displays the participant name by default. As the participants
respond, the corresponding box will change color. If polling with an auto list, it is
recommended to change the response grid text to Device ID Only in the
preferences. As the participants respond a Device ID will appear in the box.
l The non-response grid displays the participant name by default. As the
participants respond, the corresponding box will be removed. If polling with an auto
Response Grid
list, it is recommended to change the response grid text to Device ID Only in the
preferences.
Multiple Responses
l Response Grid Text - Determines what participant information is displayed.
l Rotation Interval - Determines the number of seconds a Response/Non-Response Grid
will pause between intervals. The acceptable range is two to ten seconds. The default is
set at four.
l Font Size - Determines the font size for the text displayed on the response grids.
l Starting Cell Color - Determines the response/non-response grid starting color.
l First Response Color - Determines the color of the cell when a participant submits a
response.
l Second Response Color - Determines the color of the cell when a participant submits a
second response.
l Third Response Color - Determines the color of the cell when a participant submits a
third response.
Multiple responses allow participants to send more than one response to a question. When this
box is checked the following options may be set:
l Number of Responses - Select the number of responses allowed for each participant
from the drop-down menu.
l Allow Duplicates - When checked, participants are allowed to select the same answer
choice more than once.
l All or Nothing Scoring - When checked, the participant must choose each correct
answer to receive points.
turningtechnologies.com/user-guides
Page 62

TurningPoint 5 for PC 62
Determines the correct and incorrect point values. Click Apply All to change all correct or
incorrect point values.
Point Values
l Correct - The point value of the correct answer can be set by entering a value in the box
provided.
l Incorrect - The point value of the incorrect answer can be set by entering a value in the
box provided.
Selecting a prompt type from the drop-down menu will automatically insert the prompt object on
Prompt
the polling slide during slide creation.
l Prompt Text - The phrase that will display in the prompt object.
Competitions
This section enables the user to view and change the preferences for competition.
The Fastest Responders settings determine what type of information and how many participants
are displayed.
l Display Correct Responders Only - Only participants who responded correctly to the
Fastest Responders
previous question slide will be displayed.
l Participant Information - Select the type of participant information to be displayed from
the drop-down menu.
l Participant Count - Select the number of participants to be displayed from the drop-down
menu.
Participant Scores
The Participant Scores preferences determine what type of information is displayed, how many
participants are displayed and how the scores are calculated.
l Participant Information - Select the type of participant information to be displayed from
the drop-down menu.
l Participant Count - Select the number of participants to be displayed from the drop-down
menu.
l Score Calculations - Select whether the points displayed are Cumulative or Single from
the drop-down menu. Cumulative points are the total points earned up to that point in the
presentation. Single points are only the points earned on the previous question slide.
turningtechnologies.com/user-guides
Page 63

TurningPoint 5 for PC 63
The Team Scores settings determine how many teams are displayed and how the scores are
calculated.
l Include Teams with Less Than 1 Point - When checked, teams that have zero or
negative points will be displayed on the slide.
l Team Display Count - Select the number of teams to be displayed from the drop-down
Team Scores
menu.
l Score Calculations - Select whether the points displayed are Cumulative or Single from
the drop-down menu. Cumulative points are the total points earned up to that point in the
presentation. Single points are only the points earned on the previous question slide.
l Include Non-Responders - When checked, participants who have been active in the
session but did not respond to a particular question or questions will be counted as a
response for their team and scored as a ‘zero.’
The Overall Racing preferences determine what image is used to represent the teams, whether
or not the winner board is displayed and what the point threshold is to win the race.
l Animated Image - Select the image to represent the teams. One image is used for all
Overall Racing Settings
teams.
l Display Winner Board - When checked, a slide displaying the winning team will appear
when the point threshold is met.
l Point Threshold to Win - When the point level has been reached the winner board will
display.
Presentation
This section enables the user to view and change various presentation preferences.
Collapse Showbar
Display Showbar
Include PowerPoint
Presentation
Use Secondary Monitor
When checked, the showbar is displayed in a shortened form.
When checked, the showbar is visible when a polling slide is displayed.
When checked, a copy of the PowerPoint presentation is automatically saved inside each
session. For more information on how to extract a PowerPoint presentation, see Extracting
Session Information on page 125.
When checked, the showbar is displayed on a secondary monitor, if available.
Anywhere
Anywhere Preferences only apply to the Anywhere Polling environment and are grouped into three sections:
Charts
Competitions
Presentation
turningtechnologies.com/user-guides
Page 64

TurningPoint 5 for PC 64
Charts
This section enables the user to view and change the chart preferences.
Chart Colors
Chart Labels
Chart Values
Default Chart Type
Determines the colors that are displayed in each chart. Click a color to open the color palette and
select a new color.
Determines if answer text or bullets will be displayed in the chart labels and legends.
Determines whether a response count (number of participants) or a percentage is displayed.
There are three formats for displaying the percentage: 0%, 0.0% and 0.00%.
Determines the default chart that is used for the presentation. To change the chart type, simply
select another one from the drop-down menu.
Determines whether the divisor used to calculate the percentages on a multiple response
question will be:
Response Divisor
Show Results
l the total number of responses received (responses)
l the total number of participants in the session’s participant list
l the total number of devices that responded
When checked, a chart is displayed when polling is closed.
Competitions
This section enables the user to view and change the preferences for competition.
turningtechnologies.com/user-guides
Page 65

TurningPoint 5 for PC 65
The Fastest Responders settings determine what type of information is displayed and how many
participants are displayed.
l Display Correct Responders Only - Only participants who responded correctly to the
Fastest Responders
previous question will be displayed.
l Participant Information - Select the type of participant information to be displayed from
the drop-down menu.
l Participant Count - Select the number of participants to be displayed from the drop-down
menu.
The Participant Scores preferences determine what type of information is displayed, how many
participants are displayed and how the scores are calculated.
l Participant Information - Select the type of participant information to be displayed from
the drop-down menu.
Participant Scores
l Participant Count - Select the number of participants to be displayed from the drop-down
menu.
l Score Calculations - Select whether the points displayed are Cumulative or Single from
the drop-down menu. Cumulative points are the total points earned up to that point in the
presentation. Single points are only the points earned on the previous question slide.
The Team Scores settings determine how many teams are displayed and how the scores are
calculated.
l Include Teams with Less Than 1 Point - When checked, teams that have zero or
negative points will be displayed.
l Team Display Count - Select the number of teams to be displayed from the drop-down
Team Scores
menu.
l Score Calculations - Select whether the points displayed are Cumulative or Single from
the drop-down menu. Cumulative points are the total points earned up to that point in the
presentation. Single points are only the points earned on the previous question slide.
l Include Non-Responders - When checked, participants who have been active in the
session but did not respond to a particular question or questions will be counted as a
response for their team and scored as a ‘zero.’
Presentation
This section enables the user to view and change various presentation preferences.
Accept First Response
Only
When checked, TurningPoint only accepts the first response sent by each participant.
Determines if a countdown timer will be displayed.
Countdown Timer
l Countdown Seconds - Set the number of seconds a countdown timer will appear on
When checked, screenshots are automatically saved with each session for reports and session
Include Screenshots
editing. For more information on how to extract screenshots, see Extracting Session
Information on page 125.
turningtechnologies.com/user-guides
screen. The acceptable range is 1 - 999. The default is set at 30 seconds.
Page 66

TurningPoint 5 for PC 66
Determines the correct and incorrect point values.
l Correct - The point value of the correct answer can be set by entering a value in the box
Point Values
provided.
l Incorrect - The point value of the incorrect answer can be set by entering a value in the
box provided.
Quick Poll Answers
Quick Poll Font
Bullet Format
Quick Poll Multiple
Responses
Determines the default number of answer choices for a Quick Poll question.
Determines the font on the Quick Poll question display.
Determines the type of answer notations. The available options include: alphabetic uppercase
[A, B, C, D], alphabetic lowercase [a, b, c, d], numeric starting at 1 [1, 2, 3, 4] or numeric starting
at 0 [0, 1, 2, 3].
Multiple responses allow participants to send more than one response to a question. When this
box is checked the following options may be set: number of responses, allow duplicates and all
or nothing scoring.
l Number of Responses - Select the number of responses allowed for each participant
from the drop-down menu.
l Allow Duplicates - When checked, participants are allowed to select the same answer
choice more than once.
l All or Nothing Scoring - When checked, the participant must choose each correct
answer to receive points.
turningtechnologies.com/user-guides
Page 67

TurningPoint 5 for PC 67
When checked, the selected response grid type is displayed each time polling is open in the
PowerPoint Polling environment. The following settings are available for Response Grids.
l Response Grid Type - Determines the default Response Grid type. There are three
Response Grids available:
l The table grid displays numbered boxes that represent each participant in the
participant list. If polling with an auto list, the number of boxes displayed is
determined by the number of participants responding.
l The response grid displays the participant name by default. As the participants
respond, the corresponding box will change color. If polling with an auto list, it is
recommended to change the response grid text to Device ID Only in the
preferences. As the participants respond a Device ID will appear in the box.
l The non-response grid displays the participant name by default. As the
participants respond, the corresponding box will be removed. If polling with an auto
list, it is recommended to change the response grid text to Device ID Only in the
preferences.
l Response Grid Text - Determines what participant information is displayed.
l Rotation Interval - Determines the number of seconds a Response/Non-Response Grid
will pause between intervals. The acceptable range is two to ten seconds. The default is
set at four.
l Font Size - Determines the font size for the text displayed on the response grids.
l Starting Cell Color - Determines the Response/Non-Response Grid starting color.
Response Grid
l First Response Color - Determines the color of the cell when a participant submits a
response.
l Second Response Color - Determines the color of the cell when a participant submits a
second response.
l Third Response Color - Determines the color of the cell when a participant submits a
third response.
l Response Grid Type - Determines the default Response Grid type. There are three
Response Grids available:
l The table grid displays numbered boxes that represent each participant in the
participant list. If polling with an auto list, the number of boxes displayed is
determined by the number of participants responding.
l The response grid displays the participant name by default. As the participants
respond, the corresponding box will change color. If polling with an auto list, it is
recommended to change the response grid text to Device ID Only in the
preferences. As the participants respond a Device ID will appear in the box.
l The non-response grid displays the participant name by default. As the
participants respond, the corresponding box will be removed. If polling with an auto
list, it is recommended to change the response grid text to Device ID Only in the
preferences.
l Response Grid Text - Determines what participant information is displayed.
l Rotation Interval - Determines the number of seconds a Response/Non-Response Grid
will pause between intervals. The acceptable range is two to ten seconds. The default is
set at four.
turningtechnologies.com/user-guides
Page 68

TurningPoint 5 for PC 68
l Font Size - Determines the font size for the text displayed on the response grids.
l Starting Cell Color - Determines the Response/Non-Response Grid starting color.
l First Response Color - Determines the color of the cell when a participant submits a
response.
l Second Response Color - Determines the color of the cell when a participant submits a
second response.
l Third Response Color - Determines the color of the cell when a participant submits a
third response.
Show Question List
Show Presentation
Window
The question list is displayed in a window beneath the Anywhere Polling showbar.
Displays the polling questions in a resizable window. The show presentation window only
applies if a question list is loaded.
Self-Paced
Self-Paced preferences only apply to the Self-Paced polling environment.
Login
Login
This section enables the user to view and change the Self-Paced Polling Preferences.
turningtechnologies.com/user-guides
Page 69

TurningPoint 5 for PC 69
Determines whether the participants are required to login to the test. There are three login options
available from the drop-down menu:
l Off - Does not require participants to login to the test.
Participant Login
l Required (Default to Previous User ID on Card) - Participants log in with the current
User ID stored in the card.
l Required (Clear Previous User ID on Card) - Participants are required to enter their
User ID before logging in.
There are three time limit options available from the drop-down menu.
l None - The test will have no timer and polling must be closed manually.
Test Time Limit
l Set Duration - Enter the hours and/or minutes for the length of the test. Polling will
automatically close at this time.
l End Time - Set a specific end time for the test. Polling will automatically close at this
time.
A completed test message can be sent to the participants. Different grade options are available
from the drop-down menu along with a Custom option.
Completed Test
Message
Show Login Window
l Custom Text Message - If Custom is selected as the completed test message, enter
text for the message in the box provided.
l Prompt Before Displaying Message - Allows participants to determine if the completed
test message is displayed.
Displays the Login window when Accept Logins is clicked, otherwise the Participant Login, Test
Time Limit and Completed Test Message preferences will be observed.
turningtechnologies.com/user-guides
Page 70

TurningPoint 5 for PC 70
POWERPOINT POLLING
This chapter covers the following sections of the PowerPoint Polling environment:
Opening the PowerPoint Polling Environment
Content
Tools
Polling
Opening the PowerPoint Polling Environment
The PowerPoint Polling environment is embedded directly into PowerPoint.
1
Open TurningPoint.
2
Optionally, select a participant list, question list or PowerPoint presentation from the left panel.
If using a question list, TurningPoint will automatically parse the content into PowerPoint slides. This may take a few
moments if there are a large number of questions in the question list. For more information on participant lists, see
Participant Lists on page 44. For more information on question lists, see Question Lists on page 22.
3
Click PowerPoint Polling.
PowerPoint opens with TurningPoint.
Office 2007/2010/2013
Office 2003
Next Steps
Polling slides can be created directly in PowerPoint. There are also tools available for enhancing the presentation. For more
information, see Content on page 70.
Content
PowerPoint Polling content is simply a PowerPoint slide with the ability to dynamically display information based on the
responses from the participants.
This section explains:
turningtechnologies.com/user-guides
Page 71

TurningPoint 5 for PC 71
Inserting a Polling Slide
Converting a PowerPoint Slide into a Multiple Choice Polling Slide
Converting a Multiple Choice Slide into a Demographic Slide
Slide Types and Slide Preferences
Objects
Competition
Import
Inserting a Polling Slide
Creating content in PowerPoint is similar to the way content was created in previous versions of TurningPoint software.
1
From the TurningPoint ribbon/toolbar, click the New icon and select a slide type.
Office 2007/2010/2013
Office 2003
There are 10 slide types available. For more information, see Slide Types and Slide Preferences on page 72. For
information on how to change the chart type, see Inserting a Chart/Changing the Chart Type on page 80.
2
Enter the question text and answer text if available.
3
Repeat steps 1 and 2 as many times as needed to create the PowerPoint Polling presentation.
4
When finished, save the PowerPoint presentation.
Enhance the presentation by adding Objects on page 79 or Competition on page 89 slides to help increase participation. Also,
try using the Tools on page 92available on the TurningPoint ribbon/toolbar.
turningtechnologies.com/user-guides
Page 72

TurningPoint 5 for PC 72
Converting a PowerPoint Slide into a Multiple Choice Polling Slide
An ordinary PowerPoint slide can be converted into a multiple choice polling slide by adding a chart to a slide that is formatted
as Title and Text or Title and Content. There can be up to 10 items in the list of answers. The question/title and the list of
answers/numbered list must be in two separate boxes in order for the conversion to work properly.
1
Select the PowerPoint slide or slides in the presentation that you want to convert into a polling slide or slides.
2
From the TurningPoint ribbon/toolbar click the Objects icon, mouse over Charts or Animated Charts and select the
desired chart type.
The answer list is re-numbered according to the TurningPoint preferences. The bullet format can be modified in the
preferences. For more information, see Questions on page 60.
3
Repeat step 2 to convert additional PowerPoint slides.
4
When finished, save the presentation by selecting File > Save As from the PowerPoint File tab.
Next Steps
Enhance the presentation by adding Objects on page 79 or Competition on page 89 slides to help increase participation. Also,
try using the Tools on page 92 available on the TurningPoint ribbon/toolbar.
Converting a Multiple Choice Slide into a Demographic Slide
A multiple choice polling slide can easily be converted to a demographic polling slide from the Slide Preferences Panel.
1
Select the Multiple Choice slide or slides in the presentation that you would like to
convert into a Demographic slide or slides.
2
Click Convert to Demographic at the bottom of the Slide Preferences Panel.
The following message is displayed.
3
Click Convert to continue.
4
Demographic Options now appears as a section on the Slide Preferences Panel. Click
the arrow to expand. For more information on demographic polling slides, see Slide Types
and Slide Preferences on page 72.
Slide Types and Slide Preferences
There are several slide types available for PowerPoint Polling:
l Multiple Choice
l Short Answer
l Numeric Response
l True/False
l Essay
l Demographic Assignment
l Priority Ranking
l Likert
turningtechnologies.com/user-guides
Page 73

TurningPoint 5 for PC 73
l Ice Breaker
l Moment to Moment
Each slide type has specific preferences. For competition slides, see Competition on page 89. For information on setting
default preferences, see Preferences on page 54.
Chart Preferences
Clicking a chart on a polling slide displays the chart preferences on the Slide Preferences Panel. The
chart colors, labels and values can be adjusted without having to open the TurningPoint Preferences
window. The chart preferences only appear on charts for the following slides: Multiple Choice, Short
Answer, Numeric Response, True/False, Demographic Assignment, Priority Ranking, Likert and Ice
Breaker.
Select a color scheme from the drop-down menu to determine what colors will be used during the
presentation. There are three options available.
l PowerPoint Scheme - uses the selected PowerPoint color scheme.
l Defined - uses user defined chart colors.
l Correct/Incorrect - applies green for correct answers and red for incorrect answers.
Multiple Choice
A multiple choice slide contains a question text box, an answer text box that allows for up to 10 answer choices and a chart.
Multiple Choice Slide Preferences:
Question Options
l Anonymous - A question marked anonymous does not track participant list
information when polling.
l Bullet Format - The bullet format for the answer choices can be changed
from the drop-down menu.
l Multiple Responses - Multiple responses allow participants to send more
than one response to a question. When this box is checked the following
options may be set: Number of Responses, Allow Duplicates and All or
Nothing Scoring.
Polling Options
l Automatically Open Polling - When checked, polling automatically opens. When unchecked, the slide needs to be
advanced to open polling.
l Show Results - When checked, the chart is displayed after polling is closed. Showing Results during polling is not
available in Office 2007.
l First Response Only - When checked, TurningPoint only accepts the first response sent by each participant.
Scoring Options
l Correct Point Value - The point value of the correct answer(s) can be set by entering a value in the box provided.
l Incorrect Point Value - The point value of the incorrect answer(s) can be set by entering a value in the box provided.
l Speed Scoring - When checked, point values will decrease relative to the time polling is kept open.
turningtechnologies.com/user-guides
Page 74

TurningPoint 5 for PC 74
l Show Advanced Scoring - When checked, the answer value and the point value are both displayed. The point value
can be changed by entering a new value in the box provided.
l Convert to Demographic - When selected, the slide becomes demographic. A demographic grouping must be
assigned in the Preferences Panel.
Short Answer
A short answer slide contains a question text box, a chart and a list of the five most common responses.
NOTE
ResponseCard NXT as of firmware version 1.0.1
. , ‘ “ ? @ # $ % ^ & * ( ) _ + - = / < > [ ] { } √ £ € E
ResponseCard XR as of firmware version 1.2.1
. , + - * / % ( ) ^ @ ! & E √ €
Short Answer Slide Preferences:
Question Options
l Anonymous - A question marked anonymous does not track
participant list information when polling.
Polling Options
l Automatically Open Polling - When checked, polling automatically
opens. When unchecked, the slide needs to be advanced to open
polling.
l Show Results - When checked, the chart is displayed after polling is closed.
l First Response Only - When checked, TurningPoint only accepts the first response sent by each participant.
l Show Correct Keyword - After polling closes, the correct keyword(s) is displayed on the slide.
Scoring Options
l Correct Point Value - The point value of the correct answer(s) can be set by entering a value in the box provided.
l Incorrect Point Value - The point value of the incorrect answer(s) can be set by entering a value in the box provided.
l Speed Scoring - When checked, point values will decrease relative to the time polling is kept open.
l Answer Value - The answer value can be set by selecting “Correct” or “No Value” from the drop-down box.
l Correct Keyword(s) - Enter keyword(s) in the box provided. Multiple keywords should be separated with a semicolon.
l Enforce Capitalization - If a response does not have proper capitalization the response is considered incorrect.
Numeric Response
A numeric response slide contains a question text box, a chart and a list of the five most common responses.
turningtechnologies.com/user-guides
Page 75

TurningPoint 5 for PC 75
Numeric Response Slide Preferences:
Question Options
l Anonymous - A question marked anonymous does not track participant list
information when polling.
Polling Options
l Automatically Open Polling - When checked, polling automatically
opens. When unchecked, the slide needs to be advanced to open polling.
l Show Results - When checked, the chart is displayed after polling is closed. Showing Results during polling is not
available in Office 2007.
l First Response Only - When checked, TurningPoint only accepts the first response sent by each participant.
l Show Correct Answer - After polling closes, the correct answer is displayed on the slide.
Scoring Options
l Correct Point Value - The point value of the correct answer(s) can be set by entering a value in the box provided.
l Incorrect Point Value - The point value of the incorrect answer(s) can be set by entering a value in the box provided.
l Speed Scoring - When checked, point values will decrease relative to the time polling is kept open.
l Answer Value - The answer value can be set by selecting “Correct” or “No Value” from the drop-down box.
l Acceptable Value - Enter a specific value in the box provided.
l Acceptable Range - If a specific value is not required for a correct answer, a range can be set. Enter a minimum value
and a maximum value in the boxes provided.
True/False
A true/false slide is used for a question with a true or false response. The slide includes generically worded question and
answers. The question text can be edited.
True/False Slide Preferences:
Question Options
l Anonymous - A question marked anonymous does not track participant list
information when polling.
l Bullet Format - The bullet format for the answer choices can be changed
from the drop-down menu.
Polling Options
l Automatically Open Polling - When checked, polling automatically opens. When unchecked, the slide needs to be
advanced to open polling.
l Show Results - When checked, the chart is displayed after polling is closed. Showing Results during polling is not
available in Office 2007.
l First Response Only - When checked, TurningPoint only accepts the first response sent by each participant.
Scoring Options
l Correct Point Value - The point value of the correct answer(s) can be set by entering a value in the box provided.
l Incorrect Point Value - The point value of the incorrect answer(s) can be set by entering a value in the box provided.
turningtechnologies.com/user-guides
Page 76

TurningPoint 5 for PC 76
l Speed Scoring - When checked, point values will decrease relative to the time polling is kept open.
l Select True or False as the correct answer. A value of No Correct can also be selected if there is no correct answer.
Essay
The essay slide contains a question region to pose a question.
Essay Slide Preferences:
Question Options
l Anonymous - A question marked anonymous does not track participant list
information when polling.
Polling Options
l Automatically Open Polling - When checked, polling automatically
opens. When unchecked, the slide needs to be advanced to open polling.
l First Response Only - When checked, TurningPoint only accepts the first response sent by each participant.
Scoring Options
l TurningPoint does not score essay slides. Manual score adjustments can be made in Results Manager.
Demographic Assignment
A demographic assignment slide contains a question text box, an answer text box that allows for up to 10 answer choices and
a chart. The demographic assignment slide assigns participants to demographic/competition groups.
Demographic Assignment Slide Preferences:
Demographic Options
l Demographic Grouping - Categorize the demographic options for easier
reporting.
l Use in Competition - The answer options become teams and can be used
in team competitions. When unchecked, the slide is no longer considered a
Team Assignment slide.
l Save to participant list - The competition information is saved to the
current participant list.
Question Options
l Bullet Format - The bullet format for the answer choices can be changed from the drop-down menu.
Polling Options
l Automatically Open Polling - When checked, polling automatically opens. When unchecked, the slide needs to be
advanced to open polling.
l Show Results - When checked, the chart is displayed after polling is closed. Showing Results during polling is not
available in Office 2007.
l First Response Only - When checked, TurningPoint only accepts the first response sent by each participant.
Priority Ranking
turningtechnologies.com/user-guides
Page 77

TurningPoint 5 for PC 77
The priority ranking slide contains a question text box, an answer text box that allows for up to 10 answer choices and a chart.
The participants’ responses are weighed and then ranked accordingly.
Priority Ranking Slide Preferences:
Question Options
l Anonymous - A question marked anonymous does not track participant list
information when polling.
l Bullet Format - The bullet format for the answer choices can be changed
from the drop-down menu.
l Response Limit - The Response Limit dictates the number of answer
choices a participant can select for a specific question.
l Allow Duplicates - When checked, participants are permitted to select the same answer choice more than once.
l Response Weights - Set the value for each response by selecting a value from the drop-down menu or enter a value
from 0 to 99999. Repeat for the remaining answers.
Polling Options
l Automatically Open Polling - When checked, polling automatically opens. When unchecked, the slide needs to be
advanced to open polling.
l Show Results - When checked, the chart is displayed after polling is closed. Showing Results during polling is not
available in Office 2007.
l Convert to Demographic - When selected, the slide becomes demographic. A demographic grouping must be
assigned in the Preferences Panel.
Likert
A likert slide is used to determine varying levels of agreement or disagreement. The slide includes a generically worded
question and answers. The text can be edited.
Likert Slide Preferences:
Question Options
l Anonymous - A question marked anonymous does not track participant list
information when polling.
l Bullet Format - The bullet format for the answer choices can be changed
from the drop-down menu.
l Multiple Responses - Multiple responses allow participants to send more
than one response to a question. When this box is checked the following
options may be set: Number of Responses, Allow Duplicates and All or
Nothing Scoring.
Polling Options
l Automatically Open Polling - When checked, polling automatically opens. When unchecked, the slide needs to be
advanced to open polling.
l Show Results - When checked, the chart is displayed after polling is closed. Showing Results during polling is not
available in Office 2007.
l First Response Only - When checked, TurningPoint only accepts the first response sent by each participant.
Scoring Options
turningtechnologies.com/user-guides
Page 78

TurningPoint 5 for PC 78
l Correct Point Value - The point value of the correct answer(s) can be set by entering a value in the box provided.
l Incorrect Point Value - The point value of the incorrect answer(s) can be set by entering a value in the box provided.
l Speed Scoring - When checked, point values will decrease relative to the time polling is kept open.
l Show Advanced Scoring - When checked, the answer value and the point value are both displayed. The point value
can be changed by entering a new value in the box provided.
Ice Breaker
An ice breaker slide is a slide with an analogy or word scramble question to get the participants involved in the polling
presentation. Analogies are automatically generated, but a word must be provided for the word scramble.
Ice Breaker Slide Preferences:
Question Options
l Anonymous - A question marked anonymous does
not track participant list information when polling.
l Bullet Format - The bullet format for the answer
choices can be changed from the drop-down menu.
l Multiple Responses - Multiple responses allow participants to send more than one response to a question. When this
box is checked the following options may be set: Number of Responses, Allow Duplicates and All or Nothing Scoring.
Polling Options
l Automatically Open Polling - When checked, polling automatically opens. When unchecked, the slide needs to be
advanced to open polling.
l Show Results - When checked, the chart is displayed after polling is closed. Showing Results during polling is not
available in Office 2007.
l First Response Only - When checked, TurningPoint only accepts the first response sent by each participant.
Scoring Options
l Correct Point Value - The point value of the correct answer(s) can be set by entering a value in the box provided.
l Incorrect Point Value - The point value of the incorrect answer(s) can be set by entering a value in the box provided.
l Speed Scoring - When checked, point values will decrease relative to the time polling is kept open.
l Show Advanced Scoring - When checked, the answer value and the point value are both displayed. The point value
can be changed by entering a new value in the box provided.
Moment to Moment
The moment to moment slide can be used to have participants rate something on a
scale of 1 to 5 over a period of time. The slide contains a question text box and a
chart that shows the average response at each polling interval. The chart displays
the average response over time in a line graph.
Moment to Moment Slide Preferences:
l Polling Cycle - Select the polling interval (in seconds) from the drop-down
menu. The default is one second. The chart will update based on the polling
interval.
turningtechnologies.com/user-guides
Page 79

TurningPoint 5 for PC 79
Objects
Objects may be added to each slide in several ways. This section covers adding objects to a slide through the TurningPoint
ribbon/toolbar.
l Objects such as charts, countdown timers, response grids and prompts may be set as default objects that are
automatically inserted on each slide. To set default objects, see PowerPoint on page 59 for more information.
l Objects may also be set during question list creation. For more information, see Content on page 20.
l Objects can be added to a slide through the TurningPoint ribbon/toolbar.
There are several types of objects available, this section covers:
Inserting a Correct Answer Indicator
Inserting a Chart/Changing the Chart Type
Inserting an Animated Chart
Inserting a Countdown Timer
Inserting a Grid
Inserting a Prompt
Inserting a Response Counter
Inserting Stats
Inserting a Correct Answer Indicator
A correct answer indicator allows participants to see the correct answer or answers after polling is closed. The indicator
appears during a presentation when the slide is advanced after displaying the chart.
Prerequisites
A correct answer must be set before a correct answer indicator can be inserted on a polling slide.
1
Select the polling slide.
TIP
Select more than one slide by holding down the Ctrl or Shift key on the keyboard.
2
From the TurningPoint ribbon/toolbar click the Objects icon, mouse over Correct Answer Indicator and select the
desired indicator.
Office 2007/2010/2013
turningtechnologies.com/user-guides
Page 80

TurningPoint 5 for PC 80
Office 2003
There are seven types of correct answer indicators available.
Rectangle Checkmark Smiley Star
Arrow Custom Blinking Rectangle
l A custom answer indicator can be a BMP, JPG, GIF, PNG or JPEG file. The image is placed in the same
location as the checkmark, smiley, star and arrow correct answer indicators.
l Select a different correct answer indicator from the Objects menu to change the current correct answer indicator
on the slide.
l To remove the correct answer indicator, simply delete the object from the slide.
TIP
Correct answer indicators can be formatted like regular PowerPoint objects. Right-click on the
object and select a formatting option from the menu.
Inserting a Chart/Changing the Chart Type
A chart displays the results of participant responses. The default chart type and display options, such as colors, labels and
value, can be defined in the Preferences. For more information on how to set a default chart type, see Charts on page 64.
Prerequisites
To make a PowerPoint slide interactive, a TurningPoint chart must be added to the slide. Assuming that the PowerPoint slide
is in Title and Content form, a chart can be added by following the steps below.
1
Select the polling slide.
TIP
Select more than one slide by holding down the Ctrl or Shift key on the keyboard.
turningtechnologies.com/user-guides
Page 81

TurningPoint 5 for PC 81
2
From the TurningPoint ribbon/toolbar click the Objects icon, mouse over Charts and select the desired chart.
Office 2007/2010/2013
Office 2003
There are seven chart types available.
Vertical Horizontal 3D Pie Distributed Pie
Offset Doughnut Responses Only
3
Select a different chart from the Objects menu to change the current chart on the slide.
turningtechnologies.com/user-guides
Page 82

TurningPoint 5 for PC 82
4
To remove the chart, simply delete the object from the slide.
WARNING
Deleting a TurningPoint chart from a slide demotes the slide to non-interactive. To hide the chart
from the audience, simply uncheck the Show Results option in the Slide Preferences Panel or to
apply to all slides, click the Preferences icon on the TurningPoint toolbar, select PowerPoint,
uncheck Show Results and click Apply All.
Inserting an Animated Chart
An animated chart is a flash object that appears over the Slide Show in full screen.
Adobe Flash Player must be installed to use the animated charts. Go to http://get.adobe.com/flashplayer to download the
latest version of Adobe Flash Player.
1
Select the polling slide.
TIP
Select more than one slide by holding down the Ctrl or Shift key on the keyboard.
2
From the TurningPoint ribbon/toolbar click the Objects icon, mouse over Animated Charts and select the desired
chart.
Office 2007/2010/2013
Office 2003
A placeholder is inserted for the animated chart.
turningtechnologies.com/user-guides
Page 83

TurningPoint 5 for PC 83
There are seven animated chart types available.
3D Column 2D Column 3D Pie 2D Pie
3D Doughnut 2D Doughnut 2D Bar
3
Select a different chart from the Objects menu to change the current chart on the slide. The chart can also be changed
during the Slide Show by selecting a different chart type from the drop-down menu on the chart window.
4
To remove the animated chart, simply delete the placeholder from the slide.
Inserting a Countdown Timer
A countdown timer provides participants with a visual cue that polling is about to close as it counts down to zero. When the
countdown expires, the countdown timer disappears and polling is automatically closed. A countdown timer can be made to
appear on each polling slide that is created. For more information on how to automatically include a countdown timer on each
polling slide, see PowerPoint on page 59.
1
Select the polling slide.
TIP
Select more than one slide by holding down the Ctrl or Shift key on the keyboard.
2
From the TurningPoint ribbon/toolbar click the Objects icon, mouse over Countdown and select the desired
countdown timer.
Office 2007/2010/2013
turningtechnologies.com/user-guides
Page 84

TurningPoint 5 for PC 84
Office 2003
There are four countdown timers available.
Square Letter Clock Gemstone
l Select a different countdown from the Objects menu to change the current countdown on the slide.
l To remove the countdown, simply delete the object from the slide.
3
To adjust the time or add a sound to the countdown timer, click the countdown timer.
Adjust the time from the Slide Preferences Panel.
a
To adjust the time, enter a value into the Countdown Seconds box. A valid entry is 1 - 999.
b
To add a sound, click ..., browse to the location of the sound file and click Open.
TIP
Countdown timers can be formatted like regular PowerPoint objects. Right-click on the
object and select a formatting option from the menu.
Inserting a Grid
A grid is an object that is overlaid on a slide during the presentation and indicates which participants have responded. A grid
can be made to appear on each polling slide that is created. For more information on how to automatically include a grid on each
polling slide or to customize the grid, see PowerPoint on page 59.
turningtechnologies.com/user-guides
Page 85

TurningPoint 5 for PC 85
1
Select the polling slide.
2
From the TurningPoint ribbon/toolbar click the Objects icon, mouse over Grids and select the desired grid.
Grids Menu (Office 2007/2010/2013)
Grids Menu (Office 2003)
A placeholder is inserted for the grid.
There are three grids available:
Table
l Table - The table grid displays numbered boxes that represent each participant in the participant list. If polling
Response
Non-Response
with an auto list, the number of boxes displayed is determined by the number of participants responding.
l Response Grid - A response grid displays participant names by default. As participants respond, the
corresponding box changes color. If polling with an auto list, it is recommended to change the response grid text
to Device ID Only. As participants respond, a Device ID appears in the box.
l Non-Response - The non-response grid displays the participant name by default. As the participants respond,
the corresponding box is removed. If polling with an auto list it is recommended to change the response grid text
to Device ID Only in the preferences.
3
Select a different grid from the Objects menu to change the current grid on the slide.
4
To remove the grid, simply delete the object from the slide.
turningtechnologies.com/user-guides
Page 86

TurningPoint 5 for PC 86
5
While polling is open, hold the mouse over the grid to access the grid controls.
a
Click the left or right arrows below Rotate to view more participants.
b
Click the left or right “A” to increase or decrease font size. The font size will increase or decrease by one size
for each click. The minimum font size is 12 and the maximum font size is 48.
Inserting a Prompt
A prompt provides participants with a visual cue that the slide is a polling slide to which they can respond. A prompt can be
made to appear on each polling slide that is created. For more information on how to automatically include a prompt on each
polling slide, see PowerPoint on page 59.
1
Select the polling slide.
2
From the TurningPoint ribbon/toolbar click Objects, mouse over Prompt and select the desired prompt.
Office 2007/2010/2013
Office 2003
There are four prompts available.
Bevel Explosion Speech Marquis
turningtechnologies.com/user-guides
Page 87

TurningPoint 5 for PC 87
3
Select a different prompt from the Objects menu to change the current prompt on the slide.
4
To remove the prompt, simply delete the object from the slide.
TIP
Prompts can be formatted like regular PowerPoint objects. Right-click on the object and select a
formatting option from the menu. The prompt text can be adjusted in the preferences.
Inserting a Response Counter
During the Slide Show, the response counter displays the number of responses. For example, if there are 32 participants in the
participant list, the response counter displays “0 of 32.” It continues to count as the responses are received and closes polling
when the 32nd response is received.
1
Select the polling slide.
2
From the TurningPoint ribbon/toolbar click the Objects icon and select Response Counter.
Office 2007/2010/2013
Office 2003
A placeholder is inserted for the response counter.
3
To remove the response counter, simply delete the object from the slide.
TIP
The response counter can be formatted like regular PowerPoint objects. Right-click on the object
and select a formatting option from the menu. The prompt text can be adjusted in the preferences.
turningtechnologies.com/user-guides
Page 88

TurningPoint 5 for PC 88
Inserting Stats
Stats objects reveal statistics about responses after polling is closed. The value of the statistic is displayed in the stats object
during a presentation after polling has been closed.
1
Select the polling slide.
2
From the TurningPoint ribbon/toolbar click the Objects icon, mouse over Stats and select the desired stat.
Office 2007/2010/2013
Office 2003
There are four stats available.
3
Select a different stat from the Objects menu to change the current stat on the slide.
TIP
Multiple stats may be placed on a single slide.
4
To remove a stat, simply delete the object from the slide.
TIP
Stats can be formatted like regular PowerPoint objects. Right-click on the object and select a
formatting option from the menu. The prompt text can be adjusted in the preferences.
turningtechnologies.com/user-guides
Page 89

TurningPoint 5 for PC 89
Competition
Competition slides keep track of the participants or teams with the most points and fastest responses. There are several slide
types available for competitions:
l Team Assignment
l Participant Leader Board
l Team Leader Board
l Team MVP Board
l Fastest Responders
l Racing Leader Board
l Wager
IMPORTANT
Point values or correct answers need to be assigned to answer choices for participants or teams to
accumulate points for competition.
Team Assignment
A team assignment slide contains a question text box, an answer text box that allows for up to 10 answer choices and a chart.
The team assignment slide assigns participants to teams for competitions and is also considered a demographic slide.
Team Assignment Slide Preferences:
Demographic Options
l Demographic Grouping - Categorize the demographic options
for easier reporting.
l Use in Competition - The answer options become teams and
can be used in team competitions. When unchecked, the slide is
no longer considered a Team Assignment slide.
l Save to participant list - The competition information is saved
to the current participant list.
Question Options
l Bullet Format - The bullet format for the answer choices can be changed from the drop-down menu.
Polling Options
l Automatically Open Polling - When checked, polling automatically opens. When unchecked, the slide needs to be
advanced to open polling.
l Show Results - When checked, the chart is displayed after polling is closed.
l First Response Only - When checked, TurningPoint only accepts the first response sent by each participant.
Participant Leader Board
A participant leader board displays the top individual participants ranked by their total points. This slide updates dynamically
after each question. Press the tab key on the keyboard to view more participants in the participant list.
turningtechnologies.com/user-guides
Page 90

TurningPoint 5 for PC 90
Participant Leader Board Slide Preferences:
l Display participant - Select the type of participant information
to be displayed from the drop-down menu.
l Number to Display - Select the number of participants to be
displayed from the drop-down menu.
l Score Calculations - Select whether the points displayed are
Cumulative or Single from the drop-down menu. Cumulative
points are the total points earned up to that point in the
presentation. Single points are only the points earned on the
previous question slide.
Team Leader Board
The team leader board displays teams ranked by their total points. Team scoring works by calculating the point total for all of
the participants on a team and then dividing it by the number of participants. The slide updates dynamically after each question.
Press the tab key on the keyboard to view more team scores.
Team Leader Board Slide Preferences:
l Number to Display - Select the number of teams to be
displayed from the drop-down menu.
l Score Calculations - Select whether the points displayed are
Cumulative or Single from the drop-down menu. Cumulative
points are the total points earned up to that point in the
presentation. Single points are only the points earned on the
previous question slide.
l Include teams with points <1 - When checked, teams that
have zero or negative points will be displayed on the slide.
Team MVP Board
The team MVP board displays the individual participant on each team with the most points. This feature requires the use of a
participant list, teams and correct answers. The slide is updated dynamically after each question.
Team MVP Board Slide Preferences:
l Display participant - Select the type of participant information
to be displayed from the drop-down menu.
l Number to Display - Select the number of participants to be
displayed from the drop-down menu.
l Score Calculations - Select whether the points displayed are
Cumulative or Single from the drop-down menu. Cumulative
points are the total points earned up to that point in the
presentation. Single points are only the points earned on the
previous question slide.
l Include teams with points <1 - When checked, teams that
have zero or negative points will be displayed on the slide.
turningtechnologies.com/user-guides
Page 91

TurningPoint 5 for PC 91
Fastest Responders
The fastest responders slide displays the individual participants who
responded correctly and fastest to the most recent question. This
feature requires a correct response or point value and is updated
dynamically after each question. Press the tab key on the keyboard to
view more fastest responders.
Fastest Responders Slide Preferences:
l Display correct responders only - Only participants who
responded correctly to the previous question slide will be
displayed.
l Display participant - Select the type of participant information
to be displayed from the drop-down menu.
l Number to Display - Select the number of participants to be displayed from the drop-down menu.
Racing Leader Board
The racing leader board slide presents a visual representation of the team scores. An image to represent the teams is selected
in the slide preferences panel. When the slide is advanced, the images move in relation to the number of points earned.
Racing Leader Board Slide Preferences:
l Number to Display - Select the number of teams to be
displayed from the drop-down menu.
l Score Calculations - Select whether the points displayed are
Cumulative or Single from the drop-down menu. Cumulative
points are the total points earned up to that point in the
presentation. Single points are only the points earned on the
previous question slide.
l Animated Image - Select the image to represent the teams.
One image is used for all teams.
l Animation Speed - Select the speed for the images.
l Animation (direction) - Select the direction, horizontal or vertical, for the images to race.
Wager
The wager slide allows participants to wager a percentage of their
points on the next question slide. If the participants fail to correctly
answer the question, the amount of points wagered is lost. If the
participants successfully answer the question, they are awarded that
percentage of points. If there is a correct answer value for the question,
participants are also awarded those points in addition to the points
wagered.
Wager Slide Preferences:
l Automatically Open Polling - When checked, polling
automatically opens. When unchecked, the slide needs to be
advanced to open polling.
l Bullet Format - The bullet format for the answer choices can be changed from the drop-down menu.
turningtechnologies.com/user-guides
Page 92

TurningPoint 5 for PC 92
Import
The Import Question List icon on the TurningPoint ribbon/toolbar is used to import a question list file from any location, such as
the TurningPoint Content folder, a flash drive or network drive.
Importing a Question List File
The questions from the question list file are converted into polling slides.
1
Click the Import icon on the TurningPoint ribbon/toolbar.
2
Browse to the location of the question list file.
3
Select the question list file and click Open.
NOTE
Only one question list file may be selected at a time.
A box displays the status of the question list file import.
Next Steps
Correct answers and other slide setting options can be adjusted in the Slide Preferences Panel. For more information on Slide
Preferences, see Slide Types and Slide Preferences on page 72.
Tools
The PowerPoint Polling tools are advanced features that can be used to enhance the presentation.
There are six tools available:
Comparative Links
Conditional Branching
Convert to Picture
Demographic Comparison
Ranking Wizard
Standards
Comparative Links
Comparative links can be used to display the results from two separate slides on one slide. If a question is asked at the
beginning of the presentation and then again towards the end, a comparative links slide will display the results from each
question on the same slide.
Inserting a Comparative Link
Generally, the slides being compared should each have the same number of answers. The slide on which the comparison
displays must come after the second slide being compared so that the results of those slides are available for display.
In TurningPoint, a comparative link slide does not need to be present in order to generate a Comparative Results Report.
Prerequisites
A presentation must contain at least two Multiple Choice polling slides to set up a comparative link.
turningtechnologies.com/user-guides
Page 93

TurningPoint 5 for PC 93
1
Select an insertion point in the PowerPoint presentation for the comparative links slide.
2
From the TurningPoint ribbon/toolbar, click the Tools icon and select Comparative Links.
The Add Comparative Link Slide window opens.
3
Select the First Slide you would like to compare from the dropdown menu.
4
Select the Second Slide you would like to compare from the
drop-down menu.
5
Click OK.
The comparative links slide is inserted into the presentation.
Office 2007/2010/2013
Office 2003
The comparative links slide can be moved in the slide deck as long as it is displayed after both slides you would like to
compare.
To remove a comparative link, simply delete the slide.
NOTE
The chart colors can only be customized by adjusting the PowerPoint color scheme.
6
Repeat steps 1 - 5 to add additional comparative links.
Conditional Branching
Conditional branching allows a user to control the order of slides in the presentation based on responses received from
participants.
Setting Up Conditional Branching
Conditional branching is set up by defining a condition which, if satisfied, advances to a specified slide.
Prerequisites
A polling presentation that contains all of the branching slides is required.
turningtechnologies.com/user-guides
Page 94

TurningPoint 5 for PC 94
1
Click the Tools icon on the TurningPoint ribbon/toolbar and
Office 2007/2010/2013
select Conditional Branching.
The Conditional Branching window opens.
Office 2003
2
Select the slide where the branch will begin from the Select a Slide drop-down menu.
3
Click Add to add a rule.
The Conditional Branching Rules box displays the rule with a default name.
4
Optionally, click Rename to change the default name of the rule.
Enter a name in the box provided and click OK.
5
Optionally, create additional conditions for a slide by clicking AND Condition or OR Condition as logical operators.
NOTE
There can be up to 30 conditions per selected slide.
l Click AND Condition to link a conditional branching item to the previous item to specify that both conditions
should be met. If “Condition” and “Condition” then go to “Slide Selection.”
l Click OR Condition to link a conditional branching item to the previous item to specify that either condition can be
met. If “Condition” or “Condition” then go to “Slide Selection.”
6
Define all conditions in the Conditional Branching Rule Description by selecting the appropriate link.
a
Condition - Choose Percentage of Responses, Number of Responders or Majority Rules.
turningtechnologies.com/user-guides
Page 95

TurningPoint 5 for PC 95
b
The Compound Rule Condition Box opens and displays up to three components of the compound rule that must
be selected.
c
Comparison Operator - Choose an operator to satisfy the condition. The choices are Greater Than, Less Than,
Equal To, Not Equal To, Greater Than or Equal To, or Less Than or Equal To.
d
Value - Determines the value or percentage to compare to in the next step. For Number of Responders, enter a
number of responses (from 0 to the total number of participants). If Percentage of Responses was chosen, enter
a percentage of responses (from 1 to 100).
e
Selected Answer - Determines what answer must be selected to make the condition true. The number or
percentage of responses for the selected answer will be used in the comparison. Any of the answer choices on
the slide may be chosen. The condition uses the number of responses for that selected answer choice.
f
Slide Selection - Select the slide to be displayed when the condition is fulfilled. Select any slide in the
presentation.
turningtechnologies.com/user-guides
Page 96

TurningPoint 5 for PC 96
7
Repeat steps 3 - 6 to add additional independent conditions to the same slide.
8
Click OK in the Conditional Branching window when all the conditions have been added to the slides.
When running the presentation, the slides set up for conditional branching will advance to the selected slide if the condition is
met.
A condition may be removed by selecting it from the list in the Conditional Branching window and clicking Delete.
Convert to Picture
Text-based answer options can be converted to pictures when visual aids would be beneficial to the audience.
Converting a Text-based Slide to a Picture Slide
Since pictures are being used as answers, the horizontal and offset charts will not align correctly with the answers. It is
recommended that a vertical, 3D pie, distributed pie or doughnut chart be used.
1
Create a polling slide.
The text in the answer region will be replaced by pictures. Therefore, it is recommended to use descriptive words or
phrases in the answer region because this text will be used for the chart labels, reports, extracted question lists and in
the session editor. Correct answer indicators need to be inserted on the slide before converting it to a picture slide.
NOTE
Short answer, numeric, essay and moment to moment slides do not support the Convert to
Picture tool.
turningtechnologies.com/user-guides
Page 97

TurningPoint 5 for PC 97
2
Use PowerPoint’s Insert > Picture menu to insert one picture for each answer choice.
Find more information on inserting pictures in
PowerPoint’s online help.
3
Resize and arrange the pictures so that they are properly
displayed on the slide.
4
To assign the pictures to a proper answer choice, follow
these steps:
a
Click outside the slide to ensure that no objects on
the slide are selected.
b
Click the picture that corresponds to the first
answer choice.
c
Hold down the Control key on the keyboard and
click the second picture.
Now both the first and second pictures are
selected.
d
Repeat step c for each additional picture until all of
the pictures have been selected.
NOTE
Pictures may be included on the slide that
are not associated with one of the answers (for decoration or illustration). Do not click these
pictures.
Office 2007/2010/2013
Office 2003
5
Click the Tools icon on the TurningPoint ribbon/toolbar and select Convert to Picture.
Office 2007/2010/2013 and Office 2003
The pictures are given a label and the text-based answer options are now hidden. The pictures can be resized and
arranged as necessary.
Next Steps
Correct answers and other slide setting options can be adjusted in the Slide Preferences Panel. For more information on Slide
Preferences, see Slide Types and Slide Preferences on page 72.
Demographic Comparison
A demographic comparison slide can be used to display the results of a question slide in terms of certain demographic
information gathered from the participants.
turningtechnologies.com/user-guides
Page 98

TurningPoint 5 for PC 98
Inserting a Demographic Comparison
A demographic comparison slide can use the information from a demographic assignment slide or a demographic defined in the
participant list. The slide is then linked to a Multiple Choice, Priority Ranking or True/False polling slide.
Prerequisites
A presentation must contain at least one demographic and one polling slide or demographics in the selected participant list to
set up a demographic comparison.
1
Select an insertion point in the PowerPoint presentation for the demographic comparison slide.
2
From the TurningPoint ribbon/toolbar, click the Tools icon and
select Demographic Comparison.
The Add Demographic Comparison Slide window opens.
3
Select the Demographic from the drop-down menu.
4
Select the Question from the drop-down menu.
5
Click OK.
The demographic comparison slide is inserted into the
presentation.
Office 2007/2010/2013
Office 2003
To remove a demographic comparison, simply delete the slide.
NOTE
If a demographic from a participant list was selected during slide creation, that participant list
must be loaded with the Slide Show in order for the slide to function properly.
6
Repeat steps 1 - 5 to add additional demographic comparisons.
Ranking Wizard
Quickly and easily create slides that support decision-making, prioritization or other kinds of ranking with the Ranking Wizard.
The Ranking Wizard automatically creates slides to compare items on up to three criteria, then summarizes the results in a
turningtechnologies.com/user-guides
Page 99

TurningPoint 5 for PC 99
chart.
Creating Polling Slides with the Ranking Wizard
The Ranking Wizard guides a user through the creation of a set of ranking slides.
1
Select an insertion point in the PowerPoint presentation for the ranking slides.
The ranking slides will be added to the presentation after the insertion point.
2
Click the Tools icon on the TurningPoint ribbon/toolbar and select Ranking Wizard.
Office 2007/2010/2013
Office 2003
The Ranking Wizard opens.
3
Enter a name for an item to be ranked in the box provided and click Add or press Enter on the keyboard.
The item is added to the list. At least two items are needed for ranking.
Repeat this step until all of the ranking items have been added to the list.
TIP
The list of ranking items can be saved and used again at a later time.
Click the Save button (shaped like a disk) to save a text file with the list of items. To open the list
click the Load button (shaped like a folder) to open a saved ranking list.
turningtechnologies.com/user-guides
Page 100

TurningPoint 5 for PC 100
4
Enter a name for the First Criterion and, optionally, for the Second and Third Criterion in the boxes provided.
At least one criterion must be entered for the ranking. If the items are being ranked on a single criterion, leave the
second and third criterion blank.
The first and second criterion appear on the horizontal and vertical axes of the chart, respectively. The third criterion is
represented in the chart by the size of the bubble for each item.
5
Uncheck the boxes next to the number to limit the scale to less than 1 - 10.
Unchecking a smaller number also unchecks all the larger numbers. Click Reset Scale to restore the original ranking
scale.
To edit the text of the scale, double-click the existing text.
TIP
The ranking scale can be saved and used again at a later time.
Click the Save button (shaped like a disk) to save the ranking scale. To open the ranking scale
click the Load button (shaped like a folder) to open a saved ranking scale.
6
Click Next.
The Ranking Wizard advances and the display options can be specified. An example of how the slides will appear
based on the selected display options is shown in the bottom of the window.
7
Select an option for Present Items. Only one item may be selected.
l Select Standard X/XY/XYZ to rank the items on a numerical scale for the criteria
l Select Paired Comparison to compare the items by pairs on the criteria. If paired comparison is selected, the box
for a response of “No Preference” may be checked.
8
Select an option for Slide Order. Only one item may be selected.
l Select Grouped by Criteria to group the slides for each item for the first criterion, then slides for each item for the
second criterion and so on.
l Select Grouped by List Item to group the slides for each criterion about the first item in the list, then the slides for
each criterion about the second item in the list and so on.
9
Select the Polling Options. Multiple items may be selected.
l Automatic open polling will open polling when each slide is displayed.
l Auto-advance automatically advances the slide after all participants have responded to a question if no chart is
shown.
turningtechnologies.com/user-guides
 Loading...