

Page 1

________________________________________________ Response Level 1 Training Workbook
Page 2

______________________________________________________________ Response User’s Guide
Contents
Contact Information ................................................................................................... 6
Setting Up Response ................................................................................................... 7
Overview ....................................................................................................................... 7
Purpose ......................................................................................................................... 7
Install Response ............................................................................................................. 8
Basic Installation ......................................................................................................... 8
Advanced Installation ................................................................................................... 8
Download Instructions................................................................................................ 8
Response Receiver ......................................................................................................... 9
Receiver Set Up ........................................................................................................... 9
Manually Detect Receiv er ............................................................................................. 9
Response Student Response Pads ...................................................................................10
Cricket RF .....................................................................................................................10
CPS Pulse Student Response Pad ....................................................................................10
PRS RF Student Response Pad ........................................................................................11
Databases .....................................................................................................................11
Response Window Tour .................................................................................................12
Select Database .........................................................................................................12
Setup My Hardware ....................................................................................................12
Create A New Class ....................................................................................................12
Collect Responses .......................................................................................................12
Manage My Data ........................................................................................................12
Simple View ...............................................................................................................12
Configuring Student PRS RF Response Pads .....................................................................13
Normal Configuration ..................................................................................................14
Loaner Configuration ..................................................................................................14
Instructor Configuration ..............................................................................................15
Test System ..................................................................................................................17
Test the Student Response Pads ..................................................................................17
Creating a Class ........................................................................................................18
Create a Roster .........................................................................................................20
• Import Roster ......................................................................................................20
2 | Page
Page 3

______________________________________________________________ Response User’s Guide
Manually enter students into the roster ........................................................................22
Import a roster using a csv file ....................................................................................23
Global Preferences ....................................................................................................25
System .........................................................................................................................25
Backup Preferences .......................................................................................................26
Gradebook Preferences ..................................................................................................27
Response Area Preferences ............................................................................................27
Chart Preferences ..........................................................................................................27
Directories Preferences ..................................................................................................28
Instant Classroom Interactivity ................................................................................29
Overview ......................................................................................................................29
Purpose ........................................................................................................................29
Participation: Impromptu ...............................................................................................30
Starting a Participation Session ....................................................................................30
Question Type Compatibility List Chart ............................................................................31
Session Toolbar-Icon Description s ................................................................................32
Session Toolbar Preferences ........................................................................................34
Ending a Session ...........................................................................................................39
Reports ........................................................................................................................39
Self-Paced: Impromptu ..................................................................................................40
Creating an Answer Key ..............................................................................................40
Editing a Question in the Test Key ...............................................................................41
Starting a Self-Paced Session .......................................................................................44
Homework: Impromptu ..................................................................................................45
Student walk through for Homework Mode ...................................................................45
Collect Homework Responses from the Student Response Pads ......................................45
Reports ........................................................................................................................47
Session Details by Student ..........................................................................................47
Creating Content in Response .........................................................................................48
Overview ......................................................................................................................48
Purpose ........................................................................................................................48
Folders and Lessons ......................................................................................................49
Creating Lessons and Folders ......................................................................................50
Editing Lessons ..........................................................................................................50
Deleting Lessons ........................................................................................................50
3 | Page
Page 4

______________________________________________________________ Response User’s Guide
Importing Lessons .........................................................................................................51
Exporting Lessons ......................................................................................................51
Questions .....................................................................................................................52
Editing Tools ..............................................................................................................52
Navigation Tools .........................................................................................................54
Crafting the Question and its Response Choices ............................................................55
Print a Response Lesson .............................................................................................56
Starting a Response Session .....................................................................................57
Reports ........................................................................................................................58
Session Summary by Question .....................................................................................58
Response for PowerPoint ........................................................................................59
Overview ......................................................................................................................59
Purpose ........................................................................................................................59
Install PowerPoint Add-in .........................................................................................60
Install PowerPoint Add-in (Mac) ...................................................................................61
Creating Response Questions from PowerPoint slides .......................................................62
Insert the questions ....................................................................................................62
Editing Questions .......................................................................................................63
Deleting Questions .....................................................................................................63
Starting a PowerPoint Session ........................................................................................64
Managing Data and Reports ......................................................................................65
Overview ......................................................................................................................65
Purpose ........................................................................................................................65
Tour of the Manage My Data Window .............................................................................66
Reviewing an Administered Session .................................................................................66
Editing an Administered Session .....................................................................................70
Using the Scoring Tab ....................................................................................................72
Moving and Exporting Session Data ................................................................................73
Generating Various Reports for a Session ........................................................................74
Session Reports ..........................................................................................................74
Response Lesson Reports ...............................................................................................77
Answer Key ...................................................................................................................80
Standards .....................................................................................................................81
Managing and Generating Reports for the Gradebook .......................................................84
View the Gradebook ...................................................................................................84
4 | Page
Page 5

______________________________________________________________ Response User’s Guide
Delete or Exclude a Session from the Gradebook ...........................................................84
Exporting Gradebook Data ..........................................................................................84
Customize the Gradebook ..............................................................................................85
Choosing Gradebook Columns to Display ......................................................................85
Create Gradebook Reports ..........................................................................................86
Grades By Clicker ID ...................................................................................................87
Grades by Session ......................................................................................................87
5 | Page
Page 6
______________________________________________________________ Response User’s Guide
Contact Information
In addition to this training guide and the Response software help menu, the following are other
resources available to support your implementation of Response.
Sales Support: 866.496.4949
Technical Support: 888.333.4988
For software update downloads and online training, please visit our website:
www.einstruction.com.
Copyright
eInstruction
CPS PPT
All other trademarks are the property of their respectiv e o w ners.
eInstruction
whiteboards, mobile interactive whiteboards, data reporting , and high-quality content. These
solutions have been shown to increase student engagement, while supporting student-centered
collaborative learning and providing real-time assessment feedback t o ed ucators in mor e t han
500,000 classrooms around the world.
Please visit us on the web at www.einstruction.com for product and support information.
No part of this document may be reproduced, transmitted, transcribed, stored in a retrieval
system or translated into any language or computer language, in any form or by any means,
electronic, mechanical, magnetic, optical, chemical, manual ,or otherwise, without the prior
written permission of eInstruction.
©
2012 eInstruction Corporation. All rights reserved.
®
and ExamView® are registered trademarks and Workspace™, Response, CPS™ and
™
are trademarks of eInstruction Corporation in the United States and other countries.
®
offers educators a family of software, student response systems, interactive
6 | Page
Page 7

______________________________________________________________ Response User’s Guide
Setting Up Response
Overview
This section is designed for the beginner who has never used Response. You will set up a CPS
Pulse and Response receiver and use Cricket RF, PRS RF, and CPS Pulse
create a Response database with class and student information to use when launching
Response lessons.
Purpose
After completing this section, you will be able to:
• Navigate the buttons on the Cricket, PRS RF, and CPS Pulse.
• Navigate the Response window.
• Create, name, and save a new Response database.
• Detect a CPS Pulse and Response receiver.
• Configure PRS RF Student Response Pads.
• Create a class by following steps in the class wizard.
• Auto-populate student and St ud ent R esponse P ad IDs in t he class roster.
• Enter and edit student demographic information in the class roster manually.
• Import a csv file with a class list.
• Customize and set preferences in the software.
™
pads. You will also
7 | Page
Page 8

______________________________________________________________ Response User’s Guide
Install Response
Basic Installation
1. Insert the Response Installation DVD into your DVD-ROM drive. The Response
installation wizard will appear.
2. Choose your language
3. Click OK.
4. Click Next and follow the on-screen prompts.
5. Click Finish. The Startup Wizard places a Response icon on your desktop.
Advanced Installation
1. With the Response Installation DVD already in the drive, double-click the DVD-ROM
icon in My Computer.
2. Double-click setup.exe. The Response installation wizard will appear.
3. Choose your language.
4. Click OK.
5. Click Next and follow the on-screen prompts.
6. Click Finish. The Startup Wizard places a Response icon on your desktop.
Download Instructions Additionally, you may download the latest version of Response by visiting:
www.einstruction.com/downloads
8 | Page
Page 9

______________________________________________________________ Response User’s Guide
PRS Receiver (Compatible with the
PRS RF and the Cricket Pads)
CPS RF Receiver (Compatible with
the CPS Pulse Pads)
Response Receiver
Along with the CPS Pulse, PRS RF or Cricket Student Response Pads,
you will need the USB Receiver. T he R e s ponse and CPS RF
Receiver uses radio frequency (RF) technology. All
responses inputted into the Student Response
Pads are transmitted to the receiver and
recorded in the Response d atabase.
Receiver Set Up
The receivers can accept signals from the CPS Pulse, P RS RF and the Cricket up to 150 feet
away.
1. Ensure the Response software is installed
first. Plug in the Response or CPS RF
receiver to an available USB port on your
computer.
2. Your operating system may run a wizard,
or search for the necessary drivers to
operate the receiver, the first time the
receiver is connected.
3. Open Response from your desktop icon. The Response main screen appears.
Manually Detect Receiver
1. Select Setup My Hardware. The eInstruction Device Manager opens.
2. The Response or CPS RF receiver
icon should appear with a green check
mark. The check mark shows the
receiver is connected.
3. If the Receiver icon doesn’t appear,
click the Options menu and Discover
Devices. If the Response or CPS RF
receiver appears with a red “ X”, rightclick the Response recei ver i con and
click Connect. The Response or CPS
RF receiver will then be connected.
9 | Page
Page 10

______________________________________________________________ Response User’s Guide
Response Student Response Pads
Cricket RF
The Cricket can answer true/false and multiple-choice questi ons
(up to 6 answer choices depend i n g on the delivery mode). Because
the Cricket does not have an LCD display, there are various status
lights to show connection and answer transmission.
CPS Pulse Student Response Pad
The CPS Pulse Student Response Pads can answer true/false, yes/no,
numeric, and multiple-choice questions (up to 10 answer cho ices
depending on the delivery mode), short answer (up to 20 characters),
and essay questions (up to 140 characters).
10 | Page
Page 11
______________________________________________________________ Response User’s Guide
Response Main Window
PRS RF Student Response Pad
The PRS RF Student Response Pads can do
multiple choice, true/ f alse, numerics, short
answer, multiple corr ect, answer series,
decimal point, fractions and
positive/negative numbers.
Databases
A Response database is a file with a file extension of .prs. This file is the storage area in
Response where save your class information, lessons and questions, standards, and student
performance data for sessions already administered.
The system is set up so you can start using it right away. You can use the default database,
defaultDB.prs, and start asking questions now. You also have the option of creating your own
database as seen below.
Create a New Database
You have the option of creating your own database if you share the Response system with
other instructors. Organizing the data collected by Response is easy when you save multiple
classes and lessons to a single database.
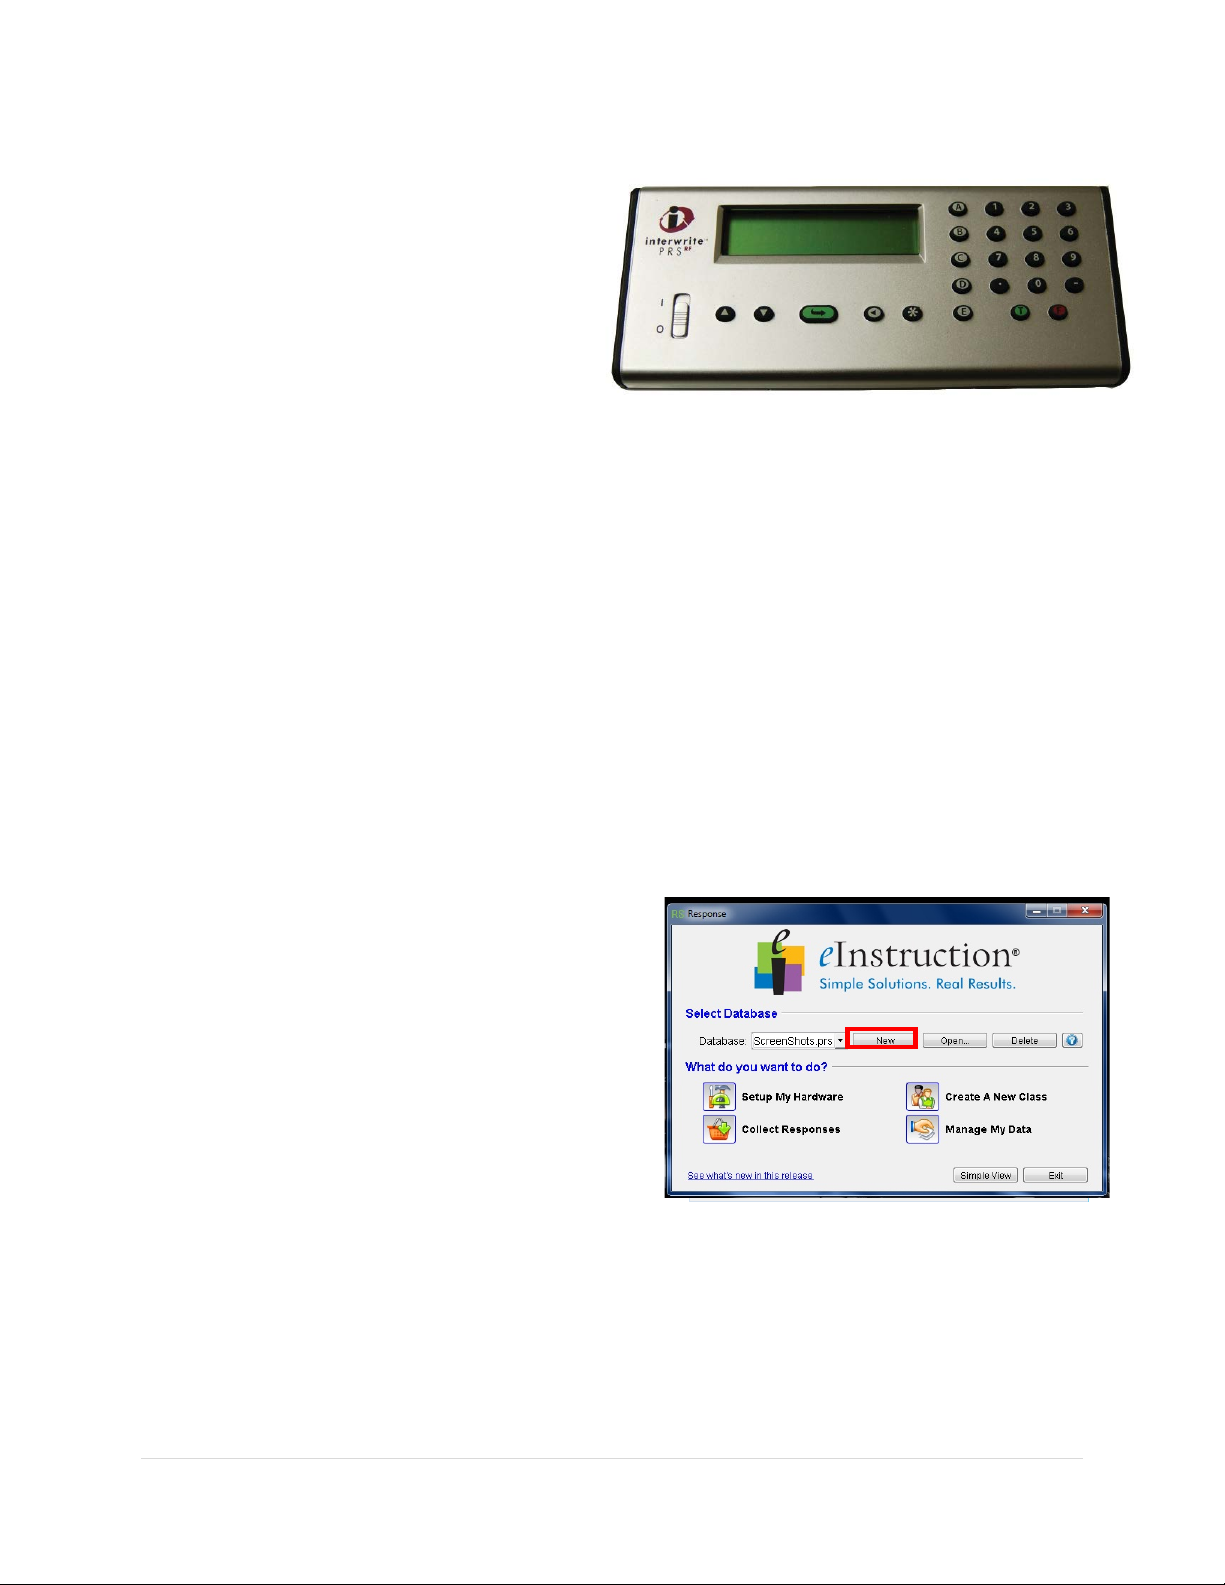
7. Open Response from the desktop icon.
The Response main screen appears.
8. Click New. The New Database dialog
9. Type a name for the database file in the
10. Click OK.
box opens.
Name: text box.
11 | Page
Page 12
______________________________________________________________ Response User’s Guide
Response Window Tour
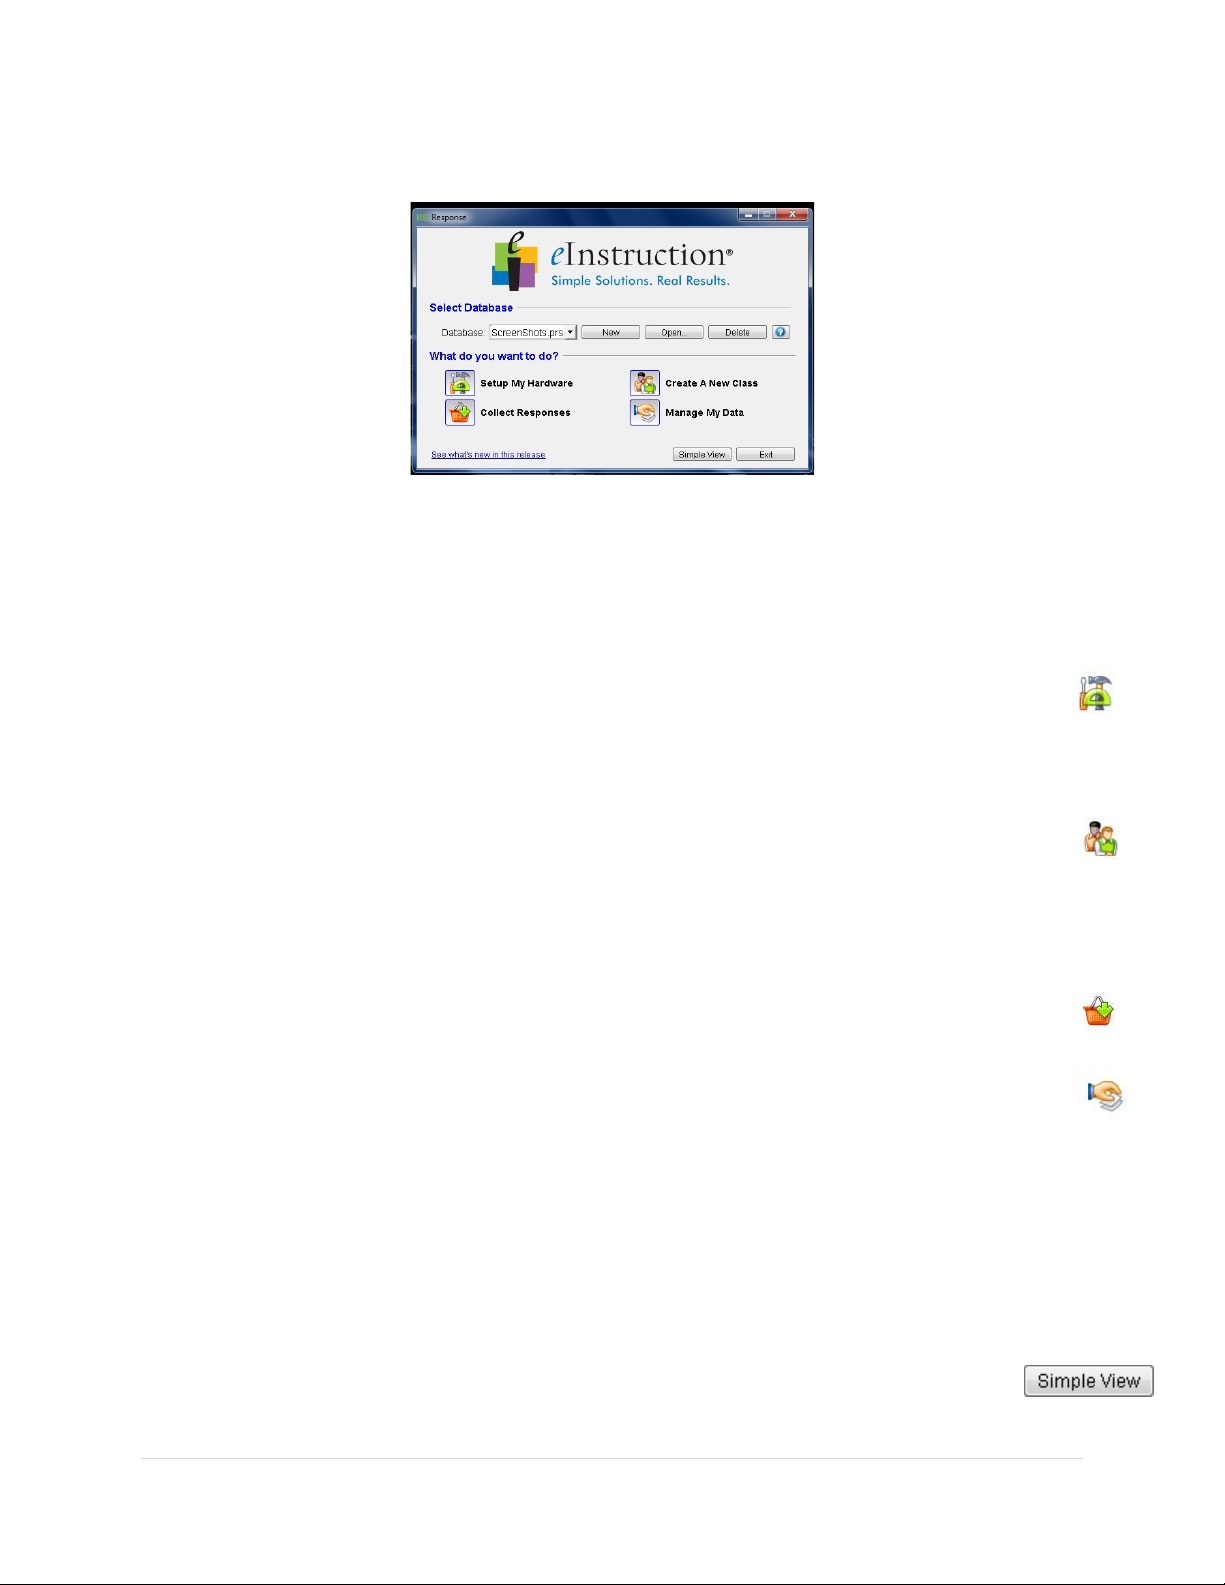
Select Database
A Response database is a file with a file extension of .prs. This file is where you save
your class information, lessons and questions, standards, and student performance data
for sessions already administered. The system is set up with a default database, so you
can start using it right away. You also have the option of creating your own database if
you share your computer with other instructors .
Setup My Hardware
This opens the eInstruction Device Manager, where you can setup and troubleshoot
the receiver, enable the instruct o r Student Response Pad, or configure Student
Response Pads.
Create A New Class
Though Response comes with a premade class, you may use the New Class Wizard
to create additional classes. It walks you throu gh every step required to set up your
class, from naming it to creating or importing the class roster.
Collect Responses
There are a variety of ways of collecting your students' responses in your database
such as asking questions on the fly (impromptu), using PowerPoint, Self-Paced
testing, or Homework collection.
Manage My Data
This is where you will manage your classes, class rosters, session data, class
attendance, and class gradebooks. In addition, you can do the following:
• Create and manage your lessons and the questions in each lesson.
• Import standards for your state.
• Set up answer keys.
• Analyze and compile your data into a variety of useful reports.
Simple View
This button will allow you to collapse the Response window to only show the
Collect Responses and Manage My Data buttons. This feature is useful once you
have initially set-up your system.
12 | Page
Page 13

______________________________________________________________ Response User’s Guide
Configuring Student PRS RF Response Pads
Depending on your requirements, the PRS RF Student Response Pad may need to b e
configured. Only PRS RF Student Response Pads can be configured. By default, PRS RF Student
Response Pads are configured as Normal.
Normal
• Factory default.
• Generally used in a university setting when the student owns the Student
Response Pad or when the Student Response Pad is the property of the student
for the school term.
• The student enters his or her student ID one time only. The student ID is stored
in the CPS Pulse Student Response Pad's memory and is transmitted with each
answer to ensure the student receives credit for the response.
Loaner
• Requires initial configuration.
• Typically used when the school owns the Student Response Pads and mult iple
classes share the Student Response Pads.
• Because the students share the Student Response Pads, the student IDs are not
remembered by the Student Res ponse Pad and therefore it prompts for the
student ID each time it is powered on.
• Also may also be used in case a student forgets to bring their Student Response
Pad to class.
Instructor
• Requires initial configuration.
• The Instructor Student Response Pad is used by the teacher to send commands
to the session and to remotely control it from anywhere in the room.
Closed, Closed Loaner, Closed Instructor
• Student Response Pads configured as any one of the three Closed configurations
can only be used in a Class whose System Type has been set to Closed.
• Closed and Closed Loaner PRS RF Student Response Pads can join the Closed
Class and only a Closed Instructor PRS RF Student Response Pads can remotely
run the Session for the Class.
• The Closed Student Response Pads will be linked to the Closed Class by a Class
ID; the Class ID is configured in both the Response class and clicker allowing for
only clickers with the class ID configured in them to join the class.
• The Closed Student Response Pads will automatically join a Closed Class when
powered on.
13 | Page
Page 14
______________________________________________________________ Response User’s Guide
Normal Configuration
As mentioned above, the PRS RF Student Response Pads are configured as normal by default.
You will configure Student Response Pads as Normal in case you need to delete student IDs
from previously used Student Response Pads or change back to default from another
configuration such as Loaner.
1. Select Setup My Hardware from the main
screen.
2. Right-click the Response Receiver icon, and
select Properties.
3. Click on the Configure Clickers tab.
4. Choose Normal from the Clicker Type drop
down menu.
5. Click on the Setup button to display the
Feedback instructions.
6. Turn on your Student Response Pad.
7. Input the number or letter (the channel) that appears at the end of the line in
angled brackets. Ex : <3> The channel may vary on each setup.
nd
8. Once you see Normal on t he 2
line, press the arrow key to join.
When seeing Join ID followed by a number this means that you have successfully configured
your Student Response Pad.
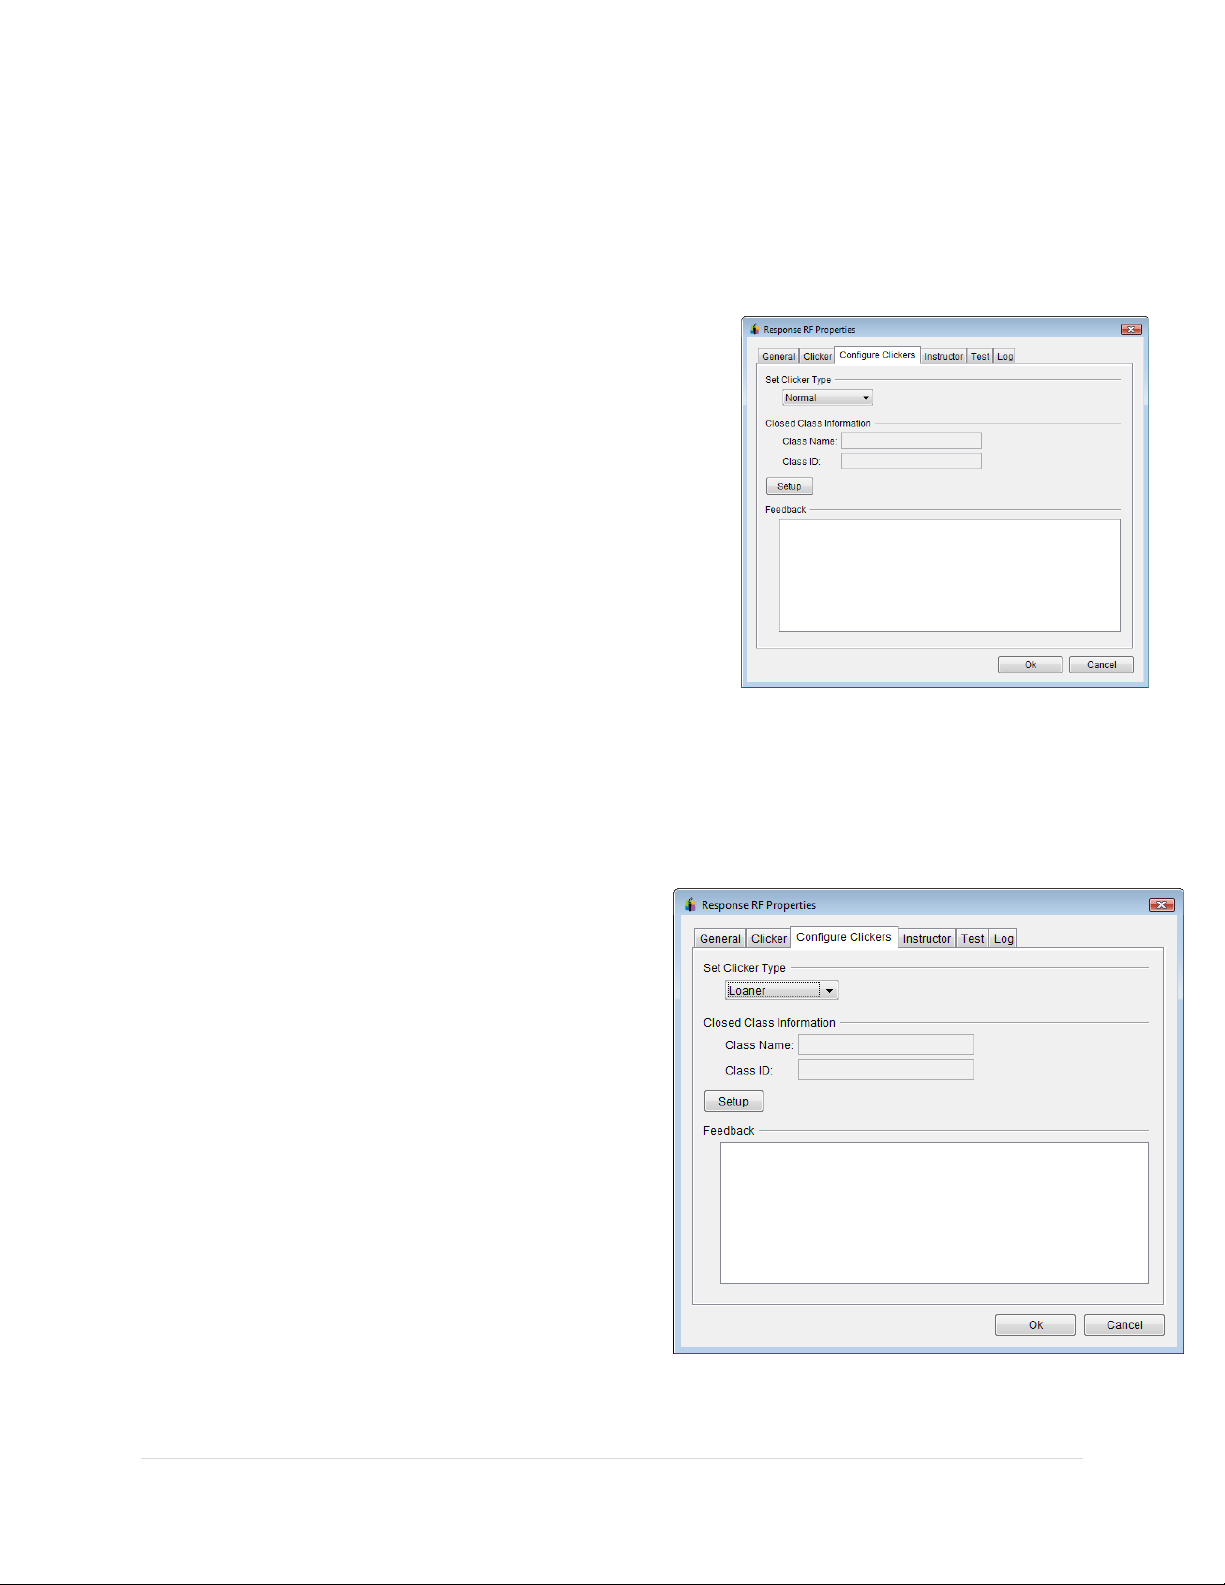
Loaner Configuration
If you are configuring your Student Response Pads
as Loaner, you are facing one of the following two
scenarios:
You own a set of Student Response Pads that will
be used by multiple sets of students, and you want
the students to be able to use whatever Student
Response Pad they pick up at the beginning of
class.
All students in your class(es) have purchased a
Student Response Pad, and you want a few spares
in case they forget to bring their Student Response
Pads.
14 | Page
Page 15

______________________________________________________________ Response User’s Guide
1. Select Setup My Hardware from the main screen.
2. Right-click the Response Receiver icon, then select Properties.
3. Click the Configure Clickers tab.
4. Choose Loaner from the Clicker Type drop down menu.
5. Click on the Setup button to display the Feedback
instructions.
6. Turn on Student Response Pad.
7. Input the number or letter (the channel) that
appears at the end of the line in angled brackets.
Ex: <3>
nd
8. Once you see Loaner on the 2
line, press the
arrow key to join.
When seeing Join ID followed by a number, this means that
you have successfully configured your Student Response
Pad.
Instructor Configuration
A PRS RF Response Pad configured as an Instructor Student Response Pad is used to remotely
control a Response session. For example, an Instructor Student Response Pad allows you to
start and stop a question from anywhere in the classroom.
1. Select Setup My Hardware from the main screen.
2. Right-click the Response Receiver i con, then select Properties.
3. Click the Configure Clickers tab.
4. Choose the Clicker Type Instructor from the drop down menu.
5. Click on the Setup button to display the Feedback instructions.
6. Turn on your Student Response Pad.
7. Input the number or letter (the channel) that appears at the end of the line in
angled brackets. Ex : <3> The channel may vary on each setup.
nd
8. Once you see Instructor on the 2
line, press the green arrow key to join.
9. If you see Join ID followed by a number it means that you have successfully
configured your Student Response Pad.
15 | Page
Page 16
______________________________________________________________ Response User’s Guide
10. When the Instructor Student Response Pad has been
configured, highlight the Instructor Clicker Setup
button in the Navigation Pane.
11. Click on the “Enable Instructor Clicker” checkbox.
12. Enter the Radio (Clicker) ID of the Instructor or
Student Response Pad in the text box.
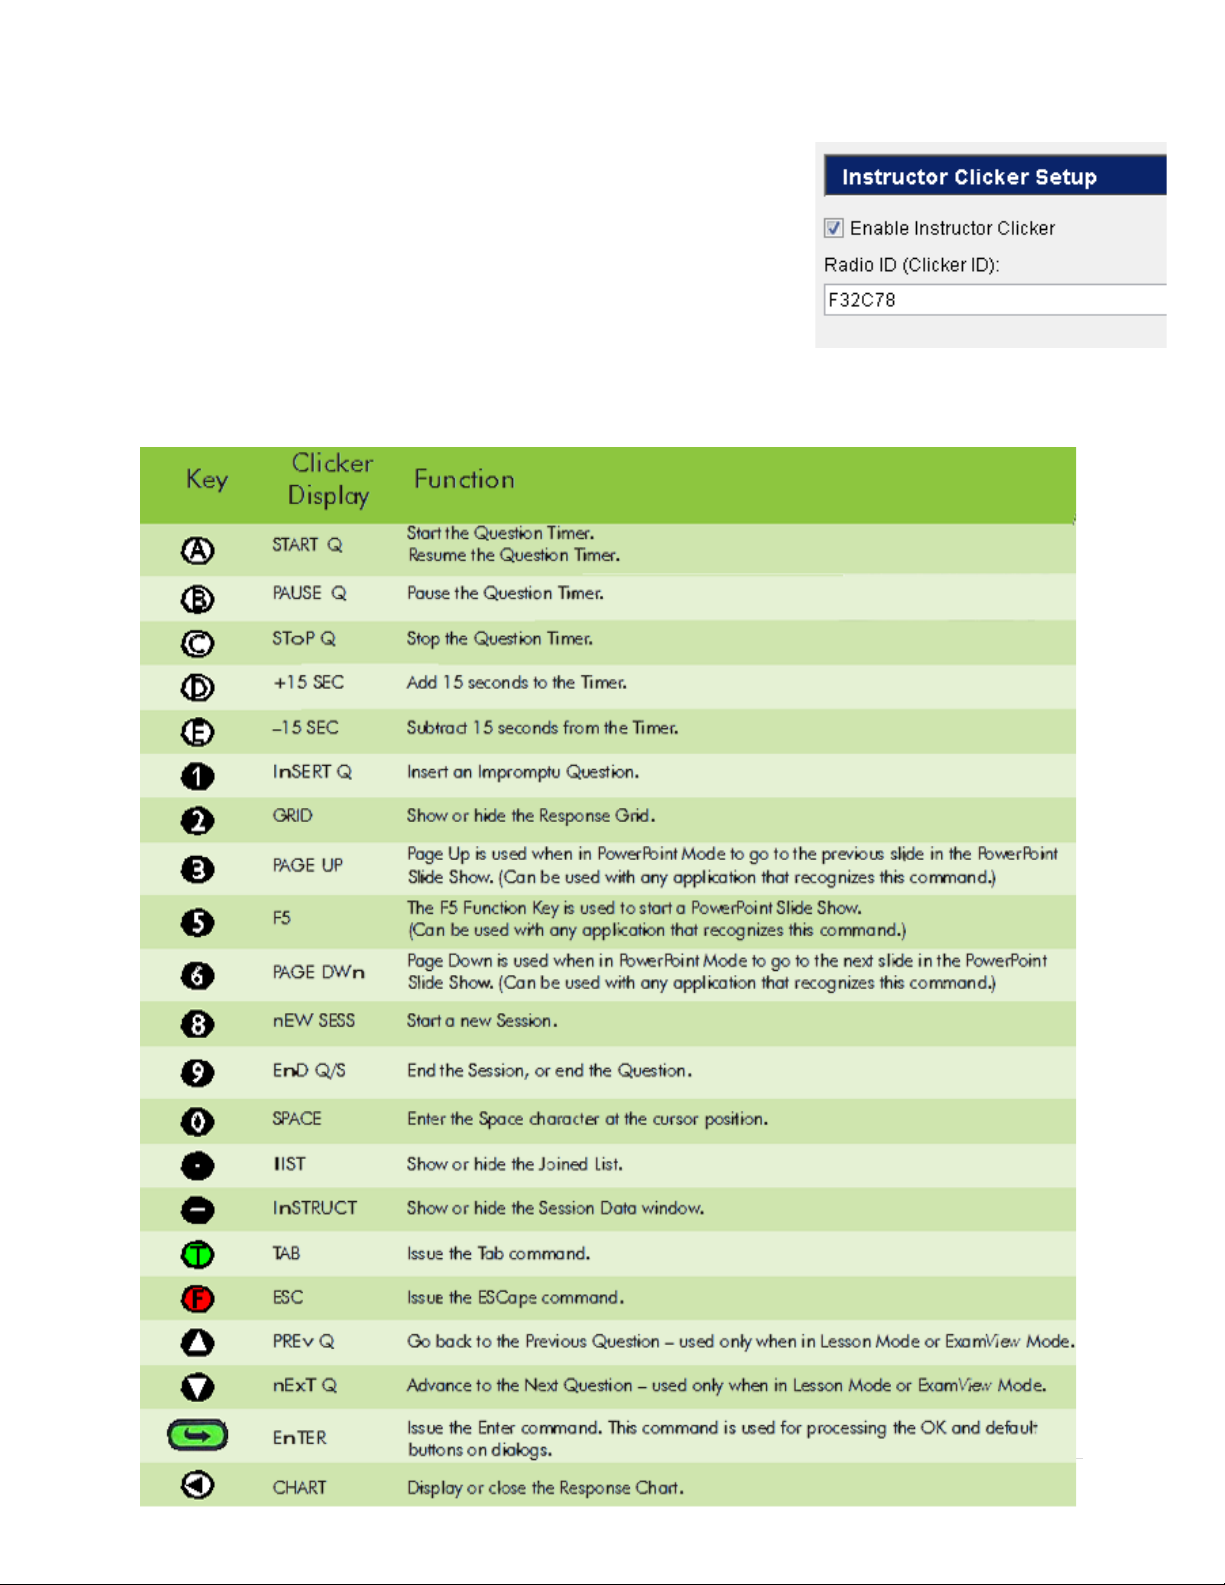
Instructor PRS RF Key Assignments
16 | Page
Page 17
______________________________________________________________ Response User’s Guide
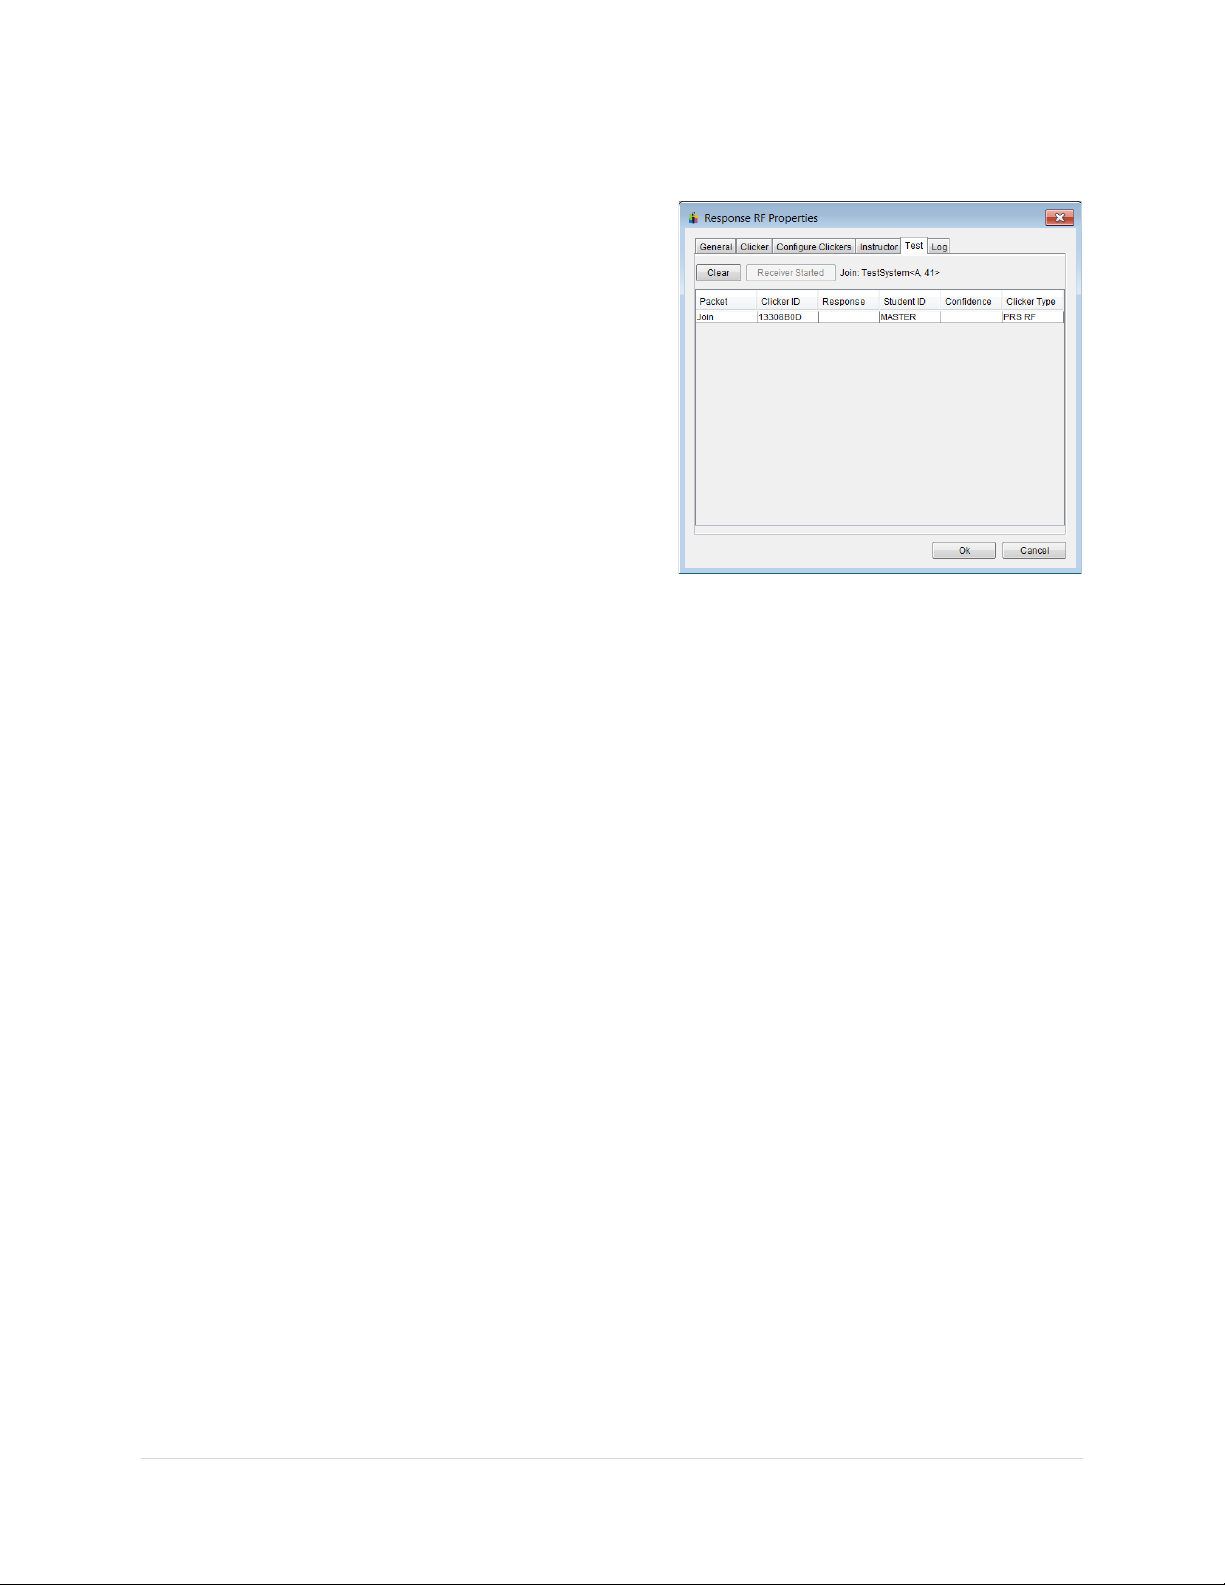
Test System
The Test System option tests both your receiver and
Student Response Pads. It determines whether the
receiver is installed properly and can successfully
receive responses.
1. Select Setup My Hardware from the
main screen. The eInstruction Device
Manager window opens.
2. Right-click the Receiver icon, then select
Properties.
3. Click the Test tab.
4. Click on the Start Receiver button.
Response starts the receiver and displays a channel number.
Test the Student Response Pads
1. Power on the Student Response Pads (Cricket, PRS RF and/or CPS Pulse) you want
to test.
Refer to the numbered pair at the top of the window, such as <A, 41>, when using
a PRS RF/ Cricket mixed environment system. The PRS RF uses the first single digit
to connect. The Cricket uses the second, 2 digit number to connect. When using
Pulse Student Response Pads use the number after the following display: CPS RF
Pulse <44>. If using all three classroom solutions mentioned the display would look
st
like: Mrs. Smith’s 1
Grade Class <C, 45> CPS RF Pulse <44>.
2. When a signal is received from a Student Response Pad, the Stud ent Response Pad
and its identifying information will be listed in the window.
17 | Page
Page 18
______________________________________________________________ Response User’s Guide
Optional Fields
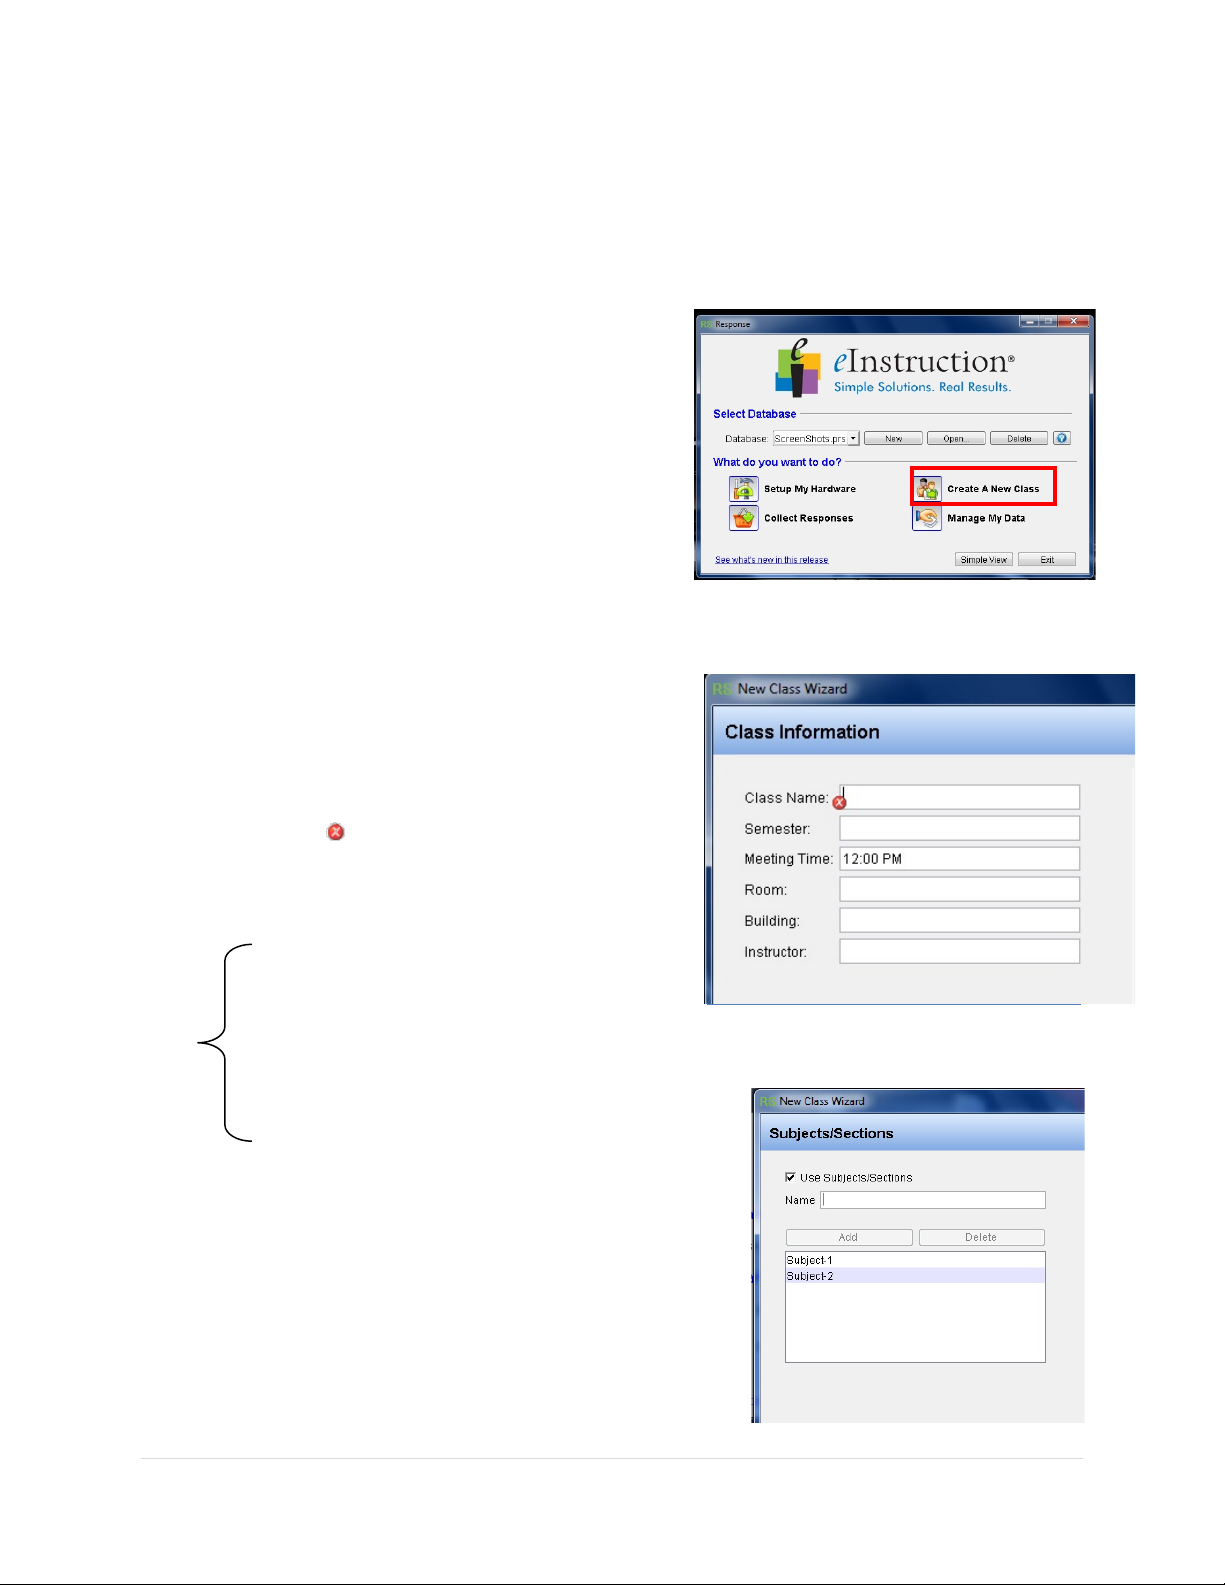
Creating a Class
The New Class Wizard takes you through each step in the process of s etting up your class and
class roster. Additional directions can be found on each page of the wizard.
1. Select Create A New Class from the main
screen and the New Class Wizard will open.
Note Additional directions are provi d ed on each
page of the New Class Wizard.
2. Click on Next to pass the first page and
begin defining your class.
3. Enter Class Information:
• Class Name: This is the only required
information for a class. Identify the
class by giving it a unique name.
Note Throughout the New Class Wizard, this
symbol indicates a required field. You
cannot move to the next page until all
required fields are filled in.
• Semester: Semester during which you
teach your class.
• Meeting Time: The time during which
your class meets.
• Room: Room number of your class.
• Building: Building where you teach your
class.
• Instructor: Name of the instructor that
teaches this class.
4. Click on the Next button to continue.
5. Enter Subjects/Sections:
This is an optional class setting. It is used when an
instructor has multiple subjects or sections of the
same students.
18 | Page
Page 19

______________________________________________________________ Response User’s Guide
• Click on the checkbox to activa te this Use Subject/Sections option.
• Give each Subject or Section a unique name.
• Click on the Add button to add the new Subject or Section for the class to the
list.
• If you want to delete a Subject or Section, select it in the list and click on the
Delete button.
6. Click on the Next button to continue.
7. Select Student Response Pad Type(s):
Identify the Student Response Pad(s) that will
be used by the students in this class. You can
have a mixed environment where PRS RF/CPS
Pulse and Cricket are used together. All
responses are received by t h e compatible
receiver and recorded in the sa m e s oftware.
8. Click on the Next button to continue.
9. Enter Broadcast Name. The Broadcast Name is the name of the class that will
appear on the PRS RF’s LCD display during the initial auto-scan. It is the name by
which the students will identify this class in order to join it.
Note This can be no more than 10 characters and may
not include punctuations or symbols.
10. Enter System Type. System Type is based on
the configuration of the Student Response Pads
being used in the class: Normal, Closed, or Loaner.
Note If wanting to use polling, surveying or the
anonymous options, check the Ignore Student ID’s
from PRS RF (LCD) Clicker check box.
11. Click on the Next button to continue.
12. The last step of the new class wizard is to add
students. This will be covere d in the next
section, so for now click skip.
13. Click on the Next button to continue.
14. Click the Finish button and you will be taken
back to the main screen.
19 | Page
Page 20
______________________________________________________________ Response User’s Guide
Create a Roster
There are three methods of adding students to the roster.
• Auto-populate roster
The first time a student joins a class with their Student Response Pad, their
student IDs and Student Response Pad IDs (ex cept for IR) are added to the
roster automatically. Student names and other student profile informatio n can
be added at a later time.
• Manually enter students into the roster
Enter students into the roster manually, one at a time.
• Import Roster
Import the roster from a variety of applications using a csv format.
Tip For the PRS RF/CPS Pulse Student Response Pads, use the auto-populate function
to add the Student Response Pad and student IDs and then add the student names
manually or by importing a roster in csv format. For the Cricket, the the Student
Response Pad IDs are the same as the student IDs.
Auto-Populate Roster
In order to auto-populate the roster with student IDs and Student Response Pad IDs, join and
quit a session. No responses are necessary.
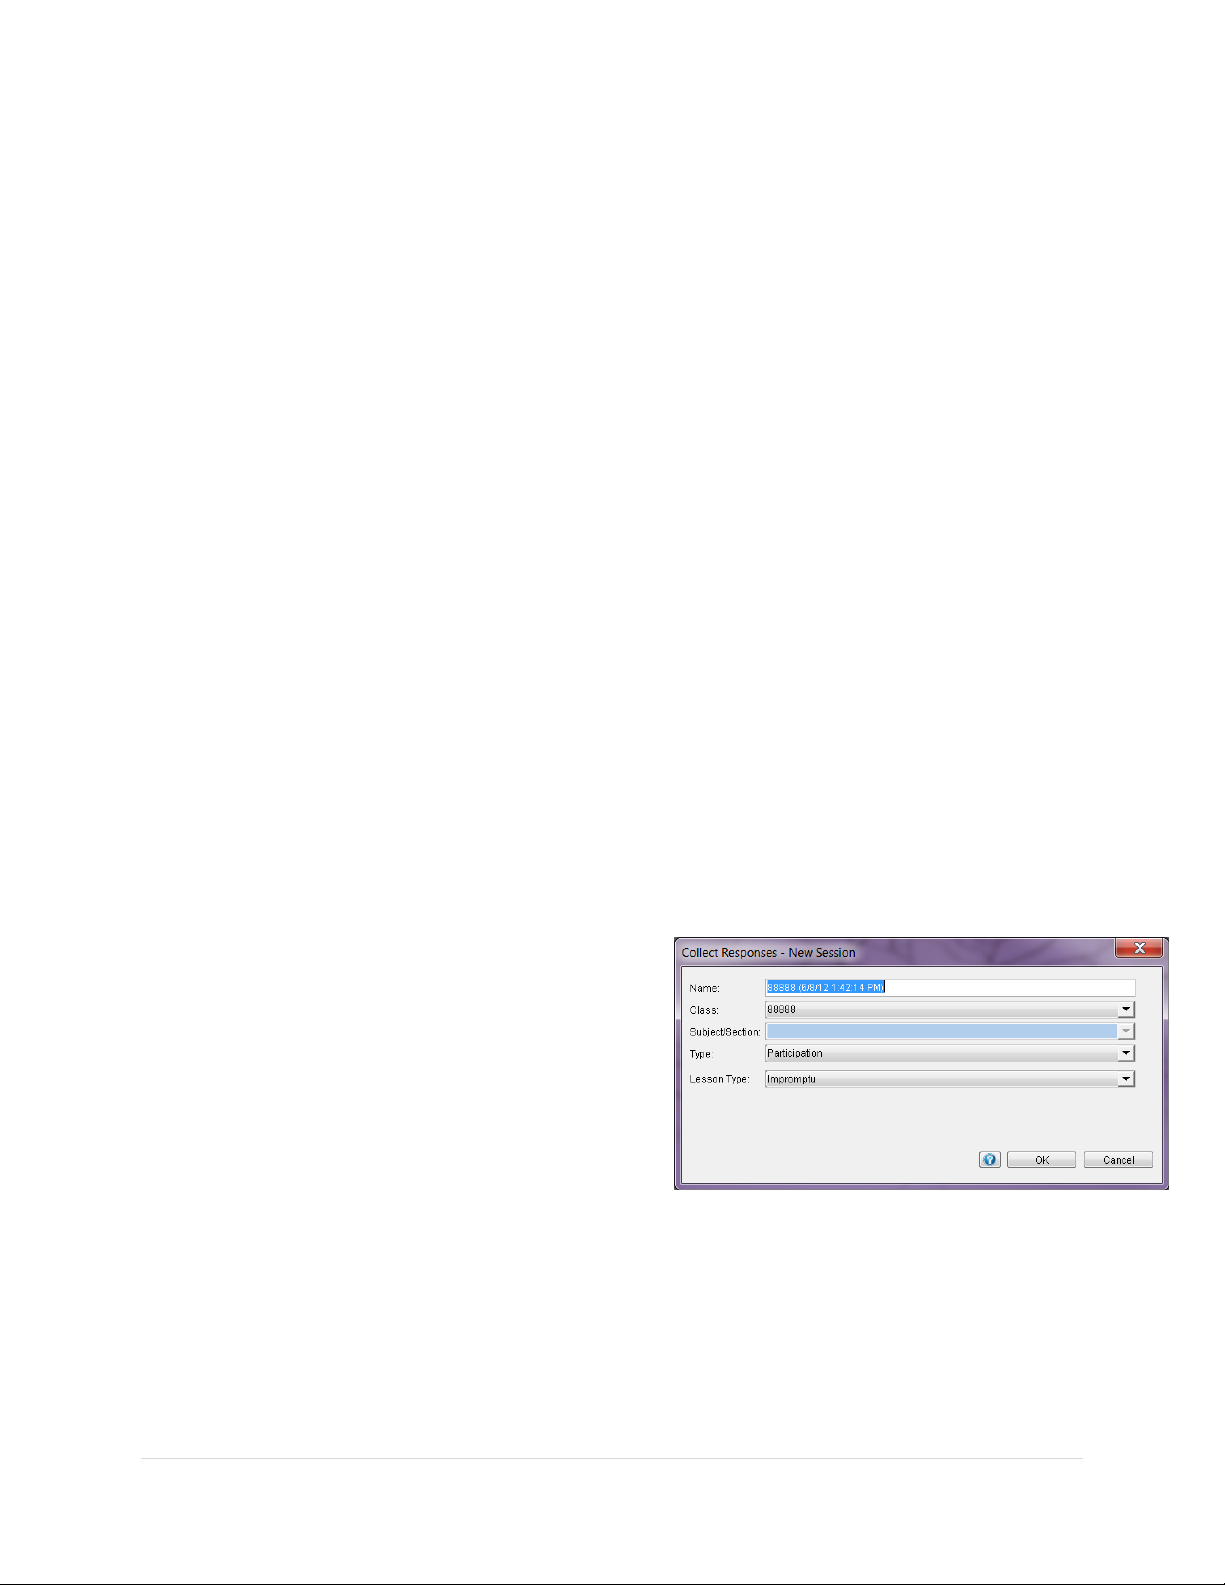
Select Collect Responses from the main screen.
The Collect Responses-New Session dialog box will appear with the following fields:
• Name: The default name is the
class name followed by the date and
time at which the session is
initiating. This of course can be
customized as seen here.
• Class: You should have already
created a class so you now have two
classes in the drop down menu.
Select your New Customized class in
order to build the roster.
• Subject/Section: Select the
Subject or Section, if appropriate.
• Select Impromptu as the Lesson Type.
Click on the OK button to accept the settings.
Click OK to dismiss the Impromptu Options and display the Session Toolbar.
20 | Page
Page 21
______________________________________________________________ Response User’s Guide
Roster Pane
Classes
Pane
Have students turn on all Student Response
Pads and join the class by ent er ing the join
code character(s) within the bracket s < >.
If using all three classroom solutions
mentioned the display would look like: Mrs.
Smith’s 1st Grade Class <C, 45> CPS RF Pulse <44>.
On the PRS RF Student Response Pad, press after the class name is displayed to join the
class. On the Cricket Student Response Pads, enter the join code.
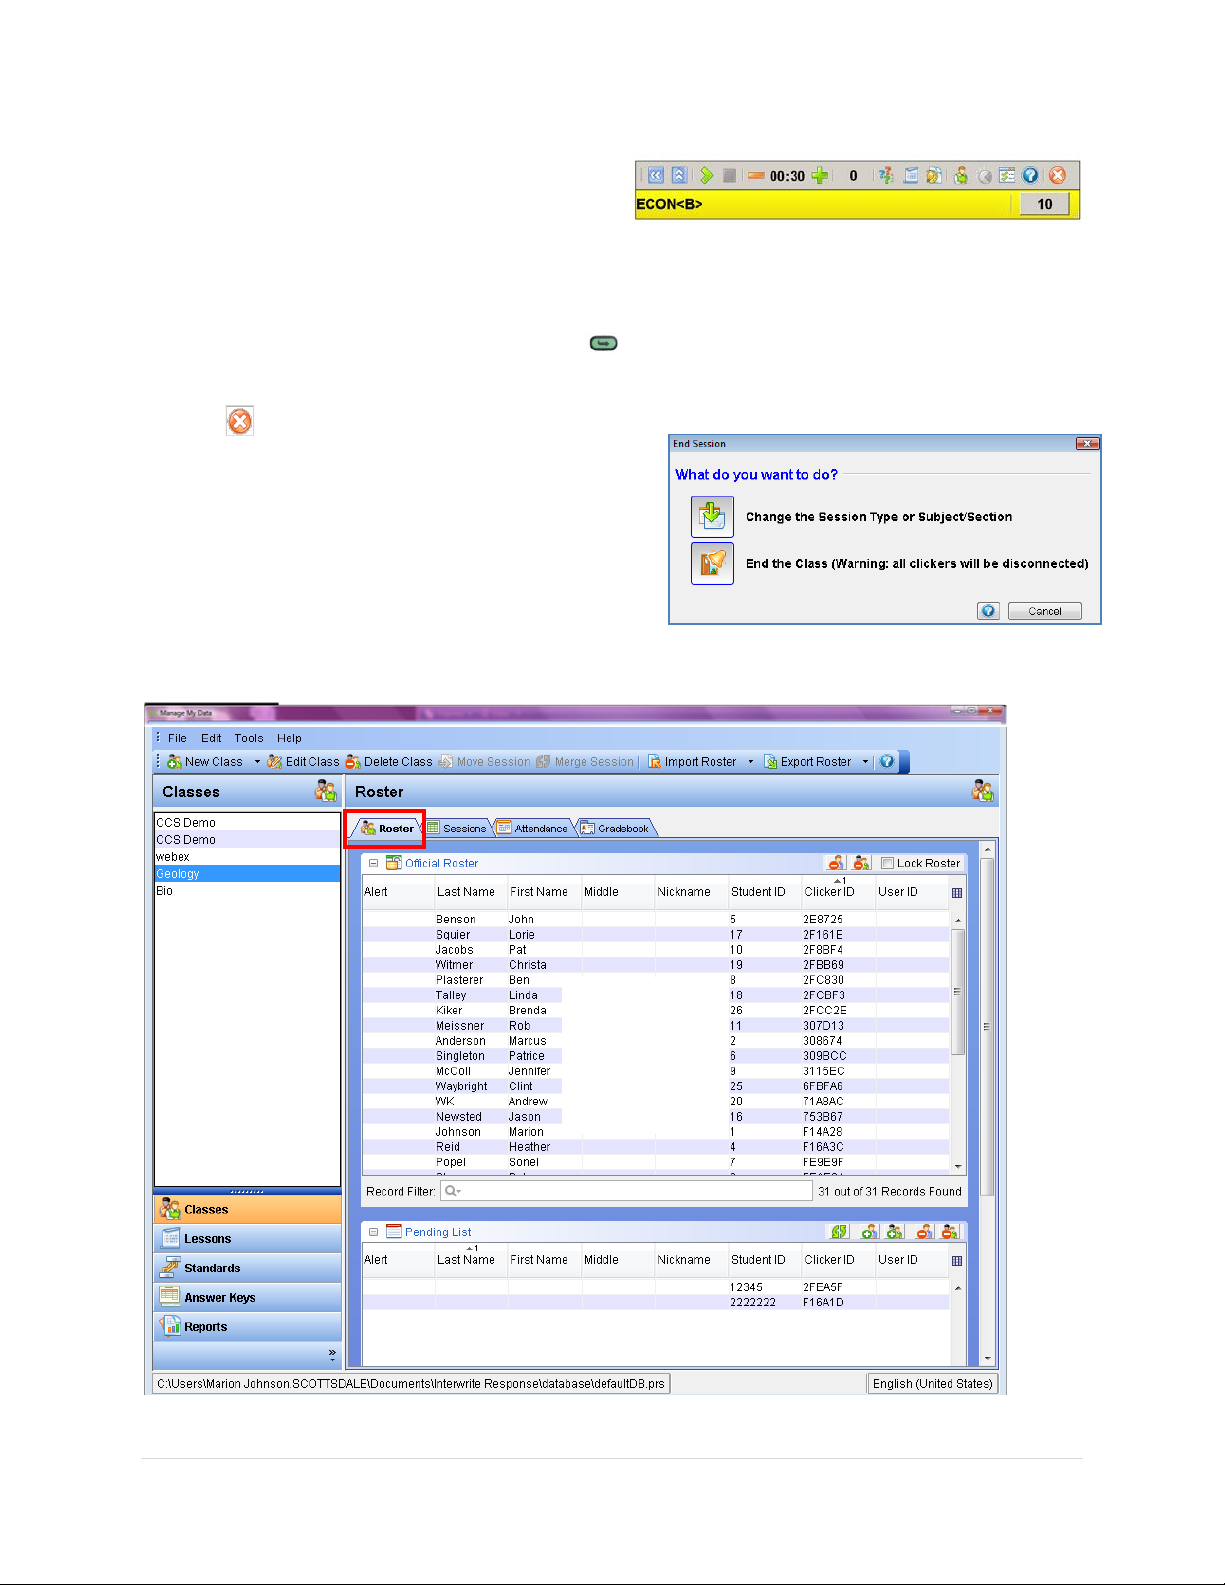
Click on to End Session.
Click End the Class to return to the main screen.
Click Manage My Data from the main screen.
When the Manage My Data window appears, select
the class from the classes pane.
Select the Roster tab from the roster pane.
21 | Page
Page 22
______________________________________________________________ Response User’s Guide
All new students added to a roster will first go to the Pending List until approved by the
instructor at which time; the student(s) will be moved to the Official Roster.
Note The
Alert column
is provided to show any issues like duplicate student IDs or blank
student IDs, etc. You should resolve thes e i ssues before the next session to ensure
data integrity.
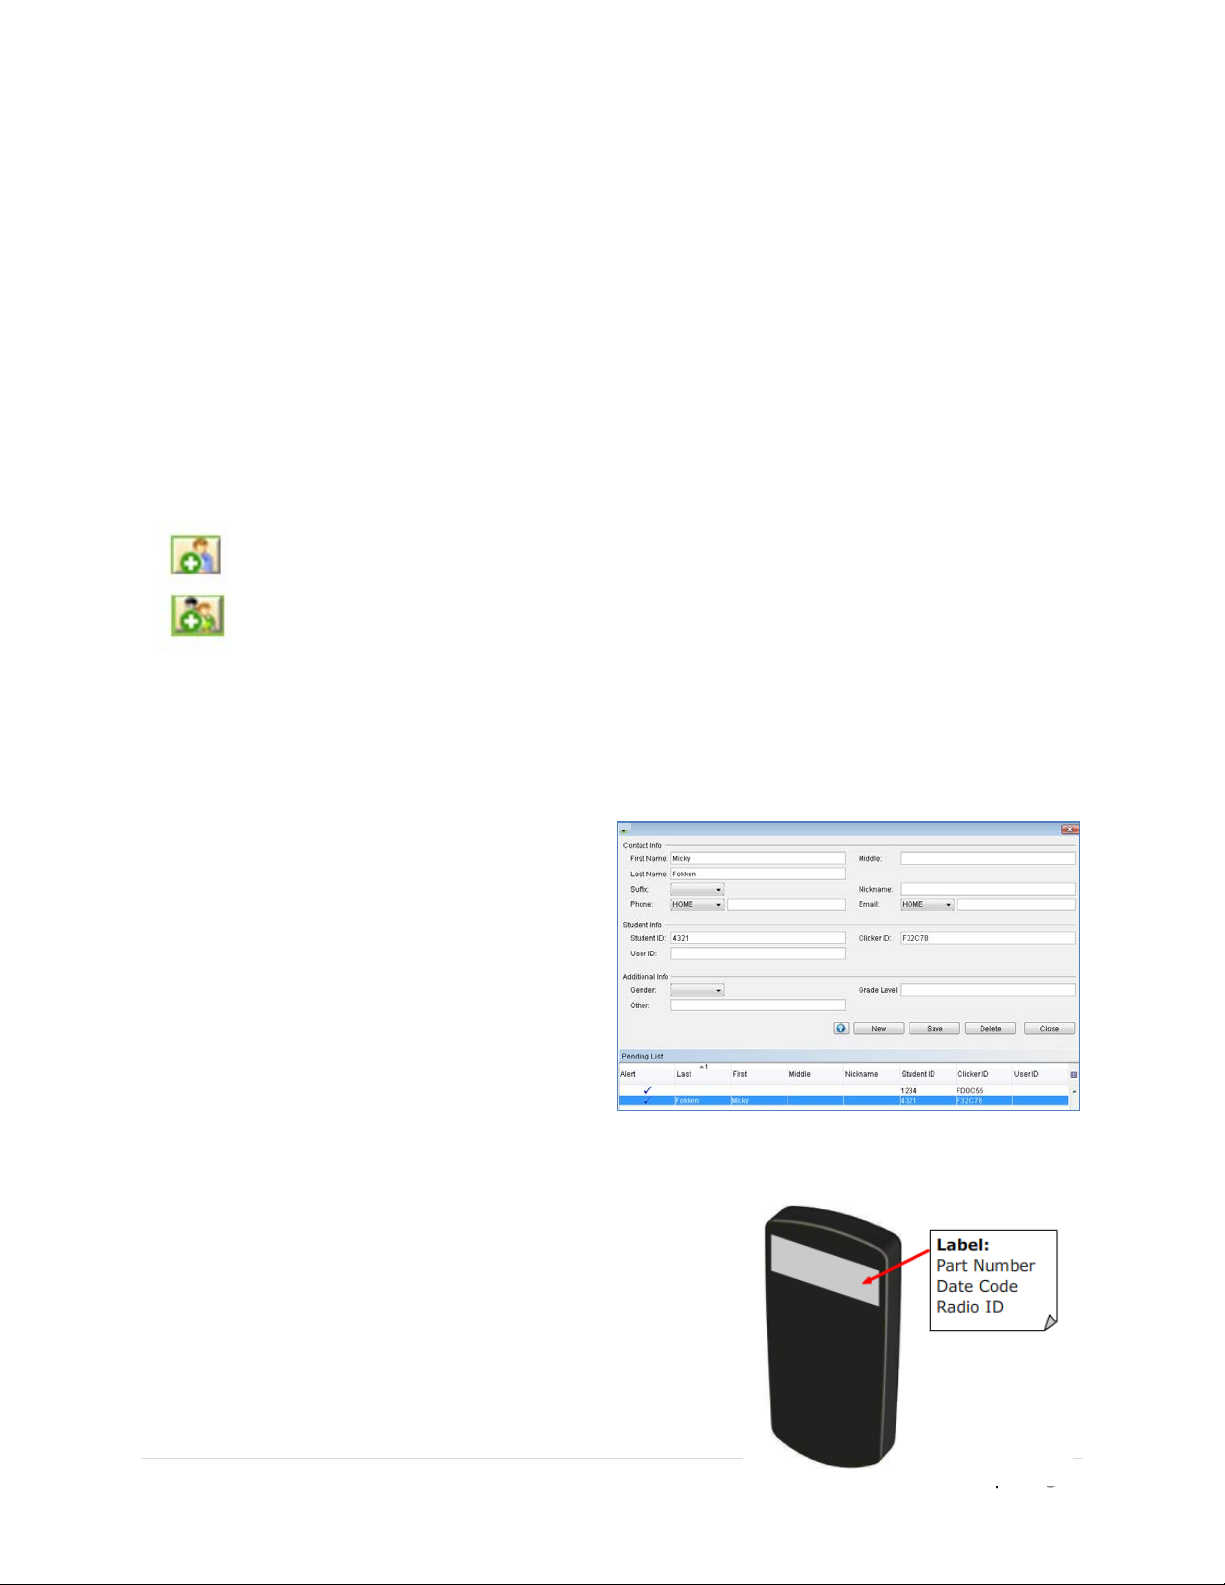
Use one of the following two icons either to move students individually to the Official Roster or
to move the entire roster.
• Move the selected stud ent re cords from the Pending List t o th e O ff i cial Roster.
• Moves all the student records from the Pending List to the Official Roster. It will
not move a record into the Official Roster if it is a duplicate of a recor d already
in the Roster.
Manually enter students into the roster
1. From the main screen, navigate to
the Manage My Data > Classes
> Roster tab.
2. Double click a student from the
Official Roster or click New
Student.
3. Enter the required information,
such as Student ID and Clicker
ID.
Note We recommend the auto populate method to be used when adding students to a
roster. To find the Student Response Pad/Radio ID on the Cricket RF, look on the
white label on the back.
4. Enter Student’s First Name and Last Name
along with any other information you would like
to record.
5. Click on Save to record the student information
into the roster.
22 | Page
Page 23
______________________________________________________________ Response User’s Guide
FIRST
NAME
LAST
NAME
STUDENT
ID
Ben
Affleck
1
Jennifer
Aniston
2
Drew
Barrymore
3
Halle
Berry
4
Cate
Blanchett
5
Jackie
Chan
6
Bill
Cosby
7
Courtney
Cox
8
Penelope
Cruz
9
Matt
Damon
10
6. To edit another student, highlight their name in the bottom window and change the
information,click the Save button.
7. To add a new student, click New.
8. When finished, click Close.
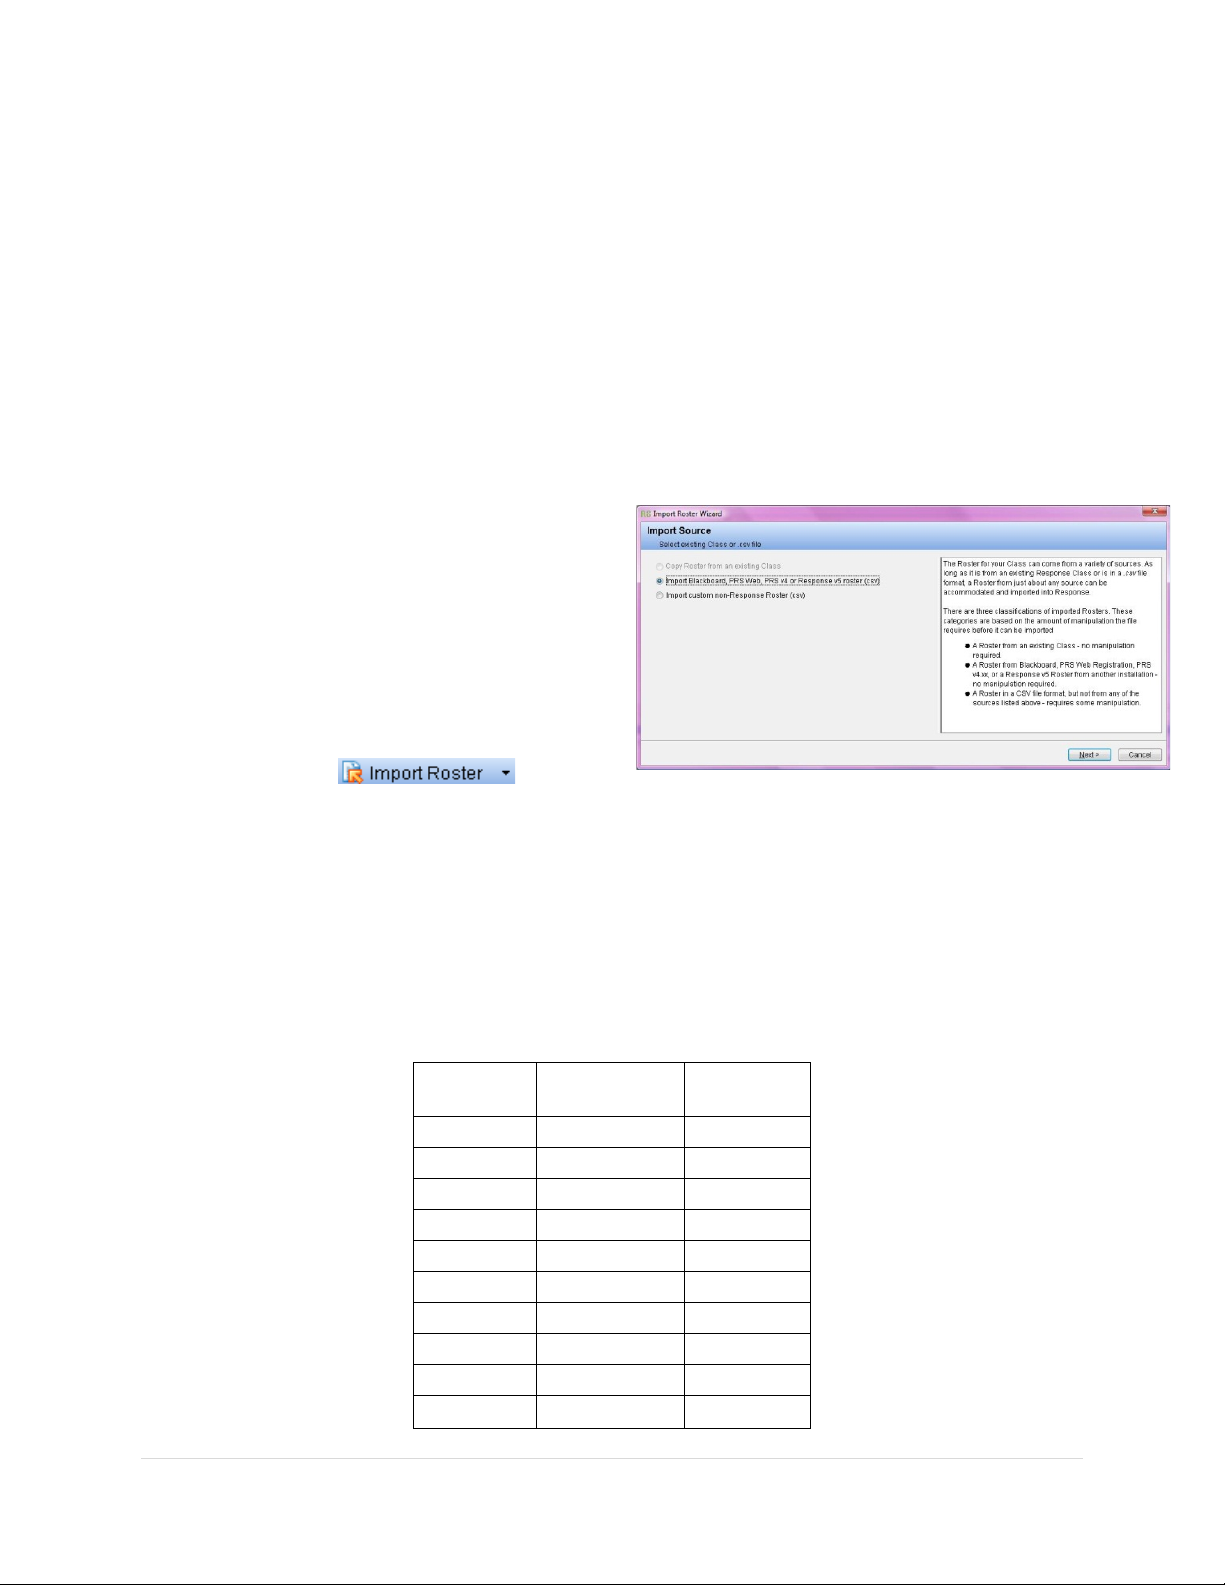
Import a roster using a csv file
The roster for your class can come from a variety of sources. As long as it is from an existing
Response class or is in a .csv file format, a roster from just about any source can be
accommodated and imported into Response.
There are three classifications of imported rosters. These categories are based on the amount
of manipulation the file requires before it can be imported.
• A roster from an existing class -
no manipulation required.
• A roster in a CSV file format, but
not from any of the sources
listed above - requires some
manipulation.
9. Click on in the
Manage My Data window.
10. Select Import custom non-Response Roster (csv).
Note All fields are required. The .csv file must include a heading (ex: First Name, Last
Name, Student ID) for each column otherwise it will not be recognized. See
example roster below.
23 | Page
Page 24

______________________________________________________________ Response User’s Guide
11. Click on the Browse button to select the
file.
12. Navigate to the location of the roster file you
want to import, select it and click on the Open
button.
13. Indicate how the imported roster is parsed.
Most are comma-separated.
14. Click on the Next button to continue.
15. Select merge to retain the information in the
existing roster such as the Student Response
Clicker ID and Student ID. It is recommended
that you Merge with current Roster by
Student ID since it is usually a required field in
most registration applications.
16. Click on the Next button to match the roster
fields.
.csv
Tip Remove the Custom Fields that are not in use by
highlighting and clicking the . The fields are
deleted only from the list and no t from your original
file.
17. Use the arrows to the right of the Roster Field
column to line up the Roster Fields with the Custom
Fields. The Roster Fields with asterisks must
match with a Custom Field.
Click on the Finish button to exit the Import Roster Wizard.
have a
24 | Page
Page 25
______________________________________________________________ Response User’s Guide
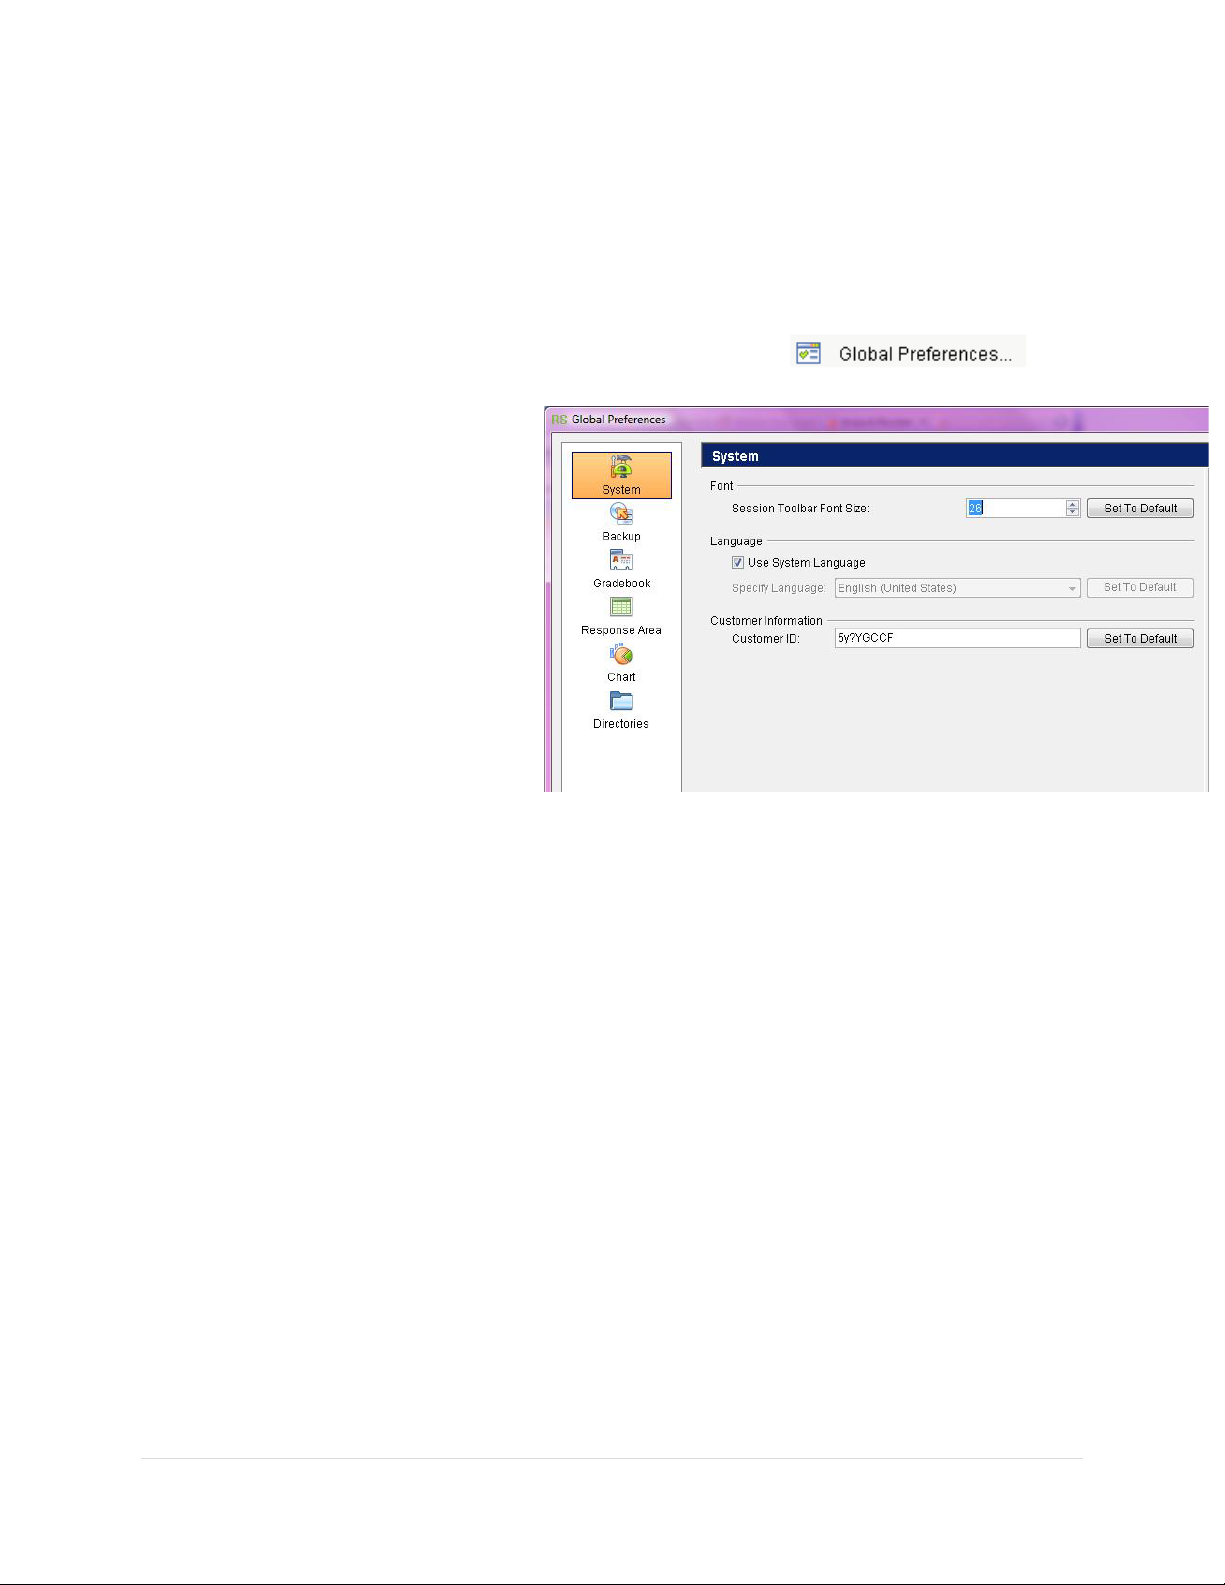
Global Preferences
Response offers many ways to customize System, Backup, Gradebooks, the Response area,
Charting and Directories. Each area of customization can be found under Global Pr e fe r en ces.
1. Navigate to Manage My Data > Edit.
2. Select Global Preferences from the drop down list.
System
Customize the following System
settings:
Font
You can change the size of the Session
Toolbar Font by clicking on the
increase and decrease buttons. This
will affect the size of the numeric
characters of the Timer, Response
Counter, and the Joined Counter and
the alphanumeric characters in the
class Name and Join Code. It will not
affect the display of the information on
the Session Status Bar.
Language
Response supports 48 different languages, including English. If your System Language setting i s
one of the supported languages, Response will display in that language by default. If you want
to view the list of supported languages or choose a specific language from the list, clear the
Use System Language checkbox to activate the language list. Scroll the list and click on your
language preference to select it.
Customer Information
The Customer ID is a value used in an IR installation, where each of the IR Student Response
Pads in a Class Pack are programmed with a unique ID that is recognized by only one PRS
Response system - the system whose Customer ID matches the one that was used to program
the IR Student Response Pads.
Note If you changed any of these System settings and you want to change one of them
back to the original setting, click on the associated Set To Default button.
25 | Page
Page 26
______________________________________________________________ Response User’s Guide
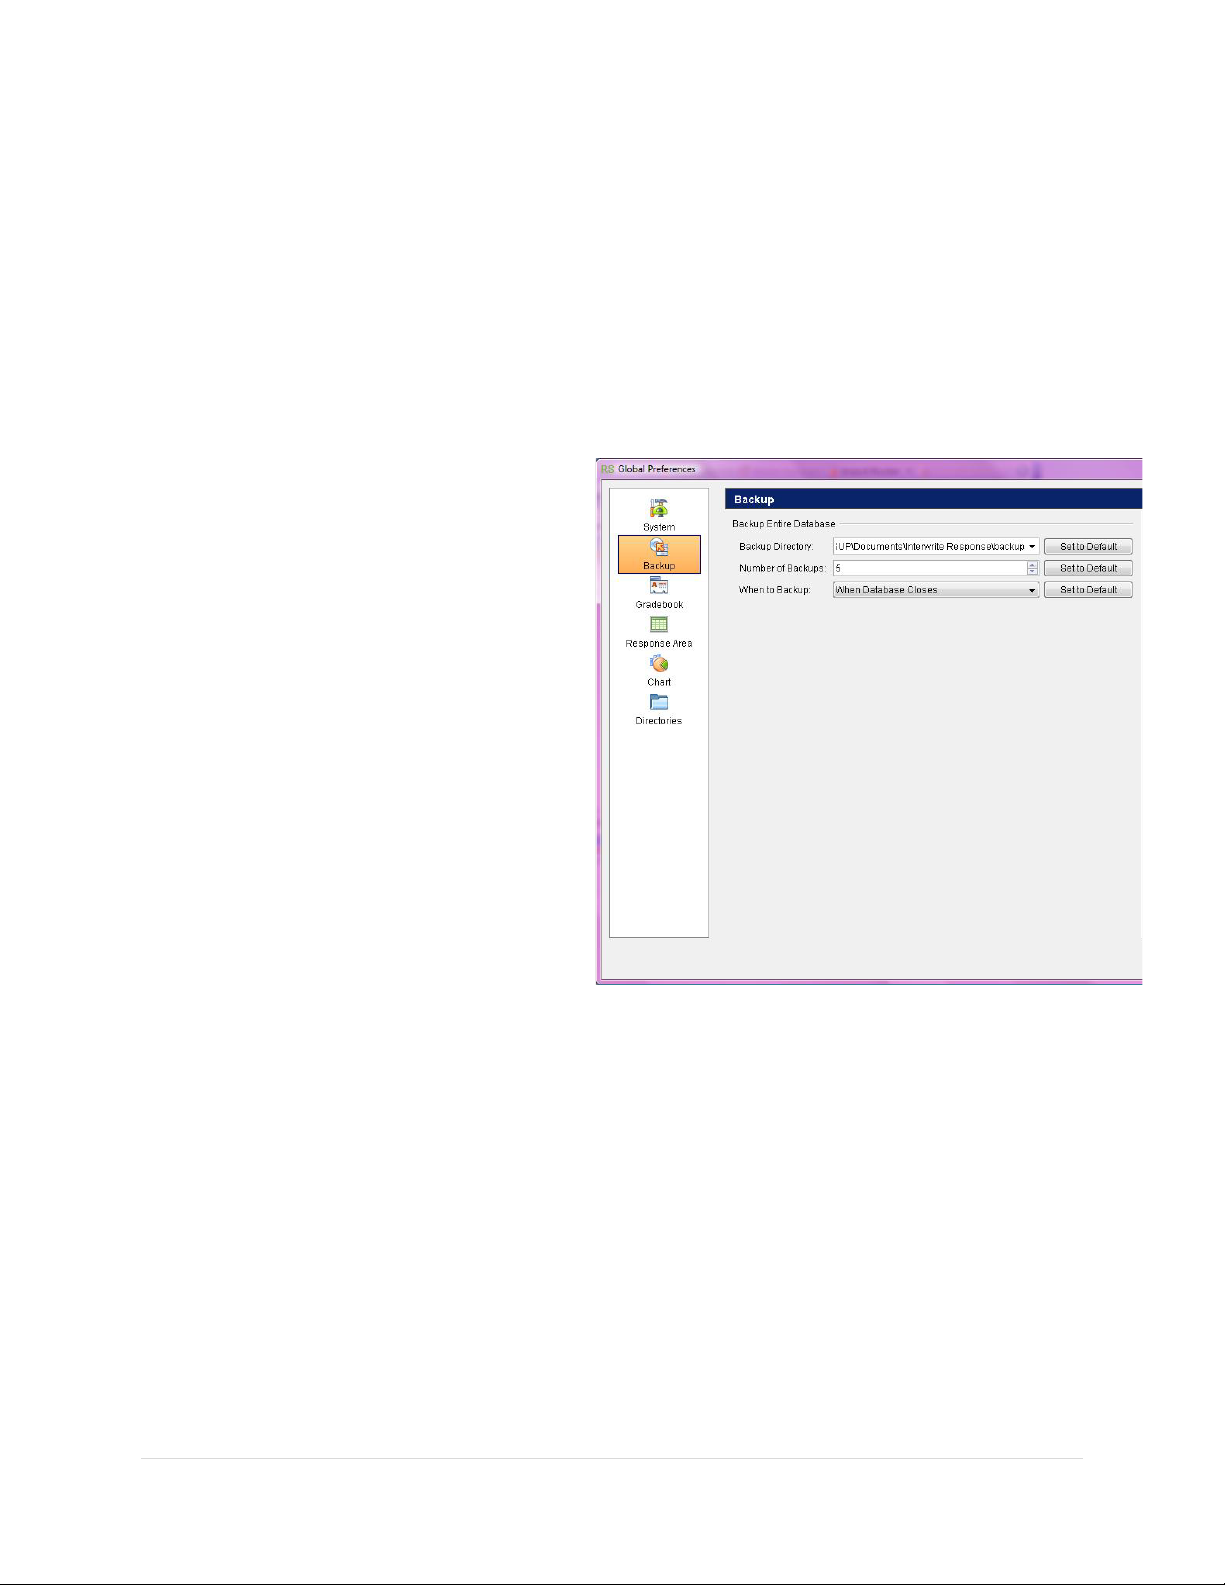
Backup Preferences
Response creates a copy, r ef er red to as a Backup, of your database whenever the database is
opened. This setting screen allows you to establish: where you want the backup to be located
and how many copies of the database are to be saved before Response overwrite s them.
Backup Directory
By default, the Backup directory is designated as the Response/backup folder. We strongly
recommend that you change the Backup directo ry to a location on your network, or to a thumb
drive.
Number of Backups
The default number of backups, the
, is 5. This means that five separate
cycle
copies will be made of your database before
it is overwritten. In the backup directory you
designate, if you have a database named
Default.prs
Default_1.prs
third
of backup copies you designate for your
rollover cycle may depend on the amount of
space you have available for their storage.
When to Backup
By default when you start Response it
automatically creates a copy of this
database. You can specify to create a
backup file when the software opens or
closes. If you select another database,
Response opens it and automatically creates
a backup copy of the newly opened database.
What do I do if I lose my database? If you lose your database, or it becomes corrupted,
copy the latest backup into your Response/database folder. Startup Response and click on
the Open button. Navigate to where you copied the backup database, s elect i t, and click on the
Open button.
, the first backup will be named
, the second
Default_3.prs
, and so on. The number
Default_2.prs
rollover
, the
26 | Page
Page 27
______________________________________________________________ Response User’s Guide
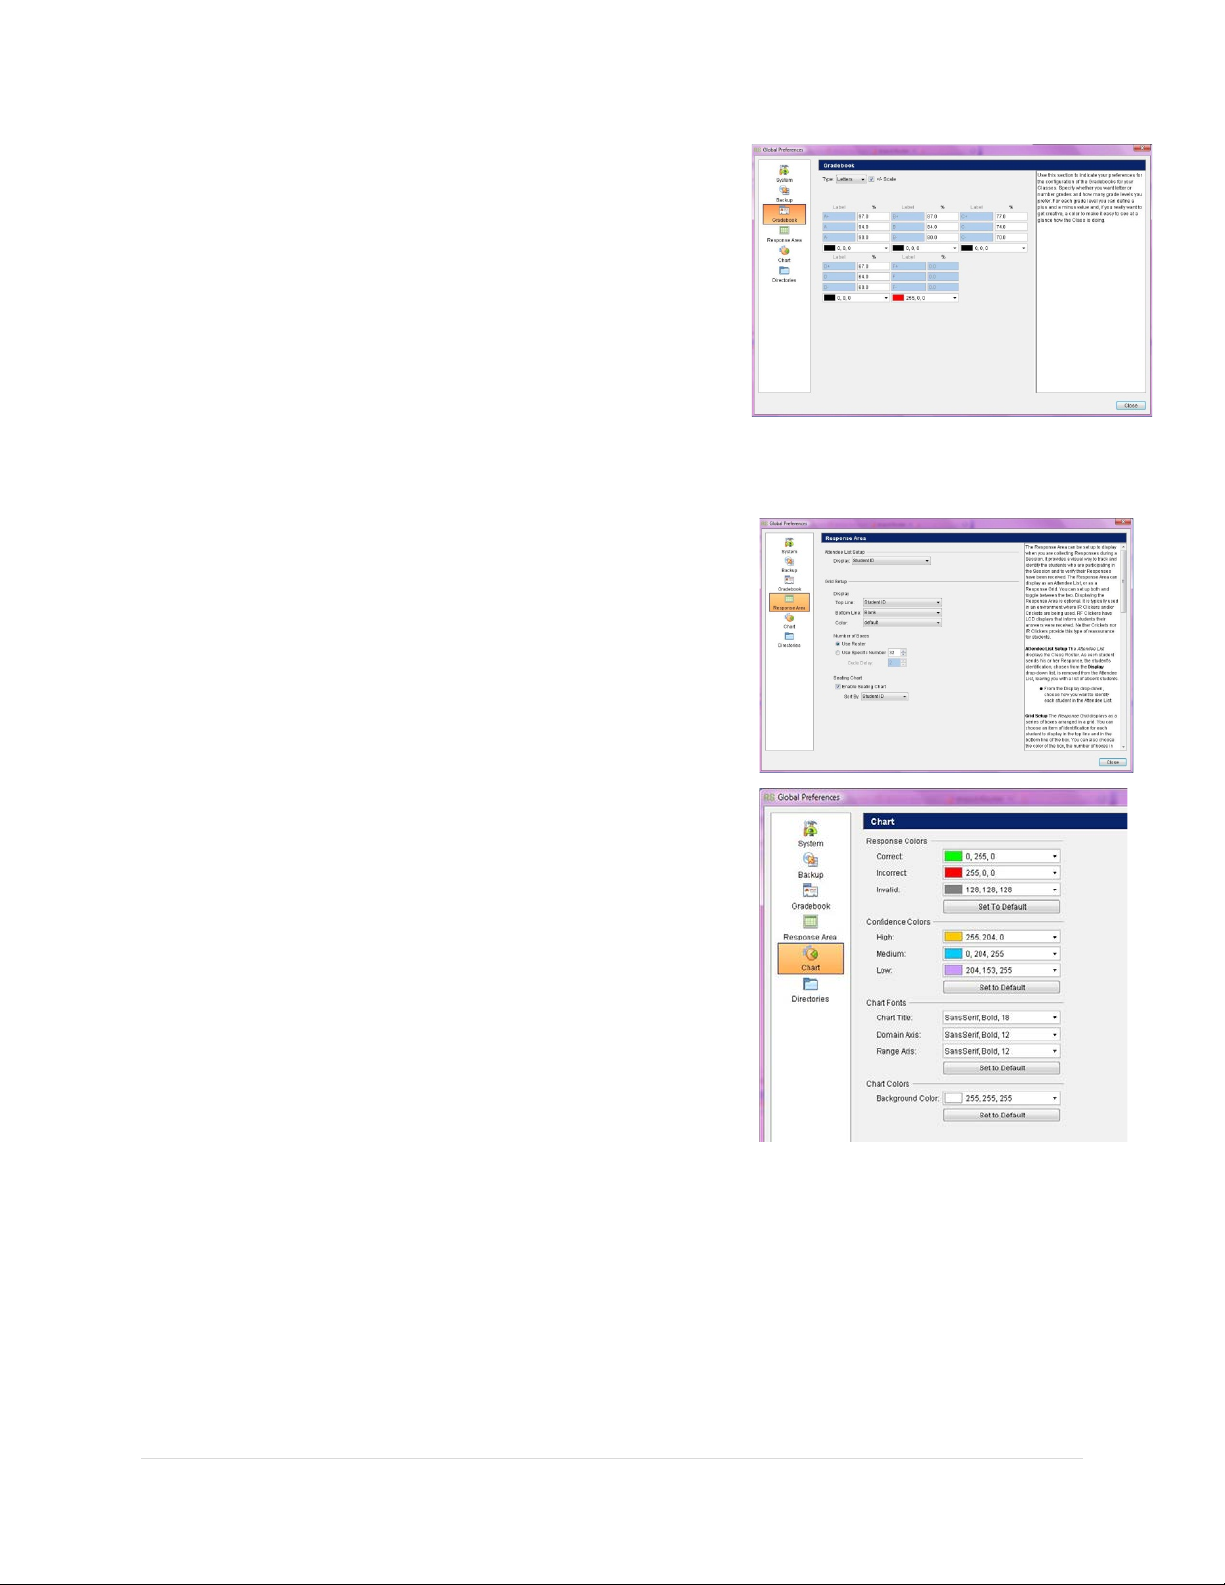
Gradebook Preferences
Use this section to indi cate your preferences for the
configuration of the gradebooks for your classes. Specify
whether you want letter or number grades and how many
grade levels you prefer. For each grade level you can define
a plus and a minus value and, if you really want to get
creative, a color to make it easy to see at a glance how the
class is doing.
Response Area Preferences
The Response Area can be set up to display when you are
collecting responses during a session. It provid es a visual
way to track and identify the students who are participating
in the session and to verify their responses have been
received. The Response Area can display as an Attendee Li st,
or as a Response Grid. You can set up both and toggle
between the two. Displaying the Response Area is optional.
It is typically used in an environment where IR Student
Response Pads and/or Crickets are being used.
Chart Preferences
Response Colors:
Different colors are used to visually identify the breakdown
of answers as
category shows the actual color assignment and its RGB
formula. Click on the Set to Default button to reassign the
original color selections.
Confidence Colors
Students can attach a Confidence Level Indicator to their
answers. This will inform the instructor how confident the
student is about their answer. The Pads use a 1 and 9 scale.
(PRS RF only) 1 being low confidence and 9 being a high confidence, by default the confidence
level is a medium confidence.
Chart Fonts
These preference settings refer to the text at the top of the chart and to the numbers that
identify the X and Y axis coordinates.
Chart Colors
This option will allow you to change the background color of the response chart.
Correct, Incorrect
, or
Invalid
. Each color
27 | Page
Page 28

______________________________________________________________ Response User’s Guide
Directories Preferences
These settings indicate your preference regarding data shari ng and the preferred location for
your exported rosters and sessions.
Data Sharing
If you want to share your data and make it available to
others who use the computer , click on the checkbox. The
Response directori e s w i l l be re-created in the Program Files
directory, which is an open access directory that is available
to all who have access on the computer.
Export
Indicate the location you want your Roster, Session and
Lesson exports to default to.
28 | Page
Page 29

______________________________________________________________ Response User’s Guide
Instant Classroom Interactivity
Overview
This section is designed for the beginner who has only used Response to set up a database and
classes. You will learn how to use the Participation Impromptu mode of delivering questions on
the fly to bring interactivity to their existing lessons.
Purpose
After completing this module, participants will be able to:
• Launch an Impromptu session in the Participation mode.
• Change delivery options for different instructional use.
• Become familiar with the Session Toolbar.
• Set Session Toolbar Preferences.
• Create an answer key.
• Launch an Impromptu session in the Self-Paced and Homework mode.
• Gather responses using Homework Mode.
• Generate reports to analyze student performance dat a.
29 | Page
Page 30

______________________________________________________________ Response User’s Guide
Participation: Impromptu
Use this feature to ask questions during a lesson in coordination with existing questions from
textbooks, multimedia presentations, or any other non-Response source. Screen captures of
the desktop are automatically taken and saved as part of the session data.
Starting a Participation Session
You will collect responses during a session. A
session is a meeting of the students in a class for
the purpose of collecting t heir answers to questions.
1. Select Collect Responses from main
screen.
2. The Collect Responses-New Session
dialog box will appear with the following
fields:
• Name: The default name is the class name followed by the date and time at
which the Session is initiating. This of course can be customized as seen here.
• Class: Select your new class that
you created earlier. This clas s
should already have your list of
students, roster.
• Subject/Section: Select the
Subject or Section, if appropriate.
• Lesson Type: Select
Participation as the Type of
Session you are going to run.
• Select Impromptu as the
Lesson Type.
3. Click on the OK button to accept the settings.
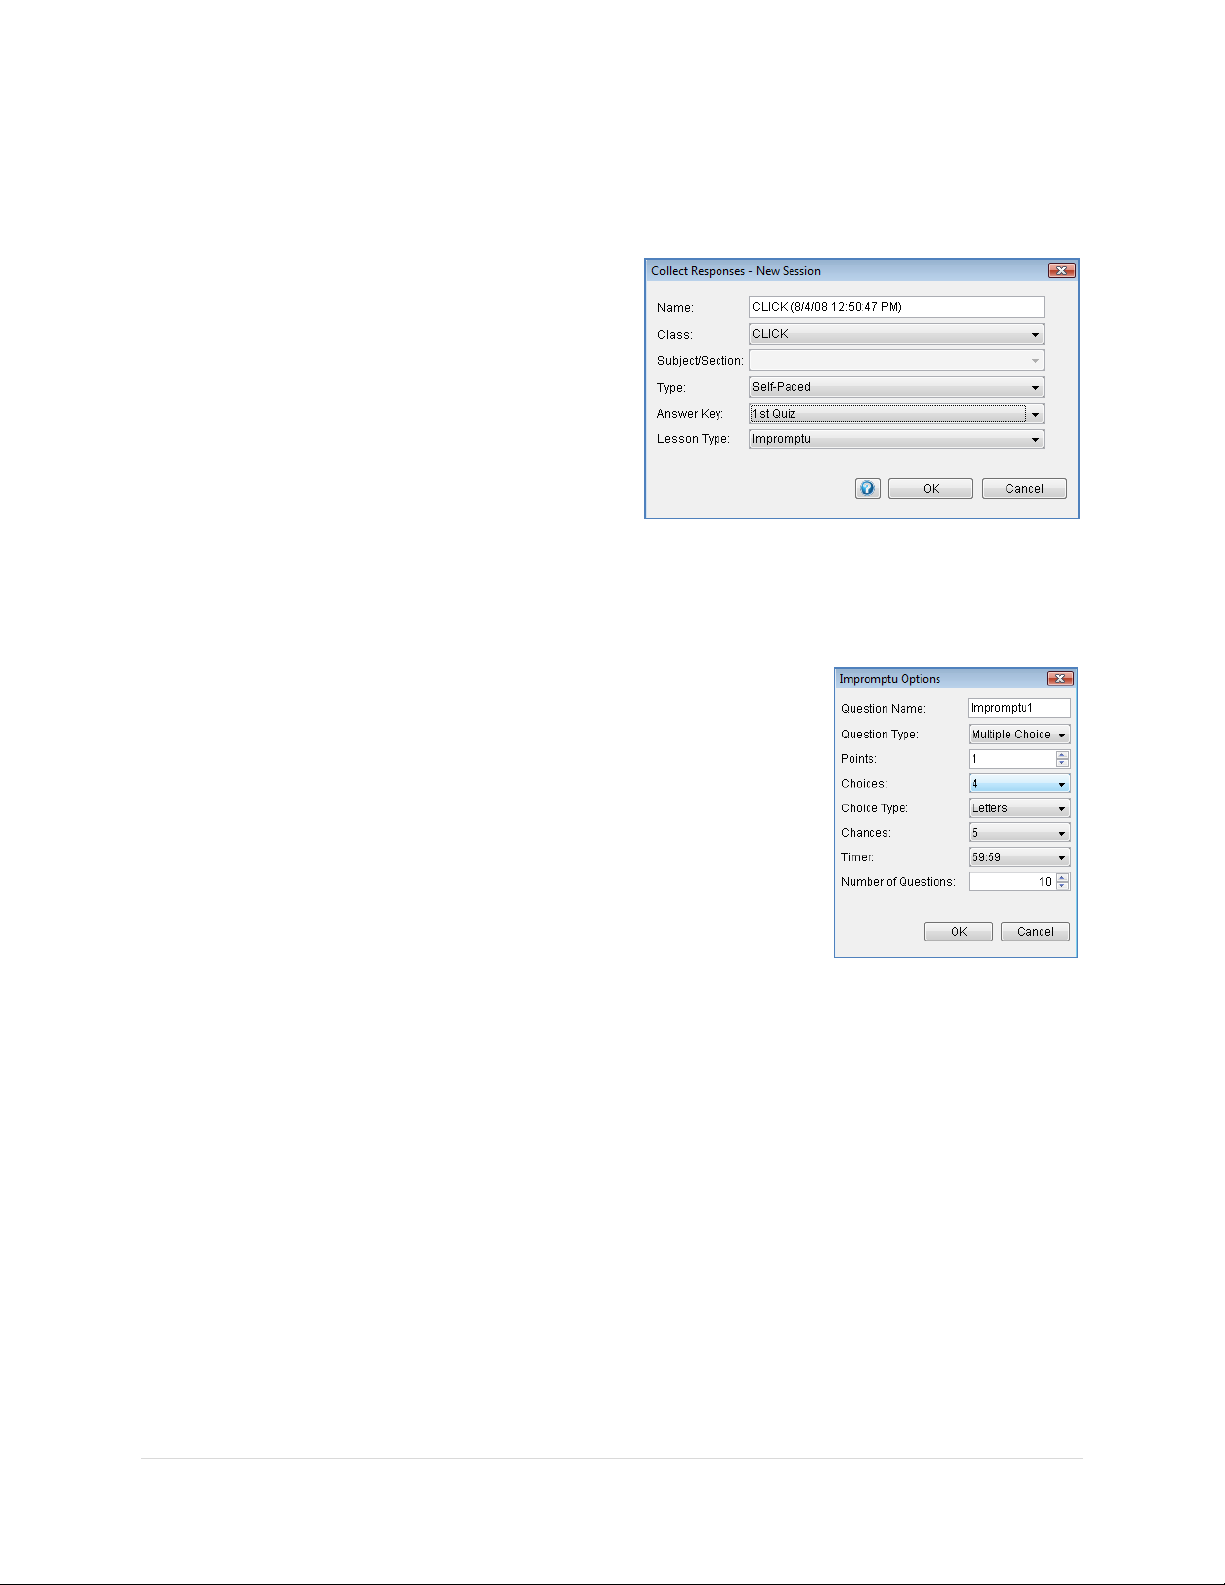
Now you will see the Impromptu Options. You can choose to prompt
these options for every question by checking off Prompt Every Question.
• Question Name: This field is automatically filled with text
such as Impromptu 1,2, etc. You may change it if you
choose to remember the context of the question for reporting
purposes.
• Question Type: Choose a Question Type from the drop-
down list.
30 | Page
Page 31

______________________________________________________________ Response User’s Guide
X X
Answer Series: Arrange the answers in the correct order. All of
X X X
Multiple Choice, Single Correct: Choose one correct answer
X X
Numeric: Enter the numeric answer using the numeric Input
X
Essay Question: Type the correct answer using the input keys.
X X
Survey: A Survey Question is asking for a n opinion. There is no
X X X
True/False: True/False Questions have two answer choices,
The below table explains each type of question and the compatible Student Response Pad.
Question Type Compatibility List Chart
CPS
Pulse
PRS RF Cricket Question Type
the answer choices are included in the correct answer, which is a
string with the answer choices in the correct order, e.g., DBCA or
4361725.
from the answer choices.
Keys. The answer can be up to 11 numeric characters plus the
minus sign or the decimal point. (CPS Pulse only)
Short Answer: Type the correct answer using the input keys. The
answer can be no more than 20 characters long. (CPS Pulse only)
The answer can be no more than 140 characters long. (CPS Pulse
only)
correct answer. Question must be posed in multiple choice
format.
True or False. Cri cket Student Re sponse Pads have a T button
and an F button. CPS Pulse uses A for True, and B for False.
• Points: Indicate the number of points students will be
awarded for a correct answer.
• Choices: Sele ct the number of answer choices you want
to define for this question.
• Choice Type: Lettered or numbered answer options are
available for Multiple Choice, Answer Series and Survey
Question Types.
• Chances: Indicate how many times students can change
their answers to the question within the allotted time.
Answers transmitted after all the chances have been
taken will be ignored.
• Timer: Indicate the amount of time students will have to
respond to this question.
• Correct Answer: The correct answer can be inputted into
this field. It is generally left blank during an Impromptu
question. If you choose not to set the correct answer
when creating the question, you may do so later in the
Manage My Data section of the Response software.
31 | Page
Page 32
______________________________________________________________ Response User’s Guide
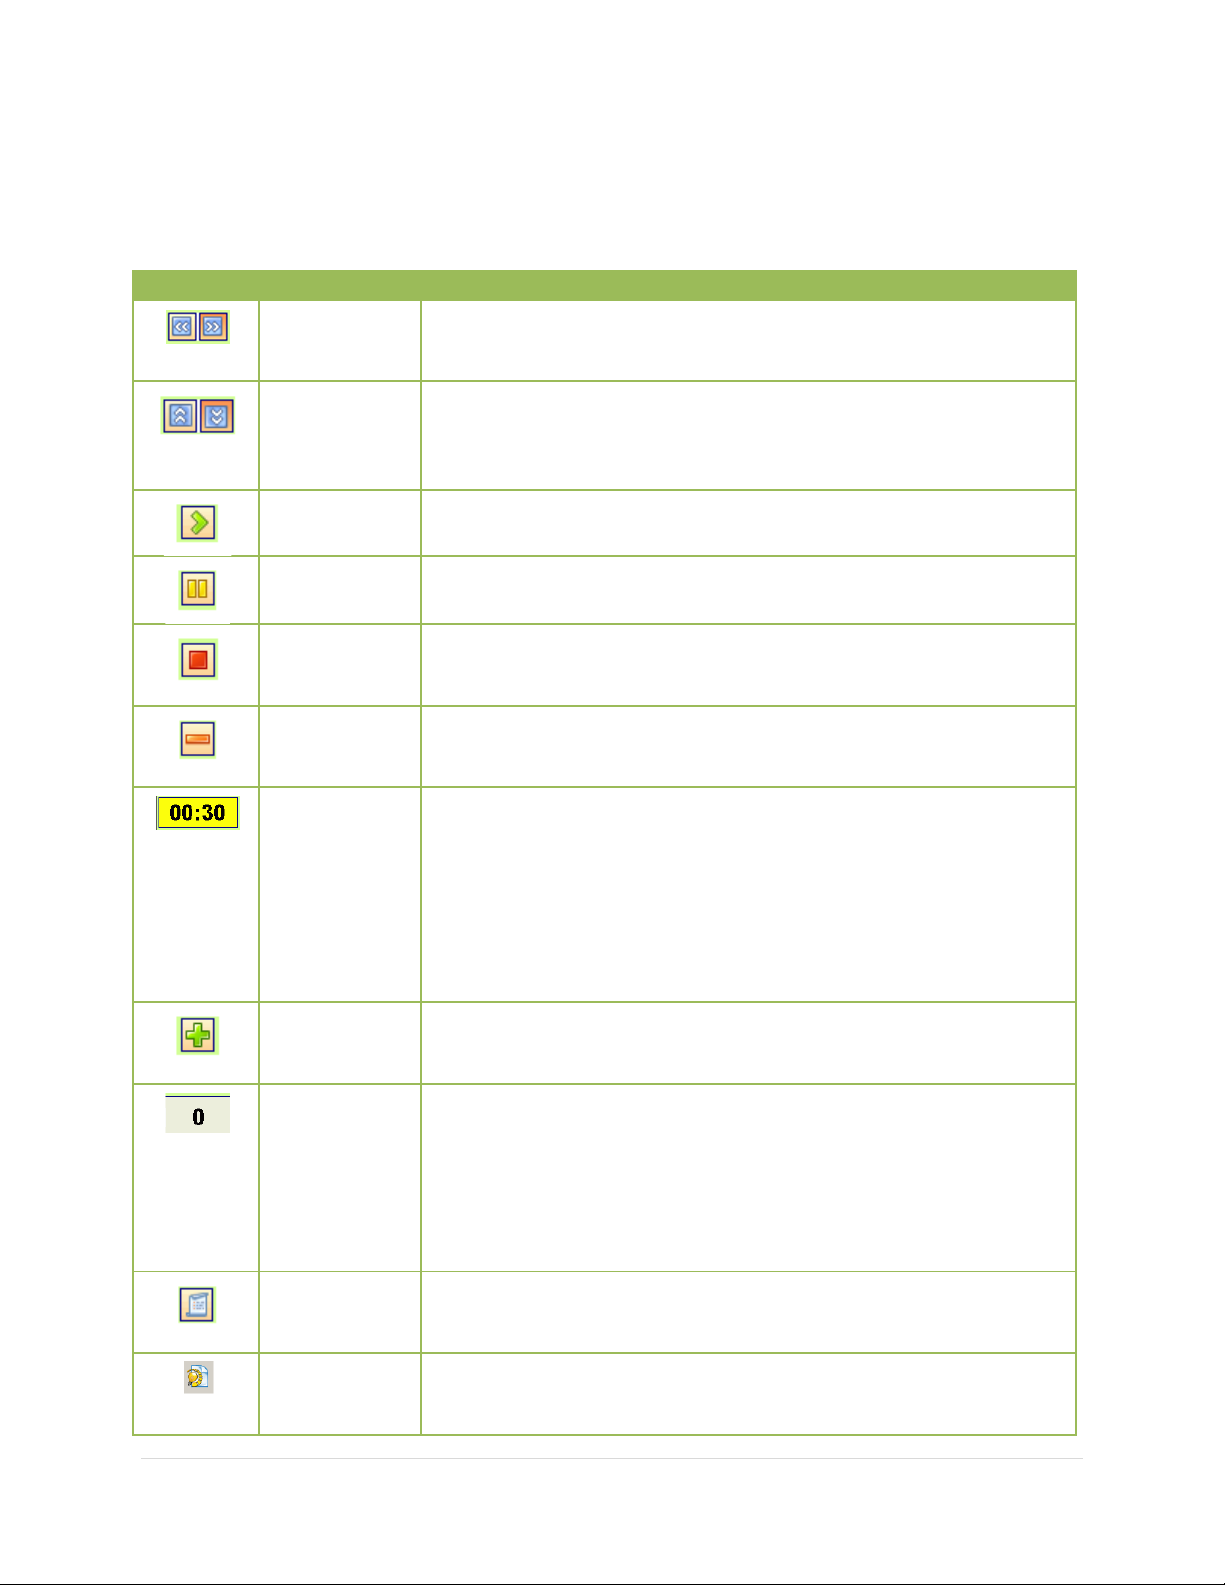
Tool Icon
Tool Name
Tool Description
Collapse/
Toolbar
A handy tool when you nee d to see the full screen; click
Collapse/
Components
A handy tool when you nee d to see the full screen; click
Start Timer
Students cannot send their answers to the question until
Pause Timer
Click on this tool to pause the timer. Answers sent while
Stop Timer
When everyone has responded to the question (the
Joined List), you can click on this tool to stop the timer.
Decrease
Each time you click on this tool the amount of time on
from Preferences.
Timer
The timer displays the total time allotted for the
students' Student Response Pads.
Increase
Each time you click on this tool the amount of time on
from Preferences.
Number of
The label on this button is a counter and shows the
Data section of Response.
Switch to
Mode
When you click on this tool, the Select Lesson dialog will
session.
Switch to
Mode
When you switch to ExamView
Mode, a dialog box is
questions.
Select OK to accept the Impromptu options. The Session Toolbar appears. See Tour
of Session Toolbar on the next page.
Session Toolbar-I con Des cri ptions
Restore
Restore
Attached
Time
on it to collapse the toolbar. Click again to expand it.
on it to collapse the toolbar. Click again to expand it.
you click on this tool to start the timer.
the timer is paused will not be accepted.
Responses counter will show the same number as the
the timer will decreas e. You can change the increment
question. It will begin counting down as soon as you
click on the Start Timer tool. When the timer reaches the
last 10 seconds, a slider with a purple ball displays. The
ball begins to drop as the timer counts down the final 10
seconds. When time has expired, Response will not
accept any more transmissions from the
Time
the timer will increase. You can change the increment
Student
Responses
number of answers received. You can compare it to the
Joined List count er on the RF Status Toolbar to
determine when everyone has answered the question. In
addition, you can click on this button to view the Session
Data window, which is also accessed from the Manage
Lesson
ExamView
display. Click on the lesson you want to run in this
displayed that allows you to load your ExamView
®
32 | Page
Page 33
______________________________________________________________ Response User’s Guide
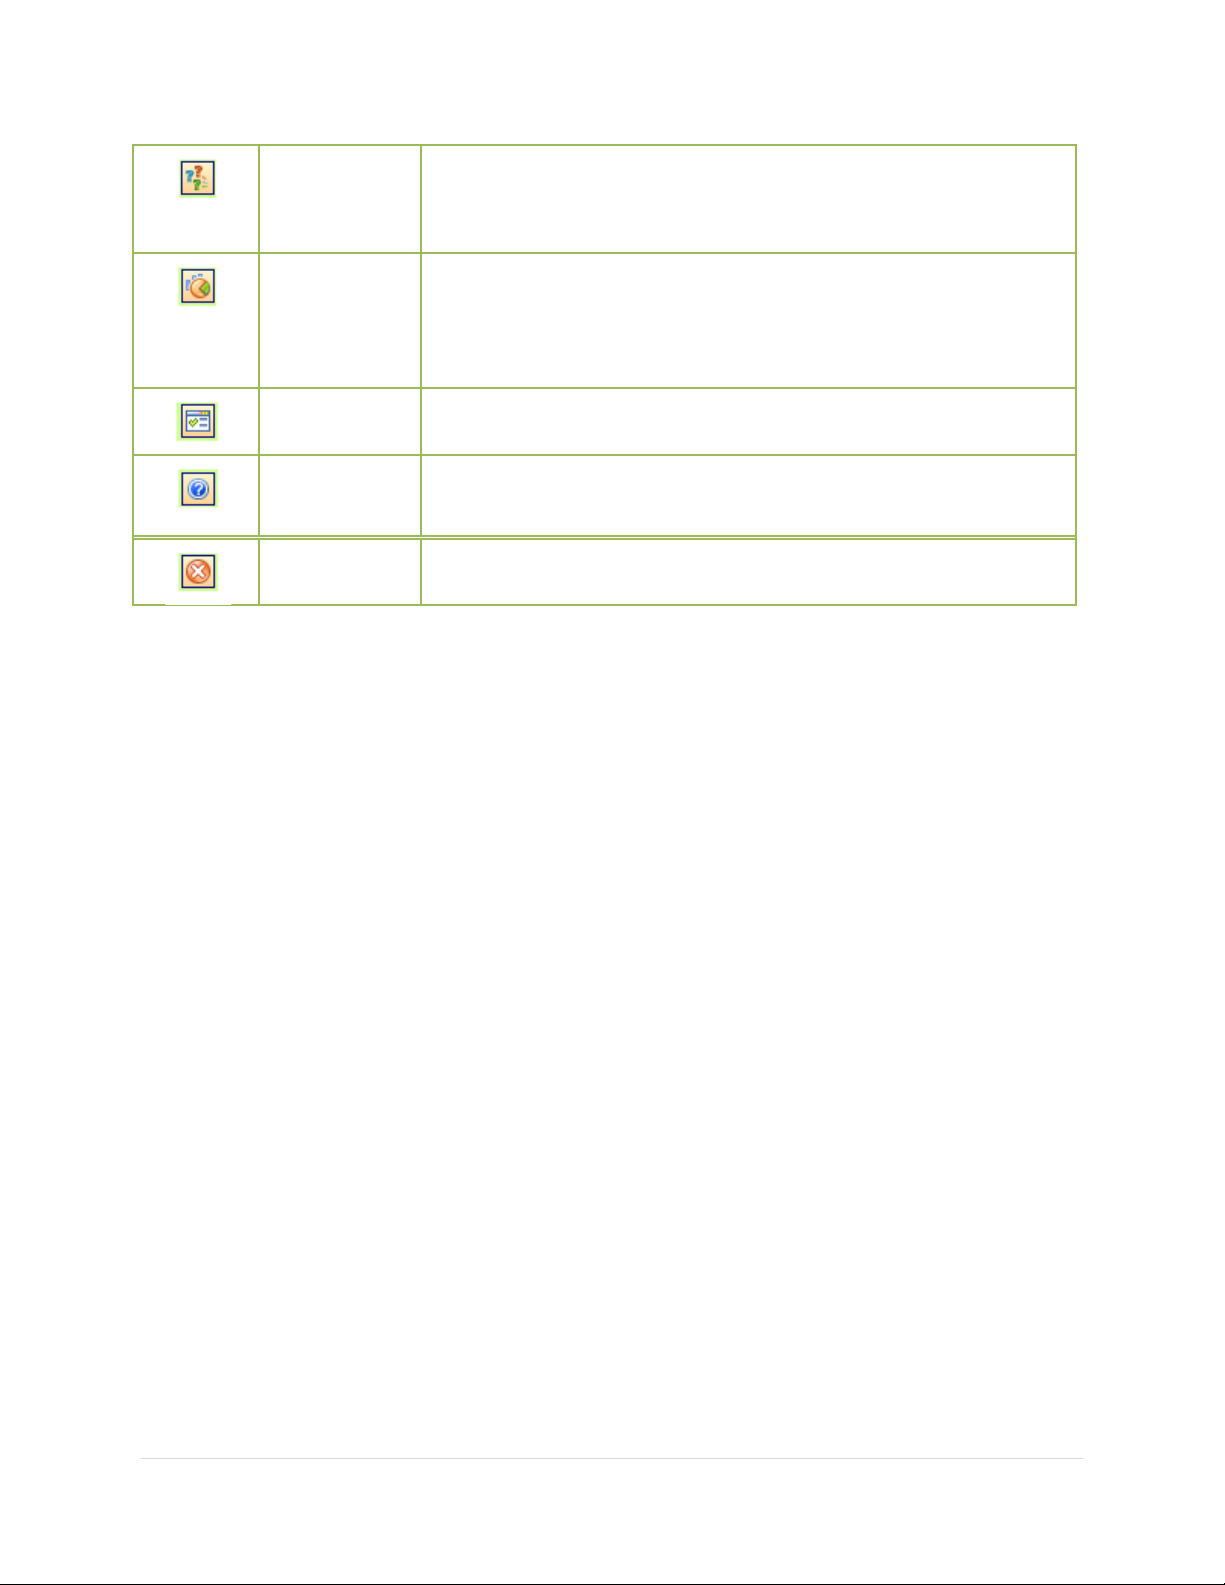
Switch to
Click on this tool to switch to Impromptu Mode and add
Question Properties for your Impromptu Question.
Show
The Show Response Chart tool is available only when the
question just asked.
Show
Click on this tool to display the Session Preferences options
Session
Help
Click on this tool to display this context-sensitive Help.
End Session
Click on this tool to end the session and display the What
Impromptu
Mode
Response
Chart
Preferences
Toolbar
an impromptu question to the session. The Impromptu
Options dialog will display where you can set the
Automatically Show Chart Preferences option (Sess ion
Preferences Menu) is not selected. Click on this tool
when you are ready to show the polling results for the
menu.
do you want to do? dialog.
33 | Page
Page 34
______________________________________________________________ Response User’s Guide
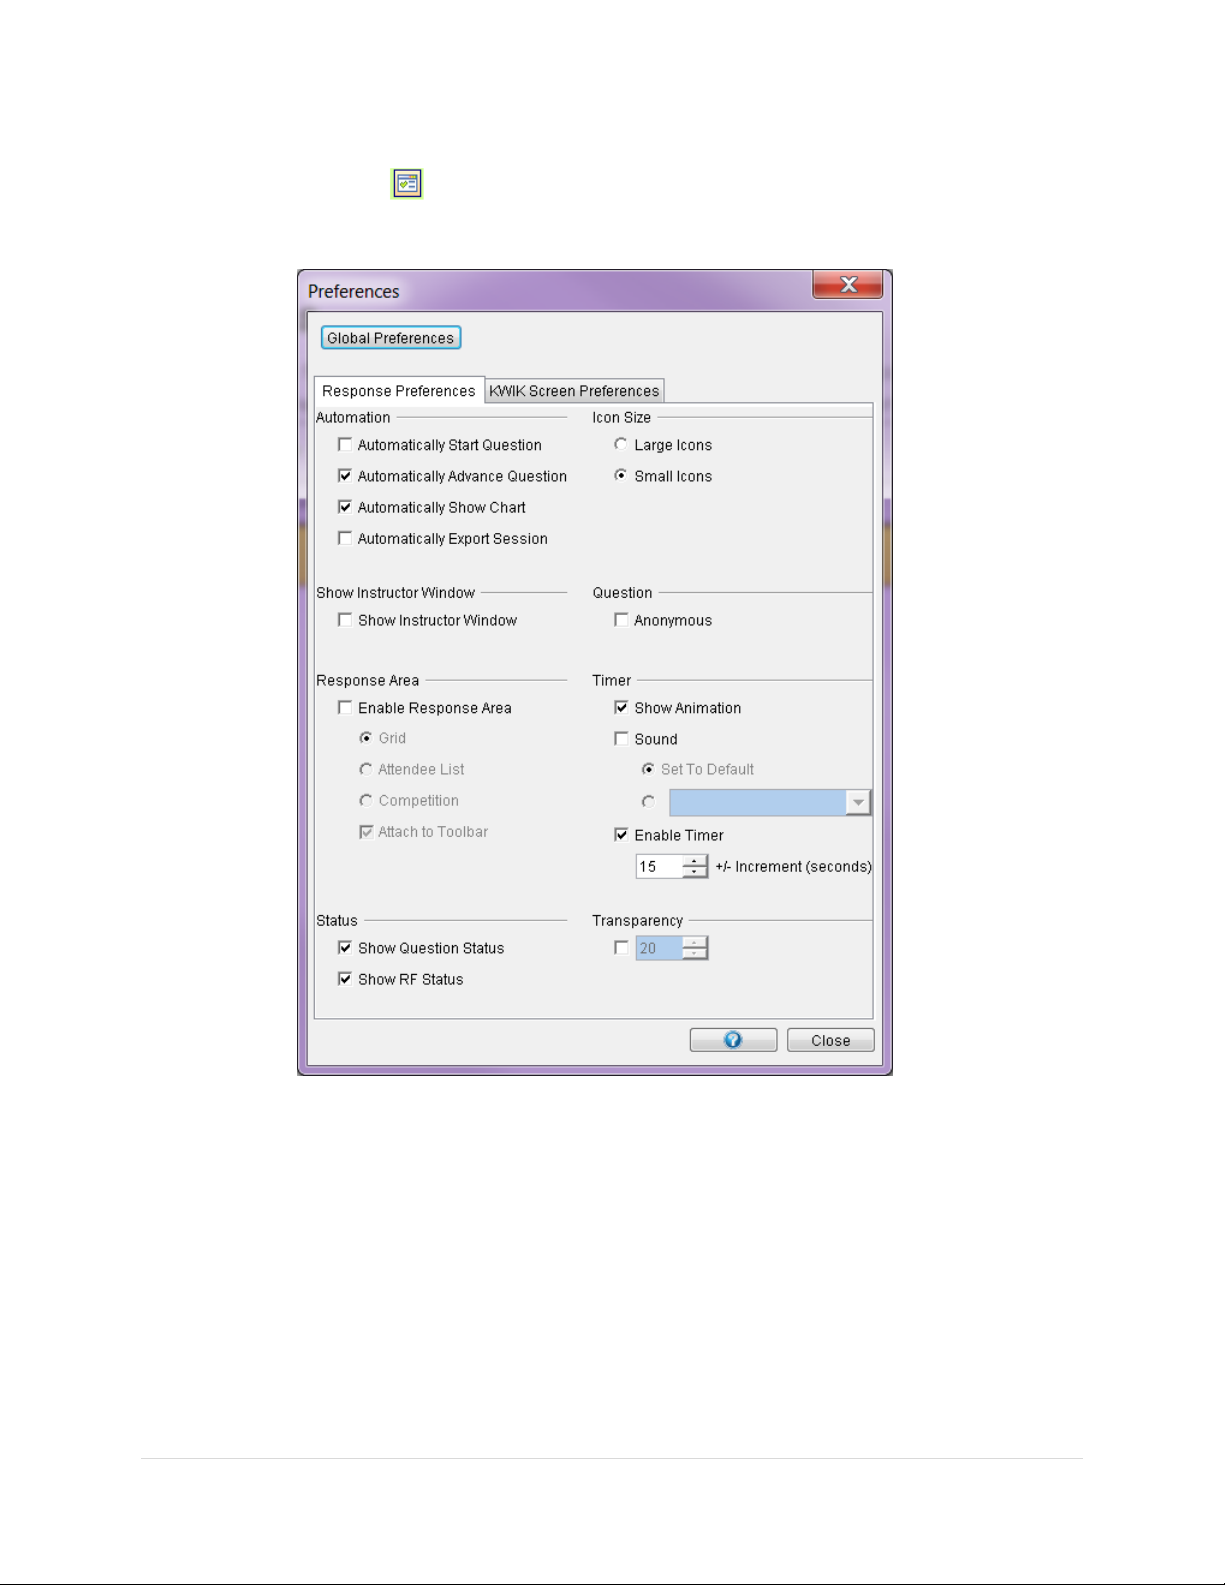
Session Toolbar Preferences
The Preferences menu is divided up into eight sections that deal with eight different
aspects of the Session presentation environment.
Automation
• Automatically Start Question: Automatically starts the question, so that you do
not need to press the Start b u tton to begin the response cycle.
• Automatically Advance Question: As soon as the Response Chart is closed,
Response displays the next question in the lesson.
• Automatically Show Chart: When this Preferences option is selected, the
Response Chart will pop up either when the timer expires, or when yo u click on
the Stop Timer tool.
34 | Page
Page 35

______________________________________________________________ Response User’s Guide
• Automatically Export Session: When this Preferences set ting is selected, the raw
Session data will be exported automatically to Interwrite
Response/exports/sessions, or to the locatio n you s pecified in the Global
Preferences/Directories section, as a CSV file when the Session or the Class has
ended.
Icon Size
• Small Icons / Large Icons: By default the Session Toolbar tools are
represented by small icons. Click on the Large Icons radio button to make the
icons larger.
Instructor Window
• Show Instructor Window: Shows the answers in real time, as they are being
received in Response, us ing the Session Data dialog. This feature should be
used on a separate screen that only the instructor can see so correct answers
are not revealed to the students.
Question
• Anonymous: Select this Preferences option when you want to collect and
record data without the students' identification.
• Show If Correct on Clickers; now found in the Device Manager: When
selected, the messag e Correct or Incorrect will appear on each student's PRS RF
Student Response Pad LCD display after the questio n has ended . On t he CPS
Pulse Student Response Pad the device will show a check or an X on the display
to indicate if correct, once the question has ended.
Note The option to turn on correct answer for the Student Response Pad can be
found in the Device Manager>Right click the receiver>Properties>Clicker.
Check the box next to: Indicate Correct Response on Clicker
Response Area
• Enable Respons e Area: Displays the Response Area. The Response Area is
configured in Global Prefer e nces. Click on the radio button that represents the
type of Response Area you want to display, the Response Grid or the Attendee
List. An additional option attaches the selected Response Area display to the
Session Toolbar. If you prefer to move the Response Area to another location on
the screen, uncheck the option. The Response Area will display in its own dialog.
Competition: This option will add two additional bars to the session toolbar,
Fastest Time and Leaderboard. Fastest time will display the students with
fastest time and what their time was. The Leaderboard will rank the top 5
students as they complete the questions.
Timer
• Show Animation: By default, animation is enabled. When the timer counts
down to 10 seconds, the slider and ball display and the ball begins to drop.
• Sound: An air horn alerts students that the timer is about to expire. It sounds
when the timer counts down to 10 seconds and the animated ball begins
35 | Page
Page 36

______________________________________________________________ Response User’s Guide
Scanning found 1
to drop. You can also add your own sound file (.wav or .mp3), by clicking on the
radio button, then drop down arrow.
• Enable Time r: When the timer is showing, you can change the increment
value of the timer increase and decrease control s by clicking on the spinner
arrows to increase or decreas e the increment value.
Status
• Show Question Status: The Question Status Bar is the portion of the Session
Toolbar that displays the settings from the New Session dialog , the question
settings, and the timer status.
• Show RF Status: The RF Status Bar is the yellow status bar that displays
across the bottom of the Session Toolbar when an RF class is running.
Transparency
• When the focus is not on the Session Toolbar it becomes transparent to the level
of transparency established with this setting. The higher the setting, the more
transparent the Session Toolbar becomes. If you do not want the toolbar to
become transparent, cl ea r the checkbox.
Joining the Class
When you see the Session Toolbar with the Yellow RF Status bar with the Join Code, students
can turn on their Student Response Dev ices and join.
1. Turn on the Student Response Pads.
2. Enter the Join Code within the brackets < > and press
the send key. PRS RF/CPS Pulse users should wait until
the class name is displayed on the Student Response Pad
ECON
screen before pressing the s end key.
Respond to a Question
Pose a question for students to answer. This
question could come from any of your existing
lesson materials or even could be created
on the fly (impromptu).
Enter the response using the Student Response
Pad.
Press send to send the respons e to the receiver.
After all responses ha ve been collected, press or let the timer reach 0 to stop the question.
If set in the options, the response chart will automatically appear (set by default).
Because the question was entered on the fly (impromptu), the correct a nswer is not set. Click
to bring up the Question Properties window and mark the correct answer.
36 | Page
Page 37

______________________________________________________________ Response User’s Guide
Tool Icon
Tool Name
Tool Description
Edit Question
Use to make changes to the question's properties after you
Show Session
Display the Session Data window where you will see a number
Chart Type
• Vertical Chart: Display responses in a
Data Sorting
• Bin Values: Display the frequency of each individual
and answer series questions.
The correct answer in the Response Chart window changes from red to green.
Response Chart-Icon Descriptions
Properties
Data
have reviewed response distribution. You can also access the
partial credit opti on from here.
of different views of the response data.
• Horizontal Chart: Display responses in a horizontal
• Pie Chart: Display responses in a pie chart.
• Histogram Chart Display responses in a histogram
• Top 5 Values: Display the top five most frequent
• Top 10 or 15 Values: Display the top 10 or 15 most
vertical chart.
chart.
format. This chart is only available for numeric question
types.
correct response choice i n a bin in the response chart.
This option is available only for multiple
correct/multiple choice question types.
responses to the question. This option is available for
multiple correct/multiple choice, numeric and answer
series questions.
frequent responses to the question. This option is
available for multiple correct/multiple choice, numeric
37 | Page
Page 38

______________________________________________________________ Response User’s Guide
• All Values: Display all the Response Choices or
Numeric and Answer Series Questions.
Slice Question
Display a cross section of the data in this question and the
Compare
Display a side-by-side comparison between the current
Return to
Use this tool to return to a display of the current question after
Response Choice sets that were transmitted. This
option is available for Multiple Correct/Multiple Choice,
Data
Questions
Original
Question
data in a previously polled question.
question and another question you select from the popup
dialog.
you have compared it with another question, or set up a data
slice.
38 | Page
Page 39

______________________________________________________________ Response User’s Guide
Ending a Session
Once you are finished polling your students, you can end your current session and view the
data.
1. Click on the End Session button on the session toolbar.
2. You will then be prompted to either
change the session type/subject, or to
end the class. If you select End the
Class, all Student Response Pads will be
disconnected from the class, and you
then return to the main Response screen.
3. To view data from your session, click on the Manage My Data button .
4. Click on the Classes button, and then select the class you wish to review session
data.
5. Click on the Sessions tab,
and then double click on
the session that you
would like to review.
6. For more information on reviewing, editing, and reports for a session, see Module 6:
Managing Data and Reports.
Reports
See the reports secti on of this guide for step-by-step directio ns on how to generate, print, and
export reports. Look at this report following the Participation: Impromptu section of delivery.
Session Summary by Student
The Session Summary by Student lists the report type, session name, class, cla ss average,
Student Response Pad ID numbers, student names, st ud ent IDs, number of correct to
attempted answers, and percentage of correct to attempted answers for all students selected in
the report.
39 | Page
Page 40
______________________________________________________________ Response User’s Guide
Self-Paced: Impromptu
The Self-Paced Impromptu can be used as a supplement to worksheet s and other instructi o nal
materials you have in hardcopy. You can create an answer key in Response, distribute hard
copies to the students, and have them respond for a quick grade using Self-Paced mode.
Creating an Answer Key
When you create an answer key, please have a hard copy of the course material with you,
preferably one that has the correct answers indicated. You should make this answer key before
you present it to your students.
1. Begin by going into the Manage My Data section of the Response Software.
2. Click on the Answer Key button in the left window pane.
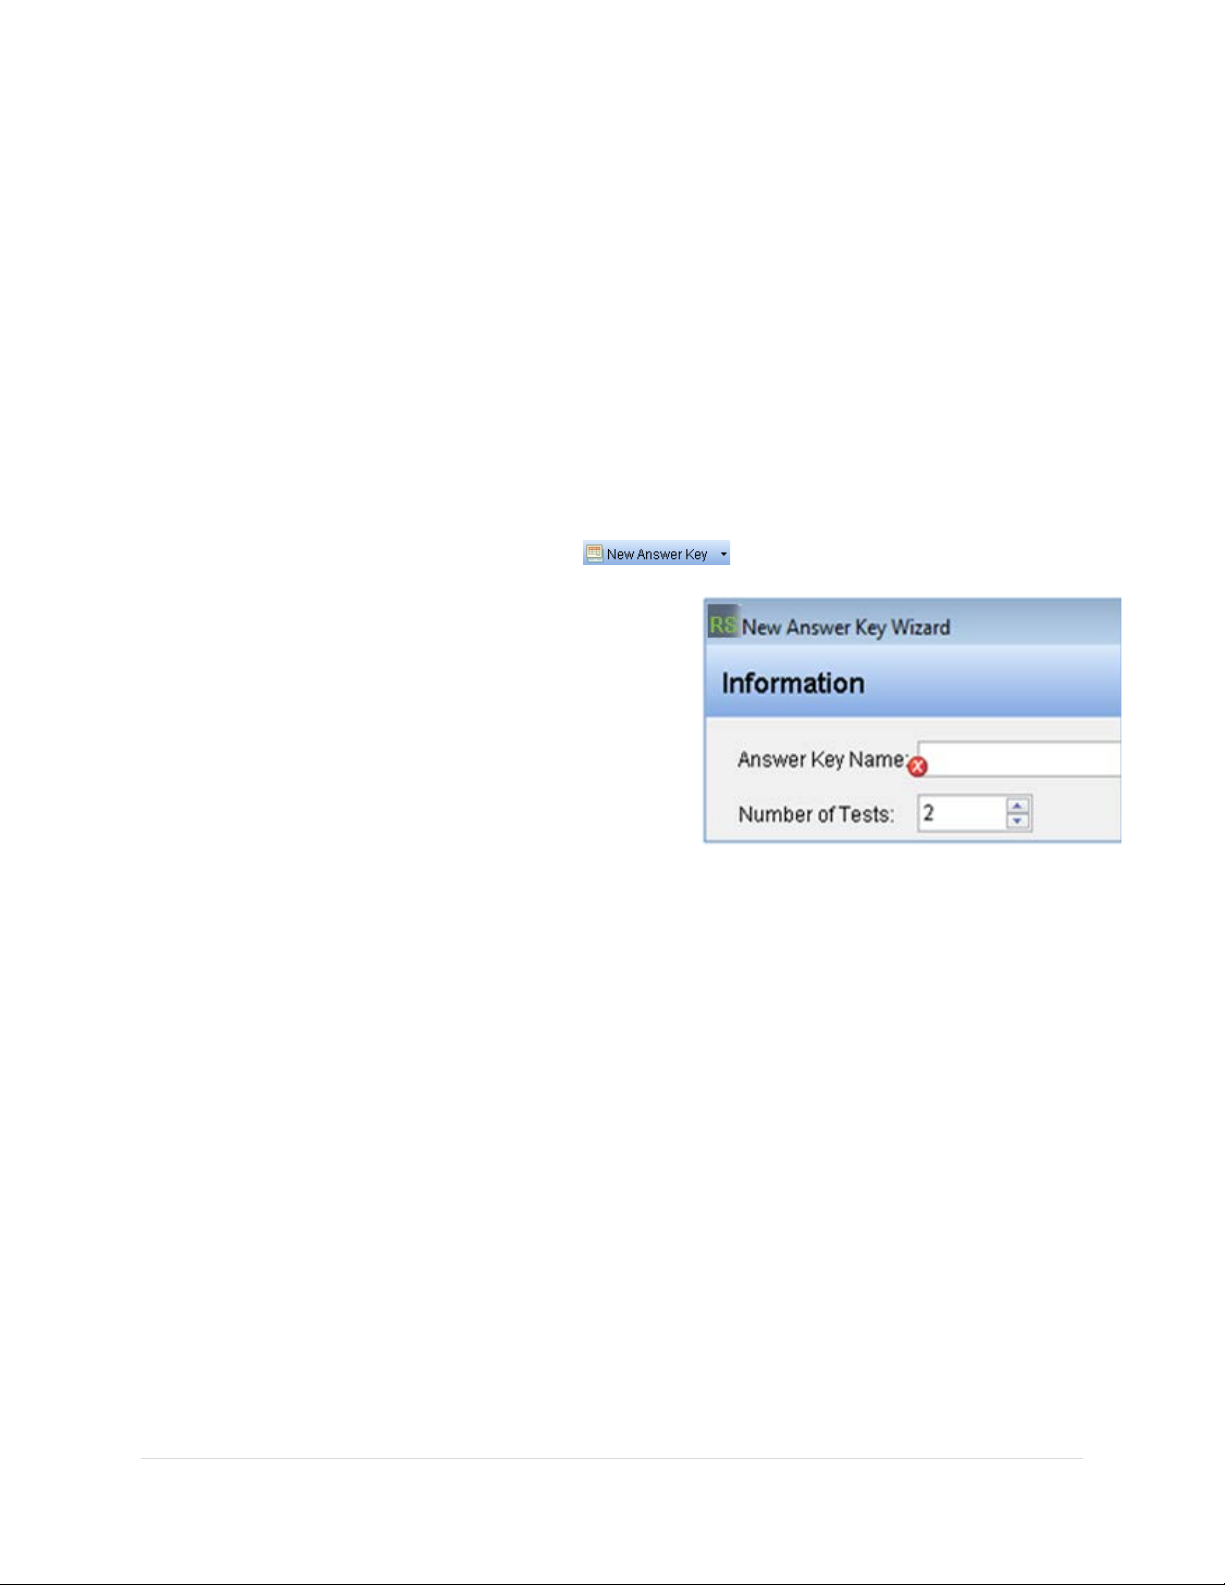
3. Click New Answer Key in the menu
options. The New Answer Key Wizard
will appear.
4. Enter the Answer Key Name. (See the
next page for sample questions and
answers to use)
5. Change the Number of Tests to 2. This
feature is available for creating multiple
versions of an answer key. (optional)
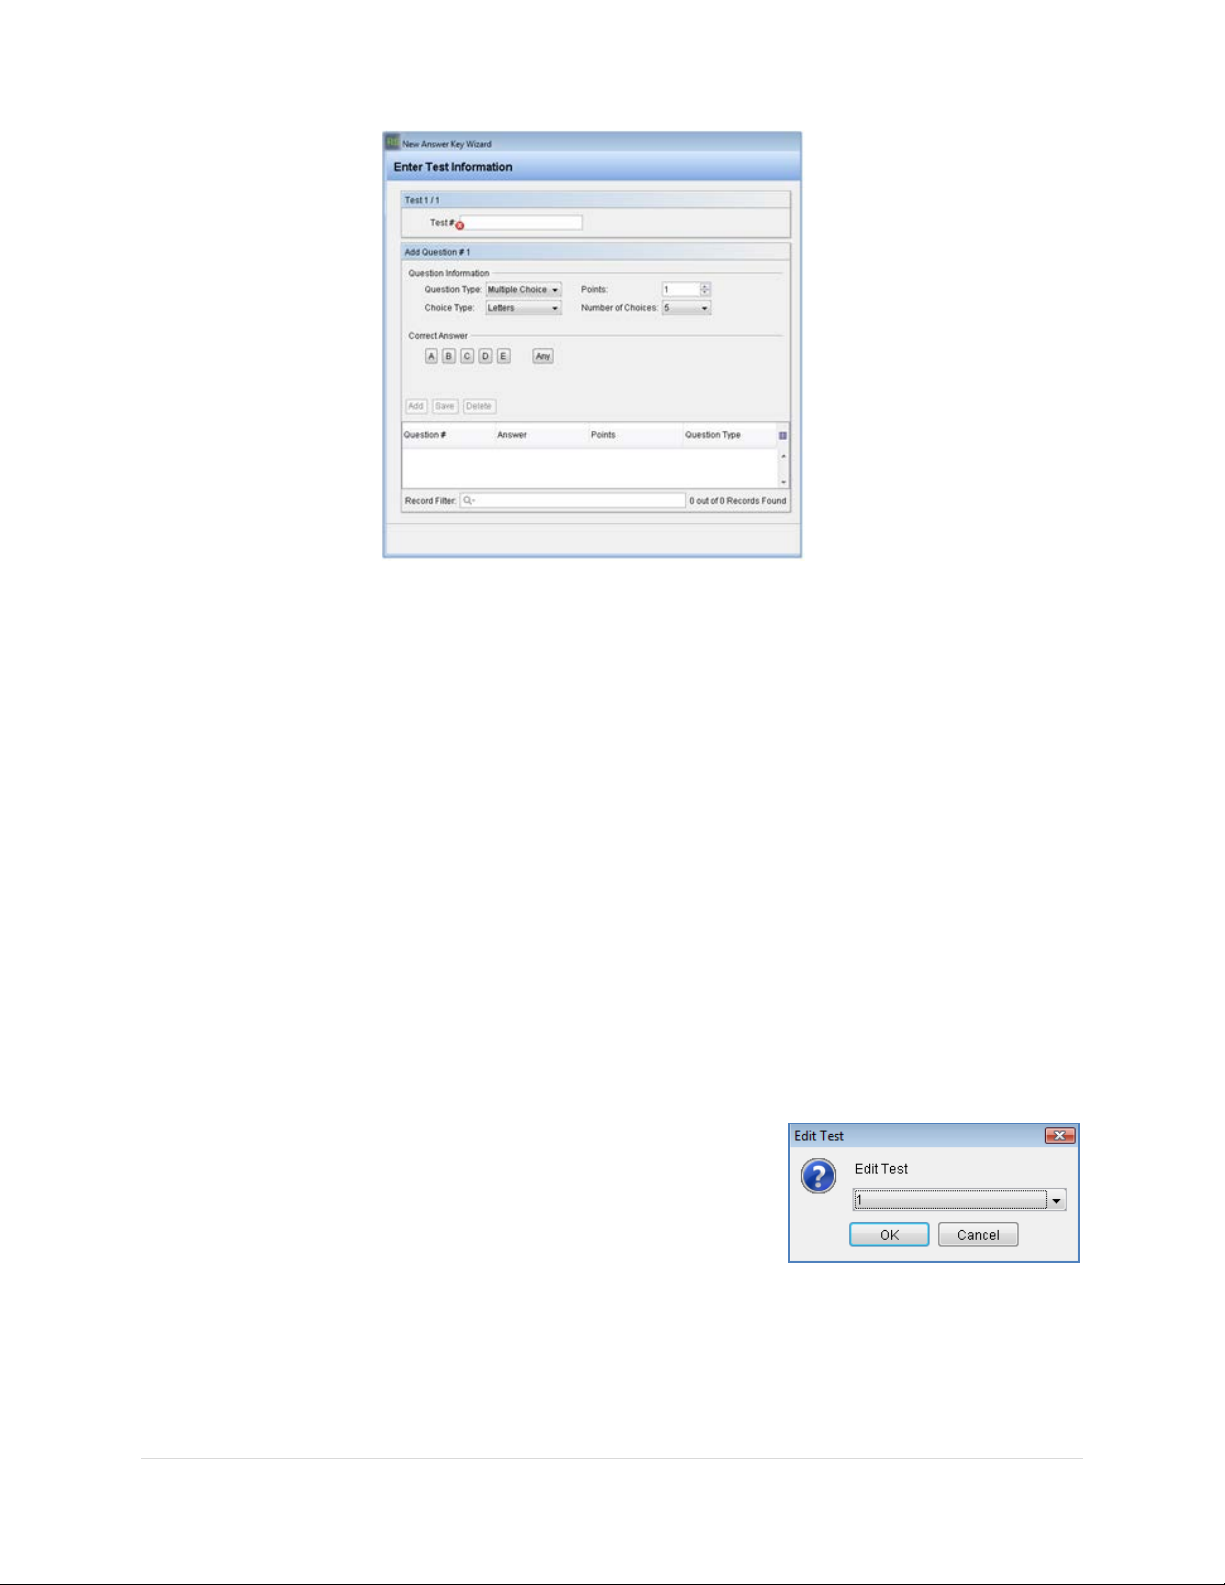
6. Click on the Next button to continue. The Enter Test Information window appears.
7. Enter Tes t Information.
• Test #: Each Test Key is numbered and each student will need to enter the
number of the test when joining a session to specify which version of the test
they are taking.
• Question Type: Select a Question Type from the drop down list (
Series, Multiple Choice, Numeric, Short Answer, Survey, True/False
• Points: Indicate the number of points each question is worth.
m
• Choice Type: For
choices may be lettered or numbered. You may define up to 5 l ettered answer
choices, while you can define up to 10 numbered answer choices.
• Chances: Indicate how many times students can change their answers to the
question within the allotted time. Answers transmitted after all the chances have
been taken will be ignored.
• Specify the Correct Answer.
ultiple choice, answer series and survey question types the
Answer
)
40 | Page
Page 41
______________________________________________________________ Response User’s Guide
8. Click on the Save button. The question will be listed in the pane b elow the question
profile pane. The question number displayed in the profile pane's title bar is
automatically incremented so you can go to the next question after clicking save.
9. When you have entered all the questions that will be included in this test key, click
on the Next button to begin setting up the next test key.
10. When you have finished setting up all of your test keys, they will be displayed in the
Confirm pane. Click on the Finish button when you have reviewed your test keys.
Editing a Question in the Test Key
Note Editing a key will only change the answer key for future sessions and will not
propagate thru existing sessions.
1. Highlight the answer key i n the Manage My Data section of Response.
2. Double-click on the question you want to edit. The
Edit Test window appears.
3. Select the test number which you wish to edit
and click OK.
4. Select the question which you wish to edit. It is
redisplayed in the Question profile pane.
5. Make your changes to the question profile and click on the Save button to save the
edits to the question. The question profile pane is still in Edit Mode.
41 | Page
Page 42

______________________________________________________________ Response User’s Guide
6. Click on the Add button to change from Edit Mode to Add Mode, so you can add
additional questions to the test key.
7. Click Delete to delete a question, and click OK to return to the previous menu.
Sample Citizenship Test Question s
*Correct answers are marked.
TEST VERSION A
1. How many stripes are there on the U.S. flag?
A. 10
B. 13 *
C. 50
2. Who is the chief justice of the Supreme Court today?
1. George W. Bush
2. Alberto Gonzales
3. Thomas Jefferson
4. John G. Roberts Jr. *
3. In what year was the Constitution written?
A. 1776
B. 1787 *
C. 1876
D. 1812
4. Which of these is guaranteed by the First Amendment?
A. Freedom of the press *
B. Right to bear arms
C. Right to happiness
5. How many Supreme Court justices are there?
Numeric-Answer = 9 *
6. The first 10 amendments to the Constitution called “The Preamble”.
True
False *
42 | Page
Page 43

______________________________________________________________ Response User’s Guide
7. When was the Declaration of Independence adopted?
A. July 4, 1776 *
B. July 4, 1787
C. July 4, 1812
TEST VERSION B
1. When was the Declaration of Independence adopted?
A. July 4, 1776 *
B. July 4, 1787
C. July 4, 1812
2. How many Supreme Court justices are there?
Numeric-Answer = 9
3. Who is the chief justice of the Supreme Court today?
1. George W. Bush
2. Alberto Gonzales
3. Thomas Jefferson
4. John G. Roberts Jr. *
4. In what year was the Constitution written?
A. 1776
B. 1787 *
C. 1876
D. 1812
5. How many stripes are there on the U.S. flag?
A. 10
B. 13 *
C. 50
6. The first 10 amendments to the Constitution called “The Preamble”.
True
False *
7. Which of these is guaranteed by the First Amendment?
A. Freedom of the press *
B. Right to bear arms
C. Right to happiness
43 | Page
Page 44
______________________________________________________________ Response User’s Guide
Starting a Self-Paced Session
1. Select Collect Responses from main s creen.
2. The Collect Responses-New
Session dialog box will appear.
Enter a name for the session.
3. Select your Class that you created
earlier.
4. Select the Subject or Section, if
appropriate.
5. Select Self-Paced as the Type of
Session you are going to run.
6. Select the Answer key created in the previous section.
7. Select Impromptu as the Lesson Type.
8. Click on the OK button to accept the settings. Now you
will see the Impromptu Options window. Most of thes e
fields can be ignored when running a Self-Paced mode
with an Answer Key. Indicate the amount of time
students will need to complete th ei r test/quiz. The timer
and number of questions are required.
9. The Session Toolbar will appear giving you the
information needed to join the class. Once you see the
frequency available on the yellow RF Status Bar, students
may turn on their Student Response Pads and join the
session.
10. After they have joined the session, they may need to specify a test number, if
delivering multiple tests simultaneously.
11. Use the down arrow on the Student Response Pad to advance to the next question
and the up arrow to go to a previous question on the PRS RF and the Left and Right
arrows on the CPS Pulse Pad. Be sure to press enter on t h e Student Response Pad
to save the answer before going to the next question.
12. After all students have submitted their answers, click the End button on the session
toolbar to end the session.
44 | Page
Page 45

______________________________________________________________ Response User’s Guide
Setup menu
Homework 1 A
Scanning found
Once you see your class on the
2
Press
Homework: Impromptu
Homework Mode allows a student to enter responses into their Student Response Pad outside
of the classroom, which an instructor can collect at a later time. This functionality is useful for
homework or other take-home assignments, to ask questions during field trips, etc.
Set-Up Student Response Pad for Homework Mode (Students)
Collect Homework Responses from the Student Response Pads
1. Select Collect Responses from main s creen.
2. The Collect Responses-New
Session dialog box will appear. Enter
a name for the session.
3. Select your Class that you created
earlier.
4. Select the Subject /Section, if
appropriate.
5. Select Homework as the Type of
Session you are going to run.
6. Select the answer key created in the previous section.
7. Select Impromptu as the Lesson Type.
8. Click on the OK button to accept the settings.
Now you will see the Impromptu Options. Most of these fields can be ignored when running a
Homework mode with an answer key.
The Session Toolbar will appear giving
you the information needed to join the
class.
Once you see the frequency available on the yellow RF Status Bar, turn on the Student
Response Pads.
ECON
Homework 1 A
Send
to continue.
nd
line, press the key.
Press to send all
responses.
After collecting the responses of the homework assignment, you may end the session.
45 | Page
Page 46

______________________________________________________________ Response User’s Guide
Student walk through for Homework Mode for the CPS Pulse Student Response Pad.
1. Press the menu button
2. Click the right arrow button once and then Send on Homework.
3. Choose 1 of 4 homework bins on the pulse clicker that you would like to store your
homework in and press Send .
4. Enter a Name for the homework assignment using the keypad and click Send
5. To edit an existing homework assignment, select Edit. To create a new homework
assignment, select New, then click Send for selection.
6. If New is chosen, select Yes to clear any previo usly entered data in the selected
homework location or No to return to previous screen.
7. If Yes is selected enter a Test # (use 1 if teacher didn’t assign a test number) and
Send .
8. If Edit is selected enter a Test # (use 1 if teacher didn’t as s ign a test number) and
Send .
9. The Student Response Pad will display “Q01:” to allow student to enter answers for
question #1 on the homework. To navigate through the Homework, use the
navigation arrows on the keypad. Click Send button after every answer.
Answers entered while in homework mode are stored on the Student Response Pad.
Note The Student Response Pad input mode may have to be adjust ed for each different
question type. The input mode will default to Text Entry mode, but can be changed
to Alpha or Numeric entry by clicking .
Student walk through for Homework Mode for the PRS RF Student Response Pad.
1. Press the menu button *
2. Using the up or down arrow keys, scroll to Homeowork
3. Press the Green Arrow button
4. Enter a Name for the homework assignment using the keypad and press the
Green Arrow button again.
5. Scroll down to the first homework question (HO1:).
6. Continue Homework pressing the Green Arrow button after each question answered.
46 | Page
Page 47

______________________________________________________________ Response User’s Guide
Reports
See the reports secti on of this guide for step-by-step directio ns on how to generate, print, and
export reports. Look at this report following the Self-Paced section o f delivery.
Session Details by Student
The Session Details by Student lists the report type, session name, class, class average, Student
Response Pad ID numbers, student names, student IDs, number of correct to attempted
answers, and percentage of correct to attempted answers for all students selected in the report.
This report displays the all responses for each student before moving on to the next student. It
is a great tool to use when focusing on one student at a time.
47 | Page
Page 48

______________________________________________________________ Response User’s Guide
Creating Content in Response
Overview
This section is designed for the beginner who has only used Response to set up a database and
classes. You will create lessons and us e the Question Editor to create t heir own content within
Response and deliver lessons in various modes
Purpose
After completing this module, you will be able to:
• Create folders, subfolders, and lessons.
• Import and export lessons.
• Create questions using the question editor and set question options.
• Edit questions to make and save changes.
• Copy and paste questions for repeated use.
• Rearrange the order of questions within a lesson.
• Start a session in Participation mode.
48 | Page
Page 49

______________________________________________________________ Response User’s Guide
Navigation
Data Pane
Folders and Lessons
Lessons are organized in the lesson tree in much the same way folders are organized in
directories. The o rganized lessons are containers for the questions that are asked during a
session. The Lessons Toolbar displays when the Lessons button in the navigation pane is
selected.
The lesson side (navigation pane) gives a view of all folders and lessons in the selected
database.
The question side (data pane) lists all of the questions associated with the lesson highlighted.
Pane
49 | Page
Page 50
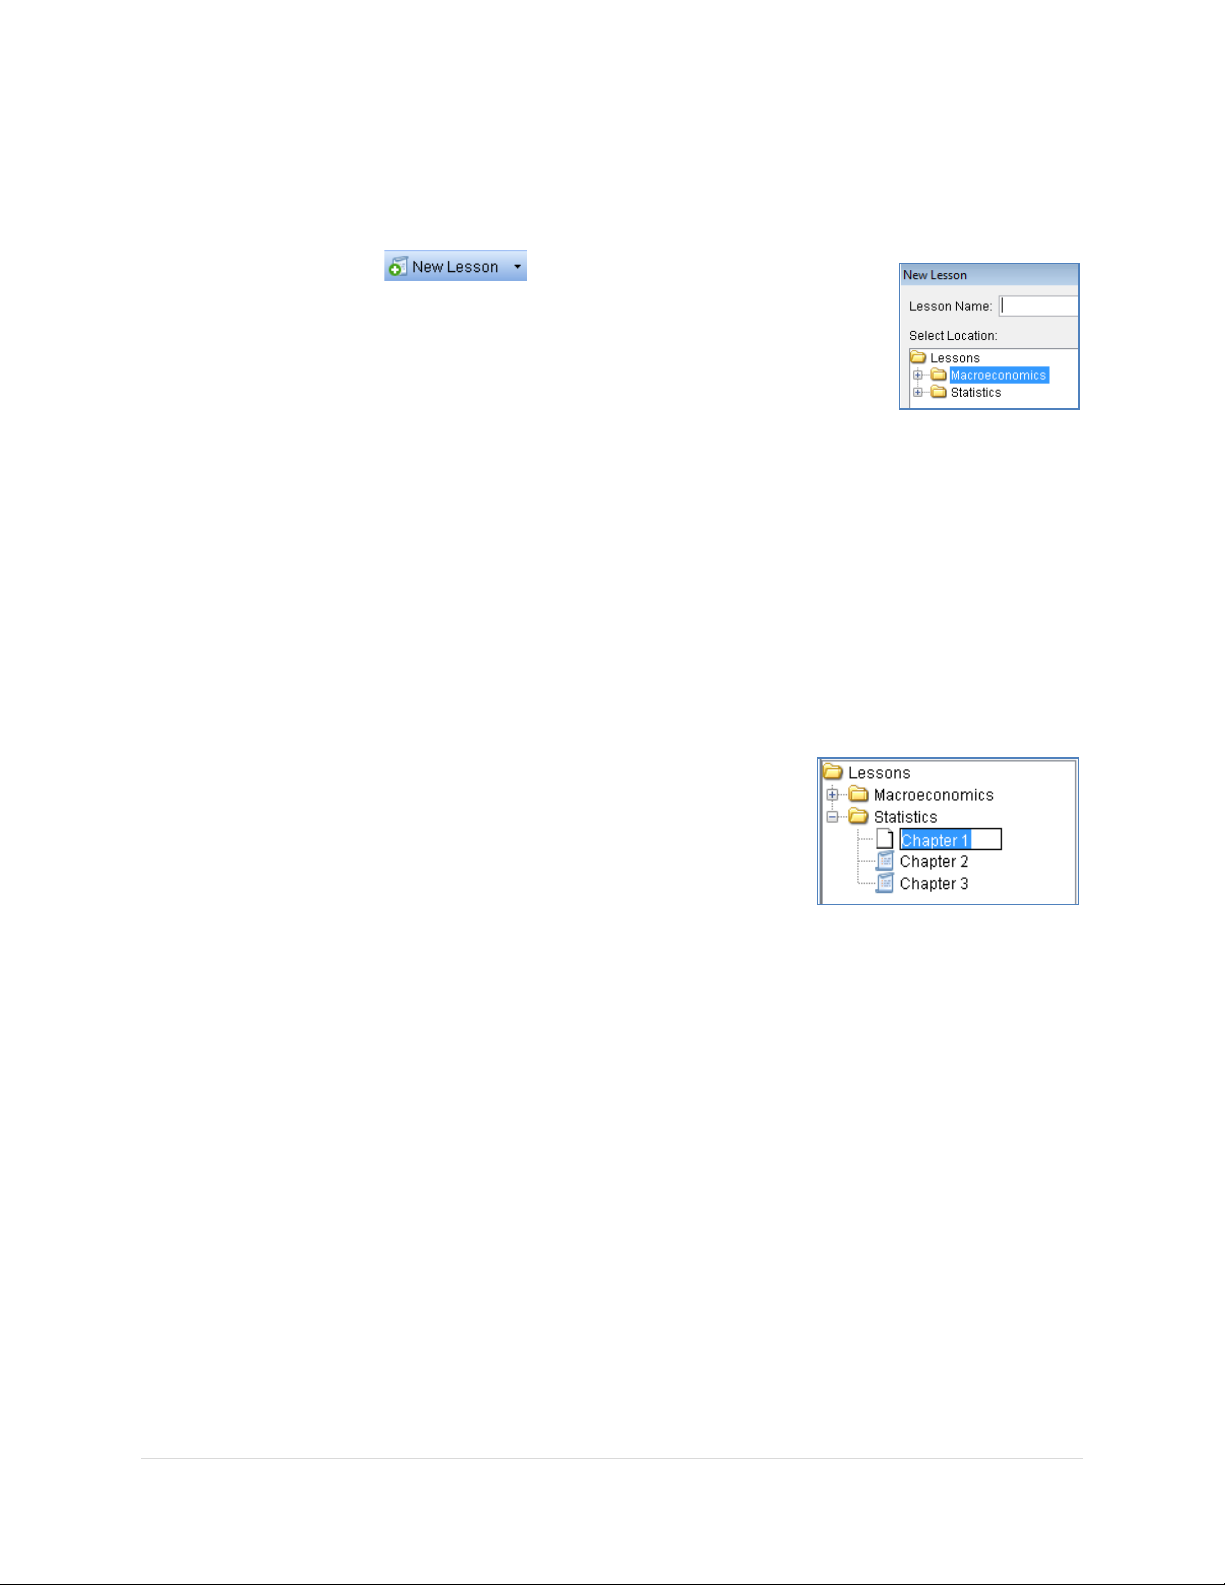
______________________________________________________________ Response User’s Guide
Creating Lessons and Folders
1. Highlight the Lessons folder in the Navigation Pane.
2. Click on the tool in the Lessons Toolbar or by
right clicking on the Lessons folder.
3. Type in the name that you would like to assign your New
Folder.
4. Click OK to return to the Manage My Data window.
5. Highlight the lesson you just created and r epeat step 2-4 to convert the lesson you
just created into a folder.
Note When you insert a lesson in another lesson, it converts the parent lesso n to a fold er.
Editing Lessons
You can edit a lessons name, to do so follow the below steps.
1. Click on the Edit Lesson tool in the Lessons Toolbar
or by right clicking on the lesson itself.
2. The lesson's name appears in a rename text box. Make
your changes to the name of the lesson.
3. Press the Enter k ey t o save the edited name.
Deleting Lesso ns
1. Click on the Lesson you want to delete.
2. Click on the Delete Lesson tool in the Lessons Toolbar or by right clicking on the
Lesson itself.
3. You will be asked to confirm the deletion. The lesson and all the questions in it will
be removed from the Lesson Tree.
50 | Page
Page 51

______________________________________________________________ Response User’s Guide
Importing Lessons
Lessons can be imported from a variety of sources, such as lessons that have been exported
from PRS or from other Response installations; publisher-supplied lessons from Pearson, or
from Bedford, Freeman, Worth; Blackboard Specification dat files; or image files. When you
import lessons from any of the sources listed in the Lesson Import Wizard, you can manage
those lessons using the Response Question Editor.
1. Select the positio n in the Lesson Tree where you want the imported lesson file(s)
to be located.
2. Click on the Import Lesson tool.
3. Click on the down arrow to
display the list of lesson sources.
Select a lesson source from the
list.
4. Notice that the file type of the
lesson source you chose is
displayed in the label above the
Select Files box. Click on the
Browse button and navigate to the
location of the lesson files you want
to import.
5. If you chose the Response Database option, navigate to the Response database that
contains the lesson you want to import, open it, and click on the Next button. For
all other selections , click on the Import button to import the lesson files into the
Response Lesson Tree.
Exporting Lessons
An exported Response lesson can be mov ed to another Response installation on another
system. Response saves exported lessons in an .xml file.
1. Select the lesson you want to export.
2. Click on the Export Lesson tool on the
Lesson Toolbar. The Export Lesson
Wizard will display.
3. The name of the file selected for export
appears in the File Name field.
4. Click on the down arrow to display the default Export Directory. We recommend
you save the exported file th er e .
5. Click on the Export button to create the exported lesson file. You will be notified
that the file was saved to the location specified.
51 | Page
Page 52
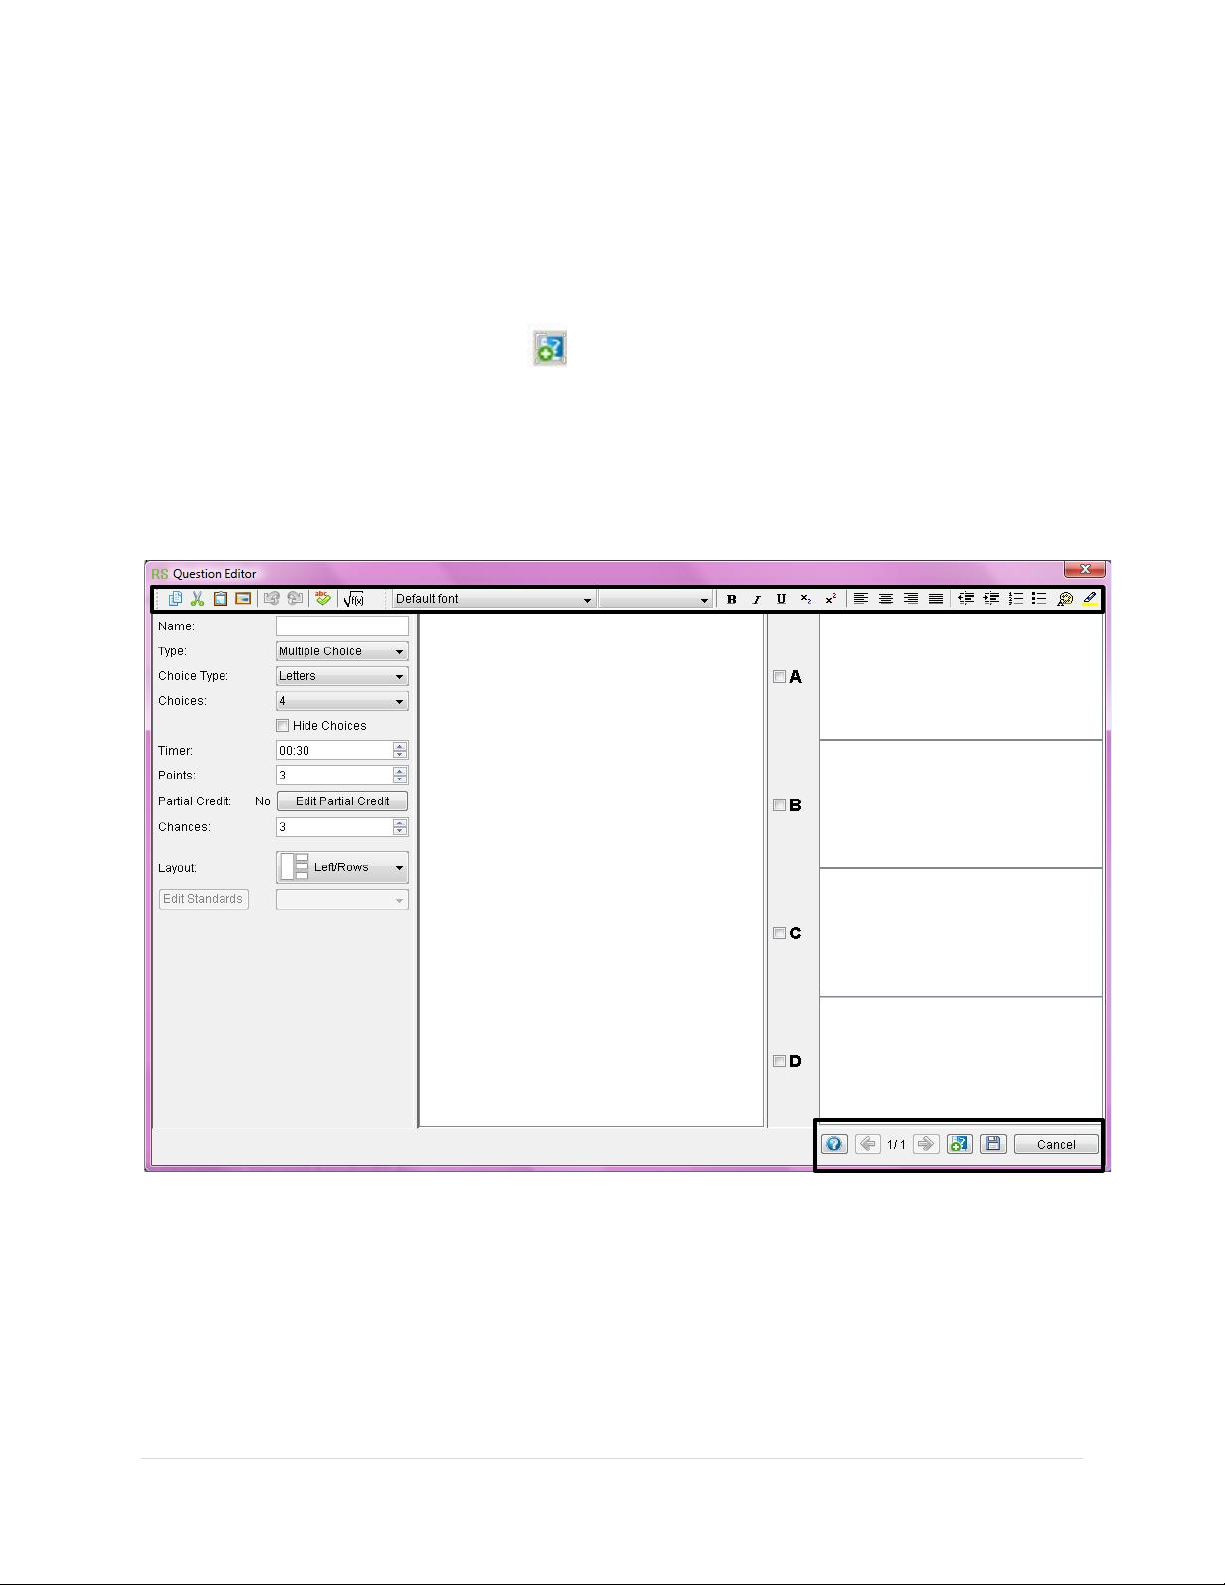
______________________________________________________________ Response User’s Guide
Question Propertie s
Navigation Tools
Type response
Type the question here.
Editing Tools
Questions
After you create a lesson, you can populate the lesson with questions. You create questions by
using the Response Ques tio n Edit or.
1. Select the lesson to which the questions will be added.
2. Click on the New Question icon under the Questions heading.
3. The Question Editor window will appear. This Question Editor gives you the
tools you need to create and edit the questio ns for your lesso ns.
Question Editor
choices here.
Editing Tools
These tools are grouped by function in the toolbar across the top of the Question Editor:
• Cut, Copy, Paste, and Insert Graphic.
• Undo and Redo.
• Spellcheck.
• Insert equation (using the built-in Equation Editor).
52 | Page
Page 53
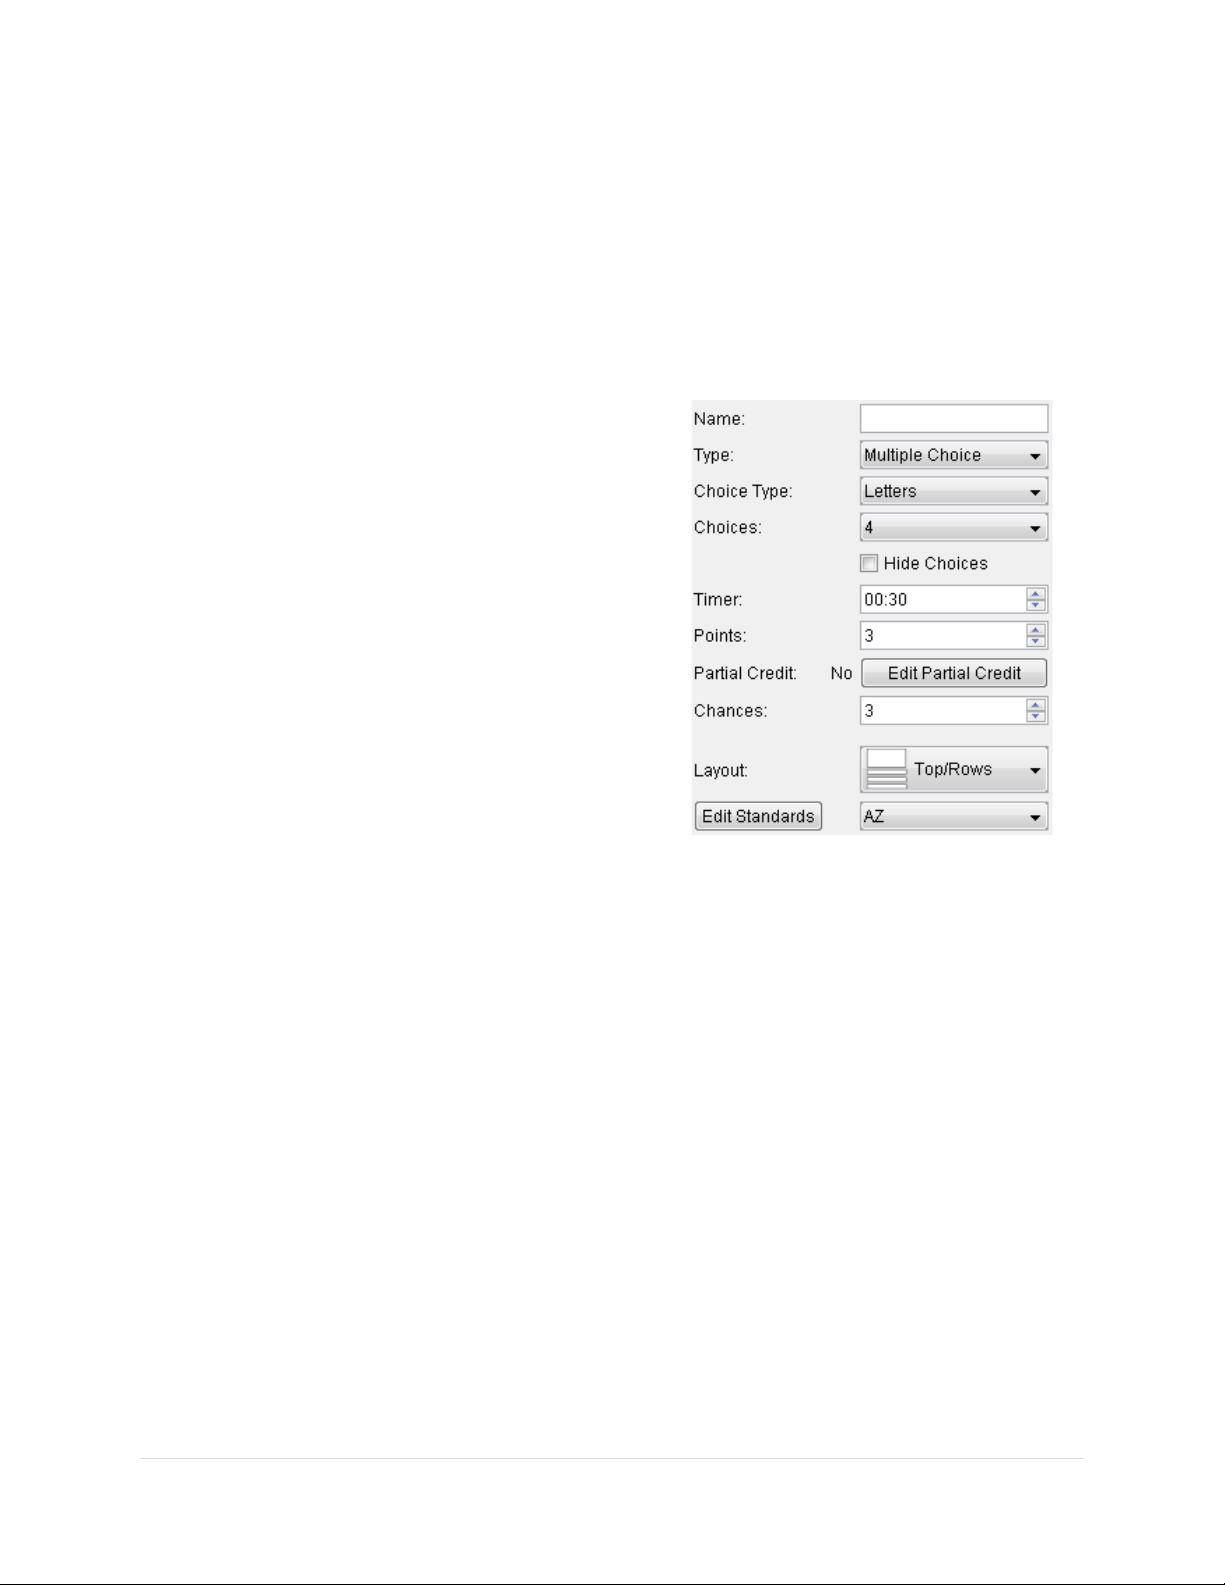
______________________________________________________________ Response User’s Guide
• Font and font attributes.
• Alignment.
• Indents, lists, foreground color and highlight color.
Question Properties
The Question Editor provides a list of properties t hat you will apply to each question you
define here. Properties determine how the question will be displayed and scored when it is
presented during the session. The question properties are list ed down the left side o f the
Question Editor window.
Name
Enter the name of the question. The name
you enter in this field will appear in the Name
column of the Questions pane in the Manage
My Data window, so it should be a name that
will help you readily recognize t he question
without having to view it in the Question
Editor.
Type
Choose a Question Type from the drop-down
list.
• Answer Series: Arrange the answers
in the correct order. All of th e an s w er
choices are included in the correct
answer, which is a string with the
answer choices in the correct order, e.g., DBCA or 4361725.
• Multiple Choice, Single Corr ect: Choose the correct answer from the answer
choices.
• Multiple Choice, Multiple Correct: Choose all of the answers that are correct
from the list of choices.
• Numeric: Enter the numeric answer using t he numeric input keys. The answer
can be up to 11 numeric characters plus the minus sign or the decimal point.
• Short Answer: Type the correct answer using the input keys. The answer can
be no more than 11 characters long.
• Essay Question: Type the correct answer using the input keys. The answer can
be no more than 140 characters.
• Survey: A survey question is asking for an opinion. There is no correct answer.
• No Response: Gives you the opportunity to use the Question Editor to create
Questions, as well as content, for presentation.
• True/False: True/Fa l se questions have two answer choices, True or F a l se.
Cricket and PRS RF Student Response Pads have a T button and an F button.
The CPS Pulse uses A for True and B for False.
Note See the Question Type Compatibility List Chart for further information on
Question Types.
53 | Page
Page 54
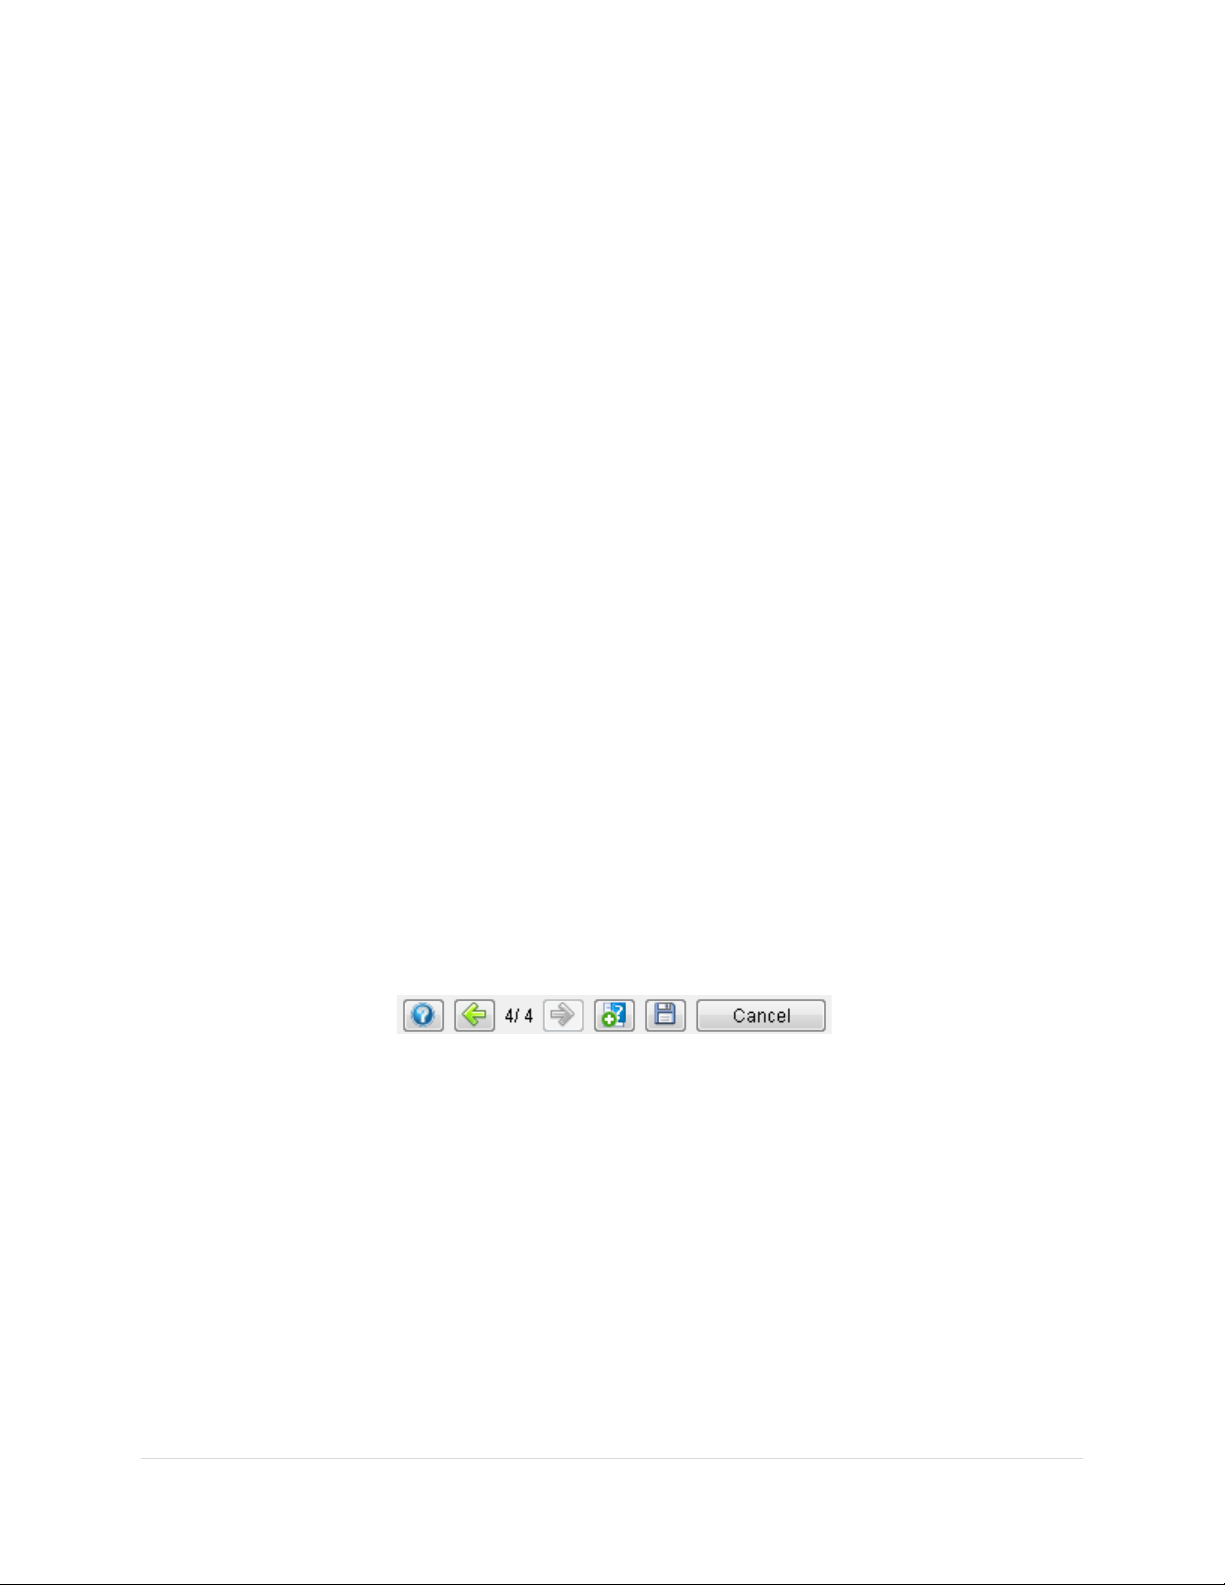
______________________________________________________________ Response User’s Guide
Choice Type
Lettered or numbered answer options are available for Multiple Choice, Answer Series
and Survey Question Types.
Choices
Select the number of answer choices you want to define for this question. Click on the
Hide checkbox if those answer cho ices are going to be presented during the session by
a means other than Response.
Timer
Indicate the amount of time students will have to respond to this question.
Points
Indicate the number of points students will be awarded for a correct answer.
Partial Credit
This setting allows you to assign partial credit for other acceptable answer choices or a
combination of acceptable answer choices.
Chances
Indicate how many times students can change their answers to the question within the
allotted time. Answers transmitted after all the chances have been taken will be ignored.
Layout
Select the layout that displays the question and its answer choices to best advantage.
Edit Standards
After downloading your state standards you may align standards to each question that
you create.
Navigation Tools The Navigation Tools are located in the bottom, right-hand corner.
Help
То аaccess help.
Previous and Next buttons
Move back and forth through the questions in the lesson.
New Question button
Save and advance to a new Question Editor page.
Save button
Save your changes and take you back to the Manage My Data window.
Cancel
Exit the Question Editor. A pop up window appears. Click Yes if wanting to save the
changes and click No if not wanting to save the changes made to the question.
54 | Page
Page 55
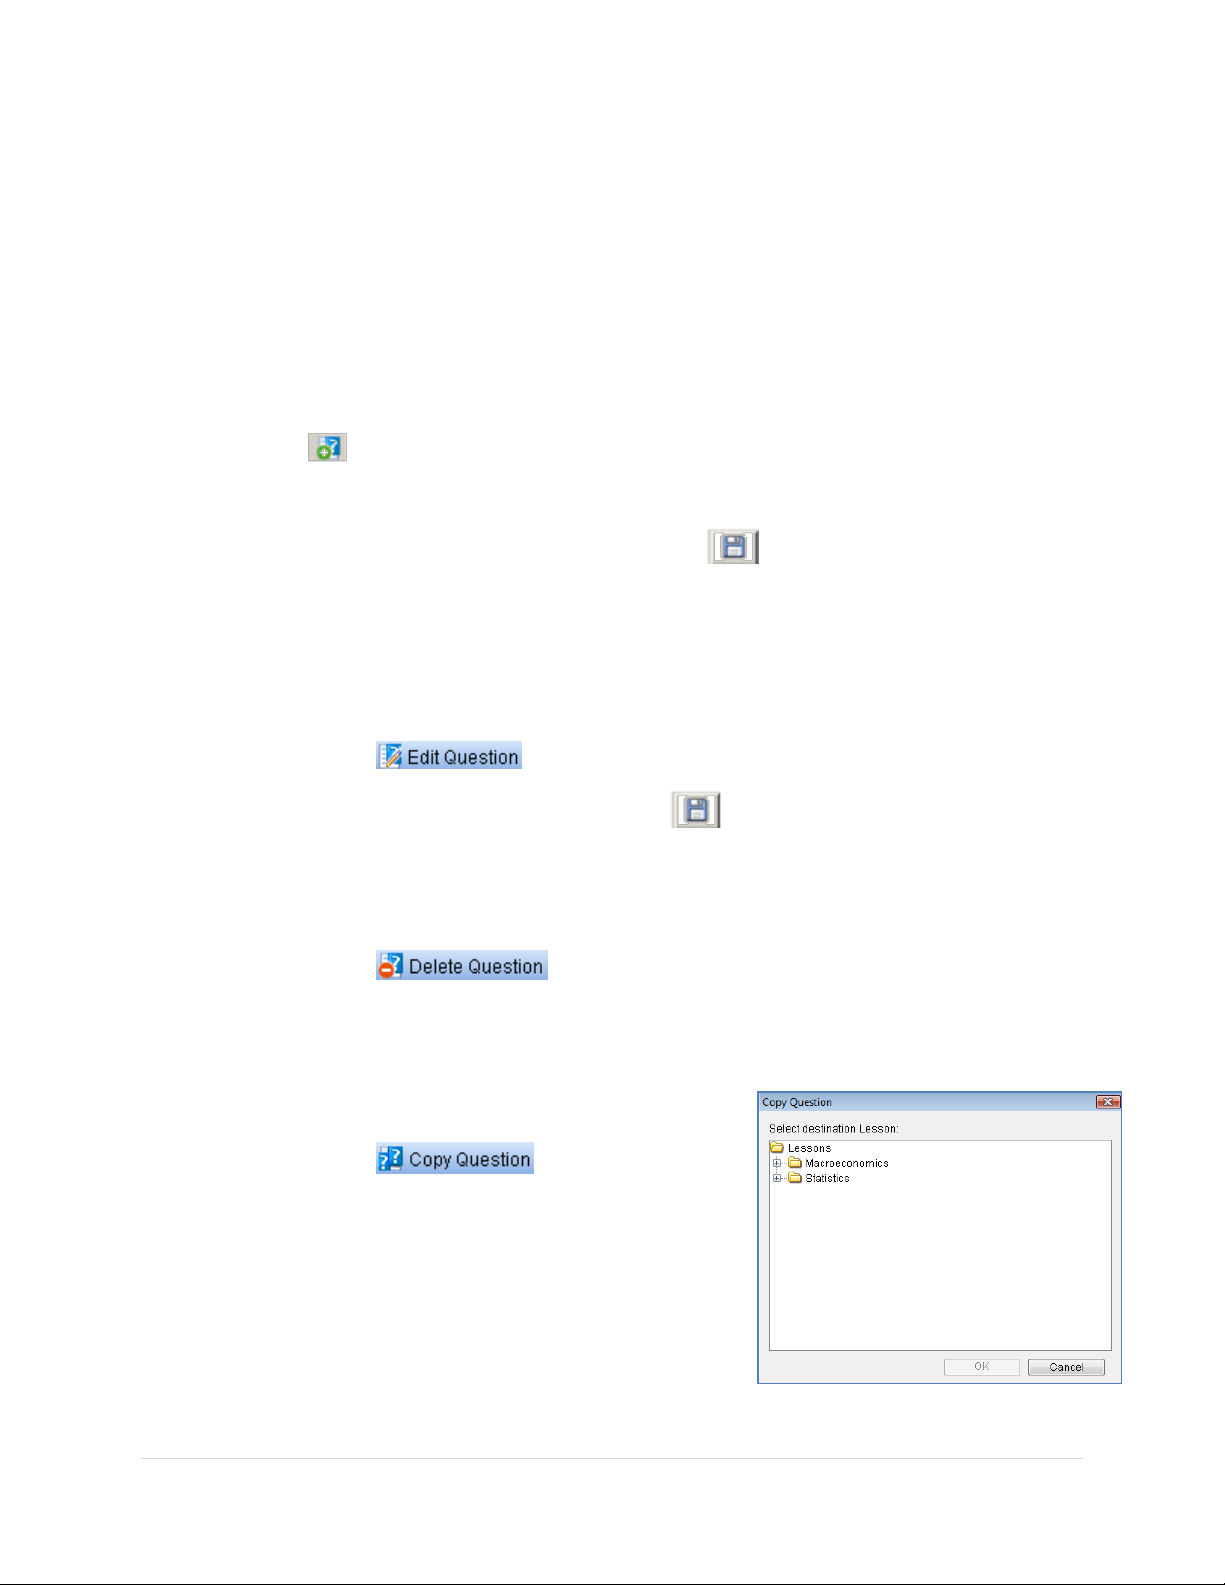
______________________________________________________________ Response User’s Guide
Crafting the Question and its Response Choices
1. Choose a Question Type from the Q uestion Properties.
2. Type the question in the question box.
3. Type the answers in the answer box(es).
4. Select the correct answer by clicking the checkbox that corresp onds with the
correct answer box.
5. Click to Save and Move to Next Question.
Repeat steps 1-5 to add additional questions to the lesson.
6. When you are finished adding questions, click . This will Save and Close the
Question Editor.
Editing Questions
1. Select the question you want to edit.
2. Click on the tool. The Question Editor is displayed.
3. Make the necessary change s a nd click on to save and exit the question.
Deleting Questions
1. Select the question you want to delete.
2. Click on the tool. You will be asked to confirm t he deletion.
Copying Questions
Response makes it easy to co py questions from one lesson to another.
1. Select the question you want to copy.
2. Click on the tool.
3. In the Copy Question dialog select the
destination of the lesson and click on the OK
button.
Note When you open the destination lesson, the name
of the copied question is preceded by
(Copy).
55 | Page
Page 56

______________________________________________________________ Response User’s Guide
Reorder Questions
1. Select the question that you want to move.
2. Use the Move Up and Move Down but tons to rearrange the questions in
the lesson, they will be in the order you want to present them during a session.
When you select the first questio n or the last question in the lesson, you can only
move the question in one direct i on. The other move buttons are grayed out.
Print a Response Lesson
1. From the Manage My Data window, select the Reports button.
2. Select Response Lesson from the navigation pane.
3. Select the lesson you would like to use from the Select Lesson drop down box.
4. Choose the type of report you would like to print from the Choose Report Type
drop down box. For tests choose Lesson No Correct Answer.
5. Click on Create Report . A printable version of your lesson will appear in a new
window. You can either print or save your Response lesson (.rtf, .html,
.pdf) from this window.
56 | Page
Page 57

______________________________________________________________ Response User’s Guide
Starting a Response Session
A new Session is started by clicking Collect Responses from the Main Response window.
1. Click on the Collect Responses button to
display the Collect Responses - New Session
dialog.
2. Select the Class.
3. Select the Subject/Section, if ap propriate.
4. Select Type, if appropriate
5. Select the Lesson Type
• Impromptu
• Response Lesson
• ExamView
6. Click on the OK button to accept the settings.
7. From the Select Lesson window. Click on the Lesson
you would like to administer.
8. Click OK. The Question Window appears.
9. Start the question by clicking .
10. End the question by clicking .
11. Click to advance to the next question.
12. Click after the lesson is over to end the session. A pop up window appears.
13. What do you want to do?
• Change the Session Type or Subject/Section
• End the Class (Warning: the Student Response Pads will be disconnected)
• Cancel
14. You will be returned to the main Response Window.
57 | Page
Page 58

______________________________________________________________ Response User’s Guide
Reports
See the reports secti on of this guide for step-by-step directions on how to generate, print, and
export reports.
Session Summary by Question
This report shows an abbreviated version of the question, the correct answer, and a breakdown
of the percentage of the class’ answers for each of the answer choices.
58 | Page
Page 59

______________________________________________________________ Response User’s Guide
Response for PowerPoint
Overview
This section is designed for the beginner who has completed module one to set up a database
and classes as well as module two on creating Impromptu lessons in the Participation, SelfPaced, and Homework mode. You will learn how to use the PowerPoint Add-in to create
question slides in PowerPoint.
Purpose
After completing this section, you will be able to:
• Setup the PowerPoint Add-in.
• Create different types of Response questions in PowerPoint.
• Administer a PowerPoint session.
59 | Page
Page 60

______________________________________________________________ Response User’s Guide
Install PowerPoint Add-in
Response provides a PowerPoint integration that can transform your existing Power Point s l ides
into Response questions with the click of a button.
Once you install Response on your Windows system and register the Addin, the PowerPoint
Add-in toolbar is automatically added to your PowerPoint.
If you have followed the above steps and still don’t see the Response toolbar, you will need to
install the add-in by accessing it through your Windows Start Menu: eInstruction > Response >
Register PowerPoint Add-In. Click. A pop up window will state successful. Click Ok.
If at any time you wish to uninstall the Response Toolbar from PowerPoint, Windows Start
Menu: eInstruction > Response > UnRegister PowerPoint Add-In. Click. A pop up window will
state successful. Click Ok.
60 | Page
Page 61

______________________________________________________________ Response User’s Guide
Install PowerPoint Add-in (Mac)
Note Once the Add -in is loaded it will remain resident in PowerPoint, until it has been
removed.
1. Launch PowerPoint.
2. Click on the PowerPoint option from the menubar, and then click on Preferences.
3. On the view tab, make sure to uncheck Project
Gallery at Startup.
4. From the menu-bar, choos e Tools, and then Add-Ins (may also be listed as
Templates and Add-Ins.
5. Click on Add, then go to Macintosh
HD>Applications>eInstruction>Response>PRS
Addin.ppa>Open.
6. Click Accept.
7. The Response PowerPoint Addin will appear either with the other toolbars or along
the left hand side of the screen.
61 | Page
Page 62

______________________________________________________________ Response User’s Guide
Creating Response Questions from PowerPoint slides
As mentioned earlier, R esponse questions can be created by co n verting any existing PowerPoint
slides or by creating New Question Slides and setting the parameters on them. The different
question types that are available are True/False, Multiple Choice, Series, Short Answer,
Numeric, and Essay Questions. We will be creating a separate question slide for each Question
Type. You can only include one question per PowerPoint slide if you’re using the
PowerPoint Add-in.
Sample Questions:
Most of the world’s water is saline.
True * False
French is the official language in which of the following countries? (select all that apply)
a. Haiti * b. Equatorial Guinea c. Guinea * d. Mauritania
Put the following movies in order. Answer: CABD
a. Rocky b. Rain Man c. The Godfather d. Dances with Wolves
What is the 4th planet from the sun?
Answer: MARS
What’s a number between 1/4 and 1/3 in decimal form?
Answer: Any number between 0.26 and 0.32
Insert the questions
1. Open a new PowerPoint Presentation.
2. Type each question on a separate slide (optional). With each slide, try adding some
graphics, changing the background color, or adding some animation.
See sample question sl ides bel ow:
62 | Page
Page 63

______________________________________________________________ Response User’s Guide
3. After designing your slides, go back to the first slide and click in the
Response Add-in toolbar. The following dialog box appears.
4. Set the question parameters, such
as question type, number of choices
and correct response.
5. Click OK to save your settings. When
you return to your PowerPoint slide,
you will see that the Response icon
has been added to the page.
6. Repeat steps 3-5 for every slide.
Note Please check the Question Type Compatibility List Chart for device and quest i on
compatibility.
Editing Questions
1. If you need to increase the Time or change Answer Choices from letters to numbers,
click on .
Deleting Questions
If you accidentally inserted a question into the wrong slide, you may delete the Response
question by clicking on .
63 | Page
Page 64

______________________________________________________________ Response User’s Guide
Starting a PowerPoint Session
If you are using PowerPoint to present your questions, it is very important that you follow this
procedure in preparation for your session. We recommend you launch Response first and start a
new session and have your student’s join the RF class prior to starting you PowerPoint show.
1. Start your PowerPoint presentation.
When you start your PowerPoint lecture
slide show, Response detects the presence
of question slides in the slide show and
automatically switches the sess i o n into
PowerPoint Mode.
2. Select the Class and click OK.
3. To advance questions, you simply advance the PowerPoint slide as you normally
would. Each slide that has a Response question will maximize the Session Toolbar.
If there are no Response Questions on a slide, the Session Toolbar will be
minimized.
4. To start a question click the
Start/Pause Button located on the
toolbar. Each slide with a Response
question will need to be started.
5. When you are finished with your PowerPoint lesson, you can either exit out of slide
show mode or click on the End Session button from the session toolbar.
6. To view your session data click on the Manage My Data button from the Response
main screen.
64 | Page
Page 65

______________________________________________________________ Response User’s Guide
Managing Data and Reports
Overview
This section is designed for those who would like to track the data and progress of their
students. You will learn to navigate the Manage My Data screen.
Purpose
After completing this section, you will be able to:
• Identify different tools available on the Manage My Data page.
• Review administered session and view responses and scores.
• Edit the session.
• Move the location of the session.
• Export and generate reports for session data.
• Manage and generate reports for attendance.
• Manage and generate reports for the gradebook.
65 | Page
Page 66

______________________________________________________________ Response User’s Guide
Buttons
Tabs
Tour of the Manage My Data Window
The Manage My Data tab contains many options for data management. The most useful tabs
include classes, and reports. There are various tabs that will change depending on which button
you choose. Click on a few of the buttons and tabs to see what options are available. Here are
some of the options you will find:
Classes
Roster, Session data, Attendance data, and Gradebook data.
Lessons
Folders, lessons, and question data.
Standards
Imported state standards.
Answer Keys
Create and Editing Answer Keys
*For more information on using Answer Keys refer to Section2.
Reports
Various reports including Session, Attendance, Gradebook, and Standards.
66 | Page
Page 67
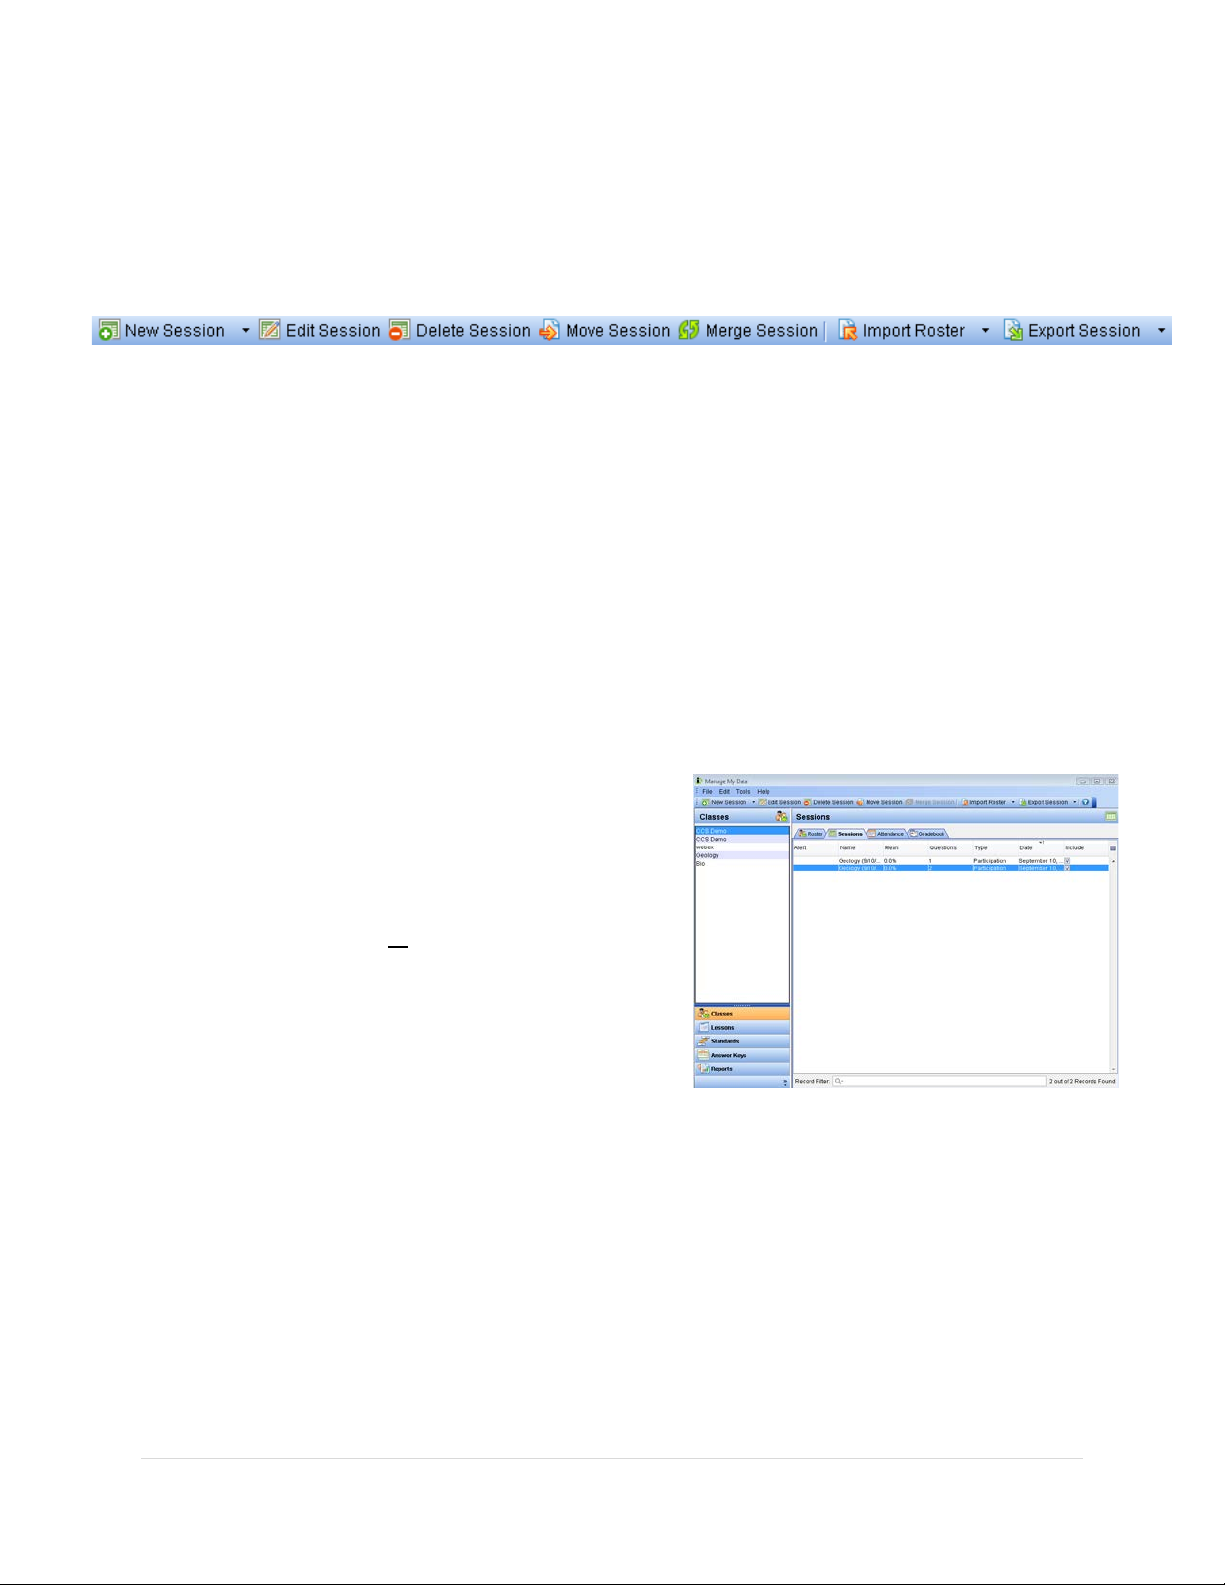
______________________________________________________________ Response User’s Guide
Reviewing an Administered Session
Once you have administered a session, you have a variety of options for reviewing and
monitoring your session. To access your session data go to Classes > Sessions tab.
There are several options found in the Session toolbar. These includ e:
• New Session: Collect student responses by creating a new sessio n
• Edit Session: Opens an existing session to view more detailed data, you can
also modify students’ answers and change point values
• Delete Session: Deletes unwanted s es s io ns
• Move Session: Moves a session to another class or section
• Merge (Append) Session: Allows you to take two sessions and merge them
together
• Export Session: Creates a .csv or.txt file that can be used by an LMS or you
can also export as “raw” data
View Session Data
1. From the Manage My Data window,
click on the Classes button.
2. Click on the Sessions tab.
3. Double click on the session, you would
like to review
want to review from the sessions tab, then
click on Edit session.
4. The Session Data window will appear.
When reviewing a session the Res ponses
and Marks tabs are the most useful.
or
select the session you
67 | Page
Page 68
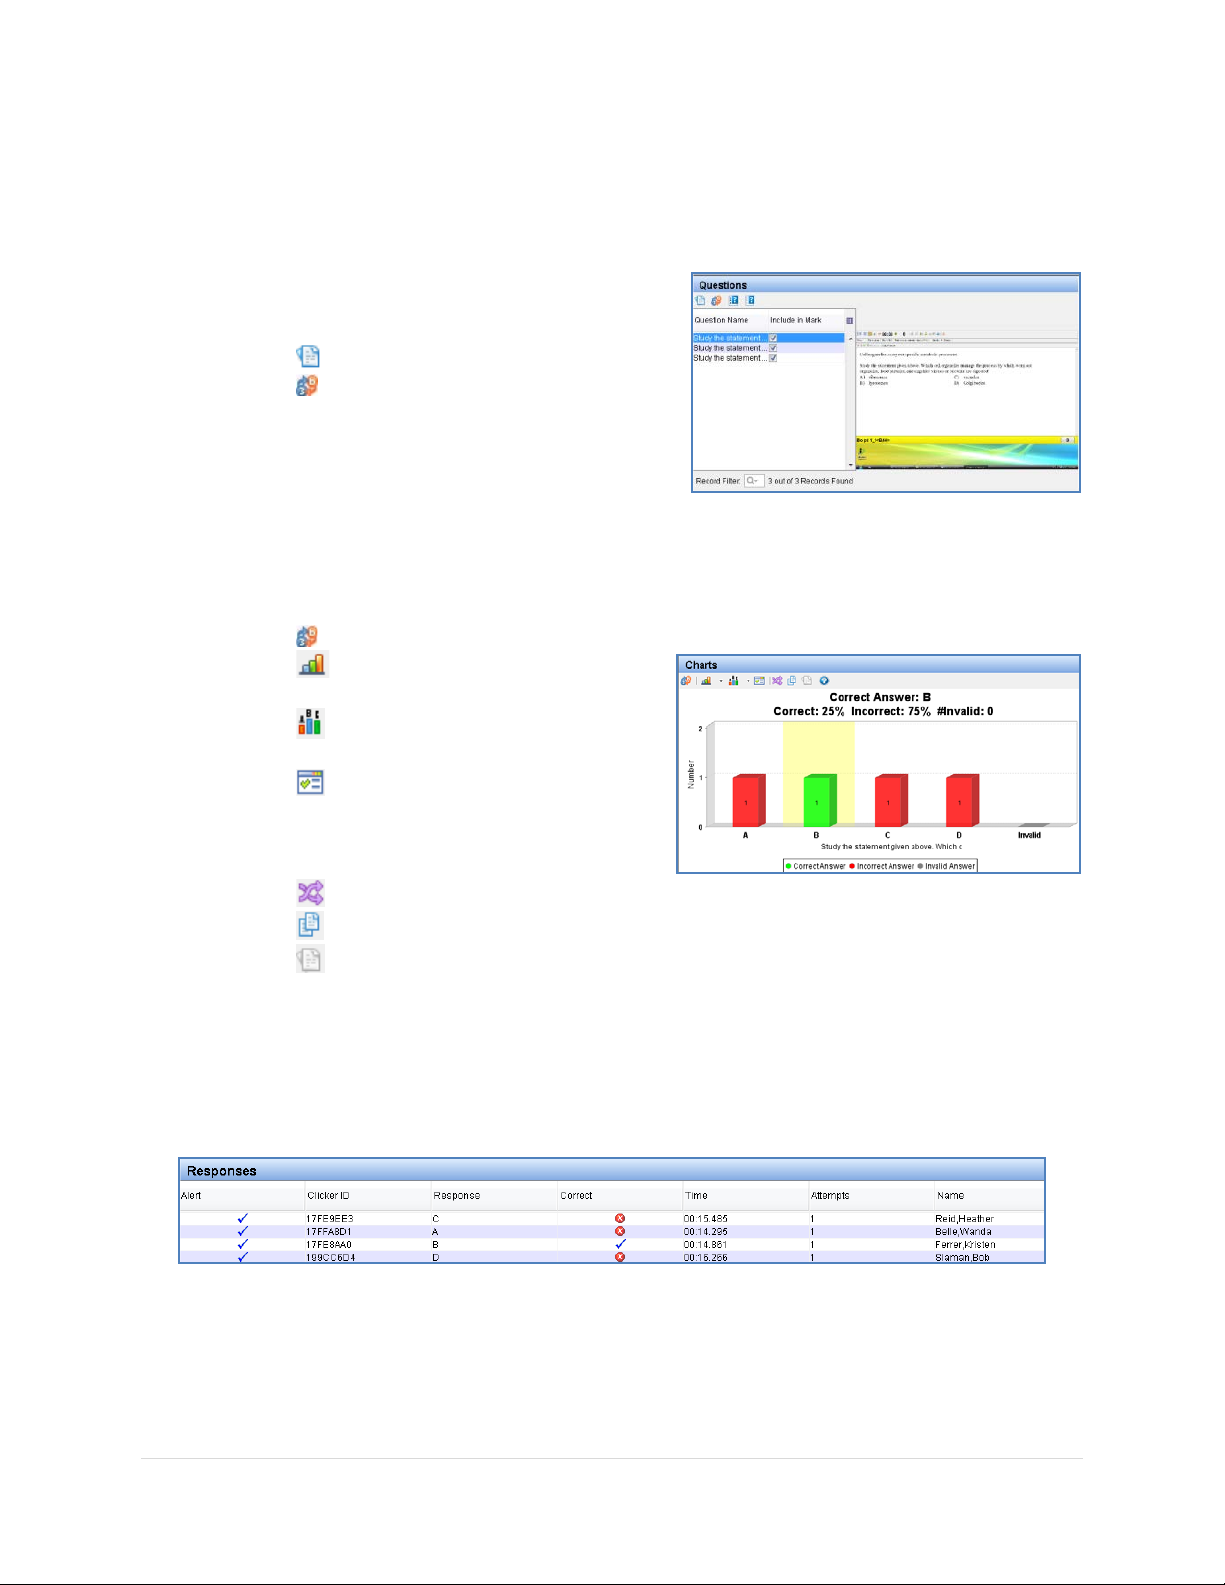
______________________________________________________________ Response User’s Guide
Responses Tab
The Responses tab is divided into three panes, Questions, Charts, and Reponses.
Questions
• view the question
• edit the question properties
• select the questions you would like to
be part of the marked session
Note Editing a question will propagate through the existing session.
Charts
• edit the question properties
• change the graph to be a bar,
horizontal, or pie chart
Responses
• View students’ answers and other data such as how long it took them answer and
• change the graph to display all
values, top five, or bin values
• change the chart pref er e nces to
hide/show values as a percentage or
number responded, correct answer,
chart legend, or confidence level
• slice data from two questions
• perform side by side question comparisons
• return to the orig i nal question (use this butt o n with slice data and side by
side comparison buttons
how many times they answered a question
68 | Page
Page 69
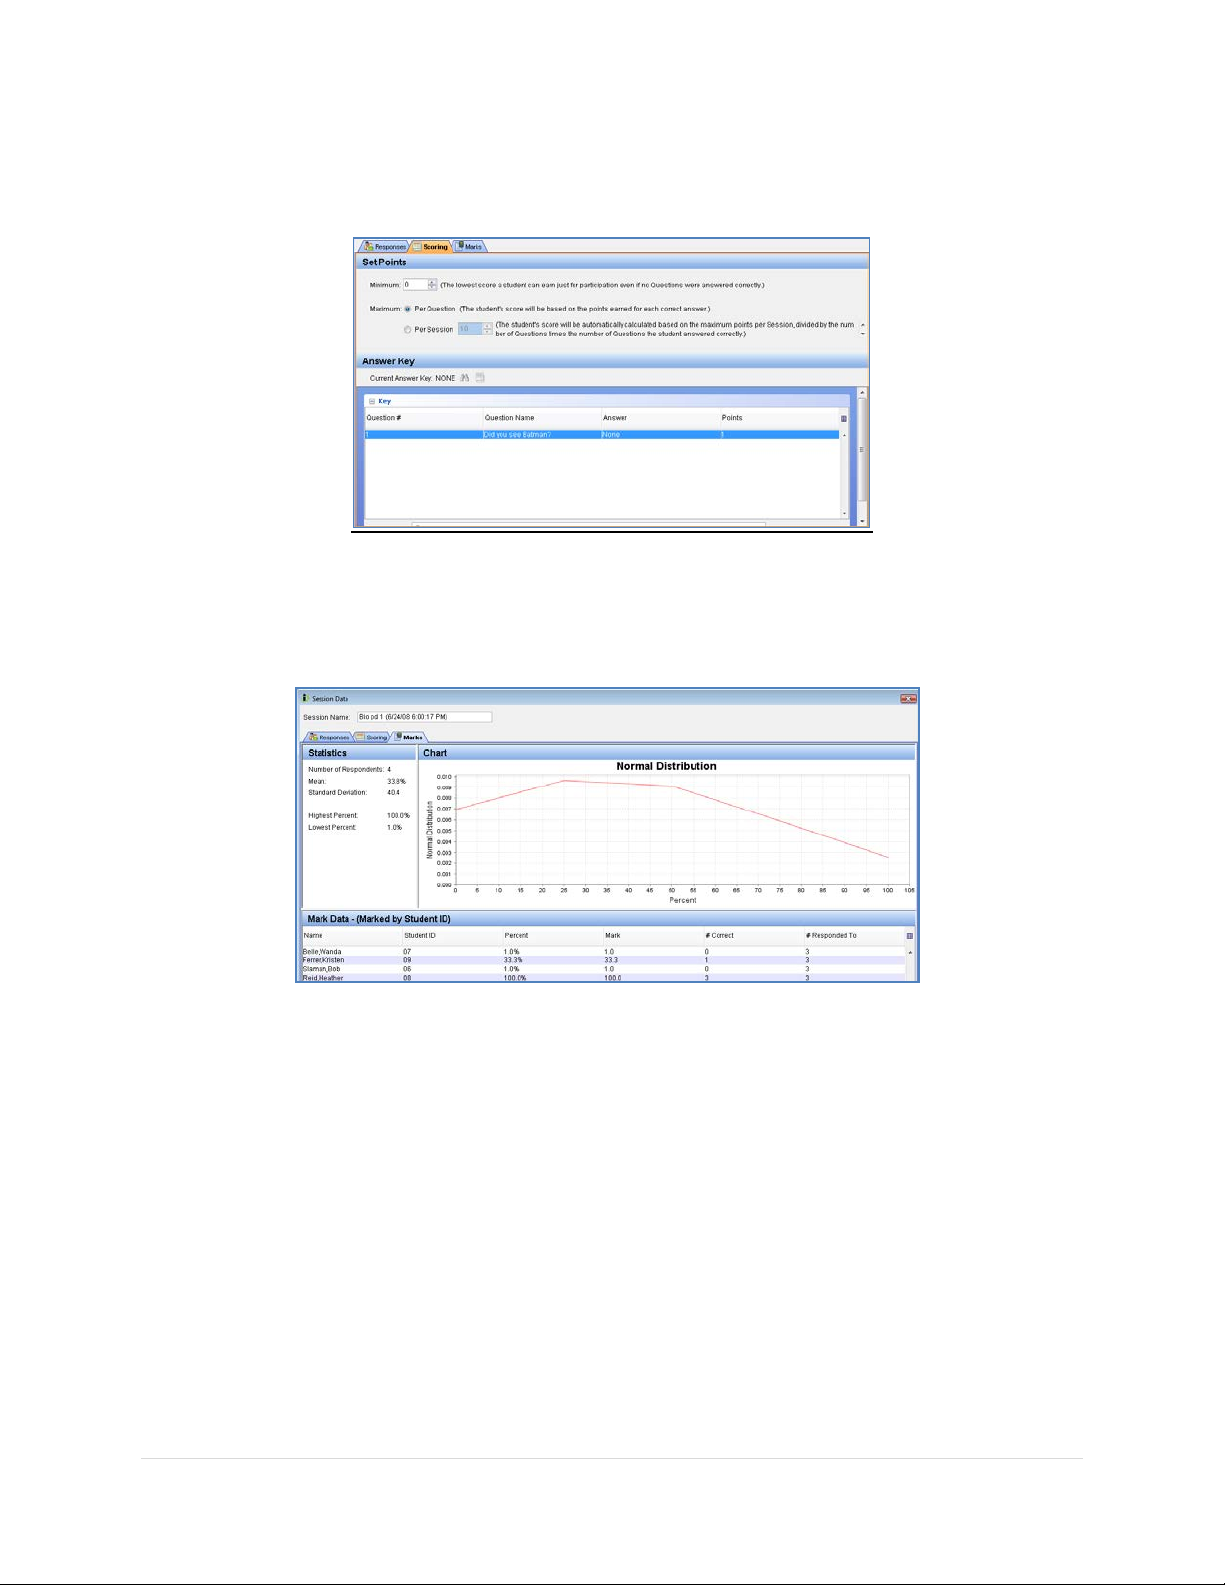
______________________________________________________________ Response User’s Guide
Scoring Tab
The Scoring tab allows you to set various points options and also modify the answer key.
Marks Tab
The Marks tab will allow you to see cumulative score for that particular session, as well as a few
statistics for the session.
69 | Page
Page 70
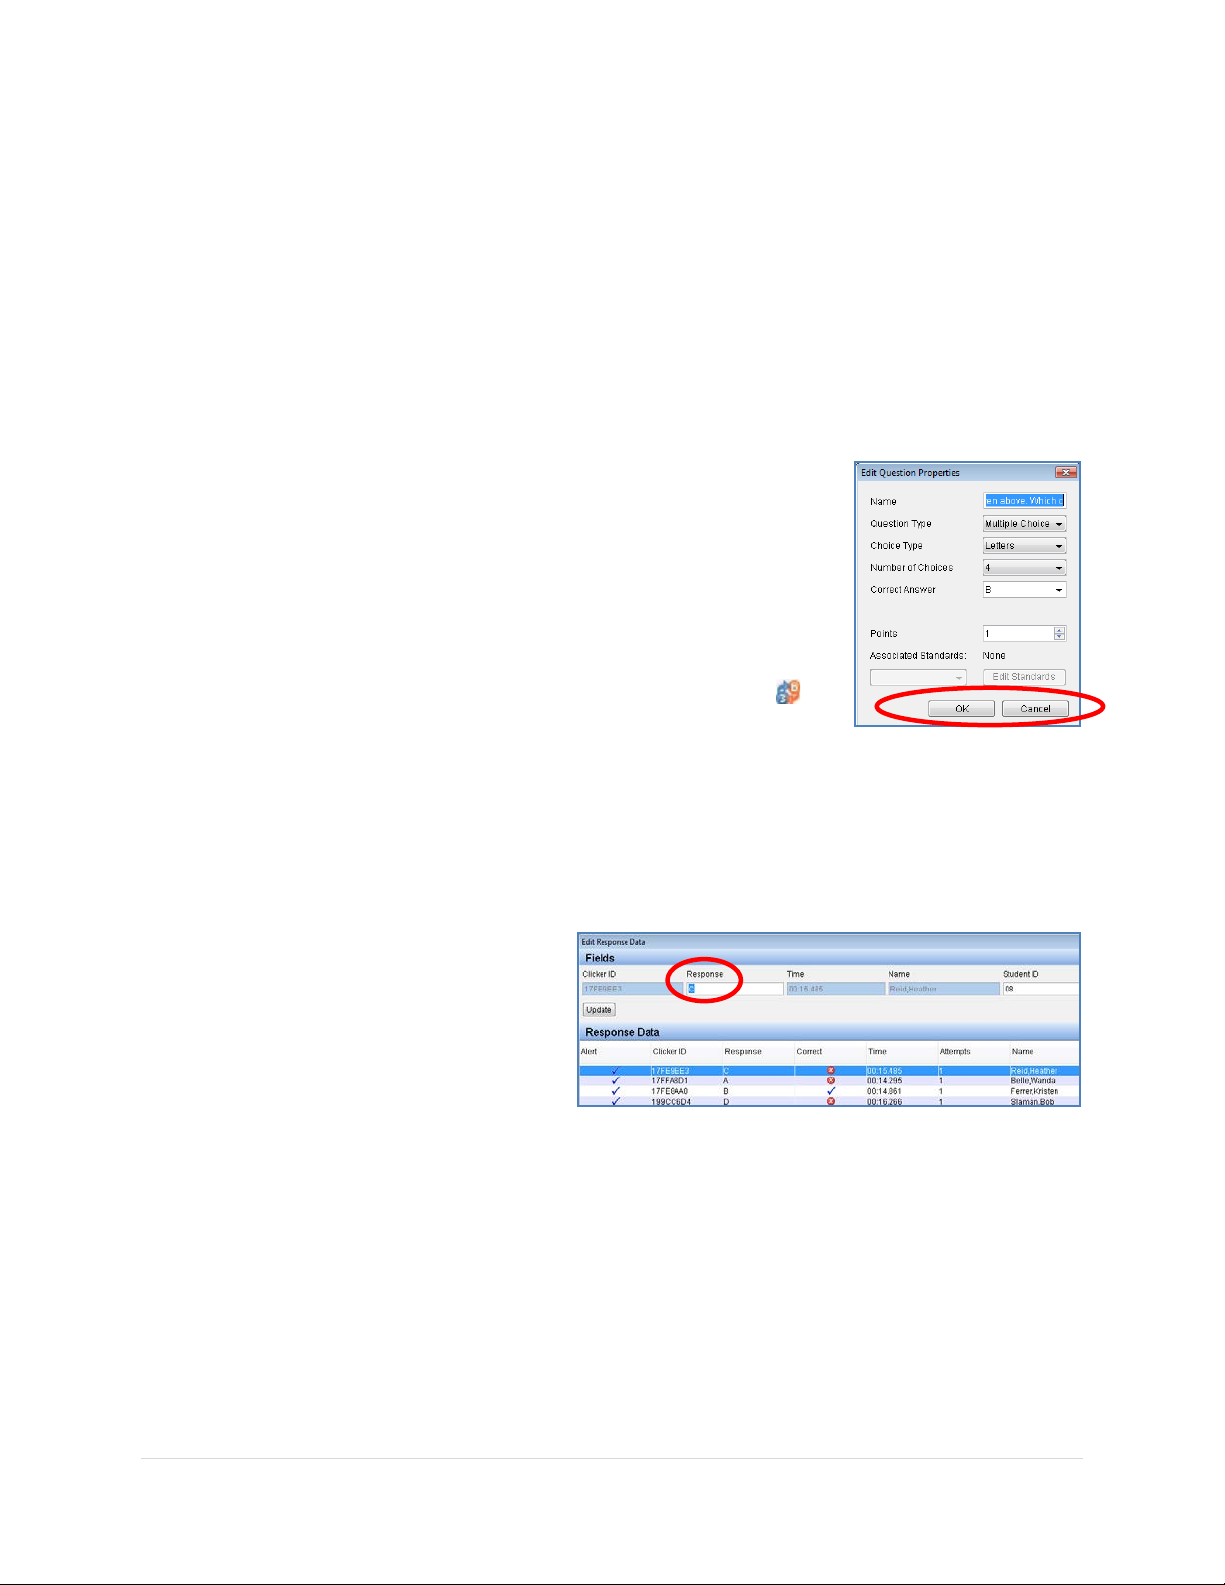
______________________________________________________________ Response User’s Guide
Editing an Administered Session
There may be times where you need to edit session data. For example, you may have put the
wrong correct answer when you created the question, or a student may have answered a
numeric multiple choice questi on with a lettered answer choice. T h er e are several tools in
Response that can help you edit a session.
Re-grade the Correct Answer (all students)
You may change a correct answer once a session is polled. The changes will be applied to all of
the students’ answers. You can also change the point value or associated standards.
1. From the Manage My Data window, click on the
Classes button.
2. Click on the Sessions tab; make sure the Response tab is
selected.
3. Double-click the session you wish to edit.
4. In the Questions pane, click on the question you want to
change, then click on the Edit Question Properties
button.
5. Make the desired changes, and t hen click OK.
Re-grade the Correct Answer (individual student)
1. From the Manage My Data
window, click on the Classes
button.
2. Click on the Sessions tab,
then the Response tab.
3. Double-click the student
record or student you wish to edit.
4. In the Questions pane, click on the question you want to change.
5. In the Responses pane, double click on the student’s response.
6. The Edit Response Data Window will appear, in the response box change the
student’s answer then click on Update.
7. You can also change other answers if you need to or change a Student ID. If you
are finished close out of the window.
70 | Page
Page 71
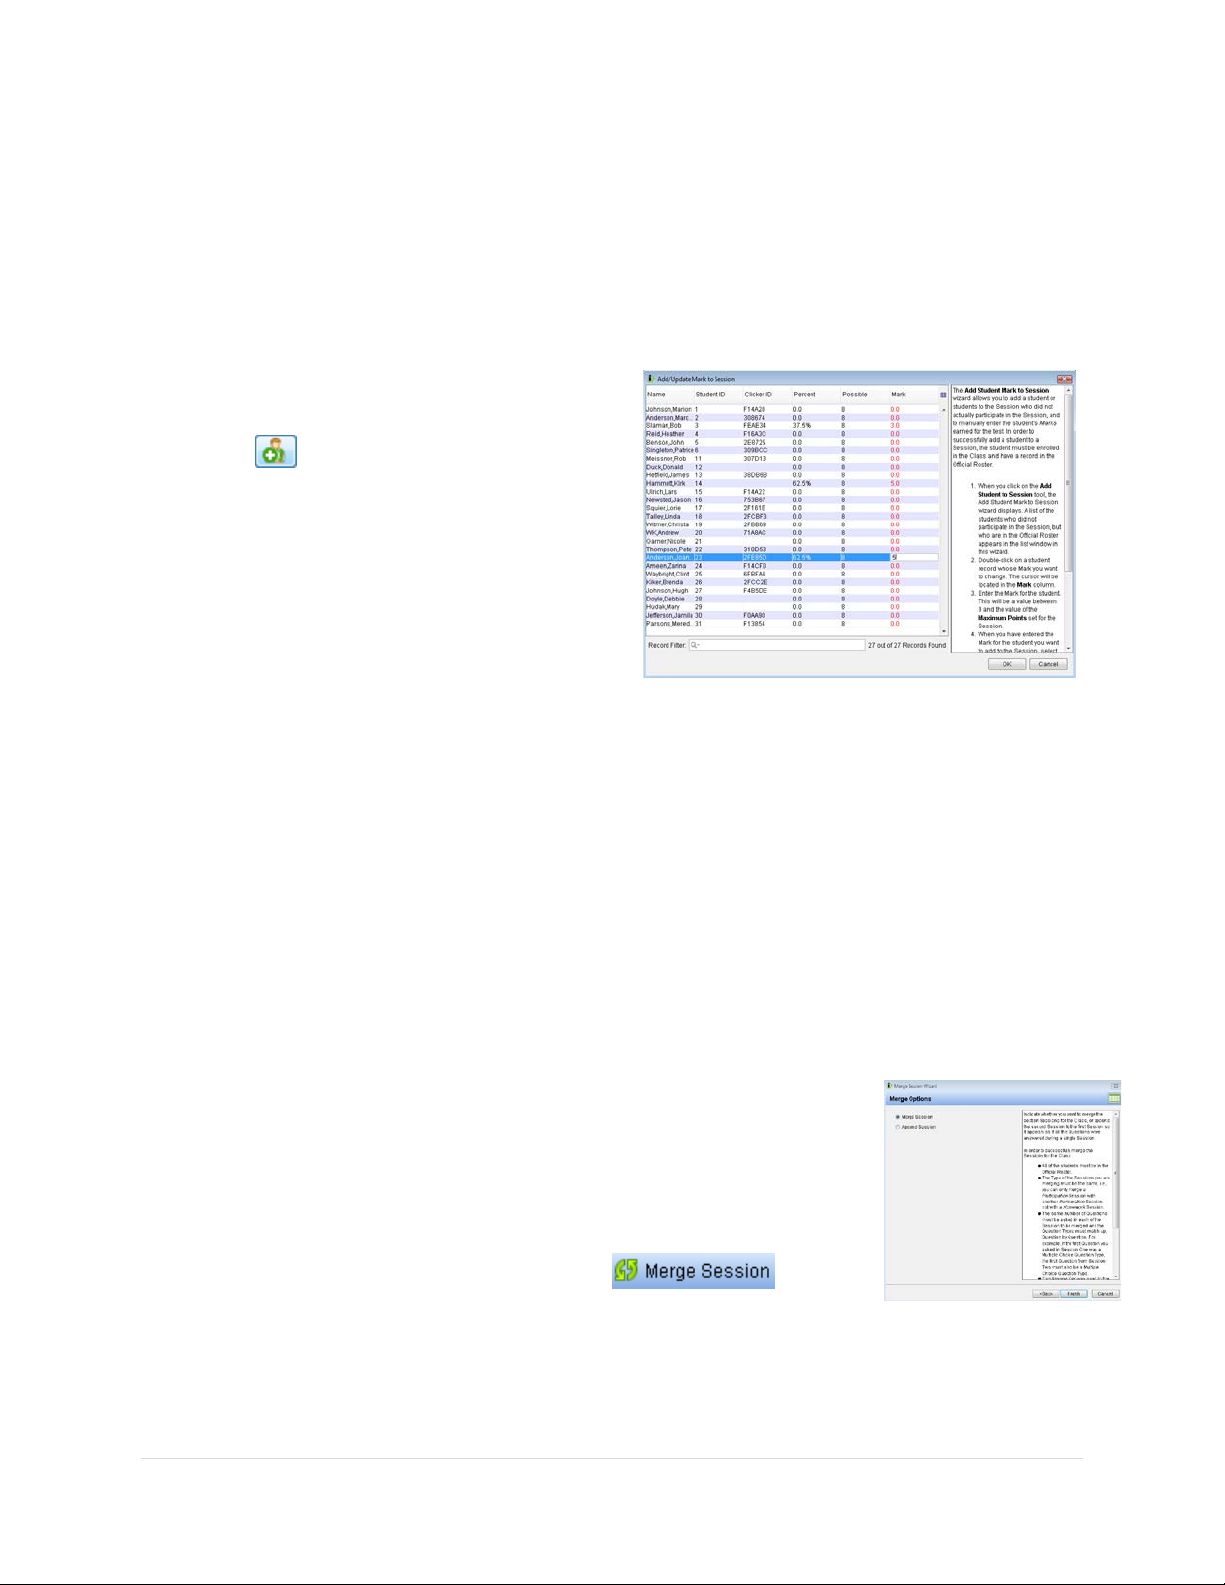
______________________________________________________________ Response User’s Guide
Add Student Score to Session
This feature will allow you to manually add a mark to a session for students that were absent or
perhaps took a paper make-up test.
1. From the Manage My Data window, select Classes, and then the class you wish to
use.
2. Next click on the Sessions tab, and then double click on the session you want
to add a student score.
3. Click on the Add Student button
. A list of students that that did
not attend the session will appear.
4. Select the student you want to add,
and then double click on the Mark cell
for that student. Enter his/her score.
5. Click OK. The student’s score will
appear under the Marks tab.
Merge or Append a Session
Once a session has been polled you may need to merge or append the session data. The
Merge function will allow you to take multiple sessions and merge it into one session. Merged
sessions must be from the same roster and test. For example, you have a class with multiple
sections. The student s are able to attend whatever sect i on they like. You can use the merge
feature to merge the data from the multiple sections into one session for the class.
Use the append feature if you would like to take two session but merge them so they appear as
one. For example, you started a session but did not finish the session because there was a fire
drill. The following day you finish the questions that were not asked. You can append the
session so that the two separate sessions will appear as one session.
1. From the Manage My Data window, select Classes, and then
the class you wish to use.
2. Next click on the Sessions tab. Hold down the control key
(ctrl) on your computer and click on the sessions you
would like to merge/append.
3. Click on the Merge Session button .
4. Follow the steps in the wizard.
5. The new merged session will appear under the sessions tab.
71 | Page
Page 72
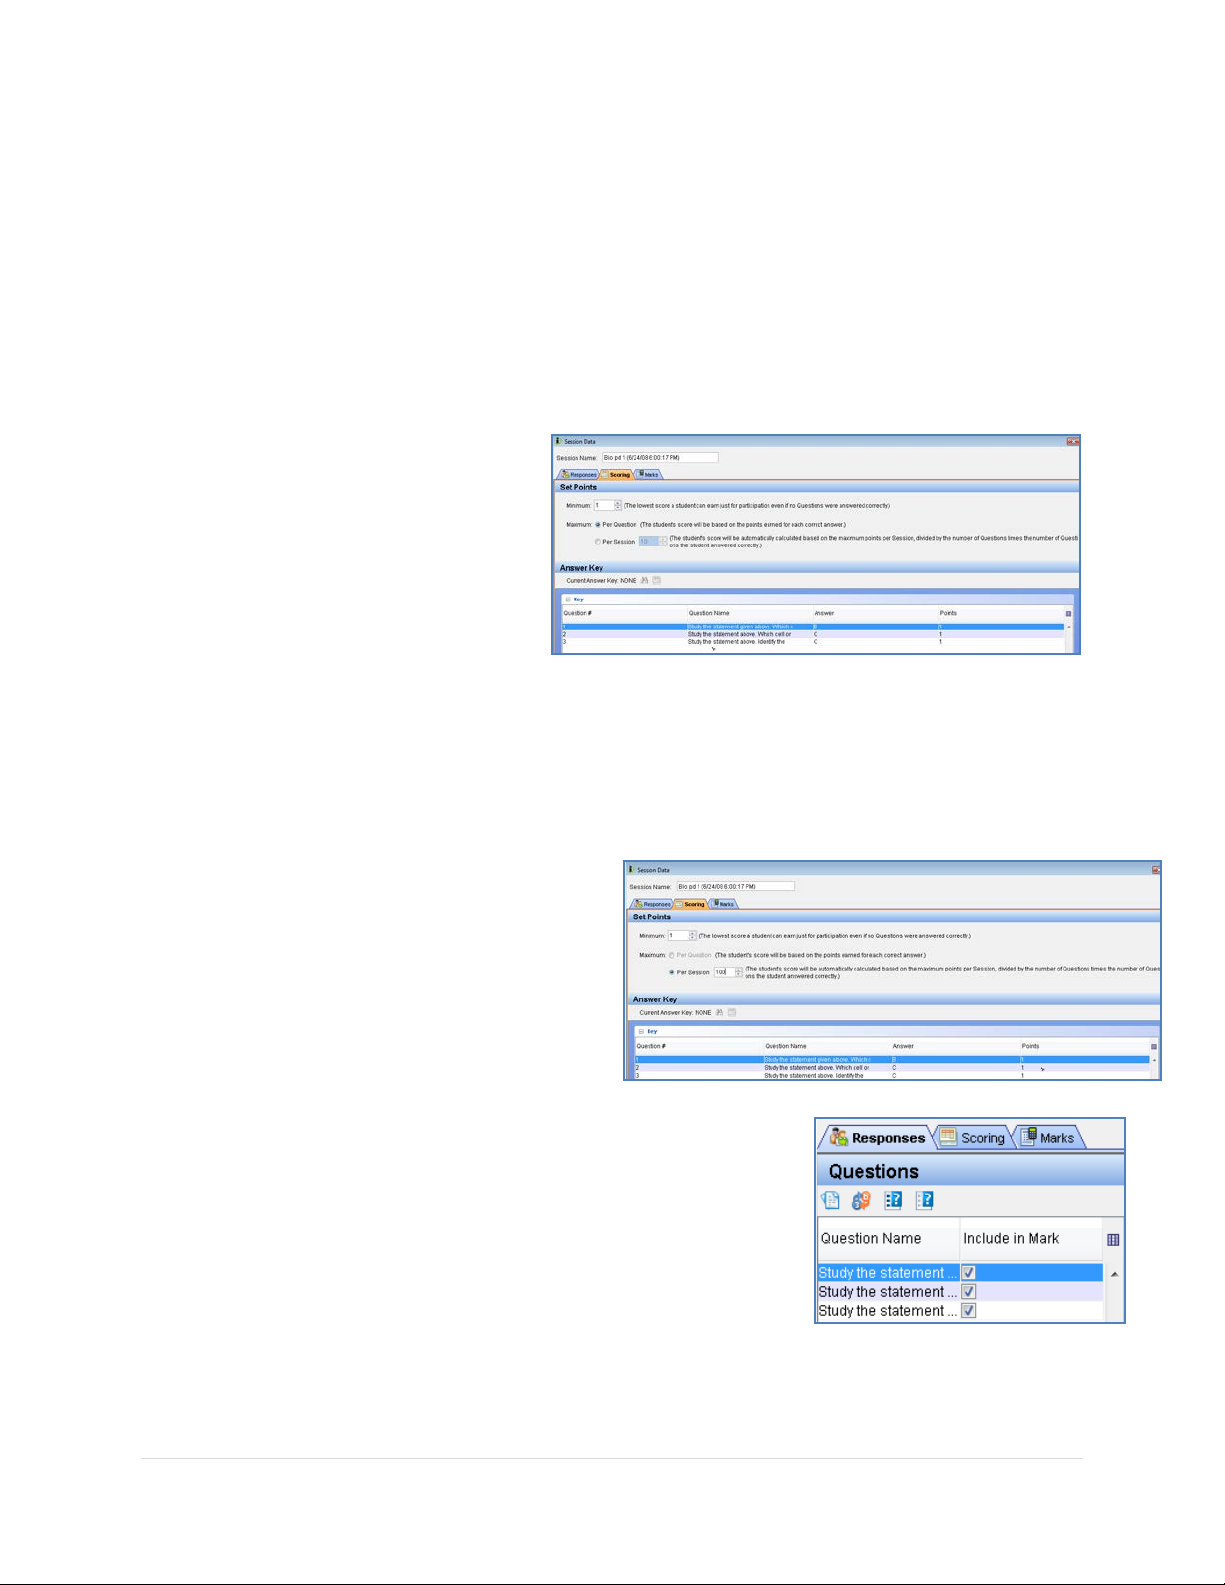
______________________________________________________________ Response User’s Guide
Using the Scoring Tab
The scoring tab allows you to change the point values for questions. You can also view and
edit answer keys that were used during the session.
Setting Points-Minimum
This option will allow you to assign a minimum amount of points for responding to a question,
even if the answer was incorrect.
1. From the Manage My Data
window, click on the
Classes button.
2. Click on the Sessions tab,
and double-click the
session you wish to score.
3. Click the Scoring tab.
4. Change the Minimum point value.
5. Click on the close button when you are done.
Setting Points-Maximum
This option allows you to either assign
different point values for questions or you can
set a Maximum point value that can be earned
for the Session. For example, if you were to
set a Maximum value of 100 points for the
Session, and you asked four Questions,
students who answered all the Questions
correctly would earn 100 points.
1. From the Manage My Data window, click on the
Classes button.
2. Click on the Sessions tab,
3. Double Click on the Session.
4. Click on the Scoring tab.
5. Change the Maximum point value.
6. Click on the close button when you are done.
72 | Page
Page 73

______________________________________________________________ Response User’s Guide
Include Question in Mark
This option allows you to decide which questions will be counted in the final score. On the
Response tab, uncheck any questions you do not want to be included.
Moving and Exporting Session Data
There may be times when you will either need to move your data, or export your data so it can
be used outside of the Response database.
Move Session
This feature is useful when you need to move a session
to another class or section.
1. From the Manage My Data main screen click
on Move session.
2. Select Session tab.
3. Double-click the session you wish to edit.
4. Select the new class or section where you would like to move your session.
5. Click OK.
Export Session
This feature will allow you to export a session to be used
with an LMS system or a file that just contains the raw
session data. If you click on the drop down arrow next
to the Export Session button you can also export the
roster and gradebook.
1. From the Manage My Data main screen
click on Export Session.
2. Select Session tab.
3. Double-click the session you wish to edit.
4. Select the Export Type and any other options.
5. Click Next on the wizard, then Finish.
73 | Page
Page 74

______________________________________________________________ Response User’s Guide
Generating Various Reports for a Session
Response Reports provides a framework for outputting the data in your Response database.
For managing data use the Session, Response, Answer Key, and Gradebook reports.
Session Reports
There are several session reports you can create depending on what information you want to
extract from the session.
1. From the Manage My Data main screen, click on the Reports button.
2. In the navigation pane, choose Session.
3. Select the type of report you would like to print from the Choose Report Type
drop down menu.
4. Select the class and session you would like to create the report for.
5. Click Create Report. Your report will appear in a window that will allow you to
save or print your report. If you choose to save your report, it will save as a .PDF
Session Details by Question
This report will show you the question, graph, and a listing of the students and their responses
for the question. The report will show this information for each of the questions.
74 | Page
Page 75
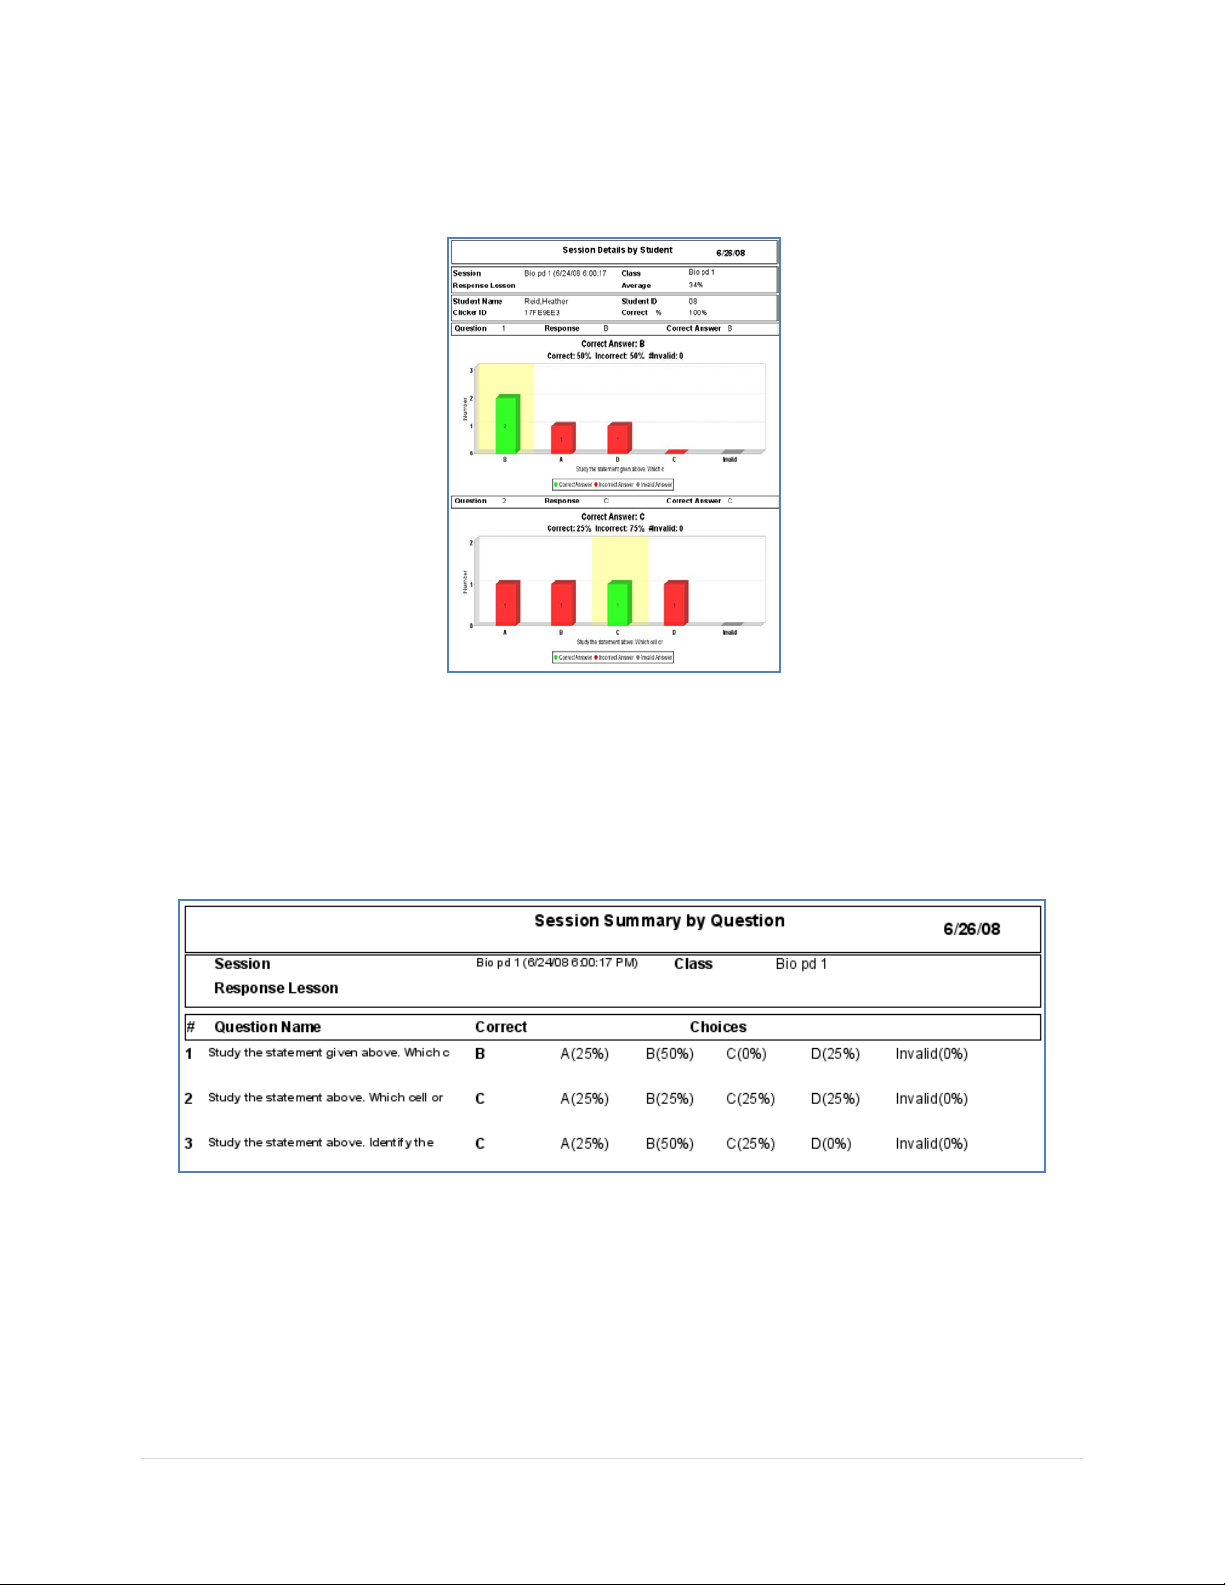
______________________________________________________________ Response User’s Guide
Session Details by Student
This report will show a graph for each question that is answered by each student.
Session Summary by Question
This report shows an abbreviated version of the question, the correct answer, and a breakdown
of the percentage of the class’ answers for each of the answer choices.
75 | Page
Page 76

______________________________________________________________ Response User’s Guide
Session Summary by Student
This report will show a listing of the students, their overall score, how many question they
answered correctly, how many quest io n s they attempted t o answer, how many quest io ns were
actually asked, and the number of question there were actually counted in the score.
Session Review
This report shows the question and the graph for each question that was asked.
76 | Page
Page 77

______________________________________________________________ Response User’s Guide
Study Guide
This report shows a listing of each question, the student’s answer, and the correct answer.
Study Guide for Missed Questions
This report shows a listing of questions missed and the correct answer.
Response Lesson Reports
This option will allow you create and print various reports for lessons created in Response using
the question editor.
1. From the Manage My Data main screen, click on the Reports button.
2. In the navigation pane, choose Response lesson.
3. Select the type of report you would like to print from the Choose Report Type
drop down menu.
4. Select the lesson in which you want to create the repo r t.
77 | Page
Page 78

______________________________________________________________ Response User’s Guide
5. Click Create Report. Your report will appear in a window that will allow you to
save or print your report. If you choose to save your report, it will save as a .PDF
Lesson by Question
This report will show you the lesson questions, answer choices, and co rrect answer. This report
is useful if you would like to make a back-up hard copy of your lesson.
78 | Page
Page 79

______________________________________________________________ Response User’s Guide
Lesson No Correct Answer
This report will show you the lesson questions, answer choices, but not the correct answer.
This report is useful if you want to create a study guide for the students.
Lesson No Choices
This report will show only the question, without the answer choices. This report is useful if you
would like the students to work through solving a question.
79 | Page
Page 80

______________________________________________________________ Response User’s Guide
Answer Key
This function will allow you to make a printed copy of your answer key.
1. From the Manage My Data
main screen, click on the
Reports button.
2. In the navigation pane,
choose Answer Key.
3. Select the type of report
you would like to print from
the Choose Report Type from the drop down menu.
4. Select the answer key in which you would like to create the report.
5. Click Create Report. Your report will appear in a window that will allow you to
save or print your report. If you choose to save your report, it will save as a .PDF
80 | Page
Page 81

______________________________________________________________ Response User’s Guide
Standards
In Response you have the ability to assign state standards to your lesson questions. There are
reports that will cross reference students’ responses with assign standards.
1. From the Manage My Data main screen, click on the Reports button.
2. In the navigation pane, choose Standards.
3. Select the type of report you would like to print from the Choose Report Type
from the drop down menu.
4. Select the class in which you would like to create the r eport.
5. Click Create Report. Your report will appear in a window that will allow you to
save or print your report. If you choose to save your report, it will save as a .PDF
Session Summary by Class, by Standard
This report will create a listing of standards that were assigned to lesson questions. It will also
show the correct percentage the class scored for that standard.
Session Summary by Student, by Standard
This report is created for individual students and shows a listing of standards that were
assigned to lesson questions. It will also show it will also show if that student mastered that
standard.
81 | Page
Page 82
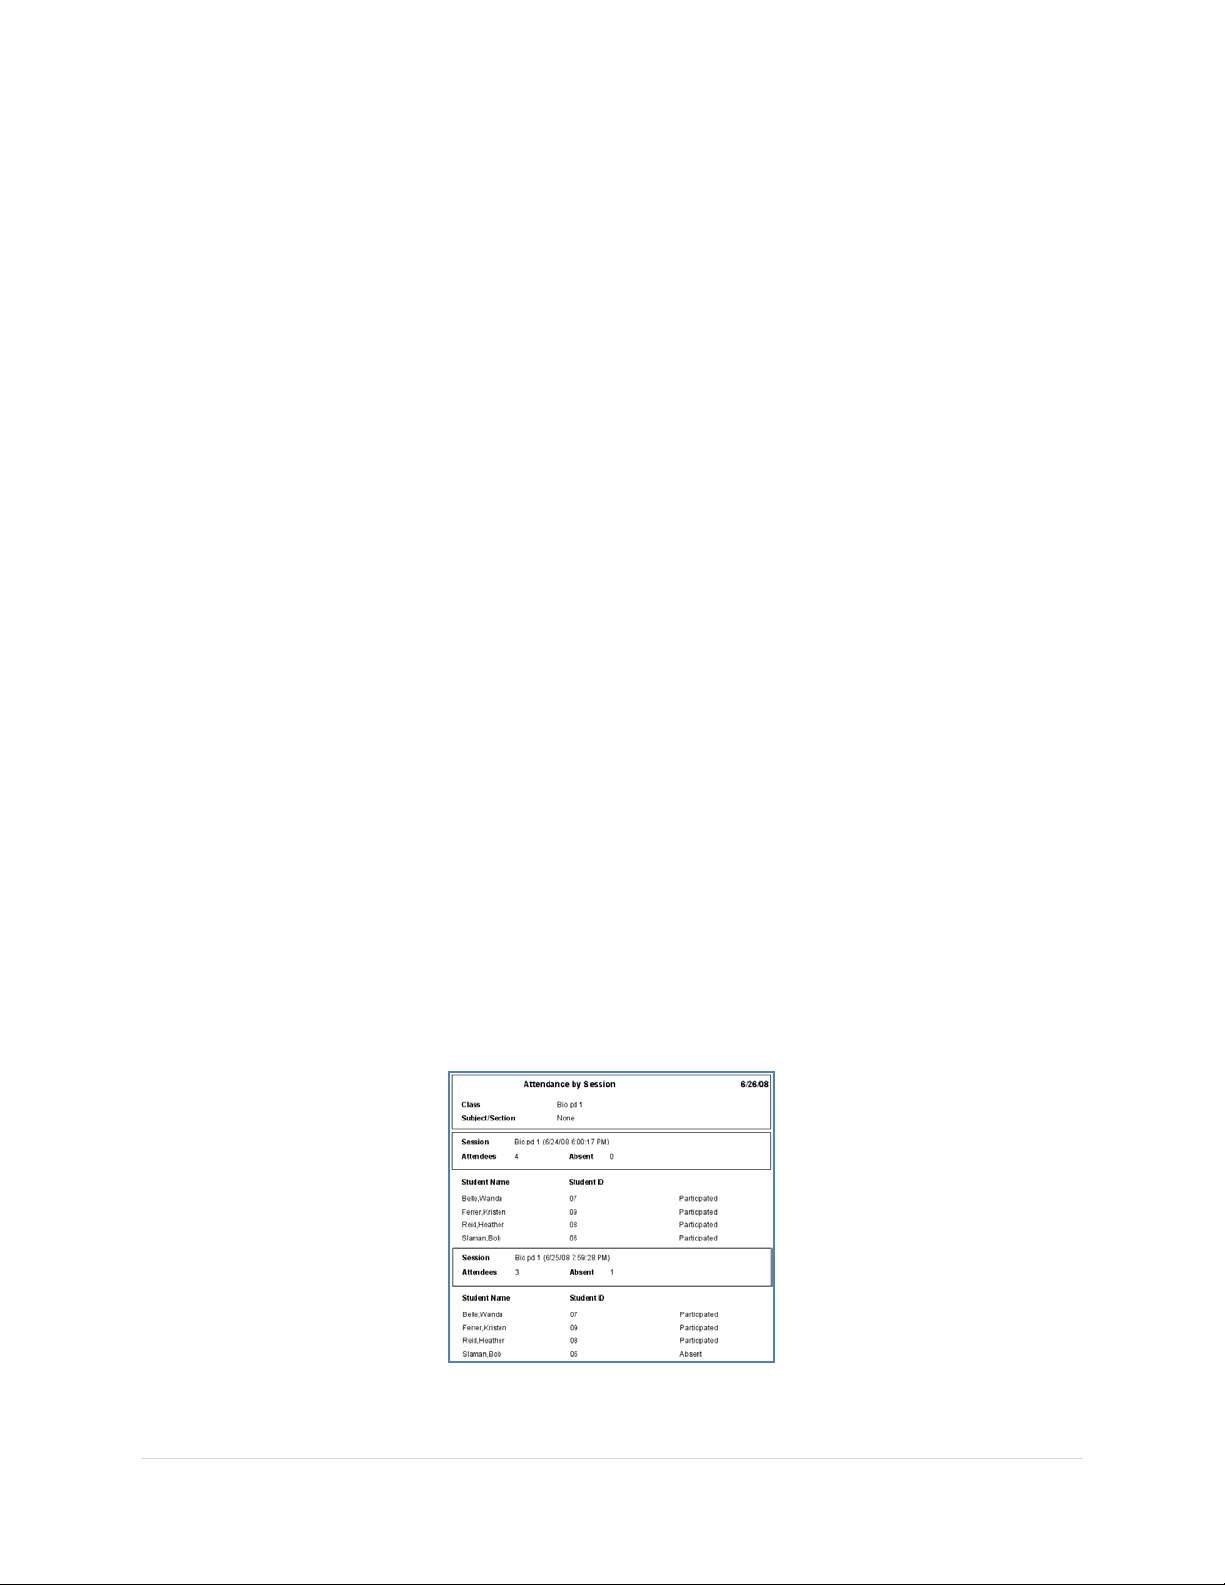
______________________________________________________________ Response User’s Guide
Managing and Generating Reports for Attendance
Whenever a session is administered, Response will track attendance. If a student answers a
question, she or he, is counted as present. Following the session you can view or create a
report to show attendance data.
1. From the Manage My Data main screen, click on the Classes button, choose the
Attendance tab.
2. In the data pane, you will see a listing of students. For each student there will be a
column for cumulative absences and a listing of sessions. An “A” will appear in the
session column if the student was absent.
To Generate an Attendance Report
1. From the Manage My Data main screen, click on the Reports button.
2. In the navigation pane, choose Attendance.
3. Select the type of report you would like to print from the Choose Report Type
drop down menu.
4. Select the class in which you would like to create the report.
5. Click Create Report. Your report will appear in a window that will allow you to
save or print your report. If you choose to save your report, it will save as a .PDF
Attendance By Session
This report will show each session, the number of students that attended and absent. It will
also show a listing of the students that participated in the session.
82 | Page
Page 83
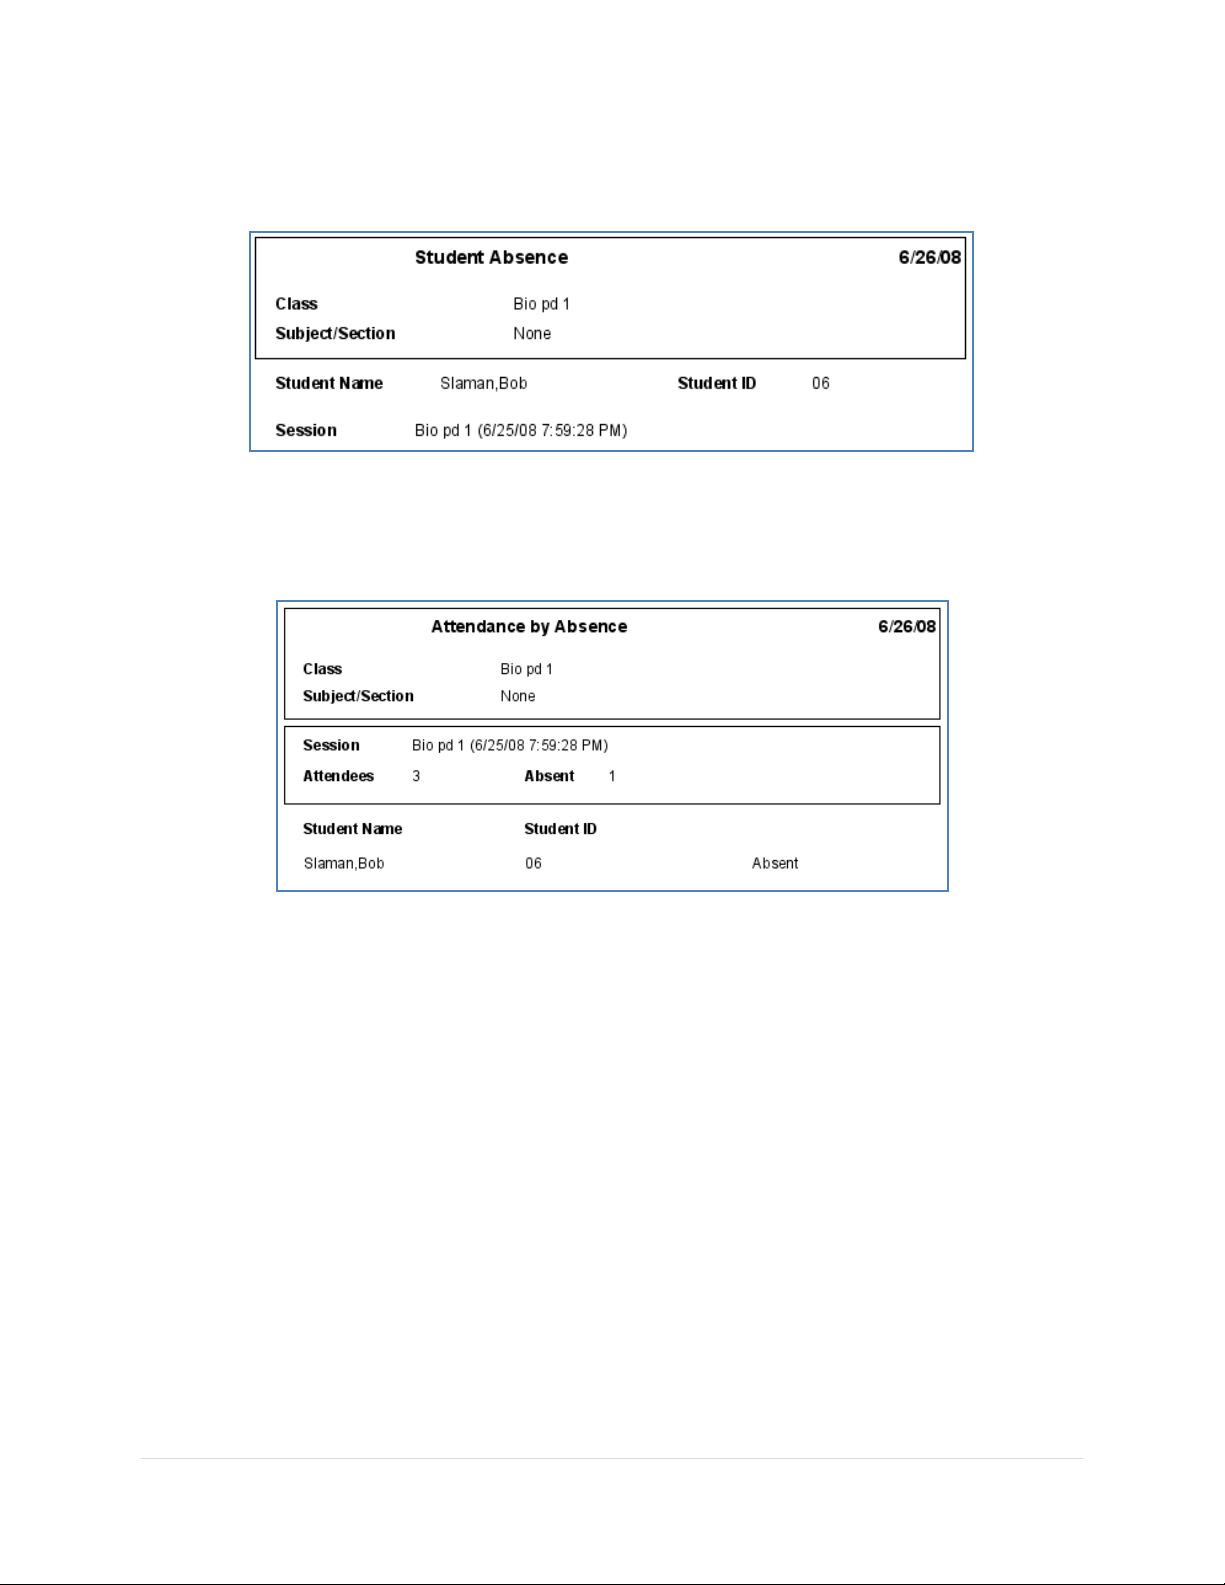
______________________________________________________________ Response User’s Guide
Attendance By Student Absence
This report will show a student and the sessions he or she missed.
Attendance By Absence
This report will show a listing of sessions and what students were absent for that session.
83 | Page
Page 84

______________________________________________________________ Response User’s Guide
Managing and Generating Reports for the Gradebook
When session has ended, the results are automatically scored and sent to the gradebook. The
gradebook will list the students, the various sessions, and scoring data. Each student will also
have a cumulative score and percentage as well.
View the Gradebook
1. From the Manage My Data tab, click
on the Classes button.
2. Select your class from the navigation
pane.
3. Click on the Grade book tab.
Delete or Exclude a Session from the Gradebook
1. From the Manage My Data
tab, click on the Classes
button.
2. Select your class from the navigation pane.
3. Click on the Sessions tab.
• To exclude a session from th e gr ad eb ook , uncheck the “Include” b ox fo r that
session.
• To delete a session, cli ck on the sessions you want to delete , and then click on
Delete from the menubar.
Exporting Gradebook Data
1. From the Manage My Data tab, click on the
Classes button.
2. Select your class from the navigation pane.
3. Click on the Grade book Tab, then click on the
Export Gradebook button .
84 | Page
Page 85

______________________________________________________________ Response User’s Guide
4. Choose the export type from the drop down menu. If you are using raw data you
can choose the parse you would like to use (comma, semicolon, or tab). Follow the
steps of the wizard.
Customize the Gradebook
1. From the Manage My Data main screen, click on Edit from the menu bar.
2. Choose Global Pref erences, and then select Gradebook from the bar on the left
hand side.
3. Modify any options for your gradebook.
• Type: This will change the scores t o
either be a letter grade or a nume r i c al
score.
• Levels: This will allow you to select
different tiers for your scoring structure.
For example, if your institution only
supports letter grades A-E, that would consist of five levels. Each letter grade
would represent one level.
• +/- Scale: This option allows you to specify a numerical value for each of the
levels. For example, if you are using letter grades, you can specify what
percentage constitutes an “A”, “A+”, or “A-” Instructors that grade on a “curve”
use this feature.
• You can also color code your grades as well. For example, if the lowest level in
your gradebook is an “E”, you could set that level to display in red, so you
attention will be called to that score.
Choosing Gradebook Columns to Display
1. From the Manage My Data tab, click on the Classes button.
2. Select your class from the navigation pane.
3. Click on the Gradebook Tab, then click on the
Column Display button .
4. Check the options you want displayed, and then
click OK.
85 | Page
Page 86
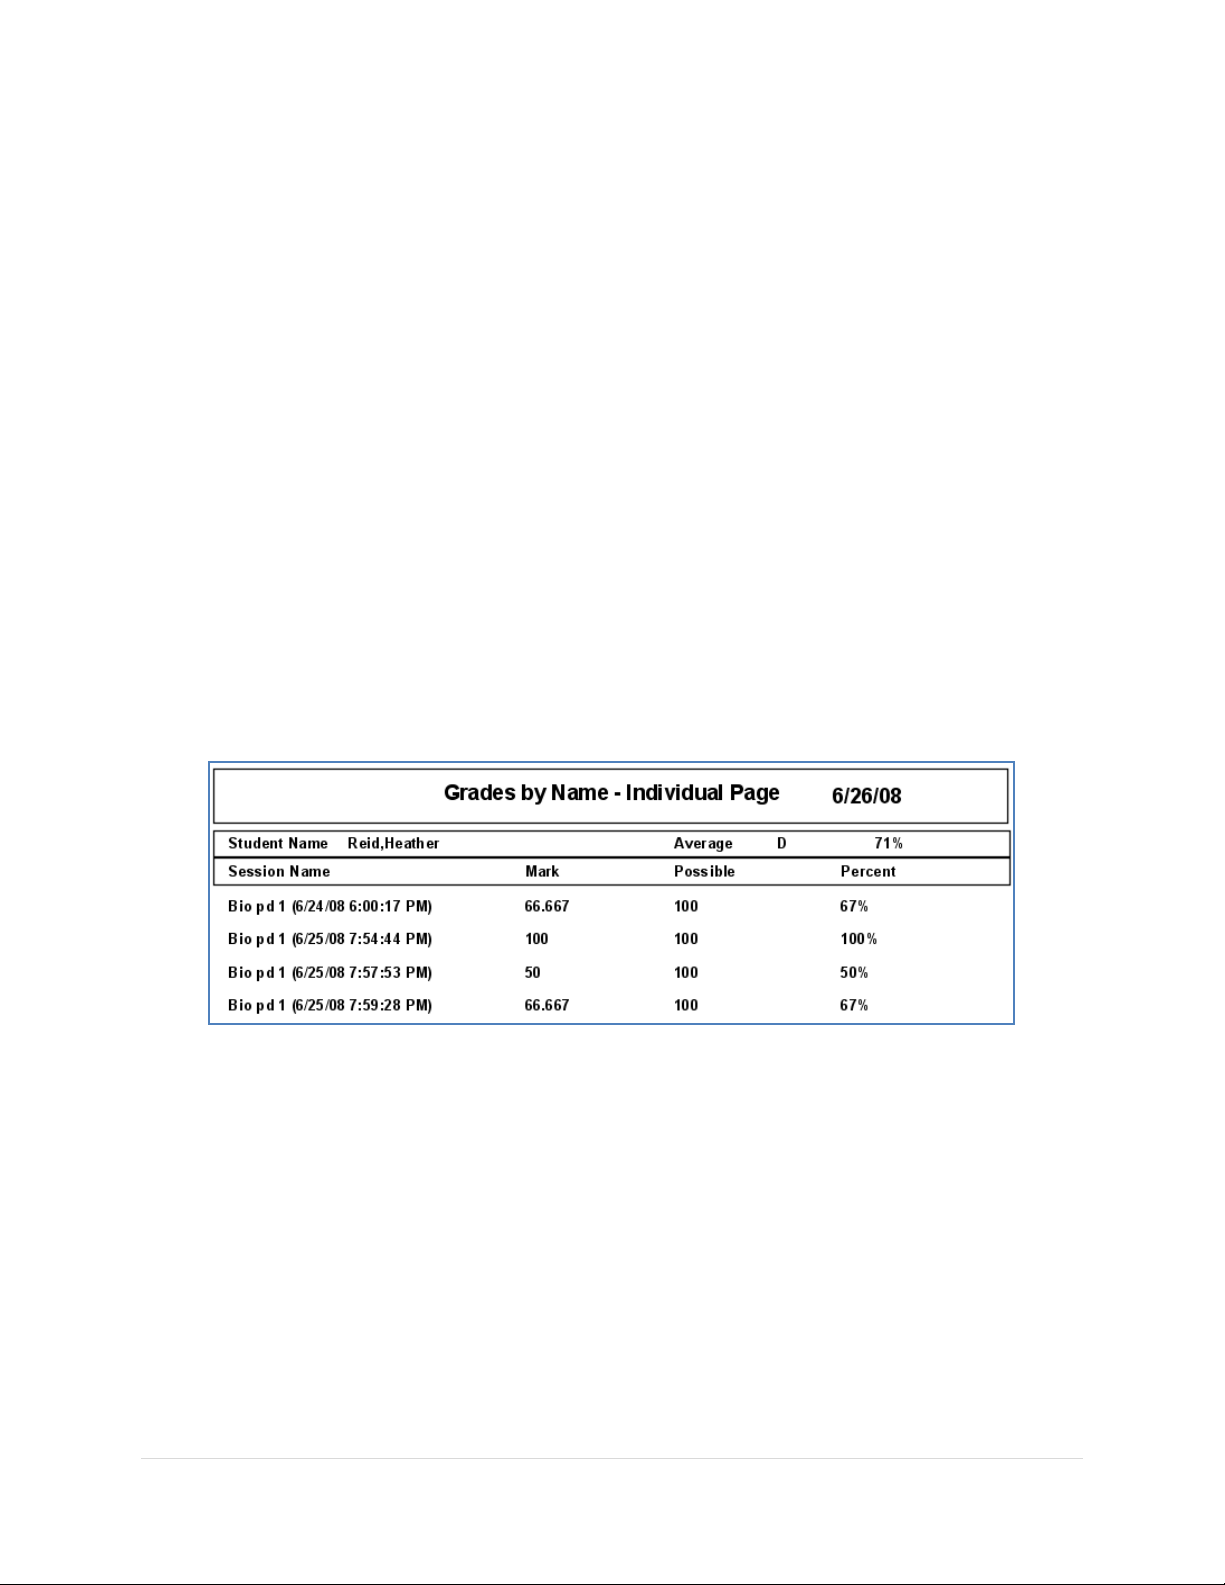
______________________________________________________________ Response User’s Guide
5. You can also re-arrange columns in the gradebook by dragging them to the desired
location.
Create Gradebook Reports
1. From the Manage My Data main screen, click on the Reports button.
2. In the navigation pane, choose Gradebook.
3. Select the type of report you would like to print from the Choose Report Type
drop down menu.
4. Select the class you would li ke to create the report for.
5. Click Create Report. Your report will appear in a window that will allow you to
save or print your report. If you choose to save your report, it will save as a .PDF
Grades By Student
This report will create a page for each student. Each student will have a listing of all of the
sessions they participated in and their score. In this repo rt the student’s are identified by their
name.
Grades By Student ID
This report will create a listing of session data for each student; however, the students are only
identified by their student ID number.
86 | Page
Page 87

______________________________________________________________ Response User’s Guide
Grades By Clicker ID
This report will create a listing of session data for each student; however, the students are only
identified by their Student Response Pad ID number.
Grades by Session
This report will show a listing of each session. Within this listing are the students and their
scoring data.
87 | Page
Page 88

______________________________________________________________ Response User’s Guide
37-01822-01 | 36-01823 RevA
88 | Page
 Loading...