


 Series
Quickstart Guide
A54-00000-85132
2 Milan Series
Important Safety
Instructions
Terminals marked with this symbol carry electrical current of sufficient
magnitude to constitute risk of electric shock. Use only high-quality commercially-available speaker cables with plugs pre-installed. All other installation or modification should be performed only by qualified personnel.
This symbol, wherever it appears, alerts you to the presence of uninsulated
dangerous voltage inside the enclosure - voltage that may be sufficient to constitute a risk of shock.
This symbol, wherever it appears, alerts you to important operating and
maintenance instructions in the accompanying literature. Please read the manual.
Caution
To reduce the risk of electric shock, do not remove
the top cover (or the rear section). No user serviceable parts inside. Refer servicing to qualified personnel.
Caution
To reduce the risk of fire or electric shock, do not
expose this appliance to rain and moisture. The apparatus shall not be exposed to dripping or splashing liquids and no objects filled with
liquids, such as vases, shall be placed on the apparatus.
Caution
These service instructions are for use by qualified
service personnel only. To reduce the risk of electric shock do not perform any servicing other than that contained in the operation instructions. Repairs have to be performed by qualified service personnel.
1.Read these instructions.
2.Keep these instructions.
3.Heed all warnings.
4.Follow all instructions.
5.Do not use this apparatus near water.
6.Clean only with dry cloth.
7.Do not block any ventilation openings. Install in accordance with the manufacturer’s instructions.
8.Do not install near any
heat sources such as radiators, heat registers, stoves, or other apparatus (including amplifiers) that produce heat.
9.Do not defeat the safety purpose of the polarized or grounding-type plug. A polarized plug has two blades with one wider than the other. A groundingtype plug has two blades and a third grounding prong. The wide blade or the third prong are provided for your safety. If the provided plug does not fit into your outlet, consult an electrician for replacement of the obsolete outlet.
10.Protect the power cord from being walked on or pinched particularly
at plugs, convenience receptacles, and the point where they exit from the apparatus.
11.Use only attachments/accessories specified by the manufacturer.
12.Use only
with the cart, stand, tripod,
bracket, or table specified by the manufacturer,
or sold with the apparatus.
When a cart is used, use caution when moving the cart/apparatus combination to avoid injury from tip-over.
13.Unplug this apparatus during lightning storms or when unused for long periods of time.
14.Refer all servicing to qualified service personnel. Servicing is required when the apparatus has been damaged in any way, such as power supply cord or plug is damaged, liquid has been spilled or objects have fallen into the apparatus, the apparatus has been exposed to rain or moisture, does not operate normally, or has been dropped.
15.The apparatus shall be connected to a MAINS socket outlet with a protective earthing connection.
16.Where the MAINS plug or an appliance coupler is used as the disconnect device, the disconnect device shall remain readily operable.
LEGAL DISCLAIMER
TECHNICAL SPECIFICATIONS AND APPEARANCES ARE SUBJECT TO CHANGE WITHOUT NOTICE AND ACCURACY IS NOT GUARANTEED. BEHRINGER, KLARK TEKNIK, MIDAS, BUGERA, AND TURBOSOUND
ARE PART OF THE MUSIC GROUP (MUSIC-GROUP.COM).
ALL TRADEMARKS ARE THE PROPERTY OF THEIR RESPECTIVE OWNERS. MUSIC GROUP ACCEPTS NO LIABILITY FOR ANY LOSS WHICH MAY BE SUFFERED BY ANY PERSON WHO RELIES EITHER WHOLLY OR IN PART UPON ANY DESCRIPTION, PHOTOGRAPH OR STATEMENT CONTAINED HEREIN.
COLORS AND SPECIFICATIONS MAY VARY FROM ACTUAL PRODUCT. MUSIC GROUP PRODUCTS ARE SOLD THROUGH AUTHORIZED FULLFILLERS AND RESELLERS ONLY. FULLFILLERS AND RESELLERS ARE NOT AGENTS OF MUSIC GROUP AND HAVE ABSOLUTELY NO AUTHORITY TO BIND MUSIC GROUP BY ANY EXPRESS OR IMPLIED UNDERTAKING OR REPRESENTATION. THIS MANUAL IS COPYRIGHTED.
NO PART OF THIS MANUAL MAY BE REPRODUCED OR TRANSMITTED IN ANY FORM OR BY ANY MEANS, ELECTRONIC OR MECHANICAL, INCLUDING PHOTOCOPYING
AND RECORDING OF ANY KIND, FOR ANY PURPOSE, WITHOUT THE EXPRESS WRITTEN PERMISSION OF MUSIC GROUP IP LTD.
ALL RIGHTS RESERVED.
© 2013 MUSIC Group IP Ltd.
Trident Chambers, Wickhams Cay,
P.O. Box 146, Road Town, Tortola,
British Virgin Islands
LIMITED WARRANTY
For the applicable warranty terms and conditions and additional information regarding MUSIC Group’s Limited Warranty,
please see complete details online at www.music-group.com/warranty.
Quickstart Guide |
3 |
Introduction
Congratulations, you have purchased a professional loudspeaker product from the Milan series of loudspeakers, designed to give you the best in audio quality and many years of reliable, troublefree operation. It offers excellent pattern control, superior audio quality, proven reliability, ease of setup, consistent performance, and the backing of a world leader in acoustics technology including a
comprehensive warranty against manufacturing defects. Please read through this guide carefully before you attempt to operate the loudspeaker system. It contains valuable information which will enable you to quickly and easily connect the loudspeakers to your outboard equipment; and important system and set-up checks.
Thanks
Thank you for choosing a TURBOSOUND loudspeaker product for your application.
By engaging in an on-going rigorous program of research and development all TURBOSOUND products are carefully engineered for world class performance and reliability.
If you would like further information about this or any other TURBOSOUND product, please contact us. Detailed product information is available on our website at: turbosound.com
We look forward to helping you in the near future.
Unpacking
After unpacking the unit please check carefully for damage. If damage is found, please notify the carrier concerned at once. You, the consignee, must instigate any claim. Please retain all packaging in case of future re-shipment.
Models covered by this Quick Start Guide
Milan M10, Milan M12, Milan M15, Milan M15B, Milan M18B
4 Milan Series
Connection Diagrams
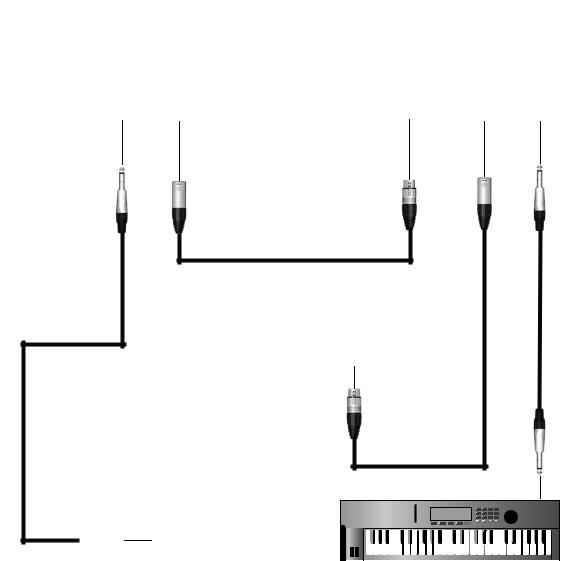
Small duo setup using the integrated mixer and Mix Out function
The integrated two channel mixer allows the simultaneous use of either two low impedance dynamic microphones, a microphone and a line level source, or two line level sources. The line level source(s) can be an acoustic instrument such as a guitar with either passive or active on-board electrics,
a keyboard, or MP3 player. Connect dynamic microphones directly to either of the combo jack/XLR input connectors, switch the MIC/LINE switch to MIC and adjust the volume level as desired. Connect line sources to either of the combo jack/XLR connectors, switch the MIC/LINE switch to LINE and adjust the volume control as desired. Switch the LOW CUT filter to 'OFF' and switch the PROG switch to 'MUSIC'. Additional microphones and sources can be connected by using the MIX OUT function to daisy-chain to additional Milan loudspeakers.
Quickstart Guide |
5 |
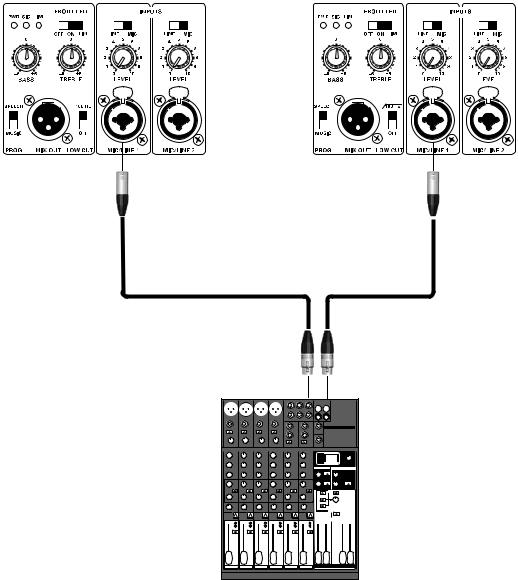
Stereo PA with an external mixer
Two Milan loudspeakers form the left and right elements of a stereo PA setup with all signal sources connected to an external mixing console. Ensure that the MIC/LINE switch is set to LINE on both loudspeakers. Set the LOW CUT switch to the ‘OFF’ position when not using subwoofers. For mixed vocal and music program material set the PROG switch to 'MUSIC'. Bring up the master faders on the mixer, ensuring that the outputs are not clipping, and then adjust both loudspeakers’ level controls to the desired loudness. Adjust the bass and treble controls as required to acheive a suitable frequency response from the system. For consistent balance and response set the level controls and tone controls to approximately the same positions on both cabinets.

6 Milan Series
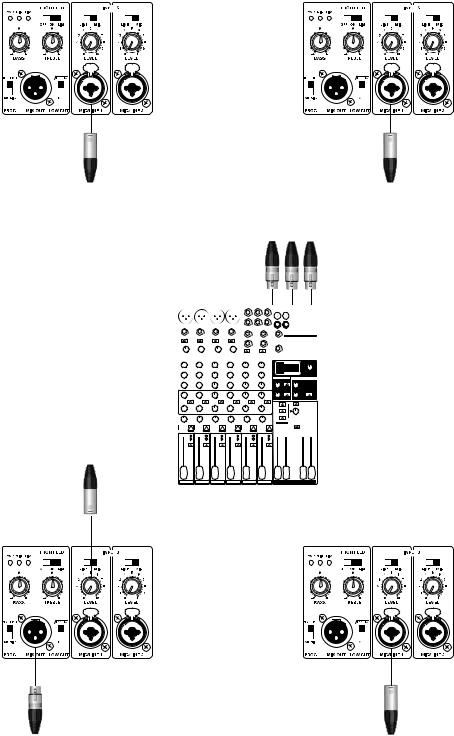
Stereo PA with an external mixer and subwoofer(s)
In this example, sub frequencies are routed to a separate subwoofer(s) in order to gain extended frequency response and higher overall sound level. Connect the mixer output first to the subwoofers and then loop up to the Milan mid/high loudspeakers. Set the MIC/LINE switch to LINE and set the
LOW CUT switch to the 100 Hz position to roll off the low frequencies to the Milan mid/high loudspeakers. The tone controls on both cabinets should be set to the same positions, nominally flat to begin with. Ensure that the mixer outputs are not clipping, and then adjust both loudspeakers’ level controls to the desired loudness.
LEFT |
|
|
|
|
|
|
|
|
|
RIGHT |
|||||
LEFT |
|
|
|
|
|
|
|
|
|
RIGHT |
|||||
|
|
|
|
|
|
|
|
|
|
|
|
|
|
|
|
|
|
|
|
|
|
|
|
|
|
|
|
|
|
|
|
|
|
|
|
|
|
|
|
|
|
|
|
|
|
|
|
|
|
|
|
|
|
|
|
|
|
|
|
|
|
|
|
|
|
|
|
|
|
|
|
|
|
|
|
|
|
|
|
|
|
|
|
|
|
|
|
|
|
|
|
|
|
|
|
|
|
|
|
|
|
|
|
|
|
|
|
|
|
|
|
|
|
|
|
|
|
|
|
|
|
|
|
|
|
|
|
|
|
|
|
|
|
|
|
|
|
|
|
|
|
|
|
|
|
|
|
|
|
|
|
|
|
|
|
|
|
|
|
|
|
|
|
|
|
|
|
|
|
|
|
|
|
|
|
|
|
|
|
|
|
|
|
|
|
|
|
|
|
|
|
|
|
|
|
|
|
|
|
|
|
|
|
|
|
|
|
|
|
|
|
|
|
|
|
|
|
|
|
|
|
|
|
|
|
|
|
|
|
|
|
|
|
|
|
|
|
|
|
|
|
|
|
|
|
|
|
|
|
|
|
|
|
|
|
|
|
|
|
|
|
|
|
|
|
|
|
|
|
|
|
Quickstart Guide |
7 |
Stereo PA with powered wedge monitors
On larger gigs a separate monitor system provides good quality foldback for individual performers and helps to keep the front of house PA sound less cluttered. Set the LOW CUT switch on the monitor speakers to the 100 Hz position for best results if used on the floor.
LEFT |
|
RIGHT |
|
||||||||||||||
LEFT |
|
RIGHT |
|
||||||||||||||
|
|
|
|
|
|
|
|
|
|
|
|
|
|
|
|
|
|
|
|
|
|
|
|
|
|
|
|
|
|
|
|
|
|
|
|
|
|
|
|
|
|
|
|
|
|
|
|
|
|
|
|
|
|
|
|
|
|
|
|
|
|
|
|
|
|
|
|
|
|
|
|
|
|
|
|
|
|
|
|
|
|
|
|
|
|
|
|
|
|
|
|
|
|
|
|
|
|
|
|
|
|
|
|
|
|
|
|
|
|
|
|
|
|
|
|
|
|
|
|
|
|
|
|
|
|
|
|
|
|
|
|
|
|
|
|
|
|
|
|
|
|
|
|
|
|
|
|
|
|
|
|
|
|
|
|
|
|
|
|
|
|
|
|
|
|
|
|
|
|
|
|
|
|
|
|
|
|
|
|
|
|
|
|
|
|
|
|
|
|
|
|
|
|
|
|
|
|
|
|
|
|
|
|
|
|
|
|
|
|
|
|
|
|
|
|
|
|
|
|
|
|
|
|
|
|
|
|
|
|
|
|
|
|
|
|
|
|
|
|
|
|
|
|
|
|
|
|
|
|
|
|
|
|
|
|
|
|
|
|
|
|
|
|
|
|
|
|
|
|
|
|
|
|
|
|
|
|
|
|
|
|
|
|
|
|
|
|
|
|
|
|
|
|
|
|
|
|
|
|
|
|
|
|
|
|
|
|
|
|
|
|
|
|
|
|
|
|
|
|
|
|
|
|
|
|
|
|
|
|
|
|
|
|
|
|
|
|
|
|
|
|
|
|
|
|
|
|
|
|
|
|
|
|
|
|
|
|
|
|
|
|
|
|
|
|
|
|
|
|
|
|
|
|
|
|
|
|
|
|
|
|
|
|
|
|
|
|
|
|
|
|
|
|
|
|
|
|
|
|
|
|
|
|
|
|
|
|
|
|
|
|
|
|
MON1 |
MON2 |
MON1 |
MON2 |
|
|
|
|
8 Milan Series
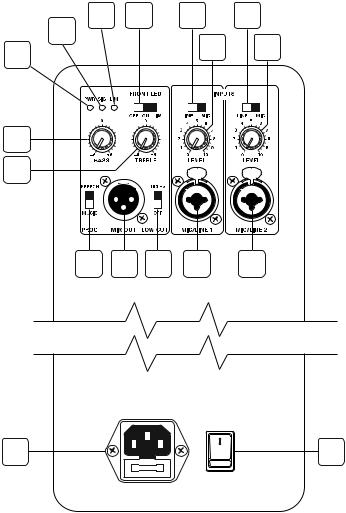
Connecting to the Milan Loudspeaker
1.Mains Connector and Fuseholder
Mains power is connected to the loudspeaker via a combination IEC connector and fuseholder.
2.Mains Switch
Rocker switch turns mains power on to the loudspeaker. Make sure the level controls are fully off (MIN) before switching on.
3.Signal Input
These combo female XLR/jack connectors accept both XLR connectors and mono
(2 pole) or stereo (3 pole) ¼" jack plugs for use with a variety of balanced and unbalanced microphones, instruments and line sources. The inputs are electronically balanced to avoid hum loops and RF interference, and are wired pin 2 hot, pin 3 cold.
100 Hz Low Cut Switch
11 12 13
10
9 |
14 |
|
8
7
6 |
5 |
4 |
3 |
This low cut filter can be switched in when |
|
using the Milan loudspeaker with subwoofers |
|
or when used as a floor monitor. It introduces |
|
a fourth order low cut filter in the lower part of |
1 |
the frequency response at 100 Hz, and is useful to avoid boominess due to proximity to the floor when the loudspeaker is used as a floor monitor. The low cut should also be selected when used with sub-bass loudspeakers
and allows bass frequencies to be routed appropriately to the sub-bass speakers,
avoiding an overlap, and giving greater clarity and definition to the overall sound.
13
14
3
2
4.Mix Out
A balanced line level signal output on a balanced male XLR connector that connects to additional powered Milan loudspeakers. This output contains a mix of all connected sources and is post-EQ, although it is independent of the 100 Hz low cut switch. Note that adjusting equalisation will similarly affect any additional Milan loudspeakers connected to this output.
5.Program Switch
Sets a frequency response contour optimised for either voices or mixed music program material.
6.Treble Control
The treble control provides ±6 dB of shelving at 12 kHz. Always use equalisation sparingly, aiming to cut rather than boost especially when the loudspeaker is used near boundaries such as walls or floors.
 Loading...