

Page 1
1
------------------------------------------------------------------------------------------------------------------------
Product Name: Dual Stage
Product Description: Dual stage boost controller
Product Number: TS-0105-1001/TS-0105-1002
ABOUT THIS PRODUCT
Thank you for purchasing your new DSBC. This new model now has some great new features. These include:
• 2 ramp rates of boost to give you the option of a fast rise in boost or a slightly tame rise for more sensitive setups.
• A wider boost adjustment range for wastegates with low spring base pressures.
IMPORTANT NOTES ON YOUR BOOST CONTROLLER
• Use only silicone hose that is the correct size and pressure rating for your application when fitting your boost controller – other
hoses will be effected by heat and will eventually crack or split which could cause excessive boost pressure and engine damage
• Ensure that all plumbing is secured with clamps
• Your boost controller should be mounted at least 100mm from any heat source
• A Turbosmart Fuel Cut Defender may need to be used in conjunction with your boost controller – refer to www.turbosmart.com.au
• The boost dials have a left handed thread, be sure not to over tighten as this will damage the boost controller
RECOMMENDATIONS
• Turbosmart recommends that the Air Fuel ratio is checked once boost pressure is set
• Turbosmart recommends that boost pressure is set using a Dynamometer and not on the street
• Turbosmart recommends that a accurate boost gauge be permanently fitted to the vehicle
• Turbosmart recommends that your boost controller is fitted and adjusted by an appropriately qualified technician
------------------------------------------------------------------------------------------------------------------------
HOW TO INSTALL YOUR BOOST CONTROLLER
TOOLS REQUIRED
General mechanic tools
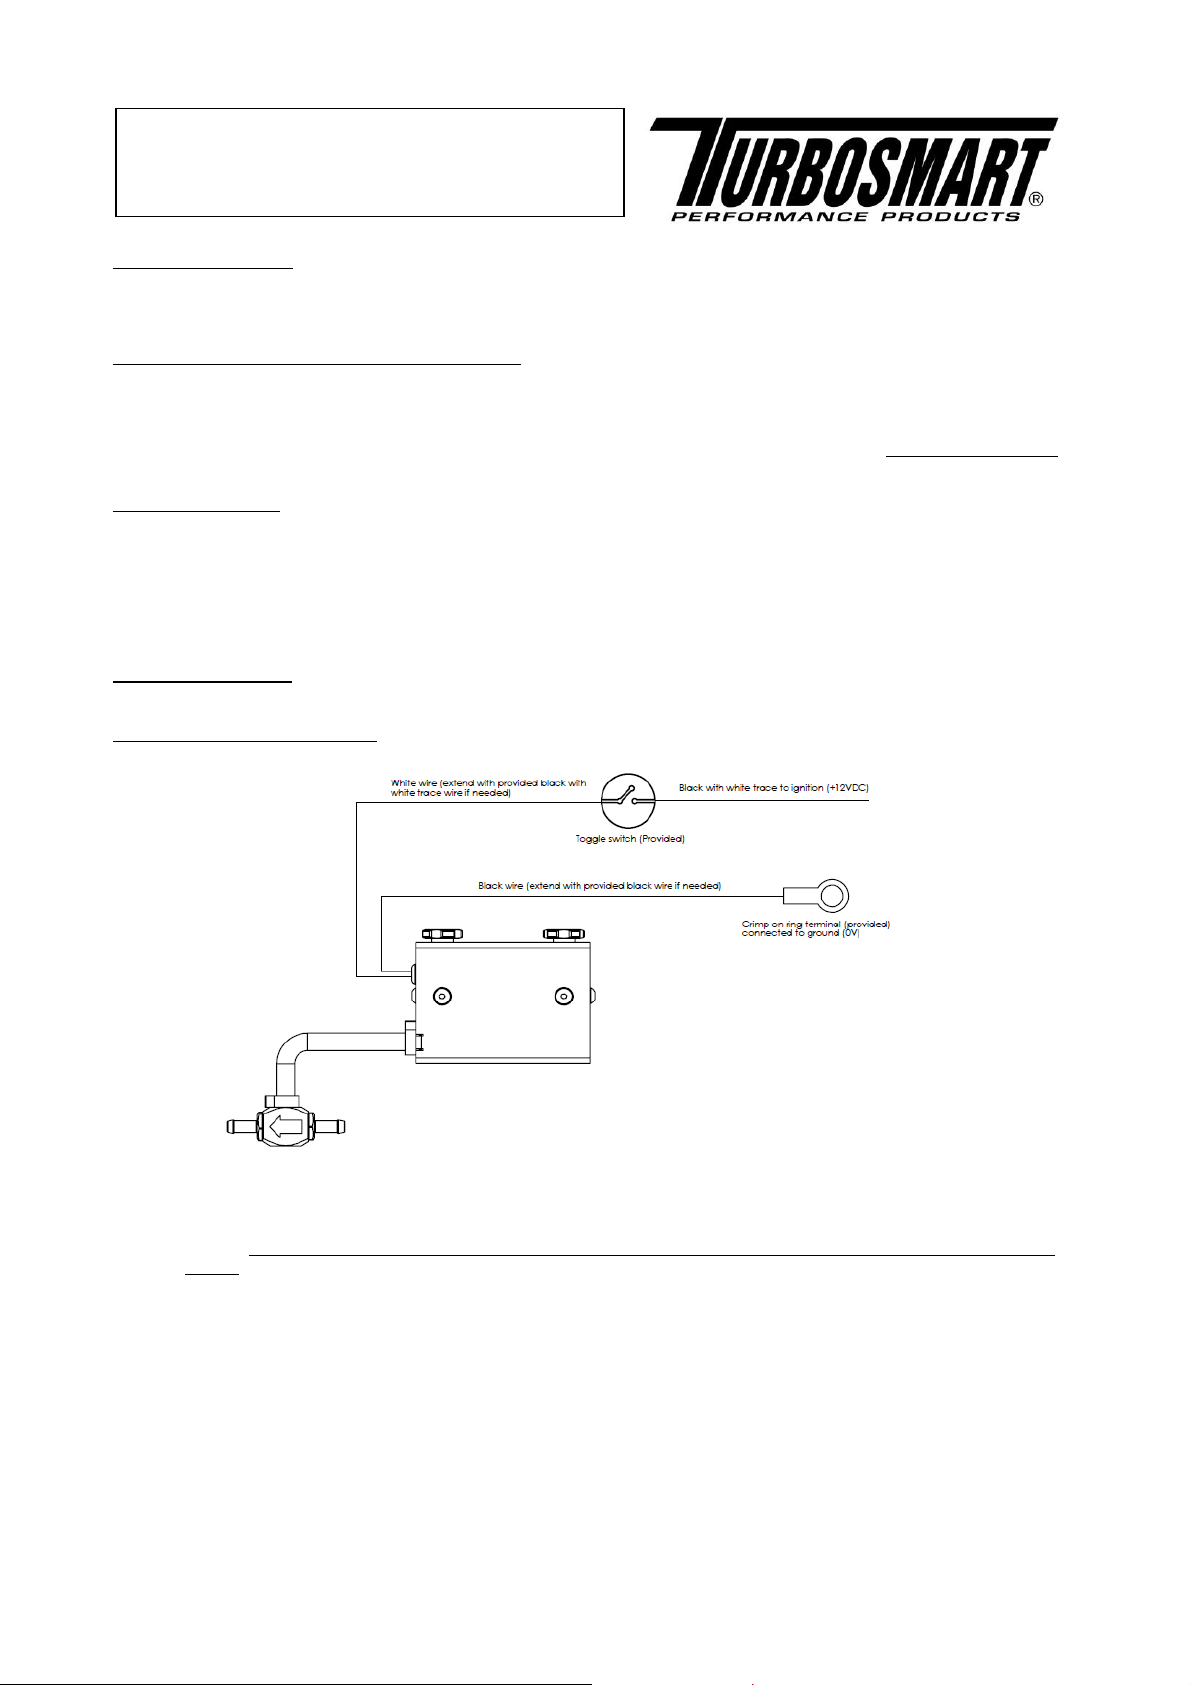
ELECTRICAL CONNECTION
The white wire is positive and the Black wire is negative
Supplied wiring can be split if needed to extend wiring to the appropriate areas
Extend the white wire using the supplied black with white trace wire through the supplied switch to a fused 12 volt ignition
supply – Important, failure to connect to an ignition supply may cause the battery to go flat and may result in damage to the
product
Check that the power source can accept an additional 1amp load
Connect the black wire on the unit, with crimp supplied, to a solid ground point on the chassis. Use the supplied black wire to
extend if needed.
Page 2
2
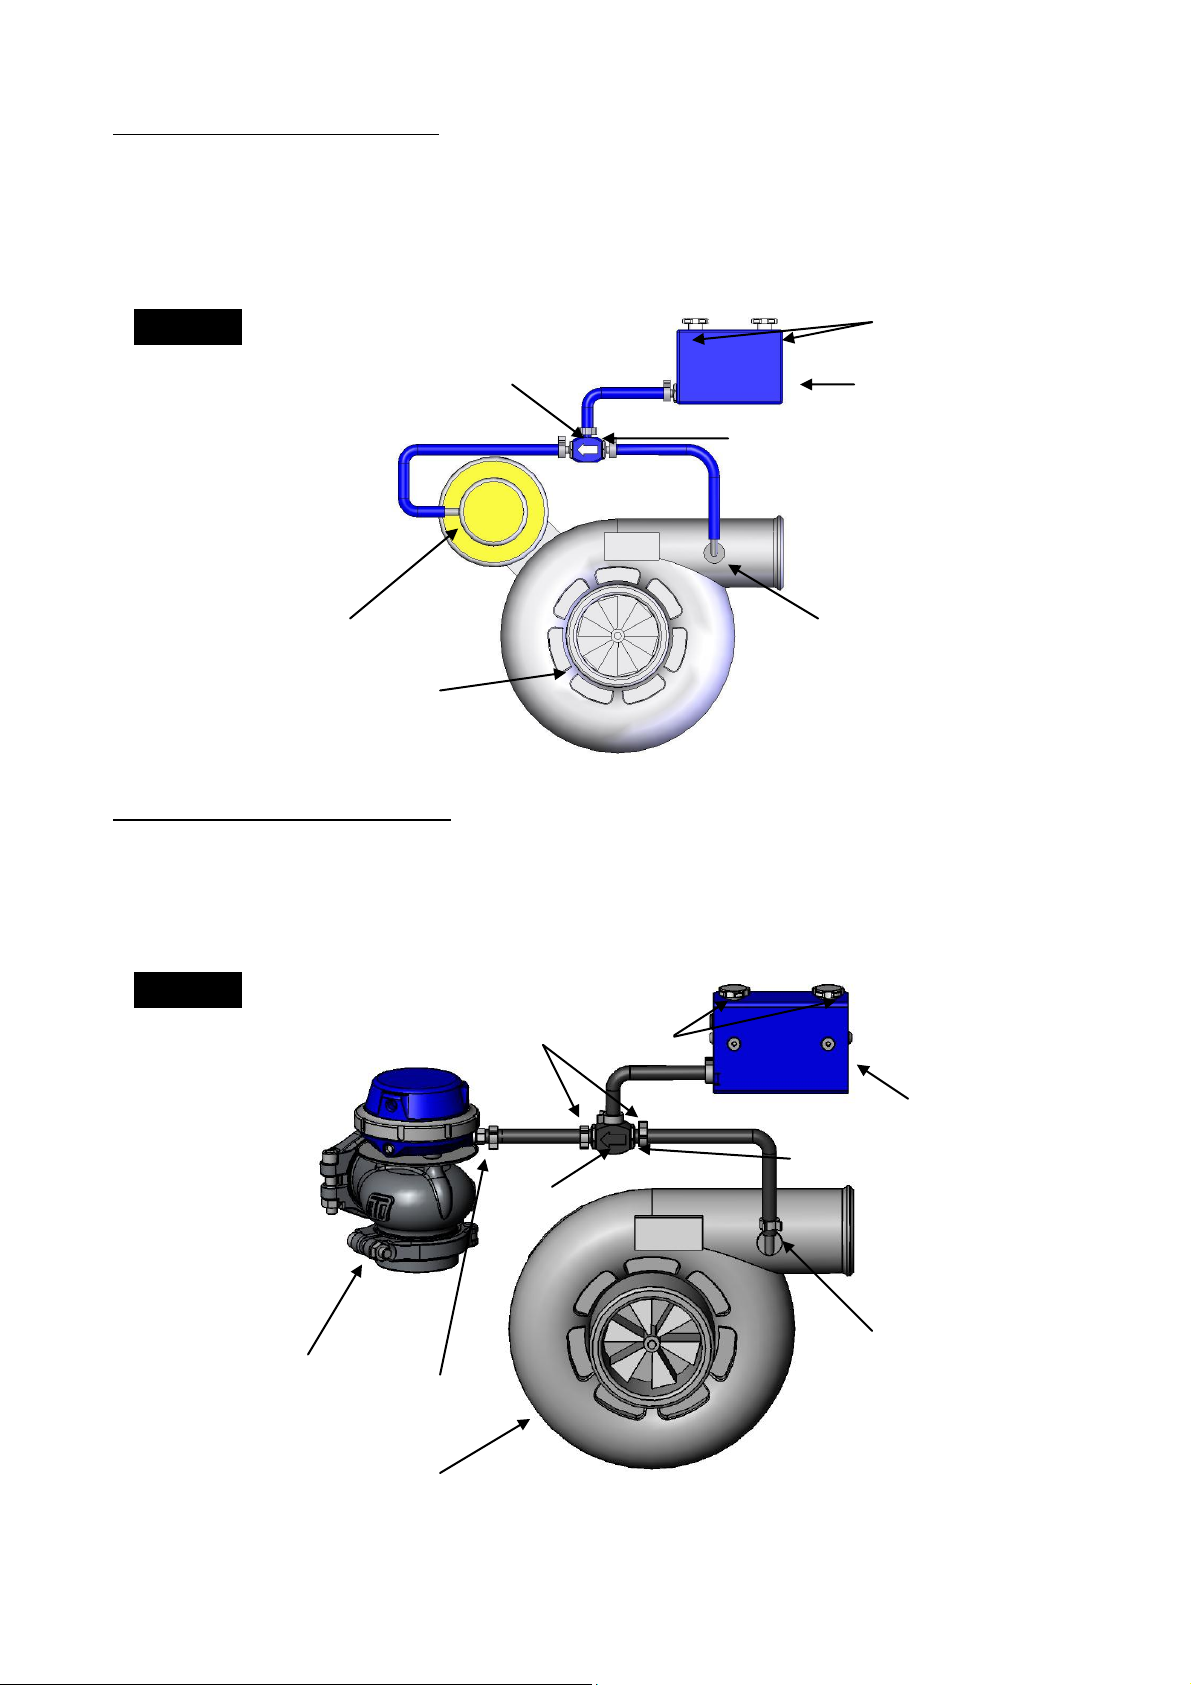
1) INTERNAL WASTEGATE SETUP
Wastegate actuator port
DSBC Tee piece
Pressure source port
(Located before the
throttle body)
Compressor
Boost controller
Wastegate Arrow
Drawing 1
Turbocharger
Boost dials
Bottom port
External wastegate
DSBC Tee Piece
Hose clamps
Wastegate
Arrow
Pressure source port
(Located before the throttle
body)
Drawing 2
Boost dials
Boost controller
• Allow the engine to cool down before installing your boost controller
• Locate the pressure source port and the wastegate actuator port on the turbocharger assembly (refer drawing 1)
• Remove the factory boost control solenoid if fitted from the boost pressure supply port while leaving the solenoid connected to the
ECU
• Install the DSBC Tee piece in the wastegate pressure line with the wastegate arrow pointing towards the wastegate actuator
• If your wastegate actuator has additional ports, these will need to be blocked
• Secure all silicone hose ends with hose clamps
• Mount your boost controller bracket onto the vehicle, and then attach the boost controller onto the bracket with the supplied screws
• Make sure the boost dials are turned completely anti-clockwise before making adjustments.
HOW TO INSTALL YOUR BOOST CONTROLLER cont.
2) EXTERNAL WASTEGATE SETUP
• Allow the engine to cool down before installing your boost controller
• Locate the bottom port on the external wastegate and the pressure source port (refer Drawing 2)
• Install the DSBC Tee piece in the wastegate pressure line with the wastegate arrow pointing towards the bottom port on the
wastegate
• Secure all silicone hose ends with hose clamps
• Mount your boost controller bracket onto the vehicle, and then attach the boost controller onto the bracket with the supplied screws
• Make sure the boost dials is turned completely anti-clockwise before making adjustments.
Page 3

3
3) PARALLEL TWIN TURBO SETUP
Turbochargers
Wastegate actuators ports
Boost dial
DSBC Tee Piece
Arrow
Pressure source
(Located before
the throttle body)
Equal lengths
T Piece
Drawing 3
Boost controller
• Allow the engine to cool down before installing your boost controller
• Locate the wastegate actuator ports on both turbochargers and a pressure source port (refer Drawing 3)
• Remove the factory boost control solenoid if fitted from the boost pressure supply line
• Install the DSBC Tee piece in the wastegate pressure line with the wastegate arrow pointing towards the wastegate actuators. Be
sure to keep the hoses joining the wastegate actuators at equal lengths
• Secure all silicone hose ends with hose clamps
• Mount your boost controller bracket onto the vehicle, and then attach the boost controller onto the bracket with the supplied screws
• Make sure the boost dials is turned completely anti-clockwise before making adjustments.
*Note for sequential turbo systems: Sequential turbo setups can be complex and vary from car to car. Please contact your local Turbosmart dealer for more details
Page 4

4
SETTING BOOST PRESSURE
Boost spike curve
Ideal boost curve
Input Nipple with
small hole
Ball
Spring
Wastegate Arrow
Drawing 4
DSBC Tee piece
IMPORTANT NOTES ON BOOST PRESSURE ADJUSTMENT
• Adjustment to your boost controller is made by rotating the Boost Dials
• Rotate in a clockwise direction to increase boost and the reverse direction to decrease boost
• Before making any adjustment, the Boost Dials will need to be fully closed (anti-clockwise)
Step 1: Apply full load to the engine in a high gear (at least 3rd or 4th gear) at full throttle and note the boost pressure
Step 2: To increase the low boost setting, rotate the Low Boost Dial clockwise (maximum of 1 complete revolution at a time)
Step 3: Apply full load to the engine and note the boost pressure
Step 4: Compare the actual boost pressure with the desired boost pressure. If the actual pressure is below the desired pressure,
Step 5: Once the low boost setting is complete, follow step 2 to step 4 on the High boost dial.
return to step 2. If the actual is above the desired boost then decrease by rotating the Boost Dial anti-clockwise and return
to step 3.
BOOST SPIKING
If boost spiking occurs and is undesirable for your application, the gate system can be removed to give you a less aggressive boost
curve. This modification is only required in a minimal number of applications.
IMPORTANT NOTES ON GATE SYSTEM REMOVAL
The gate system can be removed by the following steps.
Perform this modification on a clean bench so that the ball and spring are not lost
• Allow the engine to cool down before removing the boost controller from your vehicle
• Identify the input nipple with the restrictor at the end on the DSBC tee piece. Loosen the input nipple and remove the ball and
spring.
• Check that the internal air passages are clear and free from debris
• Re-install the boost controller by following the instructions for your setup
• You will need to re-adjust your boost settings after the removal of the gate.
----------------------------------------------------------------------------------------------------------------------
TROUBLE SHOOTING
The following points should be checked if you find that your engine is developing excessive boost, the boost pressure is fluctuating or
the desired boost level cannot be achieved. Please note, the following checks will cure 99% of problems experienced when fitting a
Turbosmart boost controller.
• Check that the boost controller is installed so that the arrow points toward the wastegate actuator
• Check the joining hoses for splits, cracks or loose connection and are the correct size for the application
• Check to see if the boost controller is blocked or contaminated with dirt or debris
• Ensure that there is nothing but the boost controller in the hose between the pressure source and the wastegate actuator, ie tee
pieces for boost gauge or to factory boost solenoid.
• Pressure test the wastegate actuator for leakage, the diaphragm or housing may be cracked or split
• Check that the wastegate is operating correctly
Page 5

5
ONE YEAR LIMITED WARRANTY
Turbosmart is a company built on Customer Satisfaction and Service. That is why all of our products go through regimented test procedures before they are
packaged and shipped. Turbosmart stands behind its products for one full year after purchase. Terms of Warranty, Service and Returns are as follows:
Limited Warranty: Turbosmart warrants its products to be free from defects in material and workmanship under normal use and if properly installed for a period
of one year from date of purchase. If found to be defective, it will be replaced or repaired if returned prepaid along with proof of date of purchase. This shall
constitute the sole remedy of the purchaser and the sole liability of Turbosmart to the extent permitted by law, the foregoing is exclusive and in lieu of all other
warranties or representations whether expressed or implied, including any implied warranty of merchantability or fitness. In no event shall Turbosmart be liable
for special or consequential damages. This warranty is only valid on products purchased from Turbosmart Authorized Dealers.
Service: After the warranty period has expired, repair service is charged based on a minimum and maximum charge rate. (Contact Customer Service for current
rate).
Returns: When returning a Turbosmart product for repair, it must be accompanied by a completed Customer Warranty Form and RMA number. To access this
form please go to our website www.turbosmartonline.com and you will find it on the Downloads page.
THE TURBOSMART PLEDGE
DO NOT USE ANY TURBOSMART PRODUCT UNTIL YOU HAVE CAREFULLY READ AND UNDERSTOOD THE FOLLOWING AGREEMENT. Please call if
you have any questions or do not understand this agreement. Refer to our brochure, website or catalogue for terms and conditions and further information
regarding your product. Turbosmart appreciates your business and pride ourselves on our customer service. We are always happy to offer you advice and will
provide you with help in any way we can. The purpose of this agreement is to avoid any problems or hard feelings.
We sometimes make mistakes, as do our dealers, distributors and suppliers. Even customers can sometimes order the wrong parts. Do not use, modify, install,
trial assemble, nick, drop, scratch or adjust any part until you first check for any damage. Damage must be reported immediately. NO EXCEPTIONS. If there are
any components missing please contact your authorized reseller immediately upon receipt of your shipment. Missing components must be reported within five
(5) business days of receipt. Parts returned for any reason MUST BE IN RESALABLE CONDITION. It is YOUR responsibility, “THE CUSTOMER” to carefully
package any returns to avoid shipping damage. Insurance is highly recommended. Credit cannot be issued for damaged goods.
Warranty as to Defects – Australian Consumer Law
1.1 We warrant for a period of twelve (12) months from the date of supply of the Goods and/or Services that if due to the fault of Turbosmart the Goods
and/or Services (as the case may be) provided by Us are defective then We will, as determined by Us do one or more of the following:
1. In the case of Goods; the replacement of the Goods, the supply of equivalent Goods, the repair of the Goods, the payment of the cost of
replacing the Goods or of acquiring equivalent Goods, or the payment of having the Goods repaired; or
2. In the case of Services; the supplying of the Services again, or the payment of the cost of having the Services supplied again.
1.2 You will only be entitled to the benefit of the warranty set out in this pledge, if You have not wholly or partially caused or contributed to the defect
to the Goods by the misuse of the Goods or the failure to use the Goods in accordance with any specifications or instructions applicable to the Goods.
1.3 The warranty contained in this pledge is provided by Turbosmart Pty Limited of 32 Milton Street North, Ashfield NSW 2131, Australia, Telephone:
+(61) 1300 735 506, Email: sales@turbosmart.com.au.
1.4 In order for a You to make a claim on the warranty You must within twelve (12) months of delivery of the Goods or Services give written notice to Us
at the address specified in clause 1.3 above of the details of any defects in respect thereof. Any Goods referred to in a notice given pursuant to this
clause should be left in the state and condition in which they were delivered until such time as We or Our duly authorised agent have inspected the
Goods with such inspection to be carried out within a reasonable time after service of such notice. If the Goods are not so left in the state and condition
in which they were delivered then the You shall be deemed to have accepted the Goods and the warranty contained in this pledge shall not apply.
1.5 You shall be responsible for all expenses associated with making a warranty claim under this pledge however if the Goods and/or Services are found to
be defective due to Our fault then We shall reimburse You for any expenses incurred by You in making a warranty claim upon receiving evidence
satisfactory to Turbosmart to support such expenditure.
1.6 The benefits to You given by the warranty contained in this pledge are in addition to other rights and remedies of You have under a law in relation to
the Goods or Services to which the warranty relates. In accordance with the Australian Consumer Law We makes the following statement: “Our goods
come with guarantees that cannot be excluded under the Australian Consumer Law. You are entitled to a replacement or refund for a major failure and
compensation for any other reasonably foreseeable loss or damage. You are also entitled to have the goods repaired or replaced if the goods fail to be
of acceptable quality and the failure does not amount to a major failure.”
EXCEPT AS PROVIDED BY LAW, THIS LIMITED WARRANTY IS THE ONLY EXPRESS WARRANTY, WHICH APPLIES TO TURBOSMART PRODUCT AS
EXPRESSLY GIVEN IN LIEU OF ANY OTHER WARRANTY EXPRESSED OR IMPLIED, INCLUDING THAT OF MERCHANTABILITY. ANY IMPLIED
WARRANTY INCLUDING THAT OF MERCHANTABILITY AND/OR FITNESS FOR A PARTICCULAR PURPOSE IS HEREBY LIMITED BY THE SAME TERMS
AND TIME LIMITATIONS SET FORTH IN THIS LIMITED EXPRESS WARRANTY AND OTHERWISE EXCLUDED.
EXCEPT FOR THOSE OBLIGATIONS ASSUMED HEREIN, TURBOSMART ASSUMES NO OTHER OBLIGATIONS IN CONNECTION WITH THE SALE OF
ITS PRODUCTS.
IN THE EVENT THAT THE INDIVIUDAL PURCHASER DOES NOT AGREE WITH THIS AGREEMENT THE BUYER MAY PROMPTLY RETURN THIS
PRODUCT, IN A NEW AND UN-USED CONDITION, WITH A DATED PROOF OF PURCHASE, TO THE PLACE OF PURCHASE WITHIN SEVEN (7) DAYS
FROM THE DATE OF PURCHASE FOR A FULL REFUND.
THE INSTALLATION OF THIS PRODUCT INDICATES THAT THE INDIVIDUAL PURCHASER HAS READ AND UNDERSTOOD THIS AGREEMENT AND
ACCEPTS ITS TERMS AND CONDITIONS.
Happy motoring!
The Turbosmart Team
Turbosmart Pty Limited P.O. Box 264 Croydon, NSW 2132 Australia ABN: 69 081 069 794
Ph: +61 1300 735 506 Fax: +61 1300 735 509 Email: instructions@turbosmart.com.au
www.turbosmartonline.com
 Loading...