

TM
Owner’s Manual
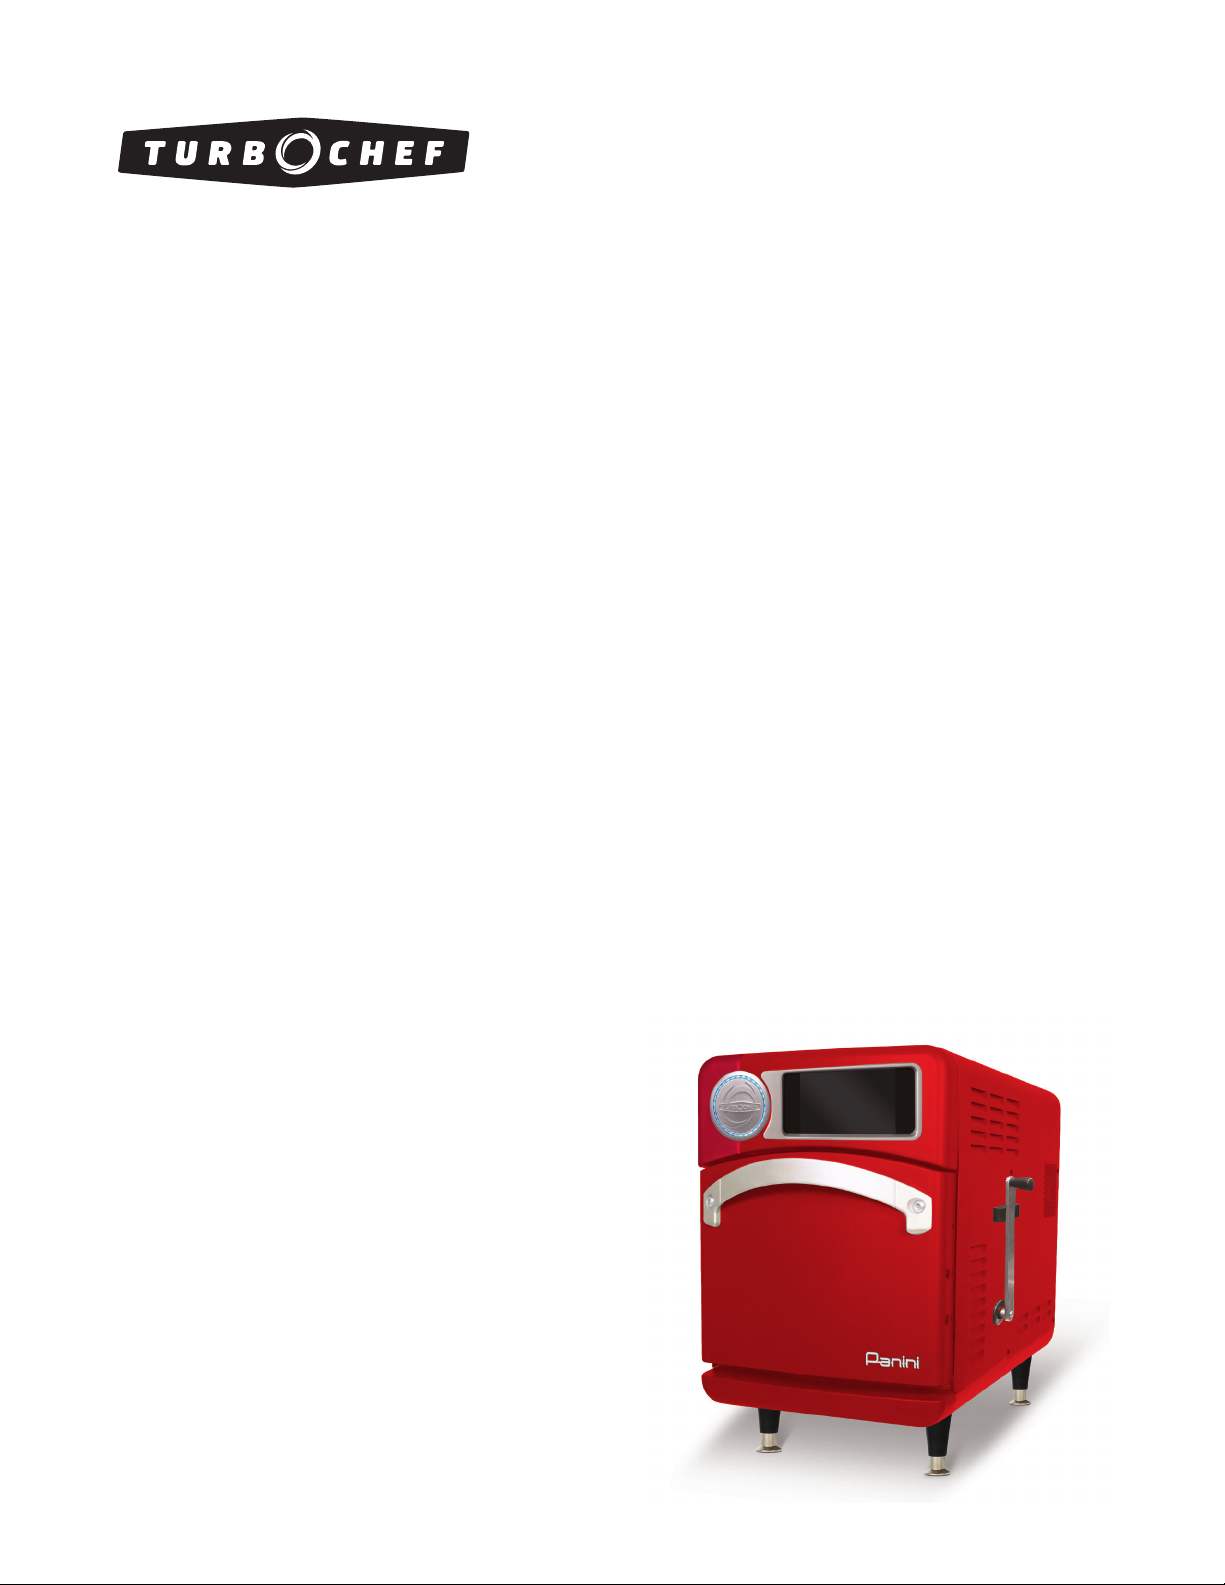
EL BANDIDO
©2019 TurboChef Technologies, Inc.


For further information, call
800.90TURBO
or
+1 214.379.6000
Original Instructions
The information contained in this manual is important for the proper installation, use, maintenance,
and repair of this oven. Follow these procedures and instructions to help ensure satisfactory baking
results and years of trouble-free service.
Errors – descriptive, typographic, or pictorial – are subject to correction. Specifications are subject to
change without notice.
Please carefully read this manual and retain it for future reference.

Table of Contents
Important Safety Instructions
General Safety Information i
Reducing Fire Risk ii
Grounding Instructions ii
Power Cord Replacement or Removal ii
Precautions to Avoid Possible Exposure to Excessive Microwave Energy iii
RF Interference Considerations iii
Protective Earth (Ground) Symbol iii
Equipotential Bonding Symbol iii
Specifications and Installation
Theory of Operation 1
Features 1
Dimensions 1
Certifications 2
Oven Construction 2
Electrical Specifications 2
Installation 2
Unpacking Instructions 2
Installation Warnings - Read Before Lifting Oven 2
Lifting and Placing the Oven 3
Installation Near Open Heat Source 3
Oven Restraint Kit 4
ChefComm Pro® 4
ChefComm LimitedTM 4
Date and Time Prompt 4
Voltage Selection 4
Ventilation 4
Cleaning
Daily Maintenance 5-8
Oven Controls 9

Cooking 10
Menu Cook Mode 10
Manual Cook Mode 13
Info Mode
Information Screen 15
Serial Number 15
Menu Version 15
Firmware Version 15
Service Number 15
VAC (Voltage) 15
Tutorials
Counters Screen 15
Cook Counter 15
Total Cook Time 15
Magnetron Time 15
Total Time (oven on) 15
Power Cycles 15
Fault Log 15
Options Screen 15
Editing / 15
Cook More / 15
Load Menu / 15
Light Ring / 16
VAC / 16
Demo Mode / 16
Manual Cooking / 16
Diagnostic Mode / 16
F2 Bypass / 16
Settings Screen 16
Temperature / 16
Language 16
WiFi Network 17
Sound Volume 18
Set Date 18
Set Time 18
Auto On / 18
Auto Off / 18
Service Screen 19
Manufacturing (Mfg) Screen 19
Load Menu from USB or Smart Card 19
Save Menu to USB or Smart Card 20
Firmware Update 20

Edit Mode
Edit Set Temperature 21
Access Edit Items Screen 21
Name a Group 21
Delete a Group 22
Move a Group 23
Item Editing Options 24
Edit Settings 25
Name an Item 27
Add a Recipe from the Cookbook 28
Change Group 28
Move an Item 29
Delete an Item 29
Troubleshooting 30
North America Limited Warranty 32
International Limited Warranty 34

IMPORTANT SAFETY INSTRUCTIONS
WARNING: When operating this oven, strictly adhere to the following safety precautions to reduce
the risk of burns, electric shock, fire, injury, damage to oven or property near oven, or possible exposure
to excessive microwave energy.
GENERAL SAFETY INFORMATION
a
Read all instructions before using this appliance.
a
Read and follow the specific “Precautions to Avoid Possible Exposure to Excessive Microwave Energy”
found on page ii.
a
This appliance must be grounded. Connect only to a properly grounded outlet. See “Grounding
Instructions” on page ii.
a
Install or locate this appliance only in accordance with the provided installation instructions.
a
This appliance should be serviced by qualified service personnel only. Contact the nearest authorized
service facility for examination, repair, or adjustment.
a
Keep the cord away from heated surfaces.
a
Liquids, such as water, coffee, or tea are able to be overheated beyond the boiling point without
appearing to be boiling. Visible bubbling or boiling when the container is removed from the microwave
oven is not always present.
.
a
WARNING:The contents of feeding bottles and baby food jars must be stirred or shaken and the
temperature checked before consumption, in order to avoid burns (IEC 60335-2-90).
a
Use this appliance only for its intended uses as described in this manual.
a
Only use utensils that are suitable for use in microwave ovens (IEC 60335-2-90).
X
use corrosive chemicals or vapors in this appliance; it is not designed for industrial/laboratory use.
X
WARNING: heat liquids or other foods in sealed containers (e.g., jars, whole eggs, etc.)
since they are liable to explode.
X
allow children to use this appliance.
X
operate this appliance if it has a damaged cord or plug, is not working properly, or has been
damaged or dropped. See “Power Cord Replacement or Removal” found on page ii.
X
cover or block any openings on this appliance.
X
store this appliance outdoors.
X
use this product near water (e.g., near a kitchen sink, in a wet basement, near a swimming pool).
X
immerse the cord or plug in water.
X
let the cord hang over the edge of a table or counter.
X
use a water jet for cleaning. See pages 5-8 in this manual for proper cleaning procedures.
X
WARNING: Due to the nature of the appliance, the floors around it may be slippery.
X
This appliance is not to be used by children or persons with reduced physical, sensory or mental
capabilities, or lack of experience and knowledge, unless they have been given supervision or instruction.
i
SAFETY INSTRUCTIONS
SAVE THESE INSTRUCTIONS
ii
SAFETY INSTRUCTIONS
REDUCING FIRE RISK
a
Remove wire twist-ties from paper or plastic bags used to facilitate cooking in the oven.
a
If materials inside the oven ignite, keep the oven door closed, turn the oven off, and disconnect the
power cord or shut off power at the fuse or circuit breaker panel.
a
If smoke is observed, switch off or unplug the oven. Keep the door closed to stifle any flames.
X
use the cook cavity for storage purposes.
X
overcook food. Carefully attend to the oven if paper, plastic, or other combustible materials are
placed inside the oven to facilitate cooking.
X
leave paper products, cooking utensils, or food in the cavity when the oven is not in use.
GROUNDING INSTRUCTIONS
This appliance must be grounded. In the event of an electrical short circuit, grounding reduces the risk of
electric shock by providing an escape wire for the electric current. This oven is equipped with a cord that
has a grounding wire with a grounding plug, which must be plugged into an outlet that is properly installed
and grounded. Consult a qualified electrician or serviceman if uncertain about the ability to follow grounding instructions or if doubt exists as to whether the appliance is properly grounded.
DO NOT use an extension cord. If the power cord is too short, have a qualified electrician or serviceman
install an outlet near the appliance.
WARNING: Improper grounding can result in risk of electric shock.
WARNING: Risk of Electric Shock. If the cord or plug becomes damaged, replace only with a cord
and plug of the same type
POWER CORD REPLACEMENT OR REMOVAL
If the power cord is damaged, it must be replaced by the manufacturer, its service agent, or a similarly
qualified person.
WARNING: If the oven is unplugged during service or maintenance, the user must be able to access
and see the plug at all times to ensure that the oven remains unplugged. The plug must remain near the
oven and cannot be placed behind another appliance or in another room.
SAVE THESE INSTRUCTIONS

PRECAUTIONS TO AVOID POSSIBLE EXPOSURE
TO EXCESSIVE MICROWAVE ENERGY
(a) Do not attempt to operate this oven with the door open since open-door operation can result in
harmful exposure to microwave energy. It is important not to defeat or tamper with the safety
interlocks.
(b) Do not place any object between the oven front face and the door or allow soil or cleaner residue to
accumulate on sealing surfaces.
(c) Do not operate the oven if it is damaged. It is particularly important that the oven door close
properly and that there is no damage to the: (1) Door (bent), (2) hinges and latches (broken or
loosened), (3) door seals and sealing surfaces.
(d) The oven should not be adjusted or repaired by anyone except properly qualified service personnel.
RF INTERFERENCE CONSIDERATIONS
This oven generates radio frequency signals. This device has been tested and was determined to be in compliance with applicable portions of FCC part 18 requirements and to the protection requirements of Council
Directive 89/336/EEC on the approximation of the laws of the Member States relating to electromagnetic
compatibility at the time of manufacture. However, some equipment with sensitivity to signals below these
limits may experience interference.
iii
If your equipment experiences interference:
a
Increase the physical separation between this oven and the sensitive equipment.
a
If the sensitive device can be grounded, do so following accepted grounding practices.
a
If battery-powered microphones are being affected, ensure that the batteries are fully charged.
a
Keep sensitive equipment on separate electrical circuits if possible.
a
Route intercom wires, microphone wires, speaker cables, etc. away from the oven.
PROTECTIVE EARTH GROUND SYMBOL
This symbol identifies the terminal which is intended for connecting an external conductor for
protection against electric shock in case of a fault, or the terminal of a protective earth (ground)
electrode.
EQUIPOTENTIAL BONDING SYMBOL
This symbol identifies the terminals which, when connected together, bring the various parts of an
equipment or of a system to the same potential, not necessarily being the earth (ground) potential,
e.g. for local bonding.
SAFETY INSTRUCTIONS
SAVE THESE INSTRUCTIONS

iv
SAFETY INSTRUCTIONS
This page intentionally blank.
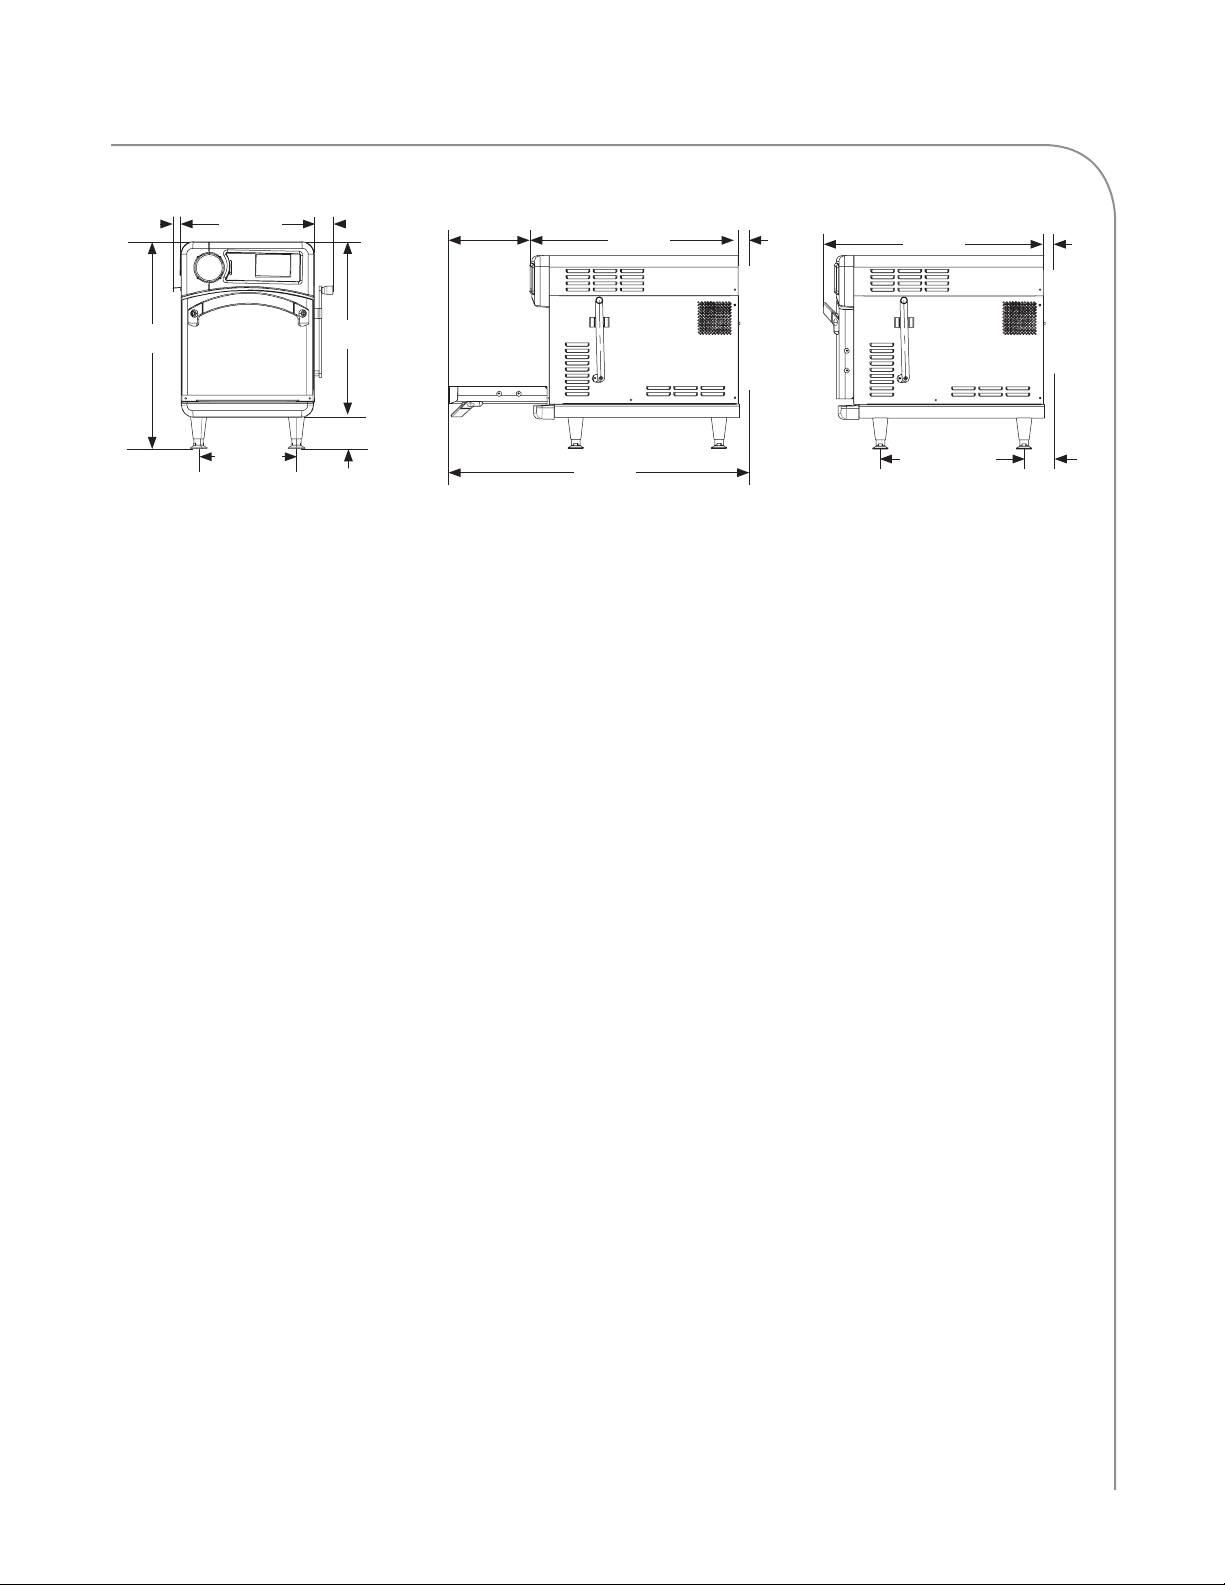
1
1.00”
(25 mm)
16.0”
(406 mm)
2.24”
(57 mm)
10.7”
(272 mm)
25.9”
(658 mm)
2.5”
(64 mm)
27.3”
(693 mm)
2.5”
(64 mm)
25.0”
(635 mm)
11.8”
(300 mm)
Figure 1: i1 Oven Dimensions
21.0”
(533 mm)
4.0”
(102 mm)
(993 mm)
Theory of Operation
Utilizing TurboChef’s patented technology to
rapidly cook food without compromising quality, the
El Bandido oven provides superior cooking
performance while requiring minimal space and energy
consumption. The control system precisely coordinates
independent top and bottom impinged airflow with
top-launched microwave to deliver product-specific
results, and integral catalytic converters allow for UL®certified ventless operation (see page 4 for details).
This manual includes instructions for installing,
cleaning, and operating El Bandido ovens. If you
have questions that are not addressed in this manual,
contact Customer Support at 800.90TURBO (+1
214.379.6000) or your Authorized Distributor.
Features
- Panini press mechanism with aluminum anodized
upper and lower panini plates
- Capacitive touch screen with industrial-grade
tempered glass cover
- Manual mode for on-the-fly cooking
- Add from cookbook option that allows a user to
access and save TurboChef cookbook recipes
- Up to 10 selectable languages
- Integrated tutorials for daily operation
and maintenance
- Enhanced data logging for troubleshooting
assistance and learning which products are
being cooked and when
- Menu editing tools and USB/smart
card detection
- WiFi ready for the connected kitchen
39.1”
Dimensions
Oven Dimensions
Height: 25.0” (635 mm)
Width: 16.0” (406 mm)
Overall Width: 19.24” (489 mm)
Depth (footprint): 18.5” (470 mm)
Depth (door closed): 29.8” (757 mm)
Depth (door open): 39.1” (993 mm)
Oven Weight
170 lb. (77 kg)
Cook Cavity Dimensions
Height: 7.2” (183 mm)
Width: 12.5” (318 mm)
Depth: 10.5” (267 mm)
Volume: 0.54 ft3 (15.4 liters)
Clearances
Top: 5” (127 mm)
Side without Handle: 2” (51 mm)
Side with Handle: 6” (152 mm)
18.5” (470 mm)
4.2”
(107 mm)
SPECIFICATIONS AND INSTALLATION
2
SPECIFICATIONS AND INSTALLATION
Certifications
cULus, UL EPH, TÜV, CE, FDA
Oven Construction
Exterior
- Powder coated, corrosion-resistant steel outer
wrap and door
- Die-cast aluminum front panels with matte-
chrome accents
- Cool-to-touch exterior; all surfaces below 50°C
- Ergonomic matte-chrome door handle
- 4-inch adjustable legs
Interior
- 201/304 stainless steel
- Fully welded and insulated cook chamber
- Removable rack and lower jetplate
Installation
Install or locate this appliance only in accordance
with the instructions below.
Unpacking Instructions
1. Remove the oven from its packaging.
2. Before discarding, check the packaging
thoroughly for accessories and literature.
NOTE: Packaging may also be retained in case the
oven may at some point be shipped somewhere
else or returned to the manufacturer.
3. Check the cook cavity thoroughly for
accessories and literature.
4. Discard any packaging in the cook cavity.
Installation Warnings - Read Before Lifting Oven
WARNING: The El Bandido oven weighs
approximately 170 lb. (77 kg). Never lift
with fewer than two people.
Electrical Specifications
TurboChef recommends a Type D circuit breaker
for all installations outside the United States.
Single Phase
US/Canada: 208/240 VAC*, 60 Hz, 30 A, 6.2 kW
Europe/Asia (UK): 230 VAC, 50 Hz, 27 A, 6.2 kW
Brazil (BK): 220 VAC, 60 Hz, 28 A, 6.2 kW
Latin America (LA): 220 VAC, 60 Hz, 28 A, 6.2 kW
Japan (JK): 200 VAC, 50 or 60 Hz, 30 A, 6.2 kW
Multiphase
Europe/Asia Wye (EW): 400 VAC, 50 Hz, 16 A, 6.2 kW
Europe/Asia Delta (ED): 230 VAC, 50 Hz, 20 A, 6.2 kW
Australia Wye (AU): 400 VAC, 50 Hz, 16 A, 6.2 kW
Japan Delta (JD): 200 VAC, 50 or 60 Hz, 20 A, 6.2 kW
Korea/Middle East Wye (KW): 400 VAC, 60 Hz, 16 A, 6.2 kW
Korea/Middle East Delta (SD): 230 VAC, 60 Hz, 20 A, 6.2 kW
* US/Canada models include a voltage sensor
that detects 208 or 240 VAC, but does not compensate for lack-of or over-voltage installations.
WARNING: Never lift the oven from the
front and rear or by the door handle. Doing so
will cause the door to misalign, resulting in a
non-warranty service call.
WARNING: The oven must be properly
placed on a food station at all times.
TurboChef will not recognize a fallen oven as
a warrantable claim and is not liable for any
injuries that may result.
WARNING: This oven is not intended for
built-in installation (i.e., installing the oven in
any structure that surrounds the oven by five
or more sides). Be sure to provide a minimum
of 2” (51 mm) clearance for the side without
handle, 6” (152 mm) for the side with the
handle, and 5” (127 mm) clearance for the
top.
WARNING: This oven is not intended to be
stacked without appropriate hardware.
Contact TurboChef for details.
3
Lifting and Placing the Oven
1. Prepare a surface at least 26” (660 mm) deep
and capable of supporting 175 lb. (79 kg).
NOTE: Do not remove the oven legs, as clearance
is required for the bottom cooling fan.
2. Position one or more persons at the left and
right sides of the oven.
3. Place hands under the oven and lift.
4. Place the oven on the prepared surface,
ensuring no edges are hanging off the sides.
5. Ensure the oven rack is properly installed
(attached to the bottom jetplate).
6. Plug in the oven.
NOTE: The oven is primarily serviced through
its top. DO NOT install shelving directly over
the unit. The operator will be responsible for
service charges incurred as a result of added time
required to access the top of the oven.
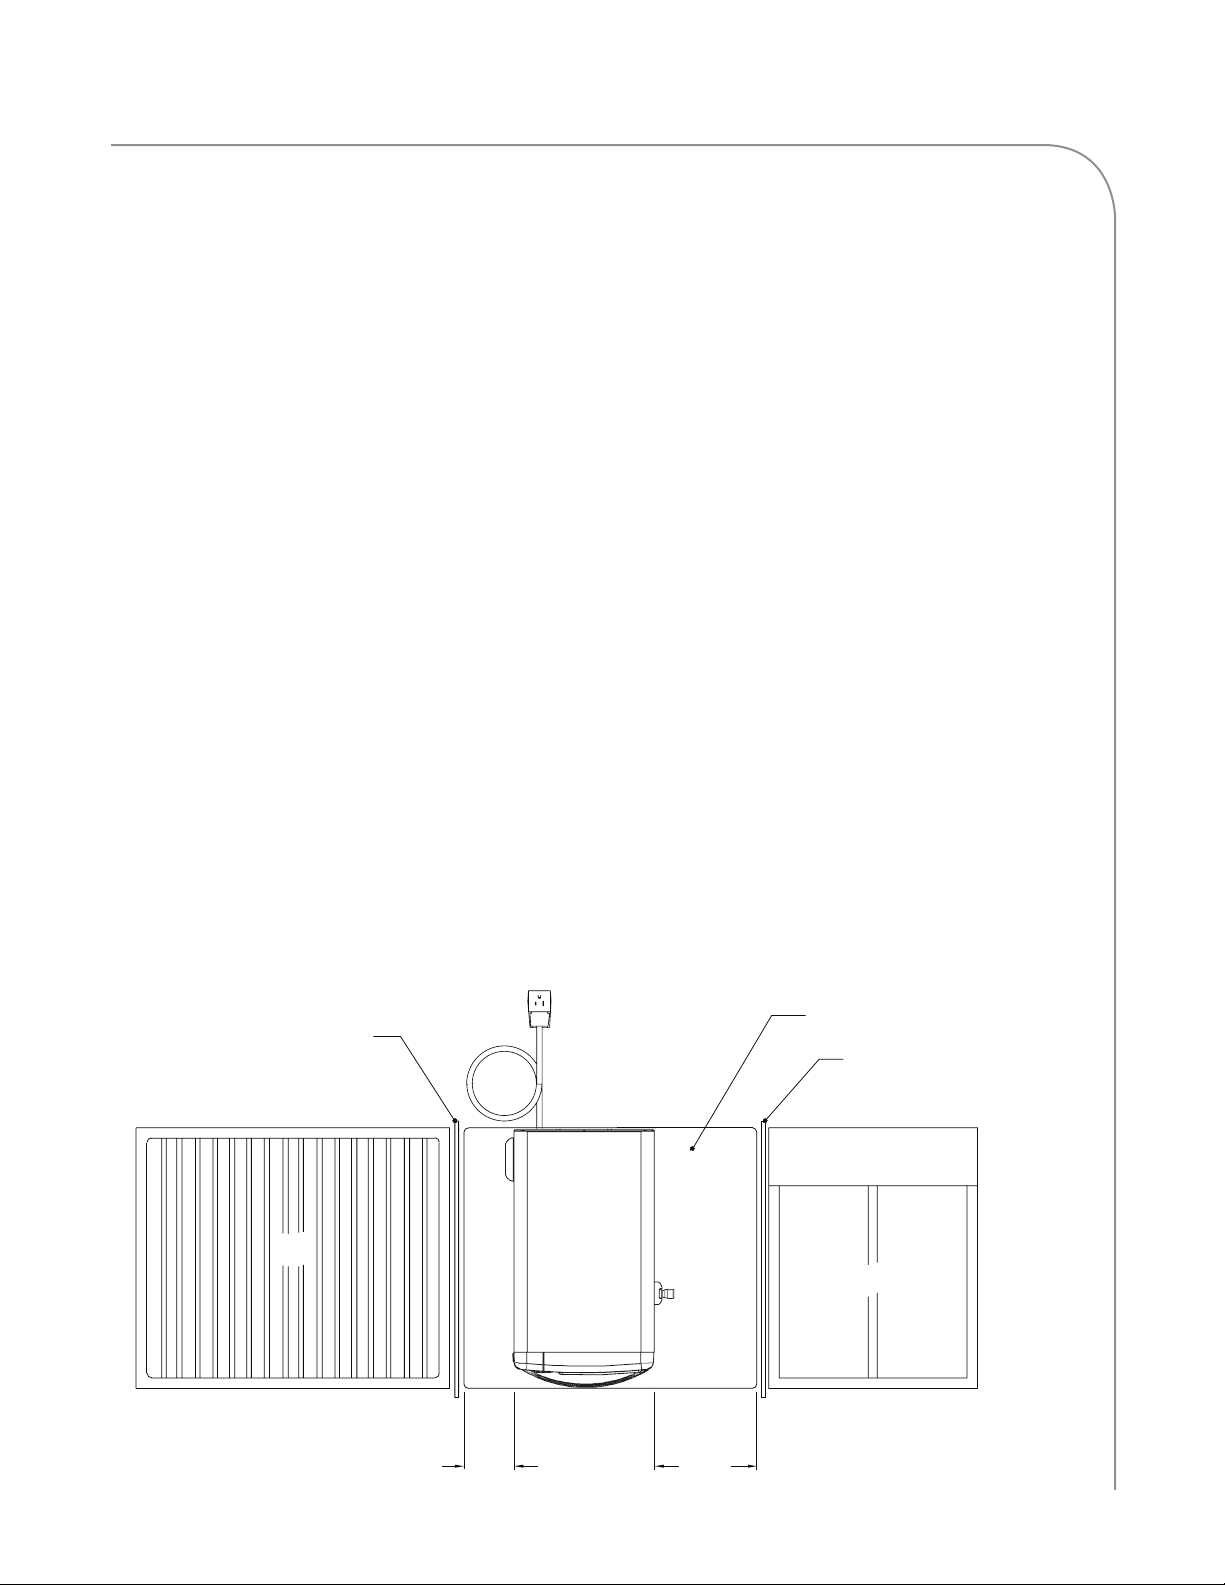
Installation Near Open Heat Source
When placing a TurboChef oven near an open
heat source (Figure 2), strictly adhere to the
following:
- If the oven is being placed near a grill or stove,
a divider must exist between the oven and the
open heat source, with a minimum of 6” (152
mm) between the oven and the divider.
- If the oven is being placed near a fryer, a
divider must exist between the oven and fryer,
with a minimum of 12” (305 mm) between
the oven and the divider.
- The height of the divider must be greater than
or equal to the height of the oven (25.0” or
635 mm).
- Verify the oven location has a minimum 5”
(127 mm) clearance on top and a minimum 2”
(51 mm) clearance on each side.
Partition
25.0” (635 mm)
Above Counter Top
Grill
Figure 2: Installation Near Open Heat Source
6”
(152 mm)
Minimum
TurboChef
El Bandido
Oven
12”
(305 mm)
Minimum
Counter Top / Table
Partition
25.0” (635 mm)
Above Counter Top
Deep Fryer
SPECIFICATIONS AND INSTALLATION
4
SPECIFICATIONS AND INSTALLATION
Oven Restraint Kit
Part Number: TC3-0242
WARNING: The Oven Restraint Kit will
not prevent the oven from falling off a
countertop if the oven is pulled off or
allowed to slide off the edge. Installation
instructions are included with the kit.
ChefComm Pro
Part Number: CON-7006
ChefComm Pro® lets you easily create menu
settings on a computer and upload them to an
oven via smart card. For more information, call
TurboChef Customer Support at 800.90TURBO
or +1 214.379.6000.
ChefComm Limited
Part Number: CON-7016
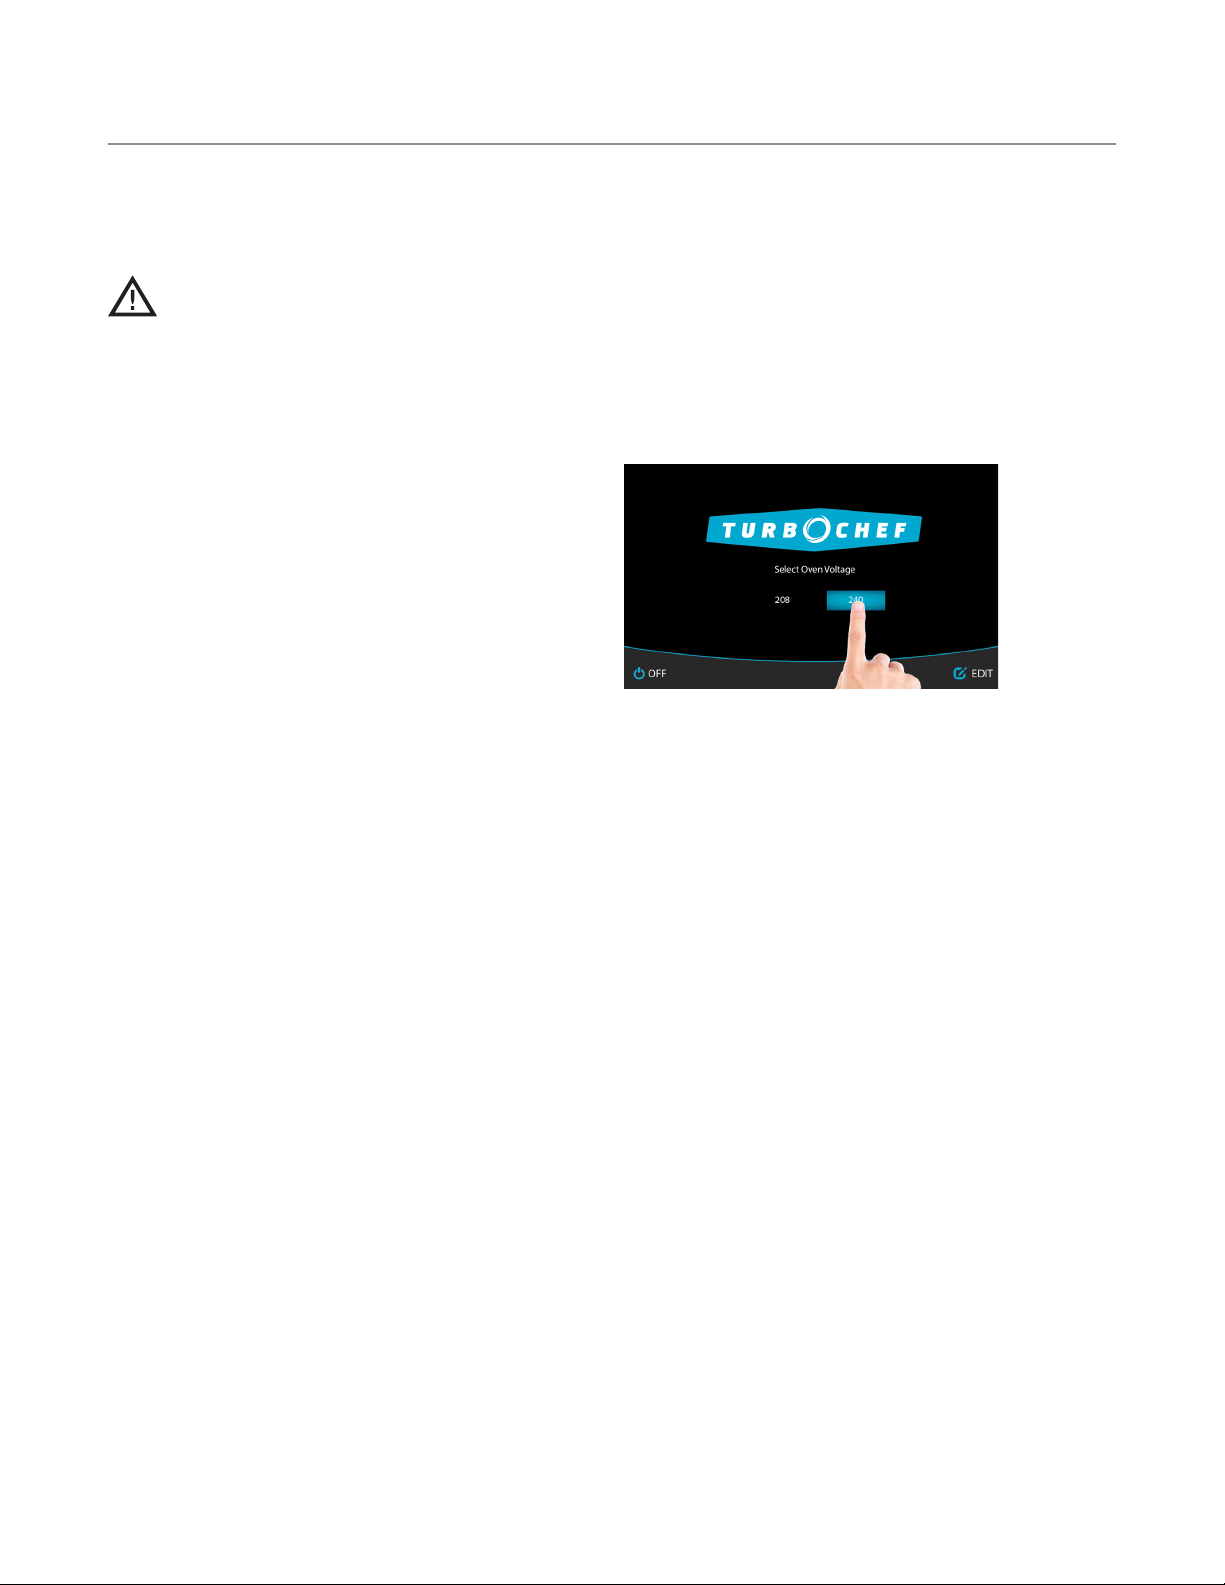
Voltage Selection
For North America oven models, the oven will detect
208 or 240 incoming voltage.
If incoming voltage for the store is different than the
factory-preset voltage, the operator will be required to
select either 208 or 240. The correct voltage will be
enlarged on the screen, identifying which option to
touch (see Figure 3 below).
Figure 3: Selecting Voltage
Ventilation
ChefComm LimitedTM is a “read-and-transfer only”
version of ChefComm Pro that helps ensure menu settings are easy to distribute, while preventing them from
being altered at the store level.
Date and Time Prompt
The oven maintains a data log that contains valuable
information about the operation of the oven, including
faults, items cooked, and other events. An accurate
date and time are important for the data log. If the
oven loses the date and time as a result of prolonged
disconnection from power, a prompt will alert the
operator to set the date and time. The prompt will only
occur once. If bypassed, the operator must update the
date and time from the Info Mode Settings screen (see
page 16 for details.)
The TurboChef El Bandido oven has been approved
by Underwriter’s Laboratory for ventless operation (UL
KNLZ listing) for all food items except for foods classified as “fatty raw proteins.” Such foods include bonein, skin-on chicken, raw ham¬burger meat, raw bacon,
raw sausage, steaks, etc. If cooking these types of foods,
consult local HVAC codes and authorities to ensure
compliance with ventilation requirements.
To ensure continued compliance with all health, building, and fire codes, you are required to maintain clean
and sanitary conditions around your oven at all times.
NOTE: In no event shall the manufacturer assume any
liability for damages or injuries resulting from installations which are not in compliance with the instructions and codes previously listed. Failure to comply
with these instructions could result in the issuance
of a temporary cease and desist order from the local
health department until the environment concerns are
addressed.
Panini Press Warnings and Usage
• e panini press should be used with care. Never force the panini press arm open or closed. Apply enough
pressure to press the food item, but no more.
• To close the press from its open position, apply gentle outward pressure to the arm in order for it to clear the
latch block on the side of the oven.
• e panini press assembly should be removed daily (or as required depending on use) and cleaned with
TurboChef oven cleaner.
• Never use metal scrapers or metal cleaning pads to clean the press plates.
• e press plates will discolor over time. is is normal.
• Avoid spraying cleaner in or near the bottom press plate’s bearings.
• Rinse with water and dry before re-installing in oven.
• Take care when handling the press. Do not drop the press onto the countertop.
• Never put the panini press into a dish washer or soak. Always wash by hand.
• e press bearings do not require lubrication. DO NOT use any type of lubricant on the bearings.
• e press arm assembly does not require lubrication. DO NOT use any type of lubricant on the press arm.
• From time to time, the press’s scissor arms may bow outwards and not adequately hold the top press plate.
Gently apply enough pressure to readjust the arms inward.
5
Daily Maintenance
Follow the steps below when cleaning your El Bandido
oven. Use only TurboChef ®-approved cleaning chemicals.
The use of any other cleaning products may damage critical oven components, resulting in a non-warranty service
call.
Step 1: Prepare the Oven
WARNING: The oven operates at approximately 500°F (260°C) and may cause
injury if not allowed to cool properly.
1.1 Turn off the oven by touching the Off icon.
1.2 Slightly open the oven door.
1.3 Cooling takes approximately 60 minutes or longer. DO NOT clean the oven until the
Step 1.1
oven displays “ready to clean.”
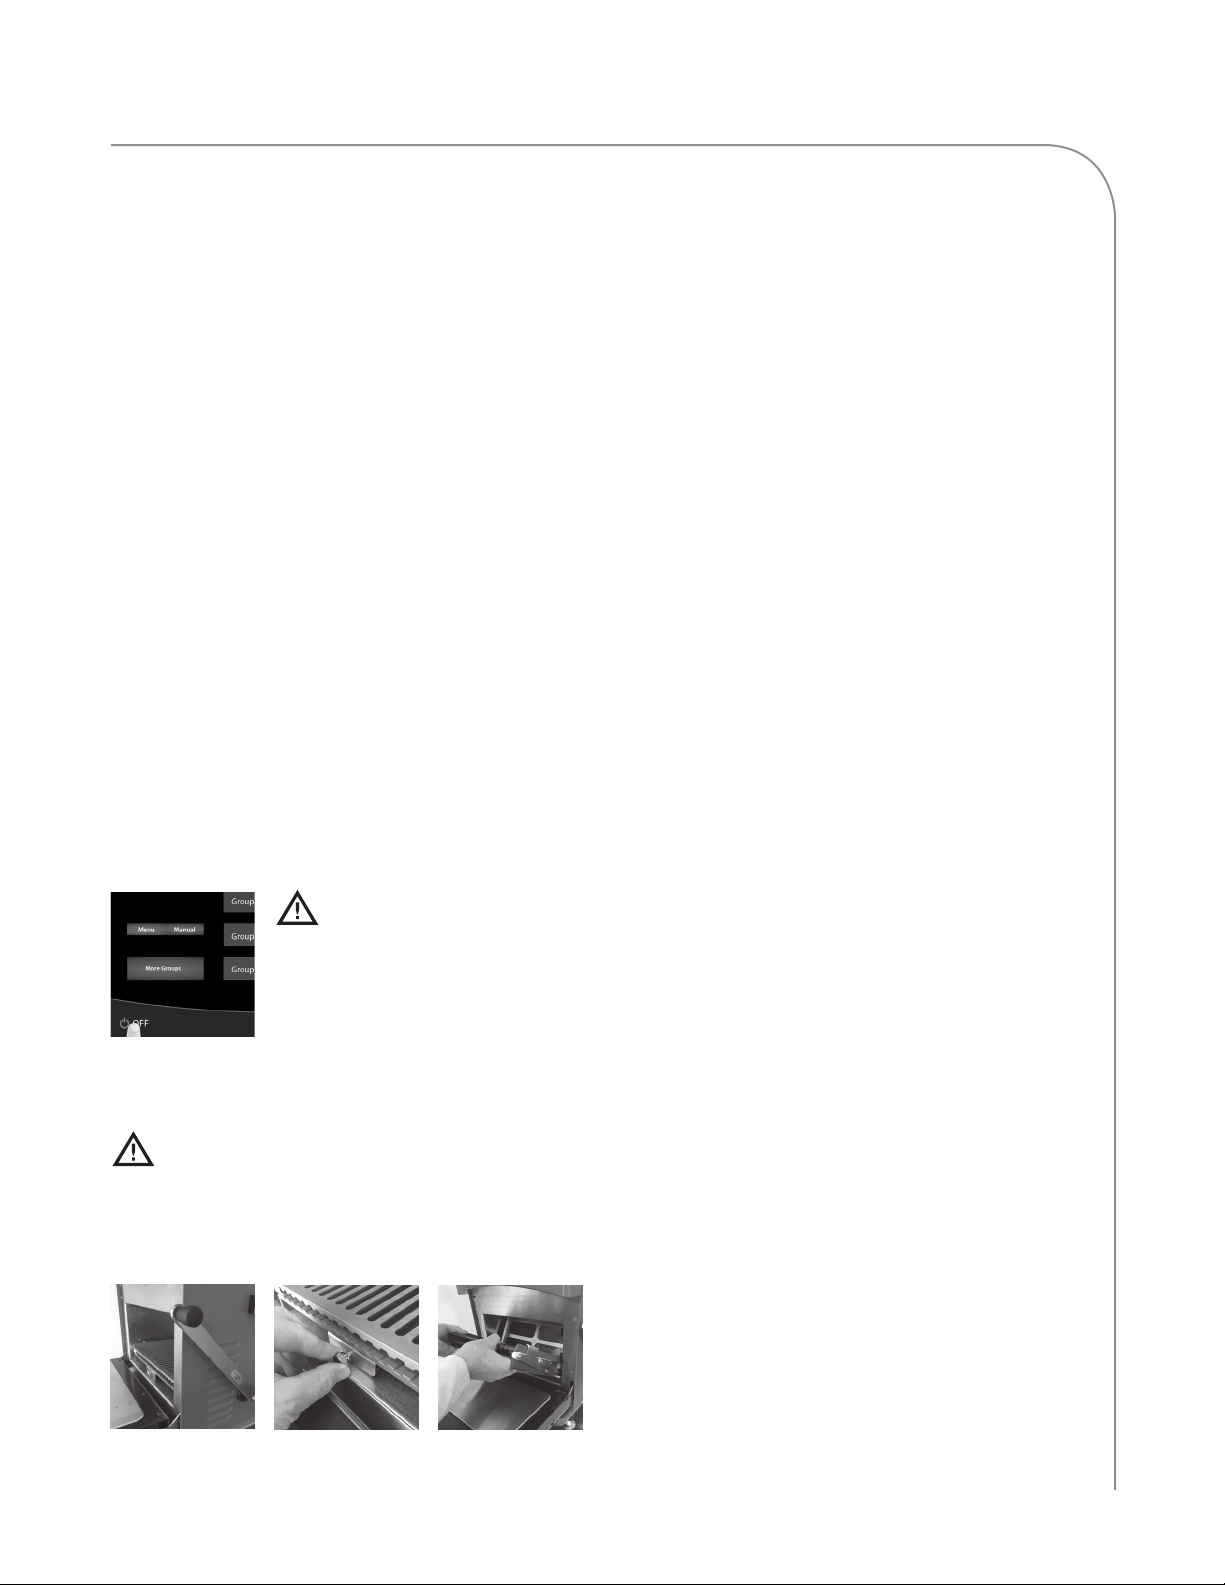
Step 2: Remove the Panini Press
WARNING: Be sure the oven interior is cool before removing the panini press.
2.1 Open the oven door and set the panini press to the “closed” (down) position.
2.2 Unscrew and remove the thumbscrew (retain for reassembly, step 13.2.4) at the front of the assembly.
2.3 Remove the panini press by pulling the assembly out of the cook cavity and carefully tilting up.
Supplies and Equipment
TurboChef ® Oven Cleaner (Product Number: 103180),
TurboChef ® Oven Guard (Product Number: 103181),
Kay ClickSan® sanitizer, nylon scrub pad, cleaning
towel, disposable gloves, protective eyewear, dust mask
(optional)
Step 2.1 Step 2.2 Step 2.3
Continued on next page...
CLEANING
 Loading...