

Page 1

T.I.E.
ALPHA 150
Owner's Manual :: 2-11
GB
Mode d'emploi :: 13-21
F
Manual del usario :: 22-31
E
Gebruikers gids :: 32-41
NL
583 1026 B
© TUNTURI 2001
:: 1
Page 2
WELCOME TO THE WORLD OF
TUNTURI EXERCISING!
Your choice shows that you really want to invest in your well-being
and condition; it also shows you really value high quality and style.
With Tunturi Fitness Equipment, you’ve chosen a high-quality, safe and
motivating product as your training partner.
This guide is an essential part of your exercise equipment. Start
familiarising yourself with the Tunturi T.I.E. interface by carefully
reading this manual. It offers the information you need for both the
use and maintenance of your equipment. This manual is well worth
keeping, as you may need these instructions later on.
1. INSTALLATION ::
1.1 Turning the user interface on and off
3. PULSE MEASUREMENT ::
2. KEYS ::
2.1 Function keys
2.2 Rec and OK
2.3 Reset
2.4 Setting keys -/+
4. MAIN DISPLAY ::
5. FUNCTIONS ::
5.1 Adjusting resistance
5.2 Reset
5.3 Mode
5.4 Prog
5.5 Recovery
5.6 Pause
5.7 Set
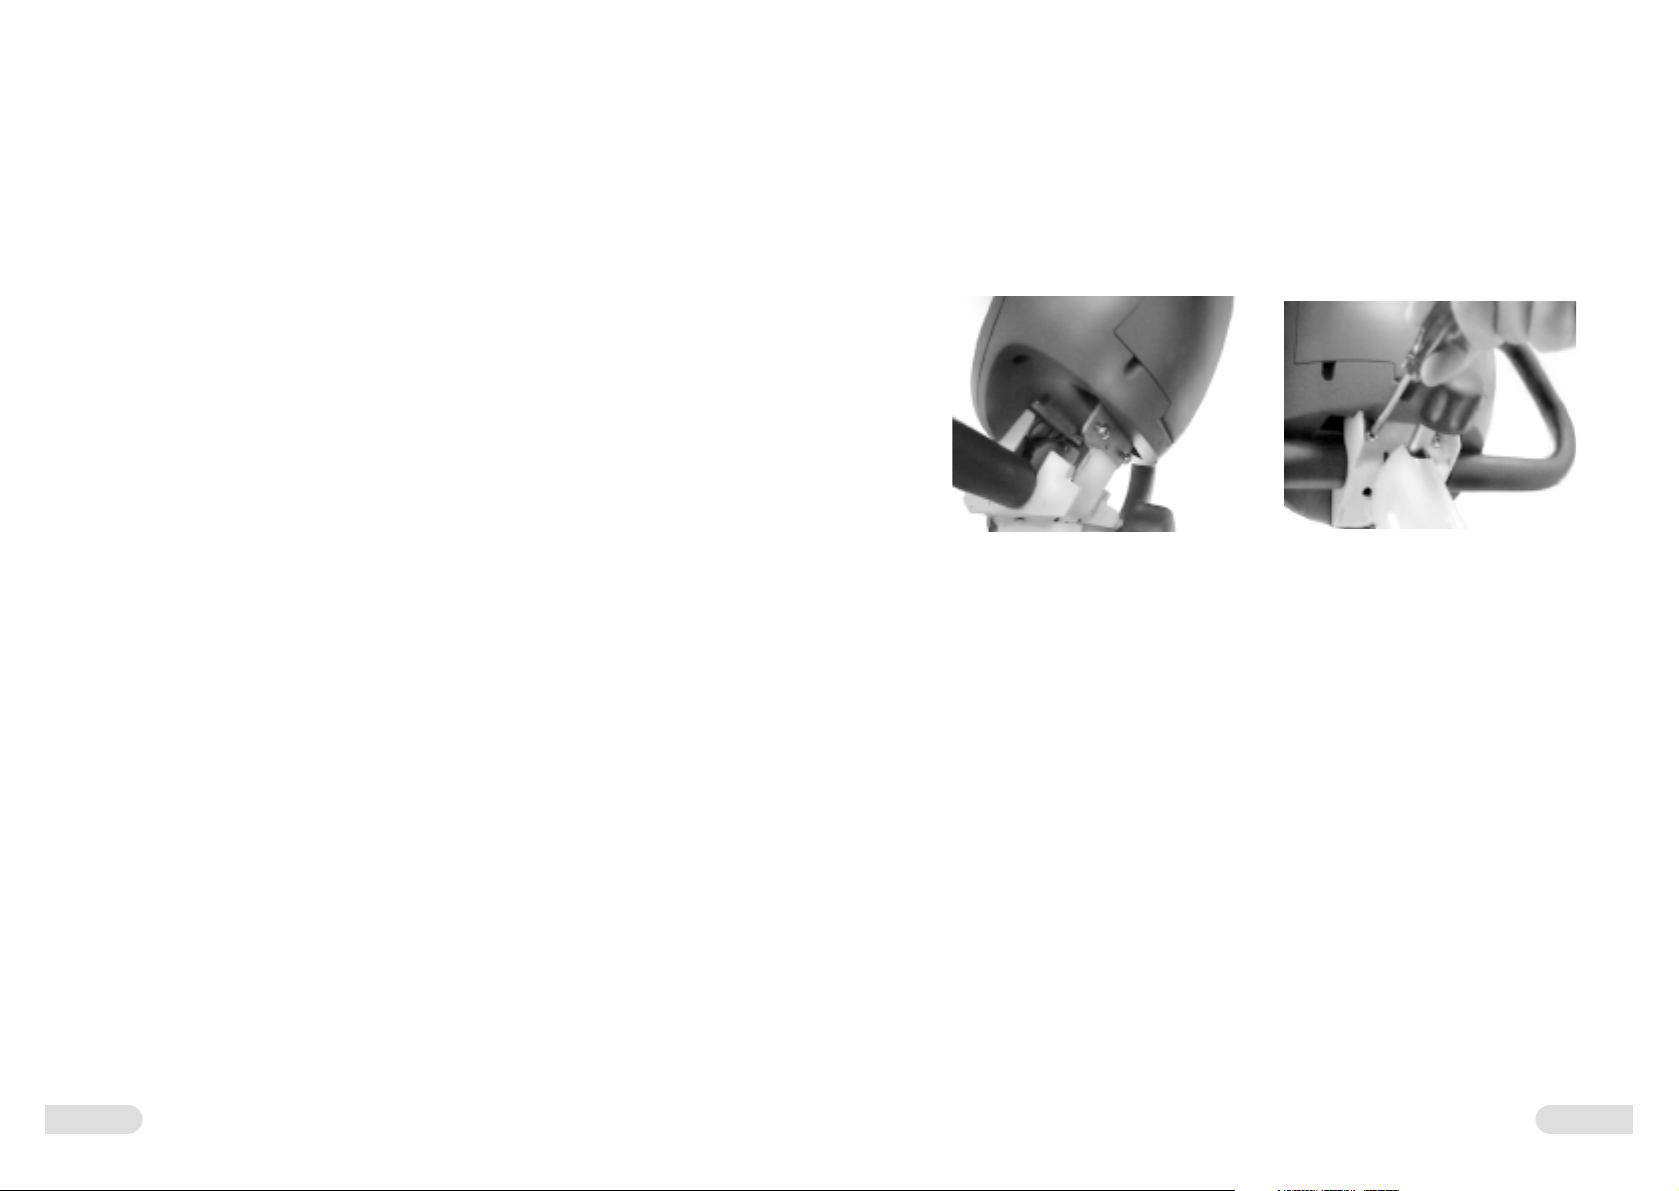
1. INSTALLATION ::
Push the T.I.E. interface module carefully into place at the top of
the handlebar support tube. The loose screws hanging from the metal
fastening plate on the bottom of the T.I.E. module must enter the holes
at the top end of the handlebar. Make sure that the module is correctly in
place and tighten the fastening screws.
1.1 TURNING THE USER INTERFACE ON AND OFF
The user interface turns itself on when the device is connected to the
mains current. When the user interface has not been used for fi ve minutes
(no heart-rate registered, no keys pressed, no pedalling), it automatically
switches itself to energy-saver state. Alpha 150 is returned to its active
state by pressing any key, starting to pedal or sending heart-rate signals
to the unit. When you restart, Alpha 150 automatically starts from Mode
function.
:: Protect Alpha 150 from excess sunlight, because that may fade
the interface box and surface membrane colours. Please also be
careful not to allow Alpha 150 to come into contact with
water. A sharp blow may damage the interface.
6. MAINTENANCE ::
2 ::
:: 3
Page 3
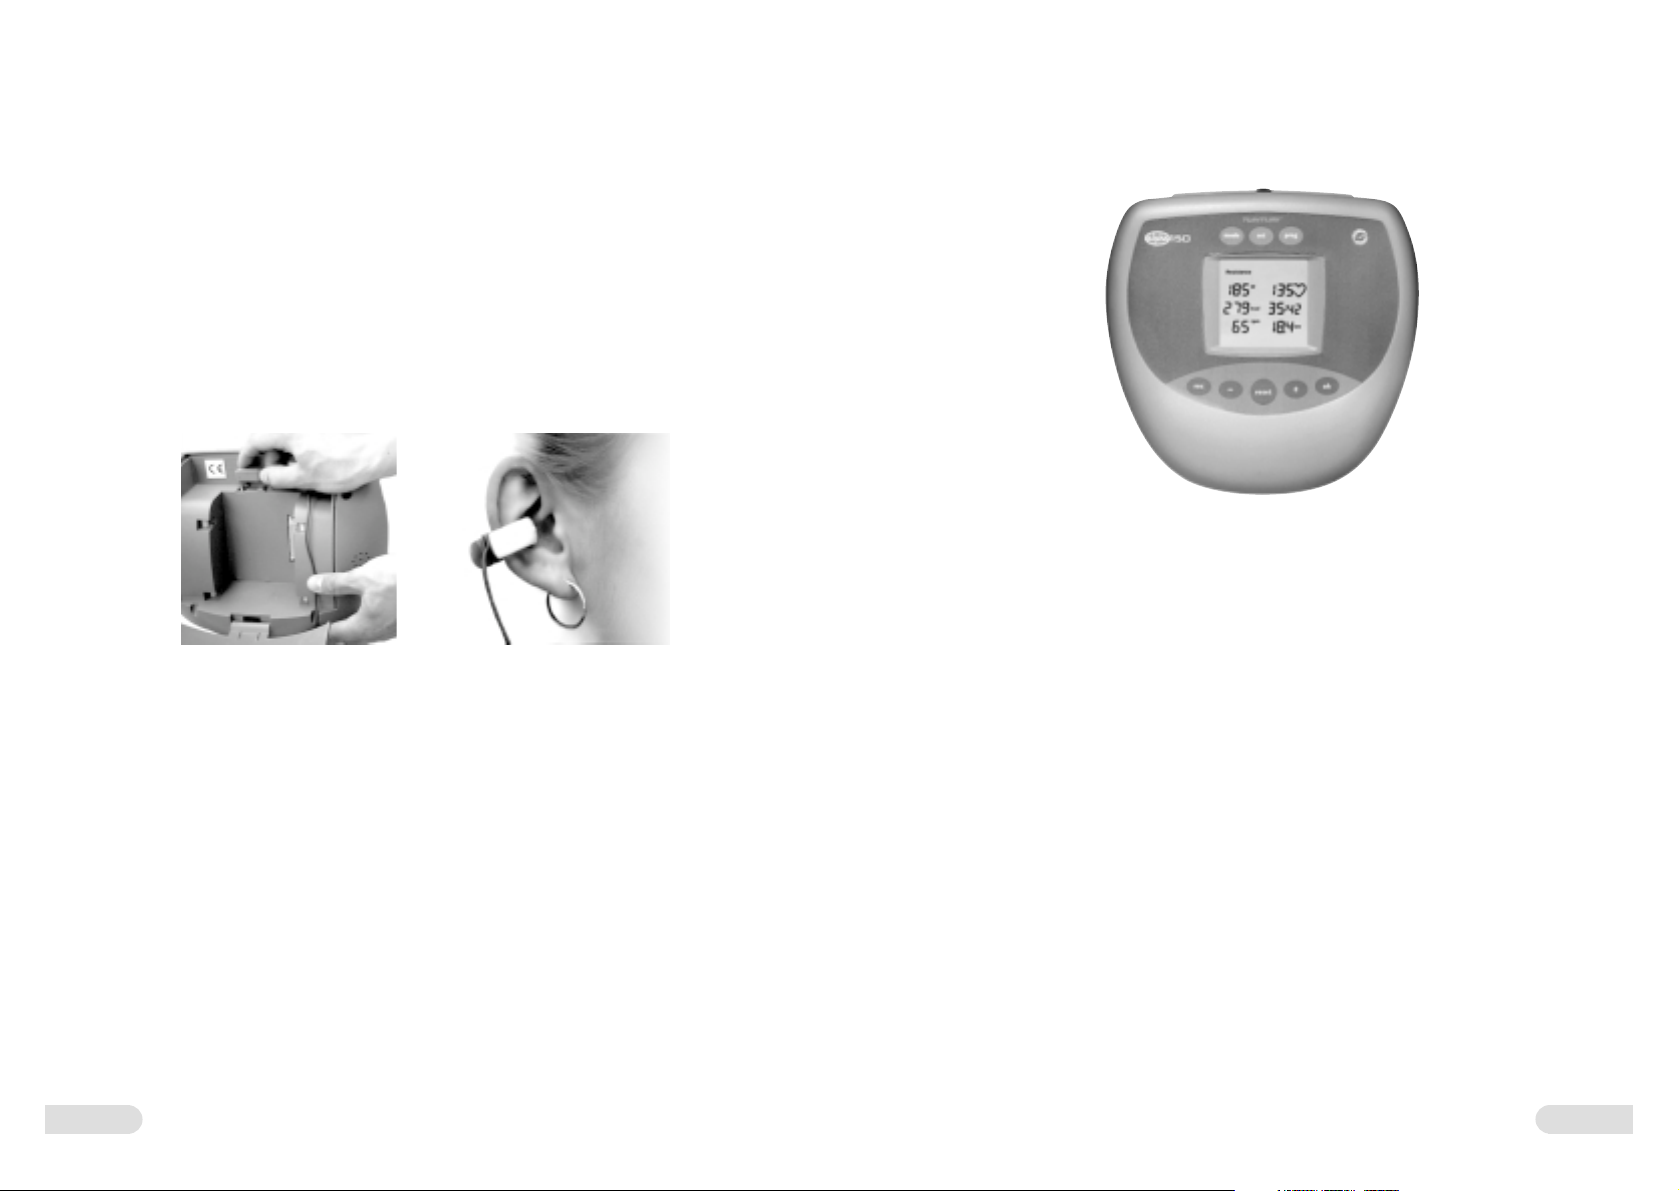
2. PULSE MEASUREMENT ::
You can buy the ear sensor needed for pulse measurement from your
Tunturi dealer or importer as an accessory.
3. USER INTERFACE ::
Measure your pulse as follows:
1. Open the cover at the back of Alpha 150 and pushing the ear
sensor connector into the interface connector. Lead the ear sensor
wire out through the hole between the cover and the box, and
close the cover.
2. Attach the ear sensor to the earlobe.
3. Attach the sensor wire to your shirt with the clip provided. This
prevents the sensor and wire from moving.
If there are problems in pulse measurement:
:: Check how the sensor works while not pedalling.
:: A disturbance may be caused by the physiological properties of the
earlobe. Try measuring on the inside surface of the ear or on
the tip of your fi nger.
:: Rub the earlobe with your fi ngers to quicken circulation.
:: If pulse values rise above 150 beats/min., earlobe measurement
may be affected by the faster circulation.
:: Sometimes a strong light source in the immediate vicinity of
the user may cause disturbances.
Please clean the ear sensor after use with a damp cloth. Do not use
solvents.
NOTE! Always detach the ear sensor connector from the user interface
when you use the heart-rate belt. The ear sensor disturbs heart-rate
measurement.
3.1
3.2
3.3
3.4
3.1 FUNCTION KEYS
MODE includes constant resistance, constant effort and constant heartrate workouts. The user interface automatically starts from the constant
resistance workout. Use the operation key SET to make settings
and adjustments to the user interface options. PROG includes preprogrammed exercise profi les, memory positions for your self-designed
exercise profi les and measurement of recovery pulse.
3.2 REC AND OK
Use the Rec key to save your own workouts. Press Rec before beginning
the workout you wish to save. Press OK to confi rm.
3.3 RESET
Press the Reset key for more than one second to display the cumulative
values. Pressing Reset always resets the value on the display.
3.4 SETTING KEYS -/+
Use the setting keys (-/+) to adjust resistance, effort and heart rate for
the workout.
4 ::
:: 5
Page 4

4. MAIN DISPLAY ::
5. FUNCTIONS ::
When you turn the user interface on, the display shows the following
exercise parameters:
1. Effi ciency (W)
:: Figure indicates exercise effi ciency in Watts, which depends on
pedalling speed and resistance adjustment.
2. Energy consumption (kcal / kJ)
:: Displays cumulative energy consumption (0-999); default setting
is kcal.
3. Speed (rpm / km/h / mph)
:: Default setting is rpm (pedal revolutions / minute).
4. Pulse
:: Heart rate transmitter belt or an ear sensor is required.
:: If the user interface does not receive a heart-rate signal, - - is
displayed instead of the heart rate.
NOTE! Always disconnect the ear sensor from the user interface if using
a heart rate transmitter belt; the ear sensor will interfere with the heart
rate transmitter.
5. Time
:: Displays the exercise time elapsed between 0:00 - 59:59 minutes
and between 1:00 - 10:00 hours in 1 minute increments.
:: Time display stops if speed falls to zero.
6. Distance (km / miles)
:: Default display setting is km.
:: Displays the distance travelled during the workout in km (or
miles) to two decimal points up to 9.99 km (or miles) and with
one decimal point up to 99.9.
5.1 ADJUSTING RESISTANCE
Resistance in constant resistance workouts is adjusted with the - / + keys.
The text SET and setting value are displayed when you adjust resistance.
The meter returns to the main display 2 seconds after setting the value.
5.2 RESET
Press RESET to reset the values on the display. Cumulative training
values are displayed by pressing RESET for more than one second. They
remain on the display for as long as the key is pressed.
5.3 MODE
MODE includes constant resistance, constant effort and constant heartrate workouts. In all workouts, one parameter is set as a constant,
after which your exercise equipment automatically maintains the
level. Constant heat-rate exercise requires your using the heart-rate
measurement system.
1. Press MODE key to select the workout.
:: Resistance = constant resistance exercise at the same resistance level
throughout. Faster pedalling means an increase in effort.
:: Watt = constant effort exercise; the interface adjusts resistance
automatically so the training effort set, e.g. 100 W, remains the
same independent of pedalling rate.
:: Pulse = constant heart-rate exercise; the interface adjusts effort
automatically and keeps your heart-rate at the desired level, e.g.
120 beats per minute, independent of pedalling rate.
2. Set the target level with the - /+ keys. You can adjust the target
level with the - / + keys during the workout whereupon the text
SET and the setting value (Nm, W, heart rate) are displayed. The
meter returns to the main display 2 seconds after setting the target
value.
6 ::
:: 7
Page 5

5.4 PROG
5.5 RECOVERY
PROG includes pre-programmed exercise profi les, memory positions for
self-designed profi les and measuring recovery pulse. The resistance level
varies in a pre-determined way and has three options: Health = fi tness
improvement, Slim = weight control, Fit = profi le designed for the
physically fi t. The level of diffi culty of the selected profi le can be scaled
from 1 to 9. Level 1 is the easiest and longest and level 9 the most
challenging and shortest. A full description of the profi les is given at the
end of these instructions.
Pre-programmed profi les (Health, Slim, Fit)
1. Press PROG until the desired profi le (Health, Slim, Fit) appears
on the display. Press OK to confi rm.
2. Use the - / + keys to select the level (Level 1-9). Press OK to
confi rm.
3. Start pedalling to begin the workout.
Designing your own exercise profi les
You can save three self-designed exercise profi les. Although the profi le can
be any of the MODE programs (Resistance, Watt, Pulse), the program
cannot be changed during saving. A total of 30 changes can be saved in
each profi le. There is no time limit in the profi les.
1. Press REC to start saving your self-designed workout. During
saving the text REC is displayed. Press OK after completing your
profi le. The text REC on the display is cleared and replaced by
memory position “User 1”. The fl ashing numeric value indicates
that a profi le has already been saved in the memory position.
Previous profi les can be replaced by new ones, or use the - / + keys
to move to other memory positions (User 1, 2, 3). Press OK to
save the profi le in the desired memory position.
Measure your recovery pulse rate at the end of the workout. To measure
recovery pulse rate press PROG until the text “Recovery” appears on the
display. Press OK to confi rm.
:: The measurement of recovery pulse takes two minutes, during
which time the current heart rate is displayed. During measuring
the text “Recovery” fl ashes on the display.
:: At the end of the measurement period the recovery ratio
percentage is displayed. The smaller the reading the fi tter you are.
Note that results are individual and not directly comparable with
those of others.
NOTE! If there is a problem in pulse measurement, the display will
show - - instead of the heart rate, and measurement of recovery pulse
will automatically restart when the user interface once again receives a
heart-rate signal.
:: Press OK to move from recovery pulse measurement to the
main display. The main display will appear automatically 1 minute
after the measurement.
5.6 PAUSE
When the user interface has not been used for three minutes (no heart
rate registered, no keys pressed, no pedalling), it automatically switches
itself to energy-saver state. The interface is returned to its active state by
pressing any key, starting to pedal or sending heart-rate signals to the
unit. The values in a workout that has been interrupted are saved in
the memory of the user interface for 10 minutes, after which they are
reset. The values on the display are always reset when the RESET key
is pressed.
2. To use a self-designed exercise profi le press PROG until User
appears on the display. Use the - / + keys to select a memory
position (User 1, 2, 3). If the memory position is empty the
reading 0:00 is displayed. Press OK to confi rm your choice.
3. Start pedalling to begin the workout.
8 ::
:: 9
Page 6

5.7 SET
6. MAINTENANCE ::
1. To set the heart-rate limit press SET once. The lower heart rate
limit is indicated by the text LO and the upper limit by HI. If
desired, the user interface indicates when your heart rate falls
below the lower limit or exceeds the upper limit with an alarm. To
set heart rate limits procede as follows:
:: The lower limit (LO) may be set between 50 and 220 beats per
minute. Use the - or + keys to set the value and press OK to
confi rm. Set the upper heart-rate limit (max. 220) in the same way
as for the lower limit. Press OK to confi rm.
:: To delete heart-rate limits use the - or + key to move the values
above the permitted upper or lower limit. The value is then
replaced by — on the display.
2. To select the alarm press SET twice. The text Ind OFF indicates
that the alarms are switched off and Ind ON that they are
switched on. Use the - or + keys to select OFF or ON and press
OK to confi rm.
3. To set units of measurement press SET three times.
:: Default units are rpm, km and kcal.
:: To change the units press the + or - key until the desired units are
displayed.
:: To measure speed you can set either revolutions per minute,
(rpm), kilometres per hour (km/h) or miles per hour (mph).
Energy consumption measurement can be set for kilocalories
(kcal) or kilojoules (kJ).
:: In addition to rpm you can also select either kilometres (km) or
miles as distance measures. If km/h is selected as the unit to
measure speed, km will automatically be the unit for distance. The
same applies to the units mph and miles.
:: Press OK to confi rm your selections, which are then saved and
indicated on the main display.
:: Press the RESET key to exit the setting function without saving
the adjustment. This resets the readings on the main display.
:: In training, T.I.E. interface tolerates an environment measuring
+10°C to +35°C. A T.I.E. interface can be stored in temperatures
ranging between -15°C and +40°C. Air humidity in the T.I.E.
interface training or storage environment must never exceed 90 %.
:: Press the keys with the tip of the fi nger; your nails may damage
the key membrane.
:: Do not let the T.I.E. interface come into contact with water.
Always dry the surface of the interface, if there are any drops of
sweat on it. Use a soft, absorbent cloth. Do not use solvents to
clean the user interface surface.
:: Protect the user interface from excess sunlight: it may fade the
colours of the user interface box and surface membrane.
:: Please contact your dealer immediately if you notice any defects or
malfunctions while using your T.I.E. interface. Please state the
nature of the problem, conditions of use, purchase date and serial
number of your T.I.E. interface. The location of the serial number
sticker is shown on the inside cover.
:: At the end of this manual, you’ll fi nd a diagram and list of spare
parts for the Alpha 150.
:: T.I.E. user interfaces meet the requirements of the EU’s EMC
Directives on electromagnetic compatibility (89/336/EEC) and
electrical equipment designed for use within certain voltage limits
(73/23/EEC). This product therefore carries the CE label.
NOTE! The instructions must be followed carefully in the assembly,
use and maintenance of your equipment. The warranty does not cover
damage due to negligence of the assembly, adjustment and maintenance
instructions described herein. Changes or modifi cations not expressly
approved by Tunturi Oy Ltd will void the user's authority to operate
the equipment!
Due to our continuous policy of product development, Tunturi reserves
the right to change specifi cations without notice.
10 ::
We wish you many enjoyable training sessions with your new
Tunturi training partner!
:: 11
Page 7

PROFILES ::
Health Slim Fit Health Slim Fit
(min) (W) (bps) (W) (min) (W) (W) (W)
0 80 80 80 31 130 130 140
1 90 90 90 32 140 130 140
2 90 90 100 33 140 140 140
3 100 100 110 34 140 140 150
4 110 100 130 35 140 140 150
5 120 110 130 36 140 140 170
6 130 110 140 37 140 130 170
7 140 120 140 38 140 130 170
8 140 120 140 39 130 130 170
9 140 130 130 40 130 120 150
10 140 130 130 41 120 120 150
11 140 130 120 42 110 120 150
12 140 130 120 43 110 120 120
13 130 140 150 44 120 120 120
14 130 140 150 45 130 130 120
15 120 140 170 46 130 130 130
16 120 140 170 47 140 130 130
17 130 140 150 48 140 140 140
18 130 140 150 49 140 140 140
19 140 140 140 50 140 140 140
20 140 130 140 51 140 140 130
21 140 130 140 52 140 130 130
22 140 130 150 53 140 130 120
23 140 130 150 54 140 130 120
24 140 120 180 55 130 120 110
25 140 120 180 56 130 120 110
26 130 120 150 57 120 120 100
27 130 120 150 58 120 110 100
28 120 120 140 59 110 110 100
29 120 120 130
30 130 130 130
Level 1 2 3 4 5 6 7 8 9
Intensity = 0,7 0,775 0,85 0,925 1,0 1,075 1,15 1,225 1,3
Level x
42 ::
:: 43
 Loading...