

Page 1
www.tunturi.com
UPRIGHT BIKE
USER MANUAL ..............................03-24
BETRIEBSANLEITUNG .................25-48
MODE D'EMPLOI ...........................49-74
HANDLEIDING ...............................75-97
Page 2

Page 3

GB
Owner’s manual • PLATINUM PRO
3
Welcome
Welcome to the world of Tunturi
exercising!
Your choice shows that you really
want to invest in your well being and
condition; it also shows you really value
high quality, safe and motivating product
as your training partner. Whatever your
goal in training, we are certain this is
the training equipment to get you there.
You’ll find information about using your
exercise equipment and what makes for
efficient training at Tunturi’s website at
www.tunturi.com
Contents
Welcome ......................................... 3
Safety Instructions ........................ 3
Electrical safety ................................... 4
Assembly........................................ 5
Step 1: ................................................. 5
Step 2: ................................................. 6
Step 3: ...................................................
Step 4: ................................................. 8
User interface................................. 9
Jog wheel and Buttons ......................... 9
Start up screen ................................... 10
Programs ...................................... 10
Quick start .......................................... 10
End your workout.................................11
Target heart rate ..................................11
Manual ................................................ 12
Watt Constant ..................................... 13
T-Ride ................................................. 14
Preset Programs................................. 14
Own Trainings..................................... 16
Fitness test ......................................... 17
T-Road ................................................ 19
User settings ................................ 19
User Log ............................................. 20
User Setting ........................................ 20
Edit User ............................................. 20
Delete User......................................... 21
Change User ...................................... 21
Create User ........................................ 21
Heart Rate Training...................... 22
How to wear your wireless chest strap
transmitter:.......................................... 22
Exercising .................................... 23
Maintenance ................................. 23
Troubleshooting .................................. 24
Moving and storage ............................ 24
Specications .............................. 97
User Interface ..................................... 97
Equipment .......................................... 97
Spare parts list.................................... 98
Exploded view .................................. 100
Safety Instructions
Read this guide through carefully
before assembling, using or servicing
your fitness equipment. Please keep
the guide somewhere safe; it will
provide you now and in the future with
the information you need to use and
maintain your equipment. Always follow
these instructions with care.
Note about your health
• Before you start any training, consult
a physician to check your state of
health.
• If you experience nausea, dizziness
or other abnormal symptoms while
exercising, stop your workout at once
and consult a physician.
• To avoid muscular pain and strain,
begin each workout by warming up
and end it by cooling down (slow
pedaling at low resistance). Don’t
forget to stretch at the end of the
workout.
Note about the exercise environment
• The equipment is not to be used
outdoors.
• Place the equipment on a firm,
level surface. Place the equipment
on a protective base to avoid any
damages to the floor beneath the
equipment.
• Make sure that the exercising
environment has adequate
Page 4

4
Owner’s manual
•
PLATINUM PRO
ventilation. To avoid catching cold, do
not exercise in a draughty place.
• In training, the equipment tolerates
an environment measuring +10°C to
+35°C. The equipment can be stored
in temperatures ranging between
-15°C and +40°C. Air humidity in the
training or storage environment must
never
exceed 90%.
Note about the equipment
• If children are allowed to use
the equipment, they should be
supervised and taught to use the
equipment properly, keeping in
mind the child’s physical and mental
development and their personality.
• Before you start using the equipment,
make sure that it functions correctly
in every way. Do not use faulty
equipment.
• Press the keys with the tip of the
finger; your nails may damage the
key membrane.
• Never lean on the interface.
• Never remove the side covers. Do
not step on the frame casing.
• Only one person may use the
equipment at a time.
• Hold the handlebar for support when
getting on or off the equipment.
• Wear appropriate clothing and shoes
when exercising.
• Protect the meter from sunlight and
always dry the surface of the meter if
there are any drops of sweat on it.
• Further information on warranty
terms can be found in the warranty
booklet included with the product.
• Please note that the warranty does
not cover damage due to shipping
or negligence of adjustment or
maintenance instructions described
in this manual.
• The equipment must not be used by
persons weighing over 150 kg.
• Do not attempt any servicing or
adjustments other than those
described in this guide. Everything
else must be left to someone
familiar with the maintenance of
electromechanical equipment and
authorized under the laws of the
country in question to carry out
maintenance and repair work.
• Never drop or insert any object into
any openings.
• Do not use outdoors.
• Do not use excessive pressure
on console control keys. They are
precision set to properly function with
little finger pressure. Pushing harder
is not going to make the unit go faster
or slower. If you feel the buttons are
not functioning properly with normal
pressure, contact your dealer.
Electrical safety
(only for equipment with electric power)
• Before use, always check that the
mains voltage is the same as the
voltage on the rating plate of the
equipment.
• Do not use an extension cable.
• Keep the mains cable away from
heat, oil and sharp edges.
• Do not alter or modify the mains
cable or the mains plug.
• Do not use the equipment if the
mains cable or the mains plug is
damaged or defective. If the mains
cable or the mains plug is damaged
or defective, contact your dealer.
• Always fully unwind the mains cable.
• Do not run the mains cable
underneath the equipment. Do not
run the mains cable underneath a
carpet. Do not place any objects on
the mains cable.
• Make sure that the mains cable does
not hang over the edge of a table.
Make sure that the mains cable
cannot be caught accidentally or
tripped over.
• Do not leave the equipment
unattended when the mains plug is
inserted into the wall socket.
• Do not pull the mains cable to
remove the mains plug from the wall
socket.
• Remove the mains plug from the
wall socket when the equipment
is not in use, before assembly or
disassembly and before cleaning and
maintenance.
SAVE THIS INSTRUCTION MANUAL
Page 5
GB
Owner’s manual • PLATINUM PRO
5
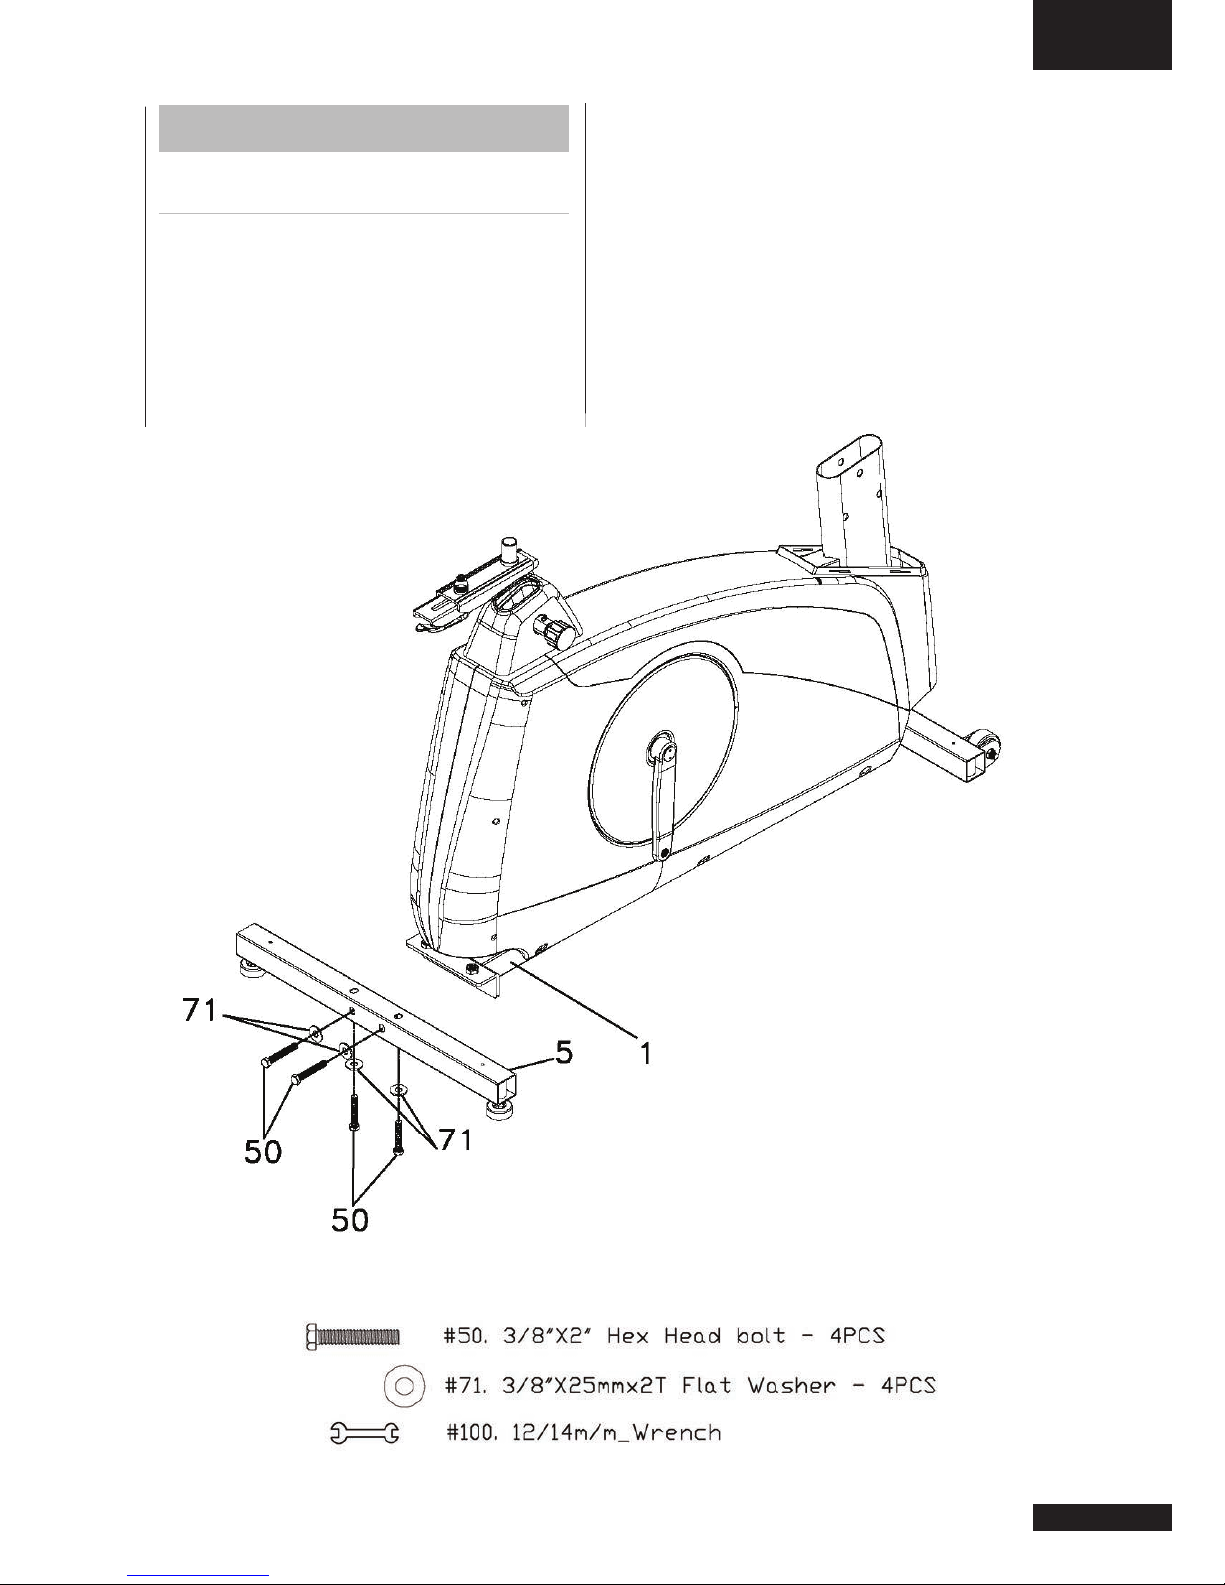
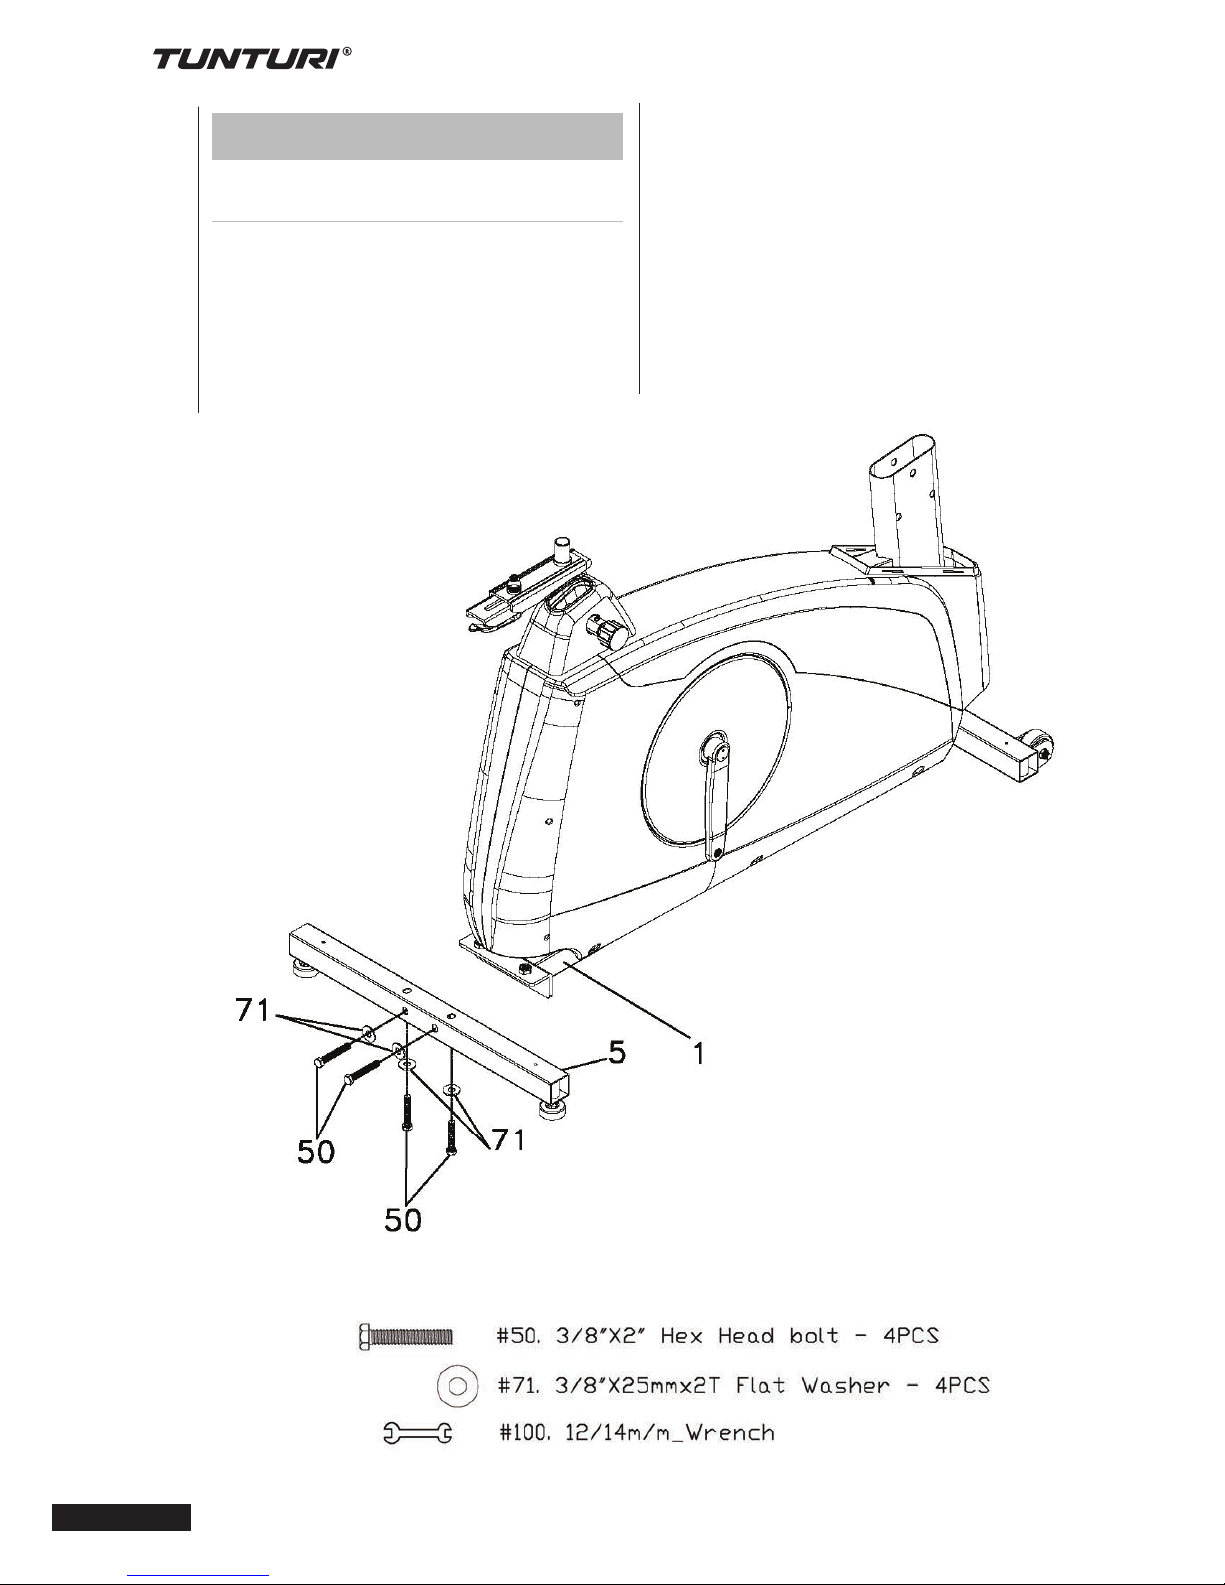
Assembly
Step 1:
Rear support tube assembly
1. Install the rear support tube (5) onto
the main frame (1) with four 3/8” x 2”
Hex head bolts (50) and four 3/8” x
25mm Flat Washers (71).
Page 6
6
Owner’s manual
•
PLATINUM PRO
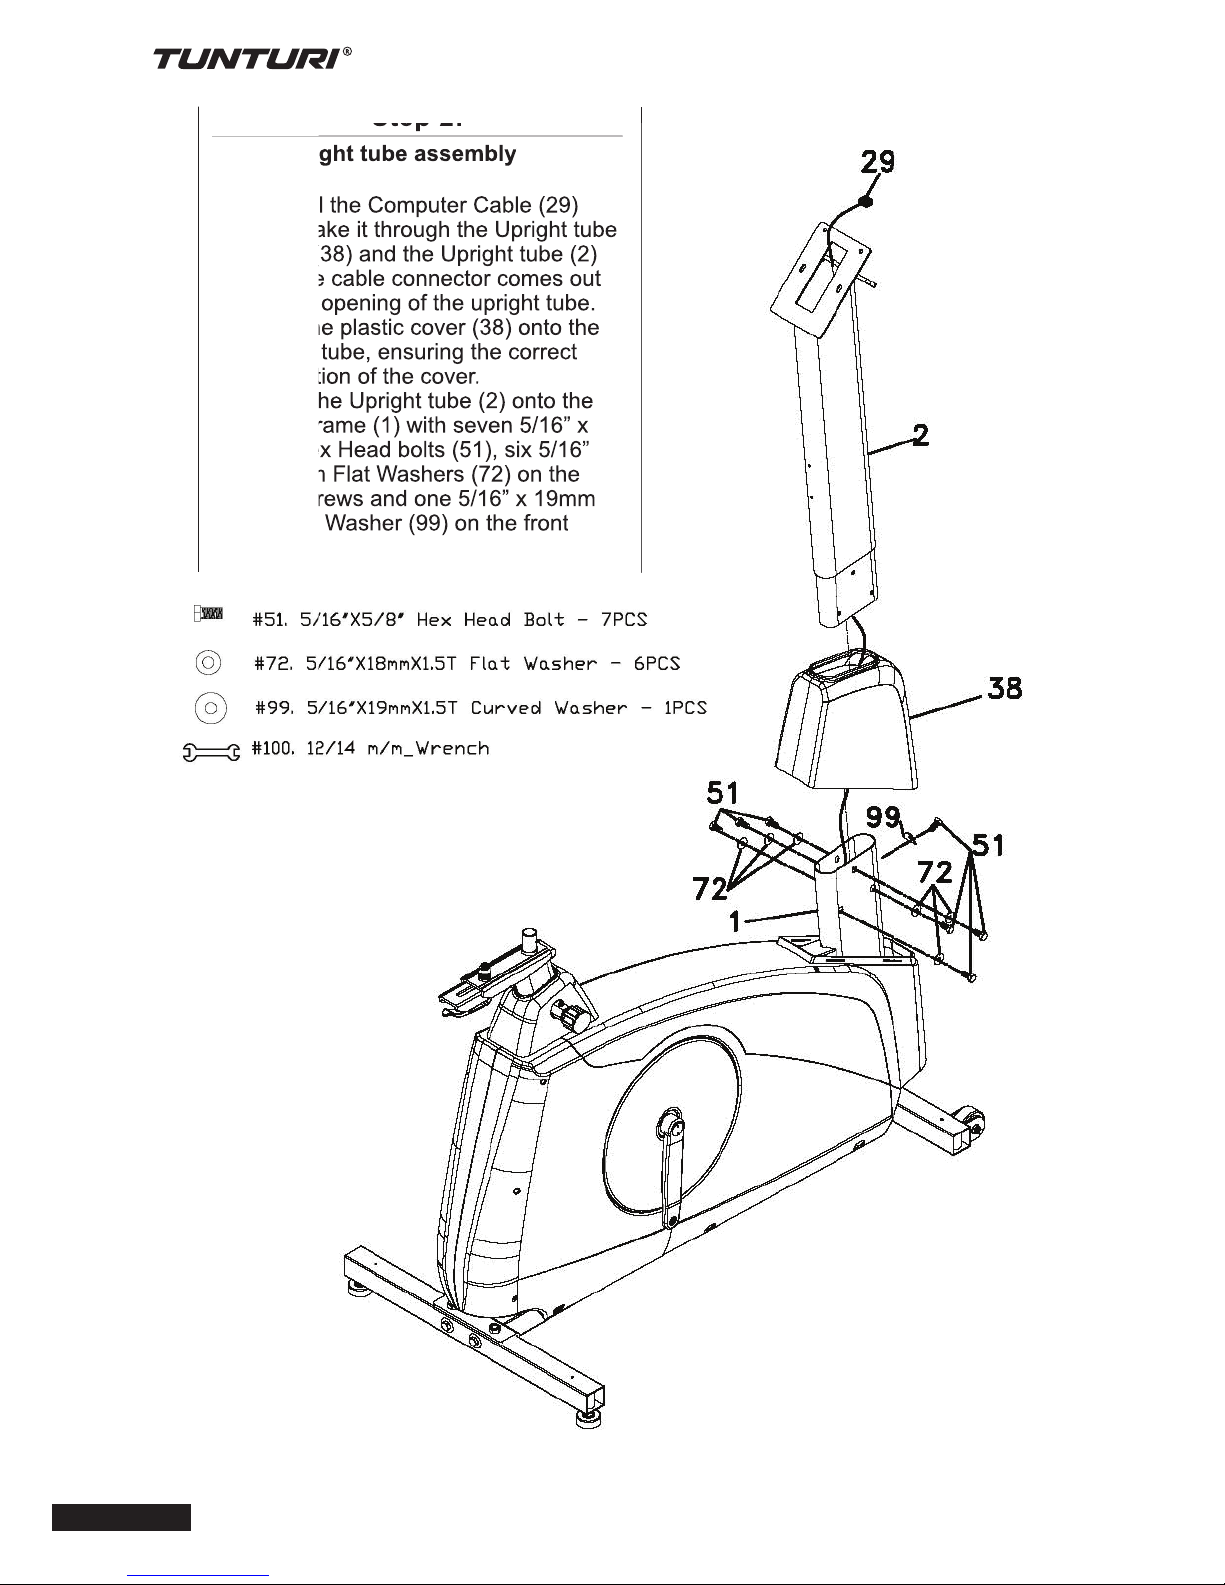
Step 2:
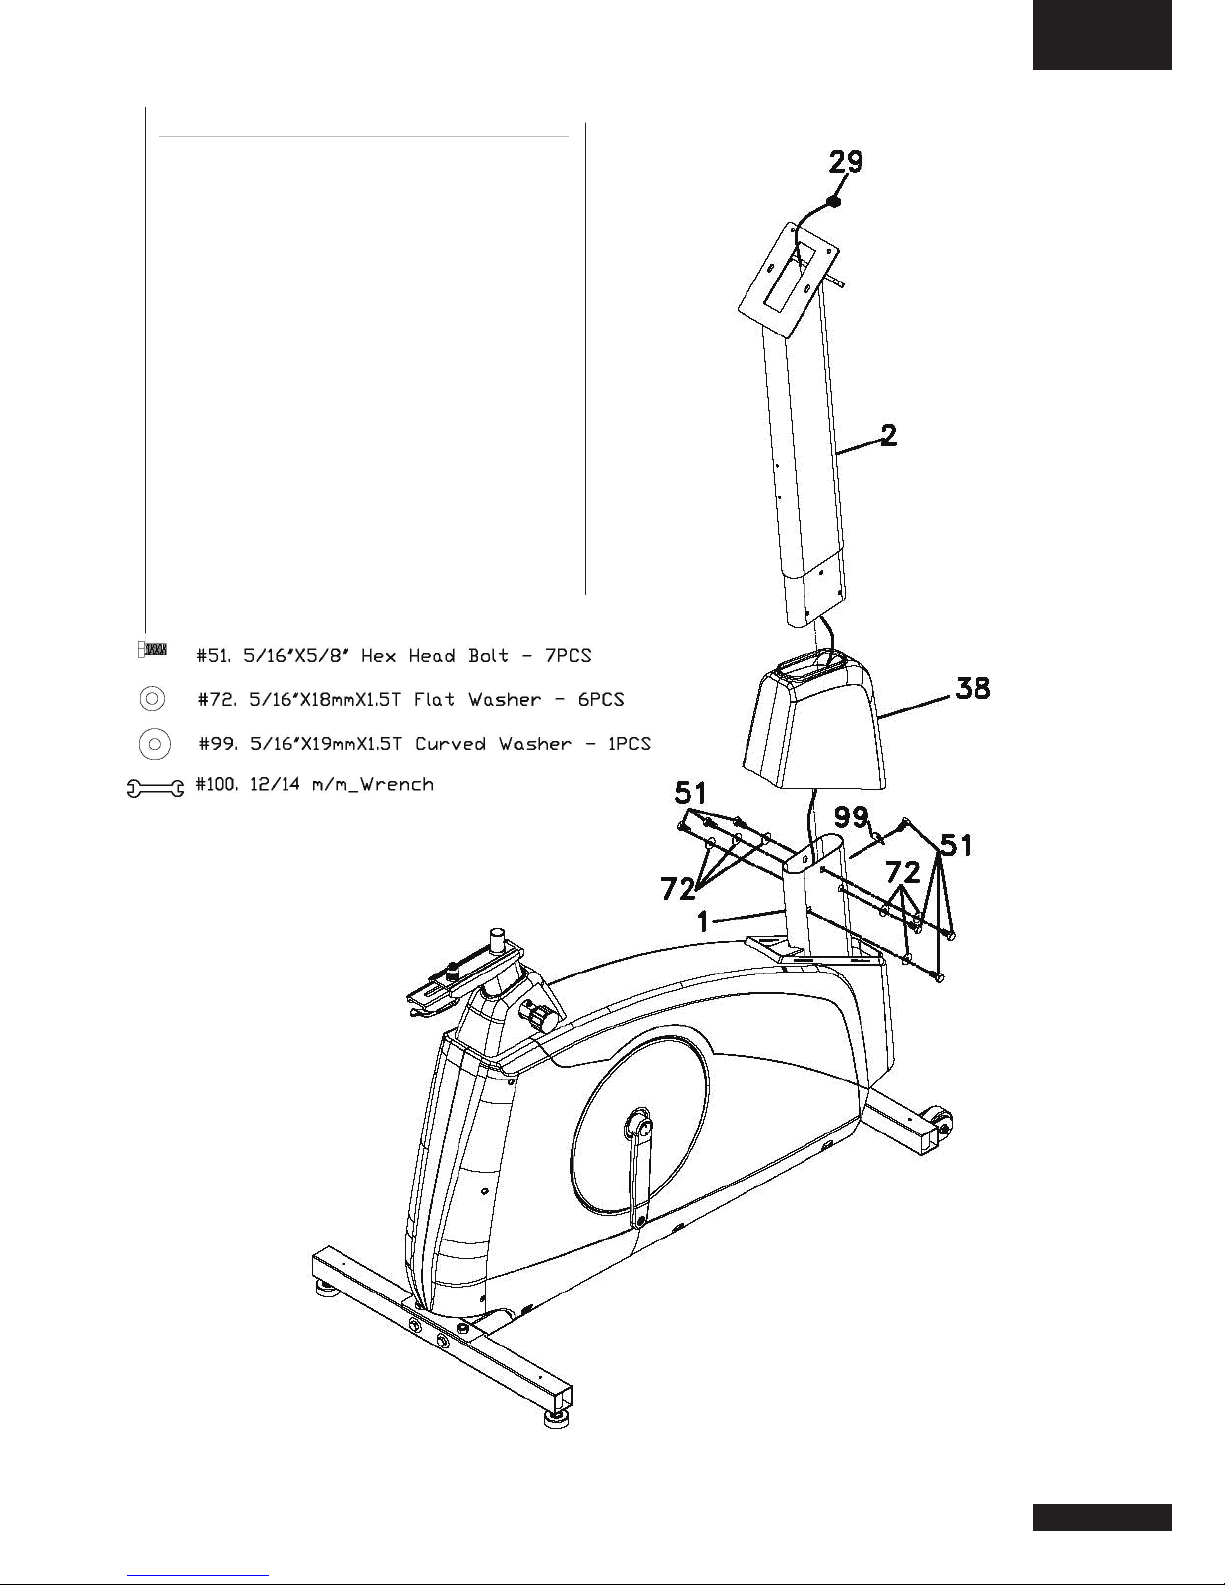
Front upright tube assembly
1. Unravel the Computer Cable (29)
and snake it through the Upright tube
Cover (38) and the Upright tube (2)
until the cable connector comes out
the top opening of the upright tube.
Slide the plastic cover (38) onto the
upright tube, ensuring the correct
orientation of the cover.
2. Install the Upright tube (2) onto the
Main Frame (1) with seven 5/16” x
5/8” Hex Head bolts (51), six 5/16”
x 18mm Flat Washers (72) on the
side screws and one 5/16” x 19mm
Curved Washer (99) on the front
screw.
Step 2:
Page 7
GB
Owner’s manual • PLATINUM PRO
7
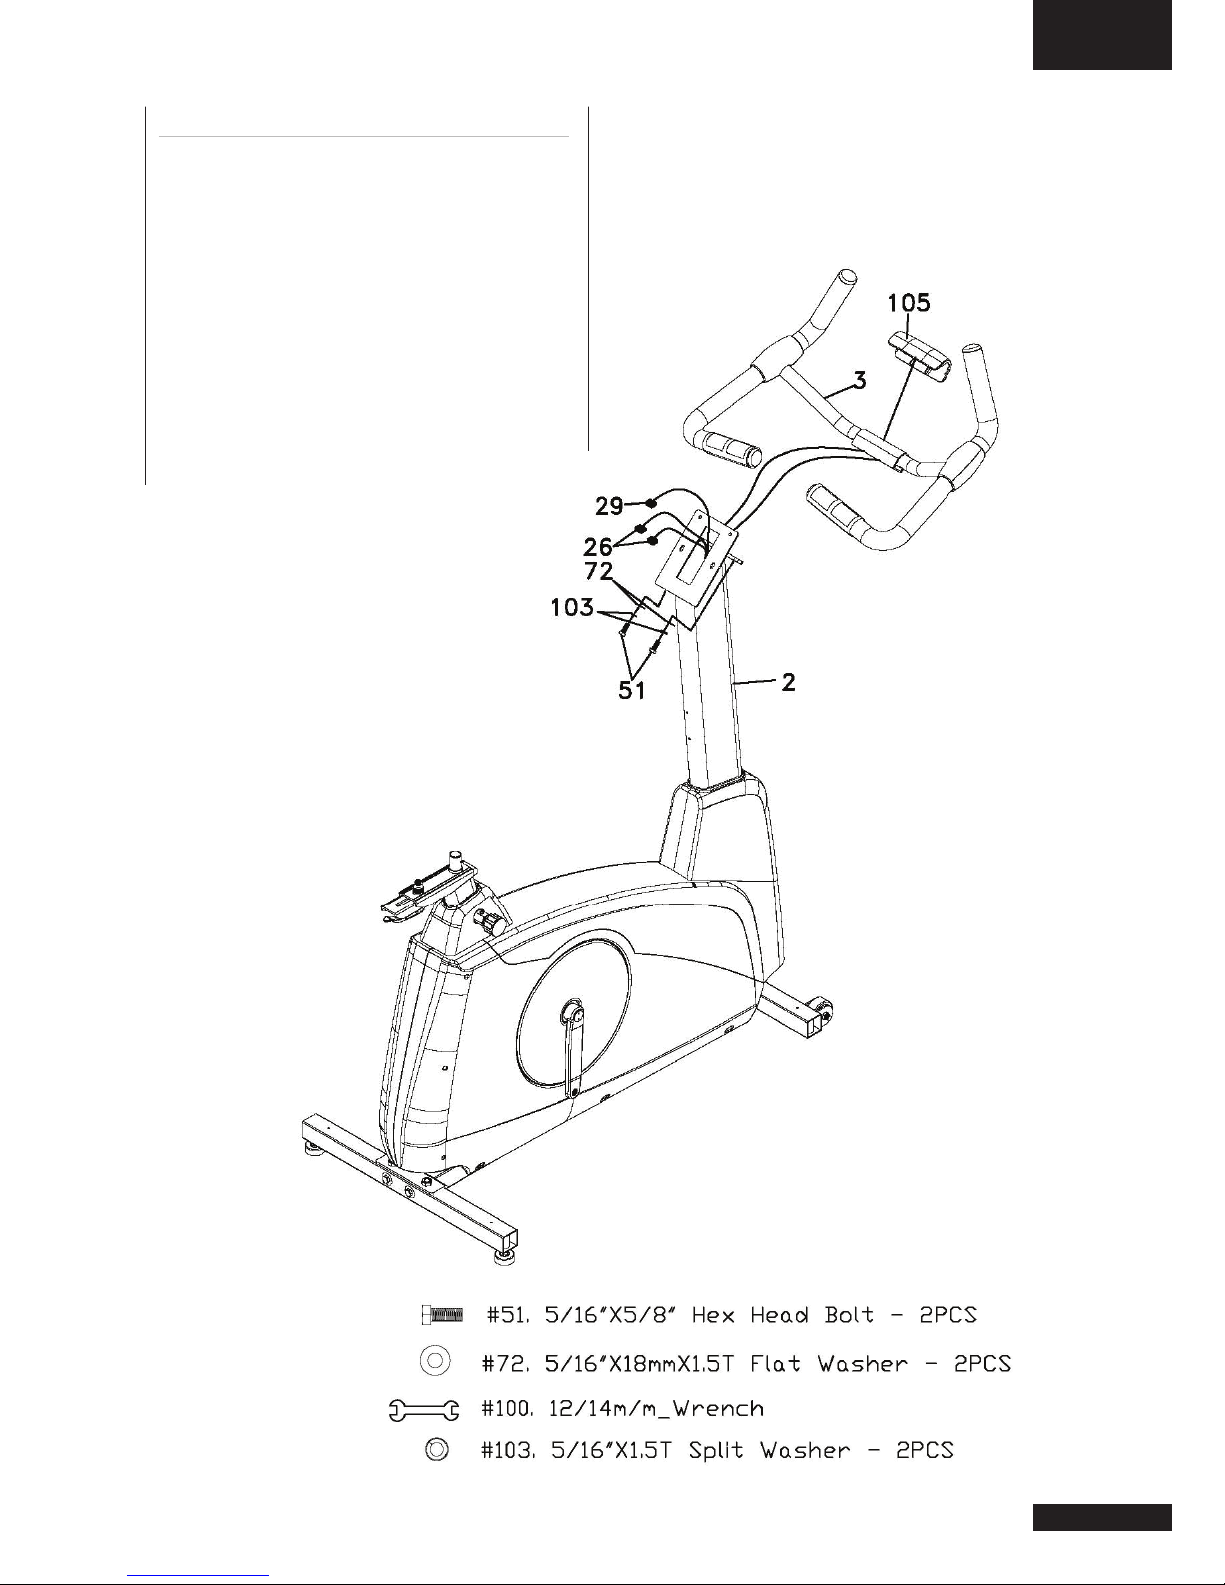
Step 3:
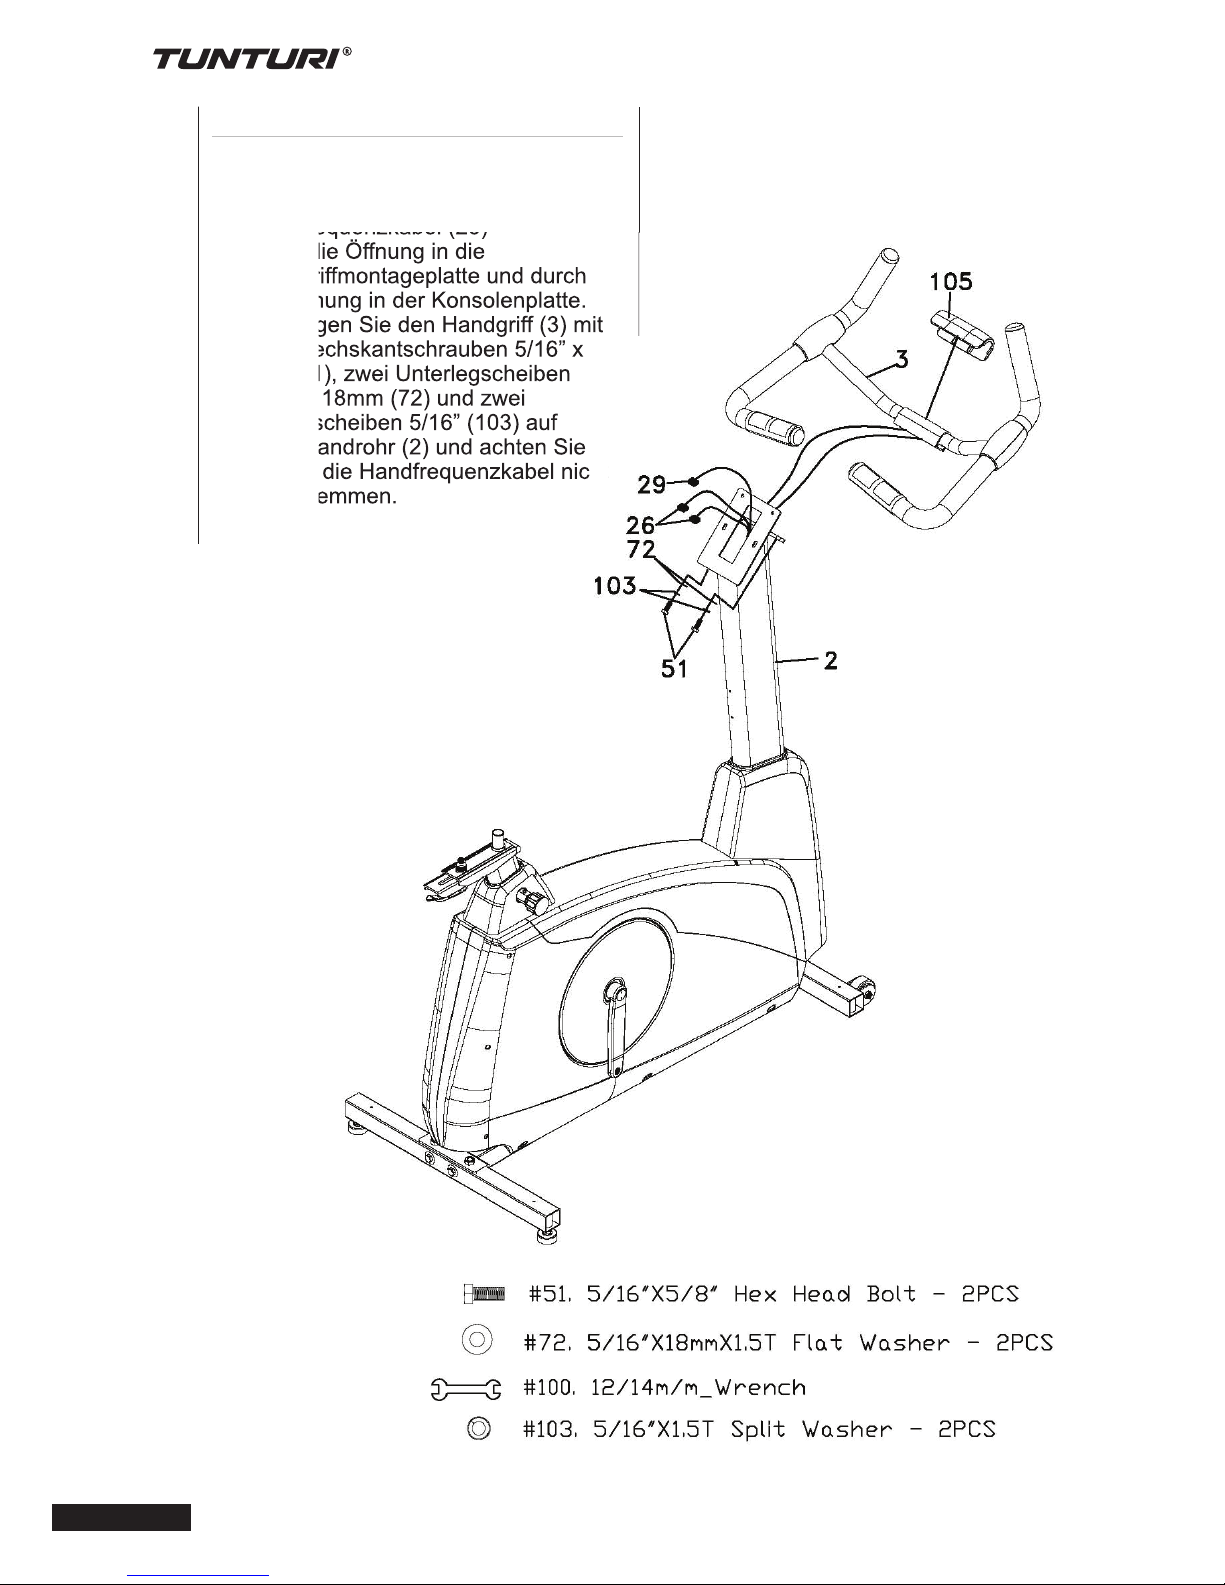
Handlebar
1. Run the two hand pulse wires (26)
into the hole in the handle bar
mounting plate and out through the
hole in the console plate.
2. Install the Handle Bar (3) onto the
Upright tube (2) with two 5/16” x
5/8” Hex Head bolts (51), two 5/16”
x 18mm Flat Washers (72) and two
5/16” Split Washers (103) being
careful not to pinch the hand pulse
wires.
Page 8

8
Owner’s manual
•
PLATINUM PRO
There is an “L” stamped into the end
of the threaded post of the left pedal
and an “R” in the right. Make sure to
tighten the pedals as much as you
possibly can. It may be necessary
to re-tighten the pedals if you feel a
thumping during pedaling the bike. A
noise or feeling such as a thumping
or clicking is usually caused by the
pedals being too loose.
4. Install the Seat slide tube (7) onto the
track on top of the seat tube with the
seat post facing forward. Install the
seat (19) onto the seat post.
5. Install the Bottle Holder (116) onto
the Upright tube with two M5x12mm
Phillips Head Screws (58)..
Step 4:
Console, Seat, Pedals And Main
Housing Covers Assembly
1. Insert the Computer Cable (29) and
two Hand pulse cables (26) into
the connectors in the back of the
Console (34). Install the Console (34)
onto the Upright tube at the bottom
with two M5x12mm Phillips Head
Screws (58).Then fasten the Console
(34) with the Fixing Plate (12) onto
the Upright tube on the top with two
M5x12mm Phillips Head Screws (58).
2. Install the Front Foot Cover (40) and
the Rear Foot Cover (41) onto the
Main Frame (1) with four M5x12mm
Phillips Head Screws (58).
3. Install the Pedals (45 L, 46R)
onto the Crank arms (16L, 16R).
Remember that the left pedal has a
reverse thread and will be screwed
into the crank in the opposite rotation
from normal threads.
Page 9
GB
Owner’s manual • PLATINUM PRO
9
User interface
Jog wheel and Buttons
A Back, Stop button:
• Move back to previous window
• Stop the active training
B Main menu:
• It will go back to main menu or quick
start if press main menu button.
• During training: pause if press this
button
C User/Settings:
• Press this button to enter User/
Setting mode screen
• This button is of no use during
workout
D Jog wheel:
Turn functions:
• Choose workout mode in main menu
• User/setting mode option selection
• Choose working item on the setting
screen
• Increase or decrease the setting
value
• Adjusting target value (high/low)
during workout
• Shift up or down during T-Ride™ or
T-Road workout
Horizontal
Turning clockwise to choose option
rightward; counterclockwise for leftward
Vertical
Turning clockwise to shift up;
counterclockwise to shift down
Press functions:
• Sport mode confirmation
• Option confirmation under User/
Setting mode
• Confirmation of working item on
setting screen
• Setting value confirmation
• Screen switching between bpm ↔
Nm or bpm ↔ W during workout
• Screen switching between bpm ↔ m
or bpm ↔ ft during T-Ride™
• Screen switching between Video ↔
Profile during T-Road
• Switching to next tutoring mode
during T-Trainer™
• Option confirmation under Music
mode screen
USB Port
Usb port can be used for:
• Service purposes such as software
update.
Note! Format should not be NTFS
Page 10
10
Owner’s manual
•
PLATINUM PRO
Programs
Quick start
• Turn the jog wheel and select
“Quick start“
• Press the jog wheel to confirm and
enter the workout screen quickly
Workout screen
The X axis denote time in minutes
between 0~30. It is updated once every
15 minutes during workout
• During workout, press the jog wheel
button to switch the Y-axis between
Nm↔ bpm.
• The bar chart denotes torque value
Nm. Rotate the jog wheel to adjust
the Nm value.
• The white dot line shows current
position, which moves rightward as
workout time increases. The workout
screen could show 5-hour data at
most.
• The orange curve shows the user’s
actual heart rate, which varies as the
heart rate frequency goes up and
down.
Start up screen
When user interface startup it will show
loading screen as shown below.
After a few seconds this scree will
change into Data reading in progress
screen. Shown below.
After loading the application the user
interface will be show main menu
screen.
Trainer is now ready to start your
workout programming of just select quick
start and begin.
Page 11
GB
Owner’s manual • PLATINUM PRO
11
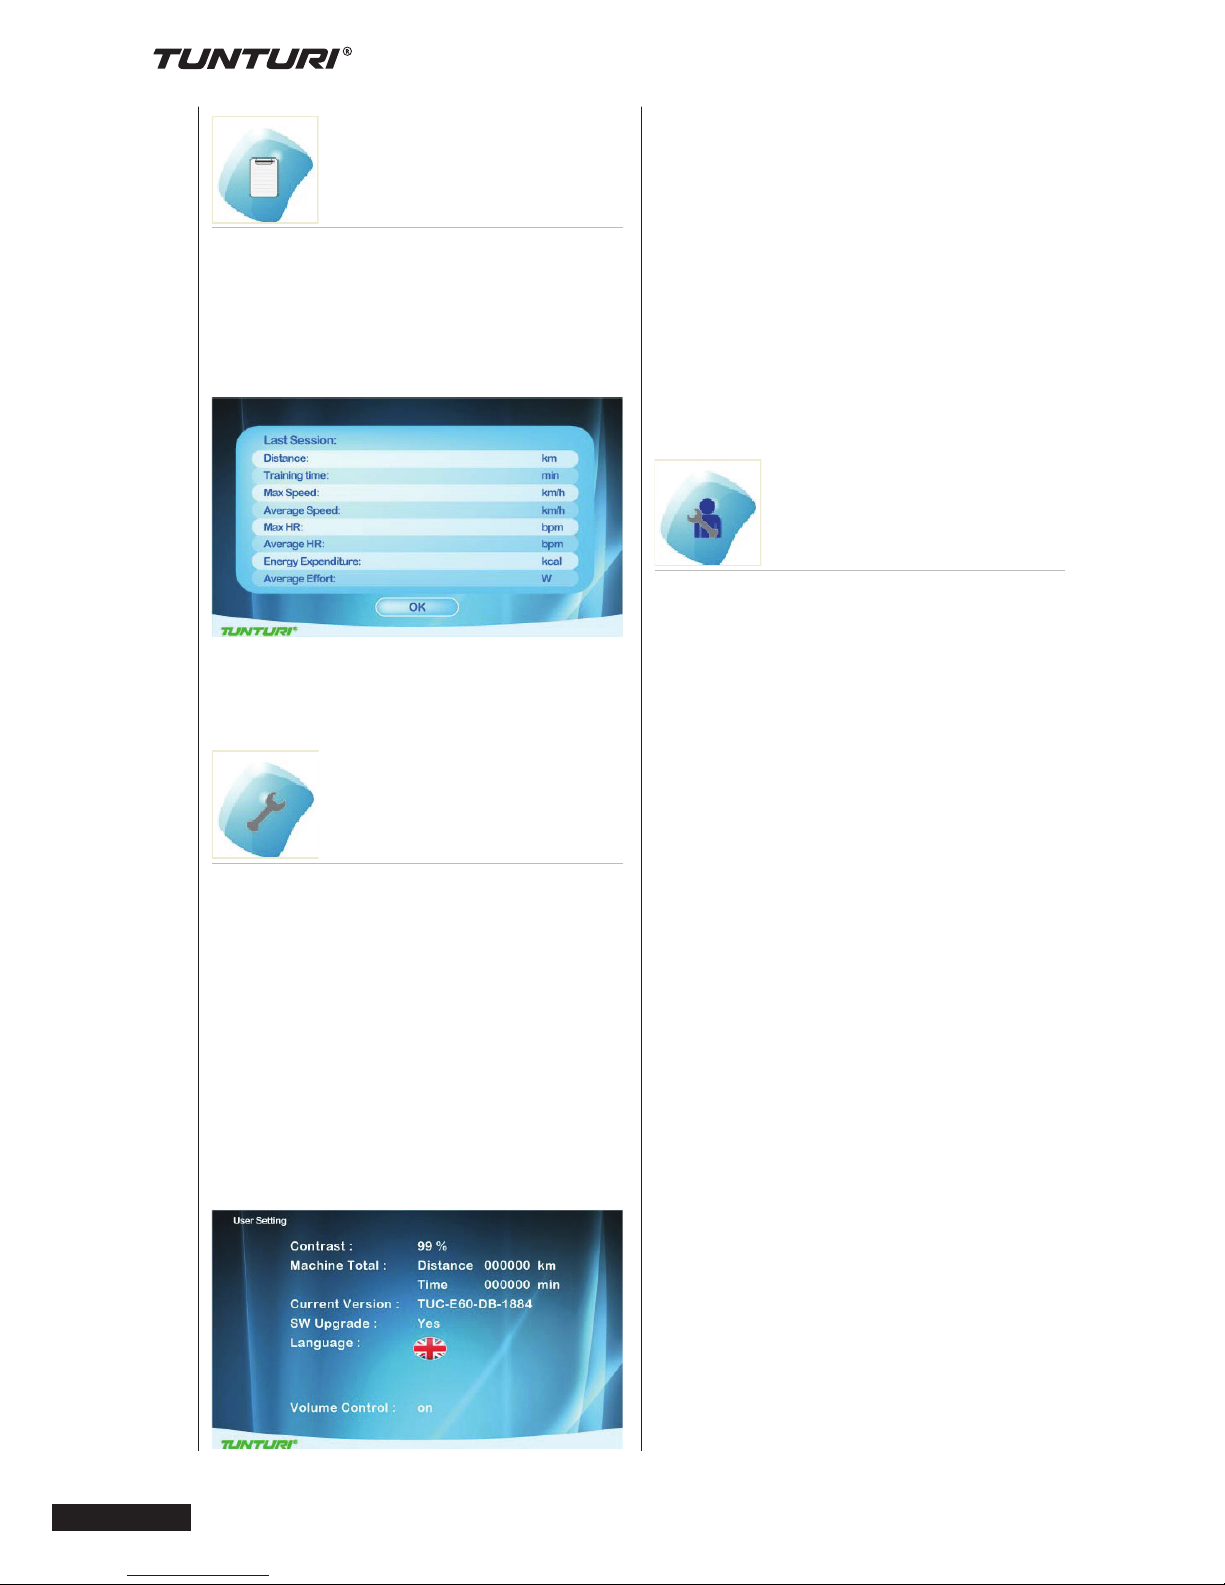
End your workout
The workout end screen pops up when
Back/stop or Main menu is pressed or
when the white dot line reaches the
target value.
Workout end screen
Continue:
Choose ”Continue” to return to workout
screen
Exit:
Choose “Exit” to exit to last session
screen.
Save&Exit:
Choose “Save&Exit” and enter a file
name at the bottom of the screen: use
the jog wheel to select A~Z or 0~9, save
all workout data and name the file for a
new workout mode.
Display the workout data in Last session
screen.
Workout data screen
Press the jog wheel button to return to
main menu.
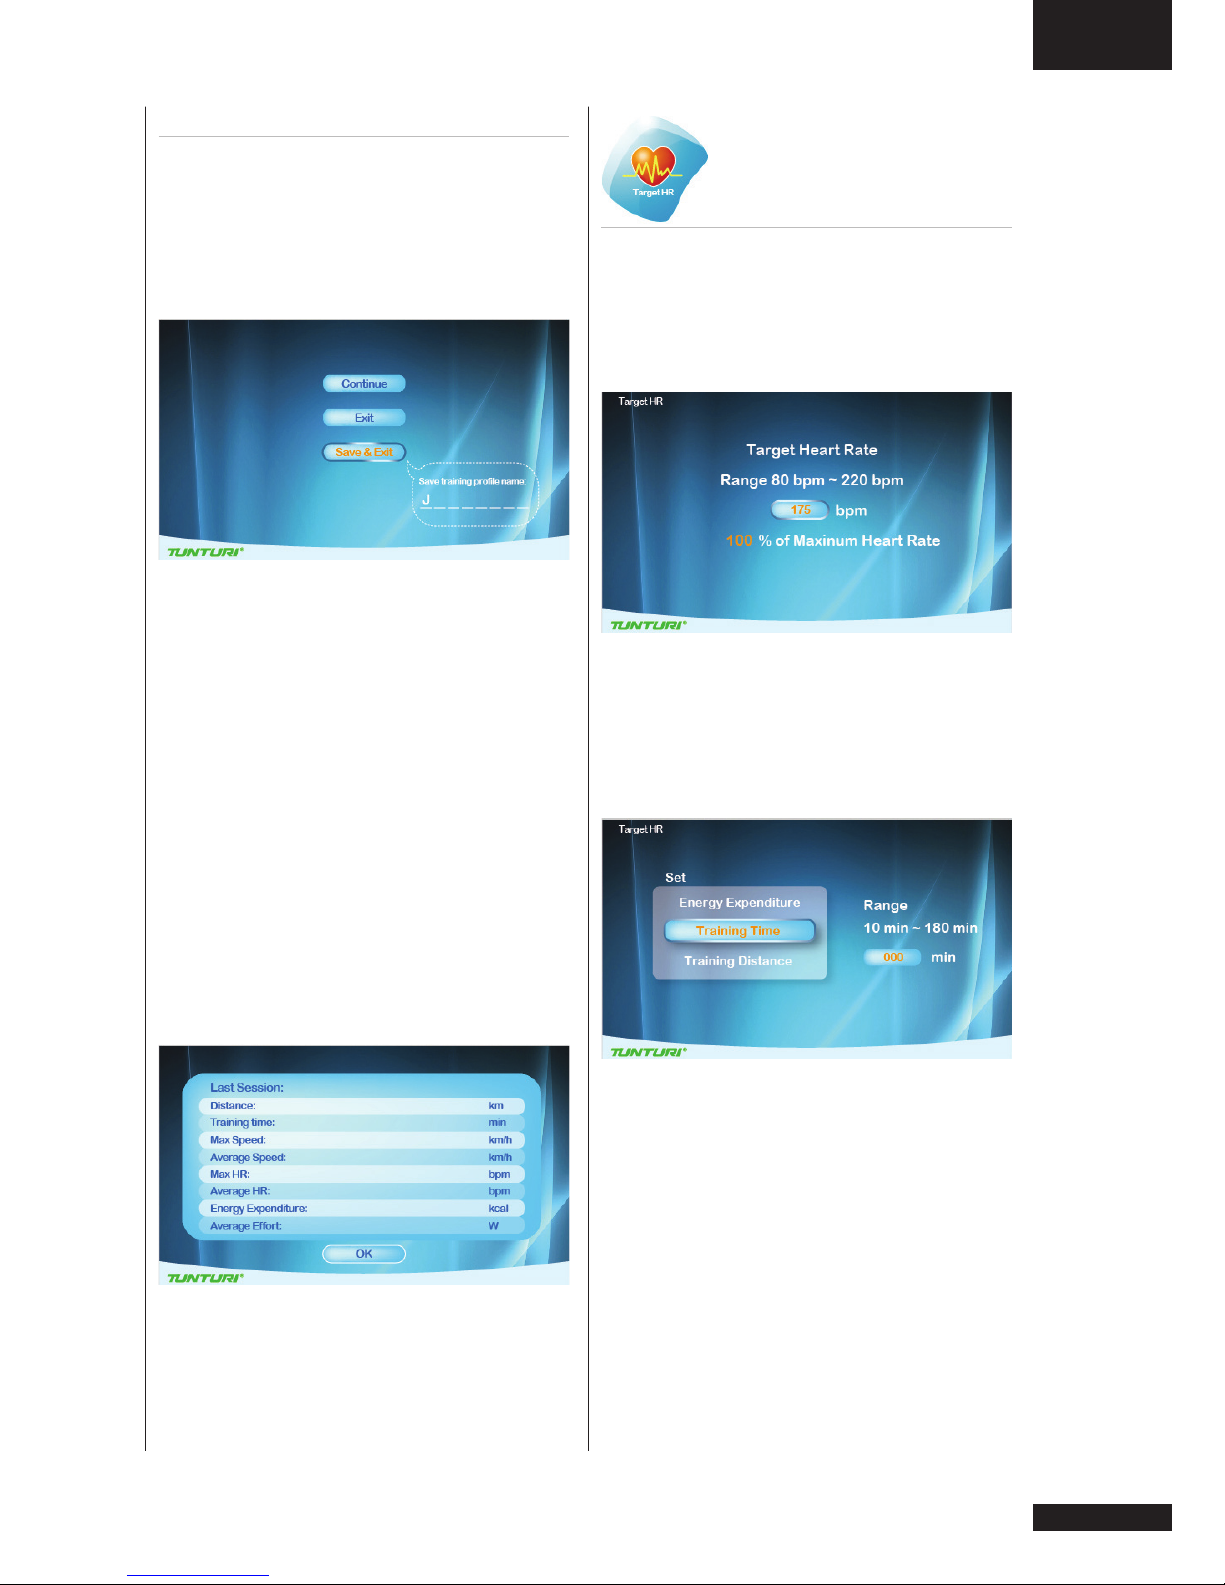
Target heart rate
• Turn the jog wheel and select
“Target HR“
• Press the jog wheel to confirm and
enter the Setting screen (1)
Setting screen (1)
• Turn the jog wheel to adjust target
heart rate value.
(The percentage varies with bpm value)
• Press the jog wheel to confirm and
enter the Setting screen (2)
Setting screen (2)
• Turn jog wheel to select item
• Press the jog wheel button for
confirmation and continue the range
setting at the right.
• Turn jog wheel to change setting
ranges
• Press the jog wheel button to confirm
and enter the Workout screen.
Page 12
12
Owner’s manual
•
PLATINUM PRO
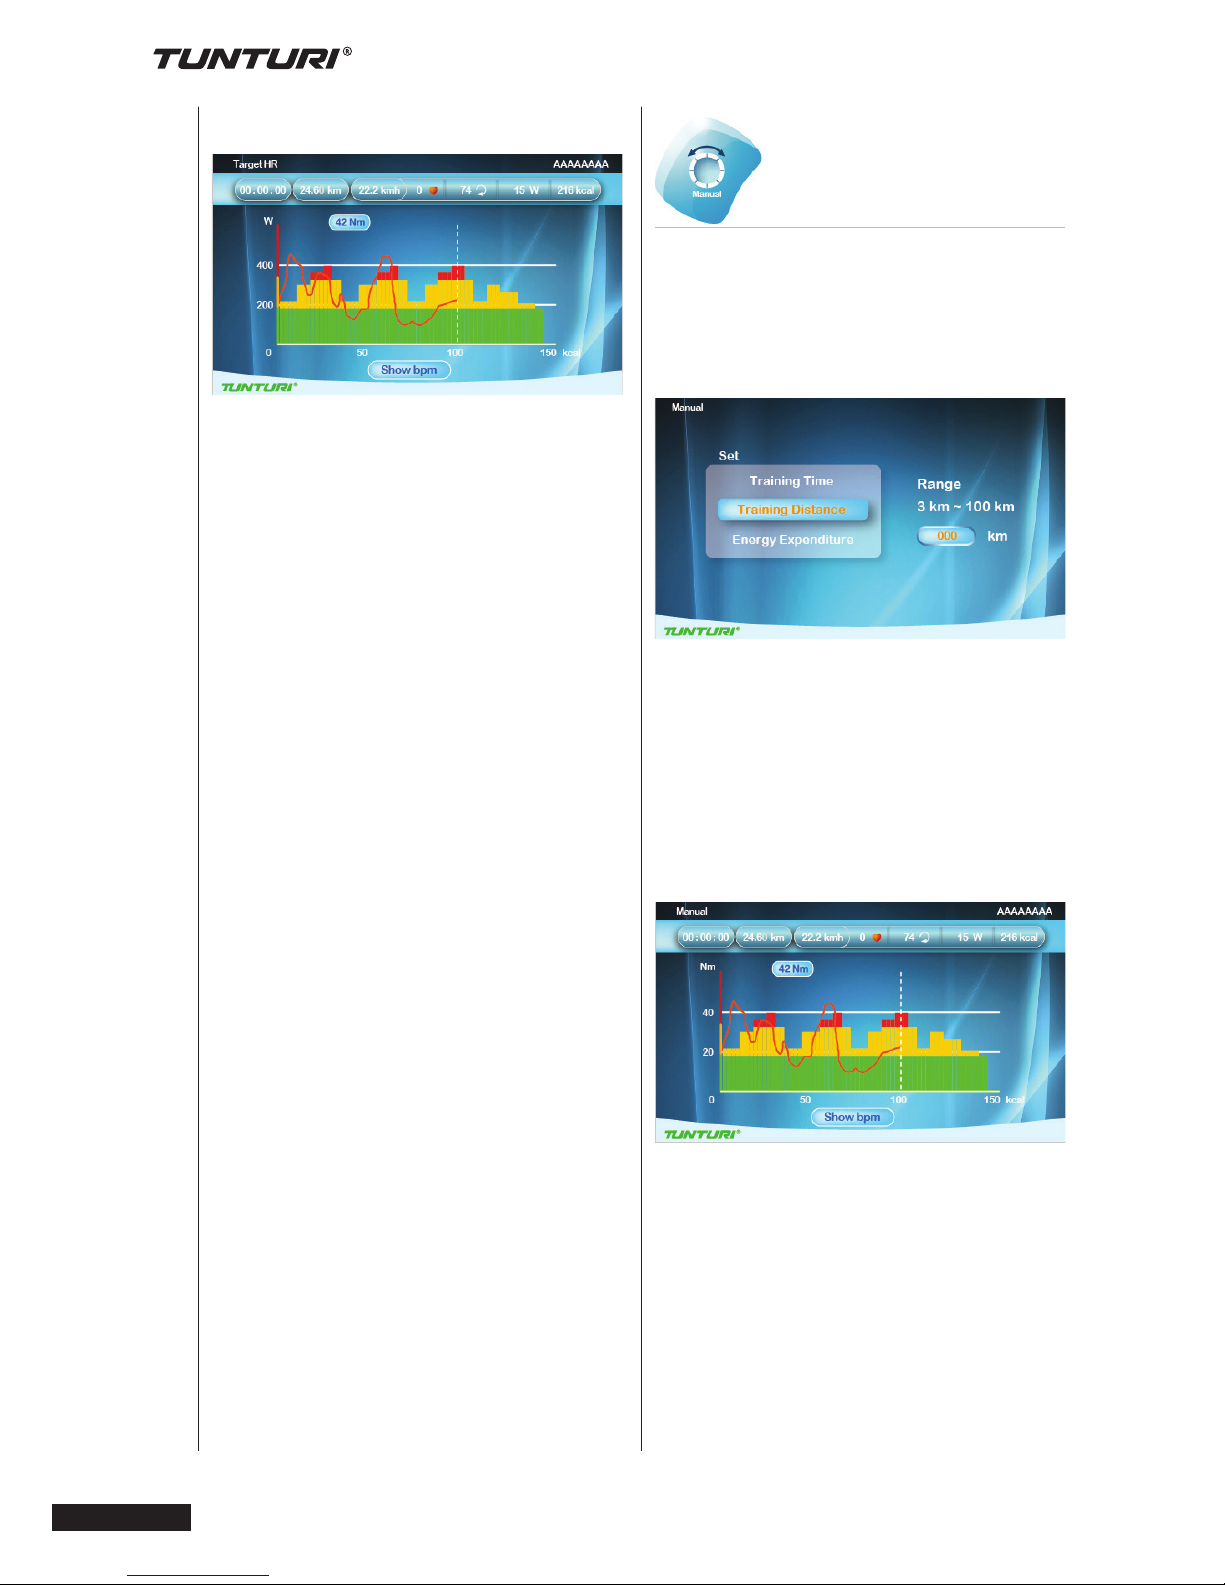
Manual
• Turn the jog wheel and select
“Manual”
• Press the jog wheel to confirm and
enter the Setting screen (1).
Setting screen (1)
• Turn jog wheel to select item
• Press the jog wheel button for
confirmation and continue the range
setting at the right.
• Turn jog wheel to change setting
ranges
• Press the jog wheel button to confirm
and enter the Workout screen.
Workout screen
The X-axis unit is shown according to
the selection of Energy/Time/Distance in
Set screen.
Energy Unit: kcal
Time Unit: min
Distance Unit: km in metric
mile in Imperial
• During workout, press the jog wheel
button to switch the Y-axis between
• Nm↔ bpm
Workout screen
The X-axis unit is shown according to
the selection of Energy/Time/Distance in
Set screen:
Energy Unit: kcal
Time Unit: min
Distance Unit: km in metric
mile in Imperial
• During workout, press the jog wheel
button to switch the Y-axis between
W↔ bpm
• The bar chart denotes target heart
rate value bpm. Rotate the jog wheel
to adjust the target heart rate value.
• The white dot line shows current
position, which moves rightward as
calorie /time/distance increases.
• The orange curve shows the user’s
actual heart rate, which varies as the
heart rate frequency goes up and
down.
• The blue curve shows the actual Watt
value.
• Console programming: Assist the
user to achieve the target according
to its target heart rate input during
workout. When actual heart rate is
higher than target value, the system
would decrease Watt value; while
increases Watt value when actual
heart rate is below target value.
• A message of “No Heart Rate” is
shown if the user’s heart rate is not
detected during workout.
To stop your workout see:
“End your workout”
Page 13

GB
Owner’s manual • PLATINUM PRO
13
• The bar chart denotes torque Nm
value. Rotate the jog wheel to adjust
the Nm value.
• The white dot line shows current
position, which moves rightward as
calorie /time/distance increases.
• The orange curve shows the user’s
actual heart rate, which varies as the
heart rate frequency goes up and
down
To stop your workout see:
“End your workout”
Watt Constant
• Turn the jog wheel and select
“Watt Constant”
• Press the jog wheel to confirm and
enter the Setting screen (1).
Setting screen (1)
• Turn the jog wheel to adjust target
Watt value.
• Press the jog wheel to confirm and
enter the Setting screen (2)
Setting screen (2)
• Turn jog wheel to select item
• Press the jog wheel button for
confirmation and continue the range
setting at the right.
• Turn jog wheel to change setting
ranges
• Press the jog wheel button to confirm
and enter the Workout screen
Workout screen
The X-axis unit is shown according to
the selection of Energy/Time/Distance in
Set screen.
Energy Unit: kcal
Time Unit: min
Distance Unit: km in metric
mile in Imperial
• During workout, press the jog wheel
button to switch the Y-axis between
Nm↔ bpm
• The bar chart denotes the Watt value.
Rotate the jog wheel to adjust the
Watt value
• The white dot line shows current
position, which moves rightward as
calorie /time/distance increases
• The orange curve shows the user’s
actual heart rate, which varies as the
heart rate frequency goes up and
down
• Console programming: Assist the
user to achieve the target according
to its target Watt value input during
workout. When actual Watt value
> target value, the system would
decrease Watt value; while increases
Watt value when actual Watt rate <
target value.
To stop your workout see:
“End your workout”
Page 14
14
Owner’s manual
•
PLATINUM PRO
• Set up the Ending point of Workout:
rotate the jog wheel button to adjust
the right white dot line, press the jog
wheel button for confirmation then
enter the Workout screen.
Workout screen
The X-axis is shown as distance unit, km
in metric and mile in Imperial
• During workout, press the jog wheel
button to switch the Y-axis between
m↔ bpm in metric, ft↔bpm in
imperial
• The white dot line shows current
position, which moves rightward as
distance increases
• The orange curve shows the user’s
actual heart rate, which varies as the
heart rate frequency goes up and
down
• In the right of the screen is the gear
shift from 1~8,
Turn the jog wheel button to switch
• The white icon + 0°in the left bottom
of the screen shows the incline level
and it varies with the Profile incline
level change.
• The Last Session screen shows
workout data. Press the jog wheel
button to return to Main menu
To stop your workout see:
“End your workout”
Preset Programs
• Turn the jog wheel and select
“Preset Programs”
• Press the jog wheel to confirm and
enter the Setting screen (1).
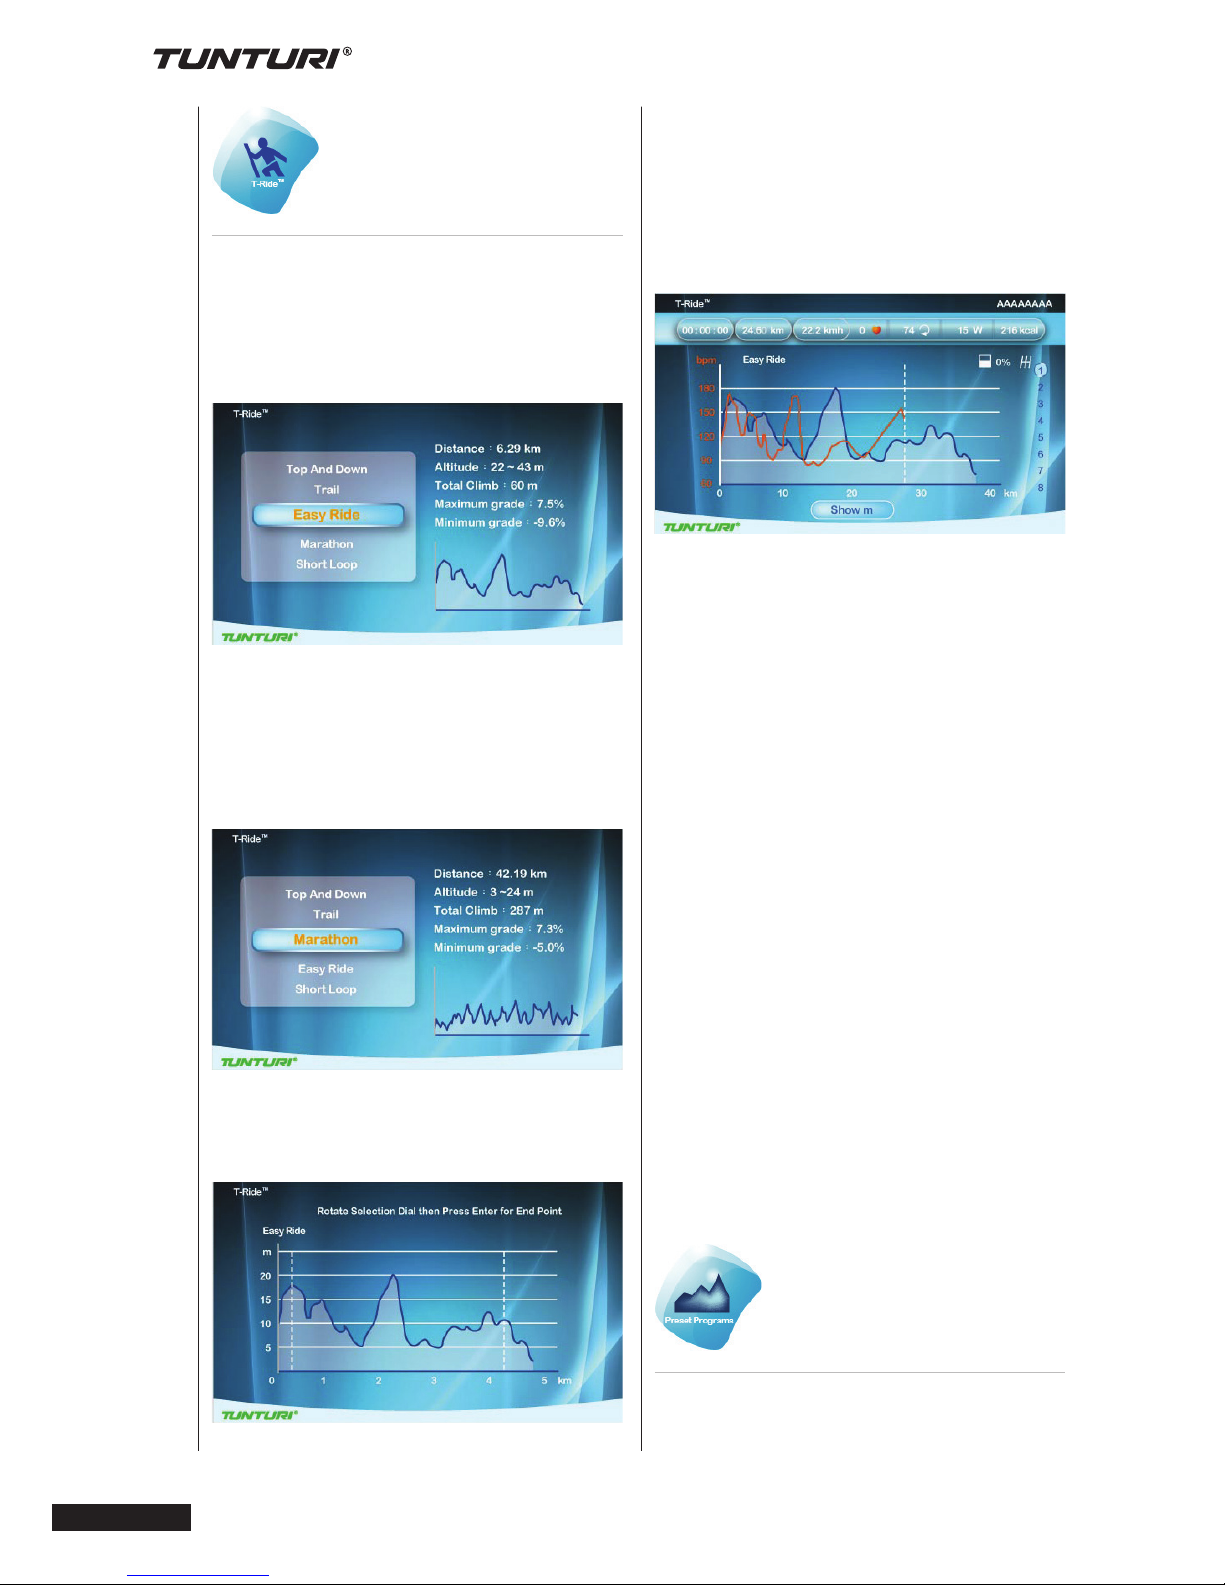
T-Ride
• Turn the jog wheel and select
“T-ride”
• Press the jog wheel to confirm and
enter the Setting screen (1).
Setting screen (1)
• Turn the jog wheel to select between:
Top and Down - Trail - Easy Ride Marathon - Short Loop
• Press the jog wheel to confirm and
enter the Setting screen (2)
Setting screen (2)
• Set up the Startup point of Workout:
rotate the jog wheel button to adjust
the left white dot line, press the jog
wheel button for confirmation.
Page 15

GB
Owner’s manual • PLATINUM PRO
15
Setting screen (1)
• Turn the jog wheel to select between:
• Watt control: Rolling Hills - Hill Climb
- Cross Country - Stamina - Power
Interval items and,
Heart Rate Control: Fat burner 1 Fat burner 2 - Cardio Strength Cardio Climb - Cardio Interval
• Press the jog wheel to confirm and
enter the Setting screen (2)
•
Setting screen (2)
• Turn jog wheel to select item
• Press the jog wheel button for
confirmation and continue the range
setting at the right.
• Turn jog wheel to change setting
ranges
• Press the jog wheel button to confirm
and enter the Workout screen
Workout screen ( Watt Control )
The X-axis unit is shown according to
the selection of Time/Distance in Set
screen:
Time Unit: min
Distance Unit: km in metric
mile in Imperial
• During workout, press the jog wheel
button to switch the Y-axis between
W↔ bpm
• The bar chart denotes the default
target Watt value of the Profile.
Rotate the jog wheel to adjust the
percentage of Profile Watt value in
the right of the white dot line
• The white dot line shows current
position, which moves rightward as
time/distance increases
• The orange curve shows the user’s
actual heart rate, which varies as the
heart rate frequency goes up and
down
• Console Programming is the same as
Watt Constant mode
Workout (Heart Rate Control)
The X-axis unit is shown according to
the selection of Time/Distance in Set
screen:
Time Unit: min
Distance Unit: km in metric
mile in Imperial
• During workout, press the jog wheel
button to switch the Y-axis between
W↔ bpm
• The bar chart denotes the default
target Watt value of the Profile.
Rotate the jog wheel to adjust the
percentage of Profile Watt value in
the right of the white dot line
• The white dot line shows current
position, which moves rightward as
time/distance increases
Page 16

16
Owner’s manual
•
PLATINUM PRO
Setting Screen (1) is for user’s saved
items and training records.
They are shown in the right and left
screen.
• Turn jog wheel to select item
• Press the jog wheel button to confirm
and to open selection window.
Selection window
• Turn the jog wheel and select item
Choose “Replay”
• Press jog wheel button to confirm.
Enter workout screen and continue
the previous training
Choose “Edit”
• Press jog wheel to confirm
• Enter and edit the range setting
• Press jog wheel button to confirm
and to enter workout screen
Choose “Delete”
• Turn jog wheel to select item
• Press the jog wheel button to confirm
and to open selection window.
• Choose Yes to delete selected file,
choose no not delete selected file.
• Press jog wheel button to confirm.
Workout screen:
Workout screen is depending on the
trainings mode you are in.
Nm manual mode
It’s the same as Manual mode
Watt Constant Mode
Its’ the same as Preset programs Watt
Mode
Target HR Mode
It’s the same as Preset programs Heart
Rate Mode
• The orange curve shows the user’s
actual heart rate, which varies as the
heart rate frequency goes up and
down
• The blue curve shows the actual Watt
value
• Console Programming is the same as
Target HR mode
To stop your workout see:
“End your workout”
Own Trainings
• Turn the jog wheel and select
“Preset Programs”
• Press the jog wheel to confirm and
enter the Setting screen (1).
NOTE
When no saved trainings are found
below window will appear.
• Press jog wheel to go back to main
menu
Setting screen (1)
Page 17
GB
Owner’s manual • PLATINUM PRO
17
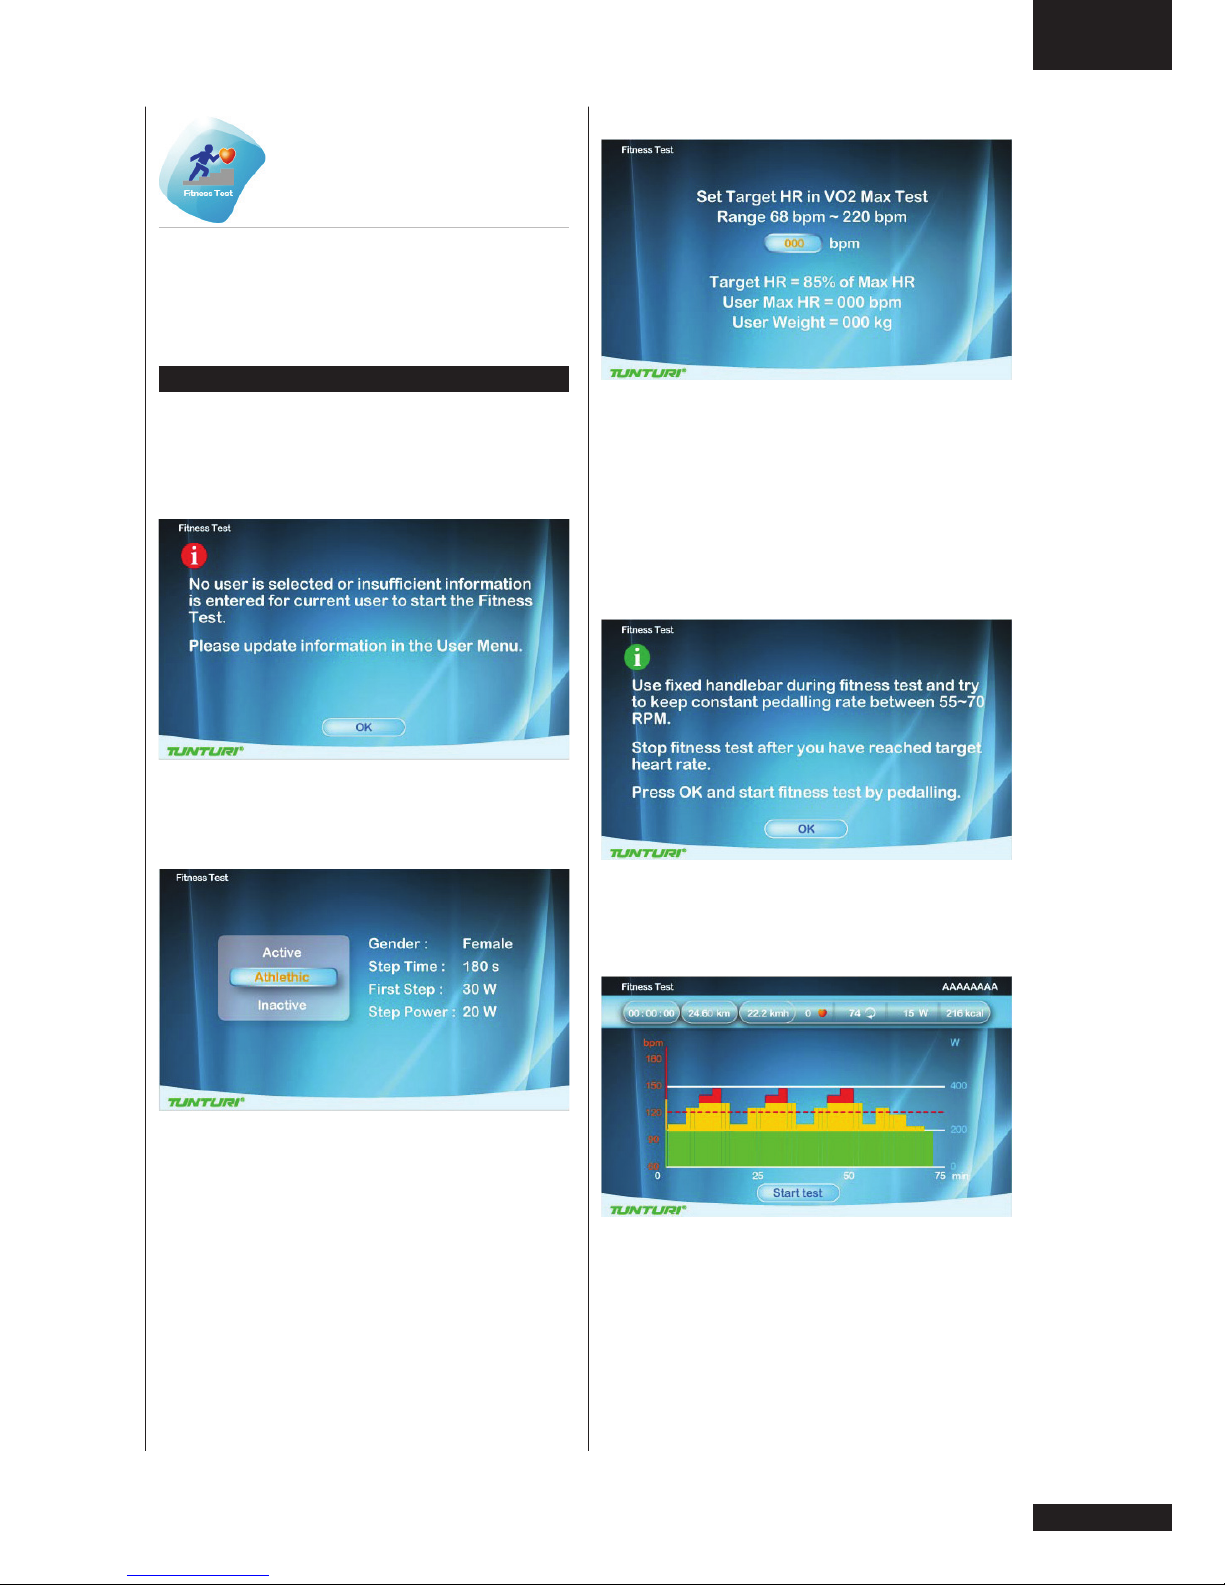
Fitness test
• Turn the jog wheel and select
“Fitness test”
• Press the jog wheel to confirm and
enter the Setting screen (1).
NOTE
User interface needs the user’s data to
process Fitness test, if no any user data
available Fitness test cannot start up.
Below message will pop up.
• Press jog wheel to go back to main
menu
Setting screen (1)
• Turn jog wheel to select item
• (Inactive / Active / Athletic mode)
• Press the jog wheel button to confirm
and to open setting screen (2)
Setting screen (2)
• Turn jog wheel set up user’s target
heart rate within Vo2 Max value.
(The range is between 68~220bpm.)
default: 85% of Max HR and shows
user’s Max HR (bpm) and weight (kg)
• Press the jog wheel button to confirm
and to open information window
Information window
• Press the jog wheel button to confirm
and to open Workout screen.
Workout screen
• The X-axis unit is min
• The Y-axis unit is bpm
• The bar chart denotes the Watt value
of the Profile.
• The white dot line shows current
position, which moves rightward as
time increases, the workout time is 5hour at most then the workout screen
Page 18
18
Owner’s manual
•
PLATINUM PRO
• Press jog wheel to go back to main
menu
To stop your workout see:
“End your workout”
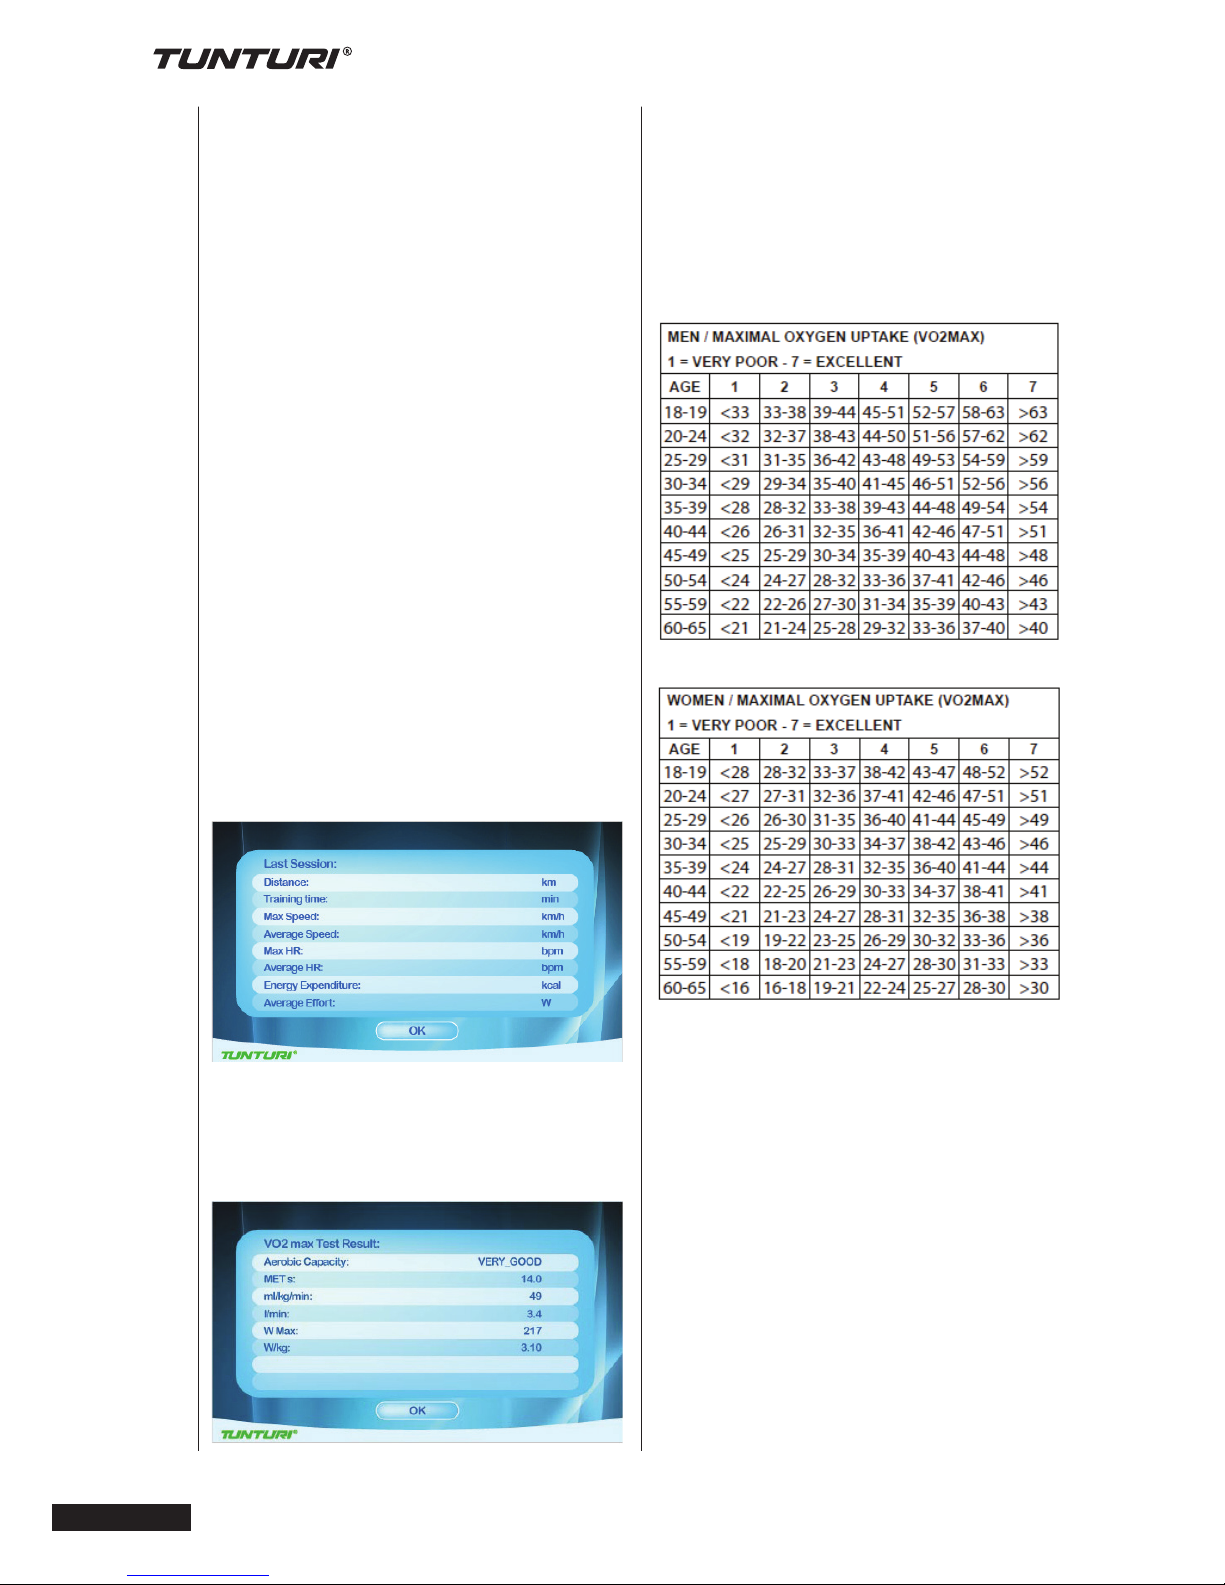
VO2 Max test result table.
leaves
• The orange curve shows the user’s
actual heart rate, which varies as the
heart rate frequency goes up and
down
• The horizontal red dot line shows the
user’s target hear rate value
The screen shows
”Test Failed ! if:
• The workout time is too short
• RPM value is too low
• HR target is not reached
• HR is less than 110 bpm
”No Heart Rate detected”if:
• It doesn’t detect the user’s heart rate
Press Back/stop or Main menu button to
leave the workout screen
“Target HR reached! Stop test or
Continue”
• User has achieves the target.
• Press the jog wheel button to end the
test and show workout data screen
Workout data screen
• Press jog wheel to go to VO2 Max
test result screen
VO2 Max test result screen
Page 19
GB
Owner’s manual • PLATINUM PRO
19
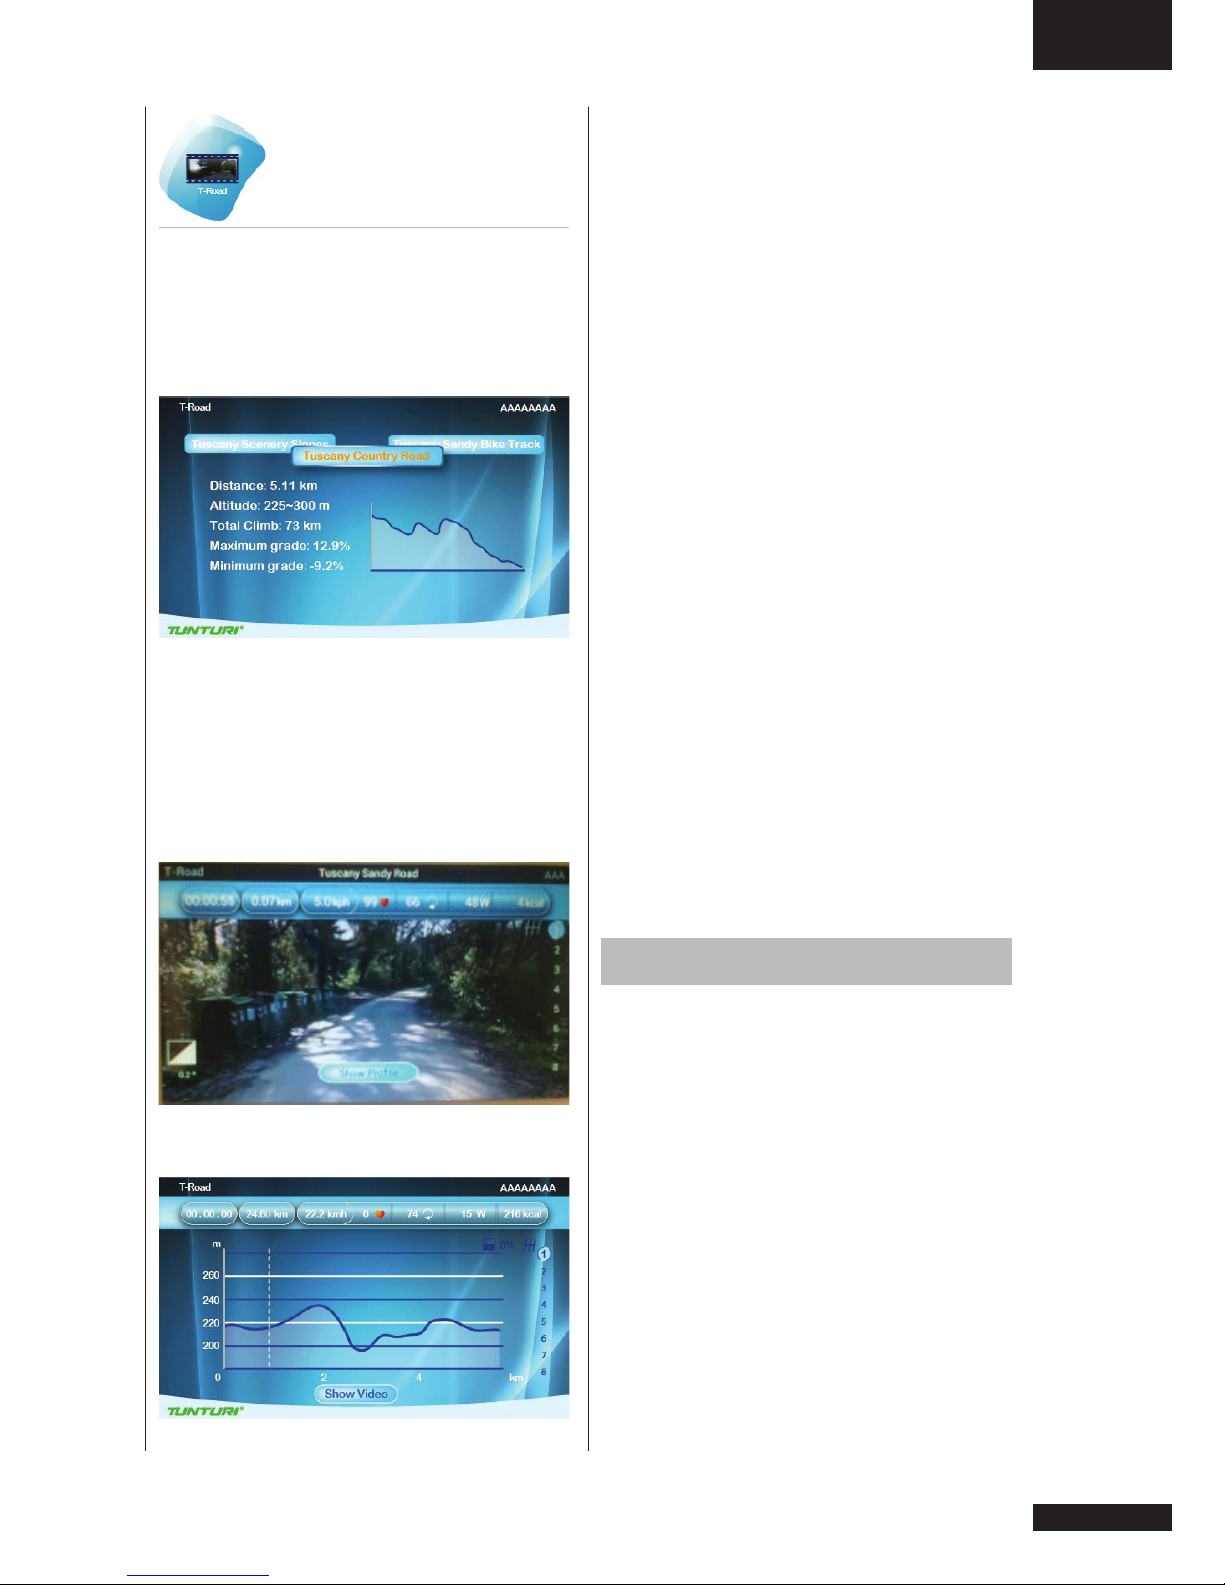
T-Road
• Turn the jog wheel and select
“T-Trainer”
• Press the jog wheel to confirm and
enter the Setting screen (1).
Setting screen (1)
There are 3 selectable tracks available.
Knowing: Tuscany Sandy Road/ Tuscany
Scenrey Road/ Tuscany Country Road.
• Turn the jog wheel and select your
training track
• Press the jog wheel to confirm and
enter the workout video screen.
Press the jog wheel during workout to
switch between Video and Profile screen
• The X-axis is shown as distance unit,
km in metric and mile in Imperial
• The Y-axis unit is m in metric and ft in
Imperial
• Press the Jog wheel during workout
to switch between Video ↔ Profile
screen
In profile screen:
• The white dot line shows current
position, which moves rightward as
workout time increases.
• The orange curve shows the user’s
actual heart rate, which varies as the
heart rate frequency goes up and
down
In video screen:
• In the right of the screen is the gear
shift from 1~8, use the jog wheel
button to switch
• The white icon + 0°in the left bottom
of the screen shows the incline level
and it varies with the Profile incline
level change.
• Press Back/stop, Main menu or the
white dot line reaches the target
value can leave the workout screen
To stop your workout see:
“End your workout”
User settings
Press “User/Settings” button to enter
the User/Settings main menu.
• Use the jog wheel to select one of the
six available items.
• Press the jog wheel button for
confirmation to enter the selected
item setting screen
Page 20
20
Owner’s manual
•
PLATINUM PRO
How to modify settings
• Turn jog wheel to select changeable
item.
• Press jog wheel to open selected
item in right side of the screen for
edit..
• Turn jog wheel to change value of
selected.
• Press jog wheel to confirm change.
• Turn jog wheel to select next item, or
use Back/ Stop button to go back to
setting menu.
Edit User
By selecting the Edit User you can:
Edit:
User name:
• Turn jog wheel and select “Name”
• Press jog wheel to open “Name”edit.
• Turn jog wheel to select letter
• Press jog wheel to confirm
• Turn jog wheel to select next letter
• When name is edit correctly than
select “√” to confirm name and go
back to Edit user Menu
Units, Display
• Turn jog wheel and select “Units”
• Press jog wheel to open “Units” edit
• Turn jog wheel to select
Metric: show units in km/kph/Kcal
Imperial: show units in mile/mph/kcal
• Press jog wheel to confirm and go
back to Edit user Menu
Display
• Turn jog wheel and select “Display”
• Press jog wheel to open “Display”
edit
• Turn jog wheel to select
Count up: preset time/ distance will
be counting up
Count Down: preset time/ distance
will be counting down.
• Press jog wheel to confirm and go
back to Edit user Menu
Gender
• Turn jog wheel and select “Gender”
• Press jog wheel to open “Gender”
edit
• Turn jog wheel to select Male/
Female
• Press jog wheel to confirm and go
back to Edit user Menu
User Log
By selecting the “User Log” you can:
view the training data of the selected
user.
You can view either the last training
session data or a summary of all the
user’s sessions.
Exit the training data by pressing
BACK/STOP.
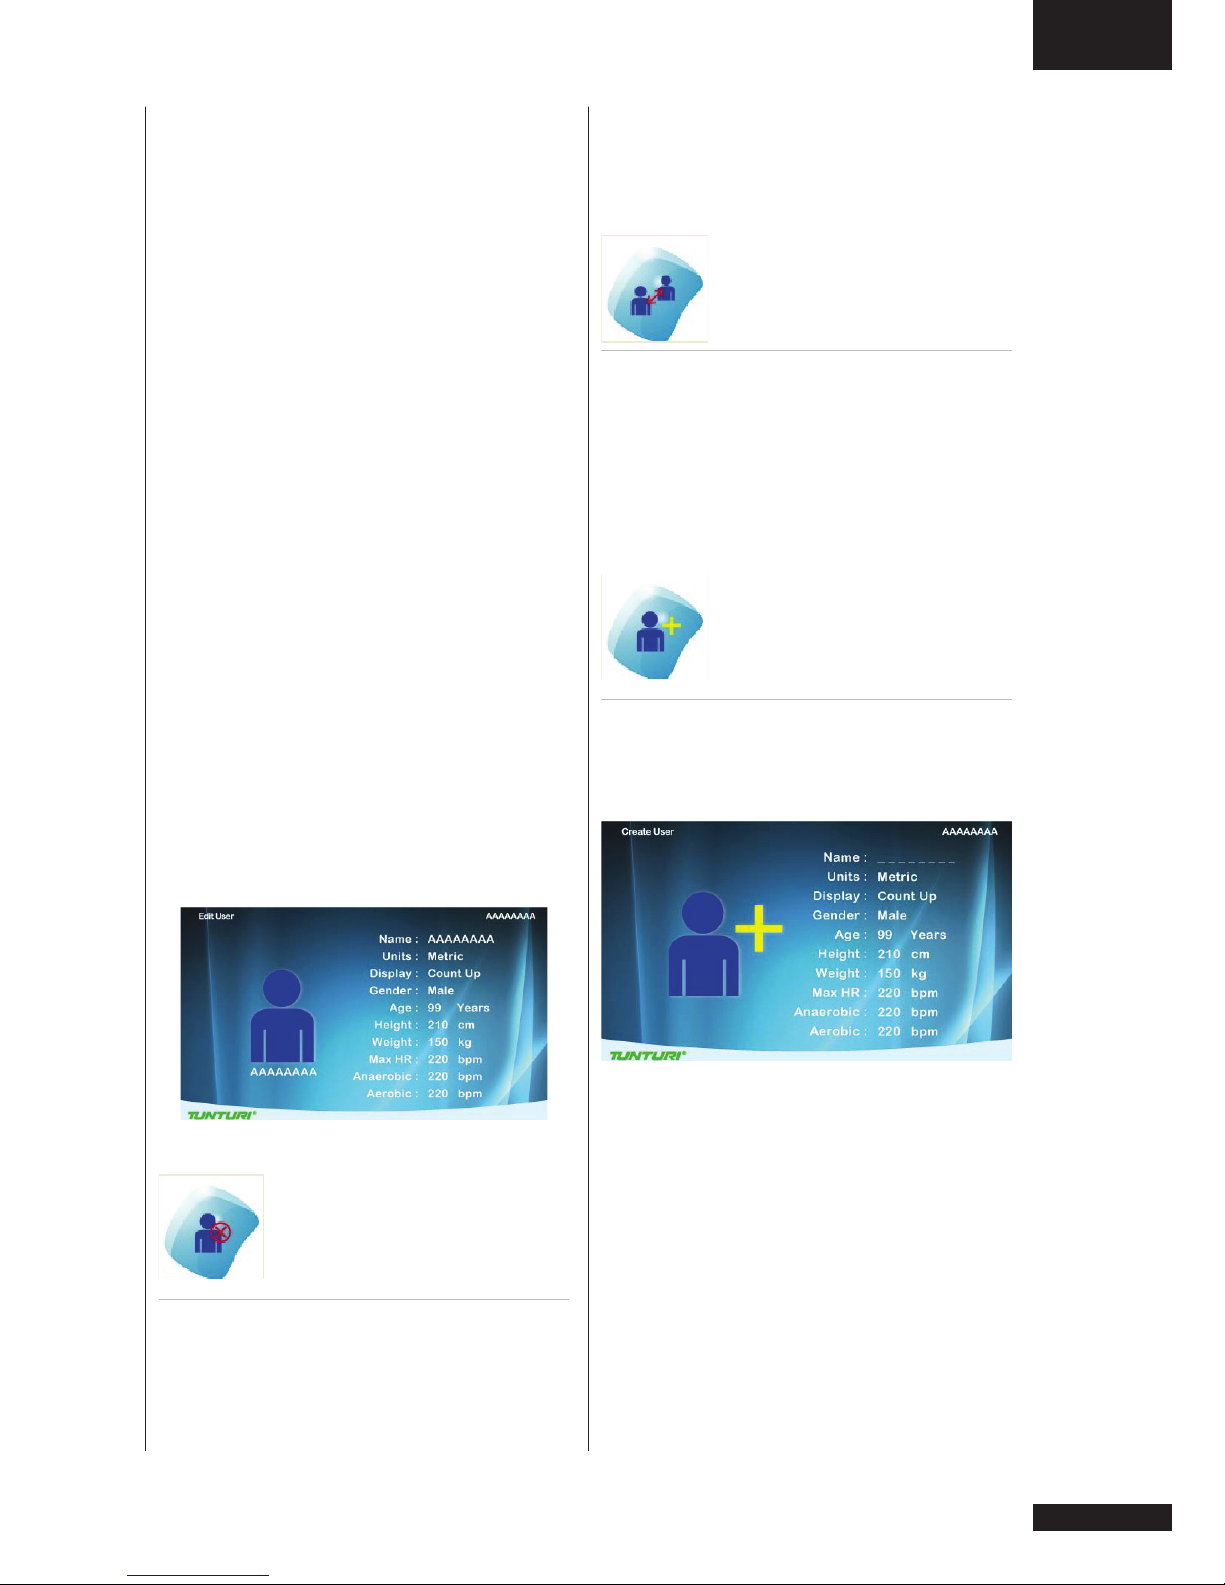
User Setting
By selecting the “User Setting” you can:
• Adjust the brightness (Default=50%)
• Check the total mileages of the
machine.
• Check the total used time for the
machine.
• Check the default firmware and
software version of Console
• Change language
• Select button beep sound on(yes) or
off (NO)
User setting window.
Page 21
GB
Owner’s manual • PLATINUM PRO
21
Age
• Turn jog wheel and select “Age”
• Press jog wheel to open “Age” edit
• Turn jog wheel to change age
• Press jog wheel to confirm and go
back to Edit user Menu
Height
• Turn jog wheel and select “Height”
• Press jog wheel to open “Height” edit
• Turn jog wheel to change Height
In cm when units in Metric
In ft/inch when units in Imperial.
• Press jog wheel to confirm and go
back to Edit user Menu
Weight
• Turn jog wheel and select “Weight”
• Press jog wheel to open “Weight” edit
• Turn jog wheel to change Weight
In kg when units in Metric
In lbs when units in Imperial.
• Press jog wheel to confirm and go
back to Edit user Menu
Max HR
• Turn jog wheel and select “Max HR”
• Press jog wheel to open “Max HR”
edit
• Turn jog wheel to change default max
HR preset as:
when selected Male : 220-age
when selected female : 226-age
• Press jog wheel to confirm and go
back to Edit user Menu
Delete User
By selecting the “Delete User” you can:
Delete a user and all its data.
• Turn jog wheel and select the user
you want to delete
• Press jog wheel to delete the
selected user and go back to setting
menu.
User will be deleted without further
prompting
Change User
By selecting the “Change User” you can:
Select an other preset user profile.
• Turn jog wheel and select the user
you want to activate
• Press jog wheel to confirm the
selected user and go back to setting
menu.
Create User
By selecting the “Create User” you can
set up a new user profile. Maximum of 8
users can be installed.
See Edit user on how to create user.
Page 22
22
Owner’s manual
•
PLATINUM PRO
For someone who is 40 years old their
target heart rate zone is calculated:
220 – 40 = 180 (maximum heart rate)
180 x .6 = 108 beats per minute (60% of
maximum)
180 X .7 = 126 beats per minute (70% of
maximum)
So for a 40 year old the training zone
would be 108 to 126 beats per minute.
How to wear your wireless chest
strap transmitter:
• Attach the transmitter to the elastic
strap using the locking parts.
• Adjust the strap as tightly as possible
as long as the strap is not too tight to
remain comfortable.
• Position the transmitter with the logo
centred in the middle of your body
facing away from your chest (some
people must position the transmitter
slightly left of centre). Attach the final
end of the elastic strap by inserting
the round end and, using the locking
parts, secure the transmitter and
strap around your chest.
• Position the transmitter immediately
below the pectoral muscles.
• Sweat is the best conductor to
measure very minute heart beat
electrical signals. However, plain
water can also be used to pre-wet
the electrodes (2 black square areas
on the reverse side of the belt and
either side of transmitter). It’s also
recommended that you wear the
transmitter strap a few minutes
before your work out. Some users,
because of body chemistry, have
a more difficult time in achieving
a strong, steady signal at the
beginning. After “warming up”, this
problem lessens. As noted, wearing
clothing over the transmitter/strap
doesn’t affect performance.
• Your workout must be within range distance between transmitter/receiver
- to achieve a strong steady signal.
The length of range may vary some
what but generally stay close enough
Heart Rate Training
A word about Heart Rate:
The old motto, “no pain, no gain”, is a
myth that has been overpowered by the
benefits of exercising
comfortably. A great deal of this success
has been
promoted by the use of heart rate
monitors. With the proper use of a heart
rate monitor, many people find that their
usual choice of exercise intensity was
either too high or too low and exercise is
much more enjoyable by
maintaining their heart rate in the desired
benefit range.
To determine the benefit range in
which you wish to train, you must first
determine your Maximum Heart Rate.
This can be accomplished by using the
following formula: 220 minus your age.
This will give you the Maximum heart
rate (MHR) for someone of your age. To
determine the effective heart rate range
for specific goals you simply calculate
a percentage your MHR. Your Heart
rate training zone is 50% to 90% of your
maximum heart rate. 60% of your MHR
is the zone that burns fat while 70% is
for strengthening the cardio vascular
system. This 60% to 70% is the zone to
stay in for maximum benefit.
Page 23

GB
Owner’s manual • PLATINUM PRO
23
to the console to maintain good,
strong, reliable readings. Wearing
the transmitter immediately against
bare skin assures you of proper
operation. If you wish, you may wear
the transmitter over a shirt. To do so,
moisten the areas of the shirt that the
electrodes will rest upon.
NOTE!
The transmitter is automatically activated
when it detects activity from the user’s
heart. Additionally, it automatically
deactivates when it does not receive any
activity. Although the transmitter is water
resistant, moisture can have the effect
of creating false signals, so you should
take precautions to completely dry the
transmitter after use to prolong battery
life (estimated transmitter battery life
is 2500 hours). If your chest strap has
a replaceable battery the replacement
battery is Panasonic CR2032.
Caution!
Do not use this trainer for Target Heart
Rate unless a steady, solid Actual Heart
Rate value is being displayed. High,
wild, random numbers being displayed
indicate a problem.
1. Areas to look at for interference,
which may cause erratic heart rate:
2. Microwave ovens, TVs, small appliances, etc.Fluorescent lights.
3. Some household security systems.
4. Perimeter fence for a pet.
5. Some people have problems with the
transmitter picking up a signal from
their skin. If you have problems try
wearing the transmitter upside down.
Normally the transmitter will be oriented so the logo is right side up.
6. The antenna that picks up your heart
rate is very sensitive. If there is an
outside noise source, turning the
whole machine 90 degrees may
de-tune the interference.
7. If you continue to experience problems contact your dealer.
Exercising
Working out with this device is excellent
aerobic exercise, the principle being that
the exercise should be suitably light,
but of long duration. Aerobic exercise
is based on improving the body’s
maximum oxygen upteke, which in turn
improves endurance and fitness. The
ability of the body to burn fat as a fuel is
directly dependent on its oxygen-uptake
capacity. Aerobic exercise should be
above all pleasant. You should work up a
light sweat but you should not get out of
breath during the workout.
You should exercise at least three times
a week, 30 minutes at a time, to reach
a basic fitness level Maintaining this
level requires a few exercise sessions
each week. Once the basic condition
has been reached, it is easily improved,
simply by increasing the number of
exercise sessions. You should start
slowly at a low pedalling speed and low
resistance, because for an overweight
person strenuous exercise may subject
the heart and circulatory system to
excessive strain. As fitness improves,
resistance and pedalling speed can be
increased gradually.
Maintenance
The equipment requires very little
maintenance. Check, however, from
time-to-time that all screws and nuts are
tight.
• After exercising, clean the equipment
with a soft, absorbent cloth.
Do not use solvents.
• Never remove the equipment’s
protective casing.
The electromagnetic brake forms a
magnetic field that
may damage the mechanism of a watch,
or the magnetic identification strip on a
credit or cash card, should they come
into immediate contact with the magnets.
Page 24

24
Owner’s manual
•
PLATINUM PRO
Never attempt to detach or remove the
electromagnetic brake!
The electromagnetic brake is based on
electromagnetic resistance; resistance
level is electronically measured and
shown as watt reading on the display.
Due to the measurement system, your
Tunturi ergometer need not be recalibrated when assembled, serviced
and used according to this Owner’s
Manual.
Troubleshooting
Despite continuous quality control,
defects and malfunctions caused by
individual components may occur
in the equipment. In most cases it’s
unnecessary to take the whole device
in for repair, as it’s usually sufficient
to replace the defective part. If the
equipment does not function properly
during use, contact your Tunturi dealer
immediately. Always give the model and
serial number of your equipment. Please
state also the nature of the problem,
conditions of use and purchase date.
If you require spare parts, always
give the model, serial number of your
equipment and the spare part number
for the part you need. The spare part list
is at the back of this manual. Use only
spare parts mentioned in the spare part
list.
Moving and storage
Please follow these instructions when
carrying and moving the equipment
about, because lifting it incorrectly may
strain your back or risk other accidents:
For transportation or moving of the
device, two grown-ups are needed.
Remain standing in front of the device
on each side and take a sturdy grip at
the handles. Lift the rear of the device
so as to lift the front of the device on the
wheels. Move the device and carefully
put it down to its new place. To prevent
the equipment malfunctioning, store in
a dry place with as little temperature
variation as possible and protected from
dust.
NOTE!
Transport the equipment with caution
over uneven surfaces, for example over
a step. The equipment should never be
transported upstairs using the wheels
over the steps, instead it must be
carried. We recommend that you use a
protective base when transporting the
equipment.
NOTE!
The instructions must be followed
carefully in the assembly, use and
maintenance of your equipment. The
warranty does not cover damage due to
negligence of the assembly, adjustment
and maintenance instructions described
herein. Changes or modifications not
expressly approved by Tunturi New
Fitness BV. will void the user’s authority
to operate the equipment!
WE WISH YOU MANY ENJOYABLE
TRAININGS WITH YOUR NEW
TUNTURI TRAINING PARTNER!
Page 25

D
betriebsanleitung • PLATINUM PRO
25
Welcome ....................................... 25
Warnhinweise zur Sicherheit ...... 26
Elektrische Sicherheit ........................ 27
Montageanweisungen ................. 28
Schritt 1: ............................................ 28
Schritt 2: ............................................ 29
Schritt 3: ............................................ 30
Schritt 4: ............................................ 31
User interface .............................. 32
Drehschalter und Tasten .................... 32
Bildschirm Starten .............................. 33
Programme................................... 33
Schnellstart ......................................... 33
Beenden des Trainings ....................... 34
Zieherzfrequenz.................................. 34
Manuell ............................................... 35
Wattsteuerung .................................... 36
T-Ride ................................................. 37
Preset Programme ............................. 38
Eigenes Training ................................. 39
Fitnesstest .......................................... 40
T-Road ................................................ 42
Benutzer-einstellungen ............... 43
Benutzerprotokoll................................ 43
Benutzer bearbeiten ........................... 43
Bearbeiten .......................................... 44
Benutzer Löschen............................... 45
Benutzer ändern ................................. 45
Benutzer erstellen............................... 45
Herzfrequenztraining ................... 45
Herzfrequenzsender verwenden ........ 46
Trainieren ..................................... 47
Wartung ........................................ 47
Betriebsstörungen .............................. 48
Moving and storage ............................ 48
Welcome
Herzlich willkommen in der welt des
trainierens mit tunturi!
Durch Ihren Kauf haben Sie bewiesen,
dass Ihnen Ihre Gesundheit und Ihre
Kondition viel wert sind; auch haben Sie
gezeigt, dass Sie Qualität zu schätzen
wissen. Mit einem Tunturi-Fitnessgerät
haben Sie sich für ein hochwertiges,
sicheres und motivierendes Produkt als
Trainingspartner entschieden. Welches
Ziel Sie auch immer mit Ihrem Training
verfolgen, wir sind sicher, dass Sie
es mit diesem Fitnessgerät erreichen.
Hinweise zu Ihrem Trainingsgerät und
zum effektiven Training damit finden Sie
auf der Internetseite von Tunturi
www.tunturi.com.
Contents
Deutsch
Diese deutsche Bedienungsanleitung ist
eine Übersetzung des englischen Textes.
Es können keine Rechte auf diese
Übersetzung abgeleitet werden.
Page 26

26
betriebsanleitung
•
PLATINUM PRO
• Das Gerät sollte grundsätzlich nur
von einer Person benutzt werden.
• Das Gerät daft nur in Innenräumen
benutzt werden.
• Das Gerät auf möglichst ebenen
Untergrund stellen.
• Stützen Sie sich nie gegen das
Benutzerinterface ab!
• Bedienen Sie die Tasten mit der
Fingerkuppe. Ein Fingernagel
kann die Membrane der Tasten
beschädigen.
• Das Gerät nie ohne die Abdeckungen
benutzen.
• Dieses Gerät ist nicht für den
Einsatz in Feuchträumen (Sauna,
Schwimmbad) vorgesehen.
• Beim Training muss die
Umgebungstemperatur zwischen
+10°C und +35°C liegen. Zur
Aufbewahrung kann das Gerät
bei Temperaturen zwischen -15°C
und +40°C gelagert werden. Die
Luftfeuchtigkeit darf nie 90 %
überschreiten.
• Vor Beginn des Trainings
sicherstellen, dass das Gerät völlig
intakt ist. Auf keinen Fall mit einem
fehlerhaften Gerät trainieren.
• Zum Auf-und Absteigen am Lenker
abstützen. Nicht auf das Gehäuse
treten.
• Zur Benutzung des Gerätes stets
angemessene Kleidung und
Schuhwerk tragen.
• Nie die Hände in die Nähe von
beweglichen Teilen bringen.
• Zur Vermeidung von Muskelkater
Auf- und Abwärmtraining nicht
vergessen.
• Keine anderen als die in dieser
Betriebsanleitung beschriebenen
Wartungsmassnahmen und
Einstellungen vornehmen. Die
angegebenen Wartungsanweisungen
sind einzuhalten.
• Das Gerät darf nicht von Personen
benutzt werden, deren Gewicht über
150 kg liegt.
• Nähere Informationen zur Garantie
auf Ihr Fitnessgerät finden Sie im
dem Gerät beiliegenden Garantieheft.
Für Schäden, die durch Missachtung
der beschriebenen Einstellungs- und
Wartungsanweisungen entstehen,
Warnhinweise zur
Sicherheit
Dieses Handbuch ist ein wesentlicher
Bestandteil Ihrer Trainingsausrüstung.
Lesen Sie dieses Handbuch bitte
sorgfältig durch, bevor Sie Ihr
Trainingsgerät montieren, mit ihm
trainieren oder es warten. Bitte
bewahren Sie dieses Handbuch; es
wird Sie jetzt und zukünftig darüber
informieren, wie Sie Ihr Gerät benutzen
und warten. Befolgen Sie diese
Anweisungen immer sorgfältig.
• Vor Beginn eines
Trainingsprogrammes einen Arzt
konsultieren.
• Bei Übelkeit, Schwindelgefühl oder
anderen anomalen Symptomen sollte
das Training sofort abgebrochen und
unverzüglich ein Arzt aufgesucht
werden.
• Dieses Gerät hat ein geschwindigkeitsabhängiges Bremssystem, d.h.
je schneller Sie trainieren, desto
höher ist die Belastung.
• Aufgrund des natürlichen Spieltriebes
und der Experimentierfreudigkeit
der Kinder können Situationen
und Verhaltensweisen entstehen,
für die das Trainingsgerät weder
gebaut noch abgesichert ist und
die eine Verantwortung seitens
des Herstellers ausschliessen.
Wenn Sie dennoch Kinder an das
Trainingsgerät lassen, müssen
Sie deshalb deren geistige und
körperliche Entwicklung und
vor allem deren Temperament
berücksichtigen, sie gegebenenfalls
beaufsichtigen und sie vor allem auf
die richtige Benutzung des Gerätes
hinweisen.
• Vergewissern Sie sich, dass während
des Trainings oder beim Bewegen
des Geräts kein Haustier in der Nähe
ist.
• Bitte beachten Sie beim Aufstellen
des Gerätes, dass in jede Richtung
wenigstens 100 cm Freiraum
vorhanden ist.
Page 27

D
betriebsanleitung • PLATINUM PRO
27
Netzstecker in die Wandsteckdose
eingesteckt ist.
• Ziehen Sie nicht am Netzkabel,
um den Netzstecker aus der
Wandsteckdose zu ziehen.
• Ziehen Sie den Netzstecker aus
der Wandsteckdose, wenn das
Gerät nicht verwendet wird, bevor
es zusammengebaut oder zerlegt
wird sowie vor der Reinigung und
Wartung.
Speichern Sie diese Anleitung!
besteht kein Garantie-Anspruch!
• Lassen Sie niemals einen
Gegenstand in eine der Öffnungen
fallen.
• Nicht unter freiem Himmel
verwenden.
• Drücken Sie nicht mit Gewalt auf
die Konsolen-Steuerungstasten.
Diese sind so eingestellt, dass sie
auf leichten Fingerdruck reagieren.
Wenn Sie stärker darauf drücken,
wird das Gerät weder schneller noch
langsamer. Wenn Sie das Gefühl
haben, dass diese Tasten nicht richtig
funktionieren, wenden Sie sich bitte
an Ihren Händler.
Elektrische Sicherheit
(betrifft nur elektrisch betriebene Geräte)
• Vergewissern Sie sich vor der
Verwendung stets, dass die
Netzspannung mit der Spannung
auf dem Typenschild des Geräts
übereinstimmt.
• Verwenden Sie kein
Verlängerungskabel.
• Halten Sie das Netzkabel von Hitze,
Öl und scharfen Kanten fern.
• Verändern Sie nichts am Netzkabel
oder am Netzstecker
• Verwenden Sie das Gerät nicht, falls
das Netzkabel oder der Netzstecker
• beschädigt oder defekt ist. Ist das
Netzkabel oder der Netzstecker
beschädigt oder defekt, wenden Sie
sich an Ihren Händler.
• Wickeln Sie das Netzkabel immer
vollständig ab.
• Lassen Sie das Netzkabel nicht unter
dem Gerät entlanglaufen. Lassen
Sie das Netzkabel nicht unter einem
Teppich entlanglaufen. Stellen
Sie keine Gegenstände auf das
Netzkabel.
• Vergewissern Sie sich, dass das
Netzkabel nicht über der Kante eines
Tisches hängt. Vergewissern Sie
sich, dass niemand versehentlich
über das Netzkabel stolpert.
• Lassen Sie das Gerät nicht
unbeaufsichtigt, wenn der
Page 28
28
betriebsanleitung
•
PLATINUM PRO
Montageanweisungen
Schritt 1:
Montage Des Hinteren Fussrohrs
1. Installieren Sie das hintere Fußrohr
(5) mit vier Sechskantschrauben
3/8”x2-1/4” (50) und vier
Unterlegscheiben 3/8” x 25 mm (71)
auf dem Hauptrahmen.
Page 29
D
betriebsanleitung • PLATINUM PRO
29
Schritt 2:
Montage Des Vorderen Hauptrohrs
1. Wickeln Sie das Computerkabel
(29) auf und schieben Sie es durch
die Standrohrabdeckung (38) und
das Standrohr (2), bis der Stecker
oben aus dem Standrohr herausragt.
Schieben Sie die Plastikabdeckung
(38) auf das Standrohr und
achten Sie dabei auf die korrekte
Ausrichtung der Abdeckung.
2. Befestigen Sie mit sieben
Sechskantschrauben 5/16”x5/8”
(51), sechs Unterlegscheiben 5/16”
x 18 mm (72) an den seitlichen
Schrauben und einer gebogenen
Unterlegscheibe 5/16 ”x19 mm
(99) an der vorderen Schraube das
Standrohr (2) auf dem
Hauptrahmen (1).
Page 30
30
betriebsanleitung
•
PLATINUM PRO
Schritt 3:
Montage Des Handgriffs
1. Führen Sie die beiden
Handfrequenzkabel (26)
durch die Öffnung in die
Handgriffmontageplatte und durch
die Öffnung in der Konsolenplatte.
Befestigen Sie den Handgriff (3) mit
zwei Sechskantschrauben 5/16” x
5/8” (51), zwei Unterlegscheiben
5/16” x 18mm (72) und zwei
Schlitzscheiben 5/16” (103) auf
dem Standrohr (2) und achten Sie
darauf, die Handfrequenzkabel nicht
einzuklemmen.
Page 31

D
betriebsanleitung • PLATINUM PRO
31
Schritt 4:
Montage Von Konsole, Sattel, Pedale
Und Hauptgehäuseabdeckung
1. Stecken Sie das Computerkabel
(29) und zwei HandfrequenzsensorMontage-W/Kabel (26) in die
Anschlüsse auf der Rückseite
der Konsole (34). Befestigen Sie
die Konsole (34) mit vier PhilipsKopfschrauben M5x12mm (58) auf
dem Standrohr.
2. Bringen Sie mit vier PhilipsKopfschrauben M5×12mm (58) die
vordere Fußabdeckung (40) und die
hintere Fußabdeckung (41) auf dem
Hauptrahmen (1) an.
3. Bringen Sie die Pedale (45 L, 46R)
an den Kurbeln an (16L, 16R).
Denken Sie daran, dass das linke
Pedal ein entgegengesetztes
Gewinde hat, das anders herum in
die Kurbel gedreht wird. Für das linke
Pedal ist am Ende des Gewindes ein
„L“ eingeprägt, am rechten Pedal ein
„R“. Achten Sie darauf, die Pedale
so fest zu ziehen wie möglich. Es
kann notwendig sein, die Pedal
nachzuziehen, wenn Sie beim Treten
einen Schlag im Pedal spüren. Ein
Geräusch oder ein Schlag- oder
Klickgefühl ist in der Regel auf lose
Pedale zurückzuführen.
4. Bringen Sie das Sattel-Schieberohr
(7) auf der Schiene oben am
Sattelrohr an, sodass der Sattel
nach vorne zeigt. Befestigen Sie den
Sattel (19) auf der Sattelstütze.
5. Befestigen Sie den Flaschenhalter
(116) mit zwei Philips-Kopfschrauben
M5x12mm (58) auf dem Standrohr
Fußpedale
Forschungen der Entwicklungsabteilung
in Zusammenarbeit mit einem führenden
Sportwissenschaftler und RehaSpezialisten haben zu einem Durchbruch
im Pedaldesign geführt. Dieses Pedal
hat eine minimale Breite und es ist
leicht gebogen, um ein natürlicheres
Fahrgefühl zu ermöglichen.
Page 32

32
betriebsanleitung
•
PLATINUM PRO
User interface
Drehschalter und Tasten
A Back, Stop Taste:
• Zurück zum vorherigem Fenster.
Beenden Sie das aktive Training.
B Main Menu:
• Geht zurück zum Hauptmenü oder
Schnellstart wenn Main Menu Taste
betätigt wird.
• Durch die Taste während des aktiven
Trainings einzudrücken wird das
Programm im Ruhemodus gestellt.
C User/Settings
• Drücken Sie diese Taste um
den Gebraucher / GebraucheEinstellungen eingeben. Diese
Taste funktioniert nicht während des
Trainings.
D Drehschalter:
Aktivieren von Funktionen:
• Wählen Sie den Training-Modus im
Hauptmenü..
• Benutzer/Einstellung-Modus
Auswahl;.
• Wählen Sie den gewünschten Modus
im Einstellungsfenster.
• Erhöhen oder verringern Sie den
Einstellungswert..
• Anpassung vom Zielwert (hoch/
niedrig) während des Trainings..
• Verschieben Sie nach oben oder
unten während T-Ride™ or T-Road
Training.
Horizontal
Drehen im Uhrzeigersinn – Option nach
rechts,
Drehen gegen den Uhrzeigersinn –
Option nach links.
Vertikal
Drehen im Uhrzeigersinn - Option nach
Oben..
Drehen gegen den Uhrzeigersinn –
Option nach unten.
Funktionen Drucktaste (Drehschalter):
• Sport Modus Bestätigung.
• Option Bestätigung unter Benutzer
Einstellmodus..
• Bestätigung vom Aktiven Programm
im Einstellungs-Modus
• Einstellungs-Werte und Bestätigung.
• Umschalten Bildschirm zwischen
bpm ↔ Nm oder bpm ↔ W während
dem Training.
• Umschalten Bildschirm zwischen
bpm ↔ m oder bpm ↔ ft während
T-Ride™.
• Umschalten Bildschirm zwischen
Video ↔ Profile während T-Road.
• Wechsel zum nächste Begleitung
während T-Trainer™
• Option Bestätigung zwischen MusikModus-Anzeige
Page 33

D
betriebsanleitung • PLATINUM PRO
33
Trainer ist jetzt bereit um die Workout
Programme zu starten, selektiere diese
mit quick-Start und beginne
Programme
Schnellstart
• Drehe den Schalter und wählen Sie
„Schnellstart“
• Bestätigen Sie die Auswahl, indem
Sie den Drehschalter drücken und
gehen sie sofort zum TrainingsBildschirm.
Trainings-Bildschirm
Die X Achse zeigt die Zeit in Minuten
zwischen 0 ~ 30. Es wird während
des Trainings (alle 15 Minuten) aktualisiert
• Um die Y-Achse, während des
Trainings zu ändern von Nm↔ bpm,
drücken Sie den Drehschalter.
• Dass Balkendiagramm zeigt den
Drehmoment in Nm. betätigen Sie
den Drehschalter um diesen Wert zu
ändern.
• Die weiße unterbrochene Linie
zeigt die aktuelle Position. Diese
bewegt sich nach rechts wenn die
Trainingszeit verläuft. Der Bildschirm
kann maximal 5 Stunden Daten
zeigen
• Die Orange Kurve zeigt die Aktuelle
Herzfrequenz des Benutzers. Diese
Variiert da die Herzfrequenz häufig
ändert.
USB Anschluss
USB Ausgang kann benutzt werden für;
• Service-Zwecke Z.B. SoftwareUpdate.
Beachten Sie, das Format sollte nicht
! NTFS sein.
Bildschirm Starten
Wenn der Bildschirm gestartet wird
das Lade-Zeichen gezeigt wie unten
dargestellt.
Nach einigen Sekunden ändert sich
im Data Fortschritt-Anzeige wie unten
dargestellt.
Nachdem die Applikation vom
Gebraucher geladen ist, wird das
Hauptmenu erscheinen
Page 34

34
betriebsanleitung
•
PLATINUM PRO
Zieherzfrequenz
• Wählen Sie “Zieherzfrequenz“. aus
mit dem Drehschalter
• Bestätigen Sie die Auswahl, indem
Sie den Drehschalter drücken und
gehen sie sofort zum EinstellungsBildschirm l
Einstellungs-Bildschirm (1)
• Drehen Sie den Schalter um die
Zielherzfrequenz einzustellen.
(Die Anzahl schwankt mit Bpm-Wert)
• Bestätigen Sie durch den
Drehschalter einzudrücken und
gehen sie sofort zum EinstellungsBildschirm
Einstellungs-Bildschirm (2)
• Wählen Sie Programm aus mit dem
Drehschalter.
• Bestätigen Sie die Auswahl, indem
Sie den Drehschalter drücken und
gehen Sie weiter mit die BereichEinstellungen (rechts)
• Drehe den Schalter um
Einstellbereich zu ändern
• Bestätigen Sie die Auswahl, indem
Sie den Drehschalter drücken und
gehen sie sofort zum TrainingsBildschirm
Beenden des Trainings
• Das Trainings-Ende Bildschirm
erscheint wenn Back/Stop oder
Hauptmenu gedrückt wird oder wenn
der weiße unterbrochene Linie den
Zielwert erreicht
Trainings Abschluss Bildschirm
Weither : (Continue)
Wählen Sie ”Weither” um zu TrainingsBildschirm zurückzukehren
Beenden: (Exit)
• Wählen Sie “beenden” um das letzte
Wiedergabefenster zu Schließen.
Speichern:
Wählen Sie “Speichern” und geben Sie
einen Dateinamen ein, am unteren Rand
des Bildschirms
Benutze den Drehschalter um A –
Z, oder 0-9 zu selektieren und alle
Trainingsdaten zu Speichern für einen
neuen Trainings-Modus
.
• Die Trainingsdaten vom letzten
gespeichertem Training werden
gezeigt
Trainingsdaten Bildschirm
Drücken Sie den Drehschalter um zum
Hauptmenu zurückzukehren.
Page 35

D
betriebsanleitung • PLATINUM PRO
35
Manuell
• Drehe den Schalter und wähle
“Manuell”
• Bestätigen Sie die Auswahl indem
Sie den Drehschalter drücken und
gehen Sie sofort zum EinstellungsBildschirm (1).
Einstellungs-Bildschirm (1)
• Wählen Sie das Programm mit dem
Drehschalter.
• Bestätigen Sie die Auswahl, indem
Sie den Drehschalter drücken und
gehen Sie weiter mit die BereichEinstellungen (rechts).
• Drehe den Schalter um
Einstellbereich zu ändern.
• Bestätigen Sie die Auswahl, indem
Sie den Drehschalter drücken und
gehen sie sofort zum TrainingsBildschirm
Einstellungs-Bildschirm
Die X-Achse zeigt die gewählte Auswahl
Energie/Zeit/Abstand im Set Screen:
Energie Einheit kcal
Zeit Einheit min
Abstand Einheit Km in Metrisch
Mile in Imperial
• Um die Y-Achse, während des
Trainings zu ändern von Nm↔ bpm,
drücken Sie den Drehschalter.
Einstellungs-Bildschirm
Die X-Achse zeigt die gewählte Auswahl
Energie/Zeit/Abstand im Set Screen:
Energie Einheit Kcal
Zeit Einheit Min
Abstand Einheit Km in Metrisch
Mile in Imperial
• Drücken Sie den Drehschalter um die
Y-Achse während des Trainings zu
ändern von W↔ bpm.
• Dass Balkendiagramm zeigt die
Herzfrequenz in Bpm. Betätigen Sie
den Drehschalter um diesen Wert zu
ändern
• Die weiße unterbrochene Linie zeigt
die aktuelle Position. Diese bewegt
sich nach rechts wenn die Kalorien/
Zeit/Abstand sich ändern
• Die Orange Kurve zeigt die Aktuelle
Herzfrequenz des Benutzers. Diese
Variiert da die Herzfrequenz häufig
ändert
• Die blaue Kurve zeigt den Aktuellen
Watt wert.
• Konsole Einstellung unterstützt den
Benutzer um seine Ziele zu erreichen
das als Ziel-Herzfrequenz eingestellt
ist.
• Wenn die Aktuelle. Herzfrequenz
höher ist als die eingestellte wird
das System die Watt zahl senken.
Und, erhöhen wenn die Aktuelle
Herzfrequenz Niedriger ist.
• Die Meldung “No Heart Rate” wird
gezeigt wenn die Herzfrequenz vom
Benutzer, während dem Training,
nicht gemessen wird
Um das Training zu beenden - siehe “
“Beenden des Trainings”
Page 36

36
betriebsanleitung
•
PLATINUM PRO
• Wählen Sie Programm aus mit dem
Drehschalter.
• Bestätigen Sie die Auswahl, indem
Sie den Drehschalter drücken und
gehen Sie weiter mit die BereichEinstellungen (rechts).
• Drehe den Schalter um
Einstellbereich zu ändern.
• Drücke den Drehschalter zur
Bestätigung und gehen Sie weiter im
Trainings-Bildschirm.
Trainings Bildschirm
Die X-Achse zeigt die gewählte Auswahl
Energie/Zeit/Abstand im Set Screen:
Energie Einheit Kcal
Zeit Einheit Min
Abstand Einheit Km in Metrisch
Mile in Imperial
• Um die Y-Achse, während des
Trainings zu ändern von Nm↔ bpm,
drücken Sie den Drehschalter.
• Dass Balkendiagramm zeigt den
Drehmoment in Watt. betätigen Sie
den Drehschalter um diesen Wert zu
ändern.
• Die weiße unterbrochene Linie zeigt
die aktuelle Position. Diese bewegt
sich nach rechts wenn die Energie/
Zeit/Abstand verläuft. Stunden Daten
zeigen
• Die Orange Kurve zeigt die Aktuelle
Herzfrequenz des Benutzers. Diese
Variiert da die Herzfrequenz häufig
ändert.
• Die Konsole Programmierung:
unterstützt den Benutzer sein/
ihr Ziel zu Erreichen. Wenn die
Aktuelle. Watt Zahl höher ist als die
eingestellte, wird das System die
Watt zahl senken. Und, erhöhen
wenn die Aktuelle Herzfrequenz
Niedriger ist
Um das Training zu beenden - siehe “
“Beenden des Trainings”
• Dass Balkendiagramm zeigt den
Drehmoment in Nm. betätigen Sie
den Drehschalter um diesen Wert zu
ändern.
• Die weiße unterbrochene Linie zeigt
die aktuelle Position. Diese bewegt
sich nach rechts wenn die Energie/
Zeit/Abstand verläuft. Stunden Daten
zeigen
• Die Orange Kurve zeigt die Aktuelle
Herzfrequenz des Benutzers. Diese
Variiert da die Herzfrequenz häufig
ändert.
Um das Training zu beenden - siehe “
“Beenden des Trainings”
Wattsteuerung
• Drehen Sie den Schalter und wählen
sie „“Wattsteuring“.
• Bestätigen Sie durch den
Drehschalter einzudrücken und
gehen sie sofort zum EinstellungsBildschirm(1)
Einstellungs-Bildschirm(1)
• Drehen Sie den Schalter um die Watt
Zahl einzustellen.
• Drücke den Drehschalter zur
Bestätigung und gehen Sie weiter
mit die Bereich-Einstellungen zum
Einstellungs- Bildschirm(2).
Einstellungs-Bildschirm (2)
Page 37

D
betriebsanleitung • PLATINUM PRO
37
• Einstellen vom Endpunkt des
Trainings .Drehen Sie den Schalter
um den weiße unterbrochene Linie
einzustellen.
Drücke den Drehschalter zur
Bestätigung und gehen Sie weiter mit
die Bereich-Einstellungen
Die X-Achse zeigt die gewählte Einheit
in KM/Metrisch und Mile/Imperial.
• Um die Y-Achse, während des
Trainings zu ändern von m↔ Bpm/
Metrisch, Ft↔Bpm in Imperial,
• Die weiße unterbrochene Linie
zeigt den die Aktuelle Diese bewegt
sich nach rechts wenn der Abstand
vergrößert.
• Die Orange Kurve zeigt die Aktuelle
Herzfrequenz des Benutzers. Diese
Variiert da die Herzfrequenz häufig
ändert.
• An der rechten Seite vom Bildschirm
ist die Gangschaltung von 1-8.
Drehen Sie den Schalter um diese zu
ändern.
• Das Weiße Ikon + 0° links unten im
Bildschirm zeigt den Steigungswert
und ändert sich während des
Training.
• Der letzte Bildschirm zeigt die
Trainingsdaten. Drücken Sie den
Drehschalter um zum Hauptmenu
zurückzukehren.
Um das Training zu beenden - siehe “
“Beenden des Trainings”
T-Ride
• Drehen Sie den Schalter und wählen
sie “T-ride”.
• Bestätigen Sie die Auswahl, indem
Sie den Drehschalter drücken und
gehen Sie weiter mit die BereichEinstellungen (1
Einstellungs-Bildschirm (1)
• Drehen Sie den Schalter und wählen
Sie zwischen Top and Down - Spur
(Trail) - Easy Ride - Marathon - Short
Loop
• Drücke den Drehschalter zur
Bestätigung und gehen Sie weiter mit
die Bereich-Einstellungen (2)
Einstellungs-Bildschirm (2)
• Einstellen vom Startpunkt des
Trainings. Drehen Sie den Schalter
um die weiße unterbrochene
Linie einzustellen. Drücke den
Drehschalter zur Bestätigung..
Page 38

38
betriebsanleitung
•
PLATINUM PRO
• Drücke den Drehschalter zur
Bestätigung.. und gehen Sie weiter
mit die Einstellungen an der rechten
Seite des Bildschirms.
• Drehen Sie den Schalter um die
Einstellungen zu ändern.
• Drücke den Drehschalter zur
Bestätigung.. und gehen Sie weiter
mit die Bereich-Einstellungen
Training-Bildschirm ( Watt Control )
Die X-Achse zeigt die gewählte Auswahl
Zeit/Abstand im Set Screen:
Zeit Einheit Min
Abstand Einheit Km in Metrisch
Mile in Imperial
Um die Y-Achse, während des Trainings
zu ändern von W↔ Bpm.
Dass Balkendiagramm zeigt das Ziel im
in Watt-Wert des Profils.
Betätigen Sie den Drehschalter um
diesen Wert zu ändern.
Die Weiße Unterbrochene-Linie zeigt
den die Aktuelle Watt-Zahl. Dieser
bewegt sich nach rechts wenn der
Abstand vergrößert.
Die Orange Kurve zeigt die Aktuelle
Herzfrequenz des Benutzers. Diese
Variiert da die Herzfrequenz häufig
ändert.
Konsole Programmierung ist gleich wie
im Watt Konstant-Modus.
Training Bildschirm (Heart Rate Control)
Preset Programme
• Drehen Sie den Schalter und wählen
Sie
“Preset Programme”.
• Drücke den Drehschalter zur
Bestätigung.. und gehen Sie weiter
mit die Bereich-Einstellungen (1).
Einstellungs-Bildschirm (1)
• Drehen Sie den Schalter und wählen
Sie zwischen:
• Wattsteuerung: Hügellandschaft,
Steigung, Querfeldein, Ausdauer,
Power-Intervall (Rolling Hills - Hill
Climb - Cross Country - Stamina Power Interval) items oder,
Zieherzfrequenz: Fettverbrenner
1, Fettverbrenner 2, Cardio - Kraft,
Cardio - Steigung, Cardio - Intervall.
(Fat burner 1 - Fat burner 2 - Cardio
Strength - Cardio Climb - Cardio
Interval)
• Drücke den Drehschalter zur
Bestätigung.. und gehen Sie weiter
mit dem Bereich-Einstellungen (2).
Einstellungs-Bildschirm (2)
• Drehen Sie den Schalter und wählen
Sie.
Page 39

D
betriebsanleitung • PLATINUM PRO
39
Kein gespeicherten Training gefunden
• Drücke den Drehschalter und gehen
Sie zurück zum Hauptmenu.
Einstellungs-Bildschirm (1)
Einstellungs-Bildschirm (1) ist für
gespeicherte Benutzertrainingsdaten.
Diese werden rechts im Bildschirm
gezeigt.
• Drehen Sie den Schalter und wählen
Sie.
• Bestätigen Sie die Auswahl, indem
Sie den Drehschalter drücken und
gehen Sie weiter mit die EinstellungsBildschirm (1)
Einstellungs-Bildschirm
• Drehen Sie den Schalter und wählen
Sie.
Wählen “Wiederholung” (Replay)
• Bestätigen Sie die Auswahl, indem
Sie den Drehschalter drücken und
gehen Sie weiter im EinstellungsBildschirm und dem vorigem Training
Die X-Achse zeigt die gewählte Auswahl
Zeit/Abstand im Set Screen:
Zeit Einheit Min
Abstand Einheit Km in Metrisch
Mile in Imperial
• Um die Y-Achse, während des
Trainings zu ändern von W↔ Bpm
• Das Balkendiagramm zeigt das Ziel
im Watt-Wert des Profils. Betätigen
Sie den Drehschalter um die
Prozente in Watt zu ändern rechts in
der Weißen unterbrochene Linie.
• Die Weiße Unterbrochene-Linie
zeigt die Aktuelle Watt-Zahl. Dieser
bewegt sich nach rechts wenn der
Abstand vergrößert
• Die Orange Kurve zeigt die Aktuelle
Herzfrequenz des Benutzers. Diese
Variiert da die Herzfrequenz häufig
ändert
• Die blaue Linie zeigt den Aktuellen
Watt Wert..
• Konsole Programmierung entspricht
dem Ziel im HR-Modus.
Um das Training zu beenden - siehe “
“Beenden des Trainings”
Eigenes Training
• Drehen Sie den Schalter und wählen
Sie.
“Eigenes training”.
• Bestätigen Sie die Auswahl, indem
Sie den Drehschalter drücken und
gehen Sie weiter mit die BereichEinstellungen (1)
Hinweis
Wenn keine gespeicherte Training
gefunden werden, wird das
untenstehende Fenster gezeigt.
Page 40

40
betriebsanleitung
•
PLATINUM PRO
• Drücke den Drehschalter und gehen
Sie zurück zum Hauptmenu.
Einstellungs-Bildschirm (1)
• Drehe den Schalter und wähle..
• (Inactive / Active / Athletic mode).
• Bestätigen Sie die Auswahl indem
Sie den Drehschaltern drücken und
gehen sie sofort zum EinstellungsBildschirm (2).
Einstellungs-Bildschirm (2)
• Drehe den Schalter um den
Herzfrequenz Zielwert in Vo2 Max
Wert, einzustellen..
(der Bereich liegt zwischen
8~220Bpm.)
Standard 85% vom Max HR und
Gewicht (Kg).
• Bestätigen Sie die Auswahl indem
Sie den Drehschaltern drücken und
um das Informations-Fenster zu
öffnen.
Wählen “Bearbeiten” (Edit)
• Bestätigen Sie die Auswahl, indem
Sie den Drehschalter drücken
• Geben Sie die Einstellungen ein oder
bearbeiten sie diese und bestätigen
Sie..
• Drücken Sie den Drehschalter zum
bestätigen und gehen sie weiter im
Trainings-Bildschirm.
Wählen “Löschen” (Delete)
• Drehe den Schalter und wähle..
• Bestätigen Sie die Auswahl indem
Sie den Drehschaltern drücken und
gehen sie sofort zum SelektionsBildschirm.
• Wähle Yes um die gewählte Datei zu
löschen..
• Bestätige durch den Drehschalter zu
drücken.
Trainings-Bildschirm:
Die Trainingswiedergabe ist abhängig
vom gewähltem Trainings-Modus.
Nm Manual Modus:
Ist gleich am Manual Modus
Watt Constant Mode:
Ist gleich am Voreingestellten Programm
Watt Modus.
Target HR Modus:
Diese ist gleich am Vorprogrammierten
Herzfrequenz Programms.
Fitnesstest
• Drehe den Schalter und wähle
“Fitnesstest”.
• Bestätigen Sie die Auswahl indem
Sie den Drehschaltern drücken und
gehen sie sofort zum EinstellungsBildschirm (1).
Hinweis
Der User Interface braucht die
Benutzerdaten zum Berechnen.
Des Fitness Tests, Wenn keine
Benutzerdaten bekannt sind, kann der
Fitness Test nicht gestartet werden.
Die untenstehende Nachricht wird
gezeigt..
Page 41

D
betriebsanleitung • PLATINUM PRO
41
Der Bildschirm zeigt;
”Testfehler!” wenn:
• Die Trainingszeit zu kurz ist.
• RPM Wert zu niedrig ist.
• HR Wert nicht erreicht wird.
• HR unter 110 Bpm ist.
”Herzfrequenz nicht festgestellt!
wenn:
• Die Herzfrequenz vom Gebraucher
wird während dem Training nicht
gemessen.
Drücke Back/Stop oder Hauptmenu um
den Trainings-Bildschirm zu verlassen.
Zielherzfrequenz erreicht. Stop Test
oder gehe weiter”
• Benutzer hat das Ziel erreicht.
• Drücke den Drehschalter um den
Test zu beenden und direkt zum
Trainings Data Bildschirm zu gehen.
Trainings Daten Bildschirm
Drücke den Drehschalter um zum VO2
Max Testresultat Bildschirm zu gehen.
VO2 Max Testresultat Bildschirm
• Drücke den Drehschalter um zum
Hauptmenu zurückzukehren.
Um das Training zu beenden - siehe “
“Beenden des Trainings“
Informations-Fenster
Halten Sie sich am Lenker fest.
Trittfrequenz: 50-70 UpM. Beenden
Sie den Fitnesstest, wenn Sie die
Zielherzfrequenz erreicht haben.
Drücken Sie auf OK und starten Sie
den Fitnesstest durch Treten.
• Bestätigen Sie die Auswahl indem
Sie den Drehschalter drücken und
gehen sie sofort zum TrainingsBildschirm.
Trainings Bildschirm
• Die X-Achse ist in Min.
• Die Y-Achse ist in Bpm.
• Das Balkendiagramm zeigt den Watt
wert des Profils.
• Die weiße unterbrochene Linie
zeigt die aktuelle Position. Diese
bewegt sich nach rechts wenn die
Trainingszeit verläuft. Der Bildschirm
kann maximal 5 Stunden Daten
zeigen.
• Die Orange Kurve zeigt die Aktuelle
Herzfrequenz vom Benutzer. Diese
Variiert da die Herzfrequenz häufig
ändert.
• Die horizontale rote Linie zeigt
den Zielwert der eingestellten
Herzfrequenz.
Page 42

42
betriebsanleitung
•
PLATINUM PRO
Sie können aus 3 unterschiedliche
Trainingsstrecken wählen.
Zu wissen: Tuscany Sandy Road/
Tuscany Scenery Road/ Tuscany
Country Road.
• Drehe den Schalter und wähle die
Trainings Strecke.
• Bestätige die Auswahl indem Sie den
Drehschalter drücken und gehen Sie
sofort zum Trainings-Bildschirm.
Drücke den Drehschalter um, während
des Trainings, zu wechseln zwischen
Video und Profil Bildschirm.
• Die X-Achse zeigt den Abstand. Km
in Metrisch, Mile in Imperial
• Die Y-Achse ist M in Metrisch, Ft in
Imperial.
• Drücke den Drehschalter um,
während des Trainings, zu wechseln
zwischen Video ↔ Profile Bildschirm.
Im Bildschirm “Profil”:
• Die Weiße unterbrochene Linie
zeigt die aktuelle Position, diese
bewegt sich nach rechts wenn de
Trainingszeit verstreicht.
• Die Orange Kurve zeigt die Aktuelle
Herzfrequenz des Benutzers. Diese
Variiert da die Herzfrequenz häufig
ändert.
VO2 Max test result table.
T-Road
• Drehe den Schalter und wähle
“T-road”.
• Bestätigen Sie die Auswahl indem
Sie den Drehschalter drücken und
gehen Sie sofort zum TrainingsBildschirm (1).
Einstellungs-Bildschirm (1)
Page 43

D
betriebsanleitung • PLATINUM PRO
43
Schließen Sie die Trainingsdaten durch
die BACK/STOP zu drücken.
Benutzer bearbeiten
Durch Auswahl von “Benutzer
bearbeiten” können Sie:
• Die Helligkeit einstellen (Standard =
50%).
• Die gesamte Km-Benutzung vom
Trainer nachsehen.
• Die gesamte Zeit-Benutzung vom
Trainer nachsehen.
• Die Standard Soft- und Firmware
und die Software-Version form User
Interface nachsehen
• Sprache ändern.
• Signalton der Tasten an- (Ja) oder
ausschalten (NEIN).
Benutzereinstellungs-Fenster
Wie kann Benutzereinstellungen
ändern
• Drehen Sie den Schalter um die
Einstellung zu wählen das Sie ändern
möchten.
• Drücke den Drehschalter um die
ausgewählte Einstellung in der
rechten Seite vom Bildschirm zu
öffnen.
Im Bildschirm:
• In der rechten Ecke des Bildschirms
ist der Schalthebel 1-8. Benutze den
Drehschalter zum Wechseln.
• Das Weiße Symbol + 0° links
unten auf dem Bildschirm zeigt die
Steigung. Diese schwankt mit der
Profil-Steigung durch gang Wechsel.
• Drücken Sie Back/Stop, Hauptmenu
oder Weiße unterbrochene Linie Wert
kann den Bildschirm verlassen wenn
Ziel Zahl erreicht wird.
Um das Training zu beenden - siehe “
“Beenden des Trainings”
Benutzer-
einstellungen
Drücke die “User/Settings” Taste um in
den Benutzereinstellungen, Hauptmenu
zu gelangen.
• Benutze den Drehschalter um
einer der sechs Möglichkeiten
auszuwählen...
• Drücke den Drehschalter zur
Bestätigung um das gewählte
Programm zu öffnen.
Benutzerprotokoll
Durch die Auswahl von
“Benutzerprotokoll” können Sie sich
die Trainingsdaten vom ausgewählten
Benutzer ansehen.
Sie können die neuesten Daten oder
ein anderes Training vom Benutzer
ansehen.
Page 44

44
betriebsanleitung
•
PLATINUM PRO
untenstehende Daten zu ändern.
Nach oben zälen: die Einstellungen
Zeit/Abstand, werden addiert..
Nach untenbstand, werden
subtrahiert.
• Drücke den Drehschalter um diese
Einstellung zu Bestätigen und kehre
zurück zum Bearbeitungsmenu..
Geschlecht
• Drehe den Schalter und wähle
“Geschlecht”.
• Drücke den Drehschalter um
“Display” zu bearbeiten..
• Drehe den Schalter um Männlich/
Weiblich zu wählen.
• Drücke den Drehschalter um diese
Einstellung zu Bestätigen und kehre
zurück zum Bearbeitungsmenu.
Alter
• Drehe den Schalter und wähle
“Alter”.
• Drücke den Drehschalter um “Alter”
zu bearbeiten..
• Drehe den Schalter um das Alter zu
ändern.
• Drücke den Drehschalter um diese
Einstellung zu Bestätigen und kehre
zurück zum Bearbeitungsmenu.
Körpergröße
• Drehe den Schalter und wähle
“Körpergröße”.
• Drücke den Drehschalter um “Größe”
zu bearbeiten
• Drehe den Schalter um “Größe“ zu
ändern. In Cm wenn in Metrische-, in
Ft/Inch wenn in Imperial eingestellt.
• Drücke den Drehschalter um diese
Einstellung zu Bestätigen und kehre
zurück zum Bearbeitungsmenu.
Gewicht
• Drehe den Schalter und wähle
“Gewicht”.
• Drücke den Drehschalter um
“Gewicht” zu bearbeiten
• Drehe den Schalter um “Gewicht“ zu
ändern. In Kg wenn in Metrische-, in
Lbs wenn in Imperial eingestellt.
• Drücke den Drehschalter um diese
Einstellung zu Bestätigen und kehre
zurück zum Bearbeitungsmenu.
• Drehe den Schalter um die
Einstellung zu ändern.
• Drücke den Drehschalter zur
Bestätigung der Änderung.
• Drehe den Schalter um die nächste
Einstellung zu ändern oder benutze
die Back/ Stop Taste um zum
Einstellungsmenu zurückzukehren.
Bearbeiten
Durch den „Bearbeiten“ durch diesen
zu selektieren und bearbeiten zu
wählen, können sie die untenstehenden
Einstellungen ändern:
Benutzer Name:
• Drehe den Schalter und wähle
“Name”.
• Drücke den Drehschalter um “Name”
Bearbeitung zu wählen.
• Drehe den Schalter um den
Buchstabe zu wählen.
• Drücke den Drehschalter zur
Bestätigung.
• Drehe den Schalter um den nächsten
Buchstabe zu wählen.
• Wen der Name Korrekt geändert
ist, wähle “√” um diesen zu
Bestätigen und kehre zurück zum
Bearbeitungsmenu..
Einheiten
• Drehe den Schalter und wähle
“Einheiten”.
• Drücke den Drehschalter um
“Einheiten” Bearbeitung zu wählen.
• Drehe den Schalter zu wählen
Metrisch: km/kph/Kcal
Imperial: mile/mph/kcal.
• Drücke den Drehschalter um diese
Einstellung zu Bestätigen und kehre
zurück zum Bearbeitungsmenu
Anzeige
• Drehe den Schalter und wähle
“Anzeige”.
• Drücke den Drehschalter um
“Display” zu bearbeiten.
• Drehe den Schalter um die
Page 45

D
betriebsanleitung • PLATINUM PRO
45
Benutzer erstellen
Durch “Benutzer erstellen” können sie
ein neues Benutzerprofil machen. Es
können maximal 8 Benutzer eingegeben
werden.
Bei “Benutzer bearbeiten” sehen Sie
die Möglichkeiten um einen Benutzer zu
erstellen.
Herzfrequenztraining
Eine Anmerkung zur Herzfrequenz:
Das alte Motto „Kein Schmerz, kein
Gewinn“ (eigentlich „Ohne Schweiß kein
Preis“, engl.: „no pain, no gain“) ist ein
überkommener Mythos, den moderne
Trainingsmethoden überflüssig gemacht
haben. Ein großer Teil dieses Erfolgs
wurde mit Herzfrequenzüberwachung
erreicht. Bei geeignetem Einsatz der
Herzfrequenzüberwachung empfinden
viele Personen, dass Ihr bisheriger
Einsatz zu hoch oder zu gering war und
das Training wird viel befriedigender,
wenn es in einem richtigen
Herzfrequenzbereich durchgeführt wird.
Um den richtigen Bereich zu bestimmen,
in dem Sie trainieren möchten, müssen
Sie erst Ihre maximale Herzfrequenz
bestimmen. Diese können Sie
folgendermaßen errechnen: 220
minus Ihr Alter. So erhalten Sie die
maximale Herzfrequenz (MHF) für eine
Person Ihres Alters. Um die effektive
Herzfrequenz für bestimmte Ziele
Max HF
• Drehe den Schalter und wähle “ Max
HF ”.
• Drehe den Schalter um “ Max HR ”
zu bearbeiten. Standard
wenn Fraulich – 220 Alter
wenn Männlich – 226 Alter
• Drücke den Drehschalter um diese
Einstellung zu Bestätigen und kehre
zurück zum Bearbeitungsmenu.
Benutzer Löschen
Durch den “Benutzer Löschen” zu
wählen, können Sie:
• Benutzer und alle Daten löschen.
• Drehe den Schalter und wählen
Sie den Benutzer den Sie löschen
möchten.
• Drücke den Drehschalter um den
Benutzer zu löschen und kehre
zurück zum Bearbeitungsmenu.
• Benutzer wird, ohne weitere
Nachfrage gelöscht.
Benutzer ändern
Durch den “Benutzer ändern” zu wählen,
können Sie
Select an other preset user profile.
• Drehe den Schalter und wählen Sie
den Benutzer den Sie aktivieren
möchten.
• Drücke den Drehschalter zur
Bestätigung und kehre zurück zum
Bearbeitungsmenu
Page 46

46
betriebsanleitung
•
PLATINUM PRO
zu ermitteln, errechnen Sie einfach
einen Prozentsatz Ihrer MHF. Ihr
Herzfrequenz-Trainingsbereich liegt
bei 50 % bis 90 % Ihrer maximalen
Herzfrequenz. 60 % Ihrer MHF ist der
Bereich, in dem Fett verbrannt wird,
während 70 % das cardiovaskuläre
System stärken. Dieser Bereich von
60 % bis 70 % ist der Bereich mit dem
maximalen Nutzen.
Für eine Person von 40 Jahren
errechnet sich die Zielherzfrequenz
folgendermaßen:
220 – 40 = 180 (maximale Herzfrequenz)
180 x .6 = 108 Schläge pro Minute (60%
vom Maximum)
180 x .7 = 126 Schläge pro Minute (70%
vom Maximum)
Der Trainingsbereich für eine 40jährige
Person liegt also zwischen 108 und 126
Schlägen pro Minute.
Herzfrequenzsender
verwenden
Wie tragen Sie einen BrustgurtFunksender:
• Bringen Sie den Sender an den
entsprechenden Stellen am
elastischen Gurt an.
• Stellen Sie den Gurt so eng wie
möglich ein, solange der Gurt dabei
noch bequem zu tragen ist.
• Bringen Sie den Sender mit dem
Logo in der Mitte Ihres Körpers
so an, dass dieser von Ihnen weg
zeigt (einige Personen müssen den
Sender leicht rechts oder links der
Mitte tragen). Befestigen Sie das
Ende des elastischen Gurts, indem
Sie das runden Ende einstecken,
den Sender mit den Verschlussteilen
sichern und den Gurt um die Brust
binden.
• Schieben Sie den Sender gleich
unter den
Brustmuskel.
• Schweiß ist der beste Leiter für
die elektrische Erfassung jedes
Herzschlags. Sauberes Wasser
kann aber auch verwendet werden,
um die Elektroden anzufeuchten (2
schwarze Bereiche auf der Rückseite
und an jeder Seite des Gurts) Es
ist auch empfehlenswert, dass Sie
Ihren Sendergurt einige Minuten vor
dem Training tragen. Einige Benutzer
haben aufgrund Ihrer Körperchemie
anfangs größere Schwierigkeiten, ein
starkes gleichbleibendes Signal zu
erreichen. Nach dem „Aufwärmen“
sollte dies behoben sein. Wie
beschrieben beeinträchtigt das
Tragen von Kleidung die Leistung
des Senders/Gurts nicht.
• Ihr Training muss innerhalb des
Empfangsbereichs - Abstand von
Sender/Empfänger - stattfinden,
um ein starkes gleichmäßiges
Signal zu erhalten. Die Größe des
Empfangsbereichs kann sich etwas
ändern, im Allgemeinen aber bleiben
Sie nahe genug an der Konsole, um
ein gutes, starkes und zuverlässiges
Signal zu erhalten. Das Tragen des
Senders direkt auf nackter Haut
gewährleistet gutes Funktionieren.
Sie können den Sender aber auch
über einem Hemd tragen. Dazu
feuchten Sie die Bereiche des
Hemds an, auf dem die Elektroden
aufliegen.
Page 47

D
betriebsanleitung • PLATINUM PRO
47
Trainieren
Treten mit einem Ergometer ist
eine ausgezeichnete aerobe
Trainingsform, d.h. das Training ist
zwar leicht, erfordert aber eine lange
Trainingsdauer. Das aerobe Training
basiert auf einer Verbesserung der
max. Sauerstoffaufnahmefähigkeit,
was zu einer Steigerung von Kondition
und Ausdauer führt. Die Fähigkeit des
Körpers, Fett zu verbrennen, hängt
direkt von der Fähigkeit des Körpers
ab, Sauerstoff zu transportieren. Das
aerobe Training ist eine angenehme
Trainingsform. Man muss zwar ins
Schwitzen, aber nicht ausser Atem
kommen.
Das Training sollte aus mindestens drei
30- minütigen Einheiten pro Woche
bestehen. So wird eine Grundkondition
erreicht. Die Aufrechterhaltung
der Kondition setzt zirka zwei
Übungseinheiten pro Woche voraus.
Ist die Grundkondition erreicht,
kann diese leicht durch Erhöhen der
Trainingsfrequenz verbessert werden.
Eine zu grosse Anstrengung bei
einem zu hohen Körpergewicht kann
zu einer gefährlichen Belastung des
Herzens und des Kreislaufs führen. Die
Tretgeschwindingkeit kann der Kondition
entsprechend langsam erhöhr werden.
Die Trainingseffi zienz kann mit Hilfe der
Herzfrequenz geschätzt werden.
Wartung
Das Gerät braucht nur sehr wenig
Wartung. Prüfen Sie dennoch von
Zeit zu Zeit, dass alle Schrauben und
Muttern fest sitzen.
• Bitte trocknen Sie nach jedem
Training alle Teile des Gerätes mit
einem weichen, saugfähigen Tuch.
Verwenden Sie keine Lösungsmittel.
• Entfernen Sie niemals die
Schutzverkleidung des Gerätes.
BITTE BEACHTEN!
Der Sender wird automatisch aktiviert,
wenn eine Herzaktivität erkannt wird.
Er erkennt außerdem das Ausbleiben
jeglicher Aktivität. Auch wenn der Sender
wasserfest ist, kann Feuchtigkeit zu
fehlerhaften Signalen führen. Sie sollten
nach Verwendung den Sender daher
vollständig trocknen lassen, um die
Lebensdauer der Batterie (geschätzte
2500 Stunden) zu erhalten. Wenn Ihr
Brustgurt eine austauschbare Batterie
hat, verwenden Sie als Ersatzbatterie die
Panasonic CR2032.
WARNUNG!
Verwenden Sie das Gerät nicht für ein
Zielherzfrequenztraining, wenn nicht eine
aktuelle stabile Herzfrequenz angezeigt
wird. Hohe, wilde, zufällige angezeigte
Zahlen deuten auf ein Problem hin.
Interferenzen, die zu einer
fehlerhaften Herzfrequenz führen
können:
• Mikrowellen, Fernseher, Kleingeräte
usw.
• Fluoreszierende Lampen.
• Einige Haussicherheitssysteme.
• Haustierumzäunungen
• Einige Personen haben Probleme
damit, das Signal über ihre Haut
zu empfangen. Wenn Sie damit
Probleme haben, tragen Sie den
Sender mit dem Kopf nach unten.
In der Regel wird der Sender so
getragen, dass das Logo richtig
herum steht.
• Die Antenne, die Ihre Herzfrequenz
aufnimmt, ist sehr empfindlich. Bei
einem Fremdrauschen drehen Sie
das Gerät um 90 Grad. Dies könnte
die Interferenz beheben.
• Wenn Sie weiterhin solche Probleme
haben, wenden Sie sich an Ihren
Händler
Page 48

48
betriebsanleitung
•
PLATINUM PRO
Die elektromagnetische Bremse
erzeugt ein Magnetfeld. Dadurch
können Uhrwerke oder Magnetstreifen
aufKreditkarten beschädigt werden,
wenn Sie in direkten Kontakt mit den
Magneten kommen. Versuchen Sie
niemals, die elektromagnetische Bremse
zu lösen oder zu entfernen!
Die elektromagnetische Bremse
basiert sich auf elektromagnetischem
Widerstand; Widerstandsniveau wird
fortlaufend elektronisch gemessen und
als Watt im Cockpit angezeigt. Folglich
braucht Ihr Tunturi Ergometer nicht
nachgeeicht werden.
Betriebsstörungen
Trotz kontinuierlicher
Qualitätsüberwachung können
vereinzelt an den Geräten durch
einzelne Komponenten verursachte
Funktionsstörungen auftreten. Dabei
ist es nicht angebracht, das ganze
Gerät zur Reparatur zu bringen, da der
Fehler meistens durch Austauschen
der defekten Komponente behoben
werden kann. Wenn das Gerät
während des Gebrauchs nicht
einwandfrei funktioniert, wenden Sie
sich bitte umgehend an die für Sie
zuständige Tunturi- Alleinvertretung.
Beschreiben Sie das Problem, die
Einsatzbedingungen und teilen Sie das
Kaufdatum und die Typenbezeichnung
und die Seriennummer Ihres Gerätes
mit. Wenden Sie sich an Ihre nationale
Tunturi-Vertretung, wenn Sie Ersatzteile
benötigen. Beschreiben Sie die
Einsatzbedingungen und teilen Sie das
Kaufdatum und die Seriennummer des
Gerätes mit. Die Ersatzteilnummern
fi nden Sie in der Liste am Ende
dieser Anweisung. Nur Teile in der
Ersatzteilliste dürfen verwendet werden.
Moving and storage
Das Gerät ist mit Transporträdern
versehen. Um Schäden zu vermeiden,
das Gerät nach folgenden Anweisungen
transportieren:
• Schalten Sie das Gerät immer aus
und ziehen Sie den Netzstecker aus
der Wandsteckdose, bevor Sie das
Gerät an einen anderen Platz stellen.
• Um das Gerät zu transportieren
braucht man zwei Erwachsene. An
der Vorderseite an beiden Seiten
des Geräts Platz nehmen und einen
festen Griff and den Handgriffen
nehmen. Die Vorderseite des Geräts
so aufheben, dass sich das Hinterteil
des Geräts auf den Transporträder
zieht. Das Gerät umziehen und es
vorsichtig auf seinen neuen Platz
senken.
BITTE BEACHTEN!
Das Gerät nur mit äusserster Vorsicht
über eine Schwelle oder andere
unebene Flächen transportieren. Das
Gerät dar nicht auf den Transportroller
über eine Treppe geschoben werden es muss unbedingt getragen werden. Ein
Verschieben des Gerätes kann manche
Fussbodenmaterialien beschädigen,
z.b. Holzparkettböden. In diesem Fall
müssen Sie den boden vorher schützen.
Lagern Sie das Gerät an einem
trockenen, staubfreien Ort mit möglichst
geringen Temperaturschwankunen.
BITTE BEACHTEN!
Die Hinweise bezüglich der Montage,
der Benutzung und der Wartung Ihres
Geräts müssen sorgfältig beachtet
werden. Die Garantie schliesst
keine Beschädigungen ein, die auf
Fahrlässigkeit bei der Montage,
Einstellung und Wartung, wie sie
in diesem Handbuch beschrieben
wurden, zurückzuführen sind.
Werden Modifizierungen ohne das
Einverständnis der Tunturi New Fitness
BV. vorgenommen, erlischt jeglicher
Garantieanspruch!
WIR WÜNSCHEN IHNEN VIELE
NGENEHME TRAININGSSTUNDEN
MIT IHREM NEUEN TUNTURI
TRAININGSPARTNER!
Page 49

F
mode d´emploi • PLATINUM PRO
49
Bienvenue .................................... 49
Consignes de sécurité-
importantes .................................. 49
Instructions de montage ............. 51
Etape 1: ............................................. 51
Etape 2: ............................................. 52
Etape 3: ............................................. 53
Etape 4: ............................................. 54
User interface............................... 55
Molette et boutons ............................. 55
Écran de demarrage ........................... 56
Programmes................................. 56
Démarrage rapide............................... 56
Fin de l’entrainment ............................ 57
Pouls Constant ................................... 57
Manuel ................................................ 58
Effort Constant .................................... 59
T-Ride ................................................. 60
Preset Programmes............................ 61
Prols Personnels............................... 63
Test De Fitness ................................... 64
T-Road ................................................ 66
Paramètres de l’utilisateur.......... 67
Journal utilisateur ............................... 67
Modier utilisatuer .............................. 67
Moddier Utilisateur ............................ 68
Effacer utilisateur ................................ 69
Changer Utilisateur ............................. 69
Créer utilisateur .................................. 69
Entraînement pour améliorer la -
fréquence cardiaque ................... 69
Utilisation d’un émetteur de fréquence 70
Exercice ........................................ 71
Maintenance ................................. 72
Defauts de fonctionement................... 72
Transport et rangement ...................... 72
Contents
Français
Ce manuel français est une traduction
de la version anglaise.
Notez que la version anglaise est en tête
dans le contenu lorsque des différences
sont trouvées.
Bienvenue
Bienvenue dans le monde de
l’entraînement tunturi !
Votre choix prouve que vous souhaitez
réellement investir dans votre bienêtre et votre condition ; il révèle aussi
que vous savez apprécier la haute
qualité et l’élégance. En choisissant
un équipement sportif Tunturi, vous
adoptez un produit de premier choix
comme partenaire pour un entraînement
motivant en toute sécurité. Quel que soit
votre objectif, nous sommes persuadés
que cet appareil est celui qui vous y
conduira. Adressez-vous à WWW.
TUNTURI.com pour plus d’informations
Consignes de
sécurité importantes
Lisez attentivement ce mode d’emploi
avant d’assembler, d’utiliser ou
d’effectuer l’entretien de votre appareil
sportif. Veuillez conserver ce guide, il
contient les renseignements dont vous
aurez besoin, maintenant et plus tard,
pour utiliser et entretenir votre appareil.
Suivez toujours les instructions très
rigoureusement.
Votre sante
• Consultez votre médecin avant de
commencer vos exercices.
• Si vous êtes pris de nausées ou
de vertiges ou sentez d’autres
symptômes anormaux pendant
l’entraînement, interrompez
immédiatement la session et
consultez votre médecin.
• Afin d’éviter toutes douleurs
musculaires, commencez et terminez
vos sessions par des mouvements
d’échauffement (pédalage lent avec
une résistance faible). N’oubliez pas
non plus d’effectuer des mouvements
d’étirement pour terminer votre
session.
Page 50

50
mode d´emploi
•
PLATINUM PRO
Votre milieu d’entrainement
• L’appareil ne doit pas être utilisé à
l’exterieur.
• Placez l’appareil sur une surface
aussi plane que possible. Placez une
protection sous l’appareil.
• Assurez-vous d’une ventilation
suffisante, mais evitez toutefois les
courants d’air.
• En entraînement, l’appareil supporte
des températures de 10°C à 35°C.
L’appareil peut aussi être rangée
à une température comprise entre
- 15°C et +40°C. L’hygrométrie du
local d’utilisation ou de rangement de
l’appareil ne doit jamais
excéder 90 %..
L’utilisation de l’appareil
• Si vous décidez de laisser un enfant
utiliser l’appareil, prenez toujours
en considération l’état de son
développement physique et mental
ainsi que son caractère. Donnez à
l’enfant les conseils nécessaires pour
une bonne utilisation de l’appareil et
ne le laissez jamais seul.
• Commencez par vérifier que
l’appareil est en parfait état de
marche. N’utilisez jamais un appareil
défectueux.
• Ne vous accoudez jamais à l’unite
des compteurs !
• Appuyez sur les touches du bout des
doigts : vos ongles risquent d’abîmer
la membrane des touches.
• N’utilisez jamais l’appareil avec les
protections latérales démontées.
• Ne montez jamais à deux ou à
plusieurs sur l’appareil. Montez et
descendez de l’elliptique en vous
tenant à la poignée fixe.
• Prenez toujours appui avec vos
mains sur le guidon en montant sur
l’appareil ou en en descendant.
• Portez des vêtements et chaussures
appropriés.
• Protégez l’unite des compteurs
d’une exposition au soleil et séchez
toujours la surface de l’unite des
compteurs si des gouttes de sueur
sont tombées dessus.
• N’effectuez jamais d ‘autres
opérations de réglage et d ‘entretien
que celles mentionnées dans ce
guide et suivez bien les conseils
d’entretien qui y sont donnés.
• L’appareil ne doit pas être utlisé par
des personnes pesant plus de
150 kg.
• Pour information complémentaire sur
la garantie de votre équipement de
fitness, veuillez consulter la brochure
de garantie livrée avec l’appareil.
Veuillez noter que la garantie ne
couvre pas les dommages causes
par un manque de precaution quant
aux instructions de montage et
d’entretien decrites dans ce mode
d’emploi.
• Ne jamais laisser tomber ou
introduire des objets dans les
ouvertures.
• Ne pas utiliser à l’extérieur.
• Ne pas exercer une pression
excessive sur les boutons de
commande de la console. Ils ont
été réglés avec précision, de façon
à fonctionner correctement par une
légère pression du doigt. Le fait
d’appuyer plus fort ne changera rien
à la rapidité de la console. Si vous
avez l’impression que les boutons ne
fonctionnent pas correctement sous
une pression normale, contactez
votre revendeur.
CONSERVEZ CES INSTRUCTIONS!
Page 51

F
mode d´emploi • PLATINUM PRO
51
Instructions de
montage
Etape 1:
Montage du tube arriere pour les
pieds
1. Montez le tube arrière pour les pieds
(5) sur le cadre rincipal à l’aide
de quatre boulons 3/8”x2” à tête
hexagonale (50) et quatre rondelles
plates 3/8”x25 mm (71).
Page 52

52
mode d´emploi
•
PLATINUM PRO
Etape 2:
Montage du tube vertical avant
1. Démêlez le câble de l’ordinateur (29)
et faites le passer à travers le capot
du tube vertical (38) et le tube vertical
(2) jusqu’à ce que le connecteur du
câble sorte de l’ouverture située sur
le dessus du tube vertical. Faites
glisser le capot en plastique (38) sur
le tube vertical en veillant à la bonne
orientation du capot.
2. Montez le tube vertical (2) sur le
cadre principal (1) à l’aide de sept
boulons 5/16”x5/8” à tête hexagonale
(51), six rondelles plates 5/16”x18
mm (72) sur les vis latérales et une
rondelle courbée 5/16”x19 mm (99)
sur la vis avant.
Page 53

F
mode d´emploi • PLATINUM PRO
53
Etape 3:
Montage du guidon
1. Faites passer les deux câbles du
capteur de pouls (26) par le trou dans
la plaque de montage du guidon
et faites les sortir par le trou dans
la plaque de la console. Montez le
guidon (3) sur le tube vertical (2) à
l’aide de deux boulons 5/16”x5/8” à
tête hexagonale (51), deux rondelles
plates 5/16”x18 mm (72) et deux
rondelles fendues 5/16” (103) en
veillant à ne pas coincer les câbles
du capteur de pouls.
Page 54

54
mode d´emploi
•
PLATINUM PRO
pédales, si vous vous constatez des
mouvements saccadés en pédalant.
Des pédales pas assez serrées sont
souvent à l’origine de bruits suspects,
de mouvement saccadés et de
cliquetis.
4. Montez la tige de selle (7) sur le
guide situé sur le tube de selle en
orientant la tige de selle vers l’avant.
Montez la selle (19) sur la tige de
selle.
5. Montez le porte-bidon (116) sur le
tube vertical à l’aide de deux vis
cruciformes M5x12 mm (58).
Les pédales
Grâce aux recherches effectuées en
collaboration avec un scientifi que de
haut niveau et un expert en rééducation,
notre service ingénierie a réussi une
percée dans la conception de pédales.
Dans cette conception, la largeur de
la pédale a été réduite et la pédale est
légèrement inclinée, afi n de procurer
une impression plus naturelle lors du
pédalage.
Etape 4:
Montage de la console, du siege,
des pedales et des capots
1. Branchez le câble de l’ordinateur
(29) et les deux câbles du capteur
de pouls (26) sur les connecteurs à
l’arrière de la console (34). Montez
la console (34) sur le tube vertical
à l’aide de quatre vis cruciformes
M5x12 mm (58).
2. Montez le capot avant aux pieds (40)
et le capot arrière aux pieds (41)
sur le cadre principal (1) à l’aide de
quatre vis cruciformes M5x12 mm
(58).
3. Montez les pédales (45 gauche, 46
droite) sur les bras de manivelle (16L,
16R). Rappelez-vous que la pédale
de gauche a un fi letage inverse et
se visse sur le bras de manivelle
dans le sens inverse par rapport au
fi letage ordinaire. L’extrémité de la
partie fi letée de la pédale gauche
est marquée d’un “L” et celle de la
pédale droite est marquée d’un “R”.
Assurez-vous de serrer les pédales
autant que vous le pouvez. Il peut
être nécessaire de resserrer les
Page 55

F
mode d´emploi • PLATINUM PRO
55
l’écran de paramètres.
• Augmente ou diminue la valeur du
paramètre.
• Réglage de la valeur cible (plus ou
moins) pendant l’entraînement.
• Augmente ou diminue la vitesse
pendant un entraînement T-Ride™
ou T-Road.
• Dans l’écran du mode Musique, elle
permet de sélectionner des chansons
ou
• Une fonction et de régler le volume.
Horizontal
Tourner dans le sens des aiguilles d’une
montre pour choisir l’option de droite et
dans le sens inverse des aiguilles d’une
montre pour celle de gauche.
Vertical
Tourner dans le sens des aiguilles d’une
montre pour monter et dans le sens
inverse des aiguilles d’une montre pour
descendre
Fonctions du bouton de la molette:
• Confirmation du mode Sport.
• Confirmation de l’option en mode
Utilisateur/Paramètres.
• Configuration de l’élément de travail
dans l’écran de configuration.
• Confirmation de la valeur du
paramètre.
• Changement d’écran pendant
l’entraînement entre bpm ↔ Nm ou
bpm ↔ W.
• Changement d’écran pendant
T-Ride™ entre bpm ↔ m ou bpm ↔
ft.
• Changement d’écran pendant T-Road
entre Vidéo ↔ Profil.
• Pendant T-Trainer™, changement au
mode d’encadrement suivant.
User interface
Molette et boutons
A Bouton Back, Stop:
• Ce bouton permet de retourner à la
fenêtre précédente.
• Il arrête l’entraînement en cours.
B Menu principal:
• Ce bouton permet de revenir au
menu principal ou de lancer la
fonction quick start.
• Pendant l’entraînement ce bouton
déclenche la pause.
C Utilisateur/Paramètres:
• Appuyez sur ce bouton pour entrer
dans l’écran du mode Utilisateur/
Paramètres.
• Ce bouton est inactif pendant
l’entraînement.
D Molette:
Fonctions de la rotation de la molette:
• Dans le menu principal, elle
permet de sélectionner un mode
d’entraînement.
• Sélection des options du mode
Utilisateur/Paramètres.
• Sélection d’un élément de travail sur
Page 56

56
mode d´emploi
•
PLATINUM PRO
La machine est alors prête à commencer
la programmation de votre séance
d’entraînement. Il vous suffit de
sélectionner démarrage rapide (quick
start) et de commencer.
Programmes
Démarrage rapide
• Tourner la molette et sélectionner
“Démarrage rapide”.
• Appuyer sur la molette pour confirmer
la sélection et ouvrir directement
l’écran d’entraînement.
Écran d’entraînement
L’abscisse représente la durée en
minutes entre 0~30. Elle est mise à
jour toutes les 15 minutes pendant
l’entraînement.
• Pendant que vous faites de
l’exercice, appuyez sur le bouton
de la molette pour que l’ordonnée
s’affiche en Nm ou en bpm.
• Le graphique représente la valeur
de couple en Nm. Faites tourner
la molette pour régler la valeur de
couple.
• La ligne pointillée blanche représente
la position en cours, qui se déplace
vers la droite à mesure que la durée
de l’entraînement augmente. L’écran
d’entraînement peut afficher au
maximum les données de 5 heures.
• La courbe orange affiche le rythme
cardiaque réel de l’utilisateur qui
varie à mesure que la fréquence
cardiaque augmente ou diminue.
Port USB
Le port USB peut être utilisé pour
• Fonctions de maintenance, comme
une mise à jour du système.
ATTENTION ! Le format NTFS n’est
pas pris en charge.
Écran de demarrage
Lors du démarrage de l’interface de
l’utilisateur, un écran de chargement
comme celui qui est représenté cidessous s’affiche.
Après quelques secondes, cet écran
laissera place à l’écran de lecture de
données en cours. Comme celui-ci.
Après avoir chargé l’application,
l’interface de l’utilisateur affichera l’écran
du menu principal.
Page 57

F
mode d´emploi • PLATINUM PRO
57
Pouls Constant
• Tourner la molette et sélectionner
“pouls constant”.
• Appuyer sur la molette pour confirmer
la sélection et ouvrir directement
l’écran d’configuration(1).
Écran Configuration (1)
• Faites tourner la molette pour régler
la valeur de rythme cardiaque. (le
pourcentage varie avec la valeur
de bpm)
• Appuyez sur la molette pour
confirmer la sélection et entrez dans
l’écran Paramètres (2).
Écran Paramètres (2)
• Tournez la molette pour sélectionner
un élément.
• Appuyez sur le bouton de la molette
pour confirmer et continuer à définir
les paramètres de droite.
• Tournez la molette pour changer les
paramètres.
• Appuyez sur la molette pour
confirmer la sélection et entrez dans
l’écran d’entraînement.
Fin de l’entrainment
L’écran de fin d’entraînement apparaît
lorsque l’utilisateur appuie sur Back/Stop
ou sur le menu principal, ou quand la
ligne pointillée blanche atteint la valeur
cible.
Écran de fin d’entraînement
Continuer: (continue)
Sélectionnez ”Continue” pour revenir à
l’écran d’entraînement
Quitter: (exit)
Sélectionnez “quitter” pour quitter
l’entraînement et retourner à l’écran de
la dernière séance.
Sauver & quitter: (save & exit)
Sélectionnez “Sauver & quitter” et
saisissez un nom de fichier en bas
de l’écran : utilisez la molette pour
sélectionnez une lettre A~Z ou un
chiffre 0~9. Enregistrez les données
de l’entraînement et donnez un nom
au fichier pour un nouveau mode
d’entraînement.
Affiche les données de l’entraînement
dans l’écran de la dernière séance
Écran de données de l’entraînement
Appuyez sur le bouton de la molette
pour retourner au menu principal.
Page 58

58
mode d´emploi
•
PLATINUM PRO
cardiaque de l’utilisateur n’est pas
détecté pendant l’entraînement.
Pour arrêter votre entraînement,
reportez-vous à la section :
“Fin de l’entraînement ”
Manuel
• Tourner la molette et sélectionner
“manuel”.
• Appuyer sur la molette pour confirmer
la sélection et ouvrir directement
l’écran d’configuration(1).
Écran Configuration (1)
• Tournez la molette pour sélectionner
un élément.
• Appuyez sur le bouton de la molette
pour confirmer et continuer à définir
les paramètres de droite.
• Tournez la molette pour changer les
paramètres.
• Appuyez sur la molette pour
confirmer la sélection et entrez dans
l’écran d’entraînement.
Écran d’entraînement
Écran d’entraînement
L’unité de l’abscisse s’affiche en
fonction de la sélection des valeurs
Énergie/Temps/Distance dans l’écran
Configuration :
Unité d’énergie : kcal
Unité de temps : min
Unité de distance : km
(dans le système métrique)
mile
(dans le système impérial)
• Pendant que vous faites de
l’exercice, appuyez sur le bouton de
la molette pour afficher l’ordonnée
• en W ou en bpm.
• Le graphique représente la valeur
de rythme cardiaque cible en bpm.
Faites tourner la molette pour régler
la valeur de rythme cardiaque.
• La ligne pointillée blanche représente
la position en cours, qui se déplace
vers la droite à mesure que les
valeurs de calories/temps/distance
augmentent.
• La courbe orange affiche le rythme
cardiaque réel de l’utilisateur qui
varie à mesure que la fréquence
cardiaque augmente ou diminue.
• La courbe bleue représente la valeur
de Watts réelle.
• Programmation de la console : La
console aide l’utilisateur à atteindre
un objectif en fonction du rythme
cardiaque cible qu’il a prédéfini
pendant l’entraînement. Lorsque le
rythme cardiaque réel est supérieur
à la valeur cible, le système réduit
la valeur de Watts ; à l’inverse, il
augmente la valeur de Watts si le
rythme cardiaque réel est en dessous
de la valeur cible.
• Le message « Pas de rythme
cardiaque » s’affiche si le rythme
Page 59

F
mode d´emploi • PLATINUM PRO
59
Écran Configuration (1)
• Faites tourner la molette pour régler
la valeur de Watts cible.
• Appuyez sur la molette pour
confirmer la sélection et entrez dans
l’écran Configuration (2).
Écran Configuration (2)
• Tournez la molette pour sélectionner
un élément.
• Appuyez sur le bouton de la molette
pour confirmer et continuer à définir
les paramètres de droite.
• Tournez la molette pour changer les
paramètres.
• Appuyez sur la molette pour
confirmer la sélection et entrez dans
l’écran d’entraînement.
Écran d’entraînement
L’unité de l’abscisse s’affiche en
fonction de la sélection des valeurs
L’unité de l’abscisse s’affiche en
fonction de la sélection des valeurs
Énergie/Temps/Distance dans l’écran
Configuration :
Unité d’énergie : kcal
Unité de temps : min
Unité de distance : km
(dans le système métrique)
mile
(dans le système impérial)
• Pendant que vous faites de
l’exercice, appuyez sur le bouton
de la molette pour que l’ordonnée
s’affiche en Nm ou en bpm.
• Le graphique représente la valeur
de couple en Nm. Faites tourner
la molette pour régler la valeur de
couple.
• La ligne pointillée blanche représente
la position en cours, qui se déplace
vers la droite à mesure que les
valeurs de calories/temps/distance
augmentent.
• La courbe orange affiche le rythme
cardiaque réel de l’utilisateur qui
varie à mesure que la fréquence
cardiaque augmente ou diminue.
Pour arrêter votre entraînement,
reportez-vous à la section :
“Fin de l’entraînement ”
Effort Constant
• Tourner la molette et sélectionner
“effort constant”.
• Appuyer sur la molette pour confirmer
la sélection et ouvrir directement
l’écran d’configuration(1).
Page 60

60
mode d´emploi
•
PLATINUM PRO
Écran Configuration (1)
• Tournez la molette pour sélectionner:
Haut et bas (top and down) - Trail Easy Ride - Marathon - Boucle courte
(short loop).
• Appuyez sur la molette pour
confirmer la sélection et entrez dans
l’écran Configuration (2).
Écran Configuration (2)
• Choisissez le point de départ de
l’entraînement : faites tourner la
molette pour régler la ligne pointillée
blanche de gauche et appuyez sur le
bouton de la molette pour confirmer.
• Choisissez le point final de
l’entraînement : faites tourner la
molette pour régler la ligne pointillée
blanche de droite et appuyez sur le
bouton de la molette pour confirmer.
Entrez ensuite dans l’écran
d’entraînement.
Énergie/Temps/Distance dans l’écran
Configuration :
Unité d’énergie : kcal
Unité de temps : min
Unité de distance : km
(dans le système métrique)
mile
(dans le système impérial)
• Pendant que vous faites de
l’exercice, appuyez sur le bouton
de la molette pour que l’ordonnée
s’affiche en Nm ou en bpm.
• Le graphique représente la valeur de
Watts. Faites tourner la molette pour
régler la valeur de Watts.
• La ligne pointillée blanche représente
la position en cours, qui se déplace
vers la droite à mesure que les
valeurs de calories/temps/distance
augmentent.
• La courbe orange affiche le rythme
cardiaque réel de l’utilisateur qui
varie à mesure que la fréquence
cardiaque augmente ou diminue.
• Programmation de la console : La
console aide l’utilisateur à atteindre
un objectif en fonction de la valeur de
Watts cible qu’il a prédéfinie pendant
l’entraînement. Lorsque la valeur de
Watts réelle est > à la valeur cible, le
système réduit la valeur de Watts ;
à l’inverse, il augmente la valeur de
Watts si la valeur de Watts réelle est
< à la valeur cible.
Pour arrêter votre entraînement,
reportez-vous à la section :
“Fin de l’entraînement ”
T-Ride
• Tourner la molette et sélectionner
“T-Ride”.
• Appuyer sur la molette pour confirmer
la sélection et ouvrir directement
l’écran d’configuration(1).
Page 61

F
mode d´emploi • PLATINUM PRO
61
Preset Programmes
• Tourner la molette et sélectionner
“Preset programmes”.
• Appuyer sur la molette pour confirmer
la sélection et ouvrir directement
l’écran d’configuration(1).
Écran Configuration (1)
• Tournez la molette pour sélectionner :
• Effort Constant: Rolling Hills - Hill
Climb - Cross Country - Stamina Power Éléments Interval et
Contrôle du rythme cardiaque :
Fat burner 1 - Fat burner 2 - Cardio
Strength - Cardio Climb - Cardio
Interval.
• Appuyez sur la molette pour
confirmer la sélection et entrez dans
l’écran Configuration (2).
Écran Configuration (2)
• Tournez la molette pour sélectionner
un élément.
• Appuyez sur le bouton de la molette
pour confirmer et continuer à définir
les paramètres de droite.
• Tournez la molette pour changer les
paramètres.
• Appuyez sur la molette pour
Écran d’entraînement
L’abscisse est affichée en unité de
distance (Km dans le système métrique
et mile dans le système impérial).
• Pendant que vous faites de
l’exercice, appuyez sur le bouton de
la molette pour que l’ordonnée affiche
les m ou les bpm, dans le système
métrique, ou les ft ou les bpm, dans
le système impérial.
• La ligne pointillée blanche représente
la position en cours, qui se déplace
vers la droite à mesure que la
distance augmente.
• La courbe orange affiche le rythme
cardiaque réel de l’utilisateur qui
varie à mesure que la fréquence
cardiaque augmente ou diminue.
• Sur la droite de l’écran, on trouve le
changement de vitesse, de 1 à 8.
• Tournez la molette pour changer la
vitesse.
• L’icône blanche + 0°en bas à gauche
de l’écran représente le niveau
d’inclinaison. Il varie lorsque le
niveau d’inclinaison du Profil change.
• L’écran Dernière séance affiche les
données de l’entraînement. Appuyez
sur le bouton de la molette pour
retourner au Menu principal.
Pour arrêter votre entraînement,
reportez-vous à la section :
“Fin de l’entraînement ”
Page 62

62
mode d´emploi
•
PLATINUM PRO
Entraînement
(Contrôle du rythme cardiaque)
L’unité de l’abscisse s’affiche en
fonction de la sélection des valeurs
Énergie/Temps/Distance dans l’écran
Configuration :
Unité d’énergie : kcal
Unité de temps : min
Unité de distance : km
(dans le système métrique)
mile
(dans le système impérial)
• Pendant que vous faites de
l’exercice, appuyez sur le bouton de
la molette pour que l’abscisse affiche
les W ou les bpm.
• Le graphique représente la valeur
de Watts cible par défaut du Profil.
Faites tourner la molette pour régler
le pourcentage de valeur de Watts
du profil à droite de la ligne pointillée
blanche.
• La ligne pointillée blanche
représente la position en cours, qui
se déplace vers la droite à mesure
que les valeurs de temps/distance
augmentent.
• La courbe orange affiche le rythme
cardiaque réel de l’utilisateur qui
varie à mesure que la fréquence
cardiaque augmente ou diminue.
• La courbe bleue représente la valeur
de Watts réelle.
• L’écran Programmation de la console
est le même qu’en mode Pouls
Constant
Pour arrêter votre entraînement,
reportez-vous à la section :
“Fin de l’entraînement ”
confirmer la sélection et entrez dans
l’écran d’entraînement.
Écran d’entraînement (Watt Control)
L’unité de l’abscisse s’affiche en
fonction de la sélection des valeurs
Énergie/Temps/Distance dans l’écran
Configuration :
Unité d’énergie : kcal
Unité de temps : min
Unité de distance : km
(dans le système métrique)
mile
(dans le système impérial)
• Pendant que vous faites de
l’exercice, appuyez sur le bouton de
la molette pour que l’abscisse affiche
les W ou les bpm.
• Le graphique représente la valeur
de Watts cible par défaut du Profil.
Faites tourner la molette pour régler
le pourcentage de valeur de Watts
du profil à droite de la ligne pointillée
blanche.
• La ligne pointillée blanche
représente la position en cours, qui
se déplace vers la droite à mesure
que les valeurs de temps/distance
augmentent.
• La courbe orange affiche le rythme
cardiaque réel de l’utilisateur qui
varie à mesure que la fréquence
cardiaque augmente ou diminue.
• L’écran Programmation de la console
est le même qu’en mode effort
constant
Page 63

F
mode d´emploi • PLATINUM PRO
63
Fenêtre de sélection
Tournez la molette et sélectionnez un
élément
“Relire “ (Replay)
• Appuyez sur le bouton de la molette
pour confirmer.
Entrez dans l’écran d’entraînement et
continuez l’entraînement précédent
“Modifier” (“Edit”)
• Appuyez sur la molette pour
confirmer.
• Entrez dans l’écran et modifiez le
paramètre.
• Appuyez sur la molette pour
confirmer et entrez dans l’écran
d’entraînement.
“Supprimer” (Delete)
• Tournez la molette pour sélectionner
un élément.
• Appuyez sur le bouton de la molette
pour confirmer la sélection et ouvrir la
fenêtre de sélection.
• Choisissez Oui pour effacer le fichier
sélectionné ; choisissez Non pour ne
pas effacer le fichier sélectionné.
• Appuyez sur le bouton de la molette
pour confirmer.
Écran d’entraînement :
L’écran d’entraînement dépend du mode
d’entraînement dans lequel vous vous
trouvez.
Mode Nm manuel :
Ce mode est identique au mode Manuel.
Mode Effort Constant :
Ce mode est identique au mode Watt
des programmes prédéfinis.
Mode Pouls Constant :
Ce mode est identique au mode Rythme
cardiaque des programmes prédéfinis.
Profils Personnels
• Tourner la molette et sélectionner
“Profils personnels”.
• Appuyer sur la molette pour confirmer
la sélection et ouvrir directement
l’écran d’configuration(1).
REMARQUE
Si aucun entraînement enregistré n’est
trouvé, la fenêtre ci-dessous s’affichera.
Aucun exercise sauvé trouvé
• Appuyez sur la molette pour
retourner au menu principal.
Écran Configuration (1)
L’écran Configuration (1) affiche les
éléments et les entraînements que
l’utilisateur a enregistrés.
Ils s’affichent dans l’écran de droite et de
gauche.
• Tournez la molette pour sélectionner
un élément.
• Appuyez sur le bouton de la molette
pour confirmer la sélection et ouvrir la
fenêtre de sélection.
Page 64

64
mode d´emploi
•
PLATINUM PRO
l’écran Configuration.
Écran Configuration (2)
• Faites tourner la molette pour définir
le rythme cardiaque de l’utilisateur
dans la valeur Max Vo2. (La
fourchette est entre 68~220bpm.par
défaut : 85% du RC max et affiche
le RC max (bpm) et le poids (kg) de
l’utilisateur.
• Appuyez sur le bouton de la molette
pour confirmer la sélection et ouvrir la
fenêtre d’information
Fenêtre d’information
Conservez un rythme de pédalage de
50 à 70 rpm. Terminer le test lorsque
la fréquence cible est atteinte. Cliquez
OK et commencez à pédaler pour
débuter le test de fitness.
• Appuyez sur le bouton de la molette
pour confirmer la sélection et ouvrir
l’écran d’entraînement.
Test De Fitness
• Tourner la molette et sélectionner
“Test De Fitness”.
• Appuyer sur la molette pour confirmer
la sélection et ouvrir directement
l’écran d’configuration(1).
REMARQUE
Pour effectuer un test de forme,
l’interface doit disposer des données de
l’utilisateur. Si les données de l’utilisateur
ne sont pas disponibles, le test de forme
ne peut commencer.
Le message ci-dessous s’affichera.
Aucun utilisateur sélectionné ou
informations de l’utilisateur actuel
insuffisantes pour démarrer le Fitness
Test. Mettez à jour les informations
dans le menu Utilisateur.
• Appuyez sur la molette pour
retourner au menu principal
Écran Configuration (1)
• Tournez la molette pour sélectionner
un élément.
• (Inactif / Actif / Mode athlétique).
• Appuyez sur le bouton de la molette
pour confirmer la sélection et ouvrir
Page 65

F
mode d´emploi • PLATINUM PRO
65
Écran de données de l’entraînement
• Appuyez sur la molette pour entrer
dans l’écran de résultats du test de
Vo2 Max.
Écran de résultats du test de VO2 Max
• Appuyez sur la molette pour
retourner au menu principal.
Pour arrêter votre entraînement,
reportez-vous à la section :
“Fin de l’entraînement ”
Écran d’entraînement
• L’abscisse est affichée en min.
• L’ordonnée est affichée en bpm.
• Le graphique représente la valeur de
Watts du Profil.
• La ligne pointillée blanche représente
la position en cours qui se déplace
vers la droite à mesure que la
durée augmente. La durée de
l’entraînement est de 5 heures
au maximum. Après quoi l’écran
d’entraînement se ferme.
• La courbe orange affiche le rythme
cardiaque réel de l’utilisateur qui
varie à mesure que la fréquence
cardiaque augmente ou diminue.
• La ligne pointillée rouge horizontale
représente la valeur de rythme
cardiaque cible de l’utilisateur.
L’écran affiche :
”Echec du test!” si:
• La durée de l’entraînement est trop
courte.
• La valeur de RPM est trop faible.
• La cible de RC n’est pas atteinte.
• Le RC est inférieur à 110 bpm.
”Frequence cardiaque non detectee!”
si:
• Le rythme cardiaque de l’utilisateur
n’est pas détecté.
Appuyez sur Back/stop ou sur le bouton
Menu principal pour quitter l’écran
d’entraînement
“Cible FC atteinte! Continuer de
pédaler”
• L’utilisateur a atteint sa cible.
• Appuyez sur le bouton de la molette
pour finir le test et afficher l’écran de
données de l’entraînement.
Page 66

66
mode d´emploi
•
PLATINUM PRO
3 parcours peuvent être sélectionnés.
À savoir : Tuscany Sandy Road/ Tuscany
Scenrey Road/ Tuscany Country Road.
• Tournez la molette et sélectionnez
votre parcours d’entraînement.
• Appuyez sur la molette pour
confirmer la sélection et entrez dans
l’écran vidéo de l’entraînement
Appuyez sur la molette pendant
l’entraînement pour passer de l’écran
Vidéo à l’écran Profil.
• L’abscisse est affichée en unité
de distance (Km dans le système
métrique et mile dans le système
impérial).
• L’ordonnée est affichée en m dans
le système métrique et en ft dans le
système impérial.
• Appuyez sur la molette pendant
l’entraînement pour passer de l’écran
Vidéo à l’écran Profil.
Dans l’écran Profil :
• La ligne pointillée blanche représente
la position en cours, qui se déplace
vers la droite à mesure que la durée
de l’entraînement augmente.
• La courbe orange affiche le rythme
cardiaque réel de l’utilisateur qui
varie à mesure que la fréquence
cardiaque augmente ou diminue
Tableau de résultats du test de VO2
Max
T-Road
• Tourner la molette et sélectionner
“Test De Fitness”.
• Appuyer sur la molette pour confirmer
la sélection et ouvrir directement
l’écran d’configuration(1).
Écran Configuration (1)
Page 67

F
mode d´emploi • PLATINUM PRO
67
Quittez les données d’entraînement en
appuyant sur
BACK/STOP.
Modifier utilisatuer
En sélectionnant “Modifier utilisatuer”
vous pouvez :
• Régler la luminosité (50% par
défaut).
• Vérifier le kilométrage total de la
machine.
• Vérifier la durée d’utilisation totale de
la machine.
• Vérifier la version du firmware et du
logiciel par défaut de la Console.
• Modifier la langue.
• Choisir d’activer le son des boutons
(yes) ou de le désactiver (non).
Fenêtre Paramètres de l’utilisateur
Comment modifier les paramètres
• Tournez la molette pour sélectionner
un élément modifiable.
• Appuyez sur la molette pour ouvrir
l’élément sélectionné dans la partie
de droite de l’écran afin de le
modifier.
Dans l’écran Vidéo :
• Sur la droite de l’écran, on trouve le
changement de vitesse, de 1 à 8.
Tournez la molette pour changer la
vitesse.
• L’icône blanche + 0°en bas à gauche
de l’écran représente le niveau
d’inclinaison. Il varie lorsque le
niveau d’inclinaison du Profil change.
• Appuyez sur Back/stop ou
Main menu pour quitter l’écran
d’entraînement. Cet écran se fermera
également lorsque la ligne pointillée
blanche aura atteint la valeur cible.
Pour arrêter votre entraînement,
reportez-vous à la section :
“Fin de l’entraînement ”
Paramètres de
l’utilisateur
Appuyez sur le bouton “Paramètres de
l’utilisateur” pour entrer dans le menu
principal Utilisateur/Paramètres
• Utilisez la molette pour sélectionner
l’un des six éléments disponibles.
• Appuyez sur le bouton de la molette
pour confirmer et entrer dans
l’écran de configuration de l’élément
sélectionné.
Journal utilisateur
Sélectionnez “Journal utilisateur” pour
visualiser les données d’entraînement de
l’utilisateur sélectionné.
Vous pouvez afficher soit les données de
la dernière séance, soit un récapitulatif
de l’ensemble des séances de
l’utilisateur.
Page 68

68
mode d´emploi
•
PLATINUM PRO
• Tournez la molette pour sélectionner
Chronologique :. le système
comptera de zéro jusqu’à la durée/
distance prédéfinie
Compte à rebours: le système
comptera depuis la durée/distance
définie jusqu’à zéro.
• Appuyez sur la molette pour
confirmer et retourner au menu
Moddifier utilisateur.
Sexe
• Tournez la molette pour sélectionner
“Sexe”.
• Appuyez sur la molette pour ouvrir
“Sexe” edit.
• Tournez la molette pour sélectionner
Masculin/Féminin.
• Appuyez sur la molette pour
confirmer et retourner au menu
Moddifier utilisateur.
Âge
• Tournez la molette pour sélectionner
“âge”.
• Appuyez sur la molette pour ouvrir
“âge” edit.
• Tournez la molette pour changer
l’âge.
• Appuyez sur la molette pour
confirmer et retourner au menu
Moddifier utilisateur.
Taille
• Tournez la molette pour sélectionner
“Taille”.
• Appuyez sur la molette pour ouvrir
“Taille” edit.
• Faites tourner la molette pour
modifier la taille
(en cm lorsque vous avez choisi
le système métrique et en ft/ inch
lorsque vous avez choisi le système
Impérial).
• Appuyez sur la molette pour
confirmer et retourner au menu
Moddifier utilisateur.
• Tournez la molette pour changer la
valeur du paramètre sélectionné.
• Appuyez sur la molette pour
confirmer la modification.
• Faites tourner la molette pour
sélectionner l’élément suivant ou
utilisez le bouton Back/ Stop pour
retourner au menu de paramètres.
Moddifier Utilisateur
En sélectionnant Moddifier Utilisateur
vous pouvez:
Modifier:
Le nom d’utilisateur
• Tournez la molette pour sélectionner
“Name”.
• Appuyez sur la molette pour ouvrir
“Nom”edit.
• Tournez la molette pour sélectionner
une lettre.
• Appuyez sur la molette pour
confirmer.
• Tournez la molette pour sélectionner
la lettre suivante.
• Lorsque vous avez terminé de
modifier le nom, sélectionnez “√”
pour confirmer le nom et retourner au
menu Edit User.
Unités, Affichage
• Tournez la molette pour sélectionner
“Unités”.
• Appuyez sur la molette pour ouvrir
“Unités” edit.
• Tournez la molette pour sélectionner
• Metric :. affiche les unités en km/
km/h/Kcal
Imperial : affiche les unités en mile/
mph/kcal.
• Appuyez sur la molette pour
confirmer et retourner au menu
Moddifier Utilisateur.
Afficher
• Tournez la molette pour sélectionner
“Afficher”.
• Appuyez sur la molette pour ouvrir
“afficher” edit.
Page 69

F
mode d´emploi • PLATINUM PRO
69
Changer Utilisateur
En sélectionnant “changer Utilisateur”
vous pouvez :
• Sélectionner un autre profil
d’utilisateur prédéfini.
• Faites tourner la molette et
sélectionnez l’utilisateur que vous
souhaitez activer.
• Appuyez sur la molette pour
confirmer l’utilisateur sélectionné et
retourner au menu de paramètres.
Créer utilisateur
En sélectionnant “Créer utilisateur”
vous pouvez créer un nouveau
profil d’utilisateur. Un maximum de 8
utilisateurs peuvent être installés.
Consultez la section Edit User pour
savoir comment créer un utilisateur.
Entraînement
pour améliorer la
fréquence cardiaque
Un mot sur la fréquence cardiaque :
Le vieil adage « pas de gain sans
douleur » est un mythe qui a été
démenti par les effets bénéfiques de
Poids
• Tournez la molette pour sélectionner
“Poids”.
• Appuyez sur la molette pour ouvrir
“poids” edit.
• Faites tourner la molette pour
modifier le poids
(en kg lorsque vous avez choisi
Métrique et en lbs lorsque vous avez
choisi Impérial).
• Appuyez sur la molette pour
confirmer et retourner au menu
Moddifier utilisateur.
FC Max
• Tournez la molette pour sélectionner
“FC Max”.
• Appuyez sur la molette pour ouvrir
“FC Max” edit.
• Faites tourner la molette pour
changer le FC max par défaut,
prédéfini comme :
Pour les hommes: 220-âge
pour les femmes : 226-âge
Appuyez sur la molette pour
confirmer et retourner au menu
Moddifier utilisateur.
Effacer utilisateur
En sélectionnant “Effacer Utilisateur”
vous pouvez :
• Supprimer un utilisateur et toutes ses
données.
• Faites tourner la molette et
sélectionnez l’utilisateur que vous
souhaitez supprimer.
• Appuyez sur la molette pour
supprimer l’utilisateur sélectionné et
retourner au menu de paramètres.
L’utilisateur sera alors supprimé
immédiatement
Page 70

70
mode d´emploi
•
PLATINUM PRO
180 x 0,6 = 108 battements par minute
(60 % de la fréquence maximale)
180 x 0,7 = 126 battements par minute
(70 % de la fréquence maximale)
Ainsi, pour une personne de 40 ans, la
zone d’entraînement se situerait entre
108 et 126 battements par minute.
Utilisation d’un émetteur de
fréquence
Comment porter la ceinture thoracique
émettrice sans fil ?
1. Attachez l’émetteur à la ceinture
élastique à l’aide des fixations.
2. Serrez la ceinture le plus possible
en faisant en sorte qu’elle reste
confortable.
3. Positionnez l’émetteur avec le logo
centré au milieu de votre corps et
tourné vers l’extérieur (certaines
personnes doivent positionner
l’émetteur légèrement à gauche du
centre). Attachez l’extrémité ronde
de la ceinture élastique en l’insérant
et attachez l’émetteur et la ceinture
autour de votre poitrine à l’aide des
fixations.
4. Positionnez l’émetteur juste en
dessous des muscles pectoraux.
5. La sueur est le meilleur conducteur
pour mesurer les signaux électriques
minuscules émis par les battements
du coeur. Cependant, l’eau du
robinet peut également être utilisée
pour humidifier les électrodes (les
2 zones noires carrées sur la face
arrière de la ceinture, situées de
chaque côté de l’émetteur). Il est
également recommandé de mettre
la ceinture émettrice quelques
minutes avant l’entraînement.
Certains utilisateurs auront plus de
mal à obtenir un signal fort et stable
au début en raison de la chimie de
leur corps. Un bon échauffement
permet de résoudre ce problème.
Comme nous l’avons indiqué, le fait
de porter des vêtements par-dessus
l’émetteur/la ceinture n’affecte pas
les performances.
l’entraînement en douceur. Une grande
partie de ce succès est due à l’utilisation
de moniteurs de fréquence cardiaque.
Grâce à l’utilisation appropriée d’un
moniteur de fréquence cardiaque, de
nombreuses personnes se sont rendues
compte que l’intensité avec laquelle elles
avaient l’habitude de s’entraîner était soit
trop forte, soit trop faible. L’entraînement
est beaucoup plus agréable si l’on
maintient sa fréquence cardiaque dans
l’intervalle préconisé. Pour déterminer
l’intervalle bénéfique dans lequel vous
souhaitez vous entraîner, vous devez
d’abord déterminer votre fréquence
cardiaque maximale. Utilisez pour ce
faire la formule suivante : 220 moins
votre âge. Cela vous donnera la
fréquence cardiaque maximale (FCM)
pour quelqu’un de votre âge. Pour
éterminer l’intervalle des fréquences
cardiaques permettant d’atteindre des
objectifs précis, il suffit de calculer
un pourcentage de votre FCM. Pour
améliorer votre fréquence cardiaque
par l’entraînement, le pourcentage de
la fréquence cardiaque maximale doit
être compris entre 50 % et 90 %. 60 %
de votre FCM est le pourcentage qui
permet de brûler les graisses, alors que
70 % est le pourcentage qui renforce le
système cardiovasculaire. Vous devez
rester dans la zone 60 % - 70 % pour
obtenir les meilleurs résultats.
Pour une personne de 40 ans, la zone
cible pour la fréquence cardiaque est
calculée comme suit :
220 - 40 = 180 (fréquence cardiaque
maximale)
Page 71

F
mode d´emploi • PLATINUM PRO
71
6. Vous devez observer une certaine
distance entre ’émetteur et le
récepteur lors de votre entraînement,
afin d’obtenir un signal fort et stable.
Cette distance peut varier quelque
peu, mais en général, vous devez
rester assez proche de la console
pour obtenir des résultats précis
et fiables. En portant l’émetteur
directement sur la peau nue, vous
assurez son bon fonctionnement.
Si vous le souhaitez, vous pouvez
porter l’émetteur par-dessus une
chemise. Pour ce faire, humidifiez les
zones
NOTE!
• L’émetteur est automatiquement
activé quand il détecte une activité
du coeur de l’utilisateur. En outre,
il est automatiquement désactive
quand il ne détecte plus aucune
activité. Bien que l’émetteur résiste
à l’eau, l’humidité peut avoir pour
effet de créer de faux signaux. Par
conséquent, vous devez sécher
complètement l’émetteur après usage
afin de prolonger la durée de vie
de la batterie (la durée de vie de la
batterie de l’émetteur étant estimée
à 2500 heures). Si votre ceinture
thoracique est équipée d’une batterie
remplaçable, elle doit être remplacée
par une Panasonic CR2032
Attention!
Ne pas utiliser ce produit pour la
fréquence cardiaque cible, à moins
qu’une valeur constante et fiable
soit affichée pour cettefréquence. Si
l’écran affiche des valeurs aléatoires,
irrégulières ou élevées, cela signifie qu’il
y a un problème.
Voici quelques sources d’interférence
pouvant causer des fréquences cardiaques irrégulières:
1. Fours à micro-ondes, téléviseurs,
petits appareils électroménagers etc.
2. Lampes fluorescentes.
3. Certains systèmes d’alarme.
4. Clôtures pour animaux domestiques.
5. Chez certaines personnes, l’émetteur
a du mal à capter des signaux en
provenance de leur peau. Si vous
rencontrez des problèmes, essayez
de porter l’émetteur à l’envers.
Normalement, l’émetteur sera
orientée de telle sorte que le logo se
trouve à l’endroit.
6. L’antenne qui capte votre fréquence
cardiaque est très sensible. S’il y a
une source de bruit externe, le fait de
tourner la machine de 90 degrés peut
supprimer l’interférence.
7. Si vous continuez à rencontrer des
problèmes, vous devez contacter
votre revendeur
Exercice
Le pédalage est une excellente forme
d’exercice aérobic qui lie à la fois
modération et durée dans les efforts.
Un tel exercice vise à améliorer votre
capacité maximale d’absorption
d’oxygène, donc votre endurance et
votre condition physique. La capacité
du corps à “brûler” la graisse est
directement liée à sa capacité de
transporter l’oxygène. L’exercice aérobic
est avant tout un exercice agréable
qui devra faire apparaître une légère
sueur sur votre peau mais ne devra en
aucun cas vous essouffler. Pour vous
remettre en forme, il vous faut pratiquer
des exercices physiques au moins trois
fois par semaine pendant 30 minutes à
chaque fois et pour vous maintenir en
bonne condition, au moins deux fois par
semaine. Débutez avec une vitesse de
pédalage et une resistance faibles.
Si vous êtes obèse, un effort excessif
pourrait surcharger votre système
cardiovasculaire. Au fur et à mesure que
votre condition s’améliore, vous pourrez
augmenter résistance et vitesse.
Page 72

72
mode d´emploi
•
PLATINUM PRO
la liste des pièces détachées à la fin de
ce mode d’emploi. Seules des pièces
mentionnées dans la liste des pièces de
rechange peuvent être utilisées dans
l’appareil.
Transport et rangement
Veuillez suivre ces instructions pour
déplacer ou transporter votre vélo
d’appartement : en le levant d’une façon
incorrecte, vous risquez un accident ou
un problème de dos. Coupez toujours
l’alimentation de votre appareil et
débranchez le cordon secteur avant de
déplacer votre appareil sportif.
Mettez-vous arrière l’appareil. Soulevez
l’appareil de façon à ce qu’il repose sur
ses roulettes de transport se trouvant
dans la partie derrière du châssis et
déplacez l’appareil. Reposez l’appareil
par terre en le tenant par le guidon et
en vous tenant tout le temps arrière
l’appareil.
Le déplacement de l’équipement peut
abîmer certains revêtements de sol, par
ex. les parquets en bois. Dans ce cas,
veillez à protéger le sol.
Pour lui garantir un fonctionnement
impeccable, rangez et utilisez votre
appareil dans un endroit sec, sans
variations de température importantes,
et protégez-le contre les poussières.
carried. We recommend that you use a
protective base when transporting the
equipment.
ATTENTION!
La garantie ne couvre pas les
dommages dus à une négligence des
instructions d’assemblage, de réglages
ou de maintenance données dans ce
mode d’emploi. Suivez les instructions
scrupuleusement pour l’assemblage,
l’utilisation et la maintenance de
votre équipement. Des changements
Maintenance
Votre ergomètre Tunturi ne requièrent
qu’un minimum de maintenance.
Vérifiez, de temps en temps, que tous
les écrous et vis sont serrés.
• Après s’être exercé, séchez
toujours l’appareil avec un tissu
mou et absorbant. N’utilisez pas de
détergent.
• N’enlevez jamais les capots
protecteurs de l’appareil.
Le frein électromagnétique forme
un champ magnétique capable
d’endommager le mécanisme d’une
montre ou la bande magnétique des
cartes bancaires ou de crédit, si ceuxci entrent en contact immédiat avec les
aimants. Ne tentez jamais de détacher
ou d’enlever le frein électromagnétique!
Le frein électromagnétique est basé
sur la résistance électromagnétique;
le niveau et de résistance est
électroniquement mésuré et indiqués
en watt sur l’affichage. Par conséquent
votre ergomètre Tunturi n’a pas besoin
d’être recalibré une fois assemblé,
entretenu et utilisé selon ce guide
d’exercice.
Defauts de fonctionement
En dépit d’un contrôle continu de
la qualité, l’appareil peut présenter
des défauts ou des anomalies de
fonctionnement provenant de certains
de ses composants. Dans ce cas, il
n’est pas cependant nécessaire d’aller
faire réparer votre appareil, le problème
pouvant bien souvent être résolu
par simple changement de la pièce
défectueuse.
Contactez votre distributeur au cas
ou vous remarqeuriez un défaut ou
un mauvais fonctionnement de votre
l’appareil ou si vous avez besoin de
pièces de rechange. Indiquez-lui la
nature du problème, les conditions
d’utilisation, la date d’achat, le modèle
et le numéro de série. Vous trouverez
Page 73

F
mode d´emploi • PLATINUM PRO
73
ou modifications non expressément
approuvés par Tunturi New Fitness BV.
rendront nulle l’autorité de l’utilisateur
sur l’equipement.
NOUS VOUS SOUHAITONS
D’AGRÉABLES ET NOMBREUSES
SÉANCES D’EXERCICE AVEC
VOTRE NOUVEAU PARTENAIRE
D’ENTRAÎNEMENT TUNTURI !
Page 74

74
mode d´emploi
•
PLATINUM PRO
Contents
Wekom .......................................... 74
Belangrijke informatie ................. 74
Montage instructies ..................... 76
Stap 1: ............................................... 76
Stap 2: ............................................... 77
Stap 3: ............................................... 78
Stap 4: ............................................... 79
Monitor ......................................... 80
Draaiknop en toetsen ......................... 80
Startscherm ........................................ 81
Programma’s ................................ 81
Snel start ............................................ 81
Stop de training .................................. 82
Doelhartslag ....................................... 82
Manueel .............................................. 83
Watt gestuurd ..................................... 84
T-Ride ................................................. 85
Preset Programma’s ........................... 86
Eigen trainingen.................................. 87
Fitnesstest .......................................... 88
T-Road ................................................ 90
Gebruiker/ instellingen................ 91
Dagboek ............................................. 91
Gebruikersinstellingen ........................ 91
Aanpassen.......................................... 92
Verwijderen ......................................... 93
Kies gebruiker..................................... 93
Aanmaken .......................................... 93
Hartslagtraining ........................... 93
Een hartslagzender gebruiken............ 94
Fitness Training ........................... 95
Onderhoud ................................... 95
Gebruiksstoringen .............................. 96
Transport en opslag ............................ 96
Nederlands
De Nederlandse tekst is een vertaling
van de Engelse tekst.
Wanneer u verschil aantreft in een
taal anders dan de Engelse, dan is de
Engelse versie leidend.
Wekom
Welkom in de wereld van tunturi
training!
Uw keuze toont aan, dat u echt in uw
gezondheid en conditie wilt investeren.
Het bewijst ook, dat u kwaliteit en
stijl belangrijk vindt en waardeert.
Met deze Tunturi trainer heeft u een
veilig, motiverend kwaliteitsproduct
als trainingspartner gekozen. Wat
uw trainingsdoel ook is, wij zijn ervan
overtuigd dat de keuze van deze trainer
de juiste is om uw doel te bereiken.
Meer informatie over het gebruik van uw
trainingsapparatuur en effi ciënte training
kunt u vinden op Tunturi’s website
WWW.TUNTURI.COM
Belangrijke informatie
Deze gids is een essentieel onderdeel
van uw fi etsergometer. Lees deze gids
zorgvuldig door vóórdat u begint met
monteren, gebruiken of onderhouden
van uw fi etsergometer. Bewaar de gids
op een handige plaats. U kunt er, nu
en in de toekomst, nuttige informatie
uithalen die u nodig heeft voor het
gebruik en het onderhoud van de
apparatuur. Volg de instructies altijd met
zorg op.
Gezondheid
• Laat uw conditie door uw huisarts
controleren voordat u begint met
trainen.
• Bij misselijkheid, duizeligheid of
andere abnormale symptomen moet
u direct stoppen met de training en
een arts raadplegen.
• Om spierpijn te voorkomen, begint
u de training met een warming up
en sluit u die af met cooling-down.
U sluit de training af met stretch
oefeningen.
Page 75

NL
handleiding • PLATINUM PRO
75
zachte en absorberende doek
als er zweetdruppels op gevallen
zijn. Reinig de monitor niet met
oplosmiddelen.
• Druk op de toetsen met uw
vingertoppen; nagels kunnen de
toetsmembranen beschadigen.
• Houd de monitor uit de zon; door
zonlicht kunnen kleuren van de
monitor verbleken.
• De trainer is geschikt voor personen
met een lichaamsgewicht tot
maximaal 150 kg.
• Nadere informatie over de garantie
op uw trainingstoestel vindt u in
het bijgesloten garantieboekje. De
garantie vervalt bij schade ontstaan
tijdens de verzending of door het niet
volgen van de in deze handleiding
gegeven instructies betreffende het
monteren, afstellen en onderhoud
van het apparaat.
• Laat geen voorwerpen in openingen
vallen of steek geen voorwerpen in
openingen.
• Gebruik het apparaat niet buiten.
• Druk niet te hard op de toetsen van
het bedieningspaneel. De toetsen zijn
nauwkeurig ingesteld en functioneren
goed bij een lichte vingerdruk. Als u
harder drukt, werkt de eenheid niet
sneller of langzamer. Als u denkt dat
de toetsen niet goed functioneren bij
normale druk, neemt u contact op
met uw dealer.
BEWAAR DEZE INSTRUCTIE
HANDLEIDING!
De Trainingsruimte
• Plaats de trainer op een vlakke
en stevige ondergrond. Bescherm
de vloer onder de trainer tegen
beschadiging.
• Zorg voor voldoende ventilatie tijdens
de training, maar zorg dat u niet op
de tocht zit.
• Tijdens de training is de toegestane
gebruikstemperatuur tussen +10º
en +35°C; voor opslag gelden de
temperaturen tussen -15° en +40°C.
De luchtvochtigheid in de trainings- of
opslagruimte mag nooit hoger dan 90
% zijn.
Het Gebruik Van De Trainer
• Ouders en verzorgers van kinderen
moeten er rekening mee houden
dat kinderen speels zijn en graag
alles uitproberen. Dit kan ertoe
leiden dat de trainer wordt gebruikt
op een manier waarvoor deze niet
bedoeld is. Als kinderen de trainer
mogen gebruiken moet u als ouder of
verantwoordelijke rekening houden
met de lichamelijke en psychische
ontwikkeling en vooral de aard van
het kind. Vertel kinderen duidelijk
hoe de trainer moet worden ebruikt
en houd toezicht. De trainer is geen
geval bedoeld als speelgoed.
• Controleer voor de training of het
apparaat goed functioneert. Train
nooit op een defect apparaat.
• De trainer mag uitsluitend door één
persoon tegelijk gebruikt worden.
• Draag tijdens de training de juiste
kleding en geschikte schoenen.
• Gebruik de trainer alleen als alle
afschermingen en omkastingen
geplaatst zijn.
• Voer alleen die
onderhoudsverrichtingen en
afstellingen uit die in deze
handleiding beschreven zijn. Volg
de onderhoudsinstructies van de
handleiding nauwkeurig op.
• Gebruik de trainer uitsluitend voor het
doel waarvoor deze is gemaakt en
zoals hierna beschreven wordt.
• Zorg ervoor dat de monitor niet
met water in aanraking komt.
Veeg de monitor altijd af met een
Page 76

76
handleiding
•
PLATINUM PRO
Montage instructies
Stap 1:
Montage Van De Achtersteun
1. Bevestig de buis van de achtersteun
(5) met vier zeskantbouten van 3/8”
x 2” (50) en vier sluitringen van 3/8” x
25 mm (71) op het hoofdframe (1).
Page 77

NL
handleiding • PLATINUM PRO
77
Stap 2:
Montage Van De Verticale Buis Voor
1. Maak de computerkabel los (29) en
schuif de kabel door de kap van de
verticale buis (38) en de verticale
buis (2) totdat de connector van de
kabel boven uit de verticale buis
komt. Schuif de plastic kap (38) op
de verticale buis en zorg ervoor
dat de kap in de juiste richting is
geplaatst.
2. Bevestig de verticale buis (2) op
het hoofdframe (1) met zeven
zeskantbouten van 5/16” x 5/8” (51),
zes sluitringen van 5/16” x 18 mm
(72) op de zijschroeven en met één
gebogen sluitring van 5/16” x 19 mm
(99) op de voorste schroef.
Page 78

78
handleiding
•
PLATINUM PRO
Stap 3:
Montage Van Het Stuur
1. 1. Schuif de twee draden voor
het meten van de hartslag via de
handen (26) door de opening in de
bevestigingsplaat voor de stuur en
door de opening in de plaat van
het bedieningspaneel. Bevestig het
stuur (3) met twee zeskantbouten
van 5/16” x 5/8” (51), twee
sluitringen van 5/16” x 18 mm (72)
en twee veerringen van 5/16” (103)
voorzichtig op de verticale buis (2)
zodat u de draden voor het meten
van de hartslag via de handen niet
beschadigt.
Page 79

NL
handleiding • PLATINUM PRO
79
“L” en van een “R” voor de as van
het rechterpedaal. Draai de pedalen
stevig vast. Het kan nodig zijn om
de pedalen vast te draaien als u
tijdens het trappen schokken voelt.
Geluiden, schokjes of klikken worden
doorgaans veroorzaakt door pedalen
die niet goed zijn vastgedraaid.
4. Bevestig de schuifbuis voor het
zadel (7) op het profiel boven op
de zadelbuis met de zadelpen naar
voren gericht. Bevestig het zadel (19)
op de zadelpen.
5. Bevestig de bidonhouder (116) met
twee M5 x 12 mm kruiskopschreven
(58) op de verticale buis.
Voetpedalen
Door research in samenwerking met
vooraanstaande sportwetenschappers
en revalidatiespecialisten hebben de
technici een doorbraak bereikt bij het
pedaalontwerp. In dit ontwerp is de
pedaalbreedte geminimaliseerd en
licht gebogen voor een meer natuurlijk
fietsgevoel.
Stap 4:
Montage Van Bedieningspaneel,
Zadel, Pedalen En Kappen Van
Hoofdbehuizing
1. Sluit de computerkabel (29) en de
twee kabels voor het meten van de
hartslag via de handen (26) aan op
de aansluitingen op de achterzijde
van het bedieningspaneel (34).
Bevestig het bedieningspaneel
(34) met vier M5 x 12 mm
kruiskopschreven (58) op de verticale
buis.
2. Bevestig de kap van de voorsteun
(40) en de achtersteun (41) met vier
M5 x 12 mm kruiskopschroeven (58)
op het hoofdframe (1).
3. Bevestig de pedalen (45L, 46R) op
de crankarmen (16L, 16R). Houd er
rekening mee dat het linkerpedaal
een omgekeerde draad heeft en in
tegenstelling tot normale draden in
tegengestelde draairichting op de
crank moet worden geschroefd. Het
uiteinde van de as met de draad van
het linkerpedaal is voorzien van een
Page 80

80
handleiding
•
PLATINUM PRO
waarde.
• Aanpassen van de streefwaardes
(hoger/lager) tijdens de training.
• Opschakelen of terugschakelen
tijdens T-Ride™ of T-Road training.
• Lied selectie, werking en volume
kunnen aangepast worden in het
muziek functie scherm.
• Kies het trainingsprogramma in het
hoofdmenu.
• Gebruiker/Instellingen scherm optie
selectie.
• Kies het werkende item op het
instellingenscherm.
• Verhoog of verlaag de ingestelde
waarde.
• Aanpassen van de streefwaardes
(hoger/lager) tijdens de training.
• Opschakelen of terugschakelen
tijdens T-Ride™ of T-Road training.
Horizontaal
Draai met de klok mee om naar rechtst
te gaan; tegen de klok in om naar links
te gaan.
Verticaal
Draai met de klok mee om naar boven te
gaan; tegen de klok in om naar beneden
te gaan.
Druk funties:
• Sport modus bevestiging.
• Optie bevestigen in Gebruiker/
instellingen modus.
• Bevestigen van het werkende item op
het scherm.
• Ingestelde waarde bevestigen.
• Scherm wisselen tussen slagen per
minuut ↔ Nm of slagen per minuut
↔ W tijdens training.
• Scherm wisselen tussen slagen per
minuut ↔ m of slagen per minuut ↔
ft tijdens T-Ride™.
Monitor
Draaiknop en toetsen
A Terug/ stop toets:
• Ga terug naar het vorige scherm.
• Stop de huidige training.
•
B Hoofdmenu:
• Monitor gaat terug naar het
hoofdmenu of snel start wanneer
toets ingedrukt wordt.
• Tijdens trainen: Training wordt
gepauzeerd.
C Gebruiker/ Instellingen:
• Druk deze toets om naar het
Gebruiker/ Instellingen scherm te
gaan.
• Tijdens training heeft deze toets geen
functie
D Draaiknop
Draai functies:
• Kies het trainingsprogramma in het
hoofdmenu.
• Gebruiker/Instellingen scherm optie
selectie.
• Kies het werkende item op het
instellingenscherm.
• Verhoog of verlaag de ingestelde
Page 81

NL
handleiding • PLATINUM PRO
81
Trainer is nu klaar om uw training te
beginnen of selecteer quicksnel
Programma’s
Snel start
• Draai aan de draaiknop en selecteer
“Snel Start”.
• Druk de draaiknop in om te
bevestigen en kom snel in het
trainingsscherm.
Workout screen
De X-as duidt de tijd in minuten tussen
0~30 aan. Dit wordt elke 15 minuten geupdate tijdens training.
• During workout, press the jog wheel •
Wanneer u tijdens het trainen op de
draaiknop drukt dan kunt u de Y-as
switchen tussen Nm↔ bpm.
• Het staafdiagram toont het koppel in
Nm. Draai aan de draaiknop om de
Nm waarde aan te passen.
• De witte gestreepte lijn toont de
huidige positie, welke naar rechts
beweegt wanneer de training
voortduurt. Het trainingsscherm kan
tot 5 uur weergeven.
• Scherm wisselen tussen Video ↔
Profiel tijdens T-Road.
• Wisselen naar volgende oefening
tijdens T-Trainer.
• Optie bevestigen tijdens muziek
functie scherm.
USB ingang
Usb ingang kan gebruikt worden voor:
• Servicezaken zoals software
updates.
Let op! Bestandsformaat mag geen
NTFS zijn
Startscherm
Wanneer de monitor opstart dan toont
deze het laadscherm zoals hieronder
weergegeven.
Na een paar seconden verandert dit
scherm naar een data lezen scherm.
Zoals hieronder weergegeven
Na het laden van de applicatie van
de montior wordt het hoofdmenu
weergegeven.
Page 82

82
handleiding
•
PLATINUM PRO
Druk de draaiknop om terug te keren
naar het hoofdmenu.
Doelhartslag
• Draai aan de draaiknop en selecteer
“Doelhartslag”.
• Druk op de draaiknop om de keuze
te bevestigen en ga naar het
instellingenscherm (1)
Instellingen scherm (1)
• Draai aan de draaiknop om de
hartslag streefwaarde aan te passen.
(Het percentage varieert met slagen
per minuut).
• Druk de draaiknop om keuze
te bevestigen en ga naar
instellingenscherm (2).
Instellingen scherm (2)
• Draai de draaiknop om een item te
selecteren.
• Druk op de draaiknop om te
bevestigen en ga verder met het
instellen van het bereik rechts.
• Draai de draaiknop om de bereik
instellingen te wijzigen.
• Druk op de draaiknop om te
bevestigen en ga naar het
trainingsscherm.
• De oranje curve toont de hartslag van
de gebruiker, welke varieert wanneer
de hartslag op en neer gaat.
Stop de training
Het training eindscherm komt naar
voren wanneer u op de Terug/Stop of
Menu toets drukt of wanneer de witte
gestreepte lijn de streefwaarde bereikt.
Training beeïndigen scherm
Doorgaan: (Continue)
Kies “Doorgaan” om terug te keren naar
het trainingsscherm.
Verlaat menu: (Exit)
Kies “Verlaat menu” om af te sluiten en
naar het scherm van de laatste sessie te
gaan.
Opslaan en terug: (Save&Exit)
Kies “Opslaan en terug” en voer een
bestandsnaam in onderin het scherm:
gebruik de draaiknop om A~Z of 0~9 te
selecteren, sla alle trainings data op en
geef het bestand een naam voor een
nieuwe trainings modus.
Geef de trainingsdata weer in het
scherm van de laatste sessie.
Trainings datascherm
Page 83

NL
handleiding • PLATINUM PRO
83
Manueel
• Draai aan de draaiknop en selecteer
“Manueel”.
• Druk op de draaiknop om de keuze
te bevestigen en ga naar het
instellingenscherm (1)
Instellingen scherm (1)
• Draai de draaiknop om een item te
selecteren.
• Druk op de draaiknop om te
bevestigen en ga verder met het
instellen van het bereik rechts.
• Draai de draaiknop om de bereik
instellingen te wijzigen.
• Druk op de draaiknop om te
bevestigen en ga naar het
trainingsscherm.
Trainingsscherm
De X-as toont, afhankelijk van de
selectie, de Energie/ Tijd/ Afstand in het
Set scherm:
Energie Unit: kcal
Tijd Unit: min
Afstand Unit: km in metrisch
mijl in Imperial
• Wanneer u tijdens het trainen op de
draaiknop drukt dan kunt u de Y-as
switchen tussen Nm↔ bpm.
Trainingsscherm
De X-as toont, afhankelijk van de
selectie, de Energie/ Tijd/ Afstand in het
Set scherm:
Energie Unit: kcal
Tijd Unit: min
Afstand Unit: km in metrisch
mijl in Imperial
• Druk tijdens de training op de
draaiknop om de Y-as te wisselen
tussen W↔ bpm.
• De staafdiagram toont de hartslag
streefwaarde in slagen per minuut.
Draai aan de draaiknop om de
streefwaarde aan te passen.
• De witte gestreepte lijn toont de
huidige positie, welke naar rechts
beweegt wanneer de calorieën/tijd/
afstand stijgt.
• De oranje curve toont de hartslag van
de gebruiker, welke varieert wanneer
de hartslag op en neer gaat.
• De blauwe curve toont de huidige
Watt waarde.
• Monitor programmering: Ondersteund
de gebruiker om de streefwaarde
te bereiken aan de hand van de
hartslag streefwaarde tijdens
training. Wanneer de huidige hartslag
hoger wordt dan de ingestelde
streefwaarde, zal het systeem de
Watt waarde verlagen en verhogen
wanneer de hartslag lager is dan de
streefwaarde.
• Het bericht “Hartslag niet
gedetecteerd!” wordt getoond
wanneer de hartslag niet
gedetecteerd wordt tijdens de
training.
Om de training te stoppen zie “Stop de
training”.
Page 84

84
handleiding
•
PLATINUM PRO
• Draai de draaiknop om een item te
selecteren.
• Druk op de draaiknop om te
bevestigen en ga verder met het
instellen van het bereik rechts.
• Draai de draaiknop om de bereik
instellingen te wijzigen.
• Druk op de draaiknop om te
bevestigen en ga naar het
trainingsscherm.
Trainingsscherm
De X-as toont, afhankelijk van de
selectie, de Energie/ Tijd/ Afstand in het
Set scherm:
Energie Unit: kcal
Tijd Unit: min
Afstand Unit: km in metrisch
mijl in Imperial
• Wanneer u tijdens het trainen op de
draaiknop drukt dan kunt u de Y-as
switchen tussen Nm↔ bpm.
• Het staafdiagram toont het aantal
Watt. Draai aan de draaiknop om de
Watt waarde aan te passen.
• De witte gestreepte lijn toont de
huidige positie, welke naar rechts
beweegt wanneer de calorieën/tijd/
afstand stijgt.
• De oranje curve toont de hartslag van
de gebruiker, welke varieert wanneer
de hartslag op en neer gaat.
• Monitor programmering: Ondersteund
de gebruiker om de ingestelde
streefwaarde te bereiken aan de
hand van de Watt streefwaarde
tijdens training. Wanneer de
werkelijke Watt waarde hoger ligt
dan de streefwaarde wordt de
Watt waarde verlaagt. Wanneer de
werkelijke Watt waarde lager ligt dan
streefwaarde wordt de Watt waarde
verhoogt.
• Het staafdiagram toont het koppel in
Nm. Draai aan de draaiknop om de
Nm waarde aan te passen.
• De witte gestreepte lijn toont de
huidige positie, welke naar rechts
beweegt wanneer de calorieën/tijd/
afstand stijgt.
• De oranje curve toont de hartslag van
de gebruiker, welke varieert wanneer
de hartslag op en neer gaat.
Om de training te stoppen zie “Stop de
training”.
Watt gestuurd
• • Draai aan de draaiknop en
selecteer “Watt gestuurd”.
• • Druk op de draaiknop om de
keuze te bevestigen en ga naar het
instellingenscherm (1) .
Instellingen scherm (1)
• Draai aan de draaiknop om de Watt
streefwaarde aan te passen.
• Druk de draaiknop om keuze
te bevestigen en ga naar
instellingenscherm (2).
Instellingen scherm (2)
Page 85

NL
handleiding • PLATINUM PRO
85
• Stel het eindpunt van de training
in: Draai aan de draaiknop om
de rechter witte gestreepte lijn te
verplaatsen, druk op de draaiknop
om te bevestigen.
Trainingsscherm
De X-as toont de afstand in km bij
metrisch en mijl bij Imperial.
• Druk tijdens de training op de
draaiknop om de Y-as te wisselen
tussen m↔ bpm bij metrisch, ft↔bpm
bij Imperial.
• De witte gestreepte lijn toont de
huidige positie, welke naar rechts
beweegt wanneer de training
voortduurt.
• De oranje curve toont de hartslag van
de gebruiker, welke varieert wanneer
de hartslag op en neer gaat.
• Rechts in het scherm is de
versnelling schakelaar te zien van
1~8, Draai aan de draaiknop om te
wisselen.
• Het witte icoontje + 0° in de linker
onder hoek toont de hellingsgraad,
deze varieert aan de hand van de
Profiel hellingsgraad.
• Het laatste sessie scherm toont
de trainingsdata. Druk op de
draaiknop om terug te gaan naar het
hoofdmenu.
Om de training te stoppen zie “Stop de
training”.
Om de training te stoppen zie “Stop de
training”.
T-Ride
• Draai aan de draaiknop en selecteer
“T-Ride”.
• Druk op de draaiknop om de keuze
te bevestigen en ga naar het
instellingenscherm (1)
Instellingen scherm (1)
• Draai aan de draaiknop om te kiezen
tussen: Top & Down – Trail – Easy
ride – Marathon – Short Loop.
• Druk de draaiknop om keuze
te bevestigen en ga naar
instellingenscherm (2).
Instellingen scherm (2)
• Stel het startpunt van de training in:
Draai aan de draaiknop om de linker
witte gestreepte lijn te verplaatsen,
druk op de draaiknop om te
bevestigen.
Page 86

86
handleiding
•
PLATINUM PRO
• Druk op de draaiknop om te
bevestigen en ga naar het
trainingsscherm.
Trainingsscherm ( Watt gestuurd )
De X-as toont, afhankelijk van de
selectie, de Energie/Tijd/Afstand in het
Set scherm:
Tijd Unit: min
Afstand Unit: km in metrisch
mijl in Imperial
• Wanneer u tijdens het trainen op de
draaiknop drukt dan kunt u de Y-as
switchen tussen W↔ bpm.
• Het staafdiagram toont de standaard
Watt waarde van het profiel. Draai
aan de draaiknop om het percentage
van de Profiel Watt waarde aan
te passen rechts van de witte
gestreepte lijn..
• De witte gestreepte lijn toont de
huidige positie, welke naar rechts
beweegt wanneer de tijd/afstand
stijgt.
• De oranje curve toont de hartslag van
de gebruiker, welke varieert wanneer
de hartslag op en neer gaat.
• Console programmering: Is het zelfde
als bij “Watt gestuurde” modus.
Trainingsscherm (Hartslag gestuurd)
Preset Programma’s
• Draai aan de draaiknop en selecteer
“Preset Programma’s”.
• Druk op de draaiknop om de keuze
te bevestigen en ga naar het
instellingenscherm (1)
Instellingen scherm (1)
• Draai aan de draaiknop om te kiezen
tussen:
• Watt gestuurd: Rolling Hills - Hill
Climb - Cross Country - Stamina Power Interval items en,
Hartslag gestuurd: Fat burner 1 - Fat
burner 2 - Cardio Strength Cardio Climb - Cardio Interval.
• Druk op de draaiknop om de keuze
te bevestigen en ga naar het
instellingenscherm (2)
Instellingen scherm (2)
• Draai de draaiknop om een item te
selecteren.
• Druk op de draaiknop om te
bevestigen en ga verder met het
instellen van het bereik rechts.
• Draai de draaiknop om de bereik
instellingen te wijzigen.
Page 87

NL
handleiding • PLATINUM PRO
87
• Druk op de draaiknop om terug te
gaan naar het hoofdmenu.
Instellingen scherm (1)
Instellingenscherm (1) is voor door
gebruikers opgeslagen items en
trainingen.
Deze worden getoond op het rechter en
linker scherm.
• Draai aan de draaiknop om een item
te selecteren.
• Druk op de draaiknop om te
bevestigen en om het selectiescherm
te openen.
Selectiescherm
• • Draai aan de draaiknop en
selecteer
Kies “Herhaal” (Replay)
• Druk de draaiknop om te bevestigen
om naar het trainingsscherm te gaan
en de vorige training te hervatten.
De X-as toont, afhankelijk van de
selectie, de Energie/Tijd/Afstand in het
Set scherm:
Tijd Unit: min
Afstand Unit: km in metrisch
mijl in Imperial
• Wanneer u tijdens het trainen op de
draaiknop drukt dan kunt u de Y-as
switchen tussen W↔ bpm.
• Het staafdiagram toont de standaard
Watt waarde van het profiel. Draai
aan de draaiknop om het percentage
van de Profiel Watt waarde aan
te passen rechts van de witte
gestreepte lijn..
• De witte gestreepte lijn toont de
huidige positie, welke naar rechts
beweegt wanneer de tijd/afstand
stijgt.
• De oranje curve toont de hartslag van
de gebruiker, welke varieert wanneer
de hartslag op en neer gaat.
• De blauwe curve toont de huidige
Watt waarde.
• Console programmering: Is het zelfde
als bij “Hartslaggestuurd” modus.
Om de training te stoppen zie “Stop de
training”.
Eigen trainingen
• Draai aan de draaiknop en selecteer
“Eigen Trainingen”.
• Druk op de draaiknop om de keuze
te bevestigen en ga naar het
instellingenscherm (1).
LET OP
Wanneer er geen opgeslagen trainingen
gevonden worden wordt onderstaand
scherm weergegeven.
Page 88

88
handleiding
•
PLATINUM PRO
kunnen voeren. Wanneer er geen
gebruikersgegevens beschikbaar zijn
kan de Fitnesstest niet starten.
Onderstaande melding wordt
weergegeven.
• Druk op de draaiknop om terug te
gaan naar het hoofdmenu.
Instellingen scherm (1)
• Draai aan de draaiknop om een item
te selecteren.
• (Inctief / Actief / Atleet modus).
• Druk op de draaiknop om de keuze
te bevestigen en ga naar het
instellingenscherm (2)
Instellingen scherm (2)
• Draai aan de draaiknop om de
gebruikers hartslag streefwaarde in
te stellen binnen de Vo2 Max waarde.
(Het bereik ligt tussen de 28~220
hartslagen per minuut) Standaard:
85% van de Maximale hartslag
Kies “Bewerk” (Edit)
• Druk op de draaiknop om te
bevestigen.
• Gaan naar en pas de bereik
instellingen aan.
• Druk op de draaiknop om te
bevestigen en om naar het
trainingsscherm te gaan.
Kies “Verwijder” (Delete)
• Draai aan de draaiknop om een item
te selecteren.
• Druk op de draaiknop om te
bevestigen en om het selectiescherm
te openen.
• Kies “Ja” om het geselecteerde
item te verwijderen. Kies “Nee”
om het geselecteerde item niet te
verwijderen.
• Druk op de draaiknop om te
bevestigen.
Trainingsscherm:
Het trainingsscherm is afhankelijk van
welk trainingsprogramma gekozen
wordt.
Nm Manuele modus:
Is hetzelfde als bij “Manuele modus”.
Watt Constant modus:
Is hetzelfde als bij “Preset programma’s
Watt Modus.
Target HR Mode:
Is hetzelfde als bij “Preset programma’s
Hartslag gestuurde Modus”.
Fitnesstest
• Draai aan de draaiknop en selecteer
“Fitnesstest”.
• Druk op de draaiknop om de keuze
te bevestigen en ga naar het
instellingenscherm (1)
LET OP
De monitor heeft gebruikersgegevens
nodig om de Fitnesstest uit te
Page 89

NL
handleiding • PLATINUM PRO
89
Fitnesstest mislukt!” wanneer:
• De trainingsduur te kort is.
• Hartslag per minuut waarde is te
laag.
• Hartslag streefwaarde is niet bereikt.
• Hartslag is lager dan 110 hartslagen
per minuut.
”Hartslag niet gedetecteerd” wanneer:
• De hartslag van de gebruiker niet
waargenomen wordt.
Druk Terug/Stop of Hoofdmenu toets om
het trainingsscherm te verlaten.
“Doelhartslag bereikt!” wanneer
• Gebruiker de streefwaarde bereikt
heeft.
• Druk op de draaiknop om de test te
beëindigen en om het trainingsdata
scherm te openen.
Trainingscherm
Druk op de draaiknop om naar het Vo2
Max test resultaten scherm te gaan.
VO2 Max test resultaten scherm
• Om de training te stoppen zie “Stop
de training”.
en toont de gebruikers maximale
hartslag (hartslagen per minuut) en
gewicht (kg)
• Druk op de draaiknop om te
bevestigen en naar het informatie
scherm te gaan.
Information window
• Druk op de draaiknop om
te bevestigen en naar het
trainingsscherm.
Trainingscherm
• The X-axis unit is min
• De X-as toont de minuten.
• De Y-as toont de hartslag per minuut
• Het staafdiagram toont de standaard
Watt waarde van het profiel.
• De witte gestreepte lijn toont de
huidige positie, welke naar rechts
beweegt wanneer de training
voortduurt. Het trainingsscherm kan
tot 5 uur weergeven.
• De oranje curve toont de hartslag van
de gebruiker, welke varieert wanneer
de hartslag op en neer gaat.
• De horizontale rode stippel lijn toont
de gebruikers hartslag streefwaarde.
Het scherm toont
Page 90

90
handleiding
•
PLATINUM PRO
Er zijn 3 selecteerbare routes
beschikbaar. Namelijk: Toscany Sand
Road/ Tuscany Scenrey Road/ Tuscany
Country Road.
• Draai aan de draaiknop om de
trainingsroute te selecteren.
• Druk op de draaiknop om
te bevestigen en naar het
trainingsscherm te gaan.
Druk op de draaiknop tijdens training
om te wisselen tussen het video- en
profielscherm.
• De X-as toont de afstand in Km in
metrisch of mijl in Imperial.
• De Y-as toont m in Metrisch of ft in
Imperial.
• Druk op de draaiknop tijdens de
training om te wisselen tussen:
Video ↔ Profile scherm.
In profiel scherm:
• De witte stippellijn toont de huidige
positie, welke naar rechts beweegt
zolang de training voortduurt.
• De oranje curve toont de hartslag van
de gebruiker, welke varieert wanneer
de hartslag op en neer gaat.
In video scherm:
• Rechts in het scherm is de
versnelling schakelaar te zien van
1~8, draai aan de draaiknop om te
wisselen.
VO2 Max test resultaten tabel
T-Road
• Draai aan de draaiknop en selecteer
“T-road”.
• Druk op de draaiknop om
te bevestigen en naar het
Instellingenscherm (1) te gaan.
Setting screen (1)
Page 91

NL
handleiding • PLATINUM PRO
91
Gebruikersinstellingen
Door “Gebruikersinstellingen” te
selecteren kunt u:
• Het contrast aanpassen (Standaard
50%).
• De totaal afgelegde afstand bekijken.
• De totaal getrainde tijd bekijken.
• De standaard firmware en software
versie van de console bekijken.
• De taal instelling aanpassen.
• Geluidinstellingen: systeem geluid
“Ja” aan of “Nee”voor uit.
Gebruikers instellingenscherm
Instellingen wijzigen:
• Draai aan de draaiknop om het te
wijzigen item te selecteren.
• Druk op de draaiknop om het
geselecteerde item rechts in het
scherm te open voor wijzigingen.
• Draai aan de draaiknop om
de waarde te wijzigen van het
geselecteerde item.
• Druk op de draaiknop om de wijziging
te bevestigen.
• Draai aan de draaiknop om het
volgende item te selecteren, of druk
op Terug/stop knop om terug te keren
naar het instellingenscherm.
• Het witte icoontje + 0° in de linker
onder hoek toont de hellingsgraad,
deze varieert aan de hand van de
Profiel hellingsgraad.
• Druk Terug/Stop, Hoofdmenu of
wanneer de witte stippellijn de
streefwaarde bereikt stopt de
training.
Om de training te stoppen zie “Stop de
training”.
Gebruiker/
instellingen
Druk “gebruiker/instellingen” toets om
het Gebruikersinstellingen
• Gebruik de draaiknop om één van de
zes mogelijke items te selecteren.
• Druk op de draaiknop om te
bevestigen en om het geselecteerde
item scherm te openen.
Dagboek
Door “Dagboek” te selecteren kunt u de
trainingsdata van de gebruiker bekijken.
Of u kunt de data van de laatste training
bekijken of een totaal van alle trainingen.
Verlaat de trainingsdata door op Terug/
Stop te drukken.
Page 92

92
handleiding
•
PLATINUM PRO
Geslacht:
• Draai aan de draaiknop om
“Geslacht” te selecteren.
• Druk op de draaiknop om “Geslacht”
wijzigen te openen.
• Draai aan de draaiknop om “Man/
Vrouw” te selecteren.
• Druk op de draaiknop om te
bevestigen en terug te keren naar het
Aanpassen menu.
Leeftijd:
• Draai aan de draaiknop om “Leeftijd”
te selecteren.
• Druk op de draaiknop om “Leeftijd”
wijzigen te openen.
• Draai aan de draaiknop om de leeftijd
te wijzigen.
• Druk op de draaiknop om te
bevestigen en terug te keren naar het
Aanpassen menu.
Lengte:
• Draai aan de draaiknop om “Lengte”
te selecteren.
• Druk op de draaiknop om “Lengte”
wijzigen te openen.
• Draai aan de draaiknop om de lengte
te wijzigen.
Cm wanneer Metrisch is ingesteld
ft/ inch wanneer Imperial is ingesteld.
• Druk op de draaiknop om te
bevestigen en terug te keren naar het
Aanpassen menu.
Gewicht:
• Draai aan de draaiknop om “Gewicht”
te selecteren.
• Druk op de draaiknop om “Gewicht”
wijzigen te openen.
• Draai aan de draaiknop om het
gewicht te wijzigen.
kg wanneer Metrisch is ingesteld
lbs wanneer Imperial is ingesteld.
• Druk op de draaiknop om te
bevestigen en terug te keren naar het
Aanpassen menu.
Aanpassen
Door “Aanpassen” te selecteren kunt u
wijzigen:
Naam:
• Draai aan de draaiknop en selecteer
“Naam”.
• Druk op de draaiknop om “Naam”
wijzgen te openen.
• Draai aan de draaiknop om een letter
te selecteren.
• Druk op de draaiknop om te
bevestigen.
• Draai aan de draaiknop om de
volgende letter te selecteren.
• Wanneer de naam correct is
gewijzigd selecteert u “√” om te
bevestigen en terug te keren naar het
Edit user menu.
Eenheden:
• Draai de draaiknop om “Eenheden”
te selecteren.
• Druk op de draaiknop om “Eenheden”
wijzigen te openen.
• Draai de draaiknop om te selecteren:
Metrisch: Toont units in km/kph/Kcal.
Imperial: Toont units in mile/mph/
kcal.
• Druk op de draaiknop om te
bevestigen en terug te keren naar het
Edit user menu.
Tonen:
• Draai aan de draaiknop om “Tonen”
te selecteren.
• Druk op de draaiknop om “Tonen”
wijzigen te openen.
• Draai aan de draaiknop om te
selecteren: Oplopend:
ingestelde tijd/ afstand telt op.
Aftellend: ingestelde tijd/ afstand telt
af.
• Druk op de draaiknop om te
bevestigen en terug te keren naar het
Aanpassen menu.
Page 93

NL
handleiding • PLATINUM PRO
93
• Draai aan de draaiknop en selecteer
de gebruiker welke u wilt activeren.
• Druk op de draaiknop om te
bevestigen en terug te keren naar het
instellingen menu.
Aanmaken
Door “Aanmaken” te selecteren kunt u
een nieuwe gebruiker aanmaken.
Er kunnen maximaal 8 gebruikers
geïnstalleerd worden.
Zie “Aanpassen” voor instructies hoe de
gebruiker aan te maken.
Maximale HR:
• Draai aan de draaiknop om
“Maximale-HR” te selecteren.
• Druk op de draaiknop om “Maximale
HR” wijzigen te openen.
• Draai aan de draaiknop om de
maximale hartslag te wijzigen.
Wanneer man geselecteerd:
(220-leeftijd)
Wanneer vrouw geselecteerd:
(226-leeftijd).
• Druk op de draaiknop om te
bevestigen en terug te keren naar het
Aanpassen menu.
Verwijderen
Door “Verwijderen” te selecteren kunt u:
• Een gebruiker inclusief alle gegevens
verwijderen.
• Draai aan de draaiknop en selecteer
de gebruiker welke u wilt verwijderen.
• Druk op de draaiknop om de
geselecteerde gebruiker te
verwijderen en terug te keren naar
het instellingen menu.
De gebruiker zal verwijdert worden
zonder verdere mededelingen.
Kies gebruiker
Door “Kies gebruiker” te selecteren kunt
u:
• Een ander eerder opgesteld
gebruikersprofiel kiezen.
Hartslagtraining
Een opmerking over hartslag:
Het idee dat u pijn moet lijden om vooruit
te gaan is een mythe die is achterhaald.
U kunt nu genieten van de voordelen die
een comfortabele manier van oefenen
biedt. Een groot gedeelte van dit succes
is te danken aan het gebruik van
hartslagmeters. Door op de juiste manier
gebruik te maken van een hartslagmeter,
ebben veel mensen ontdekt dat hun
gebruikelijke intensiteit waarmee ze
oefeningen uitvoerden te hoog of te
laag was en dat de oefeningen veel
aangenamer waren door hun hartslag in
het gewenste bereik te houden.
Page 94

94
handleiding
•
PLATINUM PRO
Om vast te stellen wat het ideale bereik
is waarin u wilt trainen, moet u eerst
bepalen wat uw maximale hartslag is.
U kunt dit bepalen door de volgende
formule te gebruiken: 220 min uw
leeftijd. De uitkomst is de maximale
hartslag (MHR) voor iemand van uw
leeftijd. Om het effectieve hartslagbereik
te bepalen voor specifi eke doeleinden
berekent u eenvoudigweg uw MHR.
De trainingszone voor uw hartslag
is 50% tot 90% van uw maximale
hartslag. 60% van uw MHR is de zone
waarin vet wordt verbrand terwijl 70%
is bedoeld voor het versterken van het
cardiovasculaire systeem. Deze 60% tot
70% is de zone die u moet aanhouden
voor maximale resultaten.
Voor iemand van 40 jaar is de
berekening van hun doelhartslagzone
als volgt:
220 – 40 = 180 (maximale hartslag)
180 x 0,6 = 108 slagen per minuut (60%
van het maximum)
180 x 0,7 = 126 slagen per minuut (70%
van het maximum) Dus voor iemand van
40 jaar is de trainingszone 108 tot 126
slagen per minuut.
Een hartslagzender gebruiken
Hoe moet de draadloze borstriemzender
worden gedragen:
• Bevestig de zender met de
bevestigingsonderdelen aan de
elastische riem.
• Maak de riem zo strak mogelijk vast,
maar zorg ervoor dat de riem niet te
strak zit en comfortabel zit.
• Plaats de zender in het midden
van uw borst met het logo van u
af (sommige mensen moeten de
zenderiets links van het midden
plaatsen). Maak het uiteinde van de
elastische riem vast door het ronde
uiteinde te plaatsen en bevestig de
zender en riem rond uw borst met de
bevestigingsonderdelen.
• Plaats de zender direct onder de
borstspieren.
• Transpiratie is de beste geleider om
het aantal hartslagen
• per minuut te meten via elektrische
signalen. U kunt echter ook gewoon
water gebruiken om de elektroden
(2 zwarte vierkante gebieden op
de achterzijde van de riem en op
beide zijden van de zender) van
tevoren vochtig te maken. U wordt
ook aangeraden de zenderriem om
te doen een paar minuten voordat u
met de training begint. Bij sommige
gebruikers kost het vanwege
lichamelijke eigenschappen in het
begin meer moeite om een sterk,
constant signaal te krijgen. Na de
warming-up doet dit probleem zich
minder voor. Het dragen van kleding
over de zender en riem is niet van
invloed op de prestaties.
• Uw training moet zich binnen het
bereik bevinden, dat wil zeggen de
afstand tussen zender en ontvanger
mag niet te groot zijn om een sterk en
constant signaal te produceren. De
afstand tussen zender en ontvanger
kan iets variëren, maar u moet in
de buurt van het bedieningspaneel
blieven om tot goede en betrouwbare
metingen te komen. Als u de zender
direct op de blote huid draagt, bent
u verzekert van een goede werking.
U kunt de zender eventueel ook over
een shirt dragen. U moet hiervoor de
delen van het shirt natmaken waarop
de elektroden worden bevestigd.
Page 95

NL
handleiding • PLATINUM PRO
95
LET OP!
De zender wordt automatisch
geactiveerd wanneer deze activiteit van
het hart van de gebruiker waarneemt.
De zender wordt ook weer automatisch
gedeactiveerd wanneer deze geen
activiteit ontvangt. Hoewel de zender
waterdicht is, kan vocht zorgen voor
verkeerde signalen. U moet de zender
na gebruik volledig droogmaken om de
levensduur van de batterij te verlengen
(de batterij van de zender heeft een
geschatte levensduur van 2500 uur).
Als uw borstriem een vervangbare
batterij heeft, is dit de batterij Panasonic
CR2032.
Caution!
Gebruik deze trainer pas voor de
doelhartslag als er een constante,
betrouwbare feitelijke hartslag wordt
weergegeven. Als er hoge, willekeurige
getallen worden weergegeven, duidt dit
op een probleem.
Een zeer grillige hartslag kan onder
ander worden veroorzaakt door
storingen van:
• Magnetrons, tv’s, kleine elektrische
apparaten, enzovoort.
• TL-verlichting.
• Bepaalde beveiligingssystemen.
• Elektrische omheining voor een
huisdier.
• Bij sommige mensen worden
signalen minder goed door de
zender opgepikt via hun huid. Als
u problemen ondervindt, kunt u
het probleem mogelijk verhelpen
door de zender ondersteboven te
dragen. Doorgaans wordt de zender
gedragen met de juiste zijde van het
logo naar boven gericht.
• De antenne die uw hartslag oppikt,
is zeer gevoelig. Als er sprake is van
een geluidsbron van buitenaf, kunt u
mogelijk het hele apparaat 90 graden
draaien om de storing te verhelpen.
Als u problemen blijft ondervinden,
neemt u contact op met uw dealer.
Fitness Training
Trainen op een fietstrainer is een
uitstekende aërobe training. Het
basisidee is een voldoende lichte
training die langere tijd kan worden
volgehouden. Aërobe training bevordert
het zuurstofopnamevermogen van
het lichaam, waardoor ook het
uithoudingsvermogen en de conditie
verbeteren. Het menselijk vermogentot
het verbranden van vet is afhankelijk van
dit zuurstofopnamevermogen.
Aërobe training moet plezierig zijn. Een
eetje transpireren mag, maar buiten
adem raken niet. Tijdens een oefening
moet u gewoon een gesprek kunnen
voeren. Door minstens drie keer per
week 30 minuten te trainen, bouwt u
een basisconditie op die u vervolgens
onderhoudt door enkele keren per
week te trainen. Vervolgens kunt u uw
conditie eenvoudig verbeteren door het
aantal trainingen op te voeren. Omdat
een zware training voor mensen met
overgewicht belastend kan zijn voor
hart en bloedvaten is het verstandig te
beginnen met een langzame pedaalslag
met geringe weerstand. Naarmate de
conditie toeneemt, kunnen snelheid en
weerstand geleidelijk worden opgevoerd.
Onderhoud
De Tunturi apparaten hebben weinig
onderhoud nodig. Het is raadzaam
om zo nu en dan te controleren of alle
bouten en moeren nog goed vast zitten.
U kunt het apparaat schoonhouden door
het af te nemen met een vochtige doek.
Gebruik echter geen oplosmiddelen.
De metalen delen kunt u het beste
tegen de inwerking van transpiratievocht
beschermen, om regelmatig deze
Page 96

96
handleiding
•
PLATINUM PRO
delen te behandelen met een car-wax
of teflonolie. Verwijder de kunststof
behuizing van het apparaat nooit! De
elektromagnetische weerstand genereert
een magnetisch veld dat bijvoorbeeld
horloges of de magneetstrip op bank- en
creditcards kan beschadigen als deze in
direct contact komen met de magneten.
Probeer daarom nooit het gedeelte met
de elektromagnetische weerstand te
openen of te demonteren!
Gebruiksstoringen
Ondanks voortdurende
kwaliteitscontroles, kunnen er defecten
of storingen optreden die het gevolg
zijn van het niet goed functioneren van
onderdelen die in de looptrainer zijn
gebruikt. In de meeste gevallen is het
onnodig om het gehele apparaat ter
reparatie aan te bieden, aangezien de
storing meestal kan worden opgelost
door het vervangen van het defecte
onderdeel. Mochten er storingen
optreden bij het gebruik van de trainer,
neem dan onmiddellijk contact op met
uw Tunturi dealer. Vermeldt daarbij
altijd het model en het serienummer
van uw Tunturi trainer, de eventuele
storingscode en door wie de trainer is
geïnstalleerd.
Vermeldt bij het bestellen van
onderdelen het model, het serienummer
van het apparaat en het nummer van het
onderdeel. Op de laatste pagina’s van
deze gids vindt u de onderdelenlijst.
Transport en opslag
Zorg ervoor dat u de volgende regels
voor het verplaatsen en opslaan van het
toestel altijd de volgende regels in acht
neemt:
• Voor het verplaatsen van het
apparaat zijn twee volwassenen
nodig, die zich aan beide zijden
aan de voorkant van het apparaat
opstellen en de handgrepen
stevig vastpakken. U moet dan
de achterkant van het apparaat
zo optillen dat de voorkant steunt
op de transportwielen. Verplaats
het apparaat met behulp van de
transportwielen en laat het daarna
voorzichtig.
LET OP!
Extra voorzichtigheid is geboden bij het
verplaatsen van de trainer over een
oneffen vloer of over een drempel. Ook
mag de trainer beslist nooit op de wielen
over een trap geredenworden, in dit
geval moet de trainer worden opgetild.
Pas op dat de vloer niet beschadigd
wanneer u het toestel verplaatst.
Bescherm tere vloer materialen zoals
parket vloeren enz.
BELANGIJRK !
De garantie vervalt bij schade als gevolg
van het niet volgen van de instructies
in deze gids betreffende het monteren,
het instellen en het onderhouden van
de apparatuur. De instructies dienen
bij het in elkaar zetten, het onderhoud
en het gebruik, zo zorgvuldig mogelijk
te worden gevolgd. Veranderingen of
modificaties, welke niet door Tunturi
New Fitness BV. zijn goedgekeurd, laten
de Tunturi New Fitness BV. product
aansprakelijkheid geheel vervallen.
WIJ WENSEN U VEEL PLEZIERIGE
TRAININGEN MET UW NIEUWE
TUNTURI TRAININGSPARTNER!
Page 97

NL
handleiding • PLATINUM PRO
97
Specifications
User Interface
Graphic window in training mode:
Y-axis: Watt, bpm, Nm
X-axis: km, min, kcal
Factory defaults:
Some values should be in default setting
when shown (not zero) for first time in
session.
Time: .......................................30:00 min
Distance:.....................................10.0 km
Energy: .................................. 200 kcal
HR: ............... 75 % of Max HR of user
Effort: ............................................100 W
Units: .............................................Metric
Target display: ......................... Count Up
Speed: ........................................... kph
Gender......................................... Male
Age: ...........................................40 years
Height: ..................................... 175 cm
Weight: ....................................... 75 kg
Max HR ................................. 180 bpm
Range:
Energy range .......... 50~2000 kcal (±50)
Time range .........10~180 minutes (±10)
Distance range ............3~100 kms (± 1)
Target HR Range .......80~220 bpm (± 1)
Target effort Range ...20W ~ 350W (± 1)
Age ............................. 10~99 years (± 1)
Height
Metric Units ................ 110~210 cm (±1)
Imperial units ...... 3’7”~6’10” ft/inch(± 1)
Weight
Metric Units .................. 30~220 kg (± 1)
Imperial units ................. 66~330 lb(± 1)
Max HR .....................- 80~220 bpm (± 1)
Equipment
Length...........................................108cm
Width .............................................55 cm
Height .........................................136 cm
Weight ...........................................52 kg
This product meets the requirements
of the EU’s
EMC Directives on
electromagnetic compatibility (89/336/
EEC) and electrical equipment designed
for use within certain voltage limits
(73/23/EEC). This product therefore
carries the CE label.
This product meets EN precision and
safety standards (Class SA, EN-957,
parts 1 and 9).
Due to our continuous policy of product
development, Tunturi reserves the right
to change specifications without notice.
Page 98

98
Owner’s manual
•
PLATINUM PRO
Buble Description Qty
1 Main frame 1
2 Console mast 1
3 Handle bar 1
5 Rear stabilizer 1
6 Seat slider 1
7 Sliding seat mount 1
9 Idler wheel Assy. 1
11 Crank axle 1
12 Fixing cover plate 1
13 Chain cover bracket 1
14 Drive belt 1
15 Drive pulley (Ø330) 1
16L Crank arm (LH) 1
16R Crank arm (RH) 1
17 Bearing (6004) 2
18 Bearing (6203) 2
19 Seat 1
20 Induction brake 1
21 Power control board 1
22 Magnet (speed pick-up) 8
23 Sensor w/cable (350mm) 1
24 Handgrip foam 2
25 Handgrip foam 2
26 Handpulse W/Cable Assy. 2
29 Computer cable (1900mm) 1
30 Wire brake coil harness 1
31 DC wire (250mm) 1
34 Console Assy. 1
34~6 Console top cover 1
34~7 Console bottom cover 1
35 Ø35 × 10m/m_Rubber foot 4
36 Chain cover (LH) 1
37 Chain cover (RH) 1
38 Console mast cover 1
39 Seat post cover 1
40 Front stabilizer cover 1
41 Rear stabilizer cover 1
42 Handgrip side cap (upper) 2
43 Handgrip side cap (lower) 2
45 Pedal (LH) 1
46 Pedal (RH) 1
Spare parts list
47 Transportation wheel (Ø54) 2
49 Button head plug 4
50 Hex head bolt (3/8”×2”) 4
51 Hex head bolt (5/16”×58”) 9
52 Tapping screw (5×19) 2
53 Button head socket bolt 2
54 Hex head bolt (14”×3/4”) 8
55 J bolt (M8×170) 1
56 Phillips head screw (M6×15) 3
58 Phillips head screw (M5×12) 10
59 Flat head socket bolt
(3/8”×2”)
4
62 Tapping screw (Ø3×20) 4
65 Tapping screw (Ø3×10) 4
66 C Ring (Ø17) 1
67 C Ring (Ø20) 2
69 Flat washer (1/4”×13×1T) 7
70 Flat washer (3/8”×19×1.5T) 4
71 Flat washer (3/8”×25×2T) 4
72 Flat washer (5/16”×18×1.5T) 9
73 Flat washer (Ø17×23.5×1T) 1
75 Hex blind nut (M5) 6
76 Split washer (Ø14”) 7
77 Nyloc nut (M8×7T) 1
79 Nyloc nut (14”×8T) 4
80 Nyloc nut (516”×6T) 4
82 Nut (38”×7T) 8
83 M10 × 1.25m/m_nut 2
85 Round disk 2
86 Quick release lever 1
93 Phillips head screw driver 1
96 Crank arm end cap 2
97 Phillips head screw (M5×12) 13
99 Curved washer 1
100 Wrench (12/14) 1
102 Flat washer (5/16×16×1.0T) 2
103 Split washer (5/16”×1.5T) 2
104 Power adaptor 1
105 Handle bar cover 1
106 Seat height Adjustment knob 1
106~1 Knob nut (22×M16×M22×37) 1
106~2 Phillips head screw (M4×5L) 2
Page 99

GB
Owner’s manual • PLATINUM PRO
99
107 Slider sleeve 1
114 Slide spacer 1
116 Drink bottle holder 1
117 Wrench (13/15) 1
118 Hex head bolt (5/16”×2-14”) 2
120 Connecting cap 1
121 Flat washer (5/16”×20×3.0T) 3
122 Sleeve 1
123 Power cord 1
132 Phillips head screw (M3×10) 4
133 Attaching plate 1
135 Isolation column 4
Note:
All nut, bold, washer and screw sizes are
in inches.
Page 100

100
Owner’s manual
•
PLATINUM PRO
Exploded view
 Loading...