

Page 1
www.tunturi.com
TREADMILL PRO
USER MANUAL ..............................03-26
BETRIEBSANLEITUNG .................27-52
MODE D'EMPLOI ...........................53-78
HANDLEIDING .............................79-104
Serial number
Seriennummer
Numero de serie
Serienummer
Page 2

Page 3

GB
Owner’s manual • PLATINUM PRO
3
Contents
Welcome .............................................. 4
Safety Instructions ............................. 4
Important Electrical Information ............ 5
Circuit breakers .................................... 5
Grounding Instructions ......................... 5
General Instructions........................... 6
Heart Rate Training............................. 6
A word about Heart Rate: ..................... 6
How to wear your wireless
chest strap transmitter: ......................... 7
Assembly............................................. 8
Step 1: ................................................. 8
Step 2: ................................................. 9
Step 3: ............................................... 10
Step 4: ................................................11
User interface.................................... 12
Hardware buttons .............................. 12
Safety Key .......................................... 12
Software Buttons ................................ 12
Power on ............................................ 13
Main function bar (Left)....................... 13
Information bar (upper) ..................... 13
Main display region (Centre) .............. 13
Display functions .............................. 13
Multi language support ....................... 13
Programs ........................................... 14
Setting your workout goal ................... 14
Speed and incline control ................... 15
Workout Program ............................... 15
Workout Trip ....................................... 16
Own Training ...................................... 16
Scenery Tour ...................................... 17
Heart Rate Control.............................. 17
Fitness Test ........................................ 18
Change user ...................................... 19
Create User ........................................ 19
Edit User .......................................... 19
Clear Log ............................................ 20
Edit User ............................................. 20
Delete User ....................................... 20
Rename .............................................. 20
Web browser ..................................... 20
Media Player...................................... 21
Control buttons for media player ........ 21
Settings ............................................. 21
Wi-Fi ... 21
Date Time ........................................... 22
Brightness........................................... 23
Volume................................................ 23
Power Management ........................... 23
About .................................................. 23
Quick Start ........................................ 24
Maintenance ...................................... 24
Belt and Running Deck ...................... 24
Belt Dust ............................................. 24
General Cleaning................................ 24
Belt adjustments: ................................ 24
Troubleshooting ............................... 25
Moving and storage .......................... 26
Specications ................................. 105
Parts list ............................................ 106
Exploded view .................................. 108
Page 4

4
Owner’s manual
•
PLATINUM PRO
Welcome
Your choice shows that you really
want to invest in your well being and
condition; it also shows you really value
high quality, safe and motivating product
as your training partner. Whatever your
goal in training, we are certain this is
the training equipment to get you there.
You’ll find information about using your
exercise equipment and what makes for
efficient training at Tunturi’s website at
WWW.TUNTURI.COM
Safety Instructions
Read this guide through carefully
before assembling, using or servicing
your fitness equipment. Please keep
the guide somewhere safe; it will
provide you now and in the future with
the information you need to use and
maintain your equipment. Always follow
these instructions with care.
Note about your health
• Before you start any training, consult
a physician to check your state of
health.
• If you experience nausea, dizziness
or other abnormal symptoms while
exercising, stop your workout at once
and consult a physician.
• To avoid muscular pain and strain,
begin each workout by warming up
and end it by cooling down (slow
pedaling at low resistance). Don’t
forget to stretch at the end of the
workout.
Note about the exercise environment
• The equipment is not to be used
outdoors.
• Place the equipment on a firm,
level surface. Place the equipment
on a protective base to avoid any
damages to the floor beneath the
equipment.
• Make sure that the exercising
environment has adequate
ventilation. To avoid catching cold, do
not exercise in a draughty place.
• In training, the equipment tolerates
an environment measuring +10°C to
+35°C. The equipment can be stored
in temperatures ranging between
-15°C and +40°C. Air humidity in the
training or storage environment must
never exceed 90%.
Note about the equipment
• If children are allowed to use
the equipment, they should be
supervised and taught to use the
equipment properly, keeping in
mind the child’s physical and mental
development and their personality.
• Before you start using the equipment,
make sure that it functions correctly
in every way. Do not use faulty
equipment.
• Press the keys with the tip of the
finger; your nails may damage the
key membrane.
• Never lean on the interface.
• Never remove the side covers. Do
not step on the frame casing.
• Only one person may use the
equipment at a time.
• Hold the handlebar for support when
getting on or off the equipment.
• Wear appropriate clothing and shoes
when exercising.
• Protect the meter from sunlight and
always dry the surface of the meter if
there are any drops of sweat on it.
• Further information on warranty
terms can be found in the warranty
booklet included with the product.
• Please note that the warranty does
not cover damage due to shipping
or negligence of adjustment or
maintenance instructions described
in this manual.
• The equipment must not be used by
persons weighing over 150 kg.
• Do not attempt any servicing or
adjustments other than those
described in this guide. Everything
else must be left to someone
familiar with the maintenance of
electromechanical equipment and
Page 5
GB
Owner’s manual • PLATINUM PRO
5
Circuit breakers
Some circuit breakers used in homes
are not rated for high inrush currents
that can occur when a treadmill is first
turned on or even during normal use.
If your treadmill is tripping the circuit
breaker (even though it is the proper
current rating and the treadmill is the
only appliance on the circuit) but the
circuit breaker on the treadmill itself does
not trip, you will need to replace the
breaker with a high inrush type. This is
not a warranty defect. This is a condition
we as a manufacture have no ability to
control. This part is available through
most electrical supply stores
Grounding Instructions
This product must be grounded. If the
treadmill’s electrical system should
malfunction or breakdown grounding
provides a path of least resistance for
electric current, reducing the risk of
electric shock. This product is equipped
with a cord having an equipmentgrounding plug. The plug must be
plugged into an appropriate outlet that
is properly installed and grounded in
accordance with all local codes and
ordinances.
NOTE:
Improper connection of the equipmentgrounding conductor can result in a risk
of electric shock. Check with a
qualied electrician or serviceman if
you are in doubt as to whether the
product is properly grounded. Do not
modify the plug provided with the
product if it will not t the outlet; have
a proper outlet installed by a qualied
electrician.
authorized under the laws of the
country in question to carry out
maintenance and repair work.
• Never drop or insert any object into
any openings.
• Do not use outdoors.
• Do not use excessive pressure
on console control keys. They are
precision set to properly function with
little finger pressure. Pushing harder
is not going to make the unit go faster
or slower. If you feel the buttons are
not functioning properly with normal
pressure, contact your dealer.
SAVE THIS INSTRUCTION MANUAL
Important Electrical Information
NOTE:
NEVER use a RCD - Residual Current
Device (U.S. ver.= GFCI) - wall
outlet with this treadmill. As with any
appliance with a large motor, the RCD/
GFCI will trip often. Route the power
mains cord away from any moving part
of the treadmill including the elevation
mechanism and transport wheels.
NOTE:
NEVER remove any cover without first
disconnecting AC power. If voltage
varies by ten percent (10%) or more,
the performance of your treadmill may
be affected. Such conditions are not
covered under your warranty. If you
suspect the voltage is low, contact your
local power company or a licensed
electrician for proper testing.
NOTE:
NEVER expose this treadmill to rain
or moisture. This product is NOT
designed for use outdoors, near
a pool or spa, or in any other high
humidity environment. The temperature
specification is 40 degrees c, and
humidity is 95%, non condensing (no
water drops forming on surfaces).
Page 6

6
Owner’s manual
•
PLATINUM PRO
Heart Rate Training
A word about Heart Rate:
The old motto, “no pain, no gain”, is a
myth that has been overpowered by the
benefits of exercising comfortably.
A great deal of this success has been
promoted by the use of heart rate
monitors. With the proper use of a heart
rate monitor, many people find that their
usual choice of exercise intensity was
either too high or too low and exercise
is much more enjoyable by maintaining
their heart rate in the desired benefit
range.
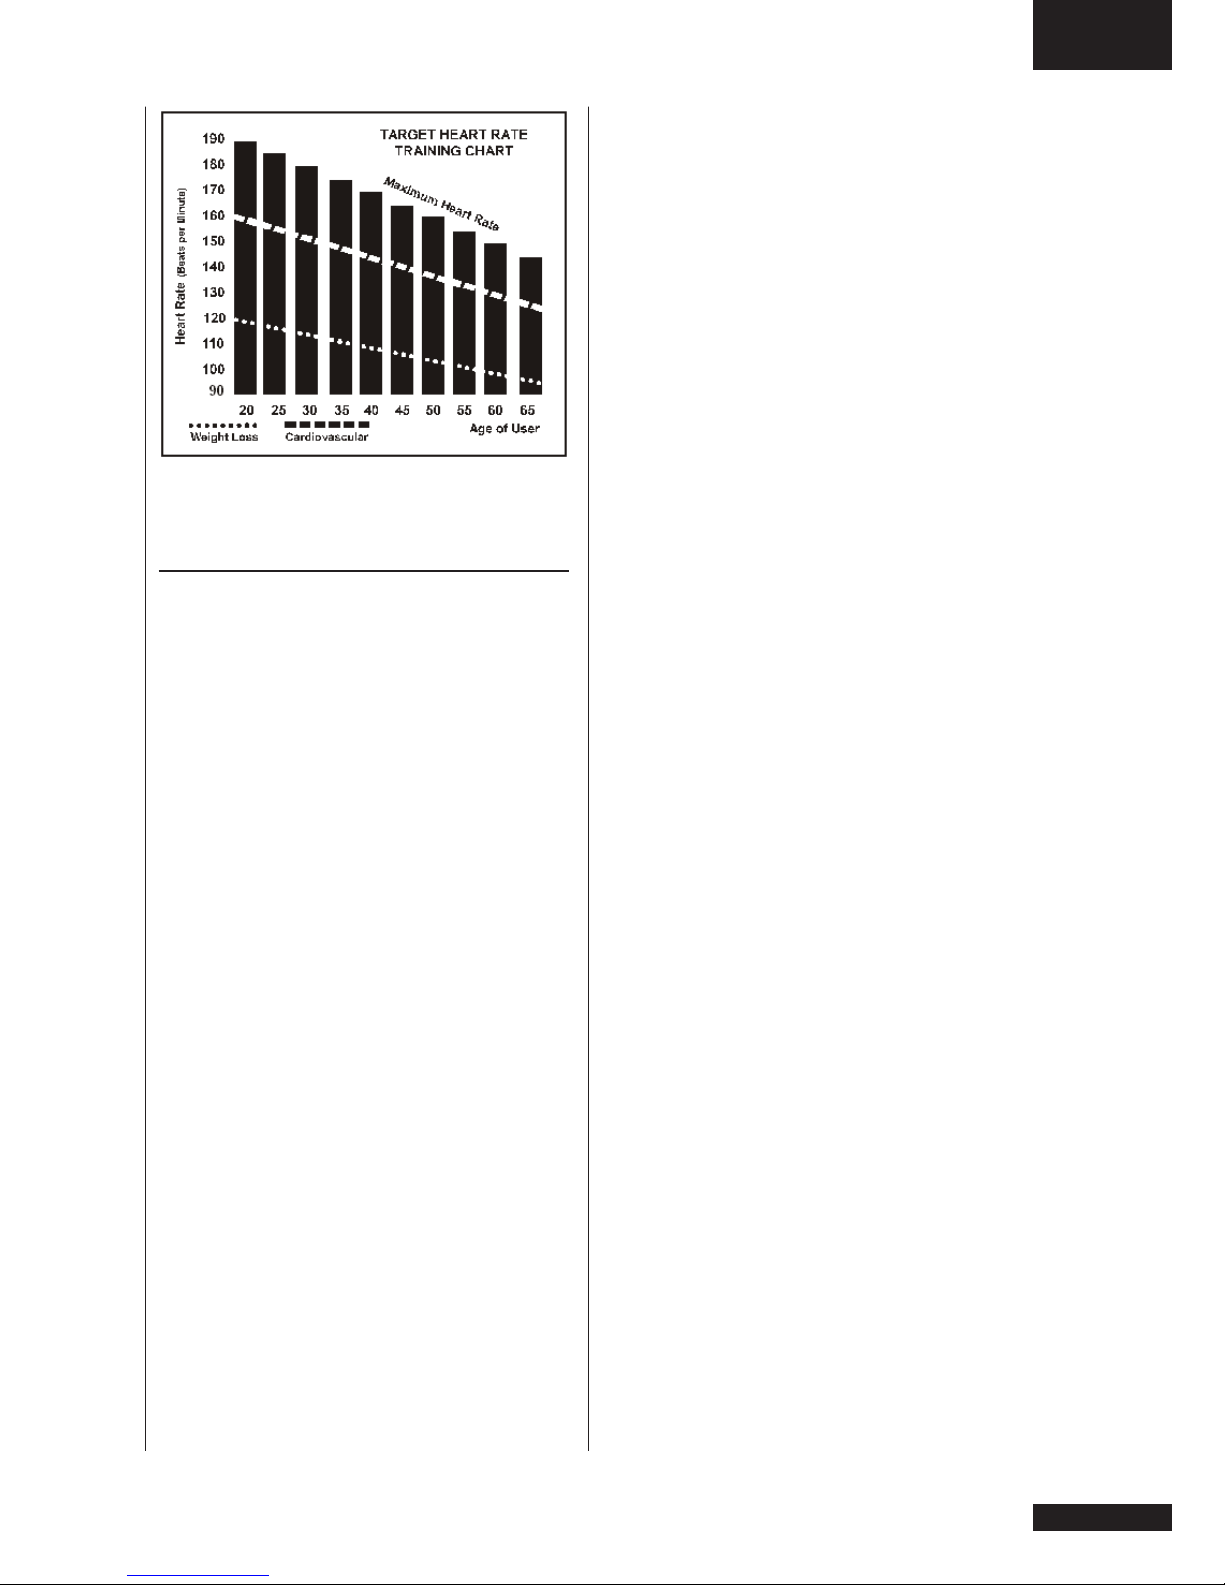
To determine the benefit range in
which you wish to train, you must first
determine your Maximum Heart Rate.
This can be accomplished by using the
following formula: 220 minus your age.
This will give you the Maximum heart
rate (MHR) for someone of your age. To
determine the effective heart rate range
for specific goals you simply calculate
a percentage your MHR. Your Heart
rate training zone is 50% to 90% of your
maximum heart rate. 70% of your MHR
is the zone that burns fat while 80% is
for strengthening the cardio vascular
system. This 70% to 80% is the zone to
stay in for maximum benefit.
For someone who is 40 years old their
target heart rate zone is calculated:
220 – 40 = 180 (maximum heart rate)
180 x 0.7 = 126 beats per minute (70%
of maximum)
180 X 0.8 = 144 beats per minute (80%
of maximum)
So for a 40 year old the training zone
would be 126 to 144 beats per minute.
General Instructions
• NEVER operate this treadmill
without reading and completely
understanding the results of any
operational change you request from
the computer.
• Understand that changes in speed
and incline do not occur immediately.
Set your desired speed on the
computer console and release the
adjustment key. The computer will
obey the command gradually.
• NEVER use your treadmill during an
electrical storm. Surges may occur
in your household power supply that
could damage treadmill components.
• Use caution while participating in
other activities while walking on your
treadmill; such as watching television,
reading, etc. These distractions may
cause you to lose balance or stray
from walking in the centre of the belt;
which may result in serious injury.
• NEVER mount or dismount the
treadmill while the belt is moving.
The treadmills start with at a very
low speed and it is unnecessary
to straddle the belt during start up.
Simply standing on the belt during
slow acceleration is proper after you
have learned to operate the unit.
• Always hold on to a handrail or hand
bar while making control changes
(incline, speed, etc.).
Do not use excessive pressure on
console control keys. They are precision
set to function properly with little finger
pressure. Pushing harder is not going
to make the unit go faster or slower. If
you feel the buttons are not functioning
properly with normal pressure contact
your dealer.
Page 7
GB
Owner’s manual • PLATINUM PRO
7
– to achieve a strong steady signal.
The length of range may vary some
• what but generally stay close enough
to the console to maintain good,
strong, reliable readings. Wearing
the transmitter immediately against
bare skin assures you of proper
operation. If you wish, you may wear
the transmitter over a shirt. To do so,
moisten the areas of the shirt that the
electrodes will rest upon.
• To disconnect from the machine
Remark
The transmitter is automatically activated
when it detects activity from the user’s
heart. Additionally, it automatically
deactivates when it does not receive any
activity. Although the transmitter is water
resistant, moisture can have the effect
of creating false signals, so you should
take precautions to completely dry the
transmitter after use to prolong battery
life (estimated transmitter battery life
is 2500 hours). If your chest strap has
a replaceable battery the replacement
battery is Panasonic CR2032.
Caution!
Do not use this product for Target Heart
Rate unless a steady, solid Actual Heart
Rate value is being displayed. High,
wild, random numbers being displayed
indicate a problem.
Areas to look at for interference, which
may cause erratic heart rate: Microwave
ovens, TVs, small appliances, etc.
Fluorescent lights. Some household
security systems. Perimeter fence for
a pet. Some people have problems
with the transmitter picking up a signal
from their skin. If you have problems try
wearing the transmitter upside down.
Normally the transmitter will be oriented
so the logo is right side up. The antenna
that picks up your heart rate is very
sensitive. If there is an outside noise
source, turning the whole machine 90
degrees may de-tune the interference.
If you continue to experience problems
contact your dealer.
How to wear your wireless chest
strap transmitter:
• Attach the transmitter to the elastic
strap using the locking parts.
• Adjust the strap as tightly as possible
as long as the strap is not too tight to
remain comfortable.
• Position the transmitter with the logo
centered in the middle of your body
facing away from your chest (some
people must position the transmitter
slightly left of center). Attach the final
end of the elastic strap by inserting
the round end and, using the locking
parts, secure the transmitter and
strap around your chest.
• Position the transmitter immediately
below the pectoral muscles.
• Sweat is the best conductor to
measure very minute heart beat
electrical signals. However, plain
water can also be used to pre-wet
the electrodes (2 black square areas
on the reverse side of the belt and
either side of transmitter). It’s also
recommended that you wear the
transmitter strap a few minutes
before your work out. Some users,
because of body chemistry, have
a more difficult time in achieving
a strong, steady signal at the
beginning. After “warming up”, this
problem lessens. As noted, wearing
clothing over the transmitter/strap
doesn’t affect performance.
• Your workout must be within range distance between transmitter/receiver
Page 8
8
Owner’s manual
•
PLATINUM PRO
Assembly
Step 1:
Upright Tubes
• The right side upright tube (19) has
the computer cable (A) pre installed.
Lift the tube off the walking surface
and attach it to the base frame. You
need to gently pull on the computer
cable as you line u the upright tube,
taking the slack out, so the cable
does not get pinched between the
tube and the base frame. Assemble
one 3/8” x 3-3/4” Button Head Socket
bolt (104), 3/8” split washer (58)
and 3/8” 1. flat washer (59) and 10”
nylon washer (153) through the top
hole in the retaining plate (21), and
corresponding top hole in the upright
tube, and screw into the base frame.
Now install the other two bolts (104)
and washers (58 & 59 & 153) and
tighten all three hand tight fixed
• Install the left upright (18) in the
same manner, but without 10” nylon
washer (153)
58 Split washer
59 Flat washer
104
Button head
socket bold.
153
Nylon washer.
58
Split washer
59
Page 9
GB
Owner’s manual • PLATINUM PRO
9
Step 2:
Console Assembly to Upright Tubes
• Connect wire connections between
user interface electronics and user
interface assembly frame.
• Fix the upper cover with the lower
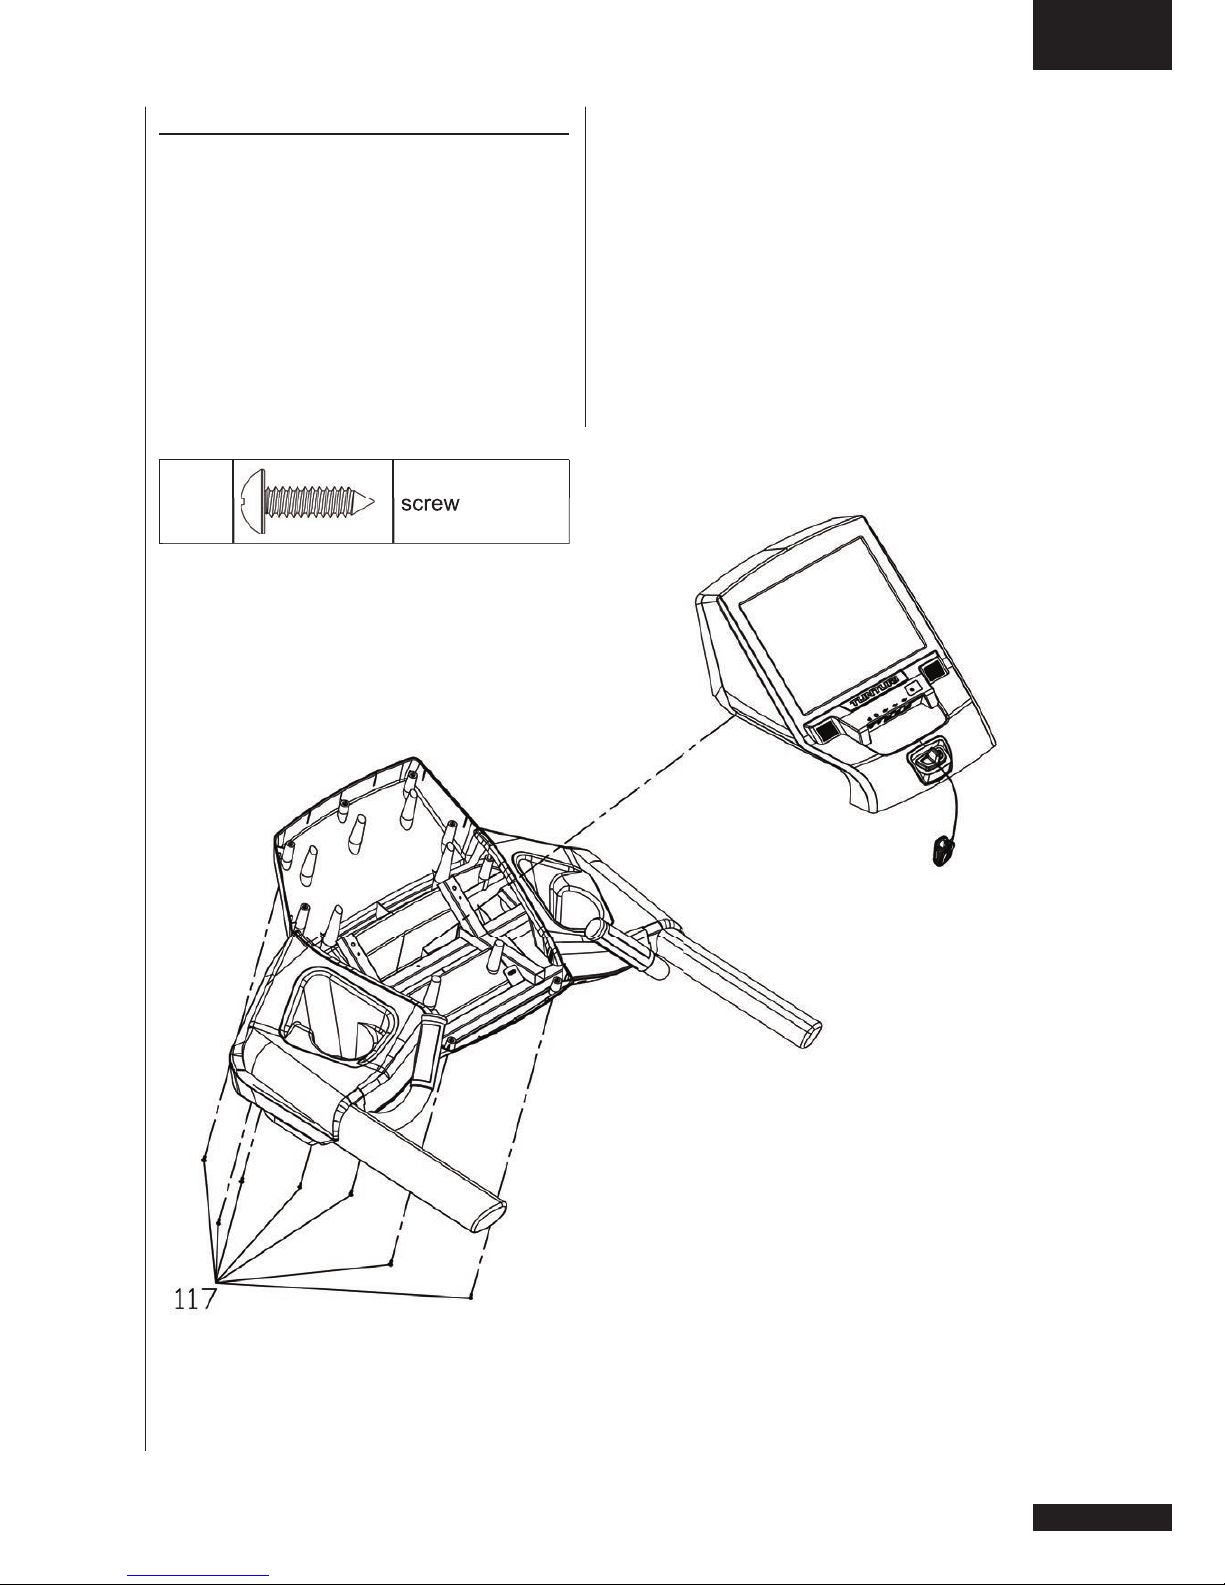
cover by fastening the 7 screws (117)
117 Metal sheet
screw
Page 10
10
Owner’s manual
•
PLATINUM PRO
Step 3:
Console Assembly to Upright Tubes
• Attach the two interface mounts
(3 left & 4 right) to the console
assembly frame with six M8x12mm
socket head cap bolts (108). Note:
Position mounting brackets (3 & 4) all
the way to the back of the console,
then tighten the screws.
• Connect the console computer cable
(C) to the mating cable (A) from the
upright tube.
• 3. Attach the console assembly to the
top of the uprights with six 3/8” x 3/4”
bolt (105), 3/8” split washer (58) and
3/8” flat washer (59). Be careful not
to pinch the computer cable.
Position mounting brackets
(3 & 4) all the way to the back of the
console, then tighten the screws.
58 split washer
59
flat washer
105
bold
108
socket head cap
bolt
Page 11
GB
Owner’s manual • PLATINUM PRO
11
Step 4:
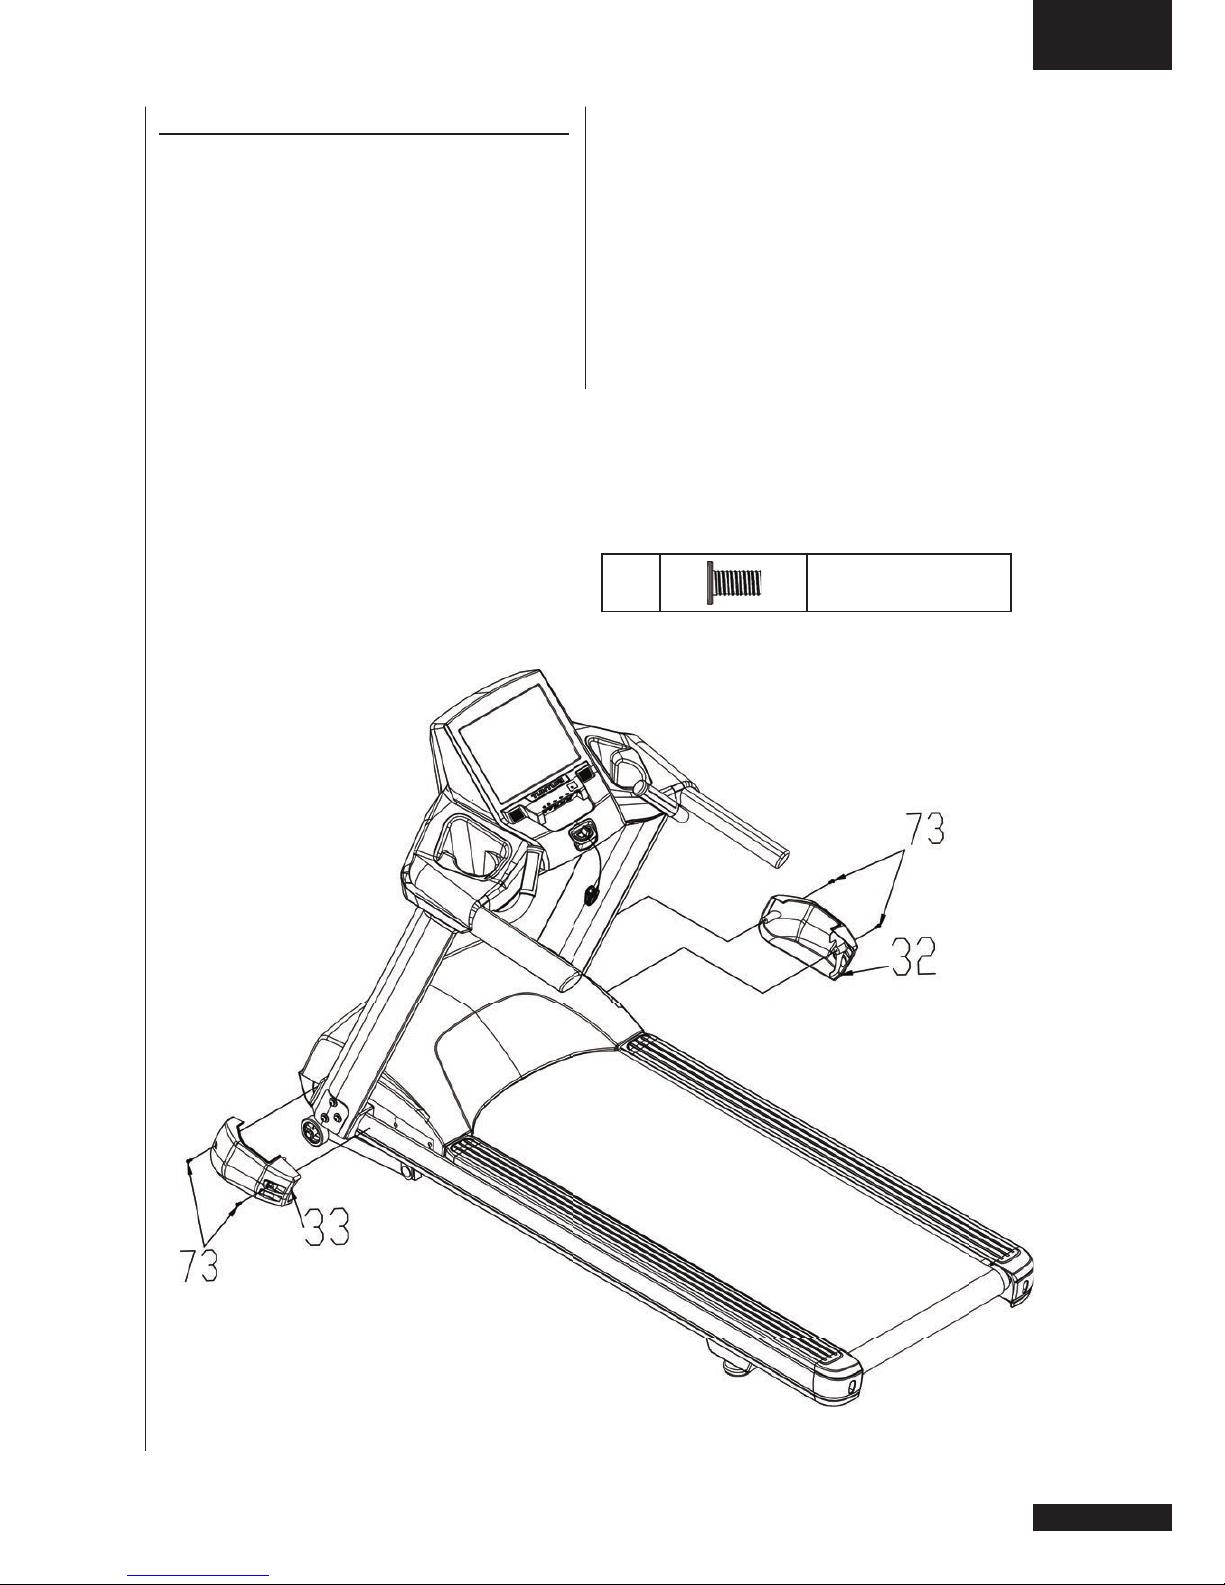
Lower side caps
• Fully tighten the in assembly step 1
hand tight tightened bolts (104) on
the right hand and left hand side to fix
the upright tubes.
• Install the lower side caps (32 & 33)
with four M5x12mm Phillips Head
screws (73).
73 Phillips head
screw
Page 12

12
Owner’s manual
•
PLATINUM PRO
• Fasten the plastic clip onto your
clothing securely to assure good
holding power. Note: The magnet has
strong enough power to minimize
accidental, unexpected stopping.
The clip should be attached securely
to make certain it does not come
off. Be familiar with its function and
limitations. The treadmill will stop,
depending on speed, with a one to
two step coast anytime the magnet
is pulled off the console. Use the
red Stop / Pause switch in normal
operation.
•
Software Buttons
Software buttons:
Remark:
Only buttons shown bright can be used
for its function. When buttons are in grey
shade, the button option is not active.
Back
Go back to former window without
saving changes.
OK
Confirm setting/ save change and go to
next screen.
Cancel
Clear changed data without saving
change.
Scroll
Use arrows Left-Right/ Up-Down to
see more selectable items than can be
shown in main window.
Data change
Upper or lower the data value.
Software key pad
show software key pad when available.
User interface
Hardware buttons
Energy efficient:
Pressing Energy efficient button will
wakes up console when being in
stand by mode. ( See “settings/ Power
Management” for more details )
Connectors:
Display is equipped with 2 x 3,5 mm jack
sockets.
Right hand Jack near USB is for Line out
Left hand side Jack is for Line in
Display is equipped with 3 USB sockets
for storage device connection.
The USB socket can only read FAT32
formated format.
Remark:
FAT32 environment is limited to 4GB file
size.
Safety Key
A safety key is provided with this unit. It
is a simple magnetic design that should
be used at all times. It is for your safety
should you fall or move too far back on
the running belt.
Pulling this safety key will stop running
belt movement.
To Use:
• Place the magnet into position on the
console control head. Your treadmill
will not start and operate without this.
Page 13
GB
Owner’s manual • PLATINUM PRO
13
Power on
Display will show at power on, a
window as a screen saver to inform you
the display software is preparing the
application.
When display has started you will see
the above window
The display can be divided in 3
sections.
Main function bar (Left)
Main function bar is showing main
function buttons to access different mode
options. Main function bar is visible in
any exercise mode, and buttons can be
pressed at all times.
Information bar (upper)
Information bar is showing:
In right upper corner the selected user
profile at all times.
In left upper corner program mode
information.
Information bar is not active as touch
screen region.
Main display region (Centre)
Main display region is changing in every
program mode.
In active mode it shows the progress of
your program, and in programming mode
it shows buttons and selection tools to
set required data for your workout.
It is also your main window for web
browser mode, and multimedia play
back.
Display functions
Multi language support
The user interface can be preset in multi
languages. When setting a language
most of the user interface content will
change into selected language.
Note: Engineer mode related text will not
change into selected language, as this is
only available in English.
User can choose from shown languages.
Select your language by pressing the
matching flag button and user text will
change into selected language directly.
You can select an other display function
by selecting a button from the main
function bar
Page 14
14
Owner’s manual
•
PLATINUM PRO
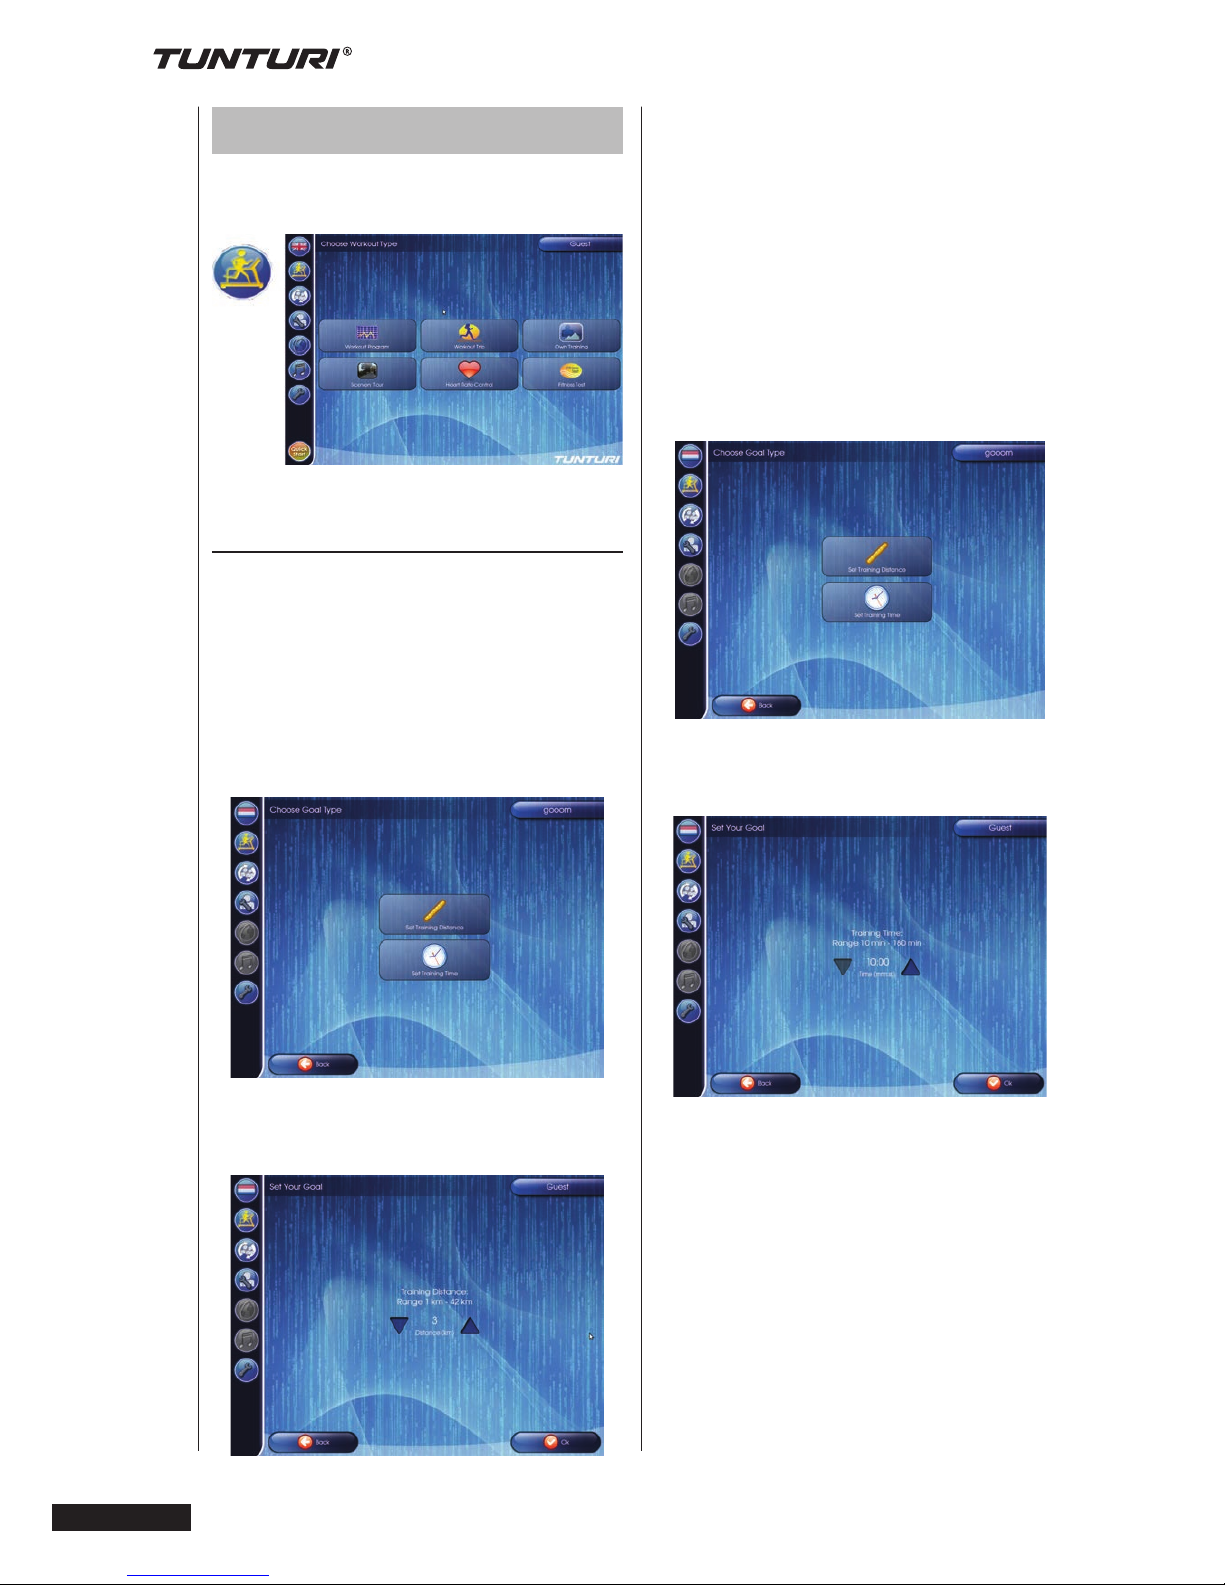
Programs
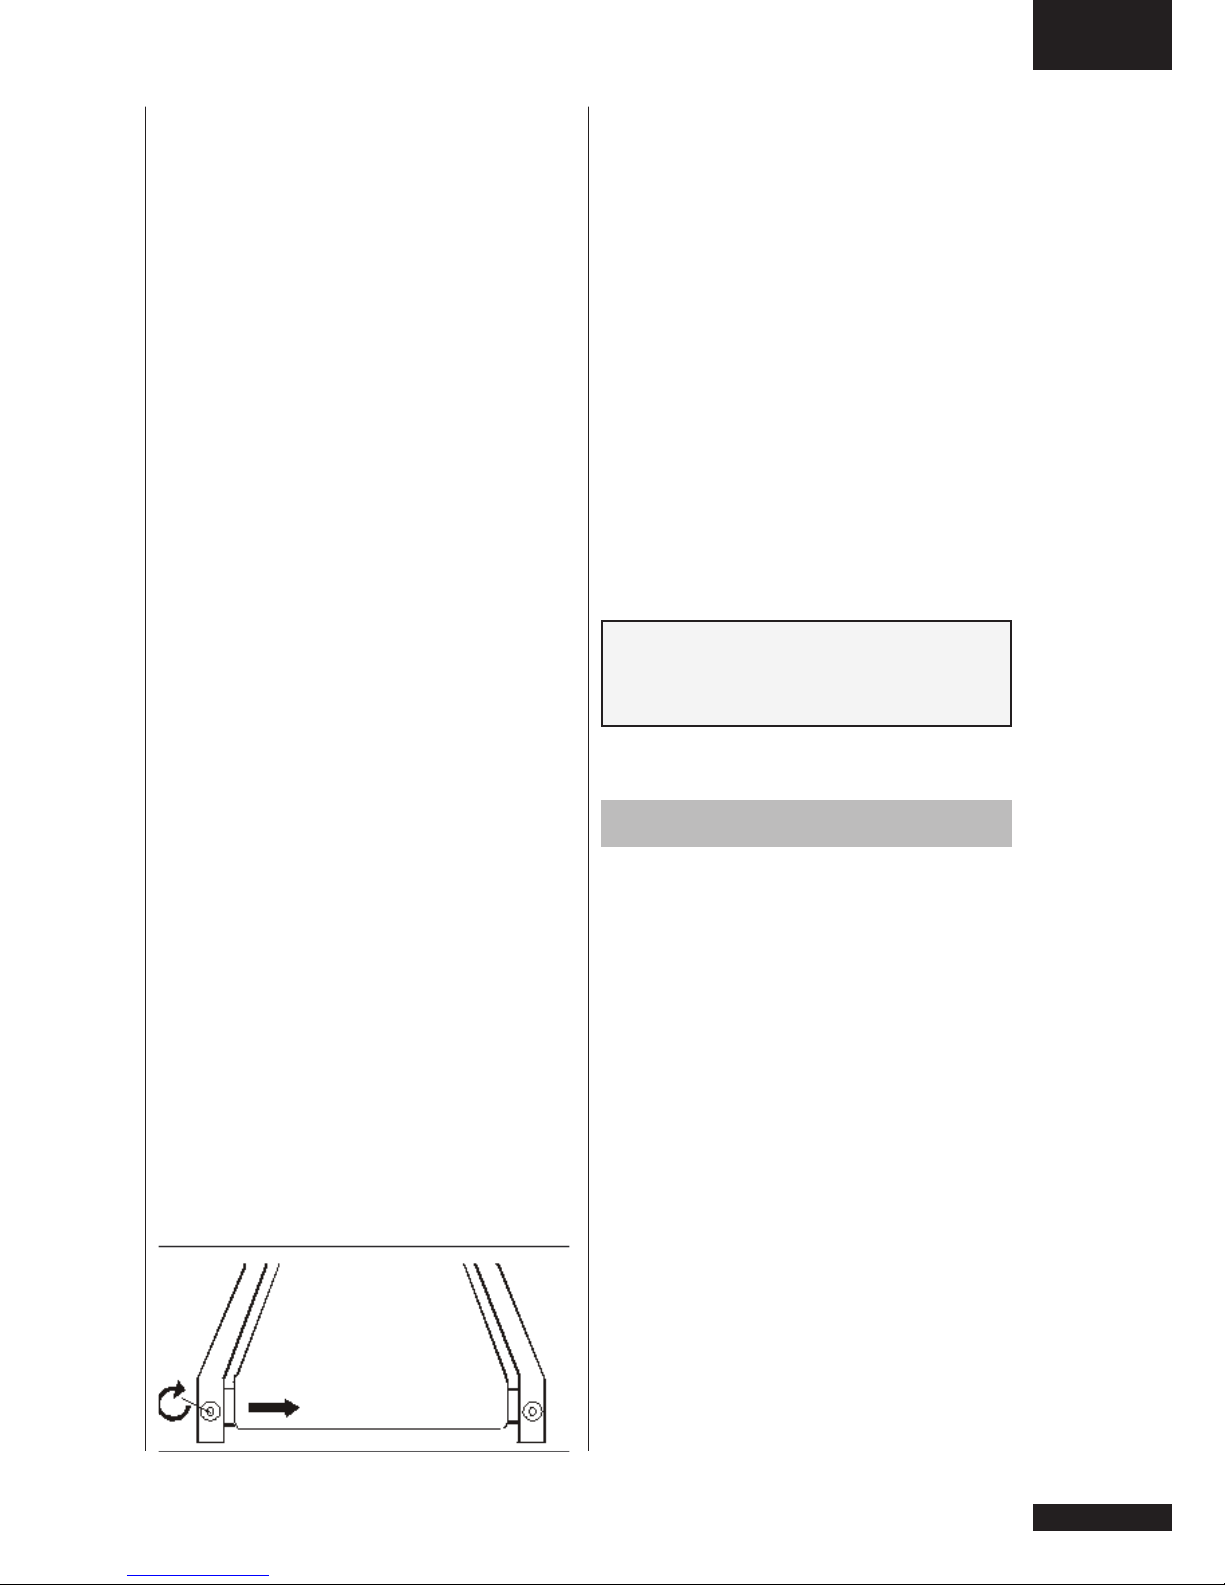
Select Programs by pressing the
workout selection button.
Setting your workout goal
Depending on your workout type you can
set your workout goal in different ways.
Setting your goal for distance.
When your program allows you to set
your workout goal for a distance you will
see the below window after selecting
your workout program.
To set a distance you need to select the
“set Training distance” button to go to the
next step in programming.
Use the arrow buttons to upper or lower
your goal. The goal limits are shown in
window too. (this image shows the limits
in metric settings) Press “OK” button to
confirm. You will go to your ready to go
program you have selected.
Setting your goal for time.
When your program allows you to set
your workout goal for a time you will see
the below window after selecting your
workout program.
To set a time you need to select the “set
Training time” button to go to the next
step in programming.
Use the arrow buttons to upper or lower
your goal. The goal limits are shown
in window too. Press “OK” button to
confirm. You will go to your ready to go
program you have selected.
Setting your goal for heart rate.
When your program allows you to set a
heart rate limit to control your workout
intensity, see the below window after
selecting your heart rate controlled
workout program.
(Note: you may need to set a goal
Page 15
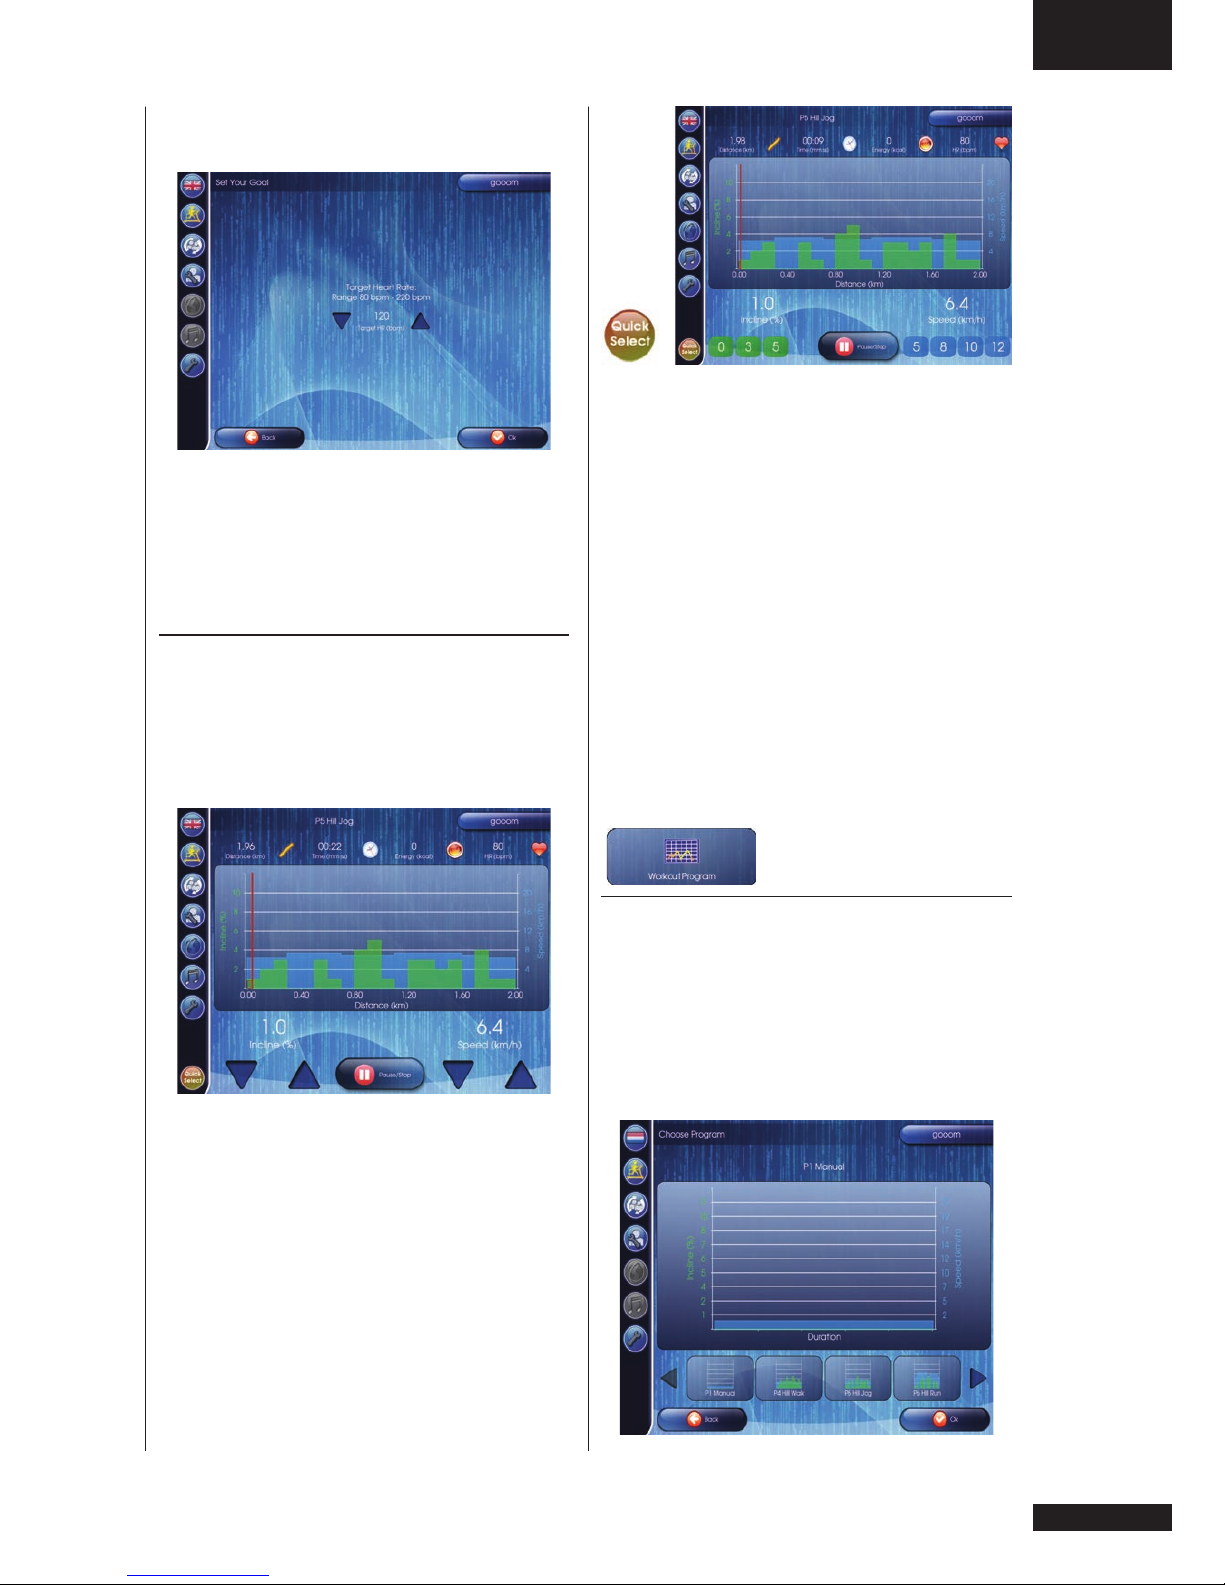
GB
Owner’s manual • PLATINUM PRO
15
Speed hot keys:
Speed Hot Keys are set as 5, 8, 10,12
For example, the speed changes from
any speed to 10 by pressing the
Speed Hot Key 10.
Elevation hot keys:
Incline Hot Keys are set 0, 3, 5%
For example, the elevation level changes
from any level to 3% by pressing the
Elevation Hot Key 3.
When pressing the Quick select button
once again, it will show the standard
adjust arrows again for speed and
incline.
Workout Program
The “Workout Program” programs
contain preset incline and speed pattern.
User could select distance or time
as workout goal. There are 5 preset
programs: P1 (manual), P4 (Hill Walk),
P5 (Hill Jog), P6 (Hill Run),
P7 (Rolling Hils)
for distance and/ or time too to set a
duration / distance limit still.)
Use the arrow buttons to upper or lower
your goal. The goal limits are shown
in window too. Press “OK” button to
confirm. You will go to your ready to go
program you have selected.
Speed and incline control
Standard adjustment
You can use the arrows in left lower
corners at all times to adjust your incline
setting, or arrows in the right corner to
adjust your speed setting.
Quick select buttons
When pressing Quick Select button in
lower corner you can change the manual
arrow adjust buttons into speed buttons
as shown below.
Page 16
16
Owner’s manual
•
PLATINUM PRO
Select your program and the goal
selection window appears. Set your work
out goal to start your selected program.
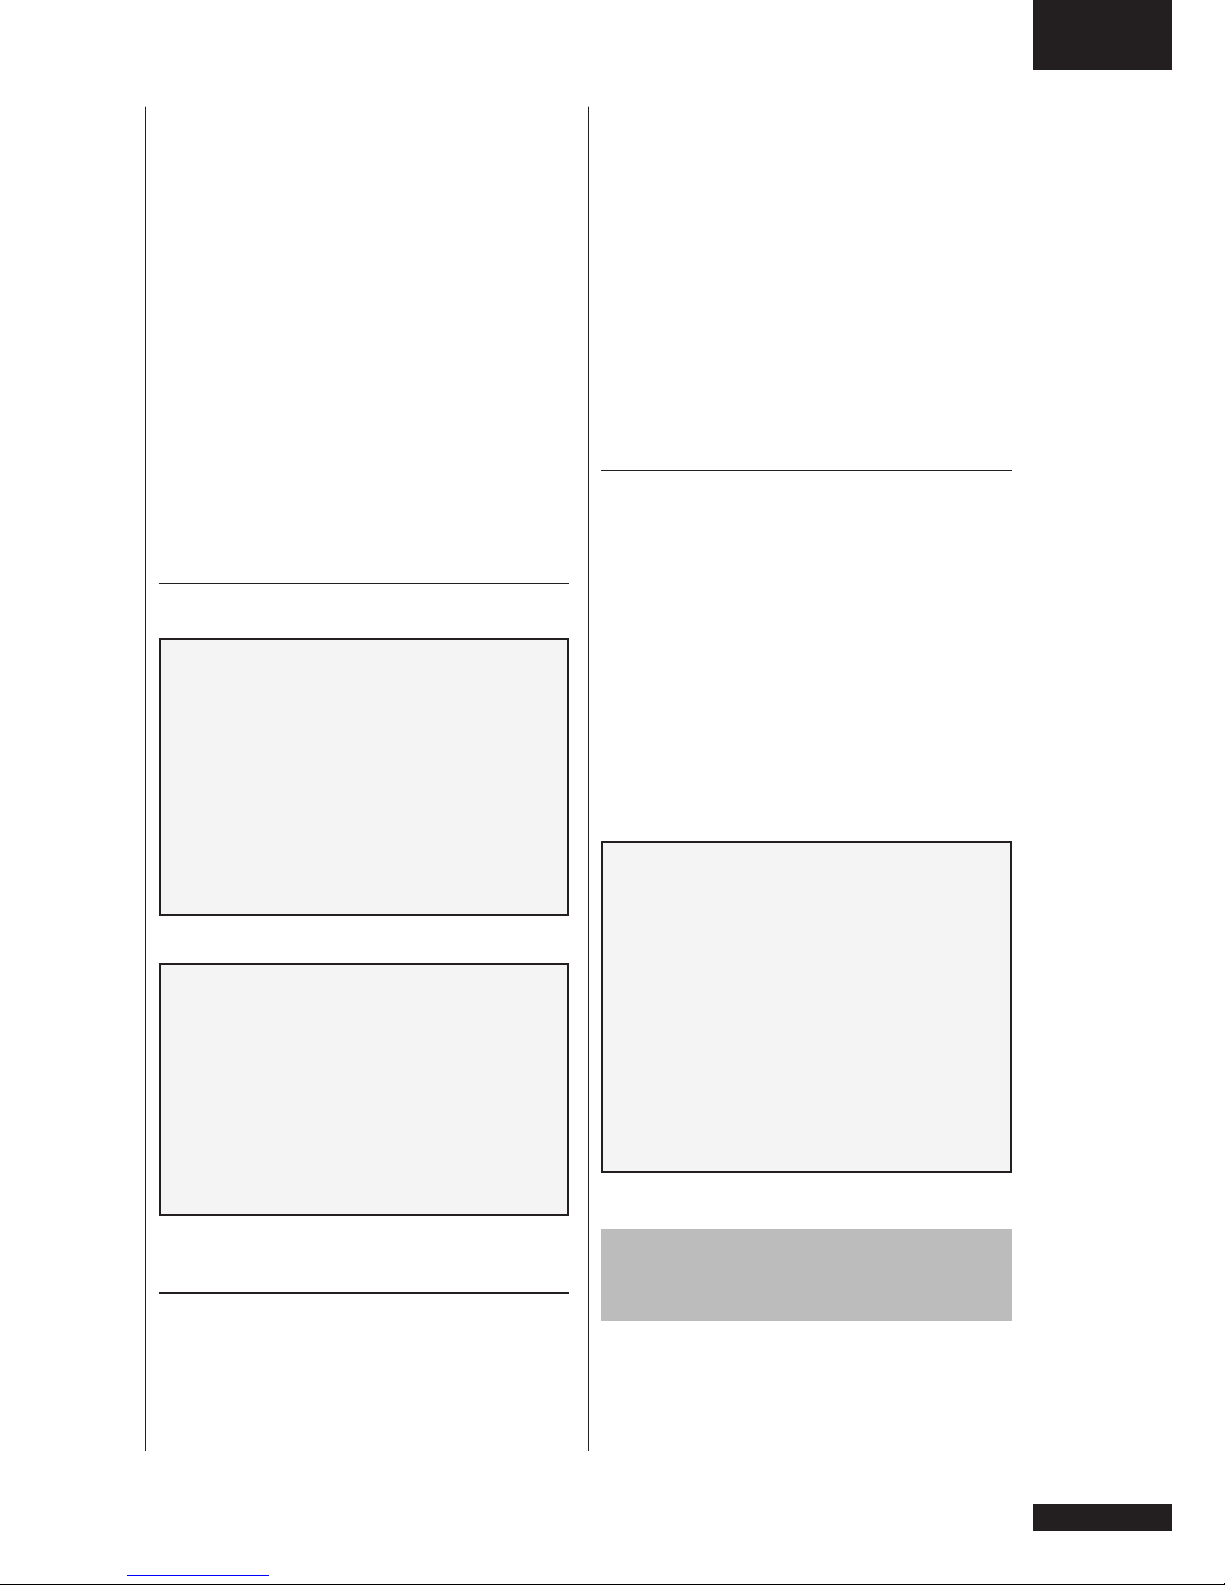
You will see below program profile when
being in active mode.
Chart display shows:
• Y-Axis left side: Incline %
• Y-axis.right side: Speed meter
• X-axis: Distance when in distance
mode. Time when in time mode
Window size is 2KM for distance unit
and 10 Min for time unit.
Workout Trip
The “Workout Trip” programs contain
real geometric data, like position,
altitude, and incline. Therefore, these
programs only contain preset incline.
The default speed is 0.8 KM/h. However,
user still could adjust NM when running.
There are 3 preset programs:
A: Tuscany Country road
B: Tuscany Sandy Track
C: Tuscany Scenery Slopes
Select your program and the goal
selection window appears. Set your work
out goal to start your selected program.
You will see below program profile.
Chart display shows:
• Y-Axis left side: Incline %
• Y-axis.right side: Speed meter
• X-axis: Distance when in distance
mode. Time when in time mode
Window size is 2KM for distance unit
and 10 Min for time unit.
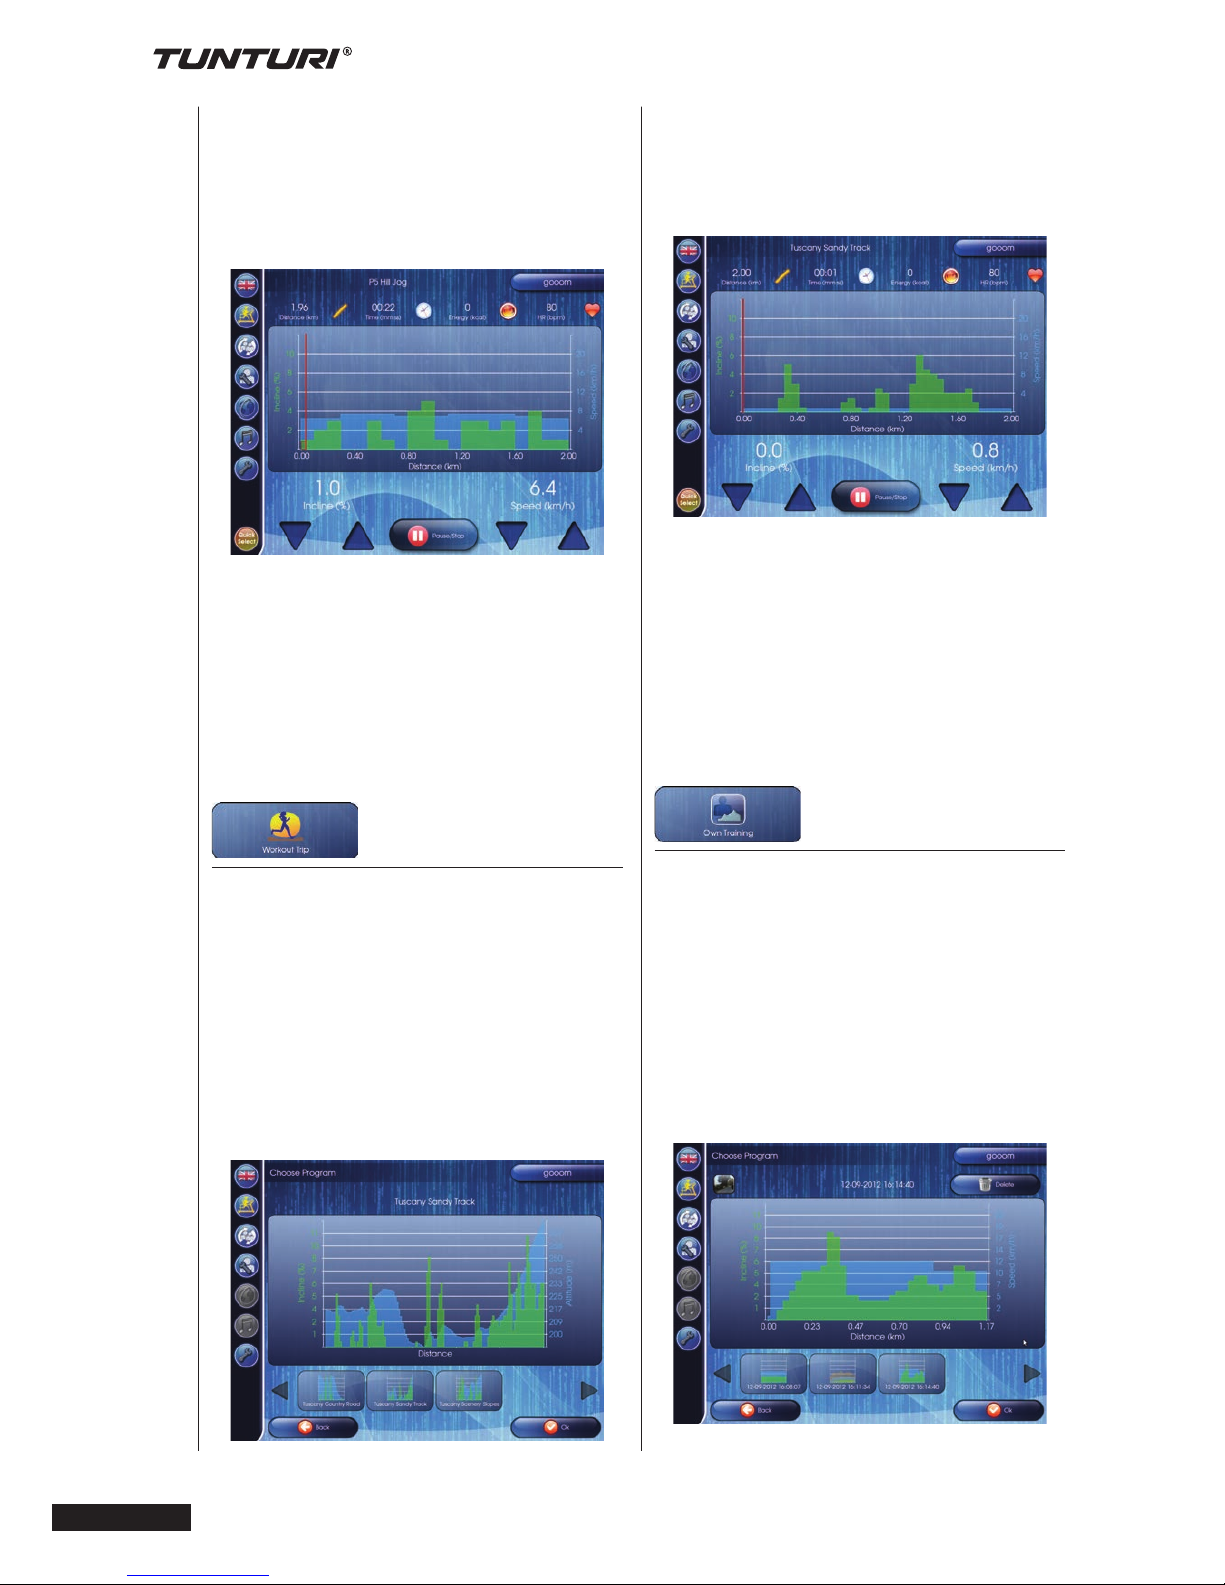
Own Training
User could save workout as his/her
“Own Training” in following criteria:
• Workout type is one of Workout
Program, Workout Trip, Scenery Tour,
and Heart Rate Control.
• Workout ran exceeds 0.1KM and
5Min.
Select a stored training if there are any
by using the arrows ( Left/ Right )
Page 17
GB
Owner’s manual • PLATINUM PRO
17
When selected your program you can
choose between Rerun mode and Race
mode after confirm by pressing OK
button.
When select Rerun mode:
Before workout, setup distance or time
as goal. Default distance and time is
set to max value depends on each own
training.
When select Race mode:
Workout always uses the distance or
time as goal in previous workout. After
workout, result will show on chart region.
The workout screen outlook depends on
workout mode type.
Scenery Tour
“Scenery Tour” uses the same workout
profiles as in “Workout Trip”, except it
has the video playback. The video was
recorded the scene in the local site. The
video playback speed will be adjusted
automatically depends on treadmill
speed: The programs contain real
geometric data, like position, altitude,
and incline. Therefore, these programs
only contain preset incline. The default
speed is 0.8 KM/h. However, user still
could adjust speed when running. There
are 3 preset programs:
A: Tuscany Country road
B: Tuscany Sandy Track
C: Tuscany Scenery Slopes
Select your program and the goal
selection window appears. Set your work
out goal to start your selected program.
You will see below program profile.
You can use the speed/ incline control
arrows at all times to adjust your workout
intensity.
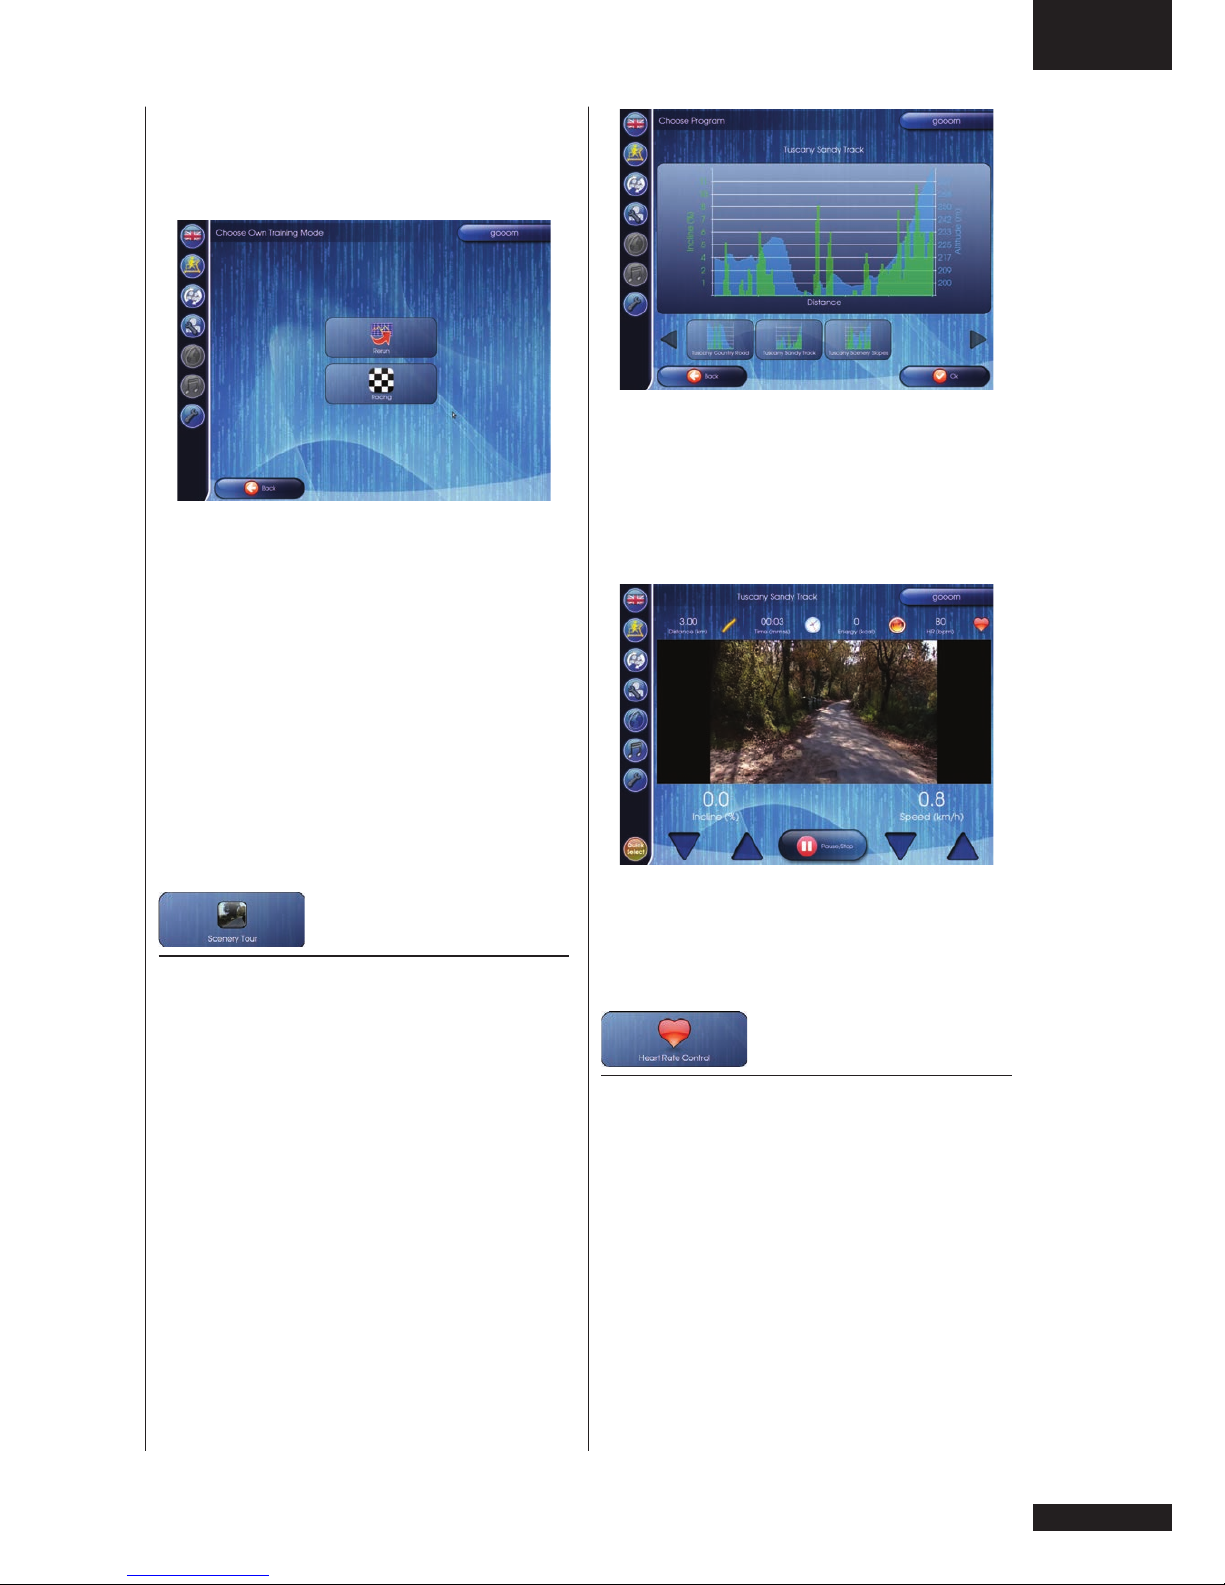
Heart Rate Control
The “Heart Rate Control” programs are
designed to control user heart rate by
resistance adjustments. So, heart rate
transmitter is required for the workout.
There are 6 preset programs
A: HRC
B: P08 Fat Burner 1
C: P09 Fat Burner 2
D: P10 Cardio
E: P11 Fit
Page 18

18
Owner’s manual
•
PLATINUM PRO
Chart display shows:
• Y-Axis left side: Heart rate ( BMP)
• Y-axis.right side: Target heart rate
• X-axis: Distance when in distance
mode. Time when in time mode
Window size is 2KM for distance unit
and 10 Min for time unit.
•
You can use the arrows to adjust
settings. The adjustable settings are
depending on the chosen training mode.
Fitness Test
Fitness test measure users fitness and
show the result after test. There are two
test modes
2KM Walk test
Fits to ordinary people.
The distance is 2KM and incline is set
to 1%. HR transmitter is required during
test. User should walk/run as fast as
possible and stop/pause will fail the test.
Speed is controlled by user.
Select your program and select your
training mode.
In speed mode you can manually adjust
incline setting and change your target
heart rate. Speed is controlled by the
program.
In incline mode you can manually adjust
speed setting and change your target
heart rate. incline is controlled by the
program.
In combination mode you can change
your target heart rate only. incline and
speed are controlled by the program.
After confirm the goal selection window
appears. Set your work out goal to start
your selected program.
You will see below program profile.
Page 19
GB
Owner’s manual • PLATINUM PRO
19
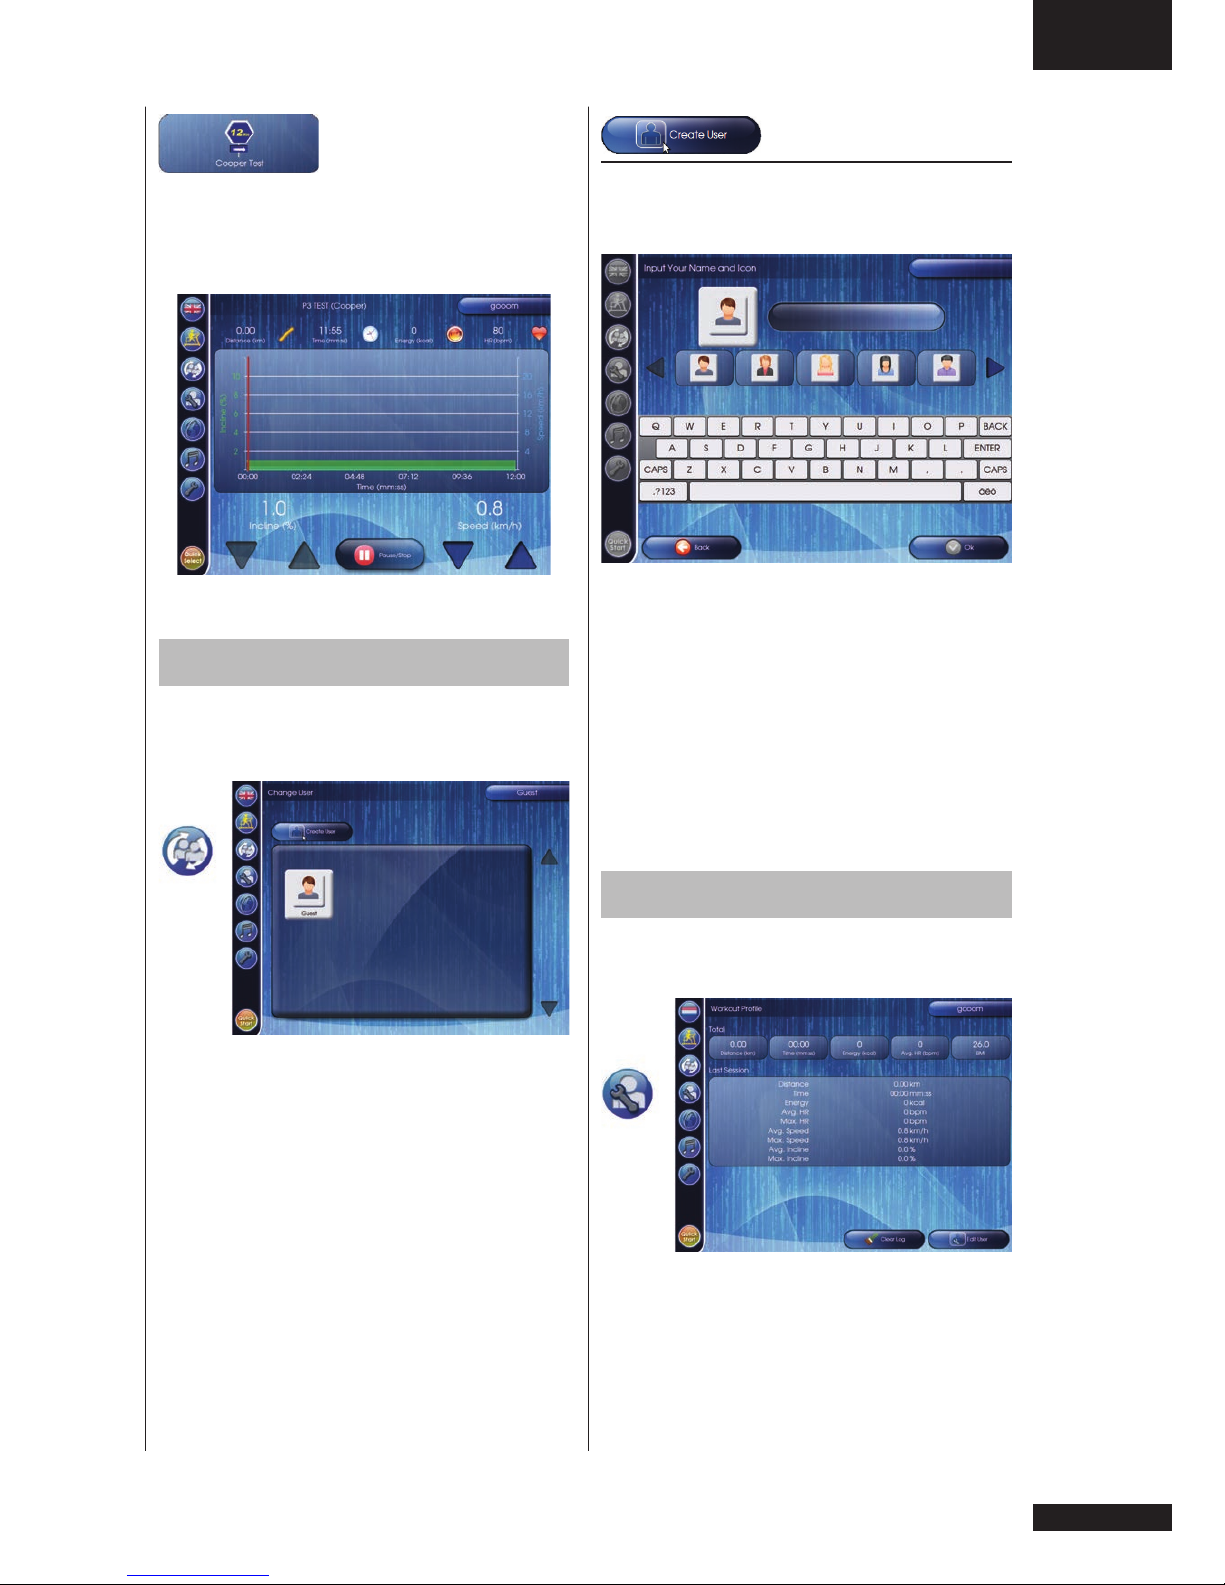
Cooper test
Fits more fit users.
The time is set on12 min and incline is
set to 1%. User should walk/run as far as
possible. Speed is controlled by user.
Change user
Open Change user menu by pressing
“Change user” button in main function
bar.
You can change a user in the same way
as you would create a user.
Select a user you want to change or
press “Create User” button and create/
modify as below:
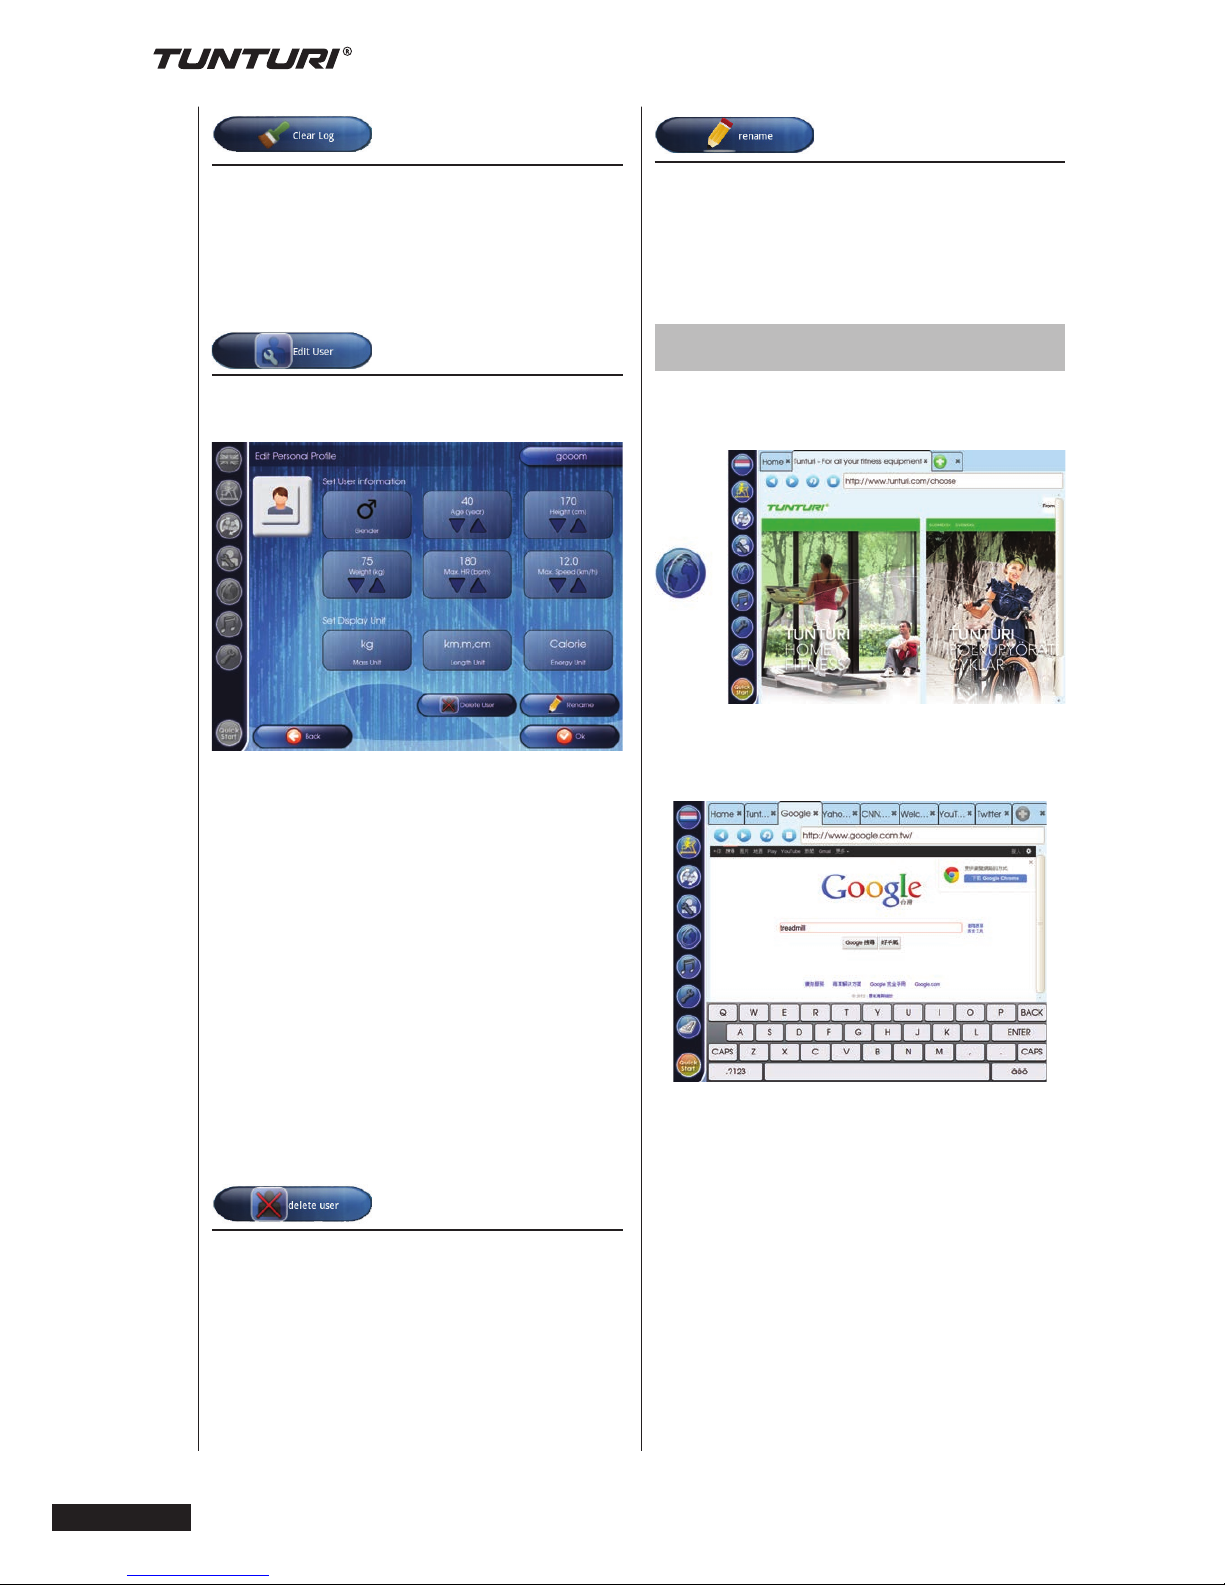
Create User
To create a new user you press the
“Create User” button. Below window will
appear.
Use the digital keyboard to write your
name, and select an avatar to use as
your personal icon. Press the “DONE”
key on the digital key board when you
have set up your name and avatar right.
Press “OK” button to continue.
Your user is created with the standard
user settings. Continue the setup of the
user profile by “Change User” details in
“Edit User” chapter.
Edit User
Open Change user menu by pressing
“Edit User” button in main function bar.
This menu shows in the upper section
the total workout log of the user.
The lower section shows the workout log
of latest workout.
Page 20
20
Owner’s manual
•
PLATINUM PRO
Rename
When button is pressed you can change
user name, and keep the stored by the
new given name.
See “Create User” for details.
Web browser
Open “Web browser” by pressing the
“Internet” button in main function bar.
When touching the URL bar you will
automatically see a software keyboard
appear.
Remark:
possibly not all websites will be
displayed correctly.
Remark:
Browsing the internet requires WiFi
connection. (See chapter “Settings”)
Remark:
The limit of page numbers that can be
open at the same time is 8
Clear Log
“Clear Log” button can be pressed
to delete as well total value as latest
workout value.
Note: Display will not prompt to confirm.
Edit User
“Edit User” button can be pressed to
change user preferences/ settings.
User details:
• Gender
• Age
• Height
• Weight
• Max HR ( will be set automatically by
selecting gender and age. But can be
changed if wanted
Unit details:
• Mass unit ( KG/ LBS )
• Length unit ( Metric/ Imperial )
• Energy unit ( Calorie/ Jouls )
When all filled out correctly, press “OK”
button to confirm.
Delete User
When button pressed the user interface
will ask to confirm your action to delete
user and it’s data completely.
Page 21
GB
Owner’s manual • PLATINUM PRO
21
Media Player
Open “Media Player” by pressing the
“Media” button in main function bar.
Control buttons for media player
Browse
Press the browse button to search for
the files you like to play back.
Remark:
Best you can store your files on an USB
drive, and put this in one of the available
USB slots. USB drive must be formatted
in FAT32 format.
Remark:
possibly not all files will be able to play.
Play control
Use play control button to play, pause,
stop or repeat your selection.
rapidly pressing the “home button”
Scale
Press button to minimize or maximize
your active video playback window.
Time
Slider shows the position of the playback
progress. You can slide the slider to fast
forward or fast backward the playback
file.
Volume
Use slider to control volume
If you haven’t stopped the music from
playing it will continue to play in most
program modes.
Note: When the selected program/
display function requires music and or
movie function the media player will stop
playing.
Settings
Open Settings menu by pressing the
“Settings” button in main function bar.
The settings window will appear.
Wi-Fi
When pressing “Wi-Fi” button it opens
Wi-Fi settings window.
Page 22
22
Owner’s manual
•
PLATINUM PRO
NOTE:
to establish a Wi-Fi connection it
might be required to set date and time
correct.
When connected with a network it will
show the connection sign.
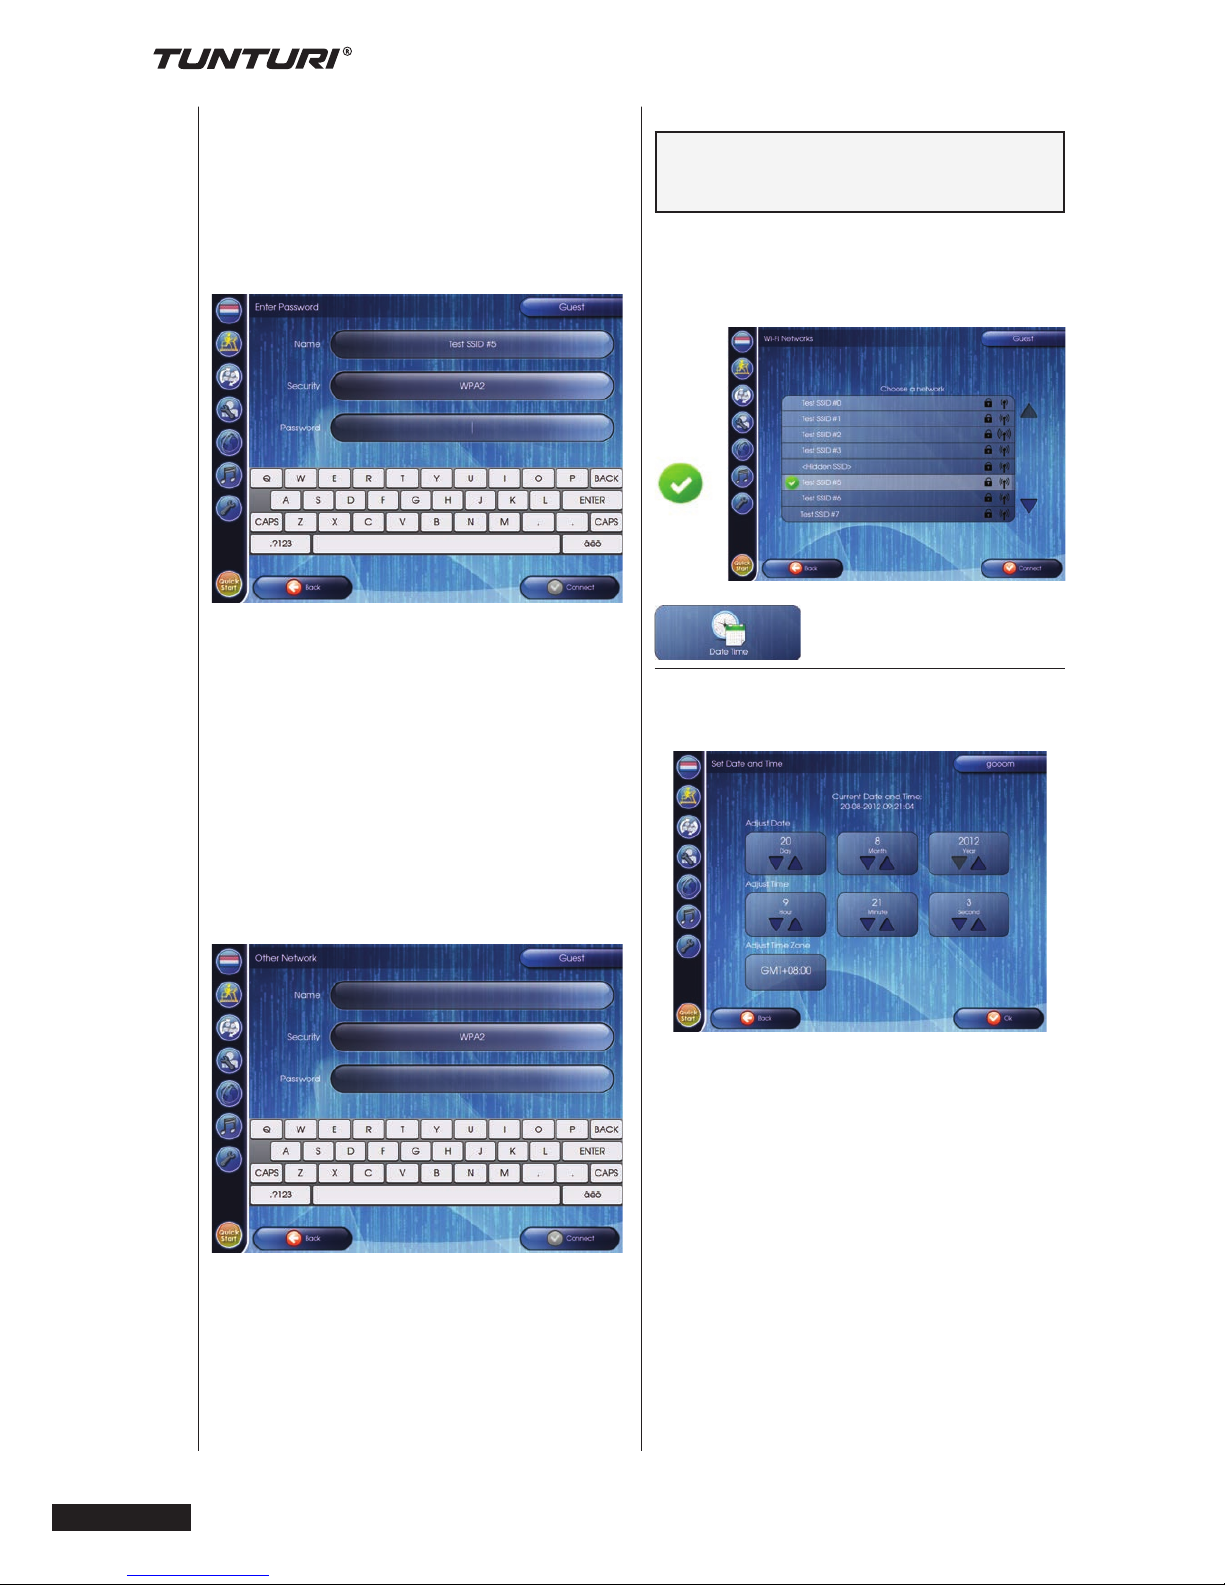
Date Time
When pressing “Date Time“ button it
opens Date Time settings window.
In here you can set date and time
correct. You can also set correct time
zone if required.
Use arrow up or down buttons to adjust.
Press OK button to confirm, and go back
to setting menu.
Press Back button to go back to settings
menu without change.
Wi-Fi networks:
Lists the available networks.
It shows authentication and signal
strength sign.
Press the network you like to connect to
once to open the connection window
Touch the Password bar and the
software keyboard will appear
automatically. Enter the pass word
and press connect button to establish
connection.
Use “Add Wi-Fi network” button, always
on the bottom of your list to add a
network when SSID is hidden. You
might need to swipe to the bottom of the
list when many available networks are
listed.
Touch the Network SSID bar and
the software keyboard will appear
automatically.
• Enter the network name
• Select Security mode
• Fill out Password
and press connect button to establish
connection.
Page 23
GB
Owner’s manual • PLATINUM PRO
23
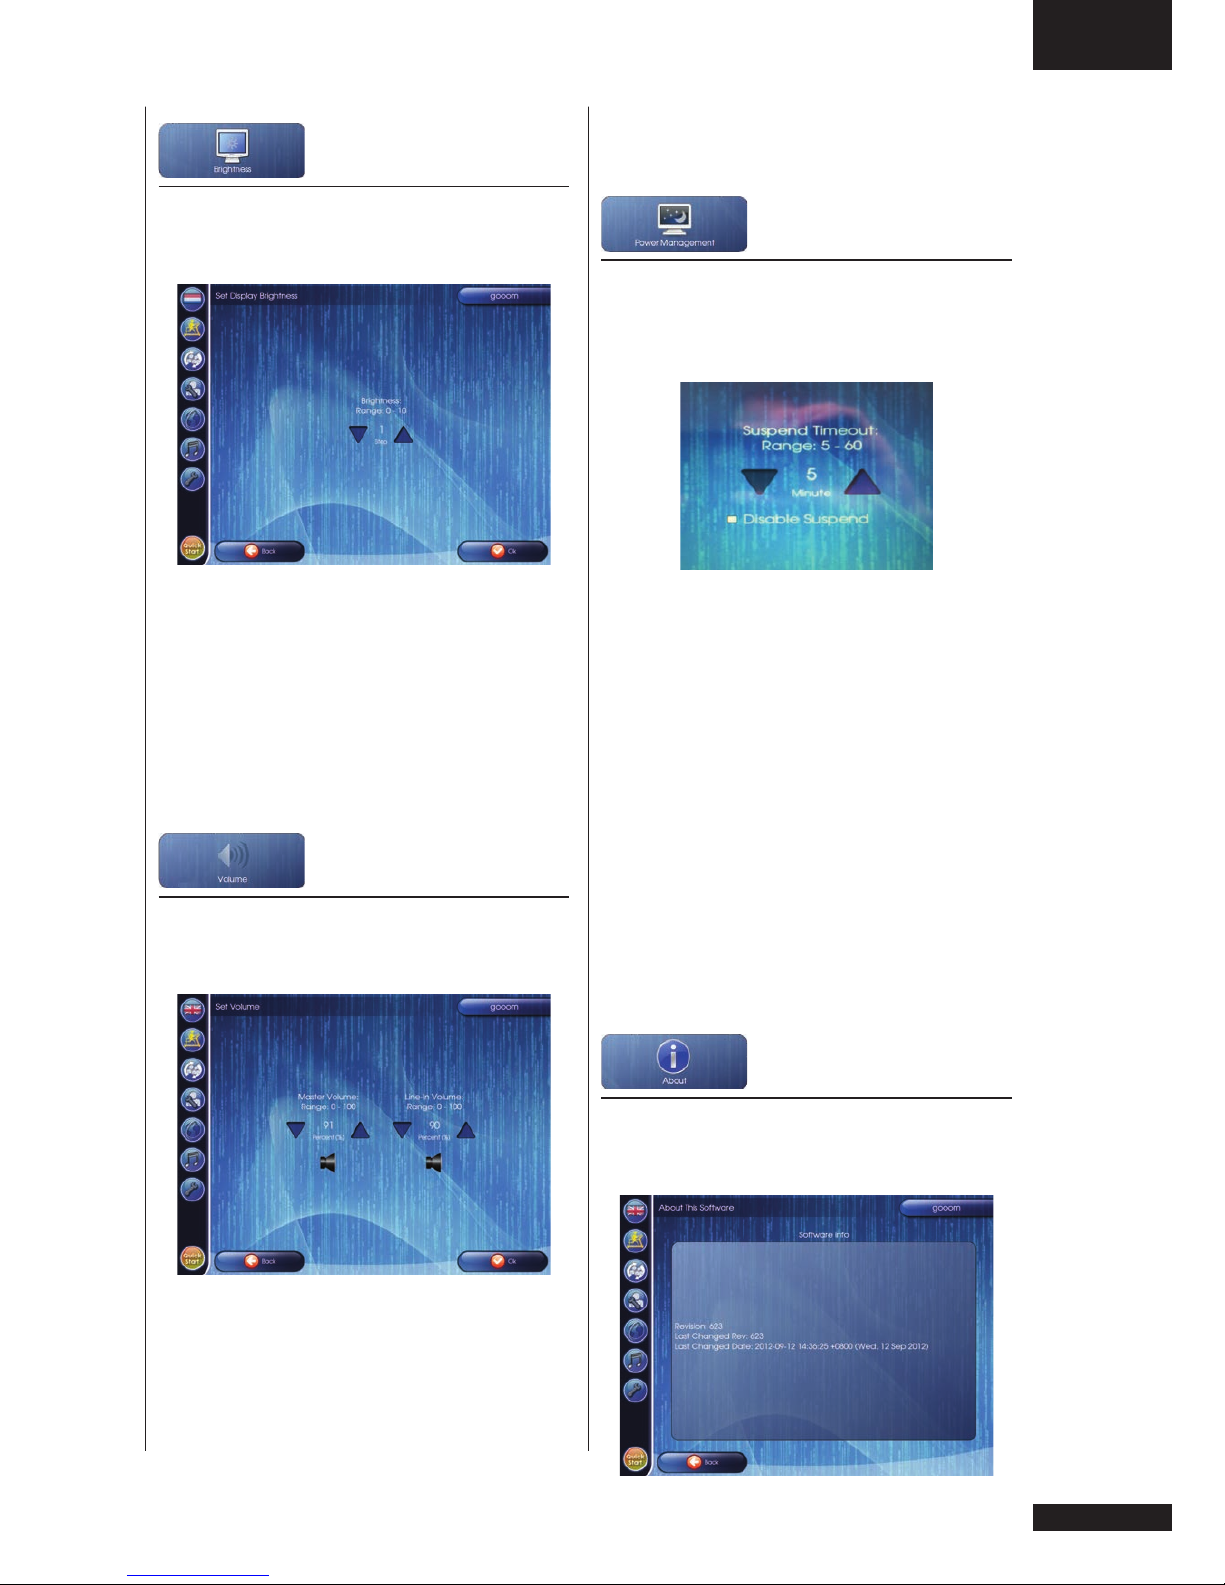
Brightness
When pressing “brightness“ button it
opens brightness settings window.
In here you can adjust brightness
in range between 0 (darker) and 10
(lighter).
Use arrow up or down buttons to adjust..
Press OK button to confirm, and go back
to setting menu.
Press Back button to go back to settings
menu without change.
Volume
When pressing “Volume“ button it opens
master volume settings window.
In here you can adjust the master
volume for web and media player and
line in volume in range between 0 and
100(max).
Use arrow up or down buttons to adjust.
Press OK button to confirm, and go back
to setting menu.
Press Back button to go back to settings
menu without change.
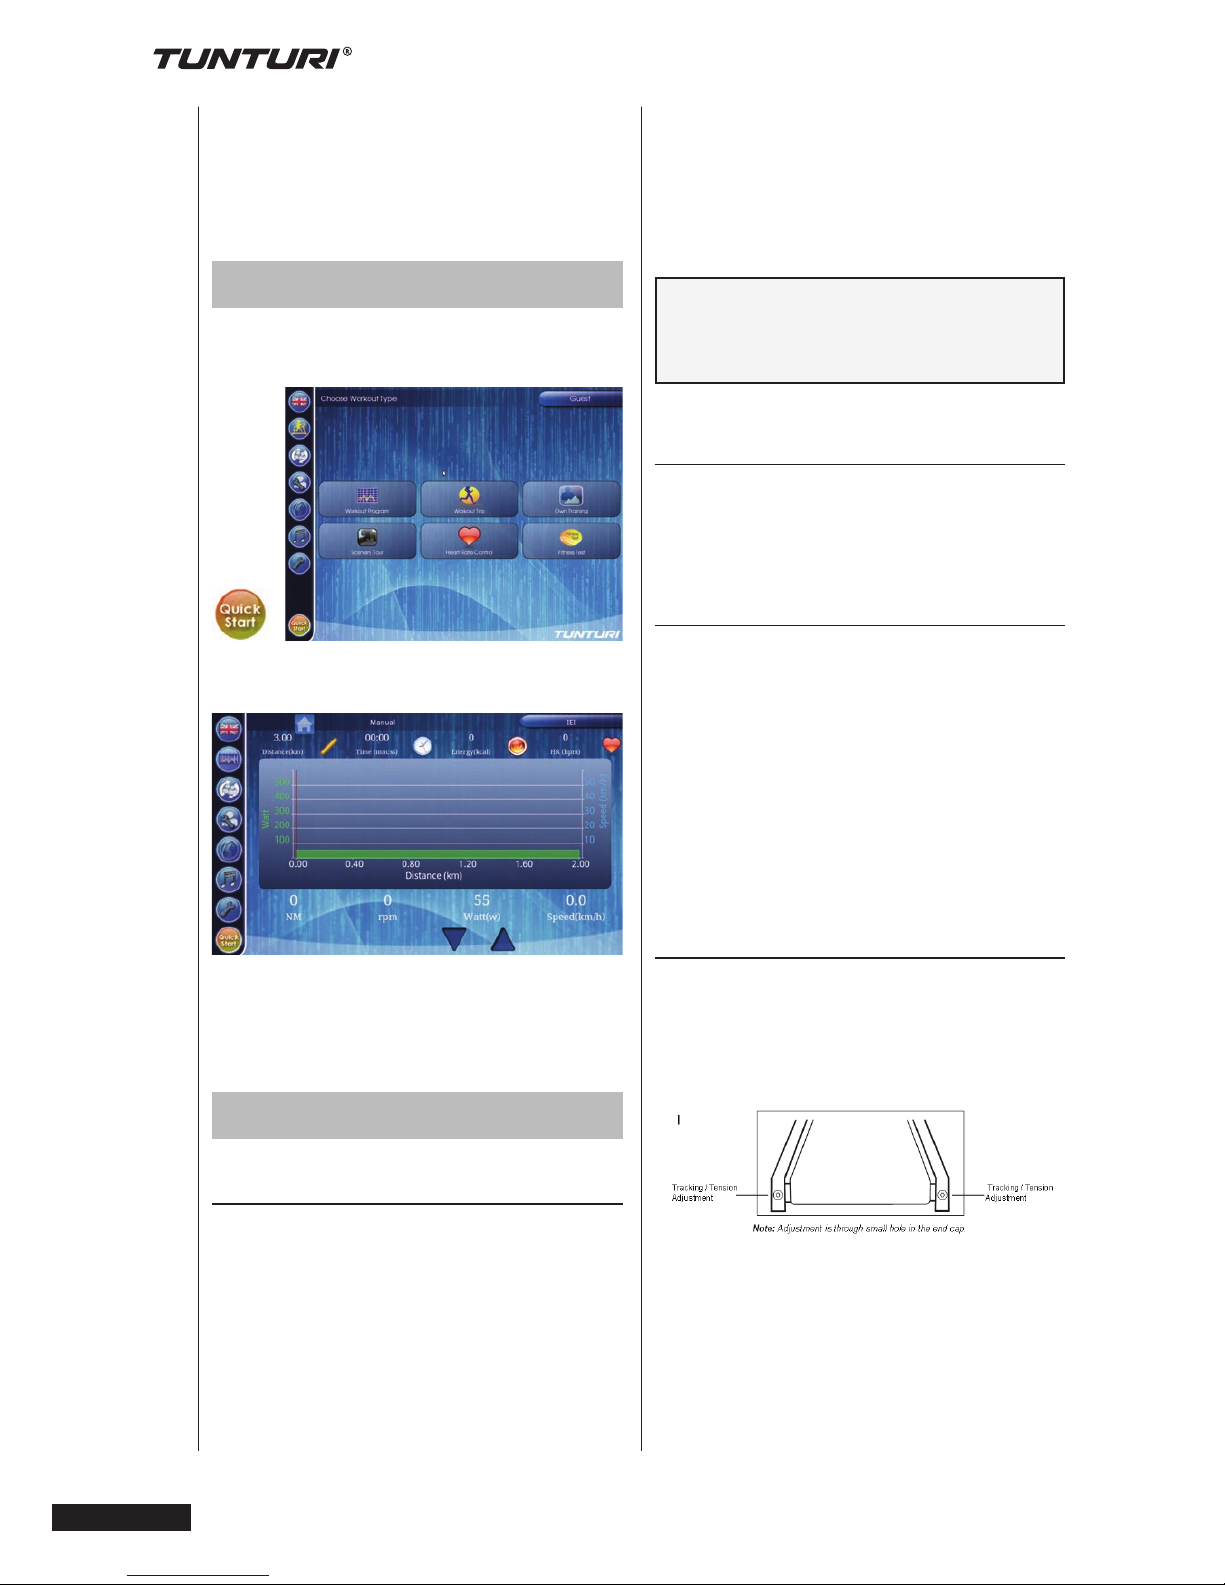
Power Management
When pressing “Power Management“
button it opens power management
window.
In factory mode the display will shut in
standby mode after 10 minutes being
idle. In power management mode you
can suspend this by plus/ minus 5
minutes. Range 5/ 60 min.
Use arrow up or down buttons to adjust.
Press OK button to confirm, and go back
to setting menu.
Press Back button to go back to settings
menu without change.
Remark:
you also find a check box to Disable/
enable suspend. When suspend has
been disabled, the display will not shut
into standby mode.
About
When pressing “About” button it opens
about information window.
Page 24
24
Owner’s manual
•
PLATINUM PRO
In here you can see the currently
installed software information only.
Press Back button to go back to settings
menu.
Quick Start
Open Quick Start by pressing the
“Quick start” button in main function bar.
Quick start will start a workout without
any preset settings as in Manual mode.
Adjusting tension levels needs to be
done manually, and there is no time limit
and ore heart rate limit set.
Maintenance
Belt and Running Deck
Your treadmill uses a very highefficient low-friction bed. Performance
is maximized when the running deck is
kept as clean as possible. Use a soft,
damp cloth or paper towel to wipe the
edge of the belt and the area between
the belt edge and frame. Also reach as
far as practical directly under the belt
edge. This should be done once a month
to extend belt and running deck life. Use
water only - no cleaners or abrasives. A
mild soap and water solution along with
a nylon scrub brush will clean the top of
the textured belt. Allow the belt to dry
before using.
NOTE:
The Running belt is pre-waxed.
Any form lubrication will harm the
performance and durability of the
running belt.
Belt Dust
This occurs during normal break-in or
until the belt stabilizes. Wiping excess off
with a damp cloth will minimize buildup.
General Cleaning
Dirt, dust, and pet hair can block air
inlets and accumulate on the running
belt. On a monthly basis: vacuum
underneath your treadmill to prevent
buildup. Twice a year, you should
remove the black motor hood and
vacuum out dirt that may accumulate.
UNPLUG POWER CORD BEFORE
THIS TASK.
Belt adjustments:
Running belt Tension Adjustment Adjustment must be made from the rear
roller. The adjustment bolts are located
at the end of the step rails in the end
caps, as noted in diagram below.
Tighten the rear roller bolts (clockwise)
only enough to prevent slippage at
the front roller. Turn both running belt
tension adjustment bolts in increments
of 1/4 turn each and inspect for proper
tension by walking on the belt at a low
speed, making sure the belt does not
Page 25
GB
Owner’s manual • PLATINUM PRO
25
slip. Keep tensioning the bolts until the
belt stops slipping.
If you feel the belt is tight enough, but
it still slips, the problem may be a loose
Motor drive belt under the front cover.
Do Not Overtighten
Over tightening will cause belt damage
and premature bearing failure.
Running belt tracking adjustment:
The performance of your treadmill is
dependent on the frame running on a
reasonably level surface. If the frame
is not level, the front and back roller
cannot run parallel, and constant belt
adjustment may be necessary.
The treadmill is designed to keep the
running belt reasonably centred while in
use. It is normal for some belts to drift
near one side while the belt is running
with no one on it. After a few minutes
of use, the running belt should have a
tendency to center itself. If, during use,
the belt continues to move toward one
side, adjustments are necessary.
Exception:
During rehabilitation where the user is
using one leg much stronger than the
other, it might happen that the running
belt drifts to one side. In these cases
you should not adjust unless the running
belt does not centre itself during normal
condition usage.
To set running belt tracking:
A 10 mm Allen wrench is provided to
adjust the rear roller. Make tracking
adjustments from the left side only. Set
belt speed at approximately 3 to 5 kph.
Remember, a small adjustment can
make a dramatic difference!
Turn the bolt clockwise to move the belt
to the right. Counterclockwise to move to
the left.Turn the bolt only a 1/4 turn and
wait a few minutes for the belt to adjust
itself. Continue to make 1/4 rotation
turns until the belt stabilizes in the center
of the running deck.
The belt may require periodic tracking
adjustment depending on use and
walking/running characteristics. Some
users will affect tracking differently.
Expect to make adjustments as required
to center the tread-belt. Adjustments will
become less of a maintenance concern
as the belt is used. Proper belt tracking
is an owner responsibility common with
all treadmills.
NOTE:
Damage to the running belt resulting
from improper tracking /tension
adjustments is not covered under the
warranty.
Troubleshooting
Despite continuous quality control,
defects and malfunctions caused by
individual components may occur
in the equipment. In most cases it’s
unnecessary to take the whole device
in for repair, as it’s usually sufficient to
replace the defective part.
If the equipment does not function
properly during use, or shows an error
code, stop your workout immediately.
Unplug the power cord and wait a few
minutes. Plug the power cord in and
check if the problem persists.
Mostly this will reset your treadmill and
eliminates error code.
If the problem still persists contact your
Tunturi dealer immediately. Always give
the model and serial number of your
equipment. Please state also the nature
of the problem, conditions of use and
purchase date.
Page 26

26
Owner’s manual
•
PLATINUM PRO
If you require spare parts, always
give the model, serial number of your
equipment and the spare part number
for the part you need. The spare part list
is at the back of this manual. Use only
spare parts mentioned in the spare part
list.
Moving and storage
Move the Platinum Treadmill treadmill
according to the following instructions:
turn off the power switch and unplug
the power cord from the wall and the
treadmill. Stand behind the treadmill
and take hold of the aluminium profile
at the rear end of the treadmill. Tilt the
rear end of the equipment so that it rests
on the transportation wheels, and move
the equipment by wheeling. Lower the
treadmill carefully onto the floor.
NOTE:
Transport the treadmill with extreme
caution over uneven surfaces, for
example over a step. The treadmill
should never be transported upstairs
using the wheels over the steps,
instead it must be carried. We
recommend that you use a protective
base when transporting the equipment.
The running belt needs to be realigned
and centred after moving.
To prevent malfunctioning of the
treadmill, store it in a dry place with as
little temperature variation as possible,
protected against dust. Always unplug
the treadmill from the electrical outlet
when not in use.
Page 27

D
betriebsanleitung • PLATINUM PRO
27
Willkommen ...................................... 27
Warnhinweise zur Sicherheit ........... 28
Wichtige elektrische Informationen..... 29
Schutzschalter .................................... 29
Erdungsanweisungen ......................... 29
Wichtige Betriebshinweise .............. 29
Herzfrequenztraining ........................ 30
Eine Anmerkung zur Herzfrequenz:.... 30
Herzfrequenzsender verwenden: ....... 31
Montageanweisungen ...................... 33
Schritt 1: ............................................ 33
Schritt 2: ............................................ 34
Schritt 3: ............................................ 35
Step 4: ............................................... 36
Konsole ............................................. 37
Sicherheitsschlüssel ........................... 37
Software Tasten .................................. 37
Einschalten ......................................... 38
Hauptfunktions-balken ........................ 38
Informations-balken ........................... 38
Haupt-fenster ..................................... 38
Display Funktionen .......................... 38
Mehrere Sprachen .............................. 38
Programme........................................ 39
Trainingsziel einstellen ....................... 39
Geschwindigkeits- und steigungs-
kontrole .............................................. 40
Trainings-Programm .......................... 41
Workout Trip ....................................... 41
Eigene Ausbildung .............................. 42
Scenery-Tour ...................................... 42
Herzfrequenz-Steuerung .................... 43
Fitness Test ........................................ 44
Benutzer ändern ............................... 44
Benutzer erstellen............................... 44
Benutzer bearbeiten ......................... 45
Protokoll löschen ................................ 45
Benutzer bearbeiten ........................... 45
Löschen von benutzer ........................ 45
Umbenennen ...................................... 45
Web browser ..................................... 45
Media Spieler .................................... 46
Control buttons for media player ........ 46
Einstellungen .................................... 47
Wi-Fi ................................................... 47
Datum Uhrzeit..................................... 48
Deutsch
Diese deutsche Bedienungsanleitung ist
eine Übersetzung des englischen Textes.
Es können keine Rechte auf diese
Übersetzung abgeleitet werden.
Willkommen
Herzlich willkommen in der welt des
trainierens mit tunturi!
Durch Ihren Kauf haben Sie bewiesen,
dass Ihnen Ihre Gesundheit und Ihre
Kondition viel wert sind; auch haben Sie
gezeigt, dass Sie Qualität zu schätzen
wissen. Mit einem Tunturi-Fitnessgerät
haben Sie sich für ein hochwertiges,
sicheres und motivierendes Produkt als
Trainingspartner entschieden. Welches
Ziel Sie auch immer mit Ihrem Training
verfolgen, wir sind sicher, dass Sie
es mit diesem Fitnessgerät erreichen.
Hinweise zu Ihrem Trainingsgerät und
zum effektiven Training damit finden Sie
auf der Internetseite von Tunturi
www.tunturi.com.
Helligkeit ............................................. 48
Volume................................................ 48
Power Management ........................... 49
Über .................................................... 49
Schnellstart ....................................... 49
Wartung ............................................. 50
Gurt und Laufäche ........................... 50
Bandstaub .......................................... 50
Allgemeine Reinigung......................... 50
Gurteinstellungen ............................... 50
Betriebs- störungen ......................... 51
Transport und ufbewahrung ............ 52
Inhaltsverzeichnis
Page 28

28
betriebsanleitung
•
PLATINUM PRO
• Das Gerät sollte grundsätzlich nur
von einer Person benutzt werden.
• Das Gerät daft nur in Innenräumen
benutzt werden.
• Das Gerät auf möglichst ebenen
Untergrund stellen.
• Stützen Sie sich nie gegen das
Benutzerinterface ab!
• Bedienen Sie die Tasten mit der
Fingerkuppe. Ein Fingernagel
kann die Membrane der Tasten
beschädigen.
• Das Gerät nie ohne die Abdeckungen
benutzen.
• Dieses Gerät ist nicht für den
Einsatz in Feuchträumen (Sauna,
Schwimmbad) vorgesehen.
• Beim Training muss die
Umgebungstemperatur zwischen
+10°C und +35°C liegen. Zur
Aufbewahrung kann das Gerät
bei Temperaturen zwischen -15°C
und +40°C gelagert werden. Die
Luftfeuchtigkeit darf nie 90 %
überschreiten.
• Vor Beginn des Trainings
sicherstellen, dass das Gerät völlig
intakt ist. Auf keinen Fall mit einem
fehlerhaften Gerät trainieren.
• Zum Auf-und Absteigen am Lenker
abstützen. Nicht auf das Gehäuse
treten.
• Zur Benutzung des Gerätes stets
angemessene Kleidung und
Schuhwerk tragen.
• Nie die Hände in die Nähe von
beweglichen Teilen bringen.
• Zur Vermeidung von Muskelkater
Auf- und Abwärmtraining nicht
vergessen.
• Keine anderen als die in dieser
Betriebsanleitung beschriebenen
Wartungsmassnahmen und
Einstellungen vornehmen. Die
angegebenen Wartungsanweisungen
sind einzuhalten.
• Das Gerät darf nicht von Personen
benutzt werden, deren Gewicht über
150 kg liegt.
• Nähere Informationen zur Garantie
auf Ihr Fitnessgerät finden Sie im
dem Gerät beiliegenden Garantieheft.
Für Schäden, die durch Missachtung
der beschriebenen Einstellungs- und
Wartungsanweisungen entstehen,
Warnhinweise zur
Sicherheit
Dieses Handbuch ist ein wesentlicher
Bestandteil Ihrer Trainingsausrüstung.
Lesen Sie dieses Handbuch bitte
sorgfältig durch, bevor Sie Ihr
Trainingsgerät montieren, mit ihm
trainieren oder es warten. Bitte
bewahren Sie dieses Handbuch; es
wird Sie jetzt und zukünftig darüber
informieren, wie Sie Ihr Gerät benutzen
und warten. Befolgen Sie diese
Anweisungen immer sorgfältig.
• Vor Beginn eines
Trainingsprogrammes einen Arzt
konsultieren.
• Bei Übelkeit, Schwindelgefühl oder
anderen anomalen Symptomen sollte
das Training sofort abgebrochen und
unverzüglich ein Arzt aufgesucht
werden.
• Dieses Gerät hat ein geschwindigkeitsabhängiges Bremssystem, d.h.
je schneller Sie trainieren, desto
höher ist die Belastung.
• Aufgrund des natürlichen Spieltriebes
und der Experimentierfreudigkeit
der Kinder können Situationen
und Verhaltensweisen entstehen,
für die das Trainingsgerät weder
gebaut noch abgesichert ist und
die eine Verantwortung seitens
des Herstellers ausschliessen.
Wenn Sie dennoch Kinder an das
Trainingsgerät lassen, müssen
Sie deshalb deren geistige und
körperliche Entwicklung und
vor allem deren Temperament
berücksichtigen, sie gegebenenfalls
beaufsichtigen und sie vor allem auf
die richtige Benutzung des Gerätes
hinweisen.
• Vergewissern Sie sich, dass während
des Trainings oder beim Bewegen
des Geräts kein Haustier in der Nähe
ist.
• Bitte beachten Sie beim Aufstellen
des Gerätes, dass in jede Richtung
wenigstens 100 cm Freiraum
vorhanden ist.
Page 29
D
betriebsanleitung • PLATINUM PRO
29
(auch wenn die Spannung korrekt ist
und das Laufband das einzige Gerät im
Stromkreis ist), aber der Schutzschalter
im Laufband selbst nicht ausgelöst wird,
müssen Sie den Schalter durch einen
für hohen Einschaltstrom ersetzen. Dies
ist nicht Teil der Garantieleistungen.
Diese Bedingungen können vom
Hersteller nicht beeinflusst werden. Die
entsprechenden Teile erhalten Sie in der
Regel im Elektrohandel.
Erdungsanweisungen
Dieses Produkt muss geerdet werden.
Wenn das Elektrosystem des Laufbands
nicht funktioniert oder ausfällt, ist
die Erdung der letzte Widerstand für
Stromspannung, wodurch Stromschläge
vermieden werden. Dieses Produkt hat
eine Kabel mit einem Erdungsstecker.
Der Stecker muss in eine geeignete
Dose gesteckt werden, die richtig gemäß
aller örtlichen Bestimmungen und
Verordnungen installiert und geerdet ist.
BITTE BEACHTEN!
Ein ungeeigneter Erdungsanschluss
des Geräts kann zu tromschlägen
führen. Überprüfen Sie zusammen mit
einem qualizierten Elektriker oder
Servicemitarbeiter in Zweifelsfällen, ob
das Gerät richtig geerdet ist. Nehmen
Sie am Stecker, der mit dem Produkt
geliefert wurde, keine Veränderungen
vor, wenn dieser nicht in die Steckdose
passt; lassen Sie von einem qualizier
ten Elektriker eine passende
Steckdose installieren.
Wichtige
Betriebshinweise
• NIEMALS das Laufband verwenden,
ohne zuvor die Ergebnisse aller
Funktionsveränderungen am
Computer gelesen und verstanden zu
besteht kein Garantie-Anspruch!
• Lassen Sie niemals einen
Gegenstand in eine der Öffnungen
fallen.
• Nicht unter freiem Himmel
verwenden.
• Drücken Sie nicht mit Gewalt auf
die Konsolen-Steuerungstasten.
Diese sind so eingestellt, dass sie
auf leichten Fingerdruck reagieren.
Wenn Sie stärker darauf drücken,
wird das Gerät weder schneller noch
langsamer. Wenn Sie das Gefühl
haben, dass diese Tasten nicht richtig
funktionieren, wenden Sie sich bitte
an Ihren Händler.
Wichtige elektrische Informationen
BITTE BEACHTEN!
NIEMALS eine RCD-Steckdose
für das Laufband verwenden
- Residual Current Device
(Fehlerstromschutzschalter) (U.S. ver.=
GFCI). Wie bei jedem Gerät mit einem
starken Motor, würde das RCD/GFCI
oft ausgelöst werden. Führen Sie das
Stromkabel abseits aller beweglichen
Teile des Laufbands, einschließlich
des Hebemechanismus und der
Transporträder.
BITTE BEACHTEN!
NIEMALS das Laufband Regen
oder Feuchtigkeit aussetzen. Dieses
Produkt ist NICHT für die Nutzung in
Außenbereichen, an einem Pool oder
Becken oder in anderer Umgebung
mit hoher Feuchtigkeit geeignet. Die
zulässige Höchsttemperatur beträgt 40
Grad C, die Feuchtigkeit 95 %, nichtkondensierend (keine Wassertropfen
von Decken).
Schutzschalter
Einige Schutzschalter in Gebäuden
sind nicht auf hohen Einschaltstrom
ausgelegt, der beim ersten Einschalten
des Laufbands oder auch bei normaler
Verwendung vorkommen kann. Wenn
Ihr Laufband den Schutzschalter auslöst
Page 30

30
betriebsanleitung
•
PLATINUM PRO
haben.
• Änderungen und Steigerungen
der Geschwindigkeit werden nicht
sofort umgesetzt. Stellen Sie die
gewünschte Geschwindigkeit auf
der Computerkonsole ein und
lösen Sie die Einstellungstaste. Der
Computer führt den Befehl langsam
gleichmäßig aus.
• NIEMALS das Laufband bei
einem Gewitter verwenden. Es
kann dabei in Ihrem Stromnetz zu
Überspannungen kommen, die Teile
des Laufbands beschädigen können.
• Seien Sie besonders aufmerksam,
wenn Sie auf dem Laufband weitere
Tätigkeiten verrichten, wie fernsehen,
lesen usw. Solche Ablenkungen
können dazu führen, dass Sie
das Gleichgewicht verlieren oder
nicht mehr in der Mitte des Bands
laufen; dies kann zu ernsthaften
Verletzungen führen.
• NIEMALS das Laufband besteigen
oder verlassen, wenn sich das Band
bewegt. Die Laufbänder starten bei
einer sehr geringen Geschwindigkeit,
Sie müssen sich beim Starten nicht
erst neben das Band stellen. Stellen
Sie sich einfach auf das Band,
während dies langsam beschleunigt,
wenn Sie wissen, wie das Gerät
funktioniert.
• Halten Sie sich immer an den
Handgriffen fest, wenn Sie
Änderungen in den Einstellungen
vornehmen (Steigung,
Geschwindigkeit usw.)
Die Steuerungstasten keinem übermäßig
hohen Druck aussetzen. Diese sind
so eingestellt, dass sie auf leichten
Fingerdruck reagieren. Wenn Sie stärker
darauf drücken, wird das Gerät weder
schneller noch langsamer. Wenn Sie das
Gefühl haben, dass diese Tasten nicht
richtig funktionieren, wenden Sie sich
bitte an Ihren Händler.
Herzfrequenztraining
Eine Anmerkung zur Herzfrequenz:
Das alte Motto „Kein Schmerz, kein
Gewinn“ (eigentlich „Ohne Schweiß kein
Preis“, engl.: „no pain, no gain“) ist ein
überkommener Mythos, den moderne
Trainingsmethoden überflüssig gemacht
haben. Ein großer Teil dieses Erfolgs
wurde mit Herzfrequenzüberwachung
erreicht. Bei geeignetem Einsatz der
Herzfrequenzüberwachung empfinden
viele Personen, dass Ihr bisheriger
Einsatz zu hoch oder zu gering war und
das Training wird viel befriedigender,
wenn es in einem richtigen
Herzfrequenzbereich durchgeführt wird.
Um den richtigen Bereich zu bestimmen,
in dem Sie trainieren möchten, müssen
Sie erst Ihre maximale Herzfrequenz
bestimmen. Diese können Sie
folgendermaßen errechnen: 220
minus Ihr Alter. So erhalten Sie die
maximale Herzfrequenz (MHF) für eine
Person Ihres Alters. Um die effektive
Herzfrequenz für bestimmte Ziele
zu ermitteln, errechnen Sie einfach
einen Prozentsatz Ihrer MHF. Ihr
Herzfrequenz- Trainingsbereich liegt
bei 50 % bis 90 % Ihrer maximalen
Herzfrequenz. 70 % Ihrer MHF ist der
Bereich, in dem Fett verbrannt wird,
während 80 % das cardiovaskuläre
System stärken. Dieser Bereich von
70 % bis 80 % ist der Bereich mit dem
maximalen Nutzen..
Für eine Person von 40 Jahren
errechnet sich die Zielherzfrequenz
folgendermaßen::
220 – 40 = 180 (maximale Herzfrequenz)
180 x 0.7 = 126 Schläge pro Minute
(70% vom Maximum)
180 x 0.8 = 144 Schläge pro Minute
(80% vom Maximum)
Der Trainingsbereich für eine 40jährige
Person liegt also zwischen 126 und 144
Schlägen pro Minute.
Page 31

D
betriebsanleitung • PLATINUM PRO
31
Herzfrequenzsender verwenden:
Wie tragen Sie einen BrustgurtFunksender:
• Bringen Sie den Sender an den
entsprechenden Stellen am
elastischen Gurt an.
• Stellen Sie den Gurt so eng wie
möglich ein, solange der Gurt dabei
noch bequem zu tragen ist.
• Bringen Sie den Sender mit dem
Logo in der Mitte Ihres Körpers
so an, dass dieser von Ihnen weg
zeigt (einige Personen müssen den
Sender leicht rechts oder links der
Mitte tragen). Befestigen Sie das
Ende des elastischen Gurts, indem
Sie das runden Ende einstecken,
den Sender mit den Verschlussteilen
sichern und den Gurt um die Brust
binden.
• Schieben Sie den Sender gleich
unter den Brustmuskel.
• Schweiß ist der beste Leiter für
die elektrische Erfassung jedes
Herzschlags. Sauberes Wasser
kann aber auch verwendet werden,
um die Elektroden anzufeuchten (2
schwarze Bereiche auf der Rückseite
und an jeder Seite des Gurts) Es
ist auch empfehlenswert, dass Sie
Ihren Sendergurt einige Minuten vor
dem Training tragen. Einige Benutzer
haben aufgrund Ihrer Körperchemie
anfangs größere Schwierigkeiten, ein
starkes gleichbleibendes Signal zu
erreichen. Nach dem „Aufwärmen“
sollte dies behoben sein. Wie
beschrieben beeinträchtigt das
Tragen von Kleidung die Leistung
des Senders/Gurts nicht.
• Ihr Training muss innerhalb des
Empfangsbereichs - Abstand von
Sender/Empfänger - stattfinden,
um ein starkes gleichmäßiges
Signal zu erhalten. Die Größe des
Empfangsbereichs kann sich etwas
ändern, im Allgemeinen aber bleiben
Sie nahe genug an der Konsole, um
ein gutes, starkes und zuverlässiges
Signal zu erhalten. Das Tragen des
Senders direkt auf nackter Haut
gewährleistet gutes Funktionieren.
Sie können den Sender aber auch
über einem Hemd tragen. Dazu
feuchten Sie die Bereiche des
Hemds an, auf dem die Elektroden
aufliegen.
Remark
Der Sender wird automatisch aktiviert,
wenn eine erzaktivität erkannt wird.
Er erkennt außerdem das Ausbleiben
jeglicher Aktivität. Auch wenn der Sender
wasserfest ist, kann Feuchtigkeit zu
fehlerhaften Signalen führen. Sie sollten
nach Verwendung den Sender daher
vollständig trocknen lassen, um die
Lebensdauer der Batterie (geschätzte
2500 Stunden) zu erhalten. Wenn Ihr
Brustgurt eine austauschbare Batterie
hat, verwenden Sie als Ersatzbatterie die
Panasonic CR2032.
Page 32

32
betriebsanleitung
•
PLATINUM PRO
HINWEIS!
Verwenden Sie dieses Produkt nicht
für ein Zielherzfrequenztraining, wenn
nicht eine aktuelle stabile Herzfrequenz
angezeigt wird. Hohe, wilde, zufällige
angezeigte Zahlen deuten auf ein
Problem hin.
Interferenzen, die zu einer fehlerhaften
Herzfrequenz führen können:
• Mikrowellen, Fernseher, Kleingeräte
usw.
• Fluoreszierende Lampen.
• Einige Haussicherheitssysteme.
• Haustierumzäunungen
• Einige Personen haben Probleme
damit, das Signal über ihre Haut
zu empfangen. Wenn Sie damit
Probleme haben, tragen Sie den
Sender mit dem Kopf nach unten.
In der Regel wird der Sender so
getragen, dass das Logo richtig
herum steht.
• Die Antenne, die Ihre Herzfrequenz
aufnimmt, ist sehr empfindlich. Bei
einem Fremdrauschen drehen Sie
das Gerät um 90 Grad. Dies könnte
die Interferenz beheben.
• Wenn Sie weiterhin solche Probleme
haben, wenden Sie sich an Ihren
Händler
Page 33

D
betriebsanleitung • PLATINUM PRO
33
Montageanweisungen
Schritt 1:
Standrohre
• Die rechten Standrohre (19) haben
ein vorinstalliertes omputerkabel
(A). Heben Sie das Rohr von der
Laufoberfläche an und bringen
Sie es auf dem Basisrahmen
an. Sie müssen leicht an den
Computerkabeln ziehen, wenn Sie
das Standrohr aufstellen, straffen
Sie dabei die Kabel, damit sie
nicht zwischen dem Rohr und
dem Basisrahmen eingeklemmt
werden können. Befestigen Sie
eine Linsenkopfschraube 3/8”x33/4” (104), Schlitzscheiben 3/8” (58)
und Unterlegscheiben 3/8” (59) und
nylon Scheiben (153) durch das
obere Loch in der Stützplatte (21)
und dem korrespondierenden Loch
im Standrohr an und schrauben Sie
diese in den Basisrahmen. Bringen
Sie jetzt die anderen beiden Bolzen
(104) und Scheiben (58 & 59 & 153)
an und ziehen Sie alles gut fest.
• Installieren Sie das rechte Standrohr
(18) auf die gleiche Weise, aber ohne
scheibe 153 .
58 Split washer
59 Flat washer
104 Button head
socket bold.
153
Nylon washer.
Page 34

34
betriebsanleitung
•
PLATINUM PRO
Schritt 2:
Konsolen Montage auf den Rahmen
• Verbinden Sie die Kabel
zwischen Konsole und die
Konsolenbefestigung am Rahmen.
• Befestige die obere und untere
Abdeckung, benutzen sie dafür die 7
Schrauben (117).
117 Metal sheet
screw
Page 35

D
betriebsanleitung • PLATINUM PRO
35
Schritt 3:
Console Assembly to Upright Tubes
• Bringen Sie mit sechs M8
Zahnscheiben (154) und Schrauben
M8 x 12 mm (108) die beiden
Befestigungen (3 links & 5 rechts) am
Konsolenrahmen an.
Bitte beachten: Stellen Sie
Halterungen (3 & 4) richtung der
Rückseite der Konsole, dann können
Sie die Schrauben anziehen.
• Verbinden Sie das
Konsolencomputerkabel (C) mit
dem entsprechenden Kabel (A) vom
Standrohr.
• Bringen Sie mit sechs Bolzen (105),
3/8” x 3/4”, Schlitzscheibe 3/8” (58)
und Unterlegscheibe 3/8”
Stellen Sie Halterungen (3 & 4) richtung
der Rückseite der Konsole, dann können
Sie die Schrauben anziehen.
58 split washer
59
flat washer
105
bold
108
socket head cap
bolt
Page 36

36
betriebsanleitung
•
PLATINUM PRO
Step 4:
Untere Seitenkappen
• Ziehen Sie die Schrauben, die im
Montageschritt 1 handfest gezogen
waren, auf der linken und rechten
Seite richtig fest (104) um den
Upright Tube zu fixieren.
• Montiere die unteren Seitenkappen
(32 & 33) mit vier M5x12mm
Kreuzschrauben (73).
73 Phillips head
screw
Page 37

D
betriebsanleitung • PLATINUM PRO
37
Zum Gebrauch:
• Legen Sie den Magneten in der
richtigen Position, auf der Konsole.
Das Laufband wird nicht starten ohne
diesen Sicherheitsschlüssel.
• Befestige die Plastikklammer an
ihre Kleidung und sorge dafür das
diese gut befestigt ist. Hinweis:
der Magnet ist gut genug befestigt
um versehentliches lösen und
damit stoppen vom Laufband, zu
vermeiden. Die Klammer sollte gut
befestigt werden, um sicherzustellen,
das dieser sich nicht von selbst
lösen kann. Machen Sie sich mit
der Funktion und Einschränkungen
bekannt. Das Laufband stoppt,
abhängig von Geschwindigkeit, in
eine bis zwei Schritten sobald der
Magnet von der Konsole gezogen
wird. Im Normalbetrieb sollten Sie
den roten Stop / Pause Schalter
benutzen um das Training zu
beenden.
Software Tasten
Bemerkung:
Nur die aufleuchtende Tasten können
benutzt werden. Wenn die Taste Grau
geschattet sind, ist die Tastenfunktion
nicht Aktiv.
Zurück (Back)
Zurück zum vorigen Fenster ohne die
Änderungen zu speichern.
OK
Bestätige Einstellungen und gehe weiter
zum nächstem Fenster.
Stornieren (Cancel)
Lösche die geänderte Daten ohne die
Änderungen zu speichern.
Scroll
Benutzte die Pfeile Left-Right/ Up-Down
um mehr auswählbare Elemente zu
sehen, die nicht alle gleichzeitig auf dem
Bildschirm gezeigt werden.
Konsole
Hardware Tasten
Energieeffizient
Wenn Sie die Energie Effizienz Taste
drücken wird die Konsole aktiviert, wenn
dieser im Standby-Modus ist (Siehe
“Einstellung/ Powermanagement” für
weitere Details).
Anschlüsse:
Display verfügt über 2 x 3,5 mm Jack
Buchsen.
Der Rechte Büchse nah am USB ist für
Ausgang von Daten, die Linke Büchse
ist für eingehende Daten.
Display verfügt über 3 USB-Büchsen
für Speicher-Geräteverbindungen. Die
USB Büchse kann nur Daten im FAT32
Format lesen..
Bemerkung:
FAT32 Umgebung beschränkt sich auf
4GB Daten.
Sicherheitsschlüssel
Bei diesem Trainer wird ein
Sicherheitsschlüssel mitgeliefert.
Es ist ein einfaches magnetisches
Design das immer benutzt werden soll.
Es ist zu ihrer Sicherheit sollten Sie
fallen oder zu weit nach hinten laufen auf
dem Band.
Abziehen dieses Sicherheitsschlüssels
wird die Funktion vom Laufband
stoppen.
Page 38

38
betriebsanleitung
•
PLATINUM PRO
Data change
Obere und untere Werte ändern.
Software Tastaturfeld
Zeigt das Software Tastaturfeld wen
vorhanden.
Einschalten
Der Bildschirm zeigt einen
Bildschirmschoner mit der Information
das die Software am laden ist.
Wenn der Bildschirm gestartet ist
sehen Sie die Abbildung oben gezeigte
Abbildung.
Der Bildschirm kann in drei Abschnitte
unterteilt werden.
Hauptfunktions-balken
(Links)
Der Hauptfunktions-Balken zeigt
die Hauptfunktion-Tasten um in den
unterschiedlichen Modi zu gelangen.
Der Hauptfunktions-Balken ist in jeder
Trainings-Modus verfügbar, Tasten
können jederzeit betätigt werden.
Informations-balken
(Oben)
Der Informations-Balken zeigt die
Benutzer Profile des gewählen
Benutzers in der rechten oberen Ecke..
in der linken oberen Ecke steht der
Programm-Modus.
Der Informations-Balken ist nicht aktiv in
im Tipp Fenster Bereich.
Haupt-fenster
(Mitte)
Das Hauptfenster ändert sich in jedem
Programm Modus.
Im aktiven Modus zeigt es den Fortgang
ihres Programms und die benötigte
Einstellung Tasten die für ihre Training
benötigt werden.
Es ist ebenfalls Hauptfenster für den
Web-Browser und Multimedia Spieler
Display Funktionen
Mehrere Sprachen
Die Benutzer Einstellungen können in
mehreren Sprachen eingestellt werden.
Nach eine Sprache eingestellt wird, wird
die meiste Information in der gewählten
Sprache gezeigt.
Hinweis: der Tekst im Engineer Modus
wird nicht in der gewählten Sprache
wiedergegeben da dieser nur in English
verfügbar ist.
Der Benutzer kann a zwischen den
untenstehenden Sprachen wählen.
Page 39

D
betriebsanleitung • PLATINUM PRO
39
Wählen Sie ihre Sprache durch auf
die Flagge des betreffenden Landes
zu drücken. Die Benutzersprache wird
sofort in der Betreffenden Sprache
umgestellt.
Sie können ein anderes
Wiedergabefenster wählen indem Sie
eine Taste im Hauptmenu drücken.
Programme
Drücke die Trainings Selektion-Taste um
ein Programm zu wählen.
Trainingsziel einstellen
Je nach Art ihres Trainings können
Sie ihr Ziel auf unterschiedliche Weise
festlegen.
Einstellung für Abstandsziel.
Wenn ihr Programm zulässt um ein
Abstandsziel einzustellen, dann sehen
Sie den untenstehenden Bildschirm
nachdem Sie das Trainingsprogramm
gewählt haben
Um einen Abstand einzustellen drücke
“Satz Trainingsstrecke” Taste um
zum nächsten Einststellungsschritt zu
gelangen
Benutze die Pfeile um ihr Ziel rauf
oder runter zu ändern. Die Grenzwerte
werden auch im Fenster gezeigt. (Diese
Abbildung zeigt die Grenzwerte in den
Metrischen Einstellungen. Drücke die
“OK” Taste zur Bestätigung. Sie gehen
sofort zum gewählten Programm.
Einstellung für Zeit Ziel.
Wenn ihr Programm zulässt um ein Zeit
Ziel einzustellen, dann sehen sei den
untenstehende Bildschirm nachdem Sie
das Trainingsprogramm gewählt haben
Um eine Zeit einzustellen drücke “ Satz
Trainingszeit ” Taste um zum nächsten
Einststellungsschritt zu gelangen.
Page 40

40
betriebsanleitung
•
PLATINUM PRO
Schnelltasten
Wenn Sie die Schnelltasten in der
unteren Ecke benutzen können Sie
die Manual Pfeile Tasten ändern
in Geschwindigkeitstasten, wie
untenstehend gezeigt.
Geschwindigkeit Schnelltasten:
Geschwindigkeit Schnelltasten sind
eingestellt als 5, 8, 10,12
Zum Beispiel, die Geschwindigkeit
von jede beliebige Geschwindigkeit
ädern in Geschwindigkeit 10 durch den
Geschwindigkeit Schnelltaste 10 zu
drücken.
Steigungswinkel Hot Keys:
Die Steigung Schnelltaten sind
eingestellt als 0, 3, 5%
Zum Beispiel, der Steigungswinkel von
jeder beliebigen Steigung nach 3%
Steigung ändern durch den Steigung
Schnelltaste 3 zu drücken.
Wenn sie die Schnelltaste erneut
drücken, werden die Standard Pfeile für
Geschwindigkeit und Steigungswinkel
wieder angezeigt
Benutze die Pfeile um ihr Ziel rauf
oder runter zu ändern. Die Grenzwerte
werden auch im Fenster gezeigt. Drücke
die “OK” Taste zur Bestätigung. Sie
gehen sofort zum gewählten Programm.
Einstellung für herzfrequenz-Ziel.
Wenn ihr Programm zulässt um ein
Herzfrequenz-Ziel einzustellen um die
Trainings-Intensität zu regulieren, dann
sehen Sie den untenstehende Bildschirm
nachdem Sie das Trainingsprogramm
gewählt haben.
(Hinweis: Es kann sein das Sie auch
ein Abstands- oder Zeit-Ziel einstellen
müssen)
Benutze die Pfeile um ihr Ziel rauf
oder runter zu ändern. Die Grenzwerte
werden auch im Fenster gezeigt. Drücke
die “OK” Taste zur Bestätigung. Sie
gehen sofort zum gewählten Programm
Geschwindigkeits- und steigungskontrole
Standard Einstellungen
Für die Standardeinstellungen können
sie jederzeit die Pfeile in der Linken,
unteren Ecke benutzen um die
Steigungseinstellung zu ändern. Oder
die Pfeile in der Rechten, unteren Ecke
um die Geschwindigkeit zu ändern.
Page 41

D
betriebsanleitung • PLATINUM PRO
41
Trainings-Programm
Das “Trainings-Programm” Programm
enthält voreingestellte Steigung und
Geschwindigkeit Muster. Benutzer kann
Abstand oder Zeit als Trainingszeit
stellen. Es gibt 5 voreingestellte:
P1
(manual), P4 (Hill Walk), P5 (Hill Jog),
P6 (Hill Run), P7 (Rolling Hils)
Wähle ihr Programm und das
Trainingsziel Fenster wird erscheinen.
Stellen Sie ihr Trainingsziel um das
Gewählte Programm zu starten.
Wenn das Ziel auf Abstand eingestellt ist
sehen Sie das Programmprofil wie unten
gezeigt.
Diagramm Anzeige:
• Y-Achse linke Seite: Steigung in %.
• Y-Achse rechte Seite:
Geschwindigkeit Anzeige.
• X-Achse: Abstand wenn im Abstands-
Modus. Zeit wenn im Zeit-Modus.
Im Fenster wird 2 KM Abstand oder
10 Minuten Zeit angezeigt.
Workout Trip
Die “Workout Trip” Programme enthalten
reale geometrische Dateien wie
Position, Höhe und Steigungswinkel.
Daher enthalten diese Programme
eine voreingestellte Steigung. Die
Standardgeschwindigkeit beträgt 0.8
KM/h. Sie können jedoch den NM
anpassen während des Trainings. Es
gibt 3 voreingestellte Programme:
A: Tuscany Country road
B: Tuscany Sandy Track
C: Tuscany Scenery Slopes
Wählen Sie ihr Programm und das
Trainingsziel Fenster wird erscheinen.
Stellen Sie ihr Trainingsziel um das
gewählte Programm zu starten.
Sie sehen das Programmprofil wie unten
gezeigt.
.
Diagramm Anzeige:
• Y-Achse linke Seite: Steigung in %.
• Y-Achse rechte Seite:
Geschwindigkeit Anzeige.
• X-Achse: Abstand wenn im AbstandsModus. Zeit wenn im Zeit-Modus.
Im Fenster wird 2 KM Abstand oder
10 Minuten Zeit angezeigt.
Page 42

42
betriebsanleitung
•
PLATINUM PRO
Eigene Ausbildung
(Own Training)
Der Benutzer kann ein Training
speichern als “Eigene Ausbildung” in
den folgenden Kriterien:
• Trainings-Typ ist eines der TrainingsTypen Trip, Scenery Tour, und Heart
Rate Control.
• Trainings Verlauf überschreitet
0.1KM und 5 Min.
Wenn vorhanden, wählen Sie eins der
gespeicherten Trainings, benutzen Sie
die Pfeile ( Links / Rechts)
Wenn Sie ihr Programm gewählt haben
können Sie zwischen Wiederholung
Modus und Racing Modus wählen.
Wenn Sie den Wiederholungs-Modus
wählen. Vor Trainingsbeginn, stellen Sie
Abstand oder Zeit als Ziel.
Standard Abstand und Zeit werden auf
dem maximalen Wert gestellt, abhängig
von ihr eigenes Training.
Wenn Sie den Racing-Modus wählen
werden immer automatisch, die letzt
benutzen Ziele für Abstand und Zeit
eingestellt Nach dem Training werden
die Ergebnisse in den Diagrammen
gezeigt.
Die Wiedergabe im Trainings-Fenster
ist abhängig vom gewähltem TrainingsModus
Scenery-Tour
“Scenery-Tour” benutzt die gleichen
Trainingsprofile wie “Workout Trip”,
es hat aber eine Video-Wiedergabe.
Das Video ist im gewähltem Gebiet
aufgenommen. Die video-Wiedergabe
–Geschwindigkeit wird automatisch
angepasst an der Laufband
Geschwindigkeit. Die Programme
enthalten reale geometrische Dateien
wie Position, Höhe und Steigungswinkel
Daher enthalten die Programme
eine voreingestellte Steigung. Die
Standardgeschwindigkeit beträgt 0.8
KM/h. Sie können jedoch den NM
anpassen während des Trainings. Es
gibt 3 voreingestellte Programme:
A: Tuscany Country road
B: Tuscany Sandy Track
C: Tuscany Scenery Slopes
Wählen Sie ihr Programm und das
Trainingsziel Fenster wird erscheinen.
Stellen Sie ihr Trainingsziel um das
gewählte Programm zu starten.
Sie sehen das Programmprofil wie unten
gezeigt
Page 43

D
betriebsanleitung • PLATINUM PRO
43
Im Geschwindigkeits- Modus können
Sie die Steigung einstellen und
ihre Ziel Herzfrequenz ändern. Die
Geschwindigkeit wird vom Programm
gesteuert.
Im Steigungs-Modus können Sie die
Geschwindigkeit und Ziel Herzfrequenz
ändern. Die Steigung wird vom
Programm gesteuert.
m Kombinations-Modus können Sie
nur die Ziel Herzfrequenz ändern. Die
Steigung und Geschwindigkeit werden
vom Programm gesteuert.
Nach Bestätigung wird das
Auswahlfenster erscheinen. Stellen Sie
sie ihr Ziel ein um das Programm zu
starten.
Sie sehen das unten gezeigte Profil.
Diagramm-Anzeige:
• Y-Achse, linke Seite: Herzfrequenz
(BMP).
• Y-Achse, rechte Seite: Ziel
Herzfrequenz.
• X-Achse: Abstand wenn im AbstandsModus. Zeit wenn im Zeit-Modus. Im
Fenster wird 2 KM Abstand oder 10
Minuten Zeit angezeigt.
Sie können Ihre Ziel-Herzfrequenz
jederzeit ändern durch Benutzung
der Pfeilen in der unteren Ecke vom
Bildschirm.
Sie können ihre Trainings-intensität
jederzeit ändern durch Benutzung der
Pfeilen in der Linken, unteren Ecke vom
Bildschirm
HerzfrequenzSteuerung
Die “Herzfrequenz-Steuerung”
Programme sind Entwickelt um die
Herzfrequenz vom Benutzer zu
Kontrollieren durch Änderung der
Wiederstands-Einstellungen. Für diese
Programme ist ein HerzfrequenzBrustgurt notwendig. Es gibt 6
voreingestellte Programme:
A: HRC
B: P08 Fat Burner 1
C: P09 Fat Burner 2
D: P10 Cardio
E: P11 Fit
Wählen Sie ihr Programm im TrainingsModus.
Page 44

44
betriebsanleitung
•
PLATINUM PRO
Fitness Test
Fitness Test misst die Kondition vom
Benutzer und zeigt die Resultate nach
dem Test. Es gibt zwei Test-methoden
2KM Lauf Test
Geeignet für Normale, durchschnittliche
Benutzer.
Der Abstand ist 2KM und Steigung
ist auf 1% festgelegt. Herzfrequenz
Brustgurt ist erforderlich während
diesem Test. Benutzer sollte so
schnell wie möglich laufen/rennen. Bei
Aufhören oder Pausieren wird der Test
abgebrochen. Geschwindigkeit wird vom
Benutzer eingestellt.
Cooper test
Geeignet für mehr erfahrene Benutzer.
Die Zeit ist auf 12 Min. und Steigung
auf 1% festgestellt. Benutzer sollte
so schnell wie möglich laufen/rennen.
Geschwindigkeit wird vom Benutzer
eingestellt.
Benutzer ändern
Öffne den Benutzer durch eindrücken
von “Change user” Taste im HauptFunktionsleiste.
Sie können einen Benutzer auf der
gleichen weise ändern wie Sie einen
neuen Benutzer erstellen.
Wähle den Benutzer den Sie ändern
möchten und drücke die “Benutzer
erstellen” Taste und erstellen/ändern Sie
wie untenstehend erklärt
Benutzer erstellen
Um einen neuen Benutzer zu erstellen
drücken Sie die “Benutzer erstellen”
Taste. Untenstehendes Fenster
erscheint;
Hier können Sie die digitale Tastatur
benutzen um ihren Namen zu schreiben
und ihren Avatar zu erstellen. Drücke
die “OK” Taste auf der digitalen Tastatur
wenn Sie ihren Namen und Avatar
ausgesucht haben.
Ihr Benutzer ist erstellt mit den Standard
Benutzereinstellungen. Ändere diese
Einstellungen im Menu “Change User”
Information im “Benutzer bearbeiten”
Kapitel.
Page 45

D
betriebsanleitung • PLATINUM PRO
45
Benutzer Information:
• Geschlecht.
• Alter.
• Höhe
• Gewicht.
• Max HR ( wird automatisch
eingestellt durch Auswahl von
Geschlecht und Alter, kann aber
geändert werden
Unit details:
• Masseneinheit ( KG/ LBS )
• Längeeinheit (Metrisch/ Imperial)
• Energieeinheit ( Kalorien/
Jouls )
Wenn alles richtig ausgefüllt isst, drücke
die “OK” Taste zur Bestätigung
Löschen von benutzer
Wenn die Taste gedrückt wird, wird eine
Bestätigung gefragt um den Benutzer
und die Kompletten Daten zu Löschen.
Umbenennen
Wenn die Taste gedrückt wird können
Sie den Namen ändern. Die Daten
werden unter dem neuen Namen
gespeichert.
Sehen Sie “Benutzer erstellen” für
Details..
Web browser
Öffne den “Web browser” durch die
“Internet” Taste im Hauptfunktion-Balken
zu drücken.
Wenn Sie den URL-Balken berühren
sehen Sie automatisch eine Software
Tastatur erscheinen.
Benutzer bearbeiten
Öffne Benutzer bearbeiten im Menu
durch die “Benutzer bearbeiten” taste zu
drücken im Haupt-Funktionsleiste
Dieses Menu zeigt, im oberen Bereich,
die gesamte Trainings Information vom
Benutzer. Im unteren Bereich wird die
Information vom Letzten Training gezeigt
Protokoll löschen
“Protokoll löschen” kann gedrückt
werden um die Information vom
gesamten oder vom letzten Training
gelöscht werden.
Hinweis: Display wird nicht promt
bestätigen.
Benutzer bearbeiten
“Benutzer bearbeiten” Taste
kann gedruckt werden um die
Benutzereinstellungen zu ändern
Page 46

46
betriebsanleitung
•
PLATINUM PRO
Bemerkung:
Möglicherweise werden nicht alle
Webseiten korrekt gezeigt.
Bemerkung:
Für das Surfen im Internet benötigen
Sie eine Wi-fi Verbindung. (siehe Kapitel
“Einstellungen”)
Bemerkung:
Es können maximal 8 Internetseiten
gleichzeitig geöffnet werden.
Media Spieler
Open “Media Player” by pressing the
“Media” button in main function bar.
Control buttons for media player
Browse
Drücke die browse Taste um Dateien zu
Suchen um Dateien die Sie abspielen
möchten zu suchen.
Bemerkung:
Sie können ihre Dateien am besten auf
einem USB Träger speichern. Diesen
können Sie in einer der USB Büchsen
einstecken. USB Format in FAT32
erforderlich.
Bemerkung:
Möglicherweise werden nicht alle
Dateien abspielbar sein.
Play control
Benutze die Play control Taste um Ihre
Auswahl abzuspielen, zu pausieren,
stoppen oder wiederholen.
Drücken Sie die “Home Taste” schnell.
Wiedergabe Größe
Drücke die Taste um ihr aktives
Video Abspielfenster zu mini- oder
maximalisieren.
Zeit
Der Schieberegler zeigt die Position
des Wiedergabe Vorgangs. Sie können
damit die Wiedergabe schnell vorwärtsoder rückwärts verschieben.
Volume
Benutze den Schieberegler um das
Volume zu regeln.
Wenn Sie die Musik nicht abschalten
wird diese, in den meisten Programmen,
weiterspielen.
Hinweis: Wenn das gewählte Programm
Musik oder den Media Spieler braucht im
Ablauf wird die Musik ausgeschaltet.
Page 47

D
betriebsanleitung • PLATINUM PRO
47
drücke die Password Taste und
die Software Tastatur erscheint.
Automatisch.
Führe das Password ein und tippe die
Verbindungstaste um eine Verbindung
herzustellen.
Benutze die “Add Wi-Fi network” Taste,
immer unten an ihrer Liste um ein
Netzwerk zuzufügen wenn, SSID wenn
ausgeblendet. Möglicherweise müssen
Sie nach unten Swipen wenn viele
Netzwerkmöglichkeiten gelistet sind
Drücke die Netzwerk SSID Taste
und die Software Tastatur erscheint.
Automatisch.
• Führe Netzwerk Name ein.
• Wähle Sicherheits-Modus.
• Füllen Sie ihr Kennwort ein.
• Drücke die „verbinden“ Taste um eine
Verbindung herzustellen.
Bemerkung:
Um eine Wi-Fi Verbindung herzustellen
kann es sein da Sie das Datum und die
Uhrzeit Korrekt eingeben
Einstellungen
Drücke die Einstellungen Taste um
in den Einstellungen, Hauptmenu zu
gelangen.
Das Einstellungsfenster wird angezeigt.
Wi-Fi
Wan Sie die “Wi-Fi” Taste drücken öffnet
das Wi-Fi Einstellungsfenster.
Wi-Fi Netzwerke:
Liste der verfügbare Netzwerke. Zeigt
die Signal-Stärke und Identifizierung.
Drücke auf dem gewünschten Netzwerk
mit dem Sie eine Verbindung wollen
sobald das Verbindungsfenster geöffnet
ist
Page 48

48
betriebsanleitung
•
PLATINUM PRO
Wenn mit einem Netzwerk verbunden,
wird das Verbindungszeichen angezeigt
im Display.
Datum Uhrzeit
Wenn Sie die “Datum Uhrzeit“ Taste
drücken öffnet sich das Datum und Zeit
Einstellungsfenster
Hier können Sie das Datum und die Zeit
korrekt einstellen. Sie können auch die
korrekte Zeit-Zone einstellen.
Benutze die Pfeile-Tasten rauf oder
runter zur Einstellung.
Drücke die OK Taste zur
Bestätigung und kehre zurück zum
Einstellungsmenu.
Drücke die Back Taste um, ohne
Änderungen, zurückzukehren zum
Einstellungsmenu.
Helligkeit
Wenn Sie die “Helligkeit“ Taste
drücken öffnet sich das HelligkeitsEinstellungsfenster.
In here you can adjust brightness
in range between 0 (darker) and 10
(lighter).
Use arrow up or down buttons to adjust..
Press OK button to confirm, and go back
to setting menu.
Press Back button to go back to settings
menu without change.
Volume
When pressing “Volume“ button it opens
master volume settings window.
Hier können Sie die Helligkeit einstellen
in einem Bereich von 0 (dunkel) und
100 (hell). Benutze die Pfeile-Tasten
rauf oder runter zur Einstellung Drücke
die OK Taste zur Bestätigung und kehre
zurück zum Einstellungsmenu.
Drücke die Back Taste um, ohne
Änderungen, zurückzukehren zum
Einstellungsmenu.
Page 49

D
betriebsanleitung • PLATINUM PRO
49
Power Management
Wenn Sie die “Power Management“
Taste drücken öffnet sich das
Management-Fenster.
Im Herstellermodus schaltet das Display
nach 10 Minuten ohne Benützung, im
Standby-Modus. Im Power ManagementModus können Sie diese Einstellung
ändern in 5 Minuten-Schritte zwischen
5 – 60 Minuten.
Benutze die Pfeile um diese
anzupassen.
Drücke die OK Taste zur
Bestätigung und kehre zurück zum
Einstellungsmenu.
Drücke die Back Taste um, ohne
Änderungen, zurückzukehren zum
Einstellungsmenu.
Bemerkung:
Sie finden auch ein KontrollKästchen um deaktivieren/aktivieren
auszuschalten. Wenn deaktiviert, wird
die Konsole nicht im Stand-By Modus
schalten.
Über
Wenn sie die “über” Taste drücken öffnet
sich das Informations-Fenster.
Hier sehen Sie nur die aktuell installierte
Software Information.
Drücke die Back Taste um zum
Einstellungsmenu zurückzukehren
Schnellstart
Öffne Schnellstart durch drücken der
“Quick start” Taste in der Hauptmenu
Funktionsleiste.
Quick start startet ein Training ohne
voreingestellte Werte, wie im Manuellen
Modus.
Anpassung in Wiederstand-Stufen
müssen Manual gemacht werden und
es kann keine Zeit- oder Herzfrequenz
Begrenzung eingestellt werden.
Page 50

50
betriebsanleitung
•
PLATINUM PRO
Wartung
Gurt und Lauffläche
Ihr Laufband hat ein sehr hocheffizientes
reibungsarmes Band. Die Leistung wird
erhöht, wenn die Lauffläche so sauber
wie möglich ist. Verwenden ein weiches,
feuchtes Tuch oder Papier, um die Ecken
des Gurts und den Bereich zwischen
Gurt und Rahmen zu reinigen. Reichen
Sie dabei auch soweit wie möglich unter
die Bandecken. Dies sollten Sie einmal
in Monat tun, um die Lebensdauer der
Lauffläche zu erhalten. Verwenden Sie
nur Wasser - keine Reinigungs- oder
Scheuermittel. Ein milde Seifenlösung
mit einem Nylonscheuerschwamm kann
verwendet werden, um die Oberfläche
des Stoffbands zu reinigen. Das Band
sollte vor der Nutzung getrocknet sein.
Bitte beachten!
Das Laufband ist vorgewachst. Jede
Schmierung schränkt
die Leistung und Haltbarkeit des
Laufbands ein.
Bandstaub
Bandstaub Dies kommt bei normalem
Einlaufen oder bei der Bandstabilisierung
vor. Wischen Sie ihn mit einem feuchten
Tuch auf.
Allgemeine Reinigung
Dreck, Staub und Tierhaare können die
Ventilation erstopfen und sich auf dem
Band sammeln. Monatlich: Unter dem
Laufband staubsaugen. Zweimal im
Jahr sollte die schwarz Motorabdeckung
entfernt und gesaugt werden.
VOR DER REINIGUNG STROMKABEL
ABZIEHEN.
Gurteinstellungen
Die Einstellung wird an der
hinteren Rolle vorgenommen. ie
Einstellungsschrauben befinden sich am
Ende der Schienen in den Endkappen,
wie im Folgenden dargestellt ist.
Ziehen Sie die hinteren Rollenschrauben
(im Uhrzeigersinn) soweit fest, dass
ein Abrutschen von der vorderen
Rolle verhindert wird. Drehen Sie
beide Laufband- ZugspannungsEinstellungsschrauben stufenweise
um 1/4-Umdrehung und überprüfen
Sie jeweils die Zugspannung, indem
Sie bei geringer Geschwindigkeit auf
dem Band laufen. Das Band sollte nicht
verrutschen. Ziehen Sie die Schrauben
soweit an, dass das Band nicht mehr
verrutscht.
Wenn Sie das Gefühl haben, dass das
Band genügend gespannt ist, aber
immer noch verrutscht, könnte die
Ursache ein loses Moto rantriebsband
unter der vorderen Abdeckung sein.
Nicht Überspannen
Eine Überspannung führt zu Schäden
am Band und orzeitigem Verschleiß der
Lager.
Laufrad-spureinstellung:
Die Leistung Ihres Laufbands hängt
davon ab, dass es auf einer geraden
Oberfläche läuft. Wenn der Rahmen
nicht gerade ist, können die vorderen
und hinteren Rollen nicht parallel
laufen und das Band muss immer
nachgestellt werden. Das Laufband
wurde so entwickelt, dass das Band
immer in der Mitte läuft. Bei einigen
Bändern ist es normal, dass das Band
zu einer Seite zieht, wenn keine Person
darauf läuft. Nach ein paar Minuten der
Nutzung sollte sich das Band von alleine
zentriert haben. Wenn der Gurt bei der
Nutzung zu einer Seite zieht, muss dies
eingestellt werden.
Page 51

D
betriebsanleitung • PLATINUM PRO
51
Bitte beachten!
Schäden am laufband durch
fehlerhafte spur-/ zugeinstellungen,
sind nicht von der garantie abgedeckt.
Betriebs- störungen
Trotz kontinuierlicher
Qualitätsüberwachung können
vereinzelt an den Geräten durch
einzelne Komponenten verursachte
Funktionsstörungen auftreten. Dabei
ist es nicht angebracht, das ganze
Gerät zur Reparatur zu bringen, da der
Fehler meistens durch Austauschen der
defekten Komponente behoben werden
kann.
Wenn das Gerät während des
Gebrauchs nicht einwandfrei funktioniert,
wenden Sie sich bitte umgehend
an die für Sie zuständige TunturiAlleinvertretung. Beschreiben Sie das
Problem, die Einsatzbedingungen
und teilen Sie das Kaufdatum und
die Typenbezeichnung und die
Seriennummer Ihres Gerätes mit.
Wenden Sie sich an Ihre nationale
Tunturi-Vertretung, wenn Sie Ersatzteile
benötigen. Beschreiben Sie die
Einsatzbedingungen und teilen Sie das
Kaufdatum und die Seriennummer des
Gerätes mit .Die Ersatzteilnummern
finden Sie in der Liste am Ende
dieser Anweisung. Nur Teile in der
Ersatzteilliste dürfen verwendet werden.
Ausnahme:
In der Reha, bei der Benutzer ein Bein
stärker belasten als das andere, kann
es vorkommen, dass das Band zu einer
Seite zieht. In diesen Fällen sollten Sie
das Band nicht einstellen, es sei denn,
das Band verläuft bei normaler Nutzung
nicht mehr zentral.
Einstellung der laufbandspur:
Für die hintere Rolle wird ein
10 mm-Inbusschlüssel benötigt.
Spureinstellungen müssen von der
linken Seite erfolgen. Stellen Sie die
Bandgeschwindigkeit auf etwa 3 bis 5
km/h ein. Denken Sie daran, dass eine
kleine Änderung große Folgen haben
kann!
Drehen Sie die Schraube im
Uhrzeigersinn, um das Band nach
rechts zu ziehen. Drehen Sie gegen
den Uhrzeigersinn, zieht das Band nach
links. Drehen Sie die Schraube nur etwa
1/4 Umdrehung und warten Sie ein
paar Minuten, bis sich das Band selbst
nachführt. Machen Sie eine weitere
1/4-Umdrehung, bis sich das Band in der
Mitte der Lauffläche stabilisiert.
Das Band muss möglicherweise
regelmäßig nachgestellt werden, je
nach Nutzungs- und Laufverhalten
Verschiedene Benutzer wirken
unterschiedlich auf das Band. Sie
müssen das Band so einstellen, dass
es in der Mitte der Fläche verläuft.
Die Einstellungen werden im Laufe
der Nutzung weniger aufwändig. Eine
richtige Bandspurführung liegt in der
Verantwortung des Besitzers.
Page 52

52
betriebsanleitung
•
PLATINUM PRO
Transport und
ufbewahrung
Bewegen Sie das Platinum Treadmill
Laufband folgendermaßen: Schalten
Sie den Strom am Stromschalter ab
und trennen Sie das Netzkabel von der
Stromquelle und demLaufband. Stellen
Sie sich hinter das Gerät und greifen Sie
am Aluminiumprofil am hinteren Ende
des Geräts zu. Heben Sie das hintere
Ende des Gerätes so an, dass es auf
den Transporträdern zu Stehen kommt.
Durch Schieben können Sie das Gerät
auf den Transporträdern bewegen.
Senken Sie die Laufunterlage vorsichtig
zu Boden.
Bitte beachten!
Das Laufband nur mit äusserster
Vorsicht über eine Schwelle
oder andere unebene Flächen
transportieren. Das Laufband darf
nicht auf den Transportrollen über
eine Treppe geschoben werden - es
muss unbedingt getragen werden.
Ein Verschieben des Gerätes kann
manche Fussbodenmaterialien
beschädigen, z.B. Holzparkettböden.
In diesem Fall müssen Sie den Boden
vorher schützen. Nach dem Bewegen
oder Transport muss das Laufband ggf.
neu ausgerichtet werden.
Um Funktionsstörungen zu vermeiden,
das Gerät in einem möglichst trockenen
Raum mit gleichbleibender Temperatur
vor Staub geschützt aufbewahren und
benutzen. Nach jedem Training den
Netzstecker ziehen.
Aufgrund unserer kontinuierlichen
Produktentwicklung behält sich
Tunturi New Fitness das Recht vor,
Spezifikationen ohne vorherige
Ankündigung zu vorzunehmen.
Bitte beachten!
Die Hinweise bezüglich der Montage,
der Benutzung und der Wartung Ihres
Gerätes müssen sorgfältig beachtet
werden. Die Garantie schliesst
keine Beschädigungen ein, die auf
Fahrlässigkeit bei der Montage,
Einstellung und Wartung, wie sie
in diesem Handbuch beschrieben
wurden, zurückzuführen sind.
Werden Modifizierungen ohne das
Einverständnis der Tunturi New Fitness
vorgenommen, erlischt jeglicher
Garantieanspruch!
WIR WÜNSCHEN IHNEN VIELE
ANGENEHME TRAININGSSTUNDEN
MIT IHREM NEUEN TUNTURI
TRAININGSPARTNER!
Page 53

F
mode d´emploi • PLATINUM PRO
53
Bienvenue
Votre choix prouve que vous souhaitez
réellement investir dans votre bienêtre et votre condition ; il révèle aussi
que vous savez apprécier la haute
qualité et l’élégance. En choisissant
un équipement sportif Tunturi, vous
adoptez un produit de premier choix
comme partenaire pour un entraînement
motivant en toute sécurité. Quel que soit
votre objectif, nous sommes persuadés
que cet appareil est celui qui vous y
conduira. Adressez-vous à
WWW.TUNTURI.COM pour plus
d’informations.
Bienvenue ......................................... 53
Consignes de ................................... 54
sécurité importantes ........................ 54
Informations importantes concernant
l’électricité ........................................... 55
Disjoncteurs ........................................ 55
Instructions de mise à la terre ............ 55
Consignes d’utilisation
mportantes Clé de sécurité ............. 56
Entraînement pour améliorer .......... 56
la fréquence cardiaque
Instructions de montage .................. 59
Étape 1: ............................................. 59
Étape 2 : ............................................ 60
Étape 3: ............................................. 61
Étape 4: ............................................. 62
Interface de l’utilisateur ................... 63
Boutons de façade ............................. 63
Clé de sécurité :.................................. 63
Boutons du logiciel ............................. 63
Mise sous tension ............................... 64
Barre des principales fonctions ........ 64
Barre d’information ............................. 64
Zone principale ................................... 64
Fonctions de l’écran......................... 64
Support multilingue ............................. 64
Programmes...................................... 65
Denir un objectif d’entrainement ....... 65
Controle de la vitesse et de
l’inclinaision ........................................ 66
Programme d’entraînement ................ 67
Workout Trip ....................................... 67
Propre formation ................................. 68
Tour Paysage...................................... 69
Heart Rate Control.............................. 69
Test de forme physique ...................... 70
Changer d’utilisateur ........................ 71
Créer un utilisateur ............................ 71
Modier l’utilisateur ......................... 71
Effacer le journal ................................. 71
Modier l’utilisateur ............................. 71
Suprimer l’utilisateur ......................... 72
Rebaptiser .......................................... 72
Web browser ..................................... 72
Media Player...................................... 72
Boutons de commande du lecteur
multimédia .......................................... 73
Settings ............................................. 73
Wi-Fi ................................................... 73
Date Heure ......................................... 74
Luminosité .......................................... 75
Volume................................................ 75
Gestion de l’alimentation ................... 75
Concerne ............................................ 76
Quick Start ........................................ 76
Maintenance ...................................... 76
Tapis et surface .................................. 76
Poussière de tapis .............................. 76
Nettoyage général .............................. 76
Reglages du tapis : ............................. 77
Defauts de ........................................ 78
fonctionement ................................... 78
Transport et ....................................... 78
rangement ......................................... 78
Ce manuel français est une traduction
de la version anglaise.
Notez que la version anglaise est en tête
dans le contenu lorsque des différences
sont trouvées.
Sommaire
Page 54

54
mode d´emploi
•
PLATINUM PRO
• Ne pas utiliser dans une endroit
où l’on utilise des produits aérosol
(spray), ni dans un endroit où l’on
administre de l’oxygène.
• Pour débrancher, placer tous les
contrôles en position fermée, puis
retirer la prise de courant.
• Seule une personne spécialisée
dans l’entretien et la réparation de
tels appareils électro-mécaniques et
qui détient le permis exigé par la loi
du pays concerné pour effectuer les
travaux en question, peut réaliser
d’éventuels changements sur les fi
ches de l’appareil ou la prise secteur.
• Avant de commencer un
entraînement, quel qu’il soit,
consultez votre médecin.
• En cas de vertige, nausées, douleur
dans la poitrine ou autres symptômes
anormaux, interrompez la séance
immédiatement et consultez un
médecin.
• N’effectuez jamais d’autres
opérations de réglage et d’entretien
que celles mentionnées dans ce
guide et suivez bien les conseils
d’entretien qui y sont donnés. Veillez
à ce que, durant l’assemblage et
l’entretien de l’appareil, l’appareil est
éteint et débranché.
• L’appareil ne doit pas être utilisé par
des personnes dont le poids excède
150 kg.
• Ne pas bloquer l’arrière du tapis de
course. Prévoir un espace dégagé
d’au moins 1 mètre entre l’arrière du
tapis de course et tout objet fixe.
• Ne pas utiliser l’appareil en présence
d’aérosols ou dans des pièces où
l’on administre de l’oxygène. Les
étincelles en provenance du moteur
peuvent provoquer des incendies
dans un environnement extrêmement
gazeux.
• Ne jamais laisser tomber ou
introduire des objets dans les
ouvertures.
• Pour débrancher, mettez toutes les
commandes sur la position OFF,
enlevez l’attache de sécurité et
retirez la fiche de la prise de courant.
• Utilisez les rampes fournies ; elles
assurent votre sécurité.described
CONSERVEZ CES INSTRUCTIONS!
Consignes de
sécurité importantes
Lisez attentivement ce mode d’emploi
avant d’assembler, d’utiliser ou
d’effectuer l’entretien de votre appareil
sportif. Veuillez conserver ce guide, il
contient les renseignements dont vous
aurez besoin, maintenant et plus tard,
pour utiliser et entretenir votre appareil.
Suivez toujours les instructions très
rigoureusement.
Lisez toutes les instructions avant
d’utiliser cet appareil.
• Débranchez toujours l’appareil de
la prise de courant immédiatement
après son utilisation et avant de le
nettoyer.
• Un équipement ne devrait jamais
être laissé sans surveillance lorsqu’il
est branché. Débranchez de la prise
lorsque vous ne l’utilisez pas et avant
de monter ou de retirer des pièces.
• Une surveillance étroite est
nécessaire lorsque cet équipement
est utilisé par ou à proximité
d’enfants, de personnes invalides ou
handicapées.
• N’utilisez cet équipement qu’à
l’usage auquel il est destiné tel que
décrit dans ce manuel. Ne pas utiliser
d’accessoires non recommandés par
le fabricant.
• N’utilisez jamais cet équipement si sa
prise ou son cordon de secteur sont
endommagés, s’il ne fonctionne pas
parfaitement, s’il est tombé ou qu’il
a été endommagé ou s’il est tombé
dans l’eau. Retournez l’équipement
au centre de service pour contrôle
et réparation. Maintenir les fils
électriques à distance des surfaces
chauffées.
• N’utilisez jamais l’appareil lorsque
ses aspirations d’air sont bloquées.
Veillez à ce qu’il n’y ait pas de
peluches, de cheveux ou équivalent
sur les aspirations d’air.
• Ne jamais laisser tomber ou insérer
aucun objet dans les aspirations d’air.
• Ne pas utiliser en extérieur.
Page 55

F
mode d´emploi • PLATINUM PRO
55
(même si la tension est correcte et si le
tapis est le seul appareil branché sur le
circuit), mais si le disjoncteur du t apis
de course ne se déclenche pas, vous
devez remplacer le disjoncteur par un
type conçu pour des appels de courant
importants. Il ne s’agit pas d’un défaut
de garantie. C ’est une situation qui
échappe à notre contrôle en tant que
fabricant. Cette pièce est disponible
dans la plupart des magasins de
fournitures électriques.
Instructions de mise à la terre
Ce produit doit être mis à la terre. Si le
système électrique du tapis de course
présente une défaillance ou une panne,
sa mise à la terre fournit un chemin
de moindre résistance au courant
électrique, réduisant ainsi le risque de
décharge électrique. Ce produit est
équipé d’un câble pourvu d’une fiche
de terre. Cette fiche doit être branchée
dans une prise appropriée, correctement
installée et mise à la terre conformément
aux normes et règlements locaux.
Attention!
Un branchement inadéquat du conducteur de terre peut entraîner des risques de décharge électrique. Veuillez
consulter un électricien qualié si vous
avez des doutes sur la mise à la terre
du produit selon les règles. Ne modi-
ez pas la che fournie avec le produit
lorsqu’elle n’entre pas dans la prise ;
faites installer une prise adéquate par
un électricien qualié..
Informations importantes
concernant l’électricité
Attention!
NE JAMAIS utiliser une prise murale
équipée d’un interrupteur différentiel
(RCD - Residual Current Device –
version U.S. = GFCI) avec ce tapis
de course. Comme avec n’importe
quel appareil équipé d’un moteur
puissant, le dispositif RCD / GFCI
se déclenche souvent. Eloignez de
câble d’alimentation de toute pièce
mobile du tapis de course, y compris
du mécanisme d’inclinaison et des
roulettes destinées au transport.
Attention!
NE JAMAIS enlever un capot avant
d’avoir coupé le courant. Une variation
de tension d’au moins dix pour cent
(10 %) peut avoir une incidence
sur les performances du tapis de
course. De telles conditions ne sont
pas couvertes par votre garantie. Si
vous avez l’impression que la tension
est trop basse, vous devez contacter
votre compagnie d’électricité ou un
électricien qualifié pour tester le circuit
électrique.
Attention!
NE JAMAIS exposer ce tapis de
course à la pluie ou à l’humidité. Ce
produit n’est PAS destiné à un usage
à l’extérieur, près d’une piscine ou
d’un spa, ou dans n’importe quel
autre environnement présentant un
taux d’humidité élevé. La température
maxi male est de 40 °C et le taux
d’humidité maximal est de 95 %, sans
condensation (pas de formation de
gouttes d’eau sur les surfaces)
Disjoncteurs
Certains disjoncteurs utilisés dans des
habitations ne sont pas conçus pour
les appels de courant importants qui
peuvent se produire lors de la mise
en marche d’un tapis de course, voire
pendant une utilisation normale. Si votre
tapis de course déclenche le disjoncteur
Page 56

56
mode d´emploi
•
PLATINUM PRO
une pression normale, contactez
votre revendeur.
Clé de sécurité
Une clé de sécurité est fournie avec cet
appareil. Il s’agit d’un simple dispositif
magnétique, que vous devriez toujours
utiliser. Celui-ci assure votre sécurité si
vous tombez ou reculez trop loin sur le
tapis.
Vous pouvez arrêter le tapis en retirant
cette clé de sécurité.
Pour l’utiliser :
• Placez l’aimant à l’endroit prévu à
cet effet sur la tête de commande de
la console. Votre tapis de course ne
démarre et ne fonctionne pas sans
cette clé.
• Attachez le clip en plastique à vos
vêtements de façon à ce qu’il ne
tombe pas. Remarque : L’aimant
est assez puissant pour réduire
au minimum les arrêts accidentels
et intempestifs. Vous devez bien
fixer le clip pour qu’il ne se détache
pas. Familiarisez-vous avec son
fonctionnement et ses limites.
En fonction de la vitesse, le tapis
de course s’arrêtera presque
immédiatement dés que l’aimant est
retiré de la console. Appuyez sur
le bouton Stop / Pause lors d’une
utilisation normale
Entraînement pour
améliorer
la fréquence
cardiaque
Un mot sur la fréquence cardiaque :
Le vieil adage « pas de gain sans
douleur » est un mythe qui a été
démenti par les effets bénéfiques de
l’entraînement en douceur. Une grande
partie de ce succès est due à l’utilisation
de moniteurs de fréquence cardiaque.
Consignes
d’utilisation
mportantes
• NE JAMAIS utiliser ce tapis de
course sans avoir entièrement
lu et compris les conséquences
des changements opérationnels
pour lesquels vous envoyez une
commande à l’ordinateur.
• Sachez que les changements
de vitesse et d’inclinaison ne se
produisent pas immédiatement.
Sélectionnez la vitesse souhaitée
sur l’écrande l’ordinateur et
lâchez le bouton de réglage.
Français 86 L’ordinateur exécutera
progressivement votre commande.
• NE JAMAIS utiliser votre tapis
de course pendant un orage. Les
composants de votre tapis de course
peuvent être endommagés par des
surtensions.
• Soyez prudent lorsque vous exercez
d’autres activités, telles que regarder
la télévision, lire un livre etc.,pendant
que vous marchez sur votre tapis.
Ces distractions peuvent vous
faire perdre votre équilibre ou vous
éloignez du centre du tapis, ce qui
peut entraîner de graves blessures.
• NE JAMAIS monter ou démonter
un tapis de course en mouvement.
Les tapis de course se mettent en
marche à une vitesse très faible.
Il est inutile d’enjamber le tapis
pendant le démarrage. Après avoir
appris à utiliser l’appareil, il suffit de
se tenir debout sur le tapis pendant
qu’il accélère lentement.
• Tenez toujours la rampe lorsque vous
actionnez les boutons de commande
(inclinaison, vitesse etc.).
• N’exercez pas une pression
excessive sur les boutons de
commande de la console. Ils ont
été réglés avec précision, de façon
à fonctionner correctement par une
légère pression du doigt. Le fait
d’appuyer plus fort ne changera rien
à la rapidité de l’appareil. Si vous
avez l’impression que les boutons ne
fonctionnent pas correctement sous
Page 57

F
mode d´emploi • PLATINUM PRO
57
Utilisation d’un émetteur de fréquence
Comment porter la ceinture thoracique
émettrice sans fil ?
• Attachez l’émetteur à la ceinture
élastique à l’aide des fixations.
• Serrez la ceinture le plus possible
en faisant en sorte qu’elle reste
confortable.
• Positionnez l’émetteur avec le logo
centré au milieu de votre corps et
tourné vers l’extérieur (certaines
personnes doivent positionner
l’émetteur légèrement à gauche du
centre). Attachez l’extrémité ronde
de la ceinture élastique en l’insérant
et attachez l’émetteur et la ceinture
autour de votre poitrine à l’aide des
fixations.
• Positionnez l’émetteur juste en
dessous des muscles pectoraux.
• La sueur est le meilleur conducteur
pour mesurer les signaux électriques
minuscules émis par les battements
du coeur. Cependant, l’eau du
robinet peut également être utilisée
pour humidifier les électrodes (les
2 zones noires carrées sur la face
arrière de la ceinture, situées de
chaque côté de l’émetteur). Il est
également recommandé de mettre
la ceinture émettrice quelques
minutes avant l’entraînement.
Certains utilisateurs auront plus de
mal à obtenir un signal fort et stable
au début en raison de la chimie de
leur corps. Un bon échauffement
permet de résoudre ce problème.
Comme nous l’avons indiqué, le fait
de porter des vêtements par-dessus
Grâce à l’utilisation appropriée d’un
moniteur de fréquence cardiaque, de
nombreuses personnes se sont rendues
compte que l’intensité avec laquelle elles
avaient l’habitude de s’entraîner était soit
trop forte, soit trop faible. L’entraînement
est beaucoup plus agréable si l’on
maintient sa fréquence cardiaque dans
l’intervalle préconisé. Pour déterminer
l’intervalle bénéfique dans lequel vous
souhaitez vous entraîner, vous devez
d’abord déterminer votre fréquence
cardiaque maximale. Utilisez pour ce
faire la formule suivante : 220 moins
votre âge. Cela vous donnera la
fréquence cardiaque maximale (FCM)
pour quelqu’un de votre âge. Pour
déterminer l’intervalle des fréquences
cardiaques permettant d’atteindre des
objectifs précis, il suffit de calculer
un pourcentage de votre FCM. Pour
améliorer votre fréq uence cardiaque
par l’entraînement, le pourcentage de la
fréquence cardiaque maximale doit être
compris entre 50 % et 90 %. 70 % de
votre FCM est le pourcentage qui permet
de brûler les graisses, alors que 80
% est le pourcentage qui renforce le
système cardiovasculaire. Vous devez
rester dans la zone 70 % - 80% pour
obtenir les meilleurs résultats.
Pour une personne de 40 ans, la zone
cible pour la fréquence cardiaque est
calculée comme suit :
220 - 40 = 180 (fréquence cardiaque
maximale)
180 x 0,7 = 126 battements par minute
(70 % de la fréquence maximale)
180 x 0,8 = 144 battements par minute
(80 % de la fréquence maximale)
Ainsi, pour une personne de 40 ans, la
zone d’entraînement se situerait entre
108 et 126 battements par minute.
Page 58

58
mode d´emploi
•
PLATINUM PRO
provenance de leur peau. Si vous
rencontrez des problèmes, essayez
de porter l’émetteur à l’envers.
Normalement, l’émetteur sera
orientée de telle sorte que le logo se
trouve à l’endroit.
• L’antenne qui capte votre fréquence
cardiaque est très sensible. S’il y a
une source de bruit externe, le fait de
tourner la machine de 90 degrés peut
supprimer l’interférence.
• Si vous continuez à rencontrer des
problèmes, vous devez contacter
votre revendeur
Exercice
Le pédalage est une excellente forme
d’exercice aérobic qui lie à la fois
modération et durée dans les efforts.
Un tel exercice vise à améliorer votre
capacité maximale d’absorption
d’oxygène, donc votre en durance et
votre condition physique. La capacité
du corps à “brûler” la graisse est
directement liée à sa capacité de
transporter l’oxygène. L’exercice aérobic
est avant tout un exercice agréable
qui devra faire apparaître une légère
sueur sur votre peau mais ne devra en
aucun cas vous essouffler. Pour vous
remettre en forme, il vous faut pratiquer
des exercices physiques au moins trois
fois par semaine pendant 30 minutes à
chaque fois et pour vous maintenir en
bonne condition, au moins deux fois
par semaine. Débutez avec une vitesse
de pédalage et une resistance faibles.
Si vous êtes obèse, un effort excessif
pourrait surcharger votre système
cardiovasculaire. Au fur et à mesure que
votre condition s’améliore, vous pourrez
augmenter résistance et vitesse.
l’émetteur/la ceinture n’affecte pas
les performances.
• ous devez observer une certaine
distance entre l’émetteur et le
récepteur lors de votre entraînement,
afin d’obtenir un signal fort et stable.
Cette distance peut varier quelque
peu, mais en général, vous devez
rester assez proche de la console
pour obtenir des résultats précis
et fiables. En portant l’émetteur
directement sur la peau nue, vous
assurez son bon fonctionnement.
Si vous le souhaitez, vous pouvez
porter l’émetteur par-dessus une
chemise. Pour ce faire, humidifiez
les zones de la chemise qui sont en
contact avec les électrodes.
Attention!
L’émetteur est automatiquement
activé quand il détecte une activité du
coeur de l’utilisateur. En outre, il est
automatiquement désactive quand il ne
détecte plus aucune activité. Bien que
l’émetteur résiste à l’eau, l’humidité peut
avoir pour effet de créer de faux signaux.
Par conséquent, vous devez sécher
complètement l’émetteur après usage
afin de prolonger la durée de vie de la
batterie (la durée de vie de la batterie de
l’émetteur étant estimée à 2500 heures).
Si votre ceinture thoracique est équipée
d’une batterie remplaçable, elle doit être
remplacée par une Panasonic CR2032
Ne pas utiliser ce produit pour la
fréquence cardiaque cible, à moins
qu’une valeur constante et fiable
soit affichée pour cette fréquence. Si
l’écran affiche des valeurs aléatoires,
irrégulières ou élevées, cela signifie
qu’il y a un problème.
Voici quelques sources d’interférence
pouvant causer des fréquences
cardiaques irrégulières:
• Fours à micro-ondes, téléviseurs,
petits appareils électroménagers etc.
• Lampes fluorescentes.
• Certains systèmes d’alarme.
• Clôtures pour animaux domestiques.
• Chez certaines personnes, l’émetteur
a du mal à capter des signaux en
Page 59

F
mode d´emploi • PLATINUM PRO
59
Instructions de
montage
Étape 1:
Tubes vertikale
• Le tube vertical du côté droit (19)
accueille le câble de l’ordinateur (A)
pré-installé. Soulevez le tube du
tapis et fixez-le au châssis. Vous
devez tirer doucement sur le câble
de l’ordinateur lorsque vous alignez
le tube vertical, en le tendant de
façon à que le câble ne soit pas
coincé entre le tube et le châssis.
Introduisez un boulon 3/8”x 3-3/4” à
tête creuse (104) avec une rondelle
fendue 3/8” (58) et une rondelle plate
3/8” (59) et une rondelle de nylon
(153) dans le trou supérieur de la
plaque de maintien (21) et dans le
trou correspondant du tube vertical et
vissez-le dans le châssis. Introduisez
ensuite les deux autres boulons (104)
et rondelles (58 & 59 & 153) et serrez
bien les trois ensembles.
• Installez le montant gauche (18) de la
même manière, mais sans la rondelle
153.
• Montez les chapeaux du bas (32 &
33) à l’aide de quatre vis cruciformes
M5 x 12 mm (73).
58 Split washer
59 Flat washer
104
Button head
socket bold.
153
Nylon washer.
Page 60

60
mode d´emploi
•
PLATINUM PRO
Étape 2 :
Montage de la console sur les tubes
verticaux
• Raccorder les câbles entre l’interface
utilisateur et le châssis d’installation
de l’interface.
• Installer le cache supérieur sur le
cache inférieur en vissant les 7 vis
(117).
117 Metal sheet
screw
Page 61

F
mode d´emploi • PLATINUM PRO
61
Étape 3:
Montage de la console sur les tubes
verticaux
• Fixez les deux supports d’interface (3
à gauche & 4 à droite) sur le châssis
de la console à l’aide de six rondelles
dentée M8 (154) et six vis M8 x 12
mm (108).
Attention: Placez les supports (3 & 4)
sur le dos de la console, vous pouvez
serrer les vis apres.
• Connectez le câble de l’ordinateur
de la console (C) au câble
correspondant (A) du tube vertical.
• Fixez la console sur le dessus
des tubes verticaux à l’aide de six
boulons 3/8”x 3/4” (105), d’une
rondelle fendue 3/8” (58) et d’une
rondelle plate 3/8” (59). Veillez à ne
pas coincer le câble de
Placez les supports (3 & 4) sur le dos de
la console, vous pouvez serrer les vis
apres.
58 split washer
59
flat washer
105
bold
108
socket head cap
bolt
Page 62

62
mode d´emploi
•
PLATINUM PRO
Étape 4:
Capuchons latéraux inférieurs
• Serrez complètement les vis serrées
à la main dans l’étape 1 (104) sur le
côté droit et le côté gauche pour fixer
les tubes verticaux.
• Installer les capuchons latéraux
inférieurs (32 & 33) à l’aide de quatre
vis cruciformes M5x12mm (73).
73 Phillips head
screw
Page 63

F
mode d´emploi • PLATINUM PRO
63
Si la clé de sécurité est extraite, le tapis
de course s’arrête immédiatement.
Comment l’utiliser
• Positionnez l’aimant en place sur la
tête de commande de la console.
C’est la condition nécessaire pour
que votre tapis de course commence
à fonctionner.
• Accrochez l’attache en plastique à
vos vêtements en veillant à ce que
la clé soit bien fixée. Remarque :
L’aimant est suffisamment fort pour
minimiser les arrêts accidentels
inattendus. L’attache doit être bien
fixée pour garantir qu’elle ne se
détachera pas. Habituez-vous à cette
fonction et connaissez-en les limites.
Le tapis s’arrêtera, en fonction de la
vitesse, en une ou deux étapes, dès
que l’aimant sera retiré de la console.
Lors d’une utilisation normale de la
machine, utilisez le bouton Stop/
Pause rouge.
Boutons du logiciel
Remarque :
Seuls les boutons en couleur peuvent
être utilisés pour cette fonction.
Lorsqu’ils sont grisés, cela signifie que
l’option du bouton n’est pas disponible.
Back / Arrière
Retourne à la fenêtre précédente sans
enregistrer les modifications
OK / Dáccord
Confirme la modification/le changement
et passe à l’écran suivant.
Cancel / Annuler
Efface les données modifiées sans
enregistrer les changements.
Scroll / naviguer
Utilisez les flèches vers le haut/bas pour
voir d’autres éléments sélectionnables
pouvant être affichés dans la fenêtre
principale.
Interface de
l’utilisateur
Boutons de façade
Efficacité énergétique :
En appuyant sur le bouton d’efficacité
énergétique, la console s’active et quitte
le mode veille. (Voir Configuration/
Gestion de la puissance pour de plus
amples informations)
Connecteurs :
L’écran est équipé de 2 prises jack de
3,5 mm.
La prise jack située à droite, à côté du
port USB, est une sortie Line out.
La prise jack située à gauche est une
entrée Line in.
L’écran est équipé de 3 prises USB
permettant de brancher un dispositif de
stockage de données.
Les prises USB ne peuvent lire que le
format FAT32.
Remarque :
L’environnement FAT32 est limité aux
fichiers de 4GB
Clé de sécurité :
Une clé de sécurité est fournie avec
cette unité. Il s’agit d’une clé magnétique
simple qui doit être utilisée à tout
moment. Elle veille à votre sécurité
au cas où vous glisseriez ou vous
éloigneriez trop du tapis de course.
Page 64

64
mode d´emploi
•
PLATINUM PRO
Data change/
changement
Augmente ou diminue la valeur
concernée.
Clavier du logiciel
Affiche le clavier du logiciel, lorsque
cette fonction est disponible.
Mise sous tension
Lorsque la machine est mise sous
tension, l’écran affiche une fenêtre
économiseur d’écran informant
l’utilisateur que le logiciel de l’écran
prépare l’application.
Une fois que l’écran aura démarré, vous
verrez la fenêtre suivante
L’écran peut être divisé en 3 sections.
Barre des principales fonctions
(Gauche)
La barre des principales fonctions
contient les boutons des principales
fonctions pour accéder aux options
des différents modes. La barre des
principales fonctions est visible en mode
exercice et les boutons sont accessibles
à tout moment.
Barre d’information
(en haut)
La barre d’information contient :
En haut à droite le profil de l’utilisateur
sélectionné à tout moment.
En haut à gauche les informations sur le
mode du programme.
La barre d’information n’est pas une
zone tactile.
Zone principale
(au centre)
La zone principale est différente selon
les divers modes de programme.
En mode actif, elle affiche l’évolution
de votre programme alors qu’en mode
programmation, elle affiche les boutons
et outils de sélection pour définir les
données requises pour votre séance
d’entraînement.
C’est aussi votre fenêtre principale en
mode navigateur Internet et lecture
multimédia.
Fonctions de l’écran
Support multilingue
Le manuel de l’utilisateur peut être
présenté dans plusieurs langues. En
choisissant une langue, la plupart du
contenu de l’interface de l’utilisateur
s’affichera dans la langue sélectionnée.
Page 65

F
mode d´emploi • PLATINUM PRO
65
Remarque : Le texte lié au mode
ingénieur n’est disponible qu’en anglais.
L’utilisateur peut choisir l’une des
langues suivantes
Sélectionnez votre langue en appuyant
sur le drapeau correspondant. Le texte
changera automatiquement dans la
langue sélectionnée.
Vous pouvez sélectionner une autre
fonction de l’écran en choisissant un
bouton dans la barre des principales
fonctions.
Programmes
Sélectionnez Programmes en
appuyant sur le bouton de sélection
d’entraînement
Definir un objectif d’entrainement
En fonction du type d’entraînement que
vous avez choisi, vous pouvez vous fixer
différents objectifs.
Fixer un objectif de distance
Si le programme que vous avez
sélectionné vous permet de fixer un
objectif de distance pour l’entraînement,
vous verrez la fenêtre ci-dessous après
avoir sélectionné votre programme
d’entraînement
Pour définir une distance, vous devrez
sélectionner le bouton «Ensemble
distance de formation» pour passer à
l’étape suivante de programmation
Utilisez les flèches pour augmenter
ou réduire votre objectif. Les limites
de l’objectif sont également affichées
dans la fenêtre. (cette image montre
les limites lorsque le système métrique
est sélectionné) Appuyez sur le
bouton «Dáccord» pour confirmer.
Vous passerez alors au programme
d’entraînement que vous avez
sélectionné.
Fixer un objectif de durée
Si le programme que vous avez
sélectionné vous permet de fixer un
objectif de durée pour l’entraînement,
vous verrez la fenêtre ci-dessous après
avoir sélectionné votre programme
d’entraînement.
Page 66

66
mode d´emploi
•
PLATINUM PRO
Utilisez les flèches pour augmenter ou
réduire votre objectif. Les limites de
l’objectif sont également affichées dans
la fenêtre. Appuyez sur «Dáccord»
pour confirmer. Vous passerez alors au
programme d’entraînement que vous
avez sélectionné
Controle de la vitesse et de
l’inclinaision
Réglages standards
Utilisez les flèches en bas à gauche à
tout moment pour régler l’inclinaison ou
les flèches à droite pour régler la vitesse.
Boutons de sélection rapide
En appuyant sur le bouton Quick Select
situé en bas vous pouvez changer
les flèches de réglage manuel par les
boutons de vitesse ci-dessous
Pour définir une durée, vous devrez
sélectionner le bouton «Ensemble le
temps de formation» pour passer à
l’étape suivante de programmation.
Utilisez les flèches pour augmenter ou
réduire votre objectif. Les limites de
l’objectif sont également affichées dans
la fenêtre. Appuyez sur «Dáccord»
pour confirmer. Vous passerez alors au
programme d’entraînement que vous
avez sélectionné.
Fixer un objectif de rythme cardiaque
Si le programme que vous avez
sélectionné vous permet de fixer
une limite de rythme cardiaque pour
contrôler l’intensité de l’entraînement,
vous verrez la fenêtre ci-dessous après
avoir sélectionné votre programme
d’entraînement à contrôle de fréquence
cardiaque.
(Remarque : il sera peut-être nécessaire
de fixer également un objectif de
distance et de durée pour définir une
limite de durée/distance).
Page 67

F
mode d´emploi • PLATINUM PRO
67
Touches de raccourci de vitesse :
Les touches de raccourci de vitesse sont
: 5, 8, 10,12. Par exemple, la vitesse
passe de n’importe quelle vitesse à 10
si l’utilisateur appuie sur la touche de
raccourci de vitesse 10.
Touches de raccourci d’inclinaison :
Les touches de raccourci d’inclinaison
sont : 0, 3, 5%. Par exemple, le niveau
d’inclinaison change de n’importe quel
niveau à 3% si l’utilisateur appuie sur la
touche de raccourci d’inclinaison 3.
En appuyant sur le bouton Quick Select
de nouveau, les flèches de réglage
standards s’afficheront de nouveau pour
la vitesse et l’inclinaison
Programme
d’entraînement
Les programmes “Programme
d’entraînement” contiennent un schéma
d’inclinaison et de vitesse prédéfini.
L’utilisateur peut sélectionner la
distance ou une durée comme objectif
d’entraînement. Il existe 5 programmes
prédéfinis : P1 (manual), P4 (Hill Walk),
P5 (Hill Jog), P6 (Hill Run),
P7 (Rolling Hils)
Sélectionnez votre programme et la
fenêtre de sélection d’objectif s’affiche.
Définissez votre objectif d’entraînement
pour commencer le programme
sélectionné.
Lorsqu’une limite a été fixée pour la
distance, vous la verrez en-dessous le
profil du programme.
Sur le graphique, on trouve :
• Côté gauche de l’ordonnée : %
d’inclinaison
• Côté droit ordonnée : Mesure de la
vitesse
• Abscisse : Distance lorsque
l’utilisateur a choisi le mode distance.
Durée lorsque l’utilisateur a choisi le
mode durée.
La taille de la fenêtre est de 2 Km
pour la distance et de 10 min pour la
durée.
Workout Trip
Les programmes “Workout Trip”
contiennent des données géométriques
réelles comme la position, l’altitude
et le dénivelé. Par conséquent, ces
programmes ne contiennent qu’un
dénivelé prédéfini. Par défaut, la vitesse
est de 0,8 km/h. Cependant, l’utilisateur
peut régler la NM lorsqu’il court. Il existe
3 programmes prédéfinis :
A: Tuscany Country road
B: Tuscany Sandy Track
C: Tuscany Scenery Slopes
Page 68

68
mode d´emploi
•
PLATINUM PRO
Sélectionnez votre programme et la
fenêtre de sélection d’objectif s’affiche.
Définissez votre objectif d’entraînement
pour commencer le programme
sélectionné.
Vous verrez le profil de programme
suivant.
Sur le graphique, on trouve :
• Côté gauche de l’ordonnée : %
d’inclinaison
• Côté droit ordonnée : Mesure de la
vitesse
• Abscisse : Distance lorsque
l’utilisateur a choisi le mode distance.
Durée lorsque l’utilisateur a choisi le
mode durée.
La taille de la fenêtre est de 2 Km
pour la distance et de 10 min pour la
durée.
Propre formation
L’utilisateur peut enregistrer son “Propre
formation” en procédant comme suit :
• L’entraînement doit être une séance
de type Programme d’entraînement,
Workout Trip, Tour Paysage ou Heart
Rate Control.
• L’entraînement doit être de plus de
0,1 Km et 5 min.
Sélectionnez un entraînement
enregistré, le cas échéant, au moyen
des flèches (droite/gauche).
Une fois votre programme sélectionné,
choisissez le mode Reprise ou le mode
Course.
Si vous avez sélectionné Reprise :
Avant l’entraînement, définissez un
objectif de distance ou de durée. Par
défaut, la distance et la durée sont
la valeur max en fonction de chaque
entraînement personnel.
Si vous avez sélectionné Course :
L’entraînement utilise toujours la
distance ou la durée de l’entraînement
précédent comme objectif. Après
l’entraînement, le résultat s’affichera sur
une zone du graphique.
La présentation de l’écran
d’entraînement dépend du type de mode
d’entraînement.
Page 69

F
mode d´emploi • PLATINUM PRO
69
Utilisez les flèches de contrôle de
la vitesse/inclinaison à tout moment
pour modifier l’intensité de votre
entraînement.
Heart Rate Control
Les programmes « Heart Rate Control
» sont développés afin de contrôler
la fréquence cardiaque de l’utilisateur
par des ajustements de résistance. Il
faut donc mettre sa ceinture cardiaque
durant l’exercice. Il y a 5 programmes
préréglés.
A: HRC
B: P08 Fat Burner 1
C: P09 Fat Burner 2
D: P10 Cardio
E: P11 Fit
Sélectionnez votre programme et votre
mode d’entraînement.
En mode vitesse, vous pouvez régler
manuellement l’inclinaison et changer
votre rythme cardiaque cible. La vitesse
est contrôlée par le programme
Tour Paysage
“Tour Paysage” utilise les mêmes profils
d’entraînement que “Workout Trip”,
sauf qu’il est accompagné de la vidéo.
La vidéo a été enregistrée dans le site
sélectionné. La vitesse de reproduction
de la vidéo s’adaptera automatiquement
à la vitesse du tapis : Le programme
contient des données géométriques
réelles comme la position, l’altitude
et le dénivelé. Par conséquent, ces
programmes ne contiennent qu’un
dénivelé prédéfini. Par défaut, la vitesse
est de 0,8 km/h. Cependant, l’utilisateur
peut régler la NM lorsqu’il court.
Il existe 3 programmes prédéfinis :
A: Tuscany Country road
B: Tuscany Sandy Track
C: Tuscany Scenery Slopes
Sélectionnez votre programme et la
fenêtre de sélection d’objectif s’affiche.
Définissez votre objectif d’entraînement
pour commencer le programme
sélectionné.
Vous verrez le profil de programme
suivant
Sélectionnez votre programme et la
fenêtre de sélection d’objectif s’affiche.
Définissez votre objectif d’entraînement
pour commencer le programme
sélectionné.
Vous verrez le profil de programme
suivant
Page 70

70
mode d´emploi
•
PLATINUM PRO
En mode inclinaison, vous pouvez régler
manuellement la vitesse et changer votre
rythme cardiaque cible. L’inclinaison est
contrôlée par le programme.
En mode combiné vous pouvez
changer votre rythme cardiaque cible
uniquement. L’inclinaison et la vitesse
sont contrôlées par le programme.
Après avoir confirmé, la fenêtre de
sélection d’objectif s’affiche. Définissez
votre objectif d’entraînement pour
commencer le programme sélectionné.
Vous verrez le profil de programme
suivant.
Sur le graphique, on trouve :
• Côté gauche de l’ordonnée : Rythme
cardiaque (BPM)
• Côté droit de l’abscisse : Rythme
cardiaque cible
• Abscisse : Distance lorsque
l’utilisateur a choisi le mode distance.
Durée lorsque l’utilisateur a choisi le
mode durée.
La taille de la fenêtre est de 2 Km
pour la distance et de 10 min pour la
durée.
Vous pouvez utiliser les flèches dans
le coin inférieur gauche à tout moment
afin de changer l’objectif de fréquence
cardiaque.
Test de forme physique
Le test de forme physique mesure l’état
de forme de l’utilisateur et affiche le
résultat à l’issue du test. Il existe deux
modes de test
Test de marche
de 2 Km
Il est adapté aux personnes ayant un
état de forme normal.
La distance est de 2 Km et l’inclinaison
de 1%. Il est nécessaire de porter un
transmetteur de RC pendant le test.
L’utilisateur doit marcher/courir le plus
rapidement possible. S’il s’arrête ou fait
une pause il échouera au test. C’est
l’utilisateur qui contrôle la vitesse.
Test de Cooper
Destiné aux utilisateurs plus sportifs.
La durée est de 12 min et l’inclinaison
de 1%. L’utilisateur doit parcourir
en marchant/courant la plus grande
distance possible. C’est l’utilisateur qui
contrôle la vitesse.
Page 71

F
mode d´emploi • PLATINUM PRO
71
Modifier l’utilisateur
Ouvrez le menu de modification de
l’utilisateur en appuyant sur le bouton
“Modifier l’utilisateur” dans la barre des
principales fonctions.
Ce menu affiche dans la section
supérieure le journal d’entraînement total
de l’utilisateur.
Dans la section inférieure, on trouve le
journal d’entraînement de la dernière
séance.
Effacer le journal
Appuyez sur le bouton “Effacer le
journal” pour effacer le journal total
aussi bien que le journal de la dernière
séance.
Remarque : L’écran ne vous demandera
pas de confirmer
Modifier l’utilisateur
“Edit User” button can be pressed to
change user preferences/ settings.
Changer d’utilisateur
Ouvrez le menu de modification de
l’utilisateur en appuyant sur le bouton
“Changer d’utilisateur” dans la barre des
principales fonctions.
La procédure est la même pour modifier
un utilisateur ou pour créer un utilisateur.
Sélectionnez l’utilisateur que vous
souhaitez modifier ou appuyez sur le
bouton “Créer un utilisateur” et modifiez/
créer comme suit
Créer un utilisateur
Pour créer un nouvel utilisateur, appuyez
sur le bouton “Créer un utilisateur”. La
fenêtre ci-dessous s’affichera.
Dans cette fenêtre vous pouvez utiliser
le clavier numérique pour écrire votre
nom et sélectionner un avatar pour
utiliser comme icône personnelle.
Appuyez sur “Dáccord” dans le clavier
numérique une fois que vous avez saisi
votre nom et choisi un avatar.
Votre utilisateur est créé avec les
paramètres standards. Configurez le
profil de l’utilisateur en appuyant sur
“Changer d’utilisateur” dans la section
“Modifier l’utilisateur”
Page 72

72
mode d´emploi
•
PLATINUM PRO
Détails de l’utilisateur :Gender
• Sexe
• Âge
• Hauteur
• Poids
• FC Max. (la valeur sera calculée
automatiquement après avoir
sélectionné le sexe et l’âge). Vous
pouvez également la modifier si vous
le souhaitez.
Détails des unités :
• Unité de masse (KG/LBS)
• Longueur unité (Métrique/Impérial)
• Unité d’énergie (Calories/Joules)
Lorsque vous avez renseigné tous les
champs correctement, appuyez sur
“Dáccord” pour confirmer
Suprimer l’utilisateur
Après avoir appuyé sur le bouton,
l’interface de l’utilisateur vous
demandera de confirmer que vous
souhaitez vraiment supprimer l’utilisateur
et toutes ses données.
Rebaptiser
Après avoir appuyé sur le bouton, vous
pouvez modifier le nom de l’utilisateur et
sauvegarder les données enregistrées
sous le nouveau nom.
Voir la section “Créer un utilisateur” pour
plus d’informations.
Web browser
Ouvrir “web browser” en appuyant sur le
bouton «Internet» dans le principal barre
de fonctions.
Lorsque vous appuyez sur la barre
d’URL, vous verrez automatiquement un
clavier logiciel s’affiche.
Remarque:
peut-être pas tous les sites Web
s’affichent correctement.
Remarque:
Naviguer sur Internet nécessite une
connexion Wifi. (lire le chapitre.settings)
“Settings”)
Remarque :
Le nombre limite de pages pouvant être
ouvertes simultanément est de 8.
Media Player
Ouvrez le menu “Media Player” en
appuyant sur le bouton “Media” dans la
barre des principales fonctions.
Page 73

F
mode d´emploi • PLATINUM PRO
73
Volume
Utilisez le curseur pour contrôler le
volume.
Si vous n’avez pas arrêté la musique,
vous continuerez à l’entendre dans la
plupart des modes de programme.
Remarque : Lorsque le programme ou
la fonction d’affichage requiert de la
musique ou une fonction vidéo, le lecteur
multimédia s’arrêtera.
Settings
Ouvrez le menu Settings en appuyant
sur le bouton “Settings” dans la barre
des principales fonctions.
La fenêtre de configuration s’affichera.
Wi-Fi
Appuyez sur le bouton “Wi-Fi” pour
ouvrir la fenêtre de configuration du WiFi.
Boutons de commande du lecteur
multimédia
Navigation
Appuyez sur le bouton Navigation
pour rechercher les fichiers que vous
souhaitez reproduire.
Remarque :
Il est recommandé d’enregistrer les
fichiers sur une clé USB et de la
brancher dans l’un des ports disponibles.
La clé USB doit être au format FAT32.
Remarque :
Tous les fichiers ne pourront peut-être
pas être lus.
Contrôle de la lecture
Utilisez le bouton de contrôle de la
lecture pour reproduire, mettre en
pause, arrêter ou répéter les fichiers
sélectionnés.
Appuyez sur le bouton « Home ».
Taille de la fenêtre
Appuyez sur ce bouton pour réduire ou
augmenter votre fenêtre de lecture vidéo
active.
Durée
Le curseur montre la position de la
progression de la lecture. Vous pouvez
faire glisser le curseur pour avancer
rapidement ou revenir en arrière dans la
lecture du fichier.
Page 74

74
mode d´emploi
•
PLATINUM PRO
Réseaux Wi-Fi :
Affiche les différents réseaux
disponibles.
On y voit l’authentification et la force du
signal.
Appuyez une fois sur le réseau auquel
vous souhaitez vous connecter pour
ouvrir la fenêtre de connexion.
Appuyez sur la barre de mot de passe
et le clavier du logiciel s’affichera
automatiquement. Saisissez le mot
de passe et appuyez sur le bouton
connexion pour vous connecter.
Utilisez le bouton “Add Wi-Fi network”
, toujours en bas de votre liste, pour
ajouter un réseau lorsque SSID est
masqué. Il vous faudra peut-être
descendre jusqu’en bas de la liste si de
nombreux réseaux sont affichés.
Appuyez sur la barre Réseau SSID
et le clavier du logiciel s’affichera
automatiquement.
• Saisissez le nom du réseau
• Sélectionnez le mode de sécurité
• Saisissez le mot de passe
et appuyez sur le bouton de
connexion pour vous connecter.
Remarque
Pour vous connecter à un réseau
Wi-Fi, il est parfois nécessaire de
configurer correctement la date et
l’heure.
Si vous êtes connecté à un réseau,
l’icône de connexion s’affichera.
Date Heure
Appuyez sur le bouton “Date Heure”
pour ouvrir la fenêtre de configuration de
la date et de l’heure
Dans cette fenêtre, vous pourrez
configurer la date et l’heure. Vous
pourrez également sélectionner votre
fuseau horaire, si nécessaire.
Utilisez les flèches vers le haut ou vers
le bas pour régler l’heure et la date.
Appuyez le bouton OK pour confirmer et
retourner au menu de configuration.
Appuyez sur le bouton Back pour
retourner au menu de configuration sans
appliquer les changements.
Page 75

F
mode d´emploi • PLATINUM PRO
75
Luminosité
Appuyez sur le bouton “Luminosité” pour
ouvrir la fenêtre de configuration de la
luminosité
Dans cette fenêtre, vous pourrez régler
la luminosité de 0 (plus sombre) à 100
(plus lumineux).
Utilisez les flèches vers le haut ou vers
le bas pour régler la luminosité. Appuyez
le bouton OK pour confirmer et retourner
au menu de configuration.
Appuyez sur le bouton Back pour
retourner au menu de configuration sans
appliquer les changements.
Volume
Appuyez sur le bouton “Volume” pour
ouvrir la fenêtre de configuration du
volume.
Dans cette fenêtre, vous pourrez régler
le volume pour Internet et pour le lecteur
multimédia, de 0 à 100 (max.).
Utilisez les flèches vers le haut ou vers
le bas pour régler le volume.
Appuyez le bouton OK pour confirmer et
retourner au menu de configuration.
Appuyez sur le bouton Back pour
retourner au menu de configuration sans
appliquer les changements.
Gestion de
l’alimentation
Appuyez sur “Gestion de l’alimentation
“ pour ouvrir la fenêtre du logiciel de
gestion de la puissance
Par défaut, l’écran passera en mode
veille au bout de 10 minutes d’inactivité.
En mode Gestion de la puissance, vous
pouvez modifier cette durée de plus ou
moins 5 minutes. De 5 à 60 minutes.
Utilisez les flèches vers le haut ou vers
le bas pour procéder au réglage.
Appuyez le bouton OK pour confirmer et
retourner au menu de configuration.
Appuyez sur le bouton Back pour
retourner au menu de configuration sans
appliquer les changements.
Remarque :
Vous trouverez également une case
à cocher pour activer/désactiver le
mode veille. Lorsque le mode veille est
désactivé, l’écran ne s’éteindra pas en
mode veille
Page 76

76
mode d´emploi
•
PLATINUM PRO
Concerne
Appuyez sur le bouton “Concerne” pour
ouvrir la fenêtre d’informations.
Vous y trouverez des informations sur le
logiciel actuellement installé.
Appuyez sur le bouton Arrière pour
retourner au menu de configuration.
Quick Start
Ouvrez Quick Start en appuyant sur le
bouton “Quick start” dans la barre des
principales fonctions.
Quick start lancera un entraînement
sans aucun paramètre prédéfini, comme
en mode Manuel.
C’est l’utilisateur qui doit régler les
niveaux de tension manuellement et
aucune limite de temps ou de rythme
cardiaque n’est programmée.
Maintenance
Tapis et surface
Votre tapis de course utilise une
couche très efficace à faible friction.
Les performances seront meilleures si
la surface est régulièrement nettoyée.
Utilisez un chiffon doux et humide ou
une serviette en papier pour essuyer le
bord du tapis et la zone entre le bord
du tapis et le châssis. Allez aussi loin
que possible sous le bord du tapis. Ce
nettoyage doit être fait une fois par mois
afin de prolonger la durée de vie du tapis
et de la surface. Utilisez uniquement de
l’eau - jamais de produits de nettoyage
ou d’abrasifs. Nettoyez le dessus du
tapis texturé avec une eau savonneuse
douce et une brosse en nylon.
Laissezsécher le tapis avant de l’utiliser.
Attention!
Le tapis est enduit de cire. Toute
lubrification nuira aux performances et
à la durabilité du tapis de course..
Poussière de tapis
Le tapis dégage de la poussière lors
d’un rodage normal jusqu’à ce que le
tapis se stabilise. Essuyez la poussière
à l’aide d’un chiffon humide pour éviter
qu’elle s’accumule.
Nettoyage général
Les saletés, la poussière et les poils
d’animaux peuvent bloquer les entrées
d’air et s’accumuler sur le tapis. Tous les
mois : passez l’aspirateur sous le tapis
de course pour éviter l’accumulation.
Retirez le capot noir du moteur deux fois
par an et aspirez les saletés qui peuvent
s’y accumuler.
DEBRANCHEZ L’APPAREIL AVANT LE
NETTOYAGE.
Page 77

F
mode d´emploi • PLATINUM PRO
77
Exception :
Lors d’une rééducation, pendant laquelle
l’utilisateur marche sur une jambe plus
forte que l’autre, il se peut que le tapis
dérive. Dans de tels cas, vous ne devez
pas centrer le tapis, à moins que le tapis
ne se centre pas automatiquement dans
des conditions d’utilisation normales.
Pour centrer le tapis :
Une clé hexagonale coudée de 10 mm
est fournie pourrégler le rouleau arrière.
Le réglage doit être effectué uniquement
du côté gauche. Réglez la vitesse du
tapis sur environ 3 à 5 km/h. Rappelezvous : un petit ajustement peut faire une
différence considérable !
Tournez le boulon dans le sens des
aiguilles d’une montre pour déplacer
le tapis vers la droite et dans le sens
inverse pour le déplacer vers la gauche.
Tournez le boulon seulement un quart
de tour à la fois et attendez quelques
minutes jusqu’à ce que le tapis se
déplace. Continuez à faire des quarts de
tour jusqu’à ce que le tapis se stabilise
au centre.
Il se peut que vous deviez centrer le
tapis de temps en temps en fonction de
l’utilisation et de votre façon de marcher/
de courir. Pour certains utilisateurs, le
centrage se fera d’une façon différente.
Attendez-vous à procéder aux
ajustements nécessaires au centrage
du tapis. Au fur et à mesure que le
tapis est utilisé, ces ajustements vous
causeront moins de soucis. Il est de la
responsabilité de tout propriétaire de
bien centrer son tapis de course.
Reglages du tapis :
Réglage de la tension du tapis - Ce
réglage doit être effectué sur le rouleau
arrière. Les boulons de réglage sont
situés sur l’extrémité des rails dans les
chapeaux, comme le schéma ci-dessous
le montre.
Serrez les boulons du rouleau arrière
(dans le sens des aiguilles d’une montre)
juste assez pour empêcher que le tapis
patine sur le rouleau avant. Tournez
les deux boulons de réglage de la
tension du tapis par incréments d’un
quart de tour et contrôlez la tension en
marchant lentement sur le tapis et en
vous assurant que celui-ci ne patine pas.
Continuez à serrer les boulons jusqu’à
ce que le tapis cesse de patiner.
Si vous avez l’impression que le tapis
est assez serré mais patine encore,
le problème provient peut-être d’une
courroie de transmission lâche sous le
capot avant
.
Ne serrez pas trop
Un serrage excessif peut endommager
le tapis et entraîner une défaillance
prématurée des roulements.
Centrage du tapis :
Le niveau de performance de votre
tapis de course dépend de la planéité
de la surface sur laquelle il fonctionne.
Lorsque le châssis n’est pas horizontal,
le rouleau avant et le rouleau arrière ne
peuvent pas rester parallèles et le tapis
devra être centré sans cesse.
Cet appareil est conçu de façon à ce que
le tapis reste raisonnablement centré
lorsqu’il est en service. Il est normal que
certains tapis ont tendance à dériver
lorsque personne ne se trouve dessus.
Après quelques minutes, le tapis devrait
se centrer automatiquement. Si le tapis
continue à dériver, il faudra le centrer.
Page 78

78
mode d´emploi
•
PLATINUM PRO
Attention!
Les dommages causes au tapis
resultant d’un mauvais centrage /
reglage de la tension ne sont pas
couverts par la garantie.
Defauts de
fonctionement
En dépit d’un contrôle continu de
la qualité, l’appareil peut présenter
des défauts ou des anomalies de
fonctionnement provenant de certains
de ses composants. Dans ce cas, il
n’est pas cependant nécessaire d’aller
faire réparer votre appareil, le problème
pouvant bien souvent être résolu
par simple changement de la pièce
défectueuse.
Contactez votre distributeur au cas
ou vous remarqeuriez un défaut ou
un mauvais fonctionnement de votre
l’appareil ou si vous avez besoin de
pièces de rechange. Indiquez-lui la
nature du problème, les conditions
d’utilisation, la date d’achat, le modèle
et le numéro de série. Vous trouverez
la liste des pièces détachées à la fin de
ce mode d’emploi. Seules des pièces
mentionnées dans la liste des pièces de
rechange peuvent être utilisées dans
l’appareil.
Transport et
rangement
Ne jamais laisser la piste en position de
rangement uniquement reposant sur les
ressorts à gaz!
Déplacer le tapis de course Platinum
treadmillde la manière suivante : placezvous derrière l’équipement et attrapez
le profil en aluminium situé à l’arrière de
l’équipement. Soulevez la partie arrière
de l’équipement de telle manière qu’il
repose sur les roulettes de transport.
Déplacez l’équipement en le poussant
sur les roulettes de transport. Abaissez
prudemment la piste.
Attention!
Pour garantir un bon fonctionnement
à votre appareil, rangez-le dans
un endroit sec, sans variations de
température importantes, et protégezle contre les poussières. N’oubliez pas
de débrancher votre appareil après
chaque utilisation.
Du fait de sa politique de développement
continu des produits, Tunturi se réserve
le droit de modifier les spécifications
sans préavis
Attention!
La garantie ne couvre pas les
dommages dus à une négligence des
instructions d’assemblage, de réglages
ou de maintenance données dans ce
mode d’emploi. Suivez les instructions
scrupuleusement pour l’assemblage,
l’utilisation et la maintenance de votre
équipement. Des changements ou
modifi cations non expressément
approuvés par Tunturi New Fitness
rendront nulle l’autorité de l’utilisateur
sur l’equipement.
NOUS VOUS SOUHAITONS
D’AGRÉABLES ET NOMBREUSES
SÉANCES D’EXERCICE AVEC VOTRE
PARTENAIRE D’ENTRAÎ NEMENT
TUNTURI!
Page 79

NL
handleiding • PLATINUM PRO
79
Welkom
Uw keuze toont aan, dat u echt in uw
gezondheid en conditie wilt investeren.
Het bewijst ook, dat u kwaliteit en
stijl belangrijk vindt en waardeert.
Met deze Tunturi trainer heeft u een
veilig, motiverend kwaliteitsproduct
als trainingspartner gekozen. Wat
uw trainingsdoel ook is, wij zijn ervan
overtuigd dat de keuze van deze trainer
de juiste is om uw doel te bereiken.
Meer informatie over het gebruik van uw
trainingsapparatuur en efficiënte training
kunt u vinden op Tunturi’s website
WWW.TUNTURI.COM
Welkom .............................................. 79
Belangrijke ....................................... 80
Informatie .......................................... 80
Belangrijke elektrische informatie ....... 81
Stroomonderbrekers: .......................... 81
Aardingsinstructies ............................. 81
Veiligheidssleutel ................................ 82
Hartslagtraining ................................ 82
Een opmerking over hartslag:............. 82
Een hartslagzender gebruiken............ 83
Fitness Training Met Tunturi ............... 84
Montage ............................................. 85
Stap 1: ............................................... 85
Stap 2: ............................................... 86
Stap 3: ............................................... 87
Stap 4: ............................................... 88
Monitor .............................................. 89
Hardwareknoppen .............................. 89
Veiligheidssleutel ................................ 89
Softwareknoppen................................ 89
Inschakelen ........................................ 90
Functiebalk ........................................ 90
De informatiebalk ............................... 90
De hoofdweergave ............................. 90
Display Functies ............................... 90
Meerdere talen ................................... 90
Programma’s ..................................... 91
Training doel instellen ......................... 91
De snelheid en helling instellen .......... 92
Workout Programma .......................... 92
Workout Trip ....................................... 93
Eigen Training..................................... 93
Scenery Tour ...................................... 94
Hartslag Control.................................. 95
Fitnesstest .......................................... 95
Verander gebruiker ........................... 96
Gebruiker aanmaken .......................... 96
Wijzig gebruiker ................................ 97
Verwijder log le ................................. 97
Wijzig gebruiker .................................. 97
Verwijder gebruiker .......................... 97
Hernoem ............................................. 97
Web browser ..................................... 97
Media speler ...................................... 98
Bedieningsknoppen voor mediaspeler 98
Instellingen ........................................ 99
Wi-Fi ................................................... 99
Datum - tijd ....................................... 100
Helderheid ........................................ 100
Volume.............................................. 100
Power Management ......................... 101
Over .................................................. 101
Quick Start ...................................... 101
Onderhoud ...................................... 102
Band en loopvlak .............................. 102
Stof op band ..................................... 102
Gebruiksstoringen.......................... 103
Verplaatsen ..................................... 104
Deze Nederlandse handleiding is een
vertaling van de Engelse tekst.
Aan deze vertaling kunnen geen rechten
ontleend worden.
De originele Engelse tekst blijft leidend.
Inhoud
Page 80

80
handleiding
•
PLATINUM PRO
onderhoudswerkzaamheden dient
u eerst de hoofdschakelaar van de
looptrainer, uit te schakelen en de
stekker uit het stopcontact te nemen.
• De Platinum Treadmill mag niet
worden gebruikt door personen die
zwaarder zijn dan 150 kg.
• Gebruik de looptrainer alleen
binnenshuis. De ideale
gebruikstemperatuur is tussen +10°C
en +35°C. De luchtvochtigheid mag
nooit hoger dan 90 % zijn.
• Houd de achterkant van de loopband
vrij. Zorg voor een vrije ruimte van 1
meter tussen de achterkant van de
loopband en een vast object.
• Gebruik de loopband niet in
een omgeving waar aërosole
spuitproducten worden gebruikt of
zuurstof wordt toegediend. Vonken
van de motor kunnen resulteren in
ontsteking in een omgeving gevuld
met gassen.
• Laat geen voorwerpen in een van
de openingen vallen en steek geen
voorwerpen in de openingen.
• Als u de loopband wilt uitschakelen,
zet u alle bedieningen in de UITstand, verwijdert u het trekkoord en
haalt u de stekker uit het stopcontact.
• Gebruik de meegeleverde
handgrepen; deze zijn ontworpen
voor uw veiligheid.
BELANGRIJK!
GEBRUIK UITSLUITEND EEN
VERLENGSNOER VAN 16 AWG
OF GROTER MET SLECHTS ÉÉN
STEKKER.
De loopband moet als enige apparaat op
het stopcontact worden aangesloten.
PROBEER NIET DE GEAARDE
STEKKER UIT TE SCHAKELEN
MET BEHULP VAN ONGESCHIKTE
ADAPTERS EN PROBEER NIET DE
SNOERSET AAN TE PASSEN.
Dit kan resulteren in een ernstige schok
of brandgevaar en onjuiste werking van
de computer.
Belangrijke
Informatie
Deze gids is een essentieel onderdeel
van uw Tunturi looptrainer. Lees
deze gids zorgvuldig door vóórdat
u begint met monteren, gebruiken
of onderhouden van uw looptrainer.
Bewaar de gids op een handige plaats.U
kunt er, nu en in de toekomst, nuttige
informatie uithalen die u nodig heeft voor
het gebruik en het onderhoud van de
apparatuur. Volg de instructies altijd met
zorg op.
Lees alle instructies voordat u dit
apparaat gebruikt
• De trainer mag alleen worden
aangesloten op een geaard
stopcontact. Het stroomverbruik
bedraagt maximaal 15 A. Het
gebruik van een verlengsnoer
is niet toegestaan. Spanningsfl
uctuaties van meer dan 10 % kunnen
storingen in de werking van de trainer
veroorzaken of de elektronische
componenten beschadigen. Indien
de netspanning onvoldoende
gereguleerd is of de trainer
anderszins niet overeenkomstig
deze gebruiksaanwijzing wordt
aangesloten, vervalt de garantie.
• De Platinum Treadmill mag alleen
worden aangesloten op een geaard
stopcontact. Het gebruik van een
verlengsnoer is niet toegestaan.
• Beperk u tot het onderhoud en
instellingen zoals in deze handleiding
worden beschreven. Stop direct als
zich andere problemen voordoen en
vraag advies bij uw Tunturi specialist.
• Laat door een arts, voordat u met
trainen begint, uw gezondheid
controleren.
• Mocht u tijdens het trainen
last krijgen van misselijkheid,
duizeligheid of andere niet normale
verschijnselen, stop dan direct uw
training en raadpleegeen arts.
• Bij het afstellen en het
onderhouden van de trainer
dient u deze gebruiksaanwijzing
op te volgen. Bij montage- en
Page 81

NL
handleiding • PLATINUM PRO
81
Stroomonderbrekers:
Sommige stroomonderbrekers
die binnenshuis worden gebruikt,
zijn niet berekend op hoge
inschakelstroomstoten die kunnen
optreden wanneer de loopband voor de
eerste keer wordt ingeschakeld of zelfs
tijdens normaal gebruik. Als de loopband
de stroomonderbreker activeert (zelfs
al heeft deze het juiste stroombereik en
is de loopband het enige aangesloten
apparaat) maar de stroomonderbreker
op de loopband zelf niet wordt
geactiveerd, moet u de onderbreker
vervangen met een type dat is berekend
op hoge inschakelstroomstoten. Dit is
geen defect dat onder de garantie valt.
Dit is een omstandigheid waarop wij
als fabrikant geen invloed hebben. Dit
onderdeel is verkrijgbaar bij de meeste
elektronicawinkels.
Aardingsinstructies
Dit product moet worden geaard. Als het
elektrische systeem van de loopband
niet goed/niet meer werkt, vormt
aarding een pad van minste weerstand
voor elektrische stroom, waardoor
het risico van een elektrische schok
afneemt. Dit product is voorzien van
een koord met een aardingsstekker.
De stekker moet in een geschikt
stopcontact worden geplaatst dat op
juiste wijze is gemonteerd en geaard
in overeenstemming met alle lokale
normen en verordeningen.
BELANGRIJK!
Onjuiste aansluiting van de
aardingsgeleider kan resulteren n
risico van een elektrische schok. Neem
contact op met een bevoegd elektricien
of onderhoudsmonteur als u niet zeker
weet of het product goed is geaard.
Pas de stekker die met het product
wordt geleverd niet aan wanneer het
niet in het stopcontact past. Laat een
geschikt stopcontact installeren door
een bevoegd elektricien.
BELANGRIJK!
Om het risico van een elektrische schok
te beperken, moet u de stekker van
de loopband uit het stopcontact halen
voordat u het apparaat gaat reinigen of
onderhouden. Verwijder het trekkoord
na gebruik om onbevoegde inschakeling
van de loopband te voorkomen.
Belangrijke elektrische informatie
BELANGRIJK!
Gebruik NOOIT een
reststroomapparaat met deze
loopband. Net als bij elk apparaat
met een grote motor zal het
reststroomapparaat vaak worden
geactiveerd. Houd het stroomsnoer
uit de buurt van bewegende
onderdelen van de loopband, inclusief
het hellingsmechanisme en de
transportwieltjes.
BELANGRIJK!
Verwijder NOOIT een van de kappen
zonder eerst e stekker uit het
stopcontact te halen. Als het voltage
varieert met tien (10) procent, kan
dit de prestaties van de loopband
negatief beïnvloeden. Dergelijke
omstandigheden vallen niet onder
de garantie. Als u vermoedt dat het
voltage te laag is, neemt u contact op
met het lokale energiebedrijf of een
bevoegd elektricien voor het uitvoeren
van een test.
BELANGRIJK!
Stel de loopband NOOIT bloot aan
regen of vocht. Dit product is NIET
ontworpen voor gebruik buitenshuis,
in de buurt van een zwembad of
spa of in een andere omgeving
met een hoge luchtvochtigheid.
De temperatuurspecificatie is 40
°C, luchtvochtigheid 95%, nietcondenserend (geen vorming van
waterdruppels op oppervlakken)..
Page 82

82
handleiding
•
PLATINUM PRO
Veiligheidssleutel
Dit apparaat wordt geleverd met een
veiligheidssleutel. Dit is een eenvoudige,
magnetische sleutel die u te allen
tijde moet gebruiken. Deze is voor uw
veiligheid als u mocht vallen of te ver
naar achteren op de band komt.
Door aan deze veiligheidssleutel te
trekken, wordt de band stilgezet.
Gebruik:
• Plaats de magneet in positie op het
bedieningspaneel. De loopband
start niet en werkt niet zonder deze
sleutel.
• Bevestig de kunststof clip stevig
aan uw kleding zodat deze goed
vastzit. Opmerking: de magneet
is sterk genoeg om het risico van
onbedoeld, onverwacht stoppen te
minimaliseren. De clip moet stevig
worden bevestigd zodat deze niet
van uw kleding losschiet. Zorg dat
u bekend bent met de werking en
beperkingen ervan. De loopband zal,
afhankelijk van de snelheid, in een
of twee stappen stoppen zodra de
magneet uit het bedieningspaneel
wordt getrokken. Gebruik tijdens
normaal gebruik de rode Stop/
Pauze-schakelaar.
Hartslagtraining
Een opmerking over hartslag:
Het idee dat u pijn moet lijden om vooruit
te gaan is een mythe die is achterhaald.
U kunt nu genieten van de voordelen die
een comfortabele manier van oefenen
biedt. Een groot gedeelte van dit succes
is te danken aan het gebruik van
hartslagmeters. Door op de juiste manier
gebruik te maken van een hartslagmeter,
hebben veel mensen ontdekt dat hun
gebruikelijke intensiteit waarmee ze
oefeningen uitvoerden te hoog of te
laag was en dat de oefeningen veel
aangenamer waren door hun hartslag in
het gewenste bereik te houden.
Belangrijke
bedieningsinstructies
• Gebruik deze loopband NOOIT
zonder eerst over de gevolgen van
een bedieningsverandering van de
computer te lezen en deze gevolgen
te begrijpen.
• U moet begrijpen dat veranderingen
in snelheid en helling niet direct
worden toegepast. Stel de gewenste
snelheid in via het bedieningspaneel
van de computer en laat de
aanpassingstoets los. De computer
zal de opdracht geleidelijk uitvoeren.
• Gebruik de loopband NOOIT
tijdens een onweersbui. Er kunnen
stroomstoten optreden in het
stopcontact die de componenten van
de loopband kunnen beschadigen.
• Ga voorzichtig te werk als u andere
activiteiten uitvoert tijdens het gebruik
van de loopband, zoals tv kijken,
lezen, enzovoort. Deze afleidingen
kunnen ertoe leiden dat u uw
evenwicht verliest of naar de rand
van de loopband beweegt. Dit kan
resulteren in ernstig letsel.
• (De)monteer de loopband NOOIT
terwijl de band beweegt. De
loopband start op zeer lage snelheid
op en u hoeft tijdens het opstarten
niet in spreidstand op de band te
staan. Nadat u hebt geleerd hoe u
het apparaat moet gebruiken, kunt
u gewoon op de band blijven staan
tijdens langzame versnelling.
• Houd altijd de handgreep of
handvatten vast wanneer u
bedieningswijzigingen doorvoert
(helling, snelheid, enzovoort).
• Druk niet te hard op de toetsen van
het bedieningspaneel De toetsen zijn
nauwkeurig ingesteld en functioneren
goed bij een lichte vingerdruk. Als
u harder drukt, werkt de eenheid
niet sneller of langzamer. Als u van
mening bent dat de toetsen niet goed
functioneren bij normale druk, neemt
u contact op met uw dealer.
Page 83

NL
handleiding • PLATINUM PRO
83
Een hartslagzender gebruiken
• Bevestig de zender met de
bevestigingsonderdelen aan de
elastische riem.
• Maak de riem zo strak mogelijk vast,
maar zorg ervoor dat de riem niet te
strak zit en comfortabel zit.
• Plaats de zender in het midden
van uw borst met het logo van u
af (sommige mensen moeten de
zender iets links van het midden
plaatsen). Maak het uiteinde van de
elastische riem vast door het ronde
uiteinde te plaatsen en bevestig de
zender en riem rond uw borst met de
bevestigingsonderdelen.
• Plaats de zender direct onder de
borstspieren.
• Transpiratie is de beste geleider om
het aantal hartslagen per minuut
te meten via elektrische signalen.
U kunt echter ook gewoon water
gebruik en om de elektroden (2
zwarte vierkante gebieden op de
achterzijde van de riem en op beide
zijden van de zender) van tevoren
vochtig te maken. U wordt ook
aangeraden de zenderriem om te
doen een paar minuten voordat u
met de training begint. Bij sommige
gebruikers kost het vanwege
lichamelijke eigenschappen in het
begin meer moeite om een sterk,
constant signaal te krijgen. Na de
warming-up doet dit probleem zich
minder voor. Het dragen van kleding
over de zender en riem is niet van
invloed op de prestaties.
• Uw training moet zich binnen het
bereik bevinden, dat wil zeggen de
afstand tussen zender en ontvanger
mag niet te groot zijn om een sterk en
constant signaal te produceren. De
afstand tussen zender en ontvanger
kan iets variëren, maar u moet in
de buurt van het bedieningspaneel
blieven om tot goede en betrouwbare
metingen te komen. Als u de zender
direct op de blote huid draagt, bent
u verzekert van een goede werking.
U kunt de zender eventueel ook over
een shirt dragen. U moet hiervoor de
delen van het shirt natmaken waar op
de elektroden worden bevestigd.
Om vast te stellen wat het ideale bereik
is waarin u wilt trainen, moet u eerst
bepalen wat uw maximale hartslag is.
U kunt dit bepalen door de volgende
formule te gebruiken: 220 min uw
leeftijd. De uitkomst is de maximale
hartslag (MHR) voor iemand van uw
leeftijd. Om het effectieve hartslagbereik
te bepalen voor specifieke doeleinden
berekent u eenvoudigweg uw MHR. De
trainingszone voor uw hartslag is 50%
tot 90% van uw maximale hartslag. 70%
van uw MHR is de zone waarin vet wordt
verbrand terwijl 80% is bedoeld voor
het versterken van het cardiovasculaire
systeem. Deze 70% tot 80% is de zone
die u moet aanhouden voor maximale
resultaten.
Voor iemand van 40 jaar is de
berekening van hun doelhartslagzone
als volgt:
220 – 40 = 180 (maximale hartslag)
180 x 0.7 = 108 slagen per minuut
(70% van het maximum)
180 x 0,8 = 126 slagen per minuut
(80% van het maximum)
Dus voor iemand van 40 jaar is de
trainingszone 108 tot
126 slagen per minuut.
Page 84

84
handleiding
•
PLATINUM PRO
BELANGRIJK!
De zender wordt automatisch
geactiveerd wanneer deze activiteit van
het hart van de gebruiker waarneemt.
De zender wordt ook weer automatisch
gedeactiveerd wanneer deze geen
activiteit ontvangt. Hoewel de zender
waterdicht is, kan vocht zorgen voor
verkeerde signalen. U moet de zender
na gebruik volledig droogmaken om de
levensduur van de batterij te verlengen
(de batterij van de zender heeft een
geschatte levensduur van 2500 uur).
Als uw borstriem een vervangbare
batterij heeft, is dit de batterij Panasonic
CR2032.
Gebruik dit product pas voor de
doelhartslag als er een constante,
betrouwbare feitelijke hartslag
wordt weergegeven. Als er hoge,
willekeurige getallen worden
weergegeven, duidt dit op een
probleem.
Een zeer grillige hartslag kan onder
ander worden veroorzaakt door
storingen van:
• Magnetrons, tv’s, kleine elektrische
apparaten, enzovoort.
• TL-verlichting.
• Bepaalde beveiligingssystemen.
• Elektrische omheining voor een
huisdier.
• Bij sommige mensen worden
signalen minder goed door de
zender opgepikt via hun huid. Als
u problemen ondervindt, kunt u
het probleem mogelijk verhelpen
door de zender ondersteboven te
dragen. Doorgaans wordt de zender
gedragen met de juiste zijde van het
logo naar boven gericht.
• De antenne die uw hartslag oppikt,
is zeer gevoelig. Als er sprake is van
een geluidsbron van buitenaf, kunt u
mogelijk het hele apparaat 90 graden
draaien om de storing te verhelpen.
Als u problemen blijft ondervinden,
neemt u contact op met uw dealer.
Fitness Training Met Tunturi
Trainen op een fitnesstrainer is een
uitstekende aërobe training. Het
basisidee is een voldoende lichte
training die langere tijd kan worden
volgehouden. Aërobe training bevordert
het zuurstofopnamevermogen van
het lichaam, waardoor ook het
uithoudingsvermogen en de conditie
verbeteren. Het menselijk vermogentot
het verbranden van vet is afhankelijk van
dit zuurstofopnamevermogen.
Aërobe training moet plezierig zijn. Een
beetje transpireren mag, maar buiten
adem raken niet. Tijdens een oefening
moet u gewoon een gesprek kunnen
voeren. Door minstens drie keer per
week 30 minuten te trainen, bouwt u
een basisconditie op die u vervolgens
onderhoudt door enkele keren per
week te trainen. Vervolgens kunt u uw
conditie eenvoudig verbeteren door het
aantal trainingen op te voeren. Omdat
eenzware training voor mensen met
overgewicht belastend kan zijn voor
hart en bloedvaten is het verstandig te
beginnen met een langzame pedaalslag
met geringe weerstand. Naarmate de
conditie toeneemt, kunnen snelheid en
weerstand geleidelijk worden opgevoerd.
Page 85

NL
handleiding • PLATINUM PRO
85
Montage
Stap 1:
Verticale buizen
• De rechter verticale buis (19) is
voorzien van de computerkabel (A).
Til de buis van het loopoppervlak en
bevestig deze aan het basisframe.
U moet voorzichtig aan de
computerkabel trekken terwijl u de
verticale buis uitlijnt en de kabel
iets straktrekken zodat deze niet
beklemd komt te zitten tussen de
buis en het basisframe. Plaats een
platbolkopbout van 3/8” x 3-3/4”
(104), een splitonderle gring van 3/8”
(58) en een platte onderlegring van
3/8” (59) 1.en nylon ring (153) door
het bovenste gat in de opsluitplaat
(21) en het overeenkomstige
bovenste gat in de verticale buis
en schroef deze in het basisframe.
Plaats de andere twee bouten (104)
en onderlegringen (58 & 59 & 153)
en draai ze alle drie goed aan.
• Plaats de linker verticale buis (18) op
dezelfde manier, zonder ring 153.
58 Split washer
59 Flat washer
104
Button head
socket bold.
153
Nylon washer.
Page 86

86
handleiding
•
PLATINUM PRO
Stap 2:
Montage van de console aan de
verticale buizen
• Sluit de draden tussen de elektronica
voor de gebruikersinterface en het
consoleframe aan.
• Bevestig het bovenste afdekpaneel
met zeven schroeven (117) aan het
onderste paneel.
117 Metal sheet
screw
Page 87

NL
handleiding • PLATINUM PRO
87
Stap 3:
Monitor frame montage
• Bevestig de twee interfacesteunen
(3 links en 4 rechts) op
het montageframe van het
bedieningspanel met zes M8
sterringen (154) en M8 x 12 mm
schroeven (108). Let op: Positioneer
montagebeugels (3 & 4) helemaal
naar de achterkant van de console,
draai dan de schroeven aan.
• Sluit de computerkabel van het
bedieningspaneel (C) aan op de
kabel (A) van de verticale buis.
• Bevestig het bedieningspaneel op de
bovenkant van de verticale buizen
met zes bouten van 3/8” x 3/4” (105),
splitonderlegringen van 3/8” (58) en
platte
Positioneer montagebeugels (3 & 4)
helemaal naar de achterkant van de
console, draai dan de schroeven aan.
58 split washer
59
flat washer
105
bold
108
socket head cap
bolt
Page 88

88
handleiding
•
PLATINUM PRO
Stap 4:
Zijpanelen
• Draai de in stap 1 bevestigde bouten
(104) aan de linker- en rechterzijde
volledig vast om de verticale buizen
te bevestigen.
• Bevestig de zijpanelen (32
en 33) met vier M5 x 12 mm
kruiskopschroeven (73).
73 Phillips head
screw
Page 89

NL
handleiding • PLATINUM PRO
89
Gebruiksinstructie:
• Leg de magneet op de daarvoor
bestemde locatie op het
bedieningspaneel. Zonder deze
sleutel kan de loopband niet worden
gestart.
• Bevestig de kunststof klem aan uw
kleding en controleer of deze goed
vastzit. Opmerking: De magneet
is sterk genoeg om het risico van
onbedoeld of onverwacht stoppen te
minimaliseren. De klem moet goed
aan uw kleding worden bevestigd
om te voorkomen dat deze loslaat.
Zorg ervoor dat u bekend met de
werking en beperkingen van de
veiligheidssleutel. De loopband zal,
afhankelijk van de snelheid, in een
of twee stappen stoppen zodra de
magneet van het bedieningspaneel
wordt getrokken. Bij normaal gebruik
gebruikt u de rode schakelaar om de
loopband te stoppen of te pauzeren.
Softwareknoppen
Opmerking:
U kunt alleen gebruikmaken van de
knoppen die actief zijn. Grijze knoppen
zijn inactief en kunnen niet worden
gebruikt.
Back/ Terug
Hiermee keert u terug naar het vorige
scherm zonder de wijzigingen op te
slaan.
OK
Hiermee bevestigt u de instellingen of
slaat u de wijzigingen op en gaat u naar
het volgende scherm.
Cancel/ Annuleer
Hiermee wist u de gewijzigde gegevens
zonder de wijzigingen op te slaan.
Scroll
Gebruik de pijlen voor links/rechts/
omhoog/omlaag om meer items te zien
dan zichtbaar zijn in het hoofdvenster.
Monitor
Hardwareknoppen
Energy efficient:
Druk op de knop “Energy efficient” om de
console uit de stand-bymodus te halen.
(Zie de informatie over energiebeheer
in de sectie “Instellingen” voor meer
informatie.)
Aansluitingen:
Het display bevat twee 3,5 mm
aansluitingen.
De aansluiting rechts (naast de USBpoort) is de line-out.
De aansluiting links is de line-in.
Het display bevat drie USB-poorten voor
het aansluiten van opslagmedia.
De USB-poorten kunnen alleen media
met de bestandsindeling FAT32 lezen.
Opmerking:
Voor een FAT32-omgeving geldt
een beperking van 4 GB voor de
bestandsgrootte.
Veiligheidssleutel
Dit apparaat wordt geleverd met een
veiligheidssleutel. Dit is een eenvoudige,
magnetische sleutel die u te allen tijde
moet gebruiken. Deze is voor uw eigen
veiligheid indien u valt of te ver naar
achteren op de band komt.
Door aan deze veiligheidssleutel te
trekken, wordt de band stilgezet.
Page 90

90
handleiding
•
PLATINUM PRO
Data change/ Verander
Hiermee verhoogt of verlaagt u de
waarde.
Schermtoetsenbord
Hiermee geeft u het schermtoetsenbord
weer (indien beschikbaar).
Inschakelen
Tijdens het inschakelen ziet u een
screensaver die aangeeft dat de
software wordt voorbereid.
Wanneer het display is opgestart, ziet u
het bovenstaande venster.
Het display is opgedeeld in drie secties.
Functiebalk
(links)
De functiebalk bevat de belangrijkste
functieknoppen waarmee u toegang
krijgt tot de verschillende modi. De
functiebalk is zichtbaar in alle modi en
de knoppen zijn altijd beschikbaar.
De informatiebalk
(boven)
Op de informatiebalk ziet u het volgende:
Aan de rechterzijde staat altijd het
geselecteerde gebruikersprofiel.
Aan de linkerzijde staat informatie over
de programmamodus.
De informatiebalk kan niet worden
bediend via aanraking.
De hoofdweergave
(midden)
De hoofdweergave wordt bij elke
programmamodus aangepast.
In de actieve modus wordt hier de
voortgang van het programma getoond
en in de programmamodus bevat de
hoofdweergave knoppen waarmee u de
vereiste gegevens voor uw workout kunt
instellen.
Deze weergave is tevens het
hoofdvenster voor de webbrowsermodus
en het afspelen van multimedia.
Display Functies
Meerdere talen
De gebruikershandleiding kan worden
ingesteld in diverse talen. Wanneer u
een taal instelt, verandert het grootste
gedeelte van de gebruikersinterface in
de geselecteerde taal.
Opmerking: Tekst met betrekking tot de
Engineering-modus verandert niet in
de geselecteerde taal omdat deze tekst
Page 91

NL
handleiding • PLATINUM PRO
91
alleen beschikbaar is in het Engels.
De gebruiker kan kiezen uit de
weergegeven talen
Selecteer de gewenste taal door op
de knop voor de bijbehorende vlag te
drukken. De gebruikerstekst verandert
daarna meteen in de geselecteerde taal.
Als u een andere weergavefunctie wilt
selecteren, drukt u op een knop op de
functiebalk.
Programma’s
Selecteer een programma via de
selectieknop voor workouts
Training doel instellen
Afhankelijk van de geselecteerde
workout kunt u het workoutdoel op
verschillende manieren instellen.
Een doelafstand instellen
Als u voor het gekozen programma
een doelafstand kunt instellen, ziet u
het onderstaande venster nadat u de
workout hebt geselecteerd.
Selecteer de knop “Instellen Afstand” om
naar de volgende stap te gaan.
Gebruik de pijlknoppen om het doel te
verhogen of verlagen. De doellimieten
worden ook in het venster weergegeven.
(Deze afbeelding toont de limieten
in metrische waarden.) Druk op de
knop “OK” om te bevestigen. Het
geselecteerde programma wordt nu
geactiveerd.
Een doeltijd instellen
Als u voor het gekozen programma
een doeltijd kunt instellen, ziet u het
onderstaande venster nadat u de
workout hebt geselecteerd.
Selecteer de knop “Instellen Tijd” om
naar de volgende stap te gaan.
Page 92

92
handleiding
•
PLATINUM PRO
Quick Select
Druk op de knop Quick Select onder aan
de console als u gebruik wilt maken van
sneltoetsen. De werking hiervan wordt
hieronder beschreven
Sneltoetsen voor de snelheid:
De sneltoetsen voor de snelheid zijn
ingesteld op 5, 8, 10 en 12.
Druk bijvoorbeeld op sneltoets 10 om
van een willekeurige snelheid naar 10 te
gaan.
Sneltoetsen voor de helling:
De sneltoetsen voor de helling zijn
ingesteld op 0%, 3% en 5%. Druk
bijvoorbeeld op de sneltoets 3 om van
een willekeurige helling naar 3% te
gaan.
Druk nogmaals op de knop Quick
Select om de normale pijlen voor het
aanpassen van de snelheid en helling
weer te geven.
Workout Programma
De programma’s voor “Workout
Programma” hebben een vooraf
ingesteld patroon voor de snelheid
en helling. De gebruiker kan
als workoutdoel de gewenste
afstand of tijd selecteren. Er zijn 5
voorgeprogrammeerde programma’s:
P1 (manual), P4 (Hill Walk), P5 (Hill
Jog), P6 (Hill Run),
P7 (Rolling Hils)
Gebruik de pijlknoppen om het doel te
verhogen of verlagen. De doellimieten
worden ook in het venster weergegeven.
Druk op de knop “OK” om te bevestigen.
Het geselecteerde programma wordt nu
geactiveerd.
Een doelhartslag instellen
Als u voor het gekozen programma een
doelhartslag kunt instellen zodat u de
intensiteit van uw workout kunt bepalen,
ziet u het onderstaande venster nadat u
de workout hebt geselecteerd.
(Opmerking: u moet mogelijk ook een
doel voor de afstand en tijd instellen om
een limiet voor de duur of afstand in te
kunnen stellen.)
Gebruik de pijlknoppen om het doel te
verhogen of verlagen. De doellimieten
worden ook in het venster weergegeven.
Druk op de knop “OK” om te bevestigen.
Het geselecteerde programma wordt nu
geactiveerd.
De snelheid en helling instellen
Standaardinstelling
Met de pijlen linksonder kunt u de helling
instellen en met de pijlen rechtsonder
kunt u de snelheid instellen.
Page 93

NL
handleiding • PLATINUM PRO
93
Selecteer het gewenste programma.
Er wordt nu een venster weergegeven
waarin u het doel kunt selecteren. Stel
het doel voor uw workout in om het
geselecteerde programma te starten.
Hieronder ziet u het programmaprofiel
met een ingestelde limiet voor de
afstand.
In de grafiekweergave ziet u:
• Y-as links: hellingspercentage
• Y-as rechts: snelheidsmeter
• X-as: de afstand voor de
afstandsmodus of de tijd voor de
tijdmodus. De eenheid voor de
afstand is 2 km en de eenheid voor
de tijd is 10 minuten.
Workout Trip
De programma’s voor “Workout Trip”
bevatten echte geometrische gegevens,
zoals positie, hoogte en helling. Om
deze reden hebben deze programma’s
een vooraf ingesteld hellingspercentage.
De standaardsnelheid is 0,8 km/uur. De
gebruiker kan de NM tijdens het lopen
echter gewoon aanpassen. Er zijn drie
voorgeprogrammeerde programma’s:
A: Tuscany Country road
B: Tuscany Sandy Track
C: Tuscany Scenery Slopes
Selecteer het gewenste programma.
Er wordt nu een venster weergegeven
waarin u het doel kunt selecteren. Stel
het doel voor uw training in om het
geselecteerde programma te starten.
U ziet het onderstaande
programmaprofiel.
In de grafiekweergave ziet u:
• Y-as links: hellingspercentage
• Y-as rechts: snelheidsmeter
• X-as: de afstand voor de
afstandsmodus of de tijd voor de
tijdmodus. De eenheid voor de
afstand is 2 km en de eenheid voor
de tijd is 10 minuten.
Eigen Training
De gebruiker kan de workout opslaan als
zijn of haar “Eigen Training” als aan de
volgende criteria is voldaan:
Page 94

94
handleiding
•
PLATINUM PRO
• Het soort training is een Workout
Program, Workout Trip, Scenery Tour
of Heart Rate Control.
• De workout is langer dan 0,1 km en
duurt langer dan 5 minuten.
Gebruik de pijlen (links en rechts)
om een reeds opgeslagen training te
selecteren.
Wanneer u het gewenste programma
hebt geselecteerd, kunt u kiezen uit de
Racen-modus en de Herstart-modus.
Doe het volgende als u de Racen-modus
hebt geselecteerd:
Stel vóór het starten van uw training een
doel in voor de afstand of tijd. Afhankelijk
van de training zijn de standaardafstand
en -tijd ingesteld op de maximale
waarden.
Doe het volgende als u de herstartmodus hebt geselecteerd:
Voor de training wordt de afstand of tijd
gebruikt die bij de vorige training als doel
is ingesteld. Na de training wordt het
resultaat weergegeven in een grafiek.
De weergave van het trainingsscherm is
afhankelijk van het soort trainingsmodus.
Scenery Tour
Voor “Scenery Tour” worden dezelfde
workoutprofielen als in “Workout Trip”
gebruikt, met het verschil dat er bij
deze programma’s een video wordt
afgespeeld. Deze video is opgenomen
op locatie. De afspeelsnelheid van de
video wordt automatisch aangepast
aan de snelheid van de loopband:
De programma’s bevatten echte
geometrische gegevens, zoals positie,
hoogte en helling. Om deze reden
hebben deze programma’s een vooraf
ingesteld hellingspercentage. De
standaardsnelheid is 0,8 km/uur. De
gebruiker kan de NM tijdens het lopen
echter gewoon aanpassen. Er zijn drie
voorgeprogrammeerde programma’s:
A: Tuscany Country road
B: Tuscany Sandy Track
C: Tuscany Scenery Slopes
Selecteer het gewenste programma.
Er wordt nu een venster weergegeven
waarin u het doel kunt selecteren. Stel
het doel voor uw training in om het
geselecteerde programma te starten.
U ziet het onderstaande
programmaprofiel.
Page 95

NL
handleiding • PLATINUM PRO
95
helling en snelheid worden bepaald door
het programma.
Na het bevestigen wordt een venster
weergegeven waarin u het doel kunt
selecteren. Stel het doel voor uw
workout in om het geselecteerde
programma te starten.
U ziet het onderstaande
programmaprofiel.
In de grafiekweergave ziet u:
• Y-as links: hartslag (BPM)
• Y-as rechts: doelhartslag
• X-as: de afstand voor de
afstandsmodus of de tijd voor de
tijdmodus.
De eenheid voor de afstand is 2
km en de eenheid voor de tijd is 10
minuten.
Gebruik de pijlen voor de snelheid en
helling om de intensiteit van uw training
aan te passen
Fitnesstest
Tijdens de fitnesstest wordt de conditie
van de gebruiker gemeten. Het resultaat
wordt na de test weergegeven. Er zijn
twee testmodi.
2 km looptest
Deze test is geschikt voor mensen met
een normale conditie.
De afstand bedraagt 2 km en de helling
is ingesteld op 1%. Voor deze test is een
hartslagzender vereist. De gebruiker
moet zo snel mogelijk lopen/rennen. De
Gebruik de pijlen voor de snelheid en
helling om de intensiteit van uw training
aan te passen
Hartslag Control
In de programma’s voor “Hartslag
Control” kan de gebruiker zelf de
instelling voor de hartslag bepalen
door de weerstand aan te passen.
Voor de Training is dus een
hartslagzender vereist. Er zijn zes
voorgeprogrammeerde programma’s:
A: HRC
B: P08 Fat Burner 1
C: P09 Fat Burner 2
D: P10 Cardio
E: P11 Fit
Selecteer het gewenste programma en
de trainingsmodus.
In de snelheidsmodus kunt u de helling
en doelhartslag handmatig aanpassen.
De snelheid wordt bepaald door het
programma.
In de hellingsmodus kunt u de snelheid
en doelhartslag handmatig aanpassen.
De helling wordt bepaald door het
programma.
In de gecombineerde modus kunt u
alleen de doelhartslag aanpassen. De
Page 96

96
handleiding
•
PLATINUM PRO
test mislukt als de gebruiker stopt met
lopen. De snelheid wordt bepaald door
de gebruiker.
Coopertest
Deze test is geschikt voor mensen met
een betere conditie.
De duur van deze test is 12 minuten
en de helling is ingesteld op 1%. De
gebruiker moet zo snel mogelijk lopen of
rennen. De snelheid wordt bepaald door
de gebruiker.
Verander gebruiker
Druk op de knop “Verander Gebruiker”
op de functiebalk om het gelijknamige
menu te openen.
U kunt een gebruiker op dezelfde manier
wijzigen als dat u een gebruiker maakt.
Selecteer de gebruiker die u wilt wijzigen
of druk op de knop “Maak nieuwe
Gebruiker”.
Gebruiker aanmaken
Als u een nieuwe gebruiker wilt maken,
drukt u op de knop “Maak nieuwe
Gebruiker”. Het onderstaande venster
wordt weergegeven.
In dit venster voert u met het digitale
toetsenbord uw naam in. Selecteer ook
een persoonlijke avatar. Druk op het
digitale toetsenbord op de toets “OK”
als u klaar bent met het instellen van uw
naam en avatar.
U hebt nu een gebruiker gemaakt met
de standaardgebruikersinstellingen.
Ga door met het instellen van het
gebruikersprofiel. Lees hiertoe de
informatie over het wijzigen van een
gebruiker in de sectie “Wijzig Gebruiker”
Page 97

NL
handleiding • PLATINUM PRO
97
• Max. hartslag (Deze waarde wordt
automatisch ingesteld wanneer u uw
geslacht en leeftijd instelt, maar kan
indien gewenst worden gewijzigd.)
Eenheden:
• Massa Eenheid (kg/lbs)
• Lengte Eenheid (metrisch/imperiaal)
Energie Eenheid (calorie/joule)
Als u deze waarden hebt ingevuld, drukt
u op de knop “OK” om te bevestigen.
Verwijder gebruiker
Wanneer u op deze knop drukt, wordt
u gevraagd de actie te bevestigen
zodat de gebruiker en alle bijbehorende
gegevens worden verwijderd.
Hernoem
Wanneer u op deze knop drukt, kunt u
de gebruikersnaam wijzigen zodat de
opgeslagen gegevens behouden blijven
onder een nieuwe naam.
Zie “Maak nieuwe Gebruiker” voor meer
informatie
Web browser
Open de “Web browser” door op de
“Internet knop” te drukken in functie balk.
Wanneer u de URL ingave balk aan tikt,
zal er een toetsenbord openen
Zie hieronder afgebeelde voorbeeld
weergave.
Wijzig gebruiker
Druk op de knop “Wijzig gebruiker” op de
functiebalk om het gelijknamige menu te
openen
Dit menu wordt weergegeven in het
bovenste gedeelte van de totale
Trainingslog van de gebruiker.
Het onderste gedeelte toont de log van
de laatste training.
Verwijder log file
Druk op de knop “Verwijder log file” om
zowel de totale waarden als de waarden
van de laatste training te verwijderen.
Opmerking: U wordt niet gevraagd te
bevestigen.
Wijzig gebruiker
Druk op de knop “wijzig gebruiker” om
de gebruikersvoorkeuren en -instellingen
te wijzigen.
Gebruikersgegevens:
• Geslacht
• Leeftijd
• Hoogte
• Gewicht
Page 98

98
handleiding
•
PLATINUM PRO
Let op:
Mogelijk worden niet all websites juist
weer gegeven.
let op:
Surven op het internet vereist een WiFi
verbinding. ( zie hoofdstuk “Instellingen”)
Opmerking:
Per keer kunnen er maximaal acht
pagina’s geopend zijn
Media speler
Open de mediaspeler door op de
functiebalk op de knop “Media” te
drukken.
Bedieningsknoppen voor
mediaspeler
Bladeren
Druk op deze knop om te zoeken naar
de bestanden die u wilt afspelen.
Opmerking:
U wordt aangeraden uw bestanden op te
slaan op een USB-stick en deze in een
van de beschikbare USB-poorten steken.
De USB-stick moet de bestandsindeling
FAT32 hebben.
Opmerking:
Mogelijk kunnen niet alle bestanden
worden afgespeeld.
Afspelen
Druk op deze knop om de geselecteerde
bestanden af te spelen, te pauzeren, te
stoppen of te herhalen.
Schaal
Druk op deze knop om het actieve
videovenster te minimaliseren of
maximaliseren.
Tijd
De balk toont de voortgang van het
afgespeelde bestand. Gebruik de
schuifknop om vooruit of achteruit te
spoelen in het bestand.
Volume
Gebruik de schuifknop om het volume
aan te passen.
Page 99

NL
handleiding • PLATINUM PRO
99
Wi-Fi-netwerken:
Hier ziet u de beschikbare netwerken
met de verificatie en signaalsterkte.
Druk eenmaal op het netwerk waarmee
u verbinding wilt maken om het
verbindingsvenster weer te geven.
Tik op de balk voor het wachtwoord om
het schermtoetsenbord weer te geven.
Voer het wachtwoord in en druk op de
knop “Connect” om een verbinding tot
stand te brengen.
Druk op de knop “Add Wi-Fi network”
onder aan de lijst om een netwerk met
een verborgen netwerknaam (SSID)
toe te voegen. U moet mogelijk naar
onderen bladeren in de lijst als deze veel
beschikbare netwerken bevat.
Als u de muziek niet hebt
stopgezet, wordt deze in de meeste
programmamodi gewoon afgespeeld.
Opmerking:
Wanneer voor de geselecteerde
programma- of weergavefunctie muziek
of video is vereist, stopt de mediaspeler
met afspelen.
Instellingen
Open het instellingenmenu door op de
functiebalk op de knop “Instellingen” te
drukken.
Het instellingenvenster wordt
weergegeven. .
Wi-Fi
Druk op de knop “Wi-Fi” om het venster
met Wi-Fi-instellingen weer te geven..
Page 100

100
handleiding
•
PLATINUM PRO
Tik op de balk voor de netwerknaam
(SSID) om het schermtoetsenbord weer
te geven.
• Voer de netwerknaam in.
• Selecteer de beveiligingsmodus.
• Voer het wachtwoord in.
Druk vervolgens op de knop
“Connect” om een verbinding tot
stand te brengen.
Opmerking:
Voor het maken van een Wi-Fiverbinding moeten de datum en tijd
mogelijk juist worden ingesteld.
Indien u verbonden bent met een
netwerk, ziet u het verbindingspictogram.
Datum - tijd
Druk op de knop “Datum tijd” om het
venster met instellingen voor de datum
en tijd weer te geven.
Hier kunt u de juiste datum en tijd
instellen. U kunt indien gewenst ook de
tijdzone instellen.
Gebruik de knoppen voor omhoog en
omlaag om de waarde aan te passen.
Druk op de knop “OK” om te
bevestigen en terug te keren naar het
instellingenmenu.
Druk op de knop “Back” om terug te
keren naar het instellingenmenu zonder
de wijzigingen op te slaan.
Helderheid
Druk op de knop “Helderheid” om
het venster met instellingen voor de
helderheid weer te geven.
Hier kunt u de helderheid aanpassen
van 0 (donker) tot 100 (licht).
Gebruik de knoppen voor omhoog
en omlaag om de waarde aan te
passen. Druk op de knop “OK” om te
bevestigen en terug te keren naar het
instellingenmenu.
Druk op de knop “Back” om terug te
keren naar het instellingenmenu zonder
de wijzigingen op te slaan.
Volume
Druk op de knop “Volume” om het
venster met instellingen voor het
basisvolume weer te geven
 Loading...