

Trust 962Z POWERC@M OPTICAL ZOOM User Manual
962Z POWERC@M OPTICAL ZOOM
UK
User’s manual
L I F E I S M O R E ! T R U S T U S T R U S T . C O M

962Z POWERC@M OPTICAL ZOOM
Thank you for your purchase. Register your product via our Inter net site at
www.trust.com/register, so that you will be eligible for optimal guarantee and service support.
You will also be automatically informed of the development of your and other Trust products.
Version 1.0
UK
L I F E I S M O R E ! T R U S T U S T R U S T . C O M
962Z POWERC@M OPTICAL ZOOM
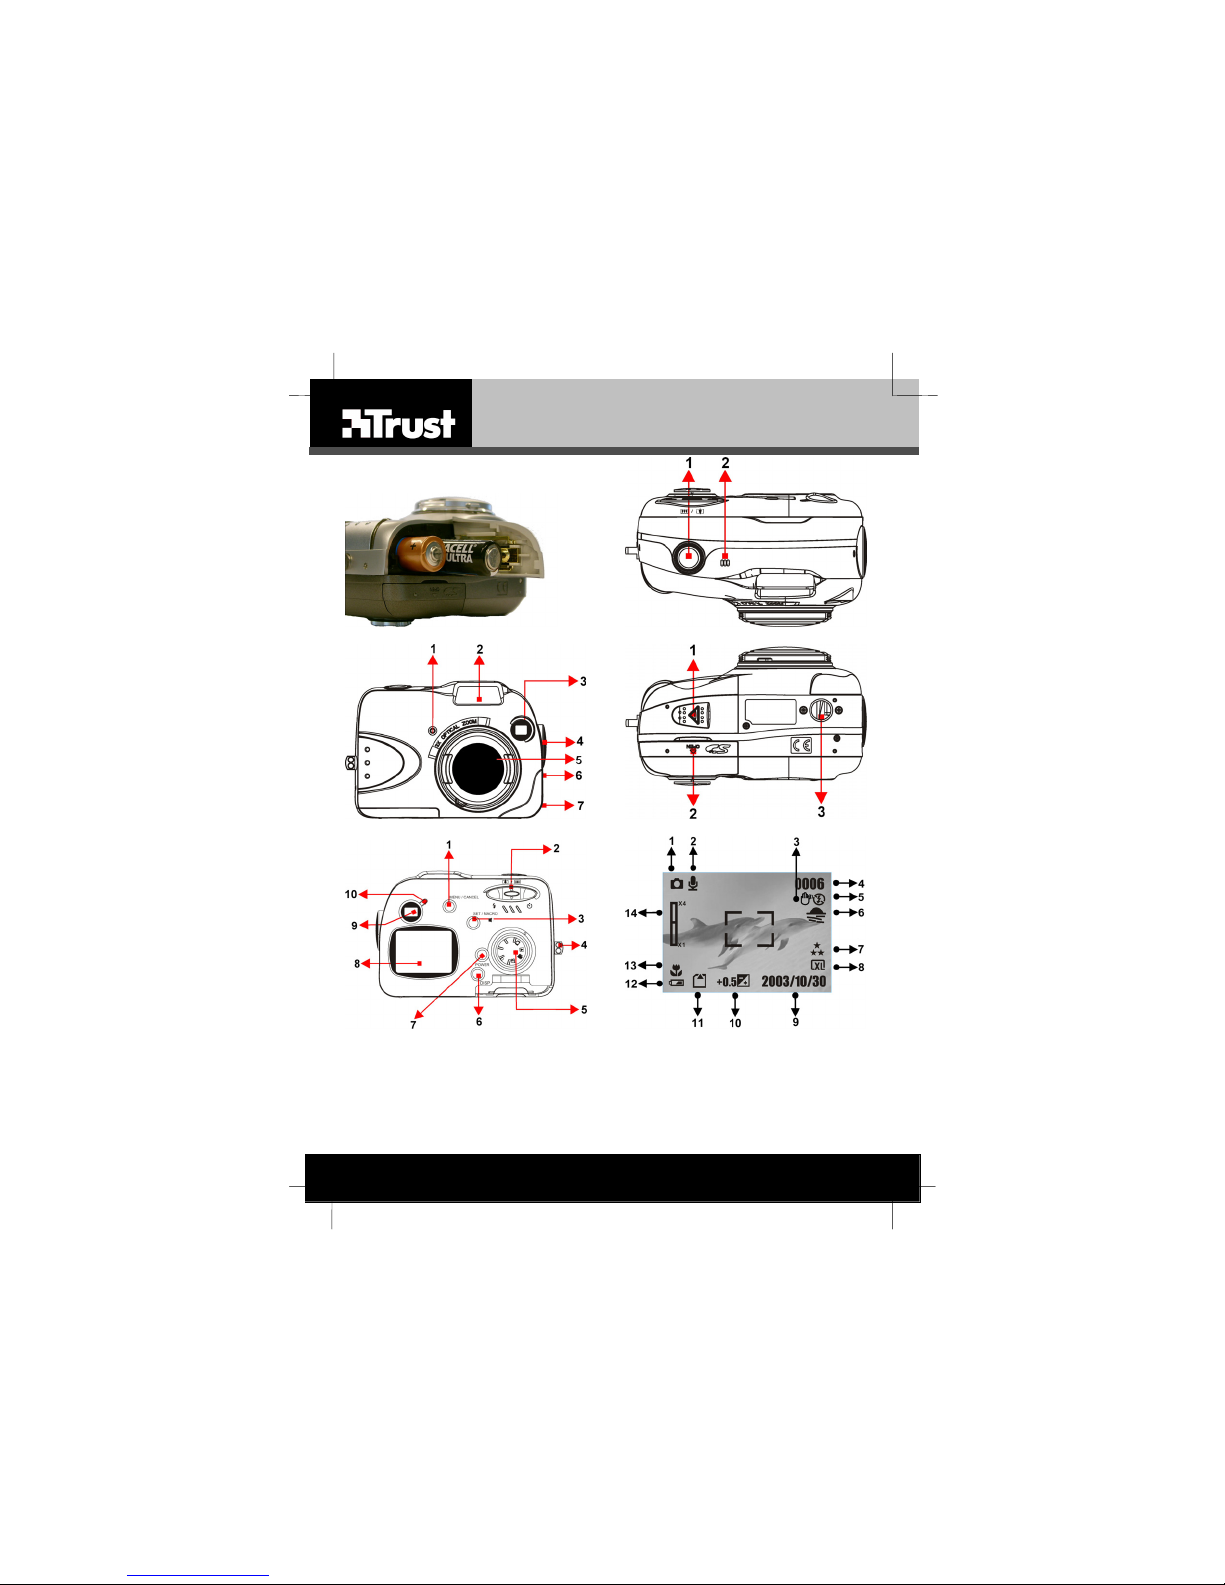
Fig. 1 Fig. 2
Fig. 3 Fig. 4
Fig. 5 Fig. 6
L I F E I S M O R E ! T R U S T U S T R U S T . C O M
962Z POWERC@M OPTICAL ZOOM
UK
DE
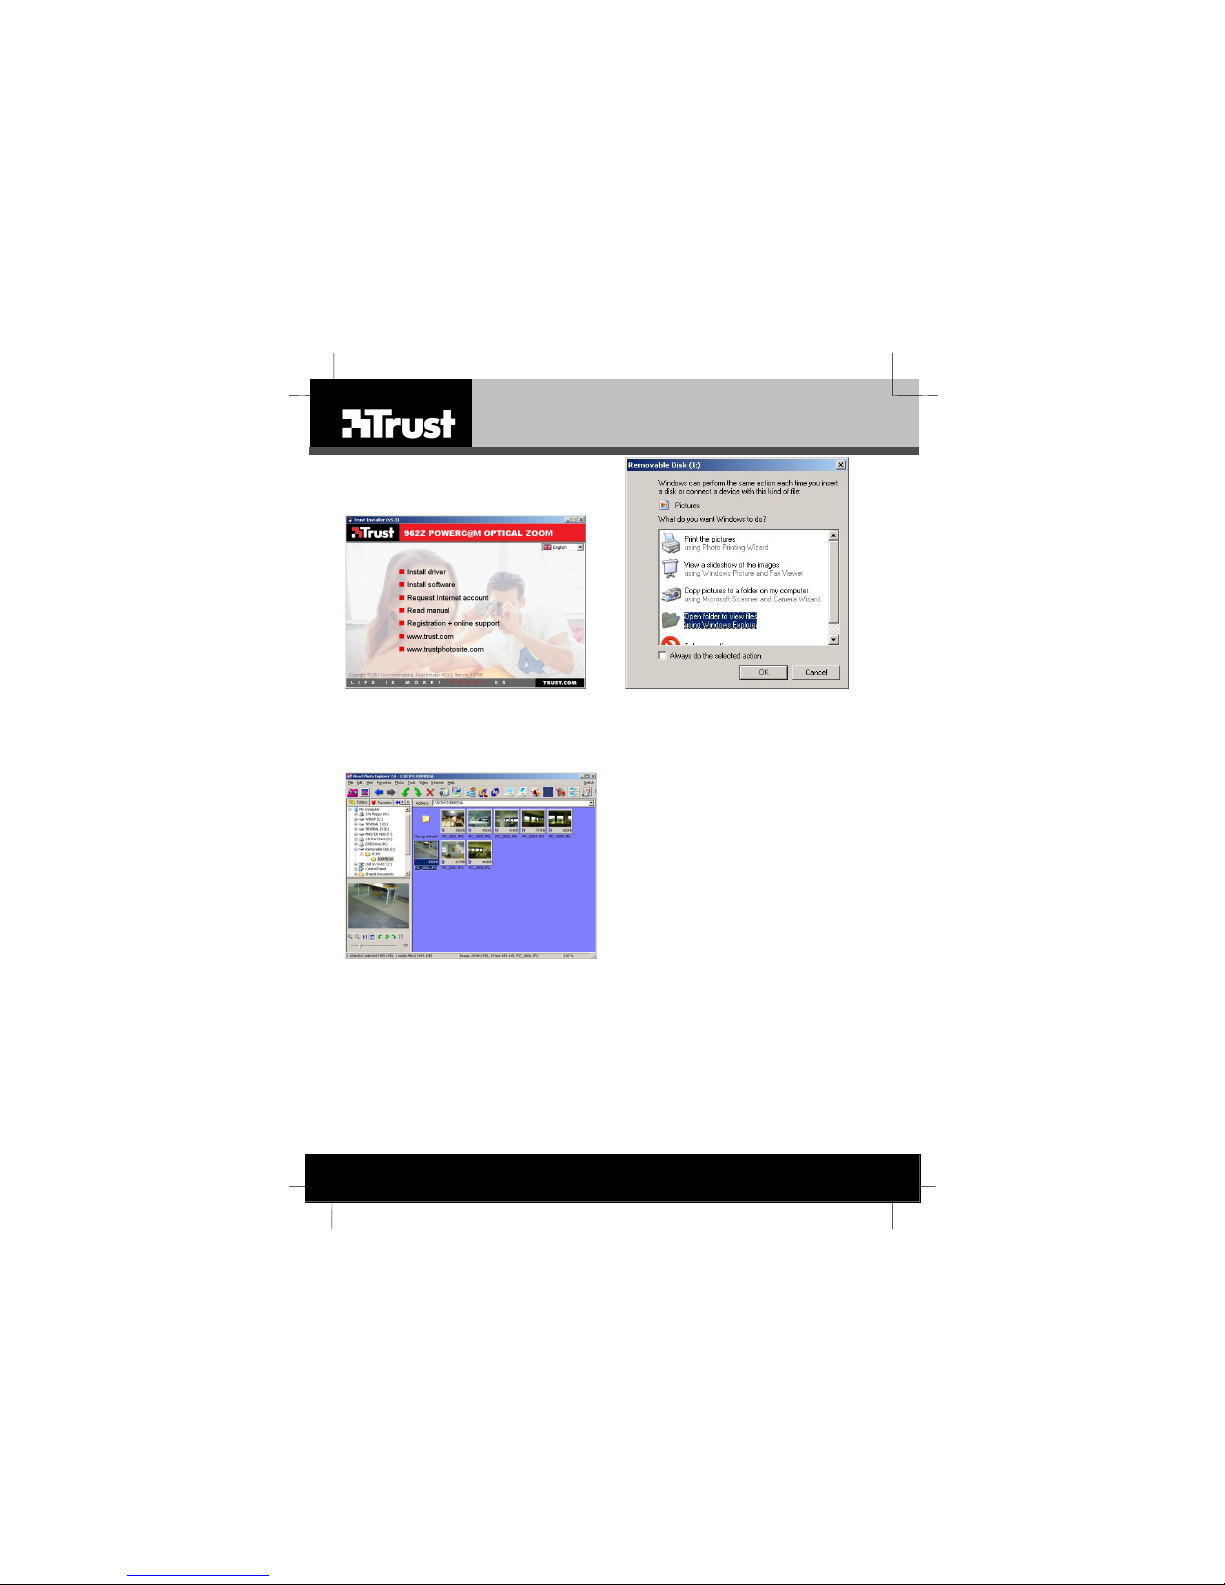
Fig. 7 Fig. 8
IT
ES
PL
NL
FR
Fig. 9
L I F E I S M O R E ! T R U S T U S T R U S T . C O M
PT

TRUST 962Z POWERC@M OPTICAL ZOOM
Use the Quick Installation Guide when using the camera for t he first time.
This guide contains the basic instructions you will need to know in order to
be able to use this camera.
Layout of the instruction manual Chapter
Inserting the batteries and function explanation (4 and 6)
Functions and operation (7 to 12)
Installation and using the software (13 to 15)
Use with a Macintosh (16)
Troubleshooting (17)
1 Introduction
This instruction manual is for users of the TRUST 962Z PowerC@m Optical Zoom.
This camera has a CCD lens to guarantee sharp images. The camera has a
maximum resolution of 4 Megapixles. The photographs are saved in the 16 MB
internal memory.
1.1 General comments regarding photography
Test photograph
Before you start photographing a unique event, it is a good idea t o first take a number
of test photographs. This will help to ensure that the camera works as required.
No compensation for unsuccessful photographs
No compensation may be claimed for unsuccessful photographs as a result of a
faulty camera, faulty software, etc.
Transferring photographs and video clips
No guarantees are given that photographs and video clips produced with this camera
can be displayed on other devices or that photographs and video clips produced with
other devices can be displayed using this camera.
Sunlight
Do not aim the camera directly at the sun for a long period of time. This may damage
the sensor.
Shaking/knocks
Do not shake the camera or knock it against anything, because this may cause a
fault, unsuccessful photographs, memory incompatibility or the loss of photographs
from the memory.
LCD screen
There may sometimes be small black or clear dots visible on the LCD screen. This is
normal and does not affect the photographs. There is no reason to exchange the
camera if there are 10 dots or less.
Exposing the LCD screen to direct sunlight for a long period of time may cause faults.
Lens
Keep the glass of the lens clean. Use a cotton bud to clean the lens. If necessary,
use special cleaning fluid for camera lenses. Do not use a dif ferent type of cleaning
product.
UK
1

TRUST 962Z POWERC@M OPTICAL ZOOM
2 Safety
Carefully read the following instructions before use.
- The Trust 962Z PowerC@m Optical Zoom does not require any special
maintenance. Use a slightly damp, soft cloth to clean t he camera.
- Do not use aggressive substances, such as white spirit, to clean the device.
These may harm the material.
- Do not submerge the device in liquid. This may be dangerous and will
damage the device. Do not use the device near water.
- Do not repair the device yourself.
2.1 Batteries
- The Duracell Ultra batteries supplied with the device are not rechargeable. Do
not try to recharge them, because this may cause them to explode.
- Never throw the batteries onto an open fire, because this may cause them to
explode.
- Never drill holes into the batteries.
- Keep the batteries out of the reach of small children.
- Use AA alkaline batteries with this camera.
You can also use rechargeable AA NiMH batteries (minimum 1800 mAh).
- When the alkaline batteries (including Duracell Ultra batteries) are empty, ask
your local authority where you can dispose of them.
Note: Standard AA NiCd batteries are unsuitable for use with this device.
Note: Do not use old and new batteries at the same time, because the old
Note: The batteries should be removed if the camera is not going to be used
batteries may deplete the new ones.
for some time. This will save the battery power.
3 Approval
This device meets the essential requirements and other relevant conditions of the
applicable European directives. The Declaration of Conformity (DoC) is available at
www.trust. com/13789/ce.
2
TRUST 962Z POWERC@M OPTICAL ZOOM
4 Inserting and removing the batteries
Follow the instructions given below to insert or remove the batteries
Note: Make sure the camera is turned off.
Open the battery cover and insert the batteries into the battery compartm ent as
indicated on the inside of the battery cover (see figure 1). Close the battery cover.
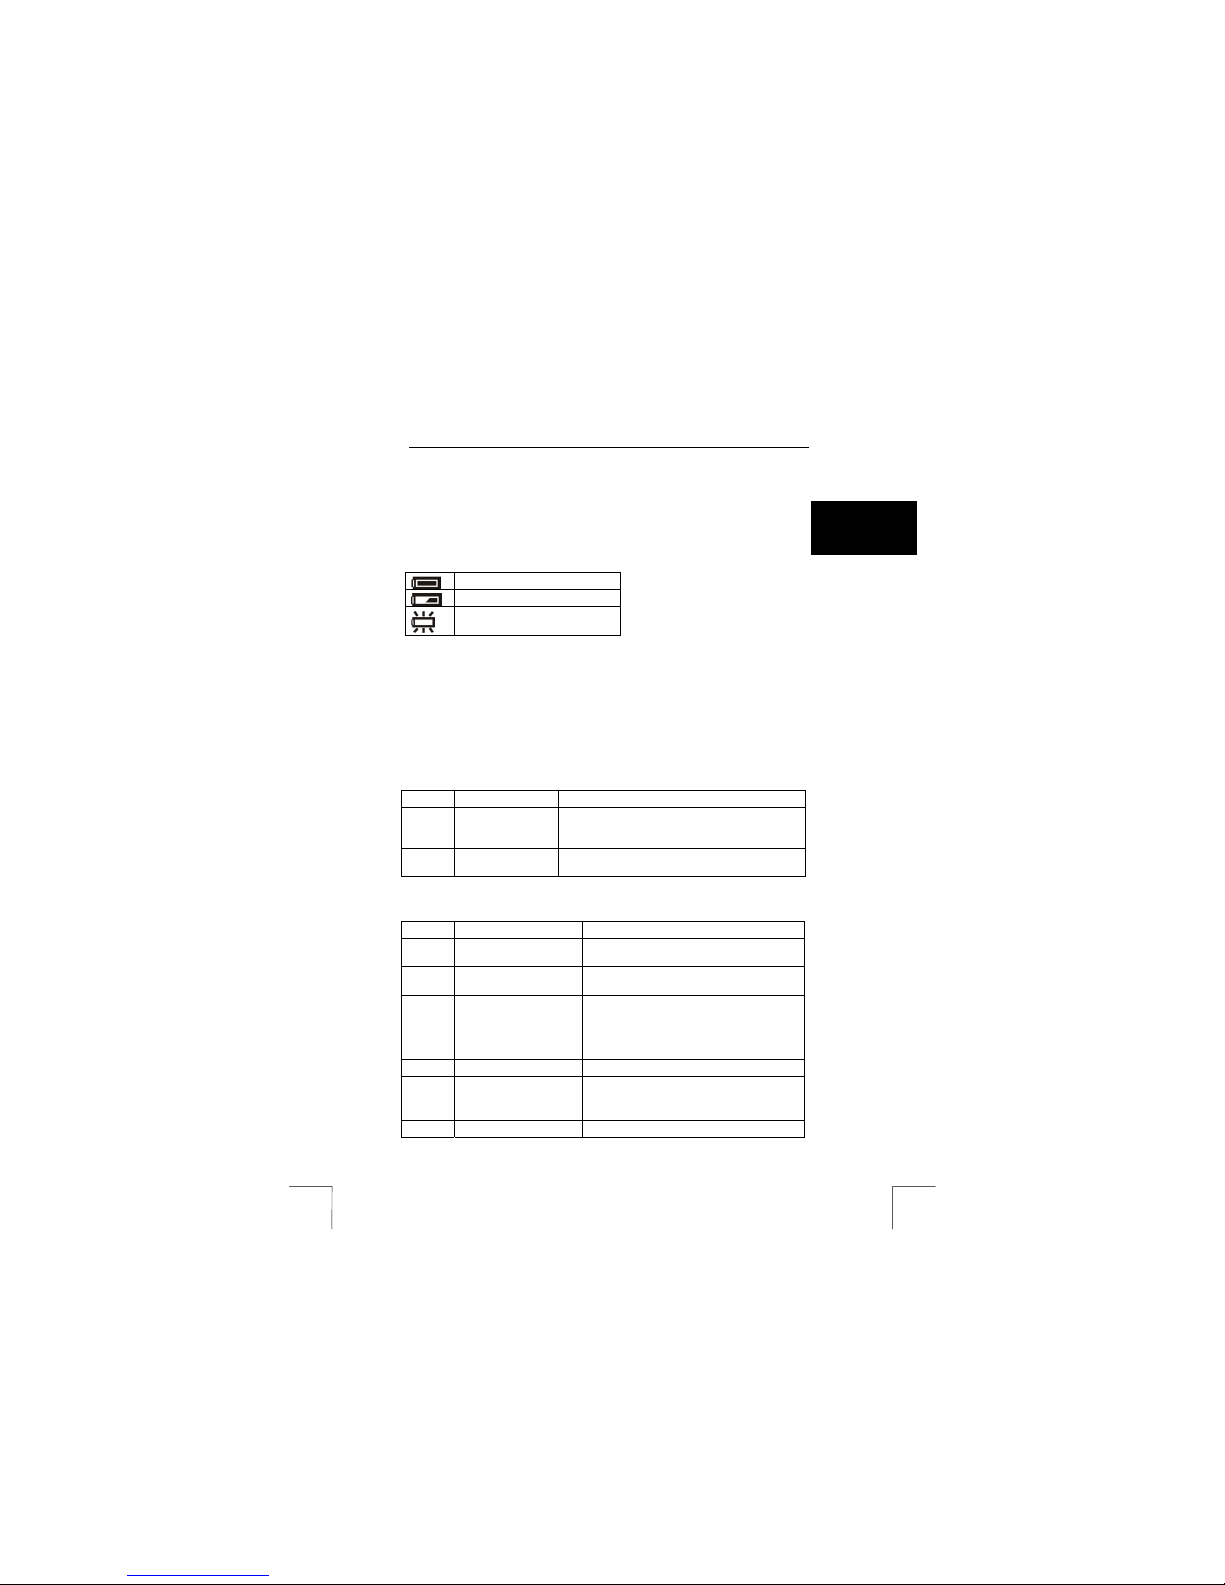
The status indicator will appear on the LCD screen (12, figure 6).
Batteries full.
Batteries half full.
Batteries empty. Replace the
batteries.
Table 1: Battery status on the LCD screen
Note: It is normal for the camera casing to become warm when using the
Note: After inserting or replacing the batteries, you will have to reset the date
Note: Turn off the LCD screen to increase the life span of the batteries.
camera.
and the time (see chapter 12).
5 Explanation of the camera functions
Functions on the top of the camera (see figur e 2).
Point Description Function
1 Exposure button Press this button to take a photograph. This
2 Microphone Records sound whilst recording video clips or
Table 2: Functions on the top of the camera
Functions on the front of the camera (see figure 3).
Point Description Function
1 Automatic exposure
indicator
2 Flash The built-in flash provides more light for the
3 Viewfinder The viewfinder is used to determine the
4 Loud speaker Emits sound.
5 Lens protector and
lens
6 TV-Out connection Connection for connecting the camera to a
button is also used to start and stop recording a
video clip.
sound after taking a photograph.
Flashes when the automatic exposure
function is used.
subject to be photographed.
size and the position of the photograph.
The actual photograph is recorded by the
lens and not the viewfinder. The image may
differ when the digital zoom is used.
Protects the lens when the camera is not in
use.
The lens records the image.
UK
3

TRUST 962Z POWERC@M OPTICAL ZOOM
Point Description Function
7 USB connection Connection for connecting the camera to
Table 3: Functions on the front of the camera
Functions on the bottom of the camera (see figure 4).
Point Description Function
1 Battery cover Cover for the batteries.
2 Memory card cover Cover for the memory card.
3 Screw point for the stand The stand supplied or a different
Table 4: The bottom of the camera
Functions at the rear of the camera (see figur e 5).
Point Description Function
1 Menu button
(Menu/Cancel)
2 Control button Button for scrolling through the menu.
3 Set/Macro/Audio button Button for confirming a selection in the
4 Wrist strap fixing point Eye for fixing the wrist strap and the
5 Rotary button Wheel for selecting the desired
6 LCD button (Disp) Button for turning the LCD screen on
7 On/Off button (Power) Button for turning the camera on and
8 LCD screen Screen for recording and displaying.
9 Viewfinder The viewfinder is used to determine
10 Indicator Indicator for a certain camera mode.
Table 5: Functions at the rear of the camera
television or video recorder.
the USB port of a computer.
stand can be screwed in here.
Opens the menu.
Left: Selects the flash.
Up/down: Zooms in or out.
Right: Selects the automatic exposure
function.
menu.
Selects the macro mode.
lens cover to the camera.
settings (see chapter 9).
and off.
off.
the size and the position of the
photograph. The actual photograph is
recorded by the lens and not the
viewfinder. The image may differ when
the digital zoom is used.
4

TRUST 962Z POWERC@M OPTICAL ZOOM
Symbols on the LCD screen (see figure 6).
Point Description
1 Mode indicator Indicator when taking photographs or
2 Sound recording
3 Insufficient light indicator This is lit when there is insufficient light to
4 Counter Indicates:
5 Flash Indicates the condition of the flash (see
6 White balance indicator Displays the selected white balance
7 Compression Displays the selected compression (see
8 Resolution Displays the selected resolution (see
9 Date Displays the date (see chapter 12).
10 Exposure Displays the altered exposure setting. It is
11 Memory Indicates whether a memory card has
12 Battery Indicates the remaining battery power
13 Macro Indicates when the macro setting has
14 Optical and digital zoom Indicates the optical and digital zoom
Table 6: LCD screen
indicator
Function
recording video clips.
The video indicator is also displayed in
the display mode.
Indicator for recording sound.
Flashes red when a sound recording is
made.
take a photograph. In that case, use the
flash.
Recording mode
photographs which can still be taken.
Playback mode
Video mode
video clip.
table 9).
setting. Not displayed if the white balance
has been set to Auto (see table 10 and
chapter 7.5.4).
table 10).
table 10).
not displayed if EV=0 (see chapter 7.5.3).
been inserted (see chapter 13.1).
(see table 1).
been selected (see chapter 7.2).
factor (see chapter 7.1).
: the number of
: the recording number.
: the maximum duration of a
UK
5
 Loading...