

Trust 913 POWERC@M ZOOM User Manual
913 POWERC@M ZOOM
User’s manual
Version 1.0
UK
L I F E I S M O R E ! T R U S T U S T R U S T . C O M

913 POWERC@M ZOOM
Thank you for your purchase. Register your product via our Inter net site at
www.trust.com/register, so that you will be eligible for optimal guarantee and service support.
You will also be automatically informed of the development of your and other Trust products.
UK
L I F E I S M O R E ! T R U S T U S T R U S T . C O M
913 POWERC@M ZOOM
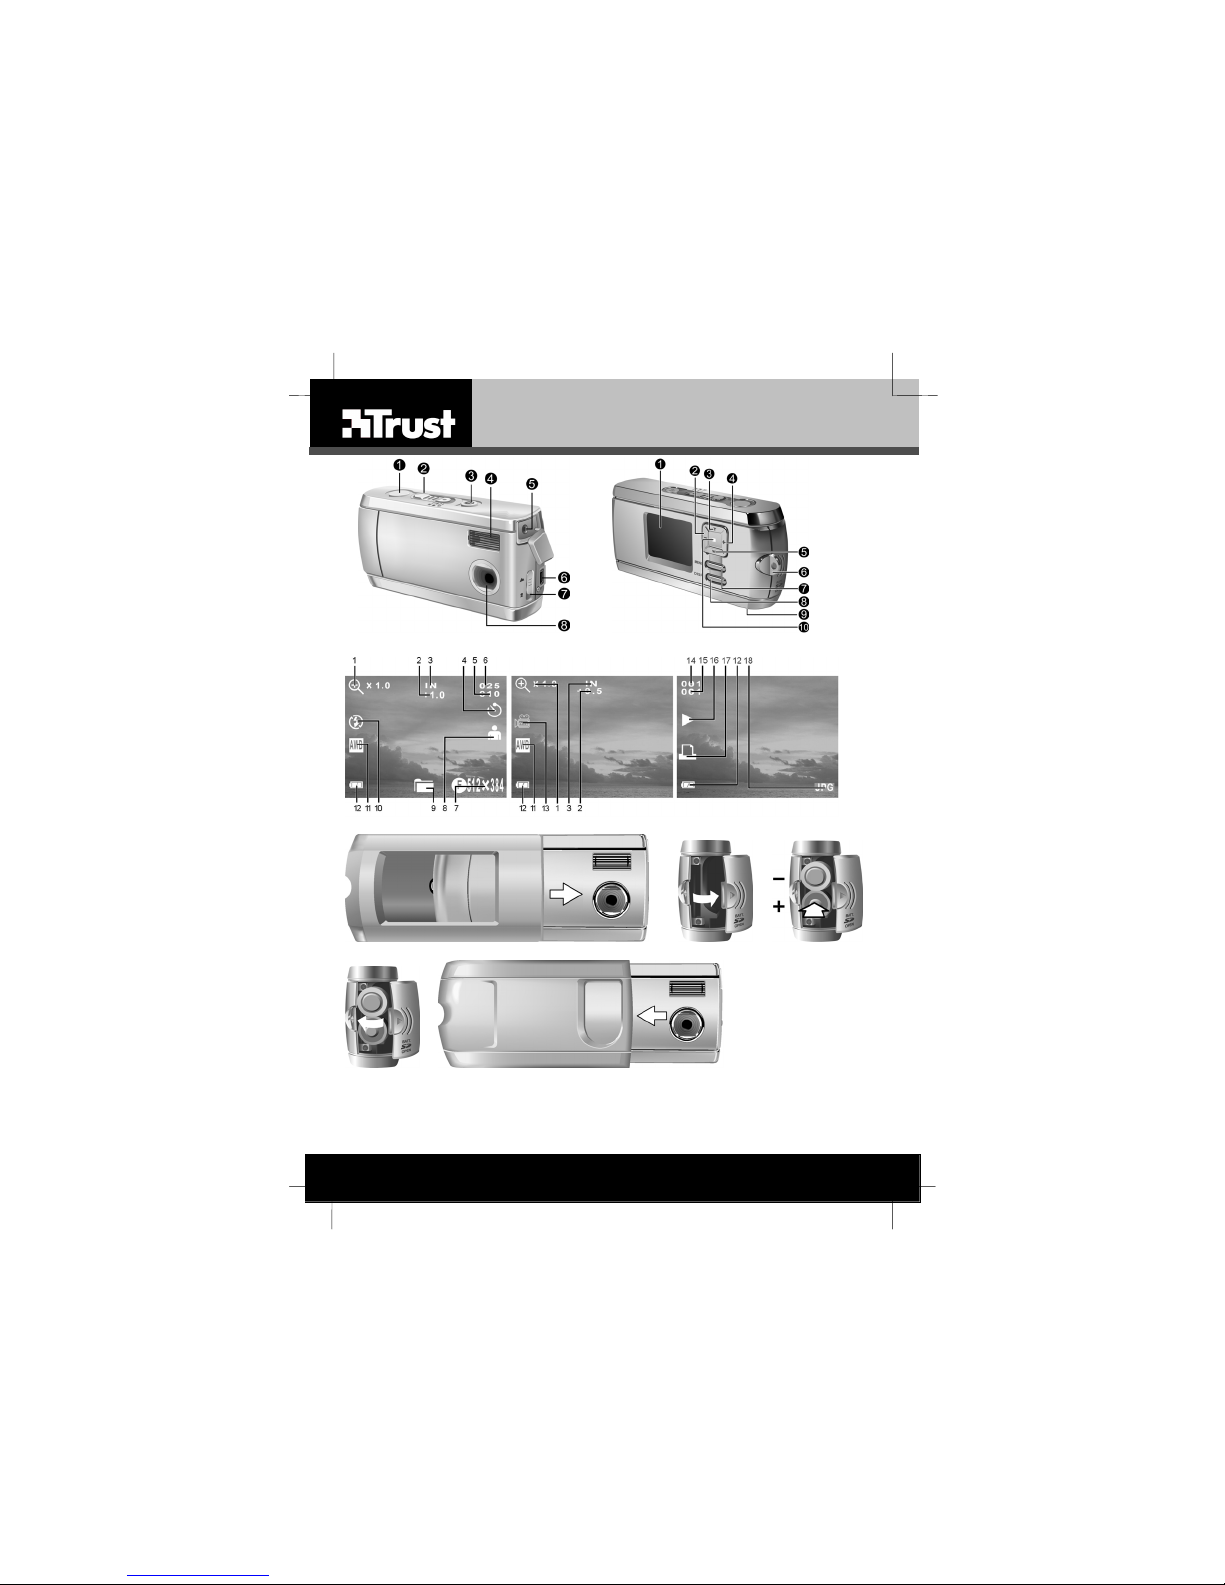
Fig. 1 Fig. 2
Fig. 3
Fig. 4a Fig.4b Fig.4c
Fig. 4d Fig. 4e
L I F E I S M O R E ! T R U S T U S T R U S T . C O M
913 POWERC@M ZOOM
UK
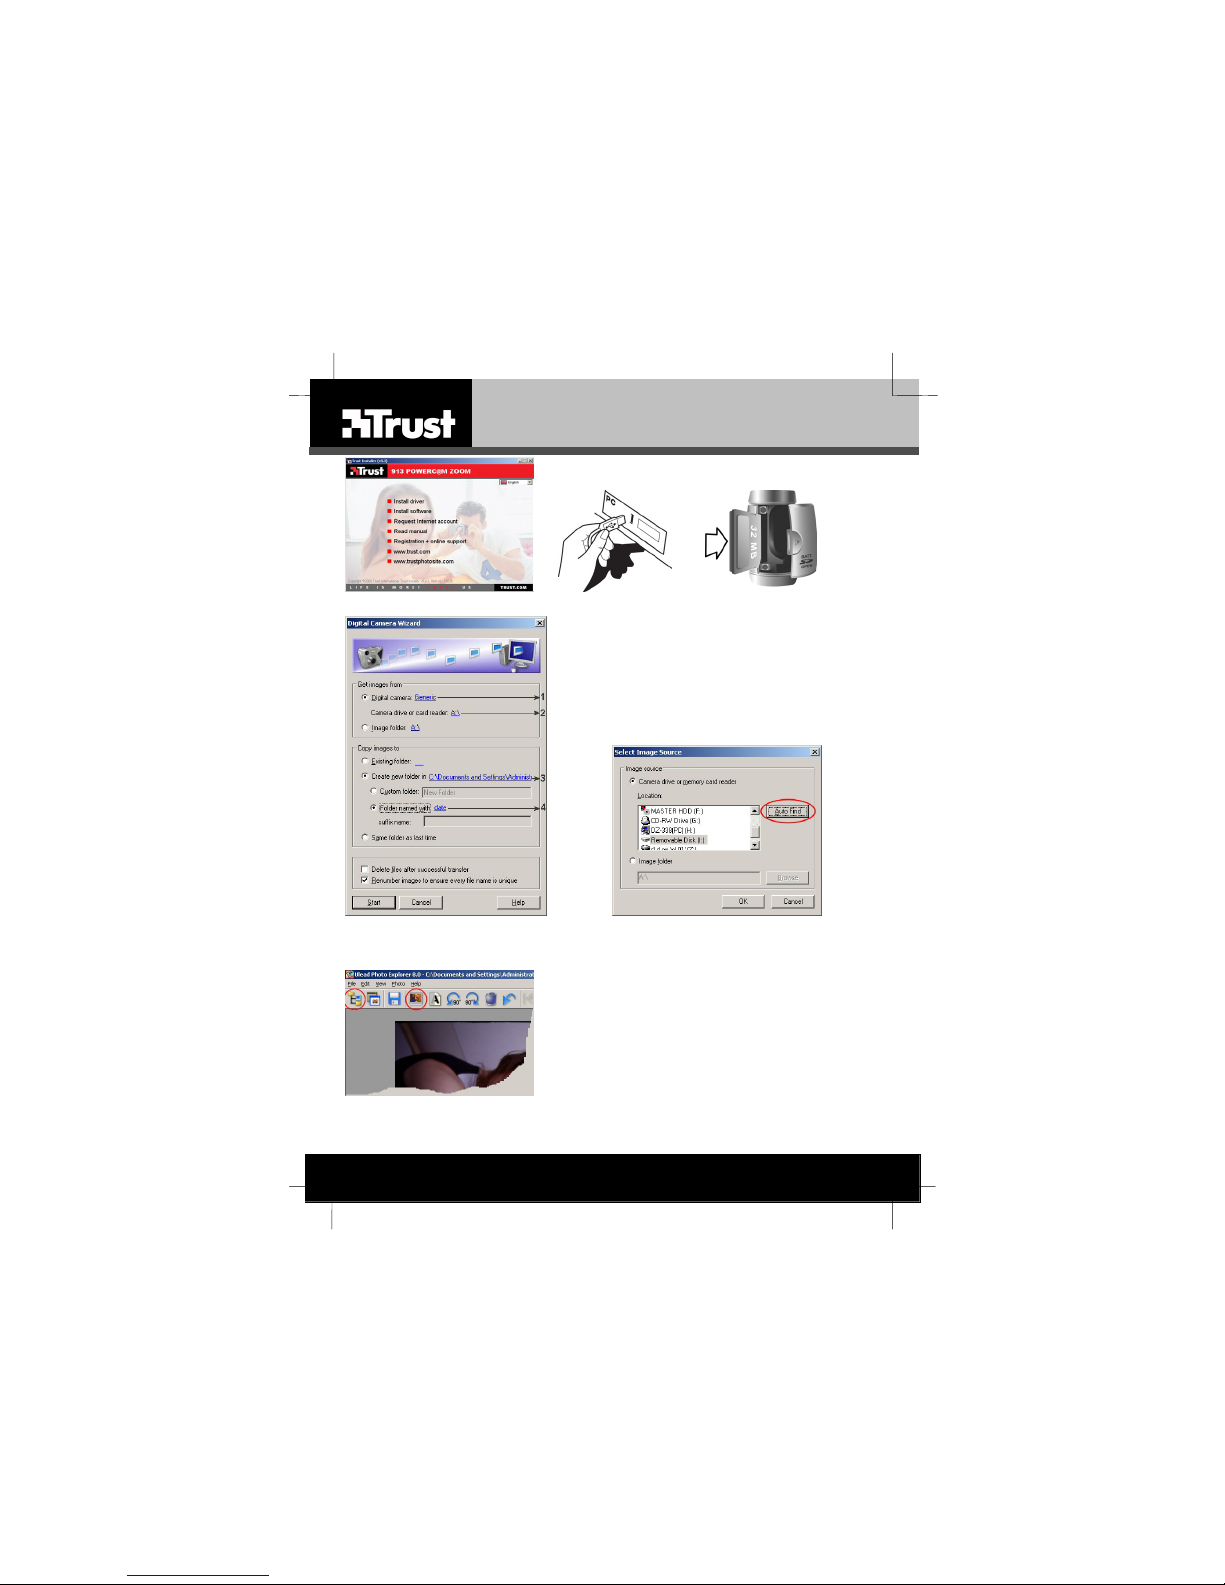
Fig. 5 Fig. 6 Fig. 7
DE
FR
IT
ES
PL
Fig. 8 Fig. 9
NL
PT
Fig. 10
L I F E I S M O R E ! T R U S T U S T R U S T . C O M

TRUST 913 POWERC@M ZOOM
Use the Quick Installation Guide when using the camera f or the first time. This
guide contains the basic instructions you will need to know in order to be able
!
to use this camera.
Consult the “Quick Reference Guide” for how to use the menu and its
functions.
1 Introduction
This manual is for users of the ‘Trust 913 PowerC@m Zoom‘. The camera has a 3.1
Megapixel CMOS sensor and maximum resolution of 6.6 Megapixels. A maximum of
60 images can be saved in the 8MB internal memory of 8MB.
1.1 General comments regarding photography
Test photograph
Before you start photographing a unique event, it is a good idea t o first take a
number of test photographs. This will help to ensure that the camera works as
required.
No compensation for unsuccessful photographs
No compensation may be claimed for unsuccessful photographs as a result of a
faulty camera, faulty software, etc.
Transferring photographs and video clips
No guarantees are given that photographs and video clips produced with this camera
can be displayed on other devices or that photographs and video clips produced with
other devices can be displayed using this camera.
Sunlight
Do not aim the camera directly at the sun for a long period of time.
Flash
Observe caution when operating the flash. Never use the flash close to the eyes of
people or animals. This can cause temporary damage to the eyes. Keep the flash at
least 2 metres away from any eyes.
Shaking/knocks
Do not shake the camera or knock it against anything. This may cause a fault,
unsuccessful photographs, memory incompatibility or the loss of photographs from
the memory.
LCD display
There may sometimes be small black or clear dots visible on the LCD screen. This is
normal and does not affect the photographs. There is no reason to exchange the
camera if there are 10 dots or less.
Exposing the LCD screen to direct sunlight for a long period of time may cause faults.
Lens
Keep the glass of the lens clean. Use a cotton bud to clean the lens. If necessary,
use special cleaning fluid for camera lenses. Do not use a dif ferent type of cleaning
product.
UK
1

TRUST 913 POWERC@M ZOOM
2 Safety
Carefully read the following instructions before use.
- The TRUST 9130 POWERC@M ZOOM does not require any special
maintenance. Use a moist soft cloth to clean the outside of the camera.
- Do not use aggressive substances, such as petrol or white spirit, to clean the
camera. These may harm the material it is made from.
- Never immerse the camera in a fluid. This may be dangerous and will damage
the product. Do not use the camera in thedirect vicinity of water.
- Do not repair this camera yourself.
2.1 Batteries
- The Duracell Ultra batteries supplied with the device are not rechargeable. Do
not try to recharge them. This can give rise to danger of an explosion.
- Never throw the batteries onto an open fire. The batteries may explode.
- Never drill holes in the batteries.
- Keep the batteries out of reach of small children.
-
Use only AA alkaline batteries with this camera.
You can also use rechargeable AA NiMH batteries (minimum 1800 mAh).
- When the alkaline batteries (including Duracell Ultra batteries) are flat, ask your
local authority where you can dispose of them.
Standard AAA NiCd batteries are not suitable.
N.B.:
N.B.: Do not use old and new batteries at the same time, because t he old
batteries may deplete the new ones.
if the camera is not to be used for a long time remove the batteries. This
N.B.:
will help to increase the lifetime of the batteries.
3 Approval
This device conforms with the essential requirements and other relevant provisions
of the applicable European directives. The Declaration of Conformity (DoC) is
available a t www.trus t.com/ 13835/CE.
4 Explanation of camera functions
4.1 Functions on the top, front and side
Functions on the top, front and side of the camera (figure 1)
Point Description
1 Shutter Press this button to take a photograph. See the
2 Mode Switch Slide to select the camera mode: Capture, Film,
3 On/off Button Press this button to turn on the camera.
4 Built-in Flash You can use the flash to take photos in places
2
Symbol
Quick Reference Guide.
or Playback. See the Quick Reference Guide.
Press it again to turn the camera off.

TRUST 913 POWERC@M ZOOM
Point Description Symbol
5 Video Out Port Connect your video out cable here and the
6 USB connection The USB (Universal Serial Bus) port is used to
7 Lens Focus
Switch
8 Lens The lens focuses the light onto the digital
Table 1: Functions on the top, front and side of the camera
where there is very little light. You can also use
the flash in well lit surroundings to avoid
undesirable shadows.
other end to your television set in order to use
the television to preview your pictures.
connect the camera to a PC as well as for
transferring photos. The USB port also enables
you to use the camera as a PC camera.
Optimize the focus for portrait or landscape
style photos.See section 6.2.
image capturing circuitry. For the best picture
quality, care should be taken to ensure it
remains free of dust, fingerprints, and
scratches.
4.2 Functions on the back
Functions on the back of the camera (figure 2)
Point Description Symbol
1 LCD display Use the LCD Screen to preview photos.
2 Left Button
(Å)
3 Buttom “T”
(zoom
in/browse
up) (Ç)
4 Right Button
(Æ)
5 Button “W”
(zoom
ou/browse
down) (È)
The LCD Screen can be used to check the
configuration details while in the Setup menu.
Use the Left Button to broswse to the left during
picture playback.
The Left Button can be used to reduce the lighting
level while in Capture mode and Film mode.
Use the Zoom-in Button to zoom-in on your subject
while in Capture mode.
Use this button to zoom-in on a photo while in
Playback mode.
The Zoom-in button is also used to move up through
menus.
Use the right button to browse to the right while in
Playback mode.
You can use the right button to raise the lighting level
while in Capture or Film mode.
Use the Zoom-out Button to zoom-out on your
subject while in Capture mode.
In Playback mode, use this button to Zoom-out and
switch between Thumbnail Review and Full-Screen
modes.
The Zoom-out button is also used to move down
through menus.
UK
3

TRUST 913 POWERC@M ZOOM
Point Description Symbol
6 Neck Strap
Loop
7 “MENU”
Button
8 “DISP”
Button
9 Tripod
connector
10 Status light Indicates the power status.
Table 2: Functions at the rear of the camera
Use the Neck Strap Loop to fix the neck strap t o the
camera for easy carrying.
Press the “MENU” button to enter the menu system.
Displayed on the LCD screen. See the Quick
Reference Guide.
Use the Tripod Connector to fix the camera to a
tripod.
This optional accessory is used to hold the camera
still. It is especially useful for taking low light night
pictures.
The light is always on when in Playback and Film
mode.
When using the Capture mode with flash the light
flashes once every second until the flash is fully
charged.
4.3 LCD display
See Figure 3.
Point Symbol
1 Zoom Indicates the level of digital zoom currently applied.
2 Lighting value See section 9.1.
3 Type of
4 Self-timer Indicates that the camera is using the Self-Timer
5 Number of
6 Pictures
7 Image quality Set values of resolution/quality. See section 9.4.
8 Portrait This preset is optimized for taking portrait photos
9 Continuous Use the continuous setting to take consecutive
10 Flash Flash indication, see section 9.2
11 White
12 Battery status See Table 4:
13 Film mode Film mode selected. See chapter 8.
4
memory
photos taken.
Remaining
balance
Description
See section 6.1.
See section 10.3.
setting. See section 9.5.
Number of photos stored in the memory.
Number of photos that can still be stored in the
memory (indication).
focusing more on the centre of the f rame than on the
peripheral areas. See section 6.2.
images. See section 9.6.
White balance indication See section 9.3.
 Loading...