


740C POWERC@M ZOOM
UK
DE
FR
IT
IT
User’s manual
ES
PL
Version 1.0
NL
PT
L I F E I S M O R E ! T R U S T U S T R U S T . C O M

740C POWERC@M ZOOM
Thank you for your purchase. Register your product via our Inter net site at
www.trust.com/register, so that you will be eligible for optimal guarantee and service support.
You will also be automatically informed of the development of your and other Trust products.
UK
DE
FR
IT
ES
PL
NL
PT
L I F E I S M O R E ! T R U S T U S T R U S T . C O M
740C POWERC@M ZOOM
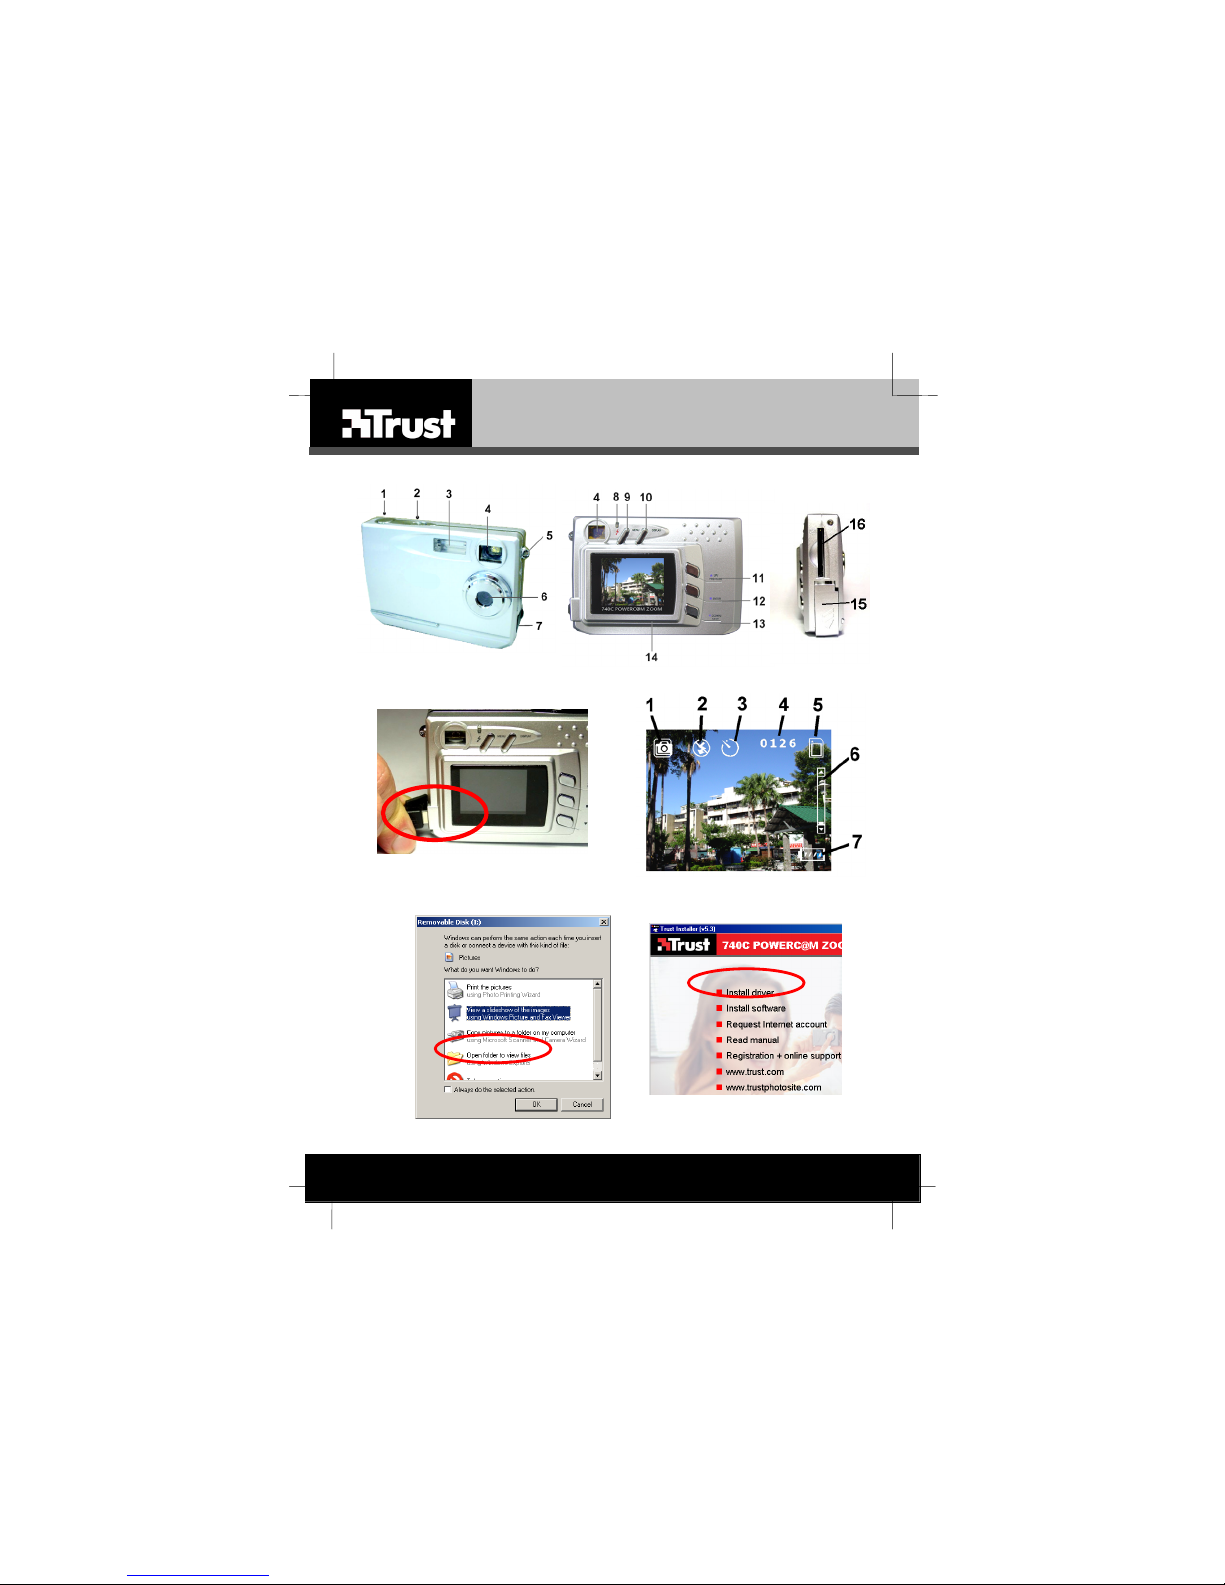
Fig. 1 Fig. 2
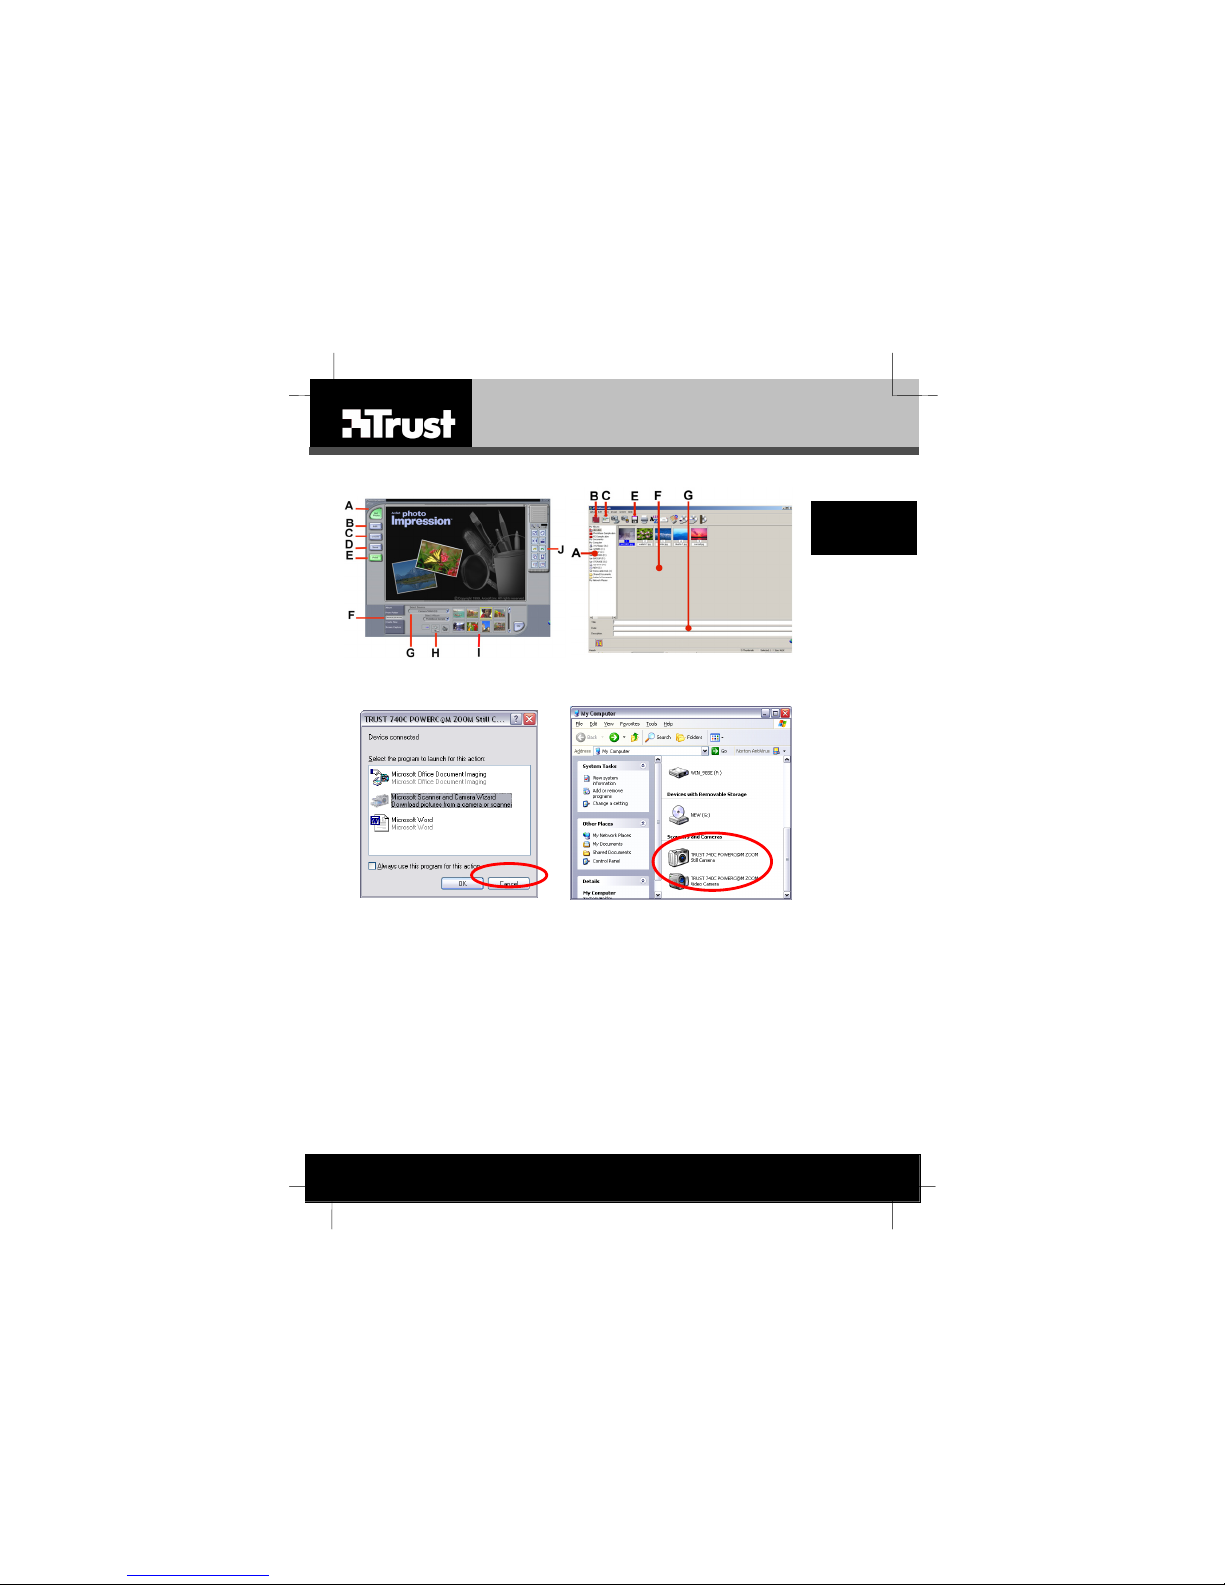
Fig. 4 Fig. 5
Fig. 3
L I F E I S M O R E ! T R U S T U S T R U S T . C O M
Fig. 6 Fig. 7
740C POWERC@M ZOOM
Fig. 8 Fig. 9
Fig. 10 Fig. 11
UK
DE
FR
IT
ES
PL
NL
PT
L I F E I S M O R E ! T R U S T U S T R U S T . C O M

TRUST 740C POWERC@M ZOOM
Use the Quick Installation Guide when using the camera f or the first time. This guide
contains the basic instructions you will need to know in order to be able to use this
camera.
1 Introduction
This manual is intended for the users of t he ‘TRUST 740C POWERC@M ZOOM ‘
The TRUST 740C POWERC@M ZOOM can be used for t aking photographs, making
a video and as a web camera for video conferences on the internet
The camera can also operate on Mac OS.9.x and 10.1 or higher as a mass storage
device.
2 General comments regarding photography
Test photograph
Before you start photographing a particular event it is a good idea to take a number
of test photographs first so that you are sure the camera is working properly.
No compensation for unsuccessful photographs
No compensation may be claimed for unsuccessful photographs as a result of a
faulty camera, faulty software, etc.
Exchanging photographs and video clips
No guarantees are given that photographs and video clips produced with this camera
can be displayed on other devices or that photographs and video clips produced with
other devices can be displayed using this camera.
Sunlight
Do not aim the camera directly at the sun for a long period of time.
Shaking/knocks
Do not shake the camera or knock it against anything. This can cause problems,
failed pictures, incompatibility of the memory or loss of picture data and memory.
LCD display
There may sometimes be small black or clear dots visible on the LCD screen. This is
normal and does not affect the photographs. There is no reason to exchange the
camera if there are 10 dots or less.
Exposing the LCD screen to direct sunlight for a long period of time may cause faults.
Lens
Keep the glass of the lens clean. Use a cotton bud to clean the lens. If necessary,
use special cleaning fluid for camera lenses. Camera cleaning fluid can be purchased
from photography shops. Do not use a different type of cleaning product.
UK
1

TRUST 740C POWERC@M ZOOM
3 Safety
3.1 General
Carefully read the following instructions before use.
The Trust 740C PowerC@m Zoom does not require any special maintenance.
•
Use a moist soft cloth to clean the outside of the camera.
Do not use aggressive substances, such as petrol or white spirit, to clean the
•
camera. These may harm the material it is made from.
Never immerse the camera in a fluid. This may be dangerous and will damage
•
the product. Do not use the camera in the direct vicinity of water.
Do not repair this camera yourself.
•
3.2 Batteries
The alkaline batteries supplied are not rechargeable. Do not try to recharge
•
them. This can give rise to danger of an explosion.
Never throw the batteries onto an open fire. The batteries may explode.
•
Never drill holes in the batteries.
•
Keep the batteries out of reach of small children.
•
Only use AAA alkaline batteries with this camera. Rechargeable AAA batteries
•
type NiMH (minimum 700 mAh) can also be used,
When the alkaline batteries are flat, ask your local authority where you can
•
dispose of them.
N.B.: Do not use old and new batteries at the same time, because the old
batteries may deplete the new ones.
N.B.: if the camera is not to be used for a long time rem ove the batteries. This
will help to increase the lifetime of the batteries.
4 Approval
This device conforms with the essential requirements and other relevant provisions of
the applicable European directives. The Declaration of Conformity (DoC) can be
consulted on www.trust.com/13902/ce.
2

TRUST 740C POWERC@M ZOOM
USING FOR THE FIRST TIME
This section is intended as an introduction to the camera and describes how
photographs are taken, how these can be viewed on the camera and how they can
be saved on the computer.
Also consult the Quick Installation Guide supplied!
5 Getting ready for use
5.1 Attaching the wrist strap
You can attach the wrist strap to the camera for optimal ease of use and safety.
1. Insert the thin end of the wrist strap through the eye (5, Fig ure 1).
2. Make a loop from the part of the wrist strap that has been inserted through the
eye.
3. Thread the other end of the wrist strap through the loop.
5.2 Inserting the batteries
Follow the steps given in the Quick Installation Guide
Note You can also use rechargeable AAA type NiMH batteries (minimum
700 mAh) in the Trust 740C PowerC@m Zoom. Do not use NiCd
batteries.
5.3 Tripod
The stand supplied with the camera can be used to keep the camera stable. It is
recommended that the tripod is used when using the self t imer, if there is not much
light or if it is being used as a webcam.
1. Screw the stand into place on the bottom of the camera.
2. Unfold the feet, unlock the stand using the handle and place the camera in
the desired position.
3. Lock the stand by placing the handle back in the original position.
6 Taking a photograph.
1. To switch the camera on hold the on/off button (2, Figure 1) pressed in until
you hear a signal. If the camera does not react check that the batteries are
positioned correctly and are not flat.
2. Look at the picture on the LCD screen and focus on it as required.
3. Press the shutter button (1, Figure 1). You will hear a sound and the photo is
taken. The LCD screen will be turned off.
4. Keep the camera pointed at the subject and wait for the second sound.
The photo has now been taken. This will be saved. This takes a maximum of
another 5 seconds. When the LCD screen lights up again the camera is ready
to take the next picture.
UK
3

TRUST 740C POWERC@M ZOOM
N.B.: The camera will turn off automatically if it has not been used for 1 minute.
This is to save the batteries. It is not possible to alter this time.
Tip: It is possible to take photos with this camera when there is less light than
is possible with other cameras. However, when there is very little light
more graining will be seen in the photos than normal. Use the flash or
move to a position where there is more light.
7 Viewing pictures taken
1. Switch on your camera.
2. Press the ENTER button (12, Figure 2) briefly. The screen will display the last
picture taken. If no pictures have been taken this will be displayed.
3. Use the keys up/down (11/13 Figure 2) to view the previous/next picture.
4. Press the ENTER button again to return to picture taking mode.
8 Installing the camera
Windows 98, ME, 2000, XP: First install the driver program. -> Section 8.1
Mac OS 9.2 or a later release: see section 19
8.1 Installing the driver (Windows 98, Windows ME,
Windows 2000 or Windows XP)
Follow the steps given in the Quick Installation Guide
N.B.: Make sure all other programs are closed during the installation.
N.B.: In the example, ‘D:/’ is used to indicate the CD-ROM drive. This may be
different for your computer.
Tip: The latest drivers can be downloaded from www.trust.com/13902. Check
whether a new driver is available and use this for the installation.
Tip: You do not have to install the driver programmes if you are using
Windows ME, 2000 or XP and you do not wish to use the PC camera
mode.
8.2 Connecting the camera to the USB computer port.
Make sure the driver has been installed in Windows before connecting the
N.B.:
camera.
N.B.: The camera must be switched on before connecting the cable.
The installation will not be carried out properly if the camera is
connected before it is switched on.
1. Switch on your camera.
2. Connect one end of the USB cable to the camera (7, Figure 1 and Figure 4).
3. Connect the other end of the USB cable to the computer.
Windows: new hardware will be found and installed automatically.
4. See the Quick Installation Guide for instructions on how to view your photos.
4

TRUST 740C POWERC@M ZOOM
Operation of the camera for advanced users
9 Description
This section gives a description of the functions of the various buttons and the
information displayed on the LCD screen.
See Figure 1 and Table 1 for a description of the various functions on the front of
the camera.
Subject Name
1
2 On/Off
3 Flash Use the built-in flash to give the subject extra
4 Optical
5 Wrist strap
6 Lens Records the image to be taken.
7 Digital
Table 1: Functions on the front of the camera
Shutter
Button
Viewfinder
fixing point
connections
Description
Press this button to take photographs or to start
and stop recording a short video clip.
Press this button to turn the camera on.
Pressing once more switches it off again.
Note: The camera turns of f automatically if it
has not been used for approximately 1
minute.
lighting if it is in dark surroundings.
To focus on the subject. This can also be done
via the LCD screen.
Eye for fixing the wrist strap to the camera.
Note: Keep the lens clean. Dirt and fingerprints
affect the result.
There are 2 connections on the left-hand side
of the camera, namely a video-out connection
and a USB port.
Video-out
: connection for connecting the
camera to a TV or video recorder in order to
view the photographs and video clips on a TV.
USB
: connection for connecting the camera to
the USB port of a computer. This connection,
allows you to save photographs and video clips
on a computer or use the camera as a webcam
to chat on the Internet.
UK
5

TRUST 740C POWERC@M ZOOM
See figure 2 and Table 2 below for a description of the various functions at the back
of the camera.
Subject Name Description
8 Status
9 Menu button Pressing this shows the menu which allows the
10 Display
11 Up key
12 ENTER key
13 Down key
14 LCD display The (TFT) LCD screen allows you to:
See Figure 3 and Table 3 below for a description of the various functions at the back
of the camera.
15 Battery cover The batteries are located behind this cover.
16 Memory slot Position for optional MMC or SD memory card
indicator
mode button
Table 2: Functions at the rear of the camera
Table 3: functions on the side of the camera
When the indicator is flashing, the cam era is
busy and cannot be used at that moment. See
section 9.2.
settings to be changed.
This button can be used to select which options
you wish to have visible on the LCD screen.
See section 10.3.
When recording: press this to zoom in on the
image.
When displaying: shows the previous picture.
In the menu: step upwards.
When recording: press this to switch to
display.
When displaying photo: switch to display.
When displaying video:
play. Press for a longer time: switch to display.
In the menu: Save the setting selected.
When recording: press this to zoom out.
When displaying: shows the next picture.
In the menu: step down.
view the subject to be photographed (Preview),
view photographs and video clips, view the
camera settings and call up the camera menu
and make settings.
See section 9.1 for a more detailed description
of the LCD screen.
in order to be able to save more pictures.
press briefly: begin to
6
 Loading...