

Page 1
V
450I RJ45 (A)DSL MODEM & ROUTER
UK
User’s manual
DE
FR
IT
ES
PL
NL
PT
GR
2.0
Page 2

450I RJ45 (A)DSL MODEM & ROUTER
Thank you for your purchase. Register your product via our Internet site at
www.trust. com/reg ister, so t hat you will be eligible for optimal guarantee and service support. You
will also be automatically informed of the development of your and other Trust products.
UK
DE
FR
IT
ES
PL
NL
PT
GR
Page 3
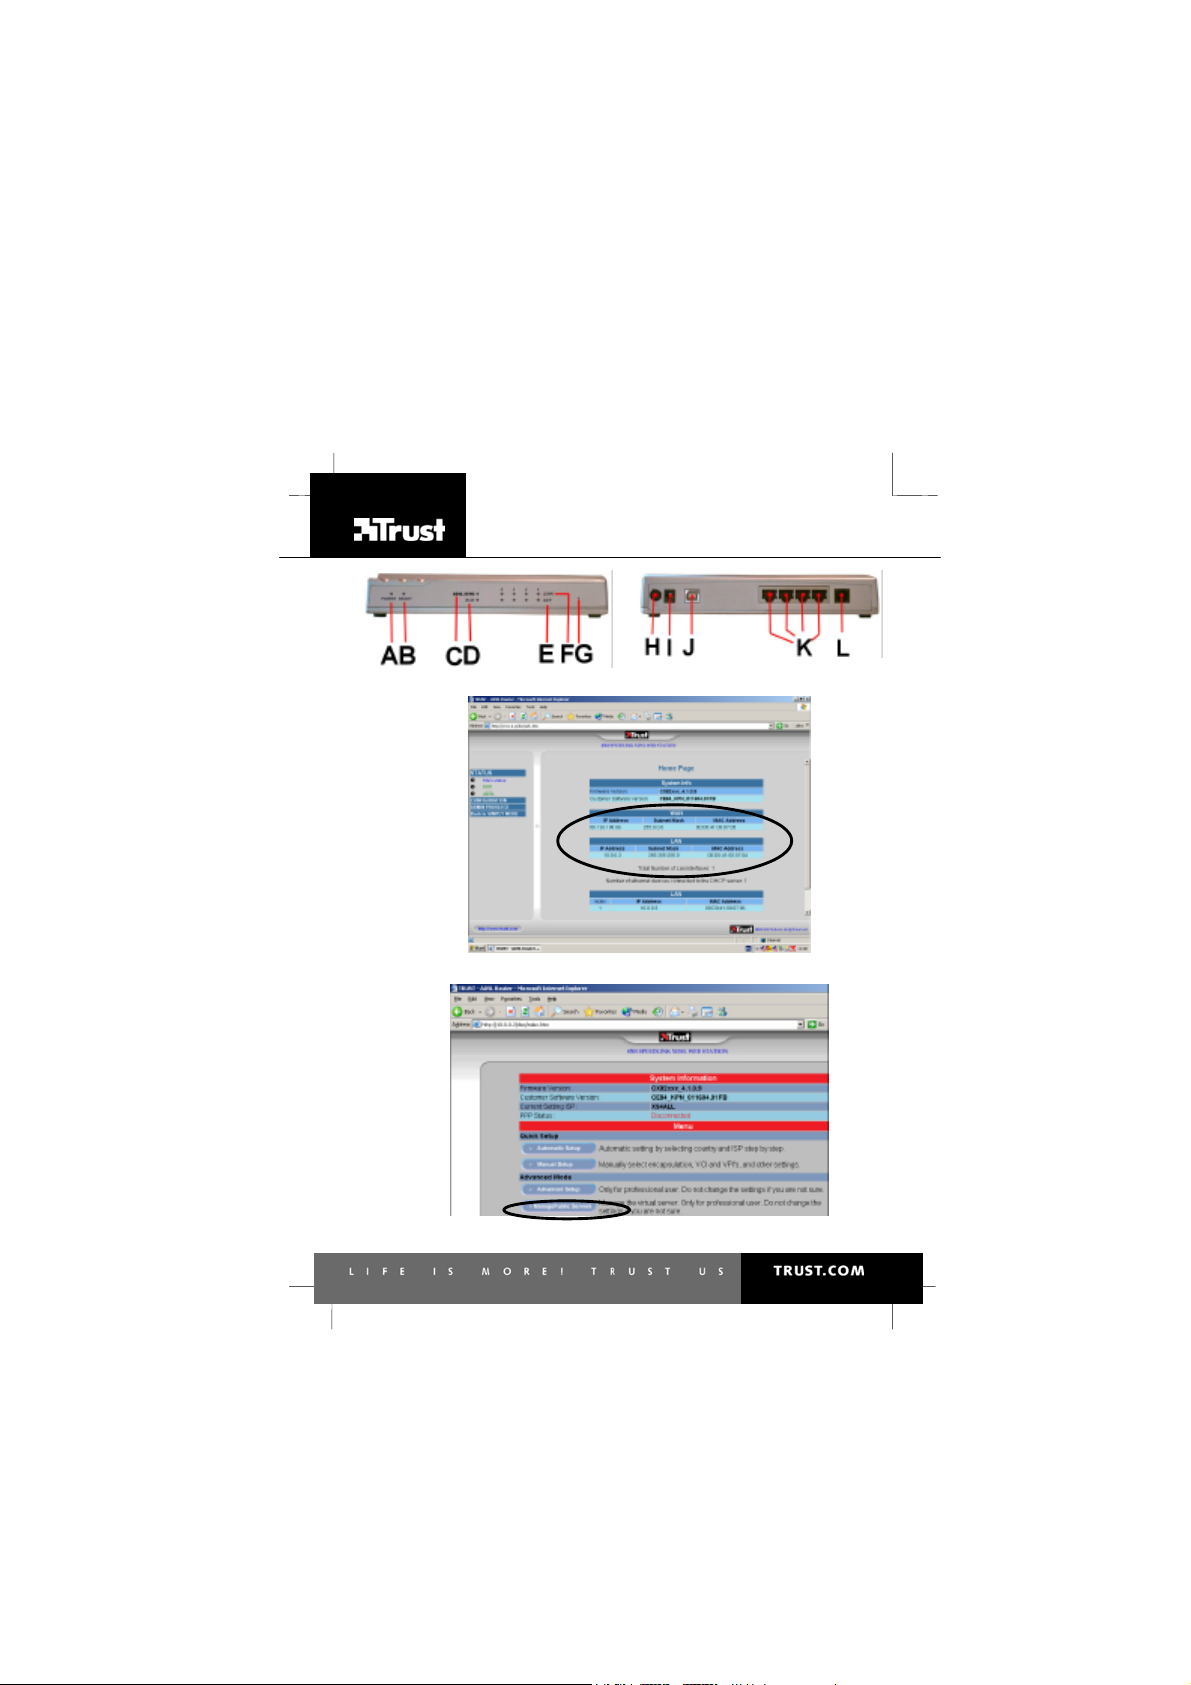
Fig. 2
450I RJ45 (A)DSL MODEM & ROUTER
Fig. 1
Fig. 3
Page 4
450I RJ45 (A)DSL MODEM & ROUTER
Fig. 4
Fig. 5
Fig. 6 Fig. 7
Page 5

TRUST 450I RJ45 (A)DSL MODEM & ROUTER
Table of contents
1 INTRODUCTION.... ...................... ............. ..................... .............. ............... 2
2 SAFETY............... ............................ ............................ ............................ ...2
UK
3 APPROVAL ............................ ............................. ............................ ...........2
4 HARDWARE AND SOFTWARE REQUIREMENTS.................. .................. 2
5 EXPLANATION INDICATORS AND CONNECTIONS... ............................. 2
6 CONNECTING POWER ADAPTER AND (A)DSL- LINE ............................ 3
7 CONNECTING MODEM & ROUTER TO YOUR COMPUTER.................... 3
8 CONFIGURE PC AND MODEM & ROUTER....... ............................ ...........4
9 CHECKING AFTER INSTALLATION/CONFIGURATION .................. ......... 4
9.1 HARDWARE CHECK................................................................................................4
9.2 CHECK MAIN STATUS .............................................................................................4
10 CONNECTING TO INTERNET....................................... ............................. 5
11 SAFETY AND PROTECTION .................................... ............................ .....5
11.1 HOW DOES THE SAFETY AND PROTECTION WORK? ...........................................5
11.2 G
12 ERASE (A)DSL MODEM/ROUTER SETTINGS.................. ........................ 6
13 (OPTIONAL) USING USB PORT........................... ............................ .........6
13.1 UNINSTALLING USB DRIVER ...........................................................................7
14 TROUBLE-SHOOTING........................ ............................. .......................... 7
15
IVING ACCESS (=OPENING PORTS
WARRANTY CONDITIONS ......................................................................10
) ................................................................5
1
Page 6

TRUST 450I RJ45 (A)DSL MODEM & ROUTER
1 Introduction
This instruction manual is for users of the ‘TRUST 450I RJ45 (A)DSL MODEM &
ROUTER’. The modem/router can be connected to 4 computers with a network
connection to share your Internet connection. The 450I modem/router is used for
(A)DSL via ISDN lines. The modem/router can be configured by the web-based
configuration menu, which can be opened simply by your Internet explorer. This
means there is no need to install a driver. The modem can be used in every country
since it is compatible with current (A)DSL standards. For some models product name
will be “450I SPEEDLINK XDSL WEB STATION” this is the same product as long as
the product name contains “450I”.
2 Safety
Carefully read the following instructions before use.
-
The 450I RJ45 (A)DSL MODEM & ROUTER does not require any special
maintenance. Use a slightly damp, soft cloth to clean the modem/router.
- Do not use aggressive substances, such as white spirit, to clean the device.
These may harm the material.
- Do not use this device near water.
- Do not repair this device.
3 Approval
- This device meets the essential requirements and other relevant conditions of
the applicable European directives. The Declaration of Conformity (DoC) is
available at www.trust.com/13523/ce
4 Hardware and software requirements
To set up a connection to the Internet you need the following (consult your Internet
service provider if necessary):
Activated Annex B (A)DSL line (Annex B (A)DSL via ISDN line)
•
Activated (A)DSL-account
•
Username and password, if you use a PPPoA- or PPPoE-connection.
•
VPI / VCI – values.
•
Internet (network) protocol. (PPPoA, PPPoE, Bridged IP or Routed IP)
•
Encapsulation protocol. (LLC/SNAP or VCMUX)
•
IP address, subnet mask, gateway if you use Routed I P
•
(A)DSL-splitter (for using the Internet and the telephone at the same
•
time)
Notice: Without the above data, your (A)DSL-modem will not function and
Notice: The Trust 450I only functions on an ISDN line, also called (A)DSL
5 Explanation indicators and connections
The (A)DSL station has several indicator lights as shown in Figure 1 on fold out page
in the manual. The following table gives a short explanation of these light indicators
and connection plug-ins.
installation is useless.
Annex B installation.
Function Definition
Power indicator
A
(green)
Ready indicator
B
(green)
Indicates if the (A)DSL station is turned on or off.
On Indicates that the (A)DSL station is
running properly and ready for use.
2
Page 7

TRUST 450I RJ45 (A)DSL MODEM & ROUTER
Function Definition
(A)DSL sync
C
indicator (green)
RxD indicator
D
(Green)
4 x Act indicators
E
(Green)
4 x LINK
F
indicators
(Green)
Reset Resets the (A)DSL station to the factory settings.
G
H
On / Off button
Adapter
I
connection
USB connection
J
(OPTIONAL)
4 x Ethernet
K
conections
WAN plug For (A)DSL line
L
Table 1: Indicators and connections
Flashing The (A)DSL station is executing a
Off The (A)DSL station has completed its
Flashing The (A)DSL station is initialising.
On Initialisation is complete, and (A)DSL
Flashing Data is being sent or received
Off No data is being sent or received
Flashing Data is being sent or received
Off No data is being sent or received
Indicates if there is a powered on computer connected
to the (A)DSL modem/router network connection.
Notice: this button deletes all your settings.
Accepts the supplied adapter (12VDC, 1000mA).
OPTIONAL For connection with USB port.
To connect your computers to.
self-test.
self-test.
signal is present.
between the (A)DSL modem/router
and Internet.
between the (A)DSL modem/router
and Internet.
between the (A)DSL modem/router
and the connected computer.
between the (A)DSL modem/router
and the connected computer.
6 Connecting power adapter and (A)DSL- line
Notice: Although you have always used an ISDN-line for your telephone calls,
To connect the modem/router to the power adapter and (A)DSL-line see instructions
in the quick installation guide steps 1~4 included in the pac kage and on the CDROM.
your (A)DSL-subscription is not necessarily Annex B. Always consult
your ISP to determine the type of (A)DSL line.
7 Connecting modem/router to your
computer
Notice: When using an Apple Mac computer only use Mac OS 9.x and higher.
To connect the modem/router see instructions in the quick installation guide steps 5 ~
6 included in the package and on the CD-ROM.
UK
3
Page 8

TRUST 450I RJ45 (A)DSL MODEM & ROUTER
8 Configure PC and modem/router
Notice: When using an Apple Mac computer make sure the network TCP/IP
Tip: When using an Apple Mac the web-based menu will be the same as
When the modem/router is connected as described in the quick installation guide
then the modem/router has to be configured for your (A)DSL Internet connection to
connect to the Internet. Before the modem/router can be configured the Windows
network settings first have to be set correctly. After configuring the PC as described
in the quick installation guide you configure the modem/router by entering the webbased menu from the modem/router with you Internet Explorer.
To do this all follow the step-by-step instructions in the quick inst allation guide
starting at step 7 to configure your W indows network settings and Trust 450I RJ45
(A)DSL MODEM & ROUTER.
Tip: After you have configured the (A)DSL modem/router with your
settings are set to DHCP and all proxy servers are switched off,
otherwise you cannot use the modem/router.
when using a PC.
computer for Internet use you can also connect your Sony Playstat ion
2 or MS XBox game console for online gaming. For setting up on one
of the two game consoles consult its user’s manual.
9 Checking after installation/configuration
9.1 Hardware check
If all is connected, configured and switched on properly as specified in the quick
installation guide then the indicators should display the same status as shown in
below table 2.
Indicator: Figure: Status: Check:
POWER (A, figure 1) Lit continuously If off then check power
READY (B, figure 1) Lit cont inuously If off wait for 2 minutes then
(A)DSL
sync
LINK (F, figure 1) Lit continuously If not lit then check network
9.2 Check main status
You can use the web-based menu for checking your Internet connection.
1. Open your Internet Explorer.
2. Type “ 10.0.0.2 “ in the address bar and then press Enter on your keyboard.
3. A Login window will appear. Enter the username “admin” and the password
4
(C, figure 1) Lit continuously If flashing cont inuously
Table 2: check indicators
“epicrouter”.
adapter is connected and
check if the modem/router is
switched on. See the quick
installation guide for
instructions.
reset the modem/router.
check (A)DSL line
connection or wrong type/not
activated (contact Internet
service provider).
cable is connected to
computer and computer is
switched on. See QIG.
Page 9

TRUST 450I RJ45 (A)DSL MODEM & ROUTER
4. Click ‘OK’
5. The web-based menu from the modem/router opens.
6. Click “Advanced Setup”. A window as shown in figure 2 appears.
If your Internet connection is connected and working properly then you should see
the WAN IP address, Subnet Mask.
10 Connecting to Internet
When finished following up instruction from the quick installation guide and all
settings from your ISP are correct you should have an Internet connection. See t he
last step to open your Microsoft Internet Explorer.
11 Safety and protection
This chapter is for advanced users only. Settings that are made in this
Notice:
11.1 How does the safety and protection work?
Notice: The 450I RJ45 (A)DSL MODEM & ROUTER includes a firewall. The
All standard Internet traffic is protected. ‘Non-st andard’ access is given true “ports”.
Each Internet program uses its own “ports”. These are prog rams such as:
music/video download software; videoconferencing software; other software that
allows you to exchange data with other computers and over the Internet.
The ports can be opened in the Virtual Server Configuration. This is available in the
web-based menu page of the modem/router.
Status of a port can be:
“OPEN”: Visible and accessible by all other computers on the Internet
“CLOSED”: Not visible or accessible for other computer s
“STEALTH”: Not visible to outsiders but accessible, used for most common ports.
Notice: The three above mentioned statuses are not reported in the web-
If a certain Internet program or service does not work properly and it is SURE you
need to open a certain port to get it working, continue with chapter 10. 2
11.2 Giving access (=opening ports)
Notice: If it is necessary to provide access to your computer it will mean that the
Actions below are for more experienced users who know how to find, set
11.2.1 Steps to take
1. Check in the program which port number and port type exactly (TCP/UDP) must
2. Find out the IP address of the PC you want to give access for the desired port.
3. Enter all the desired settings in the Virtual Server as mentioned in 11.2.2.
chapter can cause your Internet connection to become unsafe and
unprotected. The actions below are generally
of the Internet.
firewall protects your computers from intrusion. This firewall is, for
security reasons, always switched on.
based menu from your modem/router. In the modem/router default all ‘
non-standard’ ports are either “CLOSED” or “STEALTH” so always
secure and protected from intrusion.
connection will no longer be secure and protected. Make sure the port
really needs to be open!
and change computer IP addresses in the network
be opened (check help in specific program, Internet sites, manuals, etc.)
This can be static or defined by the built-in DHCP server (depends on how the
network is configured). Make sure the computer IP address remains the same
after shutting down the computer (this might result in changing your dynamic IP
address into a static IP address), otherwise the access is no longer g ranted.
not needed for basic use
UK
5
Page 10

TRUST 450I RJ45 (A)DSL MODEM & ROUTER
Tip: Also check the included Internet Sharing guide for general Internet
sharing and networking.
11.2.2 Give access / Opening ports
1. Open web-based menu: type 10.0.0.2 in the address bar of the Internet
Explorer (or other address if this is changed at configuration of the device)
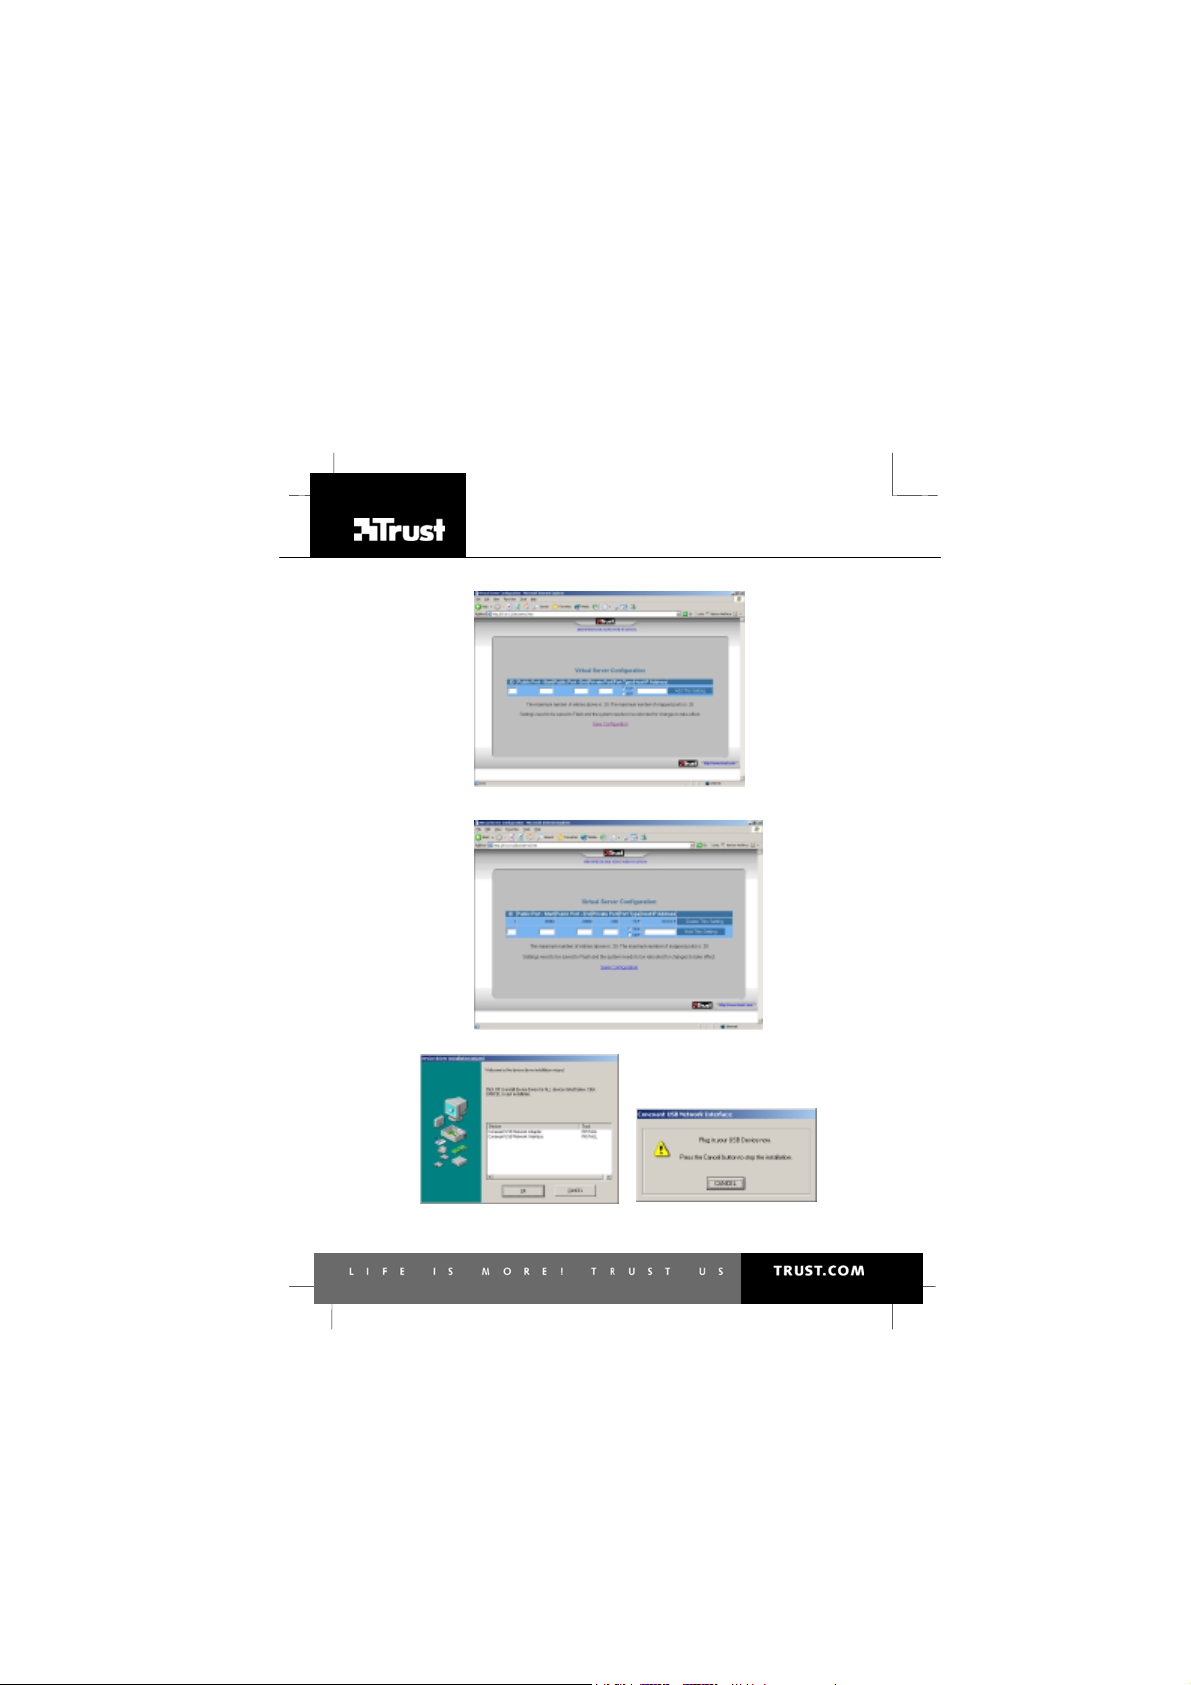
2. Click “ManagePublic Servers”. A window as in figure 4 will appear.
3. Fill in the port number you need to open in the “public port start” and “public por t
end”.
4. Fill in a private port number. This will be the number that will be visible to
outsiders. Fill in a number (does not matter which) different to the actual port
number to be most secure (so you give a virtual port number to the outside
instead of the real port number).
5. Select the “port type” which is specified by the Internet program.
6. Fill in the “IP address” from the computer on which the ports m ust be open.
7. Click “Add this setting”.
8. The settings will be added to the list. See figure 5.
9. Click save configuration.
10. Test if Internet program works correct on comput er.
12 Erase (A)DSL modem/router settings
The settings in the (A)DSL station can be erased by executing a reset. Resetting
causes all settings in the router to get back to the default factory settings. You can
use this option when, for instance, you forget your password to log int o the advanced
configuration menu.
Notice: When you use the reset button you erase all the settings you have
1. Unplug the network cables and the (A)DSL cable from the (A)DSL station.
2. Have the (A)DSL modem/router switched on and the adapter plugged in and
3. Use a thin, blunt object to press the reset button at the front of the (A)DSL
4. Press and release the reset button once (G, figure 1). W ait for a few
5. The ‘READY’ indicator (B, fig ure 1) fades away for a moment and after a
6. The settings of the (A)DSL station will be erased and reset to the default
saved to the (A)DSL modem/router.
connected to the (A)DSL station.
station.
moments.
moment starts flashing. Wait until the “READY’ indicator is lit continually
again.
factory settings. You can now reinstall the (A)DSL modem/router.
13 (Optional) Using USB port
Notice: Only use the USB port if your computer does not have a network
connection. When computer does have a network connection read the
quick installation guide to connect the modem/router to this network
connection.
Notice: The USB connection cannot be used for Apple Macintosh computers.
Tip: For information on the latest driver versions, visit
www.trust.com/13523/download If a new version is available use it for the
installation.
Tip: If you use Windows 98, have the Windows 98 CD ROM ready.
Tip: When connecting the modem/router to the USB port a virtual network
adapter will be installed. This allows the modem/router to be used as if it
is connected to a network connection.
6
Page 11

TRUST 450I RJ45 (A)DSL MODEM & ROUTER
Notice: First start the USB driver installation; a message will appear informing you
to connect the device. See below instructions on how to install the USB
driver.
Notice: Exit all other programs before beginning installation.
Notice: In the example we use ‘D:\’ to indicate the CD-ROM drive, although this
varies from computer to computer.
Dur ing installation under Windows XP, you may see a warning message
Notice:
about an unsigned driver. This does not affect functionality; you m ay
continue the installation.
1. Insert the CD-ROM into your computer’s CD-ROM drive. The installation
program will start automatically. If it does not start aut omatically, carry out
the following:
a) Select 'Run' from the Windows Start menu.
b) Type [D:\SETUP.EXE] and click on 'OK' to start the Trust Software
2. The Trust Software Installer will appear.
3. Select the language you wish the Trust Software Installer t o be displayed in.
4. Click on ‘Install USB driver‘ to start the installation of the USB driver. Figure
5. Click ‘OK’.
6. When the window shown in figure 4 appears connect the webstaion to the
7. Follow the Windows hardware installation to finish installation.
After installation a virtual network adapter will be installed. Using the modem/router
with the USB port is the same as when connected to the network connection
described in this manual and in the quick installation guide.
Installer.
3 will appear.
USB port from your computer.
13.1 Uninstalling USB driver
Notice: To uninstall the USB driver the modem/router MUST be connected to the
USB port from the computer otherwise the driver cannot be uninstalled.
1. Open the Windows ‘control panel’ from t he start menu.
2. Click ‘add and remove programs’.
3. Select the ‘Conexant USB network adapter’.
4. Click ‘remove’ button.
5. Follow the onscreen instructions t o completely remove the USB driver from
your PC.
14 Trouble-shooting
Method
1. Read the solutions given below.
2. Check for up-to-date FAQ’s, drivers and instruction
manuals on the Internet www.trust.com/13523
Problem Cause Possible solution
Modem/router
cannot be switched
on.
Power adapter is not
or not correct
connected.
See the quick installation
guide and follow step 1 to
correctly connect the power
adapter.
UK
7
Page 12

TRUST 450I RJ45 (A)DSL MODEM & ROUTER
Problem Cause Possible solution
The web-based
menu from the
modem/router
cannot be accessed
by typing 10.0.0.2 in
the Internet Explorer.
‘(A)DSL sync’
indicator on (A)DSLstation keeps on
flashing.
Cannot connect to
the Internet.
Modem/router is
switched off.
Network cable not
connected.
Windows Internet
settings or network
settings are set
incorrectly.
(A)DSL station not
receiving (A)DSL
signal.
Splitter/filter connected
incorrectly.
RJ-11 Telephone
cable has a crack.
Modem is connected
to the wrong line type
(annex B (A)DSL
station to annex A
(analogue) telephone
line.
(A)DSL is not yet
activated.
Wrong (A)DSLprovider selected
during “automatic
setup” from the webbased menu.
When used, wrong
username and / or
password.
Switch on the modem/router.
Connect network cable as
described in the quick
installation guide step 5.
See the quick installation
guide follow step 7 till 10 for
correct settings.
Connect the (A)DSL line
correctly. See quick installation
guide follow step 4.
Check the splitter/filter
connection. See the quick
installation guide follow step 4.
Use another phone cable.
Check with your internet
service provider (ISP), which
(A)DSL line type you have.
The 450I modem/router can
only be used with ISDN
(A)DSL (Annex B) line.
Consult your provider or
(A)DSL supplier to ensure
that your (A)DSL line is
activated.
Check the quick installation
guide and start at step 11 to
configure the modem/router.
Check “system log” in the
web-based menu. Open your
Internet Explorer type in
10.0.0.2 and press “enter” on
your keyboard.
Click “system log” check if
your username and
password is correct. If
(A)DSL connection
established (line sync) but
error on login at provider:
triple check login + password
at internet provider! (They
sometimes change after
move to (A)DSL subscription)
8
Page 13

TRUST 450I RJ45 (A)DSL MODEM & ROUTER
Problem Cause Possible solution
Cannot connect to
the Internet.
The ISP you have is
not in the list from
the “automatic
setup”.
Cannot connect to
the internet after
following the
“manual setup" from
the web-based
menu.
You cannot receive
calls whilst using the
Internet.
There is a rustling
noise on the
telephone line when
you call whilst using
the Internet.
Cannot send e-mail.
Annex A modem used
on an Annex B (ISDN)
line or vice versa.
Windows Internet
settings or network
settings are set
incorrectly.
ISP or settings for the
ISP was not yet known
when the list was putt
together.
Wrong protocol
installed (1483
Bridged IP, 1483
Routed IP, PPPoA, or
PPPoE).
When PPPoA or
PPPoE is used, wrong
username and / or
password filled in.
Use of wrong settings
(VCI, VPI).
Wrong encapsulation
set (LLC/Snap,
VCMUX).
When using routed IP,
wrong IP address,
subnet mask and / or
gateway filled in.
Windows Internet
settings or network
settings are set
incorrectly.
No splitter / filter. Use the splitter / filter that is
Incorrect filter /
splitter.
E-mail settings are
incorrect.
Solution is not on the
list.
Check with your ISP to
determine which kind of
(A)DSL line you have. See
chapter 5 for more
information.
See the quick installation
guide follow step 7 till 10 for
correct settings.
Follow the “manual setup”
from the web-based menu.
See quick installation guide
start at step 22.
Check the table from the
quick installation guide (step
23) Consult your Internet
Service Provider (ISP) and
ask your ISP the
fill in the rest of the checklist
behind the protocol with your
See the quick installation
guide follow step 7 till 10 for
correct settings.
provided with your ISP
subscription or buy a new
splitter / filter at your local
phone shop.
Use a loose filter between
the telephone and the
telephone line (available at
your local phone shop).
Check the e-mail settings
against those supplied by
your ISP.
Connect to the Internet using
an analogue modem or ISDN
modem and consult the
“Trust Internet troubleshooter” on the Internet or
consult your ISP.
ISP.
protocol
and
9
UK
Page 14

TRUST 450I RJ45 (A)DSL MODEM & ROUTER
Problem Cause Possible solution
Problems with
Internet settings.
Several possible
causes.
Problem is not in
this list.
If you still have problems after trying these solutions, please contact one of the Trust
Customer Care Centres. You can find more information at the back of this instruction
manual. Please have the following information available:
The item number. This is Item no 13523
•
A good description of what does not work.
•
A good description of when the problem occurs.
•
15 Warranty conditions
- Our products have a two-year manufacturer's warranty which is effective from
the date of purchase.
- If there is a fault, return the product to your dealer and include an explanation
of the fault, the proof of purchase and all the accessories.
- During the warranty period, you will receive a similar model, if one is available.
If no similar product is available, your product will be repaired.
- Please contact our help desk for missing components, such as the instruction
manual, software or other components.
- The warranty becomes invalid if the product has been opened, if there is
mechanical damage, if the product has been misused, if alterations have been
made to the product, if the product has been repaired by a third party, in the
case of negligence or if the product has been used for a purpose other than
that originally intended.
- Excluded from the warranty:
Damage caused by accidents or disasters, such as fire, f lood,
•
earthquakes, war, vandalism or theft.
Incompatibility with other hardware/software which is not stated in the
•
minimum system requirements.
Accessories, such as batteries, fuses (if applicable).
•
-
Under no circumstances will the manufacturer be held responsible for any
incidental or consequential damage, including the loss of income or other
commercial losses resulting from the use of t his product.
Reproduction of this manual or any part of it is prohibited without permission
Connect to the Internet usin
Copyright disclaimer
from Trust International B.V.
Consult the ‘INTERNET
SHARING” manual.
Connect to the Internet using
an analogue modem or ISDN
modem and consult the
following troubleshooter:
www.trust. com/customerca re
/help/internet
an analogue modem or ISDN
modem and consult the
following troubleshooter:
www.trust.com/customercare
/help/network
g
10
Page 15
SERVICE CENTRE
24 HOURS free service: www.trust.com
Residents in the UK and Ireland should contact:
Mon - Fri
From 8:00 - 16:00
I residenti in Italia possono contattare :
lun - ven
9:00 – 17:00
Les habitants de la France et de l’Afrique du Nord peuvent contacter :
Lundi-vendredi
De 9:00 à 17:00
Kontaktadresse für Einwohner Deutschlands:
Mo – Fr
9:00 - 17:00
Los habitantes de España pueden ponerse en contacto con:
lun – viernes
De las 9:00 a las 17:00
horas
Osoby mieszkające na terytorium Polski powinny skontaktować się:
Pon do pią
w godz 09:00-17:00
Inwoners van Nederland kunnen contact opnemen met:
ma – vr
9:00 - 17:00 uur
All other countries / Alle anderen Länder / Tous les autres pays
Tutti gli altri paesi / Tod os los demás países / Alle ander e landen
Mon - Fri
From 9:00 - 17:00
UK Office
Phone +44-(0)845-6090036
Fax +31-(0)78-6543299
Ufficio italiano
Telefono +39-(0)51-6635947
Fax +31-(0)78-6543299
Bureau français
Téléphone +33-(0)825-083080
Fax +31-(0)78-6543299
Deutsche Geschäftsstelle
Telefon +49-(0)2821-58835
Fax +31-(0)78-6543299
Oficina española
Teléfono +34-(0)902-160937
Fax +31-(0)78-6543299
Biuro w Polska
Tel +48-(0)22-8739812
Fax +31-(0)78-6543299
Kantoor Nederland
Tel +31 (0)78-6543387
Fax +31 -(0)78-6543299
European Head Office
Phone +31-(0)78-6549999
Fax +31-(0)78-6543299
 Loading...