

Page 1
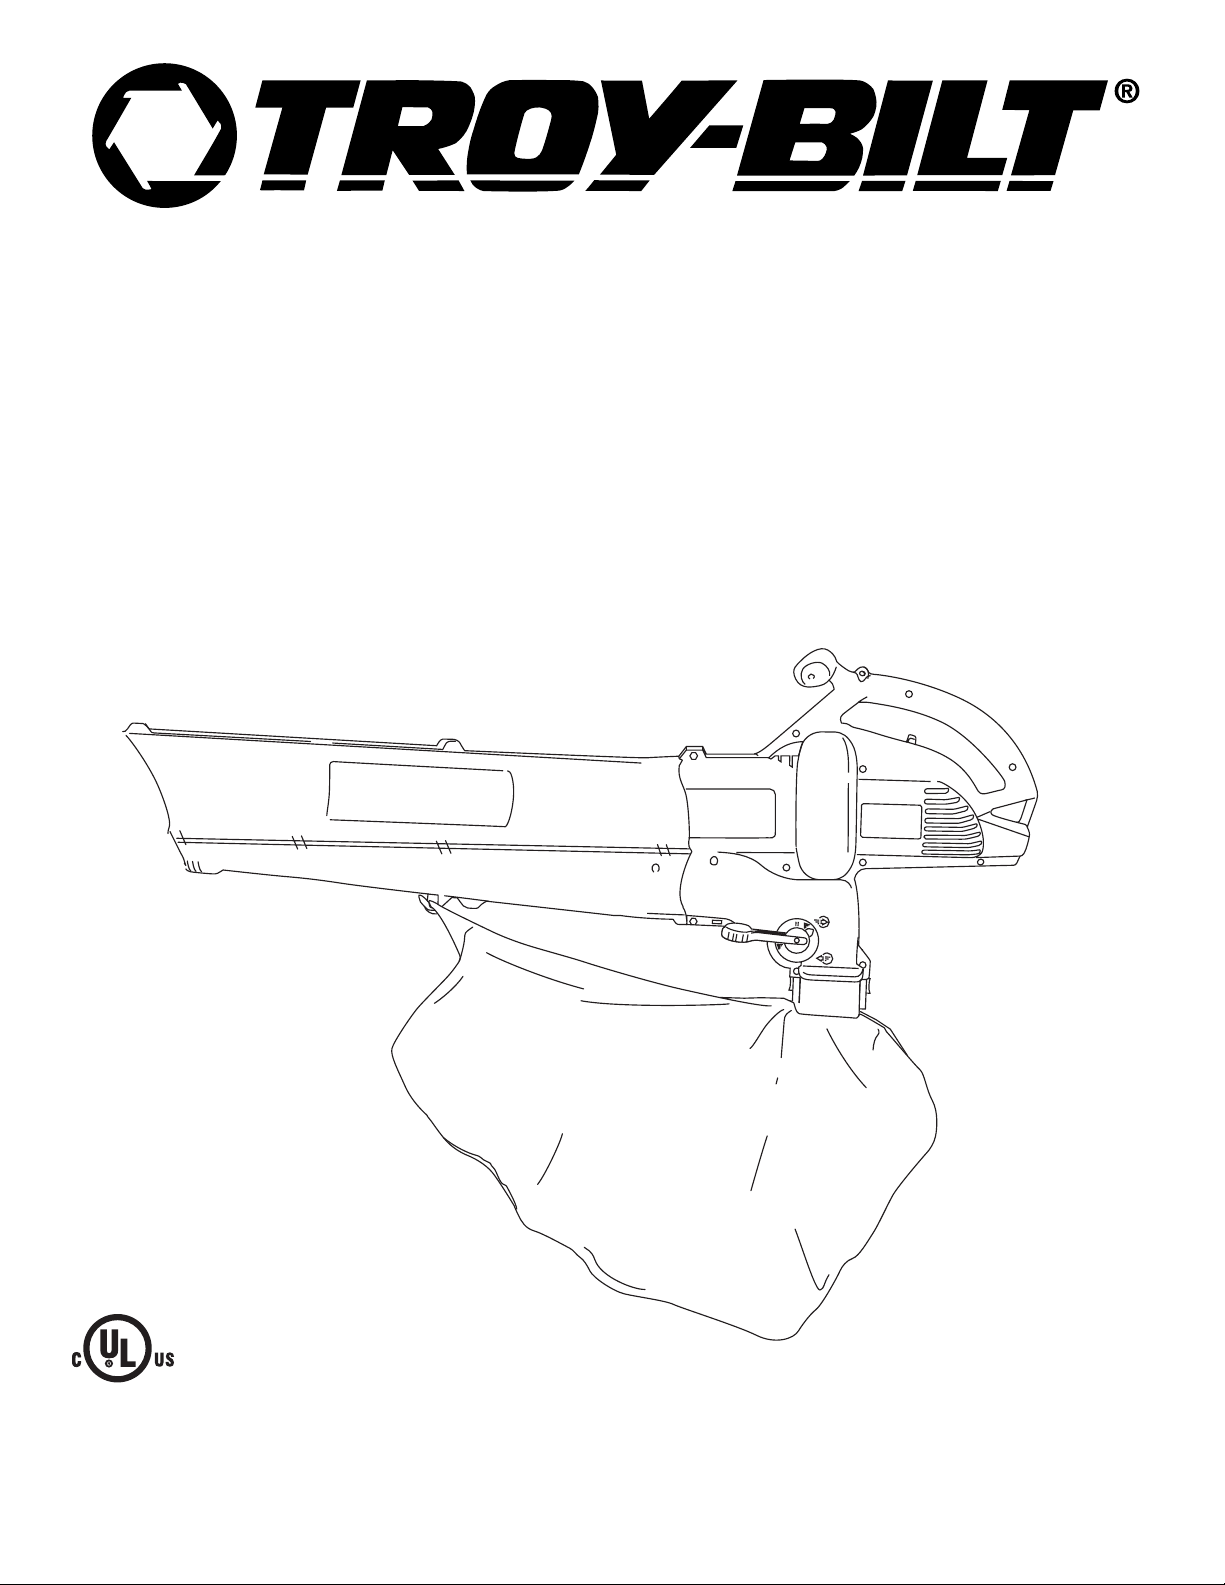
Operator’s Manual
Electric Mulching
Blower / Vacuum
Model TB125QS
P/N 769-01191 (7/04)
SAVE THESE INSTRUCTIONS DO NOT THROW AWAY
Page 2
2
INTRODUCTION
Copy the serial number
here:
THANK YOU
Thank you for buying this quality product. This modern
outdoor power tool will provide many hours of useful
service. You will find it to be a great labor-saving device.
This operator’s manual provides you with easy-tounderstand operating instructions. Read the whole
manual and follow all the instructions to keep your new
outdoor power tool in top operating condition.
PRODUCT REFERENCES, ILLUSTRATIONS
AND SPECIFICATIONS
All information, illustrations, and specifications in this
manual are based on the latest product information
available at the time of printing. We reserve the right to
make changes at any time without notice.
Copyright© 2004 MTD SOUTHWEST INC, All Rights
Reserved.
SERVICE INFORMATION
Service on this unit both within and after the warranty
period should be performed only by an authorized and
approved service dealer.
For service call 1-800-520-5520 to obtain a list of
authorized service dealers near you. For more details
about your unit, visit our website at www.troybilt.com.
If you have difficulty assembling this product or have
any questions regarding the controls, operation or
maintenance of this unit, please call the Customer
Support Department.
DO NOT RETURN THE UNIT TO THE RETAILER.
PROOF OF PURCHASE WILL BE REQUIRED FOR
WARRANTY SERVICE.
Make sure you carefully read and understand this manual before starting or operating this equipment.
THIS PRODUCT IS COVERED BY ONE OR MORE U.S. PATENTS. OTHER PATENTS PENDING.
TABLE OF CONTENTS
Service Information . . . . . . . . . . . . . . . . . . . . . . . . .2
Rules for Safe Operation . . . . . . . . . . . . . . . . . . . . .3
Know Your Unit . . . . . . . . . . . . . . . . . . . . . . . . . . . .6
Assembly Instructions . . . . . . . . . . . . . . . . . . . . . . .7
Operating Instructions . . . . . . . . . . . . . . . . . . . . . . .9
Maintenance and Repair Instructions . . . . . . . . . . .14
Specifications . . . . . . . . . . . . . . . . . . . . . . . . . . . . .15
Troubleshooting Chart . . . . . . . . . . . . . . . . . . . . . .15
Warranty Information . . . . . . . . . . . . . . . . . . . . . . .18
Parts List . . . . . . . . . . . . . . . . . . . .Inside Back Cover
Copy the model and parent
part number here:
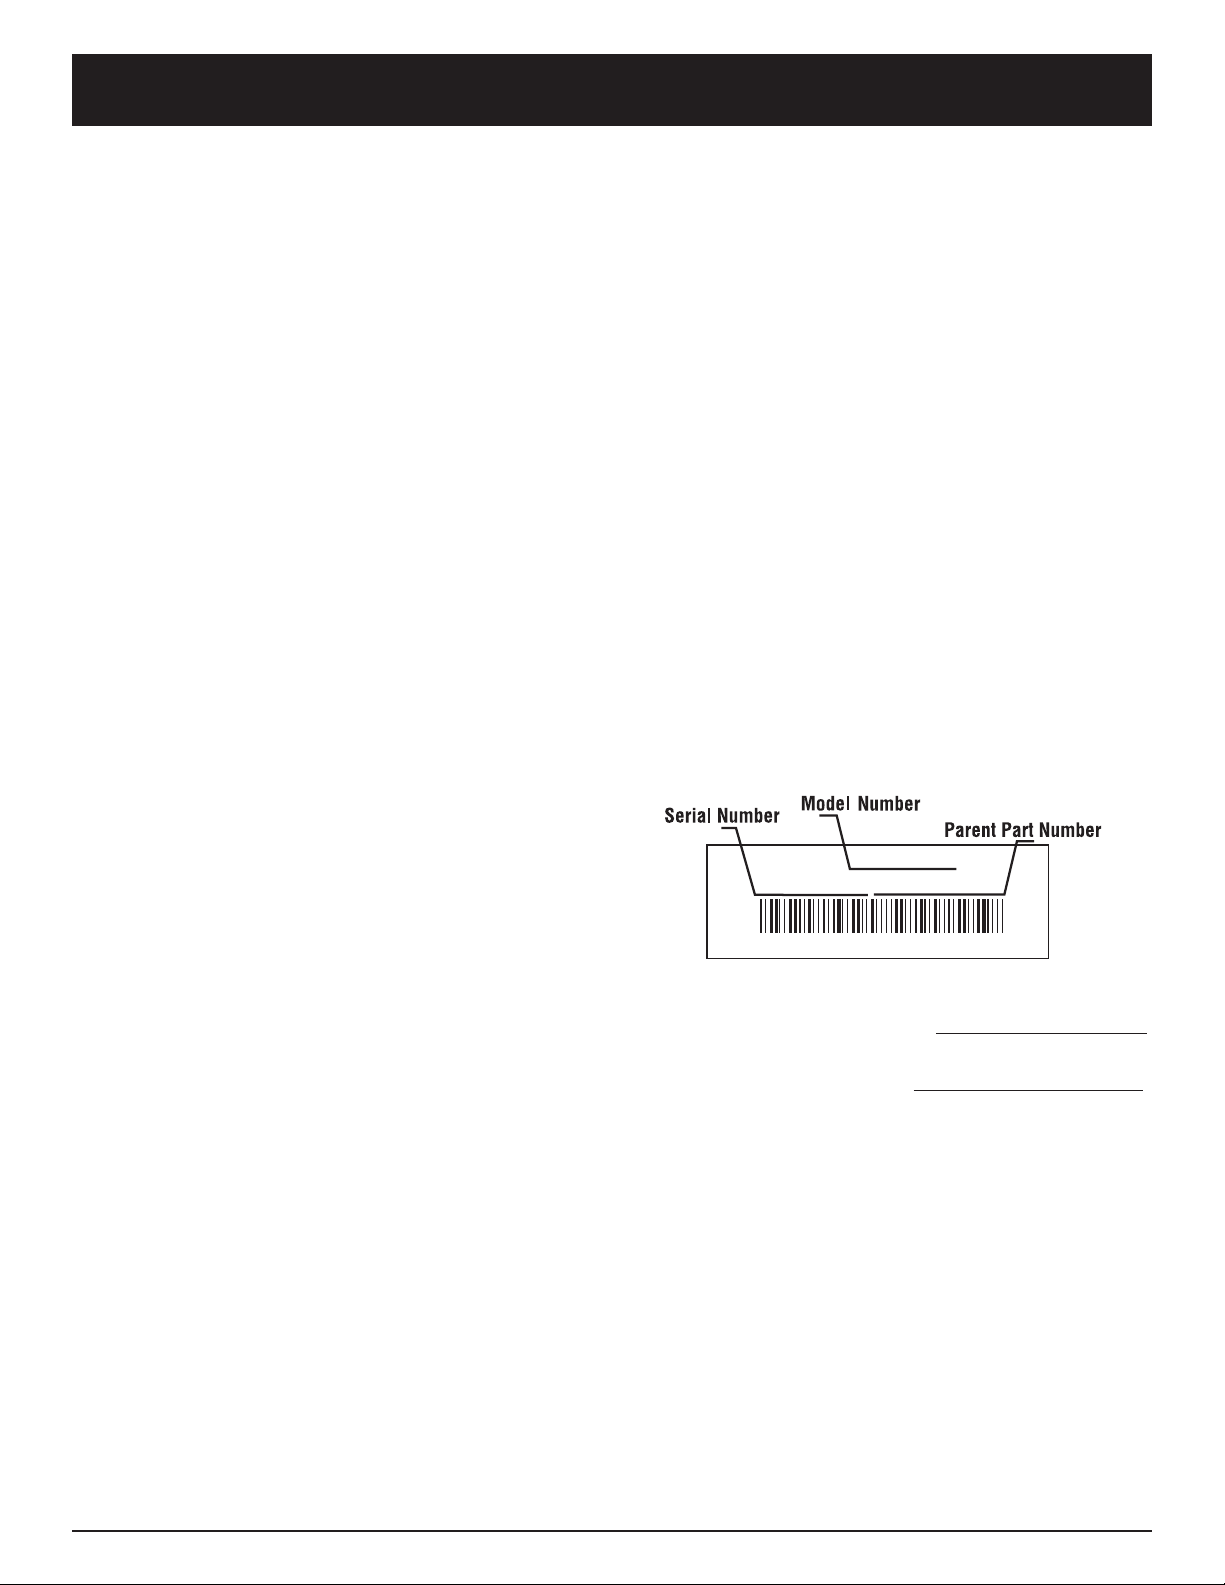
Before beginning, locate the unit’s model plate. It lists
the model and serial numbers of your unit. Refer to the
sample plate below and copy the information for future
reference.
S/N :
MODEL :
ITEM :
Page 3
3
SYMBOL MEANING
The purpose of safety symbols is to attract your
attention to possible dangers. The safety symbols,
and their explanations, deserve your careful attention
and understanding. The safety warnings do not by
themselves eliminate any danger. The instructions or
warnings they give are not substitutes for proper
accident prevention measures.
NOTE: Advises you of information or instructions vital to
the operation or maintenance of the equipment.
READ ALL INSTRUCTIONS
BEFORE OPERATING
• Read the instructions carefully. Be familiar with the
controls and proper use of the unit.
• Do not operate this unit when tired, ill or under the
influence of alcohol, drugs or medication.
• Children and teens under the age of 15 must not use
the unit, except for teens guided by an adult.
• Before each use, thoroughly inspect your unit for loose
or damaged parts. Do not use until adjustments or
repairs are made.
• All guards and safety attachments must be installed
properly before operating the unit.
• Use the right tool. Use this unit only as described in
this manual. Do not use for any job except that for
which it is intended. Use only the manufacturer’s
recommended attachments.
• Inspect the area before starting the Blower/ Vacuum.
Remove all debris and hard or sharp objects such as
glass, wire, etc.
• Use the unit only in daylight or good artificial light.
• Keep all bystanders, especially children and pets, at
least 50 feet (15 m) away from the unit while operating.
ELECTRICAL SAFETY WARNINGS
• Since the tool is double-insulated, a 2-wire extension
cord (an extension cord without a ground) may be
used. A 3-wire extension cord (an extension cord with
a ground) that uses a NEMA type connector (parallel
blade, U ground) is recommended. Extension cords
are available from your local retailer. Use only roundjacketed extension cords approved for outdoor use.
• This tool is double-insulated. Repair or replace damaged
cords.
• To reduce the risk of electrical shock, this unit has a
polarized plug (one blade is wider than the other). This
unit will fit with a polarized plug in one way only. If the
plug does not fit fully into the unit, reverse the plug. If
it still does not fit, use a cord with the correct
connection. Do not modify the unit in any way.
*The wire size (AWG) for appliances using 12 to 16
amps is 14 AWG for 25 feet, 12 AWG for 50 feet, and
not recommended for 100 or 150 feet.
RULES FOR SAFE OPERATION
Cord length (ft.) 25 50 100 150
Wire size (AWG)* 16 16 16 14
MINIMUM WIRE SIZE FOR EXTENSION CORDS FOR
120 VOLT APPLIANCES USING 0-12 AMPS*
When using the unit,
you must follow the
safety rules. Please read these instructions
before operating the unit in order to ensure
the safety of the operator and any bystanders.
Please keep these instructions for later use.
WARNING:
• IMPORTANT SAFETY INSTRUCTIONS •
Failure to obey a
safety warning can
result in injury to yourself and others.
Always follow the safety precautions to
reduce the risk of fire, electric shock and
personal injury.
WARNING:
Failure to obey a
safety warning will
result in serious injury to yourself or to
others. Always follow the safety precautions
to reduce the risk of fire, electric shock and
personal injury.
DANGER:
Failure to obey a
safety warning may
result in property damage or personal injury
to yourself or to others. Always follow the
safety precautions to reduce the risk of fire,
electric shock and personal injury.
CAUTION:
Indicates
danger,
warning or caution. Attention is required in
order to avoid serious personal injury. May
be used in conjunction with other symbols
or pictographs.
SAFETY ALERT:
When using electric
gardening appliances,
basic safety precautions should always be
followed to reduce the risk of fire, electric shock
and personal injury. Carefully read and
understand the entire operator's manual before
using your unit. Pay close attention to the
operating instructions and safety warnings.
DANGER:
To reduce the risk of
electrical shock, use
only SW-A, SOW-A, STW-A, STOW-A, SJW-A,
SJOW-A, SJTW-W or SJTOW-A cord types.
WARNING:
SYMBOL MEANING
Read the Operator’s Manual(s) and follow all
warnings and safety instructions.
Failure to do so can result in serious injury to the
operator and/or bystanders.
FOR QUESTIONS, CALL 1-800-520-5520
Page 4

4
• CORD SETS: Make sure your cord set is in good
condition, with a cord that is heavy enough to carry
the current that your unit will draw. An undersized cord
set will cause a drop in line voltage resulting in a loss
of power, as well as overheating. The table shown
above illustrates the correct size to use depending on
the cord length and nameplate amperage rating. If in
doubt, use the next heavier size line gauge. The
smaller the gauge number, the heavier the cord. To
prevent the cord from disconnecting from the unit, use
the cord hook shown in the Operating Instructions.
•Ground Fault Circuit Interrupter (GFCI) protection
should be provided on the circuit(s) or outlet(s) that will
be used for the unit. Use receptacles with built-in
GFCI protection for an extra measure of safety.
•A nameplate on your unit indicates the voltage used.
Never connect the unit to an AC voltage that differs
from this voltage.
• Inspect all extension cords and the unit power connection
periodically. Look closely for deterioration, cuts or cracks
in the insulation. Also inspect the connections for damage.
Repair or replace the cords if any defects appear.
• Avoid dangerous environments. Never operate your unit
in damp or wet conditions. Moisture is a shock hazard.
• Do not use the unit in the rain.
• Do not handle the plug or the unit with wet hands.
WHILE OPERATING
• Wear safety glasses or goggles that are marked as
meeting ANSI Z87.1-1989 standards. Also wear
ear/hearing protection when operating this unit. Wear
a face or dust mask if the operation is dusty. Long
sleeve shirts are recommended.
• Wear heavy, long pants, boots and gloves. Do not
wear loose clothing, jewelry, short pants, sandals or
go barefoot. Secure hair above shoulder level.
• Avoid accidental starting. Do not carry around a unit
that is plugged in with your finger on the trigger
switch. Be sure the switch is in the off position when
plugging in the unit.
• Do not set unit on any surface except a clean, hard
area while motor is running. Debris such as gravel,
sand, dust, grass, etc. could be picked up by the air
intake and thrown out by the discharge opening,
damaging unit, property, or causing serious injury to
bystanders or operator.
• Use extra care when cleaning on stairs.
• Do not allow to be used as a toy. Close attention is
necessary when used by or near children.
• Do not use to pick up flammable or combustible
liquids, such as gasoline, or use in areas where they
may be present.
• Do not overreach. Always keep proper footing and
balance. Do not operate from unstable surfaces like
ladders, trees, slopes or rooftops.
• Do not abuse the power cord. Do not pull or carry the
unit by the cord, use the cord as a handle, close a
door on the cord, or pull the cord around sharp edges
or corners. Keep the cord away from heated surfaces,
oil and sharp edges.
• Do not unplug by pulling on the cord. To unplug, grasp
the plug, not the cord.
• Always remain alert. Use common sense. To prevent
injury to yourself and others, do not operate this unit if
you are fatigued.
• Do not operate the unit while under the influence of
drugs, alcohol or medication.
• Do not leave the Blower/Vacuum plugged in when not
in use, changing tubes, or while being
serviced.
• Do not put any object into openings. Do not use with
any opening blocked; keep free of dirt, debris and
anything that may reduce the air flow.
• Keep hair, loose clothing, fingers, and all parts of body
away from openings and moving parts.
• Use only original equipment manufacturer replacement
parts when servicing this unit. These parts are available
from your authorized service dealer. Do not use
unauthorized parts, accessories, or attachments for
this unit. Doing so could lead to serious injury to the
user, or damage to the unit, and void your warranty.
• Do not force unit. It will do the job better and with less
likelihood of injury at a rate for which it was designed.
• Never use the Blower/Vacuum without the
blower/vacuum tube and vacuum bag attached.
• Turn off all controls before unplugging.
• Unplug the Blower/Vacuum before attempting to
install or remove the blower/vacuum tube or
vacuum bag. The unit must be unplugged, and the
impeller blades stopped to avoid contact with the
rotating blades.
WHILE OPERATING UNIT AS A BLOWER
• Never point the blower in the direction of people or
pets, or in the direction of windows. Always direct the
blowing debris away from people, animals, and
windows. Use extra caution when blowing debris near
solid objects such as trees, automobiles, walls, etc.
WHILE OPERATING UNIT AS A VACUUM
• Avoid situations that could catch the vacuum bag on
fire. Do not operate near an open flame. Do not
vacuum warm ash from fireplaces, barbecue pits,
brush piles, etc. Do not vacuum discarded cigars or
cigarettes unless the cinders are completely cool.
• The unit is designed to pickup dry material such as
leaves, grass, small twigs, and bits of paper. Do not
attempt to vacuum wet debris and/or standing water
as this may result in damage to the blower/ vacuum.
To avoid severe damage to the impeller, do not
vacuum metal, broken glass, etc.
OTHER SAFETY WARNINGS
• Be sure to secure the unit while transporting.
• Store the unit in a dry area, locked up to prevent
unauthorized use or damage, and stored in a high
place out of the reach of children.
•Never douse or squirt the unit with water or any other
liquid. Keep handles dry, clean and free from debris. Clean
after each use. See the Cleaning and Storage instructions.
• Keep these instructions. Refer to them often and use
them to instruct other users. If you loan someone this
unit, also loan them these instructions.
SA VE THESE INSTRUCTIONS
RULES FOR SAFE OPERATION
Page 5
5
RULES FOR SAFE OPERATION
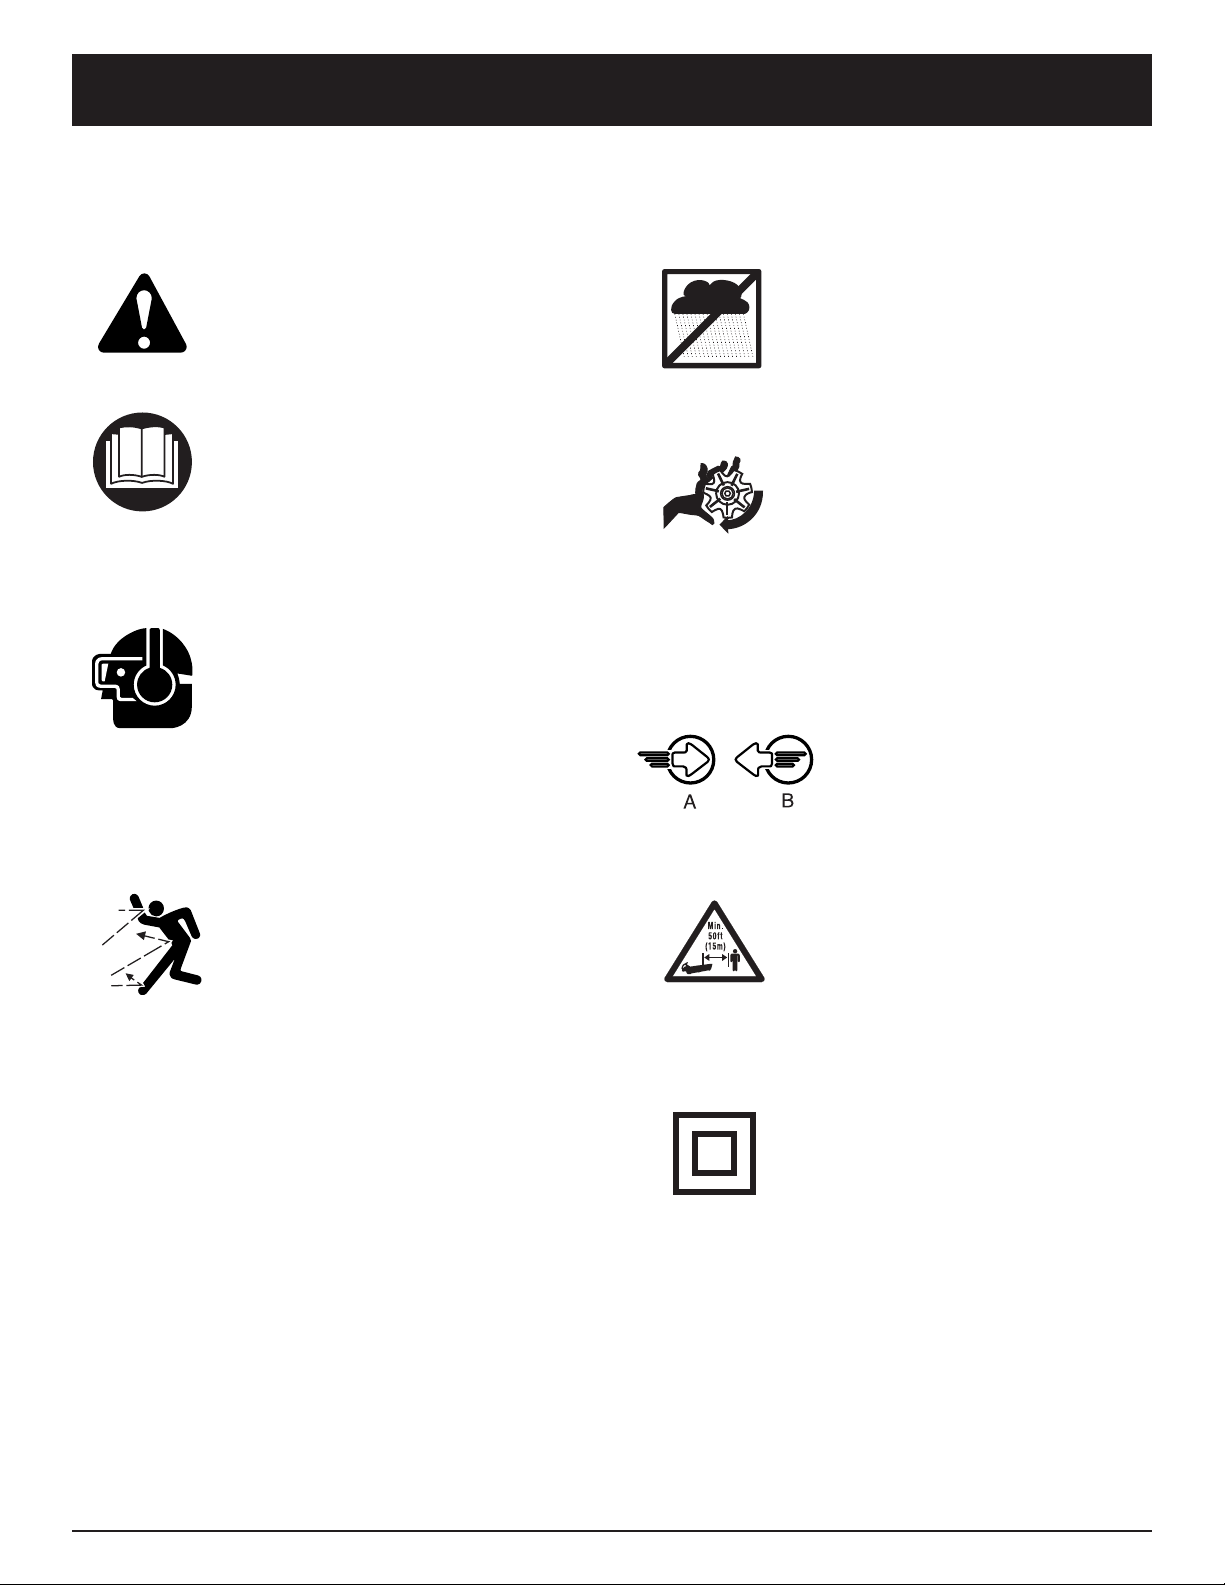
SYMBOL MEANING
• SAFETY ALERT SYMBOL
Indicates danger, warning, or
caution. May be used in conjunction
with other symbols or pictographs.
•WARNING - READ
OPERATOR'S MANUAL
Read the Operator’s Manual(s) and
follow all warnings and safety
instructions. Failure to do so can
result in serious injury to the
operator and/or bystanders.
• WEAR EYE AND HEARING
PROTECTION
WARNING:Thrown
objects and loud noise can cause
severe eye injury and hearing loss.
Wear eye protection meeting ANSI
Z87.1-1989 standards and ear
protection when operating this unit.
Use a full face shield when needed.
• THROWN OBJECTS AND
ROTATING CUTTER CAN
CAUSE SEVERE INJURY
WARNING:Keep clear
of blower outlet. Never point the
blower at yourself or others. Objects
can be thrown from blower. Do not
operate unit without proper
attachments and guards in place.
SAFETY AND INTERNATIONAL SYMBOLS
This operator's manual describes safety and international symbols and pictographs that may appear on this product.
Read the operator's manual for complete safety, assembly, operating and maintenance and repair information.
SYMBOL MEANING
• DO NOT USE IN THE RAIN
WARNING:Avoid
dangerous environments. Never
operate your unit in the rain, or in
damp or wet conditions. Moisture is
a shock hazard.
• BLOWERS – ROTATING
IMPELLER BLADES CAN
CAUSE SEVERE INJURY
WARNING:Stop the
motor and allow the impeller to stop
before opening the vacuum door,
installing or changing tubes or bag,
or before cleaning or performing any
maintenance.
• BLOWER/VACUUM MODE
CHANGE-OVER LEVER
A - Vacuum mode
B - Blower mode
• KEEP BYSTANDERS AWAY
WARNING:Keep all
bystanders, especially children and
pets, at least 50 feet (15 m.) from the
operating area.
• DOUBLE INSULATED
Two systems of insulation are
provided instead of grounding.
There is no grounding provided
and no means of grounding should
be added to this unit.
Page 6
6
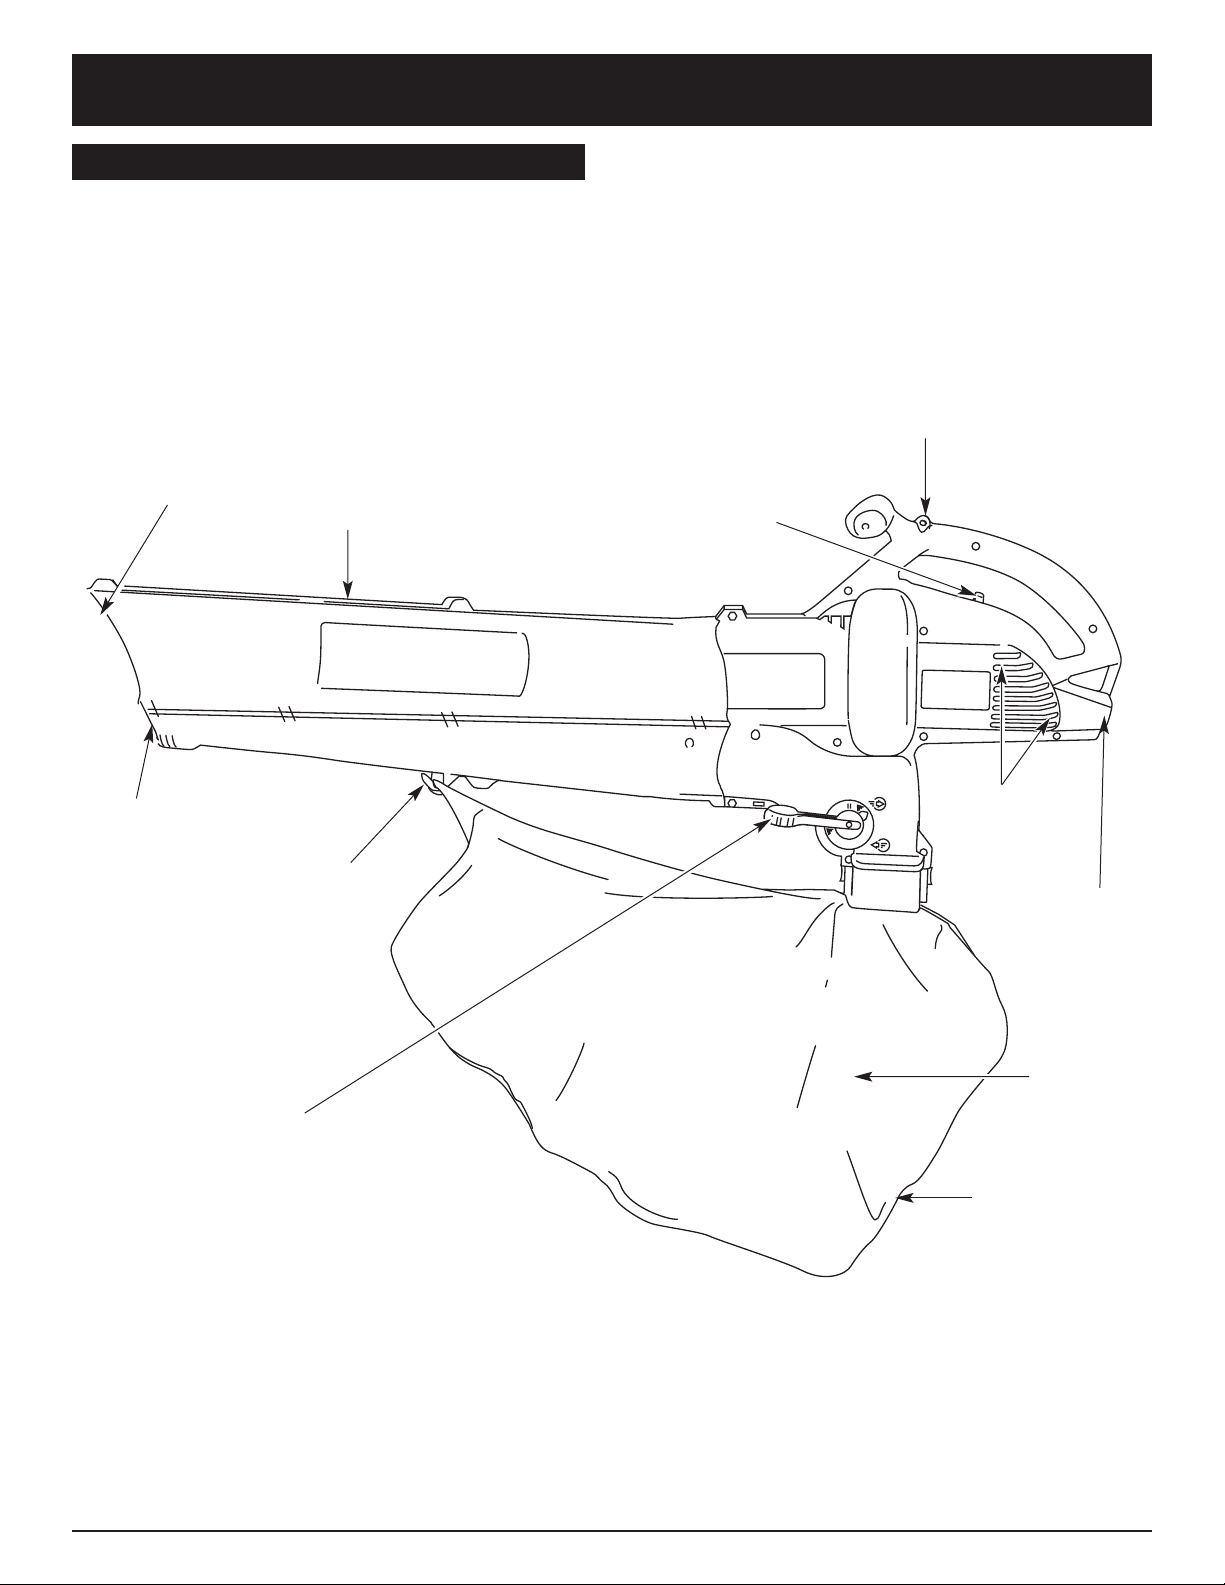
Blower/Vacuum Tube
Vacuum Bag
Blower/Vacuum Mode
Change-Over Lever
Vacuum Inlet
Blower Outlet
Vacuum Bag Hook
Power/Speed Switch
Motor Air
Vents
Vacuum Bag Zipper
Support
Fitting
RULES FOR SAFE OPERATION
APPLICATION
As a blower:
• Cleaning of yards, garages, driveways, porches,
patios, around walls, fences, etc.
As a vacuum:
• Picking up leaves, light debris, etc.
KNOW YOUR UNIT
Cord
Receptacle
Page 7
7
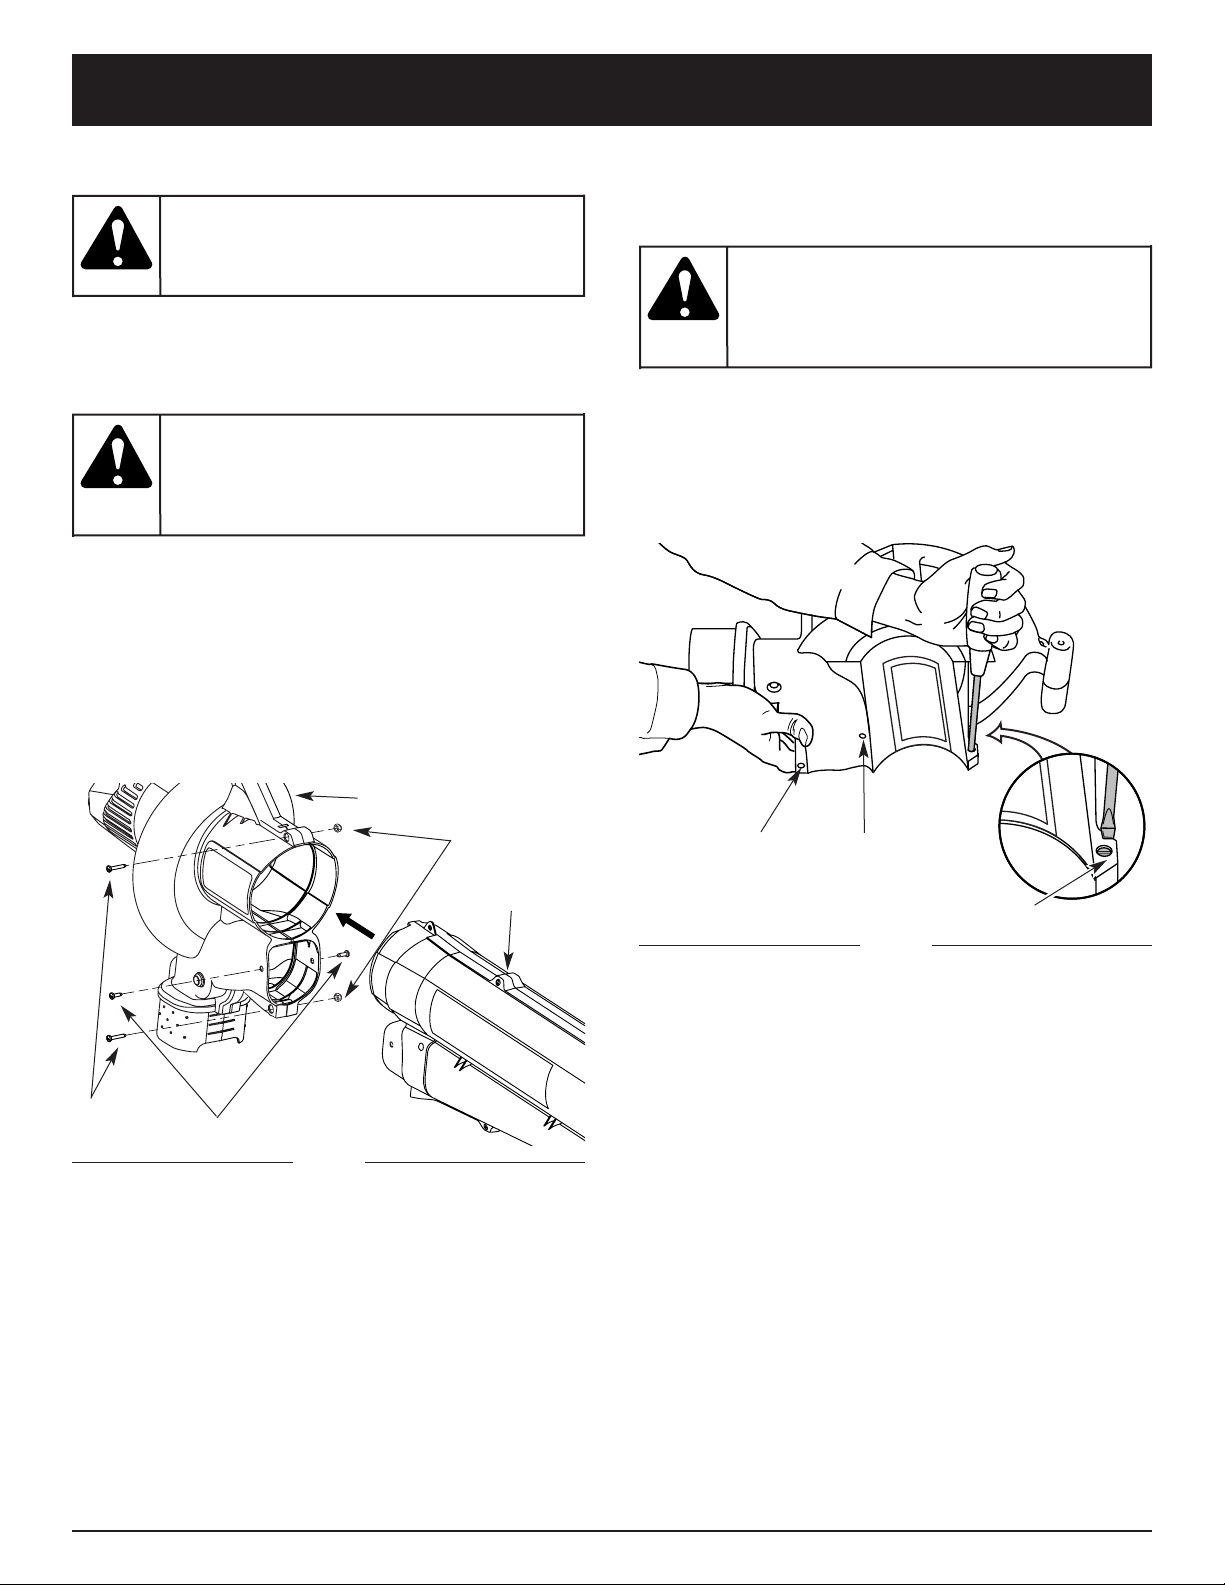
ASSEMBLY INSTRUCTIONS
Screw
and Nut
Screw and Nut
Self Tapping
Screw
ATTACHING AND REMOVING THE
BLOWER/VACUUM TUBE
Attaching
NOTE: The
blower/vacuum tube comes unassembled
on this unit. Installation is required to provide
safe and easy use for the operator.
1. Remove the screws and nuts provided from the
hardware pack.
2. Insert the blower/vacuum tube all the way into the
opening on the motor housing until the holes in the
tabs on the blower/vacuum tube align with the screw
holes in the housing (Fig. 1).
3. Insert the 2 (two) 8-32 x 3/4” slotted T20 Torx screws
into the right side of the motor housing and the 2 (two)
nuts into the left side of the motor housing (Fig. 1).
Fig. 1
4. Tighten the screws firmly. Do not over-tighten.
5. Install the 2 (two) remaining self-tapping 8-16 x 3/4”
slotted T20 Torx screws into the holes on either side
of the housing (Fig. 1). Tighten until snug, do not
over-tighten.
Removing
NOTE: It may be necessary to remove the
blower/vacuum tube to clear a blocked tube or
impeller.
1. Remove the 2 (two) self-tapping screws from either
side of the housing.
2. Remove the 2 (two) screws and nuts holding the
blower/vacuum tube on the housing (Fig. 2).
NOTE: Keep the hardware in a safe place for future use.
Fig. 2
3. Remove the blower/vacuum tube from the motor
housing.
4. Replace blower/vacuum tube before use.
Screw
Nut
Blower/Vacuum
Tube
Motor Housing
Self-Tapping Screw
To prevent serious
injury, make sure the
unit is in the off position, it is unplugged,
and the impellers have stopped before
attaching or removing tubes.
WARNING:
To avoid serious
personal injury, the
blower/vacuum tube and vacuum bag must
be assembled to unit when operating.
WARNING:
To prevent serious
injury, make sure the
unit is in the off position, it is unplugged,
and the impellers have stopped before
attaching or removing tubes.
WARNING:
Page 8

8
ASSEMBLY INSTRUCTIONS
Fig. 8
Fig. 7
Support Fitting
3. Snap the clip on to the support fitting (Fig. 7).
4. While standing in the operating position with the unit
off, adjust length to fit the operator’s size. Pull tab to
lengthen, pull strap to shorten (Fig 8).
Clip
INST ALLING THE SHOULDER HARNESS (Optional)
1. Push the strap through the center of the buckle.
2. Pull the strap over the cross bar and down through
the slot in the buckle (Fig. 6).
Fig. 6
Removing
1. Press the latching tabs on both sides of the vacuum
bag tube and pull the vacuum bag down from the
unit (Fig. 5).
2. Detach the vacuum bag from the vacuum bag hook.
Fig. 5
Latching Tabs
Vacuum Bag
Vacuum Bag Hook
Debris Exhaust Tube
Vacuum Bag Tube
Zipper
Fig. 4
Fig. 3
Latching Tabs
ATTACHING AND REMOVING THE VACUUM BAG
Attaching
1. Attach the vacuum bag to the vacuum bag hook on
the blower/vacuum tube (Fig. 3).
2. Slide the vacuum bag tube over the debris exhaust
tube on the housing. Push the tube until the latching
tabs on both sides click into place, securing the bag
on the unit (Fig. 4).
PRESS IN
PRESS IN
Clip
Page 9
9
This unit plug will only fit into a polarized extension cord
in one orientation. If the plug does not fully fit into the
extension cord, reverse the plug. If the plug still does not
fit, obtain a correct polarized extension cord.
A polarized extension cord will require the use of a
polarized wall outlet. This plug will only fit into a
polarized wall outlet in a specific orientation. If the plug
does not fit fully into the wall outlet, reverse the plug. If
the plug still does not fit, contact a qualified electrician
to install the proper wall outlet. Do not change the unit
plug, extension cord receptacle, or extension cord plug
in any way.
1. Secure the extension cord to the motor housing as
shown (Fig. 9). This prevents accidental removal of
the electrical cord.
OPERATING INSTRUCTIONS
CONNECTING THE POWER CORD
Use a minimum 25 foot (7.6 m) long, 16AWG, outdoor
electrical cord when using this unit. Other sizes include:
OFF
LOW
HIGH
Fig. 9
Fig. 11
STARTING/STOPPING INSTRUCTIONS
This unit is equipped with a three-way (OFF/ LOW/
HIGH) switch (Fig. 11):
• Slide the switch all the way down for OFF.
• Slide the switch up to the first click for LOW.
• Slide the switch up to the second click for HIGH.
Once the unit is plugged in, stand in the operating
position (Fig. 12). Slide the power/speed switch to LOW
or HIGH to start the unit. To stop the unit, slide the
switch to OFF (Fig. 11).
Fig. 10
2. Plug the female end of the electrical cord into the
receptacle at the back of the unit (Fig. 10).
Receptacle
Cord length (ft.) 25 50 100 150
Wire size (AWG) 16 16 16 14
MINIMUM WIRE SIZE FOR EXTENSION CORDS FOR
120 VOLT APPLIANCES USING 0-12 AMPS
To reduce the risk of
electrical shock, this
unit has a polarized plug (one blade is wider
than the other) and will require the use of a
polarized extension cord.
WARNING:
Page 10
10
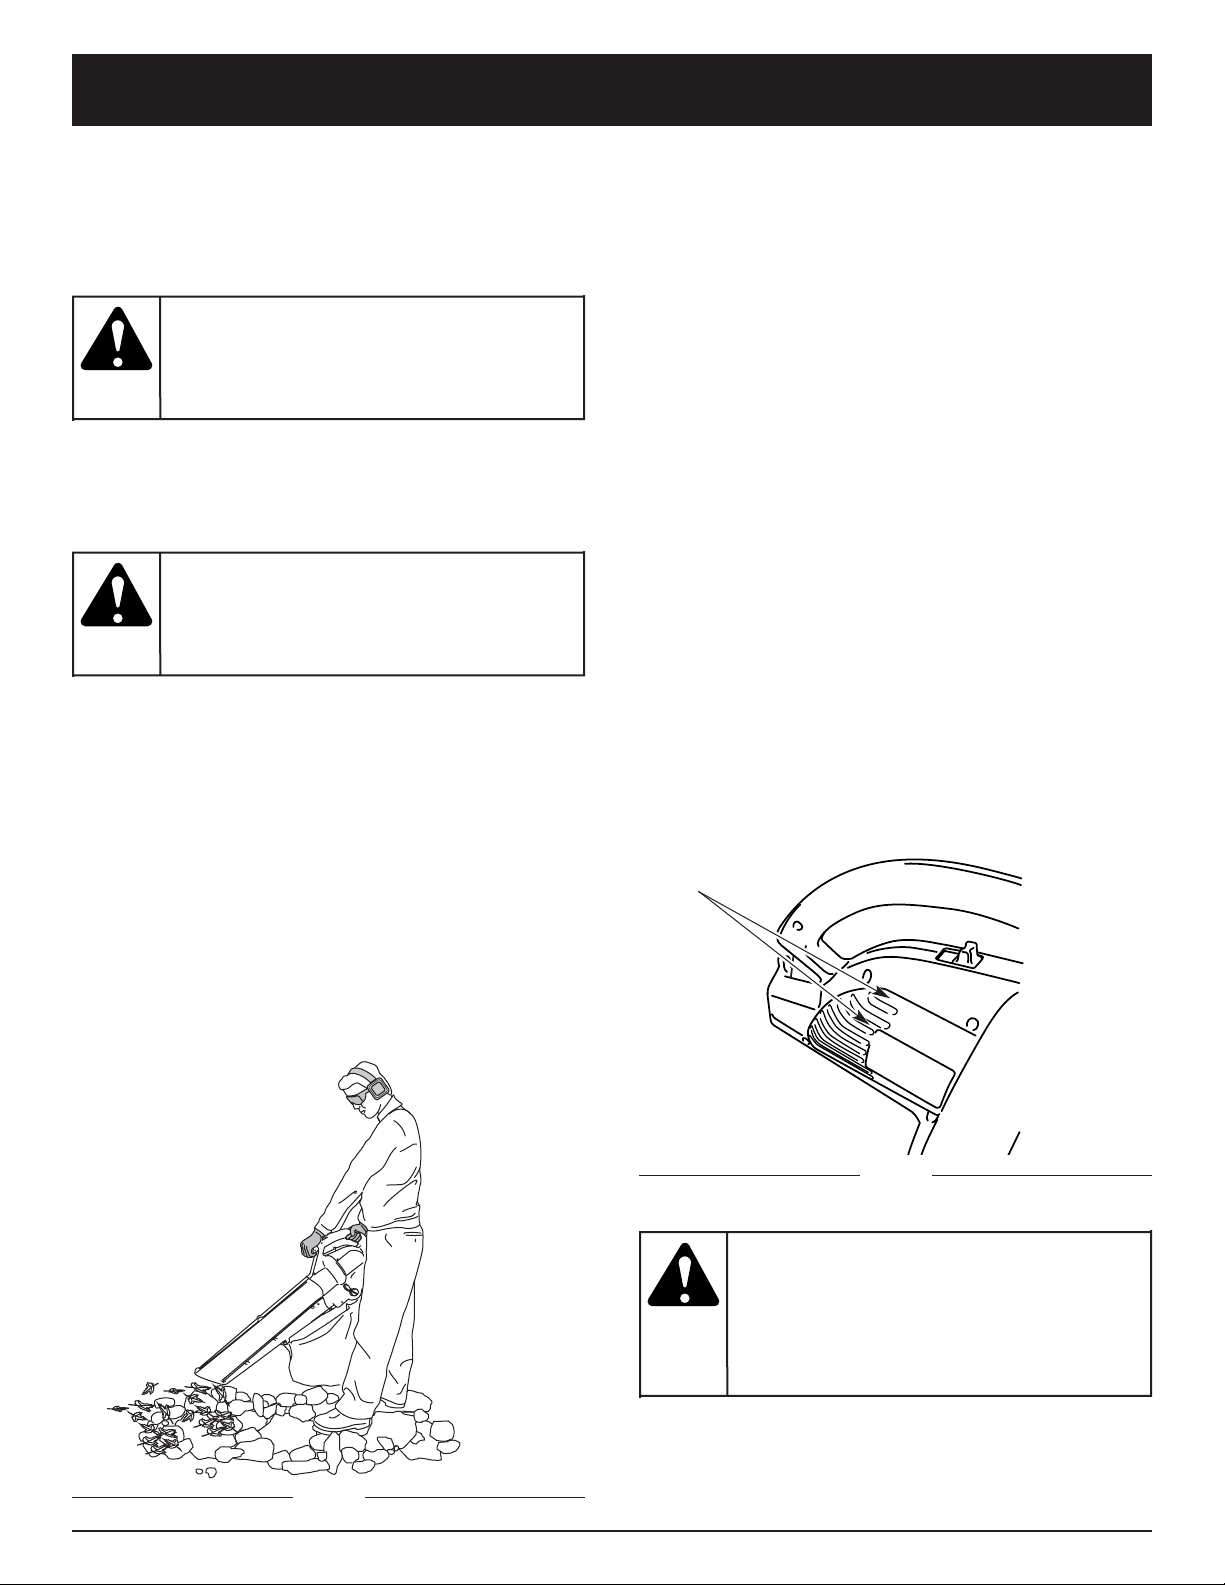
Air Vents
AIR VENTS
Never cover air vents. Keep them free from obstructions
and debris. They must always remain clear for proper
motor cooling (Fig. 13).
Fig. 13
HOLDING THE BLOWER/VACUUM
Before operating the unit, stand in the operating position.
(Fig. 12). Check for the following:
• Operator is wearing proper clothing, such as boots,
safety glasses or goggles, ear/hearing protection,
gloves, long pants and long sleeve shirt
• If the conditions are dusty, the operator is wearing a
dust mask or face mask
• The unit is in good working condition
• The tubes and bag are in place and secure
• The vacuum bag is installed and zipped closed (when
used as a vacuum)
OPERATING TIPS
• Be sure the vacuum bag is zipped closed before
operating the unit.
• Assure the unit is not directed at anybody or any loose
debris before starting the unit.
• Verify that the unit is in good working condition. Make
sure the tubes and guards are in place and secure.
• Always hold the unit with both hands when operating.
Keep a firm grip on both the front and rear handle or grips.
• To reduce the risk of hearing loss associated with sound
level(s), hearing protection is required.
Fig. 12
• Operate power equipment only at reasonable hours—
not early in the morning or late at night when people
might be disturbed. Comply with times listed in local
ordinances. Usual recommendations are 9:00 am to
5:00 pm, Monday through Saturday.
• To reduce noise levels, limit the number of pieces of
equipment used at any one time.
• To reduce noise levels, operate power blowers at the
lowest possible speed to do the job.
• Use rakes and brooms to loosen debris before blowing.
• In dusty conditions, slightly dampen surfaces or use a
mister attachment when water is available.
• Conserve water by using power blowers instead of
hoses for many lawn and garden applications,
including areas such as gutters, screens, patios, grills,
porches, and gardens.
•Watch out for children, pets, open windows or freshly
washed cars, and blow debris safely away.
• Clean up after using blowers and other equipment.
Dispose of debris appropriately.
OPERATING INSTRUCTIONS
To avoid serious
personal injury , do
not wear loose fitting clothing or articles such
as scarves, strings, chains, ties, etc. that
could get drawn into the air vents. To make
sure long hair does not get drawn into the air
vents secure hair above shoulder level.
WARNING:
To avoid serious
personal injury,
wear goggles or safety glasses at all times
when operating this unit. Wear a face mask
or dust mask in dusty locations.
WARNING:
To prevent serious
personal injury or
damage to the unit, make sure blower tubes
or vacuum tubes and the vacuum bag are in
place before you operate the unit.
WARNING:
Page 11
11
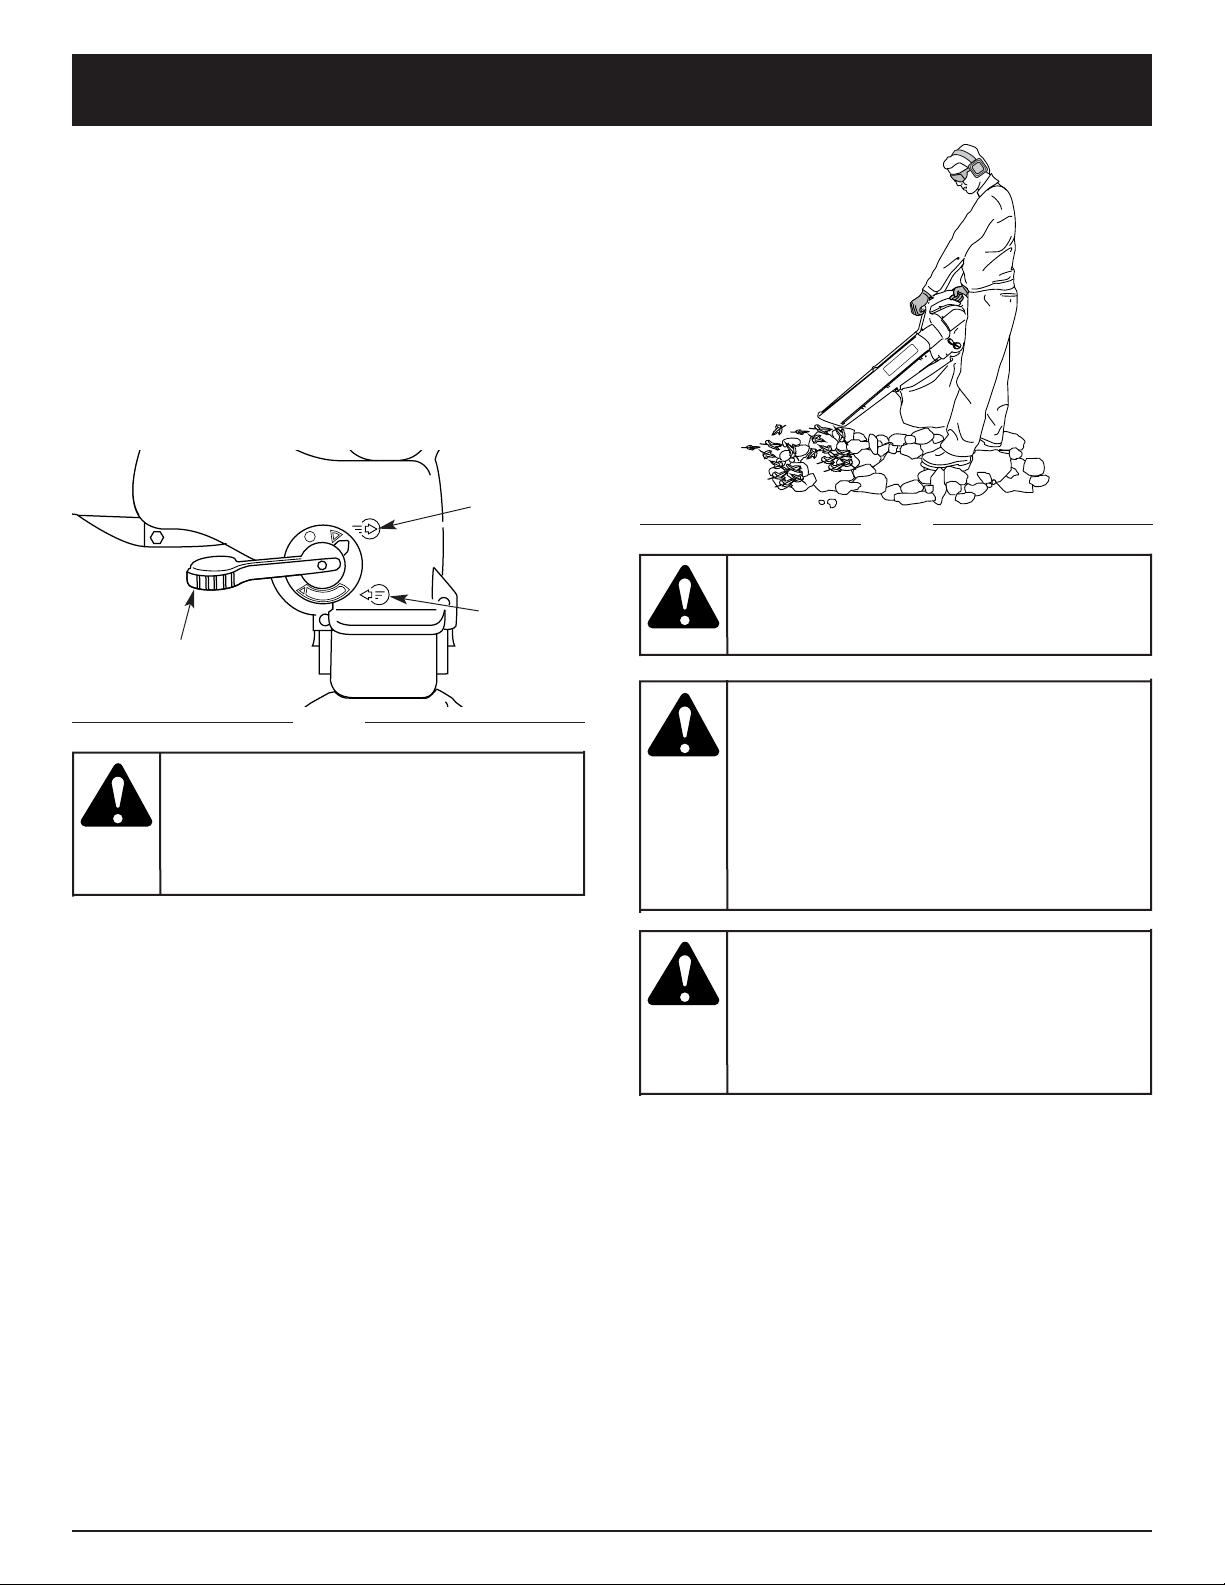
Change-over lever
OPERATING AS A BLOWER
Converting to a Blower
1. Start the unit. See Starting/Stopping Instructions.
2. Set the blower/vacuum mode change-over lever to
the up position (Blower Mode) (Fig. 14).
NOTE: Never use the unit with the lever in a position half
way between either mode.
3. If you are using the optional shoulder harness, place
it over your head and onto your shoulder and adjust
it before starting. Refer to Installing the Shoulder
Harness.
Fig. 14
Fig. 15
Fig. 16
Fig. 17
OPERATING INSTRUCTIONS
Blower Operating Procedures
Hold the blower as shown in Figures 15, 16 and 17.
Sweep from side to side with the nozzle several inches
above the ground or floor. Slowly advance the unit,
keeping the accumulated pile of debris in front of you.
Most dry blowing operations are better suited to low
speeds, rather than high. High speed blowing is a better
way to move heavier items like large debris or gravel.
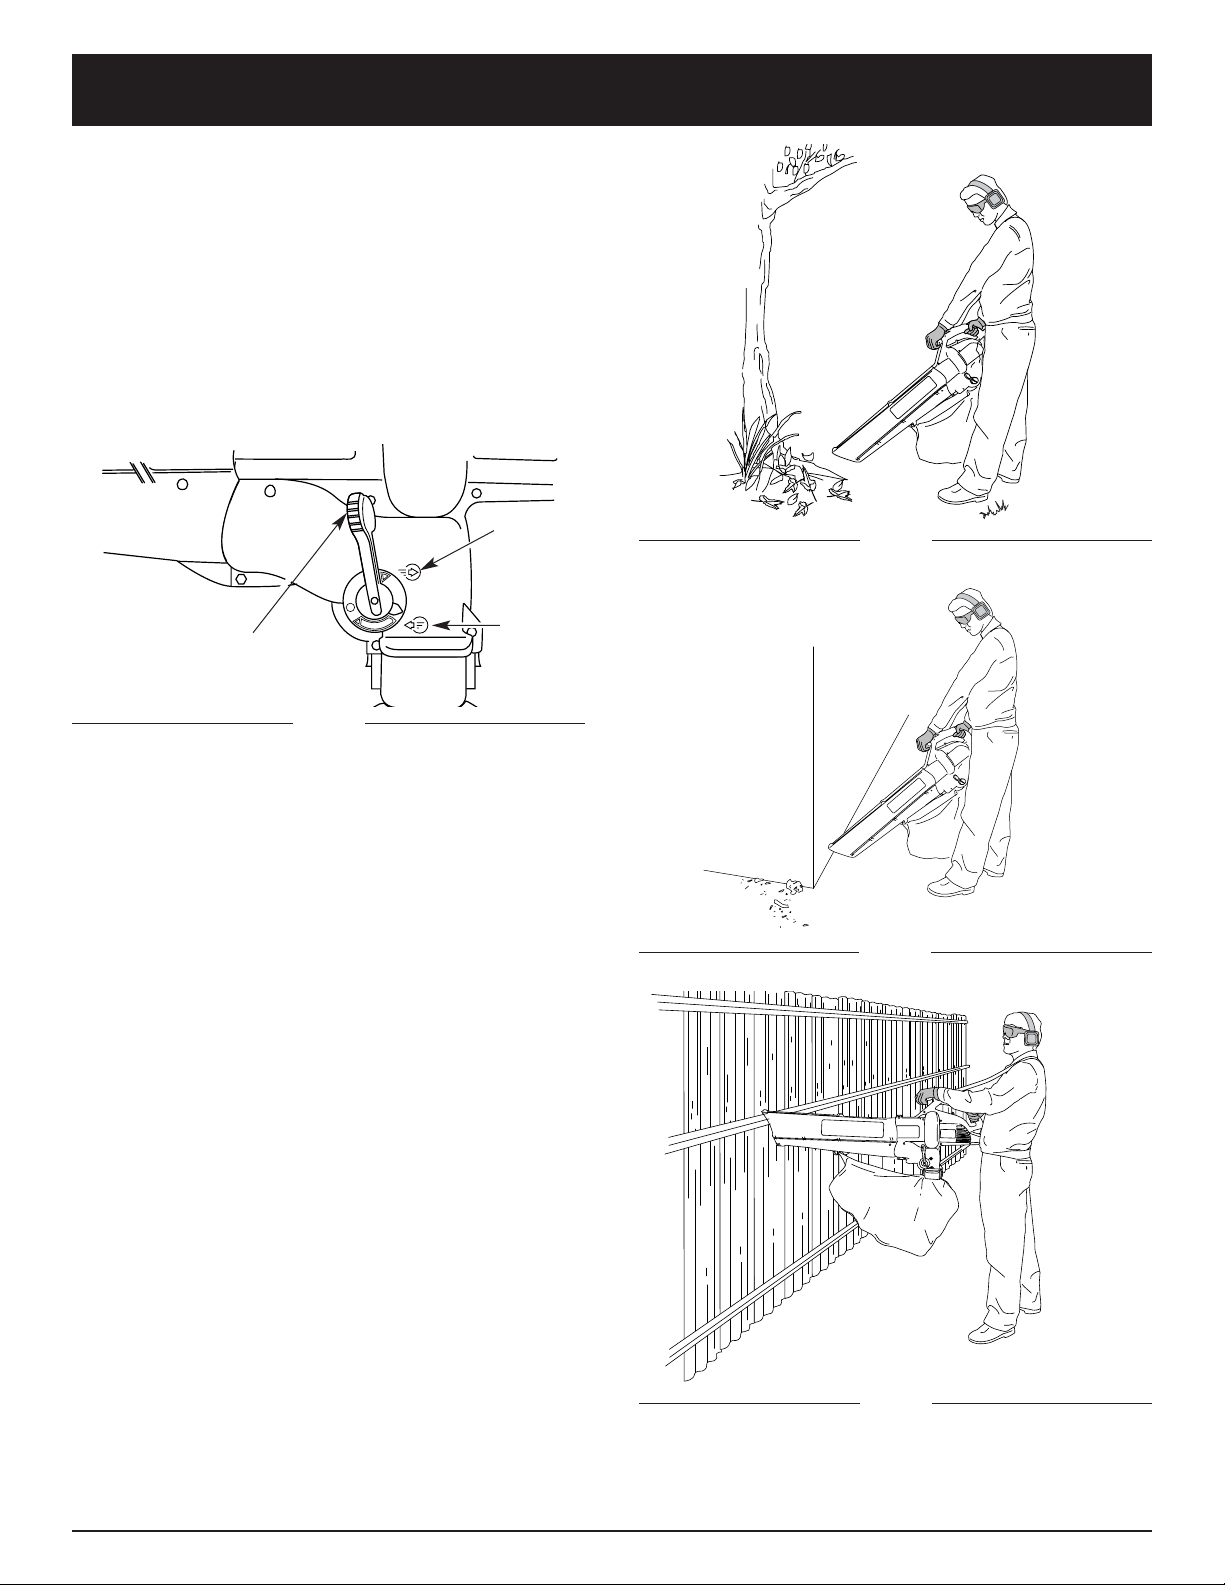
1Use the blower for trees, shrubs, flower beds and
hard-to-clean areas (Fig. 15).
2. Use the unit around buildings and for other normal
cleaning procedures (Fig. 16).
3. Use the blower around walls, overhangs, fences and
screens (Fig. 17).
Vacuum
Mode
Blower
Mode
Page 12
12
Vacuum Operation Procedures
Check for the following before operating the unit:
• Operator is wearing proper clothing, such as boots,
safety glasses or goggles, ear/hearing protection,
gloves, long pants and long sleeve shirt
• If the conditions are dusty, operator is equipped with a
dust mask or face mask
• The unit is in good working condition-- the vacuum
tubes and vacuum bag are in place and secure.
• The vacuum bag harness is in place and correctly
adjusted
Use the unit for vacuuming up light debris like leaves
and paper.
Hold the vacuum, tilting the suction tube slightly (2-4 in
or 50-100 mm above the ground), and use a sweeping
action to collect light debris (Fig. 19). The debris will flow
into the vacuum bag. Items such as small leaves and
small twigs will be mulched as they pass through the fan
housing, allowing the vacuum bag to hold more debris.
When the bag is full, suction will noticeably decrease.
Turn off the unit and allow the impeller to stop before
you unzip the bag. Unzip the bag and empty the
contents before continuing. Refer to Emptying the
Vacuum Bag.
OPERATING AS A VACUUM
Converting to Vacuum
1. Start the unit. See Starting/Stopping Instructions.
2. Set the blower/vacuum mode change-over lever to
the down position (Vacuum Mode) (Fig. 18).
NOTE: Never use the unit with the lever in a position half
way between either mode.
3. If you are using the optional shoulder harness, place
it over your head and onto your shoulder and adjust
it before starting. Refer to Installing the Shoulder
Harness.
Change-over lever
Fig. 18
Vacuum
Mode
Blower
Mode
Fig. 19
NOTE: Empty the bag after each use to avoid
deterioration and obstructing air flow, which will
reduce the performance of the vacuum
Avoid situations that
could catch the
vacuum bag on fire. Do not operate near an
open flame. Do not vacuum warm ash from
fireplaces, barbecue pits, brush piles, etc.
Do not vacuum discarded cigars or cigarettes
unless the cinders are completely cool.
WARNING:
To avoid serious
personal injury,
never unzip the vacuum bag without
stopping the unit first.
WARNING:
To prevent serious
personal injury or
damage to the unit, always install vacuum
tubes, the vacuum bag and make sure the
vacuum bag is completely zipped closed
when operating this unit as a vacuum.
WARNING:
As a vacuum, the
unit is designed to
pick up dry material such as leaves, grass,
small twigs and bits of paper. To avoid
serious personal injury, do not attempt to
vacuum wet debris and/or standing water
as this may result in damage to the blower/
vacuum. To avoid severe damage to the
impeller, do not vacuum metal, broken glass
or similar items.
WARNING:
OPERATING INSTRUCTIONS
Page 13
13
EMPTYING THE VACUUM BAG
NOTE: Empty the bag after each use to avoid
deterioration and obstructing air flow, which will
reduce the performance of the vacuum.
1. Unplug the unit.
2. While pressing the latching tabs on both sides of the
vacuum bag tube, pull the vacuum bag down off the
unit (Fig. 20).
3. Detach the vacuum bag from the vacuum bag hook.
4. Unzip the bag and empty the contents into a
garbage bag or container.
5. Turn the bag inside out after initial emptying and
vigorously shake out dust and debris.
6. Return the bag to outside in, zip the bag closed and
reinstall vacuum bag onto unit.
7. Plug the unit back into the power supply.
Fig. 20
Latching tabs
PRESS IN
PRESS IN
CLEARING A BLOCKED TUBE / IMPELLER
1. Slide the Power/Speed switch down in the OFF
position until the motor/impeller comes to a complete
stop (Fig. 11).
2. Unplug the unit.
3. Remove the vacuum bag and then the blower/vacuum
tube.
4. Carefully remove material blocking the tube or
impeller. Inspect the blades to assure no damage has
occurred. Rotate the impeller blades by hand to
assure the blockage is completely cleared.
5. Reinstall the blower/vacuum tube and the vacuum
bag.
6. Plug the unit back into the power supply.
OPERATING INSTRUCTIONS
Wear eye protection
and a dust mask
when emptying the vacuum bag.
WARNING:
To avoid serious
personal injury,
never unzip or remove the vacuum bag
without first turning the unit off.
WARNING:
To avoid serious
personal injury,
always wear gloves to protect yourself from
the impeller blades or other sharp objects.
WARNING:
To avoid serious
personal injury, be
sure the unit is off and unplugged before
clearing the impeller.
WARNING:
Page 14

14
MAINTENANCE AND REPAIR INSTRUCTIONS
CLEANING THE UNIT
Use a small brush to clean off the outside of the unit.
Do not use strong detergents. Household cleaners that
contain aromatic oils such as pine and lemon, and
solvents such as kerosene, can damage plastic housing
or handle. Wipe off any moisture with a soft cloth.
CLEANING THE VACUUM BAG
1. Empty the bag after each use to avoid deterioration
and obstructing air flow, which will reduce the
performance of the vacuum.
2. Wearing eye protection and a dust mask, clean the
bag as needed. Turn the bag inside out after initial
emptying and vigorously shake out dust and debris.
3. Wash the bag once a year or more often if needed:
a. Remove the vacuum bag.
b. Turn bag inside out.
c. Hang it up.
d. Hose it down thoroughly.
e. Hang to dry.
f. Turn bag right-side out and reinstall.
STORAGE
• Store the unit locked up to prevent unauthorized use
or damage.
• Store the unit in a dry, well-ventilated area.
• Store the unit out of the reach of children.
INSPECT EXTENSION CORDS
Inspect all extension cords periodically. Look closely for
deterioration, cuts or cracks in the insulation. Inspect the
connectors for damage. Replace cords if defective or
damaged.
SERVICING DOUBLE INSULATED UNITS
This unit is double-insulated. In a double-insulated unit,
two systems of insulation are provided instead of
grounding. There is no grounding provided and no
means of grounding should be added to this unit.
Extreme care and knowledge of the system is required
when servicing a double-insulated unit. Service should
be performed by qualified service personnel only.
Replacement parts for a double-insulated unit must be
identical to the parts they replace. Refer any repair to an
authorized service dealer. A double-insulated unit is
marked with the words “double insulation” or “double
insulated.”
To avoid serious
personal injury,
always turn your unit off and unplug it
before you clean or service it.
WARNING:
Page 15

15
TROUBLESHOOTING
If further assistance is required, contact your authorized service dealer.
CAUSE ACTION
Bag full Empty bag, as described in Empty the Vacuum Bag
Blocked tube Clear the blockage as described in Clearing a Blocked
Tube/ Impeller
Blocked impeller Clear the blockage as described in Clearing a Blocked
Tube/ Impeller
Damaged impeller Take the unit to an authorized service dealer
Dirty bag Clean the vacuum bag
Torn bag Replace the vacuum bag
Bag unzipped Zip up the vacuum bag
Unit unplugged Plug into an extension cord
UNIT WILL NOT BLOW OR VACUUM
Motor Amperage.................................................................................................................................................... 12 Amps
Motor Voltage.....................................................................................................................................A.C.,120 Volts Electric
Blower Air Output ......................................................................................................................... up to 157 mph (253 kmh)
Vacuum Air Flow............................................................................................................................. up to 424 cfm (12 cmm)
Mulching Ratio...................................................................................................................................................... up to 10:1
Operating Weight ........................................................................................................................................... 10 lb (4.5 kg)
Vacuum Bag Capacity........................................................................................................................ 0.75 bushels (26.4 L)
SPECIFICATIONS
CAUSE ACTION
Unit is unplugged Check cord to make sure it is plugged into an electrical outlet
Power/Speed switch is in the OFF position Slide switch to HIGH or LOW
GFCI in outlet has tripped (if used) Reset GFCI
UNIT WILL NOT START
Page 16

16
NOTES
Page 17

17
NOTES
Page 18

MANUFACTURER’S LIMITED WARRANTY FOR:
No implied warranty, including any implied warranty of
merchantability or fitness for a particular purpose,
applies after the applicable period of express written
warranty above as to the parts as identified. No other
express warranty or guaranty, whether written or oral,
except as mentioned above, given by any person or
entity, including a dealer or retailer, with respect to any
product shall bind Troy-Bilt LLC During the period of
the Warranty, the exclusive remedy is repair or
replacement of the product as set forth above. (Some
states do not allow limitations on how long an implied
warranty lasts, so the above limitation may not apply to
you.)
The provisions as set forth in this Warranty provide the
sole and exclusive remedy arising from the sales. TroyBilt LLC shall not be liable for incidental or
consequential loss or damages including, without
limitation, expenses incurred for substitute or
replacement lawn care services, for transportation or
for related expenses, or for rental expenses to
temporarily replace a warranted product. (Some states
do not allow limitations on how long an implied warranty
lasts, so the above limitation may not apply to you.)
In no event shall recovery of any kind be greater than the
amount of the purchase price of the product sold.
Alteration of the safety features of the product shall void
this Warranty. You assume the risk and liability for loss,
damage, or injury to you and your property and/or to
others and their property arising out of the use or misuse
or inability to use the product.
This limited warranty shall not extend to anyone other than
the original purchaser, original lessee or the person for
whom it was purchased as a gift.
How State Law Relates to this Warranty: This warranty
gives you specific legal rights, and you may also have
other rights which vary from state to state.
To locate your nearest service dealer dial
1-800-520-5520.
Troy-Bilt LLC
P.O. Box 361131
Cleveland, OH 44136-0019
The limited warranty set forth below is given by Troy-Bilt
LLC with respect to new merchandise purchased and used
in the United States, its possessions and territories.
Troy-Bilt LLC warrants this product against defects in
material and workmanship for a period of two (2) years
commencing on the date of original purchase and will, at its
option, repair or replace, free of charge, any part found to
be defective in material or workmanship. This limited
warranty shall only apply if this product has been operated
and maintained in accordance with the Operator’s Manual
furnished with the product, and has not been subject to
misuse, abuse, commercial use, neglect, accident,
improper maintenance, alteration, vandalism, theft, fire,
water or damage because of other peril or natural disaster.
Damage resulting from the installation or use of any
accessory or attachment not approved by Troy-Bilt LLC for
use with the product(s) covered by this manual will void
your warranty as to any resulting damage. This warranty is
limited to ninety (90) days from the date of original retail
purchase for any Troy-Bilt product that is used for rental or
commercial purposes, or any other income-producing
purpose.
HOW TO OBTAIN SERVICE: Warranty service is
available, WITH PROOF OF PURCHASE THROUGH
YOUR LOCAL AUTHORIZED SERVICE DEALER. To locate
the dealer in your area, visit our website at www.troybilt.com,
check for a listing in the Yellow Pages, call 1-800-520-
5520 or write to
P.O. Box 361131, Cleveland, OH 44136-
0019
.
This limited warranty does not provide coverage in
the following cases:
A. Tune-ups - Spark Plugs, Carburetor Adjustments,
Filters
B. Wear items - Bump Knobs, Outer Spools, Cutting
Line, Inner Reels, Starter Pulley, Starter Ropes, Drive
Belts
C. Troy-Bilt LLC does not extend any warranty for
products sold or exported outside of the United
States of America, its possessions and territories,
except those sold through Troy-Bilt’s authorized
channels of export distribution.
Troy-Bilt LLC reserves the right to change or improve the
design of any Troy-Bilt Product without assuming any
obligation to modify any product previously manufactured.
Page 19

Souffleuse Aspirateur Á
Pailler Électrique
Modèle TB125QS
Manuel de L'utilisateur
P/N 769-01191 (7/04)
MANUEL IMPORTANT À NE PAS JETER
Page 20

F2
Copiez le numéro
de série ici :
Copiez le numéro de
modèle / pièce mère ici :
TOUS NOS REMERCIEMENTS
Nous vous remercions d'avoir acheté ce produit de
qualité. Cet outil mécanique de plein air moderne est
conçu pour vous rendre service pendant longtemps. Il
vous sauvera beaucoup de temps comme vous pourrez
vous en rendre compte. Ce manuel de l'utilisateur
comporte un mode d'emploi facile à comprendre. Prenez
soin de lire le manuel au complet et suivez toutes ses
instructions à la lettre afin de conserver votre nouvel outil
mécanique de plein air en excellent état de
fonctionnement.
RÉFÉRENCES, ILLUSTRATIONS ET
SPÉCIFICATIONS RELATIVES AU PRODUIT
Toutes les informations, illustrations et spécifications
contenues dans ce manuel tiennent compte des
dernières informations techniques disponibles au
moment de mettre sous presse. Nous nous réservons le
droit d'y apporter des modifications à tout moment, sans
préavis.
Copyright© 2004 MTD SOUTHWEST INC., Tous droits
réservés.
NFORMATIONS D’ENTRETIEN
Tout entretien effectué sur cet appareil pendant et après
la période de garantie doit être fait par un concessionnaire agréé uniquement. Obtenez la liste des
concessionnaires agréés appelez le 1-800-520-5520.
Pour de plus amples informations à propos de votre
appareil, visitez www.troybilt.com.
NE RETOURNEZ PAS L'APPAREIL AU DÉTAILLANT
CHEZ QUI VOUS L'AVEZ ACHETÉ. TOUT SERVICE
SOUS GARANTIE NÉCESSITE UNE PREUVE D'ACHAT.
Avant d'assembler votre nouvel équipement, repérez la
plaque signalétique de l'appareil et copiez ses
informations dans l'espace ci-dessous. Ces informations
sont essentielles si vous désirez obtenir de l'aide auprès
de notre service technique ou d'un distributeur agréé. Un
exemple de plaque signalétique est présenté ci-dessous.
Prenez soin de lire et de bien comprendre ce manuel avant de démarrer ou de faire fonctionner cet équipement.
CE PRODUIT EST COUVERT PAR UN OU PLUSIEURS BREVETS AMÉRICAINS, ET D’AUTRES SONT EN INSTANCE.
TABLE DES MATIÈRES
Service technique . . . . . . . . . . . . . . . . . . . . . . . . . . .2
Consignes de sécurité . . . . . . . . . . . . . . . . . . . . . . .3
Familiarisez-vous avec votre appareil . . . . . . . . . . .6
Instructions de montage . . . . . . . . . . . . . . . . . . . . . .7
Mode d'emploi . . . . . . . . . . . . . . . . . . . . . . . . . . . . .9
Entretien et réparations . . . . . . . . . . . . . . . . . . . . .14
Caractéristiques . . . . . . . . . . . . . . . . . . . . . . . . . . .15
Tableau de dépannage . . . . . . . . . . . . . . . . . . . . . .15
Garantie . . . . . . . . . . . . . . . . . . . . . . . . . . . . . . . . .18
Liste des pièces . . . .Intérieure de la Couverture Arrière
Numéro de modèle
Numéro de série
Numéro de pièce mère
INTRODUCTION
Si vous éprouvez des difficultés à assembler ce produit
ou si vous avez des questions concernant les
commandes, le fonctionnement ou l’entretien de cet
appareil, veuillez communiquer avec notre service
technique.
MODEL :
S/N :
ITEM :
Page 21

F3
CONSIGNES DE SÉCURITÉ
SYMBOLE SIGNIFICATION
SYMBOLE SIGNIFICATION
LIRE TOUTES LES INSTRUCTIONS
AVANT UTILISATION
• Lire les instructions attentivement. Se familiariser avec
les commandes et l’utilisation correcte de cet outil.
• Ne pas utiliser l’outil si vous êtes fatigué, malade ou
sous l’effet de l’alcool, de drogues ou de médicaments.
• Les enfants de moins de 15 ans ne doivent pas utiliser
l’outil, exception faite des adolescents sous
surveillance d’un adulte.
• Avant chaque utilisation, inspectez l'appareil pour
vérifier qu'il ne comporte pas de pièces desserrées ou
endommagées. Évitez de l'utiliser jusqu'à ce que les
réglages ou réparations aient été effectués.
• Tous les accessoires de sécurité et protections
doivent être correctement installés avant utilisation.
•Utilisez l'appareil en plein jour ou avec un bon éclairage.
• Inspectez la zone de travail avant de démarrer
l’appareil. Enlevez tous les débris et objets durs ou
tranchants tel que verre, fils métalliques, etc.
• Éloignez tout spectateur, les enfants et les animaux
domestiques en particulier, d'au moins 15 m (50 pieds)
de l'appareil lorsque celui-ci est en marche.
AVERTISSEMENTS DE SÉCURITÉ ÉLECTRIQUE
• Comme cet outil comporte une isolation double, il est
donc possible d’utiliser des rallonges à 2 conducteurs
(rallonges sans terre). Cependant, il est tout à fait possible
d’utiliser des rallonges à 3 conducteurs (rallonges avec fil
de terre), qui comportent des fiches de type NEMA (fiches
parallèles, fiche terre en forme de U). Ces rallonges sont
disponibles auprès de votre revendeur local. Veillez à
n’utiliser que des rallonges à section circulaire,
approuvées pour une utilisation extérieure.
• Pour réduire le risque de choc électrique, cet appareil
est pourvu d’une fiche polarisée (une lame est plus
large que l’autre). Cet appareil ne peut être inséré dans
une prise polarisée que d’une seule manière. S’il n’est
pas possible d’insérer entièrement la fiche dans la
prise, essayez de brancher la fiche dans l’autre sens. Si
malgré tout, il n’est pas possible d’insérer la fiche,
remplacez le cordon par un cordon qui comporte les
bonnes fiches. Ne modifiez cet appareil en aucun cas.
*La grosseur du fil (AWG) pour l’ampérage de 12 à 19
ampères est de 14 AWG pour 25 pieds, de 12 AWG
pour 50 pieds et n’est pas recommandé pour 100 ou
150 pieds.
Long. de cordon (pieds)
25 50 100 150
Calibre du cordon (AWG)*
16 16 16 14
CALIBRE MINIMUM DES RALLONGES ALIMENTANT DES
APPAREILS 120V, A COURANT DE CHARGE DE 0-12 AMPS*
• IMPORTANTES CONSIGNES DE SÉCURITÉ•
Les symboles de sécurité attirent votre attention sur
des dangers potentiels. Ces symboles et leurs détails
explicatifs méritent que vous les lisiez et compreniez
bien. Les avertissements de sécurité ne peuvent éviter
les dangers de par eux-mêmes. Les consignes ou
mises en garde qu'ils donnent ne remplacent pas des
mesures préventives appropriées contre les accidents.
REMARQUE: donne des informations ou des
instructions vitales pour le fonctionnement ou
l'entretien de l'équipement.
le non-
respect d’un
avertissement peut causer dommages matériels
ou blessures graves pour tous. Respectez les
consignes de sécurité afin de réduire les risques
d'incendie, d'électrocution et de blessures.
AVERTISSEMENT :
le non-respect d’un
avertissement peut
causer dommages matériels ou blessures
graves pour tous. Respectez les consignes de
sécurité afin de réduire les risques d'incendie,
d'électrocution et de blessures.
DANGER:
le non-
respect
d’un avertissement peut causer dommages
matériels ou blessures graves pour tous.
Respectez toujours les consignes de sécurité
afin de réduire les risques d'incendie,
d'électrocution et de blessures.
MISE EN GARDE:
indique un danger, un avertissement ou une
mise en garde. Soyez vigilant afin d'éviter toute
blessure grave. Ce symbole peut être combiné
à d'autres symboles ou pictogrammes.
ALERTE DE SÉCURITÉ:
respectez toujours les
consignes de sécurité
durant l’utilisation d’appareils de jardinage
électriques afin de réduire les risques
d’incendie, d’électrocution et de blessures.
Prenez soin de bien lire et comprendre tout le
manuel de l’utilisateur avant d’utiliser la
souffleuse/aspirateur. Faites particulièrement
attention au mode d'emploi et aux
avertissements de sécurité.
DANGER:
Pour
réduire le
risque de choc électrique, utilisez uniquement
des rallonges électriques approuvées pour une
utilisation extérieure., comme par exemple les
rallonges à cordons de typeSW-A, SOW-A, STWA, STOW-A, SJW-A, SJOW-A, SJTW-W ou SJTOW.
AVER TISSEMENT:
Lisez le(s) manuel(s) de l'utilisateur et suivez tous les
avertissements et consignes de sécurité. Vous
pourriez à défaut entraîner des blessures graves pour
vous ou d'autres personnes.
SI VOUS AVEZ DES QUESTIONS, APPELEZ LE
1–800–520–5520
Page 22

F4
CONSIGNES DE SÉCURITÉ
• Cet outil comporte une isolation double. Pour toutes les
réparations, utilisez uniquement des pièces de rechange
identiques. Tout cordon électrique endommagé doit être
réparé ou remplacé.
• JEUX DE CORDONS: Vérifiez que votre jeu de cordons est en
bon état de fonctionnement. Si vous utilisez un jeu de cordons,
assurez vous de bien utiliser un cordon de calibre suffisant pour
laisser passer le courant de charge de votre appareil. Un jeu de
cordons à section trop faible risque de provoquer des chutes de
tension de ligne, qui entraînent une perte de puissance et une
surchauffe. Le tableau ci-dessous donne les calibres corrects à
utiliser, en fonction de la longueur du cordon et de la valeur de
l’intensité nominale. En cas de doute, utilisez la section de câble
immédiate-ment supérieure. Un numéro de calibre faible
correspond à une forte section de câble. Référez vous à la Mode
D’emploi pour réduire le risque de débranchement du cordon de
l’appareil pendant le fonctionnement, du jeu de cordons.
• Le(s) circuit(s) électrique(s) ou la(les) prise(s) d’alimentation de
cet outil de jardinage doit(doivent) comporter une protection
de type GFCI (qui coupe le circuit en cas de défaut de terre).
Il existe des prises qui comportent une protection GFCI, et
que l’on peut utiliser dans ce cas de figure.
• Votre appareil est pourvu d’une plaquette du constructeur, qui
indique le type de tension à utiliser. N’alimentez jamais cet
appareil avec une tension alternative différente de celle affichée.
• Procédez à une inspection périodique de vos rallonges
électriques et de la fiche de raccord de votre appareil. Examinez
plus particulièrement l’isolation qui ne doit pas présenter de
traces de détérioration, de coupures ou de mise à nu. Inspectez
également les raccords qui doivent être en bon état. Si les
cordons paraissent endommagés, remplacez les ou réparez les.
• Evitez d’utiliser cet appareil dans des conditions dangereuses.
Ne le faites jamais fonctionner en atmosphère humide ou
mouillée. L’humidité constitue un danger réel de choc électrique.
• N’utilisez pas cet appareil sous la pluie.
• Ne touchez pas la fiche ou l’appareil lui même si vos mains
sont mouillées.
PENDANT L’UTILISATION
• Portez des lunettes de sécurité conformes aux normes ANSI
Z87.1 ainsi que des protège-oreilles durant l'utilisation de
l'appareil. Portez un masque facial ou antipoussières si vous
travaillez dans un lieu poussiéreux.
• Portez des pantalons épais et longs, des bottes et des
gants. Ne marchez pas pieds nus et évitez les vêtements
lâches, bijoux, pantalons courts et sandales. Relevez les
cheveux au-dessus des épaules.
• Évitez tout démarrage accidentel. Ne transportez pas
l'appareil branché, le doigt sur l’interrupteur. Mettez ce
dernier hors tension avant de brancher.
• L’outil doit toujours être posé sur une surface propre et ferme.
Les matériaux tels que le gravier, le sable, la poussière,
l’herbe, etc. peuvent être aspirés par l’admission d’air et
projetés par la sortie de l’outil, ce qui peut endommager l’outil,
causer des dégâts matériels et des blessures graves à
l’utilisateur ou aux personnes se trouvant à proximité.
• Utilisez les outils appropriés. Utilisez l’appareil strictement
selon les consignes du manuel. Ne l’utilisez pas pour des
tâches autres que celles pour lesquelles il a été conçu.
Utilisez les accessoires recommandés par le fabricant
uniquement.
• Cet appareil n'est pas conçu pour servir de jouet.
• Ne laissez personne se servir de l’appareil comme un jouet.
Faites particulièrement attention si des enfants l’utilisent ou
se trouvent à proximité.
• Ne l’utilisez pas pour aspirer des liquides inflammables ou
combustibles tels l’essence et ne l’utilisez pas dans des
lieux où ces liquides peuvent être présents.
• Ne vous étirez pas et n’utilisez pas l’appareil à partir de
surfaces instables tel qu’échelles, arbres, pentes abruptes,
toits, etc. Tenez-vous toujours fermement sur les pieds en
position d'équilibre.
• Ne maltraitez pas le cordon. Ne tirez jamais l’appareil par le
cordon et ne le débranchez pas en tirant sur le cordon. Protégez
celui-ci de la chaleur, de l’huile et des bords tranchants.
• Débranchez en tirant sur la prise et non le cordon.
• Restez toujours en alerte. Faites preuve de bon sens. Pour
éviter de vous blesser ou de blesser les autres, n’utilisez pas
l’appareil en état de fatigue.
• N'utilisez pas l'appareil si vous êtes sous l'effet de drogues,
de l'alcool ou de médicaments.
• Ne laissez pas l'appareil branché s’il ne sert pas, pendant un
entretien/changement d’accessoires.
• N’introduisez aucun objet dans les ouvertures. N’utilisez pas
l’appareil si elles sont bouchées ; protégez-le des
débris/matières bloquant le débit d'air.
• Gardez cheveux, vêtements lâches, doigts et parties du
corps à l’écart des ouvertures/pièces mobiles.
•
N'utilisez que des pièces de rechange
d’origine du fabrican
pour l'entretien de cet appareil.
Elles sont disponibles auprès
de votre concessionnaire agréé. L'utilisation de pièces ou
accessoires autres que ceux de éqiupement original peut
causer des blessures graves, endommager l’appareil et annuler
sa garantie.
• Ne forcez pas l’appareil. Il posera moins de risques de blessures
et fonctionnera mieux à la vitesse pour laquelle il a été conçu.
• N’utilisez jamais l’appareil sans son tube de souffleuse/
aspirateur ni son sac d'aspirateur.
• Mettez toutes les commandes hors tension avant de débrancher.
• Débranchez l’appareil avant d’installer ou de retirer son tube
ou son sac d'aspirateur. L’appareil doit être débranché et les
lames de l’hélice arrêtées pour éviter de les toucher pendant
leur rotation.
LORS DE L’UTILISATION EN SOUFFLEUSE
• Ne jamais diriger le tube de la souffleuse vers des
personnes, animaux domestiques ou fenêtres. Toujours
souffler les débris en direction opposée des personnes,
animaux domestiques et fenêtres. Redoubler de prudence
lors du travail à proximité d’objets massifs tels que des
arbres, véhicules, murs, etc.
LORS DE L’UTILISATION EN ASPIRATEUR
• Éviter les situations où le sac d’aspirateur pourrait
s’enflammer. Ne pas utiliser à proximité de flammes vives,
Ne pas aspirer les cendres chaudes de cheminées, foyers,
tas de brouissalles, etc. Ne pas aspirer de mégots de
cigarettes ou de cigares sans s’être assuré qu’ils sont
complètement froids.
• Cet outil est conçu pour aspirer des matériaux secs, tels que
des feuilles, de l’herbe, des brindilles et morceaux de papier.
Ne pas essayer d’aspirer des matériaux mouillées ni de
l’eau, ce qui pourrait endommager la souffleuse/aspirateur.
Ne pas aspirer de morceaux de métal, de verre, etc., pour
éviter d’endommager l’hélice.
Page 23

F5
CONSIGNES DE SÉCURITÉ
SYMBOLES DE SÉCURITÉ ET INTERNATIONAUX
Ce manuel de l'utilisateur décrit les symboles et pictogrammes de sécurité et internationaux pouvant apparaître sur ce
produit. Consultez le manuel de l'utilisateur pour les informations concernant la sécurité, le montage, le fonctionnement,
l'entretien et les réparations.
SYMBOLE SIGNIFICATION
• SYMBOLE ALERTE DE
SÉCURITÉ
Indique un danger, un avertissement
ou une mise en garde. Ce symbole
peut être combiné à d'autres symboles
ou pictogrammes.
•AVERTISSEMENT - LISEZ LE
MANUEL DE L'UTILISATEUR
Lisez le manuel de l'utilisateur et suivez
tous les avertissements et consignes
de sécurité. Vous pourriez à défaut
entraîner des blessures graves pour
vous ou d'autres personnes.
• PORTEZ DES PROTECTIONS
(YEUX ET OREILLES)
AVERTISSEMENT:
les objets projetés et les bruits forts
peuvent endommager la vue et l’ouïe.
Portez une visière de norme ANSI
Z87.1-1989 et des protège-oreilles
pendant l'utilisation.
• LES OBJETS PROJETÉS ET LA
TÊTE ROT A TIVE PEUVENT CAUSER
DES BLESSURES GRAVES
AVERTISSEMENT:
Tenez-vous à l'écart de la sortie de
souffleuse. Ne dirigez jamais la
souffleuse vers vous ou vers les autres.
La souffleuse peut projeter des objets.
Ne faites pas fonctionner l'appareil
sans les accessoires et protections
nécessaires
.
SYMBOLE SIGNIFICATION
• N’UTILISEZ PAS L’APPAREIL
SOUS LA PLUIE
AVERTISSEMENT:
évitez les lieux dangereux.
N’utilisez jamais l’appareil sous la
pluie ou dans des conditions
humides ou mouillées. L’humidité
peut provoquer l’électrocution.
• SOUFFLEUSES – LES LAMES
ROTATIVES PEUVENT INFLIGER
DES BLESSURES GRAVES
AVERTISSEMENT:
arrêter le moteur et laisser l’hélice
parvenir à l’arrêt complet avant
d’installer ou de changer les tubes
ou le sac et avant toute opération
de nettoyage, d’entretien ou de
réparation.
• LEVIER DE BASCULE DES
MODES SOUFFLEUSE/
ASPIRATEUR
A - Mode aspirateur
B – Mode souffleuse
• ÉLOIGNEZ LES SPECTATEURS
AVERTISSEMENT:
éloignez tout spectateur, les enfants
et les animaux domestiques en
particulier, d'au moins 15 m (50 pi)
de la zone de coupe.
• DOUBLE ISOLEMENT
Les appareils à double isolement
comportent deux systèmes
d’isolement. Comme il se doit,
aucun moyen de mise à la terre
n’est fourni sur ce type d’appareil.
AUTRES AVERTISSEMENTS DE SÉCURITÉ
• Remiser l’outil dans un endroit sec pouvant être verrouillé ou
en hauteur afin d’empêcher des dommages ou un usage non
autorisé. Garder l’outils hors de portée des enfants.
• Ne jamais immerger l’outil et ne jamais l’arroser avec de
l’eau ou tout autre liquide. Garder les poignées sèches,
propres et exemptes de débris. Nettoyer après chaque
usage. Voir les sections Nettoyage et Remisage.
• Bien arrimer l’outil pour le transport.
• Conserver ces instructions. Les consulter fréquemment et
les utiliser pour instruire d’autres utilisateurs. Si l’outil est
prêté, il doit être accompagné de ces instructions.
CONSERVER CES
INSTRUCTIONS
Page 24

F6
CONSIGNES DE SÉCURITÉ
Tube de
souffleuse/aspirateur
Sac
d'aspirateur
Levier de bascule des
modes
souffleuse/aspirateur
Entrée de
aspirateur
Sortie de
souffleuse
Crochet du sac
d'aspirateur
Interrupteur
d’alimentation/vitesse
Évents du
moteur
Fermeture éclair du
sac d'aspirateur
Soutien du verrou
USAGE
Comme souffleuse :
• Nettoyage de cours, garages, chemins, porches,
terrasses, autour des murs, clôtures, etc.
Comme aspirateur :
• Ramassage de feuilles, de débris légers, etc.
FAMILIARISEZ-VOUS AVEC L’APPAREIL
Prise
Page 25

F7
INSTRUCTIONS DE MONTAGE
Vis et
écrou
Vis et écrou
Vis autotaraudeuse
FIXATION ET RETRAIT DU TUBE DE
SOUFFLEUSE/ASPIRATEUR
Fixation
REMARQUE : Le tube de souffleuse/aspirateur est
démonté lors de la livraison. Vous devez l’installer
pour assurer une utilisation sécuritaire et facile.
1. Retirez les vis et écrous fournis avec l'ensemble de
visserie.
2. Insérez complètement le tube de souffleuse/
aspirateur dans l’ouverture du carter jusqu’à ce que
les trous des pattes du tube soient alignés avec ceux
des vis du carter (Fig. 1).
3. Introduisez les 2 (deux) vis à filets interrompus 8-32
x 3/4” Torx T20 dans le côté droit du carter et les 2
(deux) écrous dans le côté gauche du carter (Fig. 1).
Fig. 1
4. Vissez bien. Évitez de trop serrer.
5. Insérez les 2 (deux) vis à filets interrompus
autotaraudeuses 8-16 x 3/4” Torx T20 restantes
dans les trous des deux côtés du carter (Fig. 1).
Vissez bien sans trop serrer.
Retrait
REMARQUE : Il peut s'avérer nécessaire de retirer le
tube de souffleuse/aspirateur pour le dégager ou
dégager l’hélice.
1. Retirez les 2 (deux) vis autotaraudeuses des deux
côtés du carter.
2. Retirez les 2 (deux) vis et écrous qui retiennent le
tube de souffleuse/aspirateur sur le carter (Fig. 2).
REMARQUE : Rangez la visserie en lieu sûr pour un
usage ultérieur
Fig. 2
3. Retirez le tube de souffleuse/aspirateur du carter.
4. Replacez le tube de souffleuse/aspirateur avant
utilisation.
Vis
Écrou
Tube de
souffleuse/
aspirateur
Carter
Vis autotaraudeuse
Pour
éviter des
blessures graves, veillez à ce que le tube et
le sac soient installés sur l’appareil lors de
son utilisation.
AVERTISSEMENT :
Pour
éviter des
blessures graves, stoppez le moteur et
laissez l’hélice s’arrêter avant de fixer ou
d’enlever les tubes.
AVERTISSEMENT :
Pour
éviter des
blessures graves, stoppez le moteur et
laissez l’hélice s’arrêter avant de fixer ou
d’enlever les tubes.
AVERTISSEMENT :
Page 26

F8
Retrait
1. Appuyez sur les pattes d’accrochage des deux côtés
du tube du sac et retirez le sac de l’appareil vers le
bas (Fig. 5).
2. Détachez le sac d’aspirateur de son crochet.
Fig. 5
Pattes
d'accrochage
Sac d'aspirateur
Crochet du sac
d'aspirateur
Tube d'évacuation
des débris
Tube du sac
d'aspirateur
Fermeture éclair
Fig. 4
Fig. 3
Pattes
d'accrochage
FIXATION ET RETRAIT DU SAC D'ASPIRATEUR
Fixation
1. 1. Fixez le sac d’aspirateur à son crochet, sur le tube
de souffleuse/aspirateur (Fig. 3).
2. Glissez le tube du sac sur le tube d'évacuation des
débris, sur le carter. Poussez le tube jusqu’à ce que
les pattes d’accrochage des deux côtés s’enfoncent
avec un déclic, fixant ainsi le sac sur l’appareil (Fig. 4).
APPUYEZ
APPUYEZ
INSTRUCTIONS DE MONTAGE
Fig. 7
Fig. 6
3. Enfoncez d'un coup sec l’attache sur le raccord de
soutien (Fig. 7).
INSTALLATION DU HARNAIS (en option)
1.Faites passer la bande au centre de la boucle.
2.Tirez la bande par-dessus la traverse et à travers la
fente de la boucle (Fig. 6).
4.Réglez la longueur en fonction de la taille de
l'opérateur. Tirez la languette pour rallonger, ou tirez la
bande pour raccourcir (Fig. 8).
Attache
Boucle
Raccord de soutien
Attache
Fig. 8
Page 27

F9
Cette fiche ne peut être insérée dans une rallonge
polarisée que d’une façon. Si la fiche ne pénètre pas
complètement dans le fil de rallonge, inversez-la. Si elle
ne s’enfonce toujours pas, procurez-vous une rallonge
polarisée appropriée.
Une telle rallonge nécessite une prise murale polarisée.
Cette fiche ne peut être insérée dans une prise murale
polarisée que d’une façon. Si la fiche ne pénètre pas
complètement dans la prise, inversez-la. Si elle ne
s’enfonce toujours pas, faites installez une prise murale
appropriée par un électricien qualifié. Ne modifiez
d’aucune façon la fiche de l’appareil, ni prise ou la fiche
du fil de rallonge.
1. Fixez la rallonge au carter tel qu’indiqué (Fig. 9) pour
éviter qu’elle ne soit retirée accidentellement.
Fig. 9
CONNEXION DU CORDON D'ALIMENTATION
Employez une corde électrique extérieure (minimum 7,6 m
ou 25 pieds de long, 16 AWG). D'autres tailles incluent::
Long. de cordon (pieds)
25 50 100 150
Calibre du cordon (AWG)*
16 16 16 14
CALIBRE MINIMUM DES RALLONGES ALIMENTANT DES
APPAREILS 120V, A COURANT DE CHARGE DE 0-12 AMPS
INSTRUCTIONS DE DÉMARRAGE ET ARRÊT
Cet appareil est équipé d’un interrupteur à trois
positions : ARRÊT/BAS/HAUT (Fig. 11).
• Glissez l’interrupteur complètement vers le bas pour le
mettre sur ARRÊT.
• Glissez l’interrupteur vers le haut jusqu’au premier
déclic pour le mettre sur BAS.
• Glissez l’interrupteur vers le haut jusqu’au deuxième
déclic pour le mettre sur HAUT.
Fig. 10
2. Branchez l’extrémité femelle du cordon dans la prise
située à l’arrière de l’appareil (Fig. 10).
ARRÊT
BAS
HAUT
Fig. 11
Prise
MODE D'EMPLOI
Afin de
diminuer
les risques d'électrocution, cet appareil est
doté d’une fiche polarisée (dont une lame est
plus large que l’autre) et nécessite l’utilisation
d’un fil de rallonge polarisé.
AVERTISSEMENT :
Page 28

F10
MODE D'EMPLOI
Évents
ÉVENTS
Ne couvrez jamais les évents. Protégez-les des
obstructions et des débris. Ils doivent toujours être
dégagés pour permettre au moteur de refroidir
correctement (Fig. 13).
Fig. 13
TENUE DE LA SOUFFLEUSE/ASPIRATEUR
Avant d’utiliser l’outil, se tenir en position de travail
(Fig. 12) et effectuer les vérifications suivantes :
• L’utilisateur doit porter une tenue appropriée, c’est-àdire des chaussures de travail, des lunettes de
sécurité, une protection auditive, des gants, des
pantalons longs et une chemise à manches longues.
• Si l’endroit est poussiéreux, porter un masque antipoussière.
• S’assurer que l’outil est en bon état de marche.
• Vérifier que les tubes et protection sont en place et
bien assujettis.
CONSEILS PRATIQUES
• Assurez-vous que la fermeture éclair du sac
d'aspirateur est fermée avant d’utiliser l’appareil.
• Lors du démarrage, veiller à ne pas diriger l’outil vers
des personnes ou des débris.
• S’assurer que l’outil est en bon état de marche. Vérifier
que les tubes et protection sont en place et bien
assujettis.
• Tenez toujours l'appareil des deux mains lorsqu’il est
en marche. Agrippez fermement les poignées avant et
arrière.
• Utiliser une protection auditive pour éviter les risques de
perte de l’ouïe causée par un niveau de bruit élevé.
• N’utiliser l’outil qu’à des heures raisonnables, c’est-àdire pas trop tôt le matin ou tard le soir lorsque cela
peut déranger les personnes vivant aux environs. Se
conformer aux réglementations locales qui sont
habituellement de 9 à 17 heures, du lundi au samedi.
• Pour réduire le niveau sonore, utiliser le moins possible
d’outils motorisés en même temps.
• Pour réduire le niveau sonore utiliser la souffleuse au
régime minimum permettant de s’acquitter de la tâche.
• Vérifier l’équipement avant de commencer le travail, en
particulier le silencieux, l’admission d’air et les filtres à air.
• Utiliser un râteau ou un balai pour séparer les débris
avant de les souffler.
• Dans les endroits poussiéreux, humecter légèrement
l’aire de travail ou utiliser un accessoire de
pulvérisation si une source d’eau est disponible.
• Conserver l’eau en utilisant la souffleuse au lieu d’un
tuyau d’arrosage pour le nettoyage des endroits tels
que les gouttières, moustiquaires, patios, grills,
porches et jardins.
• Prendre garde aux enfants, animaux domestiques,
fenêtres ouvertes et véhicules fraîchement lavés, et
souffler les débris à l’opposé de tels obstacles.
• Utiliser la tubulure complète afin que l’embout reste
près du sol.
• Après utilisation d’une souffleuse ou d’autres outils
motorisés, Nettoyer la zone de travail. Jeter les débris
dans des poubelles.
Fig. 12
pour éviter
les risques
de blessures, toujours porter des lunettes de
sécurité lors de l’utilisation de cet outil. Porter un
masque respiratoire dans les endroits poussiéreux.
AVERTISSEMENT :
pour
éviter les
risques de blessures à l’opérateur ou aux
personnes présentes, ainsi que des dommages
à l’outil, s’assurer que les tubes de souffleuse
ou les tubes et le sac d’aspirateur sont en place
(suivant le modèle) avant d’utiliser l’outil.
AVERTISSEMENT :
pour
éviter des
blessures, ne portez pas de vêtements
lâches ni foulards, colliers, chaînes,
cravates et autres articles similaires pouvant
être aspirés par les évents. Relevez les
cheveux au-dessus des épaules pour éviter
qu’ils ne soient pas aspirés par les évents.
AVERTISSEMENT :
Page 29

F11
MODE D'EMPLOI
UTILISATION DE LA SOUFFLEUSE
Conventir en Souffleuse
1. Démarrez l'appareil. Voir Instructions de démarrage
et d'arrêt.
2. Relevez le levier de bascule des modes
souffleuse/aspirateur (mode souffleuse) (Fig. 14).
REMARQUE : N’utilisez jamais l’appareil avec le levier
sur la position du milieu.
Fig. 14
Fig. 15
Fig. 16
Fig. 17
Utilisation Comme Souffleuse
Tenez la souffleuse tel qu’illustré sur les Figures 15, 16 et
17. Balayez d'un côté vers l'autre, en tenant la buse à
plusieurs centimètres du sol. Avancez lentement en vous
maintenant face à la pile de débris.
La basse vitesse convient mieux pour souffler les débris
secs alors que la haute vitesse est préférable pour
déplacer des objets plus lourds comme des débris ou du
gravier de grosse dimension.
1. Utilisez la souffleuse autour des arbres, des arbustes,
des massifs de fleurs et des zones difficiles à
nettoyer (Fig. 15).
2. Utilisez la souffleuse pour nettoyer autour des
bâtiments et pour le nettoyage normal (Fig. 16).
3. Utilisez la souffleuse pour nettoyer les murs, les
surplombs et les écrans (Fig. 17).
Levier de bascule
Mode
aspirateur
Mode
souffleuse
Page 30

F12
MODE D'EMPLOI
Fig. 18
Fig. 19
UTILISATION COMME ASPIRATEUR
Convertir en Aspirateur
1. Démarrez l'appareil. Voir Instructions de démarrage
et d'arrêt.
2. Rabaissez le levier de bascule des modes
souffleuse/aspirateur (mode aspirateur) (Fig. 18).
REMARQUE : N’utilisez jamais l’appareil avec le levier
sur la position du milieu.
Levier de bascule
Mode
aspirateur
Mode
souffleuse
Utilisation de L’aspirateur
Vérifiez les points suivants :
• L'opérateur porte des vêtements appropriés : bottes,
lunettes de sécurité, protège-oreilles, gants, pantalons
et chemises à manches longues.
• L’opérateur porte un masque facial ou antipoussières
dans les lieux poussiéreux.
• L’appareil est en bon état de fonctionnement. Les
tubes et le sac d’aspirateur sont solidement fixés.
• Le harnais du sac d'aspirateur est installé et bien réglé.
Utilisez l’appareil pour aspirer des débris légers, des
feuilles, du papier etc.
Tenez l’aspirateur en inclinant (50-100 mm, 2-4 po) un
peu le tube de succion, et aspirez les débris légers d’un
mouvement de balayage (Fig. 19). Ceci permet aux
débris de s’engouffrer dans le sac de l’aspirateur. Les
petites feuilles et brindilles sont déchiquetées dans le
boîtier du ventilateur pour accroître la capacité du sac.
Lorsque le sac est plein, l’aspiration faiblit de façon
notable. Éteignez l’appareil et laissez l’hélice s’arrêter
avant d’ouvrir le sac. Ouvrez la fermeture éclair et videz
le contenu du sac avant de continuer. Voir Vider le sac
d’aspirateur.
REMARQUE : Videz le sac après chaque utilisation pour
éviter toute détérioration et ne pas restreindre le
débit d'air, ce qui affaiblirait les performances de
l’aspirateur.
Évitez les
situations
pouvant mettre le feu au sac d’aspirateur. Ne
faites pas marcher près d’une flamme vive.
N’aspirez pas les cendres chaudes des foyers
à bois ou de barbecue, des tas de broussailles,
etc. ni les cigares ou cigarettes à moins que les
cendriers soient complètement refroidis.
AVERTISSEMENT :
En tant
qu’
aspirateur, l’appareil est conçu pour ramasser
des matériaux secs comme des feuilles, de
l’herbe, des brindilles et des morceaux de
papier. Pour éviter des blessures graves,
n’essayez pas d’aspirer des débris humides
et/ou de l’eau stagnante car cela peut
endommager la souffleuse/aspirateur. Pour
éviter d'endommager sérieusement l’hélice,
n’aspirez pas de métal, de verre brisé, etc.
AVERTISSEMENT :
Afin
d'éviter
des blessures graves, n’ouvrez jamais le sac
avant d’éteindre l’appareil.
AVERTISSEMENT :
Pour
éviter des
blessures graves et ne pas endommager
l'appareil utilisé comme aspirateur, installez
toujours les tubes et le sac d’aspirateur, et
assurez-vous que la fermeture éclair du sac
est fermée.
AVERTISSEMENT :
Page 31

F13
1. Appuyez sur Interrupteur d’alimentation/vitesse et
maintenez-la en position ARRÊT jusqu'à ce que le
moteur s’arrête complètement (Fig. 11).
2. Retirez le tube de la soufflante/aspirateur et le sac de
l'aspirateur.
3. Enlevez soigneusement tout matériau bloquant le
tube ou l’hélice. Inspectez les lames pour vous
assurer qu’elles ne sont pas endommagées. Tournez
les lames de l’hélice à la main pour vous assurer
qu’elles ne sont plus bloquées.
4. Réinstallez le sac d’aspirateur et le tube de
souffleuse/aspirateur.
Vider le Sac D’aspirateur
REMARQUE : Videz le sac après chaque utilisation pour
éviter toute détérioration et ne pas restreindre le
débit d'air, ce qui affaiblirait les performances de
l’aspirateur.
1. Appuyez sur les pattes d’accrochage des deux côtés
du tube du sac et retirez le sac de l’appareil vers le
bas (Fig. 20).
2. Détachez le sac d’aspirateur de son crochet.
3. Ouvrez la fermeture éclair et videz le contenu du sac
dans un sac de poubelle ou un récipient.
4. Retournez le sac à l’envers après l’avoir vidé pour la
première fois et secouez-le vigoureusement pour
éliminer poussière et débris.
5. Retournez le sac à l’endroit, fermez la fermeture
éclair et remettez le sac en place.
Fig. 20
Pattes
d'accrochage
APPUYEZ
APPUYEZ
DÉGAGEMENT D’UN(E) TUBE/ HÉLICE
BLOQUÉ(E)
MODE D'EMPLOI
Pour
éviter
des blessures graves, éteignez l'appareil
avant tout nettoyage ou entretien.
AVERTISSEMENT :
Our
éviter
des blessures graves, portez toujours des
gants pour vous protéger des lame de
l’hélice ou d’autres objets tranchants.
AVERTISSEMENT :
Afin
d'éviter
des blessures graves, n’ouvrez et ne retirez
jamais le sac avant d’éteindre l’appareil.
AVERTISSEMENT :
Portez
un
protecteur oculaire et un masque
antipoussières pour vider le sac.
AVERTISSEMENT :
Page 32

F14
ENTRETIEN ET RÉPARATIONS
NETTOYAGE DE L’APPAREIL
Nettoyez les évents avec une petite brosse ou un
aspirateur équipé d’une petite brosse. N'employez pas
de détergents concentrés sur le boîtier ou les pièces en
plastique. Ils peuvent être endommagés par certains
nettoyants ménagers contenant des huiles
aromatiques tel que le pin et le citron, et par des
solvants tel que le kérosène ou l’acétone. L’humidité
peut aussi provoquer l’électrocution. Essuyez toute trace
d'humidité à l'aide d'un tissu doux.
NETTOYAGE DU SAC D’ASPIRATEUR
1. Videz le sac après chaque utilisation pour éviter
toute détérioration et ne pas restreindre le débit
d'air, ce qui affaiblirait les performances de
l’aspirateur.
2. Portez un protecteur oculaire et un masque
antipoussières pour nettoyer le sac. Retournez le sac
à l’envers après l’avoir vidé pour la première fois et
secouez-le vigoureusement pour éliminer poussière
et débris.
3. Lavez le sac une fois par an ou plus selon le besoin :
a. Retirez le sac d’aspirateur.
b. Retournez-le à l’envers.
c. Suspendez-le.
d. Rincez-le abondamment avec un tuyau en lavant
de l’extérieur vers l’intérieur.
e. Suspendez-le et laissez sécher.
f. Retournez le sac à l’endroit et remettez-le en place.
INSPECTION DES FILS DE RALLONGE
Inspectez régulièrement les rallonges. Soyez à l’affût de
signes de détérioration, de coupures ou de fissures dans
l’isolation. Vérifiez que les connexions ne sont pas
endommagées. Remplacez les cordons défectueux ou
endommagés.
ENTREPOSAGE
• Rangez l’appareil dans un endroit sec, élevé ou
verrouillé, hors de portée des enfants.
• Rangez l'appareil dans un lieu verrouillé pour éviter
toute utilisation ou accident indésirable.
• Rangez l'appareil dans un lieu sec et bien aéré.
ENTRETIEN D’APPAREILS À DOUBLE
ISOLEMENT
Cet appareil possède un double isolement. Au lieu d’une
mise à la terre, les appareils à double isolement
comportent deux systèmes d’isolement. Comme il se
doit, aucun moyen de mise à la terre n’est fourni sur ce
type d’appareil.
L’entretien de ces appareils exige soins minutieux et
compétence technique, et doit être effectué par un
personnel qualifié uniquement. Les pièces de rechange
doivent être identiques aux pièces remplacées. Confiez
toute réparation à un concessionnaire agréé. Un appareil
à double isolement porte l’indication « double insulation »
ou « double insulated ».
pour
éviter des
blessures graves, éteignez toujours l'appareil
et laissez-le refroidir avant tout nettoyage ou
entretien.
AVERTISSEMENT :
Page 33

F15
CARACTÉRISTIQUES
Type de moteur............................................................................................................................. électrique, 120 volts c.a.
Intensité du moteur....................................................................................................................................................... 12 A
Sortie d’air de la souffleuse .......................................................................................................... 253 km/h (157 m/h) max.
Débit d'air de l'aspirateur........................................................................................................ 12 m3/min (424 pi3/min) max.
Rapport de paillage................................................................................................................................................10:1 max.
Poids en fonctionnement ........................................................................................................................... . 4,54 kg (10 lb)
Capacité du sac d'aspirateur........................................................................................................... 26,4 l (0,75 boisseaux)
CAUSE SOLUTION
Sac plein Videz le sac, voir Vider le sac d’aspirateur
Tube bouché Dégagez le tube, voir Dégagement d'un(e)
tube/hélice bloqué(e)
Hélice bouchée Dégagez le tube, voir Dégagement d'un(e)
tube/hélice bloqué(e)
Hélice endommagée Confiez l’appareil à un concessionnaire agréé
Sac sale Nettoyez le sac
Sac déchiré Remplacez le sac
Sac ouvert Fermez la fermeture éclair
Débranché Branchez dans une rallonge
L’APPAREIL NE SOUFFLE/N’ASPIRE PAS
DÉPANNAGE
CAUSE SOLUTION
Moteur s’arrête ou le cordon électrique Vérifier le cordon électrique et s’assurer qu’il est
branché dans une prise électriquet
Interrupteur d’alimentation/vitesse est en position ARRÊT Mettez-la en position HAUT ou BAS
MOTEUR REFUSE DE DÈMARRER
Pour toute assistance, contacter le concessionnaire agréé.
Page 34

F16
REMARQUES
Page 35

F17
REMARQUES
Page 36

GARANTIE LIMITÉE DU FABRICANT POUR:
Aucune garantie implicite, y compris toute garantie de
valeur marchande ou d'adaptation à une fin
particulière, ne s'applique après la période applicable
de garantie expresse écrite ci-dessus concernant les
pièces qui sont identifiées. Aucune autre garantie ou
caution expresse, écrite ou orale, à l'exception de
celle mentionnée ci-dessus, accordée par toute
personne ou entité, y compris tout distributeur ou
détaillant, concernant tout produit n'engagera la
responsabilité de Troy-Bilt LLC. Pendant la période de
garantie, le recours exclusif est la réparation ou le
remplacement du produit dans les conditions
énoncées ci-dessus. (Certains états ne permettent pas
la limitation de la garantie implicite, il est donc possible
que la limitation ci-dessus ne s'applique pas à vous.)
Les clauses énoncées dans la présente Garantie
constituent le recours unique et exclusif inhérent aux
ventes. Troy-Bilt LLC ne sera en aucun cas tenue
pour responsable de tout dommage indirect ou
consécutif ou de dommages comprenant, entre
autres, les dépenses encourues du fait du recours à
des services de remplacement ou de substitution
pour l'entretien des pelouses, le transport ou des frais
connexes, ou les frais entraînés par une location
destinée à remplacer provisoirement un produit sous
garantie. (Certains états ne permettent pas la limitation
de la garantie implicite, il est donc possible que la
limitation ci-dessus ne s'applique pas à vous.)
Aucun recouvrement, quel qu'il soit, ne sera d'un montant
supérieur au prix du produit vendu. Toute modification
des dispositifs de sécurité du produit annulera la présente
Garantie. Vous assumez tout risque et toute responsabilité
résultant de la perte, de l'endommagement ou du
préjudice que vous et votre propriété et/ou d'autres et
leur propriété pourront encourir d'un fait de l'utilisation
normale, de la mauvaise utilisation ou de l'incapacité
d'utiliser le produit.
La présente garantie limitée n'est accordée qu'à
l'acheteur initial, au preneur initial ou à la personne à
laquelle le produit a été offert.
Le Droit des États vis à vis de la présente garantie : la
présente garantie vous confère certains droits juridiques
et vous pouvez bénéficier d'autres droits lesquels varient
d'un état à l'autre.
Pour obtenir l'adresse du distributeur réparateur le plus
proche, composez le : 1-800-520-5520.
Troy-Bilt LLC
PO Box 361131
Cleveland, OH 44136-0019
La garantie limitée énoncée ci-après est accordée par
Troy-Bilt LLC et concerne les marchandises neuves
achetées et utilisées aux États-Unis, ses possessions et
territoires.
Troy-Bilt LLC garantit ce produit contre tout vice de
matière ou de façon pendant une période de deux (2) ans
à compter de la date d'achat initiale et elle se réserve le
choix de réparer ou de remplacer, à titre gratuit, toute
pièce présentant un vice de matière ou de façon. Cette
garantie limitée ne s'appliquera que dans la mesure où le
produit aura été utilisé et entretenu conformément au
Manuel de l'utilisateur fourni avec le produit et n'aura pas
fait l'objet d'un usage inadéquat, abusif, commercial ou
négligent, d'un accident, d'un entretien inadéquat, d'une
modification, de vandalisme, d'un vol, d'un incendie, de
dégâts d'eau ou d'un endommagement résultant d'un
autre péril ou d'un désastre naturel. Les dommages
résultats de l'installation ou de l'utilisation de tout
accessoire ou équipement non approuvé par Troy-Bilt
pour une utilisation avec le(s) produit(s) couvert(s) par le
présent manuel annuleront la garantie en ce qui concerne
les dommages qui en résulteraient éventuellement. La
présente garantie est limitée à quatre-vingt-dix (90) jours
à compter de la date d'achat au détail initiale pour tout
produit Troy-Bilt utilisé à des fins locatives ou
commerciales, ou toute utilisation produisant des
revenus.
POUR L'OBTENTION DU SERVICE DE GARANTIE : le
service au titre de la garantie est disponible, SUR
PRÉSENTATION D'UNE PREUVE D'ACHAT, AUPRÈS
DU DISTRIBUTEUR AGRÉÉ LOCAL. Pour trouver un
distributeur dans votre région, visitez notre site Web
www.troybilt.com, consultez les Pages Jaunes, appelez le
1-800-520-5520 ou écrivez à l'adresse Troy-Bilt LLC, PO
Box 361131, Cleveland, OH 44136-0019.
La garantie limitée n'offre aucune couverture dans
les cas suivants :
A. Mises au point : bougies, réglages de carburateur,
filtres
B. Éléments pouvant s'user : boutons de butée,
bobines extérieures, fil de coupe, moulinets
intérieurs, poulie du démarreur, cordons de
démarrage, courroies d'entraînement
C. Troy-Bilt LLC n'accorde aucune garantie pour les
produits vendus ou exportés des États-Unis
d'Amérique, de leurs possessions et territoires,
exception faite en ce qui concerne les produits
vendus par l'intermédiaire de ses canaux agréés de
distribution à l'exportation.
Troy-Bilt LLC se réserve le droit de modifier ou
d'améliorer la conception de ses produits sans pour
autant assumer l'obligation de modifier tout produit
d'une fabrication plus ancienne.
Page 37

Aspirador / Soplador a
Triturador Electrico
Modelo TB125QS
Manuel del Dueño/Operador
P/N 769-01191 (7/04)
ESTE MANUAL ES IMPORTANTE NO LO DESECHE
Page 38

E2
Antes de arrancar u operar este equipo, asegúrese de leer y comprender bien este manual.
ESTE PRODUCTO ESTA CUBIERTO POR UNA O MAS PATENTES DE EE.UU., OTRAS PATENTES EN TRAMITE.
Antes de que empiece a ensamblar su nuevo equipo,
por favor ubique la placa que contiene el modelo de la
unidad y escriba esa información en el espacio en
blanco aquí debajo. Aquí debajo se explica la muestra
de una placa del modelo.
INTRODUCCION
Copie el número del modelo/
pieza del fabricante aquí:
Copie el número
de serie aquí:
MUCHAS GRACIAS
Gracias por haber adquirido este gran producto. Esta
moderna herramienta motriz de exteriores está diseñada
para brindarle muchas horas de servicio útil. Usted
comprobará que es un artefacto que le ahorrará mucho
trabajo. Este manual del operador le brinda instrucciones
de operación de fácil comprensión. Lea todo el manual y
siga todas las instrucciones para mantener su nueva
herramienta motriz de exteriores en las mejores
condiciones de funcionamiento.
REFERENCIAS, ILUSTRACIONES Y
ESPECIFICACIONES DEL PRODUCTO
Toda la información, las ilustraciones y las especificaciones
contenidas en este manual se basan en la información
más reciente disponible en el momento de impresión del
manual. Nos reservamos el derecho de hacer cambios
en cualquier momento sin aviso previo.
Copyright© 2004 MTD SOUTHWEST INC. Todos los
derechos reservados.
INFORMACION DEL SERVICIO
El servicio de esta unidad, ya sea durante o después del
período cubierto por la garantía, debe ser realizado
solamente por un proveedor de servicios autorizado y
aprobado.
Llame 1-800-520-5520 para obtener una lista de
distribuidores de servicio localizados cerca de usted.
Para obtener más detalles sobre su unidad, visite
nuestro sitio en www.troybilt.com.
NO REGRESE SU UNIDAD AL VENDEDOR. PARA
SOLICITAR SERVICIO POR LA GARANTIA, DEBERA
PRESENTAR PRUEBA DE SU COMPRA.
INDICE DE CONTENIDOS
Llamadas a apoyo al cliente . . . . . . . . . . . . . . . . . . .2
Normas para una operación segura . . . . . . . . . . . . .3
Conozca su unidad . . . . . . . . . . . . . . . . . . . . . . . . .7
Instrucciones de ensamble . . . . . . . . . . . . . . . . . . .8
Instrucciones de operación . . . . . . . . . . . . . . . . . .10
Instrucciones de mantenimiento y reparación . . . .15
Especificaciones . . . . . . . . . . . . . . . . . . . . . . . . . . .16
Cuadro de solución de problemas . . . . . . . . . . . . .16
Garantía . . . . . . . . . . . . . . . . . . . . . . . . . . . . . . . . .20
Lista de Piezas . . . . . . . . . . . . . . . . . .Contraportada
Número de la
pieza del fabricante
Número de serie
Número del
modelo
S/N :
MODEL :
ITEM :
Page 39

E3
NORMAS PARA UNA OPERACION SEGURA
SIMBOLO SIGNIFICADO
Los símbolos de seguridad se utilizan para llamar su
atención sobre posibles peligros. Los símbolos de
seguridad y sus explicaciones merecen toda su atención
y comprensión. Los símbolos de seguridad no eliminan
ningún peligro por sí mismos. Las instrucciones o
advertencias que ofrecen no substituyen las medidas
adecuadas de prevención de accidentes.
SIMBOLO SIGNIFICADO
LEA TODAS LAS INSTRUCCIONES
ANTES DE LA OPERACIÓN
• Lea todas las instrucciones con cuidado. Conozca
bien los controles y el uso correcto de la unidad.
• No opere esta unidad si está cansado, enfermo, o bajo
los efectos del alcohol, drogas o medicamentos.
• Los niños y los adolescentes menores de 15 años no
deben operar las unidades, excepto por los
adolescentes guiados por un adulto.
• Antes de cada uso, inspeccione bien su soplador /
aspirador para verificar que no existan partes flojas ni
dañadas. No use la unidad hasta haber realizado los
ajustes o reparaciones.
• Todas las protecciones y accesorios de seguridad
deben estar bien instalados antes de usar la unidad.
• Use la unidad sólo con luz de día o con buena luz
artificial.
• Mantenga a todos los espectadores, en especial niños y
animales domésticos, a una distancia de por lo menos
15 m (50 pies) de la unidad durante la operación.
• Inspeccione el área antes de arrancar el soplador /
aspirador. Retire todo el escombro y los objetos duros
o afilados como vidrio, alambre, etc.
• Puede utilizar un cable de extensión de 2 alambres (o
sea, sin alambre de tierra), ya que la herramienta tiene
doble aislación. Sin embargo, puede usarse también
un cable de extensión de 3 alambres (un cable de
extensión con alambre de tierra) que utilice un
conector tipo NEMA (patillas paralelas, tierra en "U").
Puede adquirir cables de extensión en su comercio
local. Utilice únicamente cables de extensión de
camisa cilíndrica aprobados para uso al aire libre.
• Esta herramienta tiene doble aislación. Repare o
sustituya los cables dañados.
• Para reducir el riesgo de choques eléctricos, esta unidad
tiene un enchufe polarizado (una patilla es más ancha
que la otra). Esta unidad calza en un enchufe polarizado
de una sola manera. Si el enchufe no calza totalmente en
la unidad, inviértalo. Si tampo calza así, utilice un cable
con la conexión correcta. No modifique el cable ni la
unidad de manera alguna.
• IMPORTANTE INFORMACION DE SEGURIDAD •
El no
seguir una
advertencia de seguridad puede conducir a
que usted u otras personas sufran lesiones.
Siga siempre las precauciones de seguridad
para reducir el riesgo de incendio, descarga
eléctrica y lesiones personales.
ADVERTENCIA:
El no obedecer una
advertencia de
seguridad puede conducir a que usted u
otras personas sufran graves lesiones. Siga
siempre las precauciones de seguridad
para reducir el riesgo de incendio, descarga
eléctrica y lesiones personales.
PELIGRO:
El no seguir
una
advertencia de seguridad puede conducir a
daño patrimonial o a que usted u otras
personas sufran lesiones personales. Siga
siempre las precauciones de seguridad
para reducir el riesgo de incendio, descarga
eléctrica y lesiones personales.
PRECAUCION:
Indica peligro, advertencia o precaución.
Debe prestar atención para evitar sufrir
graves lesiones personales. Puede ser
utilizado junto con otros símbolos o figuras.
ALERT A DE SEGURIDAD
:
ADVERTENCIAS DE SEGURIDAD ELECTRICA
Cuando
use
artefactos eléctricos de jardinería, siempre
debe tomar precauciones básicas de seguridad
para reducir el riesgo de incendio, de descarga
eléctrica y de lesiones personales. Lea con
cuidado y comprenda todo el manual del
operador antes de usar su soplador / aspirador.
Preste mucha atención a las instrucciones de
operación y a las advertencias de seguridad.
ADVERTENCIA:
NOTA: Le ofrece información o instrucciones que son
esenciales para la operación o mantenimiento
del equipo.
Lea el manual del operador y siga todas las
advertencias e instrucciones de seguridad. De no
hacerlo, el operador y/o los espectadores pueden
sufrir graves lesiones.
SI TIENE PREGUNT AS, LLAME AL 1-800-520-5520
Page 40

E4
NORMAS PARA UNA OPERACION SEGURA
• CABLES DE EXTENSION: Verifique que el cable esté en
buenas condiciones. Cuando utilice un cable de
extensión, verifique que el mismo sea lo suficientemente
pesado para conducir la corriente consumida por la
unidad. Si utiliza un cable demasiado liviano, esto
ocasionará una caída de voltaje de la línea, y en
consecuencia una pérdida de potencia y un
sobrecalentamiento. La tabla siguiente muestra cuál es el
tamaño correcto a usar, de acuerdo con la longitud del
cable y el amperaje nominal que aparece en la placa de
datos de la máquina. Si está en duda, utilice el siguiente
tamaño más pesado. Cuanto menor es el calibre, más
pesado es el cable. Para reducir la posibilidad de que la
unidad se desconecte del cable de extensión durante el
uso, vea la Instrucciones de Operacion.
• La placa de datos de la unidad indica qué voltaje
utiliza la misma. Nunca conecte la unidad a un voltaje
de corriente alterna diferente.
• Inspeccione periódicamente todos los cables de
extensión y la conexión de la unidad a la corriente.
Revise el cable con cuidado para ver si hay deterioros,
cortes, o grietas en la aislación. Inspeccione también
las conexiones para ver si han sufrido daños. Si
observa algún defecto, repare o reemplace los cables.
• Evite los ambientes peligrosos. Nunca utilice la unidad
en ambientes húmedos o mojados. La humedad crea
peligro de choque eléctrico.
• No utilice la unidad bajo la lluvia.
• No toque el enchufe o la unidad con las manos
mojadas.
DURANTE LA OPERACION
• Use anteojos o gafas de protección que indiquen que
cumplen con las normas ANSI Z87.1, y use protección
para sus oídos y audición cuando opere esta unidad. Use
una pantalla facial o una máscara para polvo si la
operación levanta polvo.
• Use pantalones gruesos y largos, botas, guantes y
camisa de manga larga. No use ropa holgada, alhajas,
pantalones cortos, sandalias ni esté descalzo.
Sostenga su cabello sobre el nivel de sus hombros.
• Evite los arranques accidentales. No transporte la
unidad enchufada con su dedo en el interruptor.
Verifique que el interruptor esté apagado cuando
enchufe la unidad.
• No ponga la unidad sobre ninguna superficie excepto
sobre una superficie que esté limpia y que sea sólida,
cuando el motor esté prendido. Los desechos tales
como la grava, arena, polvo, césped, etc., pueden ser
absorbidos por la toma de aire y ser lanzados por la
avertura de descarga, causándole daños a la unidad,
propiedad o causándole lesiones graves a los
espectadores o al operario.
• Use la herramienta adecuada. Use esta unidad sólo
del modo que se describe en este manual. No la utilice
para ninguna tarea excepto para la que fue diseñada.
Use sólo los accesorios recomendados por el
fabricante.
• Tenga mucho cuidado cuando limpie en escaleras.
• No permita que la unidad sea utilizada como un
juguete. Es necesario prestar mucha atención cuando
la use cerca o al lado de niños.
• No use la unidad para recoger líquidos inflamables o
combustibles, como gasolina, ni la use en áreas
donde dichos líquidos puedan estar presentes.
• No se extienda demasiado ni use la unidad desde
superficies inestables como escaleras, árboles,
inclinaciones escarpadas, techos, etc. Mantenga una
posición y equilibrios adecuados en todo momento.
• No abuse del cable. No transporte nunca la unidad
llevándola del cable ni desenchufe la unidad del
receptáculo tirando del cable. Mantenga el cable lejos
del calor, aceite y bordes afilados.
•No desenchufe la unidad tirando del cable. Para
desenchufar, tome el enchufe, no el cable.
• Permanezca siempre alerta. Use su sentido común.
Para evitar que usted o los demás sufran lesiones, no
opere esta unidad si está cansado.
• No opere la unidad mientras se encuentre bajo los
efectos de drogas, alcohol o medicamentos.
• No deje el Soplador / Aspirador enchufado mientras no
lo use, mientras cambie los accesorios ni mientras
realice el servicio.
Long. de cable (pies)
25 50 100 150
Cal. del alambre (AWG)*
16 16 16 14
TAMAÑO MINIMO DE ALAMBRE PARA LOS CABLES
DE EXTENSION PARA APARATOS DE 120 VOLTIOS
QUE UTILIZAN 0-6 AMPERIOS*
*El calibre del cable (AWG) para la capacidad nominal
en amperios de 12 a 16 amperios es de 14 AWG para
25 pies, 12 AWG para 50 pies y no se recomienda para
100 o 150 pies.
• Debe proveerse protección de interrupción de circuito
accionada por corriente de pérdida a tierra (GFCI) para
el/los circuito(s) o toma(s) que se utilizarán para esta
unidad. Existen receptáculos disponibles que tienen
protección GFCI incorporada y pueden ser utilizados
para esta medida de seguridad.
Para reducir
el riesgo de
choque eléctrico, utilice únicamente cables de
extensión aprobados para uso al aire libre, por
ejemplo un cable tipo SW-A, SOW-A, STW-A,
STOW-A, SJW-A, SJOW-A, SJTW-W, o
SJTOW-A.
ADVERTENCIA:
Page 41

E5
• Desenchufe el Soplador / Aspirador antes de intentar
instalar o retirar el tubo del soplador / aspirador o la
bolsa del aspirador. La unidad debe estar
desenchufada, y las cuchillas del impulsor deben estar
quietas para evitar el contacto con las cuchillas
giratorias.
MIENTRAS OPERA COMO SOPLADORA
• Nunca apunte la sopladora hacia a la gente, mascotas
o ventanas. Dirija siempre el soplado de desechos
lejos de la gente, animales y ventanas. Tenga mucho
cuidado cuando sople desechos cerca de objetos
sólidos como árboles, automóviles, paredes, etc.
MIENTRAS OPERA COMO ASPIRADORA
• Evite situaciones que puedan prenderle fuego a la
bolsa de recolección. No la haga funcionar cerca de
una llama abierta. No aspire cenizas tibias de
chimeneas, hoyos para asado, montones de maleza,
etc. No aspire cigarros o cigarrillos descartados a
menos que las cenizas estén completamente frías.
• La unidad está diseñada para recoger material seco tal
como hojas, césped, ramitas y pedazos de papel. No
intente aspirar desechos mojados o agua estancada ya
que eso puede ocasionarle daños a la sopladora /
aspiradora. Para evitarle daños graves al rotor, no
aspire metales, vidrios rotos, etc.
OTRAS ADVERTENCIAS DE SEGURIDAD
• Asegúrese de sujetar la unidad mientras la transporta.
• Guarde la unidad en un lugar seco, bien sea bajo llave o
suficientemente alto para que evite el uso no autorizado
o daños. Manténgala fuera del alcance de los niños.
• Nunca remoje o chorree la unidad con agua o cualquier
otro líquido. Mantenga los mangos secos, limpios y
libres de escombros. Límpiela después de cada uso,
vea las Instrucciones de Limpieza y Almacenamiento.
• Conserve estas instrucciones. Consúltelas con
frecuencia y úselas para instruir a otros usuarios. Si le
presta esta unidad a otras personas, también incluya
las instrucciones
.
CONSERVE ESTAS
INSTRUCCIONES
• No coloque ningún objeto en las aberturas. No use la
unidad con ninguna abertura bloqueada; mantenga la
unidad libre de suciedad, escombro y nada que pueda
reducir el flujo de aire.
• Mantenga su cabello, la ropa holgada, los dedos y todas
las partes de su cuerpo lejos de las aberturas y las
partes móviles.
• Use sólo piezas y accesorios de repuesto fabricante
del equipo original para esta unidad. Estas piezas
están disponibles en su distribuidor autorizado. No
use piezas, accesorios ni auxiliares que no hayan sido
diseñados para esta unidad. Su uso puede conducir a
que el usuario sufra graves lesiones o al daño de la
unidad y a la invalidación de su garantía.
• No fuerce la unidad. Realizará una mejor labor con
menos posibilidad de lesiones si se utiliza a la
velocidad para la que fue diseñada.
• No use nunca el Soplador / Aspirador sin el tubo del
soplador / aspirador y la bolsa del aspirador
conectados.
• Apague todos los controles antes de desenchufar.
NORMAS PARA UNA OPERACION SEGURA
Page 42

E6
NORMAS PARA UNA OPERACIÓN SEGURA
SIMBOLOS DE SEGURIDAD E INTERNACIONALES
Este manual del operador describe los símbolos y figuras de seguridad e internacionales que pueden aparecer en este
producto. Lea el manual del operador para obtener información completa acerca de la seguridad, ensamble, operación y
mantenimiento y reparación.
SIMBOLO SIGNIFICADO
• SIMBOLO DE ALERTA DE
SEGURIDAD
IIndica peligro, advertencia o
precaución. Puede ser utilizado junto
con otros símbolos o figuras.
• ADVERTENCIA - LEA EL MANUAL
DEL OPERADOR
Lea el manual del operador y siga todas
las advertencias e instrucciones de
seguridad. De no hacerlo, el operador
y/o los espectadores pueden sufrir
graves lesiones.
• USE PROTECCION OCULAR Y
AUDITIVA
ADVERTENCIA:Los
objetos arrojados por la unidad y el ruido
fuerte pueden causar graves lesiones
oculares y pérdida auditiva. Utilice
protección ocular que cumpla con las
normas ANSI Z87.1 y protección auditiva
cuando opere esta unidad. Use una
careta completa cuando la necesite.
• LOS OBJETOS DESPEDIDOS Y LA
CUCHILLA ROTATIVA PUEDEN
CAUSAR GRAVES LESIONES
ADVERTENCIA:
Manténgase alejado de la salida del
soplador. Nunca dirija el soplador
hacia usted mismo ni hacia los
demás. Los objetos pueden salir
despedidos del soplador. No opere
esta unidad sin los accesorios y
protecciones adecuados en su lugar.
SIMBOLO SIGNIFICADO
• NO USE LA UNIDAD BAJO LA
LLUVIA
ADVERTENCIA:Evite
los ambientes peligrosos. No opere
nunca su unidad bajo la lluvia, ni en
condiciones de humedad. La
humedad presenta un riesgo de
descarga eléctrica.
• LAS SOPLADORAS– CUCHILLAS
GIRATORIAS DEL ROTOR
PUEDEN CAUSAR LESIONES
GRAVES
ADVERTENCIA:Pare
el motor y permita que el rotor se
detenga antes de instalar o cambiar
tubos o la bolsa, o antes de limpiar o
hacerle cualquier mantenimiento.
• PALANCA DE CAMBIO DE
MODO DEL SOPLADOR /
ASPIRADOR
A - Modo de aspirador
B - Modo de soplador
•MANTENGA ALEJADOS A LOS
ESPECTADORES
ADVERTENCIA:
Mantenga a todos los espectadores,
en especial a niños y animales
domésticos a por lo menos 15 m (50
pies) del área de corte.
• AISLAMINETO DOBLE
Existen dos sistemas de aislamiento
en vez de conexión a tierra. No se
proporciona ningún medio de
conexión a tierra en una unidad de
aislamiento doble, ni deben
agregarse medios de conexión a
tierra a esta unidad.
Page 43

E7
NORMAS PARA UNA OPERACION SEGURA
Tubo Soplador /
Aspirador
Entrada del
Soplador / Aspirador
Salida del
soplador
Gancho de la bolsa
del aspirador
Interruptor de
encendido / velocidad
Respiraderos
del motor
Soporte de sujeción
Palanca de cambio de modo
del Soplador / Aspirador
CONOZCA SU UNIDAD
APLICACIÓN
Como soplador:
• Limpieza de jardines, cocheras, entradas de
automóviles, pórticos, patios, alrededor de
paredes, cercos, etc.
Como aspirador:
• Recoger hojas, escombros livianos, etc.
Cierre relámpago de
la bolsa del aspirador
Bolsa del
aspirador
Page 44

E8
INSTRUCCIONES DE ENSAMBLE
Tornillo
y tuerca
Tornillo y tuerca
Tornillo
autoroscante
CONEXIÓN Y REMOCIÓN DEL TUBO DEL
SOPLADOR / ASPIRADOR
Conexión
NOTA:
El tubo del soplador / aspirador no viene
ensamblado en esta unidad. Se requiere su
instalación para ofrecer un uso fácil y seguro al
operador.
1. Saque los tornillos y las tuercas incluidos en la bolsa
de piezas.
2. Inserte el tubo del soplador / aspirador hasta el
fondo de la abertura del bastidor del motor, hasta
que los orificios de las orejetas del tubo del soplador
/ aspirador se alineen con los orificios de los tornillos
del bastidor (Fig. 1).
3. Inserte los 2 (dos) tornillos ranurados 8-32 x 3/4
pulg. T20 Torx en el lado derecho del bastidor del
motor y las 2 (dos) tuercas en el lado izquierdo del
bastidor del motor (Fig. 1).
Fig. 1
4. Ajuste los tornillos con firmeza. No los ajuste
demasiado.
5. Instale los 2 (dos) tornillos autoroscantes ranurados
20,3 cm - 16 x 1,9 cm (8-16 x 3/4”) T20 Torx
restantes en los orificios de cualquiera de los lados
del bastidor (Fig. 1). Ajuste hasta que no quede
huelgo, no los ajuste demasiado.
Remoción
NOTA: Es posible que deba retirar el tubo del soplador /
aspirador para desbrozar un tubo o propulsor
que estén obstruidos.
1. Saque los 2 (dos) tornillos autoroscantes de
cualquiera de los lados del bastidor.
2. Saque los 2 (dos) tornillos y tuercas que sostienen el
tubo del soplador / aspirador en el bastidor (Fig. 2).
NOTA: Guarde las piezas en un lugar seguro para su
uso futuro.
Fig. 2
3. Saque el tubo del soplador / aspirador del bastidor
del motor.
4. Vuelva a colocar el tubo del soplador / aspirador
antes de usar la unidad.
Tornillo
Tuerca
Tubo del soplador
/aspirador
Bastidor del motor
Tornillo autoroscante
Para evitar
graves
lesiones personales, debe usar el tubo del
soplador / aspirador y la bolsa del aspirador
cuando opere esta unidad.
ADVERTENCIA:
Para evitar
graves
lesiones personales, apague el motor y
espere que el propulsor se detenga antes de
conectar o retirar tubos.
ADVERTENCIA:
Para evitar
graves
lesiones personales, apague el motor y
espere que el propulsor se detenga antes
de conectar o retirar los tubos.
ADVERTENCIA:
Page 45

E9
INSTRUCCIONES DE ENSAMBLE
Remoción
1. Presione las lengüetas de sujeción a ambos lados
del tubo de la bolsa del aspirador y tire de la bolsa
del aspirador hacia abajo de la unidad (Fig. 5).
2. Desenganche la bolsa del aspirador del gancho de la
bolsa del aspirador.
Fig. 5
Lengüetas de
sujeción
Bolsa del aspirador
Gancho de la bolsa
del aspirador
Tubo de salida de
escombros
Tubo de la bolsa
del aspirador
Cierre relámpago
Fig. 4
Fig. 3
Lengüetas de
sujeción
CONEXIÓN Y REMOCIÓN DE LA BOLSA
DEL ASPIRADOR
Conexión
1. Conecte la bolsa del aspirador al gancho de la bolsa
del aspirador del tubo del soplador/aspirador (Fig. 3).
2. Deslice el tubo de la bolsa del aspirador sobre el
tubo de salida de escombros del bastidor. Empuje el
tubo hasta que las lengüetas de sujeción de ambos
lados se traben en su lugar, asegurando la bolsa en
la unidad (Fig. 4).
PRESIONE
HACIA
DENTRO
PRESIONE
HACIA
DENTRO
3. Enganche el broche en el montaje de apoyo (Fig. 7).
INSTALACION DEL ARNES (Opcional)
1. Pase la correa por el centro de la hebilla.
2. Pase la correa sobre la barra transversal y hacia
abajo por la ranura de la hebilla (Fig. 6).
4.Ajuste la longitud a la medida del operador. Tire de la
lengüeta para alargarla, tire de la correa para acortarla
(Fig. 8).
Gancho
Fig. 6
Fig. 7
Montaje de
apoyo
Gancho
Fig. 8
Page 46

E10
Esta unidad calzará en un cable de extensión polarizado
en una sola dirección. si el enchufe no calza por
completo en el cable de extensión, invierta el enchufe. Si
el enchufe aún no calza, obtenga un cable de extensión
polarizado adecuado.
Un cable de extensión polarizado requiere el uso de un
toma de pared polarizado. Este enchufe calzará en un
toma de pared polarizado en una sola dirección. Si el
enchufe no calza por completo en el toma de la pared,
invierta el enchufe. Si el enchufe aún no calza,
comuníquese con un electricista calificado para que
instale un toma de pared adecuado. No cambie el enchufe
de la unidad, ni el receptáculo del cable de extensión ni el
enchufe del cable de extensión de ningún modo.
1. Asegure el cable de extensión al bastidor del motor
según se indica (Fig. 9) para evitar la remoción
accidental del cable de electricidad.
CONEXION DEL CABLE DE ENERGIA
Utilice una cuerda eléctrica al aire libre (mínimo 7,6 m o
25 pies de largo, 16AWG). Otros tamaños incluyen:
Fig. 9
Fig. 11
INSTRUCCIONES DE ARRANQUE Y AP AGADO
Esta unidad está equipada con un interruptor de tres
puntos para APAGADO/BAJO/ALTO (OFF/LOW/HIGH)
(Fig. 11).
• Deslice el interruptor totalmente hacia abajo para
APAGADO (OFF).
•Deslice el interruptor hasta el primer punto para BAJO
(LOW).
• Deslice el interruptor hacia arriba hasta el segundo
punto para ALTO (HIGH).
Fig. 10
2. Enchufe el extremo hembra del cable de electricidad
en el receptáculo de la parte posterior de la unidad
(Fig. 10).
INSTRUCCIONES DE OPERACION
Long. de cable (pies)
25 50 100 150
Cal. del alambre (AWG)*
16 16 16 14
TAMAÑO MINIMO DE ALAMBRE PARA LOS CABLES
DE EXTENSION PARA APARATOS DE 120 VOLTIOS
QUE UTILIZAN 0-6 AMPERIOS*
Receptáculo
APAGADO
BAJO
ALTO
Para
reducir el
riesgo de descarga eléctrica, esta unidad
cuenta con un enchufe polarizado (una
patilla es más ancha que la otra) y requiere
el uso de un cable de extensión polarizado.
ADVERTENCIA:
Page 47

E11
INSTRUCCIONES DE OPERACION
Respiraderos
SOSTENIMIENTO DE LA SOPLADORA/
ASPIRADORA
Antes de operar esta unidad, párese en la posición de
operación (Fig. 12). Verifique lo siguiente:
• El operador está vestido con la ropa apropiada tal
como botas, gafas de protección, protección auditiva,
guantes, pantalones largos y camisa de manga larga.
• Si las condiciones son polvorientas, el operador lleva
puesta una máscara.
• La unidad se encuentra en buen estado de funcionamiento.
• Los tubos y protectores están puestos y asegurados
en su lugar.
CONSEJOS ÚTILES SOBRE LA OPERACIÓN
• Verifique que el cierre relámpago de la bolsa esté
cerrado antes de operar la unidad.
• Asegúrese que la unidad no apunte hacia desechos
sueltos o personas antes de ponerla en marcha.
•Compruebe que la unidad se encuentre en buen
estado de funcionamiento. Verifique que los tubos y
protectores estén puestos y asegurados en su lugar.
• Sostenga siempre la unidad con las dos manos
mientras la use. Mantenga un agarre firme en las
manijas o mangos anteriores y posteriores.
• Se requiere el uso de protección auditiva para reducir
el riesgo de pérdida auditiva asociada con los niveles
de sonido.
•Opere el equipo solamente durante horas razonables — no
muy temprano en las mañanas ni muy tarde en las noches,
cuando la gente se pueda molestar. Acate las horas
detalladas en las ordenanzas locales. La recomendación
usual es de 9:00 am a 5:00 pm, de lunes a sábado.
• Limite el número de equipos que se usen
simultáneamente, para reducir los niveles de ruido.
• Opere las sopladoras motorizadas a la menor velocidad
posible, para hacer el trabajo y reducir los niveles de ruido.
• Verifique el estado del equipo antes del
funcionamiento, especialmente el tubo de escape,
tomas de aire y filtros de aire.
• Use rastrillos y escobas para esparcir los desechos
antes de soplarlos.
• Remoje ligeramente las superficies o use un
aditamento para rociar cuando haya agua disponible y
se encuentre bajo condiciones polvorientas.
• Conserve agua mediante el uso de sopladoras
motorizadas en vez de usar mangueras para muchas
de las aplicaciones de prados y ajardinado, incluyendo
áreas tales como canales, mallas, patios, parrillas,
pórticos y jardines.
• Tenga cuidado con los niños, animales domésticos,
ventanas abiertas y automóviles recién lavados, y
sople los desechos en forma segura.
• Use la extensión completa de la boquilla sopladora de
manera que el chorro de aire salga cerca al suelo.
• Limpie después de usar las sopladoras y otros equipos.
Deposite los desechos en recipientes para la basura.
RESPIRADEROS
No cubra nunca los respiraderos. Manténgalos libres de
obstrucciones y escombro. Deben permanecer siempre
libres para el enfriamiento adecuado del motor (Fig. 13).
Fig. 12
Para evitar
graves
lesiones personales, no use ropa holgada ni
artículos como bufandas, cuerdas,
cadenas, corbatas, etc. que puedan ser
absorbidos por los respiraderos. Para
asegurar que el cabello largo no sea
absorbido por el respiradero, recoja su
cabello sobre el nivel de sus hombros.
ADVERTENCIA:
Dependiendo del modelo, asegúrese que los
tubos de soplado o de succión y la bolsa de
recolección estén en su lugar antes de operar
la unidad, para evitar causarse lesiones
personales graves o causárselas a otras
personas, u ocasionarle daños a la unidad.
ADVERTENCIA:
Para evitar
lesiones
personales graves, póngase gafas de
seguridad en todo momento cuando maneje
esta unidad. Póngase una máscara o máscara
para polvo en sitios que sean polvorientos.
ADVERTENCIA:
Fig. 13
Page 48

E12
INSTRUCCIONES DE OPERACION
Fig. 14
Palanca de
cambio de modo
Modo de
aspirador
Modo de
soplador
OPERACIÓN DE LA UNIDAD COMO
SOPLADOR
El Convertir a un Soplador
1. Arranque la unidad. Lea las Instrucciones de
arranque y apagado.
2. Coloque la palanca de cambio de modo del soplador
/ aspirador en la posición hacia arriba (Modo de
soplador) (Fig. 14).
NOTA: No use nunca la unidad con la palanca en la
posición intermedia.
Fig. 15
Fig. 16
Fig. 17
Procedimiento de Operación Para la Sopladora
Sostenga el soplador según se ilustra en las Figs. 15, 16 y
17. Barra de lado a lado con la boquilla a varias pulgadas
sobre el suelo o el piso. Avance lentamente, manteniendo
una pila de escombro acumulado frente a usted.
La mayoría de las operaciones de soplado de aire se
realizan mejor a una velocidad baja que alta, mientras
que la velocidad alta es mejor para mover elementos
más pesados como escombros pesados y grava.
1 Use la sopladora para árboles, arbustos, macizos de
flores y zonas de limpieza difícil (Fig. 15).
2. Use la unidad alrededor de edificios y para otras
limpiezas normales (Fig. 16).
3. Use la sopladora para paredes, salientes, cercas y
mallas (Fig. 17).
Page 49

E13
INSTRUCCIONES DE OPERACION
OPERACIÓN DE LA UNIDAD COMO ASPIRADOR
El Convertir a un Aspirador
1. Arranque la unidad. Lea las Instrucciones de
arranque y apagado.
2. Coloque la palanca de cambio de modo del
soplador/ aspirador en la posición hacia abajo
(modo de aspirador) (Fig. 18).
NOTA: No use nunca la unidad con la palanca en la
posición intermedia.
Palanca de
cambio de modo
Fig. 18
Modo de
aspirador
Modo de
soplador
Operación Como Aspirador
Antes de operar la unidad, verifique lo siguiente:
•El operador viste ropa adecuada, como botas, lentes o
gafas de protección, protección para los oídos y audición,
guantes, pantalones largos y camisa de manga larga.
• Si el trabajo levanta polvo, se utiliza una máscara para
polvo o una máscara facial.
• La unidad está en buenas condiciones de
funcionamiento. Los tubos de aspiración y la bolsa del
aspirador están colocados en su lugar y asegurados.
• El arnés de la bolsa del aspirador está colocado en su
lugar y bien ajustado.
Use la unidad para aspirar escombros chicos, hojas,
papel, etc.
Sostenga el aspirador, inclinando ligeramente (50-100
mm, 2-4 pulg.) el tubo de aspiración, y use un
movimiento de barrido para recoger el escombro chico
(Fig. 19). El escombro fluirá dentro de la bolsa del
aspirador. Los objetos como las hojas pequeñas y las
ramas pequeñas serán trituradas a medida que pasan a
través del bastidor del ventilador, permitiendo que la
bolsa del aspirador cargue más escombros.
Fig. 19
Cuando la bolsa está llena, la aspiración disminuirá en
forma notable. Apague la unidad y espere que el propulsor
se detenga antes de abrir el cierre relámpago de la bolsa.
Abra el cierre relámpago de la bolsa y vacíe su contenido
antes de continuar. Lea Vaciado de la Bolsa del Aspirador.
NOTA: Vacíe la bolsa después de cada uso para evitar el
deterioro y obstrucción de la circulación de aire,
lo cual reducirá el rendimiento del aspirador.
Evite
situaciones que puedan causar que la bolsa del
aspirador se prenda fuego. No opere la
unidad cerca de una llama. No aspire
cenizas calientes de hogares, fosos de
parrillas, pilas de maleza, etc. No aspire
cigarros ni cigarrillos desechados a menos
que las cenizas estén completamente frías.
ADVERTENCIA:
Como
aspirador,
la unidad está diseñada para recoger material
seco como hojas, césped, ramas pequeñas y
trocitos de papel. Para evitar graves lesiones
personales, no intente aspirar residuos
húmedos ni agua estancada, ya que esto
puede causar el daño del Soplador /
Aspirador. Para evitar graves daños en el
propulsor, no aspire metal, vidrios rotos, etc.
ADVERTENCIA:
Para evitar
graves
lesiones personales, nunca abra el cierre
relámpago de la bolsa sin detener primero
la unidad.
ADVERTENCIA:
Para evitar
graves
lesiones personales y el daño de la unidad,
instale siempre los tubos de aspiración, la
bolsa del aspirador y verifique que el cierre
relámpago de la bolsa del aspirador esté
completamente cerrado cuando opere esta
unidad como un aspirador.
ADVERTENCIA:
Page 50

E14
INSTRUCCIONES DE OPERACION
DESBROCE DE UN TUBO / PROPULSOR
OBSTRUIDO
1. Oprima y sostenga el Interruptor de encendido /
velocidad en la posición de apagado (OFF) hasta
que el motor se apague por completo (Fig. 11).
2. Desconecte el cable de la bujía de encendido para
evitar que la unidad arranque.
3. Quite el tubo del soplador/aspirador y la bolsa del
aspirador.
4. Saque con cuidado el material que está obstruyendo
el tubo o el propulsor. Inspeccione las cuchillas para
verificar que no hayan ocurrido daños. Gire las
cuchillas del propulsor a mano para asegurar que
haya desbrozado la obstrucción por completo.
5. Vuelva a instalar la bolsa del aspirador y el tubo del
soplador / aspirador.
6. Vuelva a conectar el cable de la bujía de encendido.
VACIADO DE LA BOLSA DEL ASPIRADOR
NOTA: Vacíe la bolsa del aspirador luego de cada uso
para evitar el deterioro y la obstrucción de la
circulación de aire, lo cual reducirá el
rendimiento del aspirador.
1. Mientras presiona las lengüetas de sujeción a ambos
lados del tubo de la bolsa del aspirador, saque la
bolsa del aspirador hacia abajo de la unidad (Fig. 20).
2. Desconecte la bolsa del aspirador del gancho de la
bolsa del aspirador.
Fig. 20
Lengüetas de
sujeción
PRESIONE
HACIA
DENTRO
PRESIONE
HACIA
DENTRO
3. Abra el cierre relámpago de la bolsa y vacíe su
contenido en una bolsa o recipiente de basura.
4. Dé vuelta la bolsa hacia fuera luego del vaciado
inicial y agite con fuerza para eliminar el polvo y el
escombro.
5. Dé vuelta la bolsa con el lado exterior hacia fuera,
suba el cierre relámpago y vuelva a instalar la bolsa
del aspirador.
Use
siempre
protección ocular y una máscara para
protegerlo contra el polvo cuando vacíe la
bolsa del aspirador.
ADVERTENCIA:
Para evitar
graves
lesiones personales, nunca abra el cierre
relámpago ni saque la bolsa del aspirador sin
antes apagar la unidad.
ADVERTENCIA:
Para evitar
graves
lesiones personales, verifique que la unidad
esté apagada entes de limpiarla o realizar
cualquier tipo de mantenimiento en ella.
ADVERTENCIA:
Para evitar
graves
lesiones personales, use siempre guantes
para protegerse contra las cuchillas del
propulsor o contra otros objetos afilados.
ADVERTENCIA:
Page 51

E15
INSTRUCCIONES DE MANTENIMIENTO Y REPARACION
SERVICIO DE LAS UNIDADES CON
AISLAMIENTO DOBLE
Esta unidad cuenta con un aislamiento doble. En una
unidad con aislamiento doble, existen dos sistemas de
aislamiento en vez de conexión a tierra. No se
proporciona ningún medio de conexión a tierra en una
unidad de aislamiento doble, ni deben agregarse medios
de conexión a tierra a esta unidad.
El servicio de una unidad con aislamiento doble requiere
mucho cuidado y conocimiento del sistema, y debe ser
realizado únicamente por personal de servicio calificado.
Las piezas de repuesto para una unidad con aislamiento
doble deben ser idénticas a las piezas que reponen.
Solicite todas las reparaciones a un proveedor de
servicio autorizado. Una unidad de aislamiento doble
está indicada con las palabras “double insulation” o
“double insulated.”
LIMPIEZA DE LA UNIDAD
Use un cepillo pequeño para limpiar la parte exterior de
la unidad. No use detergentes fuertes. Los limpiadores
domésticos que contienen aceites aromáticos como
pino y limón, y con solventes como el queroseno
pueden dañar el bastidor de plástico y la manija. Seque
toda la humedad con un paño suave.
LIMPIEZA DE LA BOLSA DEL ASPIRADOR
1. Vacíe la bolsa luego de cada uso para evitar el
deterioro y la obstrucción del flujo de aire, lo cual
reducirá el rendimiento del aspirador.
2. Limpie la bolsa según sea necesario usando
protección ocular y máscara para el polvo. Dé vuelta
la bolsa con el interior hacia afuera luego del vaciado
inicial y sacuda la bolsa vigorosamente para
desprender el polvo y el escombro.
INSPECCION DE LOS CABLES DE
EXTENSION
Inspeccione todos los cables de extensión con
frecuencia. Observe bien si no existe deterioro, cortes o
grietas en el aislamiento. Inspeccione si hay daños en
los conectores. Cambie los cables si están defectuosos
o dañados.
ALMACENAMIENTO
• Guarde la unidad en un lugar seco y alto o bajo llave,
fuera del alcance de los niños.
•Guarde la unidad bajo llave para evitar el uso no
autorizado o el daño de la unidad.
•Guarde la unidad en un área seca y bien ventilada.
3. Lave la bolsa una vez por año o con más frecuencia
si es necesario:
a. Retire la bolsa del aspirador.
b. Dé vuelta la bolsa con el interior hacia afuera.
c. Cuelgue la bolsa.
d. Limpie con una manguera por completo,
lavando desde afuera hacia adentro.
e. Cuélguela para secarla.
f. Vuelva a dar vuelta la bolsa con el lado exterior
hacia afuera y vuelva a instalarla.
Para
evitar
graves lesiones personales, apague
siempre su unidad y espere que se enfríe
antes de limpiarlo o realizar cualquier tipo
de mantenimiento.
ADVERTENCIA:
Page 52

E16
ESPECIFICACIONES
Tipo de motor..................................................................................................................................Eléctrico CA 120 voltios
Amperaje del motor......................................................................................................................................... 12 Amperios
Salida de aire del soplador............................................................................................... hasta 253 km/h (157 millas/hora)
Flujo de aire del aspirador....................................................................................................... hasta 12 m3/m (424 pies3/m )
Proporción de triturado........................................................................................................................................ hasta 10:1
Peso operativo ........................................................................................................................................... 4,5 kg (10 libras)
Capacidad de la bolsa del aspirador.................................................................................................. 26,4 L (0,75 fanegas)
CAUSA ACCION
La bolsa está llena Vacíe la bolsa, lea Vaciado de la Bolsa del Aspirador
El tubo está bloqueado Desbroce la obstrucción, lea Desbroce de un tubo /
impulsor bloqueado
El impulsor está bloqueado Desbroce la obstrucción, lea Desbroce de un tubo /
impulsor bloqueado
El impulsor está dañado Lleve la unidad a un proveedor de servicio autorizado
La bolsa está sucia Limpie la bolsa
La bolsa está desgarrada Cambie la bolsa
El cierre relámpago está abierto Cierre la bolsa con el cierre relámpago
La unidad no está enchufada Enchufe en un cable de extensión
LA UNIDAD NO SOPLA O NO ASPIRA
RESOLUCION DE PROBLEMAS
Si necesita asistencia adicional, comuníquese con su proveedor de servicio autorizado.
CAUSA ACCION
El motor se detiene, o la unidad está desenchufada Revise el cable para ver si está enchufado a un
tomacorriente
EL MOTOR NO ARRANCA
Page 53

E17
NOTAS
Page 54

E18
NOTAS
Page 55

E19
PARTS LIST
REPLACEMENT PARTS - MODEL TB125QS
120 VOLT ELECTRIC BLOWER/VAC
Item Part No. Description
1 753-04835 Left Motor Housing
2 753-04836 Right Motor Housing
3 791-181482 Housing Screw
4 791-182546 Switch Assembly
5 791-182547 Power Connection Wire Assembly
6 791-180509 Switch Lever
7 791-180503 Rubber Cushion
8 791-182548 Motor Assembly
9 791-182549 Spacer
10 791-180505 Washer
11 791-182550 Impeller
Item Part No. Description
12 791-182410 Mode Control Flapper
13 791-182411 Mode Control Lever (includes 3)
14 791-00051 Blower/Vac Tube Assembly (includes 3)
15 791-182425 Blower/Vac Tube Mounting Hardware
16 791-182417 Vacuum Bag Adapter
* 791-612930 Cable Tie
* 791-182416 Vacuum Bag Assembly
(includes 16, Vacuum Bag & Cable Tie)
* 791-682075B Shoulder Harness
* 753-04325 Patio Head
* Items Not Shown
3
14
3
13
15
3
15
3
1
4
7
12
5
6
7
8
9
10
11
2
15
3
16
14
Page 56

GARANTÍA LIMITADA DEL FABRICANTE PARA:
Ninguna garantía implícita es aplicable después del
período de aplicabilidad de la garantía expresa
escrita con anterioridad, incluyendo cualquier
garantía implícita de comerciabilidad o idoneidad
para un propósito particular con respecto a las
piezas identificadas. Exceptuando lo mencionado
anteriormente, ninguna otra garantía expresa bien
sea escrita o verbal con respecto a cualquier
producto que sea concedida por cualquier persona o
entidad, incluyendo al distribuidor o minorista,
deberá comprometer a Troy-Bilt LLC durante el
período de la Garantía, el remedio exclusivo es el
arreglo o la sustitución del producto según lo
establecido anteriormente. (Algunos estados no
permiten limitaciones en cuanto al período de duración de
una garantía implícita, de manera que puede que la
limitación anterior no sea aplicable en su caso.)
Las estipulaciones establecidas en esta Garantía
ofrecen la solución única y exclusiva que resulte de
las ventas. Troy-Bilt no deberá ser responsable de
pérdidas o daños incidentales o consecuentes que
incluyan, sin limitación, gastos incurridos debido a la
sustitución de servicios de mantenimiento de prados,
transporte o gastos relacionados, o gastos de
alquiler para reemplazar temporalmente un producto
bajo garantía. (Algunos estados no permiten limitaciones
en cuanto al período de duración de una garantía implícita,
de manera que puede que la limitación anterior no sea
aplicable en su caso.)
Ningún tipo de recuperación deberá ser superior al precio
de compra del producto vendido, en ningún caso. La
alteración de las características de seguridad del producto
deberá anular esta Garantía. Usted adopta el riesgo y la
obligación de la pérdida, daño o lesión en su persona o a
su propiedad y/o la de otras personas y sus propiedades,
que se origine a raíz del uso o mal uso, o la incompetencia
para usar el producto.
Esta garantía limitada no deberá cubrir a ninguna otra
persona distinta al comprador original, arrendatario
original, o la persona para la cual se compró en calidad de
regalo.
Relación de las leyes estatales con esta Garantía: Esta
garantía le confiere derechos legales específicos, y puede
que usted también tenga otros derechos, los cuales varían
en cada estado.
Para localizar al distribuidor de servicio local más cercano,
marque el número 1-800-520-5520.
Troy-Bilt LLC
PO Box 361131
Cleveland, OH 44136-0019
Troy-Bilt LLC concede la garantía limitada establecida
debajo para mercancías nuevas que sean compradas y
usadas en los Estados Unidos, sus posesiones y
territorios.
Troy-Bilt LLC garantiza este producto contra defectos en
el material y la mano de obra durante un período de dos
(2) años, a partir de la fecha de compra original y a su
entera discreción, arreglará o substituirá sin costo alguno
cualquier pieza cuyo material o mano de obra se considere
defectuoso. Esta garantía limitada se deberá aplicar
únicamente si este producto ha sido manejado y
mantenido de acuerdo al Manual del Operario incluido con
el producto y, si no ha sido sometido a mal uso, abuso,
uso comercial, negligencia, accidente, mantenimiento
inapropiado, alteración, vandalismo, hurto, fuego, agua o
daños debidos a otros riesgos o desastre natural. Los
daños ocasionados por la instalación o el uso de cualquier
accesorio o aditamento que no esté aprobado por TroyBilt y que sea usado con el (los) producto(s) contemplados
en este manual, anularán la garantía con respecto a
cualquier daño resultante. Esta garantía está limitada a
noventa (90) días a partir de la fecha de compra original al
detalle de cualquier producto Troy-Bilt que se use para
alquiler, para propósitos comerciales o cualquier otro
propósito que genere ingresos.
CÓMO OBTENER SERVICIO: El servicio de garantía está
disponible A TRAVÉS DE SU DISTRIBUIDOR DE
SERVICIO LOCAL AUTORIZADO, AL PRESENTAR EL
COMPROBANTE DE COMPRA. Para localizar al
distribuidor en su área, visite nuestro sitio en Internet en
www.troybilt.com, busque el aviso clasificado en las
Páginas Amarillas, llame al 1-800-520-5520 o escriba a
Troy-Bilt LLC, PO Box 361131, Cleveland, OH 44136-
0019.
Esta garantía limitada no ofrece cobertura en los
siguientes casos:
A. Sincronizaciones - bujías, ajustes de carburadores, filtros.
B. Artículos de desgaste, perillas percusivas, carretes
externos, línea de corte, carretes internos, polea de
arranque, cuerdas de arranque, correas motoras.
C. Troy-Bilt no le ofrece ninguna garantía a los productos
que sean vendidos o exportados fuera de los Estados
Unidos de América, sus posesiones y territorios, excepto
aquellos que se vendan a través de los canales de
distribución para exportación autorizados por Troy-Bilt.
Troy-Bilt se reserva el derecho a cambiar o mejorar el
diseño de cualquier producto Troy-Bilt, sin adoptar
ninguna obligación para modificar cualquier producto
fabricado con anterioridad.
 Loading...