

Page 1
Safe Operation Practices • Assembly & Set-Up • Controls & Features • Operation • Maintenance • Warranty
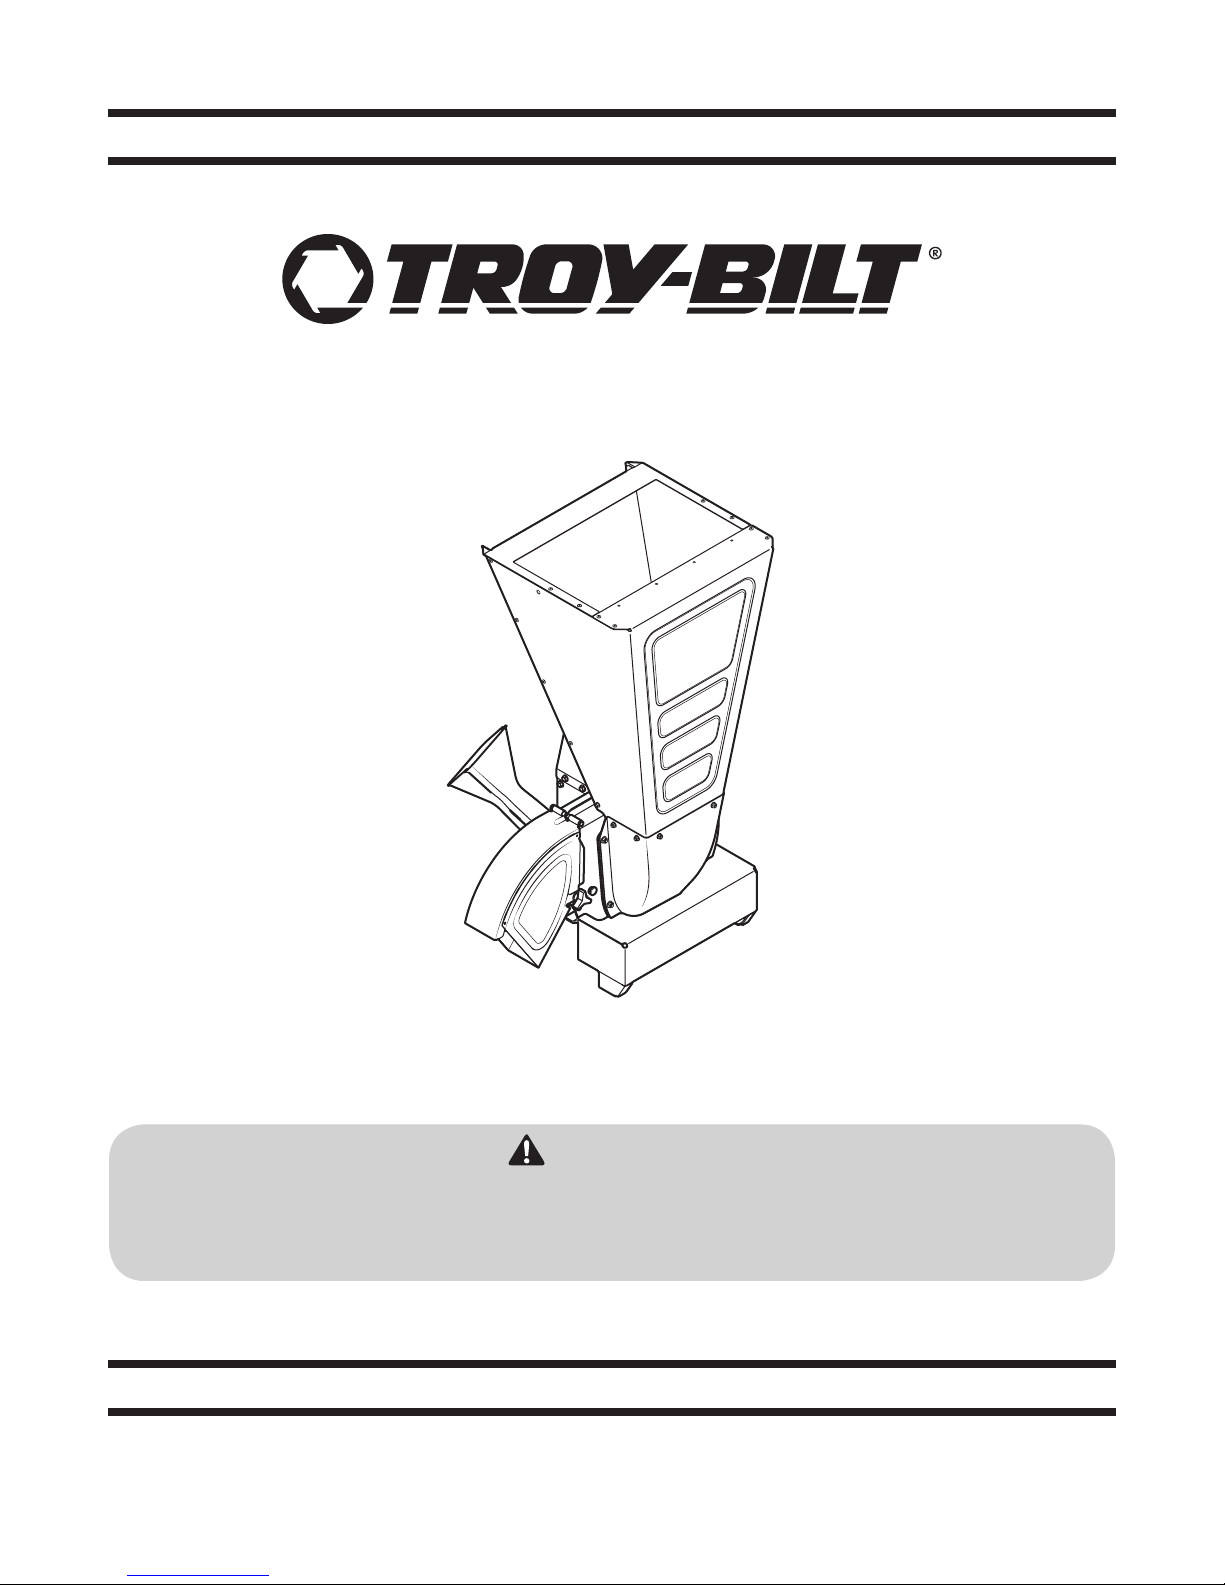
OperatOr’s Manual
FLEX™ Chipper Shredder Attachment
READ AND FOLLOW ALL SAFETY RULES AND INSTRUCTIONS IN THIS MANUAL
BEFORE ATTEMPTING TO OPERATE THIS MACHINE.
FAILURE TO COMPLY WITH THESE INSTRUCTIONS MAY RESULT IN PERSONAL INJURY.
TROY-BILT LLC, P.O. BOX 361131 CLEVELAND, OHIO 44136-0019
Printed In USA
WARNING
Form No. 769-11264
(February 29, 2016)
Page 2

To The Owner
Thank You
Thank you for purchasing this product. It was carefully
engineered to provide excellent performance when properly
operated and maintained.
Please read this entire manual prior to operating the equipment.
It instructs you how to safely and easily set up, operate and
maintain your machine. Please be sure that you, and any other
persons who will operate the machine, carefully follow the
recommended safety practices at all times. Failure to do so could
result in personal injury or property damage.
All information in this manual is relative to the most recent
product information available at the time of printing. Review
this manual frequently to familiarize yourself with the machine,
its features and operation. Please be aware that this Operator’s
Manual may cover a range of product specifications for various
models. Characteristics and features discussed and/or illustrated
in this manual may not be applicable to all models. We reserve
the right to change product specifications, designs and
equipment without notice and without incurring obligation.
Table of Contents
Safe Operation Practices ........................................ 3
Assembly & Setup .................................................... 5
Controls & Operation .............................................. 6
Maintenance & Service .......................................... 8
1
If you have any problems or questions concerning the machine,
phone an authorized Troy-Bilt service dealer or contact us
directly. Troy-Bilt’s Customer Support telephone numbers,
website address and mailing address can be found on this page.
We want to ensure your complete satisfaction at all times.
Throughout this manual, all references to right and left side of the
machine are observed from the operating position.
Troubleshooting ..................................................... 11
Replacement Parts .................................................11
Warranty .................................................................12
Spanish ....................................................................13
Record Product Information
Before setting up and operating your new equipment, please
locate the model plate on the equipment and record the
information in the provided area to the right. You can locate the
model plate by looking at the rear mounting assembly on the
chipper shredder attachment, when the unit is not coupled with
the FLEX™ Power Base. This information will be necessary, should
you seek technical support via our web site, Customer Support
Department, or with a local authorized service dealer.
Model NuMber
Serial NuMber
Product Registration and Customer Support
Please register your product on our website, www.troybilt.com
Please do NOT return the machine to the retailer or dealer without first contacting the Customer Support Department.
If you have difficulty assembling this product or have any questions regarding the controls, operation, or maintenance of
this machine, want to order replacement parts/attachments/accessories, or want to view an online How-To video; you can
seek help from the experts. Have your full model number and serial number ready. Choose from the options below:
◊ Web: www.troybilt.com/equipment/troybilt
◊ Phone: (800) 828-5500
◊ Mail: Troy-Bilt LLC • P.O. Box 361131 • Cleveland, OH • 44136-0019
2
Page 3

Important Safe Operation Practices
WARNING! This symbol points out important safety instructions which, if not followed, could endanger the personal safety and/or property of
yourself and others. Read and follow all instructions in this manual before attempting to operate this machine. Failure to comply with these
instructions may result in personal injury.
When you see this symbol. HEED ITS WARNING!
CALIFORNIA PROPOSITION 65
WARNING! Engine Exhaust, some of its constituents, and certain vehicle components contain or emit chemicals known to State of California
to cause cancer and birth defects or other reproductive harm.
DANGER! This machine was built to be operated according to the safe operation practices in this manual. As with any type of power equipment,
carelessness or error on the part of the operator can result in serious injury. This machine is capable of amputating fingers, hands, toes and feet
and throwing debris. Failure to observe the following safety instructions could result in serious injury or death.
2
Training
1. Read, understand, and follow all instructions
on the machine and in the manual(s) before
attempting to assemble and operate.
Keep this manual in a safe place for future
and regular reference and for ordering
replacement parts.
2. Be familiar with all controls and their proper
operation. Know how to stop the machine
and disengage them quickly.
3. Never allow children under 16 years of
age to operate this machine. Children 16
and over should read and understand the
instructions and safe operation practices
in this manual and on the machine and be
trained and supervised by an adult.
4. Never allow adults to operate this machine
without proper instruction.
5. Keep bystanders, pets, and children at
least 75 feet from the machine while it is in
operation. Stop machine if anyone enters
the area.
6. Never run an engine indoors or in a poorly
ventilated area. Engine exhaust contains
carbon monoxide, an odorless and deadly
gas.
7. Do not put hands and feet near rotating
parts or in the feeding chambers and
discharge opening. Contact with the
rotating impeller can amputate fingers,
hands, and feet.
8. Never attempt to unclog either the feed
intake or discharge opening, remove
or empty bag, or inspect and repair the
machine while the engine is running. Shut
the engine off and wait until all moving
parts have come to a complete stop.
Disconnect the FLEX™ Power Base from the
attachment.
Preparation
1. Thoroughly inspect the area where the
equipment is to be used. Remove all rocks,
bottles, cans, or other foreign objects which
could be picked up or thrown and cause
personal injury or damage to the machine.
2. Always wear safety glasses or safety goggles
during operation and while performing an
adjustment or repair, to protect your eyes.
Thrown objects which ricochet can cause
serious injury to the eyes.
3. Wear sturdy, rough-soled work shoes and
close-fitting slacks and shirts. Loose fitting
clothes or jewelry can be caught in movable
parts. Never operate this machine in bare
feet or sandals. Wear leather work gloves
when feeding material in the chipper chute.
4. Before starting, check all bolts and screws
for proper tightness to be sure the machine
is in safe working condition. Also, visually
inspect machine for any damage at frequent
intervals.
5. Maintain or replace safety and instructions
labels, as necessary.
Operation
1. Do not put hands and feet near rotating
parts or in the feeding chambers and
discharge opening. Contact with the
rotating impeller can amputate fingers,
hands, and feet.
2. Before starting the machine, make sure
the chipper chute, feed intake, and cutting
chamber are empty and free of all debris.
3. Thoroughly inspect all material to be
shredded and remove any metal, rocks,
bottles, cans, or other foreign objects which
could cause personal injury or damage to
the machine.
4. If it becomes necessary to push material
through the shredder hopper, use a small
diameter stick. Do not use your hands or
feet.
5. If the impeller strikes a foreign object or
if your machine should start making an
unusual noise or vibration, immediately
shut the engine off. Allow the impeller to
come to a complete stop. Disconnect the
FLEX™ Power Base from the attachment and
perform the following steps:
a. Inspect for damage.
b. Repair or replace any damaged
parts.
c. Check for any loose parts and
tighten to assure continued safe
operation.
6. Do not allow an accumulation of processed
material to build up in the discharge area.
This can prevent proper discharge and
result in kickback of material through the
feed opening.
7. Do not attempt to shred or chip material
larger than specified on the machine or
in this manual. Personal injury or machine
damage could result.
8. Never attempt to unclog either the feed
intake or discharge opening while the
engine is running. Shut the engine off,
wait until all moving parts have stopped,
disconnect the FLEX™ Power Base from the
attachment before clearing debris.
9. Never operate without the shredder hopper,
chipper chute, or chute deflector properly
attached to the machine. Never empty or
change discharge bag while the engine is
running.
10. Keep all guards, deflectors and safety
devices in place and operating properly.
11. Keep your face and body back and to the
side of the chipper chute while feeding
material into the machine to avoid
accidental kickback injuries.
12. Never operate this machine without good
visibility or light.
13. Do not operate this machine on a paved,
gravel or non-level surface.
14. Do not operate this machine while under
the influence of alcohol or drugs.
15. Never pick up or carry machine while the
engine is running.
16. If situations occur which are not covered in
this manual, use care and good judgement.
Contact Customer Support for assistance
and the name of the nearest service dealer.
Maintenance & Storage
1. Never tamper with safety devices. Check
their proper operation regularly.
3
Page 4
2. Check bolts and screws for proper tightness
at frequent intervals to keep the machine
in safe working condition. Also, visually
inspect machine for any damage and repair,
if needed.
3. Before cleaning, repairing, or inspecting,
stop the engine and make certain the
impeller and all moving parts have stopped.
Disconnect the FLEX™ Power Base from the
attachment to prevent unintended starting.
4. Do not change the engine governor settings
or overspeed the engine. The governor
controls the maximum safe operating speed
of the engine.
5. Maintain or replace safety and instruction
labels, as necessary.
6. Follow this manual for safe loading,
unloading, transporting, and storage of this
machine.
7. Never store the machine or fuel container
inside where there is an open flame, spark
or pilot light such as a water heater, furnace,
clothes dryer, etc.
8. Allow machine to cool at least 5 minutes
before storing.
9. Always refer to the operator’s manual for
proper instructions on off-season storage.
10. Observe proper disposal laws and
regulations for gas, oil, etc. to protect the
environment.
11. According to the Consumer Products
Safety Commission (CPSC) and the U.S.
Environmental Protection Agency (EPA),
this product has an Average Useful Life of
seven (7) years, or 60 hours of operation. At
the end of the Average Useful Life have
the machine inspected annually by an
authorized service dealer to ensure that all
mechanical and safety systems are working
properly and not worn excessively. Failure
to do so can result in accidents, injuries or
death.
Notice Regarding Emissions
Engines which are certified to comply with
California and federal EPA emission regulations for
SORE (Small Off Road Equipment) are certified to
operate on regular unleaded gasoline, and may
include the following emission control systems:
Engine Modification (EM), Oxidizing Catalyst
(OC), Secondary Air Injection (SAI) and Three Way
Catalyst (TWC) if so equipped.
Spark Arrestor
WARNING: This machine is
equipped with an internal
combustion engine and should not
be used on or near any unimproved
forest-covered, brushcovered or
grass-covered land unless the
engine’s exhaust system is equipped
with a spark arrestor meeting
applicable local or state laws (if any).
If a spark arrestor is used, it should be maintained
in effective working order by the operator. In the
State of California the above is required by law
(Section 4442 of the California Public Resources
Code). Other states may have similar laws. Federal
laws apply on federal lands.
A spark arrestor for the muffler is available through
your nearest engine authorized service dealer or
contact the service department, P.O. Box 361131
Cleveland, Ohio 44136-0019.
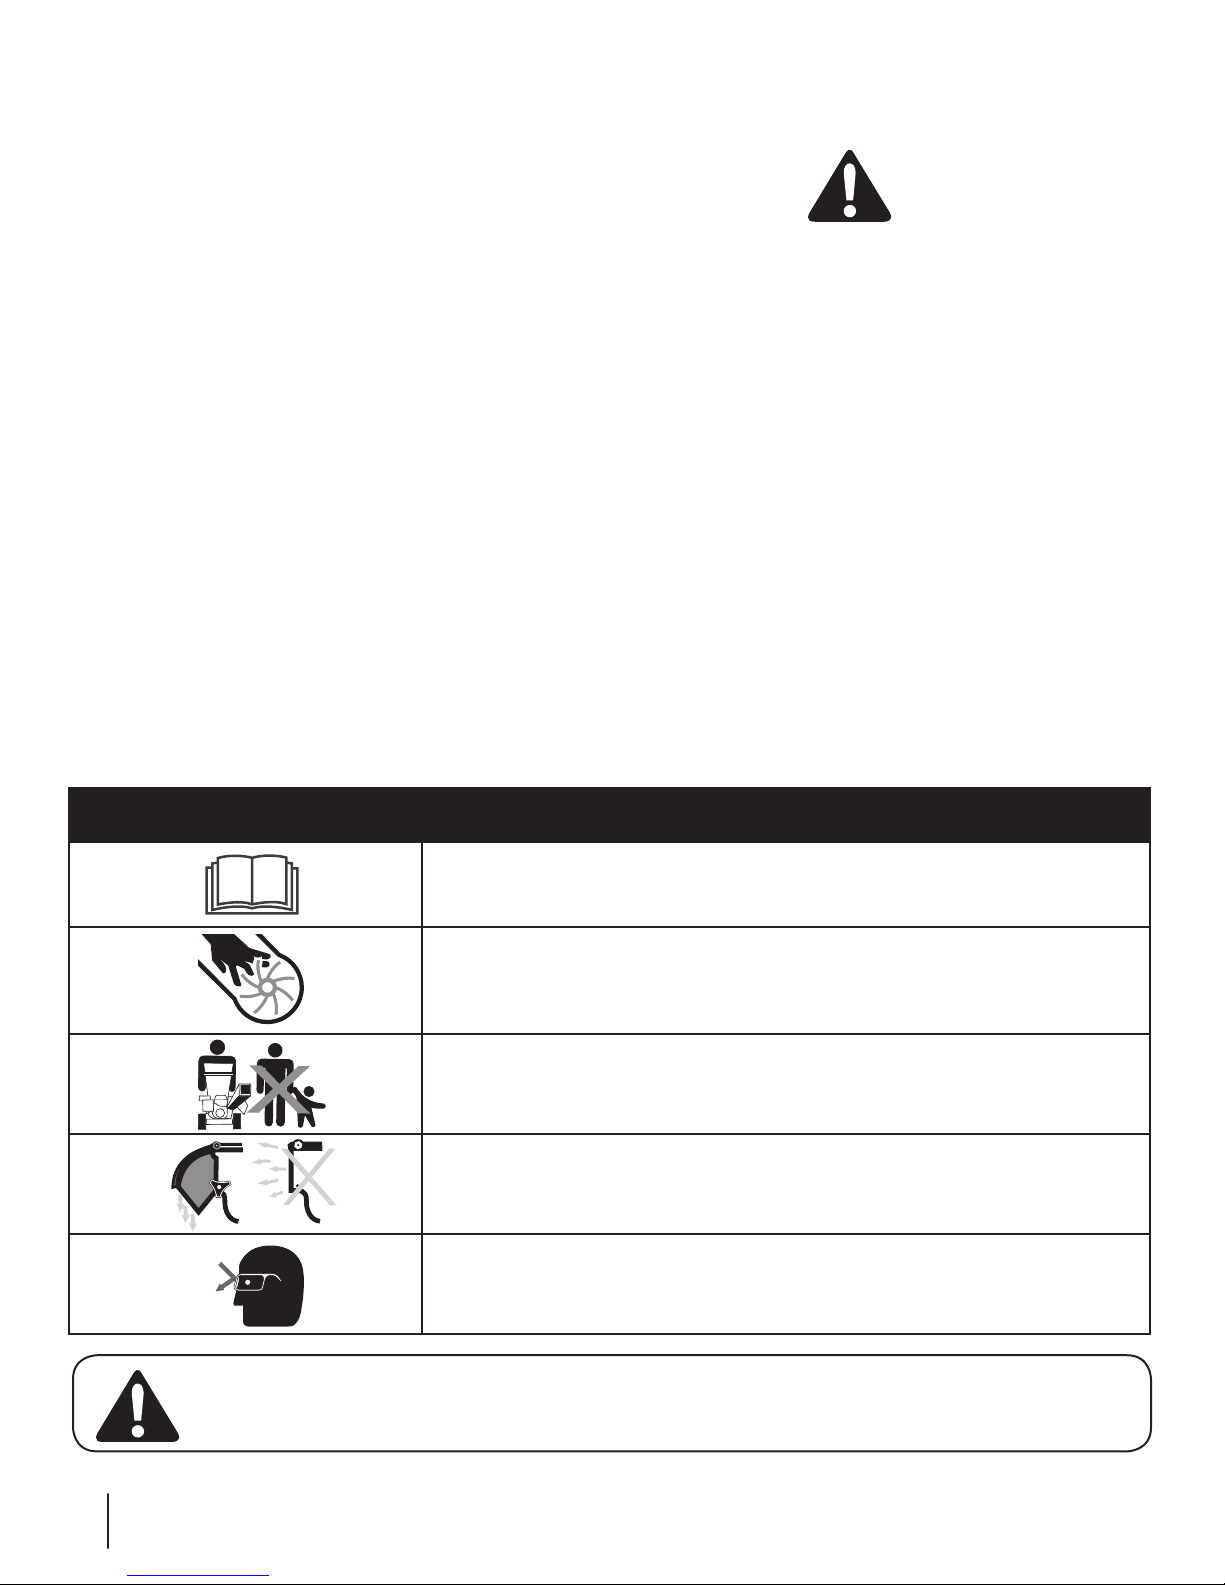
Safety Symbols
This page depicts and describes safety symbols that may appear on this product. Read, understand, and follow all instructions on the machine before
attempting to assemble and operate.
Symbol Description
READ THE OPERATOR’S MANUAL(S)
Read, understand, and follow all instructions in the manual(s) before attempting to assemble and operate.
WARNING— ROTATING BLADES
Keep hands out of inlet and discharge openings while machine is running. There are rotating blades inside
BYSTA NDERS
Keep bystanders, pets, and children at least 75 feet from the machine while it is in operation. Stop
machine if anyone enters the area.
WARNING— THROWN DEBRIS
Never operate without the chute deflector properly attached to the machine.
EYE PROTECTION
Always wear safety glasses or safety goggles when operating this machine.
WARNING! Your Responsibility—Restrict the use of this power machine to persons who read, understand and follow the warnings and
instructions in this manual and on the machine.
4 Section 2 — important Safe operation practiceS
SAVE THESE INSTRUCTIONS!
Page 5
Assembly & Set-Up
(a)
(c)
(c)
(d)
(b)
(a)
(c)
(c)
(d)
(b)
1
2
2
(a)
(a)
Read entire Operator’s Manual before
you attempt to assemble or operate
your new chipper shredder.
If you have any problems with the assembly of
your chipper shredder, please call (800) 828-5500.
If calling for assistance, please have the model and
serial number available.
Contents of Carton:
• FLEX™ Chipper Shredder Attachment
• Bag
• Chute Deflector
• Safety Glasses
• Operator’s Manual
• Fast Start Guide
Assembly
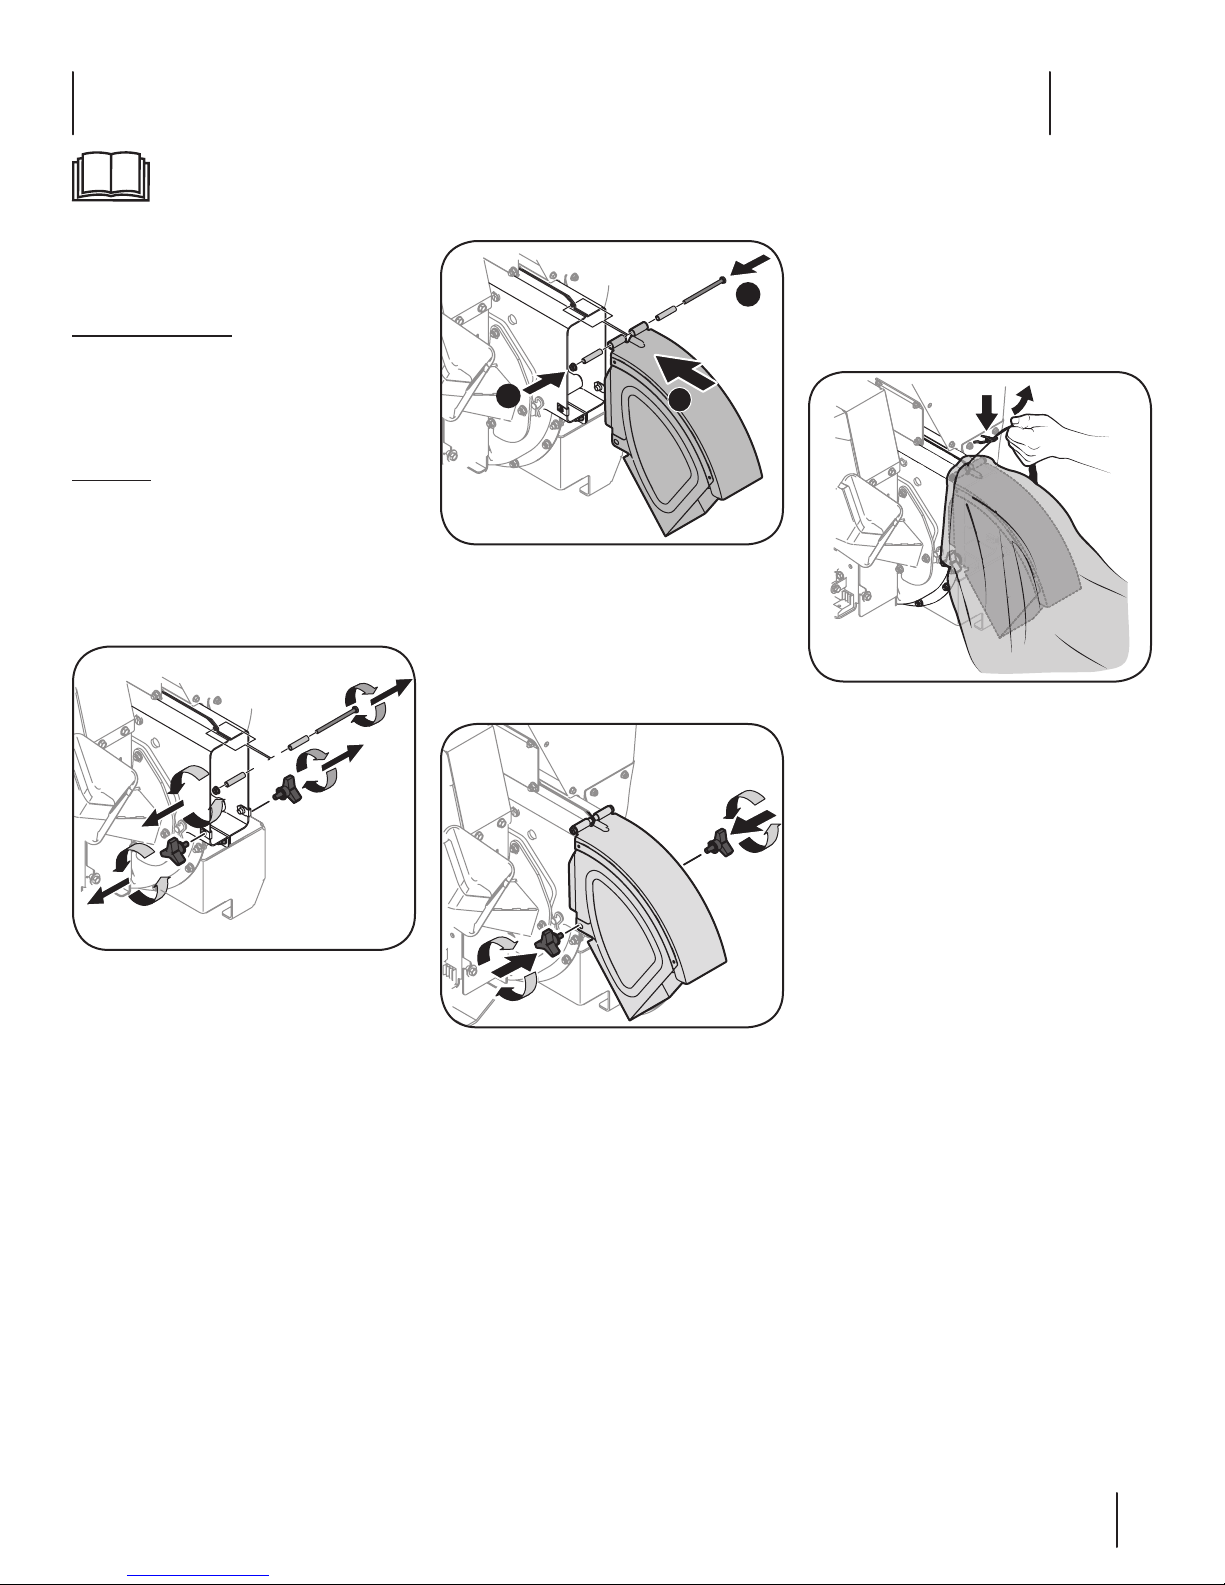
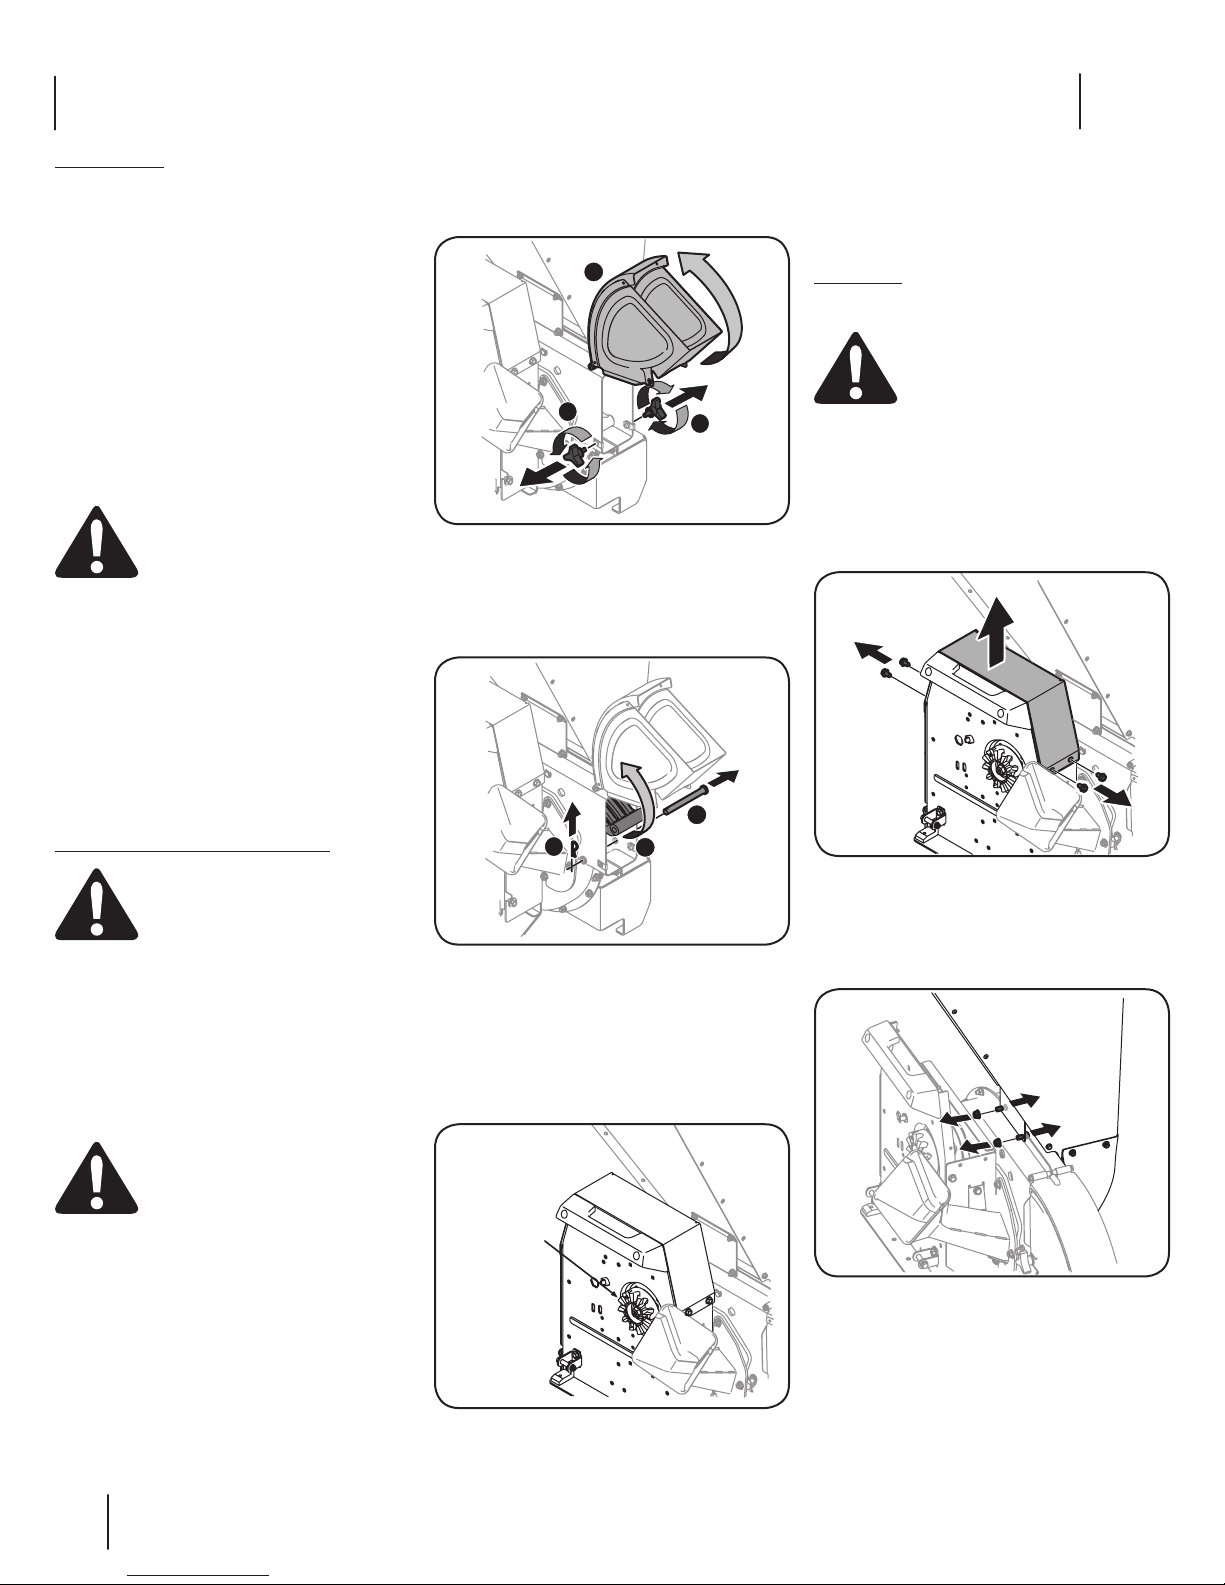
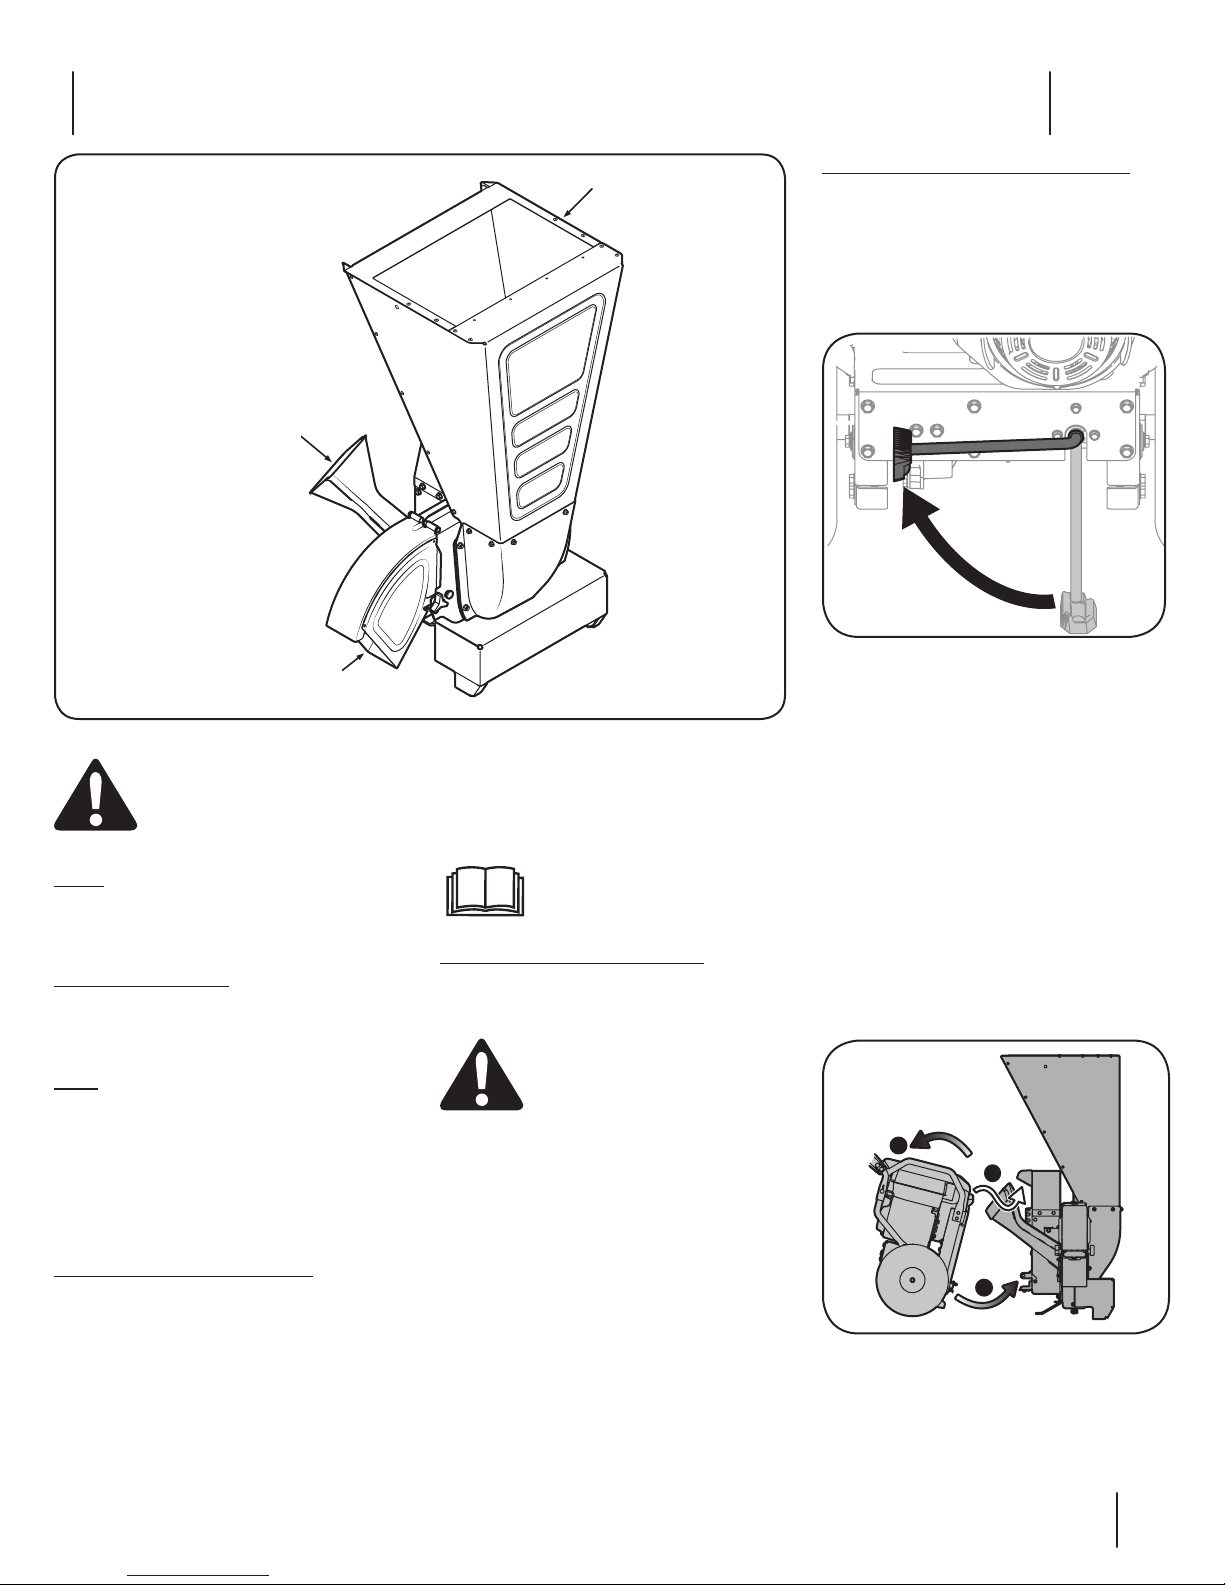
Chute Deflector
For shipping reasons, the unit is crated with its
chute deflector removed. To reattach, proceed as
follows:
1. Remove the wing knobs (a) from each side of
the lower impeller housing. See Figure 3-1.
3. Align the chute deflector in position on the
discharge opening and inser t hex bolt (d) with
spacer (c) through hinge on chute deflector
(spacers fit inside of hinges). See Figure 3-2.
Figure 3-2
4. Place second spacer (c) over hex bolt (d)
inside other hinge and secure with hex lock
nut (b). See Figure 3-2.
5. Secure both sides of chute deflector to
impeller housing using wing knobs (a)
removed in Step 1. See Figure 3-3.
3
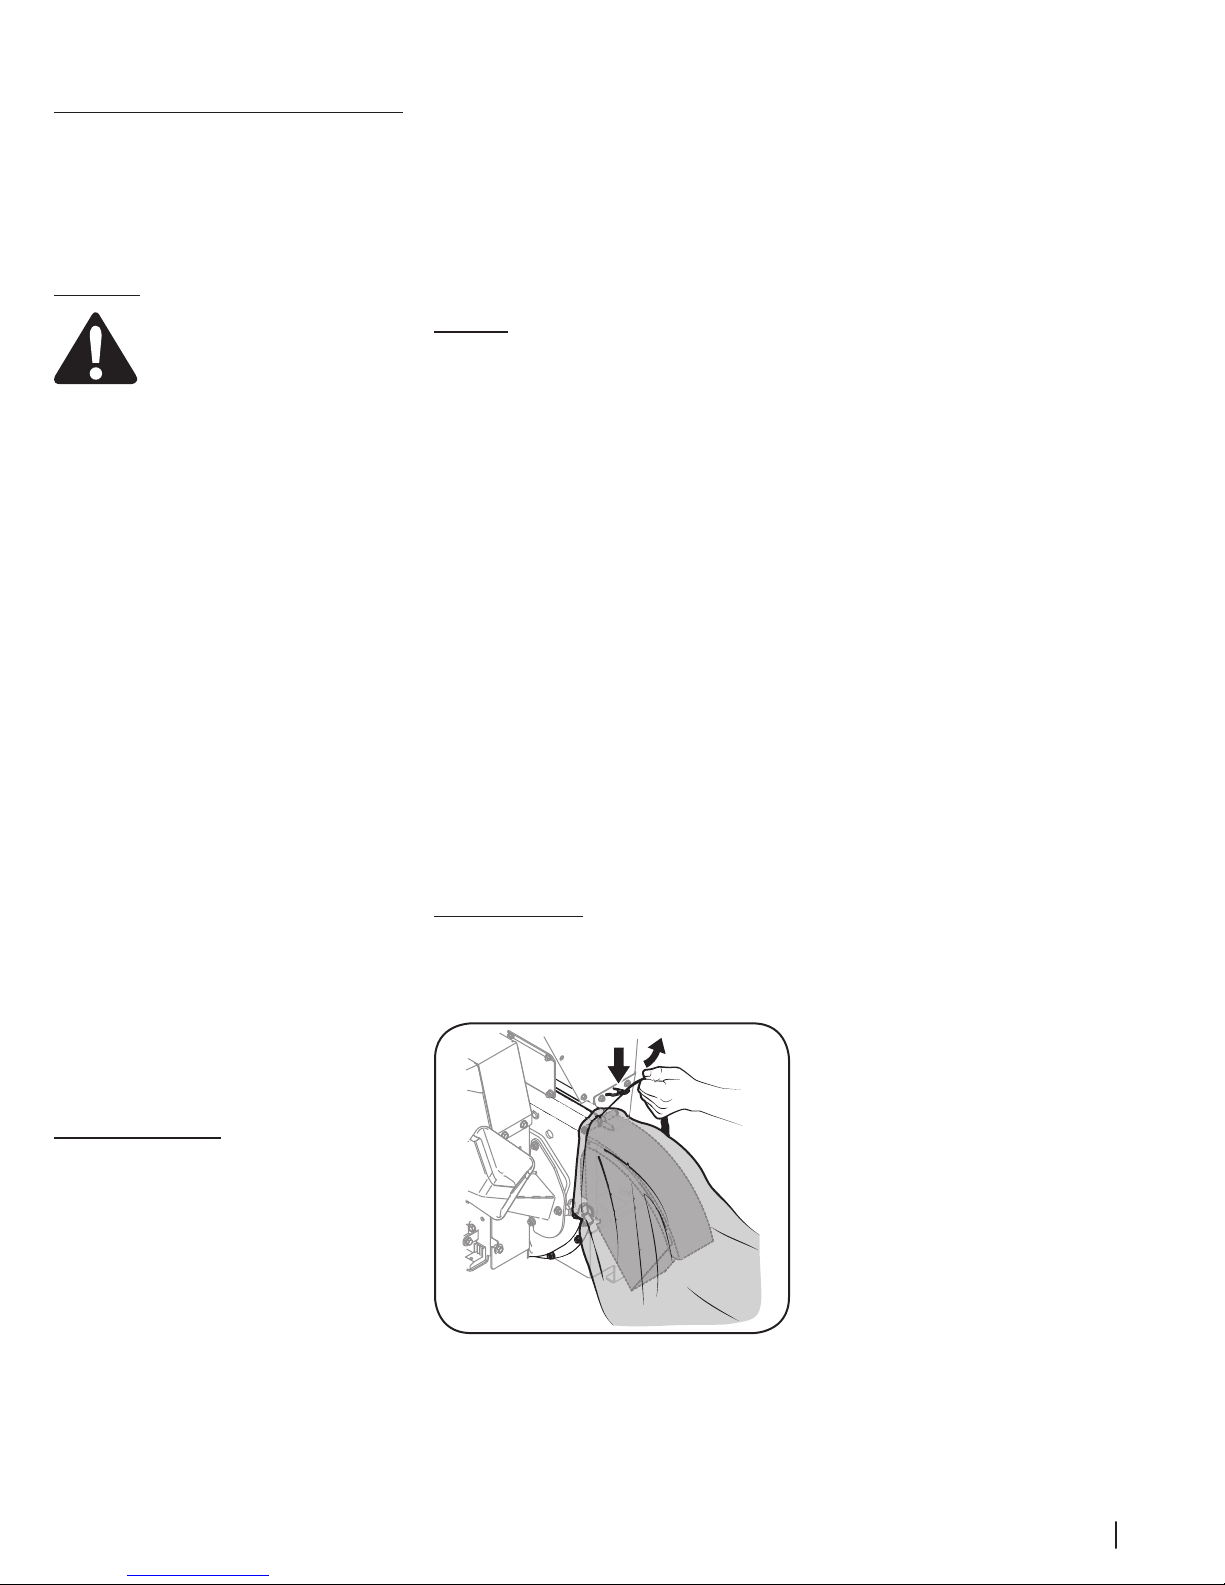
Bag
To attach the bag:
1. Place the opening of the bag completely
over the chute deflector. See Figure 3-4.
2. Position the bag so that the wing knobs
which secure the chute deflector to the
impeller housing are completely covered.
3. Pull on the draw-strap until the bag is tight
around chute deflector opening.
Figure 3-4
Figure 3-1
2. Remove the hex lock nut (b), spacers (c), and
hex bolt (d) from the top of the impeller
housing. See Figure 3-1.
Figure 3-3
5
Page 6
Controls & Operation
Hopper
Chipper Chute
1
3
2
Figure 4-1
WARNING! Read and follow all safety rules and instructions in this manual, including the
entire Controls & Operation section, before attempting to operate this machine. Failure to
comply with all safety rules and instructions may result in personal injury.
Engine
Refer to the FLEX™ Power Base Operator’s Manual
for details regarding all engine-related controls and
features.
Chipper Chute
Branches up to two inches in diameter may be fed
into the chipper chute for chipping. See Figure 4-1.
Hopper
Leaves, twigs, and branches up to 1/2-inch in
diameter may be placed into the hopper for
shredding. See Figure 4-1.
IMPORTANT: Never place branches with a diameter
greater than 1/2-inch in the hopper. Doing so can
result in serious damage to your unit’s shredder
blade, flails or impeller.
Read the entire Operator’s Manual
before you attempt to operate your
new chipper shredder.
Starting and Stopping the Engine
Start and stop the engine on the FLEX™ Power
Base in accordance with the Operator’s Manual
included with that machine.
WARNING! If leaving this equipment
unattended turn the engine OFF and
remove the ignition key.
4
Connecting to the FLEX™ Power Base
NOTE: All references to the left or right side are from
the operator’s position. Any exceptions will be noted.
1. Roll the FLEX™ Power Base over to the
chipper shredder attachment with the
kickstand UP. See Figure 4-2.
Figure 4-2
2. Roll the FLEX™ Power Base forward and tip
it up, engaging the top part of the chipper
shredder attachment with the handle mount
provided on the FLEX™ Power Base (1 of
Figure 4-3).
3. Tip the FLEX™ Power Base backwards to
engage the two bottom connection points
(2 and 3 of Figure 4-3).
Note: The operator will be able to hear the
lower mounts engage and lock (latching
sound) when coupled properly. To test if
coupled properly, lift up on the handles. If
the unit comes apart, the connection was
not made. Ensure that the kickstand is still
in the UP position, and swiftly tip the FLEX™
Power Base backward with the top mount
engaged.
Chute Deflector
Debris is discharged from the machine’s
reductio n c hamber through the chu te d efle ctor.
See Figure 4-1.
6
Figure 4-3
Note: A “clanking” noise may be heard
during start-up and shut down. It is
completely normal and does NOT indicate a
malfunction of any kind.
Page 7
Disconnecting from the FLEX™ Power Base
1. The kickstand acts only as a locking device
for the attachment to the FLEX™ Power Base.
The only time the operator would need
to deploy the kickstand once connected
to an attachment would be in the case of
uncoupling the FLEX™ Power Base from the
attachment.
Shredding
WARNING: The operation of any
chipper shredder can result in foreign
objects being thrown into the eyes,
which can damage your eyes severely.
Always wear the safety glasses
provided with this unit or eye shields
before chipping or shredding and
while performing any adjustments or
repairs.
Yard waste such as leaves and pine needles can be
placed in the hopper for shredding. After material
has been processed by the shredder blade and flails,
it will be forced out of the chute deflector, and, if
attached, into a debris collection bag.
Observe the following guidelines when shredding
yard debris:
• Never attempt to shred material other than
normal yard debris (leaves, twigs, pine cones,
etc.).
• Avoid shredding fibrous plants such as
tomato vines until they are thoroughly dried
out. Fresh vines do not shred well and tend
to wrap themselves around the impeller and
flails.
• Place reasonable amounts of debris into the
hopper at a time. Do not overload the hopper.
• Allow the material in the hopper to be drawn
into the blades and shredded before adding
additional debris to the hopper. Failure to due
so may result in a clogged hopper, clogged
chute deflector or a stalled engine.
• Avoid placing twigs longer than 24 inches into
the hopper. Twigs longer than 24 inches may
result in a clogged hopper.
IMPORTANT: Never place branches with a
diameter greater than 1/2-inch in the hopper.
Doing so can result in serious damage to the
unit’s shredder blade, flails or impeller.
3. Use a branch (or other available device, i.e.
broomstick) to dislodge debris located toward
the base of the hopper.
4. Restart engine.
NOTE: If you’re unable to pull the starter
rope as a result of accumulated debris near
the impeller, follow instructions under the
heading Cleaning the Reduction Chamber in
the “Maintenance & Adjustments” section of
this manual.
Chipping
Branches up to two inches in diameter can be fed
into the chipper chute. Observe the following
guidelines when chipping branches:
• Keep both hands firmly on the branch as you
feed it into the chipper chute.
• Never feed more than one branch into the
chipper chute at a time.
• Never feed anything other than branches (or
wood) into the chipper chute.
• Apply intermittent pressure (in short,
rotational pulses) while feeding larger
branches into the chipper chute, to avoid
bogging or stalling the engine.
• Ensure chipper chute is clear of branches (or
wood) before shutting the engine off.
IMPORTANT: Never feed branches with a
diameter greater than two (2) inches into the
chipper chute. Doing so can result in serious
damage to your unit’s chipper blades, flails or
imp eller.
NOTE: For best performance, always operate
the unit with sharp chipper blades. If a
noticeable loss in performance is encountered
while chipping branches, the chipper blades
should be replaced.
Emptying the Bag
1. Stop engine.
2. Squeeze the locking buckle to release the
bag’s draw-strap before loosening it from the
chute deflector. See Figure 4- 4.
Clearing the Hopper
Should the hopper become clogged with debris
during operation, proceed as follows:
1. Grasp the hopper with both hands and gently
agitate the chipper shredder to help loosen
debris, drawing it into the impeller.
If the clog does not clear, proceed as follows:
1. Stop engine, make certain the chipper
shredder has come to a complete stop, and
disconnect the FLEX™ Power Base from the
attachment.
2. Use your hands to remove any debris found
near the top of the hopper.
Figure 4-4
3. Empty the bag and reattach to the chute
deflector opening. Refer to the “Assembly &
Setup” section of this manual.
7Section 4 — controlS & operation
Page 8
Maintenance & Service
1
1
2
1
2
3
Dog Clutch
Maintenance
General Recommendations
• Always observe safety rules when performing
any maintenance.
• The warranty on this chipper shredder does
not cover items that have been subjected to
operator abuse or negligence. To receive full
value from warranty, operator must maintain
the equipment as instructed here.
• Changing of engine-governed speed will void
engine warranty.
• All adjustments should be checked at least
once each season.
• Periodically check all fasteners and make sure
these are tight.
WARNING: Always stop engine,
disconnect the FLEX™ Power Base
from the attachment before, cleaning,
or performing any type of
maintenance on your machine.
Equipment Care
• Clean the chipper shredder thoroughly after
each use.
• Wash bag periodically with water. Allow to
dry thoroughly in shade.
• If the reduction chamber becomes clogged,
remove and clean as instructed below.
• Sharpen or replace chipper blade every 50
hours of use.
2. If attached, remove debris bag. Remove the
two wing knobs on either side of the chute
deflector and pivot the chute deflector
upward. See Figure 5-1.
Figure 5-1
3. Remove the hairpin clip from the clevis
pin which extends through the housing
and shredder screen. Remove clevis pin.
See Figure 5-2.
5
6. When the area is cleaned, pivot the shredder
screen downward and re-secure with the
clevis pin and hairpin clip removed earlier.
7. Reattach the debris collection bag to the
chute deflector, if desired.
Blade Care
Chipper Blades
WARNING: The impeller’s chipper
blades are sharp. Wear leather work
gloves to protect your hands.
1. Stop engine, make certain the chipper
shredder has come to a complete stop, and
disconnect the FLEX™ Power Base from the
attachment.
2. Remove the cover screws which secure
the drive system cover. Retain hardware.
See Figure 5-4.
Cleaning The Reduction Chamber
WARNING: The impeller’s shredder
blade and chipper blades are sharp.
Wear leather work gloves to protect
your hands when cleaning out the
reduction chamber.
If the reduction chamber becomes clogged with
debris, the shredder screen can be pivoted upward
so that you can clean the surrounding area. To do so,
proceed as follows:
1. Stop engine, make certain the chipper
shredder has come to a complete stop, and
disconnect the FLEX™ Power Base from the
attachment.
WARNING: The muffler and
surrounding area will be hot if the
engine has been running. Use caution
and protect your hands if working
near the muffler.
8
Figure 5-2
4. Pivot the shredder screen upward. See Figure 5-2.
Clean the surrounding area by scraping away
debris.
5. Spin the dog clutch two-to-three times
to purge any remaining debris from the
reduction chamber. See Figure 5-3.
Figure 5-3
Figure 5-4
3. Remove the two flange nuts (and hex bolts)
which secure the hopper support bracket to
the impeller housing. Retain the hardware.
See Figure 5-5.
Figure 5-5
Page 9

4. Remove the front wheel bracket by loosening
1
2
the four flange nuts (and hex bolts). Retain
hardware. See Figure 5-6.
9. Remove the chipper chute by removing
three hex nuts which secure it to the impeller
housing. See Figure 5-9 & Figure 5-10.
12. Install a replacement blade (Part No. 7420544B) with the hardware removed earlier or
sharpen.
IMPORTANT: When sharpening the blade,
protect hands by using gloves. Follow the
original angle of grind and make sure to
remove an equal amount from each blade.
NOTE: Make certain blade is reassembled with
the sharp edge outward (toward the chipper
chute). Torque hardware to between 20 ft.-lbs
and 25 ft.-lbs.
Shredder Blade
WARNING: The shredder blade is
sharp. Wear leather work gloves to
protect your hands.
Figure 5-6
5. Remove six flange nuts which secure hopper
inlet guide to impeller housing. See Figure 5-7.
Figure 5-7
6. Carefully separate the hopper assembly from
the impeller housing and set it aside.
7. Pivot the shredder screen upward as
instructed under the heading Cleaning the
Reduction Chamber.
8. Remove the cover bracket from the frame
by removing the hex bolt which secures it.
See Figure 5-8.
Figure 5-9
Figure 5-10
10. Rotate the impeller by hand until the chipper
blade is visible through the impeller housing
opening.
11. Remove the blade by removing the internal
hex screws, lock washers and hex nuts which
secure it to the impeller. See Figure 5-11.
Retain the hardware.
1. Stop engine, make certain the chipper
shredder has come to a complete stop, and
disconnect the FLEX™ Power Base from the
attachment.
2. Remove the cover screws which secure
the drive system cover. Retain hardware.
See Figure 5-12.
Figure 5-12
3. Remove the two flange nuts (and hex bolts)
which secure the hopper support bracket to
the impeller housing. Retain the hardware.
See Figure 5-13.
Figure 5-8
Figure 5-11
NOTE: Use a 3/16” hex key (Allen) wrench on
the outside of the blade and a 1/2” box (or
socket) wrench on the inside of the impeller.
Hold the Allen wrench stationary and rotate
the box (or socket) wrench to loosen the nut.
Figure 5-13
9Section 5 — Maintenance & Service
Page 10

4. Remove the front wheel bracket by loosening
the four flange nuts (and hex bolts). Retain
hardware. See Figure 5-14.
Figure 5-14
5. Remove six flange nuts which secure hopper
inlet guide to impeller housing. See Figure 5-15.
9. Install a replacement blade (Part No. 742-
05239) with the hardware removed earlier.
See Figure 5-17.
Figure 5-17
IMPORTANT: When reassembling the blade,
tighten center bolt to between 31 ft.-lbs and
35 ft.-lbs. Also, make sure that the blade is
pushed against the impeller vane.
Clutch Bumpers
It is necessary to check the clutch bumpers, installed
on the dog clutch assembly, before each use. The
clutch bumpers are wearable parts that will need to
be replaced periodically after extended usage.
To replace the clutch bumpers, follow these
instructions:
1. Gently pry each clutch bumper out of the
dog clutch using a standard screw driver.
See Figure 5-18.
Off-Season Storage
• Allow the unit to run and clear out all debris
for a short time before shutting the unit down
before storage.
• When storing the chipper shredder in an
unventilated or metal storage shed, care
should be taken to rustproof the non-painted
surfaces. Using a light oil or silicone, coat the
equipment, especially any springs, bearings,
and cables.
• Remove all dirt from exterior of equipment.
• Follow lubrication recommendations.
• Store equipment in a clean, dry area. Do not
store in an area where equipment is present
that may use a pilot light or has a component
that can create a spark.
Drive Belt
IMPORTANT: See an authorized service dealer to
have your belt replaced.
Figure 5-15
6. Carefully separate the hopper assembly from
the impeller housing and set it aside.
7. Insert a piece of wood into the chute deflector
opening to stabilize the impeller and prevent
it from rotating when removing the shredder
blade.
8. Remove the hex bolt, flat washer, and
spacer to completely free shred der blade.
See Figure 5-16.
Figure 5-16
Figure 5-18
2. Replace the clutch bumpers (Kit Part No. 753-
08457) by fully pressing them into place.
10 Section 5 — Maintenance & Service
Page 11

Troubleshooting
Problem Cause Remedy
Excessive Vibration 1. Loose parts or damaged impeller. 1. See authorized service dealer.
6
Unit does not discharge 1. Discharge area clogged.
Rate of discharge slows considerably
or composition of discharged
material changes
Weak Chipping
Unit does not function 1. Broken belt. 1. See authorized service dealer to have your belt
2. Foreign object lodged in impeller.
1. Chipper blade dull. 1. Replace chipper blade or see your authorized service
1. Chipper blade dull.
2. Worn belt.
1. Stop engine, make certain the chipper shredder has
come to a complete stop, and disconnect the FLEX™
Power Base from the attachment. Clean flail screen and
inside of discharge opening. See Maintenance & Service
section under Cleaning the Reduction Chamber.
2. Stop engine, make certain the chipper shredder has
come to a complete stop, and disconnect the FLEX™
Power Base from the attachment. Remove lodged
object.
dealer.
1. Replace chipper blade or see your authorized service
dealer.
2. See authorized service dealer to have your belt
replaced.
replaced.
Replacement Parts
7
Component Part Number Description
942-0544B Chipper Blade
742-05239 Shredder Blade
753-08457 Clutch Bumpers Kit (6)
Phone (800) 828-5500 to order replacement parts or a complete Parts Manual (have your full model number and serial number ready). Parts Manual downloads are
also available free of charge at www.troybilt.com.
11
Page 12

LIMITED WARRANTY FOR FLEX ATTACHMENT PRODUCT
The limited warranty set forth herein is given by Troy-Bilt LLC to the Initial
Purchaser (as defined herein) with respect to a new Troy-Bilt-branded FLEX
attachment product consisting of either a (i) wide area mower, (ii) snowthrower, (iii) pressure washer, (iv) leaf blower, (v) dethatcher, (vi), aerator, (vii)
water pump, (viii) chipper/shredder, or (ix) log splitter (referred to hereafter
as the “Attachment”) to be used with the FLEX Power Base. This limited
warranty does not cover Emission Control Systems and is not a Federal
Emission Control Warranty Statement as defined by U.S. federal law. Please
refer to the Federal Emission Control Warranty Statement in the operator’s
manual for the FLEX Power Base product (“Power Base”) for warranties
covering Emission Control Systems.
Scope of the Limited Warranty
Troy-Bilt LLC offers the following limited warranty to the Initial Purchaser for
residential or otherwise non-commercial use of the Attachment on the FLEX
Power Base: except for the Exclusions (defined herein), during the Warrant y
Period (defined herein), the Attachment will be free from manufacturing
defects (including workmanship and materials). The “Initial Purchaser” is the
first person to purchase a new Attachment from an authorized Troy-Bilt dealer,
distributor and/or retailer of such attachment products. This limited warranty
is non-transferrable. Except as otherwise set forth herein, the limited warranty
period for this new Attachment purchased by the Initial Purchaser is two (2)
years from the date of purchase as shown on the original sales receipt for the
Attachment (“Warranty Period”).
Defects in Workmanship or Materials
Except for the Exclusions, the Attachment is warranted to be free from
manufacturing defects in either workmanship or materials for the Warranty
Period. During the Warranty Period, Troy-Bilt LLC will, at its option, either
repair or replace any original part that is covered by this limited warranty and
is determined to be defective in workmanship or material.
To qualify for this limited warranty the Attachment:
1. Must have been purchased from an authorized Troy-Bilt retailer.
2. Must have been purchased within the United States by the Initial
Purchaser.
3. Must have been used for residential or otherwise non-commercial
purposes.
4. Must have been used in a manner consistent with the normal and
proper intended use for the Attachment. This Attachment is not
intended for rental or commercial use.
Who can perform repairs under this warranty?
In order to qualif y for the limited warranty as set forth herein, the repairs made
under this warranty must be performed by an authorized Troy-Bilt service
provider.
How to get service under this limited warranty:
To locate a Troy-Bilt warranty service provider, contact your authorized
Troy-Bilt dealer, distributor and/or retailer or contact Troy-Bilt LLC at P.O. Box
361131, Cleveland, Ohio 44136-0019 or call 1-877-282-8684 or log on to our
Website at www.troybilt.com. This limited product warranty is provided
by Troy-Bilt LLC and is the only product warranty provided by Troy-Bilt LLC
for this Attachment. A COPY OF YOUR SALES RECEIPT IS REQUIRED FOR
WARRANTY SERVICE.
What this limited warranty does not cover.
This limited warranty does not cover the following (the “Exclusions”):
1. Attachment purchased outside of the United States.
2. Damage due to lack of maintenance and/or improper maintenance as
described in the operator’s manual.
3. Normal wear and tear resulting from use of the Attachment.
4. Use of the Attachment that is not consistent with the intended use
thereof as described in the operating instructions, including, but not
limited to, abuse, misuse and/or neglect of the Attachment or any use
inconsistent with and/or non-compliant with instructions contained in
the Operator’s Manual.
5. Any expendable, consumable, or routine maintenance item which
needs replacement or service as part of normal maintenance, unless
such items have defects that cause failure or premature wear within
the first thirty (30) days. Where applicable, normal wear items include
but are not limited to, blades, tires, belts, filters, fuses, hoses, where
applicable, and other consumable items.
6. Any Attachment that has been altered or modified in a manner not
consistent with the original design of the product or in a manner not
otherwise approved by Troy-Bilt LLC.
7. Paint repairs or replacements for defective paint (including materials
and application) are covered for a period of three (3) months.
8. Where applicable, wheel rims are covered for a period of three (3)
months for manufacturing defects.
9. Log splitter pumps, valves, and cylinders are covered for a period of
one (1) year.
10. The FLEX Power Base is covered by a separate limited warranty which
is contained in the operator’s manual for the FLEX Power Base.
This warranty does not cover and Troy-Bilt LLC disclaims any
responsibility for:
1. Loss of time or loss of use of the Attachment.
2. Transportation costs and other expenses incurred in connection with
the transport of the Attachment to and from the authorized Troy-Bilt
service provider.
3. Any loss or damage to other equipment or personal items.
4. Damage caused by performance or use of the Attachment in
connection with any product other than the FLEX Power Base.
Limitations:
1. THERE ARE NO IMPLIED WARRANTIES, INCLUDING, BUT NOT LIMITED
TO, ANY IMPLIED WARRANT Y OF MERCHANTABILITY OR FITNESS FOR A
PARTICULAR PURPOSE. NO WARRANTY APPLIES AFTER THE APPLICABLE
WARRANTY PERIOD AS SET FORTH ABOVE AS TO THE PARTS AS
IDENTIFIED. NO OTHER E XPRESS WARR ANTY OR GUARANTY, WHETHER
WRITTEN OR ORAL , EXCEPT AS MENTIONED ABOVE, GIVEN BY ANY
PERSON OR ENTITY, INCLUDING A DEALER OR RETAILER, WITH RESPECT
TO ANY PRODUCT SHALL BIND TROY-BILT LLC. DURING THE WARRANTY
PERIOD, THE EXCLUSIVE REMEDY IS REPAIR OR REPLACEMENT OF THE
DEFECTIVE PART, AS SET FORTH ABOVE. (SOME STATES DO NOT ALLOW
LIMITATIONS ON HOW LONG AN IMPLIED WARRANTY LASTS, SO THE
ABOVE LIMITATION MAY NOT APPLY TO YOU.)
2. THE PROVISIONS AS SE T FORTH HEREIN PROVIDE THE SOLE AND
EXCLUSIVE REMEDY ARISING FROM THE SALE. TROY-BILT SHALL NOT
BE LIABLE FOR INCIDENTAL OR CONSEQUENTIAL LOSS OR DAMAGES
INCLUDING, WITHOUT LIMITATION, FOR TRANSPORTATION OR FOR
RELATED EXPENSES, OR FOR RENTAL EXPENSES TO TEMPORARILY
REPLACE A WARRANTED PRODUCT. (SOME STATES DO NOT ALLOW
THE EXCLUSION OR LIMITATION OF INCIDENTAL OR CONSEQUENTIAL
DAMAGES, SO THE ABOVE E XCLUSION OR LIMITATION MAY NOT APPLY
TO YOU.)
3. In no event shall recover y of any kind be greater than the amount of the
purchase price of the product sold. Alteration of the safety features of the
product shall void this limited warranty. You assume the risk and liability
for loss, damage, or injury to you and your property and/or to others
and their property arising out of the use or misuse or inability to use the
product.
4. Subject to the Exclusions, this limited warranty extends to the
Initial Purchaser and to a succeeding owner of the Attachment
for non-commercial use for the duration of the Warranty Period,
beginning from the original date of purchase by the Initial Purchaser
of such Attachment. Subject to the Exclusions, in the event that the
original date of purchase by the Initial Purchaser of the Attachment is
indeterminable, the Warranty Period shall be established as twenty
eight (28) months from the Attachment ’s date of manufacture, as
determined by Troy-Bilt. In no event shall an Attachment’s warranty
extend beyond the established Warranty Period.
How State Law Relates to this Warranty:
This limited warranty gives you specific legal rights, and you may also have
other rights which vary from state to state.
Troy-Bilt LLC, P.O. BOX 361131 CLEVELAND, OHIO 44136-0019; Phone: 1-800-828-5500, 1-330-558-7220
MTD Canada Limited - KITCHENER, ON N2G 4J1; Phone 1-800-668-1238
079221 REV. D
Page 13

Al propietario
Muchas gracias
Gracias por comprar este producto. Ha sido cuidadosamente
diseñado para brindar excelente rendimiento si se lo hace funcionar y
se lo mantiene correctamente.
Por favor lea todo este manual antes de hacer funcionar el equipo.
El manual le indica cómo configurar, hacer funcionar y mantener la
máquina de manera fácil y segura. Por favor asegúrese de que usted,
y cualquier otra persona que utilice la máquina, siga atentamente y
en todo momento las medidas de seguridad recomendadas. De lo
contrario, se podrían producir lesiones personales o daños materiales.
Toda la información contenida en este manual hace referencia a la
más reciente información de producto disponible en el momento de
la impresión. Revise el manual frecuentemente para familiarizarse
con la máquina, sus características y su funcionamiento. Por favor
tenga en cuenta que este Manual del Operador puede abarcar una
variedad de especificaciones para productos de diversos modelos.
Es posible que las características y funciones incluidas y/o ilustradas
en este manual no se apliquen a todos los modelos. Nos reservamos
el derecho de modificar las especificaciones de los productos,
Índice
Medidas de Seguridad .......................................... 14
Armado e Instalación ........................................... 16
Controles y Funcionamiento ............................... 17
Mantenimiento y Servicio .................................... 19
1
diseños y equipos sin previo aviso y sin generar responsabilidad por
obligaciones de ningún tipo.
Si tiene algún problema o duda respecto a la máquina, llame a
un distribuidor de servicio Troy-Bilt autorizado o comuníquese
directamente con nosotros. En esta página encontrará los números
de teléfono, dirección del sitio web y dirección postal de Atención
al cliente de Troy-Bilt. Queremos garantizar su entera satisfacción en
todo momento.
En este manual, todas las referencias al lado derecho e izquierdo de la
máquina se hacen observándola desde la posición de operación.
Solución de Problemas ......................................... 22
Repuestos ............................................................... 22
Garantía ................................................................. 24
Registro de información de producto
Antes de instalar y hacer funcionar su equipo nuevo, por favor
localice la placa de modelo en el equipo y registre la información
en el espacio de la derecha. Podrá localizar la placa de modelo si la
busca en el conjunto de montaje trasero del accesorio de la cortadora
trituradora, cuando la unidad no está acoplada a la base de potencia
FLEX™. Necesitará esta información si tiene que solicitar soporte
técnico a través de nuestro sitio web, el Servicio de Atención al
Cliente, o de un distribuidor local de servicio autorizado.
NúMero de Modelo
NúMero de Serie
Registración del producto y Servicio de Atención al Cliente
Por favor, registre su producto en nuestro sitio web, www.troybilt.com
Por favor, NO devuelva la máquina al minorista o distribuidor sin ponerse en contacto primero con el Departamento de
Atención al Cliente.
En caso de tener problemas para ensamblar este producto o de tener dudas con respecto a los controles, el
funcionamiento o el mantenimiento de esta máquina, si desea pedir piezas/aditamentos/accesorios o si desea ver un
video instructivo en línea; puede solicitar la ayuda de expertos. Debe tener a mano el número de modelo y el número de
serie completos. Seleccione una de las opciones siguientes:
◊ Web: www.troybilt.com/equipment/troybilt
◊ Teléfono: (800) 828-5500
◊ Correo: Troy-Bilt LLC • P.O. Box 361131 • Cleveland, OH • 44136-0019
13
Page 14

Importantes medidas de seguridad
¡ADVERTENCIA! Este símbolo indica instrucciones de seguridad importantes que, de no seguirse, pueden poner en peligro su seguridad personal y/o material y la de
otras personas. Lea y cumpla todas las instrucciones de este manual antes de intentar hacer funcionar esta máquina. Si no respeta estas instrucciones puede provocar
lesiones personales.
Cuando vea este símbolo, ¡TENGA EN CUENTA LAS ADVERTENCIAS!
PROPOSICIÓN 65 DE CALIFORNIA
¡ADVERTENCIA! El escape del motor de este producto, algunos de sus componentes y algunos componentes del vehículo contienen o liberan sustancias químicas
que el Estado de California considera que pueden producir cáncer, defectos de nacimiento u otros problemas reproductivos.
¡PELIGRO! Esta máquina está diseñada para ser utilizada respetando las normas de seguridad contenidas en este manual. Al igual que con cualquier tipo de equipo
motorizado, un descuido o error por parte del operador puede producir lesiones graves. Esta máquina es capaz de amputar dedos, manos y pies y de arrojar residuos. De
no respetar las instrucciones de seguridad siguientes, se pueden ocasionar lesiones graves o la muerte.
2
Capacitación
1. Lea, entienda y cumpla todas las instrucciones
incluidas en la máquina y en el(los) manual(es)
antes de intentar realizar el montaje de la unidad y
utilizarla. Guarde este manual en un lugar seguro
para consultas futuras y periódicas, así como para
solicitar repuestos.
2. Familiarícese con todos los controles y con el uso
adecuado de los mismos. Sepa cómo detener la
máquina y desactivar los controles rápidamente.
3. No permita nunca que los niños menores de 16
años utilicen esta máquina. Los niños de 16 años
en adelante deben leer y entender las instrucciones
y las normas de seguridad contenidas en este
manual y en la máquina, y deben ser entrenados y
supervisados por un adulto.
4. Nunca permita que los adultos operen esta
máquina sin recibir antes la instrucción apropiada.
5. Mantenga a los observadores, mascotas y niños por
lo menos a 70 pies de la máquina siempre que esté
funcionando. Pare la máquina si alguien ingresa a
la zona.
6. Nunca encienda el motor en espacios cerrados o en
una zona con poca ventilación. El escape del motor
contiene monóxido de carbono, un gas inodoro
y letal.
7. No ponga las manos o los pies cerca de las piezas
rotatorias o en las cámaras de alimentación ni en
la abertura de descarga. Contacto con el impulsor
rotatorio puede resultar en la amputación de
dedos, manos o pies.
8. Nunca trate de destapar la toma de alimentación
o la abertura de descarga, ni trate de sacar o vaciar
la bolsa vacía ni de revisar y reparar la máquina
mientras el motor está en marcha. Apague el motor
y espere hasta que todas las piezas móviles se
hayan detenido por completo. Desconecte la base
de potencia FLEX™ del accesorio.
Preparativos
1. Inspeccione minuciosamente el área donde
utilizará el equipo. Retire todas las piedras,
botellas, latas y otros objetos extraños que puedan
ser levantados o arrojados causando lesiones
personales o daños a la máquina.
2. Para protegerse los ojos, utilice siempre gafas o
anteojos de seguridad mientras opera la máquina
o mientras la ajusta o repara. Los objetos arrojados
que rebotan pueden lesionar gravemente los ojos.
3. Utilice zapatos de trabajo resistentes, de suela
fuerte, así como pantalones y camisas ajustados.
Las prendas sueltas y las alhajas se pueden
enganchar en las piezas móviles. Nunca haga
funcionar la máquina descalzo o con sandalias.
Utilice guantes de trabajo de cuero cuando
alimente material por el canal de la cortadora.
4. Antes de encender la máquina controle que
todos los pernos y tornillos estén bien ajustados
para garantizar que la máquina se encuentra
en condiciones seguras de operación. Además,
inspeccione visualmente la máquina a intervalos
frecuentes para controlar si está dañada.
5. Mantenga o reemplace las etiquetas de seguridad y
de instrucciones según sea necesario.
Funcionamiento
1. No ponga las manos o los pies cerca de las piezas
rotatorias o en las cámaras de alimentación ni en
la abertura de descarga. Contacto con el impulsor
rotatorio puede resultar en la amputación de
dedos, manos o pies.
2. Antes de encender la máquina compruebe que el
canal de la cortadora, la toma de alimentación y la
cámara de corte están vacías y sin desechos.
3. Inspeccione minuciosamente todo el material
que desea triturar y saque los objetos metálicos,
piedras, botellas, latas y otros objetos extraños que
pueden ocasionar lesiones o dañar la máquina.
4. Si es necesario empujar el material por la tolva de
la trituradora use un palo de poco diámetro. No
utilice las manos ni los pies.
5. Si el impulsor golpea un objeto extraño o si la
máquina empieza a producir un sonido poco
común o una vibración, apague el motor de
inmediato. Deje que el impulsor se detenga por
completo. Desconecte la base de potencia FLEX™
del accesorio y siga estos pasos:
a. Inspeccione la máquina para ver si está
dañada.
b. Repare o reemplace las piezas dañadas.
c. Controle si hay piezas flojas y ajústelas
para asegurar que la máquina funcione de
manera segura y continua.
6. No permita que se acumule material procesado en
la zona de descarga. El mismo puede obstaculizar
la descarga adecuada y provocar el retorno del
material a través de la abertura de alimentación.
7. No intente triturar ni picar material de mayor
tamaño al especificado en la máquina o en este
manual. Se podrían producir lesiones o daños.
8. Nunca trate de destapar la toma de alimentación o
la abertura de descarga mientras el motor está en
marcha. Apague el motor y espere hasta que todas
las piezas móviles se hayan detenido, desconecte
la base de potencia FLEX™ del accesorio antes de
sacar los residuos.
9. Nunca opere la máquina sin que la tolva de la
trituradora, el canal de la cortadora o el canal
deflector estén correctamente conectados a
la máquina. Nunca vacíe ni cambie la bolsa de
descarga mientras el motor está en marcha.
10. Mantenga todos los protectores, deflectores y
dispositivos de seguridad en su lugar y en buenas
condiciones.
11. Mientras alimenta material dentro de la máquina
mantenga su rostro y su cuerpo detrás y hacia
un costado del canal de la cortadora para evitar
lesiones por retrocesos accidentales.
12. Nunca opere esta máquina si no cuenta con buena
visibilidad o luz.
13. No opere esta máquina en superficies
pavimentadas, con grava o desniveladas.
14. No opere esta máquina estando bajo los efectos
del alcohol o de drogas.
15. Nunca levante o cargue la máquina cuando el
motor esté encendido.
16. Si se presentan situaciones que no están previstas
en este manual, tenga cuidado y use el sentido
común. Póngase en contacto con Atención al
cliente para obtener asistencia y el nombre del
distribuidor de servicio más cercano.
Mantenimiento y almacenamiento
1. Nunca altere los dispositivos de seguridad. Controle
periódicamente que funcionen correctamente.
2. Controle a intervalos frecuentes que los pernos y
tornillos estén bien apretados para mantener la
máquina en condiciones de uso seguro. Además,
realice una inspección visual de la máquina para
controlar si la misma está dañada y repárela de ser
necesario.
3. Antes de limpiar, reparar o inspeccionar la
máquina, detenga el motor y compruebe que
el impulsor y todas las partes móviles se hayan
detenido. Desconecte la base de potencia FLEX™
del accesorio para evitar un arranque accidental.
4. No cambie la configuración del regulador del
motor ni acelere demasiado el motor. El regulador
del motor controla la velocidad máxima de
funcionamiento seguro del motor.
14
Page 15

5. Mantenga o reemplace las etiquetas de seguridad y
de instrucciones según sea necesario.
6. Consulte este manual para lograr carga, descarga,
transporte y almacenamiento seguros de esta
máquina.
7. Nunca almacene la máquina o el recipiente de
combustible en un espacio cerrado donde haya
una llama expuesta, chispas o piloto de encendido
como por ejemplo, de calentadores de agua,
hornos, secadores de ropa, etc.
8. Deje que la máquina se enfríe por lo menos 5
minutos antes de guardarla.
9. Consulte siempre el manual del operador
para obtener instrucciones adecuadas para el
almacenamiento fuera de temporada.
10. Respete las normas y reglamentaciones sobre la
manera correcta de eliminar gasolina, aceite, etc.
para proteger el medio ambiente.
11. Según la Comisión de Seguridad de Productos
para el Consumidor de los Estados Unidos (CPSC)
y la Agencia de Protección Ambiental de los
Estados Unidos (EPA), este producto tiene una
vida útil media de siete (7) años o 60 horas de
funcionamiento. Al finalizar la vida útil media
haga inspeccionar anualmente la máquina por
un distribuidor de servicio autorizado para
cerciorarse de que todos los sistemas mecánicos y
de seguridad funcionan correctamente y no están
muy desgastados. Si no lo hace, puede ocasionar
accidentes, lesiones o la muerte.
Aviso referido a emisiones
Los motores que están certificados y cumplen
con las normas sobre emisiones federales EPA
y de California para SORE (Equipos pequeños
todo terreno) están certificados para funcionar
con gasolina sin plomo común y pueden incluir
los siguientes sistemas de control de emisiones:
Modificación de motor (EM), catalizador oxidante
(OC), inyección de aire secundaria (SAI) y
catalizador de tres vías (TWC) si están instalados.
Amortiguador de chispas
ADVERTENCIA: Esta máquina
está equipada con un motor de
combustión interna y no debe
utilizarse en o cerca de un terreno
agreste cubierto de bosque, malezas
o pasto a menos que el sistema de
escape del motor esté equipado con
un amortiguador de chispas que
cumpla con las leyes locales o
estatales vigentes (si las hay).
Si se utiliza un amortiguador de chispas el
operador lo debe mantener en condiciones de uso
adecuadas. En el Estado de California, las medidas
anteriormente mencionadas son exigidas por ley
(Artículo 4442 del Código de Recursos Públicos de
California). Es posible que existan leyes similares
en otros estados. Las leyes federales se aplican en
territorios federales.
Puede conseguir el amortiguador de chispas para
el silenciador a través de su distribuidor autorizado
de motores más cercano o poniéndose en contacto
con el departamento de servicios, P.O. Box 361131
Cleveland, Ohio 44136-0019.
Símbolos de seguridad
En esta página se presentan y describen los símbolos de seguridad que pueden aparecer en este producto. Lea, comprenda y siga todas las instrucciones incluidas
en la máquina antes de intentar armarla y hacerla funcionar.
Símbolo Descripción
LEA LOS MANUALES DEL OPERADOR
Lea, entienda y siga todas las instrucciones incluidas en los manuales antes de intentar armar y hacer
funcionar.
ADVERTENCIA – CUCHILLAS GIRATORIAS
Mientras la máquina está en funcionamiento mantenga las manos lejos de las aberturas de entrada y de
descarga. En el interior hay cuchillas giratorias.
Mantenga a los observadores, las mascotas y los niños por lo menos a 75 pies de la máquina siempre que
esté funcionando. Pare la máquina si alguien ingresa a la zona.
ADVERTENCIA – LANZA RESIDUOS
No haga funcionar nunca sin tener el canal deflector correctamente acoplado a la máquina.
PROTECCIÓN OCULAR
Use siempre anteojos o antiparras de seguridad cuando hace funcionar esta máquina.
¡ADVERTENCIA! Su Responsabilidad. Sólo permita que usen esta máquina eléctrica las personas que lean, comprendan y respeten las
advertencias e instrucciones que aparecen en este manual y en la máquina.
¡GUARDE ESTAS INSTRUCCIONES!
15Sección 2 — importanteS medidaS de Seguridad
Page 16

Armado e Instalación
(a)
(c)
(c)
(d)
(b)
(a)
(c)
(c)
(d)
(b)
1
2
2
(a)
(a)
3
Lea todo el manual del operador antes
de intentar hacer funcionar su nueva
cortadora trituradora.
Si tiene problemas armando la cortadora trituradora,
no deje de llamar al (800) 828-5500. Si llama para pedir
asistencia, tenga a mano el modelo y el número de
serie.
Contenido de la caja:
• FLEX™ Cortadora trituradora
accesoria
• Bolsa
• Canal deflector
• Anteojos de seguridad
• Manual del Operador
• Guía de inicio rápido
Montaje
Deflector del canal de descarga
Por razones de envío, la unidad se embala sin su
canal deflector. Para volver a acoplarlo proceda de la
siguiente manera:
1. Saque las perillas a mariposa (a) de los costados
de la caja inferior del motor. Vea la Figura 3-1.
3. Ponga en línea el canal deflector en su posición
en la abertura de descarga e inserte el perno
hexagonal (d) con el separador (c) a través de la
bisagra del canal deflector (los separadores van
dentro de las bisagras). Vea la Figura 3-2.
Figura 3-2
4. Coloque el segundo separador (c) sobre el
perno hexagonal (d) dentro de la otra bisagra y
ajústelo con la tuerca de seguridad hexagonal
(b). Vea la Figura 3-2.
5. Ajuste ambos costados del canal deflector a a la
caja del motor utilizando las perillas a mariposa
(a) que había sacado en el Paso 1. Vea la Figura
3-3.
Bolsa
Para adosar la bolsa:
1. Coloque la abertura de la bolsa completamente
sobre el canal deflector. Vea la Figura 3-4.
2. Coloque la bolsa de manera que se cubran
completamente las perillas mariposa que
aseguran el deflector del canal a la caja del
motor.
3. Tire de la correa de guía hasta que la bolsa
quede ajustada alrededor de la abertura del
canal deflector.
Figura 3-4
Figura 3-1
2. Saque la tuerca de seguridad hexagonal (b),
los separadores (c) y el perno hexagonal (d)
de la parte superior de la caja del motor. Vea la
Figura 3-1.
16
Figura 3-3
Page 17
Controles y Funcionamiento
Hopper
Chipper Chute
1
3
2
4
Canal de la cortadora
Deector del canal de descarga
Figura 4-1
¡ADVERTENCIA! Lea y observe todas las normas e instrucciones de seguridad de este manual,
incluida toda la sección de Controles y Funcionamiento, antes de poner esta máquina en
funcionamiento. Si no se respetan todas las normas e instrucciones de seguridad se pueden provocar
lesiones.
Motor
Consulte el manual del operador de la base de potencia
FLEX™ para obtener información sobre todos los
controles y las características relacionados con el motor.
Canal de la cortadora
Se puede permitir el ingreso de ramas de hasta dos
pulgadas de diámetro en el canal de la cortadora para
ser cortadas. Vea la Figura 4-1.
Tolva
Las hojas, ramas pequeñas y ramas de hasta 1/2
pulgada de diámetro se pueden colocar dentro de la
tolva para su trituración. Vea la Figura 4-1.
IMPORTANTE: No coloque nunca en la tolva ramas
con un diámetro superior a 1/2 pulgadas. De hacerlo
se puede dañar gravemente la hoja de trituración, el
desgranado o el motor de la unidad.
Tolva
Lea todo el manual del operador antes
de intentar hacer funcionar su nueva
cortadora trituradora.
Arranque y detención del motor
Arranque y pare el motor de la base de potencia FLEX™
de acuerdo con el manual del operador que se incluye
con la máquina.
¡ADVERTENCIA! Si deja el equipo sin
vigilancia, apague el motor y retire la
llave de contacto.
Conexión a la base de potencia FLEX™
NOTA: Todas las referencias a los lados derecho o
izquierdo se hacen observando la misma desde la
posición del operador. En caso de que hubiese una
excepción, se especificará claramente.
1. Haga rodar la base de potencia FLEX™ hasta la
cortadora trituradora accesoria con la pata de
cabra hacia ARRIBA. Vea la Figura 4-2.
Figura 4-2
2. Haga rodar la base de potencia FLEX™ hacia
adelante y vuélquela hacia arriba, enganchando
la parte superior de la cortadora trituradora
accesoria con el montaje de la manija que viene
con la base de potencia FLEX™ (1 de Figura 4-3).
3. Vuelque la base de potencia FLEX™ hacia atrás
para enganchar los dos puntos de conexión
inferiores (2 y 3 de Figura 4-3).
Nota: El operador podrá oír cuando se
enganchan y traban (sonido de enganche) los
montajes inferiores si se acopla correctamente.
Para probar si se acopló correctamente, tire de
las manijas hacia arriba. Si la unidad se separa,
significa que no se estableció la conexión.
Verifique que la pata de cabra siga estando
hacia ARRIBA e incline rápidamente la base
de potencia FLEX™ hacia atrás con el montaje
superior enganchado.
Deflector del canal de descarga
La cámara reductora de la máquina expulsa los
residuos. Vea la Figura 4-1.
Figura 4-3
Nota: Un ruido “clunking” puede ser
escuchado durante el arranque y la parada.
Es completamente normal y no indica un mal
funcionamiento de cualquier tipo.
17
Page 18

Desconexión de la base de potencia FLEX™
1. La pata de cabra actúa únicamente como traba
para el accesorio a la base de potencia FLEX™. El
único momento en que el operador necesitaría
hacer uso de la pata de cabra una vez conectado
a un accesorio, sería para desacoplar la base de
potencia FLEX™ del accesorio.
Trituración
ADVERTENCIA: Al operar una cortadora
trituradora puede ser que objetos
extraños sean arrojados a los ojos lo cual
puede dañarlos gravemente. Utilice
siempre los anteojos de seguridad
provistos con esta unidad o protectores
para ojos antes de picar o triturar el
material o mientras realiza ajustes o
reparaciones.
El desecho que se acumula en los patios como por
ejemplo las hojas y las agujas de los pinos puede
ser colocado en la tolva para triturarlo. Después de
procesar el material con la cuchilla de la trituradora y de
desgranar, es empujado fuera del deflector del canal y, si
está instalada, hacia el interior de la bolsa de recolección
de desechos.
Respete las siguientes pautas cuando triture desechos
que se acumulan en los patios:
• Sólo utilice la máquina para triturar el material
que se encuentra en un patio normal (hojas,
ramas, piñas de los pinos, etc.).
• Evite la trituración de plantas fibrosas como,
por ejemplo, las de tomates hasta que estén
totalmente secas. Las plantas de tomates frescas
no se trituran bien y tienden a enroscarse
alrededor del motor y del desgranado.
• Coloque cantidades razonables de desechos en la
tolva por vez. No sobrecargue la tolva.
• Permita que el material que se encuentra en la
tolva sea atraído hasta las hojas y triturado antes
de agregar más desechos dentro de la misma. De
no hacerlo se puede tapar la tolva, el deflector del
canal o detener el motor.
• Evite colocar en la tolva ramas cuya longitud
exceda las 24 pulgadas. Las ramas de más de 24
pulgadas de largo pueden tapar la tolva.
IMPORTANTE: No coloque nunca en la tolva
ramas con un diámetro superior a 1/2 pulgadas.
De hacerlo se puede dañar gravemente la cuchilla
trituradora, las sierras o el motor de la unidad.
3. Use una rama (u otro dispositivo disponible,
es decir, una escoba) para sacar los desechos
ubicados cerca de la base de la tolva.
4. Vuelva a arrancar el motor.
NOTA: Si no puede tirar de la cuerda de arranque
por los residuos acumulados cerca del motor,
siga las instrucciones incluidas bajo el título
Limpieza de la cámara de reducción en la sección
"Mantenimiento y Ajustes" de este manual.
Corte
Se puede permitir el ingreso de ramas de hasta dos
pulgadas de diámetro en el canal de la cortadora.
Respete las siguientes pautas para el corte de las ramas:
• Mantenga ambas manos firmemente en la rama
a medida que la coloca dentro del canal de la
cortadora.
• No ponga nunca más de una rama dentro del
canal de la cortadora por vez.
• En el canal de la cortadora sólo se puede colocar
ramas (de madera).
• Aplique presión intermitente (en pulsos cortos,
de rotación) cuando coloque ramas más largas
dentro del canal de la cortadora para evitar
inundar o ahogar el motor.
• Compruebe que el canal de la cortadora no tiene
ramas (o madera) antes de apagar el motor.
IMPORTANTE: Nunca coloque ramas con un
diámetro superior a tres (2) pulgadas dentro del
canal de la cortadora. De hacerlo se pueden dañar
gravemente las cuchillas de corte, el desgranado
o el motor de la unidad.
NOTA: Para mejores resultados, opere siempre
la unidad con cuchillas de corte afiladas. Si
se produce una reducción apreciable en el
rendimiento mientras se cortan ramas, se debe
reemplazar las cuchillas de la cortadora.
Vaciado de la bolsa
1. Detenga el motor.
2. Oprima la hebilla de seguridad para soltar la
correa de guía de la bolsa antes de aflojarla del
deflector del canal. Vea la Figura 4-4.
Limpieza de la tolva
Si se tapa la tolva con desechos durante el
funcionamiento, proceda de la siguiente manera:
1. Tome la tolva con ambas manos y agite
suavemente la cortadora trituradora para ayudar
a soltar los residuos, atrayéndolos hasta el interior
del motor.
Si no se elimina el atascamiento proceda de la siguiente
manera:
1. Pare el motor, asegúrese de que la cortadora
trituradora se detenga completamente y
desconecte la base de potencia FLEX ™ del
accesorio.
2. Use las manos para sacar los residuos que se
encuentran cerca de la parte superior de la tolva.
18 Sección 4 — controleS y Funcionamiento
Figura 4-4
3. Vacíe la bolsa y vuelva a colocarla en la abertura
del deflector del canal. Consulte la sección
“Armado e Instalación” del presente manual.
Page 19

Mantenimiento y Servicio
1
1
2
1
2
3
Dog Clutch
Mantenimiento
Recomendaciones generales
• Respete siempre las reglas de seguridad al realizar
tareas de mantenimiento.
• La garantía de esta cortadora trituradora no
cubre elementos que han estado sujetos al mal
uso o la negligencia del operador. Para recibir
el reembolso total de la garantía, el operador
deberá dar mantenimiento al equipo tal y como
se indica en este manual.
• El cambio de la velocidad controlada del motor
invalidará la garantía del motor.
• Todos los ajustes deben ser inspeccionados al
menos una vez por temporada.
• Revise periódicamente todos los sujetadores y
compruebe que estén bien ajustados.
ADVERTENCIA: Detenga siempre el
motor, desconecte la base de potencia
FLEX™ del accesorio antes de limpiar o
de realizar cualquier tarea de
mantenimiento a su máquina.
Cuidado del equipo
• Limpie cuidadosamente la cortadora trituradora
después de cada uso.
• Lave la bolsa con agua periódicamente. Permita
que se seque bien en un sitio a la sombra.
• Si se tapa la cámara de reducción, sáquela y
límpiela como se indica a continuación.
• Afile o reemplace la cuchilla cada 50 horas de uso.
2. Si está instalada, retire la bolsa de desechos.
Saque las dos perillas a mariposa de ambos
lados del deflector del canal y gire el mismo
hacia arriba. Vea la Figura 5-1.
Figura 5-1
3. Saque el broche de horquilla de la chaveta que
se extiende a través de la caja del motor y de
la pantalla de la trituradora. Saque el pasador
de horquilla.
Vea la Figura 5-2.
5
6. Una vez limpia la zona, gire la pantalla de la
trituradora y vuelva a asegurar con el pasador
de horquilla y el sujetador de horquillas que
retiró anteriormente.
7. Vuelva a colocar la bolsa de recolección de
desechos en el deflector del canal, si lo desea.
Cuidado de la cuchilla
Cuchillas de cortadora
ADVERTENCIA: Las cuchillas de la
cortadora del motor son filosas. Utilice
guantes de trabajo de cuero para
protegerse las manos.
1. Pare el motor, asegúrese de que la cortadora
trituradora se detenga completamente y
desconecte la base de potencia FLEX ™ del
accesorio.
2. Extraiga los dos tornillos cubiertos que sujetan
la tapa del sistema motor. Guarde los herrajes.
Vea la Figura 5-4.
Limpieza del canal de reducción
ADVERTENCIA: Las cuchillas de
trituración y de corte del motor están
afiladas. Use guantes de trabajo de
cuero para protegerse las manos
cuando limpie la cámara de reducción.
Si la cámara de reducción se tapa con desechos, la
criba de desgranado se puede girar hacia arriba para
que pueda limpiar la zona circundante. Para ello,
proceda de la siguiente manera:
1. Pare el motor, asegúrese de que la cortadora
trituradora se detenga completamente y
desconecte la base de potencia FLEX ™ del
accesorio.
ADVERTENCIA: El silenciador y la zona
circundante están calientes si el motor
ha estado en funcionamiento. Sea
precavido y protéjase las manos si
trabaja cerca del silenciador.
Figura 5-2
4. Pivote hacia arriba la pantalla de la trituradora.
Vea la Figura 5-2. Limpie los alrededores
barriendo los residuos.
5. Tire del embrague de garras dos o tres veces
para purgar todos los desechos restantes de la
cámara de reducción. Vea la Figura 5-3.
Embrague
de garras
Figura 5-4
3. Saque las dos tuercas con reborde (y los
pernos hexagonales) que sujetan el soporte de
la tolva a la caja del motor. Guarde los herrajes.
Vea la Figura 5-5.
Figura 5-5
Figura 5-3
19
Page 20

4. Retire el soporte de rueda delantera aflojando
1
2
las cuatro tuercas bridadas (y los pernos
hexagonales). Guarde los herrajes. Vea la
Figura 5-6.
Figura 5-6
5. Saque las seis tuercas con reborde que sujetan
la guía de ingreso de la tolva a la caja del
motor. Vea la Figura 5-7.
9. Para sacar el canal de la cortadora saque las
tres tuercas hexagonales que lo aseguran a la
caja del motor. Vea la Figura 5-9 y la Figura
5-10.
Figura 5-9
12. Coloque una cuchilla de repuesto (Número de
pieza 742-0544B) con los herrajes que extrajo
anteriormente o afílela.
IMPORTANTE: Cuando afila la cuchilla,
protéjase las manos utilizando guantes. Siga
el ángulo original de afilado y asegúrese de
extraer una cantidad igual de cada cuchilla.
NOTA: Compruebe que las cuchillas estén
montadas nuevamente con el borde afilado
hacia afuera (hacia el canal de la cortadora).
Apriete los elementos de ferretería con una
presión de entre 20 pies/libras y 25 pies/libras.
Cuchilla de trituradora
ADVERTENCIA: La cuchilla de la
cortadora trituradora es filosa. Utilice
guantes de trabajo de cuero para
protegerse las manos.
1. Pare el motor, asegúrese de que la cortadora
trituradora se detenga completamente y
desconecte la base de potencia FLEX ™ del
accesorio.
2. Extraiga los dos tornillos cubiertos que sujetan
la tapa del sistema motor. Guarde los herrajes.
Vea la Figura 5-12.
Figura 5-7
6. Separe con cuidado el montaje de la tolva de
la caja del motor y póngalo a un lado.
7. Pivote la pantalla de la trituradora como se
indica bajo el título Limpieza de la cámara de
reducción.
8. Extraiga el soporte de la tapa del marco
extrayendo los pernos hexagonales que la
sujetan.
Vea la Figura 5-8.
Figura 5-8
Figura 5-10
10. Gire el motor con la mano hasta que una de
las dos cuchillas de la cortadora sea visible a
través de la abertura de la caja del motor.
11. Para sacar la cuchilla saque los tornillos
hexagonales internos, las arandelas de
seguridad y las tuercas hexagonales que la
sujetan al motor. Vea la Figura 5-11. Guarde los
herrajes.
Figura 5-11
NOTA: Use una llave hexagonal de 3/16” (Allen)
en el exterior de la cuchilla y una llave de
tubo de 1/2” (o cubo) en el interior del motor.
Sostenga la llave Allen firmemente y gire la
llave de tubo (o cubo) para aflojar la tuerca.
Figura 5-12
3. Saque las dos tuercas con reborde (y los
pernos hexagonales) que sujetan el soporte de
la tolva a la caja del motor. Guarde los herrajes.
Vea la Figura 5-13.
Figura 5-13
20 Sección 5 — ManteniMiento y Servicio
Page 21

4. Retire el soporte de rueda delantera aflojando
las cuatro tuercas bridadas (y los pernos
hexagonales). Guarde los herrajes. Vea la
Figura 5-14.
9. Coloque una hoja de repuesto (Número
de pieza 742-05239) con los elementos de
ferretería que extrajo anteriormente. Vea la
Figura 5-17.
Almacenamiento fuera de temporada
• Deje que la unidad funcione y elimine todos los
residuos durante un ratito antes de apagarla
previo a almacenarla.
• Cuando almacene la cortadora trituradora en
un galpón de metal o sin ventilación, tenga
especial cuidado de realizarle un tratamiento
antioxidante a las superficies no pintadas. Cubra
el equipo con una capa de aceite liviano o
silicona, especialmente los resortes, los cojinetes
y los cables.
• Elimine todo el polvo del exterior del equipo.
• Siga las recomendaciones de lubricación.
• Almacene el equipo en un área despejada y seca.
No lo almacene en un lugar donde se encuentren
equipos que usan piloto de encendido o con
componentes que pueden generar chispas.
Figura 5-14
5. Saque las seis tuercas con reborde que sujetan
la guía de ingreso de la tolva a la caja del
motor. Vea la Figura 5-15.
Figura 5-15
6. Separe con cuidado el montaje de la tolva de
la caja del motor y póngalo a un lado.
7. Coloque un trozo de madera dentro de la
abertura del deflector del canal para estabilizar
el motor y evitar que el mismo gire cuando
saque la cuchilla de la trituradora.
8. Saque el perno hexagonal, la arandela plana
y el espaciador para liberar totalmente la
cuchilla de la trituradora.
Vea la Figura 5-16.
Figura 5-17
IMPORTANTE: Al rearmar la cuchilla, ajuste
el perno central a entre 31 y 35 pies-libras.
Compruebe también que la cuchilla es
empujada contra las paletas del motor.
Topes de embrague
Es necesario controlar los topes de embrague,
instalados sobre el embrague de garras, antes
de cada uso. Los topes de embrague son piezas
que se desgastan y necesitan ser reemplazadas
periódicamente luego de un uso prolongado.
Para cambiar los topes de embrague siga estas
instrucciones:
1. Extraiga suavemente cada tope de embrague
del embrague de garras con un destornillador
común. Vea la Figura 5-18.
Correa de transmisión
IMPORTANTE: Consulte al distribuidor de servicio
autorizado llevar puesto el cinturón sustituido.
Figura 5-16
Figura 5-18
2. Reemplace los topes de embrague (Pieza de
kit Nº 753-08457) presionándolos totalmente
hasta colocarlos.
21Sección 5 — ManteniMiento y Servicio
Page 22

Solución de Problemas
Problema Causa Solución
Demasiada vibración 1. Hay partes que están flojas o el motor está dañado. 1. Consulte al distribuidor de servicio autorizado.
6
La unidad no descarga 1. El área de descarga está tapada.
La tasa de descarga se reduce de
manera considerable o cambia
la composición del material
descargado
Chipping débil 1. La hoja de la cortadora está desafilada.
Unidad no funciona 1. Correa rota. 1. Consulte al distribuidor de servicio autorizado llevar
2. Hay un objeto extraño en el motor.
1. La hoja de la cortadora está desafilada. 1. Cambie la hoja de la cortadora o consulte al
2. Correa desgastada.
1. Pare el motor, asegúrese de que la cortadora trituradora
se detenga completamente y desconecte la base
de potencia FLEX ™ del accesorio. Limpie la criba de
desgranado y el interior de la abertura de descarga. Vea
la sección Mantenimiento y Servicio bajo Limpieza de
la cámara de reducción.
2. Pare el motor, asegúrese de que la cortadora trituradora
se detenga completamente y desconecte la base de
potencia FLEX ™ del accesorio. Saque el objeto extraño
del motor.
distribuidor autorizado para el mantenimiento.
1. Cambie la hoja de la cortadora o consulte al
distribuidor autorizado para el mantenimiento.
2. Consulte al distribuidor de servicio autorizado llevar
puesto el cinturón sustituido.
puesto el cinturón sustituido.
Piezas de repuesto
7
Componente Número de pieza Descripción
942-0544B Hoja de la cortadora
742-05239 Cuchilla de trituradora
753-08457 Kit de topes de embrague (6)
Llame al (800) 828-5500 para solicitar repuestos o un Manual de Piezas completo (tenga a mano el número de modelo y número de serie completo). En www.troybilt.com también
podrá descargar el Manual de Repuestos sin cargo alguno.
22
Page 23

23Notes
Page 24

GARANTÍA LIMITADA PARA EL ACCESORIO FLEX
La garantía limitada que se estable en el presente documento es otorgada por
Troy-Bilt LLC al Comprador Inicial (como se define en este documento) en relación
con el nuevo accesorio FLEX Troy-Bilt que está integrado por ya sea una (i) cortadora
para superficies amplias, (ii) quitanieve, (iii) lavadora a presión, (iv) soplador de hojas,
(v) escarificador, (vi) aireador, (vii) bomba de agua, (viii) astilladora / desintegradora,
o (ix) triturador de leña (identificado en adelante como el "Accesorio") que se usará
con la base de potencia FLEX La presente garantía limitada no cubre los Sistemas
de control de emisiones y no constituye una Declaración de garantía del control de
las emisiones federal según lo definido por las leyes federales de los Estados Unidos.
Consulte la Declaración de garantía del control de las emisiones federal que se
incluye en el manual del operador de la base de potencia FLEX ("Base de potencia")
para conocer las garantías que cubren los Sistemas de control de emisiones.
Alcance de la Garantía limitada
Troy-Bilt LLC ofrece la siguiente garantía limitada al Comprador Inicial para uso
residencial u otro tipo de uso no comercial del Accesorio de la base de potencia
FLEX: excepto por las Exclusiones (como se definen en el presente documento),
durante el Período de la Garantía (como se define en el presente documento), el
Accesorio estará libre de defectos de fabricación (que incluyen la mano de obra y
los materiales). El “Comprador inicial” es la primera persona en adquirir un nuevo
Accesorio a un representante, distribuidor y/o minorista Troy-Bilt autorizado del
mencionado accesorio. La garantía limitada es intransferible. Excepto que se
disponga lo contrario en el presente documento, el período de la garantía limitada
para este nuevo Accesorio adquirido por el Comprador inicial es de dos (2) años a
partir de la fecha de la compra, como se indica en el comprobante de ventas original
correspondiente al Accesorio (“Período de la Garantía”).
Defectos en la mano de obra o en los materiales
Excepto por las Exclusiones, se garantiza que el Accesorio estará libre de defectos de
fabricación en la mano de obra o los materiales durante el Período de la Garantía.
Durante el Período de la Garantía, Troy-Bilt LLC reparará o reemplazará, a su juicio,
cualquier pieza original que esté cubierta por la presente garantía limitada y que se
determine que presenta algún defecto en la mano de obra o los materiales.
Para tener derecho a esta garantía limitada, el Accesorio:
1. Debe haberse adquirido a un minorista Troy-Bilt autorizado.
2. Debe haberse adquirido por el Comprador Inicial dentro del territorio de los
Estados Unidos.
3. Debe haberse usado únicamente para fines residenciales u otro tipo de uso
no comercial.
4. Debe haberse usado de una manera coherente con el uso normal y adecuado
para el que fue diseñado el Accesorio. El Accesorio no está diseñado para
arrendamiento ni para uso comercial.
¿Quién puede realizar reparaciones en virtud de la presente garantía?
A fin de reunir los requisitos para la garantía limitada según lo establecido en el
presente documento, las reparaciones realizadas en virtud de esta garantía debe
llevarlas a cabo un proveedor de reparaciones y mantenimiento Troy-Bilt autorizado.
Cómo obtener el servicio de la presente garantía limitada:
A fin de ubicar a un proveedor de reparaciones y mantenimiento de la garantía
Troy-Bilt, comuníquese con el representante, distribuidor y/o minorista Troy-Bilt
autorizado o comuníquese con Troy-Bilt LLC por correo escribiendo a P.O. Box
361131, Cleveland, Ohio 44136-0019 o telefónicamente llamando al 1-877-282-8684,
o inicie sesión en nuestro sitio Web en www.troybilt.com. La presente garantía
limitada sobre un producto es otorgada por Troy-Bilt LLC y es la única garantía de
producto que otorga Troy-Bilt LLC para este Accesorio. DEBERÁ PRESENTAR COPIA
DEL COMPROBANTE DE VENTA PARA OBTENER EL SERVICIO DE LA GARANTÍA
Lo que no cubre la presente garantía limitada.
La presente garantía limitada no cubre lo siguiente (las “Exclusiones”):
1. Los Accesorios adquiridos fuera del territorio de los Estados Unidos.
2. Los daños producidos por la falta de mantenimiento y/o un mantenimiento
inadecuado, según se describe en el manual del operador.
3. El desgaste normal producto del uso del Accesorio.
4. El uso del Accesorio que no sea coherente con el uso para el que fue diseñado
según se describe en las instrucciones de funcionamiento, que incluye, a
título de ejemplo, el uso abusivo, inadecuado y/o negligente del Accesorio o
cualquier uso que no sea coherente con las instrucciones que se incluyen en
el Manual del Operador y/o no cumpla con ellas.
5. Los artículos desechables, consumibles o de mantenimiento de rutina que
requieren reparaciones o mantenimiento como parte del mantenimiento
normal, a menos que tales artículos presenten defectos que ocasionen
fallas o un desgaste prematuro dentro de los primeros treinta (30) días. De
corresponder, los artículos de desgaste normal incluyen, a título de ejemplo,
las cuchillas, los neumáticos, las correas, los filtros, los fusibles, las mangueras,
si corresponde, y otros artículos consumibles
6. Cualquier Accesorio que haya sido alterado o modificado de una manera que
no sea coherente con el diseño original del producto o de una manera no
aprobada de alguna otra manera por Troy-Bilt LLC.
7. Las reparaciones en concepto de pintura o los reemplazos por defectos en la
pintura (que incluyen los materiales y la aplicación) están cubiertos por un
período de tres (3) meses.
8. Donde corresponda, las llantas de ruedas están cubiertas por un período de
tres (3) meses por defectos de fabricación.
9. Las bombas rompetroncos, válvulas y cilindros están cubiertos por un período
de un (1) año.
10. La base de potencia FLEX está cubierta por una garantía limitada separada
que se incluye en el manual del operador de la base de potencia FLEX.
La presente garantía no cubre y Troy-Bilt LLC rechaza todo tipo de
responsabilidad respecto de:
1. Pérdida de tiempo o pérdida de uso del Accesorio.
2. Costos de transporte y otros gastos incurridos en relación con el transporte
del Accesorio desde y hacia el proveedor de reparaciones y mantenimiento
Troy-Bilt autorizado.
3. Cualquier pérdida o daño a otros equipos o elementos personales.
4. Daños ocasionados por el rendimiento o el uso del Accesorio con cualquier
producto que no sea la Base de potencia Flex.
Limitaciones:
1. NO EXISTEN GARANTÍAS IMPLÍCITAS, INCLUÍDAS, A TÍTULO DE EJEMPLO, LAS
GARANTÍAS IMPLÍCITAS DE COMERCIABILIDAD O ADECUACIÓN PARA UN
PROPÓSITO EN PARTICULAR. PASADO EL PERÍODO DE GARANTÍA NO SE APLICARÁ
NINGUNA GARANTÍA SEGÚN LO ESTABLECIDO PRECEDENTEMENTE RESPECTO
DE LAS PIEZAS YA IDENTIFICADAS. NINGUNA OTRA GARANTÍA EXPRESA, YA SEA
ORAL O ESCRITA, EXCEPTO LA MENCIONADA ANTERIORMENTE, EXTENDIDA
POR PERSONAS FÍSICAS O JURÍDICAS, INCLUIDOS LOS DISTRIBUIDORES O
MINORISTAS RESPECTO DE CUALQUIER PRODUCTO, VINCULARÁ A TROY-BILT LLC.
DURANTE EL PERÍODO DE GARANTÍA, EL ÚNICO RECURSO SERÁ LA REPARACIÓN
O EL REEMPLAZO DE LA PIEZA DEFECTUOSA, SEGÚN LO ESTABLECIDO
PRECEDENTEMENTE. (ALGUNOS ESTADOS NO PERMITEN LA LIMITACIÓN DE LA
DURACIÓN DE LAS GARANTÍAS IMPLÍCITAS, POR LO QUE LA LIMITACIÓN ANTES
MENCIONADA PUEDE NO APLICARSE EN SU CASO).
2. LAS DISPOSICIONES ESTABLECIDAS EN EL PRESENTE DOCUMENTO PREVÉN
EL ÚNICO Y EXCLUSIVO RECURSO QUE SURGE DE LA VENTA. TROY-BILT
NO SE HARÁ RESPONSABLE DE LAS PÉRDIDAS O LOS DAÑOS INDIRECTOS
O EMERGENTES, INCLUIDOS SIN LIMITACIÓN, GASTOS DE TRANSPORTE O
GASTOS RELACIONADOS, O GASTOS DE ARRENDAMIENTO PARA REEMPLAZAR
TRANSITORIAMENTE UN PRODUCTO CUBIERTO POR LA GARANTÍA.
(ALGUNOS ESTADOS NO PERMITEN LA EXCLUSIÓN O LIMITACIÓN DE LOS
DAÑOS INDIRECTOS O EMERGENTES, POR LO QUE LAS EXCLUSIONES O
LIMITACIONES ANTES MENCIONADAS PUEDEN NO APLICARSE EN SU CASO).
3. En ningún caso se obtendrá una compensación mayor al monto del precio
de compra del producto vendido. La alteración de las características de
seguridad del producto anulará esta garantía limitada. Usted asume el
riesgo y la responsabilidad por las pérdidas, daños o lesiones personales o
materiales propios o de terceros que surjan del uso indebido o la incapacidad
de usar este producto.
4. Sujeto a las exclusiones, esta garantía limitada se extiende al comprador
inicial ya un comprador posterior de la fijación para uso no comercial para
la duración del periodo de garantía, a partir de la fecha original de compra
por parte del comprador inicial de dicha unión. Sujeto a las exclusiones, en el
caso de que la fecha original de compra por el comprador inicial del apego es
indeterminable, el periodo de garantía se establecerá como veinte y ocho (28)
meses desde la fecha de la fijación de la producción, según lo determinado
por Troy-Bilt . En ningún caso la garantía de un archivo adjunto se extienden
más allá del período de garantía establecido.
Relación de la ley estadual con esta garantía:
Esta garantía limitada le otorga derechos legales específicos, pero usted podría gozar
de otros derechos que varían de acuerdo a su lugar de residencia.
Troy-Bilt LLC, P.O. BOX 361131 CLEVELAND, OHIO 44136-0019, Teléfono: 1-800-828-5500, 1-330-558-7220
079221 REV. D
MTD Canada Limited - KITCHENER, ON N2G 4J1; Teléfono 1-800-668-1238
 Loading...