

Troy-Bilt 20292 Operator's Manual
i'_rm
2200 PSI PressureWasher
Operator'sManual
,®
BRIGGS & STRATTONPOWER PRODUCTSGROUP, LLC
JEFFERSON, WISCONSIN, U.S.A.
Manual No. 203776GS Revision A (08/20/2007)
Thankyou for purchasing this quality-built Troy-Bilt pressurewasher.We are pleasedthat you've placedyour confidencein
the Troy-Bilt brand.When operatedand maintainedaccording to the instructions in this manual, your Troy-Bilt pressure
washer will provide many yearsof dependableservice.
Thismanualcontainssafety information to makeyou awareof the hazardsand risks associatedwith pressure washersand
how to avoid them. BecauseTroy-Bilt does not necessarilyknow all the applications this pressurewasher could beused for, it
is important that you readand understandthese instructions thoroughly beforeattempting to start or operate this equipment.
Save these instructions for future reference.
Thispressure washer requiresfinal assemblybeforeuse. Referto the Assemb/ysection of this manualfor instructions on
final assembly procedures.Follow the instructions completely.
Where to Find Us
You never have to look far to find Briggs & Stratton support and service for your pressure washer. Consultyour Yellow Pages.
Thereare over 30,000 Briggs & Stratton authorizedservice dealersworldwide who provide qualityservice. You canalso
contact Troy-Bilt Customer Serviceby phone at (888) 611-6708, or on the Internet at www.troybilt.com.
PressureWasher
Model Number
Revision
Serial Number
Engine
III
Model Number
TypeNumber
CodeNumber
DatePurchased
IIIIIIIII
Troy-Bilt® is a registeredtrademark of MTD Products Inc and is used under
license to Briggs & Stratton Power Products.
Briggs & Stratton PowerProducts Group, LLC
900 North Parkway
Jefferson, WI 53549
III
Copyright © 2007 Briggs & Stratton Power Products Group,
LLC. All rights reserved. No part of this material may be
reproduced or transmitted in any form by any meanswithout
the expresswritten permission of Briggs & Stratton Power
Products Group,LLC.
2 www.troybilt.com

Table of Contents
Operator Safety ................................. 4
Equipment Description......................................... 4
Safety Rules................................................. 4
Assembly ..................................... 8
Unpack PressureWasher....................................... 8
Attach Handleand AccessoryTray ............................... 8
Add Engine Oil............................................... 9
Add Fuel.................................................... 9
Connect HoseandWater Supply to Pump......................... 10
FeaturesandControls............................ 11
Operation .................................... 12
PressureWasher Location..................................... 12
How to Start Your PressureWasher............................. 13
How to Stop Your PressureWasher ............................. 14
How to UseAccessory Tray.................................... 15
How to Use SprayTips ....................................... 15
Cleaningand Applying Detergent................................ 16
PressureWasher Rinsing ..................................... 16
CleaningDetergentSiphoning Tube.............................. 17
Automatic Cool Down System(Thermal Relief)..................... 17
€"D
t.n
t_
3
o
t_
Maintenance .................................. 18
MaintenanceSchedule........................................ 18
PressureWasher Maintenance ................................. 19
Engine Maintenance.......................................... 20
After Each Use.............................................. 23
Winter Storage.............................................. 24
Long Term Storage .......................................... 24
Troubleshooting ................................ 25
Warranties .................................... 26
Emissions Control SystemWarranty ............................. 26
PressureWasher OwnerWarranty............................... 28
Specifications ................................. 30
Product Specifications........................................ 30
Common Service Parts ....................................... 30
"o
€,#
w_
o
€1#
o
6¢
o
o
Espa_ol
OperatorSafety
SafetyRules
Equipment Description
Readthismanual carefullyand becomefamiliar
withyourpressurewasher. Knowits applications,
its limitations,and any hazardsinvolved.
This pressurewasher operatesat a max of 2,200 PSIanda
flow rateof up to 2.2 gallons per minute. This high quality
residential system features 8" wheels, axial cam pump with
stainless steel pistons,automatic cool down system,
detergent siphoning system, quick connect spray tips, safety
goggles, heavy duty 25' hose, and more.
Everyeffort has been madeto ensurethat information in this
manual is accurateand current. However,we reservethe
right to change,alter, or otherwise improvethe product and
this document at any time without prior notice.
The EmissionControl System for this pressure washeris
warranted for standards set by the Environmental Protection
Agency andthe CaliforniaAir ResourcesBoard.
,_ Thisis thesafetyalert symbol. It is usedto alertyoutopotentialpersonalinjuryhazards.Obeyall
safetymessagesthatfollow thissymboltoavoid
possibleinjury or death.
Thesafety alert symbol (_.) is usedwith a signal word
(DANGER,CAUTION,WARNING),apictorial and/or a safety
messageto alert you to hazards.DANGERindicatesa hazard
which, if not avoided, will result in death or serious injury.
WARNINGindicates a hazardwhich, if not avoided, could
result in deathor serious injury. CAUTIONindicates a hazard
which, if not avoided, might result in minor or moderate
injury. NOTICE,indicates asituation that could result in
equipment damage.Follow safetymessagesto avoid or
reducethe risk of injury or death.
WARNING
The engine exhaustfromthisproductcontainschemicals
knownto the State ofCaliforniato cause cancer, birth
defects, or otherreproductiveharm.
©
4 www.troybilt.com
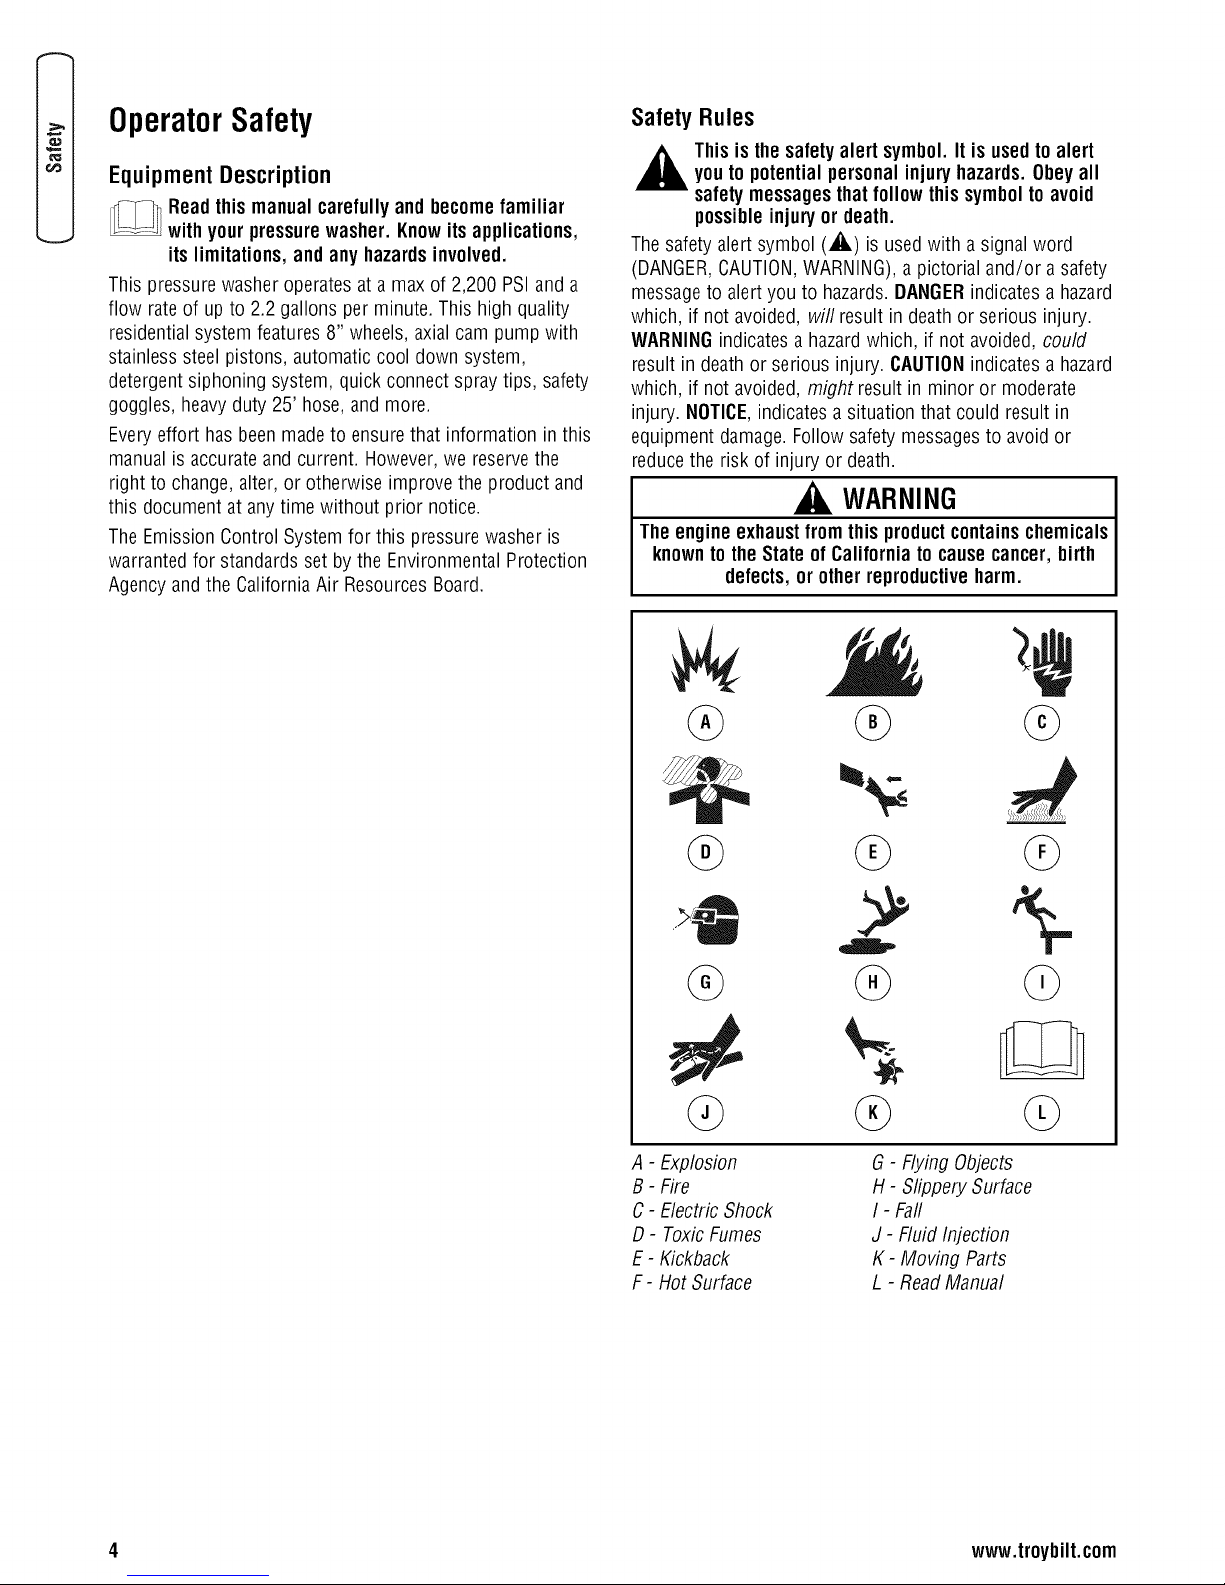
A - Explosion
B - Fire
C- Electric Shock
D- ToxicFumes
E- Kickback
F - Hot Surface
Ob
G- Flying Objects
H- Slippery Surface
I - Fail
J - FluidInjection
K- Moving Parts
L - ReadManual
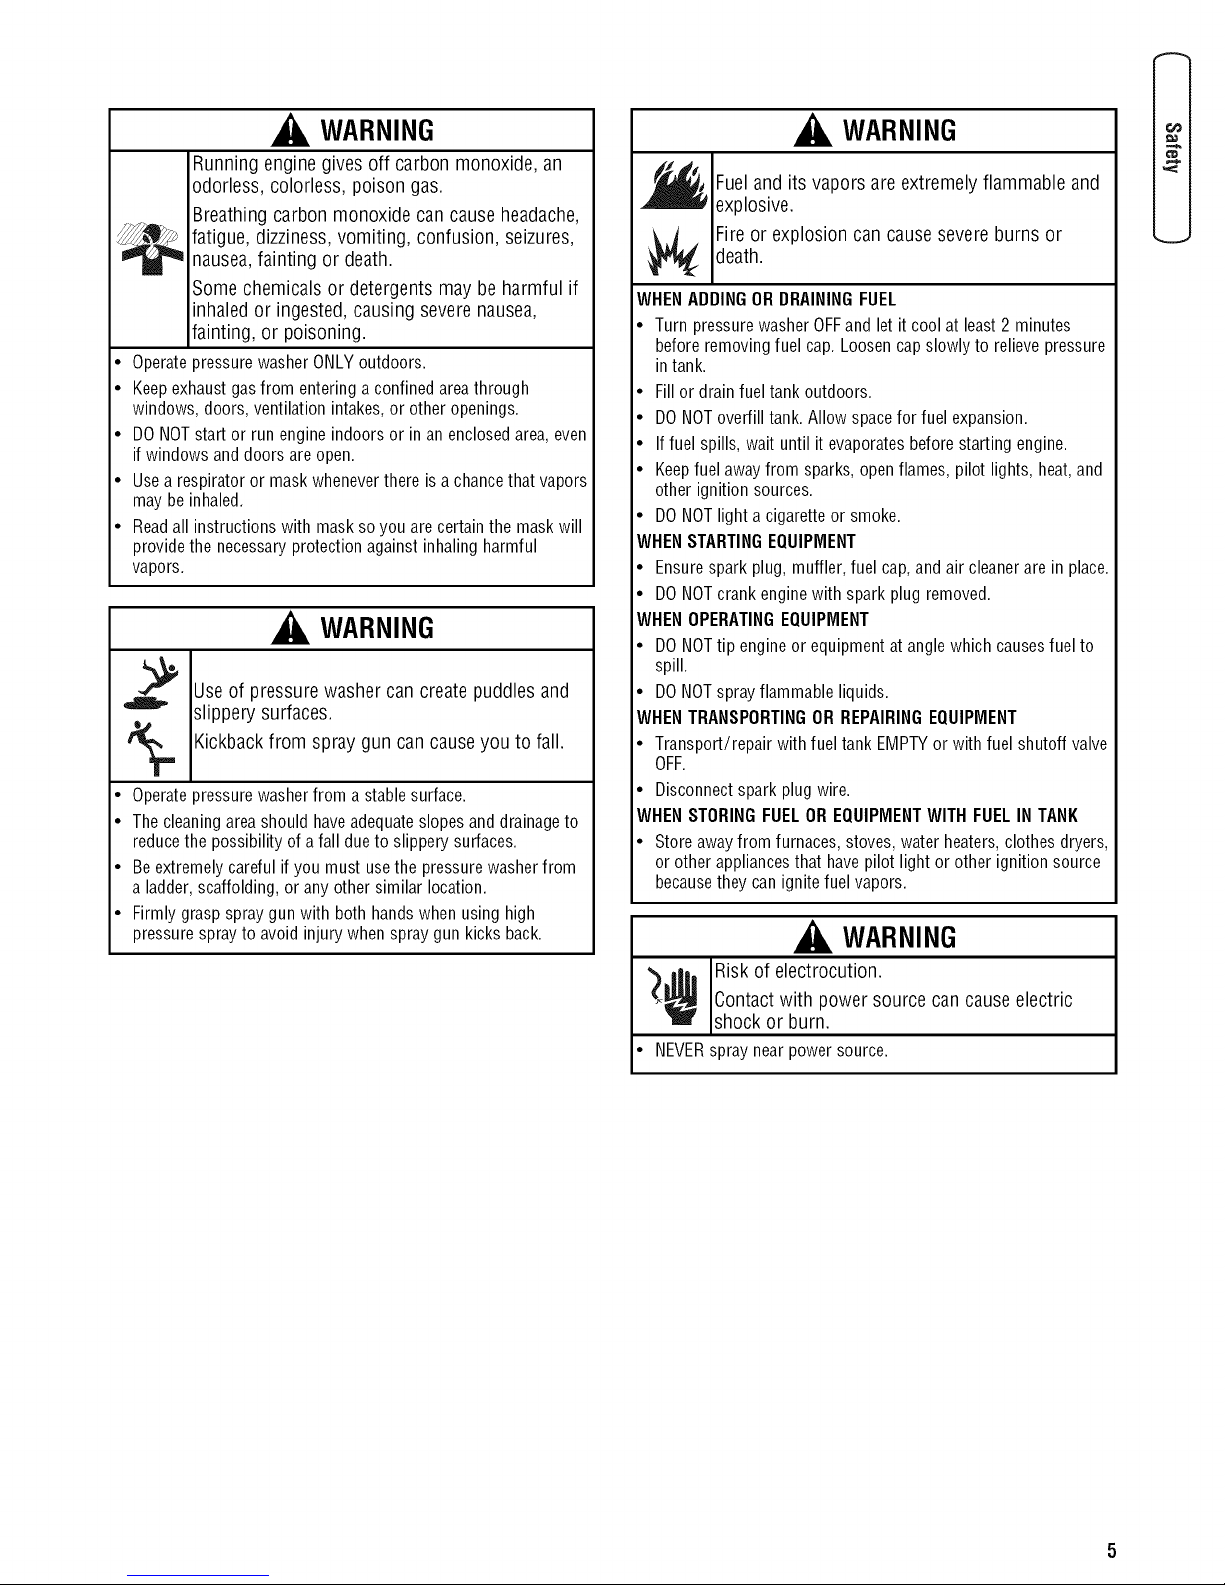
WARNING
Running engine gives off carbon monoxide, an
odorless, colorless, poison gas.
Breathing carbon monoxide can cause headache,
fatigue, dizziness, vomiting, confusion, seizures,
nausea, fainting or death.
Some chemicals or detergents may be harmful if
inhaled or ingested, causing severe nausea,
fainting, or poisoning.
• Operatepressurewasher ONLY outdoors.
• Keep exhaustgas from entering a confinedareathrough
windows, doors, ventilation intakes,or other openings.
• DO NOTstart or run engine indoors or in an enclosedarea,even
if windows and doors are open.
• Use arespirator or maskwheneverthere isa chancethat vapors
may beinhaled.
• Readall instructions with mask soyou are certain the mask will
provide the necessaryprotectionagainst inhaling harmful
vapors.
WARNING
Useof pressure washer can createpuddles and
slippery surfaces.
Kickbackfrom spraygun can causeyou to fall.
• Operatepressurewasher from a stablesurface.
• Thecleaning areashould have adequateslopes anddrainage to
reducethe possibility of a fall dueto slippery surfaces.
• Beextremely careful if you must use the pressurewasherfrom
a ladder,scaffolding, or any other similar location.
• Firmly grasp spray gun with both hands when using high
pressure spray to avoid injury when spraygun kicks back.
WARNING
._ Fuel and its are extremely flammable and
WHENADDINGOR DRAININGFUEL
• Turn pressurewasher OFFand let it cool at least 2 minutes
• Fill or drain fuel tank outdoors.
• DO NOToverfill tank. Allow spacefor fuel expansion.
• Iffuel spills,wait until it evaporatesbefore starting engine.
• Keepfuel awayfrom sparks,open flames, pilot lights, heat, and
• DO NOTlight acigarette or smoke.
WHENSTARTINGEQUIPMENT
• Ensure spark plug, muffler, fuel cap, and air cleanerare in place.
• DO NOTcrank enginewith spark plug removed.
WHENOPERATINGEQUIPMENT
• DO NOTtip engine or equipmentat anglewhich causesfuel to
• DONOTspray flammable liquids.
WHENTRANSPORTINGORREPAIRINGEQUIPMENT
• Transport/repair with fuel tank EMPTYor with fuel shutoff valve
• Disconnect spark plug wire.
WHENSTORINGFUELOR EQUIPMENTWITH FUELIN TANK
• Store awayfrom furnaces, stoves, water heaters,clothes dryers,
explosive.
death.
Fire or explosion can cause severe burns or
before removing fuel cap. Loosen capslowlyto relievepressure
in tank.
other ignition sources.
spill.
OFF.
or other appliancesthat have pilot light or other ignition source
becausethey can ignite fuel vapors.
vapors
WARNING
_¢ Risk of electrocution.
• NEVERspray near power source.
Contact with power source can cause electric
shock or burn.
WARNING
6@
• NEVERpull starter cord without first relievingspray gun
• When starting engine, pull cord slowly until resistanceisfelt and
• After eachstarting attempt, where enginefails to run, always
• Firmly grasp spray gun with both hands when using high
_ Exhaustheat/gases can ignite combustibles,
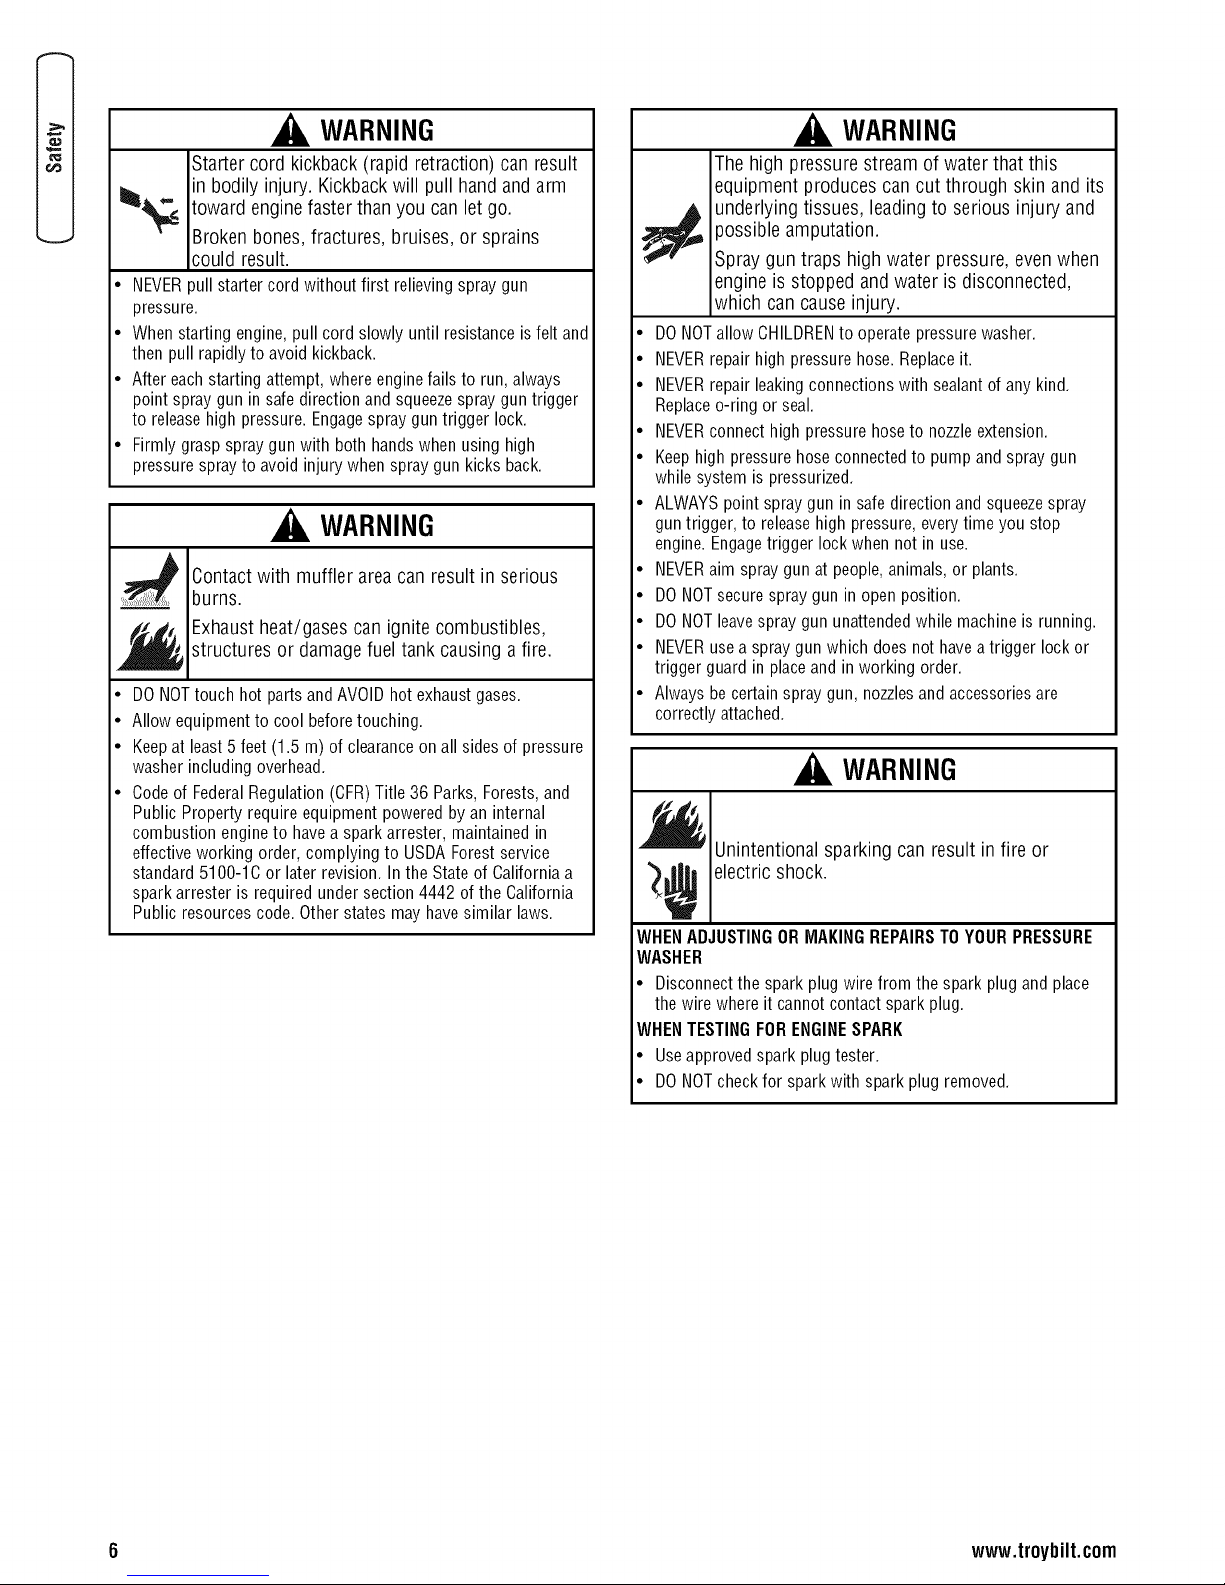
Starter cord kickback (rapid retraction) can result
_nbodily injury. Kickbackwill pull hand andarm
toward enginefaster than you can letgo.
Brokenbones, fractures, bruises, or sprains
could result.
pressure.
then pull rapidly to avoid kickback.
point spray gun in safe direction and squeezespray guntrigger
to releasehigh pressure. Engagespraygun trigger lock.
pressure spray to avoid injury when spraygun kicks back.
WARNING
Contactwith muffler areacan result in serious
burns.
structures or damagefuel tank causinga fire.
DO NOTtouch hotparts andAVOID hotexhaust gases.
Allow equipment to cool beforetouching.
Keepat least5 feet (1.5 m) of clearanceon all sidesof pressure
washer including overhead.
Codeof FederalRegulation (CFR)Title 36 Parks, Forests,and
Public Property require equipment powered by an internal
combustion engine to havea spark arrester, maintained in
effective working order, complying to USDAForest service
standard 5100-1C or later revision. In the Stateof California a
spark arrester is required under section 4442 of the California
Public resources code. Other states may havesimilar laws.
The high pressure stream of water that this
equipment produces can cut through skin and its
underlying tissues, leading to serious injury and
)ossible amputation.
Spray gun traps high water pressure, even when
engine is stopped and water is disconnected,
which can cause injury.
• DONOTallow CHILDRENto operatepressure washer.
• NEVERrepair high pressure hose.Replaceit.
• NEVERrepair leakingconnections with sealantof any kind.
Replaceo-ring or seal.
• NEVERconnect high pressurehose to nozzleextension.
• Keep high pressurehoseconnectedto pumpand spray gun
while system is pressurized.
• ALWAYSpoint spray gun in safedirection and squeezespray
guntrigger, to releasehigh pressure,every time you stop
engine. Engagetrigger lockwhen not inuse.
• NEVERaim spray gun at people, animals,or plants.
• DO NOTsecure spray gun in open position.
• DO NOTleavespray gun unattendedwhile machineis running.
• NEVERuse a spray gun which does nothave a trigger lock or
trigger guard inplace andin working order.
• Always becertain spray gun, nozzlesand accessoriesare
correctly attached.
"_ Unintentional sparking can result in fire or
_ electric shock.
WHENADJUSTINGORMAKINGREPAIRSTOYOUR PRESSURE
WASHER
• Disconnect the spark plugwire from the spark plug and place
the wire where it cannot contact spark plug.
WHENTESTINGFORENGINESPARK
• Useapproved spark plug tester.
• DO NOTcheckfor spark with spark plug removed.
WARNING
WARNING
6 www.troybilt.com
WARNING
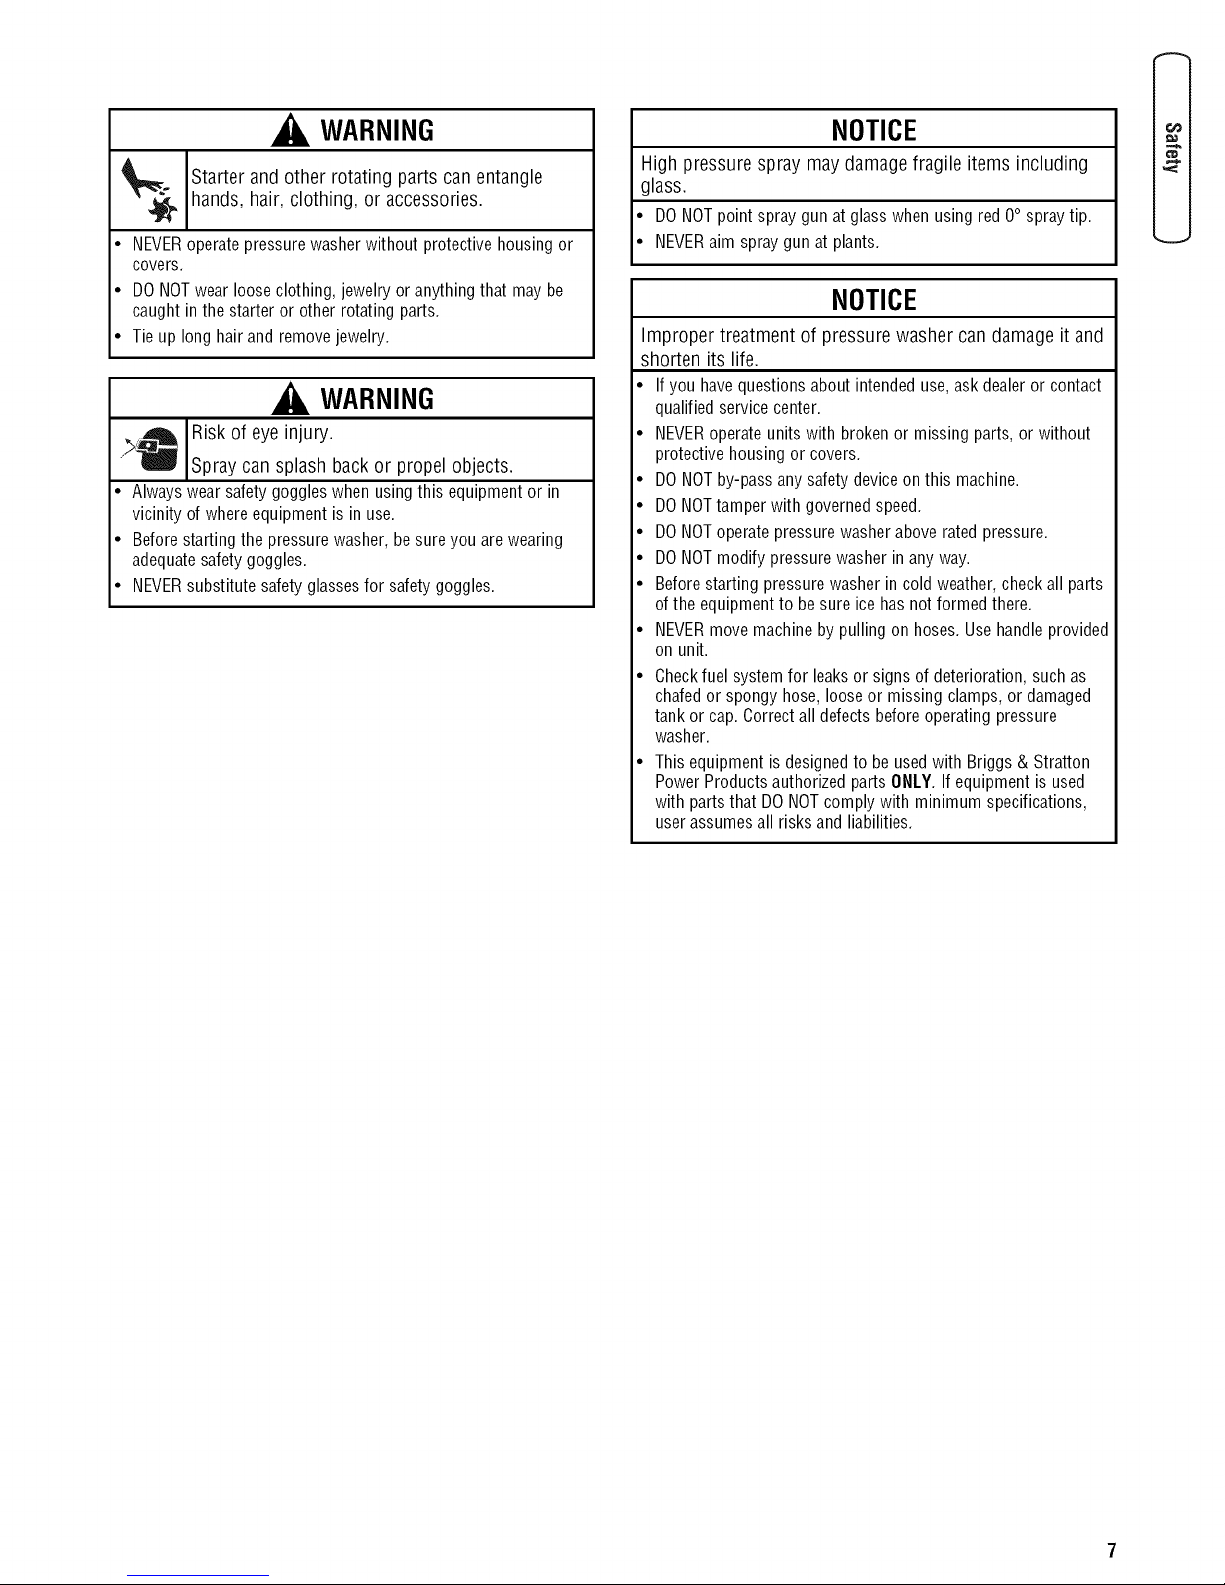
hands, hair, clothing, or accessories.
Starter and other rotating parts can entangle
• NEVERoperate pressure washerwithout protective housing or
covers.
• DO NOTwear loose clothing, jewelry oranything that may be
caught in thestarter or other rotating parts.
• Tie up long hairand removejewelry.
WARNING
>._ Risk of eye injury.
" Spray can splash back or propel objects.
• Always wearsafety goggleswhen using this equipmentor in
vicinity of where equipment is in use.
• Before starting the pressurewasher, besureyou arewearing
adequatesafety goggles.
• NEVERsubstitute safety glassesfor safety goggles.
NOTICE
High pressure spray may damage fragile items including
glass.
• DO NOTpoint spray gun at glasswhen usingred 0° spray tip.
• NEVERaim spray gun at plants.
NOTICE
Improper treatment of pressure washer can damage it and
shorten its life.
• Ifyou havequestions about intended use,ask dealer or contact
qualified servicecenter.
• NEVERoperate units with brokenor missing parts, or without
protective housing or covers.
• DO NOTby-pass any safety device on this machine.
• DONOTtamper with governedspeed.
• DONOToperate pressurewasher above rated pressure.
• DONOTmodify pressurewasher in any way.
• Before starting pressurewasher in cold weather,check all parts
of the equipment to besure ice hasnot formed there.
• NEVERmove machineby pulling on hoses. Use handleprovided
on unit.
Checkfuel systemfor leaks or signs of deterioration, suchas
chafed or spongy hose, looseor missing clamps, or damaged
tank or cap.Correct all defects before operating pressure
washer.
This equipment is designed to be usedwith Briggs & Stratton
Power Productsauthorized parts ONLY.If equipment is used
with parts that DO NOTcomply with minimum specifications,
userassumes all risks andliabilities.
€1#
Assembly
Attach Handle and Accessory Tray
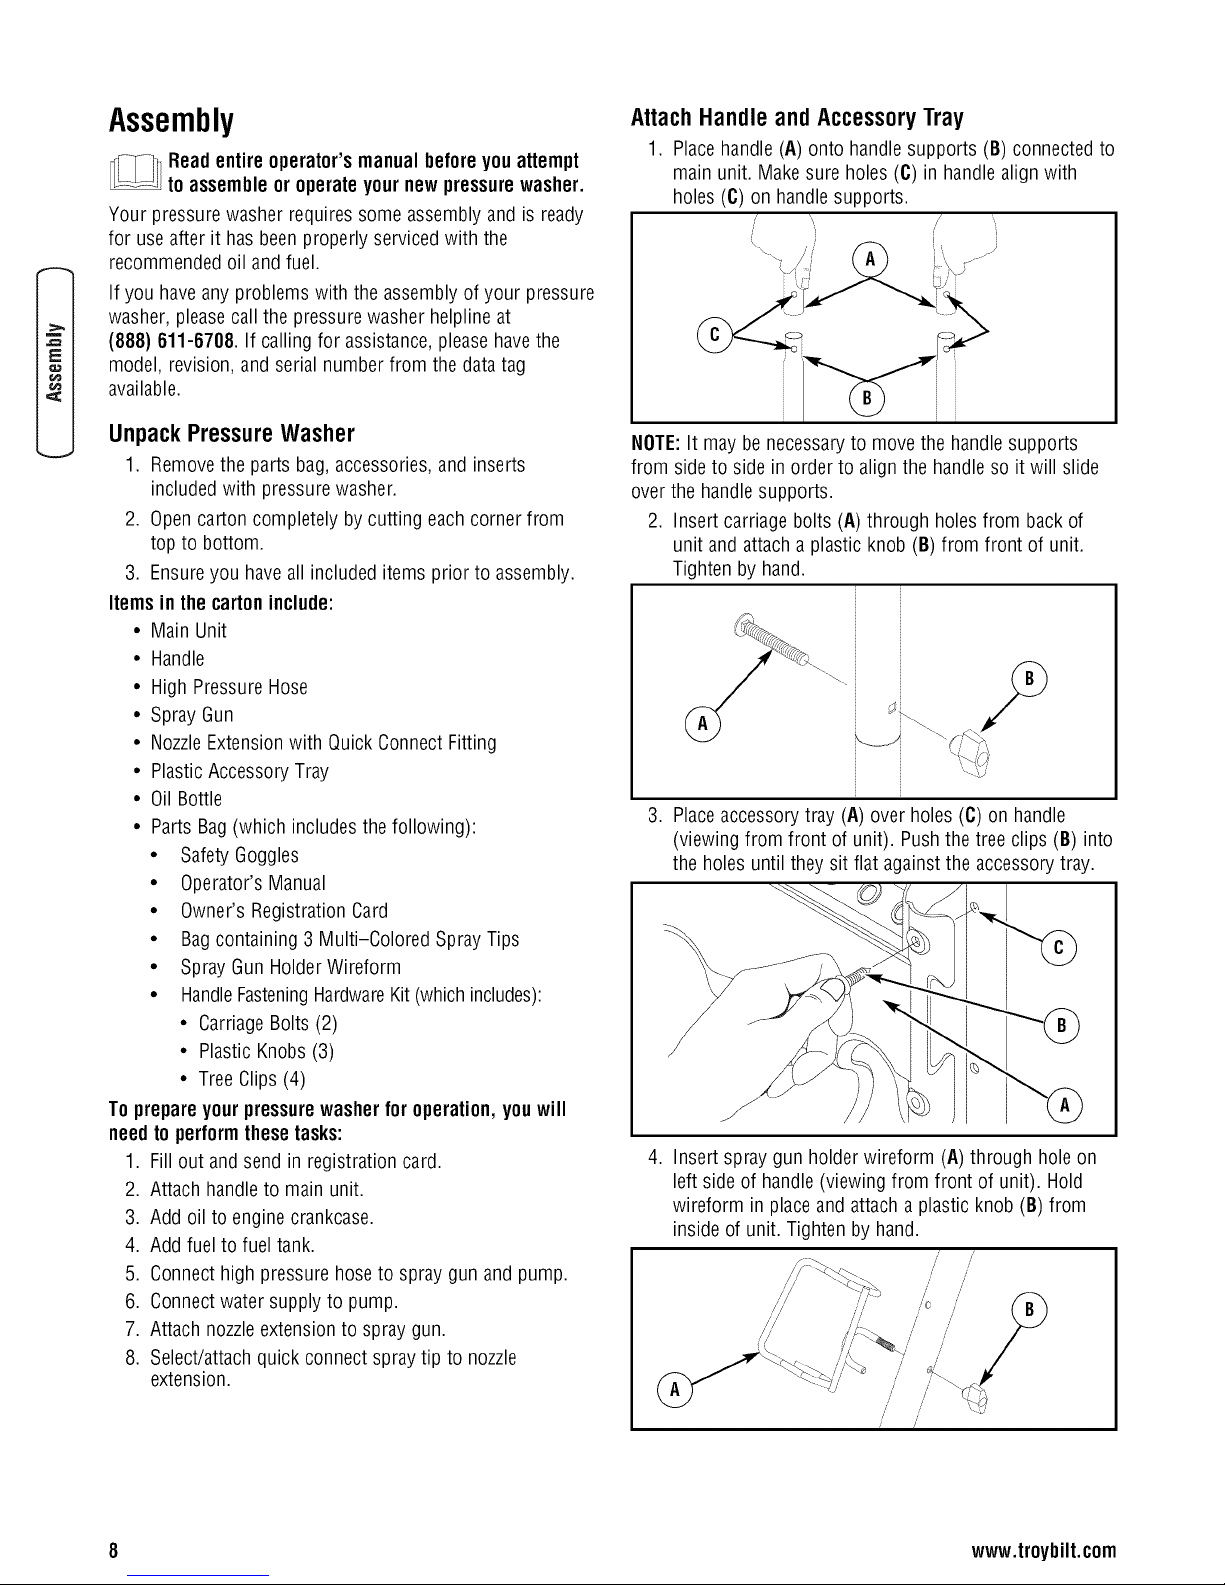
1. Placehandle (A) onto handlesupports (B) connectedto
___i ead entireoperator'smanualbeforeyou attempt
toassemble oroperateyournew pressurewasher.
Your pressure washerrequires some assemblyand is ready
main unit. Makesure holes (C) in handlealign with
holes (C) on handlesupports.
// ,,
for useafter it has beenproperly serviced with the
recommendedoil and fuel.
If you haveanyproblems with the assemblyof your pressure
washer, pleasecall the pressurewasher helplineat
(888} 611-6708. If calling for assistance, pleasehavethe
E
model, revision, and serial number from the datatag
available.
UnpackPressureWasher
1. Removethe parts bag, accessories, and inserts
included with pressurewasher.
2. Opencarton completely by cutting each corner from
top to bottom.
3. Ensureyou haveall included items prior to assembly.
Items in the cartoninclude:
• Main Unit
• Handle
• HighPressure Hose
• Spray Gun
• NozzleExtension with QuickConnectFitting
• PlasticAccessory Tray
• Oil Bottle
• PartsBag(which includes the following):
• SafetyGoggles
• Operator's Manual
• Owner's RegistrationCard
• Bag containing 3 Multi-Colored Spray Tips
• Spray Gun HolderWireform
• HandleFasteningHardwareKit(which includes):
• CarriageBolts (2)
• PlasticKnobs (3)
• TreeClips (4)
To prepare yourpressurewasherfor operation,youwill
need to performthese tasks:
1. Fill out andsend in registration card.
2. Attach handleto main unit.
3. Addoil to engine crankcase.
4. Addfuel to fuel tank.
5. Connecthigh pressurehoseto spray gunand pump.
6. Connectwater supply to pump.
7. Attach nozzleextension to spray gun.
8. Select/attachquick connect spray tip to nozzle
extension.
NOTE:It may be necessaryto move the handlesupports
from sideto side in order to alignthe handle so it will slide
over the handlesupports.
2. Insert carriage bolts (A) through holes from back of
unit andattacha plastic knob (B) from front of unit.
Tighten by hand.
,
Placeaccessorytray (A) over holes (C)on handle
(viewing from front of unit). Pushthe tree clips (B) into
the holes until theysit flat againstthe accessory tray.
,
Insert spray gun holderwireform (A) through hole on
left side of handle(viewing from front of unit). Hold
wireform in place and attach a plastic knob (B) from
inside of unit. Tighten by hand.
t /
/ /
/
/ /
/ , i//i
/ i
8 www.troybilt.com
,/
5. Insert multi-colored spray tips and other supplied
accessoriesin spaces provided in accessorytray. See
"How to UseAccessory Tray".
Add Engine Oil
1. Placepressure washeron a flat, levelsurface.
2. Cleanarea aroundoil fill and removeyellow oil fill
cap/dipstick.
3. Using oil funnel (optional), slowly pour contents of
provided oil bottle into oil fill opening.
NOTICE
Improper treatment of pressurewasher candamage it and
shorten its life.
• DONOTattemptto crankorstarttheenginebeforeit hasbeen
properlyservicedwiththe recommendedoil.Thismayresultin
anenginefailure.
4. Replaceoil fill cap/dipstick and fully tighten.
Add Fuel
Fuel mustmeet theserequirements:
• Clean,fresh, unleadedgasoline.
• A minimum of 87 octane/87 AKI (91 RON).High
altitude use, seeHigh Altitude.
• Gasolinewith up to 10% ethanol (gasohol) or upto
15% MTBE(methyl tertiary butyl ether) is acceptable.
WARNING
._ Fueland its are extremelyflammable and
WHENADDING FUEL
• Turn pressurewasher OFFand let it cool at least 2 minutes
• Fill fuel tank outdoors.
• DO NOToverfill tank. Allow spacefor fuel expansion.
• Iffuel spills,wait until it evaporatesbefore starting engine.
• Keepfuel away from sparks,open flames, pilot lights, heat,and
• DO NOTlight acigarette or smoke.
2.
explosive.
death.
Fireor explosion can causesevere burns or
before removing fuel cap. Loosen capslowly to relieve pressure
in tank.
other ignition sources.
.
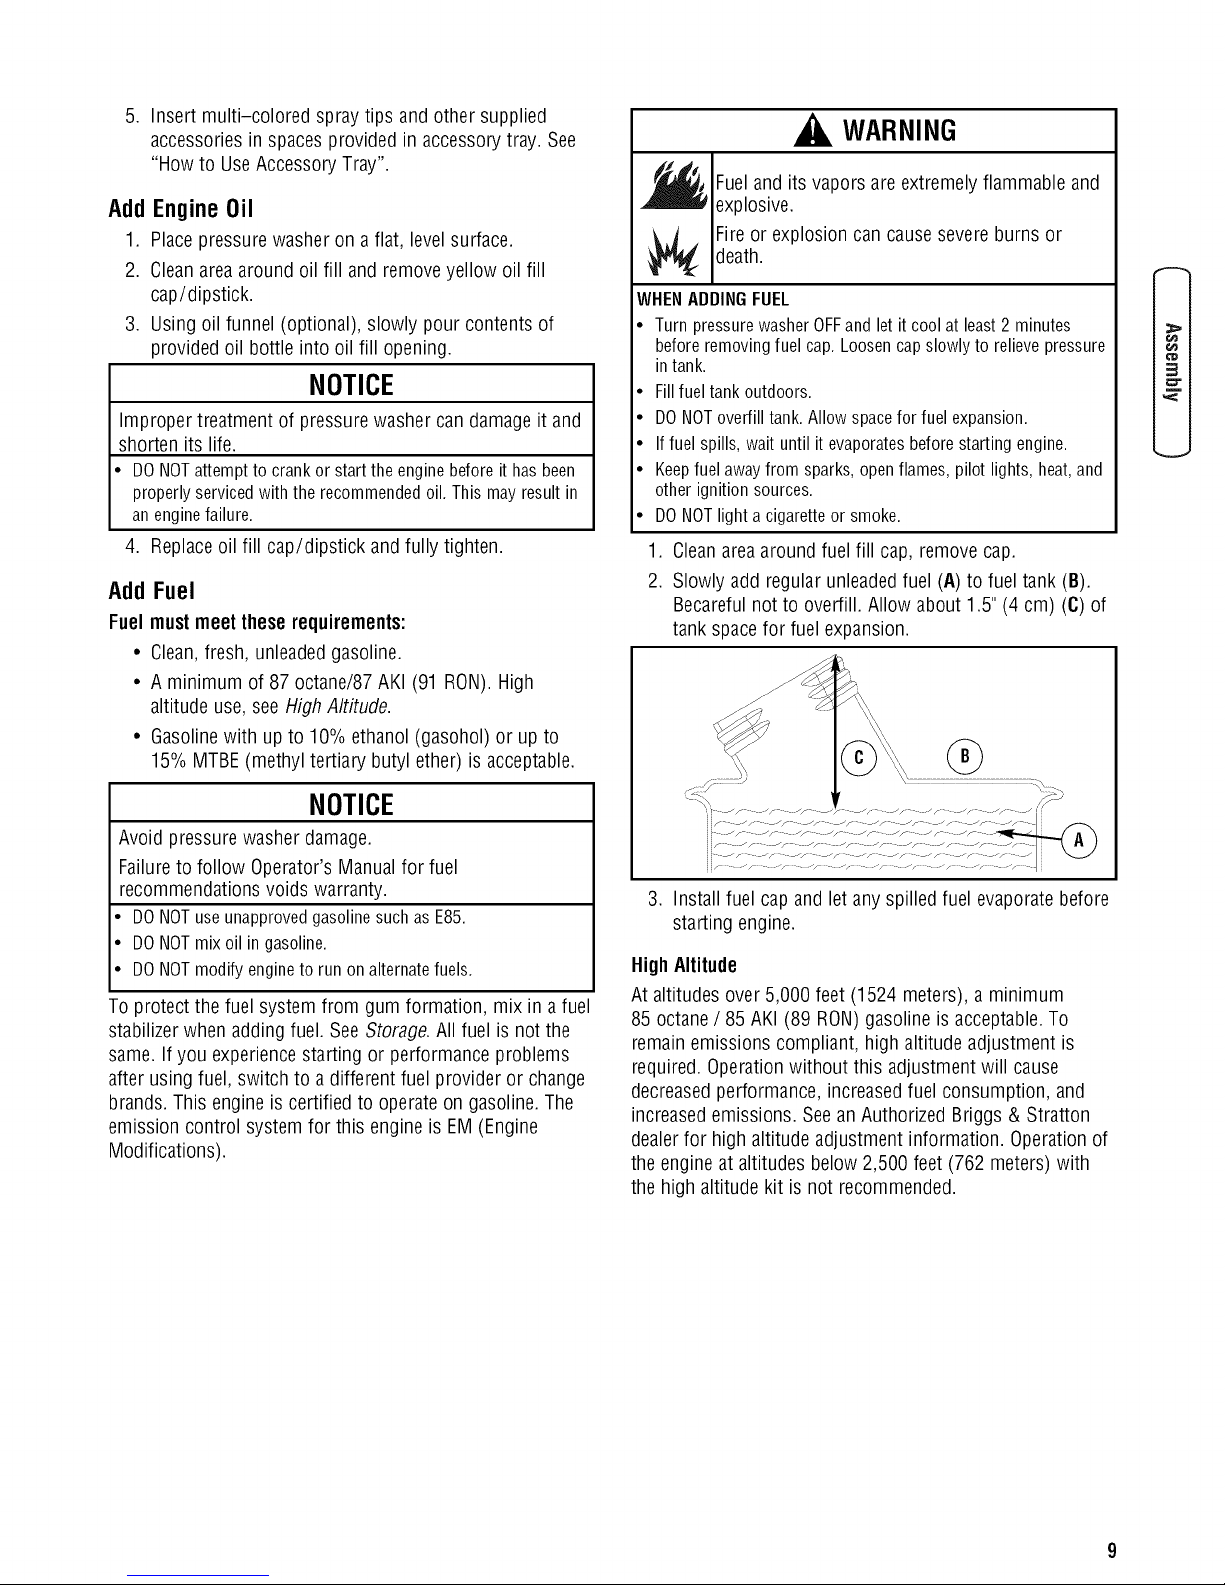
Cleanarea around fuel fill cap, removecap.
Slowly add regularunleadedfuel (A) to fuel tank (B).
Becareful not to overfill. Allow about 1.5" (4cm) (6) of
tank space for fuel expansion.
vapors
3
NOTICE
Avoid pressure washer damage.
Failureto follow Operator's Manualfor fuel
recommendationsvoids warranty.
• DONOTuseunapprovedgasolinesuchasE85.
• DONOTmixoil in gasoline.
• DONOTmodifyengineto runonalternatefuels.
To protect the fuel system from gum formation, mix in afuel
stabilizerwhen addingfuel. SeeStorage.All fuel is not the
same. If you experiencestarting or performanceproblems
after using fuel, switch to a different fuel provider or change
brands. This engineis certified to operateon gasoline. The
emission control system for this engine is EIVI(Engine
Modifications).
3. Install fuel capand let anyspilled fuel evaporatebefore
starting engine.
HighAltitude
At altitudes over 5,000 feet (1524 meters), a minimum
85 octane/ 85 AKI (89 RON)gasoline is acceptable.To
remainemissions compliant, high altitude adjustment is
required.Operationwithout this adjustment will cause
decreasedperformance, increasedfuel consumption, and
increasedemissions. Seean AuthorizedBriggs & Stratton
dealerfor high altitude adjustment information. Operationof
the engine at altitudes below 2,500 feet (762 meters) with
the high altitude kit is not recommended.
E
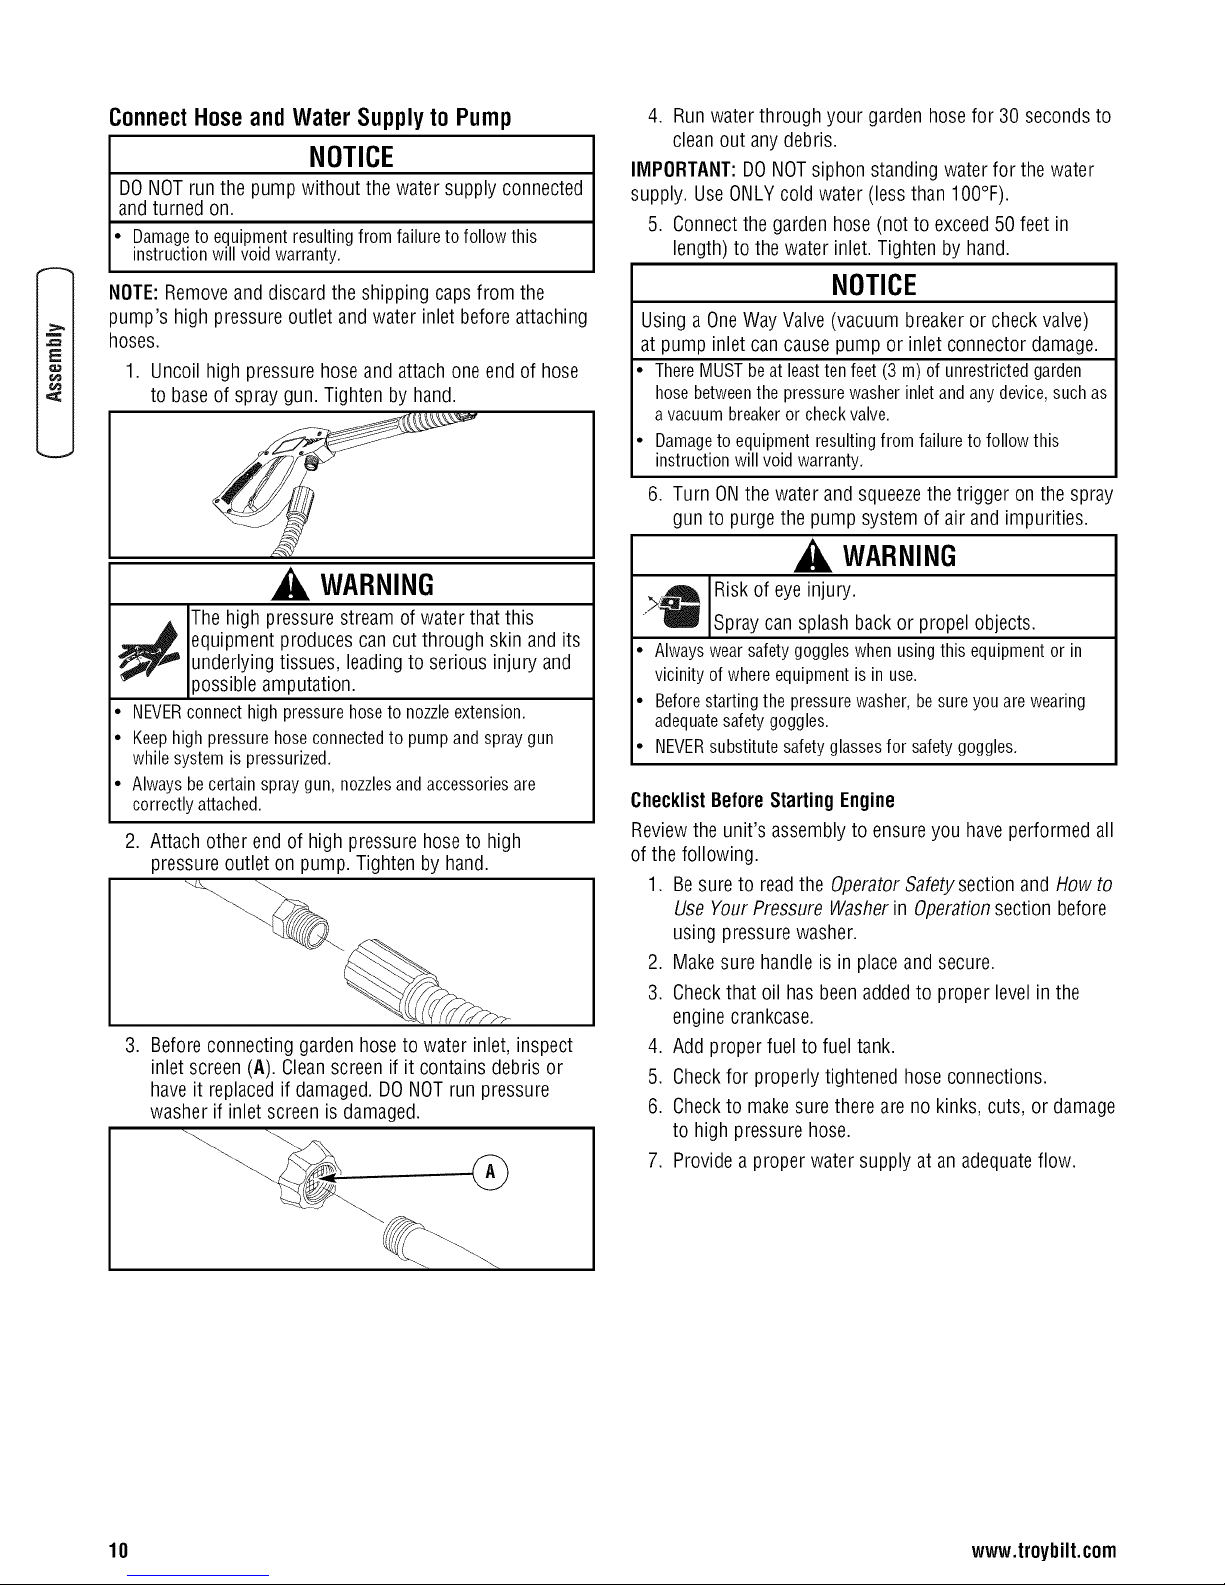
ConnectHoseandWaterSupplyto Pump
NOTICE
DONOTrun the pump without the watersupply connected
and turned on.
•" _ e-_p__ _ failuretofollowthis
instructionwillvoidwarranty.
NOTE:Remove and discard the shipping caps from the
pump's high pressureoutlet andwater inlet before attaching
hoses.
1. Uncoil high pressurehoseand attachone end of hose
to baseof spray gun. Tightenby hand.
WARNING
The high pressure stream of water that this
_ quipment produces can cut through skin and its
• NEVERconnect high pressurehose to nozzleextension.
• Keep high pressurehoseconnectedto pumpand spray gun
• Always becertain spray gun, nozzlesand accessoriesare
2. Attach other endof high pressure hoseto high
underlying tissues, leading to serious injury and
)ossible amputation.
while system is pressurized.
correctly attached.
pressure outlet on pump. Tightenby hand.
,
Beforeconnecting garden hose to water inlet, inspect
inlet screen (A). Cleanscreen if it contains debris or
haveit replacedif damaged.DONOTrun pressure
washer if inlet screen is damaged.
4. Run waterthrough your gardenhosefor 30 seconds to
cleanout anydebris.
IMPORTANT:DO NOTsiphon standing water for thewater
supply. UseONLYcold water (less than 100°F).
5. Connectthe garden hose (not to exceed50 feet in
length) to the water inlet. Tighten by hand.
NOTICE
Using a One Way Valve (vacuum breaker or check valve)
at pump inlet can cause pump or inlet connector damage.
• ThereMUST beat leastten feet (3 m) of unrestricted garden
hose betweenthe pressure washer inlet and any device,such as
avacuum breakeror checkvalve.
• Damageto equipment resulting from failure to follow this
instruction will void warranty.
6. Turn ONthe water and squeezethe trigger onthe spray
gun to purge the pump system of air andimpurities.
WARNING
>._ Risk of eye injury.
" Spray can splash back or propel objects.
• Always wearsafety goggleswhen using this equipmentor in
vicinity of where equipment is in use.
• Before starting the pressurewasher, besure you arewearing
adequatesafety goggles.
• NEVERsubstitute safety glassesfor safety goggles.
ChecklistBeforeStarting Engine
Reviewthe unit's assemblyto ensureyou haveperformed all
of the following.
1. Be sure to readthe OperatorSafetysection and Howto
Use Your Pressure Washerin Operationsection before
using pressurewasher.
2. Make sure handle is in placeand secure.
3. Checkthat oil hasbeen addedto proper level in the
engine crankcase.
4. Addproper fuel to fuel tank.
5. Checkfor properly tightened hoseconnections.
6. Checkto make sure there areno kinks, cuts, or damage
to high pressure hose.
7. Provide aproper watersupply at anadequateflow.
10 www.troybilt.com
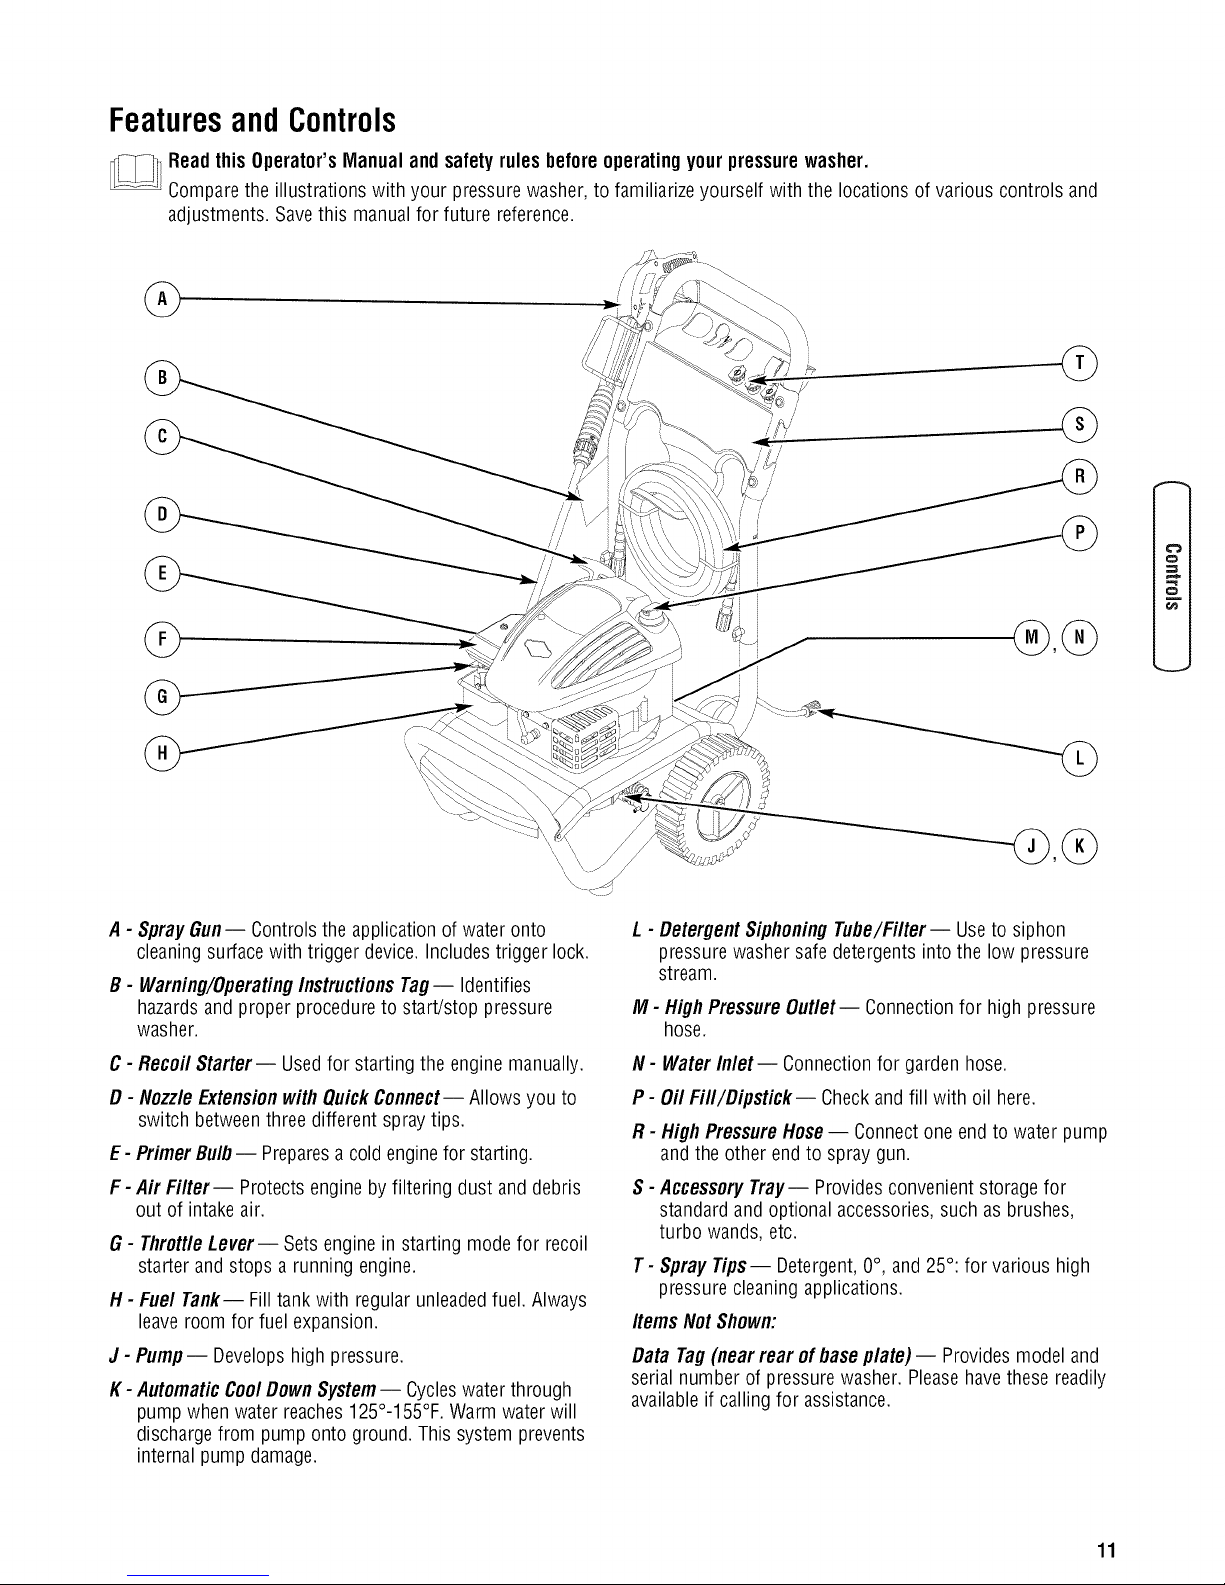
FeaturesandControls
_i eadthis Operator'sManual and safetyrulesbeforeoperatingyourpressurewasher.
Comparethe illustrations with your pressure washer,to familiarizeyourself with the locations of various controls and
adjustments. Save this manual for future reference.
////
O
;=1
A - SprayGun-- Controls the application of wateronto
cleaningsurfacewith trigger device. Includes trigger lock.
B - Warm'rig/OperatingInstructionsTag- Identifies
hazardsand proper procedureto start/stop pressure
washer.
C - Recoil Starter-- Usedfor starting the engine manually.
D - Nozzle ExtensionwithQuickConnect-- Allows you to
switch betweenthree different spraytips.
E- Primer Bulb -- Preparesacold enginefor starting.
F-Air Filter-- Protects engine by filtering dust and debris
out of intakeair.
G - Throttle Lever-- Setsengine instarting mode for recoil
starter and stops a running engine.
H - Fuel Tank-- Fill tankwith regular unleadedfuel. Always
leaveroom for fuel expansion.
J - Pump-- Developshigh pressure.
K - AutomaticCoolDown System-- Cycleswater through
pump when water reaches125°-155°F. Warm water will
dischargefrom pump onto ground. This system prevents
internal pump damage.
L - DetergentSiphoningTube/Filter-- Useto siphon
pressure washer safe detergents into the low pressure
stream.
M - HighPressure Outlet-- Connectionfor high pressure
hose.
N - WaterInlet-- Connection for garden hose.
P - Oil Fill/Dipstick-- Checkand fill with oil here.
R - High PressureHose-- Connectone end to water pump
and the other end to spray gun.
S - AccessoryTray-- Providesconvenientstorage for
standard and optional accessories,such as brushes,
turbo wands, etc.
T- Spray Tips-- Detergent,0°, and 25°: for various high
pressure cleaning applications.
Items Not Shown:
Data Tag(near rear ofbaseplate) -- Provides model and
serial number of pressurewasher. Pleasehave thesereadily
availableif calling for assistance.
11
Operation
If you haveanyproblems operating your pressure washer,
pleasecallthe pressure washer helpline at (888) 611-6788.
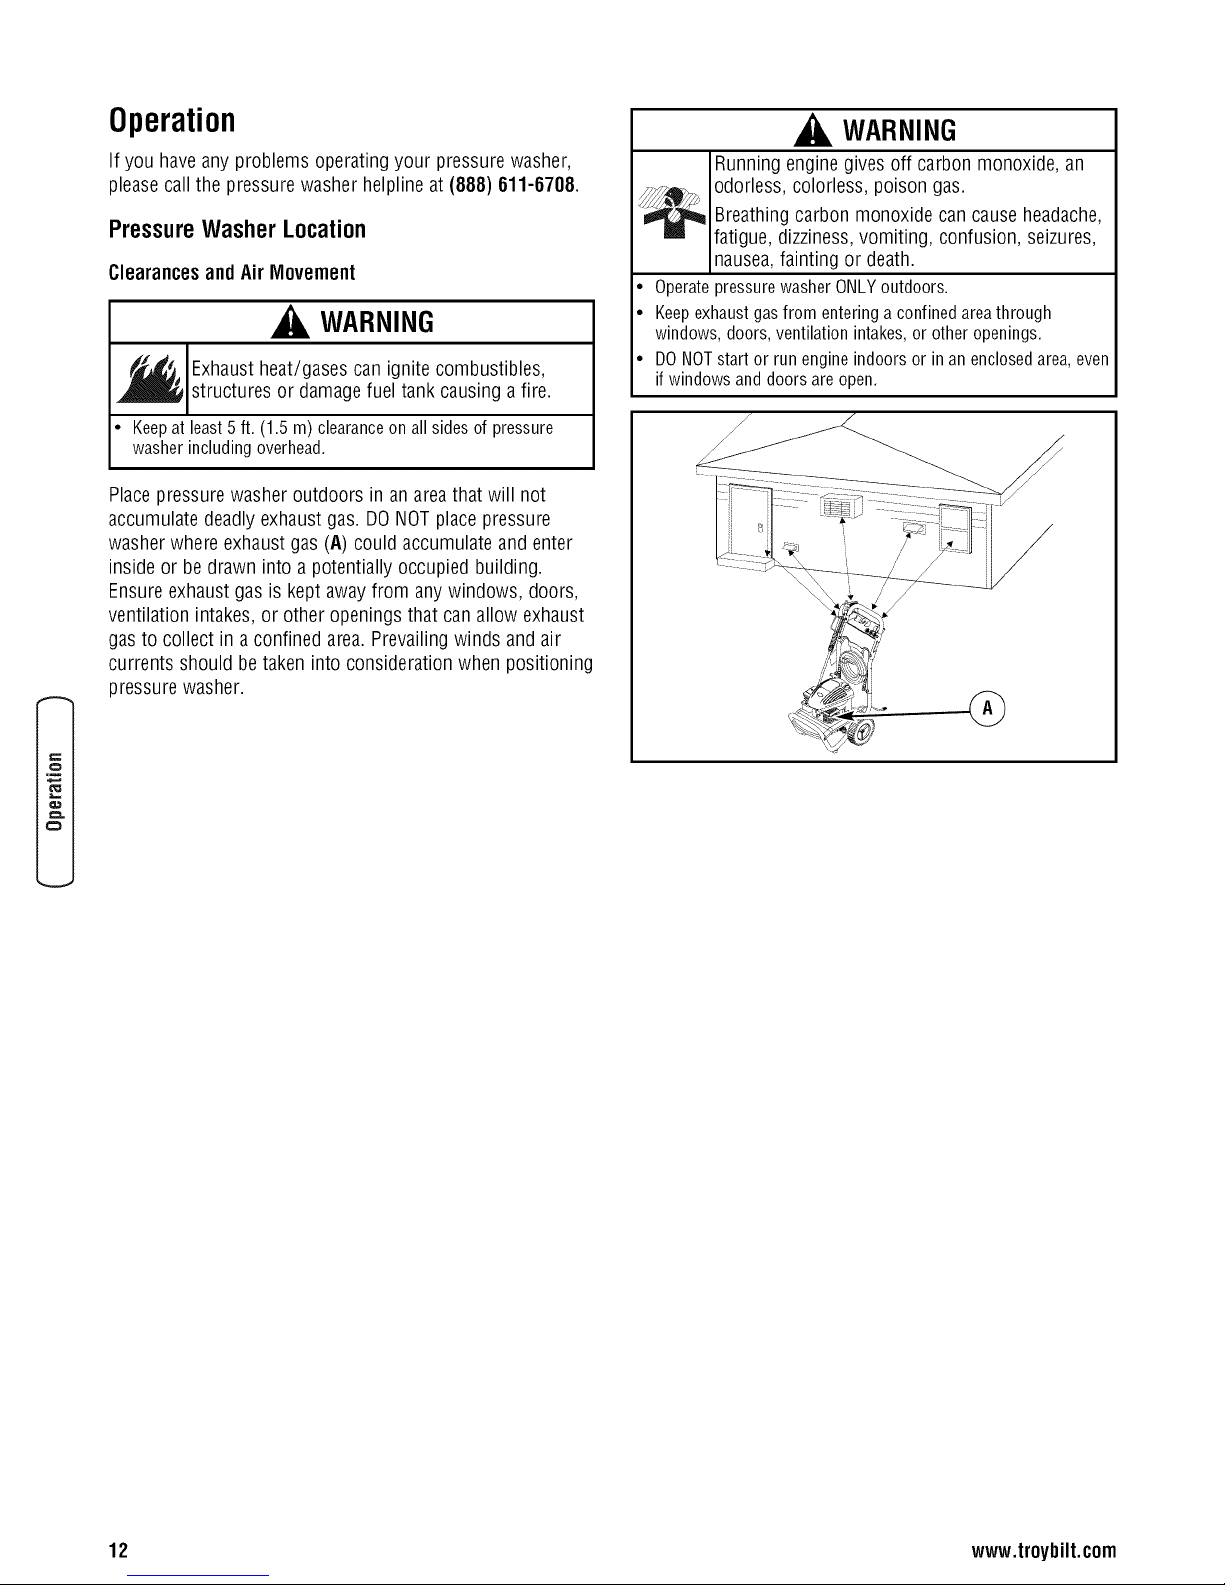
PressureWasherLocation
Clearancesand Air Movement
WARNING
_ Exhaustheat/gases can ignite combustibles,
• Keepat least5 ft. (1.5m) clearanceonall sidesof pressure
Placepressure washeroutdoors in anarea that will not
accumulate deadly exhaustgas. DONOTplacepressure
washer where exhaust gas (A) could accumulateand enter
inside or be drawn into a potentially occupiedbuilding.
Ensureexhaustgas is kept awayfrom anywindows, doors,
ventilation intakes, or other openingsthat can allow exhaust
gasto collect in aconfined area. Prevailingwinds andair
currents should betaken into consideration when positioning
pressure washer.
structures or damagefuel tank causinga fire.
washerincludingoverhead.
WARNING
Running enginegives off carbon monoxide, an
odorless, colorless, poison gas.
Breathingcarbon monoxide can cause headache,
fatigue, dizziness,vomiting, confusion, seizures,
nausea,fainting or death.
• OperatepressurewasherONLYoutdoors.
• Keepexhaustgasfromenteringa confinedareathrough
windows,doors,ventilationintakes,orotheropenings.
• DONOTstartor runengineindoorsor inanenclosedarea,even
if windowsanddoorsareopen.
12 www.troybilt.com
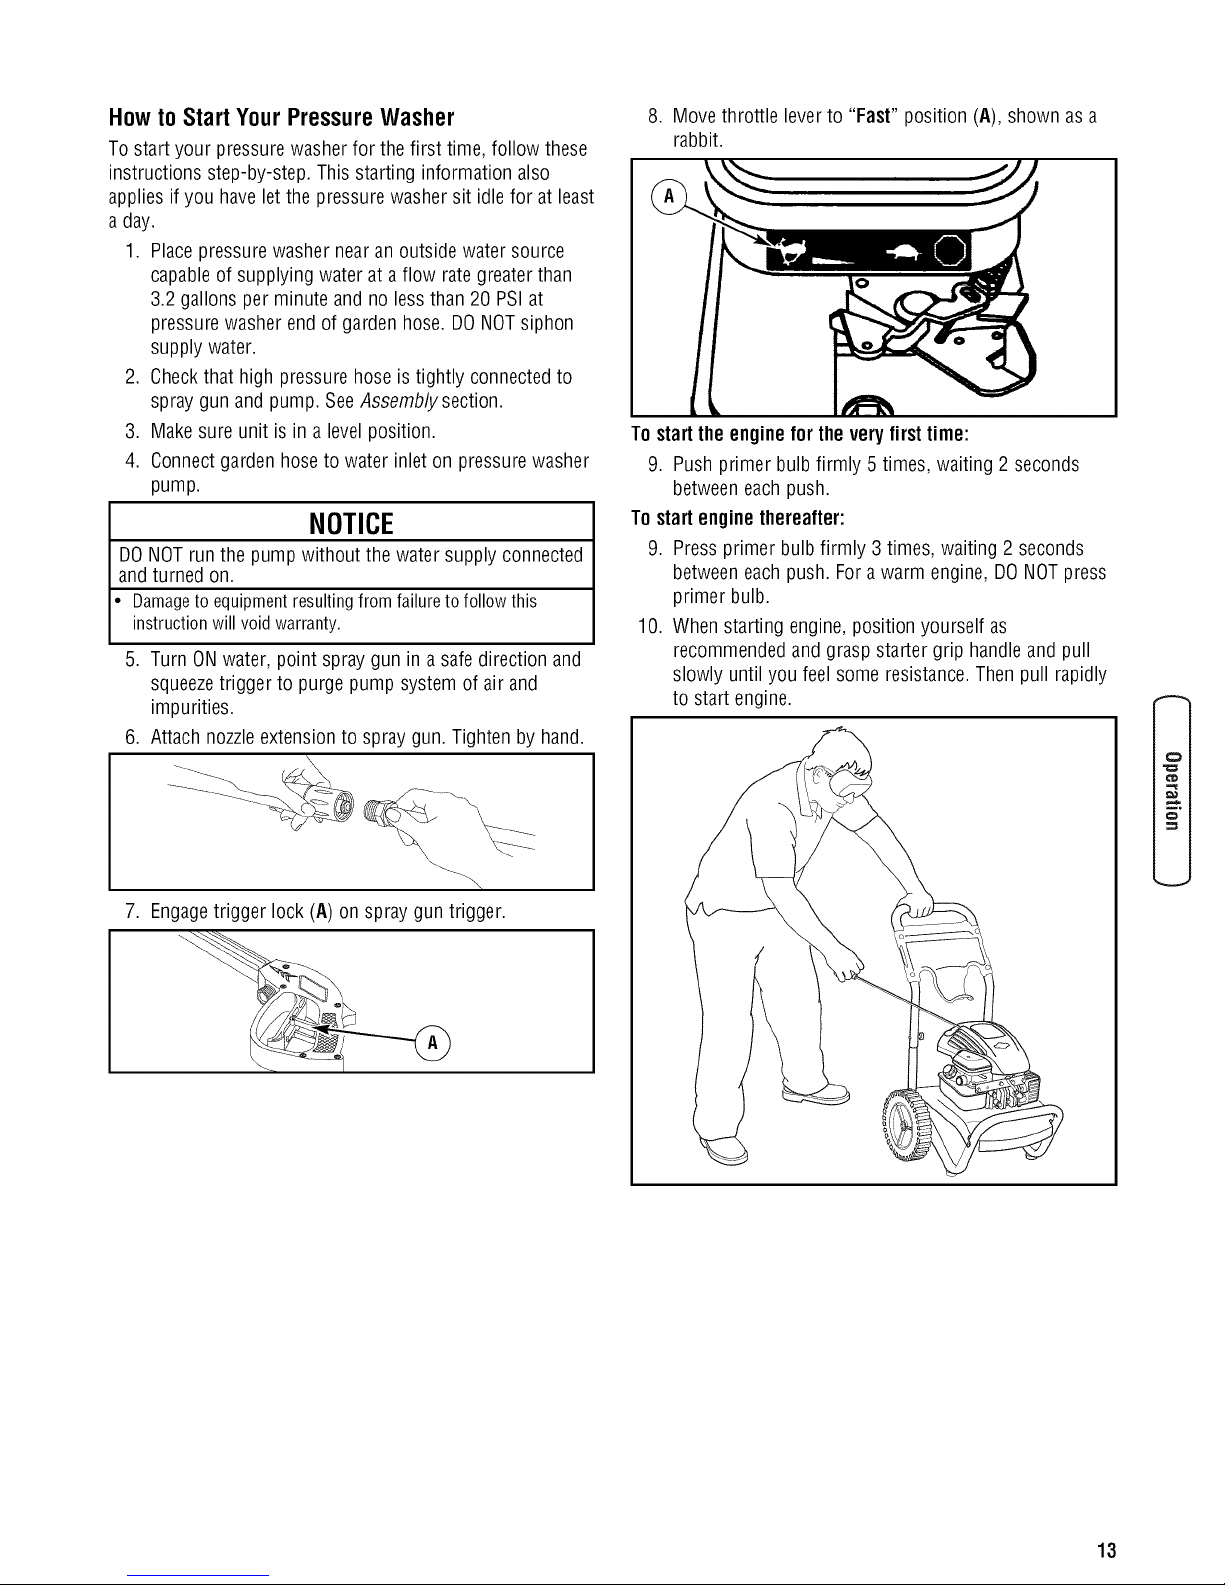
How to Start Your Pressure Washer
To start your pressurewasher for the first time, follow these
instructions step-by-step. This starting information also
applies if you havelet the pressure washersit idlefor at least
a day.
1. Placepressure washernear anoutside watersource
capableof supplying water at aflow rate greater than
3.2 gallons per minute andno less than 20 PSI at
pressure washer end of garden hose. DONOTsiphon
supply water.
2. Checkthat high pressurehoseis tightly connectedto
spray gun and pump. SeeAssembly section.
3. Makesure unit is in a level position.
4. Connectgarden hoseto water inlet on pressurewasher
pump.
NOTICE
DONOTrun the pump without the watersupply connected
and turned on.
: failuretofollowthis
instructionwillvoidwarranty.
5. Turn ONwater, point spray gun in a safe direction and
squeezetrigger to purge pump system of air and
impurities.
6. Attach nozzleextension to spray gun. Tighten by hand.
8. Move throttle lever to "Fast" position (A), shown as a
rabbit.
To startthe engine forthe veryfirst time:
9. Push primer bulbfirmly 5 times, waiting 2 seconds
between each push.
To start enginethereafter:
9. Press primer bulb firmly 3 times, waiting 2 seconds
between each push. Fora warm engine, DONOTpress
primer bulb.
10. Whenstarting engine, position yourself as
recommendedand grasp starter grip handleand pull
slowly until you feel some resistance.Then pull rapidly
to start engine.
,
Engagetrigger lock (A) on spray gun trigger.
o
13
WARNING
Starter cord kickback (rapid retraction) can result
_nbodily injury. Kickback will pull hand and arm
toward engine faster than you can let go.
Broken bones, fractures, bruises, or sprains
could result.
• NEVERpull starter cord without first relievingspray gun
pressure.
• When starting engine, pull cord slowly until resistanceisfelt and
then pull rapidly to avoid kickback.
• After eachstarting attempt, where enginefails to run, always
point spray gun in safe direction and squeezespray guntrigger
to releasehigh pressure. Engagespraygun trigger lock.
• Firmly grasp spray gun with both hands when using high
pressure spray to avoid injury when spraygun kicks back.
11. Return starter grip handleslowly. DO NOTlet rope
"snap back" againststarter.
NOTE:Always keepthe throttle leverin the "Fast" position
when operating the pressurewasher.
WARNING
The high pressure stream of water that this
equipment produces can cut through skin and its
WARNING
Contactwith muffler areacan result inserious
burns.
._ Exhaustheat/gases can ignite combustibles,
Howto StopYourPressureWasher
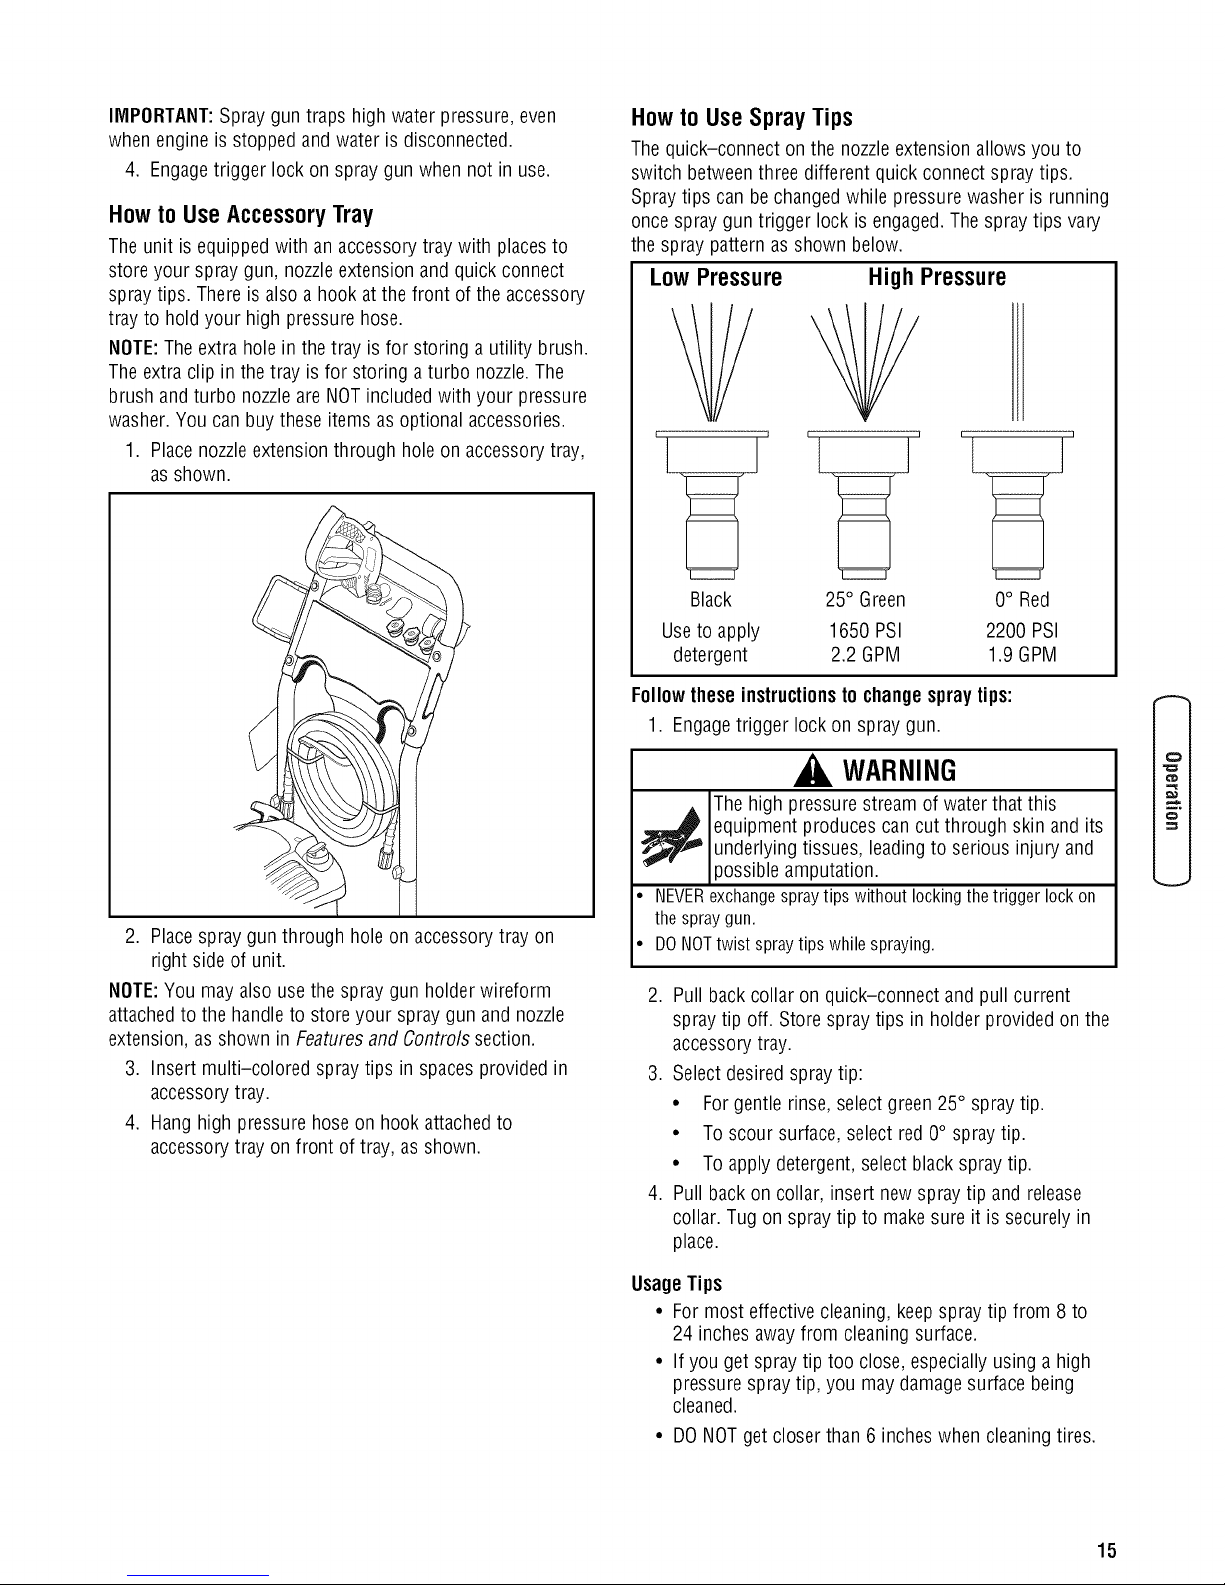
1. Release spray gun trigger and let engine idle for two
2. Move throttle to SLOW position, then STOP position (A).
structures or damagefuel tank causing a fire.
DO NOTtouch hotparts andAVOID hotexhaust gases.
Allow equipment to cool beforetouching.
Keepat least5 feet (1.5 m) of clearanceon all sidesof pressure
washer including overhead.
Code of FederalRegulation (CFR)Title 36 Parks, Forests,and
Public Property require equipment powered by an internal
combustion engineto have a spark arrester, maintained in
effective working order, complying to USDAForest service
standard 5100-1C or later revision. Inthe State of California a
spark arrester is required under section 4442 of the California
Public resources code. Otherstates may havesimilar laws.
minutes.
_ nderlying tissues, leading to serious injury and
o
• DONOTallow CHILDRENto operatepressure washer.
• Keep high pressurehoseconnectedto pumpand spray gun
while system is pressurized.
• NEVERaim spray gun at people,animals, or plants.
• DO NOTsecure spray gun in open position.
• DO NOTleavespray gun unattendedwhile machineis running.
• NEVERuse a spray gun which doesnot haveatrigger lock or
trigger guardin place andin working order.
• Always becertain spray gun, nozzlesand accessoriesare
correctly attached.
)ossible amputation.
Spray gun traps high water pressure, even when
engine is stopped and water is disconnected,
which can cause injury.
3. ALWAYSpoint spray gun in a safedirection and
squeezespray gun trigger to release retained high
water pressure.
WARNING
Thehigh pressure stream of water that this
equipment produces cancut through skin and its
_ nderlying tissues, leading to serious injury and
)ossible amputation.
Spraygun traps high water pressure, evenwhen
engine is stopped and water is disconnected,
which can causeinjury.
• Keephighpressurehoseconnectedto pumpandspraygun
whilesystemispressurized.
• ALWAYSpointspraygunin safedirectionandsqueezespray
guntrigger,to releasehighpressure,everytimeyoustop
engine.Engagetriggerlockwhennotinuse.
14 www.troybilt.com
IMPORTANT:Spray gun traps high water pressure,even
when engine is stopped and water is disconnected.
4. Engagetrigger lock on spray gunwhen not in use.
Howto UseAccessoryTray
The unit is equippedwith an accessorytray with placesto
store your spray gun, nozzleextension and quick connect
spray tips. Thereis also a hook atthe front of the accessory
tray to hold your high pressurehose.
NOTE:The extra hole in the tray is for storing a utility brush.
Theextra clip in the tray is for storing a turbo nozzle.The
brush and turbo nozzleare NOTincluded with your pressure
washer.You can buy these items asoptional accessories.
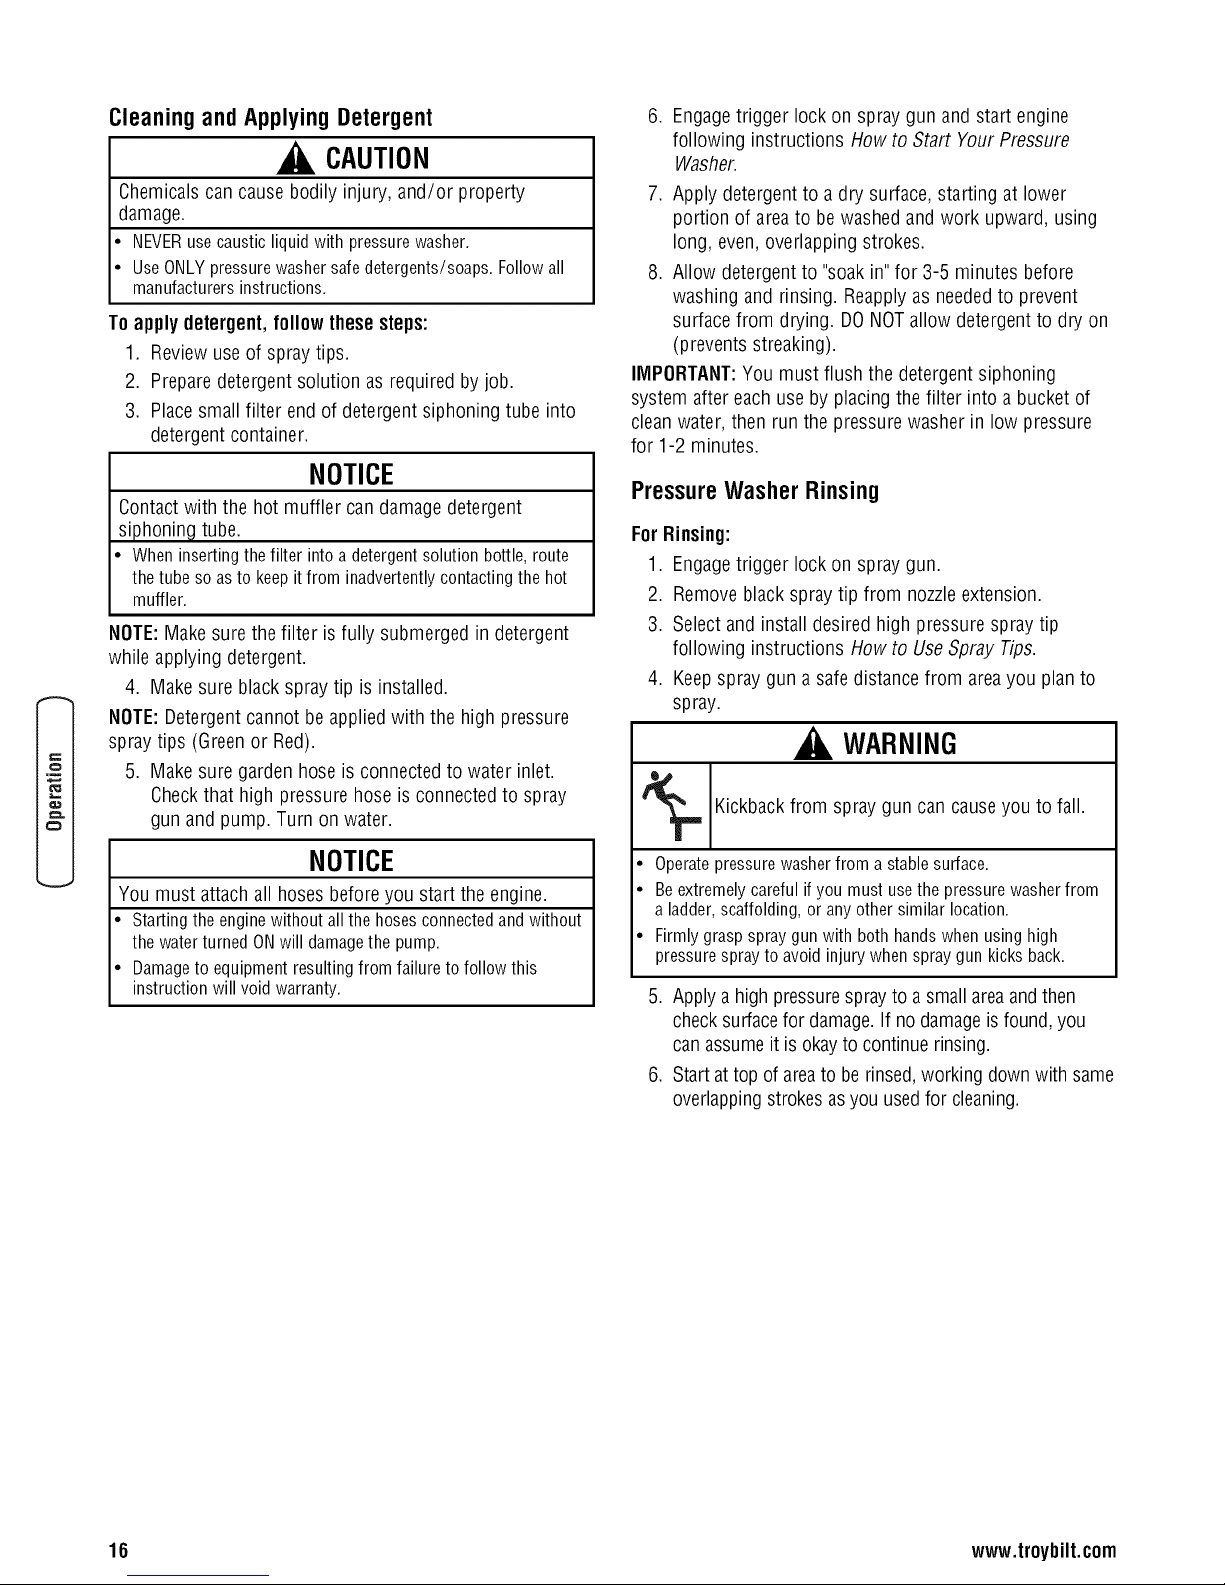
1. Placenozzleextensionthrough hole on accessorytray,
as shown.
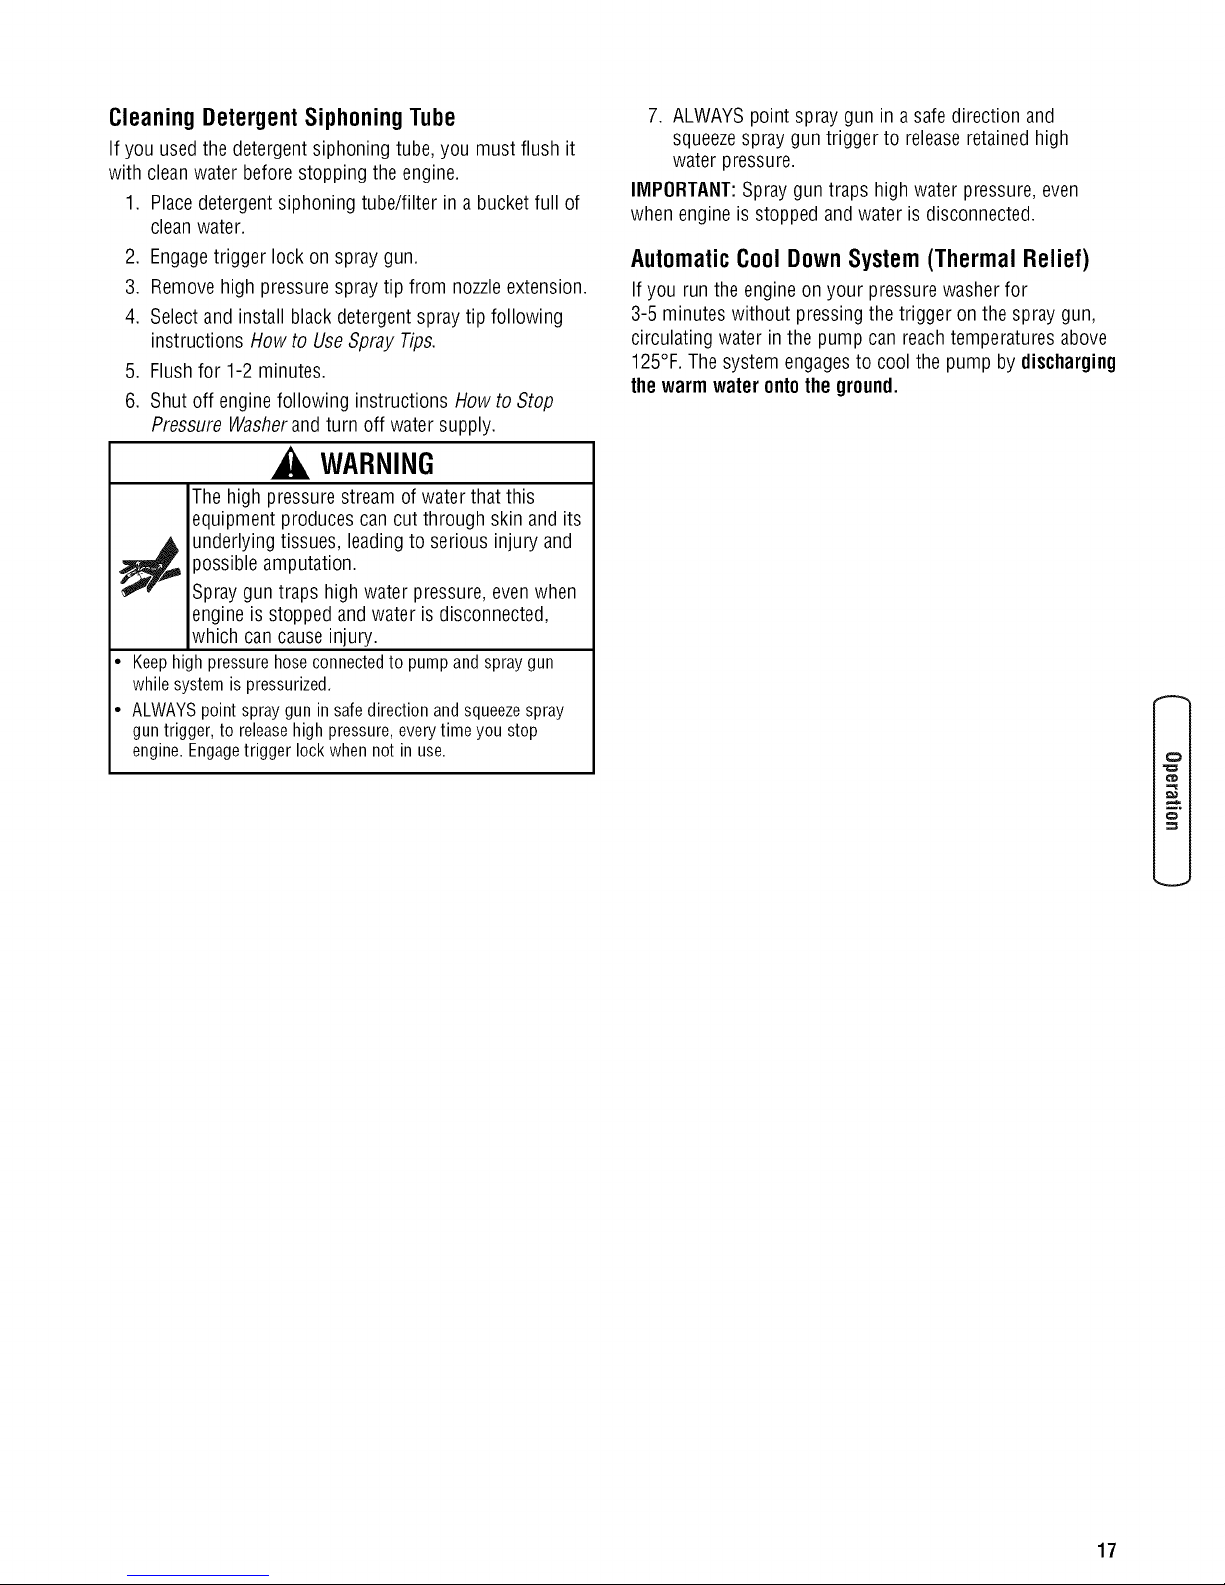
How to Use Spray Tips
Thequick-connect on the nozzleextensionallows you to
switch betweenthree different quick connect spray tips.
Spraytips can bechanged while pressure washer is running
once spray gun trigger lock is engaged.The spray tips vary
the spray pattern asshown below.
Low Pressure High Pressure
i i
2. Placespray gun through hole on accessorytray on
right side of unit.
NOTE:You may alsouse the spray gun holder wireform
attachedto the handleto storeyour spray gun and nozzle
extension, as shown in Featuresand Controls section.
3. Insert multi-colored spray tips in spaces provided in
accessorytray.
4. Hang high pressure hoseon hook attachedto
accessorytray on front of tray, as shown.
Black
25° Green 0° Red
Useto apply 1650 PSI 2200 PSI
detergent 2.2 GPM 1.9 GPM
Followtheseinstructionsto changespraytips:
1. Engagetrigger lock on spray gun.
WARNING
The high pressure stream of waterthat this
_ quipment produces can cut through skin and its
• NEVERexchangespraytipswithoutlockingthe triggerlockon
• DONOTtwistspraytipswhilespraying.
2. Pull back collar on quick-connect and pull current
3. Select desired spraytip:
4. Pull back on collar, insert newspray tip and release
underlying tissues, leadingto serious injury and
possible amputation.
thespraygun.
spray tip off. Store spray tips in holder provided on the
accessorytray.
• Forgentle rinse,select green 25° spraytip.
• To scour surface, select red0° spray tip.
• To apply detergent,select black spray tip.
collar. Tug on spray tip to make sure it is securely in
place.
o
UsageTips
• For most effective cleaning,keep spraytip from 8 to
24 inches awayfrom cleaning surface.
• If you get spray tip too close, especially using a high
pressure spray tip, you may damagesurface being
cleaned.
• DONOTget closer than 6 inches when cleaning tires.
15
CleaningandApplyingDetergent
CAUTION
Chemicalscan cause bodily injury, and/or property
damage.
• NEVERusecausticliquidwith pressurewasher.
• UseONLYpressurewashersafedetergents/soaps.Followall
manufacturersinstructions.
To applydetergent,follow thesesteps:
1. Reviewuse of spray tips.
2. Preparedetergent solution as required by job.
3. Placesmall filter end of detergent siphoning tube into
detergent container.
6. Engagetrigger lock on spray gun and start engine
following instructions How to Start YourPressure
Washer.
7. Apply detergentto a dry surface,starting at lower
portion of areato be washedand work upward, using
long, even,overlapping strokes.
8. Allow detergentto "soak in"for 3-5 minutes before
washing and rinsing. Reapplyas neededto prevent
surfacefrom drying. DO NOTallow detergentto dry on
(prevents streaking).
IMPORTANT:You must flush the detergent siphoning
system after each use by placingthe filter into a bucket of
cleanwater, then runthe pressure washer in low pressure
for 1-2 minutes.
NOTICE
Contact with the hot muffler can damage detergent
siphoning tube.
• Wheninsertingthefilter intoadetergentsolutionbottle,route
thetubesoasto keepitfrom inadvertentlycontactingthehot
muffler.
NOTE:Make surethe filter is fully submerged in detergent
while applying detergent.
4. Makesure black spraytip is installed.
NOTE:Detergent cannot be appliedwith the high pressure
spray tips (Greenor Red).
5. Makesure garden hose is connectedto water inlet.
Checkthat high pressure hoseis connectedto spray
C_
gun and pump. Turn on water.
PressureWasherRinsing
ForRinsing:
1. Engagetrigger lock on spray gun.
2. Removeblack spraytip from nozzleextension.
3. Select and install desired high pressurespray tip
following instructions How to UseSpray Tips.
4. Keepspray gun a safedistance from areayou planto
spray.
WARNING
_r= Kickback spray gun can cause you to
from fall.
NOTICE
You must attach all hosesbeforeyou start the engine.
• Startingtheenginewithoutall thehosesconnectedandwithout
thewaterturnedONwill damagethe pump.
• Damageto equipmentresultingfromfailuretofollowthis
instructionwillvoidwarranty.
• Operatepressure washerfrom a stable surface.
• Beextremely careful if you must use the pressurewasher from
a ladder,scaffolding, or anyother similar location.
• Firmly grasp spray gun with both hands when usinghigh
pressure spray to avoid injury when spraygun kicks back.
5. Applya highpressuresprayto asmall areaandthen
checksurfacefor damage.If no damageis found,you
canassumeit is okayto continue rinsing.
6. Start at top of areato be rinsed,working down with same
overlappingstrokes asyou usedfor cleaning.
16 www.troybilt.com
CleaningDetergentSiphoningTube
If you usedthe detergent siphoning tube, you must flush it
with clean water before stopping the engine.
1. Placedetergent siphoning tube/filter in a bucket full of
cleanwater.
2. Engagetrigger lock on spray gun.
3. Removehigh pressurespray tip from nozzleextension.
4. Selectand install black detergentspray tip following
instructions How to Use Spray Tips.
5. Flushfor 1-2 minutes.
6. Shut off engine following instructions How to Stop
Pressure Washerand turn off watersupply.
WARNING
Thehigh pressure stream of water that this
equipment produces cancut through skin and its
7. ALWAYSpoint spray gun in a safedirection and
squeezespray gun trigger to release retained high
water pressure.
IMPORTANT:Spraygun traps high water pressure, even
when engine is stopped andwater is disconnected.
AutomaticCoolDownSystem (ThermalRelief)
If you run the engineon your pressure washer for
3-5 minutes without pressing the trigger on the spray gun,
circulating water in the pump can reachtemperatures above
125°F.The system engagesto cool the pump by discharging
the warm water ontothe ground.
_ nderlying tissues, leadingto serious injury and
)ossible amputation.
Spraygun traps highwater pressure, evenwhen
engine is stopped and water is disconnected,
which can cause injury.
• Keephighpressurehoseconnectedto pumpandspraygun
whilesystemis pressurized.
• ALWAYSpointspraygunin safedirectionandsqueezespray
guntrigger,to releasehighpressure,everytimeyoustop
engine.Engagetriggerlockwhennot inuse.
('D
0
.,..e
17
Maintenance
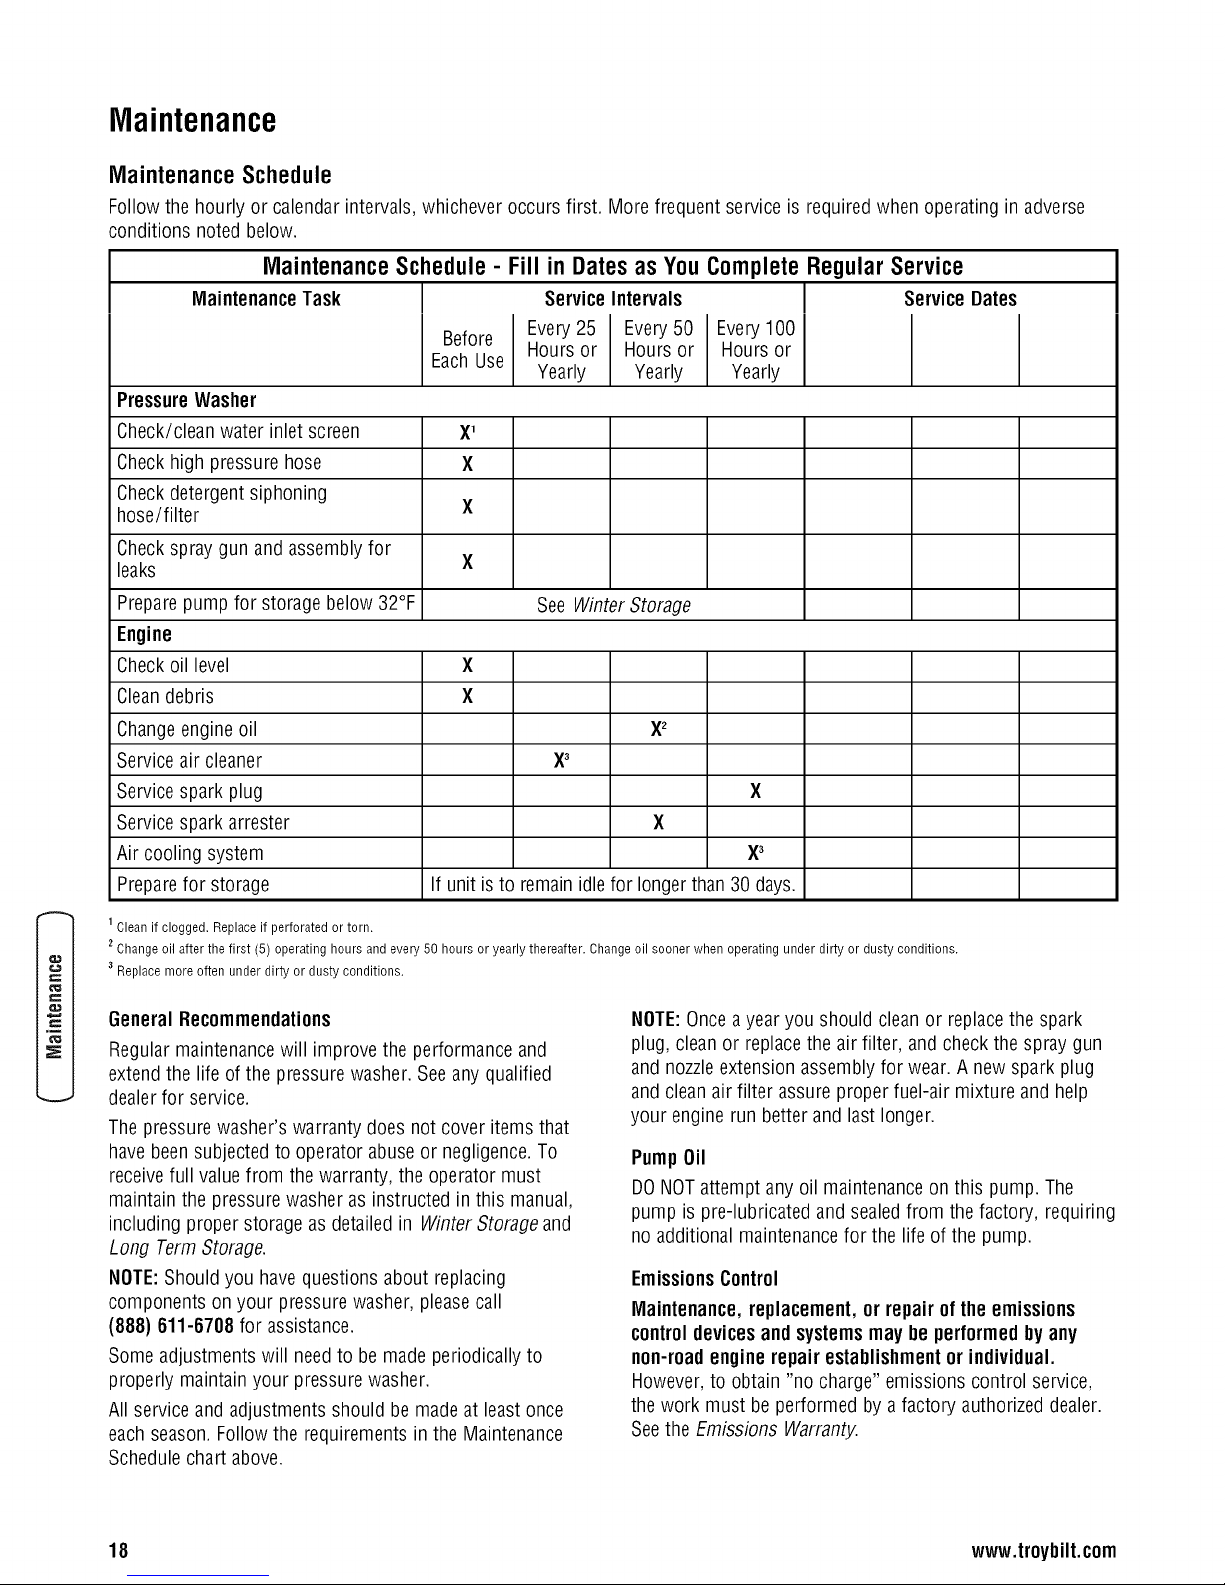
MaintenanceSchedule
Follow the hourly or calendarintervals, whichever occurs first. More frequent service is required when operating inadverse
conditions noted below.
MaintenanceSchedule- Fill in DatesasYouCompleteRegularService
MaintenanceTask ServiceIntervals Service Dates
Before Hours or Hours or Hours or
EachUse Yearly Yearly Yearly
Pressure Washer
Check/clean water inlet screen X'
Checkhigh pressure hose X
Checkdetergent siphoning
hose/filter X
Checkspray gun and assembly for
leaks X
Preparepump for storage below 32°F See WinterStorage
Engine
Checkoil level X
Cleandebris X
Every25 Every50 Every100
Changeengine oil X2
Service air cleaner X3
Service spark plug X
Service spark arrester X
Air cooling system X3
Preparefor storage If unit is to remainidle for longer than 30 days.
1Clean if clogged. Replace if perforated ortorn.
2Change oil after the first (5) operating hours and every 50 hours or yearly thereafter. Change oil sooner when operating under dirty or dusty conditions.
3Replace more often under dirty or dusty conditions.
€
GeneralRecommendations
Regular maintenancewill improve the performance and
extend the life of the pressure washer.See anyqualified
dealerfor service.
The pressurewasher's warranty does not cover items that
havebeen subjectedto operator abuseor negligence.To
receivefull valuefrom the warranty, the operator must
maintain the pressure washeras instructed inthis manual,
including proper storage as detailedin Winter Storageand
Long TermStorage.
NOTE:Should you havequestions about replacing
components on your pressurewasher, pleasecall
(888) 611-6708 for assistance.
Someadjustments will needto be made periodically to
properly maintainyour pressure washer.
All service and adjustments should bemadeat least once
eachseason.Follow the requirements in the Maintenance
NOTE:Once ayear you should cleanor replacethe spark
plug, clean or replacethe air filter, and checkthe spray gun
and nozzleextension assembly for wear. A new spark plug
and clean air filter assure properfuel-air mixture andhelp
your enginerun betterand last longer.
PumpOil
DONOTattempt any oil maintenanceon this pump. The
pump is pre-lubricated and sealedfrom the factory, requiring
no additional maintenancefor the life of the pump.
EmissionsControl
Maintenance, replacement, orrepair of theemissions
controldevicesand systemsmay beperformedby any
non-roadengine repair establishmentor individual.
However,to obtain "no charge" emissions control service,
the work must be performed by a factory authorizeddealer.
Seethe Emissions Warranty.
Schedulechart above.
18 www.troybilt.com
 Loading...