

Page 1

OVERLAY THICKNESS SELECTION
Measurement layer thicknesses from 1 to 4 inches (2.5 to 10.2
cm) may be selected. Press 〈THICK〉. The gauge displays:
Layer Thickness:
x.xx in.
Input and
Press ENTER
Enter the desired layer thickness and press 〈START/ENTER〉.
AVERAGE
Up to twelve readings may be averaged by the gauge. Press
〈SHIFT〉 and 〈AVERAGE〉 to display:
No. of readings
to average: xx
Do you want
to change?
To change the number of readings to average, press 〈YES〉.
Enter the desired number and press 〈START/ENTER〉.
STORAGE FUNCTION
Test measurement can be stored in the gauge memory under the
active project number. To enter or select a project number,
press 〈SHIFT〉 and 〈PROJECT〉. The gauge displays:
Current Project:
xxxxxxx
Do you want a
new Project #?
To accept the displayed project number, press 〈NO〉. To enter a
different project number, press 〈YES〉 and input a new project
number (up to 12 digits).
To store a measurement, press 〈STORE〉. Enter a station
number when prompted. Enter the distance from the centerline
when prompted, and enter whether the location is left or right
of the centerline.
If desired, additional information may be entered under the
station number (up to 12 characters). To store additional
information, press 〈YES〉.
5 6 1
OFFSET FUNCTION
To take measurements that are outside the calibration range of
the gauge, an Offset must be entered. The gauge applies the
offset to all measurements until the offset is disabled.
For site calibration, refer to Chapter 5 of the Manual for
Operation and Instruction.
Press 〈SHIFT〉 and 〈OFFSET〉. To enable or change the
density offset, press 〈1〉. When the current offset value is
displayed, press 〈YES〉 to change the value.
Press 〈1〉 to enter an offset value using the gauge keypad or 〈2〉
to select a value previously stored in the gauge memory.
Follow the gauge prompts to enter or select the offset value.
TESTING AND MEASUREMENT
NOTE
The following brief description applies only to single
readings. To take multiple readings and averages,
refer to the Model 4640-B Manual of Operation and
Instruction.
Place the gauge over the test site. Release the gauge handle and
push it down until the handle is resting on the stop pin.
Press 〈START/ENTER〉. The gauge displays:
MA: xxxxx PCF
Thick: xxx in.
Avg: xx
Time: xx secs.
After the count time has elapsed, the gauge displays:
Dens: x.x PCF
%MA: x.xx%
100-%MA: xx.xx%
%VOID: x.xx
To store this reading, press 〈STORE〉 (see Storage Function).
After taking readings, lift the gauge from the test site by the
source rod handle. This returns the source rod to the SAFE
position. When not taking readings, always keep the source rod
in the SAFE position.
Model 4640-B
Thin-Layer
Density Gauge
QUICK
REFERENCE
Troxler Electronic Laboratories, Inc.
P.O. Box 12057 • 3008 Cornwallis Road
Research Triangle Park, NC 27709
Phone: (919) 549-8661 • Fax: (919) 549-0761
www.troxlerlabs.com
PN 105176
September 2002
Edition 3.0
CARD
Page 2
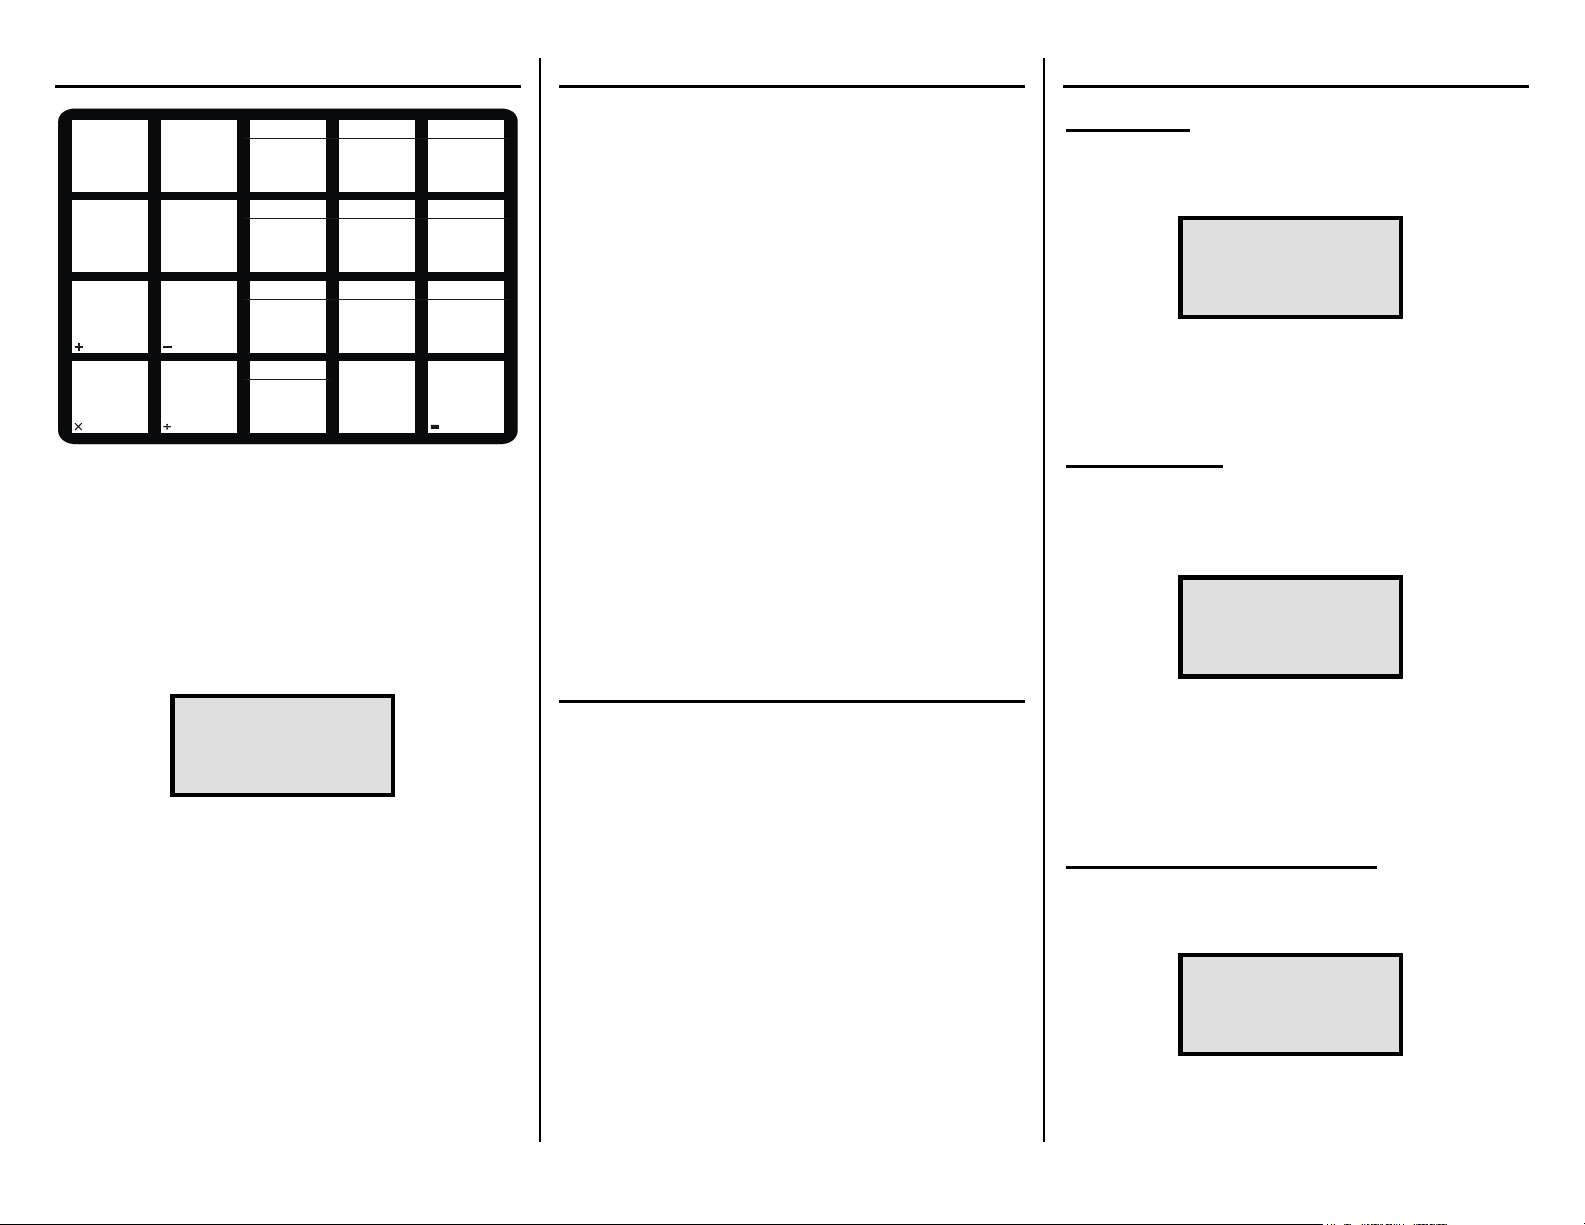
GAUGE START UP
STATUS
YES
EXIT
STORE
MS
MA/
VOIDLESS
SHIFT
The operator should wear a dosimeter or radiation
badge when working with the 4640-B Thin-Layer
Density Gauge.
Press 〈ON〉. The gauge performs an LCD test and a 300-second
self-test. Following the self-test, the gauge enters the Ready
mode. The display is:
NO/CE
C/CE
THICK
MR
TIME
STD
Model 4640-B Keypad
789
PROJECT
4
SP. CAL.
12
RECALL
0
NOTE
<READY> mm/dd/yy
Avg: xx
Time: xx mins.
BATT LIFE xx Hrs
The first line of the display alternates between the current time
and date. The second line indicates any gauge options that are
enabled, such as Average Mode. The third line indicates the
enabled count time. The last line indicates the remaining
battery life.
AVERAGE SPECIAL
PRINT ERASE
OFFSET
5
6
CALC.
3
START/
.
ENTER
THE STANDARD COUNT
To compensate for the source decay and naturally occuring
background radiation, and to check proper operation of the
gauge, take a standard count daily. Use the magnesium (Mg)
reference block and air gap spacer for this operation.
Place the reference block on a dry, flat surface of asphalt or
compacted soil with a density of at least 100 pcf (1600 kg/m3).
The location should be at least 3 m (10 ft) from any building or
vertical structure and 10 m (33 ft) from any other nuclear gauge
or radioactive source.
Place the air gap spacer on the reference block and then place
the gauge on the spacer. Ensure that the source rod is in the
SAFE position. The handle end of the gauge should rest over
the two posts on the spacer.
Press 〈STD〉. The gauge displays the last standard count. To
take a new standard count, press 〈YES〉. Check the gauge
position, then press 〈START/ENTER〉 to begin the standard
count.
After taking the standard count, the gauge displays the results
and beeps. Record the count in the standard count log and press
〈YES〉 to accept the count. The gauge returns to the Ready
mode.
SITE PREPARATION
The 4640-B gauge is designed for use on asphalt surfaces and
does not require a great deal of surface preparation.
NOTE
Keep the gauge turned parallel to the direction of the
paver and rollers.
Find a smooth, level location on the asphalt. Remove any loose
material (sand, aggregate, and so on) from the site. Ensure that
the gauge does not “rock.” It must remain level and steady. If
the gauge rocks, find a more suitable test site. If taking a
measurement around a core, the gauge may be moved a few
inches away from the hole to level the gauge.
GAUGE SETUP
COUNT TIME
To view the current count time (length of measurement), press
〈TIME〉.
- Count Time xx min.
Do you want
to change ?
To change the count time, press 〈YES〉. Use the numeric keys
to select the desired count time. The gauge returns to the Ready
mode.
DATE AND TIME
To access the current date and time settings, press 〈SHIFT〉 and
〈SPECIAL〉. Press 〈1〉, 〈0〉, and 〈START/ENTER〉. Enter the
access code and press 〈START/ENTER〉 .The gauge displays:
Date: mm/dd/yy
Do you want to
change Date?
To change the date and/or time, press 〈YES〉. Note that both the
date and time must include leading zeroes. For example
September 9, 2002 must be entered as “090902” and 9:05 must
be entered as “0905.” Enter the new date and, when prompted,
the new time.
MARSHALL/VOIDLESS DENSITY
To select a Marshall or voidless density value, press
〈MA/VOIDLESS〉. The gauge displays:
MA: xxxxx PCF
VD: xxxxx PCF
Do you want
to change?
To change a value, press 〈YES〉. The values should be a result
of laboratory samples or a predetermined specification. To
correct any input errors or abort the change, press 〈CE〉.
2 3 4
 Loading...