

Page 1
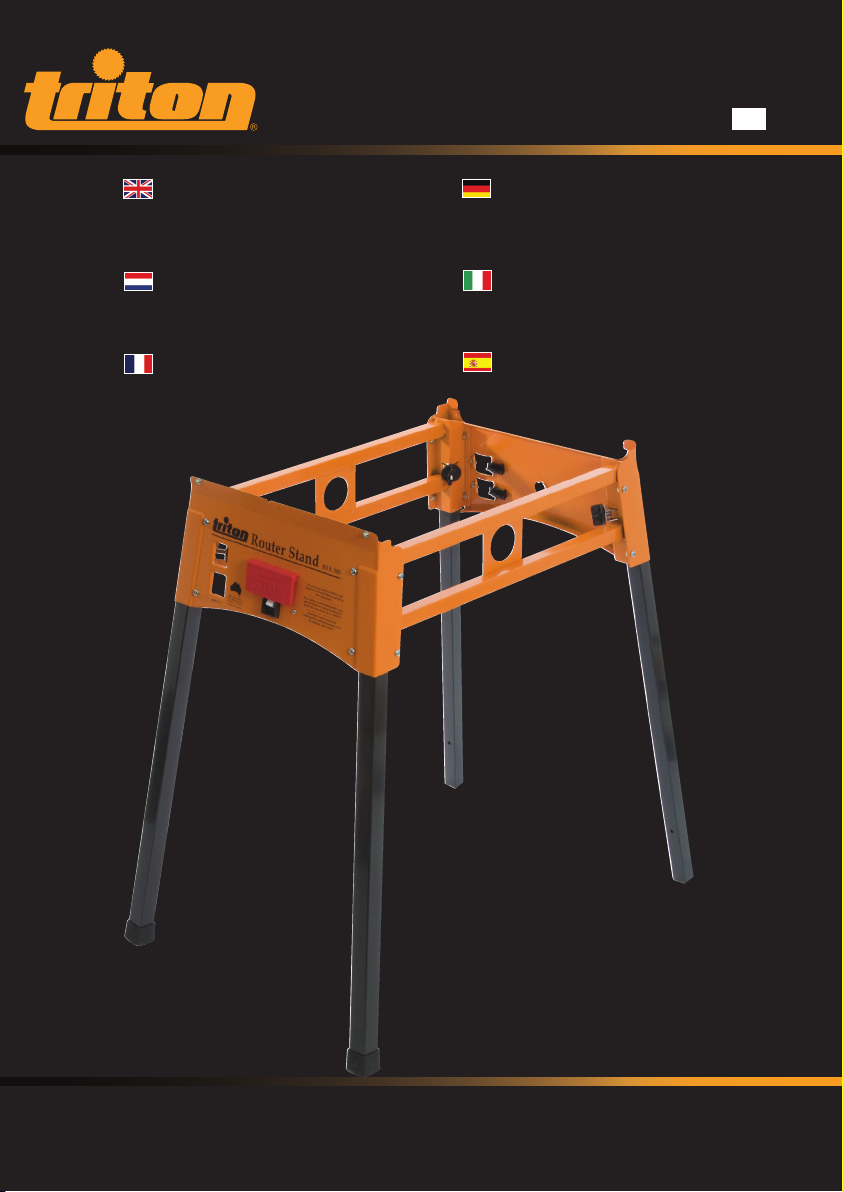
Router Stand
RSA 300
Operating and
Safety Instructions
Bedienings- en veiligheidsvoorschriften
Instructions d’utilisation et
consignes de sécurité
Gebrauchs- und
Sicherheitsanweisung
Istruzioni per l'uso e la
sicurezza
Instrucciones de funcionamiento
y seguridad
www.tritontools.com
Page 2
Thank you for purchasing this Triton tool. Please read these instructions: they contain information necessary for safe and
effective operation of this product. This product has a number of unique features and, even if you are familiar with similar
products, reading the instructions will help you get the full benefit of its unique design. Keep these instructions close to hand
and ensure all users of this tool have read and fully understand them.
CONTENTS
Symbols 2
Warranty 2
Parts List 3
Safety 4
Assembly 5
SYMBOLS
Always wear ear, eye and respiratory
protection.
GB
WARNING. To reduce the risk of injury, user
must read instruction manual.
Instruction warning.
WARRANTY
To register your guarantee visit our web site at
www.tritontools.com* and enter your details.
Your details will be included on our mailing list (unless
indicated otherwise) for information on future releases.
Details provided will not be made available to any third party.
PURCHASE RECORD
Date of Purchase: ___ / ___ / ____
Model: RSA300
Serial Number: __________________
Retain your receipt as proof of purchase
Contents / Symbols / Warranty
Triton Precision Power Tools guarantees to the
purchaser of this product that if any part proves to
be defective due to faulty materials or workmanship
within 12 MONTHS from the date of original
purchase, Triton will repair, or at its discretion
replace, the faulty part free of charge.
This guarantee does not apply to commercial use
nor does it extend to normal wear and tear or
damage as a result of accident, abuse or misuse.
* Register online within 30 days.
Terms & conditions apply.
This does not affect your statutory rights
Page 3
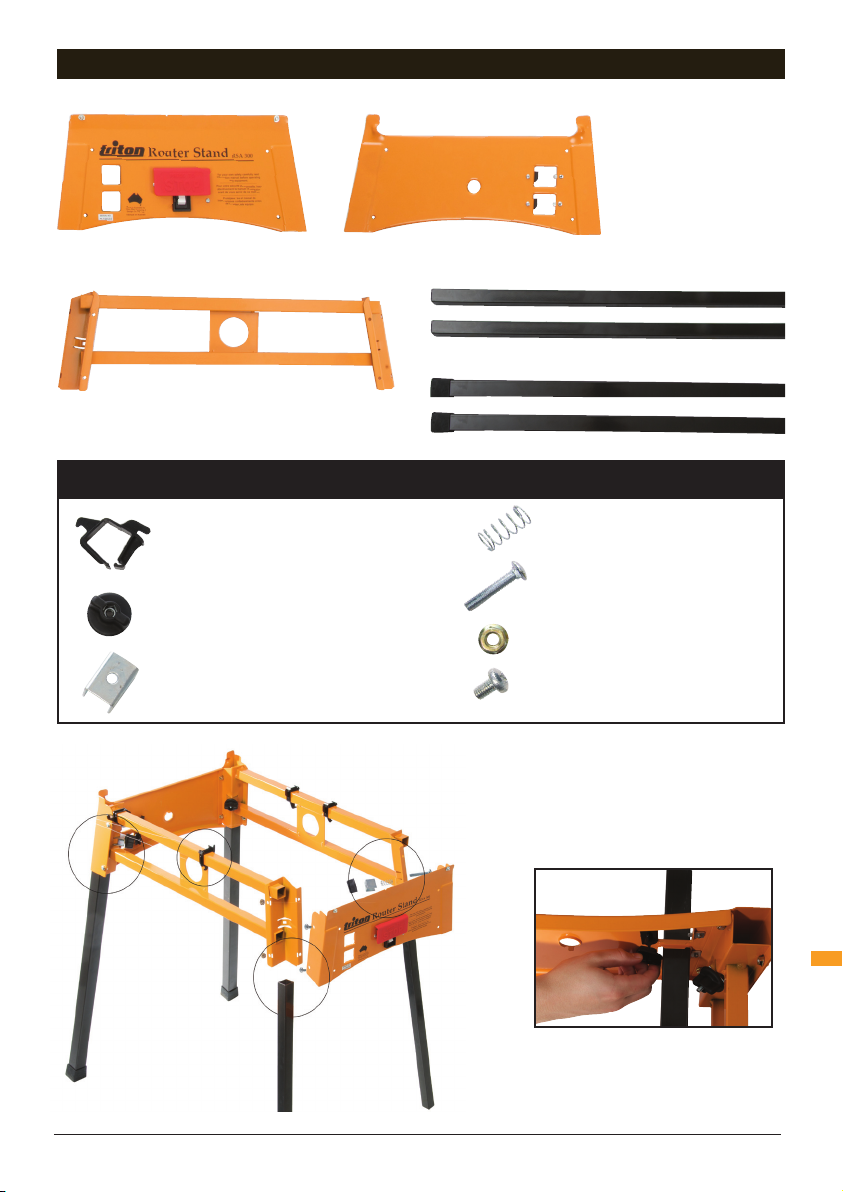
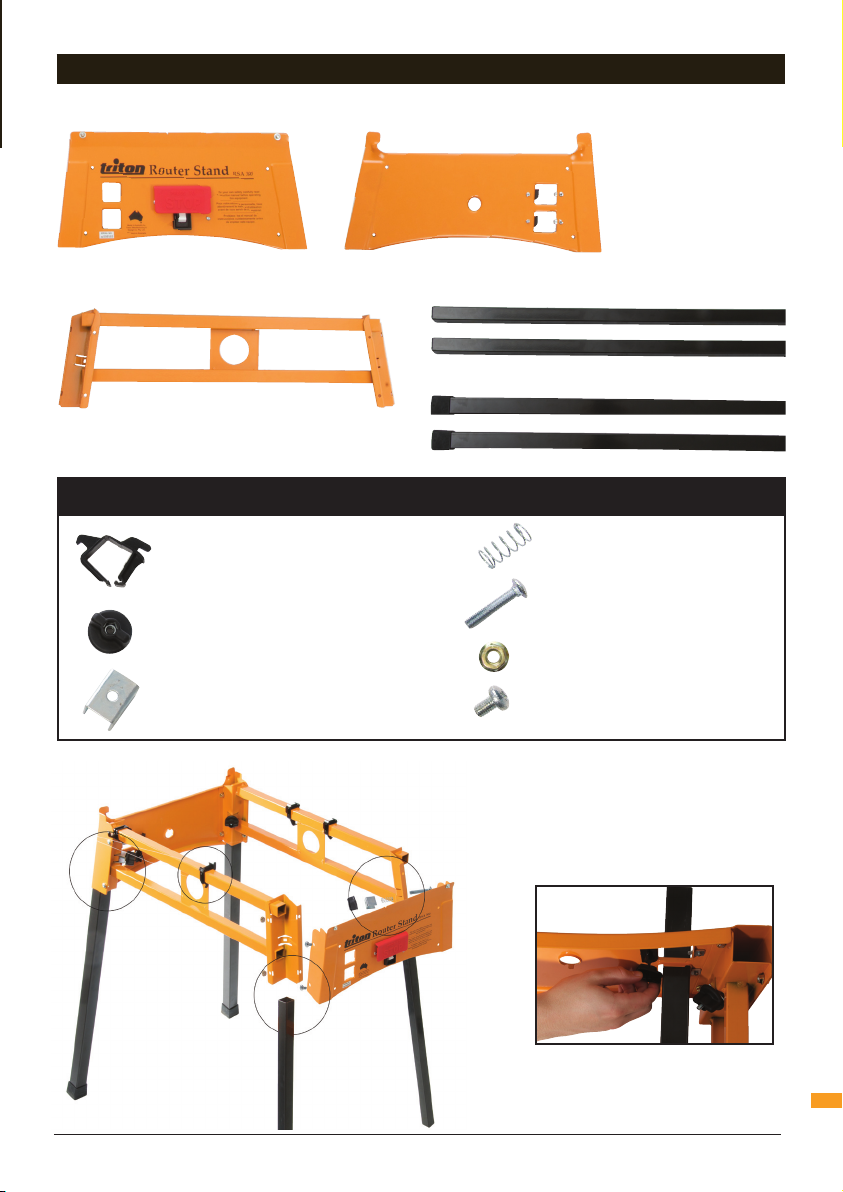
PARTS LIST
A. Front End Panel (1)
B. Rear End Panel (1)
E. Side Frame (2)
Fig.1
Step 2
F. Mounting Plate Locator (4)
G. Round Knob (4)
H. Leg Clamp (4)
C. Front Legs (packed inside rear legs) (2)
D. Rear Legs (2)
FASTENER BAG
Step 1
I. Leg Clamp Spring (4)
J. Coach Bolt (4)
K. Flange Nuts (16)
L. Phillips Head Screw (16)
Fig.2
Step 4
Step 3
Parts List
GB
3
Page 4

SAFETY INSTRUCTIONS
WARNING Read all safety warnings and all
instructions. Failure to follow the warnings and
instructions may result in electric shock, fire and/
or serious injury.
Save all warnings and instructions for future
reference.
The term "power tool" in the warnings refers to your
mains-operated (corded) power tool or batteryoperated (cordless) power tool.
1) Work area safety
a) Keep work area clean and well lit. Cluttered or dark
areas invite accidents.
b) Do not operate power tools in explosive
atmospheres, such as in the presence of
flammable liquids, gases or dust. Power tools
create sparks which may ignite the dust or fumes.
c) Keep children and bystanders away while
operating a power tool. Distractions can cause you
to lose control.
2) Electrical safety
a) Power tool plugs must match the outlet. Never
modify the plug in any way. Do not use any
adapter plugs with earthed (grounded) power
tools. Unmodified plugs and matching outlets will
reduce risk of electric shock.
b) Avoid body contact with earthed or grounded
surfaces, such as pipes, radiators, ranges and
refrigerators. There is an increased risk of electric
shock if your body is earthed or grounded.
c) Do not expose power tools to rain or wet
conditions. Water entering a power tool will increase
the risk of electric shock.
d) Do not abuse the cord. Never use the cord for
carrying, pulling or unplugging the power tool.
Keep cord away from heat, oil, sharp edges or
moving parts. Damaged or entangled cords increase
the risk of electric shock.
e) When operating a power tool outdoors, use an
extension cord suitable for outdoor use. Use of
a cord suitable for outdoor use reduces the risk of
electric shock.
f) If operating a power tool in a damp location is
unavoidable, use a residual current device (RCD)
GB
protected supply. Use of an RCD reduces the risk of
electric shock.
NOTE: The term “residual current device (RCD)”
may be replaced by the term “ground fault circuit
interrupter (GFCI)” or “earth leakage circuit breaker
(ELCB)”.
3) Personal safety
a) Stay alert, watch what you are doing and use
common sense when operating a power tool. Do
not use a power tool while you are tired or under
the influence of drugs, alcohol or medication. A
moment of inattention while operating power tools
may result in serious personal injury.
b) Use personal protective equipment. Always wear
eye protection. Protective equipment such as dust
mask, non-skid safety shoes, hard hat, or hearing
protection used for appropriate conditions will reduce
personal injuries.
c) Prevent unintentional starting. Ensure the switch
is in the off-position before connecting to power
source and/or battery pack, picking up or carrying
the tool. Carrying power tools with your finger on the
switch or energising power tools that have the switch
on invites accidents.
d) Remove any adjusting key or wrench before
turning the power tool on. A wrench or a key left
attached to a rotating part of the power tool may result
in personal injury.
e) Do not overreach. Keep proper footing and balance
at all times. This enables better control of the power
tool in unexpected situations.
f) Dress properly. Do not wear loose clothing or
jewellery. Keep your hair, clothing and gloves
away from moving parts. Loose clothes, jewellery or
long hair can be caught in moving parts.
g) If devices are provided for the connection of dust
extraction and collection facilities, ensure these
are connected and properly used. Use of dust
collection can reduce dust-related hazards.
4) Power tool use and care
a) Do not force the power tool. Use the correct power
tool for your application. The correct power tool will
do the job better and safer at the rate for which it was
designed.
b) Do not use the power tool if the switch does not
turn it on and off. Any power tool that cannot be
controlled with the switch is dangerous and must be
repaired.
c) Disconnect the plug from the power source and/
or the battery pack from the power tool before
making any adjustments, changing accessories,
or storing power tools. Such preventive safety
measures reduce the risk of starting the power tool
accidentally.
d) Store idle power tools out of the reach of children
and do not allow persons unfamiliar with the
power tool or these instructions to operate the
power tool.Power tools are dangerous in the hands of
untrained users.
4
Safety Instructions
Page 5

e) Maintain power tools. Check for misalignment or
binding of moving parts, breakage of parts and
any other condition that may affect the power
tool’s operation. If damaged, have the power tool
repaired before use. Many accidents are caused by
poorly maintained power tools.
f) Keep cutting tools sharp and clean. Properly
maintained cutting tools with sharp cutting edges are
less likely to bind and are easier to control.
ASSEMBLY
Step 1
Fit 2 Leg Clamps (H) to each Side Frame (E) using
the Coach Bolts (J), Leg Clamp Springs (I) and Round
Knobs (G). Ensure the feet of the leg clamps fit into the
slots on the side frame end brackets. Screw on the
knobs, just a few turns only. (FIG. 1)
Step 2
Attach the side frames to the front and rear end
panels (A & B) using the Phillips Head Screws (L) and
Flange Nuts (K), as shown. Do not tighten yet. Once all
fasteners are in position, place the unit on a flat work
surface and tighten firmly with a screwdriver
Step 3
Turn the unit upside down. Remove the Front Legs (C)
from their storage position inside the Rear Legs (D).
Insert the rear legs (with rubber feet) fully into their
sockets at the rear of the unit. Insert the front legs
fully into the front sockets. The location of the holes in
each leg is not important at this stage. Lock them by
tightening the round knobs.
Turn the router stand right way up and test that all feet
sit level on the ground. If on an uneven surface make
any necessary adjustments by extending one of the
legs slightly from its socket to prevent the unit from
rocking.
Storing the legs
The legs have a convenient onboard storage location.
Loosen the round knobs and remove the legs from
their sockets. Slide the front legs inside the rear legs,
ensuring that the holes in each tube line up. Insert the
legs through the cut-outs in the rear panel and into
the cut-outs in the front panel with their holes facing
outwards (FIG. 2). Engage the holes in the legs over the
tabs on the rear panel cut-outs and rotate the latches
to lock the legs in position.
g) Use the power tool, accessories and tool bits etc.
in accordance with these instructions, taking into
account the working conditions and the work to
be performed. Use of the power tool for operations
different from those intended could result in a
hazardous situation.
5) Service
a) Have your power tool serviced by a qualified repair
person using only identical replacement parts.
This will ensure that the safety of the power tool is
maintained.
GB
Safety Instructions / Assembly
5
Page 6
Hartelijk dank voor de aanschaf van dit Triton-gereedschap. Deze instructies bevatten informatie die u nodig hebt voor een
Dit product heeft een aantal unieke eigenschappen. Lees daarom deze handleiding altijd door, ook als u al bekend bent met
bandschuurmachine, zodat u alle voordelen van dit unieke ontwerp kunt benutten
Houd deze handleiding bij de hand en zorg ervoor dat alle gebruikers van dit gereedschap de handleiding hebben gelezen en
veilige en doeltreffende bediening van dit product.
volledig hebben begrepen.
INHOUD
Symbolen 6
Onderdelenlijst 6
Garantie 7
Veiligheid 8
Samenstelling 9
SYMBOLEN
Draag altijd gehoor-, oog- en
luchtwegenbescherming
WAARSCHUWING. Verminder het risico op
ongelukken en lees de handleiding voor
gebruik geheel door
Instructie waarschuwing
GARANTIE
Om uw garantie te registreren, gaat u naar onze website op
www.tritontools.com* en voert u uw gegevens in.
Uw gegevens worden opgeslagen in onze mailinglist (tenzij u
anders aangeeft) voor informatie over nieuwe producten. De
ingevulde gegevens worden aan geen enkele andere partij
beschikbaar gesteld.
NL
AANKOOPGEGEVENS
Datum van aankoop: ___ / ___ / ____
Model: RSA300
Serienummer: __________________
Bewaar uw aankoopbon als aankoopbewijs
Inhoud / Symbolen / Garantie
6
Triton Precision Power Tools garandeert de koper
van dit product dat indien een onderdeel defect is
vanwege fouten in materiaal of uitvoering binnen
12 MAANDEN na de datum van de oorspronkelijke
aankoop,
Triton het defecte onderdeel gratis repareert of, naar
eigen inzicht, vervangt.
Deze garantie heeft geen betrekking op
commercieel gebruik en strekt zich niet uit tot
normale slijtage of schade ten gevolge van een
ongeluk, verkeerd gebruik of misbruik.
* Registreer online binnen 30 dagen.
Algemene voorwaarden van toepassing.
Page 7

ONDERDELENLIJST
A. Voorpaneel (1)
B. Achterpaneel (1)
E. Zijpaneel (2)
Fig.1
Stap 2
ZAK BEVESTIGINGSMIDDELEN
F. Fixeerinrichting (4) Montageplaat
G. Ronde Knop (4)
H. Pootklem (4)
C. Voorpoten (zitten in achterpoten) (2)
D. Achterpoten (2)
I. Pootklemveer (4)
J. Slotbout (4)
K. Flensmoeren (16)
L. Kruiskopschroef (16)
Stap 1
Fig.2
Stap 4
Stap 3
Onderdelenlijst
NL
7
Page 8

ALGEMENE VEILIGHEID
WAARSCHUWING Lees alle bediening- en
veiligheidsvoorschriften. Het niet opvolgen van
alle voorschriften die hieronder vermeld staan,
kan resulteren in een elektrische schok, brand en/of
ernstig letsel.
Bewaar deze voorschriften voor toekomstig
gebruik. De term “elektrisch gereedschap” in alle
hieronder vermelde waarschuwingen heeft betrekking
op uw elektrische gereedschap dat op de stroom is
aangesloten (met een snoer) of met een accu wordt
gevoed (snoerloos).
1) Veiligheid in de werkruimte
a) Houd de werkruimte schoon en zorg voor een
goede verlichting. Rommelige en donkere ruimtes
leiden vaak tot ongelukken.
b) Werk niet met elektrisch gereedschap in
explosieve omgevingen, bijvoorbeeld in de
aanwezigheid van ontvlambare vloeistoffen,
gassen of stof. Elektrisch gereedschap brengt vonken
teweeg die stof of dampen kunnen doen ontbranden.
c) Houd kinderen en omstanders uit de buurt
wanneer u elektrisch gereedschap bedient. Door
afleiding kunt u de controle over het gereedschap
verliezen.
2) Elektrische veiligheid
a) De stekkers van het elektrische gereedschap
moeten passen bij het stopcontact. Pas de
stekker niet aan. Gebruik geen adapterstekkers
bij geaard elektrisch gereedschap. Het gebruik van
ongewijzigde stekkers en passende stopcontacten
vermindert het risico op een elektrische schok.
b) Vermijd lichamelijk contact met geaarde
oppervlakken zoals pijpen, radiatoren, fornuizen
en koelkasten. Het risico op een elektrische schok
neemt toe als uw lichaam geaard wordt.
c) Laat elektrisch gereedschap niet nat worden.
Wanneer elektrisch gereedschap nat wordt, neemt het
risico op een elektrische schok toe.
d) Beschadig het snoer niet. Gebruik het snoer
nooit om het elektrisch gereedschap te dragen,
te trekken of om de stekker uit het stopcontact
te trekken. Houd het snoer uit de buurt van hitte,
olie, scherpe randen of bewegende delen. Een
beschadigd of in de knoop geraakt snoeren verhoogt
het risico op een elektrische schok toe.
e) Wanneer u elektrisch gereedschap buiten
NL
gebruikt, maak dan gebruik van een verlengsnoer
dat geschikt is voor gebruik buitenshuis. Gebruik
een verlengsnoer dat geschikt is voor gebruik
buitenshuis om het risico op een elektrische schok te
verminderen.
f) Indien het onvermijdelijk is elektrisch gereedschap
te gebruiken in een vochtige omgeving, gebruik
dan een energiebron met een aardlek beveiliging
(Residual Currency Device). Het gebruik van een
RCD vermindert het risico op een elektrische schok.
3) Persoonlijke veiligheid
a) Blijf alert en gebruik uw gezonde verstand
wanneer u elektrisch gereedschap bedient.
Gebruik het elektrisch gereedschap niet wanneer
u vermoeid bent of onder invloed van drugs,
alcohol of medicijnen. Onoplettendheid tijdens het
bedienen van elektrisch gereedschap kan leiden tot
ernstig letsel.
b) Maak gebruik van persoonlijke bescherming.
Draag altijd een veiligheidsbril. Passende
bescherming voor de omstandigheden, zoals een
stofmasker, niet-slippende veiligheidsschoenen een
helm of gehoorbescherming, vermindert het risico op
persoonlijk letsel.
c) Zorg ervoor dat het apparaat niet per ongeluk
wordt gestart. Controleer of de schakelaar in
de ‘uit’ stand staat voordat u de stekker in het
stopcontact steekt. Het dragen van elektrisch
gereedschap met uw vinger op de schakelaar of het
aansluiten op de stroom van elektrisch gereedschap
met de schakelaar ingeschakeld kan tot ongelukken
leiden.
d) Verwijder alle stel- of moersleutels voordat u het
elektrische gereedschap inschakelt. Een moer- of
stelsleutel die zich op een draaiend onderdeel van het
elektrische gereedschap bevindt, kan leiden tot letsel.
e) Reik niet te ver. Blijf altijd stevig en in balans
staan. Zo houdt u meer controle over het elektrische
gereedschap in onverwachte situaties.
f) Draag geschikte kleding. Draag geen loshangende
kleding of sieraden. Houd haren, kleding en
handschoenen uit de buurt van bewegende delen.
Loshangende kleding, sieraden en los hangende haren
kunnen vast komen te zitten in bewegende delen.
g) Als er onderdelen voor stofafvoer- en
stofverzameling worden meegeleverd, sluit
deze dan aan en gebruik deze op de juiste wijze.
Het gebruik van deze onderdelen kan het risico op
stofgerelateerde ongelukken verminderen.
4) Gebruik en verzorging van elektrisch gereedschap
a) Forceer elektrisch gereedschap niet. Gebruik
elektrisch gereedschap dat geschikt is voor het
werk dat u wilt uitvoeren. Geschikt elektrisch
gereedschap werkt beter en veiliger op een passende
snelheid.
b) Gebruik het elektrische gereedschap niet als de
schakelaar het apparaat niet in- en uitschakelt.
Elektrisch gereedschap dat niet bediend kan worden
met de schakelaar is gevaarlijk en moet gerepareerd
worden.
Algemene veiligheid
8
Page 9

c) Haal de stekker uit het stopcontact voordat u
instellingen aanpast, toebehoren verwisselt of
het elektrische gereedschap opbergt. Dergelijke
voorzorgsmaatregelen verminderen het risico op het
per ongeluk starten van het elektrische gereedschap.
d) Berg elektrisch gereedschap dat niet in gebruik is
op buiten bereik van kinderen en laat mensen die
niet bekend zijn met het elektrische gereedschap
of met deze instructies het elektrische
gereedschap niet bedienen. Elektrisch gereedschap
is gevaarlijk in de handen van onervaren gebruikers.
e) Onderhoud uw elektrisch gereedschap. Controleer
op foutieve uitlijning of het vastslaan van
bewegende delen, gebroken onderdelen en
elke andere afwijking die de werking van het
elektrische gereedschap zou kunnen beïnvloeden.
Indien het elektrische gereedschap beschadigd
is, moet u het laten repareren voordat u het weer
gebruikt. Veel ongelukken worden veroorzaakt door
slecht onderhouden elektrisch gereedschap.
SAMENSTELLING
Stap 1
Breng 2 pootklemmen (H) aan op elk zijframe (E) met
behulp van de slotbouten (J), pootklemveren (I) en ronde
knoppen (G) (afb. 1). Zorg ervoor dat de voetjes van de
pootklemmen in de gleuven in de eindbeugels van het
zijframe komen te zitten. Draai de knoppen vast, met
slechts een paar slagen.
Stap 2
Bevestig de zijframes op de eindpanelen voor en achter
(A en B) met behulp van de kruiskopschroeven (L)
en flensmoeren (K), volgens de afbeelding. Nog niet
vastdraaien. Zodra alle bevestigingsmiddelen op hun
plaats zitten, kan het toestel op een plat werkoppervlak
worden geplaatst en kunnen ze stevig met een
schroevendraaier worden vastgezet.
Stap 3
Zet het toestel ondersteboven. Haal de voorpoten (C) uit
de opslagplaats in de achterpoten (D).
Stop de achterpoten (met rubberen voetjes) helemaal in
de betreffende posities aan de achterkant van het toestel.
Stop de voorpoten helemaal in de voorste posities.
De plaats van de gaten in elke poot is op dit moment nog
niet belangrijk. Zet ze vast door de ronde knoppen aan te
draaien.
Zet de standaard weer rechtop en controleer of alle
voetjes horizontaal op de grond staan. Op een ongelijke
ondergrond kunnen één of meer pootjes een beetje
worden uitgeschoven om te voorkomen dat de standaard
wiebelt.
f) Houd snijwerktuigen scherp en schoon. Goed
onderhouden snijwerktuigen met scherpe messen
slaan minder snel vast en zijn gemakkelijker te
bedienen.
g) Gebruik het elektrische gereedschap, toebehoren
en onderdelen, etc. volgens deze instructies en
volgens bestemming voor het specifieke type
elektrisch gereedschap, en houd daarbij rekening
met de werkomstandigheden en het uit te voeren
werk. Gebruik van elektrisch gereedschap voor
werkzaamheden die verschillen van die waarvoor
het apparaat bestemd is, kan leiden tot gevaarlijke
situaties.
5) Onderhoud
a) Laat uw elektrische gereedschap onderhouden
door een gekwalificeerde vakman en gebruik
alleen identieke vervangstukken. Zo bent u er zeker
van dat de veiligheid van het elektrische gereedschap
gewaarborgd blijft.
De poten opbergen
Er is voor de poten een handige opslagplaats in de
standaard.
Draai de ronde knoppen los en verwijder de poten. Schuif
de voorpoten binnenin de achterpoten en zorg ervoor
dat de gaten in elke stang op elkaar liggen. Voer de
poten door de uitsparingen in het achterpaneel en in de
uitsparingen in het voorpaneel met hun gaten naar buiten
toe gericht (afb. 2). Breng de gaten in de poten op de
lipjes op de uitsparingen in het achterpaneel aan en draai
de vergrendelingen aan om de poten op hun plaats vast
te zetten.
NL
Algemene veiligheid / Samenstelling
9
Page 10

Nous vous remercions d’avoir choisi cet équipement Triton. Ces instructions contiennent les informations nécessaires au
fonctionnement efficace et sûr de ce produit. Veuillez lire attentivement ce manuel pour vous assurer de tirer pleinement
Gardez ce manuel à portée de main et assurez-vous que tous les utilisateurs l’aient lu et bien compris avant toute utilisation.
avantage des caractéristiques uniques de votre nouvel équipement.
TABLE DES MATIERES
Symboles 10
Garantie 10
Liste des pièces 11
Sécurité 12
Assemblage 13
SYMBOLES
Assurez-vous de toujours porter lunettes
de protection, masque respiratoire et
protections antibruit
ATTENTION. Pour réduire
le risque de lésions, ne pas utiliser avant
d’avoir pris pleinement connaissance des
instructions d’utilisation
Avertissement
GARANTIE
Pour valider votre garantie, rendez-vous sur notre site
internet www.tritontools.com* et saisissez vos coordonnées.
Vos coordonnées seront introduites dans notre liste de
diffusion (sauf indication contraire) afin de vous informer de
nos prochaines nouveautés. Les informations que vous nous
fournirez ne seront pas communiquées à des tiers.
PENSE-BETE
Date d’achat : ___ / ___ / ____
F
Modèle : RSA300
Numéro de série :__________________
Veuillez conserver votre ticket de caisse comme preuve
d’achat.
Table des matières / Symboles / Garantie
10
Si toute pièce de ce produit s’avérait défectueuse
du fait d’un vice de fabrication ou de matériau dans
les 12 MOIS suivant la date d’achat, Triton Precision
Power Tools s’engage auprès de l’acheteur de ce
produit à réparer ou, à sa discrétion, à remplacer
gratuitement la pièce défectueuse.
Cette garantie ne s’applique pas à l’utilisation
commerciale et ne s’étend pas non plus à
l’usure normale ou aux dommages causés par
des accidents, des mauvais traitements ou une
utilisation impropre.
* Enregistrez votre produit en ligne dans les 30
jours suivant la date d’achat.
Offre soumise à conditions.
Ceci n’affecte pas vos droits statutaires
Page 11

LISTE DES PIÈCES DE RECHANGE
A. Panneau Avant (1)
E. Panneau Latéral (2)
F. Pièce de Positionnement de
G. Molette (4)
la Plaque de Fixation (4)
B. Panneau rrière (1)
C. Pieds Avant (rangés à l’intérieur des pieds arrière) (2)
D. Pieds Arrière (2)
FASTENER BAG
I. Ressort pour les Pièces de Serrage
des Pieds (4)
J. Boulon Carrossier (4)
K. Écrous à Collet (16)
Fig.1
2ème étape
H. Pièce de Serrage des Pieds (4)
4ème étape
3ème étape
1ère étape
L. Vis à Empreinte Phillips (16)
Fig.2
Liste des pièces de rechange
F
11
Page 12

CONSIGNES DE SECURITE
AVERTISSEMENT Veuillez lire l’intégralité des
consignes de sécurité et des instructions. Le
non-respect de ces consignes et instructions peut
entraîner un risque de choc électrique, d’incendie et/
ou se traduire par des blessures graves.
Veuillez conserver ces instructions et consignes
de sécurité pour référence ultérieure. L’expression
« appareil électrique » employée dans les présentes
consignes recouvre aussi bien les appareils filaires
à brancher sur le secteur que les appareils sans fils
fonctionnant sous batterie.
1) Sécurité sur la zone de travail
a) Maintenir une zone de travail propre et bien
éclairée. Des zones encombrées et mal éclairées sont
sources d’accidents.
b) Ne pas utiliser d’outils électriques dans des
environnements explosifs, tels qu’à proximité de
liquides, de gaz ou de poussières inflammables.
Les appareils électriques produisent des étincelles
susceptibles d’enflammer la poussière ou les vapeurs
présentes.
c) Eloigner les enfants et les passants pendant
l’utilisation d’un appareil électrique. Ceux-ci
peuvent provoquer une perte d’attention et faire
perdre la maîtrise de l’appareil.
2) Sécurité électrique
a) La prise d’un appareil électrique doit être adaptée
à la prise du secteur. Ne jamais modifier la prise
en aucune façon. Ne jamais utiliser d’adaptateur
sur la prise électrique d’appareil mis à la terre.
Des prises non modifiées, adaptées aux boîtiers de
prise de courant, réduiront le risque de décharge
électrique.
b) Eviter le contact corporel avec les surfaces mises
à la terre telles que tuyaux, radiateurs, cuisinières
et réfrigérateurs. Le risque de décharge électrique
est plus important si le corps est mis à la terre.
c) Ne pas exposer l’appareil électrique à la pluie ou
à l’humidité. L’infiltration d’eau dans un appareil
électrique accroît le risque de décharge électrique.
d) Ne pas maltraiter le cordon électrique. Ne
jamais utiliser le cordon électrique pour porter,
tirer ou débrancher l’appareil. Protéger le
cordon électrique de la chaleur, du contact
avec l’essence, des bords tranchants et pièces
rotatives. Un cordon électrique endommagé ou
entortillé accroît le risque de décharge électrique.
F
e) Lors d’une utilisation de l’appareil électrique en
extérieur, se servir d’une rallonge appropriée à
une utilisation en extérieur. Cela réduit le risque de
décharge électrique.
f) Si une utilisation de l’appareil électrique dans un
environnement humide ne peut être évitée, utiliser
une alimentation protégée par un disjoncteur
différentiel. L’utilisation d’un disjoncteur différentiel
réduit le risque de décharge électrique.
3) Sécurité des personnes
a) Rester vigilent et faire preuve de bon sens lors
de la manipulation de l’appareil. Ne pas utiliser
un appareil électrique lorsque l’on se trouve
dans un état de fatigue, ou sous l’influence de
drogues, d’alcool ou de médicaments. Un moment
d’inattention pendant l’utilisation d’un outil électrique
peut se traduire par des blessures graves.
b) Porter un équipement de protection approprié.
Toujours porter une protection oculaire. Le port
de masque à poussières, chaussures de sécurité
antidérapantes, casque de sécurité et protections
antibruit adaptés aux différentes conditions de travail
réduit le risque de blessures corporelles.
c) Eviter tout démarrage accidentel. S’assurer que
l’interrupteur marche-arrêt soit en position d’arrêt
avant de brancher l’appareil sur l’alimentation
secteur ou d’installer la batterie, de prendre
l’appareil ou de le transporter. Porter un appareil
électrique tout en maintenant le doigt posé sur
l’interrupteur ou brancher un appareil électrique dont
l’interrupteur est sur la position de marche est source
d’accidents.
d) Enlever toute clé et tout instrument de réglage
avant de mettre l’appareil électrique en marche.
Une clé ou un instrument de réglage laissé fixé à
un élément en rotation de l’appareil électrique peut
entraîner des blessures physiques.
e) Ne pas essayer d’atteindre une zone hors de
portée. Se tenir toujours en position stable
permettant de conserver l’équilibre. Cela permet
de mieux contrôler l’appareil électrique dans des
situations inattendues.
f) Porter des vêtements appropriés. Ne pas porter
de vêtements amples ou des bijoux pendants.
Eloigner cheveux, vêtements et gants des pièces
en mouvement. Les vêtements amples, les bijoux
pendants et cheveux longs peuvent être happés par
les pièces en rotation
g) Si l’appareil est pourvu de dispositifs destinés
au raccord d’équipements d’extraction et de
récupération de la poussière/sciure, s’assurer
qu’ils soient bien fixés et utilisés correctement.
L’utilisation de ces dispositifs peut réduire les risques
dus à la poussière.
12
Consignes de sécurité
Page 13

4) Utilisation et entretien des appareils électrique
a) Ne pas forcer sur l’appareil électrique. Utiliser
l’appareil électrique approprié au travail à
effectuer. Un appareil électrique adapté et employé
au rythme pour lequel il a été conçu permettra de
réaliser un travail de meilleure qualité et dans de
meilleures conditions de sécurité.
b) Ne pas utiliser un appareil électrique dont
l’interrupteur marche-arrêt est hors service. Tout
appareil électrique dont la commande ne s’effectue
plus par l’interrupteur marche-arrêt est dangereux et
doit être réparé.
c) Débrancher l’appareil électrique ou démonter
sa batterie avant d’effectuer tout réglage ou
changement d’accessoire et avant de le ranger.
De telles mesures préventives réduiront les risques de
démarrage accidentel.
d) Ranger les appareils électriques inutilisés
hors de portée des enfants et ne pas permettre
l’utilisation de cet appareil aux personnes non
habituées à son maniement ou n’ayant pas lu les
présentes instructions. Les appareils électriques
sont dangereux dans les mains d’utilisateurs
inexpérimentés.
ASSEMBLAGE
1ère étape
Fixez 2 pièces de serrage des pieds (H) à chaque panneau
latéral (E) à l’aide des boulons carrossiers (J), des ressorts
pour les pièces de serrage des pieds (I) et des molettes
(G) (FIG. 1). Assurez-vous que les parties saillantes des
pièces de serrage des pieds sont bien introduites dans
les fentes situées sur les équerres de fixation d’extrémité
des panneaux latéraux. Vissez les molettes en faisant
uniquement quelques tours.
2ème étape
Fixez les panneaux latéraux aux panneaux avant & arrière
(A & B) à l’aide des vis à empreinte Phillips (L) et des écrous
à collet (K), comme indiqué. Ne les serrez pas encore.
Une fois que tous les éléments de fixation sont en place,
positionnez l’appareil sur une surface de travail plate et
serrez fermement les éléments de fixation à l’aide d’un
tournevis.
e) Veiller à l’entretien des appareils électriques.
Vérifier que les éléments rotatifs soient bien
alignés et non grippés. S’assurer de l’absence de
pièces cassées ou endommagées susceptibles
de nuire au bon fonctionnement de l'appareil.
Si l’appareil électrique est endommagé, le faire
réparer avant toute utilisation. De nombreux
accidents sont dus à l’utilisation d’appareils
électriques mal entretenus.
f) Veiller à ce que les outils de coupe soient tenus
affûtés et propres. Des outils de coupe bien
entretenus, aux tranchants bien affûtés, sont moins
susceptibles de se gripper et sont plus faciles à
contrôler.
g) Utiliser l’appareil électrique, les accessoires et
outils à monter conformément à ces instructions,
en tenant compte des conditions de travail et de
la tâche à réaliser. Toute utilisation d’un appareil
électrique autre que celle pour laquelle il a été conçu
peut entraîner des situations à risque.
5) Révision
a) Ne faire réparer votre appareil électrique que
par un réparateur qualifié utilisant uniquement
des pièces de rechange identiques. Cela permet
de maintenir la sécurité d’utilisation de l’appareil
électrique.
3ème étape
Retournez la table. Sortez les pieds avant (C) de leur
position de rangement à l’intérieur des pieds arrière (D).
Introduisez complètement les pieds arrière (aux extrémités
caoutchoutées) dans leur logement situé à l’arrière de la
table. Introduisez complètement les pieds avant dans les
logements avant.
La position des trous présents sur chaque pied n’est pas
importante à ce stade. Verrouillez les pieds en place en
serrant les molettes.
Remettez la table à l’endroit et vérifiez que tous les
pieds sont au même niveau sur le sol. Si la surface sur
laquelle repose la table est inégale, effectuez les réglages
nécessaires en sortant un peu plus un des pieds de son
logement pour éviter à la table d’être instable.
Rangement des pieds
Les pieds disposent d’un emplacement de rangement
intégré pratique.
Desserrez les molettes et sortez les pieds de leur logement.
Introduisez les pieds avant à l’intérieur des pieds arrière
en les faisant glisser et en vous assurant que les trous
de chaque tube sont bien alignés. Introduisez les pieds à
travers les orifices découpés dans le panneau arrière et
dans les orifices découpés dans le panneau avant, avec les
trous des pieds tournés vers l’extérieur (FIG. 2). Enclenchez
les trous des pieds sur les languettes situées sur les orifices
découpés du panneau arrière et faites tourner les valets
d’arrêt pour verrouiller les pieds en place
F
Consignes de sécurité / Assemblage
13
Page 14

Vielen Dank, dass Sie sich für dieses Triton-Werkzeug entschieden haben. Diese Anleitung enthält wichtige Informationen für
Bitte lesen Sie diese Anleitung sorgfältig durch, um den größtmöglichen Nutzen aus dem einzigartigen Design dieses Produkts
Bewahren Sie diese Anleitung griffbereit auf und sorgen Sie dafür, dass alle Benutzer dieses Geräts sie gelesen und verstanden
das sichere und effektive Arbeiten mit diesem Produkt.
ziehen zu können.
haben.
INHALT
Symbole 14
Garantie 14
Teilliste 15
Sicherheit 16
Zusammenbau 17
SYMBOLE
Immer Gehör-, Augen- und Atemschutz
tragen
Achtung: Zur Reduzierung
des Verletzungsrisikos muss die
Gebrauchsanweisung sorgfältig vom
Bediener gelesen werden.
Warnhinweis
GARANTIE
Zur Anmeldung Ihrer Garantie besuchen Sie bitte unsere
Website www.tritontools.com* und tragen dort Ihre
persönlichen Daten ein.
Ihre Angaben werden (wenn nicht anders angewiesen) in
unseren elektronischen Verteiler aufgenommen, damit Sie
Information über zukünftige Produkteinführungen erhalten.
Die von Ihnen bereitgestellten Angaben werden nicht an
Dritte weitergegeben.
KAUFINFORMATION
Kaufdatum: ___ / ___ / ____
Modell: RSA300
Seriennummer
D
(siehe Motorgehäuse): ___________________
Bewahren Sie bitte Ihren Beleg als Kaufnachweis auf.
14
Inhalt / Symbole / Garantie
Triton garantiert dem Käufer dieses Produkts, dass
Triton, wenn sich Teile dieses Produkts innerhalb
von 12 Monaten ab Originalkaufdatum infolge
fehlerhafter Materialien oder Arbeitsausführung
als defekt erweisen, das mangelhafte Teil nach
eigenem Ermessen entweder kostenlos reparieren
oder ersetzen wird.
Diese Garantie gilt nicht für kommerzielle
Verwendung und erstreckt sich nicht auf normalen
Verschleiß oder Schäden infolge von Unfall,
Missbrauch oder unsachgemäßer Verwendung.
*Bitte registrieren Sie sich innerhalb von 30 Tagen
nach dem Kauf online.
Es gelten die allgemeinen Geschäftsbedingungen.
Ihre gesetzlich festgelegten Rechte werden dadurch
nicht eingeschränkt.
Page 15

TEILLISTE
A. Vordere Endplatte (1)
E. Vordere Endplatte (2)
F. Positionsgeber für die
Montageplatte (4)
G. Runder Knauf (4)
B. Hintere Endplatte (1)
C. Vordere Beine (in den hinteren Beinen
untergebracht) (2)
D. Hintere Beine (2)
BEUTEL MIT BEFESTIGUNGSELEMENTEN
I. Beinklemmenfeder (4)
J. Schlossschraube (4)
K. Flanschmuttern (16)
Fig.1
2. Schritt
H. Beinklemme (4)
4. Schritt
3. Schritt
1. Schritt
L. Kreuzschlitzsenkschraube (16)
Fig.2
Teilliste
D
15
Page 16

ALLGEMEINE SICHERHEITSHINWEISE
WARNUNG! Lesen Sie alle Sicherheitshinweise
und Anweisungen. Versäumnisse bei der
Einhaltung der Sicherheitshinweise und
Anweisungen können elektrischen Schlag, Brand und/
oder schwere Verletzungen verursachen.
Bewahren Sie alle Sicherheitshinweise und
Anweisungen für die Zukunft auf.
Der in den Sicherheitshinweisen verwendete Begriff
„Elektrowerkzeug“ bezieht sich auf netzbetriebene
Elektrowerkzeuge (mit Netzkabel) und auf
akkubetriebene Elektrowerkzeuge (ohne Netzkabel).
1) Arbeitsplatzsicherheit
a) Halten Sie Ihren Arbeitsbereich sauber und
gut beleuchtet. Unordnung oder unbeleuchtete
Arbeitsbereiche können zu Unfällen führen.
b) Arbeiten Sie mit dem Elektrowerkzeug nicht in
explosionsgefährdeter Umgebung, in der sich
brennbare Flüssigkeiten, Gase oder Stäube
befinden. Elektrowerkzeuge erzeugen Funken, die
den Staub oder die Dämpfe entzünden können.
c) Halten Sie Kinder und andere Personen während
der Benutzung des Elektrowerkzeugs fern. Bei
Ablenkung können Sie die Kontrolle über das Gerät
verlieren.
2) Elektrische Sicherheit
a) Der Anschlussstecker des Elektrowerkzeuges
muss in die Steckdose passen. Der Stecker darf
in keiner Weise verändert werden. Verwenden
Sie keine Adapterstecker gemeinsam mit
schutzgeerdeten Elektrowerkzeugen. Unveränderte
Stecker und passende Steckdosen verringern das
Risiko eines elektrischen Schlages.
b) Vermeiden Sie Körperkontakt mit geerdeten
Oberflächen wie von Rohren, Heizungen, Herden
und Kühlschränken. Es besteht ein erhöhtes Risiko
durch elektrischen Schlag, wenn Ihr Körper geerdet
ist.
c) Halten Sie Elektrowerkzeuge von Regen oder
Nässe fern. Das Eindringen von Wasser in ein
Elektrowerkzeug erhöht das Risiko eines elektrischen
Schlages.
d) Zweckentfremden Sie das Kabel nicht, um das
Elektrowerkzeug zu tragen, aufzuhängen oder um
den Stecker aus der Steckdose zu ziehen. Halten
Sie das Kabel fern von Hitze, Öl, scharfen Kanten
oder sich bewegenden Geräteteilen. Beschädigte
oder verwickelte Kabel erhöhen das Risiko eines
elektrischen Schlages.
D
16
Sicherheitshinweise
e) Wenn Sie mit einem Elektrowerkzeug im Freien
arbeiten, verwenden Sie nur Verlängerungskabel,
die auch für den Außenbereich geeignet sind. Die
Anwendung eines für den Außenbereich geeigneten
Verlängerungskabels verringert das Risiko eines
elektrischen Schlages.
f) Wenn der Betrieb des Elektrowerkzeuges in
feuchter Umgebung nicht vermeidbar ist,
verwenden Sie einen Fehlerstromschutzschalter.
Der Einsatz eines Fehlerstromschutzschalters
vermindert das Risiko eines elektrischen Schlages.
Hinweis: Der Begriff „Fehlerstromschutzschalter”
wird synonym mit den Begriffen „FI-Schutzschalter”
und „FI-Schalter” verwendet.
3) Sicherheit von Personen
a) Seien Sie aufmerksam, achten Sie darauf, was
Sie tun, und gehen Sie mit Vernunft an die
Arbeit mit einem Elektrowerkzeug. Benutzen
Sie kein Elektrowerkzeug, wenn Sie müde sind
oder unter dem Einfluss von Drogen, Alkohol
oder Medikamenten stehen. Ein Moment der
Unachtsamkeit beim Gebrauch des Elektrowerkzeuges
kann zu ernsthaften Verletzungen führen.
b) Tragen Sie persönliche Schutzausrüstung und
immer eine Schutzbrille. Das Tragen persönlicher
Schutzausrüstung, wie Staubmaske, rutschfeste
Sicherheitsschuhe, Schutzhelm oder Gehörschutz,
je nach Art und Einsatz des Elektrowerkzeuges,
verringert das Risiko von Verletzungen.
c) Vermeiden Sie eine unbeabsichtigte
Inbetriebnahme. Vergewissern Sie sich, dass das
Elektrowerkzeug ausgeschaltet ist, bevor Sie
es an die Stromversorgung und/oder den Akku
anschließen, es aufnehmen oder tragen. Wenn Sie
beim Tragen des Elektrowerkzeuges den Finger am
Schalter haben oder das Gerät eingeschaltet an die
Stromversorgung anschließen, kann dies zu Unfällen
führen.
d) Entfernen Sie Einstellwerkzeuge oder
Schraubenschlüssel, bevor Sie das
Elektrowerkzeug einschalten. Ein Werkzeug oder
Schlüssel, der sich in einem drehenden Geräteteil
befindet, kann zu Verletzungen führen.
e) Vermeiden Sie eine unnatürliche Körperhaltung.
Sorgen Sie für einen sicheren Stand und halten Sie
jederzeit das Gleichgewicht. Auf diese Weise lässt
sich das Elektrowerkzeug in unerwarteten Situationen
besser kontrollieren.
f) Tragen Sie geeignete Kleidung. Tragen Sie
keine weite Kleidung oder Schmuck. Halten Sie
Haare, Kleidung und Handschuhe fern von sich
bewegenden Teilen. Lockere Kleidung, Schmuck
oder lange Haare können von sich bewegenden Teilen
erfasst werden.
Page 17

g) Wenn Staubabsaug- und -auffangeinrichtungen
montiert werden können, vergewissern Sie
sich, dass diese angeschlossen sind und
richtig verwendet werden. Verwendung einer
Staubabsaugung kann Gefährdungen durch Staub
verringern.
4) Verwendung und Behandlung des
Elektrowerkzeuges
a) Überlasten Sie das Gerät nicht. Verwenden Sie für
Ihre Arbeit das dafür bestimmte Elektrowerkzeug.
Mit dem passenden Elektrowerkzeug arbeiten
Sie besser und sicherer im angegebenen
Leistungsbereich.
b) Benutzen Sie kein Elektrowerkzeug, dessen
Schalter defekt ist. Ein Elektrowerkzeug, das sich
nicht mehr ein- oder ausschalten lässt, ist gefährlich
und muss repariert werden.
c) Ziehen Sie den Stecker aus der Steckdose
und/oder entfernen Sie den Akku, bevor Sie
Geräteeinstellungen vornehmen, Zubehörteile
wechseln oder das Gerät weglegen. Diese
Vorsichtsmaßnahme verhindert den unbeabsichtigten
Start des Elektrowerkzeuges.
d) Bewahren Sie unbenutzte Elektrowerkzeuge
außerhalb der Reichweite von Kindern
auf. Lassen Sie Personen das Gerät nicht
benutzen, die mit diesem nicht vertraut sind
oder diese Anweisungen nicht gelesen haben.
Elektrowerkzeuge sind gefährlich, wenn sie von
unerfahrenen Personen benutzt werden.
ZUSAMMENBAU
1. Schritt
Unter Verwendung der Schlossschrauben (J),
Beinklemmenfedern (I) und runden Knäufe (G) an jedem
Seitenrahmen (E) 2 Beinklemmen(H) anbringen. (ABB.
1). Sicherstellen, dass die Füße der Beinklemmen in
die Schlitze an den Endhalterungen der Seitenrahmen
eingeführt werden. Die Knäufe aufschrauben und lediglich
ein paarmal festdrehen.
2. Schritt
Die Seitenrahmen an den vorderen & hinteren Endplatten
(A & B) anbringen und hierzu, wie abgebildet, die
Kreuzschlitzsenkschrauben (L) und Flanschmuttern
(K) verwenden. Noch nicht festziehen. Wenn alle
Befestigungselemente in Position sind, die Einheit
auf eine flache Arbeitsfläche stellen und mit einem
Schraubenzieher gut festziehen.
e) Pflegen Sie Elektrowerkzeuge mit Sorgfalt.
Kontrollieren Sie, ob bewegliche Teile einwandfrei
funktionieren und nicht klemmen, ob Teile
gebrochen oder so beschädigt sind, dass die
Funktion des Elektrowerkzeuges beeinträchtigt
ist. Lassen Sie beschädigte Teile vor dem Einsatz des
Gerätes reparieren. Viele Unfälle haben ihre Ursache in
schlecht gewarteten Elektrowerkzeugen.
f) Halten Sie Schneidwerkzeuge scharf und sauber.
Sorgfältig gepflegte Schneidwerkzeuge mit scharfen
Schneidkanten verklemmen sich weniger und sind
leichter zu führen.
g) Verwenden Sie Elektrowerkzeug, Zubehör,
Einsatzwerkzeuge usw. entsprechend diesen
Anweisungen. Berücksichtigen Sie dabei die
Arbeitsbedingungen und die auszuführende
Tätigkeit. Der Gebrauch von Elektrowerkzeugen für
andere als die vorgesehenen Anwendungen kann zu
gefährlichen Situationen führen.
5) Service
a) Lassen Sie Ihr Elektrowerkzeug nur von
qualifiziertem Fachpersonal und nur mit OriginalErsatzteilen reparieren. Damit wird sichergestellt,
dass die Sicherheit des Elektrowerkzeuges erhalten
bleibt.
3. Schritt
Die Einheit umdrehen. Die vorderen Beine (C) aus den
hinteren Beinen (D) entnehmen. Die hinteren Beine (mit
den Gummifüßen) ganz in ihre Buchsen hinten an der
Einheit einschieben. Die vorderen Beine ganz in ihre
vorderen Buchsen einschieben. Die Position der Löcher
in den Beinen ist an dieser Stelle nicht wichtig. Die Beine
durch Festziehen der Rundknäufe absichern.
Den Höhenverstellungsstand richtig herumdrehen und
prüfen, dass alle Beine ebenmäßig auf dem Boden stehen.
Auf einer nicht ebenen Fläche entsprechend nachstellen,
indem eines der Beine leicht herausgezogen wird, damit
die Einheit nicht wackelt.
Unterbringen der Beine
Die Beine können praktischerweise an der Einheit
untergebracht werden.
Hierfür die runden Knäufe lockern und die Beine aus ihren
Buchsen herausziehen. Die vorderen Beine in die hinteren
schieben und sicherstellen, dass die Löcher in jedem Rohr
auf einer Linie sind. Die Beine durch die Aussparungen
an der hinteren und vorderen Platte schieben, wobei die
Löcher nach außen zeigen sollten (ABB. 2). Die Löcher in
den Beinen in die Laschen einrasten, damit die Beine in
Position abgesichert sind.
Sicherheitshinweise / Zusammenbau
17
D
Page 18

Grazie per aver acquistato questo utensile Triton. Queste istruzioni contengono informazioni utili
Per essere sicuri di utilizzare al meglio il potenziale dell'utensile si raccomanda pertanto di leggere a fondo questo manuale.
Conservare il manuale in modo che sia sempre a portata di mano e accertarsi che l'operatore dell'elettroutensile lo abbia letto
per il funzionamento sicuro ed affidabile del prodotto.
e capito a pieno.
INDICE
Simboli 18
Garanzia 18
Lista dei pezzi 19
Sicurezza 20
Montaggio 21
SIMBOLI
Indossare sempre protezioni per gli occhi e
per le vie respiratorie.
Nota nelle istruzioni.
Avvertenza
GARANZIA
Per la registrazione della garanzia visitare il sito web www.
tritontools.com* e inserire i propri dettagli.
A meno che il proprietario non abbia specificato
diversamente, i suoi dettagli saranno inclusi nella lista di
distribuzione che sarà utilizzata per inviare regolarmente
informazioni sulle novità Triton. I dati personali raccolti
saranno trattati con la massima riservatezza e non saranno
rilasciati a terze parti.
INFORMAZIONI SULL’ACQUISTO
Data di acquisto: ___ / ___ / ____
Modello N.: RSA300
Numero di serie: __________________
I
Conservare lo scontrino come prova dell’acquisto
18
Indice / Simboli / Garanzia
Triton Precision Power tools garantisce al
proprietario di questo prodotto che se dovessero
essere riscontrati difetti di materiali o lavorazione
entro 12 MESI dalla data dell’acquisto originale,
effettuerà gratuitamente la riparazione o, a propria
discrezione, la sostituzione dei componenti difettosi.
Questa garanzia non è applicabile per l’uso
commerciale dell’utensile ed esclude la normale
usura o i danni causati all’utensile da incidenti, uso
improprio, abusi o alterazioni.
* Registrati on-line entro 30 giorni.
Condizioni di applicazione.
Questa garanzia non pregiudica in alcun modo i
diritti del consumatore stabiliti dalla legge.
Page 19

LISTA DEI PEZZI
A. Pannello Anteriore (1)
E. Montatura Laterale (2)
F. Localizzatore Piastra di Montaggio (4)
G. Dado Pomello di Fissaggio (4)
B. Pannello Posteriore (1)
C. Gambe Anteriori (imballate all'interno
delle gambe posteriori) (2)
D. Gambe Posteriori (2)
FASTENER BAG
I. Molla Morsetto Gamba (4)
J. Bullone a Testa Quadra (4)
K. Dado Flangiato (16)
Fig.1
Step 2
H. Morsetto Gamba (4)
Step 4
Step 3
Step 1
L. Vite a Testa Philips (16)
Fig.2
Lista dei pezzi
I
19
Page 20

NORME GENERALI DI SICUREZZA
AVVERTENZA: Leggere ed assimilare tutte
le istruzioni. La non osservanza delle seguenti
istruzioni può causare scosse elettriche, incendi
e/o lesioni gravi.
Conservare tutte le avvertenze di pericolo e le
istruzioni operative per ogni esigenza futura.
Il termine “elettroutensile” si riferisce all’utensile a
rete fissa (con filo) o un utensile a batteria (senza filo).
1. Area di lavoro.
a. Mantenere l’area di lavoro pulita e adeguatamente
illuminata. Il disordine e le zone di lavoro non
illuminate possono essere fonte di incidenti.
b. Non usare gli elettroutensili in presenza di
atmosfere esplosive, come liquidi, gas e polveri
infiammabili. Gli elettroutensili producono scintille
che potrebbero accendere le polveri o i fumi.
c. Tenere altre persone e i bambini a distanza di
sicurezza durante l’impiego dell’utensile elettrico.
Eventuali distrazioni potrebbero far perdere il controllo
dell’utensile all’operatore.
2. Sicurezza elettrica
a. Le spine degli elettroutensili devono essere
compatibili con le prese di corrente.
Non modificare in alcun modo la spina
dell’elettroutensile. Non usare adattatori con gli
elettroutensili dotati di collegamento di messa
a terra. L’uso delle spine originali non modificate e
delle prese corrispondenti ridurrà il rischio di scosse
elettriche.
b. Evitare il contatto del corpo con le superfici
collegate a massa come i tubi, i radiatori, le
cucine e i frigoriferi. Se il corpo dell’operatore è
collegato alla terra o alla massa il rischio di scosse
elettriche è maggiore.
c. Non esporre gli elettroutensili alla pioggia e non
lasciarli in ambienti umidi o bagnati. L’ ing r es s o
dell’acqua in una macchina utensile aumenta il rischio
di scosse elettriche.
d. Non usare il cavo in modo improprio. Non afferrare
mai il cavo per trasportare, tirare o staccare
l’elettroutensile dalla presa di corrente. Tenere il
cavo lontano da fonti di calore, olio, e sostanze
affini, bordi appuntiti o parti in movimento. I cavi
danneggiati o attorcigliati aumentano il rischio di
scosse elettriche.
e. Qualora si voglia usare l’utensile all’aperto, usare
cavi di prolunga compatibili con l’uso in ambienti
esterni. Un cavo idoneo all’uso in ambienti esterni
riduce il rischio di scosse elettriche.
f. Se l’utilizzo di un elettroutensile in ambiente
I
umido è inevitabile, utilizzare una fonte di
alimentazione protetta da un dispositivo
differenziale. L’uso di un dispositivo differenziale
riduce notevolmente il rischio di scosse elettriche.
NOTA : Il termine "dispositivo di corrente residua
(RCD)" può essere sostituita dal termine "circuito
di guasto a terra (GFCI) "o" dispersione a terra
interruttore (ELCB) ".
3. Sicurezza personale
a. Quando si usa un elettroutensile lavorare sempre
con la massima attenzione e concentrazione,
lasciandosi guidare dal buon senso. Non usare
mai un elettroutensile quando si è stanchi o sotto
l’effetto di medicinali e/o sostanze alcoliche o
stupefacenti. Quando si usa un elettroutensile un
attimo di distrazione è sufficiente a causare gravi
lesioni alle persone.
b. Usare dispositivi per la protezione personale.
Indossare sempre protezioni per gli occhi. I
dispositivi per la sicurezza personale, come le
mascherine antipolvere, le calzature di sicurezza
antiscivolo, il casco e la cuffia, se usati in maniera
appropriata, riducono i rischi di lesioni alle persone.
c. Evitare l’avviamento accidentale. Garantire che
l’interruttore è in posizione arresto (OFF) prima
di attaccare la presa. Trasportare gli elettroutensili
con il dito al di sopra dell’interruttore o attaccando
l’elettroutensile con l’interruttore acceso, aumenta il
rischio di accidenti.
d. Rimuovere tutte le chiavi di regolazione e le chiavi
inglesi prima di accendere l’elettroutensile. Una
chiave inglese o una chiave di regolazione collegata a
una parte in movimento dell’elettroutensile potrebbe
causare lesioni alle persone.
e. Non andare oltre l’altezza consentita. In qualsiasi
momento mantenere i piedi poggiati su superfici
solide e un punto di appoggio sicuro. Un buon
equilibrio consente di avere il massimo controllo
sull’elettroutensile nelle situazioni inaspettate.
f. Vestirsi con abbigliamento adeguato. Non indossare
abiti larghi o gioielli. Tenere i capelli, vestiti e guanti
lontano da parti in movimento.
g. Se il dispositivo utilizzato è dotato di bocchetta
per l’aspirazione della polvere accertarsi che sia
collegato e utilizzato correttamente. L’uso di tali
dispositivi riduce i rischi correlati alle polveri.
4. Maneggio ed impiego accurato di utensili elettrici
a. Non forzare l’elettroutensile. Usare sempre
l’elettroutensile corretto per il lavoro da eseguire.
L’elettroutensile corretto sarà in grado di svolgere il
lavoro in modo più efficiente e sicuro nell’ambito della
gamma di potenza indicata.
20
Norme generali di sicurezza
Page 21

b. Non usare l’elettroutensile se l’interruttore
di accensione non si accende e si spegne. Gli
elettroutensili con un interruttore di accensione
difettoso sono pericolosi e devono essere riparati
immediatamente.
c. Staccare la spina dalla presa di corrente prima
di effettuare qualsiasi regolazione, sostituire gli
accessori o riporre gli attrezzi a motore. Queste
misure di sicurezza preventive riducono il rischio di
avvio involontario.
d. Conservare l’elettroutensile fuori dalla portata
dei bambini e non lasciare che venga utilizzato
da persone non adeguatamente addestrate e
competenti nell’uso degli elettroutensili o che
non abbiano letto questo manuale di istruzioni. Gli
elettroutensili diventano estremamente pericolosi nelle
mani di persone non addestrate.
e. Mantenere gli elettroutensili. Controllare per
disallineamento o la legatura delle parti in
movimento, la rottura di parti e altre condizioni che
possono influire il funzionamento dell’apparecchio.
In caso di danneggiamento, fare riparare prima
dell’uso. Molti incidenti sono causati da una scarsa
manutenzione dell’utensile.
MONTAGGIO
Fase 1
Montare 2 morsetti per le gambe (H) su ciascun pannello
laterale del telaio (E) utilizzando le viti a testa quadra (J),
le molle dei morsetti per le gambe (I) e i pomelli circolari
(G) (FIG. 1). Accertarsi che i piedi dei morsetti per le
gambe si inseriscano nelle apposite fessure delle staffe
dei pannelli laterali del telaio. Avvitare i pomelli, ma solo
di alcuni giri.
Fase 2
Collegare le montature laterali ai pannelli anteriore e
posteriore (A e B) con le viti a testa Philips (L) e i dadi
flangiati (K), come mostra la figura. Non stringere ancora
le viti. Quando tutti i dispositivi di fissaggio saranno
posizionati, porre il supporto su una superficie da lavoro
piana e stringere saldamente con un cacciavite.
f. Mantenere le lame pulite e affilate. Gli utensili da
taglio tenuti in buone condizioni operative e con i bordi
taglienti affilati sono meno soggetti a bloccarsi e più
facili da controllare.
g. Utilizzare l’elettroutensile e tutti i componenti e gli
accessori in conformità con le istruzioni di questo
manuale e nella maniera prevista per ciascun
tipo di utensile, tenendo conto delle condizioni
lavorative e del compito da eseguire. L’utilizzo
degli elettroutensili per fini diversi da quelli previsti
rappresenta un rischio per le persone.
5. Assistenza
a. Qualsiasi intervento sull’elettroutensile deve
essere eseguito da personale qualificato
utilizzando unicamente pezzi di ricambio
compatibili e approvati. Ciò garantisce la sicurezza
dell’utensile elettrico.
Fase 3
Capovolgere il supporto. Rimuovere le gambe anteriori (C)
dal loro alloggiamento all'interno delle gambe posteriori
(D).
Inserire le gambe posteriori (con i piedini in gomma) fino
in fondo nei relativi alloggiamenti nella parte posteriore
del supporto. Inserire le gambe anteriori fino in fondo nei
relativi alloggiamenti anteriori. In questa fase la posizione
dei fori presenti su ciascuna gamba non è importante.
Bloccare stringendo i pomelli circolari.
Capovolgere il supporto per fresatrice verticale e
accertarsi che tutti i piedi siano a livello sul pavimento.
Se il pavimento non fosse a livello effettuare le dovute
regolazioni allungando leggermente una delle gambe dal
suo alloggiamento per stabilizzare il supporto.
Conservazione delle gambe
Le gambe possono essere inserite e conservate negli
appositi vani integrati nel supporto.
Allentare i pomelli circolari e rimuovere le gambe dai loro
alloggiamenti nel supporto. Infilare le gambe anteriori
all'interno delle gambe posteriori, accertandosi che i fori
sul loro profilo siano allineati. Inserire le gambe attraverso
gli appositi fori nel pannello posteriore e nel pannello
anteriore con i fori delle gambe rivolti verso l'esterno (FIG.
2). Allineare i fori delle gambe con le linguette dei fori
del pannello posteriore e girare i nottolini per bloccare le
gambe in posizione.
I
Norme generali di sicurezza / Montaggio
21
Page 22

Gracias por haber elegido esta herramienta Triton. Estas instrucciones contienen la información necesaria para un
Lea este manual atentamente para asegurarse de obtener todas las ventajas de las características únicas de su nuevo equipo.
Conserve este manual a mano y asegúrese de que todos los usuarios de la herramienta lo hayan leído y entendido
funcionamiento seguro y eficaz de este producto.
INDICE
Símbolos 22
Garantía 22
Lista de piezas 23
Seguridad 24
Montage 25
SIMBOLOS
Siempre lleve protección auditiva, protección
ocular y respiratoria
GARANTIA
Para registrar su garantía, visite nuestro sitio web en www.
tritontools.com* e introduzca sus datos.
Estos datos serán incluidos en nuestra lista de direcciones
(salvo indicación contraria) de manera que pueda recibir
información sobre nuestras novedades. Sus datos no serán
cedidos a terceros.
RECORDATORIO DE SU COMPRA
Fecha de compra: ___ / ___ / ____
Modelo: RSA300
Número de serie__________________
Conserve su recibo como prueba de compra.
E
ADVERTENCIA: No utilizar
el producto antes de haber leído y entendido
el manual del usuario.
ADVERTENCIA
Triton Precision Power Tools garantiza al comprador
de este producto que si alguna pieza resulta ser
defectuosa a causa de materiales o de mano
de obra dentro de los 12 MESES siguientes a la
compra, Triton reparará o, a su discreción, sustituirá
la pieza defectuosa sin cargo.
Está garantía no se aplica al uso comercial ni se
amplia al desgaste normal o a los daños resultantes
de un accidente, de un abuso o de una mala
utilización.
* Regístrese en línea dentro de 30 días.
Se aplican los términos y condiciones.
Esto no afecta a sus derechos legales
22
Indice / Simbolos / Garantia
Page 23
LISTA DE PIEZAS
A. Panel del Extremo delantero (1)
E. Panel del Extremo Delantero (2)
F. Localizador de la Placa de Montaje (4)
G. Pomo Redondo (4)
B. Panel del Extremo (1)
C. Patas Delanteras
(empaquetadas dentro de las patas traseras) (2)
D. Patas Traseras (2)
BOLSA DE CIERRE
I. Resorte de la Abrazadera
de la Pata (4)
J. Perno Para Madera (4)
K. Tuerca de Reborde (16)
Fig.1
Paso 2
H. Abrazadera de la Pata (4)
Paso 4
Paso 3
Paso 1
L. Tornillo de Cabeza Phillips (16)
Fig.2
Lista de piezas
E
23
Page 24

INSTRUCCIONES GENERALES DE SEGURIDAD
ADVERTENCIA Lea todas las advertencias
de seguridad e instrucciones. El no respetar
estas advertencias e instrucciones puede causar
descargas eléctricas, incendios y/o lesiones graves.
Conserve estas advertencias e instrucciones para
referencia futura.
La expresión “herramienta eléctrica” en todas la
advertencias se refiera a su herramienta eléctrica
alimentada por la red eléctrica (herramienta
alámbrica) o su herramienta eléctrica alimentada por
baterías (herramienta inalámbrica).
1) Seguridad en el área de trabajo
a) Mantenga el área de trabajo limpia y bien
iluminada. Las áreas desordenadas y oscuras invitan
a que se produzcan accidentes.
b) No maneje herramientas eléctricas en atmósferas
explosivas, como por ejemplo en presencia
de líquidos, gases o polvos inflamables. Las
herramientas eléctricas producen chispas que pueden
incendiar el polvo o los vapores.
c) Mantenga alejados a los niños y a las personas
que estén presentes mientras esté trabajando
con una herramienta eléctrica. Las distracciones
pueden hacerle perder el control de la herramienta.
2) Seguridad eléctrica
a) El enchufe de la herramienta eléctrica debe
coincidir con el tomacorriente. No modifique
nunca el enchufe de ninguna manera. No utilice
ningún enchufe adaptador con herramientas
eléctricas puestas a tierra. Los enchufes no
modificados y los tomacorrientes coincidentes
reducirán el riesgo de descargas eléctricas.
b) Evite el contacto del cuerpo con superficies
puestas a tierra tales como tuberías, radiadores,
estufas y refrigeradores. El riesgo de descarga
eléctrica se incrementa si su cuerpo está puesto a
tierra.
c) No exponga las herramientas eléctricas a la
lluvia o la humedad. La entrada de agua en una
herramienta eléctrica aumentará el riesgo de
descargas eléctricas.
d) No maltrate el cable de alimentación. No use
nunca el cable de alimentación para transportar
la herramienta eléctrica, tirar de ella o
desenchufarla. Mantenga el cable de alimentación
alejado de fuentes de calor, del aceite, de los
bordes afilados o de las piezas móviles. Los cables
de alimentación dañados o enredados aumentan el
riesgo de descargas eléctricas.
e) Cuando utilice una herramienta eléctrica en el
exterior, use un cable de extensión adecuado
para uso en exteriores. La utilización de un cable
E
adecuado para exteriores reduce el riesgo de
descargas eléctricas.
24
Instrucciones generales de seguridad
f) Si es inevitable trabajar con una herramienta
eléctrica en lugares húmedos, use un suministro
protegido por un dispositivo de corriente residual
(RCD). El uso de un RCD reduce el riesgo de
descargas eléctricas.
3) Seguridad personal
a) Manténgase alerta, fíjese en lo que está haciendo
y use el sentido común cuando esté utilizando una
herramienta eléctrica. No use una herramienta
eléctrica si se encuentra cansado o bajo la
influencia de drogas, alcohol o medicamentos.
Un momento de distracción mientras esté utilizando
una herramienta eléctrica puede provocar lesiones
corporales graves.
b) Use equipo de protección individual. Use siempre
protección ocular. El uso de equipamientos de
seguridad tales como máscara antipolvo, calzado de
seguridad antideslizante, casco duro y protecciones
auditivas adecuadas reducirá el riesgo de lesiones
corporales.
c) Evite el arranque accidental. Asegúrese de que el
interruptor está en la posición de apagado antes
de enchufar la herramienta. Si se transportan
las herramientas con el dedo en el interruptor o
se enchufan con el interruptor en la posición de
encendido, se invita a que se produzcan accidentes.
d) Quite toda llave de ajuste o de tuercas antes de
encender la herramienta eléctrica. Una llave de
tuercas o de ajuste que se ha dejado colocada en una
parte móvil de la herramienta eléctrica puede causar
lesiones corporales.
e) No adopte posturas forzadas. Manténgase en
posición firme y en equilibrio en todo momento.
De este modo, podrá controlar mejor la herramienta
eléctrica en situaciones inesperadas.
f) Vístase adecuadamente. No lleve ropa holgada
ni joyas. Mantenga el pelo, la ropa y los guantes
alejados de las piezas móviles. La ropa holgada, las
joyas o el pelo largo pueden quedar atrapados en las
piezas móviles.
g) Si se proporcionan dispositivos para la conexión
de sistemas de extracción y recolección de polvo,
asegúrese de que estén conectados y se usen
correctamente. El uso de estos dispositivos puede
reducir los peligros relacionados con el polvo.
4) Uso y cuidado de las herramientas eléctricas
a) No fuerce la herramienta eléctrica. Use la
herramienta eléctrica correcta para el trabajo a
realizar. La herramienta correcta funcionará mejor
y con más seguridad a la velocidad para la que se ha
diseñado.
Page 25

b) No use la herramienta eléctrica si el interruptor no
la enciende ni la apaga. Toda herramienta eléctrica
que no se pueda controlar con el interruptor es
peligrosa y debe ser reparada.
c) Desconecte el enchufe de la fuente de alimentación
y/o el paquete de batería de la herramienta antes
de realizar cualquier ajuste, cambio de accesorios
o almacenamiento de la herramienta eléctrica.
Estas medidas de seguridad preventivas reducen
el riesgo de arranque accidental de la herramienta
eléctrica.
d) Guarde las herramientas eléctricas que no esté
usando fuera del alcance de los niños y no deje que
personas que no estén familiarizadas con ellas o
estas instrucciones las utilicen. Las herramientas
eléctricas son peligrosas en manos de usuarios que no
hayan recibido capacitación.
e) Mantenga sus herramientas eléctricas. Revise que
no haya piezas en movimiento mal alineadas o
trabadas, piezas rotas o cualquier otra condición
que pueda afectar el funcionamiento de la
herramienta eléctrica. Si encuentra daños, haga
reparar la herramienta eléctrica antes de utilizarla.
Muchos accidentes son causados por herramientas
eléctricas que carecen de un mantenimiento adecuado.
MONTAJE
f) Mantenga las herramientas de corte afiladas y
limpias. Las herramientas de corte con bordes de
corte afilados son menos propensas a trabarse y son
más fáciles de controlar.
g) Utilice la herramienta eléctrica, los accesorios y
las brocas etc. de acuerdo con estas instrucciones
y de la forma prevista para el tipo específico de
herramienta eléctrica, teniendo en cuenta las
condiciones de trabajo y el trabajo a realizar. El uso
de la herramienta eléctrica para operaciones distintas
de aquellas para las que fue diseñada podría causar
une situación peligrosa.
5) Servicio y reparaciones
a) Haga que su herramienta eléctrica reciba
servicio de un técnico de reparaciones calificado,
utilizando únicamente piezas de recambio
idénticas. Esto asegurará que se mantenga la
seguridad de la herramienta eléctrica.
Paso 1
Monte las 2 abrazaderas de pata (H) a cada lado del
bastidor (E) usando los pernos para madera (J), resortes
de la abrazadera de las patas (I) y pomos redondos (G)
(FIG. 1). Asegúrese de que las patas de las abrazaderas
de pata entren en las ranuras de los bastidores en los
extremos de los soportes laterales. Atornille los pomos –
sólo requieren unas vueltas.
Paso 2
Monte los soportes laterales en los paneles extremos
delanteros y traseros (A y B) con los tornillos de cabeza
Phillips (L) y las tuercas de reborde (K), tal y como se
indica en la ilustración. No los apriete todavía. Cuando
todos los sujetadores estén en su sitio, ponga la unidad
sobre una superficie de trabajo plana y apriételos a fondo
con un destornillador.
Paso 3
Dé la vuelta a la unidad. Saque las patas delanteras (C)
de la posición de almacenamiento dentro de las patas
traseras (D).
Introduzca las patas traseras (con pies de goma) hasta
el fondo en sus sitios en la parte trasera de la unidad.
Introduzca las patas delanteras hasta el fondo en sus
sitios en la parte delantera. En este momento del montaje
no importa la ubicación de los agujeros en cada pata.
Bloquéelos apretando los pomos redondos.
Dé la vuelta inmediatamente al kit de ajuste de altura y
compruebe que todas las patas estén en contacto con
el suelo. Si está sobre una superficie irregular, haga los
ajustes necesarios extendiendo un poco una de las patas
para impedir que la unidad se mueva.
Almacenamiento de las patas
Las patas se pueden guardar en el cómodo lugar de
almacenamiento en la unidad misma. Afloje los pomos
redondos y quite las patas de sus sitios. Meta las patas
delanteras dentro de las patas traseras, asegurándose de
que los agujeros de cada tubo estén alineados. Introduzca
las patas por las aberturas del panel trasero y en las
aberturas del panel delantero, con los agujeros hacia
afuera (FIG. 2). Acople los agujeros de las patas por los
apéndices en las aberturas del panel trasero y gire los
sujetadores para bloquear las patas en su sitio.
Instrucciones generales de seguridad / Montaje
E
25
 Loading...