

Page 1
Perspective
-- Point Features --
By:
Tony M. Ramirez
January 2012
Page 2

Triton Imaging Inc.
Engineering Office
2121 41st Avenue, Suite 211
Capitola, CA 95010
USA
831-722-7373
831-475-8446
sales@tritonimaginginc.com
support@tritonimaginginc.com
© 2012 TRITON
This user guide is provided as a means to become familiar with TRITON’s software through an explanation of the
options available for processing sidescan data. The user interface presented in this guide is subject to change to
accommodate software upgrades and revisions. While every precaution has been taken to eliminate errors in this
guide, TRITON assumes no responsibility for errors in this document.
Users of this document are required to have a valid license for Perspective in order to activate the software.
TRITON hereby grants licensees of TRITON’s software the right to reproduce this document for internal use only.
Page ii
Page 3

Table of Contents
Point Features ........................................................................................ 1
Feature File Format .................................................................................. 1
Adding Features to Perspective ..................................................................... 3
Feature Information ................................................................................. 4
Displaying Features on Subbottom Profiles ......................................................... 5
Page iii
Page 4

UTM
LAT-
LON
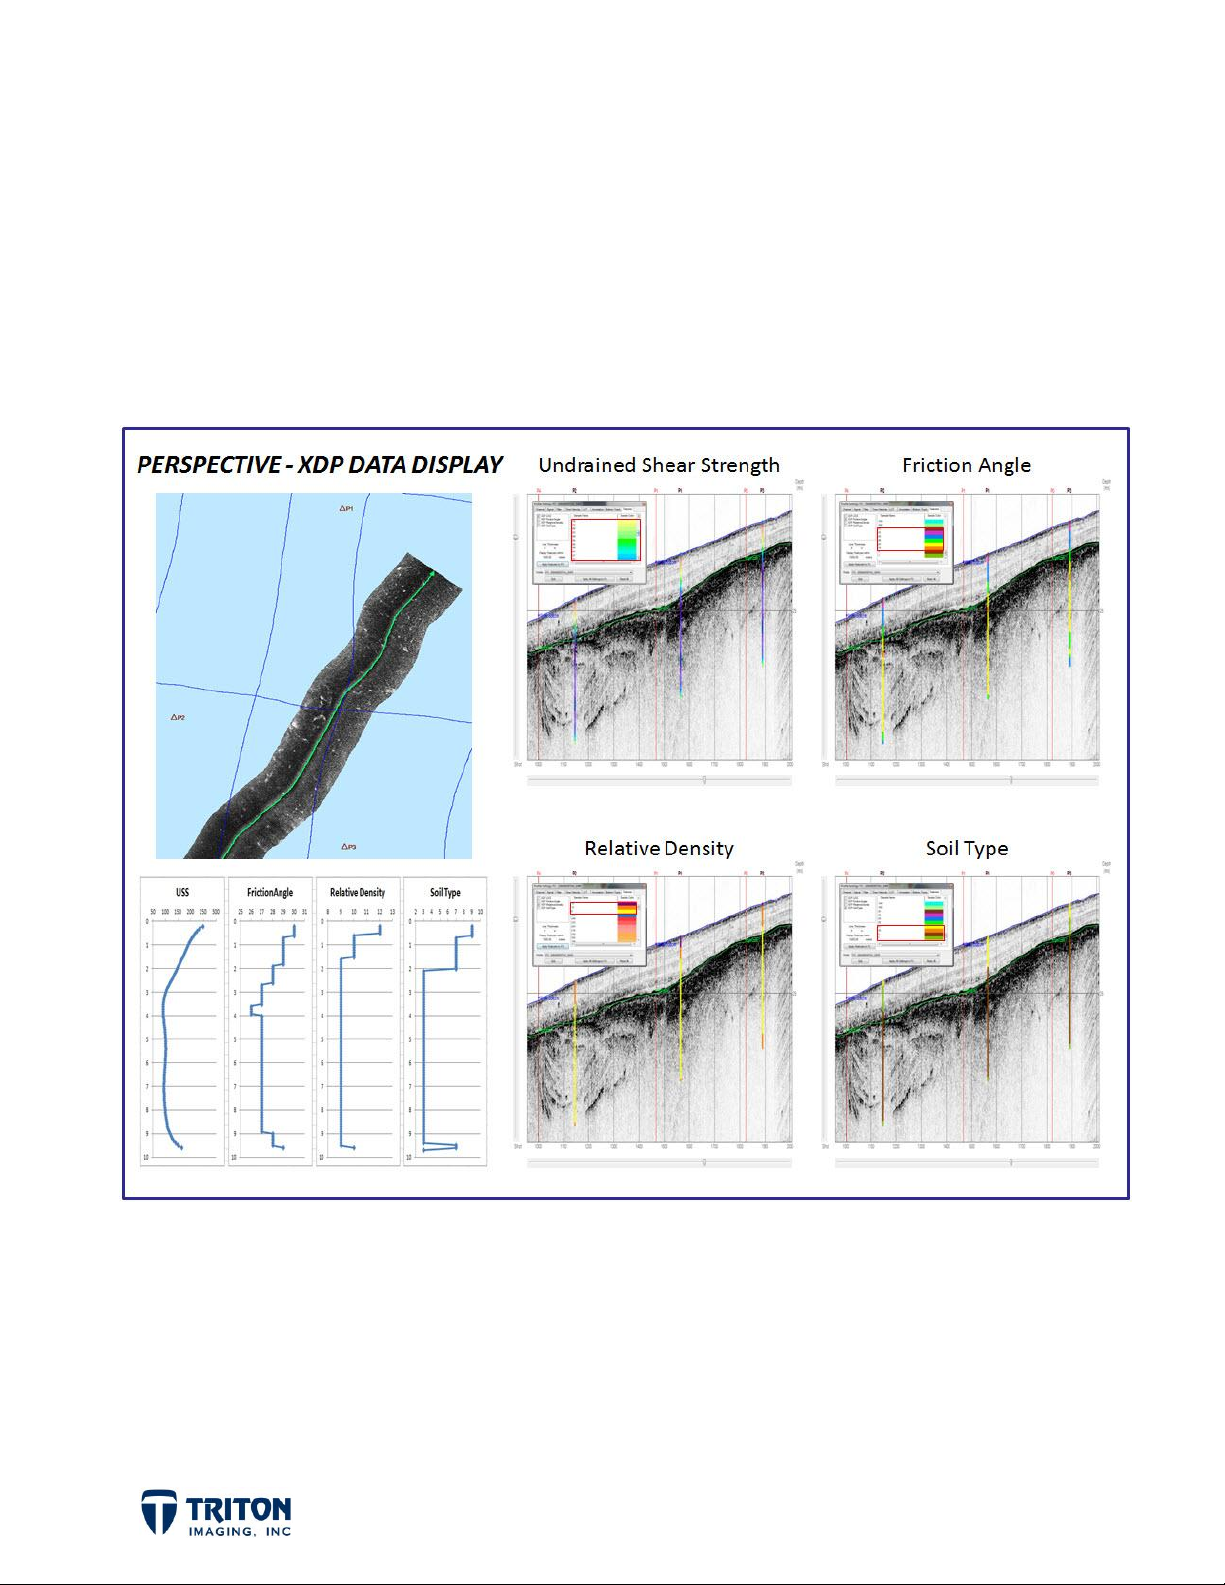
Point Features
Features are used in Perspective to allow the user to import geolocated ASCII data for
displaying locations in the map and profile views, and when relevant vertical information on
the profiles such as from boreholes or cores. In the main map window, there is a
file tree node where ASCII point data is organized in the project. For viewing the vertical
information (soil type, density, shear strength, etc.) overlaid on subbottom profiles,
options are found in the
Features
tab of the
Profile Settings
dialog.
Feature
Feature File Format
The format of the feature files is currently very specific and needs to be adhered to
exactly for the data to be parsed correctly. As shown in the image below, for each point
there are four types of information to be included: location, ID/Date/Time, comments and
depth information.
Although
profiles, leaving the depth information columns blank allows the user to bring in any point
data such as for displaying the locations of SVP and Tide stations, known wrecks in the
area, etc.
For subsurface data, in addition to sediment types any data value associated with depth
can be displayed on the profiles included downhole geophysical measurements, as long as
the data is formatted as shown above.
Features
were developed primarily to display subsurface information on seismic
Page 1
Page 5

Specifications for each section are as follows:
LOCATION: The first two columns of the feature file are for either NorthingEasting values or for Latitude-Longitude. The third column is to indicate the types
of coordinates used. Both of these files will import into the same location without
the projection wizard asking what projection/datum to select. Perspective will
assume the datum is WGS84 and that values in meters are for the project UTM
zone.
ID, DATE, TIME: These three columns are for indicating the feature ID to be used
for labeling in the map and profile views plus the date and time the data was
collected. Please note the format of the date and time. The date is mm/dd/yy (can
also use dd/mm/yy if preferred) and the time is hh:mm:ss (24 hour time). These
fields are optional and can be left blank if desired.
COMMENTS: This section is for comments of any kind. Please make sure there are
no commas in the comment as they will be treated as delineators when the software
parses the CSV or TXT file.
VALUE AND DEPTH INTERVAL: This is where the downhole information is entered.
There can be as many layer types and number of units as desired. For each layer
there are three columns. The first is for the data value. All unique data values in
the feature file will be automatically entered into the
Profile Settings Feature
for selecting the color to use for the profile display. The next two columns for each
layer indicate the start and end depths in meters for that unit. The top unit always
starts at a depth of zero since the depths are referenced to the water bottom
surface.
A couple important notes regarding the format of feature files:
The file types read by the feature import options include .CSV and .TXT (comma
separated) files.
The header used to create the file must NOT be included in the imported file as
shown in the two examples on the previous page of the same samples but with one
projected and the other not.
For feature files with no vertical information (tide stations, classification points,
etc.), the Value and Depth Interval column can be left blank.
tab
Page 2
Page 6

Adding Features to Perspective
Before adding feature files to Perspective it is important to first create a
to add the feature into. Feature Groups are used to organize features into user defined
groups. Each group is defined by a group name used to identify the group in the file tree,
with a symbol for displaying the location of the feature on the map view and also a user
selected color.
Feature groups are created by right-clicking on the root node of the Features file tree
and selecting
Selecting this option will open the
dialog shown right. Shown in this
dialog are the existing feature
groups and their associated symbol
and color.
Add / Edit / Remove Feature Group
.
Feature Group
To create a new feature group, enter
a name for the feature group, then
select a color and symbol to use.
Selecting the color will open a color
dialog to allow the user to select a
pre-defined or custom color.
A couple important notes regarding feature groups:
1. To display sounding data in the map view, select
put the labels (depths) centered on the feature location. Selecting a symbol will
offset the label up to the right of the symbol.
2. To add a new feature group when some already exist, you need to first deselect the
feature group highlighted in the list or its symbol will change when selecting the
symbol for the new feature group.
Once
the group name in the file tree and selecting
Feature Groups
are created, then features can be added to them by right-clicking on
Add
.
None
for the symbol type. This will
Page 3
Page 7

Feature Information
When feature files are added to the project, the information embedded in the ASCII file
is extracted and displayed in an information dialog. The information dialog can be launched
by right-clicking on the individual features in the file tree. Information displays for all
feature types are identical. An example of the information display for a group called
“Borehole” is shown below:
Included in the information dialog is the feature location, date & time if present in the
feature file, which file that feature is from, comments, and a graphical display of the
vertical layers present in the file with the depth interval each layer was defined. Also
indicated is the projected distances and headings to each of the subbottom profiles
loaded in the project.
The list on the top right shows the other feature files in this group present in the project.
To see the information for other boreholes, simply select the borehole in the list and the
display will update to represent the currently selected feature. When information is
shown for a particular feature, the label in the map view for that feature will increase in
size to highlight in the map which feature you have queried.
Page 4
Page 8
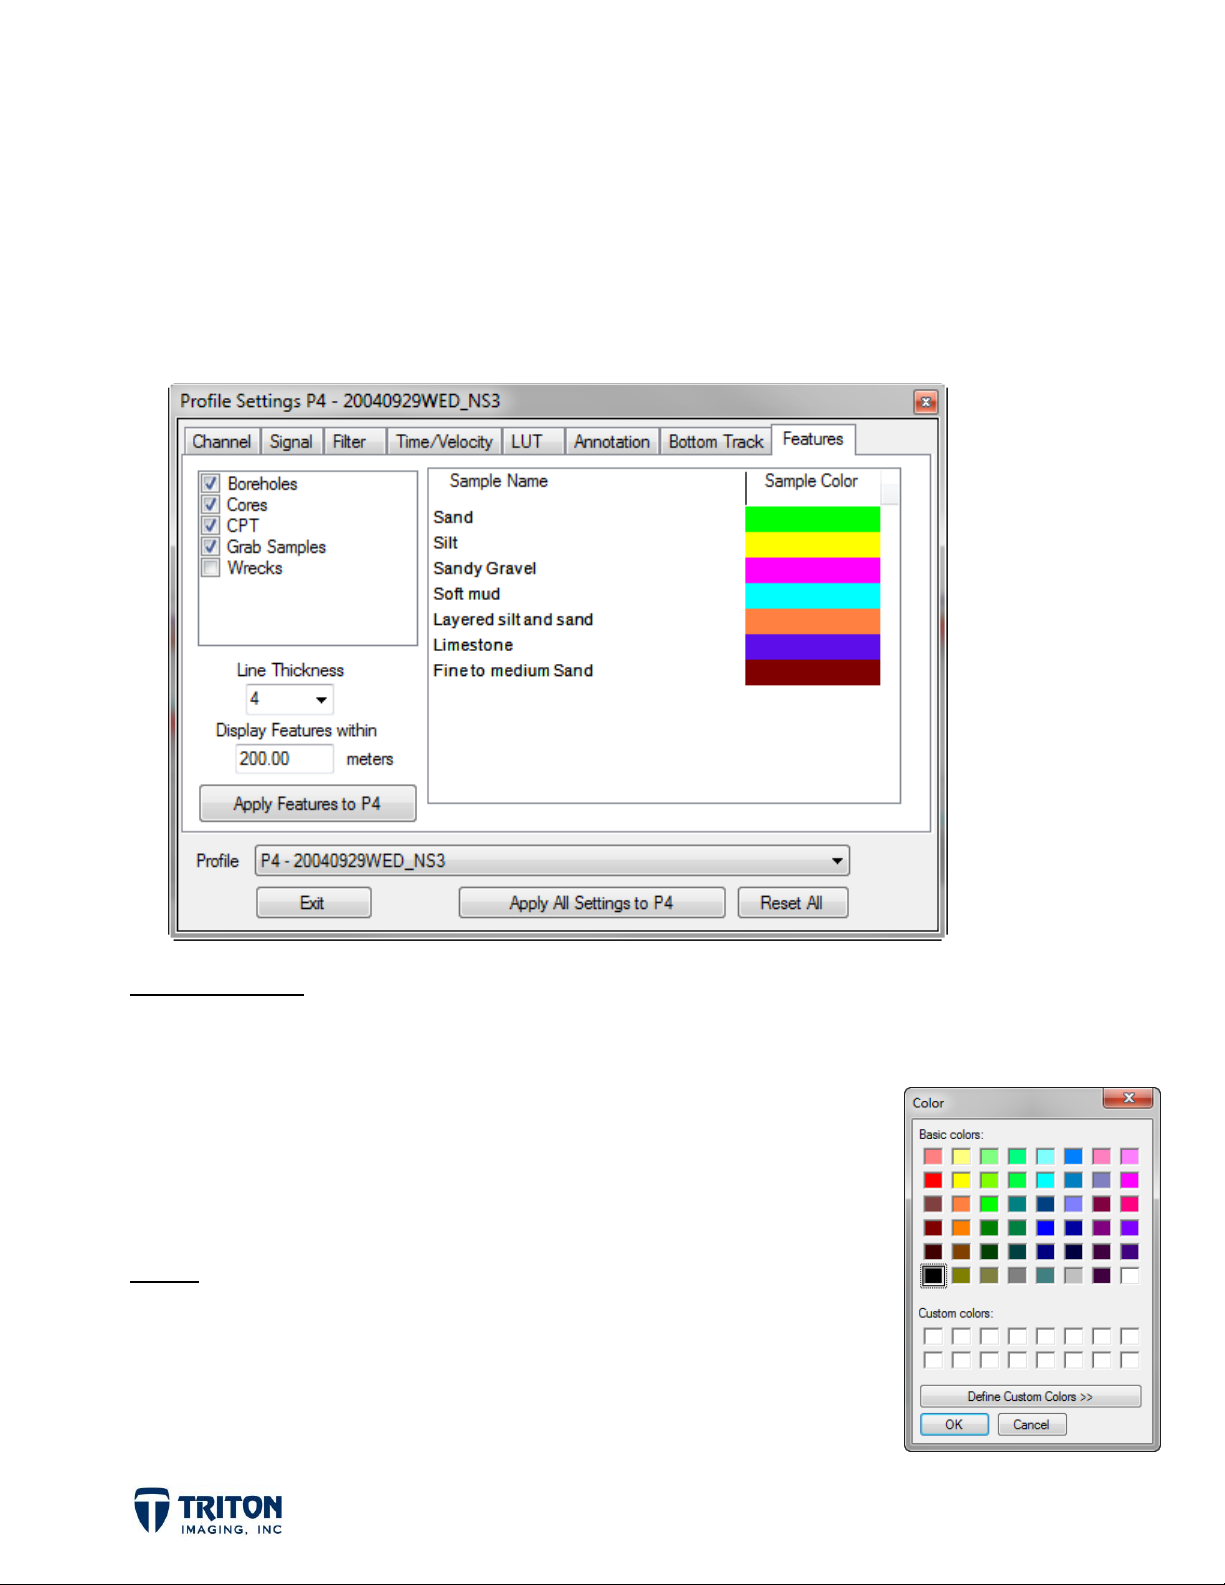
Displaying Features on Subbottom Profiles
For features that include vertical information such as sediment type, it is possible to
display this information overlain on subbottom profiles loaded in the project. Display
options are found in the subbottom
below is an example with 5 feature groups listed on the left and all the unique values (in
this case sediment types) identified with a pre-selected color.
Profile Settings
dialog under the
Features
tab. Shown
Display Options
The left side of the window has feature display options including:
list allowing users to select which features to display
line thickness adjustment
set the distance to project features onto the profile line
Colors
Shows color used for displaying each layer type identified in
the import files on profiles. To change the color, double-click
on the color to change and use the
Color
dialog to select
another option as shown right.
Page 5
 Loading...