

Page 1
UNBMXFIXBT
JOSHUA
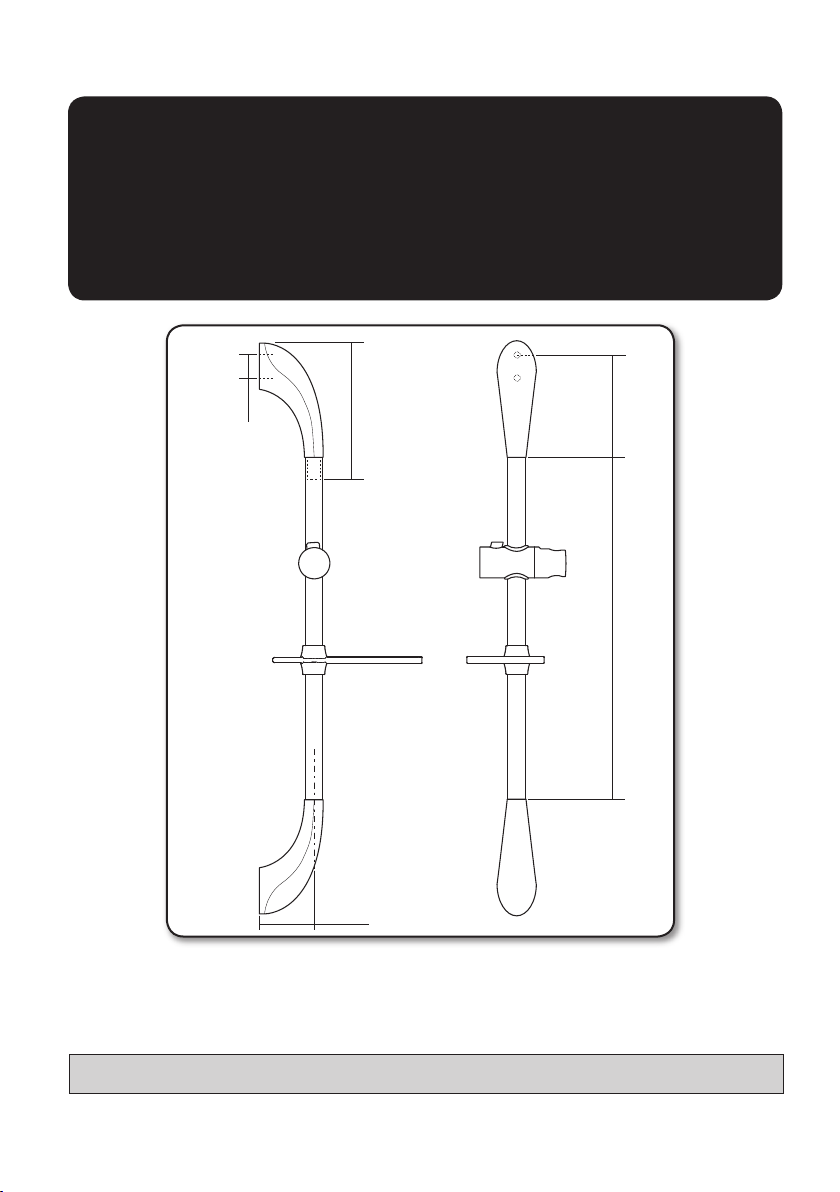
Riser rail assembly
36mm
139mm
65mm
96mm
430mm - or (940mm)
All dimensions are approximate.
Installation Instructions
Installers please note these InstructIons are to be left wIth the user
2180812C June 2010
Page 2

FITTING THE RISER RAIL ASSEMBLY
Slider/holder
assembly
Riser rail
Press and hold
button to unlock
mechanism
Soap dish/hose retainer
Fig.1
Fig.3
Fig.2
FITTING THE RISER RAIL
WARNING!
Check there are no hidden cables or
pipes before drilling holes for wall
plugs. Use great care when using
power tools near water. The use of
a residual current device (RCD) is
recommended.
Decide on the position for the rail on the wall
within the shower area. Proceed as follows:
• Offer one of the brackets to the wall for the
lower position only. Note there are three
holes in the brackets but two screws will
usually be enough. Mark the centre hole and
one of the other two.
• Drill and plug the wall.Drill and plug the wall. (An appropriate drill bit
should be used. If the wall is brick, plasterboard
or a soft building block, appropriate wall plugs
and screws should be fitted).
• Replace the bracket to the wall and secure
(fig.1).
• Locate the rail onto this lower bracket,
making sure the rail engages fully on the
bracket. Check that the indent in the riser rail
engages into the cut-out on the bracket end
(fig.2).
• Locate the second bracket on top of the rail.
Check the rail is vertical then mark the centre
hole and of the other two holes. Remove the
bracket and rail. Drill and plug the wall.
• Fit the slider/holder assembly and the soap
dish onto the riser rail. The slider can be
fitted with the showerhead on either the left
or right of the riser rail and the soap dish can
be fitted either way up (fig.3).
Page 3

FITTING THE RISER RAIL ASSEMBLY
Showerhead
Holder
Washers
Shower
Showerhead
• Place the rail onto the installed lower bracket.
Replace the upper bracket onto the rail and
secure the bracket to the wall with the screws
supplied (fig.4).
• Place a trim cover onto each bracket. Make
sure the large tab at the narrow end of the
trim cover fits into the slot between the rail
and bracket (fig.5) before pushing and
clicking the other end into place.
Should the need arise, the trim covers can be
removed by inserting a screwdriver into the
slot and carefully levering off the trim.
FITTING THE HOSE ANd SHOwERHEAd
• Feed the flexible hose through the
appropriate soap dish opening (fig.6) so
that the dish acts as a retaining ring (Water
Regulations).
Note: The holder is slightly tapered and the
showerhead and hose will only fit from one
direction.
• Screw the flexible hose onto the shower
outlet and showerhead (fig.7), making sure
the supplied washers are in place at both
ends of the flexible hose.
• Place the showerhead into the holder (fig.8)
and check that it fits correctly.
IMPORTANT: This riser rail assembly
is supplied with a hose retainer. Water
Regulations require the fitting of a double
check valve or similar device in the supply
pipework to prevent backflow if the retainer
is not used.
IMPORTANT: It is the conical end of the hose
which grips into the holder. The showerhead
will not fit in the holder without the hose
attached.
Fig.4
Fig.5
Fig.6
Fig.7 Fig.8
Page 4

SPARE PARTS
Ref. description Part Number
Kit without riser rail
White 88900024
Satin grey 88900025
Chrome 88900026
1. Bracket (single)
White 7054060
Chrome 7054064
Satin 7054062
2. Bracket Cap (single)
White 7054061
Chrome 7054065
Satin 7054063
3. Riser rail
430 mm - anodised 7042409
430 mm - white 7042411
430 mm - chrome 7042412
940 mm - anodised 7042935
4. Showerhead holder
White 83313470
Chrome 83314210
Satin 83314200
5. Soap dish - white 7054123
Soap dish - clear 7054124
3
4
5
Flexible hoses available in the following sizes:
1.00 m in white, chrome and gold
1.25 m in white, chrome and gold
1.75 m in chrome only
2
Please note: No 1 and 2 are used for both top and
bottom bracket.
Please refer to shower installation and operating instructions for service details
1
 Loading...