

Page 1

Quick Start Guide for Using TDS NOMAD GPS Equipment
t
r
Initial Unit Check
For each GPS unit, ensure you have:
• TDS NOMAD GPS Unit
• Garmin backpack receiver (antenna)
• Portable battery pack for receiver (usually found in the back pocket of backpack)
• GPS Receiver Battery Charger w/ connectable 110v power supply
• AC adapter for charging your GPS unit
• USB cable for data transfer
• Stylus with a lanyard to enter data from unit display (do not use a ballpoint pen)
Receiver battery
pack charger
Backpack receive
Battery pack
for receiver
Stylus with
lanyard
GPS uni
GPS unit
charger
USB cable
Make sure the GPS receiver battery is charged by depressing the “TEST” button on top of
the battery. All four lights should come on when the battery is completely charged. If charging is
needed, plug the barrel adapter into the large port on the side of the battery pack labeled
“Antenna/Charger” and then plug the charger into an electrical outlet for several hours.
C:\Eric\UFST_material\GPS_Instructions\Quick Start Guide for Using TDS NOMAD GPS Equipment.doc Page 1 of 18
Last edited: 9/3/2009 at 11:42:33 AM
Page 2
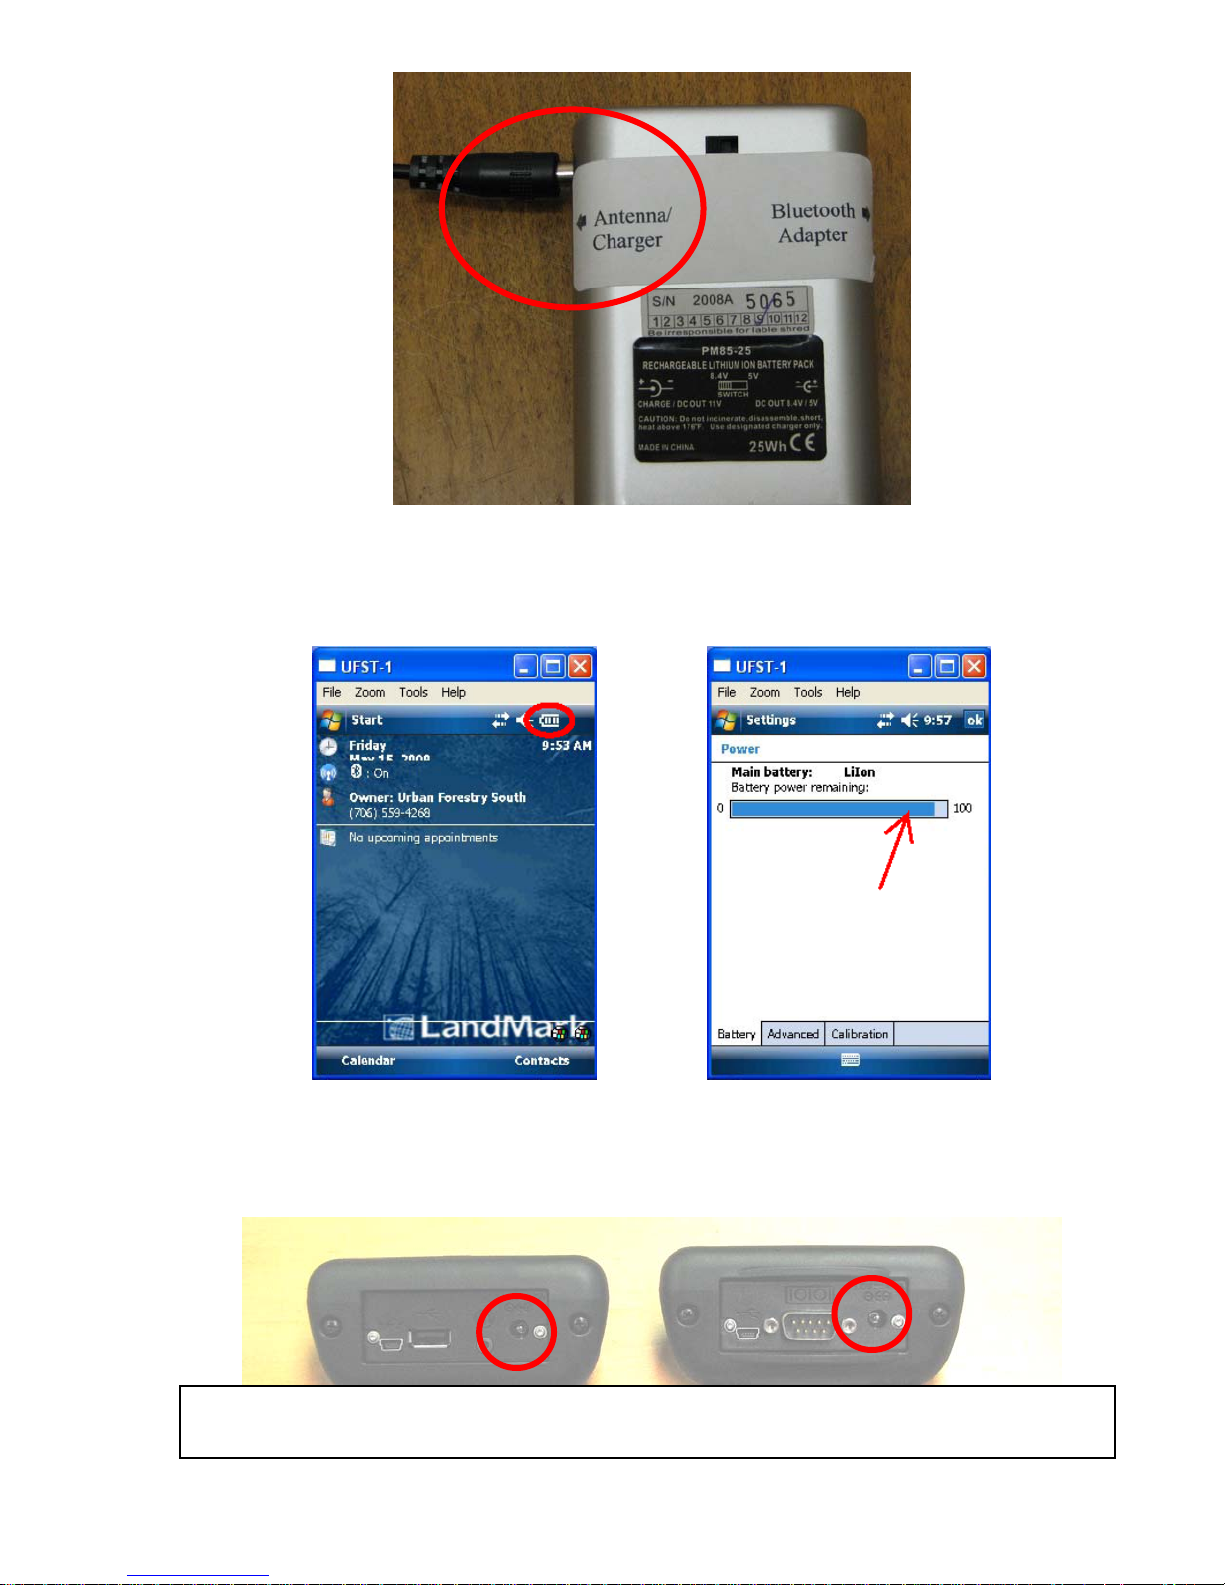
Make sure the GPS unit is charged by depressing the green on/off button in the lower, left-
hand portion of the unit, tap on the display screen to minimize the Owner Information screen, and
tap on the battery icon in the upper, right-hand portion of the display.
The main battery display box should be light blue from 0 to 100. If not, charge the unit for several
hours using the AC charging adapter. The barrel adaptor from the charger plugs into the port on the
bottom of the unit.
Depending on the type of boot the GPS unit has on the bottom of the unit, the charger will plug into the circular
port on the right-hand side of the boot.
C:\Eric\UFST_material\GPS_Instructions\Quick Start Guide for Using TDS NOMAD GPS Equipment.doc Page 2 of 18
Last edited: 9/3/2009 at 11:42:33 AM
Page 3
Preparing the GPS Unit for Data Collection
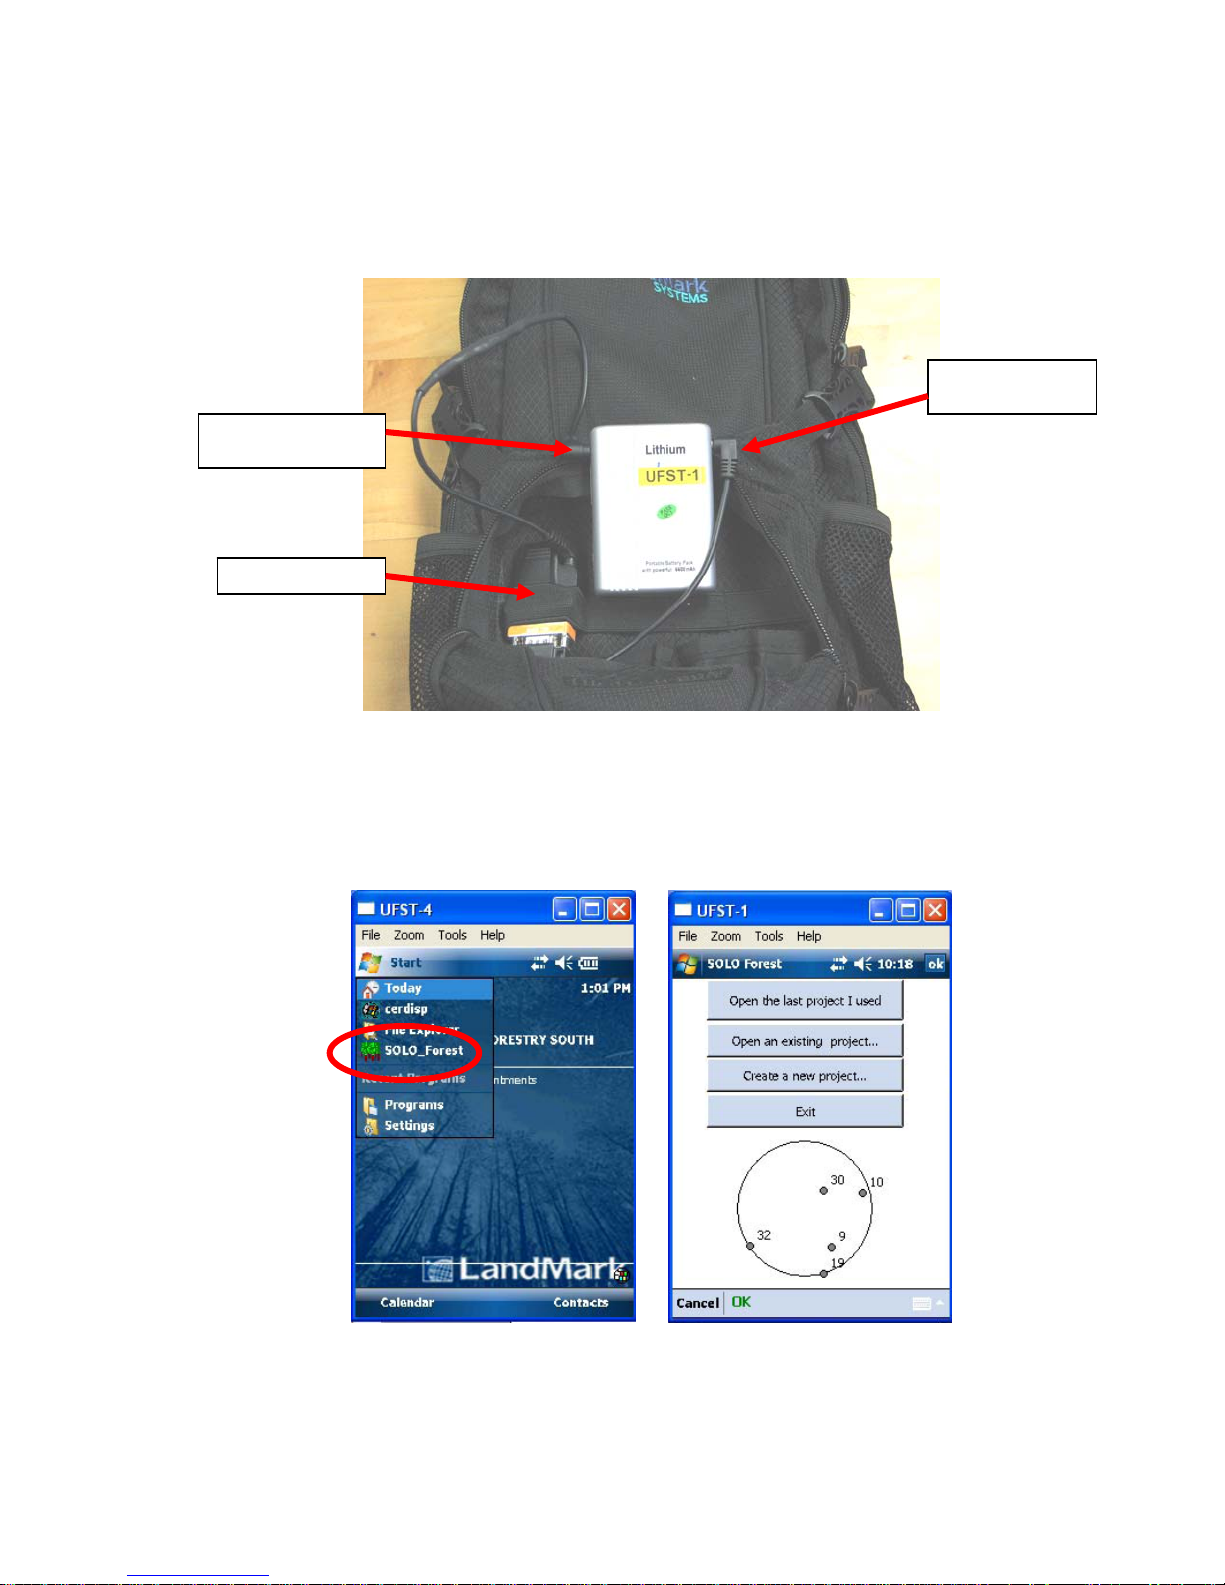
Connect battery and Bluetooth cables to receiver.
insert the larger, barrel adapter into the receiver battery pack located on the side and labeled
“Antenna/Charger”. Insert the smaller barrel adapter into the port labeled “Bluetooth Adapter”.
Ensure that the adapters are fully seated in the battery.
Bluetooth adapter
Bluetooth device
In the back pocket of the backpack,
Receiver adapter
Turn on GPS unit. Depress the green on/off button in the lower, left-hand portion of the unit.
Start SOLO_Forest software
screen. Tap on the “Start” icon in the upper, left-hand corner of the display window, and then tap on
“SOLO_Forest”.
. Tap on the display screen to minimize the Owner Information
After a few moments, the application will appear on the display showing the present satellite
configuration and giving you the option of opening an existing project, creating a new project, or
exiting.
C:\Eric\UFST_material\GPS_Instructions\Quick Start Guide for Using TDS NOMAD GPS Equipment.doc Page 3 of 18
Last edited: 9/3/2009 at 11:42:33 AM
Page 4

Create a new project. Tap on “Create a new project…” to reveal a screen that will allow you to
name your file. The file path will be displayed near the top of the screen. Ensure that it reads “\My
Documents\SOLO\”. All files should be stored in “\My Documents\SOLO\”. If another path is
displayed, navigate to it by tapping on the icon with the up-arrow in the folder until the path name
reads “\My Documents\SOLO\”. In the Name box, the date and time will appear by default in the
form of yymmdd_tttt (military time). Always keep this date and time in the file name. This will
help organize the data files. If the curser is not flashing at the beginning of the date and time in the
box, tap on the box near the beginning of the date and move it to the beginning using the directional
arrows on the screens pop-up keyboard. Type in the crew number (i.e. C3_) which should also be
the number on the GPS unit label. Use an underscore or hyphen to separate the crew id number from
the date/time. Tap on the green “OK” at the bottom of the screen when you are done naming your
file.
Navigate to appropriate file
path
Click on OK when done
File path
Tap on Name box at the beginning of
date/time and type in crew id
(i.e. C3_090510_0838).
Set up GPS Configuration. Before the start of a project, you need to set certain parameters on the
GPS unit, and these parameters will not change again unless you manually change them. After
giving your project a name, SOLO_Forest displays a series of screens giving you the opportunity to
change parameters. Tabs on the upper portion of the screen allow you to navigate among the screens
to change these parameters.
C:\Eric\UFST_material\GPS_Instructions\Quick Start Guide for Using TDS NOMAD GPS Equipment.doc Page 4 of 18
Last edited: 9/3/2009 at 11:42:33 AM
Page 5
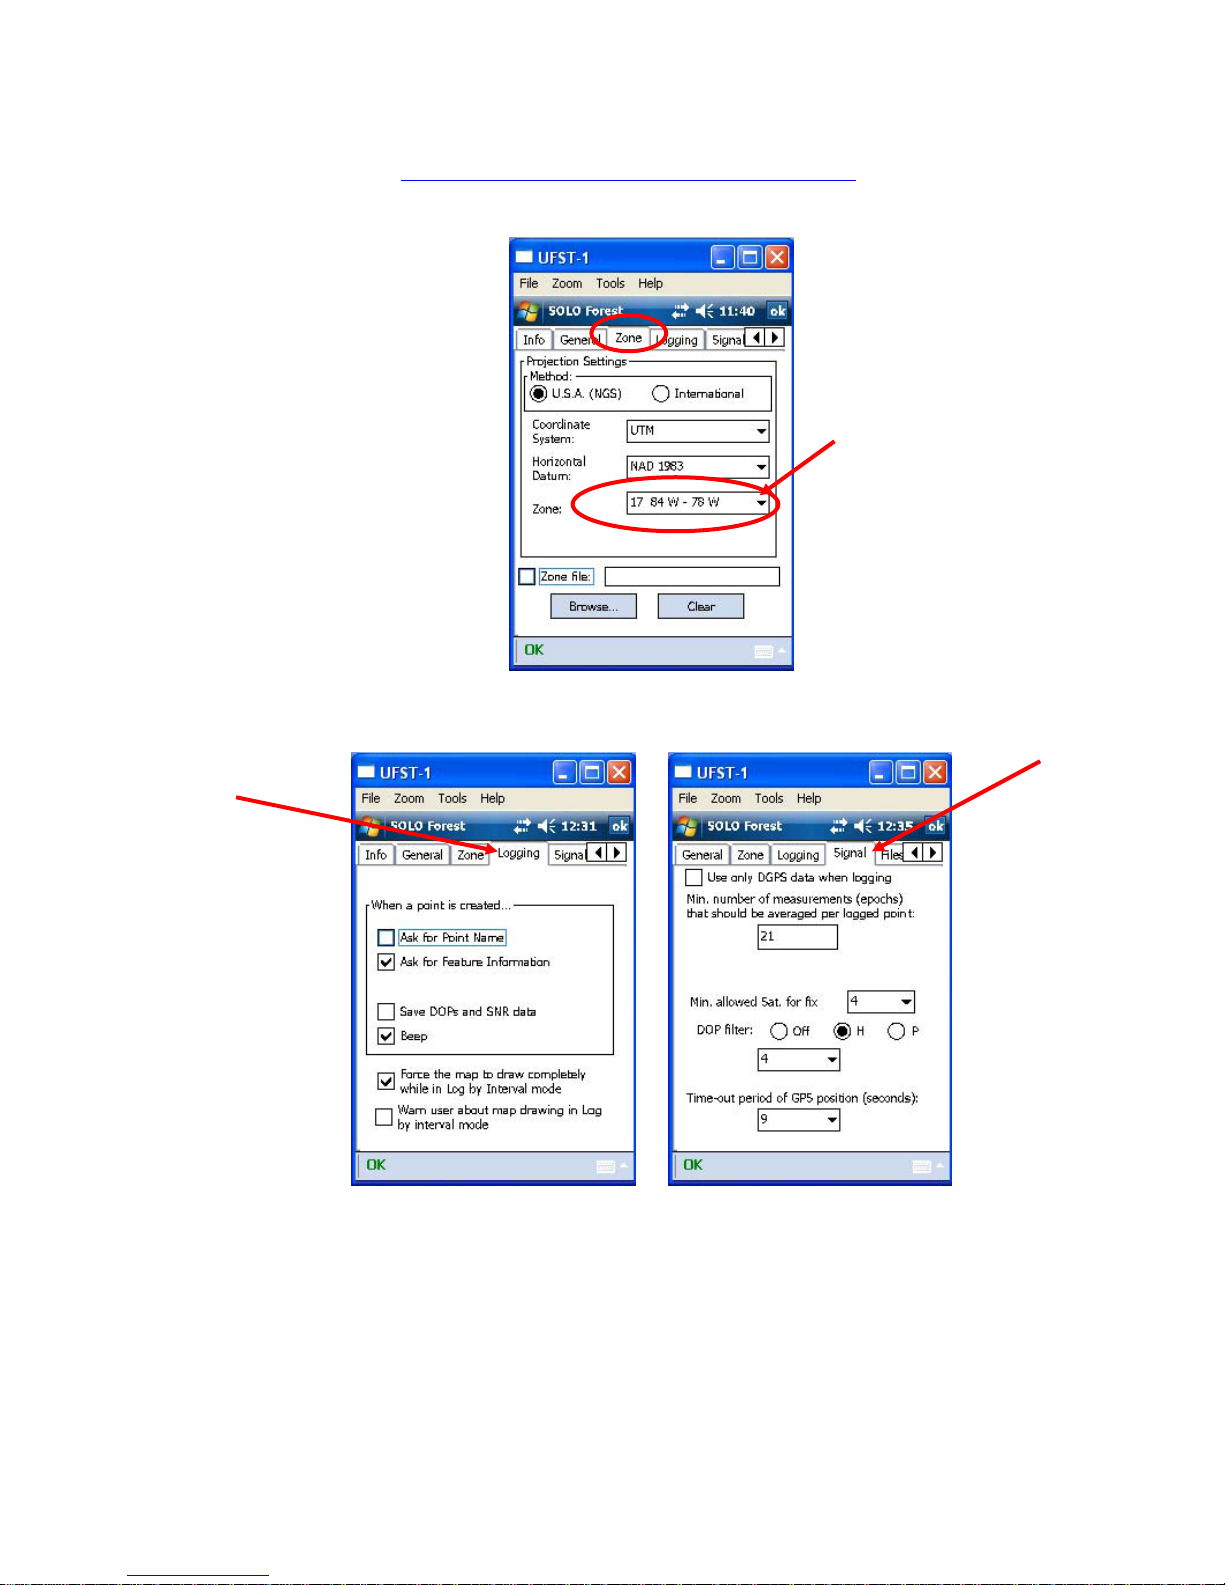
Zone: Except in rare circumstances, we will always work in the UTM coordinate system and the NAD
1983 horizontal datum. However, depending on where the incident is located, the zone will need to
be changed. A UTM zone map by state can be found on the www.UFST.org website by typing in
utm in the search box (http://www.ufst.org/resources/coordinate-tools/). Tap on the zone drop-down
menu and choose the zone in which the incident is located.
Drop-down menu to choose zone
Logging / Signal: The logging and signal screens should look like this –
C:\Eric\UFST_material\GPS_Instructions\Quick Start Guide for Using TDS NOMAD GPS Equipment.doc Page 5 of 18
Last edited: 9/3/2009 at 11:42:33 AM
Page 6
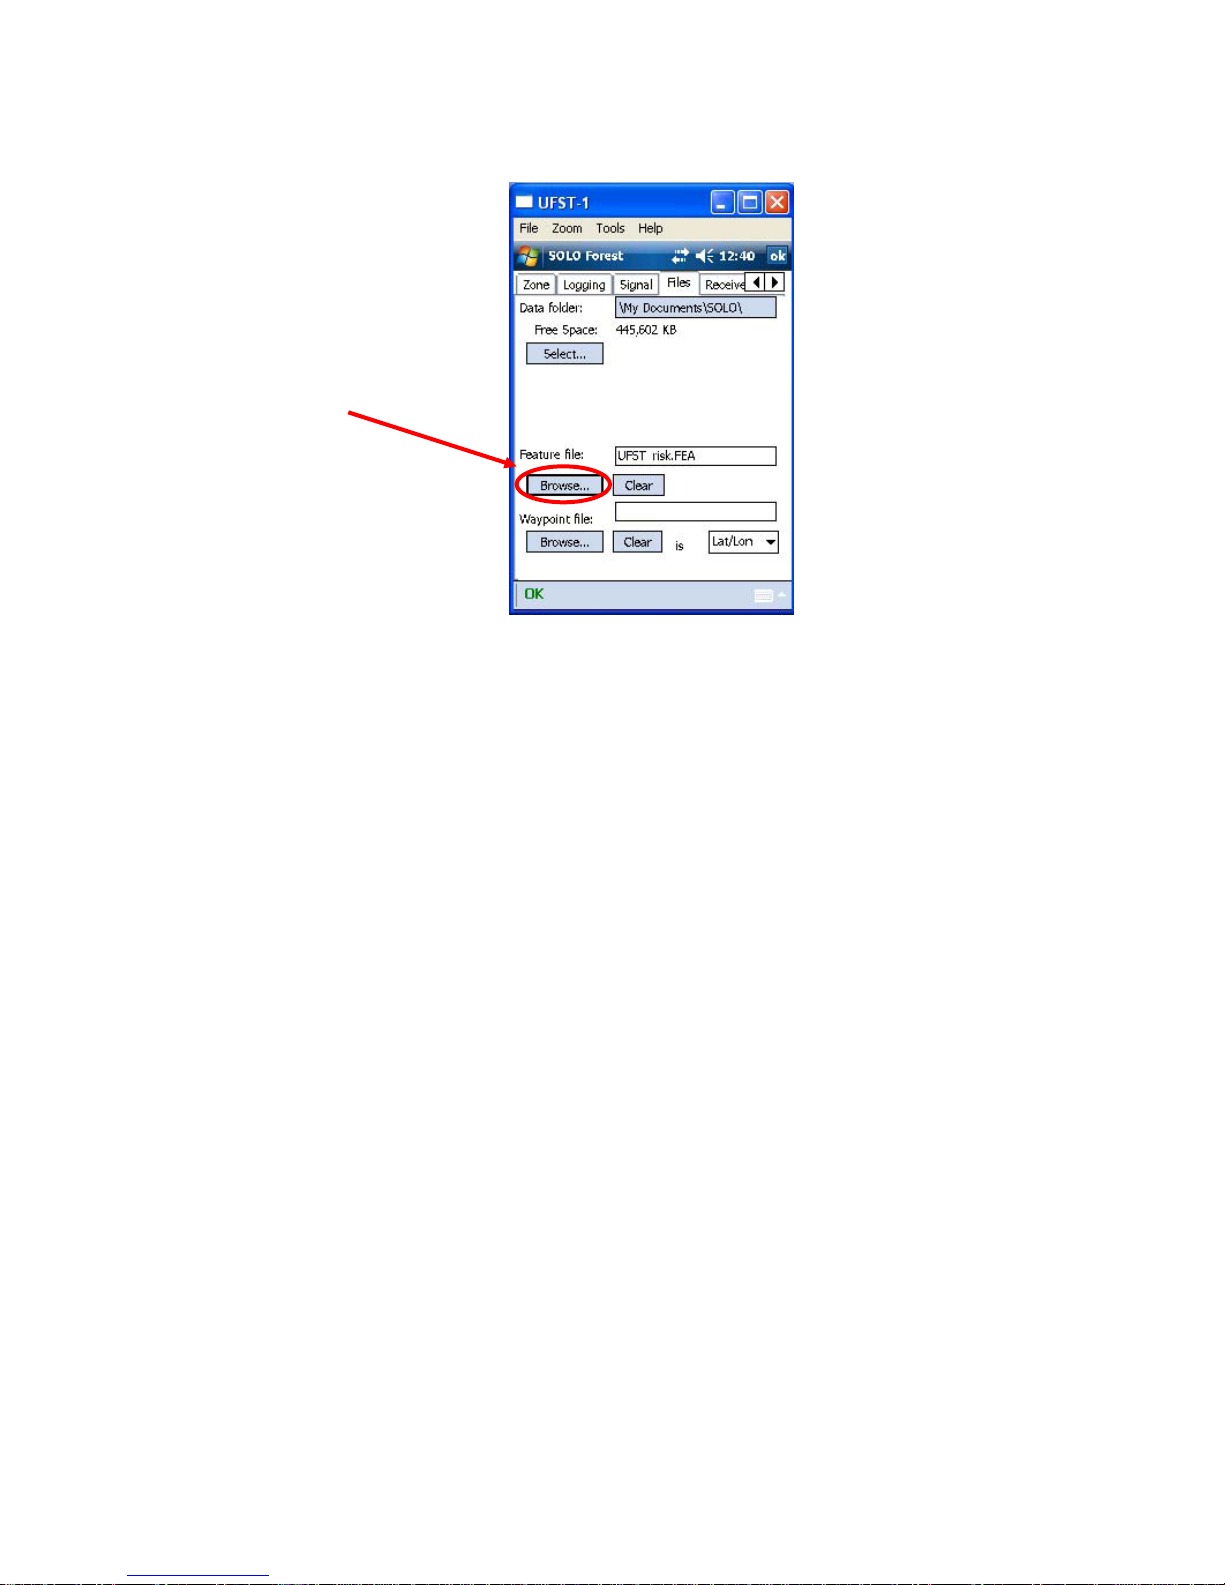
Files: The Files screen is where you choose the feature file that will allow you to assign attributes to
the trees. You may need to search for the appropriate feature file by tapping on the “Browse…” box
under “Feature file” and selecting it. In most cases, you will be using the UFST_risk.FEA as the
feature file.
Browse to find the appropriate feature
file
The other screens (Info, General, Receiver, Laser, Com, and Raw Data) should not need to be
altered. Avoid changing anything in these screens.
Tap on the green OK at the lower, left-hand side of the display to save these changes and begin
collecting data.
FYI- File Types in Solo_Forest
Several different file types will be saved in the target folder (i.e. My Documents\SOLO) in
Solo_Forest. Each is briefly explained below:
*.UDF – This is the project file that Solo_Forest sets up when you create a project. It contains all of the
information that you set in the above series of screens. Never delete the UDF file.
*.FEA – This is the feature file that is used to assign attributes to features.
*.TXT – Various text files can be imported to the target folder and may be used to edit a feature file if
needed.
*.SHP – This is a shape file that gives the spatial location of the trees or stumps assessed.
*.DBF – This is the database file that holds the attributes for the trees or stumps in the shape file.
*.SHX – This is the index file that links the shape file (*SHP) with the database file (*.DBF).
*.PRJ – This is the projection file needed in the GIS project to correctly geo-reference the assessed
trees’ or stumps’ spatial location.
C:\Eric\UFST_material\GPS_Instructions\Quick Start Guide for Using TDS NOMAD GPS Equipment.doc Page 6 of 18
Last edited: 9/3/2009 at 11:42:33 AM
Page 7

Collecting GPS Data
Verify GPS precision. If your GPS unit has a lock on the appropriate number of satellites that you
designated in your Signal set-up (usually 4 satellites), you should have a blinking crosshairs on your
display. Underneath that box with the blinking crosshairs will be displayed GPS precision
information such as HDOP, the number of satellites locked, and latitude/longitude coordinates. If
you do not see any of these, your GPS unit does not have an adequate lock onto satellites. You may
need to move to an area that will give you an open view of the sky (i.e. an open parking lot or a ball
field). Occasionally, the Bluetooth cable connections from the battery pack become loose. Ensure
the cable connections are fully seated.
Example of GPS unit without an adequate
lock on satellites. No cross-hairs nor GPS
precision information
.
Example of GPS unit with an adequate lock on
satellites. Crosshairs and GPS precision
information are displayed
.
Log a point. To begin collecting data on a feature (i.e. damaged tree), place the backpack receiver
next to the tree, on the south side if possible, and tap the icon at the bottom of the screen that looks
like a flag.
Tap on flag icon to log a point
C:\Eric\UFST_material\GPS_Instructions\Quick Start Guide for Using TDS NOMAD GPS Equipment.doc Page 7 of 18
Last edited: 9/3/2009 at 11:42:33 AM
Page 8

Select your feature. The feature log screen has three tabs at the top of the display from which to
choose. For the first point logged in a new project, all available features will be displayed
automatically under the “All” tab. Choose the feature you wish to record (i.e. park tree, street tree,
or stump) by tapping on it, and then tapping on the green OK at the bottom of the screen.
With each subsequent feature that will be logged, the most recently logged feature will be displayed
under the “Recent” tab. CAUTION: The attributes assigned to the previous tree will be displayed,
so ensure that all of the feature’s attributes represent the current tree.
Assign attributes and ensure GPS precision. The two tabs at the top of the display labeled
“Attributes” and “GPS Status” allow you to assign attributes to the damaged tree and monitor the
precision of its spatial location. Tap on the “Attributes” tab to complete the on-screen survey. For
the first feature of a new project, make sure each crew enters their team and crew number (i.e.
T1C3). This will help the GIS technician keep track of the data. After completing the attribute
survey, tap on the “GPS Status” tab to ensure its spatial integrity. If the precision is adequate (Dev:
< 10 ft) and you have collected 21 points, tap on the “Log Now” box to save the data. If the
C:\Eric\UFST_material\GPS_Instructions\Quick Start Guide for Using TDS NOMAD GPS Equipment.doc Page 8 of 18
Last edited: 9/3/2009 at 11:42:33 AM
Page 9

precision is not acceptable, tap on the icon at the lower, right-hand portion of the point display
screen to restart the GPS point averaging.
To check GPS precision
Restart GPS
point average
Adequate precision is
usually < 5 ft or 1.5 m
Wait to receive at least 21
points
Log now to save your data
Offsets: Occasionally GPS precision is inadequate due to dense tree canopy or building
interference. You may need to place the receiver away from the intended target in order to get a
better view of the sky and lock onto satellites. After entering attributes for the target and before
logging your point, tap on the “prompt for offset” box. Now when you tap on the “Log Now” box,
an offset dialogue window will appear asking for a bearing and distance. Enter the compass bearing
(in degrees) from the receiver to the target and the distance (in feet or meters, whichever is asked
for). Tap on the OK box in the dialogue window to log the feature and save the data.
Tap OK after
entering
distance and
direction
C:\Eric\UFST_material\GPS_Instructions\Quick Start Guide for Using TDS NOMAD GPS Equipment.doc Page 9 of 18
Last edited: 9/3/2009 at 11:42:33 AM
Page 10

Exporting Data to Shape Files
Set up default export features. After collecting data for the day, export the data into a shape file
so that the data can be displayed in a GIS project. On your GPS unit while in your current project,
tap on File (at the bottom of the display), tap on “More” in the pop-up window, and tap on
“Export…” to display the export dialogue window.
Select a folder in
which to store
the shape file
Export dialogue window
In the export dialogue window, tap on the “Select…” box next to the Output Directory to select a
folder in which to put the shape file. Shape files should be stored in “My
Documents\SOLO\Export”. If the file path does not point to the Export folder in Solo, then navigate
to and select it, and tap on the green OK at the bottom of the display.
Navigate to the Export folder
in My Documents\Solo
C:\Eric\UFST_material\GPS_Instructions\Quick Start Guide for Using TDS NOMAD GPS Equipment.doc Page 10 of 18
Last edited: 9/3/2009 at 11:42:33 AM
Page 11

Ensure that the data are being stored in an ArcView Shape file by selecting it in the Export Format box,
and then tap on the Options box. Make sure the options display looks like the following:
Tap on the “Projections…” box near the bottom of the display. There are two tabs at the top of the
display, General and Zone. Under General, set the “Position display” to “Northing-Easting” and the
“Distance unit” to “Meters”. Under Zone, ensure the correct zone is displayed (you should not need
to change the Coordinate System or the Horizontal Datum boxes). Tap on the green OK at the
bottom of the display.
After making these changes, SOLO_Forest will use them as the default for all subsequent projects,
so this procedure needs to be done at the end of the first day’s data collection. However, it is always
a good idea to recheck occasionally to make sure these settings have not been changed inadvertently.
C:\Eric\UFST_material\GPS_Instructions\Quick Start Guide for Using TDS NOMAD GPS Equipment.doc Page 11 of 18
Last edited: 9/3/2009 at 11:42:33 AM
Page 12

Export the data. While in the project that you want to export, open the export dialogue window
(tap on File, tap on “More”, and tap on “Export…”) and check that the default export features are
accurate (see Set up default export features above). Ensure that the radio button next to “Group
features as allowed in multiple files” is populated and a check mark is in the box next to “Prompt for
filenames”, and then tap on the “Export” box.
Name each feature by tapping on the file name box and removing the last three zeros on the end of
the file name. Tap on the green OK at the bottom of the screen. Each feature type (RiskPark,
RiskStrt, and Stump) will be named similarly.
Click on the box and
remove the last three
zeros from the file name
A pop-up window will appear indicating the number of files written to the export folder. Tap OK,
and then tap on “Close” at the bottom of the display screen. If you are done with the GPS unit, tap
on File and then Exit.
C:\Eric\UFST_material\GPS_Instructions\Quick Start Guide for Using TDS NOMAD GPS Equipment.doc Page 12 of 18
Last edited: 9/3/2009 at 11:42:33 AM
Page 13

How to Transfer Exported Shapefiles from the GPS Unit to Laptop Computer
Transferring of data (i.e. exported GIS shapefiles) from the Nomad to the project computer is a copy
and paste operation (see section on How to Use File Explorer for more details). The goal is to make a
copy of the exported Nomad data for eventual transfer to the PC and the GIS program. Note: Do not
delete any files from the Nomad while on an incident.
The recommended method of data transfer is via the USB Flash Drive. This requires two transfers;
1) from Nomad to USB flash, and 2) from USB flash to PC. An alternative method is via ActiveSync.
This transfers directly from the Nomad to the PC (if ActiveSync is functioning properly). This is a
good method, but daily data must still be backed up onto the USB flash or other non-PC storage. The
method of last resort is via the storage card or SD card. This method also requires two transfers; 1)
from Nomad to SD card, and 2) from SD card to PC, as well as the removal of the top cover and
extraction of the storage card. The steps for each method are detailed below.
Via USB Flash Drive
Insert mini-USB adapter into bottom of GPS unit and the USB device into the adapter.
Open File Explorer on the GPS unit, and navigate to “My Documents\Solo\Export”. To open
File Explorer, tap on the Start icon in the upper, left-hand portion of the screen and then tap on File
Explorer. To navigate to the Solo export folder, tap on the My Documents folder, tap on the Solo
folder, and then tap on the Export folder.
Select and copy exported files. In the Export folder, select all files exported for that day by tapping
on the first file of the group, tapping on the Shift key on the keyboard screen display, and then
tapping on the last file of the group. After all files are selected (they should be highlighted), tap on
the Control key (Ctl) and then the letter “C” on the keyboard to copy the files.
C:\Eric\UFST_material\GPS_Instructions\Quick Start Guide for Using TDS NOMAD GPS Equipment.doc Page 13 of 18
Last edited: 9/3/2009 at 11:42:33 AM
Page 14

Select all files for the day by
tapping on first file in group
Tap the shift key
Tap the last file in the group
Copy all selected file by tapping on
the Ctl key
Tap on the letter C key
Navigate to the Hard Disk and paste the exported files. Tap on the Up icon on the bottom of the
screen to find the Hard Disk device. Tap on the Hard Disk folder to open it and any project subfolder if applicable. Using the on-screen keyboard, tap on the Control Key (Ctl) and then the letter
“V” to paste the files into the folder.
Copy all files onto the
hard disk by opening the
keyboard display, tapping
on Ctl and then tapping on
the letter V.
Navigate to the Hard
Disk (flash drive) using
the Up icon
Copy files from flash drive to the appropriate folder on the project computer. Remove the
flash drive from the GPS unit, plug it into the project computer, and using Windows Explorer (Start,
All programs, Accessories, Windows Explorer) copy all of the exported files from the flash drive to
the project folder.
Tap on
keyboard icon
to open
keyboard
display
C:\Eric\UFST_material\GPS_Instructions\Quick Start Guide for Using TDS NOMAD GPS Equipment.doc Page 14 of 18
Last edited: 9/3/2009 at 11:42:33 AM
Page 15

Via ActiveSync: Because of occasional problems with syncing GPS units to other computers
using ActiveSync, this method is an alternative for copying exported data from the GPS unit to the
project computer. Connect your GPS unit with the project computer using the USB cable provided
and allow ActiveSync to connect to the unit. Do not set up a partnership between the computer
and the GPS unit when prompted to do so. Allow the GPS unit to connect as a guest by clicking
on Cancel. In the Microsoft ActiveSync window on your laptop, select the “Explore” icon to display
the contents of your Mobile Device (GPS unit).
Do not set up a partnership.
Click on Cancel
To display the contents of
the GPS unit click Explore
Double click on the “Solo” folder
C:\Eric\UFST_material\GPS_Instructions\Quick Start Guide for Using TDS NOMAD GPS Equipment.doc Page 15 of 18
Last edited: 9/3/2009 at 11:42:33 AM
Double click on the Solo folder
Page 16

Double click on the Export folder to display all of the exported files that have been created.
Double click on the
Export folder
Select all export shapefiles that were generated for that day’s work by highlighting them.
Highlight them by clicking on the first file in the group, holding down the shift key, clicking on the
last file in the group, and then letting go of the shift key. A shapefile uses supporting files in
ArcMap. These files will have the extensions SHP, SHX, DBF, and PRJ. It is important to select
all files in the shapefile group. Click on “Copy the selected items” under Folder Tasks.
Select all files in the shapefile group
collected for the day
Click on Copy the selected items to send
files to the appropriate project folder
In the copy selected items dialogue window, navigate to the project folder where all shapefiles are
stored as set up in the UFST Project Creation document.
C:\Eric\UFST_material\GPS_Instructions\Quick Start Guide for Using TDS NOMAD GPS Equipment.doc Page 16 of 18
Last edited: 9/3/2009 at 11:42:33 AM
Page 17

Via the Storage Card: This is the data transfer method to use when all others fail. Each GPS
unit should have a 2.0 GB storage card located beneath the protective cap on top of the unit. The cap
can be removed using the unit’s stylus which has a Phillips head screwdriver under its protective
rubber cap.
Open File Explorer on the GPS unit, and navigate to “My Documents\Solo\Export”. To open
File Explorer, tap on the Start icon in the upper, left-hand portion of the screen and then tap on File
Explorer. To navigate to the Solo export folder, tap on the My Documents folder, tap on the Solo
folder, and then tap on the Export folder.
Select and copy exported files. In the Export folder, select all files exported for that day by tapping
on the first file of the group, tapping on the Shift key on the keyboard screen display, and then
tapping on the last file of the group. After all files are selected (they should be highlighted), tap on
the Control key (Ctl) and then the letter “C” on the keyboard to copy the files.
Select all files for the day by
tapping on first file in group
Tap the shift key
Tap the last file in the group
C:\Eric\UFST_material\GPS_Instructions\Quick Start Guide for Using TDS NOMAD GPS Equipment.doc Page 17 of 18
Last edited: 9/3/2009 at 11:42:33 AM
Copy all selected file by tapping on
the Ctl key
Tap on the letter C key
Page 18

Navigate to the Storage Card and paste the exported files. Tap on the Up icon on the bottom of
the screen to find the Storage Card folder. Tap on the Storage Card folder to open it and any project
sub-folder if applicable. Using the on-screen keyboard, tap on the Control Key (Ctl) and then the
letter “V” to paste the files into the folder.
Navigate to the
Storage Card
using the Up icon
Copy all files onto the
storage card by opening
the keyboard display,
tapping on Ctl and then
tapping on the letter V.
Tap on
keyboard icon
to open
keyboard
display
Copy files from storage card to the appropriate folder on the project computer using the Storage
Card reading device.
C:\Eric\UFST_material\GPS_Instructions\Quick Start Guide for Using TDS NOMAD GPS Equipment.doc Page 18 of 18
Last edited: 9/3/2009 at 11:42:33 AM
 Loading...