

Page 1

Juno T41/5
User Manual
Page 2

Page 3

Welcome
Thank you for purchasing a Juno T41/5 Rugged Handheld Computer
(Terminal)! This user manual will help you configure and use your
device.
Important information for using the user manual
This user manual has been prepared to guide you through the
configuration and operation of your device, which includes:
1. Initial configuration of the device
2. Operating basics
3. Navigating the operating system and software
4. Securing your device
Please read this user manual carefully before using your device for
the first time. In particular, read the Important Safety Information and
all of Chapter 1 before using your device.
This user manual describes features and functionality that may not
be present on your particular device, as features vary by model.
Document conventions
It is important to understand the typographical conventions used in
this user manual. The formatting of the text identifies special
information:
1. CAPITAL — indicates the hardware items on the device.
Example: press the POWER button.
2. Bold — indicates the items displayed on the screen, including
icons, tiles, buttons, headings, field names and options.
Example: tap the E-mail icon.
3. Italic — indicates the name of a screen/window as shown in the
upper left corner of the display.
Example: the Settings screen.
i
Page 4

4. > — describes a procedure or a navigation path.
5. Example: Tap > Settings > System > System Information >
Wireless is equivalent to:
1. Tap the (Start) icon or press the (Start) button
2. Tap the Settings icon
3. Tap the System icon
4. Tap the System Information icon
5. On the System Information screen, slide left or right until the
Wireless tab is displayed. You can also tap the < or > in the
horizontal scroll bar to activate different tabs in the System
Information screen.
Terms
The following terms are used throughout this user manual to
describe user actions.
1. Press — press and quickly release a hardware button.
2. Tap — touch and quickly release an item displayed on the
screen.
3. Select — tap an item in a list or tap a command from a menu.
4. Drag — tap and hold on the item and then move it to the target
position without releasing your fingertip.
5. Slide — touch and drag to the left/right/up/down to move to the
next item on the list.
Important safety information
• THE DEVICE BATTERY IS PARTIALLY CHARGED WHEN
SHIPPED NEW FROM THE FACTORY.
• DO NOT OPERATE THE DEVICE WITHOUT THE CARD
SLOT COVER PROPERLY INSTALLED.
• YOUR WARRANTY IS INVALIDATED IF YOU OPEN OR
TAMPER WITH THE OUTER CASING OF THE DEVICE.
Unapproved modifications or operations beyond or in
ii
Page 5

conflict with these instructions for use may void
authorization by the authorities to operate the equipment.
• ONLY APPROVED ACCESSORIES MAY BE USED WITH THIS
EQUIPMENT. IN GENERAL, ALL CABLES MUST BE HIGH
QUALITY, SHIELDED, CORRECTLY TERMINATED AND
NORMALLY RESTRICTED TO TWO METERS IN LENGTH. THE
POWER SUPPLY APPROVED FOR THIS PRODUCT EMPLOYS
SPECIAL PROVISIONS TO AVOID RADIO INTERFERENCE
AND SHOULD NOT BE ALTERED OR SUBSTITUTED.
iii
Page 6

Disclaimers
The manufacturer operates a policy of ongoing product development.
The manufacturer reserves the right to make changes and
improvements to any of the hardware and software products
described in this document without prior notice.
The screenshots and other presentations shown in this user manual
may differ from the actual screens and presentations generated by
the actual product. The manufacturer does not warrant that this
document is error-free.
Not all models are available in all regions of the world. Depending on
the specific model purchased, the color and look of your device and
accessories may not exactly match the graphics shown in this
document. Not all models contain all of the hardware features and
software applications described in this user manual.
All such differences are minor and the actual product will deliver the
described functionality as presented in this User Manual in all
material respects, subject to limitations of the particular model
operated by the user.
Limited Warranty & Liability Limitations
This unit and battery are limited warranted against defects in
materials and workmanship for twelve (12) months from the original
date of purchase. All accessories and peripherals are limited
warranted against defects in materials and workmanship for twelve
(12) months from the original date of purchase. If notice is received
of such defects during the limited warranty period, the proven
defective product(s) will either be repaired or replaced, at the
manufacturer’s option. Replacement products may be either new or
like new.
The manufacturer does not warrant that the operation of the
products will be uninterrupted or error free. If the product is not,
within a reasonable time, repaired or replaced to a condition as
limited warranted, the customer will be entitled to a refund of the
purchase price upon prompt return of the product.
Limited warranty does not apply to defects resulting from (a)
improper or inadequate maintenance or calibration, (b) software,
iv
Page 7

interfacing, parts, or supplies not supplied by manufacturer, (c)
unauthorized modification, or misuse, (d) operation in conditions
outside of the published environmental specifications for the product,
or (e) physical damage due to external causes, including accident,
abuse, misuse or problems with electrical power. Water damage
caused by improper installation of the accessories and service parts
is not covered by warranty. Removal of or tampering with the back
case voids the limited warranty. There are important seals that will be
compromised and the device will no longer be water resistant (IP65)
or waterproof (IP68).
To the extent allowed by local law, the above limited warranties are
exclusive and no other warranty or condition, whether written or oral,
is expressed or implied, specifically disclaiming any implied
warranties or conditions of merchantability, satisfactory quality, and
fitness for a particular purpose.
To the extent allowed by local law, the remedies in this limited
warranty statement are the customer’s sole and exclusive
remedies. Except as indicated above, in no event will the
manufacturer or its suppliers be liable for loss of data or for
direct, special, incidental, consequential (including lost profit or
data), or other damage, whether based in contract, tort, or
otherwise.
Standard Warranty Addendum
Trimble Navigation Limited
935 Stewart Drive
Sunnyvale, California 94085
United States of America
Notice to Australian Purchasers
The Australian Consumer Law
Our goods come with guarantees that cannot be excluded under the
Australian Consumer Law. You are entitled to a replacement or
refund for a major failure and for compensation for any other
v
Page 8

reasonably foreseeable loss or damage. You are also entitled to
have the goods repaired or replaced if the goods fail to be of
acceptable quality and the failure does not amount to a major failure.
Trimble's warranty, as set out in the user manual accompanying this
statement, or as described in the warranty card accompanying the
Product you purchased, is in addition to any mandatory rights and
remedies that you may have under the Australian Consumer Law.
Copyright
All brand and product names are trademarks or registered
trademarks of their respective companies.
Revision:2.0
(05/2013)
vi
Page 9

Contents
Welcome .........................................................................................................i
Important information for using the user manual ..................................... i
Document conventions............................................................................. i
Terms ...................................................................................................... ii
Important safety information.................................................................... ii
Disclaimers............................................................................................. iv
Limited Warranty & Liability Limitations ................................................. iv
Standard Warranty Addendum................................................................ v
Copyright ................................................................................................ vi
Contents....................................................................................................... vii
Chapter 1 Getting Started ............................................................................ 1
1.1 Device components........................................................................... 1
1.2 Inserting a storage card and a SIM card ...........................................5
1.3 Charging the battery.......................................................................... 8
1.4 Turning your device on and choosing your language ..................... 10
Chapter 2 Operating Basics.......................................................................12
2.1 Home screen ................................................................................... 12
2.2 Start screen ..................................................................................... 14
2.3 Title bar ........................................................................................... 14
2.3.1 Title bar status indicators ............................................................. 15
2.4 Tile bar ............................................................................................ 16
2.5 Power menu ....................................................................................16
2.6 Securing your device.......................................................................17
Lock the keypad ....................................................................................17
Lock your device ................................................................................... 18
2.7 Configuring the Onscreen Keyboard............................................... 19
2.8 Perform a Clean Boot / Factory Reset ............................................ 19
2.9 Absolute Power Off mode ............................................................... 20
Chapter 3 Managing and Caring for Your Device .................................... 21
3.1 Changing basic settings ..................................................................21
Personalizing the Home screen ............................................................ 21
Setting the date, time, and alarms ........................................................21
Setting regional options......................................................................... 21
3.2 Customizing sounds and notifications............................................. 22
Specifying the sound for an event......................................................... 22
Setting the ring tone for incoming calls ................................................. 22
Copying a sound to your device............................................................ 22
3.3 Managing battery power and data storage ..................................... 23
Battery Life ............................................................................................23
vii
Page 10

Changing the power management settings ..........................................24
Managing low battery ............................................................................24
Checking the system memory ............................................................... 24
3.4 Working with files ............................................................................ 26
Copying files to your computer..............................................................26
Using File Explorer ................................................................................ 26
3.5 Adding and removing programs...................................................... 27
Installing a program from your computer .............................................. 27
Removing a program.............................................................................27
3.6 Using Task Manager .......................................................................28
3.7 Checking the Device System information ....................................... 28
3.8 Caring for your Device ....................................................................28
3.9 Safe Use of your Device .................................................................30
Chapter 4 Connecting to a PC and Synchronizing Information............. 32
4.1 Setting up Windows Mobile® Device Center ................................... 33
Using Windows Mobile Device Center .................................................. 33
4.2 Setting up ActiveSync®................................................................... 34
Setting up synchronization in ActiveSync ............................................. 34
4.3 Synchronizing with your computer ..................................................35
Starting and stopping synchronization .................................................. 35
Selecting information to synchronize ....................................................35
Troubleshooting sync connection problems.......................................... 36
Chapter 5 Using Additional Hardware Features ...................................... 37
5.1 Flashlight ......................................................................................... 36
5.2 Assigning Buttons (hardware buttons) ............................................ 36
5.3 Compass Calibration ....................................................................... 36
5.4 Working with Bluetooth ...................................................................37
5.5 Working with Wi-Fi .......................................................................... 39
Using the Summit Utilities ..................................................................... 42
Accessing the Summit Client Utility....................................................... 42
Main Window.........................................................................................44
Profile Window ...................................................................................... 45
Status Window ...................................................................................... 45
Diags Window ....................................................................................... 45
Global Window ......................................................................................46
5.6 Working with the Camera ................................................................ 46
User Interface........................................................................................ 47
Thumbnail Window................................................................................47
Capturing Images .................................................................................. 48
Capturing Videos................................................................................... 48
Closing application ................................................................................49
Image Camera Application Features..................................................... 49
Image Delete and Switch to Camera in Image review mode ................ 54
Video Camera Application Features .....................................................54
viii
Page 11

5.7 Working with GPS ...........................................................................56
GPS settings: ........................................................................................ 56
Exiting GPS applications ....................................................................... 56
5.8 SatViewer ........................................................................................ 57
5.9 Battery Logger................................................................................. 57
5.10 Barcode Scanning (For Scanner Version only)............................. 58
Appendix A: Regulatory Compliance ....................................................... 65
U.S.A. - FCC Statement ........................................................................ 65
Exposure to Radio Frequency (RF) Signals ......................................... 66
Telecommunications & Internet Association (TIA) information ............. 66
Canada Compliance, Industrie Canada (IC) ......................................... 67
RoHS Statement ................................................................................... 68
European Conformity Statement........................................................... 68
Europe................................................................................................... 68
Environmental Hazards ......................................................................... 69
Toxic and Hazardous Substances and Elements ................................. 69
Taiwan................................................................................................... 70
ix
Page 12

Page 13
Chapter 1 Getting Started
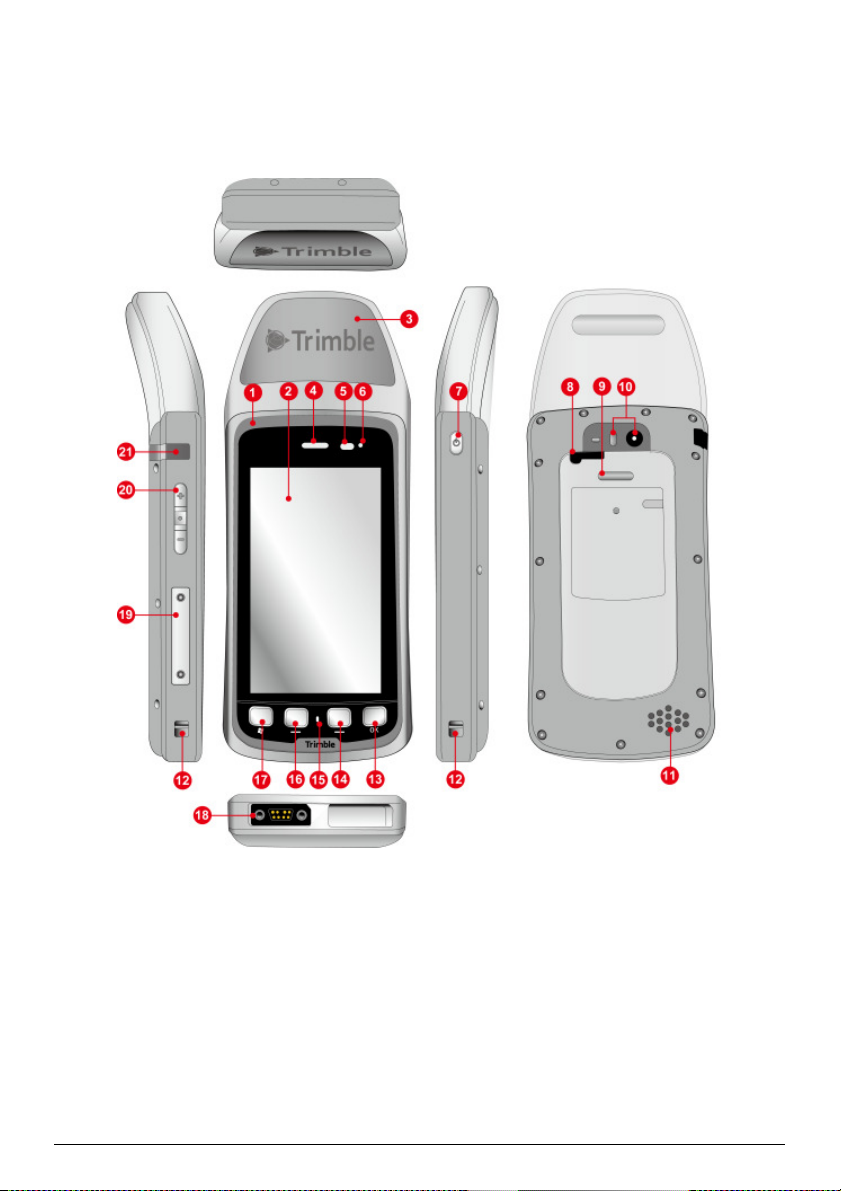
1.1 Device components
GPS Model
1
Page 14
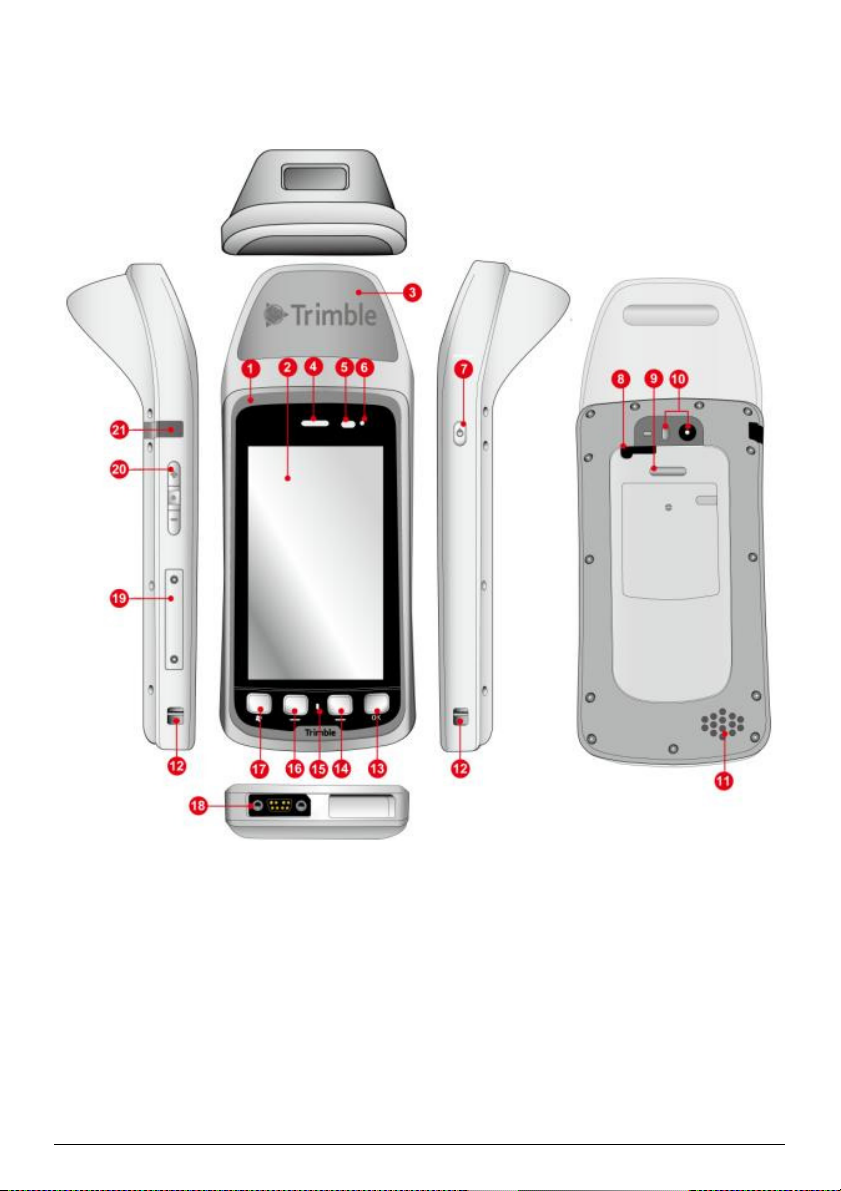
GPS + Barcodescanner Model
1. Color Band
The color band surrounding the screen is yellow or grey, and
indicates IP65 or IP68, respectively.
2. Touchscreen
The capacitive touchscreen enables handwriting, drawing and
making selections with your finger. An optional T41/5 Capacitive
Stylus, sold separately, is available.
2
Page 15
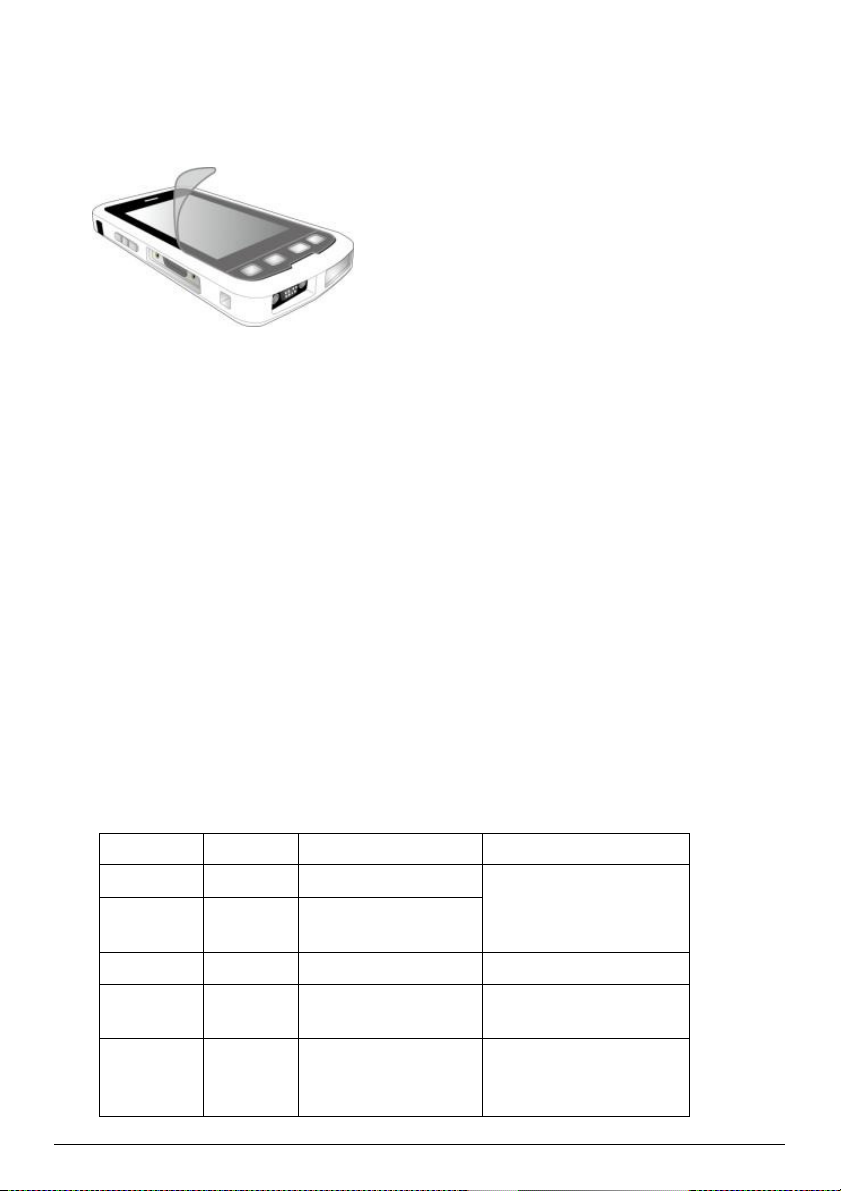
The touchscreen is on a rugged Gorilla® Glass panel, and to
prevent cosmetic scratches, a screen protector is recommended.
Follow the instruction below to apply the Screen Protector.
3. Expanded feature location
Combo of Imager and/or enhanced GPS.
4. Receiver (Ear)
When recording, you will receive your ears to hear recordings of
other participants.
5. Light Sensor
The Light Sensor detects ambient light in your environment. If the
Backlight control is configured to use the Light Sensor, the screen
brightness dims in a dark environment and brightens in a lighted
environment.
6. Notification LED
One tri-color LED (Red/Amber/Green) indicator is provided for
user notifications. These include battery status and other
operating system (OS) notifications. This indicator is capable of
operating even when the device is in Shutdown mode.
The LED status behavior is as follows:
Color Pattern
Red Solid Low battery
Red Blinking
Amber Solid Charging
Amber Blinking
Amber Blinking
Condition Notes
Connect device to
Low battery and
OS notification
Charging and OS
notification
OS notification,
medium battery
charge
3
charger before
pressing POWER.
Page 16

Color Pattern
Green Solid Fully charged
Green Blinking
<Off> n/a
Condition Notes
Fully charged and
OS notification
Battery not low,
no OS notification
7. POWER button
When the device is on, press and release to suspend or
resume the device.
Press and hold for 2 seconds to open the Power Menu.
Press and hold for 6 to 8 seconds to force the device to
Reset.
8. MCX port
The MCX port enables connecting an optional External GPS
Antenna to provide improved GPS signal reception when
operating the Juno T41/5 inside a vehicle or in other situations
where the sky visibility is limited.
9. Accessory Latch
The accessory latch is designed to lock the connection of
Extended Battery Pack.
10. Camera and Flash
The camera takes pictures and records videos.
The flash assists the camera in low-light conditions.
11. Speaker
Listen to audio media.
12. Wrist Strap tie point
Wrist strap tie points are provide on both sides of the device to
accommodate left- and right-handed users.
13. OK button
Press to confirm your selection. Pressing this button is typically
equivalent to tapping the X tile or OK tile on the Tile bar.
4
Page 17

14. RIGHT button ( )
Press to activate the associated tile (if any) on the Tile bar.
15. Microphone
Recording
16. LEFT button ( )
Press to activate the associated tile (if any) on the Tile bar.
17. button
Press to access the Start screen. Press again to access the
Home screen.
18. T41/5 Custom Port
Connect the T41/5 Custom USB Client cable to this port to
charge the device or connect to the device from a desktop or
laptop computer.
Two optional accessories are available, the T41/5 USB Host
Cable and the T41/5 9-Pin Serial Cable.
19. microSD storage card
Use the SD Card Access Tool to loosen the protective cover.
A microSD storage card provides additional file storage.
20. VOLUME control and ACTION buttons
Press the + / - button to increase/decrease the volume for your
device.
Press the ACTION button (between the + / - buttons) to select an
option.
21. Headphone or Headset connector
Connect a 3.5 mm stereo headphone to listen to audio media or
use the hands-free kit.
Connect a 3.5 mm stereo headset to listen to audio media.
1.2 Inserting a storage card and a SIM card
To install a microSD storage card and a SIM card in your device, you need
to remove the cover on the left side using the SD/SIM Card Access Tool
included with the device accessories.
NOTE: The device supports up to 32 GB SDHC microSD storage cards.
SDXC cards are not supported.
5
Page 18
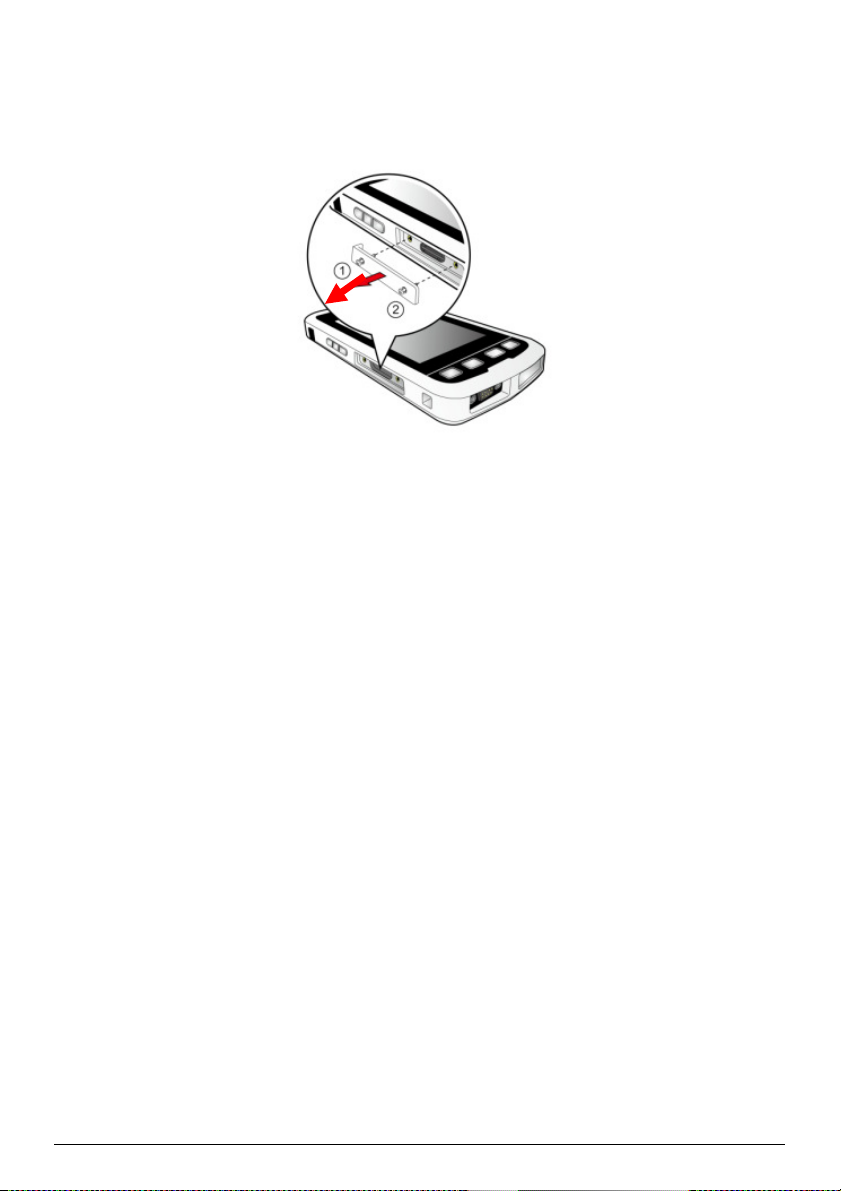
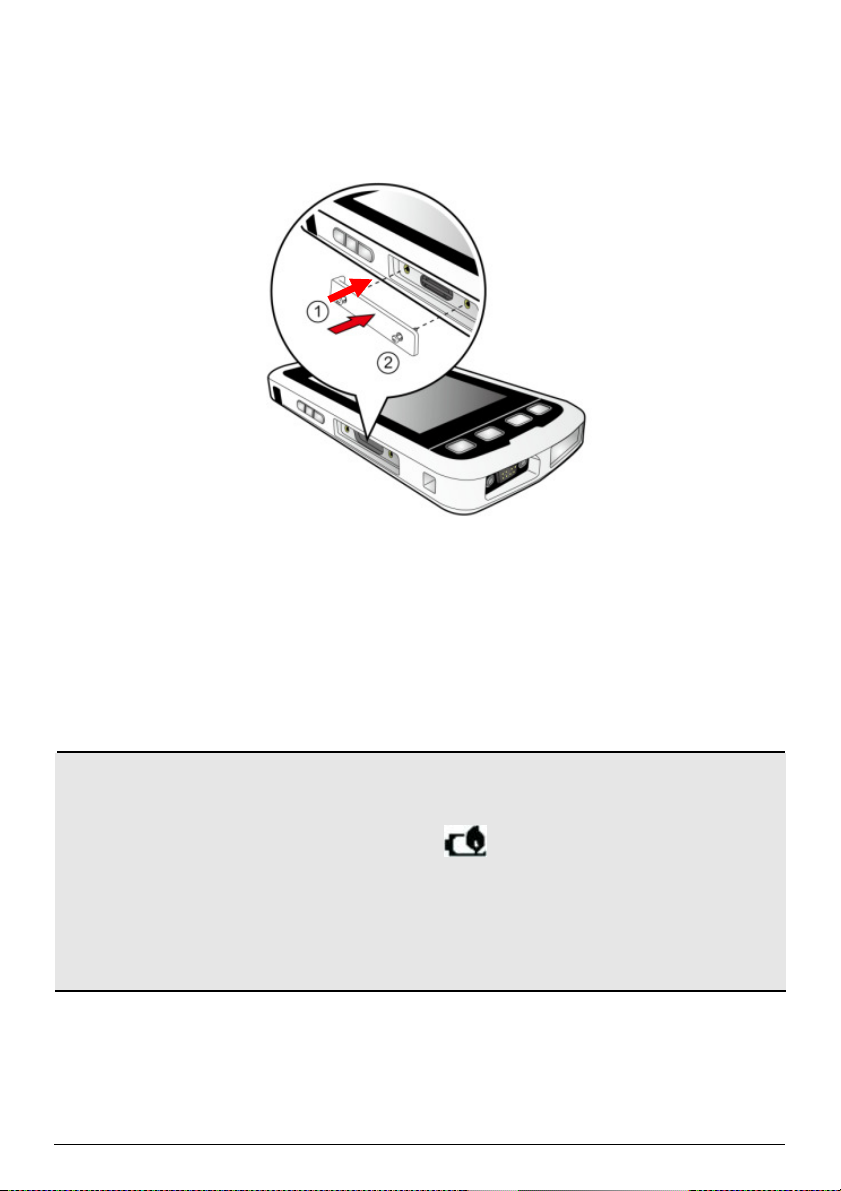
1. Remove the cover on the left side of the device by unscrewing
the screws.
2. Follow the illustration below to insert the storage card and the
SIM card:
To insert the storage card: hold the card by the edges and
gently insert it into the slot with the label facing the front of
your device. Do not apply pressure to the center of the
storage card while inserting the card.
6
Page 19

3. To remove a card, push the card to release from the slot.
NOTE: Make sure you have saved any data in open programs
before removing the storage card.
7
Page 20
4. Replace the cover and then secure it with the screws.
1.3 Charging the battery
IMPORTANT: Before using the Juno T41/5 for the first time, charge the
device for at least 4 hours. The notification LED will turn green when fully
charged.
CAUTION: Avoid Extreme Heat
• The battery is designed to stop operating at or above 149
°F (65 °C). If this status icon
overheated to 140 °F (60 °C) or more.
• If the battery temperature exceeds 158 °F (70 °C), the
battery will be disabled and the device must be sent to an
Authorized Service Provider to have the battery replaced.
appears, the battery has
8
Page 21
Operating Temperature Range: -22 °F to 140 °F (-30 °C to 60 °C)
Storage Temperature Range: -40 °F to 158 °F (-40 °C to 70 °C)
Charging Temperature: 40 °C
CAUTION: Do not exceed specified storage temperature.
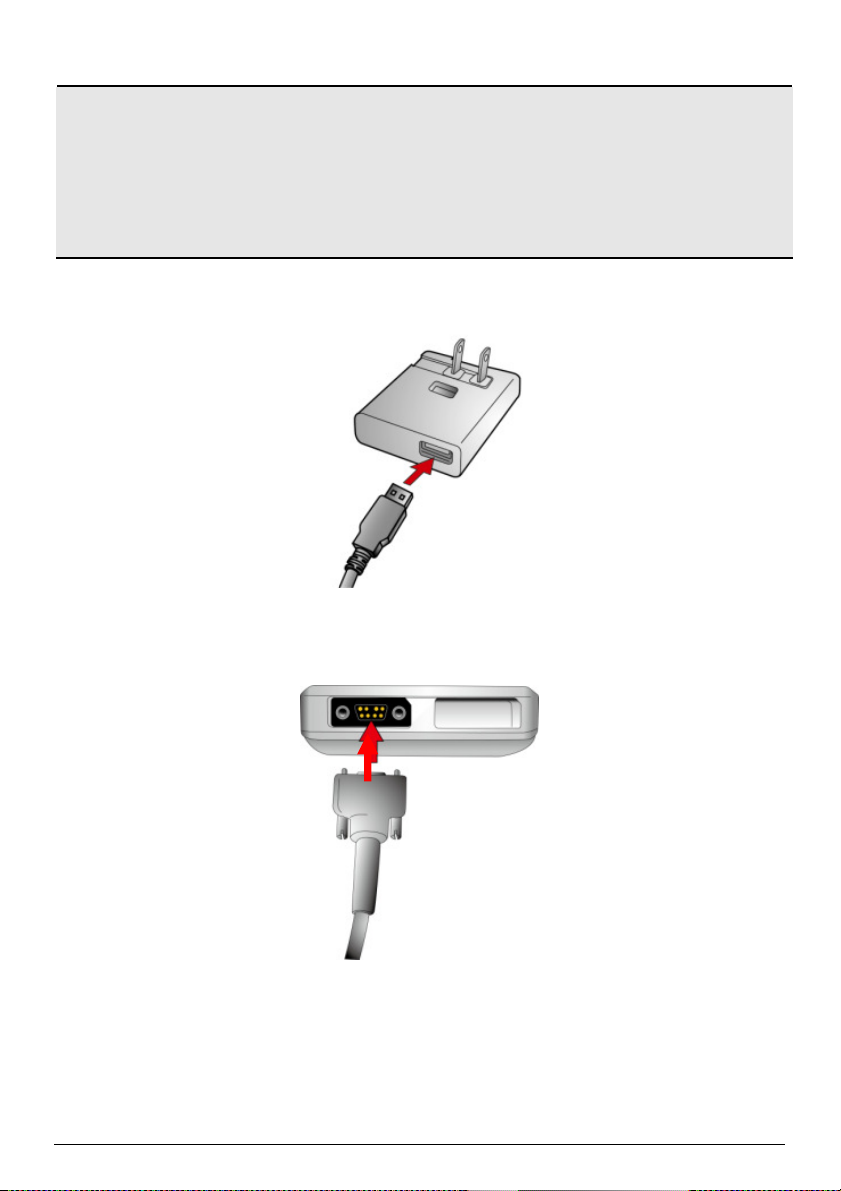
1. Connect the USB end of the T41/5 Custom USB Client cable to
the AC charger.
2. Connect the custom end of the T41/5 Custom USB Client cable
to the connector on the bottom face of your device.
9
Page 22
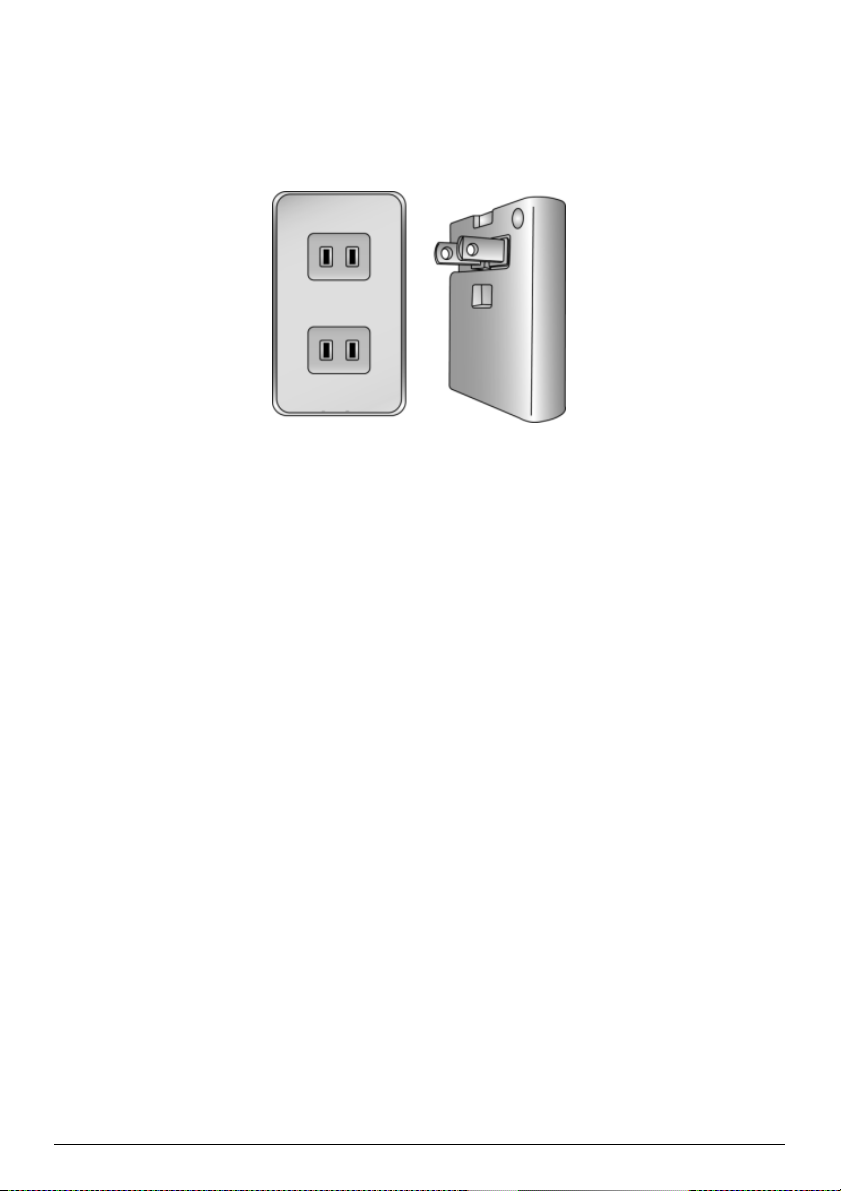
3. Plug the AC charger into a wall outlet. If needed, attach a plug
converter onto the AC charger.
Tips for extending the battery life:
See Chapter 3.3 for tips on extending battery life.
1.4 Turning your device on and choosing your
language
WARNING! BEFORE TURNING THE DEVICE ON, THE DEVICE
MUST BE PLUGGED IN TO AN EXTERNAL POWER SOURCE.
COMPLETE ALL STEPS IN 1.3 CHARGING THE BATTERY.
1. Once you begin to charge your device, the device turns on
automatically.
10
Page 23
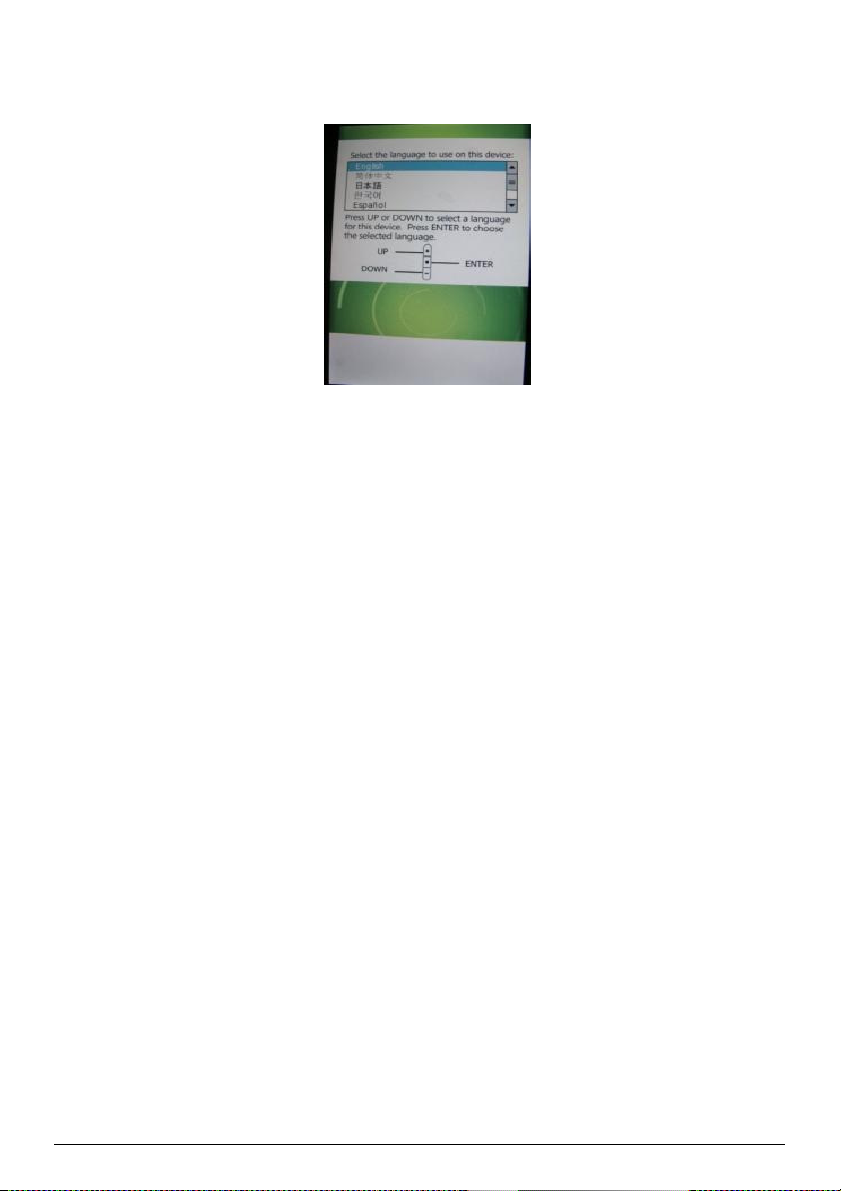
2. The Welcome Wizard will lead you through the setup process.
3. Select your preferred language by using the + or - (shown as UP
or DOWN on the Wizard) buttons on the left side of the device,
then press the ACTION (shown as ENTER on the Wizard) button
to choose the language (the touchscreen is not enabled in the
Wizard).
4. Use the + button to highlight the box next to Yes, I want to use
<language > as the language on the device.
a. Press the ACTION (ENTER) button to check the box.
b. Press the - (DOWN) button 2 times to highlight the Next >
box.
c. Press the ACTION (ENTER) button to select Next >.
Wait while your device is being configured for the
language you selected.
WARNING: The only way to change the language you have
selected is to re-install the firmware using the Firmware update
utility.
NOTE: Only Microsoft applications and messages will be
translated into languages other than English. All other error
messages, notifications and other applications may appear in
English.
5. Tap the screen to set up your device with a Security PIN
(optional).
6. See Chapter 3 for instructions on setting the date and time on
your device.
11
Page 24
Chapter 2 Operating Basics
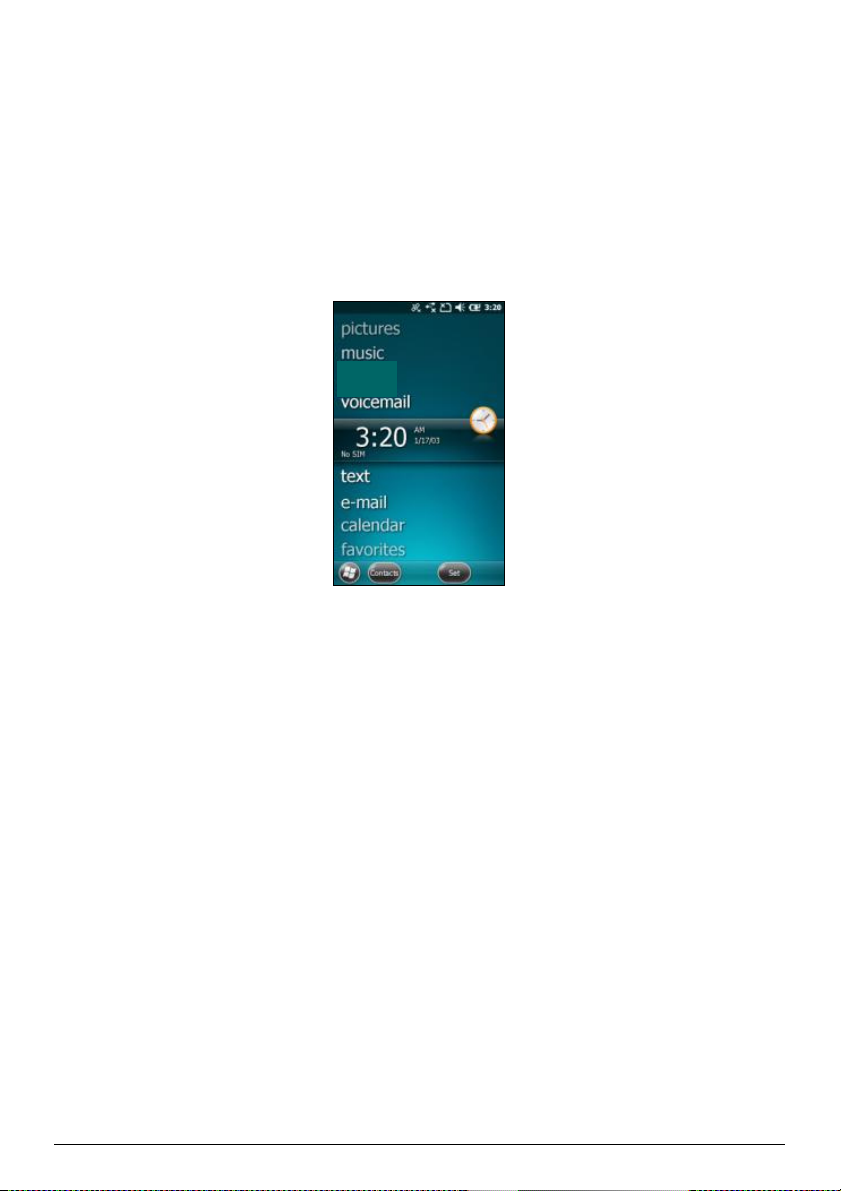
2.1 Home screen
The Home Screen is an easy way to launch common activities, such as
checking text messages or checking e-mail. You can view high-level
information at a glance, with notifications for Live services, e-mail,
voicemail, SMS/MMS and more.
To navigate the Home screen, touch and slide your fingertip up or down on
the screen; or drag the highlight bar to the desired item on the screen. The
programs provided on the Home screen include:
• pictures: Select your photos from this menu.
• music: Select your music from this menu.
• voicemail: If your device has the wifi feature, select this item to
access your voicemail.
• time: Select your time zone, set the time and date and set
alarms.
• text: If your device has the wifi feature, select this item to
compose and read text messages.
• e-mail: Select this item to read and compose e-mail.
• calendar: Select this item to manage appointments.
• favorites: Select this item to use Internet Explorer Mobile.
12
Page 25

You can change to the classic Windows Mobile Today screen by tapping
> Settings > Home.
1. On the Appearance tab, change the theme to Classic Blue.
2. On the Items tab, uncheck Windows Default and select the
items that you would like to appear on the Home screen.
13
Page 26
Juno T41/5
User Manual
2.2 Start screen
Press the button to access the Start screen where you can easily access
the software installed on your device. Slide your fingertip up/down on the
Start screen to browse more items and then access an item by tapping on
the item.
2.3 Title bar
In Windows Embedded Handheld, the title bar is located at the top of the
screen and it is touchable. Tap anywhere on the title bar to reveal a list of
vertical icon slots, representing different categories of icons. Tap an icon to
get additional notification or status information. The title bar also provides
access to the Magnify tool, providing a closer look at the data on the screen.
Simply tap the Magnify icon on the right end of the title bar to end
magnify mode.
The Start, OK, and Close (X) icons have been moved from the Title bar to
the Tile bar to improve consistency. Now, all navigation controls—Start,
OK and Close—are in one place.
14
Page 27
Juno T41/5
User Manual
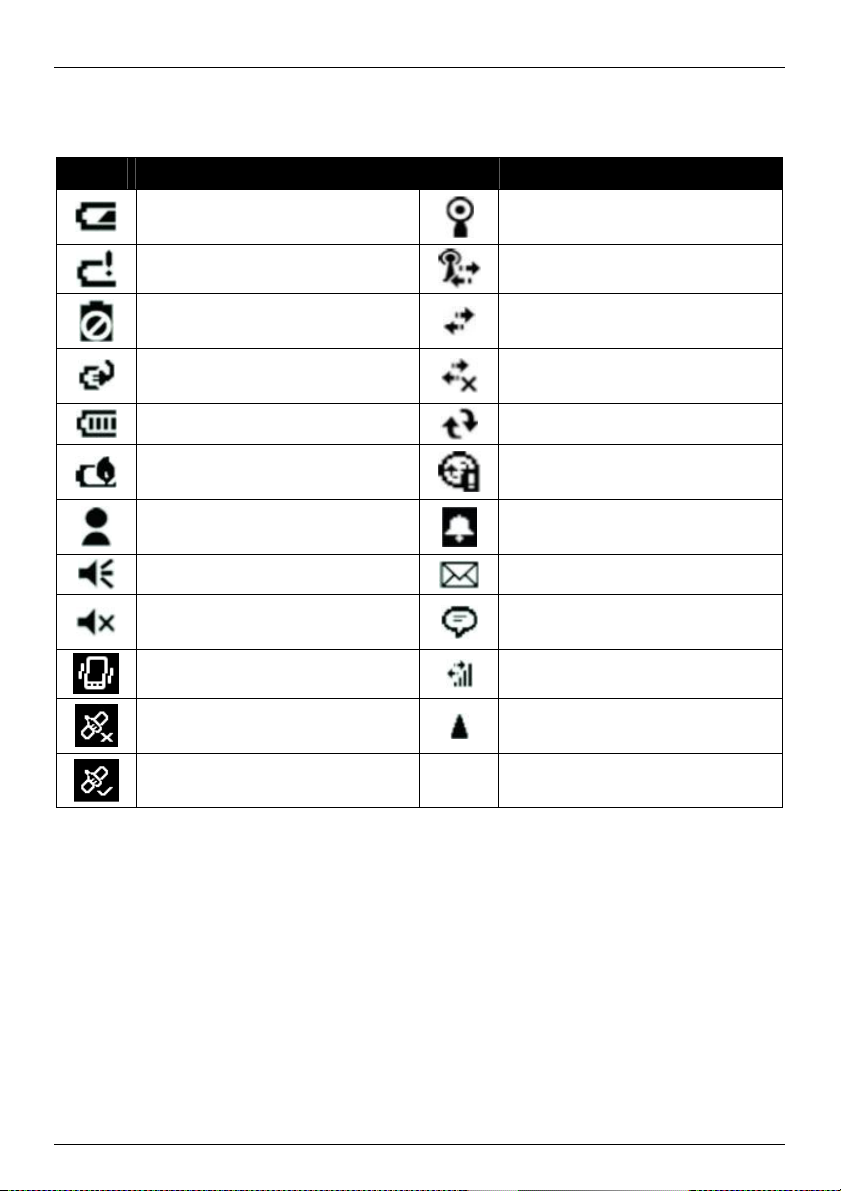
2.3.1 Title bar status indicators
The following table lists common status indicators seen in the Title bar.
Icon Description Icon Description
Battery power is low
Battery power is very low
Battery communication error
Battery charging
Battery level
Battery out of temperature range
WARNING
Instant messages received
Speaker is on
Speaker is off (or in mute
position)
Vibrate mode is on
GPS receiver is off.
GPS receiver is on.
Other networks are detected. Tap
to access an available network
Wireless network connected
Active connection, but not
currently synchronizing
Inactive connection to computer
or wireless network
Synchronizing
Synchronizing error
Pending alarm
E-mail has been received
Tap to view more notifications
Data call is in progress
Roaming mode
15
Page 28
Juno T41/5
User Manual
2.4 Tile bar
The Tile bar is located at the bottom of the screen and the information
displayed there is more uniform than on earlier versions of Windows®
Mobile operating systems. The Tile bar uses touchable tiles, and these tiles
can be activated by pressing the corresponding buttons on front keypad of
your device.
Touchable tiles can be text strings or icons, depending on the screen, and
they are at fixed positions on the Tile bar. For example, the Start icon is
always in the far left position, and the OK or Close icon is always on the
far right. If the Tile bar has a Keyboard icon, it is always in the third, or
center position; if it has additional menu or feature access icons, they will
be on either side of the Keyboard icon.
The buttons on the bezel below the screen correspond to the touchable tiles
on the Tile bar. Press a button to activate the associated tile.
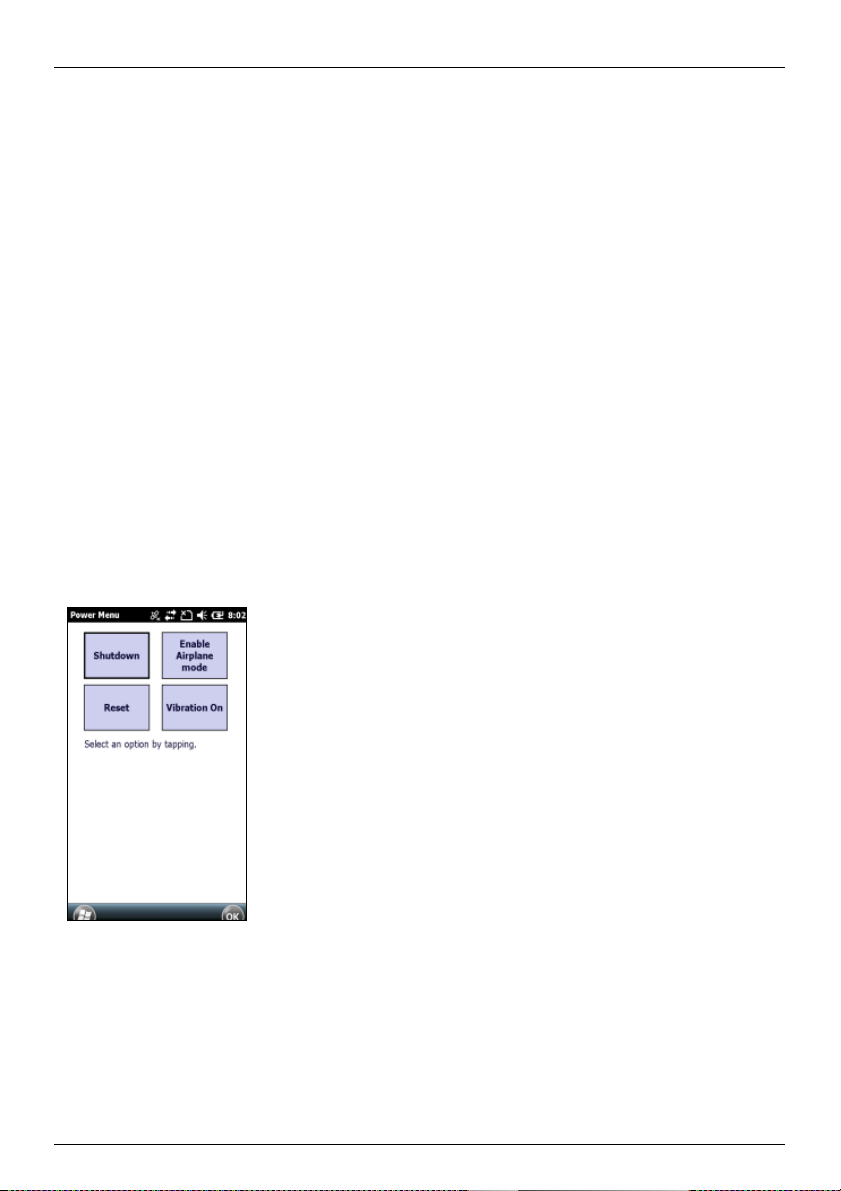
2.5 Power menu
Press and hold the POWER button for about 3 seconds until the Power
Menu appears. Tap an option or OK to exit.
• Shutdown: Turn off the device.
• Enable Airplane mode: Enable the
Airplane mode for the device.
• Disable Airplane mode: Disable the
Airplane mode for the device.
• Reset: Restart the device.
• Vibration On: Enable the Vibration
mode for the device.
NOTE: If the Power Menu does not appear
when the POWER button is held down,
and/or if you continue to hold down the
POWER button for at least 7 seconds, the
device will perform a hardware reset. It may
take a few seconds for the device to start
after the POWER button has been released.
16
Page 29
Juno T41/5
User Manual
2.6 Securing your device
You can customize the level of security you want to have on your device
by locking the keypad or the entire device.
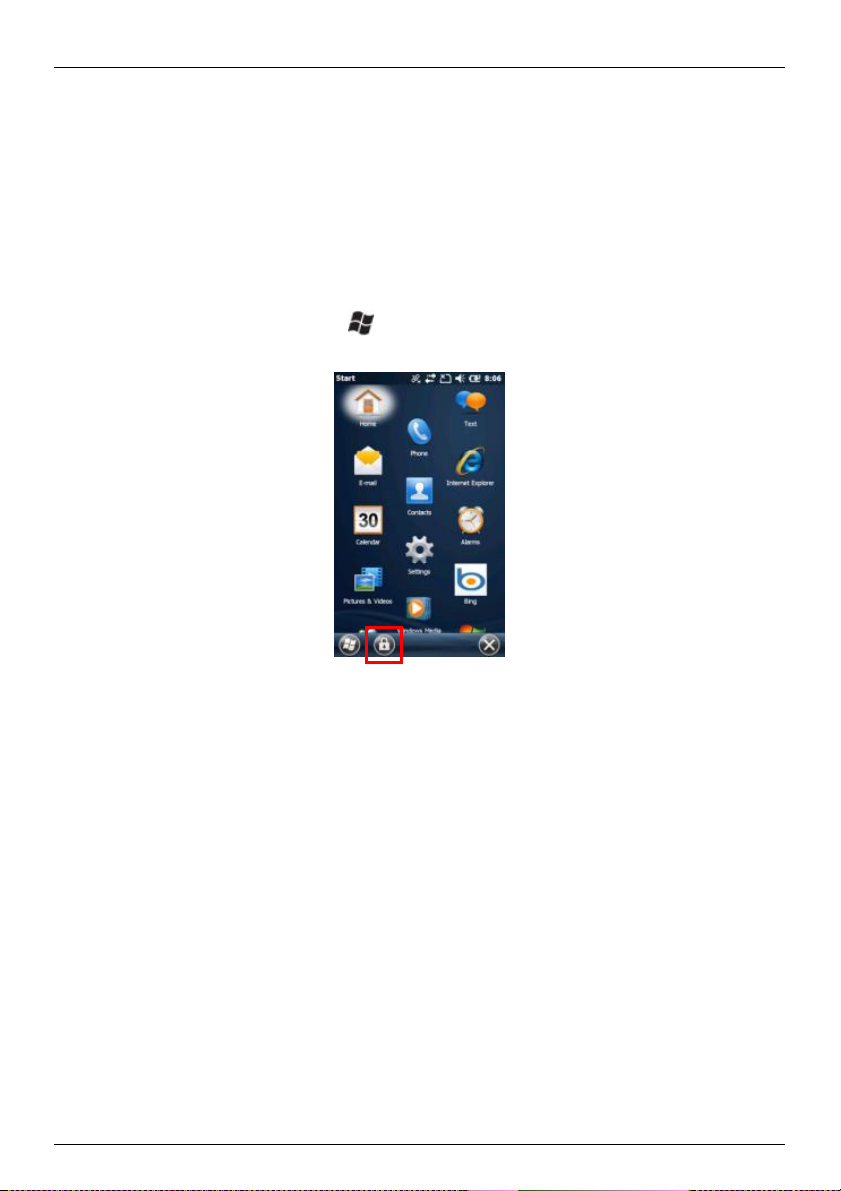
Lock the keypad
The keypad lock turns off the keypad functionality. This is a helpful feature
if, for example, your device is turned off and in your pocket, and you want
to prevent accidental button presses from activating the device.
To lock the keypad, press the button to access the Start screen, then
press the LEFT button or tap the padlock tile on the Tile bar.
17
Page 30
Juno T41/5
User Manual
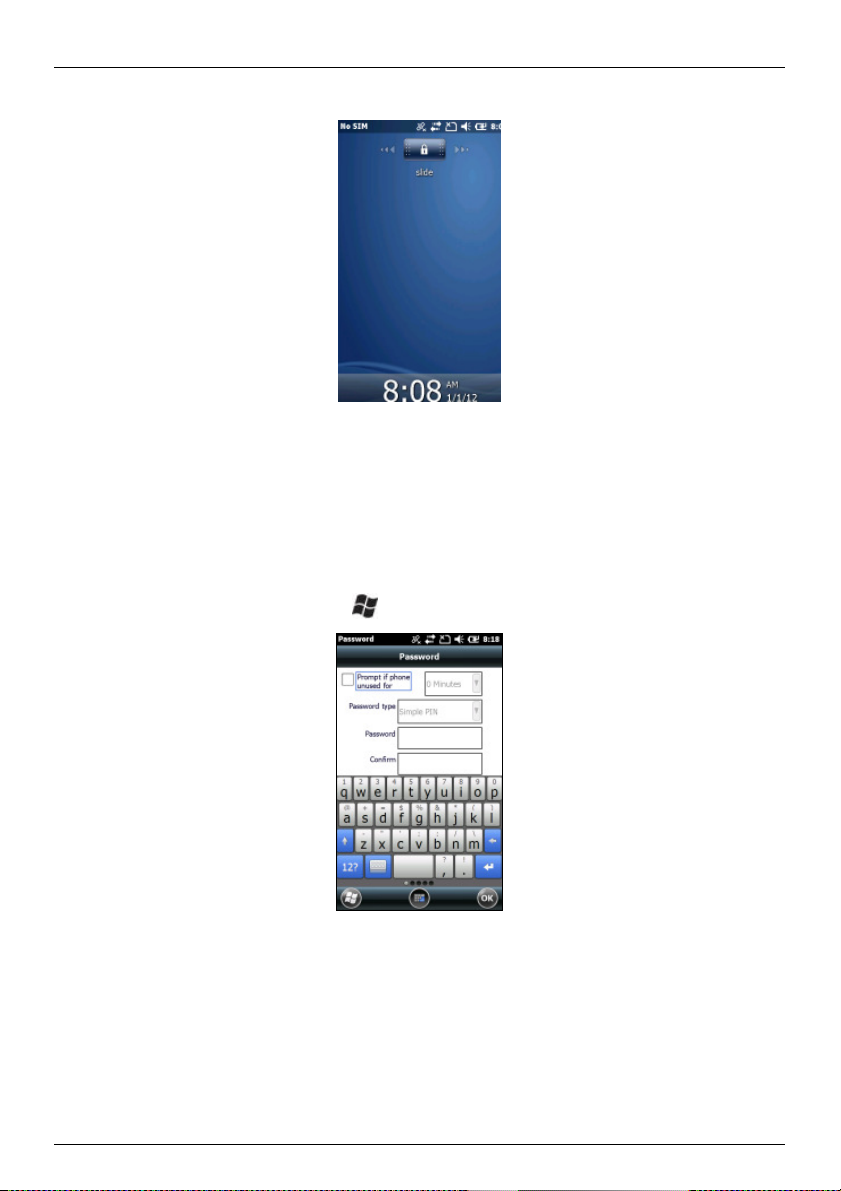
You will then see the following screen:
To unlock the keypad, slide the lock symbol.
Lock your device
Locking your device prevents access to personal data. When you enable
this feature, your device will automatically lock after a specified time of
inactivity. A screen will be displayed requiring your device lock password
before access is granted.
To access the Lock menu, tap > Settings > Lock
WARNING: BE CERTAIN TO REMEMBER THE PASSWORD.
The only way to recover from a forgotten password is to perform a
Clean Boot. However, you will LOSE all application software, licenses,
settings and data on your device. For instructions on how to Perform a
Clean Boot, see below..
18
Page 31
Juno T41/5
User Manual
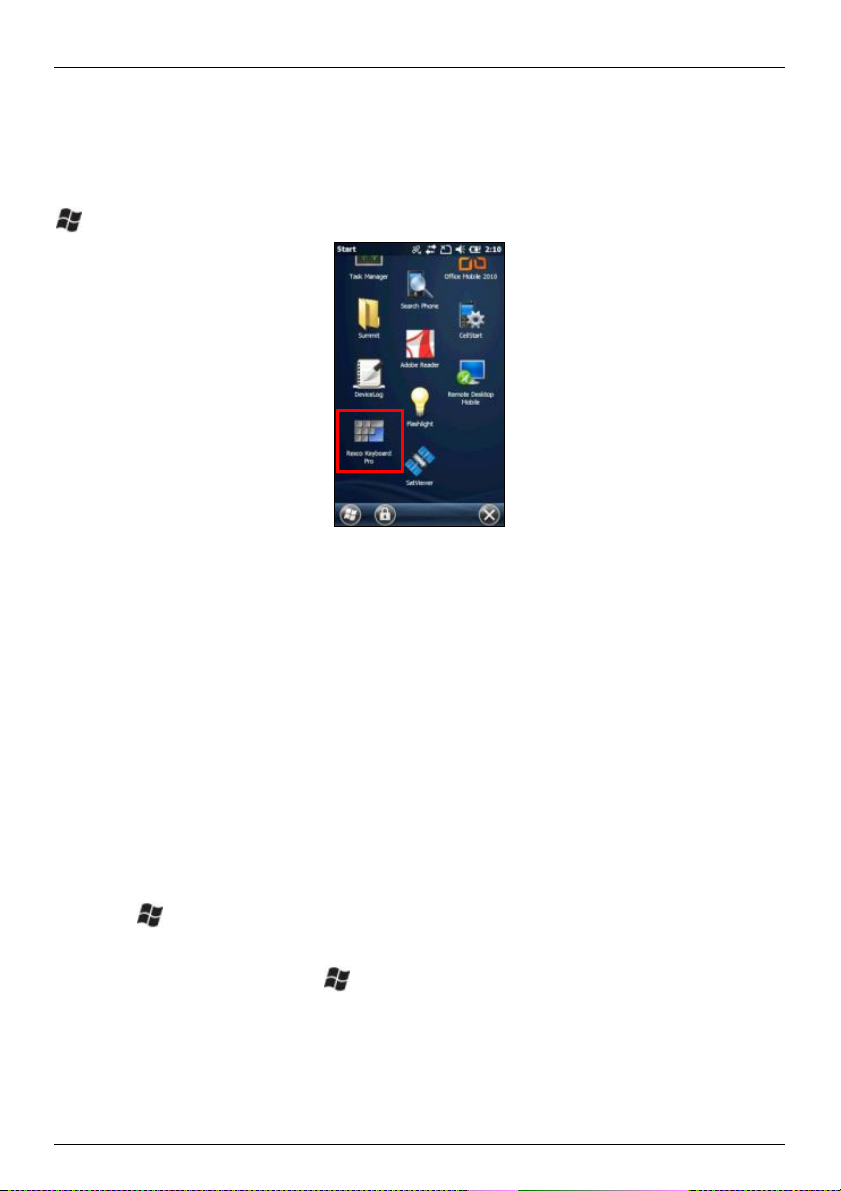
2.7 Configuring the Onscreen Keyboard
The Soft Input Panel (also called S.I.P.) is a special on-screen keyboard for
devices which do not have standard keyboards. The Juno T41/5 includes a
custom S.I.P. application called Resco Keyboard Pro. To configure it, tap
> Resco Keyboard Pro.
Resco Keyboard Pro allows you to customize your device for fast insertion
of frequently used phrases, and to customize various features including
haptic or audio feedback, basic or advanced gestures and more. Resco
Keyboard Pro supports 39 languages.
2.8 Perform a Clean Boot / Factory Reset
WARNING: Application software installed by the customer and some
licenses, settings and user data will be cleared if this function is
performed!
1. Press and hold the POWER button to display the Power Menu.
2. Tap Reset.
3. When you see the screen goes completely black, press and hold
the button.
4. When you see the Juno T41/5 screen, press the RIGHT button
while still holding the
5. Press the ACTION button on the left side of the device to clear
the persistent store. Press any other button to cancel and
continue booting normally.
button. Let go of both buttons.
19
Page 32

Juno T41/5
User Manual
2.9 Absolute Power Off mode
The Juno T41/5 features a battery cut-off mode that enables the device to
enter the absolute lowest power mode possible, even lower than the
SHUTDOWN power state. In this mode, the draw on the battery is less
than 20 uA.
The primary purpose for this mode is to prolong the shelf life of the battery
while the product is between the production factory and the customer. A
secondary purpose is to ensure the device is completely powered down
before shipping the product via air freight, or when putting the product into
storage for an extended period, typically longer than a week.
NOTE: The sole method for exiting this mode is to charge the battery.
To activate the Absolute Power Off mode, follow these steps:
1. Disconnect the T41/5 USB Client cable, if connected.
2. Press and hold the POWER button to display the Power Menu.
3. Tap Reset. The screen will go black as the unit goes through
reset.
4. When it comes out of reset, indicated by the Juno T41/5 splash
screen appearing, press and hold the LEFT button ( ) and the
RIGHT button ( ).
5. A message will appear: “Please remove AC. System is turning
off”
6. The device is now in Absolute Power Off mode.
7. Please note that the device will need to be reconnected to AC to
power back on from this mode.
20
Page 33

Juno T41/5
User Manual
Chapter 3 Managing and Caring for Your
Device
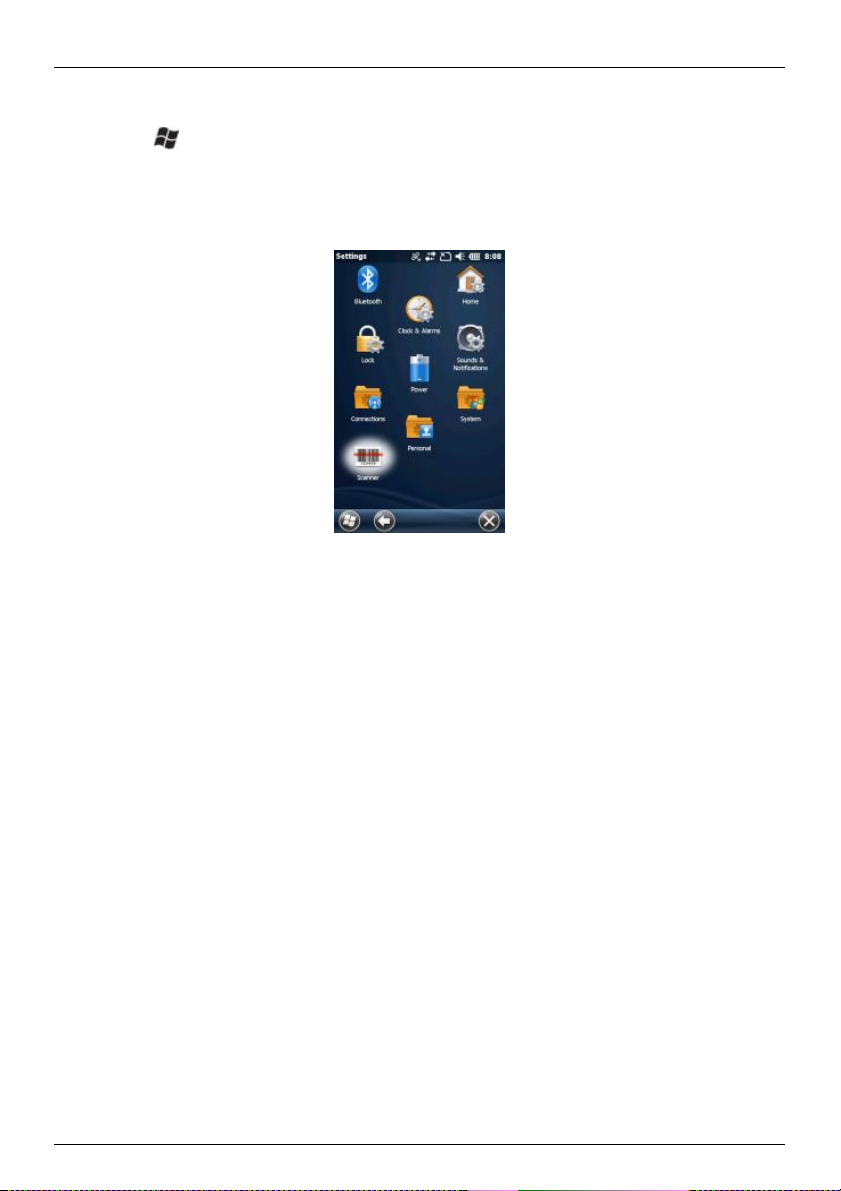
3.1 Changing basic settings
Personalizing the Home screen
The Home screen is the starting place for most of the tasks you perform on
your device and gives you access to all the features and software programs
of your device.
1. Tap > Settings > Home > Appearance.
2. Select the available option from the list.
3. When done, tap OK.
4. To set a picture as the Home screen background:
a. Select the Use this picture as the background option.
b. Tap Browse to select the picture you want to use.
c. When done, tap OK.
Setting the date, time, and alarms
1. Tap > Settings > Clock & Alarms > Time.
2. Set the Time zone, Date, and Time.
3. When done, tap OK.
4. To set an alarm:
a. On the Clock & Alarms screen, go to the Alarms tab.
b. Tap on the alarm item to display the Alarm Settings screen,
allowing you to change the Alarm settings. Tap OK to save
the settings.
c. Tap the checkbox on each available alarm item to enable
or disable the alarm.
d. When you enable an alarm, an Alarm icon appears on the
Home screen.
e. You may also need to check the Sound alarms even
when the device is set to silent or vibrate checkbox.
Setting regional options
Your device comes with the regional settings that are appropriate for your
21
Page 34

Juno T41/5
User Manual
locale.
1. On the Home screen, tap > Settings > System > Regional
Settings.
2. On the Regional Settings screen, select the Region tab and then
select your preferred language from the list.
3. If desired, you can specify the locale, date and time style, as
well as number and currency formatting options applicable to
your region.
4. When done, tap OK.
3.2 Customizing sounds and notifications
You can choose how to be notified for incoming calls, reminders, new
messages, alarms, and more.
Specifying the sound for an event
1. On the Home screen, tap > Settings > Sounds &
Notifications.
2. From the Sounds tab, select the desired sound for each event.
3. When done, tap OK.
Setting the ring tone for incoming calls
1. On the Home screen, tap > Settings > Sounds &
Notifications.
2. From the Notifications tab, select a ringtone in the Ring tone list.
3. When done, tap OK.
Copying a sound to your device
You can use a .wav, .mid, .wma, or .mp3 audio file on your device as a ring
tone, notification, or reminder.
1. Connect the device to your PC using the T41/5 Custom USB
Client cable.
2. On your PC, copy the sound file you want.
3. Explore the
System contents:
In Windows Mobile Device Center on your PC, tap File
Management > Browse the contents of your device.
22
Page 35

Juno T41/5
User Manual
In ActiveSync on your PC, tap Explore and double-tap My
Windows Mobile-Based Device.
4. Navigate to your device’s Application Data > Sounds folder and
then paste the audio file.
3.3 Managing battery power and data storage
Battery Life
The Lithium-ion polymer battery life is dependent upon the application and
operating environment. For example, estimated battery life for a new
battery is approximately 12 hours with the device turned on but idle,
backlight at 15% and all radios and compass off.
Tips for extending the battery life:
- Display backlight: Tap > Settings > System > Backlight to
minimize the amount of time the backlight stays on and dim it to only as
bright as required to view the display.
Alternatively, verify that the backlight brightness is auto-adjusting based
on the Light Sensor, by tapping > Settings > System > Backlight >
Brightness and checking the box for Use Light Sensor to adjust the
brightness.
- Wi-Fi, Bluetooth and camera: Turn off when not needed.
- GPS: Ensure that the GPS-aware applications that communicate with the
GPS are closed when not in use.
- Flashlight: Use the flashlight only when needed.
- Cold temperatures: Keep the device as close to room ambient
temperature (77 °F or 25 °C) as possible. If feasible, keep it inside your
coat or a vehicle when not in use.
- Auto features: Tap > Settings > Power > Advanced. Specify your
device to turn off in a short time if not in use. Tap > Settings >
Bluetooth > Wake Settings. Turn off Allow Bluetooth activity to turn
the device on. Bluetooth could turn on your device, transfer data and
drain the battery.
- CPU: Applications requiring significant computations by the CPU may
have some impact on battery life, but this is typically less significant
than managing the hardware features.
23
Page 36

Juno T41/5
User Manual
Changing the power management settings
You can use Power Management to check the battery, and configure
settings that prolong battery life.
1. Tap > Settings > Power.
2. On the Power screen, you can:
Select the Battery tab to check the amount of battery life
remaining.
Select the Advanced tab to change the screen power
settings.
3. To optimize battery usage, you can adjust the backlight settings:
Tap > Settings > System > Backlight.
From the Brightness tab, adjust the proper backlight level
and enable the Light Sensor to automatically adjust the
backlight brightness.
4. From the Battery Power tab and External Power tab, set the
backlight off settings
5. When done, tap OK.
Managing low battery
When the low-battery warning appears, do the following:
1. Immediately save your current data. All of your data is stored in
non-volatile persistent storage memory. Losing power will not
impact saved data or configurations other than the real-time clock.
As with any computer system, we recommend that you regularly
backup your data to removable media or to a PC.
2. Synchronize with your PC or use the AC adapter to charge the
battery.
3. Turn off your device while it is charging, especially if it is charging
from the PC USB power and not from the AC adapter power. Turn
on Juno T41/5 only when you need to use it, until the battery is
recharged.
Checking the
System memory
1. Tap > Settings > System > Memory.
24
Page 37

Juno T41/5
User Manual
2. From the Main tab and Storage Card tab, check the available
memory and the available storage on your device.
25
Page 38

Juno T41/5
User Manual
3.4 Working with files
You can copy files between your device and computer, or copy files to a
storage card installed on your device. You can also efficiently manage your
files and folders using File Explorer.
Copying files to your computer
1. Connect your device to your PC.
2. Do one of the following, as appropriate to your PC:
In Windows Mobile Device Center on your PC, tap File
Management > Browse the contents of your device.
In ActiveSync on your PC, tap Explore. This opens the
Mobile Device folder for your device.
3. Browse your device for files that you want to copy to your PC.
4. Select and copy the files [Ctrl + C] and then paste them [Ctrl + V]
to the destination folder in the PC.
Using File Explorer
File Explorer provides many easy-to-use features for file and folder
management. File Explorer lets you browse and manage the contents of
your device.
1. Tap > File Explorer. The root folder on the device is named
My Device, and contains the following folders: My Documents,
Program Files, Windows, and more.
2. Tap a folder or file to open it.
3. To return to an upper level folder, tap Up.
4. To copy files to a storage card:
a. Verify the storage card is properly installed on your device.
b. On the File Explorer screen, navigate to the appropriate
folder.
c. Select the file you want to copy, and then tap Menu > Edit
> Copy.
d. Tap Menu > Storage Card.
e. Tap Menu > Edit > Paste.
NOTE: Unlike Windows
®
PC’s, Windows Embedded Handheld does not
26
Page 39

Juno T41/5
User Manual
feature a Recycle Bin. Once a file is deleted, it cannot be recovered.
3.5 Adding and removing programs
Before you purchase additional programs for your device, make sure that
they are compatible with the Windows Embedded Handheld operating
system. Also, before you launch the program installer, check first whether
the installer can directly run on Windows Embedded Handheld or needs to
be run on a Windows PC.
Follow the setup instructions that came with your software. If prompted,
perform a reset to complete the installation.
Installing a program directly on your device
1. If the installation file is a .cab file, download the file directly to
your device, or download it to your PC and copy it to your device.
2. On your device, tap > File Explorer and navigate to the
installation file.
3. Tap the file to start the installation process.
4. Choose whether to install the program into the main memory or
your storage card, if you have the storage card inserted on your
device.
5. Wait for the installation to complete.
Installing a program from your computer
1. If the installer is an .exe file such as Setup.exe, most likely, the
installer needs to be run on a Windows PC. Download or copy it
to your computer.
2. Connect your device to your computer using the USB cable, and
then double-click the installation file on your computer to start the
installation process.
3. Follow the on-screen instructions on your computer and your
device to complete the installation.
Removing a program
1. Tap
> Settings > System > Remove Programs.
2. Scroll to the program to remove and then tap Remove.
27
Page 40

Juno T41/5
User Manual
3.6 Using Task Manager
Task Manager allows you to view or stop the programs currently running
on your device.
1. Tap > Task Manager.
2. On the Task Manager screen, select a program on the list and
then tap End Task.
3. To stop all running programs, tap Menu > End All Tasks.
4. Tap Menu to open a menu where you can change the view,
sorting order, refresh the screen, and more.
3.7 Checking the Device System information
Tap > Settings > System > System Information. Firmware version,
serial number, processor speed, RAM and Flash size, wireless
configurations, battery and card port information can be found here.
3.8 Caring for your Device
Cleaning the device
Use a soft, dampened cloth with either water or a diluted mild detergent. If
a mild detergent is used, ensure all soap residue is removed. Do not use
any chemical cleaners and do not put the device in the dishwasher.
Care of the touchscreen
Use only your finger, the T41/5 stylus or other stylus devices specifically
designed for use with capacitive touchscreens.
The use of ballpoint pens, nails or other sharp objects to operate the
touchscreen will scratch and/or damage the device. Keep the touchscreen
clean by gently wiping the display, using a soft, dampened cloth with either
clean water or glass cleaner. Use a screen protector at all times, and change
the screen protector according to manufacturer recommendations.
Do not use abrasive cleaners directly on the display. Doing so may void
your warranty. Use the screen protectors included with the device to keep
the touchscreen clean and protected, following the instructions provided on
the screen protector package.
28
Page 41

Juno T41/5
User Manual
Mechanical shock
The device is designed to resist damage for drops up to 4 ft (1.22 meters).
However, you should protect the display from impact, pressure, or abrasive
substances that can scratch it or crack it. The device should not be dropped
unnecessarily.
Environmental considerations
The device’s rugged design. Here are some considerations that will help
you get the most out of your device when working in very wet, hot or cold
conditions.
Water: This device is designed to IP65 (yellow units) or IP68 (grey units).
IPx5 is defined as resistant to driving rain and water spray. IPx8 is
defined as resistant to submersion in water up to 1 meter deep for up to 2
hours.
WARNING: Removal of the back case screws could cause leakage and
will void your warranty.
NOTE: Although an optional accessory for the port cover is available and
the audio jack has a protective cover, these are not required to maintain the
seal against water. The covers are intended to keep mud, sand and other
materials from blocking these ports.
Temperature range: The operational temperature range is from -22 °F to
+144 °F (-30 °C to +60 °C). Although the device is designed to be rugged,
do not leave it in direct sunlight in excessive heat or in a vehicle in the
sunlight for extended periods as the internal temperature may exceed the
operating or storage temperature limits.
Batteries perform best at room temperature. The battery has a stable
capacity as temperatures rise; however, the colder the temperature, the
greater the reduction in available battery capacity. Under very cold
conditions (-4 °F / -20°C and below), the battery capacity is noticeably
reduced. To improve the battery performance in very cold conditions,
consider increasing the load on the battery, such as by adjusting the
backlight to full brightness. Increasing the battery load causes the battery
to generate heat, thus warming the battery and improving the performance.
There are limits to how hard to push the battery before you reduce the
run-time instead of increasing it.
29
Page 42

Juno T41/5
User Manual
3.9 Safe Use of your Device
Repair: Do not attempt to dismantle the device for repair. There are no
user-serviceable parts inside. For service, use the contact details listed on
the cover of this manual or contact your local dealer.
Battery safety: Lithium-ion polymer batteries are classified by the U. S.
Federal Government as non-hazardous waste and are safe for disposal in
the normal municipal waste stream except where prohibited by local or
regional regulations. These batteries contain recyclable materials and are
accepted for recycling.
NOTE: In the event of a battery failure, return the device to Trimble or an
Authorized Service Provider to have the battery replaced. Trimble
disposes used batteries in accordance with local regulations.
1. Do not disassemble or open, crush, bend or deform, puncture, or
shred the battery assembly. There are no user-serviceable parts
in the battery assembly.
2. Do not use battery if plastic case is cracked, compromised or
punctured.
3. Do not attempt to separate the battery from the device.
4. Do not modify or remanufacture, attempt to insert foreign objects
into the battery, immerse or expose to water or other liquids.
5. Do not expose to fire, explosion, or other hazard. Do not expose
to temperatures above +158 °F (+70 °C). The battery is designed
to stop functioning if it reaches an unsafe temperature.
6. Only use a charging system that has been qualified for use with
the device.
7. In the event of a battery leak, do not allow the liquid to come in
contact with the skin or eyes. If contact has been made, flush the
affected area with water and seek medical advice.
Power supply safety: Use only AC and vehicle adapters intended for the
device. Other external power sources may damage your product and void
the warranty. Certification of this Class III product is only valid with the
power supply – PSA10F-050Q.
30
Page 43

Juno T41/5
User Manual
Ensure the input voltage on the power supply matches the
voltage in your location. Ensure the power supply has prongs
compatible with your outlets.
The power supply is designed for indoor use only. Avoid using
the power supply in wet areas.
Unplug the power supply from power when not connected to
the device.
Do not create a short circuit in the power output connector.
31
Page 44

Juno T41/5
User Manual
Chapter 4 Connecting to a PC and
Synchronizing Information
You can take information from your computer wherever you go by
synchronizing them to your device. The following types of information can
be synchronized:
Microsoft Outlook® information, which includes Outlook e-mail,
contacts, calendar, tasks, and notes
Notes, which are created using Microsoft® Office OneNote®
2007
Media, such as pictures, music and video
Favorites, which are the bookmarked links to your favorite
web sites
Files, such as documents and other files
Before you can synchronize, you will first need to install and set up either
ActiveSync or Windows Mobile Device Center on your computer.
After installing the synchronization software on your computer, connect
the System to your computer using the T41/5 USB Client cable. Upon
connecting the client cable to your device and your computer, choose to
start the synchronization process.
ActiveSync or Windows Mobile Device Center only synchronizes data on
your computer and System. If you have installed a storage card and you
want to back up files from the storage card, use Windows Explorer on your
computer to copy files from the storage card to your computer.
If you are sending your device to your local dealer or service center for
repair or a hard reset, data from your device will be lost. It is recommended
that you sync your device to your computer to back up your files. To back
up files from the storage card to your computer, use Windows Explorer to
copy files from the storage card to the computer.
32
Page 45

Juno T41/5
User Manual
4.1 Setting up Windows Mobile® Device Center
Microsoft Windows Mobile® Device Center is the replacement for
Microsoft® ActiveSync® on Windows Vista® and newer. Some versions of
Windows Vista® come with Windows Mobile Device Center already
installed. If Windows Mobile Device Center is not available on your
Windows Vista®, you can download it from the Microsoft website. Go to
http://www.microsoft.com and search for Windows Mobile Device Center.
When you connect your device to your computer and start Windows
Mobile Device Center for the first time, you are asked to create a Windows
Mobile partnership with your device. To create a partnership:
1. Connect your device to your PC. Windows Mobile Device Center
configures itself and then opens.
2. You are given the option to Register Online, Remind me Later,
or Don’t Register.
3. On the Windows Mobile Device Home screen, click Set up your
device.
NOTE: Choose Connect without setting up your device if you only want
to transfer media files, check for updates, and explore your device but not
sync Outlook information.
1. Select the information types that you want to synchronize then
click Next.
2. Enter a name for your device and click Set Up.
When you finish the wizard, Windows Mobile Device Center synchronizes
your device automatically. Notice that Outlook e-mail messages and other
information will appear on your device after synchronization.
Using Windows Mobile Device Center
To open Windows Mobile Device Center, click > All Programs >
Windows Mobile Device Center on your Windows Vista or newer
computer.
33
Page 46

Juno T41/5
User Manual
On Windows Mobile Device Center, you can do the following:
Click Mobile Device Settings to change synchronization
settings.
When you click Pictures > Music and Video > <XX> new
pictures/video clips are available for import, a wizard
guides you to tag and transfer photos from your device to the
Photo Gallery on your computer.
Click Pictures > Music and Video > Add media to your
device from Windows Media Player to synchronize music and
video files using Windows Media® Player.
Click File Management > Browse the contents of your
device to view documents and files on your device.
NOTE: See Windows Mobile Device Center Help for more information.
4.2 Setting up ActiveSync®
On a Windows® XP computer, you need to use Microsoft ActiveSync® 4.5
or later. If you do not have this software on your computer, you can
download it from the Microsoft website. Go to http://www.microsoft.com
and search for ActiveSync.
Setting up synchronization in ActiveSync
1. Connect your device to your computer. The Synchronization
Setup Wizard automatically starts and guides you to create a
synchronization partnership. Click Next to proceed.
2. To synchronize your device with your computer, clear the
Synchronize directly with a server running Microsoft Exchange
check box, and then click Next.
3. Select the information types that you want to synchronize, then
click Next.
4. Select or clear the Allow wireless data connections check box
according to your preference.
5. Click Finish.
When you finish the wizard, ActiveSync synchronizes your device
automatically. Notice that Outlook e-mail messages and other information
34
Page 47

Juno T41/5
User Manual
appear on your device after synchronization.
4.3 Synchronizing with your computer
Connect your device to your PC to synchronize the information between
your device and PC. While your device is connected, ActiveSync (or
Windows Mobile Device Center on your PC) synchronizes every time you
make a change on either the PC or your device.
Starting and stopping synchronization
You can manually synchronize either from your device or computer.
From your device:
1. Click > ActiveSync, and then click Sync.
2. To end synchronization before it completes, click Stop.
TIP: To delete a partnership with one computer completely, disconnect
your device from that computer first. In ActiveSync on your device, tap
Menu > Options, select the computer name, then tap Menu > Delete.
From Windows Mobile Device Center:
1. Click > All Programs > Windows Mobile Device Center.
2. Click at the lower left of the Windows Mobile Device
Center.
3. To end synchronization before it completes, click .
From ActiveSync on your computer:
When you connect your device to your computer, ActiveSync
automatically opens on your computer and synchronizes.
1. To manually start synchronization, click .
2. To end synchronization before it completes, click .
Selecting information to synchronize
You can change the information types and the amount of information to
synchronize for each type either on your device or your computer. Follow
the steps below to change synchronization settings on your device.
Before changing synchronization settings on your device, disconnect it
from your computer.
35
Page 48

Juno T41/5
User Manual
NOTE: It is not possible to set ActiveSync Options if your device has not
yet synchronized with your PC.
1. In ActiveSync on your device, tap Menu > Options.
2. Select the check box for any items you want to synchronize.
If you cannot select a check box, you might have to clear the
check box for the same information type elsewhere in the
list.
3. To change synchronization settings for an information type,
for instance, E-mail, select it and tap Settings.
4. You can then set the download size limit, specify the time
period of information to download, and more.
Some information types such as Favorites, Files and Media cannot be
selected in ActiveSync Options on your device. You can only select or
clear these items from your computer’s Windows Mobile Device Center or
ActiveSync.
A computer can have sync partnerships with many different Windows
Mobile, but a computer can have sync partnerships with at most two
computers. To ensure that your device will synchronize properly with both
computers, set up the second computer using the same synchronization
settings you used on the first computer.
Outlook e-mail can be synchronized with only one computer.
Troubleshooting sync connection problems
In some cases, when the computer connects to the Internet or a local
network, it may disconnect the connection with your device in favor of the
Internet or network connection.
If this happens, on the device, click > Settings > Connections > USB
to PC, then clear the Enable advanced network functionality check box.
36
Page 49

Juno T41/5
User Manual
Chapter 5 Using Additional Hardware
Features
5.1 Flashlight
The dual LEDs for the camera flash can also be used as a flashlight. Tap
> Flashlight to toggle the Flashlight on and off.
5.2 Assigning Buttons (hardware buttons)
Tap > Settings > Personal > Buttons. Under Program Buttons, your
favorite programs can be assigned to several of the device buttons. The list
of assignable buttons is shown on the left hand side with the program that
is assigned by default on the right. To reassign a button, select the button in
section 1 and change to the desired program or action from the pull-down
list in section 2.
You can customize the way your Up/Down control repeats by changing the
settings under the Up/Down Control tab.
CAUTION: Assigning a button to activate a program may disable the use
of that button for specific uses in other programs. For example, if the
ACTION button is assigned to open a specific program, it will no longer
trigger the camera application to capture an image.
5.3 Compass Calibration
To re-calibrate the compass, tap > Settings > System > Compass
Calibration. Follow the instructions on the screen.
37
Page 50

Juno T41/5
User Manual
5.4 Working with Bluetooth
If your device comes with built-in Bluetooth capability, you can wirelessly
transmit data to and from your device by connecting to available Bluetooth
enabled devices. To find out if you have Bluetooth installed in your device,
tap > Settings > System > System Information > Wireless.
Bluetooth capability is a short-range wireless communication technology
that exchanges information (beam) over a distance of up to 30 feet (10
meters) without requiring a physical connection.
Bluetooth settings: tap > Settings > Bluetooth.
Mode: To enable Bluetooth, select the check box Turn on Bluetooth. If
you want other Bluetooth devices to find your device, also check the Make
this device visible to other devices checkbox.
Devices: Tap Add new device to search for other Bluetooth devices. For
enhanced security, use passcodes.
COM Ports: Available only for Bluetooth-connected devices that support
serial (COM) connections.
Wake Settings: Allow Bluetooth activity to turn the device on. When
this check box is selected, another Bluetooth device can send data and your
device will turn on and reply if necessary, but only if Bluetooth is enabled.
NOTE: It is recommended that your device be configured to automatically
turn off when not in use. Otherwise, another Bluetooth device could turn
on your device, transfer data and if Juno T41/5 does not turn off again,
drain the battery.
Receiving Beams: To allow the device to receive incoming beams, tap
> Settings > Connections > Beam to open the Beam screen. Check the
Receive all incoming beams checkbox and tap OK.
Creating a Bluetooth Partnership: Bluetooth partnerships are required
for connections to some PC’s, printers, and headphones.
Configuring Bluetooth connections vary depending upon how each
Bluetooth device works. Refer to all device documentation.
1. Tap
> Settings > Bluetooth > Mode. Ensure that both
devices have Bluetooth turned on in the Mode area, are visible
and within close range.
2. Tap Devices > Add new device… Wait a few moments while
38
Page 51

Juno T41/5
User Manual
your device searches for Bluetooth devices.
3. Tap the name of the other Bluetooth device and tap Next. For
enhanced security, use passcodes. Enter the same passcode on
the other device.
4. Under Advanced, you can change the name of the other device
and add additional services, if available. Tap Save.
Creating a Bluetooth connection with a PC:
1. Ensure that your PC has connectivity software installed and has
Bluetooth hardware.
2. Set up a partnership between your device and the PC. Refer to
your PC documentation for instructions.
3. Once shown, select the PC from the Device list and tap Next.
4. Enter the passcode, if necessary and tap Next.
5. Confirm that ActiveSync service is available and place a check in
the check box and tap Finish.
6. Tap > ActiveSync > Menu > Connect via Bluetooth.
Bluetooth-enabled headphone: You can use Bluetooth stereo headphones
(A2DP) or a Bluetooth headset (HFP/HSP). Any Bluetooth audio device
supporting the A2DP, HFP, or HSP profiles should be compatible. Many
Bluetooth headphones do not require a passcode to pair with your device.
Troubleshooting Bluetooth connection problems: If your device cannot
find another Bluetooth device, confirm that the device is within range (less
than 30 feet / 10 meters) and no large objects obstruct the path of other
Bluetooth-enabled devices. Confirm that the device is turned on and has
been configured to be discoverable.
5.5 Working with Wi-Fi
If your device comes with built-in Wi-Fi capability, you can wirelessly
transmit data to and from your device by connecting to available access
points or hot spots. To find out if you have Wi-Fi installed in your device,
tap
The Wi-Fi is off by default; however the on/off state will persist after a
reset. To turn the Wi-Fi on or off, do one of the following procedures:
> Settings > System > System Information > Wireless.
39
Page 52

Juno T41/5
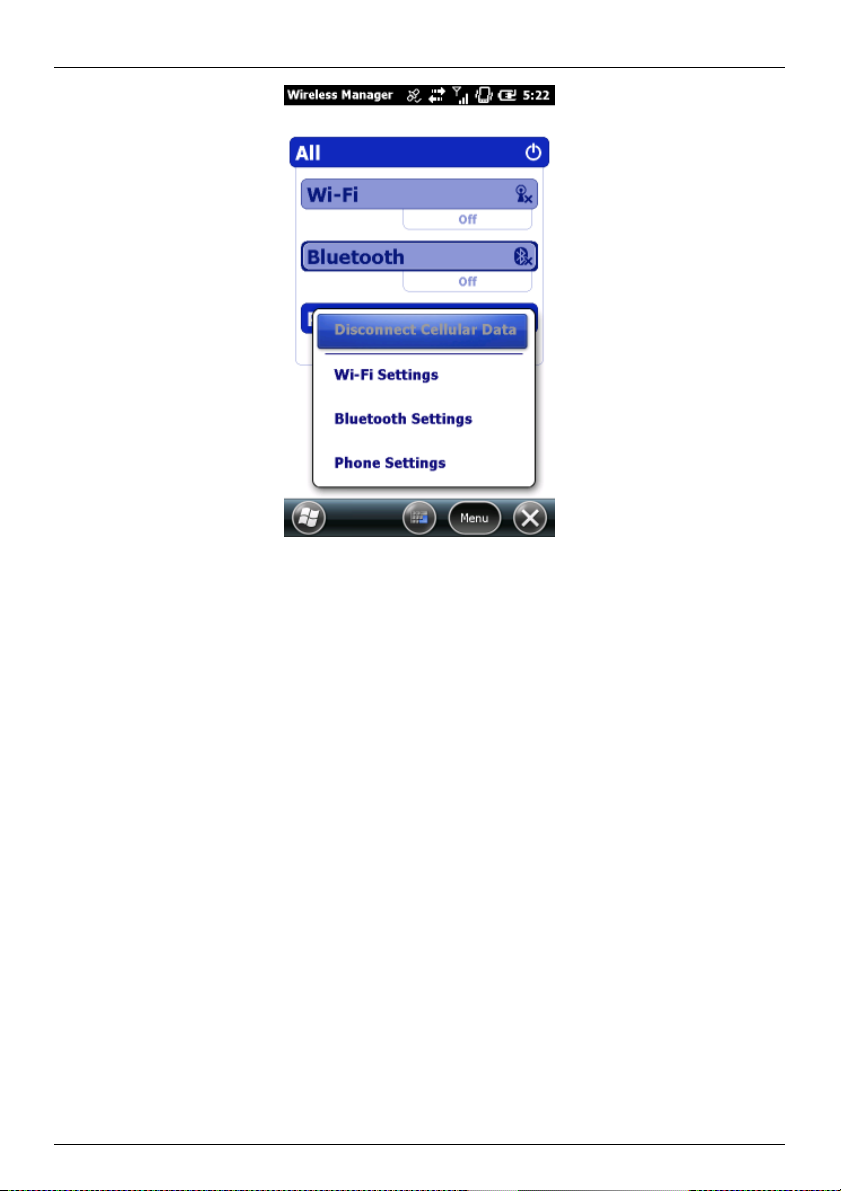
User Manual
Touch the Title bar, tap the Connectivity icon and tap
Wireless Manager to open the Wireless Manager screen,
and tap Wi-Fi.
Tap > Settings > Connections > Wireless Manager and
tap Wi-Fi.
Once the Wi-Fi is turned on, it detects the wireless networks in the vicinity
and gives you the option to connect to one. Turn Wi-Fi off when not in use
to save battery power and possibly speed up other processes.
1. Wi-Fi by default is off. Tap Wi-Fi on the Wireless Manager screen
to enable Wi-Fi as necessary.
2. After a few seconds, a Multiple Networks Detected or Network
Detected pop-up window appears.
3. Tap the network to connect to and tap OK.
4. If the network requires authentication, the Network Log On dialog
will open. For networks that require network keys, enter the
network key into the dialog box and tap Connect to begin using
the network.
5. Under Network Adapters tab, changes can be made to what
your network card connects to and to modify adapter settings.
40
Page 53
Juno T41/5
User Manual
To update Wi-Fi connection settings:
1. On the Wireless Manager screen, tap Menu > Wi-Fi Settings.
2. Tap the name of the network to update the settings for.
3. The Configure Wireless Network wizard appears. Update
settings and tap Next as needed to progress through the wizard.
4. Tap Finish to close the wizard and save the settings.
NOTE: If your device is connected to a PC that is connected to the
Internet, the device will use the PC’s Internet connection and Wi-Fi will
not appear on the Wireless Manager screen. You may allow the
simultaneous use of the PC and the Wi-Fi module by doing one of the
following:
In the ActiveSync software on your PC, select File >
Connection Settings and check the Allow wireless
connection on the device when connected to the desktop
checkbox.
In Windows Mobile Device Center software on your PC, click
Mobile Device Settings > Connection Settings and check
41
Page 54

Juno T41/5
User Manual
the Allow data connections on device when connected to
PC checkbox.
Using ActiveSync via Wi-Fi
Exchange ActiveSync, a component of Exchange Server, facilitates data
synchronization between your device and an Exchange server. This
synchronization can occur over a network connection, allowing you to
update calendars, contacts, tasks and the Inbox on your device without
directly connecting to a PC. The server must be running Exchange Server
2003 SP2 or later.
To use Exchange ActiveSync, confirm with your system administrator that
an Exchange Server is available. The administrator will provide you with a
login name, password, server name, and domain name. To configure
Exchange ActiveSync on your device:
1. Tap > ActiveSync > Menu > Add Server Source.
2. Enter your email address and tap Next.
3. Enter the User name, Password and Domain and tap Next.
4. The Automatic Configuration dialog will appear while the device
attempts to connect to Exchange Server. If the system
encounters difficulty, follow the directions of the dialogs that
appear, such as the Edit Server Settings dialog.
5. Choose the data types you want to synchronize and tap Finish.
Enter the server address and confirm with your administrator
whether the Exchange server requires an encrypted (SSL)
connection. Tap Next.
Troubleshooting Wi-Fi connection problems: If the device seems to be
connected to the network, but you are having difficulty using the network
connection, tap > Settings > Connections > Wi-Fi. The Network
Cards window will open and allow you to confirm that the connection is
appropriately configured as either a Work or Internet connection. If you are
unable to connect to a network, try connecting to another network without
any security, such as a Wi-Fi hotspot, to determine if the issue is the
hardware or the network.
42
Page 55

Juno T41/5
User Manual
Using the Summit Utilities
The Juno T41/5 software includes a Wi-Fi connection management and
monitoring utility called the Summit Client Utility (SCU). SCU allows you
to view all radio and security settings, and status; and enables you to
troubleshoot connectivity issues.
The SCU software is useful for establishing network connections on
networks that require more complex settings than the Configure Wireless
Network wizard provided in the Windows Embedded Handheld operating
system.
For more information how to use the SCU, please visit:
http://www.summitdata.com/documentation.html and click on the User’s
Guide.
Accessing the Summit Client Utility
To access SCU, tap > Settings > Connections > Wi-Fi. The Summit
Client Utility window appears.
NOTE: There are two icons labeled Wi-Fi.
SCU has five tabs which may be accessed from the top of the screen:
Main
Profile
Status
Diags (for troubleshooting)
Global
43
Page 56

Juno T41/5
User Manual
To view a tab, tap the tab bar at the top of the screen, or slide your finger
left or right to view the next tab.
Main Window
The Main window provides an overview of the current wireless network
connection configuration (Active Profile), a snapshot of connection
information, and additional information regarding SCU (About SCU). You
can also import and export settings configurations, which is useful if you
have multiple devices to configure to access your local networks.
44
Page 57
Juno T41/5
User Manual
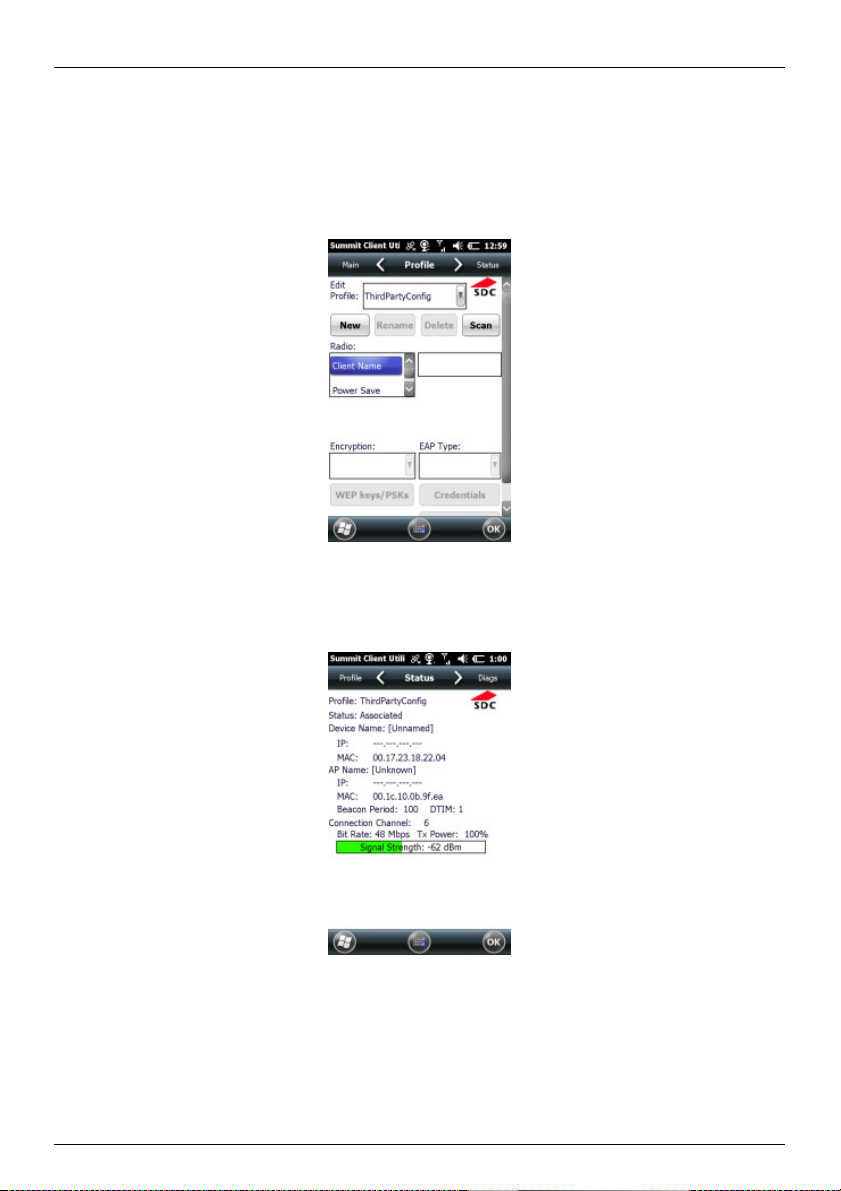
Profile Window
Profile settings are radio and security settings that are stored for each
configuration profile. Tap New to create a new Profile and enter in the
necessary connection settings for a Wi-Fi network access point. Scroll
down to find the Commit button to save changes to the Profile.
Status Window
The Status window provides status information on the radio connection
between the client device and the associated access point.
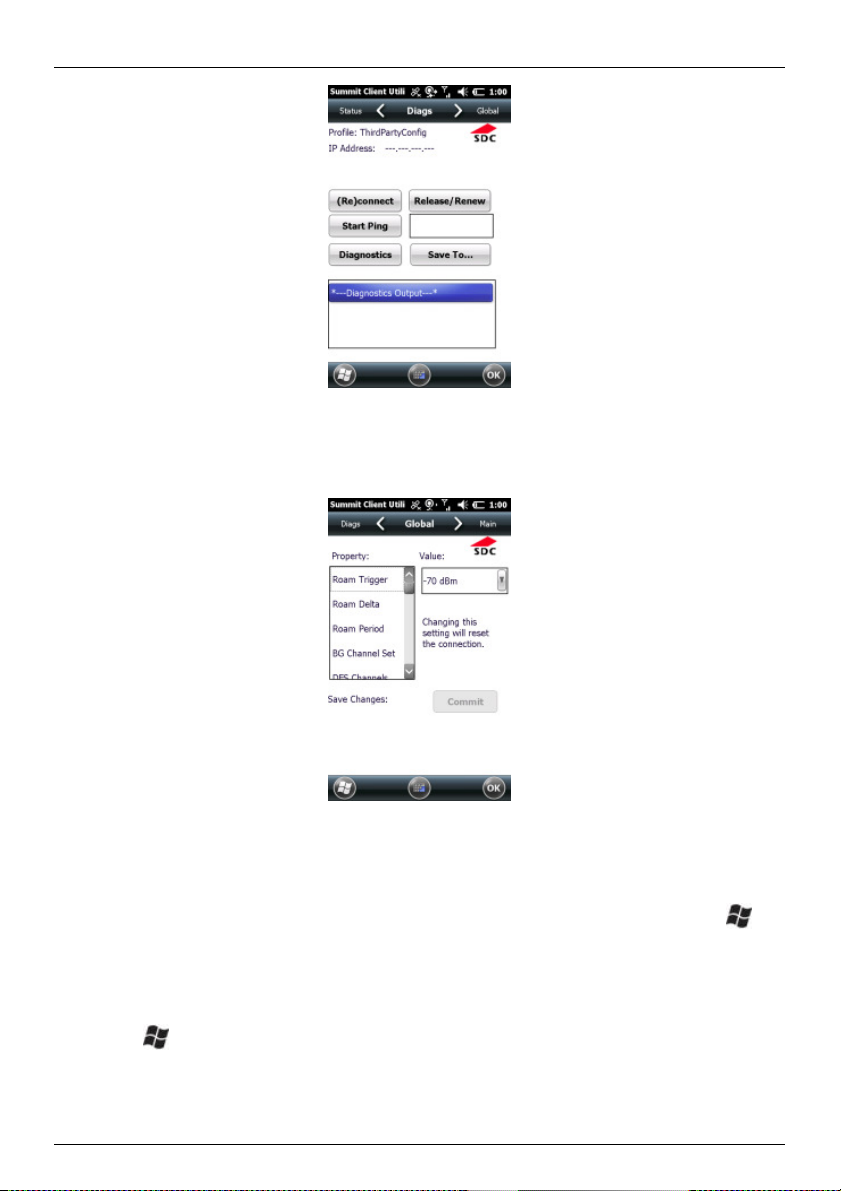
Diags Window
The Diags window enables you to troubleshoot connection issues with
SCU.
45
Page 58
Juno T41/5
User Manual
Global Window
Global settings include radio and security settings that apply to all profiles
and settings managed by SCU.
5.6 Working with the Camera
If your device comes with the built-in camera, you can capture photos and
videos. To find out if you have a camera installed in your device, tap >
Pictures & Videos. If you see the Camera icon, your device has the
camera feature.
To capture pictures and videos, open the camera application:
1. Tap
2. Tap the Camera icon or the Camera tile, or press the LEFT
button to activate the Camera tile.
> Pictures & Videos.
46
Page 59

Juno T41/5
User Manual
The camera application starts and soon displays a camera preview on the
entire display screen. The camera will be in either in Portrait or Landscape
mode as per the camera settings or according to the device orientation. The
Title bar and Tile bar will not be visible.
User Interface
Once the Camera icon is tapped, the preview screen shows. Tap on the up
arrow ( ) to display the pop-up menu system and to access various
camera features and settings.
Tap on the down arrow ( ) to exit the menus.
Thumbnail Window
A thumbnail image is shown on top of the preview screen. This is the most
recent image captured using the camera application. Tap on the thumbnail
to return to Microsoft Pictures & Videos window and display a thumbnail
preview of saved image and video files.
47
Page 60
Juno T41/5
User Manual
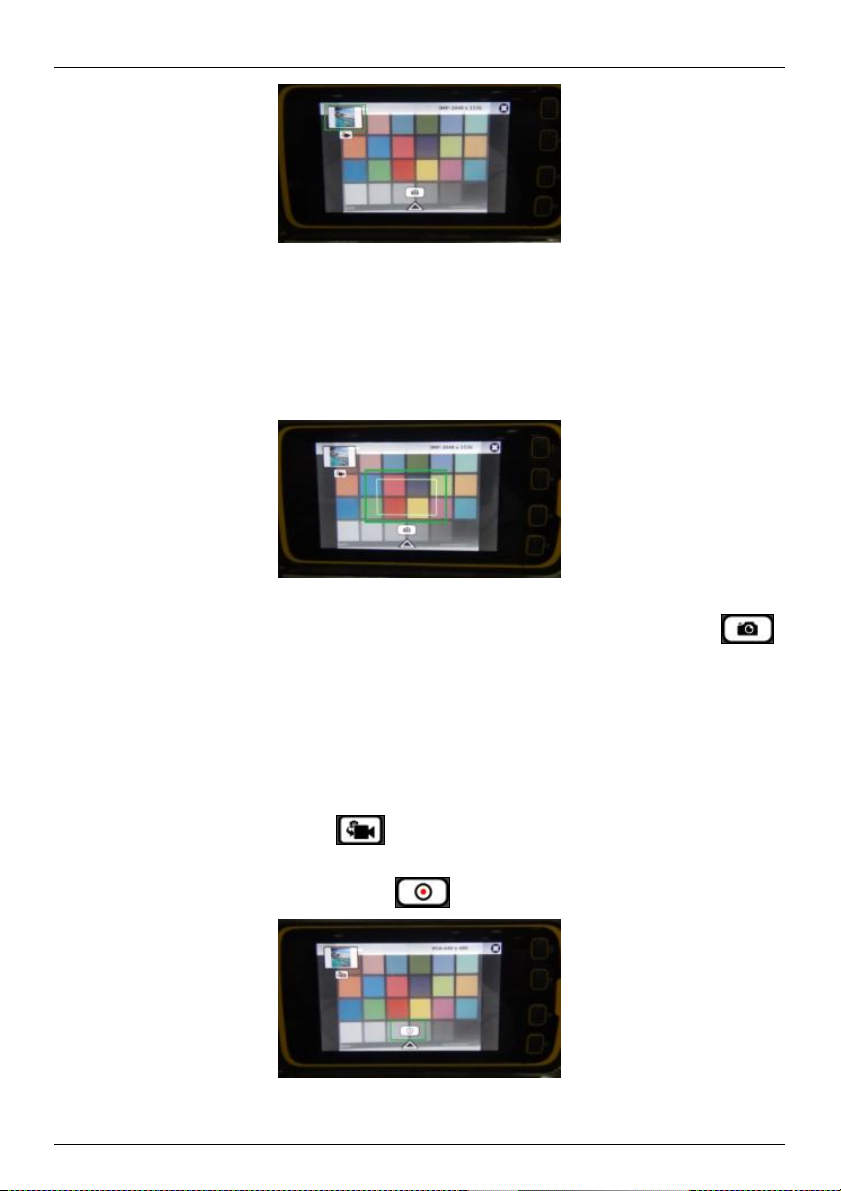
Capturing Images
If preview not focused, a quick double-tap on the preview screen focuses
the image (if focus is enabled in settings menu). Focus success is indicated
by a green box displayed at center of the screen.
The image can be captured after this by tapping on the Camera icon ( )
when the user interface is viewable on the image preview. You can also use
the ACTION button to trigger the image capture.
Captured images are saved with the file extension of .JPG.
Capturing Videos
The camera application will switch from image mode to video mode
by tapping the video icon ( ) below the thumbnail window. In
video mode, the similar icon is used to switch to Image mode.
A tap of the capture/record button ( ) will start capturing the video.
Captured video files are saved with the file extension of .WMV.
48
Page 61

Juno T41/5
User Manual
Closing application
To close the camera application, tap on the close (X) mark at the top right
corner of the preview or press the OK button.
Image Camera Application Features
Tap on the up arrow ( ) to display the pop-up menu system to access
various features and settings. The features and settings are described below.
White Balance ( )
A tap on the White Balance icon, displays the following options.
Auto: Select this option to adjust the White Balance
automatically while taking pictures and videos in different
lighting conditions.
Sunny: Select this option when taking pictures and videos in
full sunlight.
Incandescent: Select this option when taking pictures and
videos in places lit with Incandescent lighting.
Fluorescent: Select this option when taking pictures and
videos in places lit with Fluorescent lighting.
Selection of any option applies that setting to camera preview and to
images captured.
Zoom Levels ( )
A tap on the Zoom icon displays the levels of digital zoom supported by
camera application.
1.0x [Minimum Zoom]
1.5x
2.0x
2.5x
3.0x
3.5x
4.0x [Maximum Zoom]
Selection of any option applies that setting to camera preview and to
images captured.
NOTE: The Image Tagging of date-time and GPS on the image is not
compatible with a Digital Zoom setting other than 1.0x. The EXIF tagging
49
Page 62

Juno T41/5
User Manual
is not affected by Digital Zoom.
Brightness ( )
A tap on the Brightness icon enables adjustment of the Brightness offset.
+3 [Maximum Brightness]
+2
+1
0 [Normal Brightness]
-1
-2
-3 [Minimum Brightness]
Selection of any option applies that setting to camera preview and to
images captured. Increase the Brightness if the subject is underexposed, or
decrease the Brightness if the subject is overexposed. A common situation
requiring adjustment to Brightness is capturing a scene with high contrast
caused by direct exposure of light sources or areas of shading or shadows.
Flash Settings ( )
A tap on the Flash Settings icon displays the following options.
On: Selection of this option enable the flash icon ( ) on the
screen and dual LEDs will flash while capturing images.
Off: Selection of this option disables the LED flash.
Auto: Selection of this option enable the LEDs to flash if
needed to illuminate the scenes with low-light. The auto flash
icon ( ) will display on the screen.
Image Quality ( )
A tap on the Image Quality icon displays the following options.
Economy: Select this option should save the captured image
with low quality (high compression).
Normal: Select this option should save the captured image
with medium quality (medium compression).
Fine: Select this option should save the captured image with
good quality (low compression).
Super Fine: Select this option should save the captured
image with very good quality (very low compression).
50
Page 63

Juno T41/5
User Manual
Images will be stored with the selected quality and the file size of
the image increases as quality increases.
Camera Settings ( )
A tap on the Settings icon displays the sub menu which has Still
Resolution, Storage Selection, Focus, Image Review, Image Tagging
and Application Settings. These sub menu options are explained in
further detail below.
Still Resolution
The still image resolution displays on the top right corner of the
preview window when the camera user interface is visible.
Two aspect ratios are available on the Juno T41/5:
4:3
5:3
4:3 ( )
The 4:3 image resolutions available are:
1.3MP - 1280x960
3MP - 2048x1536
5MP - 2560x1920
8MP - 3264x2448
Select the desired image resolution.
5:3 ( )
The 5:3 image resolutions available are:
WVGA - 800x480
WXGA - 1280x768
2.4MP - 2000x1200
3.9MP - 2560x1536
6MP - 3264x1960
Select the desired image resolution.
Storage Select (
)
Tap on the Storage Select icon to display the following options:
Main Memory: Save images to the on-board storage.
51
Page 64

Juno T41/5
User Manual
SD Card: Save the images to the microSD card. This item is
not selectable if no microSD card is installed.
Focus ( )
Tap on the Focus icon to display the following options.
Enable: This enables the Auto Focus feature, which is
activated with double-tap on the image preview.
Disable: This disables the Auto Focus feature.
Image Review ( )
A tap on the Image Review icon will display the following options.
2 Seconds: The captured image is displayed for 2 seconds.
3 Seconds: The captured image is displayed for 3 seconds.
User Prompted: The captured image is displayed until the
user indicates to delete or save the image. See below for
further information.
Off: The captured image is not displayed. This mode is useful
for capturing images as quickly as possible.
Image Tagging ( )
Image tagging is the capture of date, time and location data on your
images. The data may be stored in the EXIF data or both the EXIF data
and on the visible image.
A tap on the Image Tagging icon will display the following sub menu and
options.
Date
Date Source:
Device Date-Time: Fetch the date-time from the device real-time
clock.
GPS Date-Time: Fetch the current GPS date-time.
NOTE: If the current GPS time is not available (due to lack of
GPS signal), the Device Date-Time is used.
Stamp Settings:
EXIF: Store the date-time information as EXIF data.
EXIF & Stamp: Store the date-time information as EXIF data and
embedded on the visible image.
52
Page 65

Juno T41/5
User Manual
Off: Do not store date-time information.
GPS
Format:
Deg/Min/Sec: Format in Degrees, Minutes, Seconds.
Decimal Degree: Format in Degrees with decimal precision.
Stamp Settings:
EXIF: Store the location information as EXIF data.
EXIF & Stamp: Store the location information as EXIF data and
embedded on the visible image.
Off: Do not store date-time information.
APP Settings ( )
Tap on the APP Settings icon to display a sub menu with the options
described below.
UI Orientation
Rotation on Tilt: Enable the automatic rotation of the camera
user interface based on device orientation/tilt.
Fixed Landscape: Lock the camera application in landscape
mode.
Fixed Portrait: Lock the camera application in portrait mode.
NOTE: This option only applies to the image capture and does not
apply to video capture, which is only available in fixed landscape
mode.
Sounds
Enable: This option enables the beep sound while focusing and
click sound for capturing the images.
Disable: This option disables the sound while focusing and
capturing the images.
Modify Prefix
Select the Modify Prefix option to display the prefix window enabling
you to edit the prefix of Image and Video files. By default, Image files
append with prefix IMG and video files append with VID.
The file is saved with a name that is auto generated with the prefix
followed by a four digit number. The number is sequential.
53
Page 66
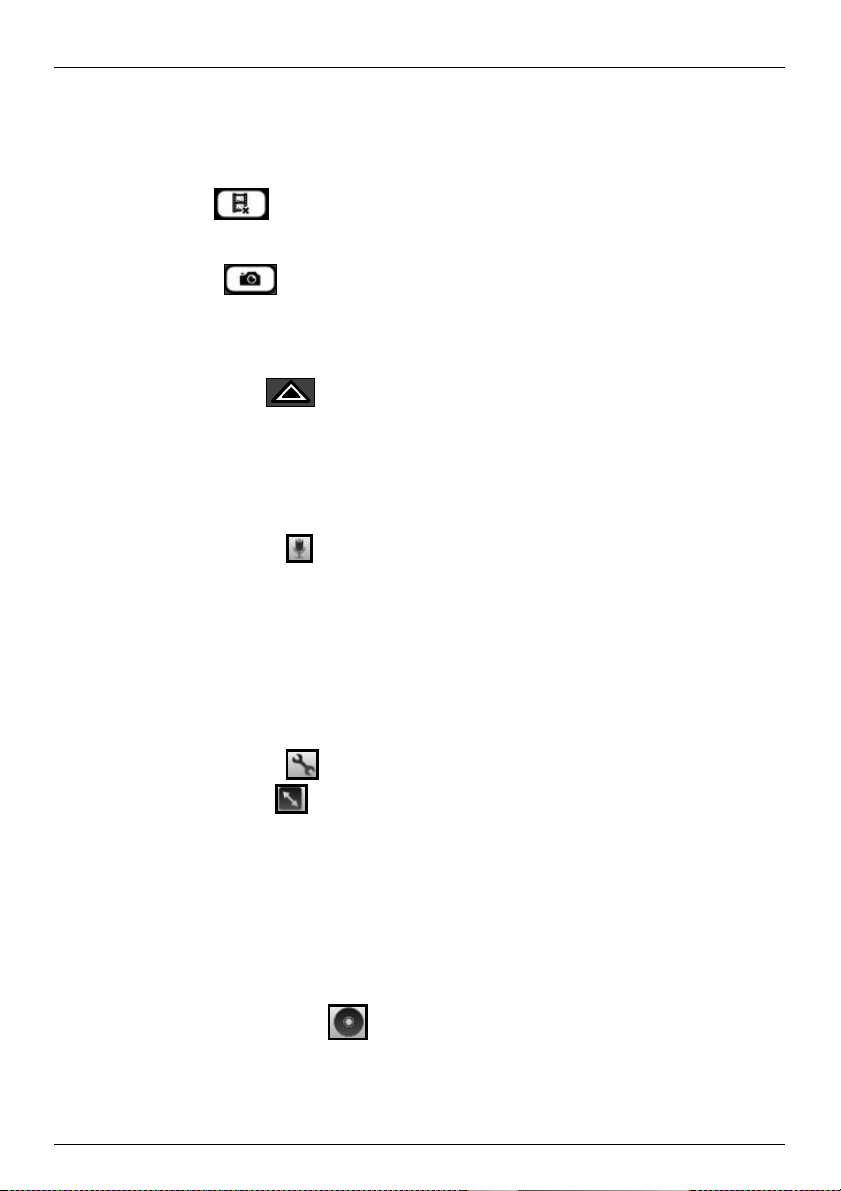
Juno T41/5
User Manual
Image Delete and Switch to Camera in Image review mode
When the Image Review mode is User Prompted, the camera application
will display the capture image and show two icons.
• DELETE ( )
Tap the delete icon to delete the image from the storage.
• CAMERA ( )
Tap the camera icon to save the image and return to image preview mode.
Video Camera Application Features
Tap on the up arrow ( ) to display the pop-up menu system to access
various features and settings. The features and settings are described below.
Many of the settings for image capture are the same for video capture, and
these include White Balance, Brightness and Focus. Settings unique to
video recording are as follows:
• Audio settings ( )
Tap the Audio Settings icon to display the following
options:
Enable: Audio capture from the MICROPHONE is enabled while
recording.
Disable: The video that is recorded does NOT include any sound
from the MICROPHONE.
• Video Settings ( )
Resolution ( )
Tap the Video Resolution icon to display the following options:
QVGA - 320x240
VGA - 640x480
WVGA - 800x480
Selection of any option applies that setting to camera preview
and to videos captured.
Storage Select ( )
Tap the Storage Select icon to display the following options:
Main Memory: Save videos to the on-board storage.
54
Page 67

Juno T41/5
User Manual
SD Card: Save the videos to the microSD card. This item is not
selectable if no microSD card is installed.
• Video Review ( )
Tap the Video Review icon to display the following options:
On: If selected, the video review mode is enabled. After video
capturing is completed, video review window enables the user to
review the capture video by playing it back. Also, DELETE and
VIDEO icons are enabled in the review window. A tap on the
Delete ( ) icon, will delete the video file and return to the
video preview window. A tap on the Video ( ) icon will save
the video file and return to the video preview window.
Off: If selected, the video review feature is disabled. The
application will return to the preview window after capturing the
video and storing the video file.
• Pause Time-out ( )
Tap the Pause Time-out icon to display the following options:
10 seconds
20 seconds
60 seconds
Disable
Select an option to specify the timeout duration of the PAUSE
feature while recording.
While recording has the option to be STOPPED (and saved) or
being PAUSED and continued. If paused, the video recording
pauses for the selected time-out. Then the pause icon changes to a
record icon, enabling the user to resume recording. The Stop icon
ends the recording and saves the video file.
55
Page 68

Juno T41/5
User Manual
5.7 Working with GPS
Tap > Settings > System > System Information > Wireless to see if
your device has GPS installed. COM2 is the dedicated hardware port for
the built-in GPS (COM1 is dedicated to the external 9-pin).
The GPS is compatible with applications that accept the NMEA position
information using a default baud rate of 38400.
GPS settings:
If you are using only one GPS-aware application, these settings do not
need to be changed. However, to use multiple GPS-aware applications, tap
> Settings > System > GPS and select the following tabs:
Access: The GPS Intermediate Driver (GPSID) allows
multiple applications to access the GPS receiver. If the check
box is unchecked, the GPSID is disabled.
Hardware: COM2 is the hardware port dedicated for the
built-in GPS. Verify that COM2 is selected. The internal GPS
communicates at 38400 baud by default. If it has been
modified by a third-party program, adjust to match the
receiver baud rate.
Programs: Programs that use GPS need to know which COM
port to use to access GPS data. When using more than one
GPS-aware application, the same GPSID port must be used
in each application. Ensure that the COM port on the
GPS-aware application(s) is set to the same GPSID port as
shown in the Programs tab of the GPS applet. The program
port must be a different port than the hardware port. By
default, the GPS program port is COM3 and should not be
modified unless directed by Technical Support.
NOTE: Some GPS-aware applications may not communicate over GPS
program ports.
Exiting GPS applications
Any time you exit a GPS application (such as SatViewer) it is advisable to
close the port gracefully, e.g. tap Disconnect from GPS and then exit the
56
Page 69

Juno T41/5
User Manual
application. Failure to do so may leave the port open and hinder the next
GPS operation.
5.8 SatViewer
SatViewer provides information such as your current longitude, latitude,
elevation, how many GPS satellites are visible and the quality of the
computed coordinates.
To open SatViewer, tap > SatViewer. To begin monitoring GPS
satellites, tap the GPS tab and the Connect to GPS button.
NOTE: External GPS receivers, Bluetooth GPS receivers or other external
GPS devices are not supported and may not work correctly with SatViewer.
5.9 Battery Logger
The battery logger is useful for monitoring battery performance under
certain user scenarios or to check if the battery has a performance issue.
To run the Battery Logger, tap > File Explorer. In the Windows folder,
find batlog and tap it to start the program. Tap File > Start Battery
Logging. The software will prompt you to specify where to log the data
file.
The program analyzes and logs the following information about the
battery:
- Charge cycles begun and % capacity at initiation
- Charge cycles fully completed
- Aborted charge cycles and % capacity at termination
- Provide notification when the number of charge cycles reaches 90%
of the max
57
Page 70

Juno T41/5
User Manual
5.10 Barcode Scanning (For Scanner Version only)
5.10.1 How to Scan Barcode
Tap the ScanAgent icon to launch the button you assigned
for scanning barcode under “Bottons” dialogue box
Option 2: Press the button you assigned for scanning barcode
under “Bottons” dialogue box.
How to make Button Assignment
1. On Desktop, tap Settings.
2. Tap Personal.
58
Page 71

Juno T41/5
User Manual
3. Tap Buttons.
4. Tap the button you want to assign for
barcode scanning, and then tap the
drop-down list under “2. Assign a
program”.
5. Tap “ScanAgent” and tap OK.
59
Page 72

Juno T41/5
User Manual
5.10.2 Scanner Setup
1. On Desktop, tap Settings.
2. Tap Scanner.
3. The Scanner Setup dialogue box shows.
Tap Scan Now to test the functionality of the built-in scanner.
60
Page 73
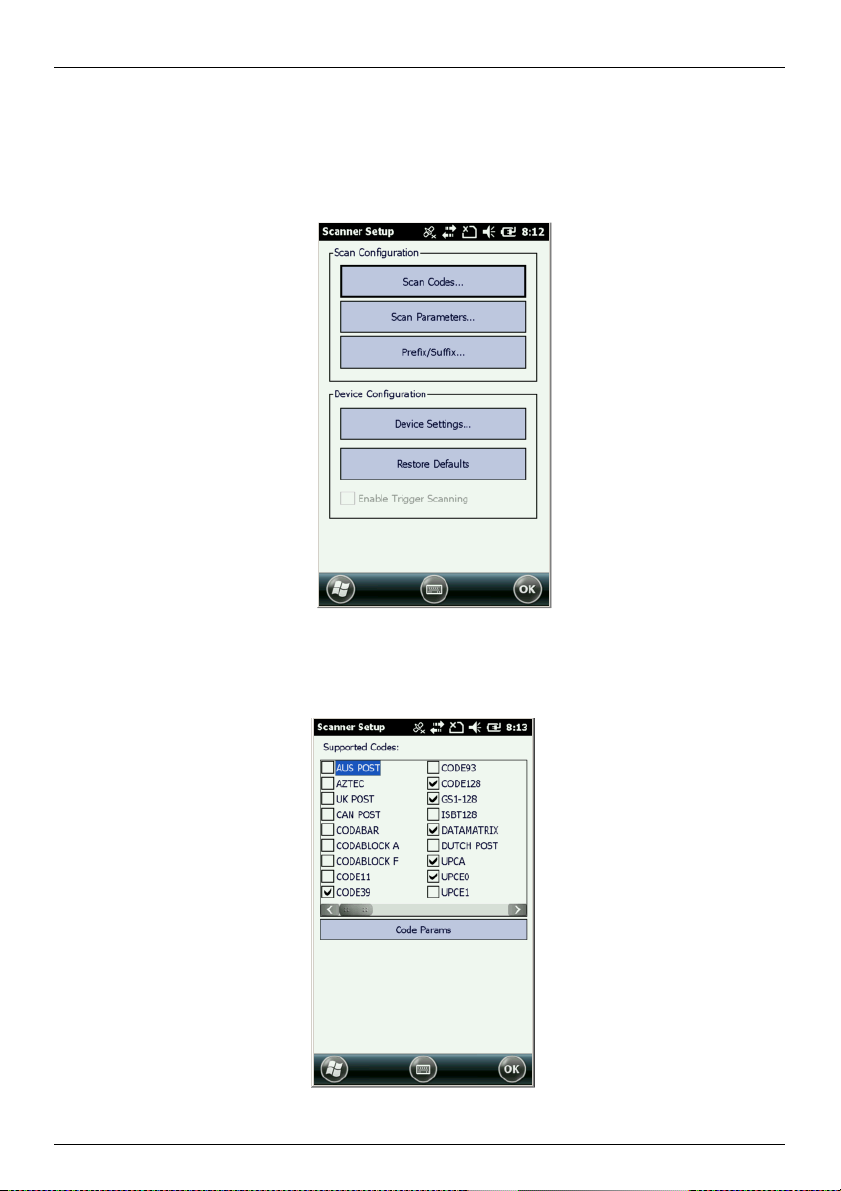
Juno T41/5
User Manual
For further configurations, please tap Edit Config.
4. Once Edit Config tapped, the screen below shows:
a. By tapping Scan Codes, you can enter Supported Code screen.
61
Page 74
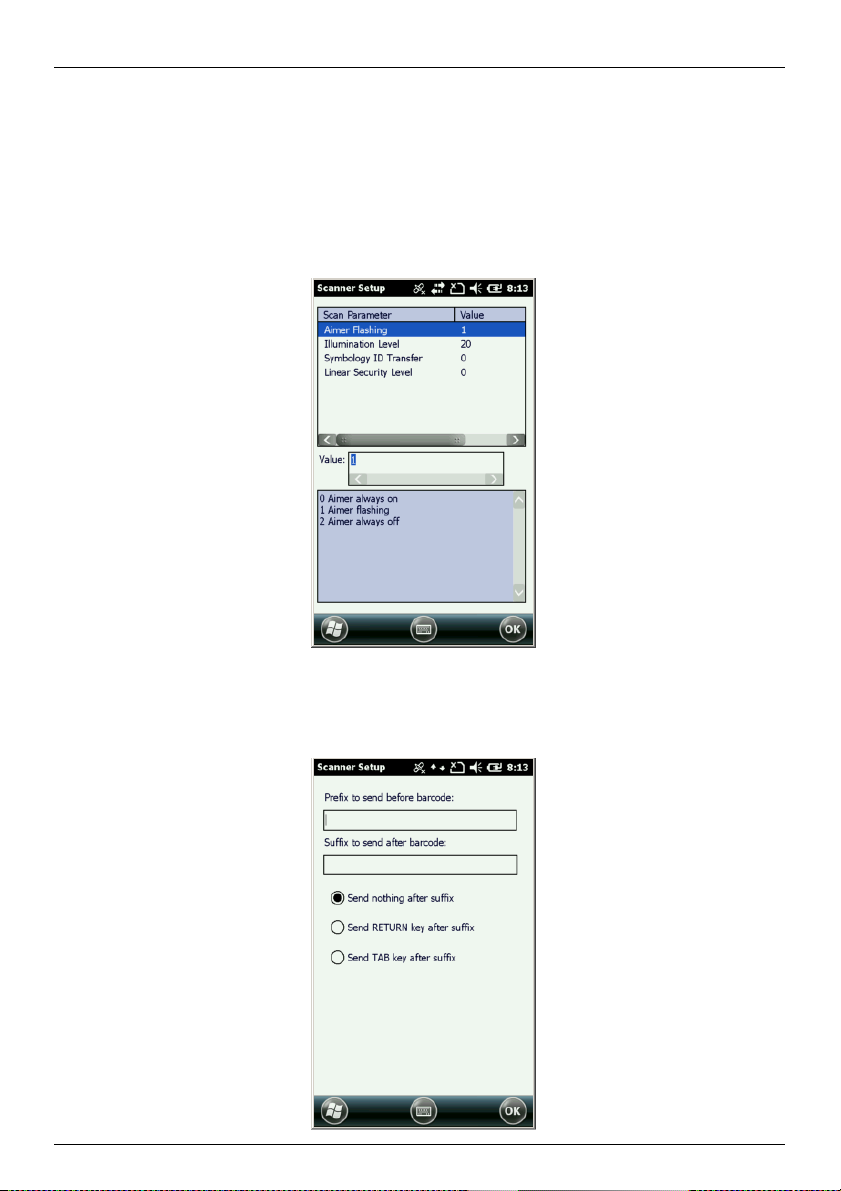
Juno T41/5
User Manual
b. By tapping Scan Parameter, you can enter scan parameter
configuration screen.
Tap a parameter and enter a value into Value box and click OK.
c. By tapping Prefix/Sufix, you can enter prefix/sufix configuration
screen.
62
Page 75

Juno T41/5
User Manual
d. By tapping Device Setting, you can enter reader parameter
configuration screen.
Tap a reader parameter and enter a value into Value box and
click OK.
e. By tapping Restore Defaults, you can restore the scanner to
default configurations.
Tap Yes to conform the message or No to cancel.
Tap a reader parameter and enter a value into Value box and
click OK.
63
Page 76
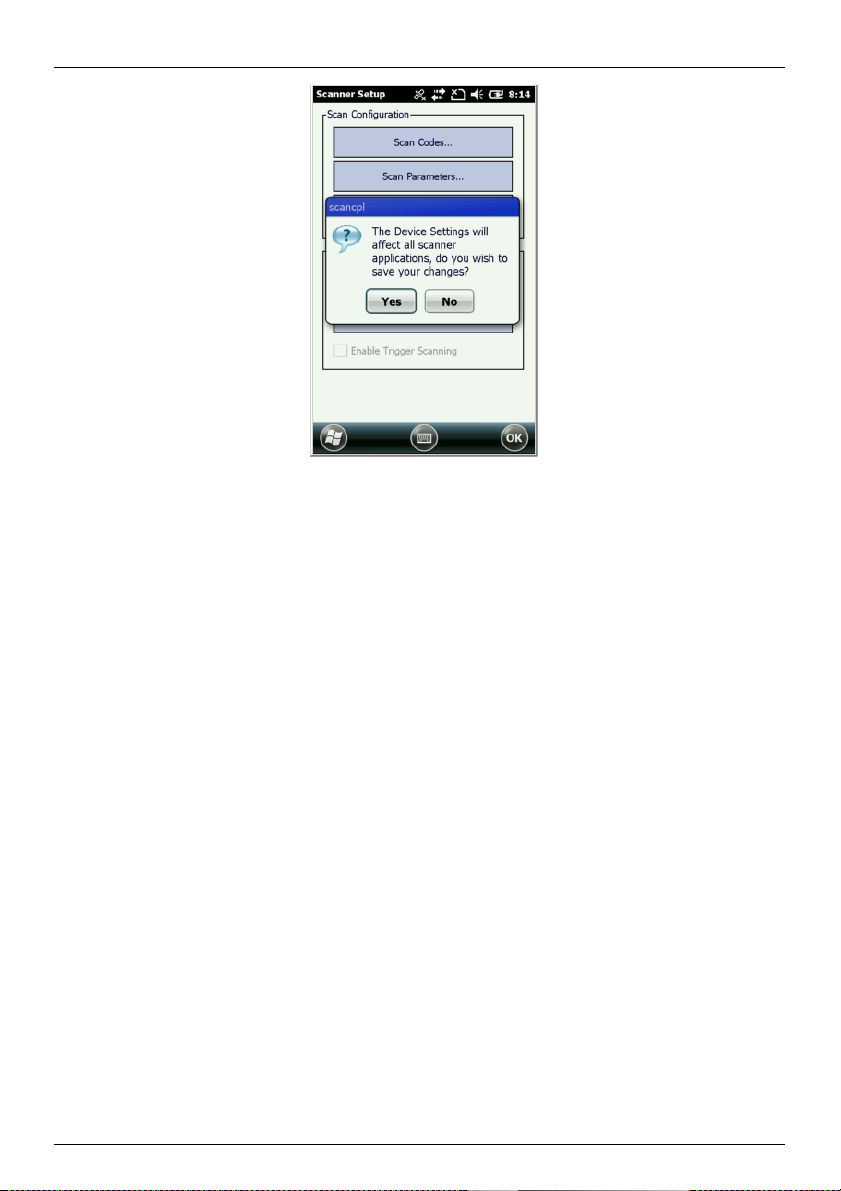
Juno T41/5
User Manual
64
Page 77

Juno T41/5
User Manual
Appendix A: Regulatory Compliance
U.S.A. - FCC Statement
This equipment has been tested and found to comply with the limits for a
Class B digital device, pursuant to part 15 of the FCC rules. These limits
are designed to provide reasonable protection against harmful interference
in a residential installation. This equipment generates, uses and can radiate
radio frequency energy and, if not installed and used in accordance with
the instructions, may cause harmful interference to radio communications.
However, there is no guarantee that interference will not occur in a
particular installation. If this equipment does cause harmful interference to
radio or television reception, which can be determined by turning the
equipment off and on, the user is encouraged to try to correct the
interference by one or more of the following measures:
–Reorient or relocate the receiving antenna.
–Increase the separation between the equipment and receiver.
–Connect the equipment into an outlet on a circuit different from that to
which the receiver is connected.
–Consult the dealer or an experienced radio/TV technician for help.
FCC 15.21
You are cautioned that changes or modifications not expressly
approved by the part responsible for compliance could void the
user’s authority to operate the equipment.
This device complies with part 15 of the FCC Rules. Operation is
subject to the following two conditions:
1) this device may not cause interference and
2) this device must accept any interference, including interference
that may cause undesired operation of the device
FCC RF Radiation Exposure Statement:
For body worn operation, this
computer
has been tested and meets FCC RF
exposure guidelines when used with an accessory that
contains no metal and that positions the handset a minimum of 10 mm from the
body. Use of other accessories may not ensure compliance with FCC RF
exposure guidelines."
65
Page 78

Juno T41/5
User Manual
Exposure to Radio Frequency (RF) Signals
Your device contains a radio transmitter and receiver. The radiated output
power is far below the international radio frequency exposure limits. These
limits are part of comprehensive guidelines and establish permitted levels
of RF energy for the general population. The guidelines are based on the
safety standards previously set by international standards bodies:
• American National Standards Institute (ANSI) IEEE.
C95.1-1992.
• National Council on Radiation Protection and Measurement
(NCRP). Report 86. 1986.
• Int’l Commission on Non-Ionizing Radiation Protection
(ICNIRP) 1996.
• Ministry of Health (Canada), Safety Code 6. The standards
include a substantial safety margin designed to assure the
safety of all persons, regardless of age and health.
SAR: 0.36w/kg
Use of unauthorized or modified antennas may impair call quality and
damage the computer, causing loss of performance. To assure optimal
computer performance and ensure human exposure to RF energy is within
the guidelines set forth in the relevant standards; always use your device
only in its normal-use position.
Avoiding contact with the antenna area when the computer is IN USE
optimizes the antenna performance.
Telecommunications & Internet Association (TIA) information
Hearing Aids: Some digital wireless computer s may interfere with some
hearing aids. In the event of such interference, you may want to consult
your wireless service provider, or call customer service to discuss
alternatives.
Pacemakers and Other Medical Devices: The Health Industry
Manufacturers Association recommends a minimum separation of six
inches be maintained between a handheld wireless computer and a
pacemaker to avoid potential interference with the pacemaker. These
recommendations are consistent with the independent research by and
66
Page 79

Juno T41/5
User Manual
recommendations of Wireless Technology Research. Persons with
pacemakers should use the ear opposite the pacemaker to minimize the
potential for interference. Persons with pacemakers should exercise great
caution if using a hands-free device such as a headset, as these persons
may be at greater risk of the device not maintaining the recommended
minimum six inches of separation from the pacemaker. If you have any
reason to suspect that interference is taking place, turn the computer OFF
immediately.
If you use any other personal medical device, consult the manufacturer of
your device to determine if they are adequately shielded from external RF
energy. Your physician may be able to assist you in obtaining this
information.
Turn the computer OFF in health care facilities when any regulations
posted in these areas instruct you to do so. Hospitals or health care
facilities may be using equipment that could be sensitive to external RF
energy.
Canada Compliance, Industrie Canada (IC)
This Class B digital apparatus complies with Canadian ICES-003.
Cet appareil numérique de classe B est conforme à la norme NMB-003.
This device complies with Industry Canada licence-exempt RSS standard(s). Operation
is subject to the following two conditions: (1) this device may not cause interference, and
(2) this device must accept any interference, including interference that may cause
undesired operation of the device.
Le présent appareil est conforme aux CNR d'Industrie Canada applicables auxappareils radio
exempts de licence.L'exploitation est autorisée aux deux conditions suivantes:
(1) l'appareil ne doit pas produire de brouillage, et
(2) l'utilisateur de l'appareil doit accepter tout brouillage adioélectrique subi, même si le
brouillage est susceptible d'en compromettre le fonctionnement.
RF Radiation Exposure Statement:
For body worn operation, this phone has been tested and meets RF exposure guidelines
when used with an accessory that contains no metal and that positions the handset a
minimum of 10 mm from the body.
Use of other accessories may not ensure compliance with RF exposure guidelines.
Déclaration de l'exposition aux radiations RF:
Pour le fonctionnement du corps, ce téléphone a été testé et répond aux directives
d'exposition RF lorsqu'il est utilisé avec un accessoire qui ne contient pas de métal et qui
place le combiné d'un minimum de 10 mm du corps.
Utilisation d'autres accessoires peut ne pas assurer le respect des directives d'exposition
RF.
67
Page 80

Juno T41/5
User Manual
RoHS Statement
This device conforms to RoHS (Reduction Of Hazardous
Sub-stances) European Union regulations that set
maximum concentration limits on hazardous materials
used in electrical and electronic equipment.
CAUTION: RISK OF EXPLOSION IF BATTERY IS DISPOSED OF
INCORRECTLY. DISPOSE OF THE DEVICE AND THE BATTERY
ACCORDING TO INSTRUCTIONS FOR ELECTRONIC WASTE.
European Conformity Statement
Declaration of Conformity with Regard to the R&TTE 1999/5/EC and EMC 89/336/ EEC
directives.
Europe
According to ISO / IEC Guide 22 and EN 450 14
Manufacturer’s Name: Trimble Navigation Limited.
Manufacturer’s Address: PO Box 947, Corvallis, OR 97339 USA
Declares, under our sole responsibility, that the product:
Product Name: Rugged Handheld Computer (Terminal) (JUNO T41/5)
Model Number: JUNO/T41/5-BWG; JUNO/T41/5-BWS
Regulatory Name: JUNO/T41/5-BWG; JUNO/T41/5-BWS
Product Options: ALL
68
Page 81

Juno T41/5
User Manual
Conforms to the following Product Specifications:
EN300 440-1 v1.6.1:2010 and EN300 440-2 v
1.4.1:2010
EN50360:2001/ EN62209-1:2006/EN62311:2008/
EN62209-2:2010
EN301489-1 v1.9.2:2011; -3 v1.4.1: 2002; -7 v1.3.1: 2005;
-17 v2.2.1: 2012; -24 v1.5.1: 2010
EN55022/EN55024:2010
EN300328 v1.7.1: 2006
EN60950-1:2006+A11:2009+A1:2010+A12:2011
EN 61000-3-2:2006
EN 61000-3-3:2008
EN 61000-4-2:2001
EN 61000-4-3:2006
EN 61000-4-4:2004
EN 61000-4-5:2006
EN 61000-4-6:2005
EN 61000-4-11:2004
EN 60950-1:2001
Importer of Record: Trimble European Regional Fulfillment Center,
Logistics Manager, Meerheide 45, 5521DZ Eersel,
Netherlands.
Environmental Hazards
The product complies with international RoHS regulations.
Toxic and Hazardous Substances and Elements
Hexavalent
Chromium
(Cr6+)
Part Name
Printed
Circuit
Assemblies
Display
Keypad
Housing
Hardware
Lead
(Pb)
Mercury
(Hg)
Cadmium
(Cd)
X O O O O O
X O O O O O
X O O O O O
O O O O O O
O O O O O O
69
Poly-bromi
nated
biphenyls
(PBB)
Poly-bromi
nated
diphenyl
ethers
(PBDE)
Page 82

Juno T41/5
User Manual
Product Period does not include these items
Battery
Power supply
Cable
Manual
Hand strap
Stylus pkg.
Companion
CD
X O O O O O
X O O O O O
O O O O O O
O O O O O O
O O O O O O
O O O O O O
O O O O O O
The meter may be affected by static electricity interference.
please turn off the transmission function and wait a few minutes to start this function.
Taiwan
低功率電波輻射性電機管理辦法
第十二條: 經型式認證合格之低功率射頻電機,非經許可,公司、商
號或使用者均不得擅自變更頻率、加大功率或變更原設計之特性及功
能。
第十四條: 低功率射頻電機之使用不得影響飛航安全及干擾合法通
信;經發現有干擾現象時,應立即停用,並改善至無干擾時方得繼續
使用。低功率射頻電機需忍受合法通信或工業、科學及醫療用電波輻
射性電機設備之干擾。
SAR 標準值 2.0W/Kg,送測產品實測值為 0.36w/Kg
70
 Loading...