

Page 1

Troubleshooting Guide
Ag
GPS® EZ-Boom® 2010 System
Version 2.00
Revision A
August 2009
F
Page 2

Contact Information
Trimble Agriculture Division
10355 Westmoor Dr
Suite #100
Westminster, CO 80021
USA
800-865-7438 (US toll free)
+1-913-495-2700 Phone
+1-913-495-2750 Fax
trimble_support@trimble.com
www.EZ-Boom.com
Legal Notices
Copyright and Trademarks
© 2006-2009, Trim ble N avi gati on L imit ed. All rights reserved. Trimble, AgGPS,
EZ-Boom, EZ-Guide, and EZ-Steer are trademarks of Trimble Navigation
Limited, registered in the United States and in other countries. Autopilot,
EZ-Toolbox, FieldManager, and FmX are trademarks of Trimble Navigation
Limited.
All other trademarks are the property of their respective owners.
Release Notice
This is the August 2009 release (Revision A) of the EZ-Boom 2010 Automated
Application Control System Troubleshooting Guide. It applies to version 2.00 of
the EZ-Boom 2010 automated application control system.
LIMITED WARRANTY TERMS AND CONDITIONS
Product Limited Warranty
Subject to the following terms and conditions, Trimble Navigation Limited
(“Trimble”) warrants that for a period of one (1) year from date of purchase
this Trimble product (the “Product”) will substantially conform to Trimble's
publicly available specifications for the Product and that the hardware and
any storage media components of the Product will be substantially free from
defects in materials and workmanship.
Product Software
Produ ct software, w hether buil t into hardware circuitry as firmware, provided
as a standalone computer software product, embedded in flash memory, or
stored on magnetic or other media, is licensed solely for use with or as an
integral part of the Product and is not sold. If accompanied by a separate end
user license agreement (“EULA”), use of any such software will be subject to
the terms of such end user license agreement (including any differing limited
warranty terms, exclusions, and limitations), which shall control over the
terms and conditions set forth in this limited warranty.
Software Fixes
During the limited warranty period you will be entitled to receive such Fixes
to the Product software that Trimble releases and makes commercially
available and for which it does not charge separately, subject to the
procedures for delivery to purchasers of Trimble products generally. If you
have purchased the Product from an authorized Trimble dealer rather than
from Trimble directly, Trimble may, at its option, forward the software Fix to
the Trimble dealer for final distribution to you. Minor Updates, Major
Upgrades, new products, or substantially new software releases, as identified
by Trimble, are expressly excluded from this update process and limited
warranty. Receipt of software Fixes or other enhancements shall not serve to
extend the limited warranty period.
For purposes of this warranty the following definitions shall apply: (1)
“Fix(es)” means an error correction or other update created to fix a previous
software version that does not substantially conform to its Trimble
specifications; (2) “Minor Update” occurs when enhancements are made to
current features in a software program; and (3) “Major Upgrade” occurs when
significant new features are added to software, or when a new product
containing new features replaces the further development of a current
product line. Trimble reserves the right to determine, in its sole discretion,
what constitutes a Fix, Minor Update, or Major Upgrade.
Warranty Remedies
If the Trimble Product fails during the warranty period for reasons covered by
this limited warranty and you notify Trimble of such failure during the
warranty period, Trimble will repair OR replace the nonconforming Product
with new, equ ivalen t to new, or reco ndition ed par ts or Pr oduct, OR refu nd the
Product purchase price paid by you, at Trimble’s option, upon your return of
the Product in accordance with Trimble's product return procedures then in
effect.
How to Obtain Warranty Service
To obtain warranty service for the Product, please contact your local Trimble
authorized dealer. Alternatively, you may contact Trimble to request warranty
service at +1-408-481-6940 (24 hours a day) or e-mail your request to
trimble_support@trimble.com. Please be prepared to provide:
– your name, address, and telephone numbers
– proof of purchase
– a copy of this Trimble warranty
– a description of the nonconforming Product including the model
number
– an explanation of the problem
The customer service representative may need additional information from
you depending on the nature of the problem.
Warranty Exclusions and Disclaimer
This Product limited warranty shall only apply in the event and to the extent
that (a) the Product is properly and correctly installed, configured, interfaced,
maintained, stored, and operated in accordance with Trimble's applicable
operator's manual and specifications, and; (b) the Product is not modified or
misused. This Product limited warranty shall not apply to, and Trimble shall
not be responsible for, defects or perfor mance problems resultin g from (i) the
combination or utilization of the Product with hardware or software
products, information, data, systems, interfaces, or devices not made,
supplied, or specified by Trimble; (ii) the operation of the Product under any
specification other than, or in addition to, Trimble's standard specifications
for its products; (iii) the unauthorized installation, modification, or use of the
Product; (iv) damage caused by: accident, lightning or other electrical
discharge, fresh or salt water immersion or spray (outside of Product
specifications); or exposure to environmental conditions for which the
Product is not intended; (v) normal wear and tear on consumable parts (e.g.,
batteries); or (vi) cosmetic damage. Trimble does not warrant or guarantee
the results obtained through the use of the Product, or that software
components will operate error free.
NOTICE REGARDING PRODUCTS EQUIPPED WITH TECHNOLOGY
CAPABLE OF TRACKING SATELLITE SI GNALS FROM SATELLITE BASED
AUGMENTATION SYSTEM S (SBAS) (WAAS/EGNOS, AND MSAS),
OMNISTAR, GPS, MODERNIZED GPS OR GLONASS SATELLITES, OR
FROM IALA BEACON SOURCES: TRIMBLE IS NOT RESPONSIB LE FOR
THE OPERATION OR FAILURE OF OPERATION OF ANY SATELLITE
BASED POSITIONING SYSTEM OR THE AVAI LABILITY OF ANY
SATELLITE BASED POSITIONING SIGNALS.
THE FOREGOING LIMITED WARRANTY TERMS STATE TRIMBL E’S ENTIRE
LIABILITY, AND YOUR EXCLUSIVE REMEDIES, REL ATING TO THE TRIMBLE
PRODUCT. EXCEPT AS OTHERWISE EXPRESSLY PROVIDED HEREIN, THE
PRODUCT, AND ACCOMPANYING DOCUMENTATION AND MATERIALS
ARE PROVIDED “AS-IS” AND WITHOUT EXPRESS OR IMPLIED WARRANTY
OF ANY KIND, BY EITHER TRIMBLE OR ANYONE WHO HAS BEEN
INVOLVED IN ITS CREATION, PRODUCTION, INSTALLATION, OR
DISTRIBUTION , INCLUDING, BUT NOT LIMITED TO, THE IMPLIED
WARRANTIES OF MERCHANTABILITY AND FITNESS FOR A PARTICULAR
PURPOSE, TITLE, AND NONINFRINGEMENT. THE ST ATED EXPRESS
WARRANTIES ARE IN LIEU OF ALL OBLIGATIONS OR LIABILITIES ON THE
PART OF TRIMBLE ARISING OUT OF, OR IN CONNECTION WITH, ANY
PRODUCT. BECAUSE SOME STATES AND JURISDICTIONS DO NOT ALLOW
LIMITATIONS ON DURATION OR THE EXCLUSION OF AN IMPLIED
WARRANTY, THE ABOVE LIMITATION MAY NOT APPLY OR FULLY APPLY
TO YOU.
Limitation of Liability
TRIMBLE'S ENTIRE LIABILITY UNDER ANY PROVISION HEREIN SHALL BE
LIMITED TO THE AMOUNT PAID BY YOU FOR THE PRODUCT. TO THE
MAXIMUM EXTENT PERMITTED BY APPLICABLE LAW, IN NO EVENT
SHALL TRIMBLE OR ITS SUPPLIERS BE LIABLE FOR ANY INDIRECT,
SPECIAL , INCIDENTAL, OR CONSEQUENTIAL DAMAGE WHATSOEVER
UNDER ANY CIRCUMSTANCE OR LEGAL THEORY RELATI NG IN ANYWAY
TO THE PRODUCTS, SOFTWARE AND ACCOMPANYING DOCUMENTATION
AND MATERIALS, (INCLUDING, WITHOUT LIMITATION, DAMAGES FOR
LOSS OF BUSINESS PROFITS, BUSINESS INTERRUPTION, LOSS OF DATA, OR
ANY OTHER PECUNIARY LOSS), REGARDL ESS OF WHETHER TRIMBLE HAS
BEEN ADVISED OF THE POSSIBILITY OF ANY SUCH LOSS AND REGARDLESS
OF THE COURSE OF DEALING WHICH DEVELOPS OR HAS DEVELOPED
BETWEEN YOU AND TRIMBLE. BECAUSE SOME STATES AND
JURISDICTIONS DO NOT ALLOW THE EXCLUSION OR LIMITATION OF
LIABILITY FOR CONSEQUENTIAL OR INCIDENTAL DAMAGES, THE ABOVE
LIMITATION MAY NOT APPLY TO YOU.
PLEASE NOTE: THE ABOVE TRIMBLE LIMITED WARRANTY PROVISIONS
WILL NOT APPLY TO PRODUCTS PURCHASED IN THOSE
JURISDICTIONS (E.G., MEMBER STATES OF THE EUROPEAN ECONOMIC
AREA) IN WHICH PRODUCT WARRANTIES ARE THE RESPONSI BILITY
OF THE LOCAL TRIMBLE AUTHORIZED DEALER FROM WHOM THE
PRODUCTS ARE ACQUIRED. IN SUCH A CASE, PLEASE CONTACT YOUR
LOCAL TRIMBLE AUTHORIZED DEALER FOR APPLICABLE WARRANTY
INFORMATION.
Official Language
THE OFFICIAL LANGUAGE OF THESE TERMS AND CONDITIONS IS
ENGLISH. IN THE EVENT OF A CONFLICT BETWEEN ENGLISH AND OTHER
LANGUAGE VERSIONS, THE ENGLISH LANGUAGE SHALL CONTROL.
Registration
To receive information regarding updates and new products, please contact
your local dealer or visit the Trimble website at www.trimble.com/register.
Upon registration you may select the newsletter, upgrade, or new product
information you desire.
Class A Warning
This is a Class A product. In a domestic environment the product may cause
radio interference in which case the user may be required to take adequate
measures.
Notice to Our European Union Customers
For product recycling instructions and more information, please go to:
www.trimble.com/ev.shtml
Recycling in Europe: To recycle Trimble WEEE, Call
+31 497 53 2430, and ask for the "WEEE Associate"
Or
Mail a request for recycling instructions to:
Tri mbl e Europe BV
c/o Menlo Worldwide Logistics
Meerheide 45
5521 DZ Eersel, NL
2 EZ-Boom 2010 System Troubleshooting Guide
Page 3

Contents
Safety Information . . . . . . . . . . . . . . . . . . . . . . . . . . . . . . . . 7
Configuring vehicles with solenoid boom valves for use with the EZ-Boom 2010 System. . . . . 8
Calculating the maximum total current draw . . . . . . . . . . . . . . . . . . . . . . . . . . . . 8
Reducing the maximum total current draw . . . . . . . . . . . . . . . . . . . . . . . . . . . . . 8
1 EZ-Boom 2010 System Error Messages. . . . . . . . . . . . . . . . . . . . . . 9
LED errors . . . . . . . . . . . . . . . . . . . . . . . . . . . . . . . . . . . . . . . . . . . . . . . . . . . . . 10
Viewing error messages . . . . . . . . . . . . . . . . . . . . . . . . . . . . . . . . . . . . . . . . . . . . . 11
EZ-Guide Plus lightbar guidance system . . . . . . . . . . . . . . . . . . . . . . . . . . . . . . 11
EZ-Guide 500 lightbar . . . . . . . . . . . . . . . . . . . . . . . . . . . . . . . . . . . . . . . . . . 11
AgGPS FieldManager display . . . . . . . . . . . . . . . . . . . . . . . . . . . . . . . . . . . . . 11
FmX integrated display . . . . . . . . . . . . . . . . . . . . . . . . . . . . . . . . . . . . . . . . . 12
Clearing the error log. . . . . . . . . . . . . . . . . . . . . . . . . . . . . . . . . . . . . . . . . . . . . . . 13
The EZ-Boom icon does not appear on the lightbar . . . . . . . . . . . . . . . . . . . . . . . . . . . 15
Cause . . . . . . . . . . . . . . . . . . . . . . . . . . . . . . . . . . . . . . . . . . . . . . . . . . . . 15
Solution . . . . . . . . . . . . . . . . . . . . . . . . . . . . . . . . . . . . . . . . . . . . . . . . . . . 15
CAN communication issue when using cable P/N 62063 . . . . . . . . . . . . . . . . . . . . . . . . 17
Cause . . . . . . . . . . . . . . . . . . . . . . . . . . . . . . . . . . . . . . . . . . . . . . . . . . . . 17
Solution . . . . . . . . . . . . . . . . . . . . . . . . . . . . . . . . . . . . . . . . . . . . . . . . . . . 17
EZ-Boom system error message 4500: “Setup Invalid” . . . . . . . . . . . . . . . . . . . . . . . . . . 19
Cause . . . . . . . . . . . . . . . . . . . . . . . . . . . . . . . . . . . . . . . . . . . . . . . . . . . . 19
Possible failure modes. . . . . . . . . . . . . . . . . . . . . . . . . . . . . . . . . . . . . . . . . . 19
Solution . . . . . . . . . . . . . . . . . . . . . . . . . . . . . . . . . . . . . . . . . . . . . . . . . . . 19
EZ-Boom system error message 4600: “Rate Not Responding”. . . . . . . . . . . . . . . . . . . . . 20
Cause . . . . . . . . . . . . . . . . . . . . . . . . . . . . . . . . . . . . . . . . . . . . . . . . . . . . 20
Possible failure modes. . . . . . . . . . . . . . . . . . . . . . . . . . . . . . . . . . . . . . . . . . 20
Solution . . . . . . . . . . . . . . . . . . . . . . . . . . . . . . . . . . . . . . . . . . . . . . . . . . . 20
EZ-Boom system error message xx01: “Boom Over Current”. . . . . . . . . . . . . . . . . . . . . . 22
Cause . . . . . . . . . . . . . . . . . . . . . . . . . . . . . . . . . . . . . . . . . . . . . . . . . . . . 22
Possible failure modes. . . . . . . . . . . . . . . . . . . . . . . . . . . . . . . . . . . . . . . . . . 22
Solution . . . . . . . . . . . . . . . . . . . . . . . . . . . . . . . . . . . . . . . . . . . . . . . . . . . 22
EZ-Boom system error message xx02: “Boom Driver Failure” . . . . . . . . . . . . . . . . . . . . . 23
Cause . . . . . . . . . . . . . . . . . . . . . . . . . . . . . . . . . . . . . . . . . . . . . . . . . . . . 23
Possible failure modes. . . . . . . . . . . . . . . . . . . . . . . . . . . . . . . . . . . . . . . . . . 23
Solution . . . . . . . . . . . . . . . . . . . . . . . . . . . . . . . . . . . . . . . . . . . . . . . . . . . 23
EZ-Boom system error message 5101: “Flow Valve Over Current” . . . . . . . . . . . . . . . . . . 24
Cause . . . . . . . . . . . . . . . . . . . . . . . . . . . . . . . . . . . . . . . . . . . . . . . . . . . . 24
Possible failure modes. . . . . . . . . . . . . . . . . . . . . . . . . . . . . . . . . . . . . . . . . . 24
Solution . . . . . . . . . . . . . . . . . . . . . . . . . . . . . . . . . . . . . . . . . . . . . . . . . . . 24
EZ-Boom system error message 5102: “Flow Valve Driver Failure” . . . . . . . . . . . . . . . . . . 25
Cause . . . . . . . . . . . . . . . . . . . . . . . . . . . . . . . . . . . . . . . . . . . . . . . . . . . . 25
Possible failure modes. . . . . . . . . . . . . . . . . . . . . . . . . . . . . . . . . . . . . . . . . . 25
EZ-Boom 2010 System Troubleshooting Guide 3
Page 4

Solution . . . . . . . . . . . . . . . . . . . . . . . . . . . . . . . . . . . . . . . . . . . . . . . . . . . 25
EZ-Boom system error message 5103: “Flow Valve Open”. . . . . . . . . . . . . . . . . . . . . . . . 26
Cause . . . . . . . . . . . . . . . . . . . . . . . . . . . . . . . . . . . . . . . . . . . . . . . . . . . . 26
Possible failure modes. . . . . . . . . . . . . . . . . . . . . . . . . . . . . . . . . . . . . . . . . . 26
Solution . . . . . . . . . . . . . . . . . . . . . . . . . . . . . . . . . . . . . . . . . . . . . . . . . . . 26
EZ-Boom system error message 5201: “Main Pressure Below Min” . . . . . . . . . . . . . . . . . . 27
Cause . . . . . . . . . . . . . . . . . . . . . . . . . . . . . . . . . . . . . . . . . . . . . . . . . . . . 27
Possible failure modes. . . . . . . . . . . . . . . . . . . . . . . . . . . . . . . . . . . . . . . . . . 27
Solution . . . . . . . . . . . . . . . . . . . . . . . . . . . . . . . . . . . . . . . . . . . . . . . . . . . 27
EZ-Boom system error message 5202: “Main Pressure Above Max” . . . . . . . . . . . . . . . . . 29
Cause . . . . . . . . . . . . . . . . . . . . . . . . . . . . . . . . . . . . . . . . . . . . . . . . . . . . 29
Possible failure modes. . . . . . . . . . . . . . . . . . . . . . . . . . . . . . . . . . . . . . . . . . 29
Solution . . . . . . . . . . . . . . . . . . . . . . . . . . . . . . . . . . . . . . . . . . . . . . . . . . . 29
EZ-Boom system error message 6B00: “Minimum Flow” . . . . . . . . . . . . . . . . . . . . . . . . 31
Cause . . . . . . . . . . . . . . . . . . . . . . . . . . . . . . . . . . . . . . . . . . . . . . . . . . . . 31
Possible failure modes. . . . . . . . . . . . . . . . . . . . . . . . . . . . . . . . . . . . . . . . . . 31
Solution . . . . . . . . . . . . . . . . . . . . . . . . . . . . . . . . . . . . . . . . . . . . . . . . . . . 31
Operating the Rate Increment/Decrement switch . . . . . . . . . . . . . . . . . . . . . . . . . . . . 33
Description. . . . . . . . . . . . . . . . . . . . . . . . . . . . . . . . . . . . . . . . . . . . . . . . . 33
Summary . . . . . . . . . . . . . . . . . . . . . . . . . . . . . . . . . . . . . . . . . . . . . . . . . . 33
Solution . . . . . . . . . . . . . . . . . . . . . . . . . . . . . . . . . . . . . . . . . . . . . . . . . . . 33
Spray booms do not turn on in a corner . . . . . . . . . . . . . . . . . . . . . . . . . . . . . . . . . . . 35
Cause . . . . . . . . . . . . . . . . . . . . . . . . . . . . . . . . . . . . . . . . . . . . . . . . . . . . 35
Solution . . . . . . . . . . . . . . . . . . . . . . . . . . . . . . . . . . . . . . . . . . . . . . . . . . . 35
The system shuts off when GPS signal is lost. . . . . . . . . . . . . . . . . . . . . . . . . . . . . . . . 37
Cause . . . . . . . . . . . . . . . . . . . . . . . . . . . . . . . . . . . . . . . . . . . . . . . . . . . . 37
Solution . . . . . . . . . . . . . . . . . . . . . . . . . . . . . . . . . . . . . . . . . . . . . . . . . . . 37
System behavior following loss of GPS . . . . . . . . . . . . . . . . . . . . . . . . . . . . . . . 37
Boom sections do not turn on . . . . . . . . . . . . . . . . . . . . . . . . . . . . . . . . . . . . . . . . . 38
Solution . . . . . . . . . . . . . . . . . . . . . . . . . . . . . . . . . . . . . . . . . . . . . . . . . . . 38
Rate not responding and Min Flow reached . . . . . . . . . . . . . . . . . . . . . . . . . . . . . . . . 39
Cause . . . . . . . . . . . . . . . . . . . . . . . . . . . . . . . . . . . . . . . . . . . . . . . . . . . . 39
Solution . . . . . . . . . . . . . . . . . . . . . . . . . . . . . . . . . . . . . . . . . . . . . . . . . . . 39
Not reading any Applied Rate "With supported flow meter" . . . . . . . . . . . . . . . . . . . . . . 40
Cause . . . . . . . . . . . . . . . . . . . . . . . . . . . . . . . . . . . . . . . . . . . . . . . . . . . . 40
Solution . . . . . . . . . . . . . . . . . . . . . . . . . . . . . . . . . . . . . . . . . . . . . . . . . . . 40
Incorrect tank volume message . . . . . . . . . . . . . . . . . . . . . . . . . . . . . . . . . . . . . . . . 41
Cause . . . . . . . . . . . . . . . . . . . . . . . . . . . . . . . . . . . . . . . . . . . . . . . . . . . . 41
Possible failure modes. . . . . . . . . . . . . . . . . . . . . . . . . . . . . . . . . . . . . . . . . . 41
Solution . . . . . . . . . . . . . . . . . . . . . . . . . . . . . . . . . . . . . . . . . . . . . . . . . . . 41
Pressure stays at Set limit on Pressure sensor Cal. . . . . . . . . . . . . . . . . . . . . . . . . . . . . 42
Cause . . . . . . . . . . . . . . . . . . . . . . . . . . . . . . . . . . . . . . . . . . . . . . . . . . . . 42
Solution . . . . . . . . . . . . . . . . . . . . . . . . . . . . . . . . . . . . . . . . . . . . . . . . . . . 42
Boom section 1 on an SPX sprayer does not turn on . . . . . . . . . . . . . . . . . . . . . . . . . . . 43
4 EZ-Boom 2010 System Troubleshooting Guide
Page 5

Cause . . . . . . . . . . . . . . . . . . . . . . . . . . . . . . . . . . . . . . . . . . . . . . . . . . . . 43
Solution . . . . . . . . . . . . . . . . . . . . . . . . . . . . . . . . . . . . . . . . . . . . . . . . . . . 43
“Rate not responding” message . . . . . . . . . . . . . . . . . . . . . . . . . . . . . . . . . . . . . . . . 44
Cause . . . . . . . . . . . . . . . . . . . . . . . . . . . . . . . . . . . . . . . . . . . . . . . . . . . . 44
Possible failure modes. . . . . . . . . . . . . . . . . . . . . . . . . . . . . . . . . . . . . . . . . . 44
Solution . . . . . . . . . . . . . . . . . . . . . . . . . . . . . . . . . . . . . . . . . . . . . . . . . . . 44
Rate fluctuates around the Target Rate. . . . . . . . . . . . . . . . . . . . . . . . . . . . . . . . . . . . 45
Cause . . . . . . . . . . . . . . . . . . . . . . . . . . . . . . . . . . . . . . . . . . . . . . . . . . . . 45
Possible failure modes. . . . . . . . . . . . . . . . . . . . . . . . . . . . . . . . . . . . . . . . . . 45
Solution . . . . . . . . . . . . . . . . . . . . . . . . . . . . . . . . . . . . . . . . . . . . . . . . . . . 45
Flow Control Valve Error Driver Failure (-1 mA) Fault . . . . . . . . . . . . . . . . . . . . . . . . . . 46
Cause . . . . . . . . . . . . . . . . . . . . . . . . . . . . . . . . . . . . . . . . . . . . . . . . . . . . 46
Solution . . . . . . . . . . . . . . . . . . . . . . . . . . . . . . . . . . . . . . . . . . . . . . . . . . . 46
Control Valve in headland fault . . . . . . . . . . . . . . . . . . . . . . . . . . . . . . . . . . . . . . . . 47
Cause . . . . . . . . . . . . . . . . . . . . . . . . . . . . . . . . . . . . . . . . . . . . . . . . . . . . 47
Possible failure modes. . . . . . . . . . . . . . . . . . . . . . . . . . . . . . . . . . . . . . . . . . 47
Solution . . . . . . . . . . . . . . . . . . . . . . . . . . . . . . . . . . . . . . . . . . . . . . . . . . . 47
Sections not mapping when EZ-Boom controller is controlling sections only . . . . . . . . . . . 48
Cause . . . . . . . . . . . . . . . . . . . . . . . . . . . . . . . . . . . . . . . . . . . . . . . . . . . . 48
Possible failure modes. . . . . . . . . . . . . . . . . . . . . . . . . . . . . . . . . . . . . . . . . . 48
Solution . . . . . . . . . . . . . . . . . . . . . . . . . . . . . . . . . . . . . . . . . . . . . . . . . . 48
Boom sections do not turn off . . . . . . . . . . . . . . . . . . . . . . . . . . . . . . . . . . . . . . . . . 49
Cause . . . . . . . . . . . . . . . . . . . . . . . . . . . . . . . . . . . . . . . . . . . . . . . . . . . . 49
Possible failure modes. . . . . . . . . . . . . . . . . . . . . . . . . . . . . . . . . . . . . . . . . . 49
Solution . . . . . . . . . . . . . . . . . . . . . . . . . . . . . . . . . . . . . . . . . . . . . . . . . . . 49
2 EZ-Boom 2010 System Harness Schematics . . . . . . . . . . . . . . . . . . 51
EZ-Boom 2010 system cable pinout information . . . . . . . . . . . . . . . . . . . . . . . . . . . . . 52
EZ-Guide-to-EZ-Steer harness: P/N 52763 . . . . . . . . . . . . . . . . . . . . . . . . . . . . . . . . . 53
EZ-Steer-to-EZ-Boom harness: P/N 58377 . . . . . . . . . . . . . . . . . . . . . . . . . . . . . . . . . 54
Terminator connector: P/N 58378 . . . . . . . . . . . . . . . . . . . . . . . . . . . . . . . . . . . . . . 55
Raven 4x0 series “Y” cable: P/N 58560 . . . . . . . . . . . . . . . . . . . . . . . . . . . . . . . . . . . . 56
CAN terminator: P/N 59783 . . . . . . . . . . . . . . . . . . . . . . . . . . . . . . . . . . . . . . . . . . 57
AgGPS FieldManager display harness (Rev B): P/N 59872. . . . . . . . . . . . . . . . . . . . . . . . 58
FieldManager-to-EZ-Boom-extension-cable: P/N 59873 . . . . . . . . . . . . . . . . . . . . . . . . 59
Raven 4x00 series “Y ” cable: P/N 59942 (see next page) . . . . . . . . . . . . . . . . . . . . . . . . . 60
EZ-Boom-to-Raven-4x00 adaptor harness: P/N 59943 . . . . . . . . . . . . . . . . . . . . . . . . . . 62
Implement switch harness: P/N 60477. . . . . . . . . . . . . . . . . . . . . . . . . . . . . . . . . . . . 63
Implement tee harness: P/N 60567 . . . . . . . . . . . . . . . . . . . . . . . . . . . . . . . . . . . . . . 64
Implement switch extension harness (10 ft): P/N 60478. . . . . . . . . . . . . . . . . . . . . . . . . 65
Implement switch extension harness (25 ft): P/N 60479. . . . . . . . . . . . . . . . . . . . . . . . . 66
Raven to EZ-Boom harness: P/N 58560 . . . . . . . . . . . . . . . . . . . . . . . . . . . . . . . . . . . 67
Foot pedal assembly: P/N 60490. . . . . . . . . . . . . . . . . . . . . . . . . . . . . . . . . . . . . . . . 68
EZ-Boom cable John Deere 4710, 4720, 4920: P/N 61593 . . . . . . . . . . . . . . . . . . . . . . . . 69
EZ-Boom 2010 System Troubleshooting Guide 5
Page 6

EZ-Boom cable John Deere 4710, 4720, 4920: P/N 61593 (Pinouts) . . . . . . . . . . . . . . 70
Spracoupe to EZ-Boom harness: P/N 61991-00 . . . . . . . . . . . . . . . . . . . . . . . . . . . . . . 71
Flowmeter: P/N 62136 . . . . . . . . . . . . . . . . . . . . . . . . . . . . . . . . . . . . . . . . . . . . . . 72
EZ-Boom to Flexicoil adapter: P/N 64396 (1 of 2) . . . . . . . . . . . . . . . . . . . . . . . . . . . . 73
EZ-Boom to Flexicoil adapter: P/N 64396 (2 of 2) . . . . . . . . . . . . . . . . . . . . . . . . . . . . 74
Spracoupe to EZ-Boom adapter: P/N 64670 . . . . . . . . . . . . . . . . . . . . . . . . . . . . . . . . 75
Spracoupe to EZ-Boom cable: P/N 64671 (1 of 2) . . . . . . . . . . . . . . . . . . . . . . . . . . . . 76
Spracoupe to EZ-Boom cable: P/N 64671 (2 of 2) . . . . . . . . . . . . . . . . . . . . . . . . . . . . . 77
FmX to CAN w/port replicator : P/N 67087 . . . . . . . . . . . . . . . . . . . . . . . . . . . . . . . . . 78
3 EZ-Boom 2010 System Technical Specifications . . . . . . . . . . . . . . . 79
Technical specifications . . . . . . . . . . . . . . . . . . . . . . . . . . . . . . . . . . . . . . . . . . . . . 80
6 EZ-Boom 2010 System Troubleshooting Guide
Page 7

Safety Information
In this chapter:
Configuring vehicles with
solenoid boom valves for use with
the EZ-Boom 2010 System
Always follow the instructions that
accompany a Caution. The information it
provides is intended to minimize the risk of
personal injury and/or damage to property.
CAUTION – This alert warns of a
C
Note – An absence of specific alerts does not
mean that there are no safety risks involved.
hazard or unsafe practice which,
if not avoided, can cause injury or
damage.
EZ-Boom 2010 System Troubleshooting Guide 7
Page 8

Safety Information
Configuring vehicles with solenoid boom valves for use with the EZ-Boom 2010 System
For vehicles equipped with three-wire motorized boom valves, the EZ-Boom® 2010
system controller is rated to drive all ten (10) boom sections.
For vehicles with solenoid boom valves, you may need to modify the vehicle, or the
vehicle configuration, to ensure that the total current draw does not exceed 16 Amps.
C
CAUTION – Before using solenoid boom valves, calculate the maximum total current
draw. Do not allow the total to exceed 16 Amps. A higher current draw can cause the
EZ-Boom controller to overheat and malfunction. To keep below the 16 Amp limit, modify
your vehicle setup or configuration.
Calculating the maximum total current draw
1. Find the maximum current draw for one of the solenoid boom valves. If there is
no rating in the manufacturer’s documentation, contact the vendor.
2. Multiply the maximum current draw for one valve by the total number of
solenoid boom valves on the vehicle. For example, if one valve has a maximum
current draw of 3 Amps:
This many boom
valves...
5 5 x 3 Amp = 15 Amp
9 9 x 3 Amp = 27 Amp
Would result in a total maximum current
draw of...
Reducing the maximum total current draw
If the total current draw is greater than 16 Amps, do one of the following:
• Use fewer boom valves on the vehicle.
• Add external relays to each of the solenoid valves to reduce the current draw
from the EZ-Boom system.
• Replace solenoid valves with three-wire motorized boom valves.
8 EZ-Boom 2010 System Troubleshooting Guide
Page 9

EZ-Boom 2010 System Error
CHAPTER
1
Messages
In this chapter:
LED errors
Viewing error messages
Clearing the error log
EZ-Boom system error messages
1
This chapter describes the controller LED
states and system error messages from the
EZ-Boom 2010 automated application control
system. It then explains how to correct the
errors.
EZ-Boom 2010 System Troubleshooting Guide 9
Page 10
1 EZ-Boom 2010 System Error Messages
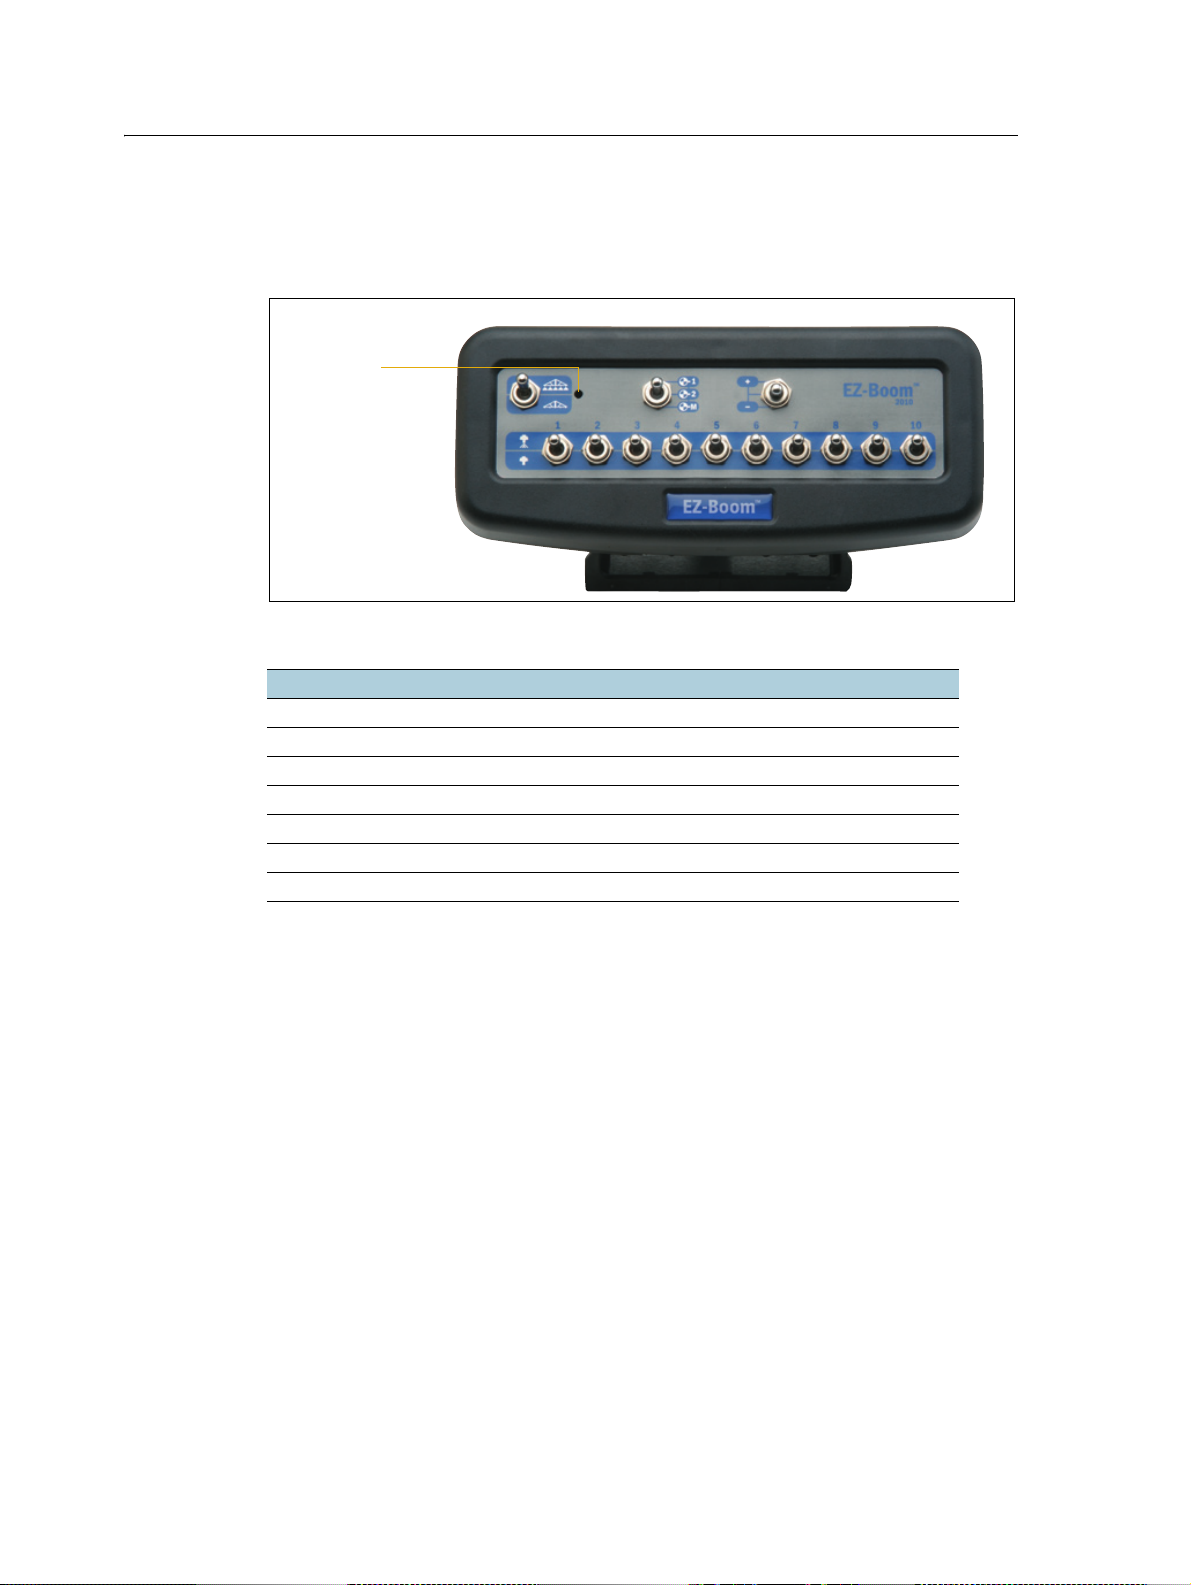
Status LED
LED errors
The status LED on the EZ-Boom 2010 controller indicates the current operating state.
It does this by displaying different colors and flash patterns:
LED state Description
Off No power
Steady green Normal operation
Flashing 1 Hz yellow CAN bus errors detected (error active/passive state)
Steady yellow CAN bus off
Steady red Hardware or initialization failure
Flashing 1 Hz red Firmware download in process
Flashing fast red Firmware download error
10 EZ-Boom 2010 System Troubleshooting Guide
Page 11
Viewing error messages
EZ-Guide Plus lightbar guidance system
EZ-Boom 2010 System Error Messages 1
To view error messages on the EZ-Boom 2010 system when it is connected to an
EZ-Guide
®
Plus lightbar guidance system:
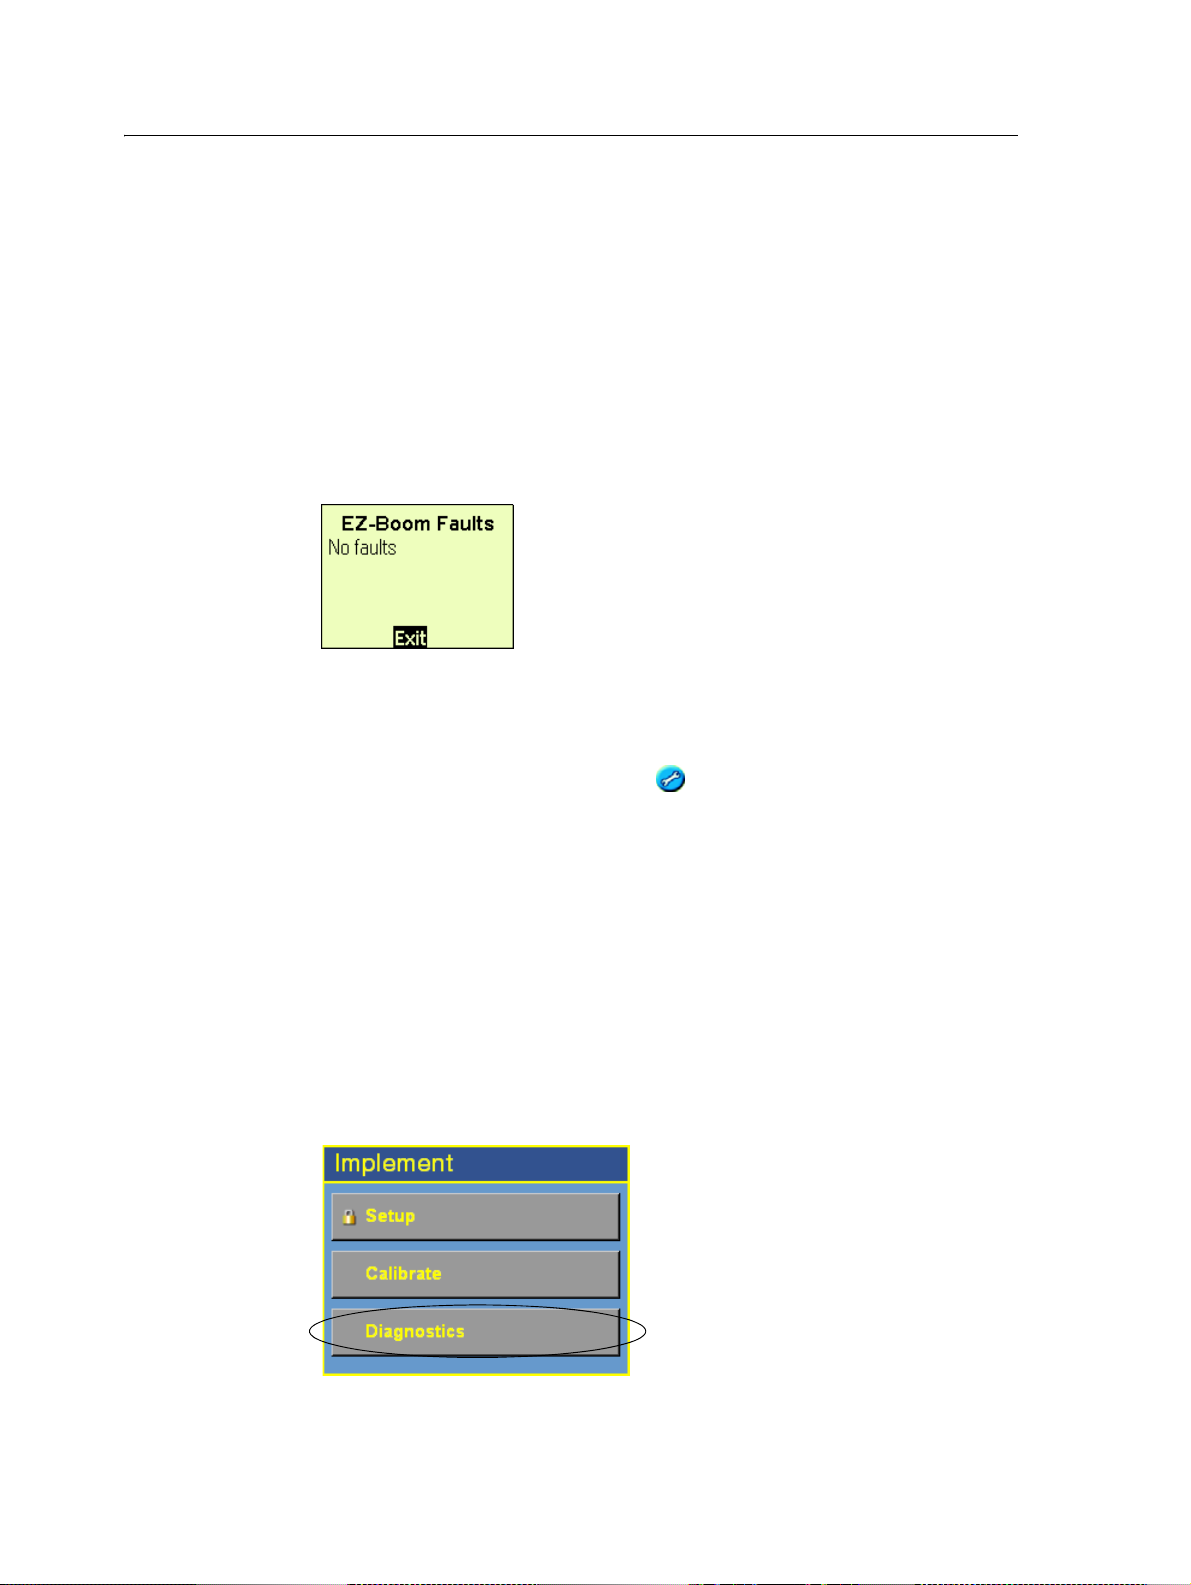
1. From the lightbar navigation screen, select 7.
2. Select EZ-Boom / Fault History.
The EZ-Boom Faults screen appears. The previous four error messages that the
EZ-Boom 2010 system has encountered appear on the screen.
EZ-Guide 500 lightbar
To view error messages on the EZ-Boom 2010 system when it is connected to an
EZ-Guide 500 lightbar guidance system:
1. From the lightbar home screen, select .
2. Select Fault History.
3. Select EZ-Boom Fault History.
The EZ-Boom Faults screen appears.
AgGPS FieldManager display
To view error messages on the EZ-Boom 2010 system when it is connected to an
®
AgGPS
FieldManager™ display:
1. From the FieldManager display home screen, press the Configuration button.
The Configuration screen appears.
2. Highlight the EZ-Boom plugin and then tap Diagnostics.
EZ-Boom 2010 System Troubleshooting Guide 11
Page 12
1 EZ-Boom 2010 System Error Messages
The EZ-Boom Diagnostics screen appears. This is the same as shown below for
the FMX integrated display.
3. Tap the View Error Log button. The EZ-Boom Error History screen appears. It
displays the EZ-Boom system errors.
Note – Because this is a list of errors that have occurred, errors on the list are not
necessarily still occurring.
A error message also pops up on the main navigation screen of the display when the
error is encountered.
FmX integrated display
To view error messages on the EZ-Boom 2010 system when it is connected to an
™
AgGPS FmX
integrated display:
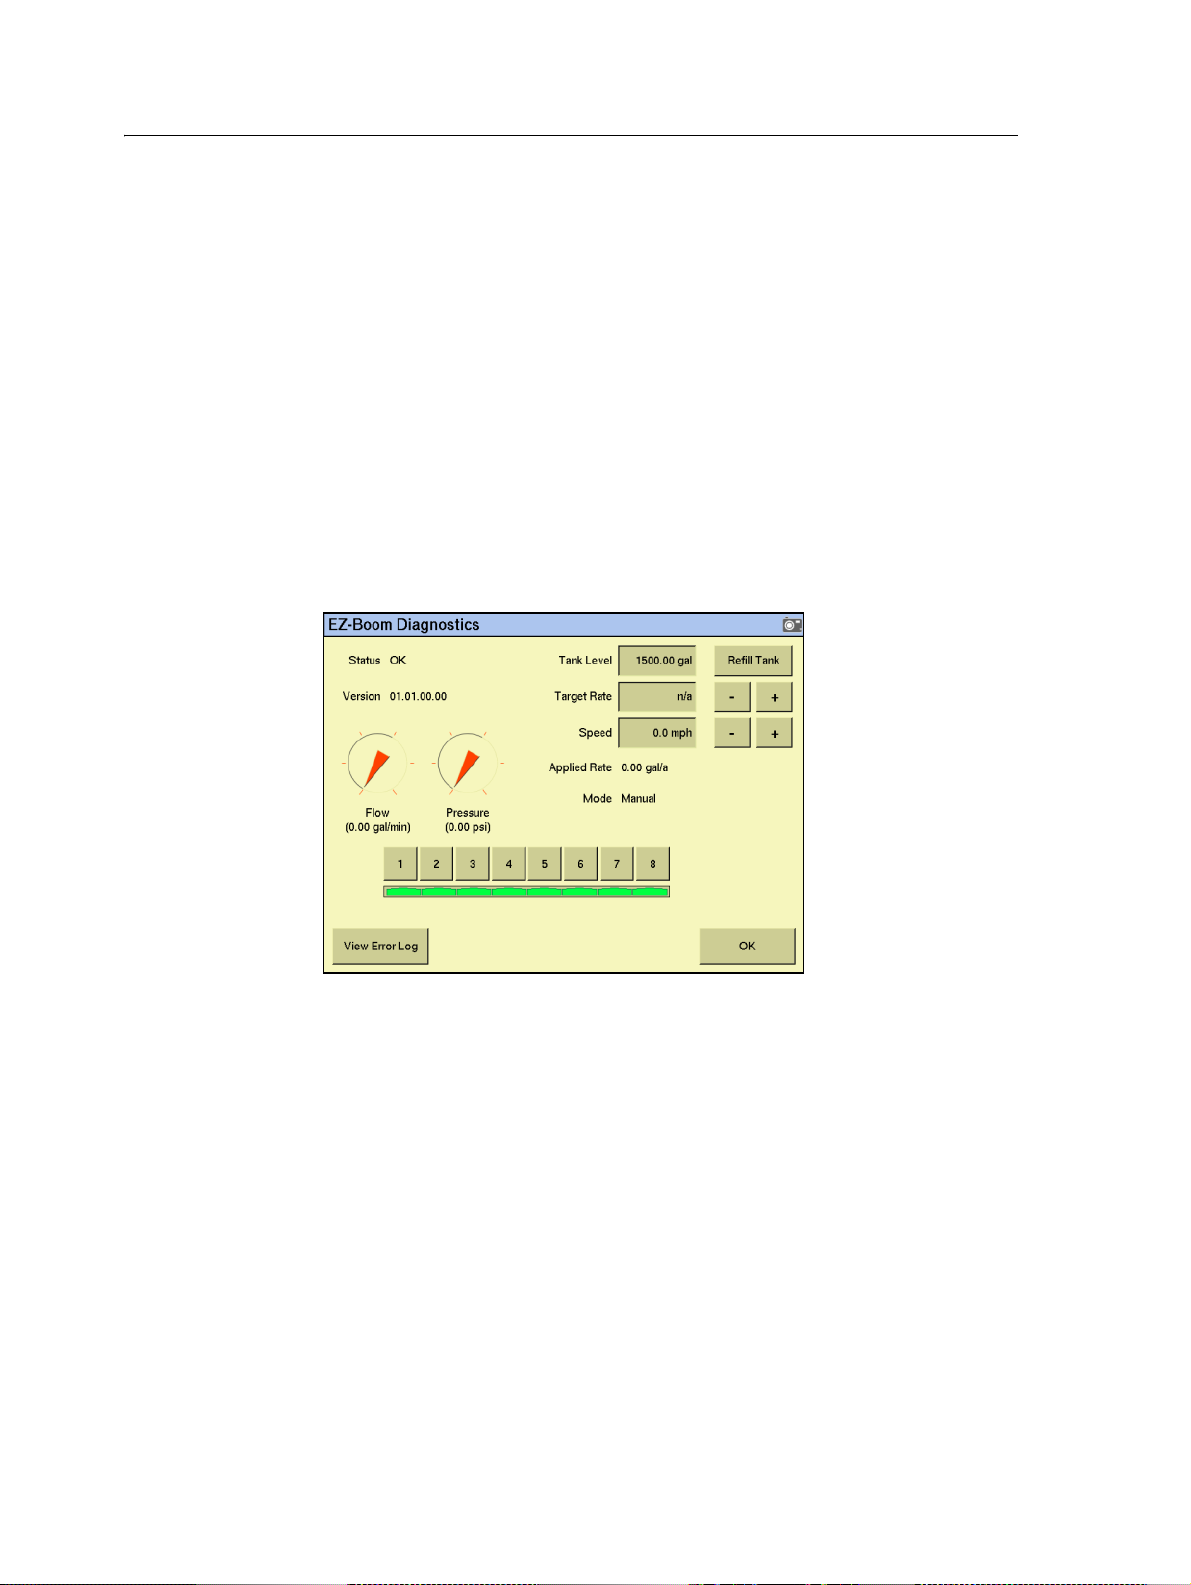
1. From the Configuration screen, select the EZ-Boom plugin and then tap
Diagnostics:
The EZ-Boom Diagnostics screen includes information on:
–current flow
– current pressure
–boom valve state
– EZ-Boom controller version number
It also shows the status of the EZ-Boom controller to ensure that it is working as
expected.
2. To check that the system is responding as expected, set the Targ et Rate and
Speed fields to a fixed known value.
3. To view previous errors, tap View Error Log.
12 EZ-Boom 2010 System Troubleshooting Guide
Page 13

Clearing the error log
These steps apply to all systems unless otherwise specified.
Step 1: Clear the error message
a. Write down the error message.
b. Check the details.
c. Press .
Step 2: Do one or both of the following, as directed:
• Check the current to the EZ-Boom controller. Details are given with each error
message.
• Check the flow control valve setup parameters.
EZ-Boom 2010 System Error Messages 1
FmX integrated
display
EZ-guide 500
lightbar
EZ-Guide Plus
lightbar
FieldManager
display
a. On the display, press the Configuration button. The
Configuration screen appears.
b. Highlight the EZ-Boom plugin and then tap the Setup
button.
c. Make sure that the EZ-Boom system settings are correct.
d. Highlight the Implement plugin and then tap the Setup
button.
e. Make sure that the Implement system settings are correct.
a. From the main navigation screen, select 7. The Configuration
menu appears.
b. Select Application Control. The Application Control screen
appears.
c. Make sure that the Application system settings are correct.
a. From the main navigation screen, select 7. The setup menu
appears.
b. Select EZ-Boom/Control Valve. The Ctrl. Valve Setup screen
appears.
c. Check through the flow control valve settings, to ensure that
they are correct.
a. On the display, press the Configuration button. The
Configuration screen appears.
b. Highlight the EZ-Boom plugin and then tap the Setup
button.
c. Make sure that the EZ-Boom system settings are correct.
d. Highlight the Implement plugin and then tap the Setup
button.
e. Make sure that the Implement system settings are correct.
Step 3: Check that pin 3 and pin 1 share a grounding point
Check that pin 3 on the CAN connector and pin 1 on the 16-pin main connector
are both connected to the same electrical ground point:
EZ-Boom 2010 System Troubleshooting Guide 13
Page 14

1 EZ-Boom 2010 System Error Messages
a. Attach a multitester to pin 3 on the CAN connector harness and pin 1 on
the 16-pin main connector harness.
b. Measure the resistance. The resistance should be < 0.3 ohms.
14 EZ-Boom 2010 System Troubleshooting Guide
Page 15

EZ-Boom 2010 System Error Messages 1
The EZ-Boom icon does not appear on the lightbar
Cause
There are several factors that can cause this issue. To resolve it, see the following
sections:
• CAN bus communication error
• Wrong firmware version
• Wrong configuration
Solution
CAN bus communication error
When the EZ-Boom 2010 system and the EZ-Guide Plus lightbar are communicating
correctly, the EZ Boom status light is solid green. If the light is anything else, check the
wiring and all of the connectors between the EZ-Boom 2010 system and the lightbar.
Status light
condition
Off No power to the EZ-Boom 2010 system.
Steady green Normal operation
Steady yellow The CAN bus is off. There is no communication between the EZ-Boom 2010 system and
Flashing yellow
(once per second)
Steady red There is a hardware or initialization failure. The EZ-Boom 2010 system has started up
Flashing red
(once per second)
Flashing red
(faster than once
per second)
Description
the lightbar. Check power on the lightbar, and check the cabling between the lightbar
and the EZ-Boom 2010 system.
CAN bus error. There is a communication error between the EZ-Boom 2010 system and
the lightbar. Turn off the EZ-Boom controller and the lightbar and then turn them on
again. Verify that the EZ-Boom controller and the lightbar have the latest firmware
version installed.
incorrectly and may have a hardware problem. Turn off the EZ-Boom 2010 system and
the lightbar and then turn them on again. Verify that the EZ-Boom controller and the
lightbar have the latest firmware version installed.
If this does not resolve the issue, try another EZ-Boom controller.
Firmware download is in progress. Firmware or software is being downloaded to the
EZ-Boom controller. This is a normal operation and may take several minutes to
complete.
Firmware download error: An error has occurred while downloading firmware to the
EZ-Boom controller. Restart the firmware download.
Wrong firmware version
Check which version of firmware is installed on the EZ-Guide Plus lightbar:
1. From the main guidance screen, select Configuration.
2. Select About.
EZ-Boom 2010 System Troubleshooting Guide 15
Page 16

1 EZ-Boom 2010 System Error Messages
3. The Ver field shows the current firmware version. Do one of the following:
–If the firmware is not version 4.00 or later, download the latest firmware
and the EZ-Toolbox
™
software onto your computer from
www.EZ-Guide.com.
–If the firmware is the latest version, restore the lightbar defaults.
To re store d e f a u lt s:
1. From the main screen, select the Configuration icon and then press .
2. Select Defaults.
3. Select Restore Defaults.
If this does not resolve the issue, use the EZ-Toolbox software to reinstall the firmware
on the lightbar:
1. Turn off the lightbar.
2. Start the EZ-Toolbox software on your computer.
3. Select the EZ-Guide+ tab.
4. If the current firmware version does not appear in the Select firmware file field,
select the drop down menu arrow to view all available firmware versions. If the
current firmware is not in this list, click
you saved the downloaded file, highlight the folder and then click
Browse, navigate to the folder where
OK.
5. Click Proceed in the top right corner of the EZ-Toolbox screen and then follow
the instructions in the Status messages field.
Wrong configuration
Set the Path Display for the EZ-Boom 2010 system:
1. From the main guidance screen, press Configuration.
2. Select Lightbar / Display Config.
3. Set the Path Display field to EZ-Boom and then press .
If this does not resolve the issue, restore the lightbar default settings. See above.
If restoring the defaults does not resolve the issue, use the EZ-Toolbox software to
reinstall the firmware on the lightbar. See above.
16 EZ-Boom 2010 System Troubleshooting Guide
Page 17
EZ-Boom 2010 System Error Messages 1
CAN communication issue when using cable P/N 62063
Cause
When you use cable P/N 62063 to connect an EZ-Boom system to an EZ-Guide 500
lightbar with an Autopilot
™
system, there is no CAN communication with the EZBoom system. This is because the CAN HI and CAN LO on cable P/N 62603 have been
swapped or there is not a CAN terminator connected to the EZ-Boom cable.
To identify whether there is CAN communication, check the color of the LED on the
EZ-Boom controller. If the LED lights up orange, there is no CAN communication: If
the LED lights up green, CAN communication has been established.
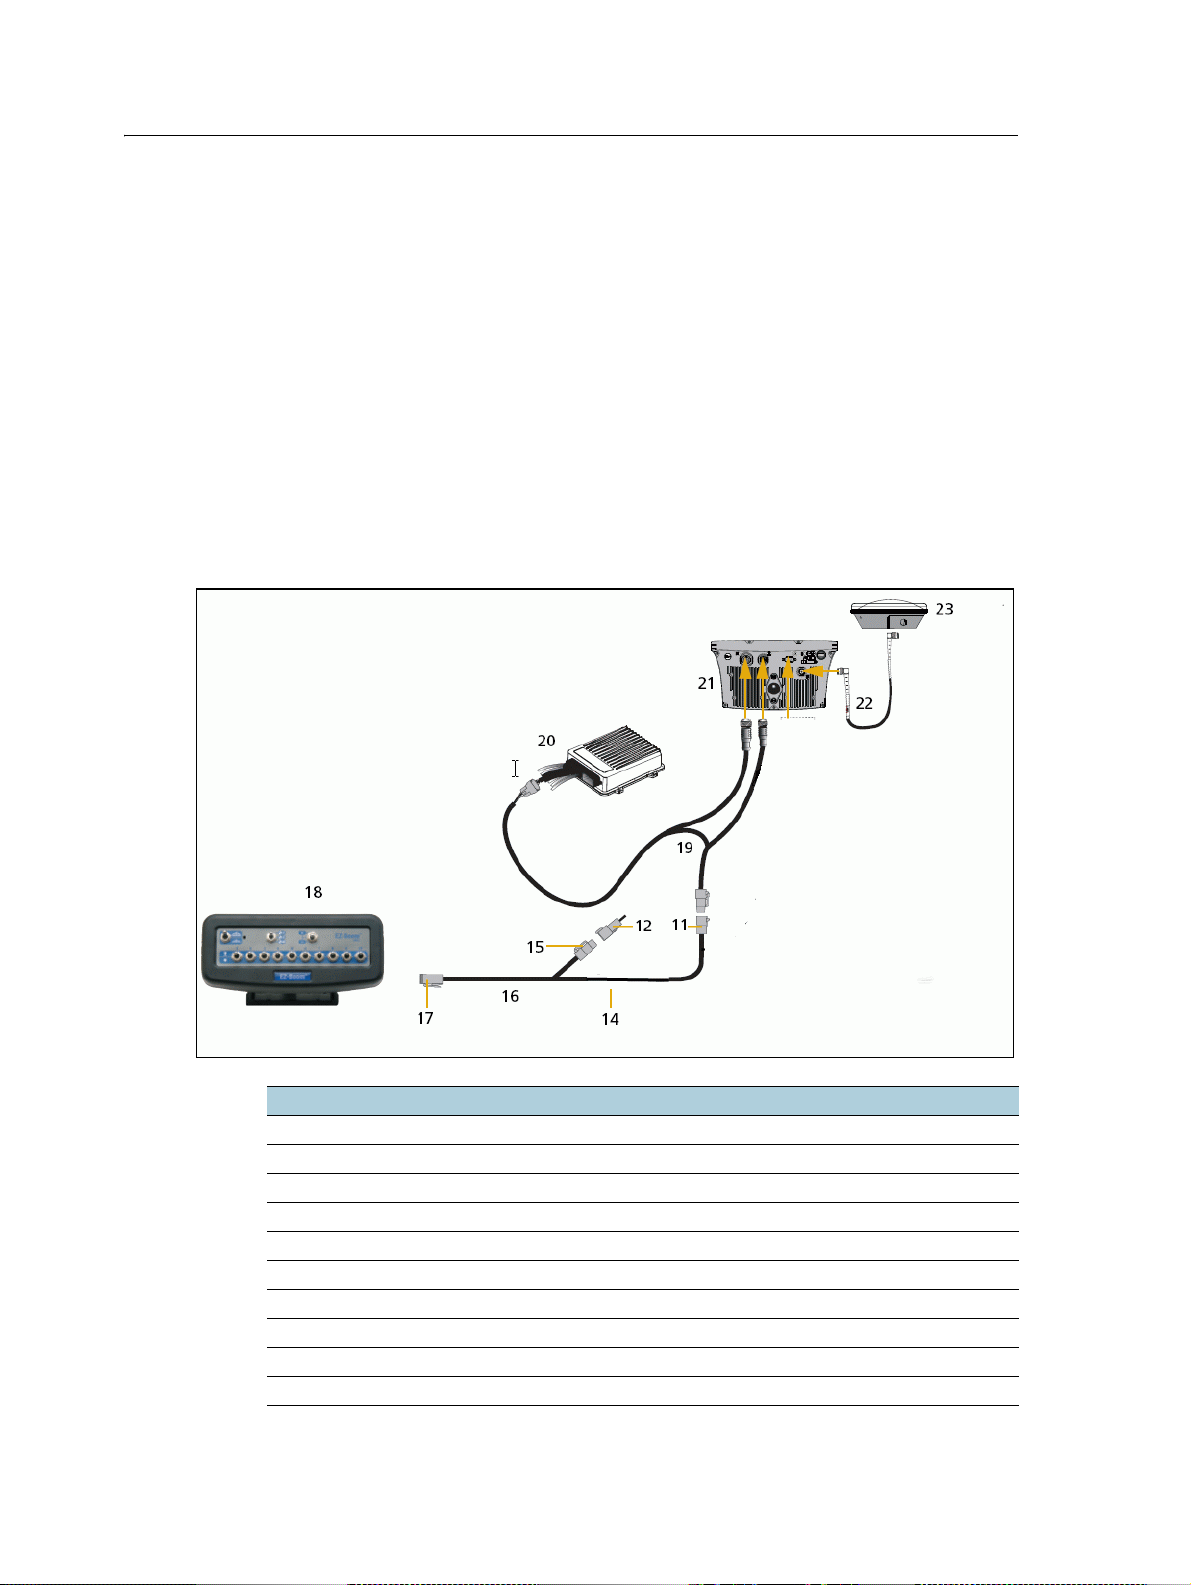
Solution
Replace cable P/N 62063 with the new cable configuration shown below.
Item Description P/N
11 S5 connector
12 CAN terminator 59783
14 S3 connector
15 P1 connector
16 EZ-Boom cable 61437
17 P3 connector
18 EZ-Boom controller
19 Autopilot to EZ-Guide 500 cable 62063
20 AgGPS Autopilot controller 66100-xx / 66200-xxtr>
21 EZ-Guide 500 lightbar 50449
EZ-Boom 2010 System Troubleshooting Guide 17
Page 18

1 EZ-Boom 2010 System Error Messages
Item Description P/N
22 GPS antenna cable
23 GPS antenna 57200-00
18 EZ-Boom 2010 System Troubleshooting Guide
Page 19

EZ-Boom 2010 System Error Messages 1
EZ-Boom system error message 4500: “Setup Invalid”
Cause
A critical EZ-Boom system error has occurred. This message appears at start-up and
every time the setup process is ended, if the configuration is invalid.
Possible failure modes
• One or more of the setup parameters are invalid.
Note – If this is only an occasional problem, use the display to clear the controller error
and continue to operate.
Solution
STEP 1: Clear the error message (page 13)
STEP 2: Check all setup parameters
FmX integrated
display
EZ-guide 500
lightbar
EZ-Guide Plus
lightbar
FieldManager
display
a. On the display, press the Configuration button. The
Configuration screen appears.
b. Highlight the EZ-Boom plugin and then tap Setup.
c. Make sure that the EZ-Boom system settings are correct.
d. Highlight the Implement plugin and then tap Setup.
e. Make sure that the Implement system settings are correct.
a. From the main navigation screen, select "wrench icon". The
configuration menu appears.
b. Select Application Control. The Application Control screen
appears.
c. Make sure that the Application system settings are correct.
a. From the main navigation screen, select 7. The Setup menu
appears.
b. Select EZ-Boom. The EZ-Boom screen appears.
c. Make sure that the EZ-Boom system settings are correct.
a. On the display, press the Configuration button. The
Configuration screen appears.
b. Highlight the EZ-Boom plugin and then tap Setup.
c. Make sure that the EZ-Boom system settings are correct.
d. Highlight the Implement plugin and then tap Setup.
e. Make sure that the Implement system settings are correct.
EZ-Boom 2010 System Troubleshooting Guide 19
Page 20

1 EZ-Boom 2010 System Error Messages
EZ-Boom system error message 4600: “Rate Not Responding”
Cause
A critical EZ-Boom system error has occurred. The difference between the actual flow
and the target flow has been greater than 30% for at least 6 seconds. This message
appears when the error first occurs and every second of continuous error after that
until it is corrected.
Possible failure modes
• The flow meter calibration number is incorrect.
• The target rate is outside the operating range of the spray nozzles.
• The target rate is outside the operating range of the solution pump.
• The target rate cannot be maintained because the sprayer speed is too low or
too high.
• The flow control valve setup is incorrect.
Note – If this is only an occasional problem, use the display to clear the controller error
and continue to operate.
Solution
B
B
STEP 1: Clear the error message (page 13)
STEP 2: Check the following setup parameters
a. Do a catch test to confirm that the flowmeter calibration number is
correct.
b. Check that the flow control valve setup is correct.
Tip – If your sprayer has a bypass servo, check that there is no crossover cable
connected to the flow control valve. On Raven systems, this cable is required
to allow the Raven flow controller to correctly adjust the valve. On an
EZ-Boom system, this cable is not required. If a crossover cable is not fitted but
the EZ-Boom system cannot properly control a bypass flow control valve, try
changing the control valve setup to Inline Servo.
c. Check that the target rate is within the operating parameters of the spray
nozzles at your spraying speed.
Tip – Refer to your spray nozzle selection chart for information relating to
flow and speed.
If necessary, do one of the following:
– change the spray nozzles
– adjust your target rate and/or speed to match the target rate to the
sprayer nozzles
20 EZ-Boom 2010 System Troubleshooting Guide
Page 21

EZ-Boom 2010 System Error Messages 1
d. Check that the solution pump is able to deliver the correct flow for your
specified target rate. If necessary, change the spray nozzles or adjust your
target rate and/or speed to bring the required flow to within the
capabilities of the solution pump.
Step 3: Check the strainers
Check that the strainers on the sprayer are not blocked.
EZ-Boom 2010 System Troubleshooting Guide 21
Page 22

1 EZ-Boom 2010 System Error Messages
EZ-Boom system error message xx01: “Boom Over Current”
Cause
A critical EZ-Boom system error has occurred. The boom is turned on and the current
feedback is greater than 5.3
every 10 seconds of continuous error after that until it is corrected.
Possible failure modes
• There is a faulty boom valve.
Note – If this is only an occasional problem, use the display to clear the controller error
and continue to operate.
Solution
Step 1: Clear the error message(page 13)
Step 2: Check the current to the EZ-Boom controller
a. With a multitester, check the current to the specified test pin of the 16-pin
connector on the EZ-Boom controller while the associated boom section is
turned on. For example, when diagnosing Error Message 4701, supply
power to pin 16, and Ground to pin 1 and then hook a multi-meter into the
circuit on pin 6.
A. This message appears when the error first occurs and
b. If the current is greater than 5.3 A, check the vehicle wiring and the boom
valve.
Error number Boom section Test p i n
4701 1 6
4801 2 2
4901 3 5
4A01 4 7
4B01 5 8
4C01 6 9
4D01 7 15
4E01 8 1
4F01 9 2
5001 10 3
Step 3: Check that pin 3 and pin 1 share a grounding point (page 13)
22 EZ-Boom 2010 System Troubleshooting Guide
Page 23

EZ-Boom 2010 System Error Messages 1
EZ-Boom system error message xx02: “Boom Driver Failure”
Cause
A critical EZ-Boom system error has occurred. The boom is turned off and the current
feedback is greater than approximately 2.0
first occurs and every 10 seconds of continuous error after that until it is corrected.
Possible failure modes
• There is a faulty boom valve or wiring harness.
Note – If this is only an occasional problem, use the display to clear the controller error
and continue to operate.
Solution
STEP 1: Clear the error message(page 13)
STEP 2: Check the current to the EZ-Boom controller
a. With a multitester, check the current to the specified test pin of the 16-pin
connector on the EZ-Boom controller while the associated boom section is
turned on. For example, when diagnosing Error Message 4702, supply
power to pin 16, and Ground to pin 1 and then hook a multi-meter into the
circuit on pin 6.
A. This message appears when the error
b. If the current is greater than 2.0 A, check the vehicle wiring and the boom
valve.
Error number Boom section Test p i n
4702 1 6
4802 2 2
4902 3 5
4A02 4 7
4B02 5 8
4C02 6 9
4D02 7 15
4E02 8 1
4F02 9 2
5002 10 3
STEP 3: Check that pin 3 and pin 1 share a grounding point (page 13)
EZ-Boom 2010 System Troubleshooting Guide 23
Page 24

1 EZ-Boom 2010 System Error Messages
EZ-Boom system error message 5101: “Flow Valve Over Current”
Cause
A critical EZ-Boom system error has occurred. When the valve is being adjusted, the
current feedback is greater than approximately 4.0
error first occurs and every 10 seconds of continuous error after that until it is
corrected.
Possible failure modes
• There is a faulty control valve or wiring harness.
Note – If this is only an occasional problem, use the display to clear the controller error
and continue to operate.
Solution
STEP 1: Clear the error message(page 13)
STEP 2: Check the flow control valve setup parameters (page 13)
A. This message appears when the
STEP 3: Check the current to the EZ-Boom controller
a. With a multitester, check the current to pins 3 and 4 of the 16-pin
connector on the EZ-Boom controller while the valve is being adjusted.
If checking at the EZ-Boom controller, supply power to pin 16 and Ground
to pin 1.
b. If the current is greater than approximately 4.0 A, check the vehicle wiring
and the control valve.
24 EZ-Boom 2010 System Troubleshooting Guide
Page 25

EZ-Boom 2010 System Error Messages 1
EZ-Boom system error message 5102: “Flow Valve Driver Failure”
Cause
A critical EZ-Boom system error has occurred. The valve is not being adjusted and the
current feedback is greater than approximately 2.0
error first occurs and every 10 seconds of continuous error after that until it is
corrected.
Possible failure modes
• There is a faulty flow control valve or wiring harness.
Note – If this is only an occasional problem, use the display to clear the controller error
and continue to operate.
Solution
STEP 1: Clear the error message(page 13)
STEP 2: Check the flow control valve setup parameters (page 13)
A. This message appears when the
STEP 3: Check the current to the EZ-Boom controller
a. With a multitester, check the current to pins 3 and 4 of the 16-pin
connector on the EZ-Boom controller while the valve is not being adjusted.
b. If the current is greater than approximately 2.0 A, check the vehicle wiring
and the flow control valve.
EZ-Boom 2010 System Troubleshooting Guide 25
Page 26

1 EZ-Boom 2010 System Error Messages
EZ-Boom system error message 5103: “Flow Valve Open”
Cause
A critical EZ-Boom system error has occurred. There are two possible causes of this
error code:
• The driver part has a digital status feedback. The error is triggered when the
status indicates an error opening or closing.
• A count is kept for the digital status feedback of the driver part. When normal
operation occurs, the count decreases by 1. When an error occurs, the count
increases by 1. If the error count reaches 50, the device enters an error state and
the valve is no longer adjusted.
This message appears when the error first occurs and every 10 seconds of continuous
error after that until it is corrected.
Possible failure modes
• There is a faulty flow control valve or wiring harness.
Note – If this is only an occasional problem, use the display to clear the controller error
and continue to operate.
Solution
STEP 1: Clear the error message(page 13)
STEP 2: Check the flow control valve setup parameters (page 13)
STEP 3: Turn the controller off and on again
If the error count has reached 50 and the device has entered a error state:
a. Turn the controller off.
b. Wait for 5 seconds.
c. Turn the controller on again. This will reset the error count to 0.
26 EZ-Boom 2010 System Troubleshooting Guide
Page 27

EZ-Boom 2010 System Error Messages 1
EZ-Boom system error message 5201: “Main Pressure Below Min”
Cause
A critical EZ-Boom system error has occurred. There are two possible causes of this
error message:
• The pressure is lower than -70 kPa.
• A pressure indication of < 0 psi occurred for a period of at least three seconds.
This message appears when the error first occurs and every 10 seconds of continuous
error after that until it is corrected.
Note – This error will only occur if the pressure sensor is enabled in the EZ-Boom system
setup.
Possible failure modes
• There is a faulty pressure sensor or wiring harness.
• The pressure sensor is not calibrated correctly.
Note – If this is only an occasional problem, use the display to clear the controller error
and continue to operate.
Solution
STEP 1: Clear the error message(page 13)
STEP 2: Check the pressure setup parameters
FmX integrated
display
EZ-guide 500
lightbar
a. On the display, press the Configuration button. The
Configuration screen appears.
b. Select the EZ-Boom plugin and then tap Calibrate.
c. Select Pressure Calibration and then tap Start.
d. Check that the pressure sensor is enabled and that the valve
settings are correct.
e. If necessary, re-calibrate the sensor.
a. On the display select the wrench icon. The Configuration
screen appears.
b. Select Application Control, select Pressure Calibration and
then select Calibrate Pressure Sensor.
c. Set Pressure Sensor State to On.
d. Ensure that the Slope value is correct and that the Set point
matches the charged system pressure gauge.
EZ-Boom 2010 System Troubleshooting Guide 27
Page 28

1 EZ-Boom 2010 System Error Messages
EZ-Guide Plus
lightbar
FieldManager
display
a. From the main navigation screen, select 7. The setup menu
appears.
b. Select EZ-Boom/Pressure Cal. The Pressure Cal screen appears.
c. Ensure that the sensor is enabled and the settings are correct.
d. If necessary, re-calibrate the sensor.
a. On the display, press the Configuration button. The
Configuration screen appears.
b. Select the EZ-Boom plugin and then tap Calibrate.
c. Select Pressure Calibration and then tap Start.
d. Check that the pressure sensor is enabled and that the valve
settings are correct.
e. If necessary, re-calibrate the sensor.
Step 3: Check the wiring harness and the pressure sensor output
a. Check that the sensor is receiving 12 VDC from the EZ-Boom controller.
b. Check that the sensor is outputting 1 V–5 V.
28 EZ-Boom 2010 System Troubleshooting Guide
Page 29

EZ-Boom 2010 System Error Messages 1
EZ-Boom system error message 5202: “Main Pressure Above Max”
Cause
A critical EZ-Boom system error has occurred. There are two possible causes of this
error message:
• The pressure is lower than -70 kPa.
• The input voltage is greater than approximately 4.95 V for 3 seconds
continuously.
This message appears when the error first occurs and every 10 seconds of continuous
error after that until it is corrected.
Note – This fault will only appear if the pressure sensor is enabled in the EZ-Boom system
setup.
Possible failure modes
• There is a faulty pressure sensor or wiring harness.
• The pressure sensor is not calibrated correctly.
Note – If this is only an occasional problem, use the display to clear the controller error
and continue to operate.
Solution
STEP 1: Clear the error message(page 13)
STEP 2: Check the pressure setup parameters
FmX integrated
display
EZ-guide 500
lightbar
a. On the display, press the Configuration button. The
Configuration screen appears.
b. Select the EZ-Boom plugin and then tap Calibrate.
c. Select Pressure Calibration and then tap Start.
d. Check that the pressure sensor is enabled and that the valve
settings are correct.
e. If necessary, re-calibrate the sensor.
a. On the display select the wrench icon. The Configuration
screen appears.
b. Select Application Control, select Pressure Calibration and
then select Calibrate Pressure Sensor.
c. Set Pressure Sensor State to On.
d. Ensure that the Slope value is correct and that the Set point
matches the charged system pressure gauge.
EZ-Boom 2010 System Troubleshooting Guide 29
Page 30

1 EZ-Boom 2010 System Error Messages
EZ-Guide Plus
lightbar
FieldManager
display
a. From the main navigation screen, select 7. The setup menu
appears.
b. Select EZ-Boom/Pressure Cal. The Pressure Cal screen appears.
c. Ensure that the sensor is enabled and the settings are correct.
d. If necessary, re-calibrate the sensor.
a. On the display, press the Configuration button. The
Configuration screen appears.
b. Select the EZ-Boom plugin and then tap Calibrate.
c. Select Pressure Calibration and then tap Start.
d. Check that the pressure sensor is enabled and that the valve
settings are correct.
e. If necessary, re-calibrate the sensor.
Step 3: Check the wiring harness and the pressure sensor output
a. Check that the sensor is receiving 12 VDC from the EZ-Boom controller.
b. Check that the sensor is outputting 1 V–5 V.
30 EZ-Boom 2010 System Troubleshooting Guide
Page 31

EZ-Boom 2010 System Error Messages 1
EZ-Boom system error message 6B00: “Minimum Flow”
Cause
A critical EZ-Boom system error has occurred. This error message appears when the
actual flow is less than the Minimum Flow setting (scaled for the current swath) and
the target flow is less than the actual flow:
This message appears when the error first occurs and every second of continuous error
after that until it is corrected.
Possible failure modes
• There is a faulty flow meter or wiring harness.
• The sprayer is traveling so slowly that the target rate cannot be maintained
unless the flow drops below the Minimum Flow setting.
• The Minimum Flow setting is too high.
Note – If this is only an occasional problem, use the display to clear the controller error
and continue to operate.
Solution
STEP 1: Clear the error message(page 13)
STEP 2: Check the Minimum Flow setting
FmX integrated
display
EZ-guide 500
lightbar
EZ-Guide Plus
lightbar
FieldManager
display
a. On the display, press the Configuration button. The
Configuration screen appears.
b. Select the EZ-Boom plugin and then tap Calibrate.
c. Select Flow Calibration and then tap Start.
d. Make sure that the value in the Min Flow field is appropriate
(not too high).
a. On the display select the wrench icon. The Configuration
screen appears.
b. Select Application Control and then select Application Setup.
c. Make sure that the value in the Min Flow field is appropriate
(not too high).
a. From the main navigation screen, select 7. The setup menu
appears.
b. Select EZ-Boom/Application. The Application Setup screen
appears.
c. Ensure that the Min Flow setting is appropriate (not too
high).
a. On the display, press the Configuration button. The
Configuration screen appears.
b. Select the EZ-Boom plugin and then tap Calibrate.
c. Select Flow Calibration and then tap Start.
d. Make sure that the value in the Min Flow field is appropriate
(not too high).
EZ-Boom 2010 System Troubleshooting Guide 31
Page 32

1 EZ-Boom 2010 System Error Messages
Step 3: Check the liquid flow
FmX integrated
display
EZ-guide 500
lightbar
EZ-Guide Plus
lightbar
FieldManager
display
a. Check the output from the flow meter when liquid is flowing
through the sprayer. To do this, perform a flow calibration:
b. On the display, press the Configuration button. The
Configuration screen appears.
c. Select the EZ-Boom plugin and then tap Calibrate. The
Implement Calibration screen appears.
d. Select Flow Calibration. The EZ-Boom Flow Calibration screen
appears.
e. Tap the Recalibrate button to run the flow calibration
sequence.
f. Follow the onscreen instructions or refer to the AgGPS
FieldManager Display User Guide version 2.00.
a. On the display, select the wrench icon. The Configuration
screen appears.
b. Select Application Control and then select the Flow
Calibration wizard.
c. Select Calibrate Now to begin calibration.
Check the output from the flow meter when liquid is flowing
through the sprayer. To do this, perform a flow calibration:
a. From the main navigation screen, select 7. The setup menu
appears.
b. Select EZ-Boom/Flow Calibration. The Flow Calibration screen
appears.
c. Press until you have selected Calibrate.
d. Press to run the flow calibration sequence.
a. Check the output from the flow meter when liquid is flowing
through the sprayer. To do this, perform a flow calibration:
b. On the display, press the Configuration button. The
Configuration screen appears.
c. Select the EZ-Boom plugin and then tap Calibrate. The
Implement Calibration screen appears.
d. Select Flow Calibration. The EZ-Boom Flow Calibration screen
appears.
e. Tap the Recalibrate button to run the flow calibration
sequence.
f. Follow the onscreen instructions or refer to the AgGPS
FieldManager Display User Guide version 2.00.
Step 4: Check the wiring harness and flow meter output
Check that the flow meter is being supplied the correct voltage from the
EZ-Boom controller.
32 EZ-Boom 2010 System Troubleshooting Guide
Page 33

EZ-Boom 2010 System Error Messages 1
Operating the Rate Increment/Decrement switch
Description
Setting the amount by which the current application rate (Rate 1 or Rate 2) increases
and decreases each time you press the Rate Adjustment (increase/decrease) switch.
Summary
If you use the pre-selected target rates (Rate 1 or Rate 2), toggle the switch every time
that you want to increase or decrease the rate. When the system is in manual mode,
you can hold the switch in the upward position-the application will continue to
increase automatically. Release the switch when you reach the required rate.
Solution
The Increment/Decrement switch depends on the setting of the Rate switch: Rate 1,
Rate 2, or Manual mode.
Note – The way that the switch works depends on the display you are using.
EZ-Guide Plus lightbar: Rate 1 or Rate 2
Set the Step value in the Application Setup screen.
• To increase the flow by that step value, press the
Increment/Decrement switch up.
• To decrease the flow by that step value, press the
switch down.
If you hold the switch up or down, the flow increases or decreases by only one step. To
increase or decrease by another step, you must release the switch and then press it
again.
EZ-Guide 500 system: Rate 1 or Rate 2
Set the Rate Increment value in
the Application Setup screen.
• To increase the flow by
that step value, press the
Increment/Decrement
switch up.
• To decrease the flow by
that step value, press the
switch down.
If you hold the switch up or down, the flow increases or decreases by only one step. To
increase or decrease by another step, you must release the switch and then press it
again.
EZ-Boom 2010 System Troubleshooting Guide 33
Page 34

1 EZ-Boom 2010 System Error Messages
FieldManager display: Rate 1 or Rate 2
Set the Rate Increment value in
the EZ-Boom Setup screen.
• To increase or decrease
the flow by the rate increment value, enter the required value into the
appropriate field.
If you hold the switch up or down, the flow increases or decreases by only one step. To
increase or decrease by another step, you must release the switch and then press it
again.
Manual mode
The Increment/Decrement switch adjusts the rate control valve while you hold the
switch up or down.
• When you hold the switch in the Increment position (up), the rate control valve
opens until it is fully open or until you release the switch.
• When you hold the switch in the Decrement position (down), the rate control
valve closes until it is fully closed or until you release the switch.
34 EZ-Boom 2010 System Troubleshooting Guide
Page 35

Spray booms do not turn on in a corner
Cause
The sprayer has no ground speed.
Solution
Use the manual-rate-from-stationary mode to spray the corners of fields. This ensures
maximum spray coverage of your field, while minimizing repeat coverage.
1. Drive around the corner while spraying. An area of land is missed.
2. Once you pass the corner and straighten up, stop the vehicle.
EZ-Boom 2010 System Error Messages 1
3. Use the master switch to turn off the EZ-Boom controller.
4. Reverse the vehicle until the spray boom is at the field boundary ( for example,
the fence).
5. Adjust the EZ-Boom controller switches:
a. Set the rate switch to manual mode (M).
b. Turn on the master switch.
Because the vehicle is starting from a stationary position, automated boom
switching is disabled.
Note – Once the boom sections are open, you may need to adjust the flow rate with the rate
adjustment Inc/Dec switch.
EZ-Boom 2010 System Troubleshooting Guide 35
Page 36

1 EZ-Boom 2010 System Error Messages
6. Begin driving. As soon as the vehicle begins moving, set the rate switch back to
one of the automated spray modes (Rate 1 or Rate 2). This re-enables automated
boom switching. Any boom sections that are re-covering an area that was
previously sprayed will turn off.
7. Continue driving the field as before.
36 EZ-Boom 2010 System Troubleshooting Guide
Page 37

EZ-Boom 2010 System Error Messages 1
The system shuts off when GPS signal is lost
Cause
The system no longer has a vehicle speed input, which the EZ-Boom controller needs
to calculate the GPS position and the spray rate.
Solution
To continue spraying if the GPS signal is lost, switch to manual rate control mode (the
M position), which does not require vehicle speed input. However, the EZ-Boom
controller cannot then calculate an automatic spray rate or adjust the spray rate if the
vehicle speed increases or decreases.
For more information, see System behavior following loss of GPS below.
Note – When in manual mode, use the vehicle speedometer and system pressure gauges to
maintain the correct spray volume.
Rate control and the loss of GPS
To determine a spray rate, you need the following information:
• Sprayer speed (mph)
• Sprayer boom width (inches)
• Flow of spray (Gallons per minute)
Boom control and the loss of GPS
Position information is lost when GPS is lost. Without position information, the
EZ-Boom 2010 system cannot determine the location of the spray boom and so cannot
detect previously-sprayed areas in order to control individual boom sections.
If the system is in the Auto Rate 1 or Auto Rate 2 mode, the loss of GPS turns off all the
boom sections. Switch the rate control to manual mode to turn on the boom sections
and continue to spray.
While the EZ-Boom 2010 system is without a valid GPS position, mapping or coverage
logging is disabled.
System behavior following loss of GPS
System Behavior
EZ-Guide Plus The system uses "dead reckoning" for five seconds; the speed and heading are
assumed to remain the same. After five seconds, if the rate control is in Rate 1 or
Rate 2, the EZ-Guide Plus lightbar turns off the boom sections.
EZ-Guide 500 The display immediately turns off all boom sections.
FieldManager The display immediately turns off all boom sections.
FmX The display immediately turns off all boom sections.
EZ-Boom 2010 System Troubleshooting Guide 37
Page 38

1 EZ-Boom 2010 System Error Messages
Boom sections do not turn on
Cause
Boom sections do not receive a signal voltage to open.
Solution
Check the state of the boom section on the display.
LED color The section is...
Red Off.
Green On.
Sending power to the boom valves.
Yel low
or
Grey
Looking for a non-covered area.
No power is supplied to the boom valves.
or
Looking for flow.
Sending power to the boom valves.
Waiting to see flow.
Check the system setting:
1. Turn off the Rate Control.
2. Set the Off When Stopped option to Yes.
3. Move the EZ-Boom rate switch to Rate 1 or Rate 2 and then to Manual.
The system should turn boom section LEDs to green and send power to turn on
the boom valves.
4. Do one of the following:
–If the section LEDs do not turn green, check if there is a cable plugged into
the 14-pin connector. If there is, unplug this connector and see if all
sections then turn green.
–If the section LEDs do turn green, look for a missing implement plug or
implement switch.
38 EZ-Boom 2010 System Troubleshooting Guide
Page 39

EZ-Boom 2010 System Error Messages 1
Rate not responding and Min Flow reached
Cause
The system is a the minimum flow setting and cannot adjust the rate any lower.
Solution
Set Min Flow to the lowest possible rate for the control valve and flow meter.
EZ-Boom 2010 System Troubleshooting Guide 39
Page 40

1 EZ-Boom 2010 System Error Messages
Not reading any Applied Rate "With supported flow meter"
Cause
No signal from the flow meter.
Solution
1. Check the flow meter power, signal, and ground wiring:
– Depending on the flow meter, the power wire may have 5 V or 12 V.
– The signal wire should have 5 V.
– The ground wire should show good continuity to ground “under 1 ohm".
2. Check for good continuity on the signal wire from the flow meter back to pin 13
on the harness going to the 16-pin connector on the EZ-Boom controller.
3. If the wires are satisfactory, check for a Hz reading on the EZ-Boom pin 13. You
will need to back-probe the wire to do this test.
– If there is a Hz reading, reinstall the EZ-Boom and display firmware. If that
does not resolve the issue, try a different EZ-Boom controller.
– If there is no Hz reading, try a different flow meter.
40 EZ-Boom 2010 System Troubleshooting Guide
Page 41

Incorrect tank volume message
Cause
Amount that is applied does not match tank volume.
Possible failure modes
• The system reports that there are X number of gallons left, but the tank is empty.
• The system reports that the tank is empty but there are still X number of gallons
left.
Solution
1. Perform a catch test to make sure that the system is outputting the correct
amount for the sprayer tips.
2. If the system is incorrect by a small amount, increase the Cal number slightly to
output more or decrease the Cal number slightly to output less.
Note – The tank volume markings may not be exact; change the Cal number by only a
small amount because it affects how much is being sprayed.
EZ-Boom 2010 System Error Messages 1
EZ-Boom 2010 System Troubleshooting Guide 41
Page 42

1 EZ-Boom 2010 System Error Messages
Pressure stays at Set limit on Pressure sensor Cal.
Cause
No change in voltage from the pressure sensor.
Solution
Do one or more of the following:
• Make sure that the pressure changes at the pressure sensor.
• Make sure that the correct sensor (Aux or Main) is calibrated.
• Make sure the slope value is set correctly: 27 mV/PSI for Trimble implements.
• Check for power, ground, and signal voltage at the pressure sensor. Power goes
into the pressure sensor and then the signal voltage out should change when PSI
changes. Back-probe the signal wire and then vary the pressure to make sure
that the signal voltage changes.
• If the signal voltage does not vary with pressure change, replace the pressure
sensor.
• If the signal voltage does vary with pressure change, check continuity from the
signal wire out at the pressure sensor to the 14-pin connector on the EZ-Boom
controller. Main pressure sensor is pin 10; Aux pressure sensor is pin 6.
• If continuity is satisfactory, reinstall the EZ-Boom and display firmware. If that
does not resolve the issue, try a different EZ-Boom controller.
42 EZ-Boom 2010 System Troubleshooting Guide
Page 43

EZ-Boom 2010 System Error Messages 1
Boom section 1 on an SPX sprayer does not turn on
Cause
There may be a diode molded in the connector on the sprayer.
Solution
Check continuity on pin 6 of the 16-pin connector going into to the back of the
EZ-Boom controller to the boom section 1 signal wire.
If there is a diode in the system, you see continuity with the leads one way and when
you reverse them, you see an open.
In this case, use a Y-harness to jump pin 6 on the Y-harness to pin 6 on the sprayer
harness.
If you see an open with the leads both ways, look for broken wiring from the EZ-Boom
controller out to the number 1 boom valve.
EZ-Boom 2010 System Troubleshooting Guide 43
Page 44

1 EZ-Boom 2010 System Error Messages
“Rate not responding” message
Cause
Applied rate is unable to reach the Target Rate.
Possible failure modes
Message appears when speeding up or slowing down.
Solution
1. Check the following:
–The tips in use
–Tip spacing
– Required target rate
– Require running speed
2. Check the sprayer tip chart to make sure that the tips can run that speed.
3. Do one of the following:
– If the tips cannot run at that speed, change the tips.
– If the tips can output the required rate at that speed but the message still
appears, perform a catch test to double-check the flow calibration number.
44 EZ-Boom 2010 System Troubleshooting Guide
Page 45

Rate fluctuates around the Target Rate.
Cause
The control valve is either responding too quickly and overshooting the target rate, or
moving too slowly and drifting away from the target rate.
Possible failure modes
Incorrect settings for Response 1, Response 2, or Threshold.
Solution
Do one of the following:
• If the EZ-Boom system is not controlling rate, check and adjust as necessary the
other rate controller settings.
• If the EZ-Boom system is controlling rate, check and adjust as necessary the
Response 1, Response 2, and Threshold values.
– Response 1 shows the response speed for the control valve once the Target
rate goes beyond the threshold value.
EZ-Boom 2010 System Error Messages 1
– Response 2 shows the response speed for the control valve when within the
threshold.
– Threshold shows the distance allowed from the Target rate before
switching from Response 2 to Response 1.
For a faster control valve response speed, set a higher number.
For a slower response speed, set a lower number.
Note – Trimble does not average the application rate so there will be more fluctuations.
EZ-Boom 2010 System Troubleshooting Guide 45
Page 46

1 EZ-Boom 2010 System Error Messages
Flow Control Valve Error Driver Failure (-1 mA) Fault
Cause
Probably a poor electrical system ground.
Solution
Do one or more of the following:
• Check the EZ-Boom ground wiring. Jump a separate ground wire into pin 1 of
the 16-pin connector on the back of the EZ-Boom controller.
• Check that the continuity of the cabling from the EZ-Boom controller to the
control valve is less than 1
• Repeat the tests on another EZ-Boom controller and/or control valve.
ohm.
46 EZ-Boom 2010 System Troubleshooting Guide
Page 47

Control Valve in headland fault
Cause
The control valve shuts completely when Close on zero flow is set to Yes, or the master
switch is turned off.
Possible failure modes
The Control Valve closes when you enter a headland and then takes a long time to
build pressure when you leave the headland.
Solution
Do one or more of the following:
• Make sure that Close on Zero Flow is set to No.
• Make sure that the master switch stays turned on and is not turned off when
you enter a headland.
• If there is section overlap when you go into or come out of the headland, the
flow rate may be too low for the control valve. Enter a minimum flow value to
keep the valve open.
EZ-Boom 2010 System Error Messages 1
EZ-Boom 2010 System Troubleshooting Guide 47
Page 48

1 EZ-Boom 2010 System Error Messages
Sections not mapping when EZ-Boom controller is controlling sections only
Cause
Rate control is set to On and is looking for a flow meter signal to start mapping, but
there is no flow meter signal available when doing section control.
Possible failure modes
Section LEDs turn from red to yellow/grey on the display but do not map.
Solution
Turn off the Rate Control.
48 EZ-Boom 2010 System Troubleshooting Guide
Page 49

Boom sections do not turn off
Cause
If either the Master switch or the Aux-Master switch is turned on, the sections stay on.
Possible failure modes
Boom sections stay on when:
• The Master switch is turned on and then off.
• The Aux-Master switch is turned on and then off.
Solution
• To make the Aux-Master switch control the system, turn off the EZ-Boom
Master switch.
• To make the EZ-Boom Master switch control the system, turn off the
Aux-Master switch.
Note – The Aux-Master switch supplies power into pin 10 on the EZ-Boom 16-pin
connector.
EZ-Boom 2010 System Error Messages 1
EZ-Boom 2010 System Troubleshooting Guide 49
Page 50

1 EZ-Boom 2010 System Error Messages
50 EZ-Boom 2010 System Troubleshooting Guide
Page 51

EZ-Boom 2010 System Harness
CHAPTER
2
Schematics
In this chapter:
EZ-Boom 2010 system cable
pinout information
EZ-Guide-to-EZ-Steer harness: P/N
52763
EZ-Steer-to-EZ-Boom harness: P/N
58377
Terminator connector: P/N 58378
Raven 4x0 series “Y” cable: P/N
58560
CAN terminator: P/N 59783
AgGPS FieldManager display
harness (Rev B): P/N 59872
FieldManager-to-EZ-Boom-
extension-cable: P/N 59873
Raven 4x00 series “Y” cable: P/N
59942 (see next page)
EZ-Boom-to-Raven-4x00 adaptor
harness: P/N 59943
2
EZ-Boom cable John Deere 4710,
4720, 4920: P/N 61593
Spracoupe to EZ-Boom harness:
P/N 61991-00
Flowmeter: P/N 62136
EZ-Boom to Flexicoil adapter:
P/N 64396 (1 of 2)
EZ-Boom to Flexicoil adapter:
P/N 64396 (2 of 2)
Spracoupe to EZ-Boom adapter:
P/N 64670
Spracoupe to EZ-Boom cable:
P/N 64671 (1 of 2)
Spracoupe to EZ-Boom cable:
P/N 64671 (2 of 2)
FmX to CAN w/port replicator:
P/N 67087
This chapter describes the EZ-Boom 2010
system harness schematics.
Implement switch harness: P/N
60477
Implement tee harness: P/N 60567
Implement switch extension
harness (10 ft): P/N 60478
Raven to EZ-Boom harness:
P/N 58560
Foot pedal assembly: P/N 60490
EZ-Boom 2010 System Troubleshooting Guide 51
Page 52

2 EZ-Boom 2010 System Harness Schematics
EZ-Boom 2010 system cable pinout information
52 EZ-Boom 2010 System Troubleshooting Guide
Page 53

EZ-Guide-to-EZ-Steer harness: P/N 52763
P2
P2
(Which connects the EZ-Guide Plus lightbar guidance system to the EZ-Steer®
assisted steering system):
EZ-Boom 2010 System Harness Schematics 2
EZ-Boom 2010 System Troubleshooting Guide 53
Page 54

2 EZ-Boom 2010 System Harness Schematics
TO POWER
TO EZ-Boom
EZ-Boom
EZ-Steer-to-EZ-Boom harness: P/N 58377
54 EZ-Boom 2010 System Troubleshooting Guide
Page 55
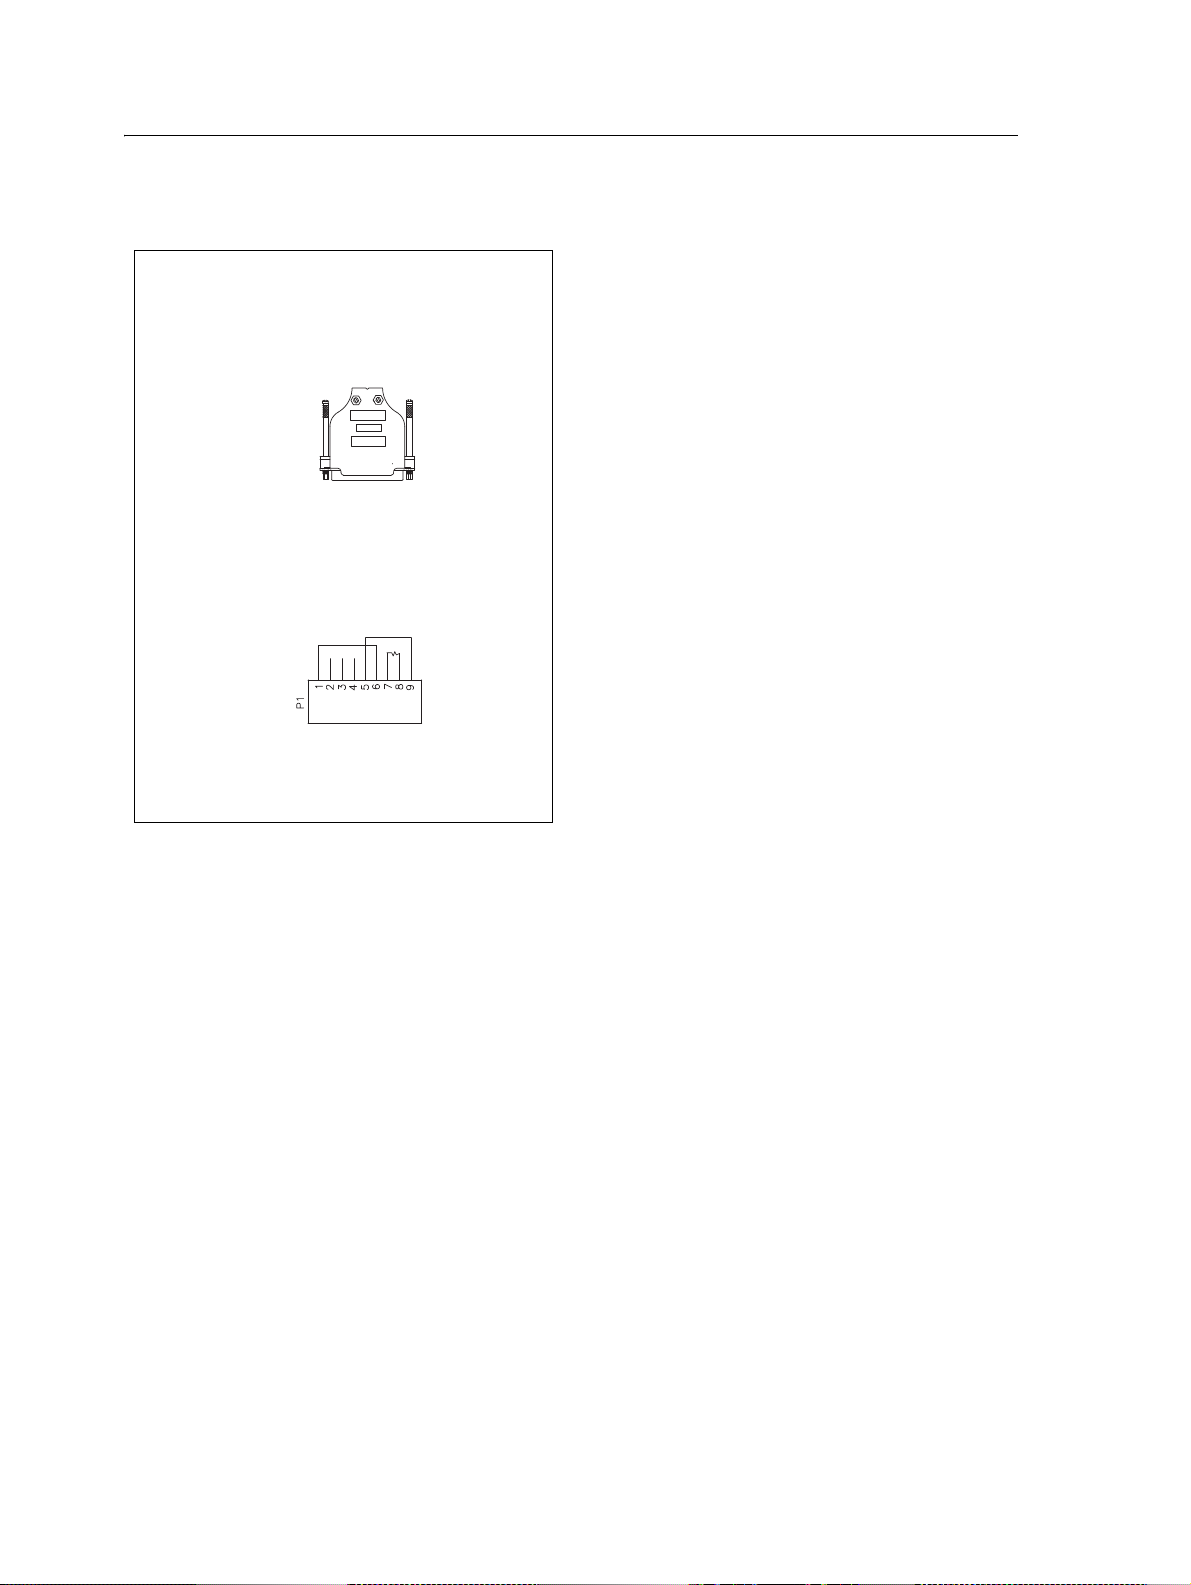
Terminator connector: P/N 58378
EZ-Boom 2010 System Harness Schematics 2
EZ-Boom 2010 System Troubleshooting Guide 55
Page 56

2 EZ-Boom 2010 System Harness Schematics
EZ-Boom
EZ-Boom
Raven 4x0 series “Y” cable: P/N 58560
56 EZ-Boom 2010 System Troubleshooting Guide
Page 57

CAN terminator: P/N 59783
EZ-Boom 2010 System Harness Schematics 2
EZ-Boom 2010 System Troubleshooting Guide 57
Page 58

2 EZ-Boom 2010 System Harness Schematics
AgGPS FieldManager display harness (Rev B): P/N 59872
58 EZ-Boom 2010 System Troubleshooting Guide
Page 59

EZ-Boom 2010 System Harness Schematics 2
EZ-Boom
FieldManager-to-EZ-Boom-extension-cable: P/N 59873
EZ-Boom 2010 System Troubleshooting Guide 59
Page 60

2 EZ-Boom 2010 System Harness Schematics
Raven 4x00 series “Y” cable: P/N 59942 (see next page)
60 EZ-Boom 2010 System Troubleshooting Guide
Page 61

EZ-Boom 2010 System Harness Schematics 2
EZ-Boom 2010 System Troubleshooting Guide 61
Page 62

2 EZ-Boom 2010 System Harness Schematics
EZ-Boom
EZ-Boom
EZ-Boom
EZ-Boom
EZ-Boom
EZ-Boom-to-Raven-4x00 adaptor harness: P/N 59943
62 EZ-Boom 2010 System Troubleshooting Guide
Page 63

Implement switch harness: P/N 60477
EZ-Boom 2010 System Harness Schematics 2
EZ-Boom 2010 System Troubleshooting Guide 63
Page 64
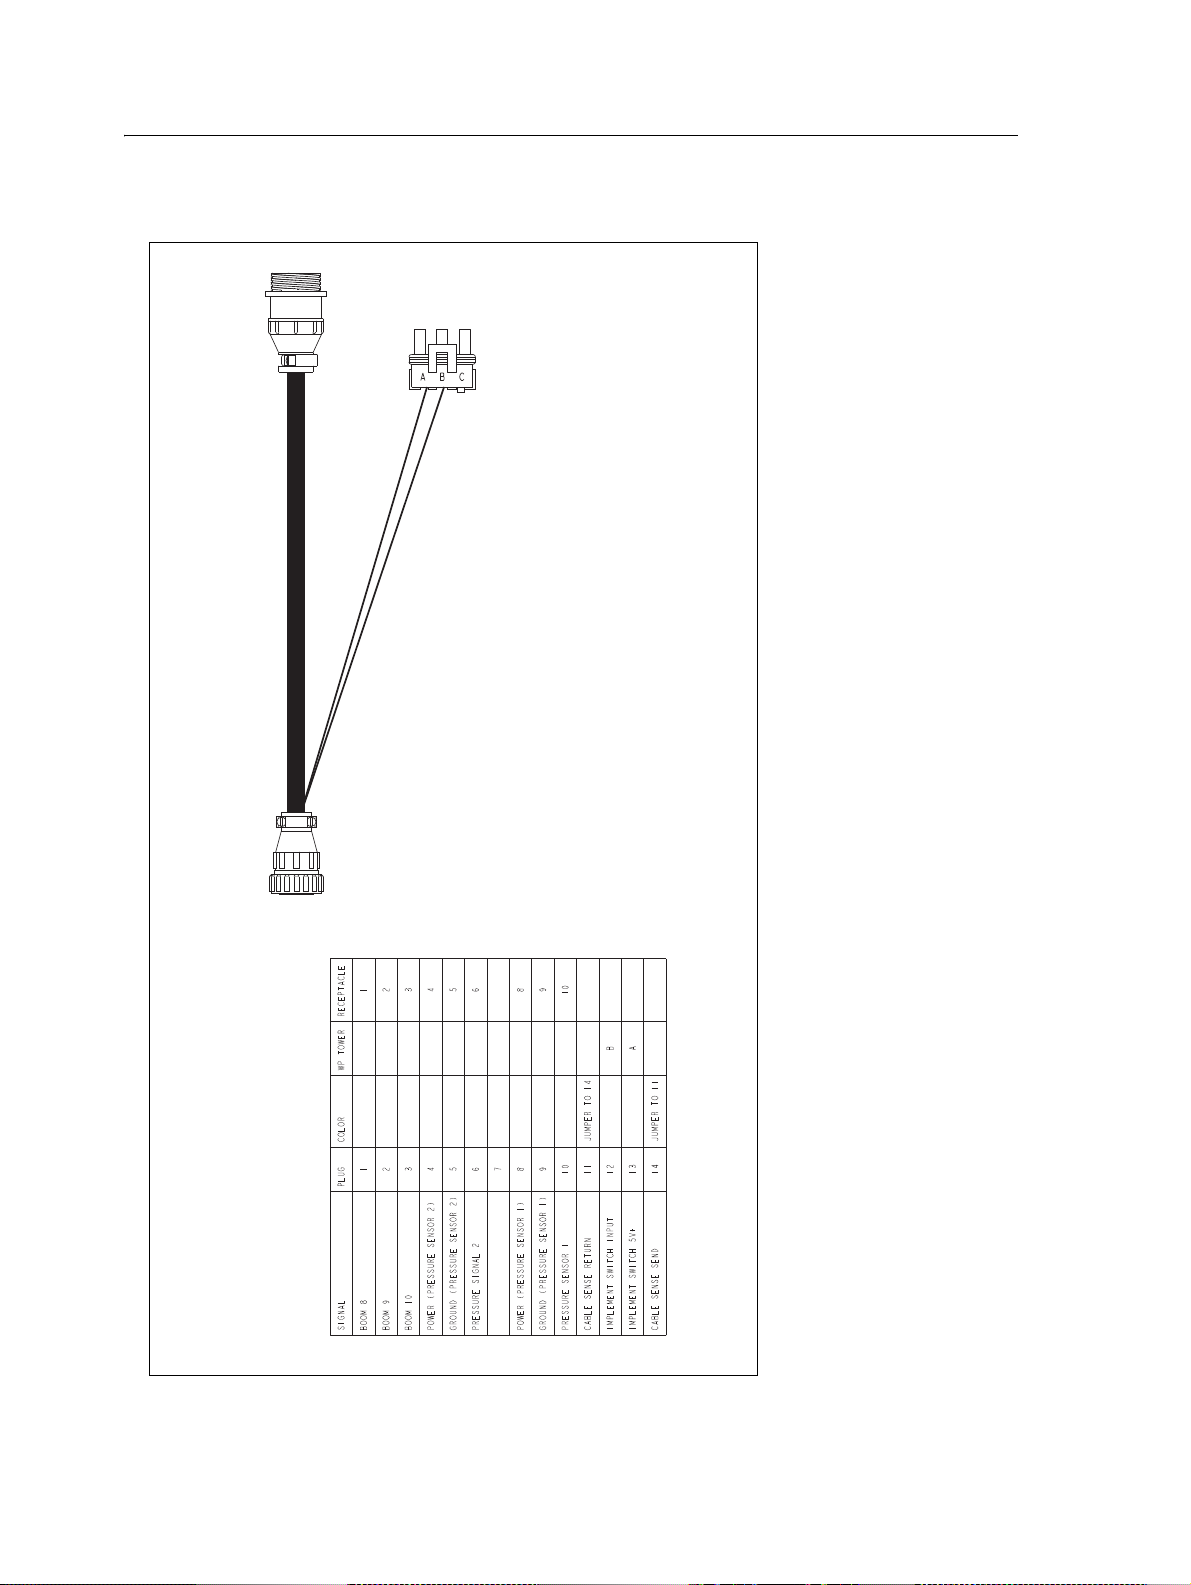
2 EZ-Boom 2010 System Harness Schematics
Implement tee harness: P/N 60567
64 EZ-Boom 2010 System Troubleshooting Guide
Page 65

EZ-Boom 2010 System Harness Schematics 2
Implement switch extension harness (10 ft): P/N 60478
EZ-Boom 2010 System Troubleshooting Guide 65
Page 66

2 EZ-Boom 2010 System Harness Schematics
Implement switch extension harness (25 ft): P/N 60479
66 EZ-Boom 2010 System Troubleshooting Guide
Page 67

Raven to EZ-Boom harness: P/N 58560
EZ-Boom 2010 System Harness Schematics 2
EZ-Boom 2010 System Troubleshooting Guide 67
Page 68

2 EZ-Boom 2010 System Harness Schematics
Foot pedal assembly: P/N 60490
68 EZ-Boom 2010 System Troubleshooting Guide
Page 69

EZ-Boom 2010 System Harness Schematics 2
A
B
C
A
B
C
See below for pinouts
EZ-Boom cable John Deere 4710, 4720, 4920: P/N 61593
EZ-Boom 2010 System Troubleshooting Guide 69
Page 70

SIGNAL
EZ-BOOM
MAIN
AMP 16 PIN
COLOR
WIRE
LABEL
WIRE P/N
WIRE
SIZE
REMOTE
MASTER
DEUTSCH 2 PIN PLUG
POWER
3 PIN PLUG
FUSE
FLOW METER
DEUTSCH 8 PIN RECPT.
BLADE
TERMINALS
GROUND
1 (14 GA) BLACK 2000966-0 16 GA
B (BLACK WIRE)
BOOM 2
2 GREEN BOOM 2 2000976-5 18 GA 2
BOOM 3
5 ORANGE BOOM 3 2000976-3 18 GA 3
BOOM 1
6 WHITE BOOM 1 2000976-9 18 GA 1
BOOM 4
7 BLUE BOOM 4 2000976-6 18 GA 4
BOOM 5
8 BROWN BOOM 5 2000976-1 18 GA 5
BOOM 6
9 YELLOW BOOM 6 2000976-4 18 GA 6
AUX. MASTER SWITCH INPUT
10 BLACK 2000843-3X18 18 GA 2
GROUND
11 BLACK
4
FLOW SIGNAL
13 WHITE
3
SWITCHED 12V+ (OUT)
14 RED 2000843-3X18 18 GA 1
BOOM 7
15 VIOLET BOOM 7 2000976-7 18 GA 7
FUSED POWER
16 RED 2000966-2 16 GA
A
BATTERY POWER A (RED WIRE) B
2 EZ-Boom 2010 System Harness Schematics
EZ-Boom cable John Deere 4710, 4720, 4920: P/N 61593 (Pinouts)
70 EZ-Boom 2010 System Troubleshooting Guide
Page 71

EZ-Boom 2010 System Harness Schematics 2
Spracoupe to EZ-Boom harness: P/N 61991-00
EZ-Boom 2010 System Troubleshooting Guide 71
Page 72

2 EZ-Boom 2010 System Harness Schematics
Flowmeter: P/N 62136
72 EZ-Boom 2010 System Troubleshooting Guide
Page 73

EZ-Boom 2010 System Harness Schematics 2
EZ-Boom to Flexicoil adapter: P/N 64396 (1 of 2)
EZ-Boom 2010 System Troubleshooting Guide 73
Page 74

2 EZ-Boom 2010 System Harness Schematics
EZ-Boom to Flexicoil adapter: P/N 64396 (2 of 2)
74 EZ-Boom 2010 System Troubleshooting Guide
Page 75

EZ-Boom 2010 System Harness Schematics 2
Spracoupe to EZ-Boom adapter: P/N 64670
EZ-Boom 2010 System Troubleshooting Guide 75
Page 76
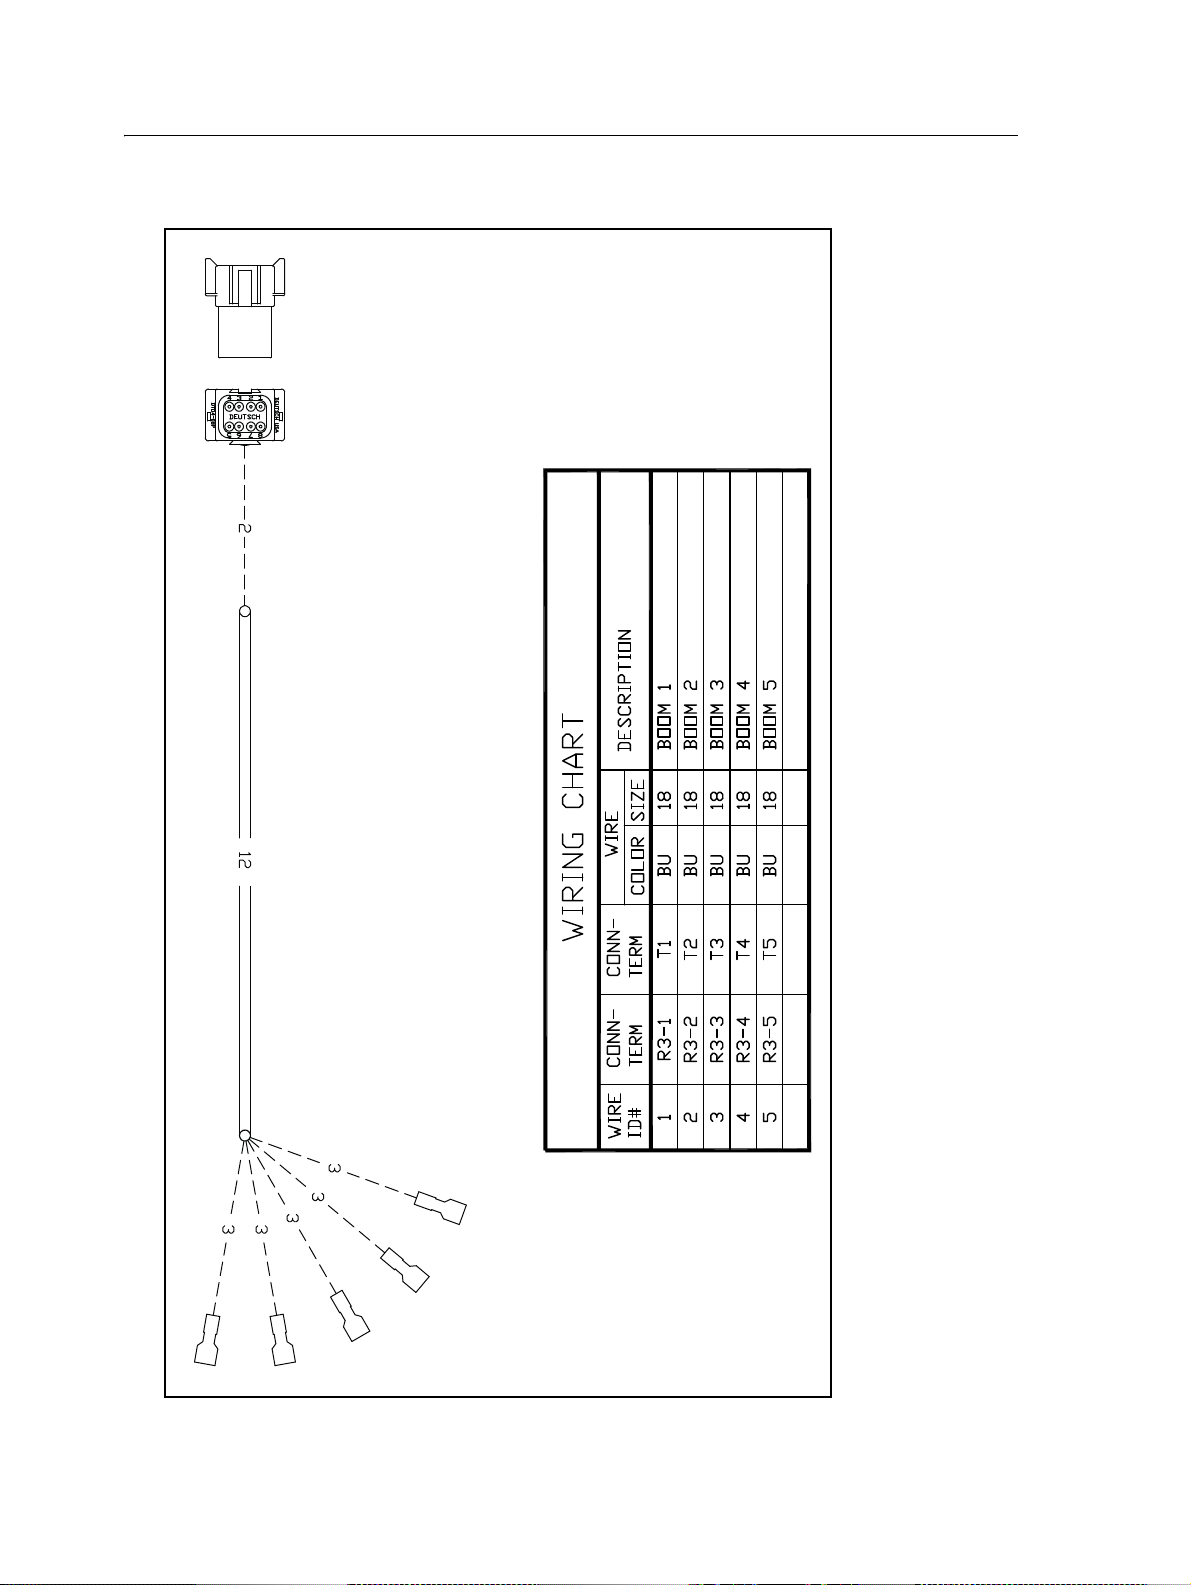
2 EZ-Boom 2010 System Harness Schematics
Spracoupe to EZ-Boom cable: P/N 64671 (1 of 2)
76 EZ-Boom 2010 System Troubleshooting Guide
Page 77

EZ-Boom 2010 System Harness Schematics 2
Spracoupe to EZ-Boom cable: P/N 64671 (2 of 2)
EZ-Boom 2010 System Troubleshooting Guide 77
Page 78

2 EZ-Boom 2010 System Harness Schematics
FmX to CAN w/port replicator: P/N 67087
78 EZ-Boom 2010 System Troubleshooting Guide
Page 79

CHAPTER
EZ-Boom 2010 System Technical
3
Specifications
In this chapter:
Technical specifications
3
This chapter lists the technical specifications
of the EZ-Boom 2010 system.
EZ-Boom 2010 System Troubleshooting Guide 79
Page 80

3 EZ-Boom 2010 System Technical Specifications
Technical specifications
Item Description
Dimensions 266 mm W x 115 mm H x 87 mm D
(10.5" W x 4.5" H x 3.4" D)
Weight 0.855 kg
(1.89 lb)
Environmental Sealed to IP54
Operating temperature -40°C to 70°C
Storage temperature -40°C to 70°C
Inputs 4 x digital inputs (flowmeter, remote switch, implement switch, cable sense)
Switching threshold: 1.25 V
Tolerate: -18 V to +18 V
ESD protected
2 x analog pressure inputs (main and auxiliary)
Analog range: 0 V to 5 V
Tolerate: -18 V to +18 V
ESD protected
Outputs Boom drives
10 high-side drivers
4 A steady state each
Protected against short to ground, over-temperature, over-current
Servo drive
H-bridge servo drive IC
4 A steady state each
Protected against short to ground and +12, over-temperature, over-current
Supply outputs 5 V output
Limited at approx 0.7 A
Protected against short to ground, over-temperature, ESD
12 V output
Limited at approx 0.7 A
Protected against short to ground, over-temperature, ESD
80 EZ-Boom 2010 System Troubleshooting Guide
Page 81

EZ-Boom 2010 System Technical Specifications 3
EZ-Boom 2010 System Troubleshooting Guide 81
 Loading...