

Page 1
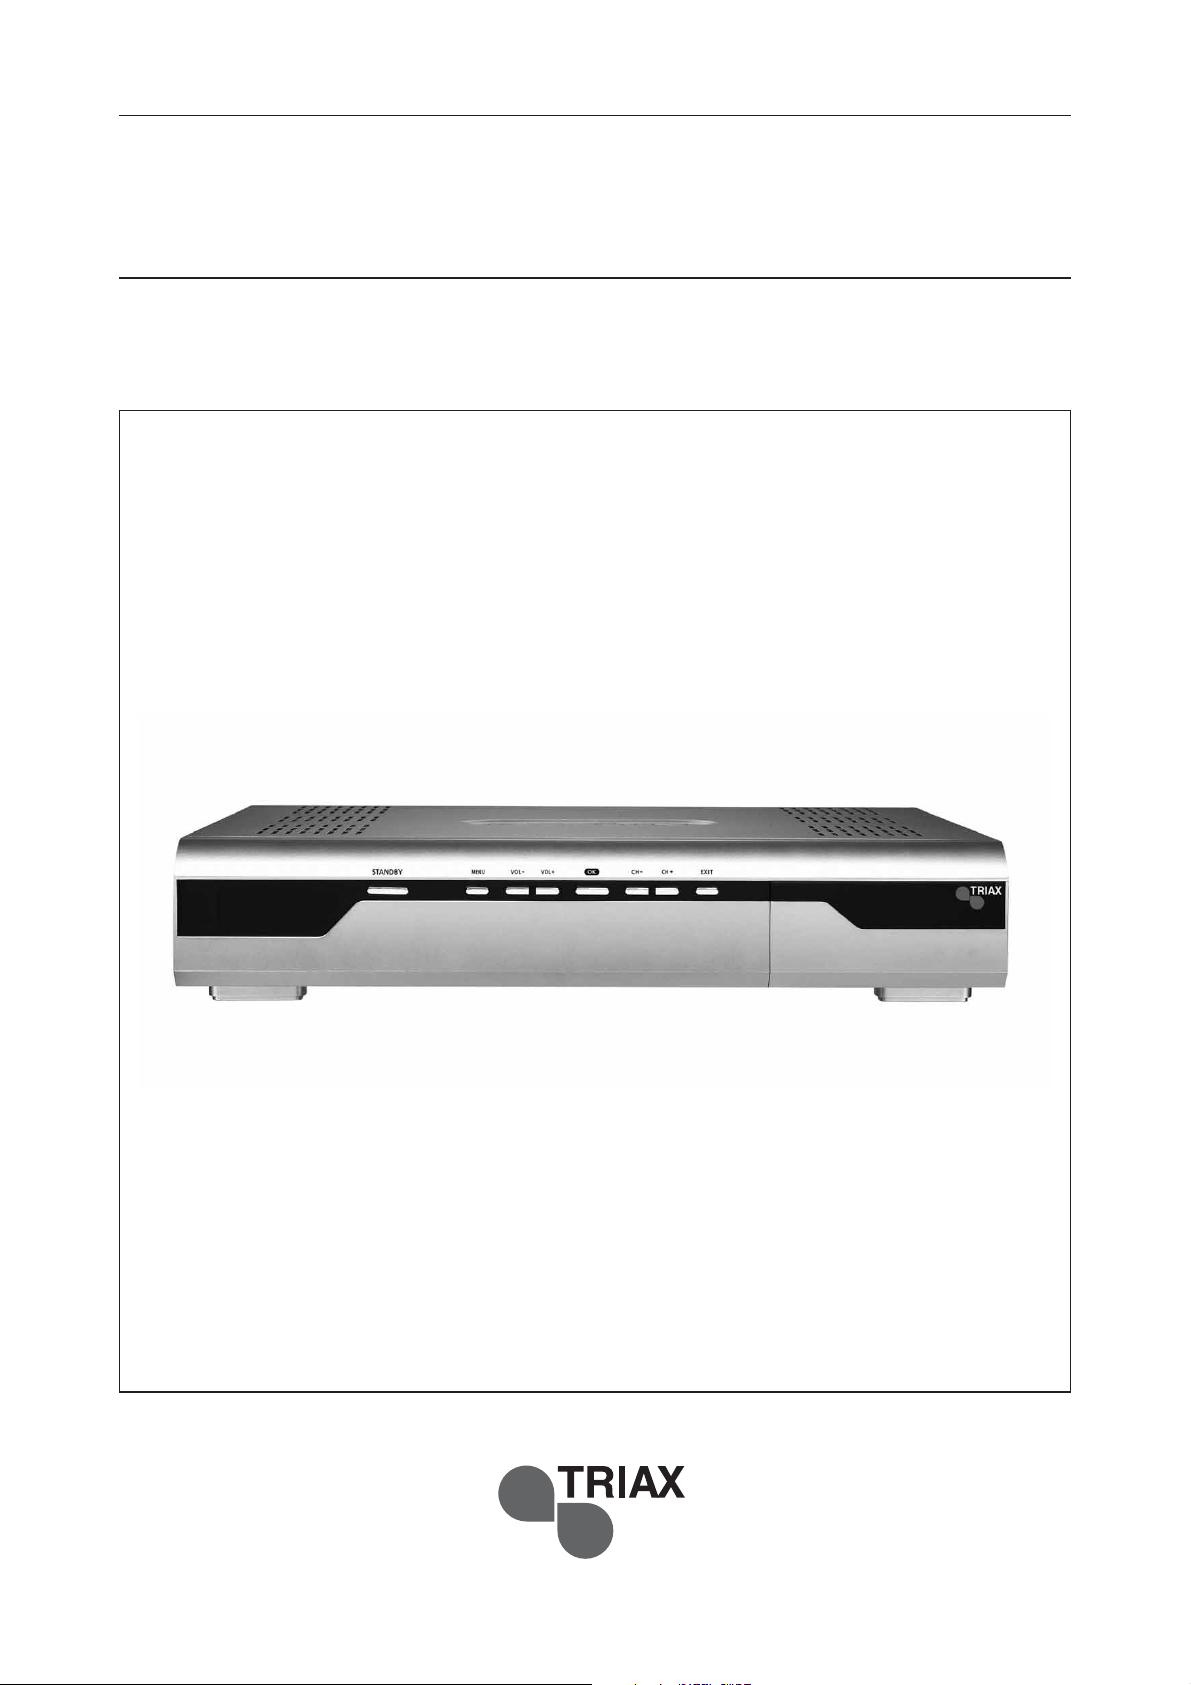
TRIAX STR 333
Digital Combo Receiver
PREMIUM DUAL PVR
N1_ENGLISH
104165
Use Manual
Page 2
General Safety
Cautions
CAUTION
RISK OF ELECTRIC SHOCK
DO NOT OPEN
CAUTION
remove the cover. No user serviceable parts inside.
5HIHUDQ\VHUYLFLQJWRTXDOL¿HG6HUYLFHSHUVRQQHO
Read this manual carefully before using the product. The cautions described below contain important
information about safety, and are categorized into:
The company will not take any responsibility for accidents or damage resulting from careless handling by
the user.
: To reduce the risk of electrical shock, do not
Danger, Warning and Notice.
Danger
If the user mishandles the product, there is a risk of loss of life or critical injury.
• Connect the power cord only to A/C outlets as specified by the user manual or product specification.
If the power code is connected to a non-specified A/C outlet, it could result in fire or electric shock.
• The product must not be exposed to water or liquid of any sort, or be exposed to drips or splashes.
It could result in fire or electric shock.
• Do not place heavy objects, including the product itself, on top of the power cord. If it is damaged,
it could result in fire or electric shock.
• Do not place metal objects on top of the apparatus. If metal objects fall into the apparatus, it could result
in fire or electric shock.
• Do not repair, disassemble or modify this apparatus yourself. It might cause fire or electric shock.
If internal checking or maintenance is needed, please contact your service center or agency.
• Do not block or cover any ventilation opening. A fire might result from overheating.
• Turn off and unplug the power as quickly as possible during electric storms.
Failure to do so could result in fire or electric shock.
• Remove the antenna’s power plug from the outlet as quickly as possible during electric storms.
Failure to do so could result in fire or electric shock.
• Do not drop the apparatus (for example by putting it in a place where it may fall) or subject it to impact.
The product might be damaged. If it is damaged, please turn off the power and remove the plug from
the power outlet, or fire or electric shock may result.
• Never touch the power cord with wet hands. It could result in an electric shock.
2
Page 3
Cautions
3
Warning
If the product is mishandled, the user might receive a serious or minor injury.
Damage or loss to the user’s property might also result.
• The product must not be exposed to water or liquid. If the apparatus is exposed to drips or splashes,
it might cause a problem that cannot be repaired.
• Do not repair, disassemble or modify this apparatus yourself. It might be seriously damaged,
possibly beyond repair.
• Turn off the power and unplug the power cord as quickly as possible during electric storms.
They might damage the apparatus.
• Remove the antenna’s power plug from the outlet as quickly as possible during electric storms, or the
apparatus might be damaged.
• Data recorded in the HDD might be lost due to a shock, lightening or electricity failure.
The user must back up his or her own data, and the company does not take any responsibility for failure
to do so.
Notice
If the product is mishandled, it might cause minor damage.
• If the apparatus becomes marked, clean it gently with a soft cloth or towel. Never use chemical solvents
such as benzene, thinner, acetone or other solvents. The surface of the apparatus might become discolored
and the paint might peel.
• Do not place or keep the apparatus in the following situations. Doing so might cause problems.
- where it is too hot or cold.
- where there is high humidity.
- where there are excessive temperatures, for example in front of airconditioners or heating vents.
- where there is dust or soot.
- in confined areas where the heat cannot be released.
- where it is exposed to direct sunlight.
• Turn the apparatus off or unplug the power cord if it is to remain unused for a long period of time.
• Do not place heavy objects on top of this apparatus. It might cause malfunction or damage.
• If the apparatus is so seriously damaged that it cannot be repaired, or has stopped working altogether,
dispose of it properly in accordance with the local laws or regulations in your area.
Page 4

Contents
General Safety.................................................................................................. 2
1. Functions and Installation ........................................................................ 5
2. Easy Installation........................................................................................ 10
1.1 Remote Control Unit................................................................. 5
1.2 Front Panel................................................................................. 6
1.3 Rear Panel .................................................................................. 6
1.4 CAM(Conditional Access Module) and Smart Card ............. 7
1.5 Connecting and Installation ................................................... 8
3. Basic Operation.......................................................................................... 12
4. Main Menu Guide....................................................................................... 18
4.1 PVR - Record & Play................................................................ 18
4.2 Edit Channel List .....................................................................24
4.3 Program Guide......................................................................... 26
4.4 System Setting........................................................................ 27
4.5 Utility (option) .........................................................................33
4.6 Common Interface.................................................................. 34
5. Troubleshooting......................................................................................... 34
6. Technical Specifications ..........................................................................35
4
Page 5
1. Functions and Installation
5
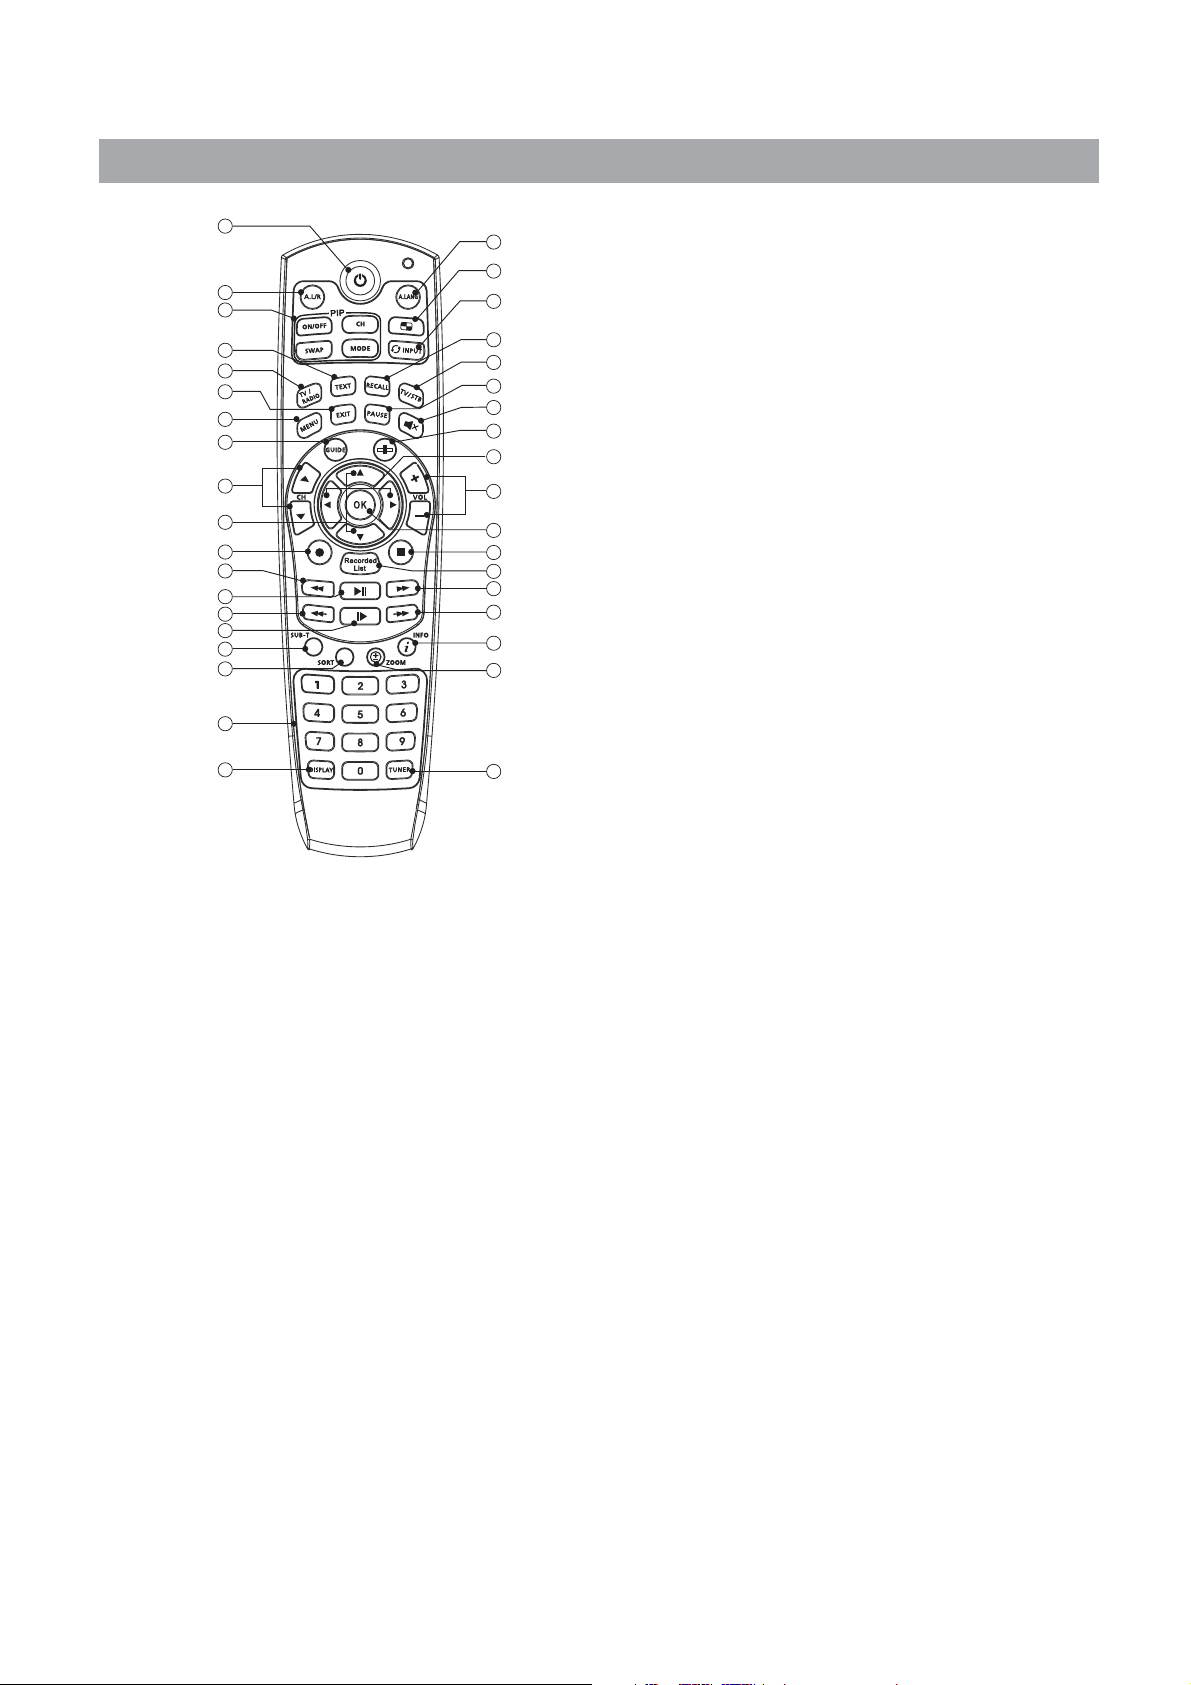
1.1 Remote Control Unit
1
2
4
8
7
12
11
15
17
19
22
25
27
28
30
31
32
35
36
3
5
6
9
10
13
14
16
20
18
21
23
24
26
29
34
33
37
1. STAND BY To switch between operation and stand by
mode.
A.L/R To select the sound mode. (Mono, Left,
2.
Right, Stereo) To display the reserved list.
(Option)
A/LANG To select the audio language.
3.
PIP
4.
ON/OFF To turn the PIP screen on/off.
CH To change the PIP screen channel.
If you press the button, the PIP Channel List
will be shown.
SWAP To swap the main screen for the PIP screen.
MODE To change or modify the size or location of
the PIP.
Multichannel button
5.
Multi video pop-up window will appear.
INPUT Selection of external input. (Option)
6.
TV/RADIO To switch between TV and Radio.
7.
TEXT To see the teletext by OSD. (Option)
8.
RECALL To return to the previous channel.
9.
TV/STB To switch between TV and STB receive mode.
10.
MENU To display the Main Menu on the screen or
11.
return to the previous menu.
EXIT To return the normal viewing mode from a
12.
menu.
PAUSE To pause or play video.
13.
MUTE To enable or disable audio.
14.
15.
GUIDE To display the TV/RADIO program guide.
Progress bar To display the book mark banner.
16.
CHANNEL UP/DOWN
17.
To change channel up and down.
VOLUME UP/DOWN
18.
To increase or decrease the volume.
Up/Down To move up or down on the menu.
19.
Left/Right To move left or right on the menu.
20.
To increase or decrease the volume.
OK To confirm your choice.
21.
Record Saves the current channel to the HDD.
22.
Stop Used for stopping play.
23.
Recorded List
24.
To open the File List screen.
Rew Used for rewinding.
25.
FF Used for fast-forwarding.
26.
Play/Pause Used for playing or pausing files.
27.
Quick Replay To go to the previous screen.
28.
Quick Forward To go to the next screen.
29.
Slow Used for viewing the screen in slow
30.
motion.
SUB-T(Red) To enable or disable subtitle or
31.
change the channel list mode.
SORT(Green) To sort channel list.
32.
ZOOM(Yellow) Enlarge the current picture.
33.
INFO(Blue) To display the information box on the
34.
screen.
NUMERIC BUTTONS
35.
To select the channel and enter
the channel edit and PIN code.
DISPLAY To open the Display screen of the System
36.
Setting menu.
TUNER To switch between Terrestrial and Satellite
37.
mode. (Only COMBO)
Note
• When inserting batteries, make sure that the polarity (+/-) is
correct.
• The design of the Remote Control Unit may be changed
without any notice in advance.
Page 6
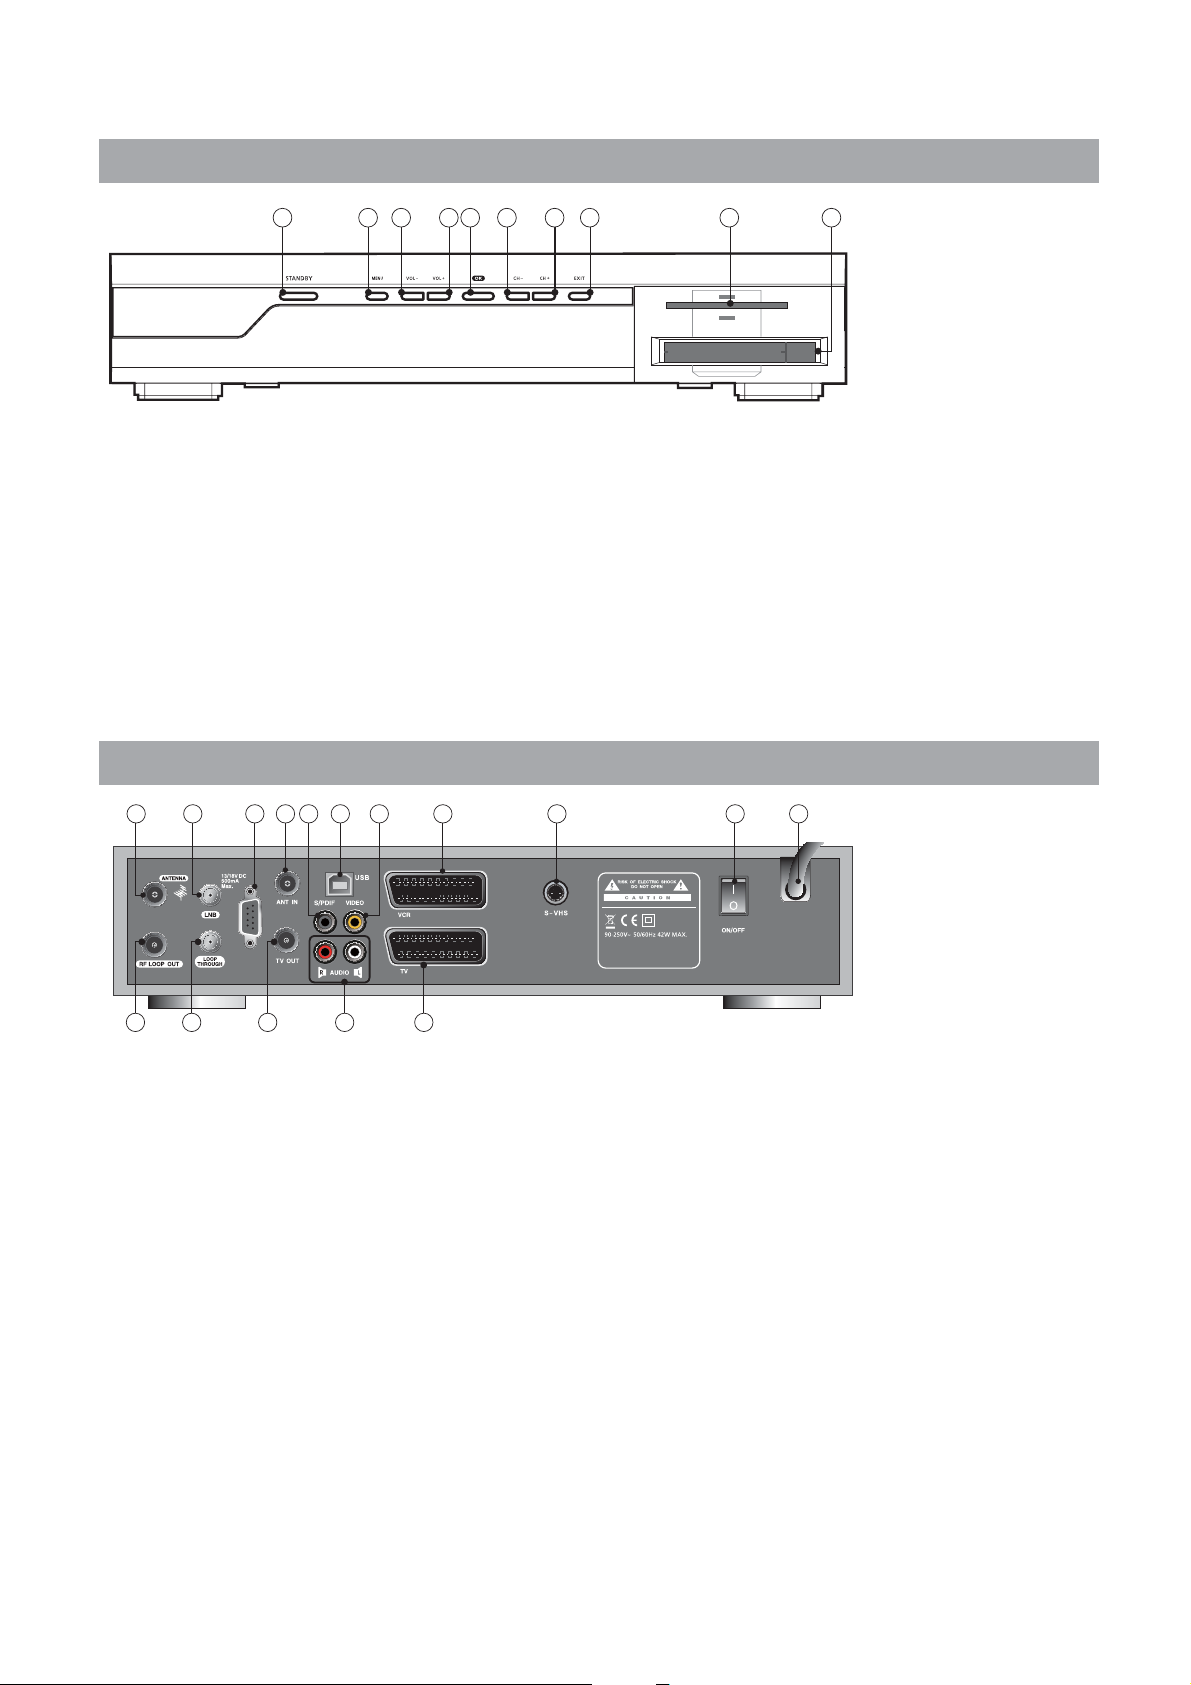
1.2 Front Panel
81 72 3 3 5 54 6
1. STAND BY(POWER)
Switch the receiver power "ON" or "OFF".
2.
MENU
To see main menu.
3.
VOL -/
+
To turn the volume -/+ or select a
sub-menu item.
4.
OK
To select a program, a highlighted line or
parameter value.
5.
CH -/+( ProgramŸ/ź)
Channel -/+ or select item of sub-menu.
6.
EXIT
Exit from parameter and cancel selected function.
7.
Smartcard Slot
1 Slot for smart card.
8.
Cam Slot (Option)
2 Slot for Common Interface CAM with smart card.
1.3 Rear Panel
1 3 6 8 9 12 15
5
161411
42
1. ANTENNA
Input connector from terrestrial antenna.
RF LOOP OUT
2.
Looped through antenna RF signal output.
Used to connect to ANT IN.
LNB
3.
Input connector from LNB.
LOOP THROUGH
4.
Output for SAT IF looped through signal.
RS-232
5.
To connect to a personal computer for software
upgrade.
ANT IN
6.
RF antenna input.
TV OUT
7.
To connect a TV via a coaxial cable.
S/PDIF(Coaxial/Optical)
8.
To connect a digital amplifier output.
7
1310
9.
10.
11.
12.
13.
14.
15.
16.
Note
The design of the Front/Rear Panel may be changed without
any notice in advance.
VIDEO
Video connection port to the TV or
other equipment.
AUDIO
Audio connection port to the TV or
other equipment.
USB port
To connect the USB cable to the PC.
SCART for VCR
Connect this port to the VCR via SCART cable.
SCART for TV
Connect this port to the TV via SCART cable.
S-VHS
Video connection port to a TV or other equipment via
super video.
POWER Switch
Provide power to the main unit.
POWER Supply
90 ~ 250V AC, 50/60Hz.
6
Page 7

7
1.4 CAM(Conditional Access Module) and Smart Card (Option)
Caution
Please do not plug in the main power supply cord until you have finished all of the connections!
Although some TV and radio channels are free to view, you must subscribe to most TV and radio/music
channels and a Conditional Access component is required.
If you want to enjoy watching scrambled broadcasting channels, you need to purchase the CAMs and smart
cards from a service provider’s sales department.
However, broadcasting channels from multiple service providers call for multiple CAMs and Smart cards.
Receivers which have only the CAMs and smartcards provided by the one service provider can show several
broadcasting channels of the provider.
Please refer to manuals provided by service providers for details because the CAM and smartcards are featured
with unique menus, apart from menus given by the receiver.
Watching "Free-To-Air" channel is available regardless of the CAM and smart cards.
As service providers download new information to smart cards if necessary, those who have CAMs and smart
cards should always put the smart cards in proper slots.
Inserting a Smart card
A Smart card looks similar to a credit card and entitles you to view
and listen to all the channels you choose to subscribe to.
The Smart card slot on the receiver can be used for Smart cards only.
1. Open the right-hand cover on the front panel of the receiver.
2. Hold the Smart card horizontally with the electronic chip
(small square-shaped, gold in colour) facing upwards.
3. Insert the Smart card into the top slot.
Inserting the CI (Common Interface) Module
Your digital satellite receiver is equipped with a slot for the Common
Interface (CI).
1. Open the right-hand cover on the front panel of the digital
satellite receiver.
2. Insert the smart card into the CI-Module, and the CI-Module into
the slot.
Note
• CI and CAS embeded model only.
• Smartcard
• CI Module
• Smartcard
Page 8
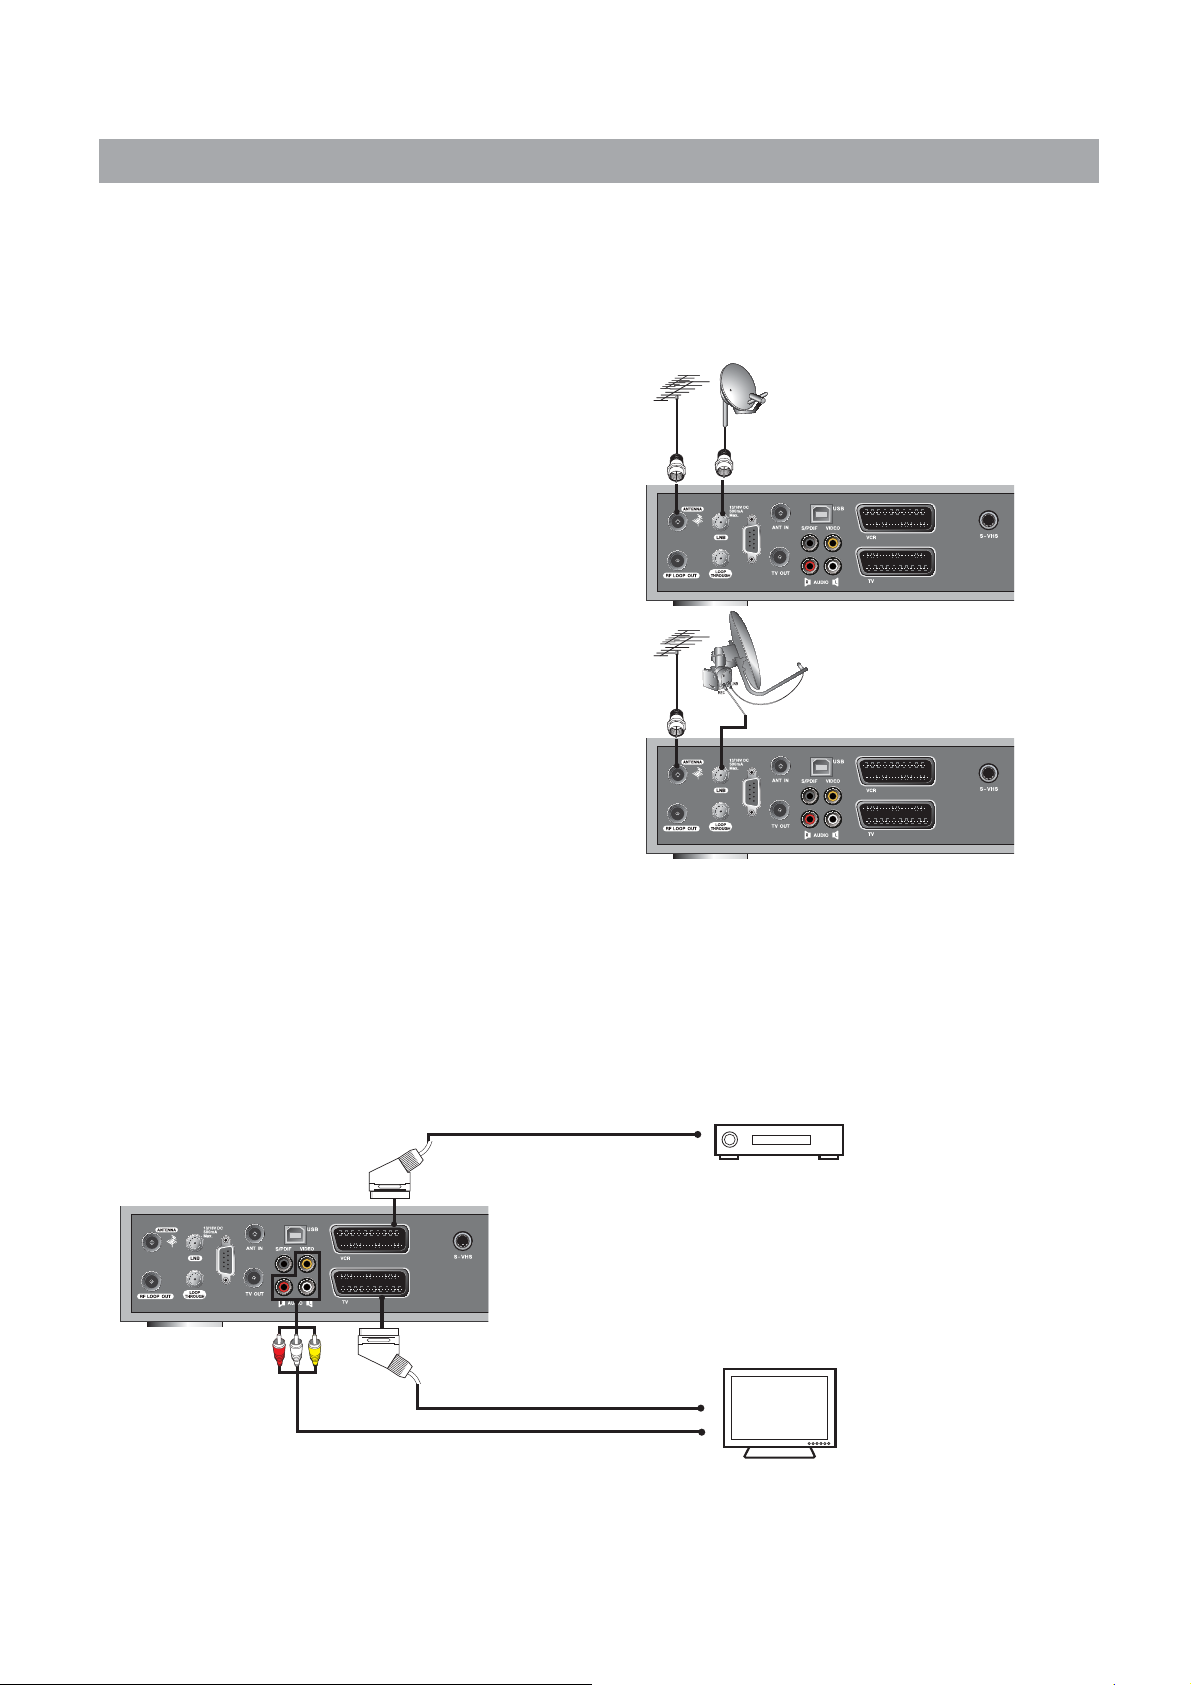
1.5 Connecting and Installation
1.5.1 How to connect the receiver to various other systems
There are several ways of connecting the receiver to your TV, VCR and/or Hi-Fi SYSTEM. Consult your local
supplier for assistance in setting-up your system that is best suited to your requirements.
1.5.2 To Connect Satellite and Terrestrial Antenna
(Only Combo)
• Connect one end of RF cable to the ANT IN on the back
of the receiver and the other end to a terrestrial antenna
connection or the jack for the public antenna on the
wall.
Ƈ
DiSEqC 1.0
• Connect the coaxial cable from the LNB to the LNB IN
jack on back of the receiver.
Ƈ
DiSEqC 1.2 Motor
• Connect one end of your coaxial cable to the LNB IN
connector on the receiver and the other end to the
REC or Receiver connector on the DiSEqC 1.2 motor.
• Connect the coaxial cable from the LNB to the LNB
connector on the DiSEqC 1.2 motor.
• Combo Receiver
• Combo Receiver
1.5.3 Connect the receiver to a TV set
• Connect the receiver to a TV set with SCART, if your TV set is equipped for it. Alternatively you can use A/V,
TV out (UHF) or S/Video jacks.
1.5.4 Connect the receiver to a VCR
• Connect the SCART jack from the VCR to the back of the receiver.
• Combo Receiver
• Video
• TV
8
Page 9

1.5 Connecting and Installation
9
1.5.5 Connect the receiver to a Hi-Fi System
• Connect a RCA stereo cable from the AUDIO L/R jacks, S/PDIF on the receiver to the LINE, AUX, SPARE
or EXTRA input jacks on your Hi-Fi System.
1.5.6 Connect the receiver to a Digital Audio System
• If you have a DAC with S/PDIF coaxial cable input, you can connect the receiver with it to enjoy higher
quality sound. Connect S/PDIF coaxial cable to a digital amplifier.
• Digitaler Verstärker
• Combo Receiver
• Hi-Fi-Anlage
• Combo Receiver
1.5.7 Connecting to the PC
• Turn the receiver and your PC on.
• Connect the receiver to your PC with the enclosed
USB cable.
• Open the PVR menu and select CONNECT USB.
• To confirm, click the start button and then click
Program
ĺ Accessories ĺWindows Explorer.
• You can check that the new drive is installed in
your computer.
The factory drive name is PVR HDD.
• PC
Note
• Connect the cable with input jack on STB properly shown in the picture.
• Please be careful when you upload or download files while the receiver is connected to a PC with the USB cable.
The data recorded in the HDD may be lost if the PC’s power is turned off, or if the USB cable is unplugged while
uploading or downloading files.
1.5.8 Loop Through
• If you have another analogue or digital receiver and you wish to use the same LNB then you can connect
it via the loop through. Connect one end of the coaxial cable to the Loop Through on the receiver and connect
the other end to the LNB IN on your second receiver.
Page 10
2. Easy Installation
2.1 Menu Application
Press the MENU button on the remote control unit.
You will see the “Main Menu” on the screen.
• Default PIN code is "0000"
• You can move into the desired submenu using the UP/DOWN/LEFT/RIGHT buttons.
• You should enter the PIN code in order to move into the corresponding submenu in case of the Installation,
the Edit Channel List or the System Setting.
• Press the OK button to confirm your selection.
• Press the MENU button to return to previous menu. Or press the EXIT button to quit the Menu system
completely.
2.2 Easy Installation
Before you watch the television or radio program, you must perform the installation procedure first.
Therefore you will see only “Easy Installation Menu” at first when you plug into your system.
The Easy Installation gives you the convenience of selecting various languages, adjusting the time and channel
search.
•
Automatic Installation by “Easy Installation”
The Installation Wizard is a user-friendly method assuring the easy set-up of the receiver by the new user.
•
System Connection
Connect the receiver to all peripheral devices such as the TV, Audio and Video etc.
•
Power On
Power switch is locaded on the back of the receiver.
The power cord of the receiver should be connected to a wall outlet.
Turn on the power of the receiver and other devices.
Press the STANDBY button on the front of the receiver or on the remote control.
• Power Off
When you press the STAND BY button again. The receiver will display “OFF”.
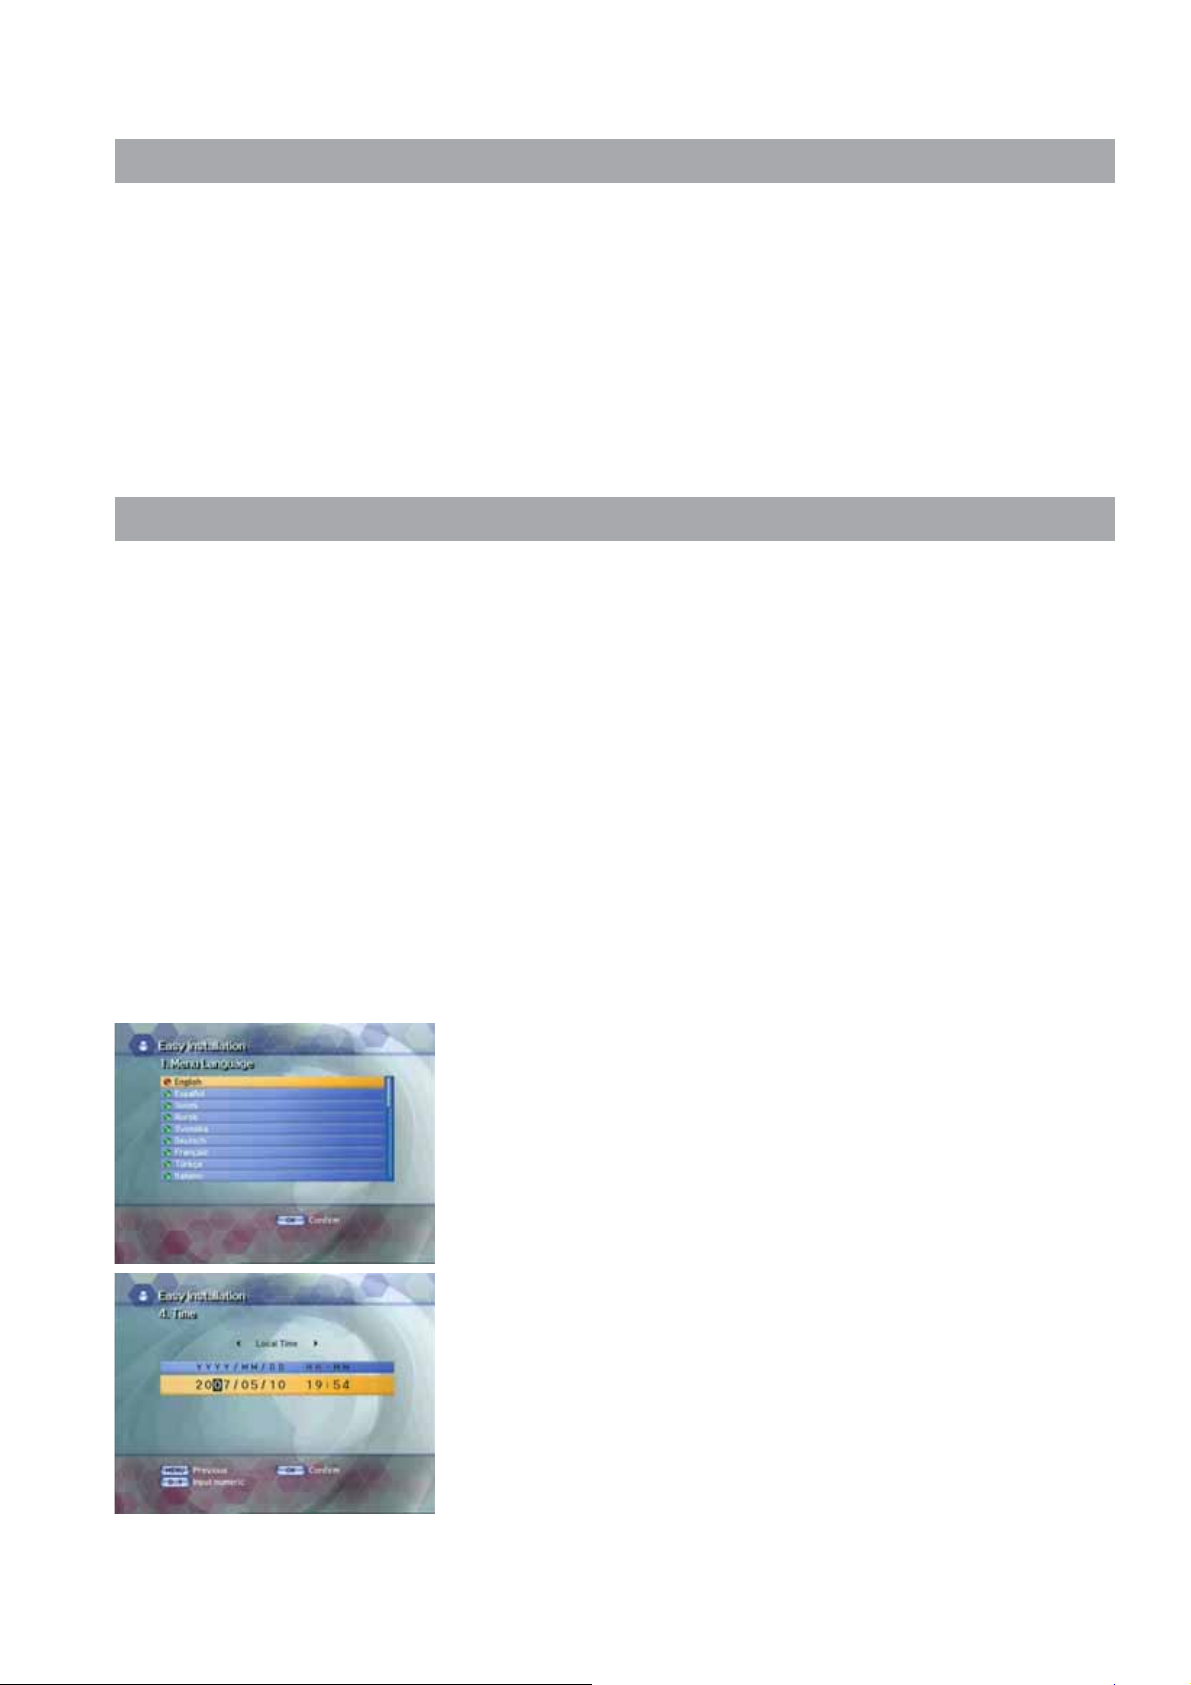
2.2.1 Language
The first option in “Easy Installation” is to select the desired language
of the Menu, Audio, or Subtitle.
Place the cursor on the sub menu by pressing the keys and press the
OK button to change the language.
The Language of the Menu, Audio, or Subtitle will be changed to the
selected language.
2.2.2 Local Time/GMT
Select the time setting type.
Press the LEFT/RIGHT button to select either Local Time or GMT and
then press the DOWN button to move to the time setting item.
When Local Time is selected.
You can set your local time according to your location.
To set the local time, press the NUMERIC button.
When GMT is selected.
Press the LEFT/RIGHT button to select the current time zone from
standard time and then press the OK button.
When you press the LEFT/RIGHT button, the time zone will move
by 30 minutes.
10
Page 11
2.2 Easy Installation
11
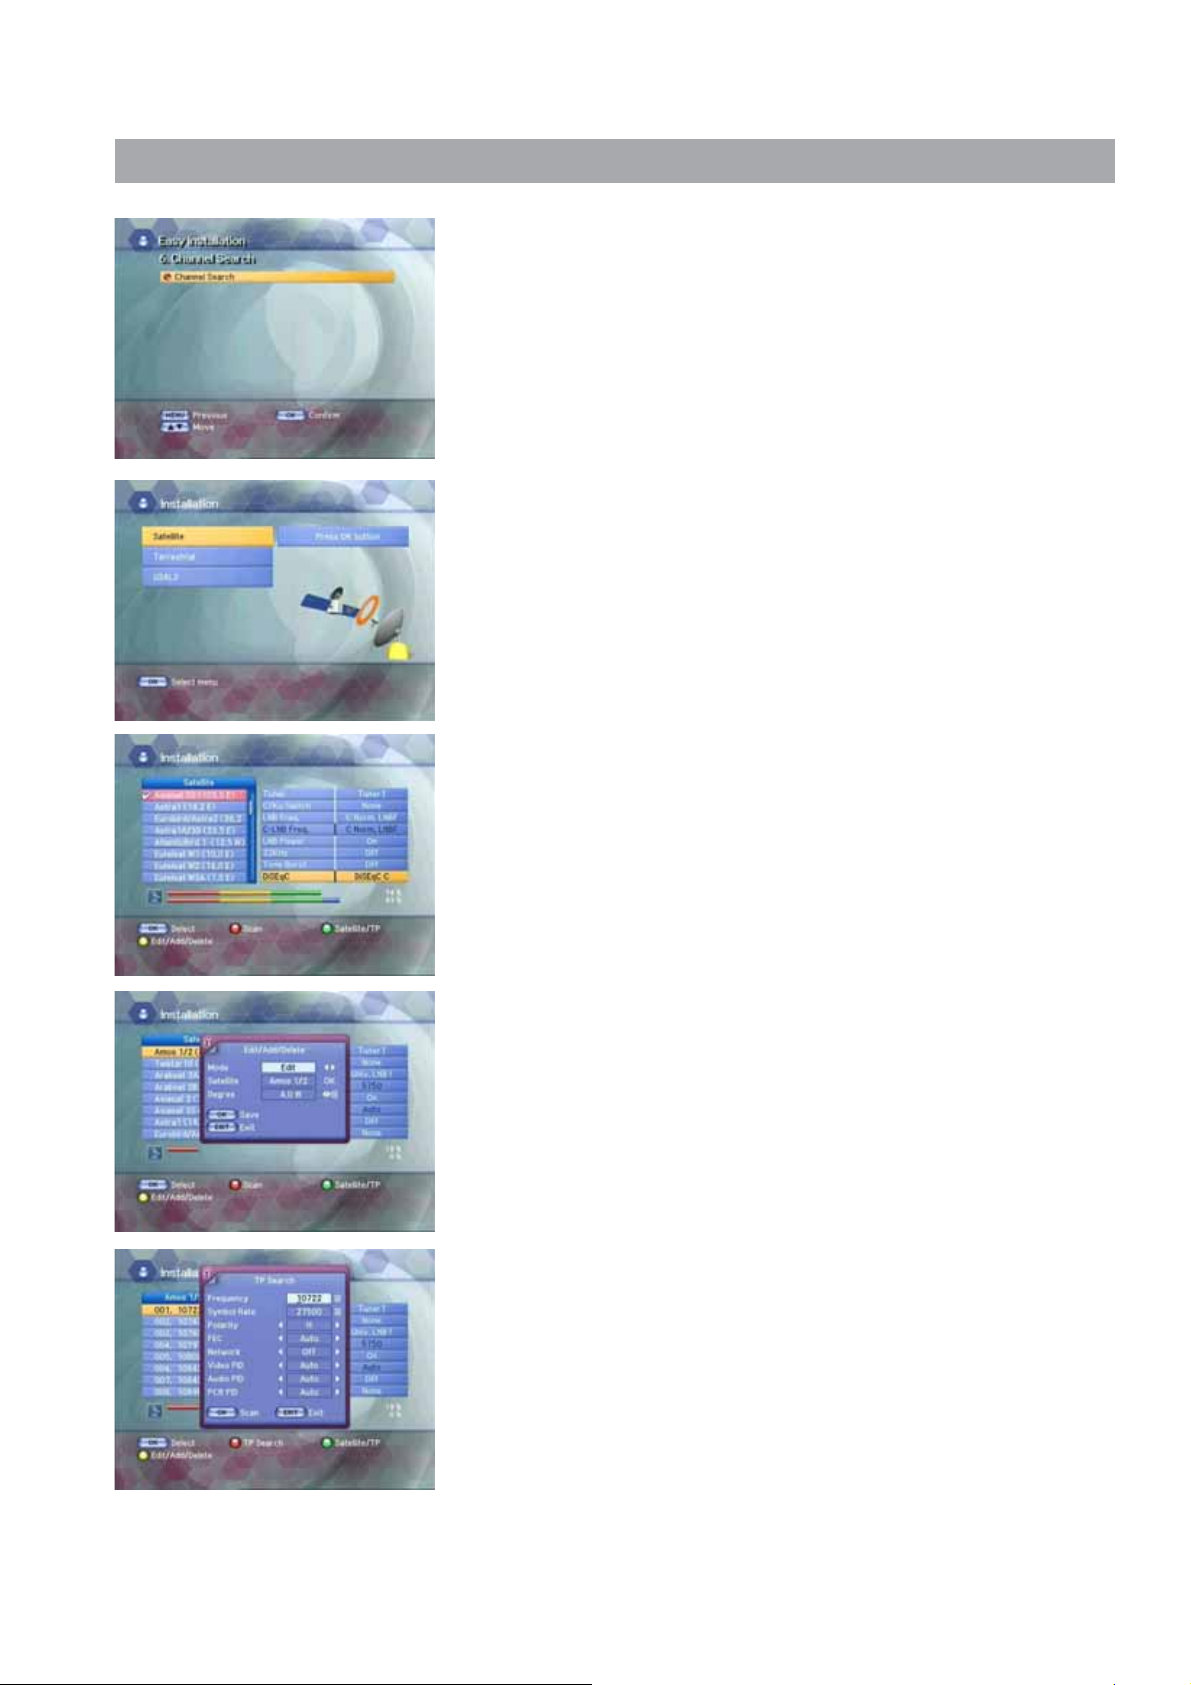
2.2.3 Channel Search
You can search the channels.
If you press the OK button, the Installation screen will appear
If you want to search the channel, you select between Satellite and
Terrestrial. And then press the OK button to move to the channel
search setting screen.
2.2.4 Satellite - Channel Search
Select the satellite you want using the UP/DOWN buttons on the
satellite list.
Ƈ To Edit or Add satellite list
• To edit or add satellite list on the list, press the YELLOW button to
select edit or add mode. And press the OK button.
• Place the cursor on satellite field and press the OK button.
• The keypad will be displayed so that you can Edit or Add satellite
name you want.
• Input degree you want using the NUMERIC buttons or the
LEFT/RIGHT buttons. And press the OK button to save.
Ƈ To Delete satellite list
• To delete satellite list on the list, press the YELLOW button to select
delete mode. And press the OK button.
Ƈ To Edit, Add, or Delete TP list
• When the GREEN button is pressed, it can be toggled Satellite list and
TP list.
• Press the YELLOW button to edit, add or delete the TP list.
• Input Mode, Frequency, Symbol Rate, Polarity, and FEC, and press the
OK button to save.
Ƈ TP Search
Press the RED button on the TP list.
Pop up window will be displayed on the screen.
• Frequency: Input a proper Frequency using the NUMERIC
buttons.
• Symbol Rate: Input a proper Symbol Rate using the NUMERIC
buttons.
• Polarity: Use the LEFT/RIGHT buttons to select the
Polarisation of the transponder.(Horizontal, Vertical)
• FEC: Use the LEFT/RIGHT buttons to select the FEC of the
transponder.
• You can select the value of Auto, 1/2, 2/3, 3/4, 5/6, and 7/8.
• Network: You can select Yes or No. When you select “Yes”,
you can find more transponders using the home
network.
• Video PID/Audio PID/PCR PID:
You can set PID to search for services.
Use the LEFT/RIGHT buttons or the NUMERIC
buttons to input the value.
Press the
OK button to start Scanning.
Page 12

2.2 Easy Installation
Ƈ C/KU Switch:
You can select C/KU band by selection of switch type.
(None, DiSEqC Switch)
Ƈ Position (DiSeqC 1.2)
After selecting a satellite, please select position number.
To change value, press the OK button.
The position list will be displayed.
Ƈ LNB Freq.
Select the proper LNB frequency referring to your LNB using the OK and
the UP/DOWN buttons.
Ƈ C-LNB Freq.
When selecting the C/KU Switch is selected as “None”, the C-LNB Freq
will be dimmed automatically.
Press the OK button, and then the C-LNB Freq. list will be displayed.
You can also input the freq. you want. After inputting freq.
Using the NUMERIC buttons, press the OK button.
(None, DiSEqC Switch)
Ƈ LNB Power
Select the LNB Power On or OFF.
Ƈ 22KHz
Depending on the user’s antenna switch box or LNB. You can supply
either 22KHz by setting “ON” or not by setting “OFF”.
Ƈ Tone Burst
Depending on the user’s antenna switch box. (“off”, “SAT A” or “SAT B”)
Ƈ DiSEqC - DiSEqC
You can select and use appropriate port for your DiSEqC switch box.
Press the OK button to select DiSEqC List. (None, DiSEqC A, DiSEqC B,
DiSEqC C, DiSEqC D, Motor, USALS)
Ƈ DiSEqC - DiSEqC 1.2 and USALS
Press the BLUE button to set Drive(Fine Drive or Normal Drive) to run
the motor.
• Fine Drive/Normal Drive
To move the motor, press the LEFT/RIGHT button.
• Go to zero
To move the zero position, press the OK button.
• Store to location
To store the current position, press the OK button.
• East Limit
To set the east limit by current position, press the OK button.
• West Limit
To set the west limit by current position, press the OK button.
• Clear Limit
To clear the stored limit value, press the OK button.
12
Page 13

2.2 Easy Installation
13
Ƈ Scan
• After selecting all that is necessary, press the RED button to scan the
satellite list.
Pop up widow will bedisplayed.
• Select ON or OFF according to your Network.
• Select All or FTA Search Type.
• Select All, TV, or Radio TV/Radio type.
• Press the OK button and searching will start.
Note
•
After the Degree, Longitude and Latitude is entered accurately,
the DiSEqC Motor will automatically move to the satellite’s position.
2.2.5 Terrestrial - Channel Search
Ƈ Manual Search
Manual search is more convenient to search a specific MUX.
This menu searches also channels broadcasted over a specific MUX
using its detected information.
• Press the UP/DOWN buttons to select the MUX No. you want to find,
and then press OK button to add or remove fron the search list.
• To start search, press the GREEN button.
• At the pop up window, select all channel or FTA channel search.
• Press the BLUE button to change the MUX priority. (Auto/High/Low).
• When searching is started, the name of channels searched will be
displayed on the screen.
• When searching is finished, the ”Search finished” message will be
displayed on the center of the screen.
• Press the OK button to save the channel list and watch the channel
searched.
2.2.6 USALS
Set Longitude and Latitude when you use USALS.
• Press the UP/DOWN buttons to select Longitude and Latitude.
• Press the NUMERIC buttons to set the angle of Longitude and
Latitude.
• Press the OK button to set the direction of Longitude and Latitude.
Page 14

3. Basic Operation
3.1 Basic Function Usage
3.1.1 Program Information
After the television channels have been programmed, you will see the
information box each time you change the channels.
• Every time you change channels you will receive program
• You may change channel with the
• When you press the
3.1.2 Now-Information Banner
• During “Channel Banner” is appearing, when you press the
• Using “
information for a few seconds. (In the “
select how long this information will be shown.)
You can get “Channel Banner” at the bottom of the screen.
COLOR button, you can use the banner as a
simple channel operation.
INFO(BLUE) button, you can get “Now-Information Banner”.
Now-Information Banner”, you can get a simple EPG of
“Now-Information”.
Banner Time” menu you can
UP/DOWN button.
3.1.3 Next-Information Banner
• During “Channel Banner” is appearing, when you press the YELLOW
button, you can get “Next-Information Banner”.
• Using “
“Next-Information”.
3.1.4 Channel-Information Banner
• During “Channel Banner” is appearing, when you press GREEN
button, you can get “Channel-Information Banner”.
• Using “
channel listing information.
3.1.5 Volume Control/Mute
• To control audio volume, press the Volume UP/DOWN buttons.
• Volume control bar will be appeared in bottom of the TV screen.
• To temporarily stop the volume, press the
To cancel mute, press the MUTE button again or press the Volume
UP/DOWN buttons.
Next-Information Banner”, you can get a simple EPG of
Channel-Information Banner”, you can get a detailed
MUTE button.
14
Page 15
3.1 Basic Function Usage
15
3.1.6 Subtitle
• Press the SUB-T(Red) button and the popup window will be displayed
on the screen.
• Select the Off then subtitle function is off.
• Select the Subtitle language, and then you can see Subtitles.
3.1.7 Teletext
• If a broadcast supports teletext, you can watch teletext.
• If you press the
TEXT button, teletext will appear on the screen.
3.1.8 Simple Channel List
• When you press the OK button during receiving service stream,
you can get “Channel List” view.
• Using the
choose another channel.
• After moving highlight on a channel, then press the
• To get the channel sort list, press the
Pop up window will be displayed on the screen.
• Select the sort list you want with the
press the OK button to get it.
There are seven ways of sorting : Normal, Tuner, Satellite, CAS,
Network, Genre, and Favorite.
• Press the
channel on the Simple Channel List.
3.1.9 Auto Favorite
• You can edit auto favorite.
• Press the YELLOW button in Simple Channel List.
3.1.10 Soundtrack
• When you want to change the Audio Language of current channel,
press the A.LANG button on the remote control. The on-screen menu
is displayed on the left side of the screen.
• Use the
• To cancel or exit, press the
• You can change a default audio language in the system setting
menu mode.
UP/DOWN button in “Channel List” view, you can
OK button.
SORT(Green) button.
UP/DOWN buttons and then
INFO(Blue) button. You can see the Signal of current
UP/DOWN buttons to choose the audio you want.
A.LANG button again.
Page 16
3.1 Basic Function Usage
3.1.11 To change the audio output
• Press the A.L/R button on the remote control unit to change the
output.
• Then on-screen menu is displayed on the top right side of the screen.
• Press the
(Mono, Left, Right, Stereo)
3.1.12 PIP
The PIP (Picture-in-Picture) function allows you to watch two screens
at the same time. With the PIP function, you can move the PIP screen
or freely adjust the screen size.
• If you press the
screen, the PIP will be shown at the top left of the screen.
• If you press the
appear on the screen.
• Press the
select a channel, and press the OK button.
• Press the
to change the location of the PIP screen.
• Press the
/LEFT/RIGHT button to change the size of the PIP screen.
• If you press the
a multi-media window type. The main screen will be displayed on the
left, and the PIP screen on the right side of the screen, as a multimedia window type.
• Press the
while the PIP screen is showing.
A.L/R button repeatedly to change the sound mode.
PIP button while the channel is showing on the
PIP CH button, the PIP Simple Channel List will
UP/DOWN button on the PIP Simple Channel List screen to
MODE button and press the UP/DOWN/LEFT/RIGHT button
MODE button once again and press the the UP/DOWN
MODE button once again, you can see the screen as
SWAP button to swap the main screen for the PIP screen,
16
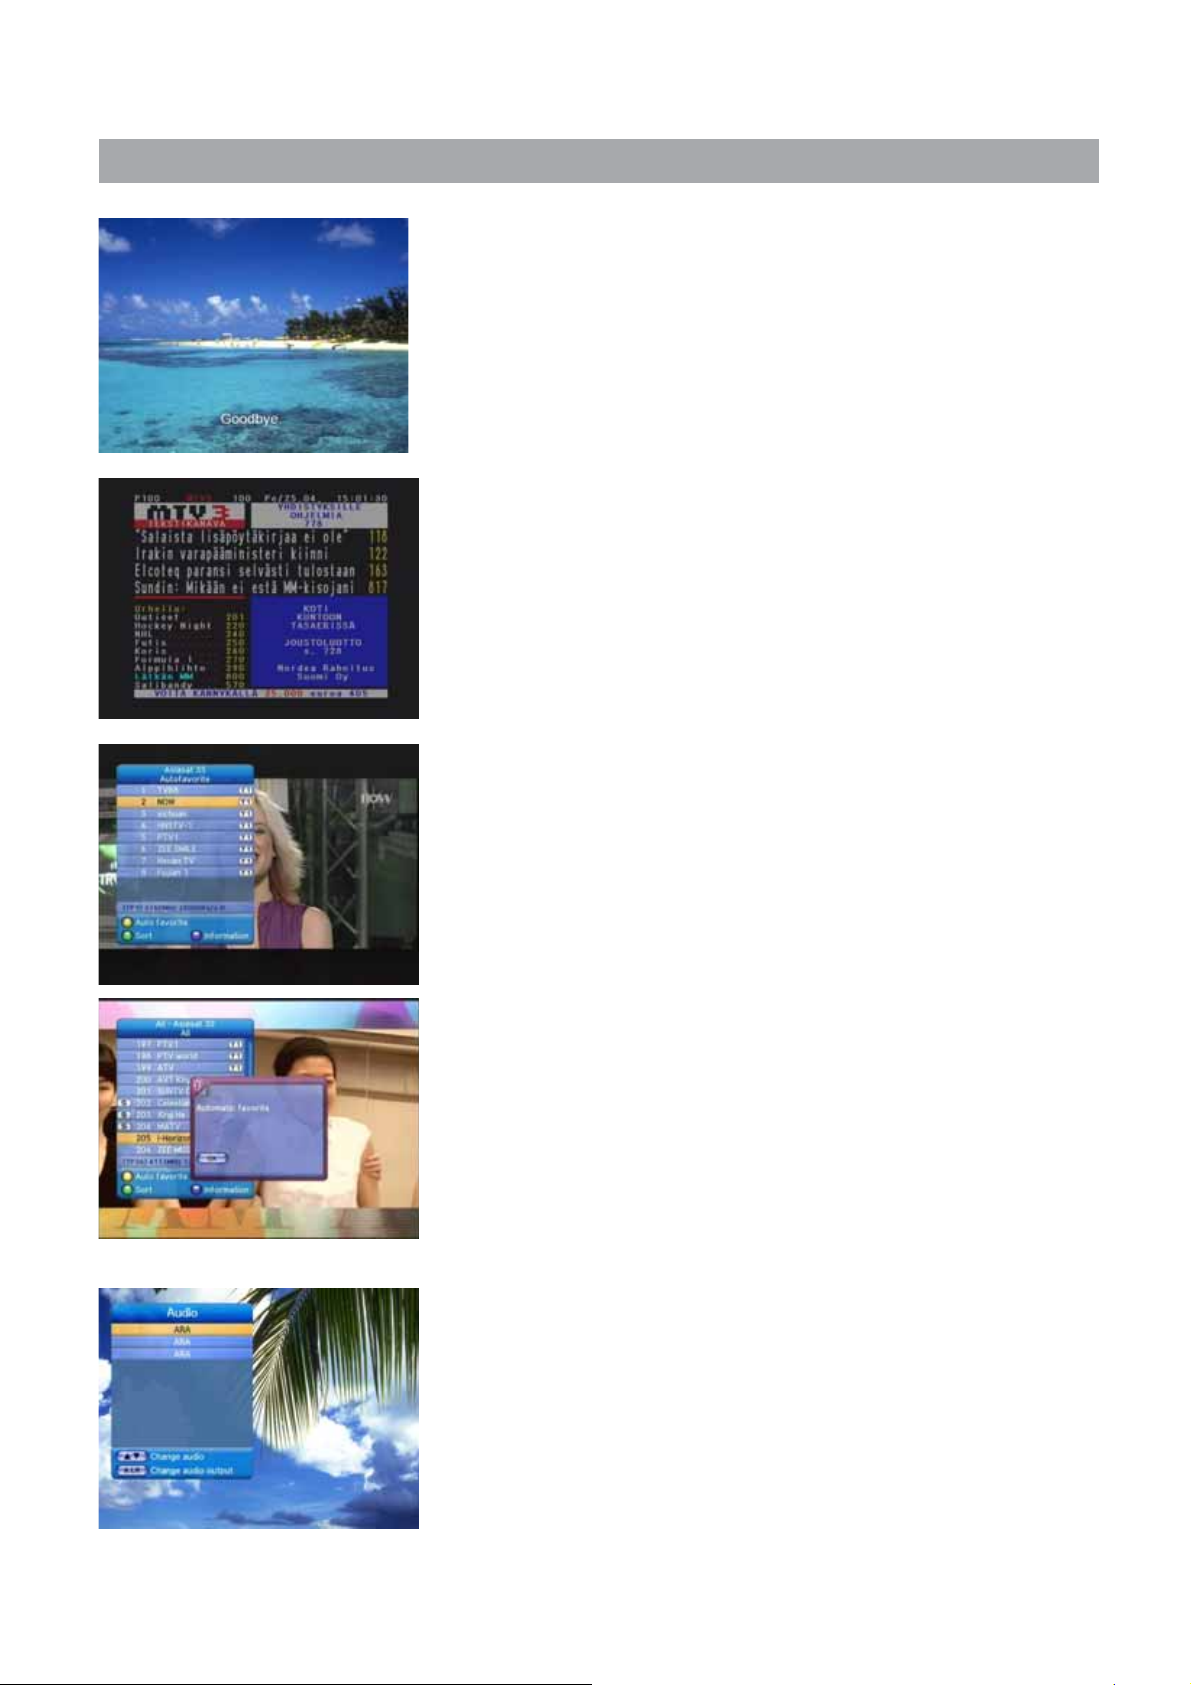
3.1.13 Recall List
Recall List is to show the previous channels (up to 10 channels).
• If you press the
window will appear.
• Press the
OK button. The changed channel will be shown with the channel
banner.
3.1.14 DISPLAY Setting
This mode changes settings such as the TV Type, RF Channel, and
RF Mode.
If you press the DISPLAY button, the A/V Settings screen of the
System Setting menu will appear. Change the settings on the screen.
RECALL on the screen, the Recall List Pop-up
UP/DOWN button to select the channel and then press the
Page 17
3.1 Basic Function Usage
17
3.1.15 TV/Radio Change
With this function, you can change the Radio listening mode while you
are watching TV.
If you press the TV/RADIO button while you are watching TV, the radio
listening screen will appear. If you press the TV/RADIO button again,
the TV screen will reappear.
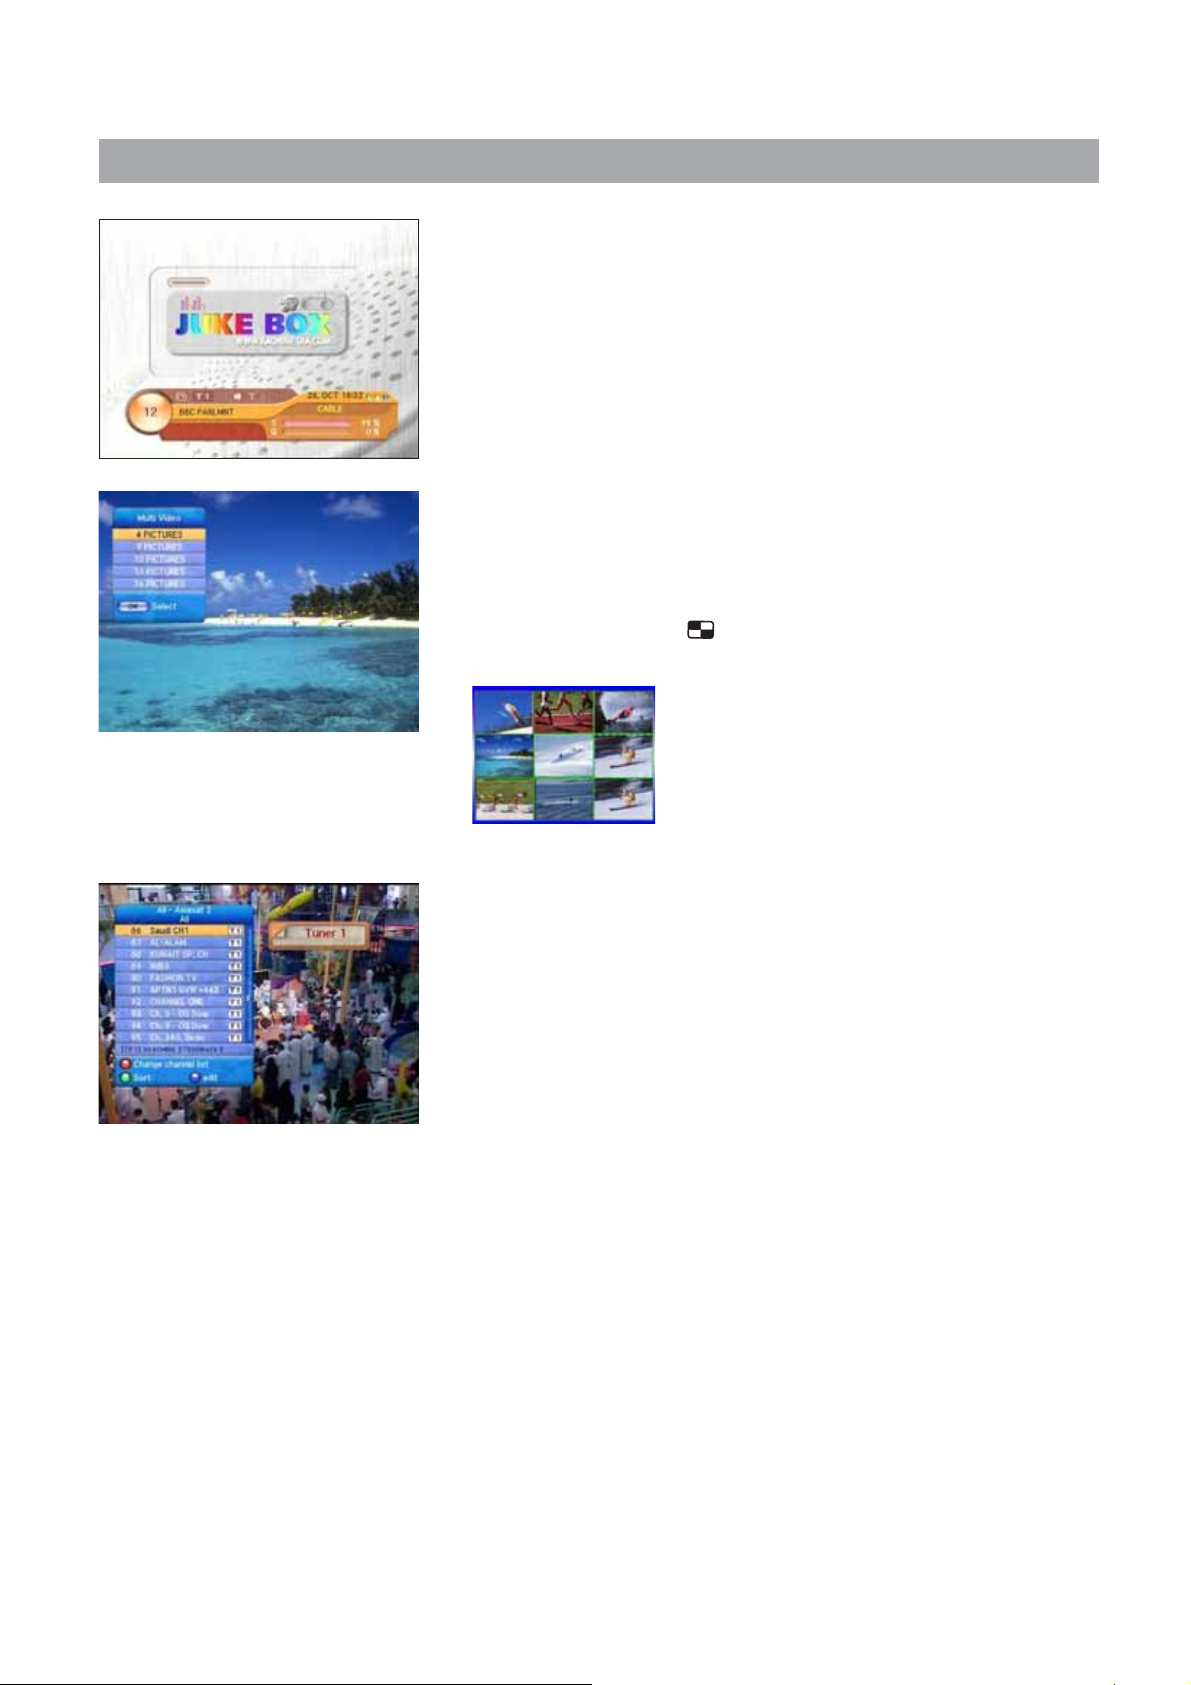
3.1.16 Multi Video
Multi Video allows you to watch several channels in one screen
simultaneously. It can be used to watch one channel from among
several channels.
• Press the
the Multi Video pop-up window will appear.
Multi Video ( ) button while you are watching TV,
3.1.17 Satellite and Terrestrial Change
With this function, you can change the Tuner while you are watching
TV. Tuner change cannot be done while PIP is in use.
If you press the TUNER button while you are watching TV, the tuner
change pop-up window will appear. Each time you press the TUNER
button, the tuner will be changed.
Page 18

4. Main Menu Guide
4.1 PVR - Record & Play
4.1.1 Record
With this function, you can check file information while recording with
the PVR. In addition, you can set the record-end time, and the power to
go off after recording.
• Press the
then press the OK button.
• When you press the
will appear.
• Press the
setting. These are record-end time, and power ON/OFF after recording.
• When you finish setting, press the
the setting will be displayed on the Record screen.
4.1.2 General Recording
Press the RECORD button to record the current broadcast program.
When the recording starts the Record Icon is displayed.
UP/DOWN button on the PVR menu to select Record and
OK button on the Record screen, the Edit screen
UP/DOWN button on the Edit screen to select the items for
RED button to save. The details of
4.1.3 Multi-Channel Recording
If you change channels while recording and press the RECORD button,
recording starts.
You can record two channels simultaneously in the manner described
above.
4.1.4 Time Shift Recording
This function is for setting the Time Shift. If you set to ON, you can use
the Time Shift function.
If the Time Shift is set while watching satellite broadcasting, press the
REW button once to rewind the currently playing screen and the PLAY/
PAUSE button to pause.
If you press the PLAY/PAUSE button, the screen will play back from the
point where it is stopped.
4.1.5 To stop Recording
• If you press the STOP button the currently recording channels are
displayed on the pop-up window.
• Press the
channel to be stopped and then press the UP/DOWN buttons again
to select further channels.
• When you finish selecting channels to be stopped, press the
button. Recording of the selected channels stops.
UP/DOWN buttons on the pop-up window to select the
STOP
18
Page 19

4.1 PVR - Record & Play
19
4.1.6 Fast-Forward & Rewind
The Fast-Forward and Rewind functions enable the user to view the
front, back or any desired part of the file.
• To view forward parts press the
parts press the REW button on the remote control.
• The screen will move when the relevant symbols appear on the
top right-hand side of the screen.
• To Rewind or Fast-Forward at a faster speed, press the relevant
button again.
• Press the
speed.
4.1.7 Slow-Motion
The Slow-Motion function can be used to PLAY at a slower speed.
• Pressing the
slower speed.
• If the button is pressed again, the screen will play at an even slower
speed.
• Press the
PLAY button at the desired place to PLAY at the recorded
SLOW MOTION button will play the screen at a
STOP button to PLAY at the recorded speed.
FF button and to view previous
4.1.8 Quick Replay/Forward
If you press and hold the QUICK REPLAY/FORWARD button, you can
rewind or fast forward the screen with 4X-speed.
If you release the button, the screen will play back.
4.1.9 Quick-Search
You can move to the desired location using the banner.
• If you press the
channel banner will appear.
• If you press and hold the
banner is visible, the location icon moves along the progress bar.
• If you release the
playing starts at that point.
4.1.10 Book Mark
If you press the Progress bar button while playing AV file, Progress for
BOOKMARK will appear.
• Press the
• Use the
• Use the
If you press the
If you press it again, the end point will be set.
If you press it once more, set A-B repeat will be initialized.
• Press the
• Use the
UP/DOWN button to move between bookmarks.
RED button to select A-B repeat.
YELLOW button to erase all bookmarks.
BLUE button on the currently playing screen the
LEFT/RIGHT buttons while the channel
LEFT/RIGHT buttons at the desired point,
OK button to specify or remove BOOKMARK.
RED button once, the start point will be set.
GREEN button to decide whether to use A-B repeat.
Page 20
4.1 PVR - Record & Play
4.1.11 To File Playback
With this function, you can play recorded files.
• If you press the
screen will appear. The currently saved directory in the HDD will be
displayed on the File List screen.
• Press the
button.
• Press the
the OK button. It starts playing.
4.1.12 File List
File List manages the files and directories in the HDD.
Press the UP/DOWN buttons on the PVR menu to select the File List
and press the OK button. The recorded files and directories currently
saved in the HDD will appear. Various basic directories such as AVDATA,
MP3 and SOFTWARE will appear in the directory. The names of the
basic directories cannot be changed.
MODE/FILE button while watching TV, the File List
UP/DOWN button to select AVDATA and then press the OK
UP/DOWN button to select the desired file and then press
The basic directories are as follows :
• AVDATA: Directory that saves recorded files
• MP3: Directory that saves MP3 files
• SOFTWARE:Directory that saves software-related files
• GAME: This is the directory that the ROM file downloaded from
the Internet site can be saved on.
Select the saved ROM file and press the OK button to
play the game.
• IMAGE : Directory that saves image files.
4.1.13 Play Mode
Press the SWAP button to change the Play mode.
Ƈ Play
Press the UP/DOWN buttons on the directory menu to select the
desired file or directory and then press the OK button. If the file is
selected, the file will play. If the directory is selected, the selected
directory file list will be displayed.
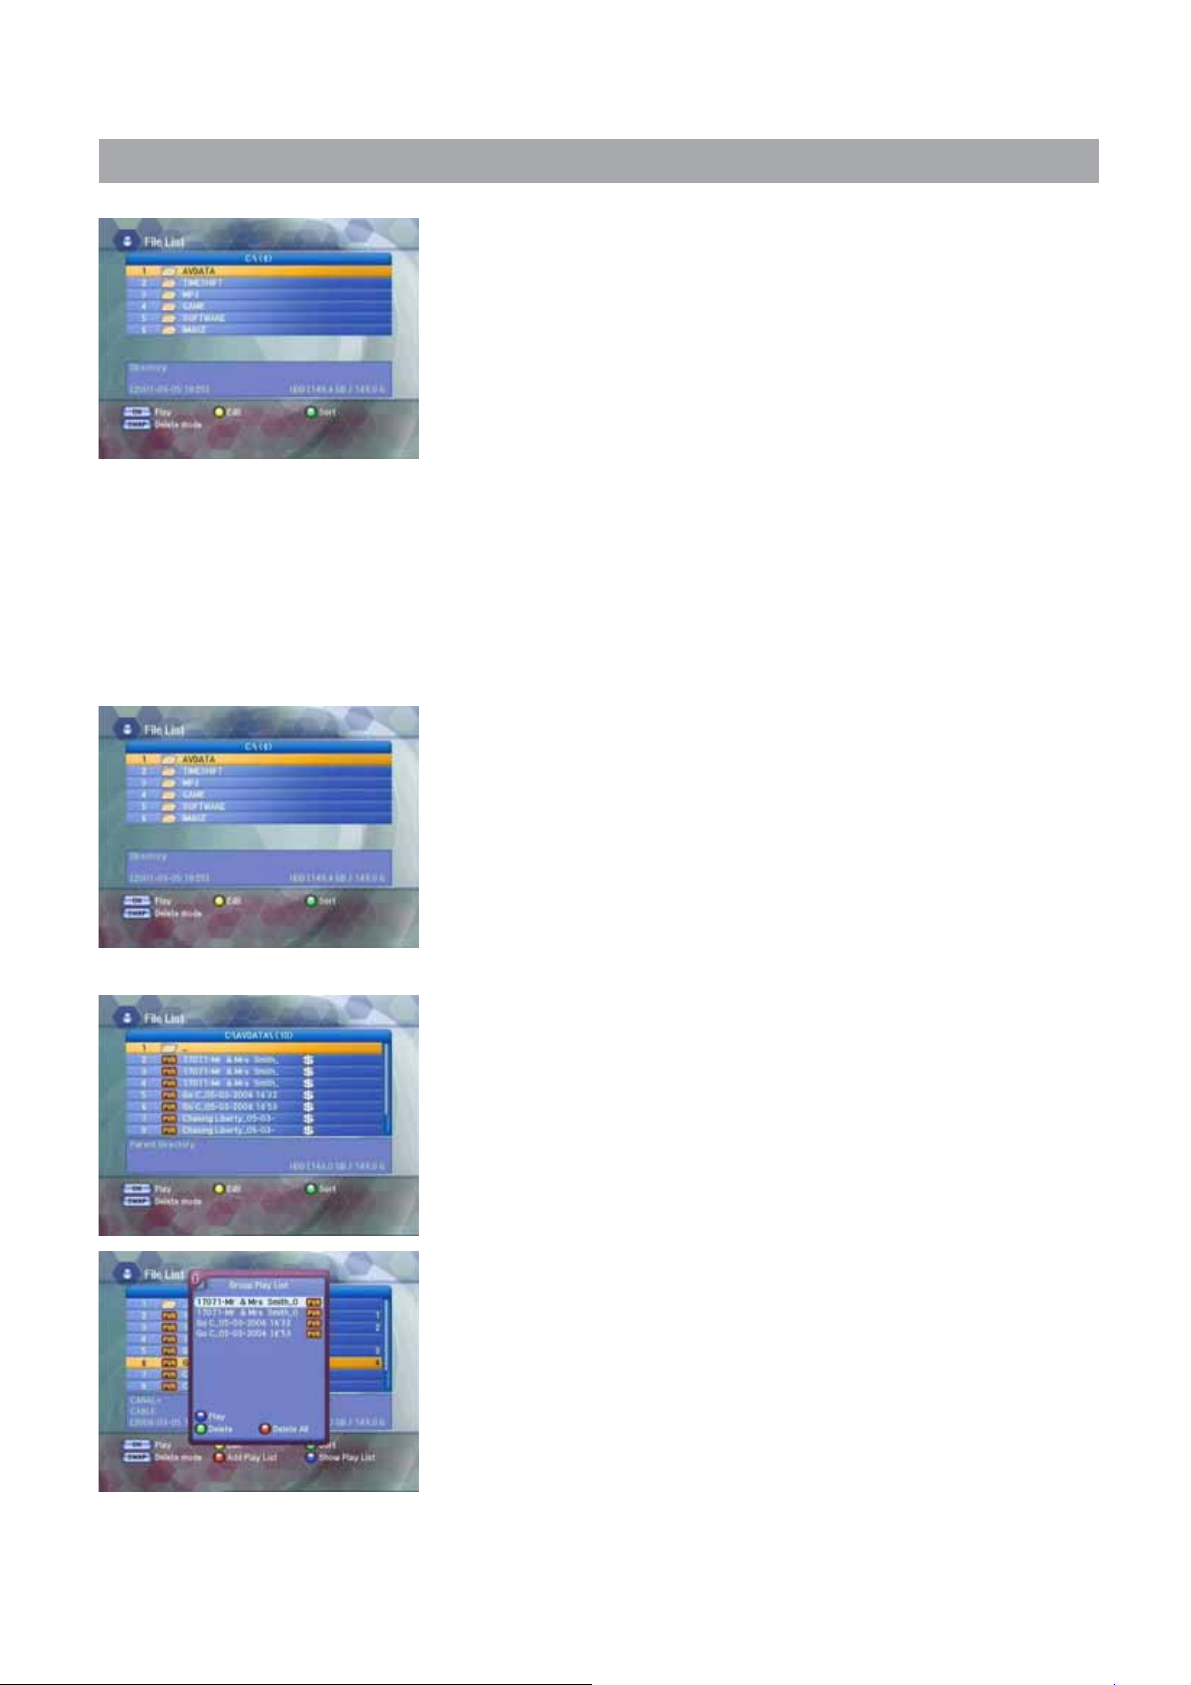
Ƈ Group Play
• Move to the directory where the file for Group Play is located.
• Press the
to be added to the Group Play List and then press the RED button.
• The number will be displayed for the selected file. Select the file to be
added to the Group Play List in the same manner as described above.
If you press the
• When you finish the file selection for Group Play press the
button. The Group Play List pop-up window will appear.
• If you press the
it starts playing.
UP/DOWN buttons on the Directory screen to select the file
RED button again, the added file will be canceled.
BLUE
BLUE button on the Group Play List pop-up window,
20
Page 21
4.1 PVR - Record & Play
21
Note
• If you press the GREEN button on the Group Play List pop-up window
after selecting the file, the selected file will be deleted.
• If you press the RED button on the Group Play List pop-up window, all files
will be deleted.
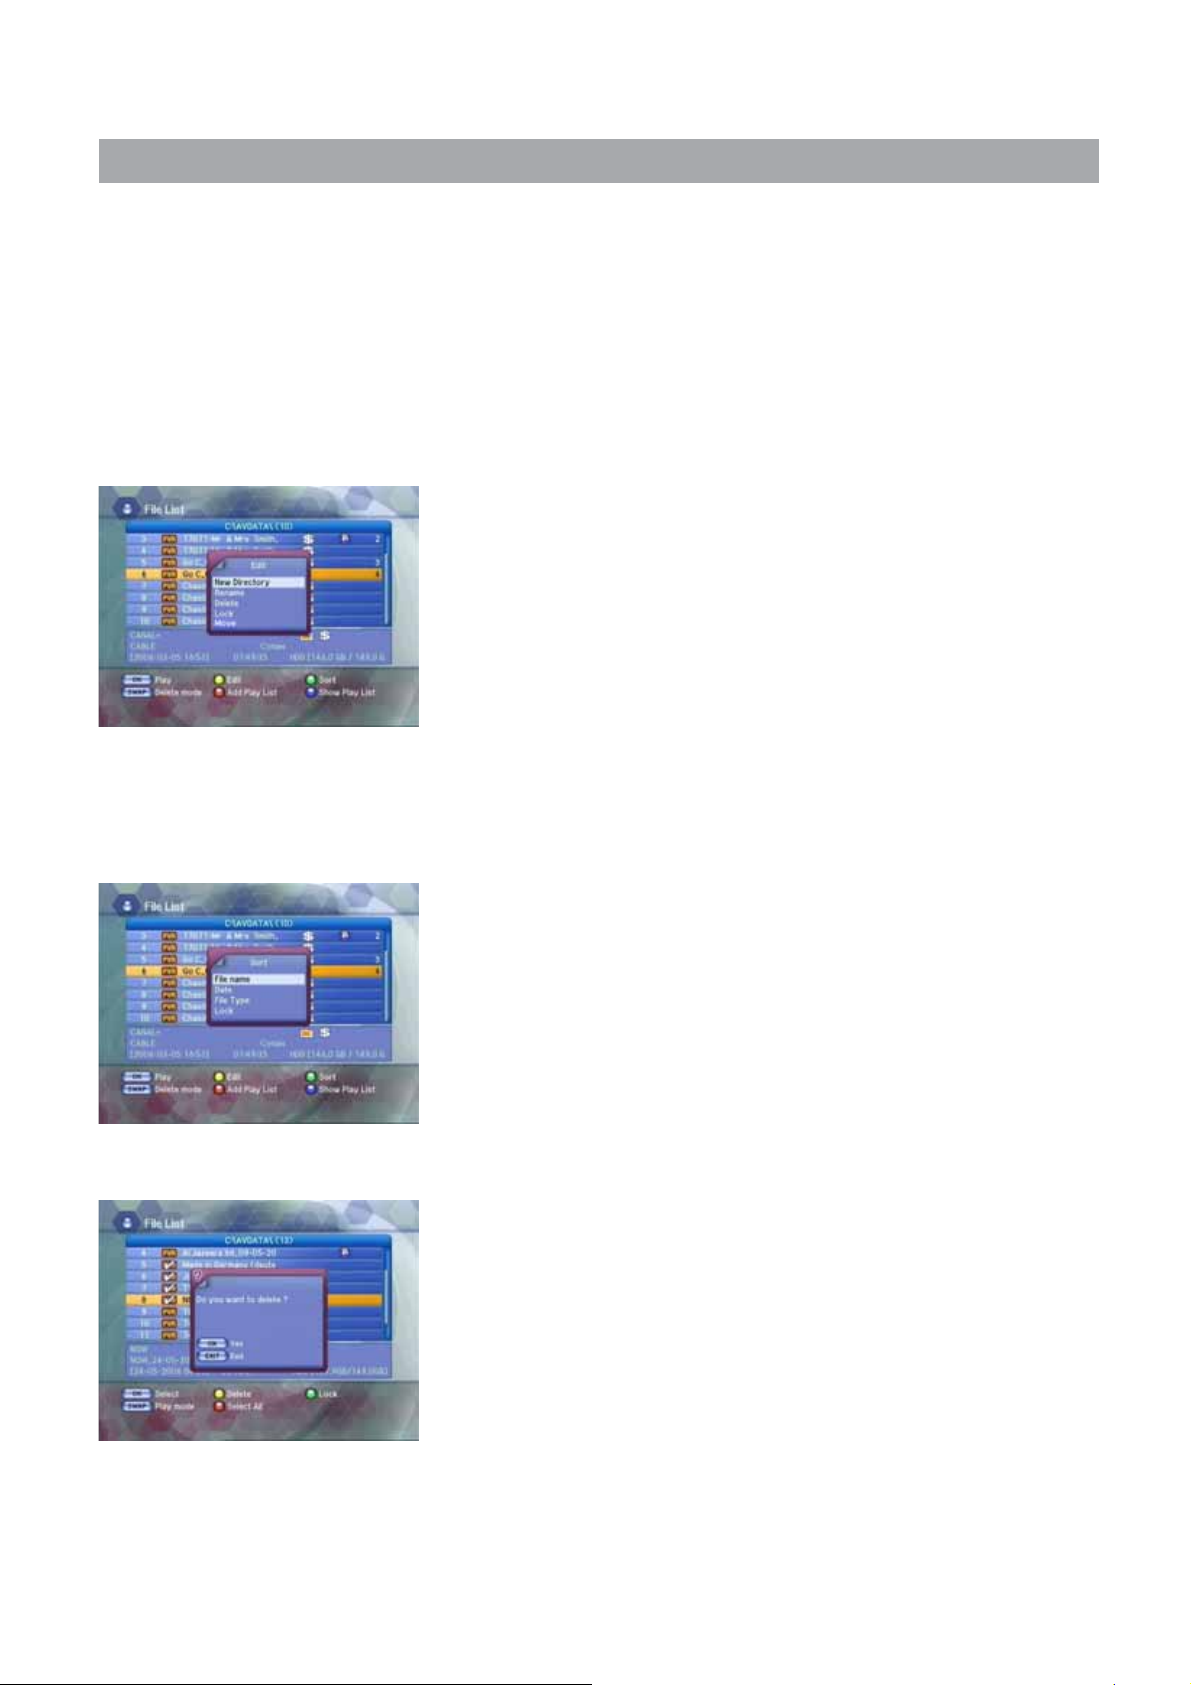
Ƈ Play List Edit
• If you press the YELLOW button on the File List screen, the File Edit
pop-up window will appear.
• Press the UP/DOWN button to select the items to be edited and then
press the OK button.
The items you can edit are as follows :
• New Directory: To create a new directory in the current directory.
• Rename: To change file or directory names. Characters such as
0~9, a~z and A~Z can be used.
• Delete: To delete a file or directory.
• Lock: To set for entering a password when you access files
and directories. They are then displayed as “hidden
files” in Microsoft Windows, after the USB cable is
connected.
• Move: You can change the position of the files.
Using the UP/DOWN buttons, select the files
you want to move and press the OK button.
Ƈ Play List Sort
• If you press the GREEN button on the File List screen, the File Sort
pop-up window will appear.
• Press the UP/DOWN button to select the arrangement method and
then press the OK button. The different methods are as follows:
The basic directories are as follows :
• File Name: To arrange files in file name order.
• Date: To arrange files in date order.
• File Type: To arrange files in file type order.
• Lock: To arrange files according to whether locked or not.
4.1.14 Delete Mode
Press the SWAP button to change the Delete mode.
Ƈ Select
Press the OK button on the File List screen.
The Checking Mark will appear On all file of the file list
Ƈ Select All
Press the RED button on the File List screen.
The Checking Mark will appear On all file of the file list.
Ƈ Delete
Press The YELLOW button on the File List Screen.
You can delete All checked File.
Ƈ Lock
Press The GREEN button on the File List Screen.
You can lock All checked File.
Page 22

4.1 PVR - Record & Play
4.1.15 Timer
With this function, you can set reserved recording functions including
adding, changing and deleting reserved recordings.
You can add a reserved recording.
• Press the UP/DOWN buttons on the PVR menu to select the Timer and
then press the OK button.
• If you press the BLUE button on the Timer screen, the Add screen will
appear.
• Press the UP/DOWN buttons on the Add screen to select the items for
setting.
These are as follows :
• Type: To set the type of reserved recording. There are three
kinds of reserved recording: PVR, DVR and Analog PVR.
• Mode: To set the interval for the reserved recording.
You can choose to record once, every day or every week.
• Date: To set the date for the reserved recording.
• Time: To set the time the reserved recording starts.
• End Time: To set the time the reserved recording Ends.
If End time is passed, the reserved recording will stop.
• Channel: Appears when you set the Type to PVR.
Press the OK button to set the channel you want
to record.
• Power off: If you select “Yes ”, the receiver turns to the Stand by
mode automatically after the recording.
If you select “No”, the receiver doesn’t turn to the Stand
by mode.
• Press the RED button to save. The details of the setting will be
displayed on the Timer screen.
Note
• To change the reserved recording, select reserved recording on the Timer
screen and then press the OK button. When the Edit screen appears, change the
reserved recording in the same way as you did with adding.
• To delete a reserved recording, select it on the Timer screen and then press the
RED button.
• Please be aware that when you change the System’s Local Time or edit a
reserved channel, the Timer might also change
• If you skip a reserved channel, or Delete it, the reserved settings are canceled.
4.1.16 USB Connection
• Press the UP/DOWN buttons on the Utility screen to select USB
Connection and then press the OK button.
• The ‘USB connected’ message pop-up window will appear.
Press the EXIT button to disconnect USB.
22
Page 23

4.1 PVR - Record & Play
23
4.1.17 Format HDD
• To format the HDD, press the UP/DOWN button on the PVR menu to
select Format HDD and then press the
• When the format confirmation pop-up window appears, press the OK
button.
4.1.18 HDD Information
You can see the HDD Information.
(Size, Serial Number, Firmware Version, Model Name)
OK button.
Page 24

4.2 Edit Channel List
From these menus, you can create favorite lists, lock, skip, delete, or
move channel.
• Select “
buttons and press the OK button.
• At the request window, Input PIN code. If you have not entered your
own PIN code, then the PIN code 0000 applies, which was set at the
factory.
• Press the
then press the OK button.
• Among the all channel list, the selected channel can be moved to the
right folder of
Move, Genre. Press the OK button to add from edit list at right folder.
• To remove the channel list from edit list at right folder, press the
button. The edited list will be removed.
• To rename the channel, press the
• Press the
• To confirm the channel list, press the
button. The request window will be displayed on the screen,
Press the OK button to save or the EXIT button to exit this menu.
Edit Channel List” in the main menu with the LEFT/RIGHT
UP/DOWN button in MODE to select the desired mode and
Favorite(Auto Favorite, 1~31), Lock, Delete, Skip,
OK
YELLOW button.
BLUE button to change the favorite name.
MENU button or the EXIT
Note
• Press the GREEN button to arrange the channels.
When the Sort pop-up window appears, select the desired arrangement and
then press the OK button.
• Press the RED button if you want to include all the channels in the channel
list.
24
Page 25

4.2 Edit Channel List
25
4.2.1 Favorite(Auto Favorite, 1~31)
• You can edit favorite TV and Radio list. This enables you to create
the 31 favorite TV and Radio lists.
• Select the channel you want to edit on the favorite list and press the
OK button.
4.2.2 Lock
• From here you can lock channels in any of the list in order to
prevent e.g. your children from watching.
• Select the channel you want to lock and press the OK button.
• Repeat the procedure for each channel you want to lock.
When you lock a channel in any list, the channel will be locked
automatically in all other lists.
4.2.3 Delete
• You can delete the TV or Radio channel from the current list.
• Select the channel you want to delete and press the OK button.
4.2.4 Skip
• You can skip the TV or Radio channel from the current list.
• Select the channel you want to skip and press the OK button.
• To recover the skipped channel, press the OK button from edit list.
4.2.5 Move
• You can change the position of the channel you want on the
TV/Radio/All channel lists.
• Select the channel you want to move to desired channel and
press the OK button.
• And press the BLUE button to change the position of the channel
you want.
• Using the UP/DOWN buttons, select the channel you want to
move and press the OK button.
• The position of the channel will be moved.
4.2.6 Genre
• You can edit the TV and Radio list of the various genres.
(Movie, News and Factual, Entertainment, Sport, Children, Factual,
Education, Lifestyle, Drama, Music, Arts, Current Affairs,
Special, Comedy, Documentary.)
• Select the channel you want to edit genre list and press the OK
button.
Page 26
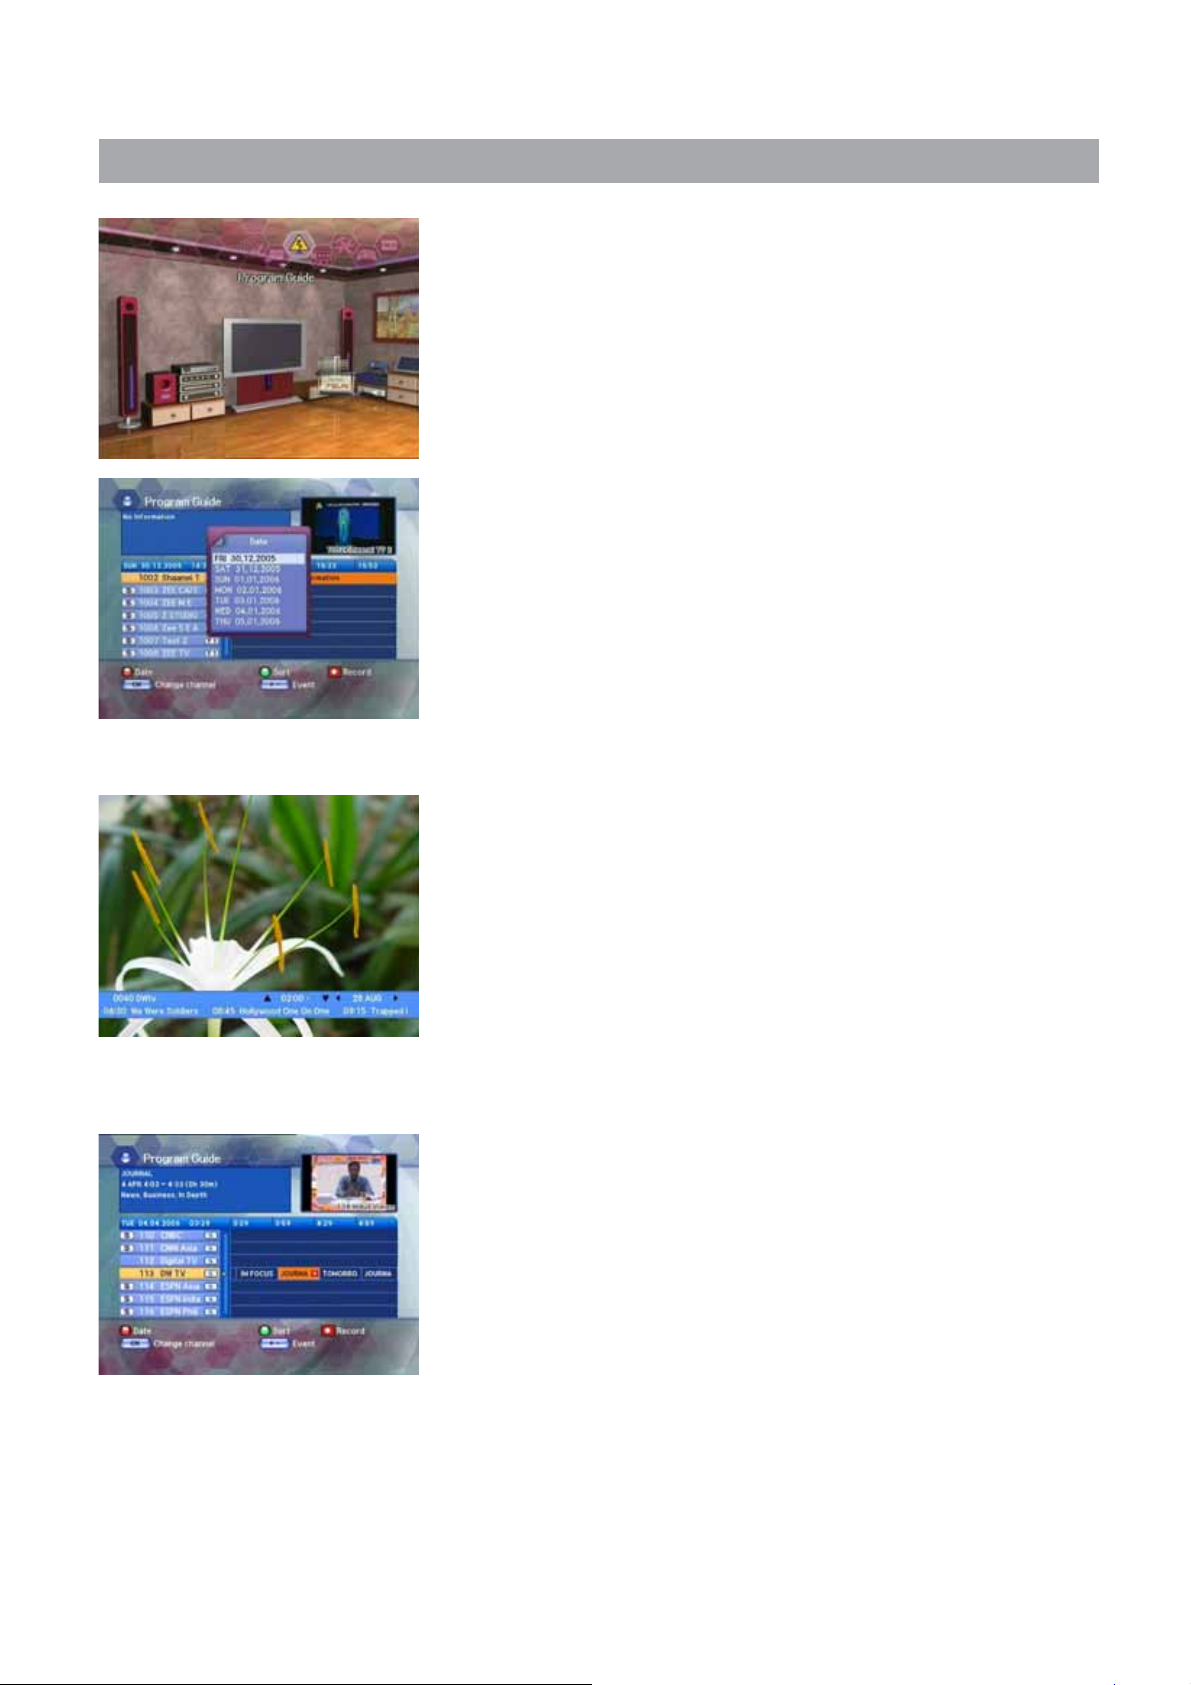
4.3 Program Guide
The program guide provides information such as the program listings
and ending times for all available programs.
You can reserve a recording by pressing RECORD button.
Select “Program Guide” in the main menu with the LEFT/RIGHT
buttons and press the OK button. In the viewing program, when you
press the EPG button, you can get this view.
Note
• The Program Guide information might not be supported by the service
providers.
4.3.1 Grid EPG Program Guide
• Press UP/DOWN buttons to change channels.
You can find out channel Information at top screen.
• Press OK button, you can charge channel as well.
• Press LEFT/RIGHT buttons to check the existing EPG info as per
its time.
• In case detailed info content is too long to check, you can check
its information as a long lists form, and resize its lists by pressing
BLUE button.
• Press GREEN button in oder to sort channel lists.
4.3.2 EPG(Electronic Program Guide) Information
• To view the Program Guide, press the GUIDE button on the remote
control unit. The EPG information will be displayed on the bottom of
the screen.
• Each press of the UP/DOWN buttons will change the displayed EPG
information by one hour.
• Each press of the LEFT/RIGHT buttons will change the displayed EPG
information by one day.
• If there is available EPG information, it will be displayed on the EPG
information bar.
• Press the GUIDE button again, and the Program Guide menu will be
displayed.
You can reserve a recording by pressing RECORD button.
26
Page 27
4.4 System Setting
27
You will be asked to enter your PIN code before you can enter this
menu. The PIN code preset to 0000 from the factory.
If you want to customize the system to suit you better, you can specify
some settings from the submenus in the “System Setting” menu.
• Select “
buttons and press the OK button.
• If you move the focus on the main menu, the contents of the selected
menu will be shown.
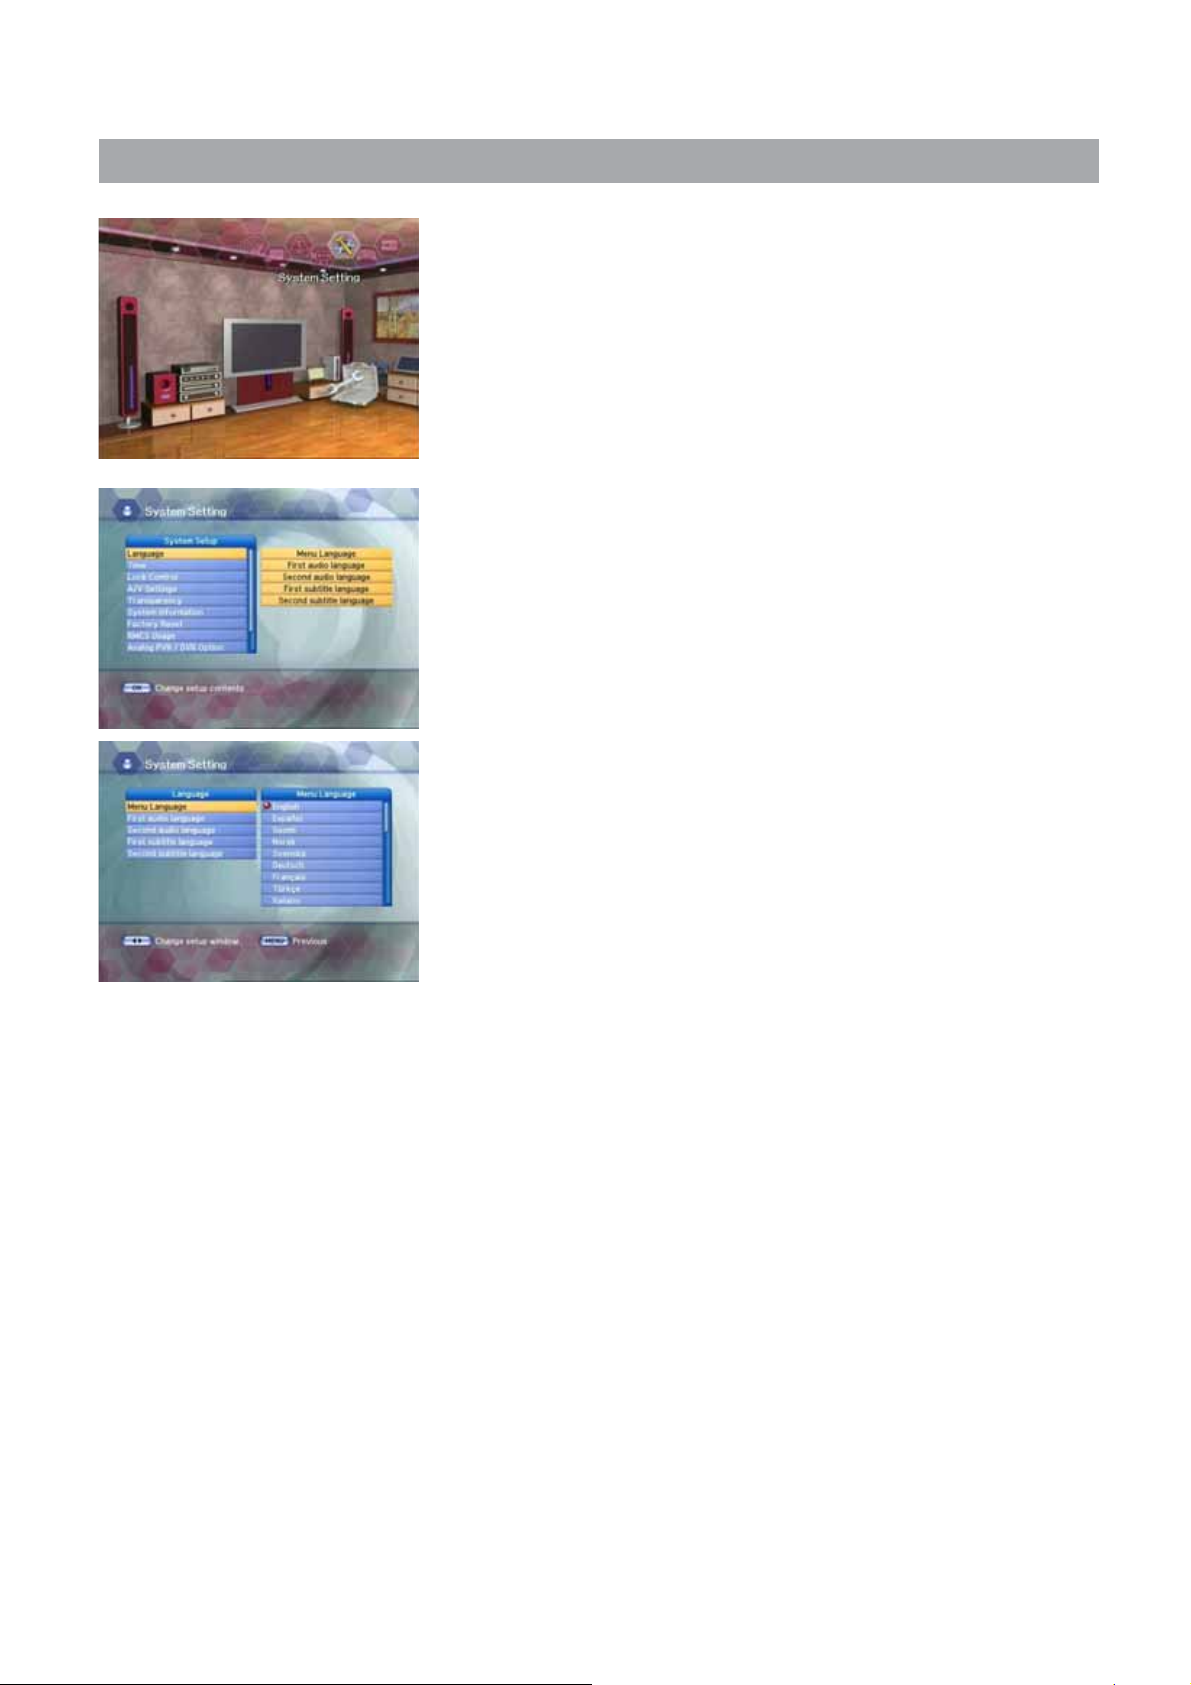
4.4.1 Language
• Press the UP/DOWN buttons on the Setup list to select Language and
press the OK button.
• Press the UP/DOWN buttons to select Menu Language, Audio
Language or Subtitle Language and then press the RIGHT button to
move to the right pop-up menu.
Ƈ Menu Language
Here you may select in which language the menus will be shown.
Use the UP/DOWN buttons to move to the language you want and then
press the OK button.
System Setting” in the main menu with the LEFT/RIGHT
Ƈ First Audio Language / Second Audio Language
In this menu, you can change default language for audio when
changing services.
Use the UP/DOWN buttons to move to language you want and then
press the OK button.
Note
•
Select the audio language between the first and second audio language.
• If the first audio language is not selected, then the second audio
language is selected by default.
(If both the first and second audio language are not available,
the audio language is set to the first audio language the selected
channel supports for.)
Ƈ First Subtitle Language / Second Subtitle Language
In this menu, you can change default language for subtitle when
changing services.
Use the UP/DOWN buttons to move to language you want and then
press the OK button.
Note
• If you cancel the subtitle function, select the off. (Option)
• Select the subtitle language between the first and second subtitle language.
• If the first subtitle language is not selected, then the second subtitle
language is selected by default.
(If both the first and second subtitle language are not available,
the subtitle language is set to the first subtitle language the selected
channel supports for.)
Page 28

4.4 System Setting
4.4.2 Time
• Press the UP/DOWN button on the Setup list to select Time and then
press the OK button.
• Press the UP/DOWN button to select either Banner Time, Time, or
Day Light Saving and then press the RIGHT button to move to the
right pop-up menu.
Ƈ Banner Time
When you switch channels, an information banner will be shown for
a few seconds.
You can select for how long the banner will be shown.
• Select the banner time you want and then press the
• Each selectable time items has meaning of the interval time during
a channel banner stays on changed channel screens.
The time ranges 1, 3, 6, 9 12, and 15 seconds.
Ƈ Time
Select the time setting type.
Press the LEFT/RIGHT buttons to select either Local Time or GMT and
then press the DOWN button to move to the time setting item.
OK button.
Local Time
You can set your local time according to your location.
• To set year, month and date, press the
The Calendar pop up window will be displayed.
Select year using the RED and GREEN buttons.
Select month using the YELLOW and BLUE buttons.
Select date using the UP/DOWN or the LEFT/RIGHT buttons.
• Adjust hour and minute with the UP/DOWN buttons and move the
field with the LEFT/RIGHT buttons.
• When the OK button is pressed, the selected time applies.
GMT
Press the UP/DOWN buttons to select the current time zone from
standard time and then press the OK button. When you press the
UP/DOWN buttons, the time zone will move by 30 minutes.
Ƈ Day Light Saving
If you want to turn the Day Lignt Saving on, press the UP/DOWN button
to select ON and then press the OK button.
UP/DOWN buttons.
28
Page 29
4.4 System Setting
29
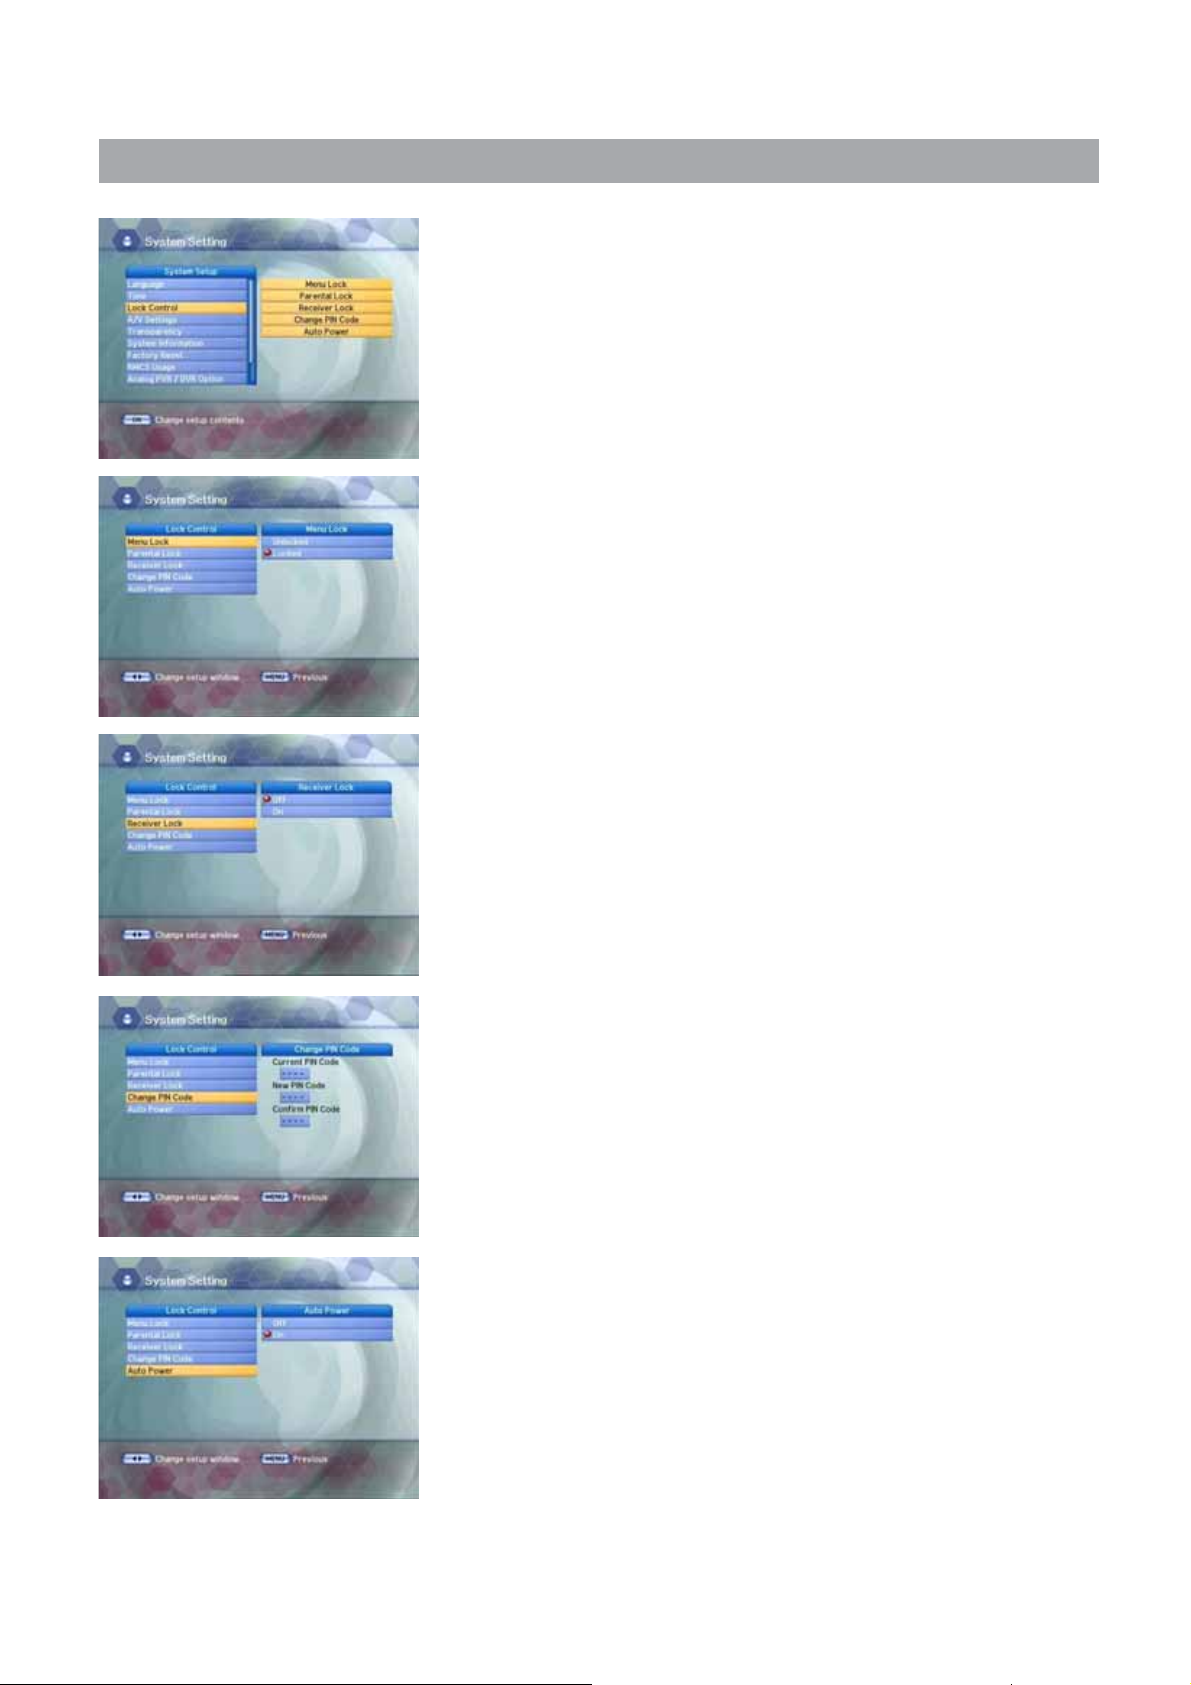
4.4.3 Lock Control
• Press the UP/DOWN button on the Set list to select Lock Control
and then press the OK button.
• Press the UP/DOWN buttons to select either Menu Lock, Parental
Lock, Receiver Lock or Change PIN Code and then press the RIGHT
button to move to the right pop-up menu.
Ƈ Menu Lock
If the Menu Lock is already set, the PIN code is needed to set the Edit
Channel List and System Setting.
If you want to set the Menu Lock, press the UP/DOWN buttons to select
Locked and then press the OK button.
Ƈ Parental Lock
When you change “Parental Lock” to “On” or “Off”, service channel can
get or not from that set values. If you select “On”, you may need PIN
code every time you select the lock channel program as you set in the
channel control.
If you select “Off”, you can see all channels without PIN code.
Ƈ Receiver Lock
If you select “On”, you will have to enter the PIN code every time you
start the receiver from standby.
Ƈ Change PIN Code
From here you can change the PIN code from the standard 0000.
DO NOT FORGET IT! Without it, you are not able to access to any of
the functions where the code is required.
You can change password for Parental Lock and Receiver Lock
simultaneously.
• Input the current PIN code using the
remote control.
• In the highlighted new PIN code, input a new PIN code.
• To verify the new PIN code, re-enter a new PIN code in the
highlighted confirm PIN code. If the PIN code is correct,
the message “Success” will be displayed on the display window.
NUMERIC buttons on the
Note
•
If you forget the PIN code, press the RGYB(Color) button in sequence.
(i.e. Red ĺ Green ĺ Yellow ĺ Blue button) The PIN code will be changed
to 0000.
Ƈ Auto Power
• If the Auto Power is set to On and power is off, the Set turns on
automatically and turns into the channel mode which you were
watching before power breakdown.
• If the Auto Power is set to Off and power is off, the Set turns into the
standby mode.
Page 30
4.4 System Setting
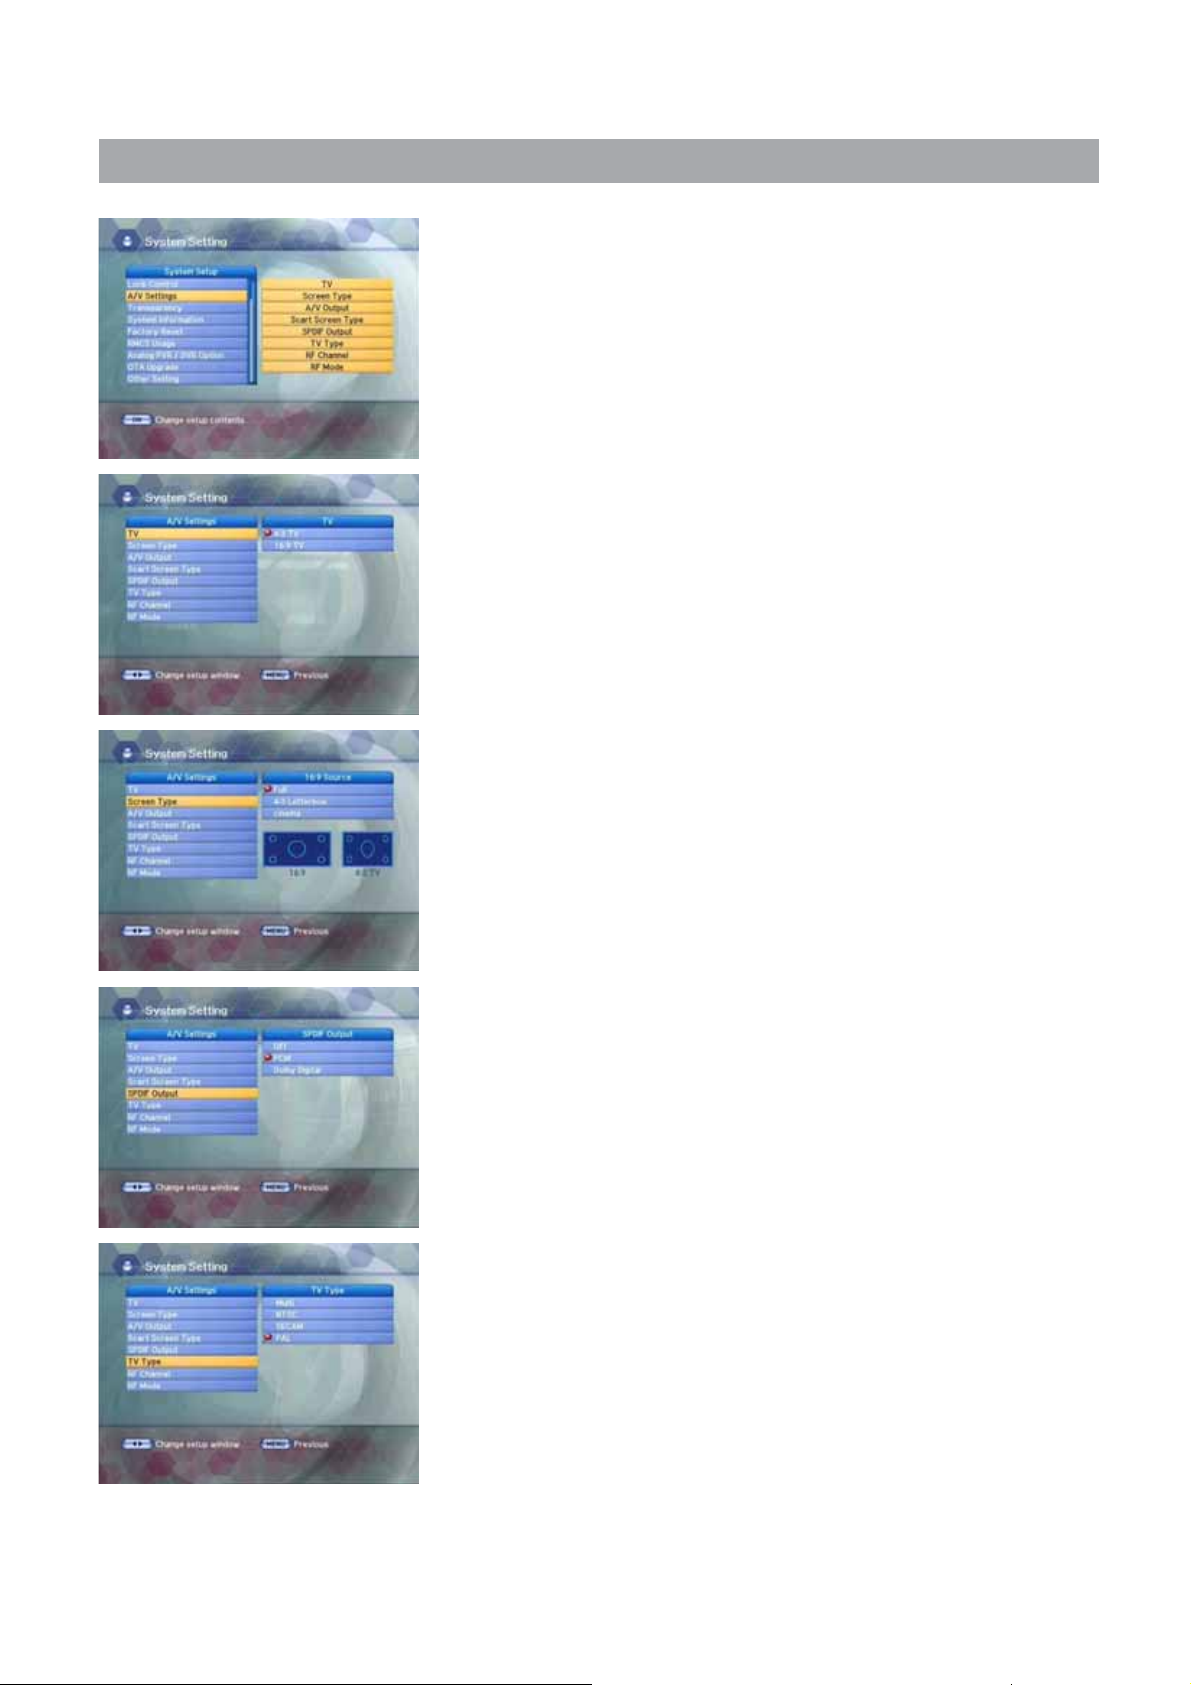
4.4.4 A/V Setting
• Press the UP/DOWN buttons on the Setup list to select Display
and press the OK button.
• Press the UP/DOWN button to select either Screen Type, Menu
Transparency, SCART Output, SPDIF Output, RF Channel, RF Mode
or TV Type and then press the RIGHT button to move to the right
pop-up menu.
Ƈ TV
If you have a TV set with 4:3 picture format, select 4:3 TV and if you
have a TV set With 16:9 picture format, select 16:9 TV.
Ƈ Screen Type
If you have a TV set with the 4:3 picture format and the transmission is
in 16:9, you can select Full, 4:3 Letterbox and Cinema.
Seleccione el ratio de aspecto de TV, que está conectado al receptor y
luego presione el boton OK.
Ƈ A/V Output
If your TV input supports SCART-RGB control, select SCART-RGB.
Otherwise select SCART-CVBS. If your TV input supports S-VHS, select
S-VHS.
Ƈ Scart Screen Type
Select Your Scart Screen Type.
You can select from 4:3 and 16:9 and then press the OK button.
Ƈ S/PDIF Output
You can hear digital audio of the Dolby 5.1 channel using S/PDIF
Output.
• If selecting Off, the digital audio will not be output.
• When selecting PCM, the unzipped digital audio is output through
S/PDIF.
• When selecting Dolby Digital, if the current channel is a Dolby audio
channel, the zipped Dolby stream is output through S/PDIF.
Ƈ TV Type
Select your TY Type. You can choose from Multi, NTSC, SECAM or PAL.
Press the UP/DOWN button to select from Multi, NTSC, SECAM or PAL
and then press the OK button.
Ƈ RF Channel
Select this alternative if you have to change the RF channel.
Select an UHF Channel you want with the UP/DOWN buttons.
The RF Channel ranges from 21 to 69.
30
Page 31
4.4 System Setting
31
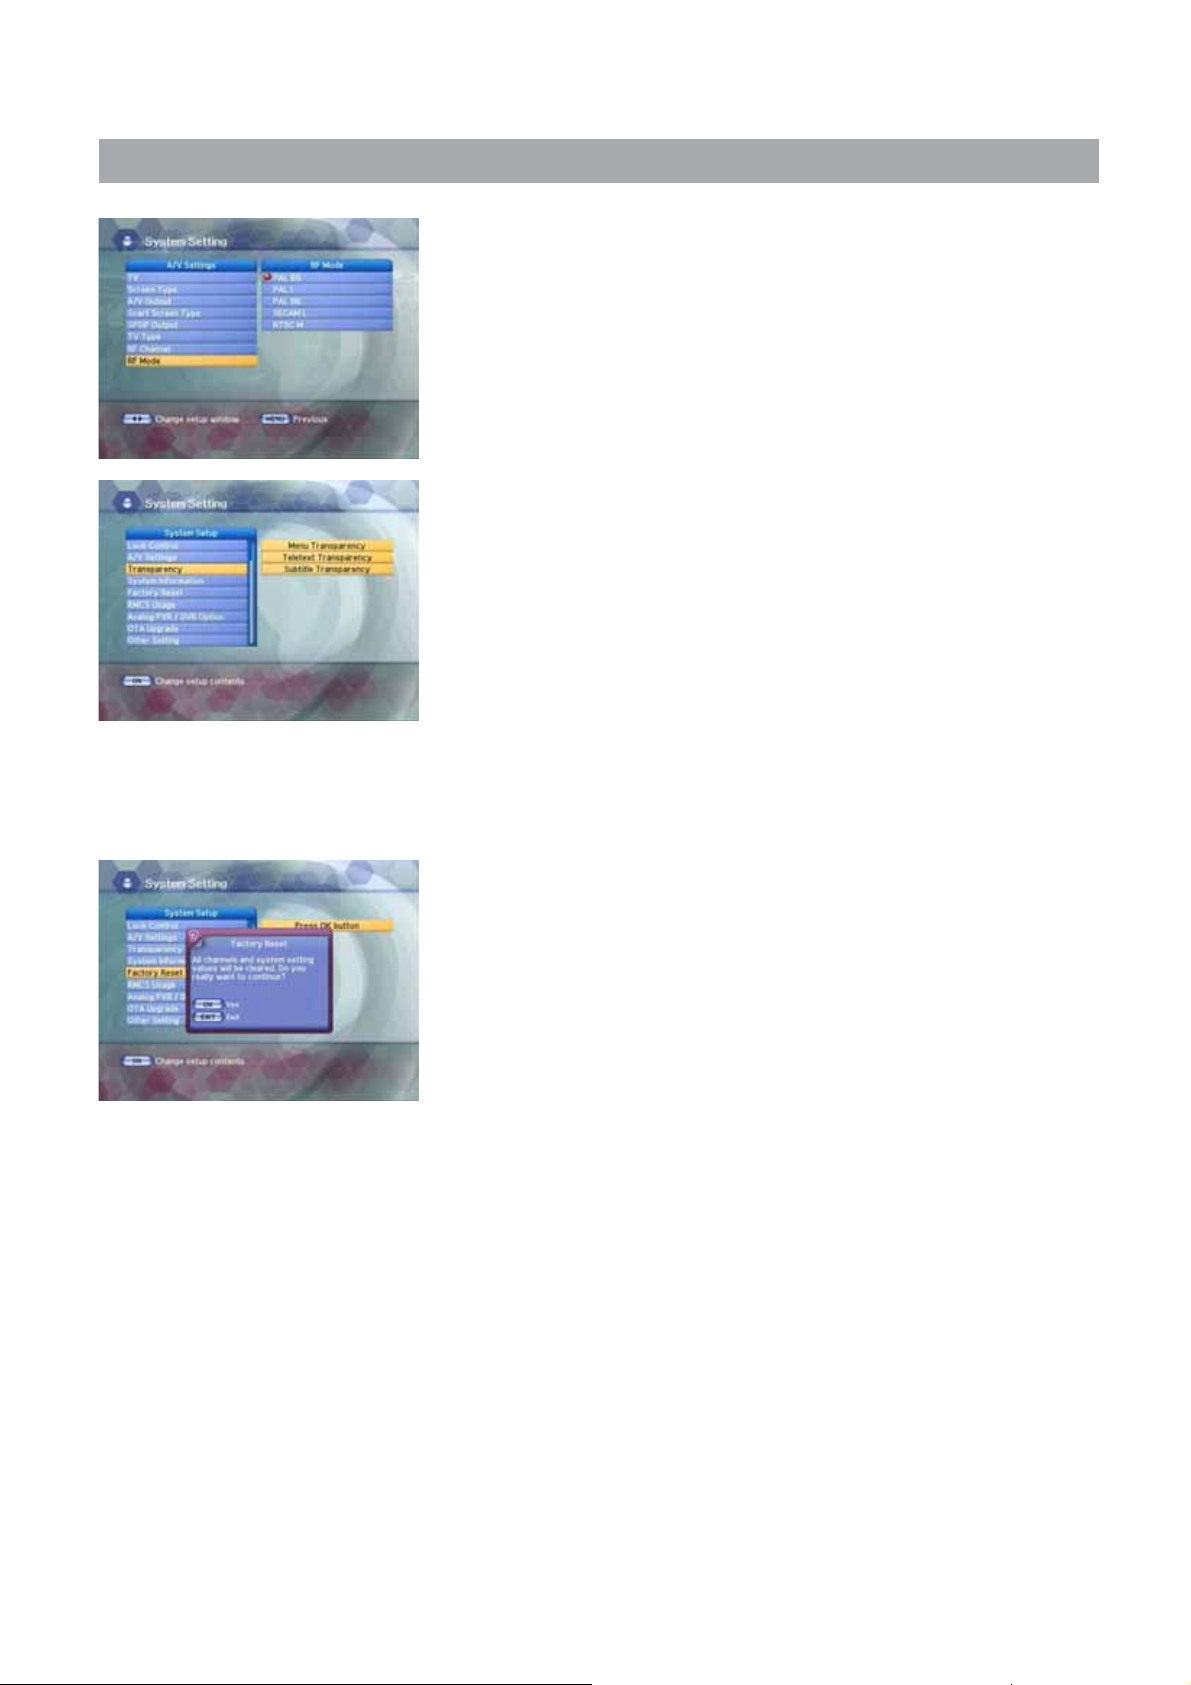
Ƈ RF Mode
You can select the RF Mode. If you get picture but no sound, the RF
Mode selecting might be wrong.
Select an RF Mode and then press the OK button.
Note
• PAL BG, PAL I, PAL DK, SECAM L, NTSC M
4.4.5 Menu Transparency
From 20% to 100% will give the variable transparency on Video and
OSD screen.
To set menu transparency, press the UP/DOWN buttons.
Press the OK button and then press the UP/DOWN buttons to
select the Menu Transparency, Teletext Transparency,
or Subtitle Transparency.The transparency will be applied on the
screen.
4.4.6 System Information
Displays the system information: MODEL name, Last Update, S/W, H/W,
Loader version, C.A
Press the UP/DOWN button on the Setup list to select System
Information and then press the OK button.
4.4.7 Factory Reset
Press the UP/DOWN button on the Setup list to select Factory Reset.
Use this option only if you have to start the complete installation
procedure from scratch. If you continue from here, all your previous
settings and all channels will be cleared! The default data will be
loaded.
If you press the OK button, it asks for your confirmation.
If you want to reset, press the OK button, or press the EXIT button to
exit this menu.
Page 32
4.4 System Setting
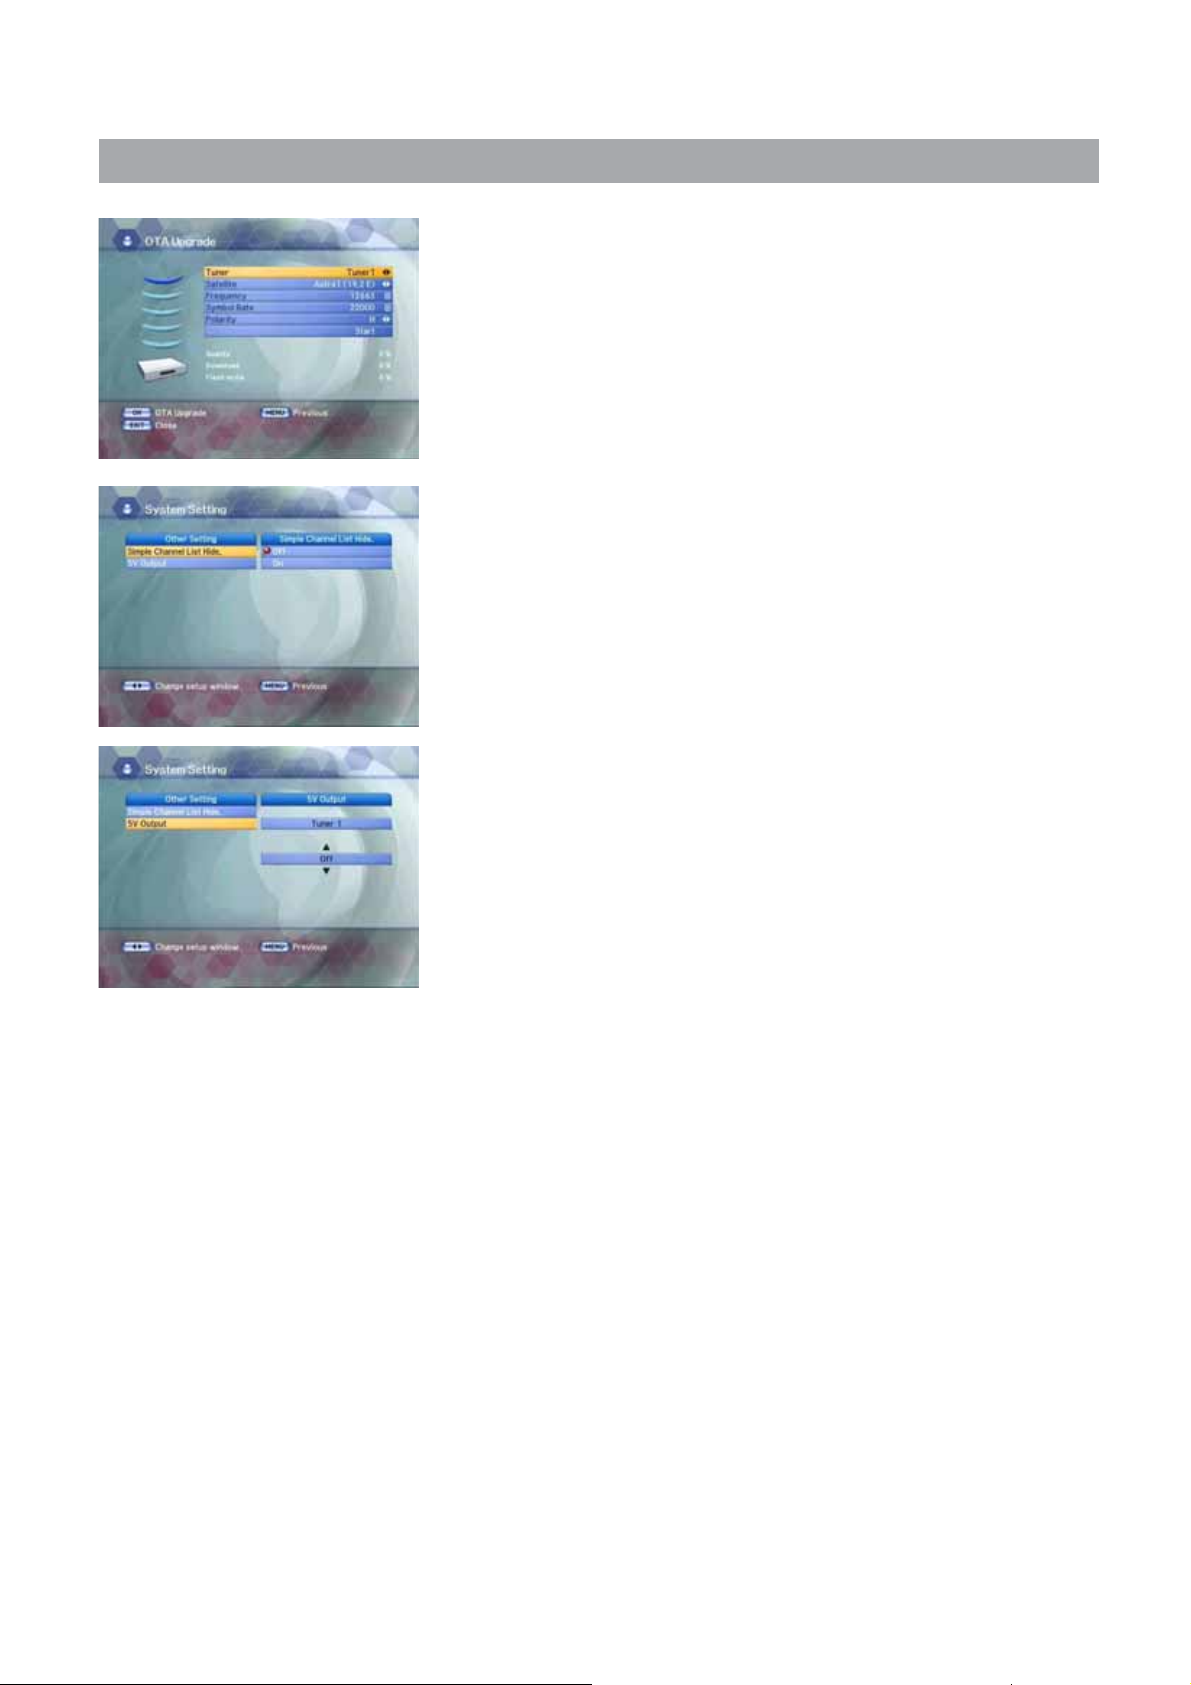
4.4.8 OTA Upgrade
Ƈ To set up OTA Upgrade
It is possible to set up OTA upgrade manually.
Please check if there is new software as pressing OK button
after entering Frequency, Symbol Rate, Const..
Updated software will be downloaded.
4.4.9 Other Setting
Ƈ Simple Channel List Hide
If you select “ON” in Simple Channel List Hide function, Simple channel
list will be disappeared when you change the channel.
Ƈ 5V Output
5 volt control for Active Antenna.
32
Page 33
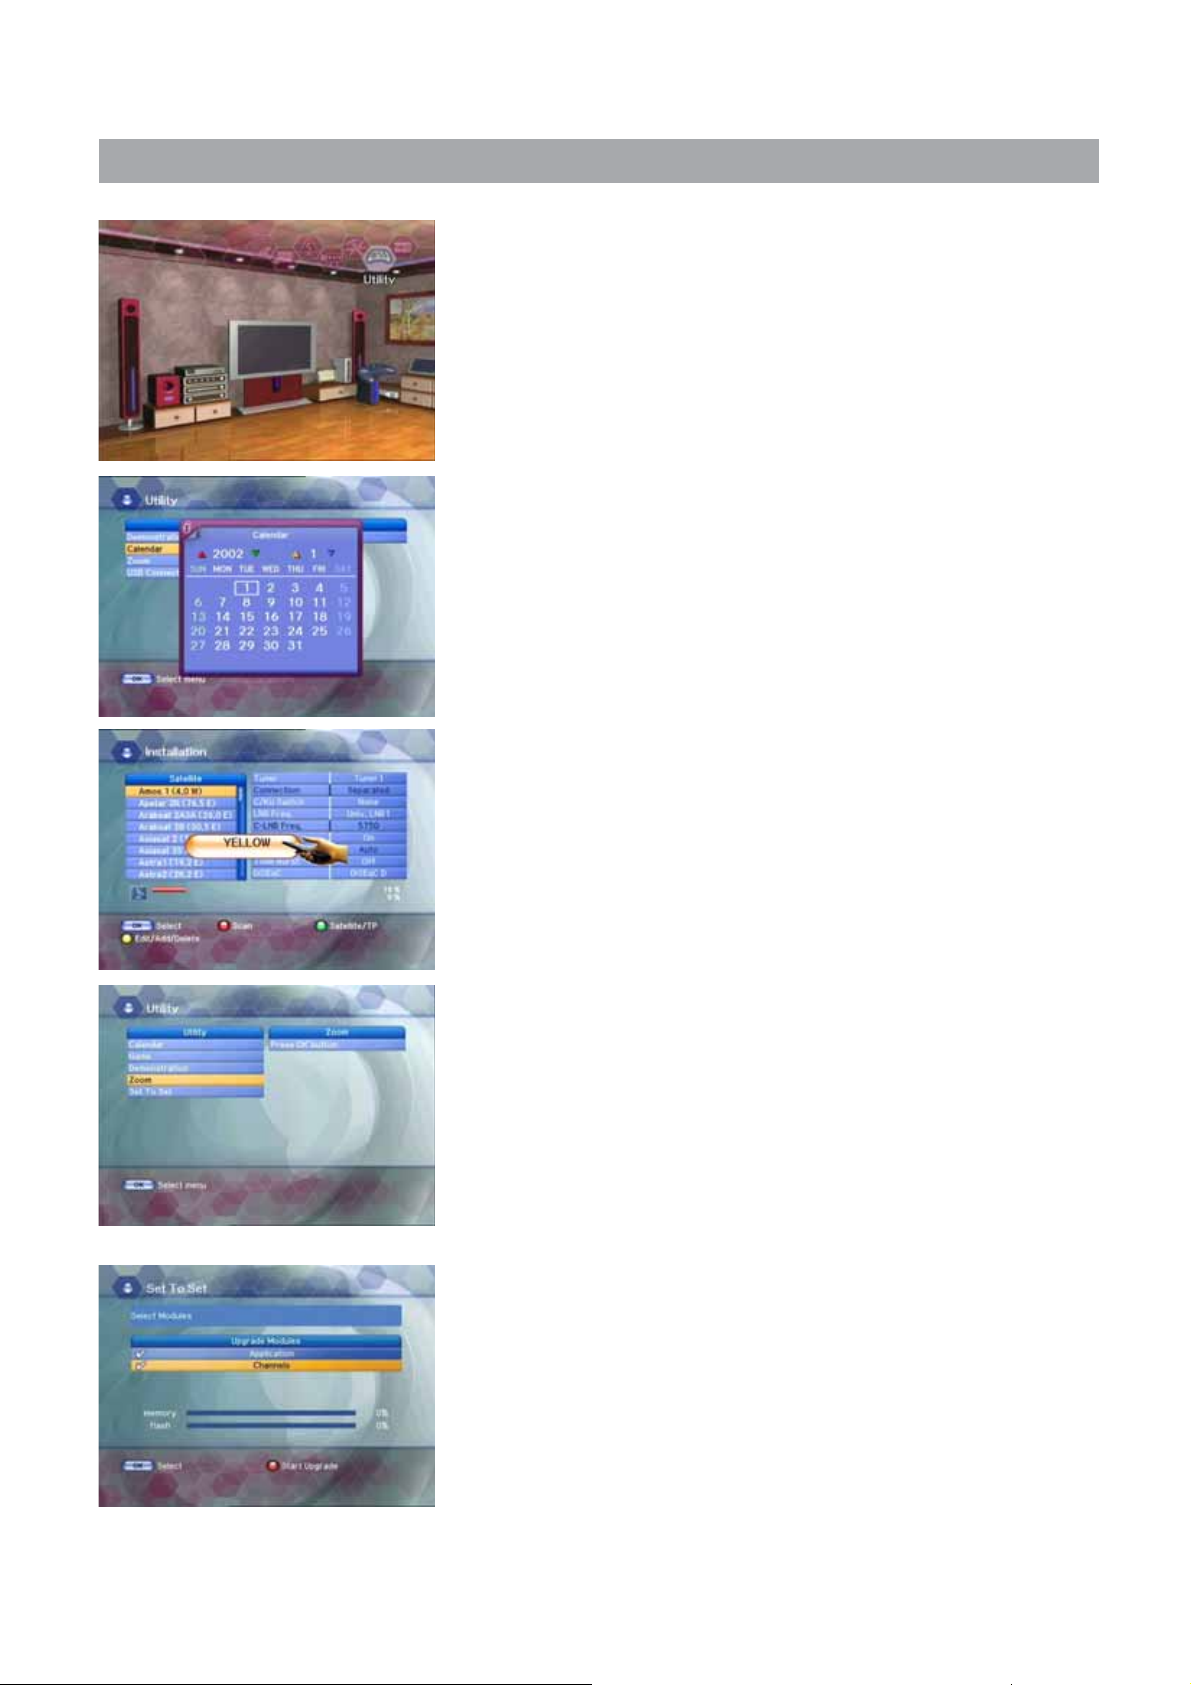
4.5 Utility (option)
33
Select “Utility” in the main menu with the LEFT/RIGHT buttons and
press the OK button.
4.5.1 Calendar
Select “Calendar” in the Utility menu with the UP/DOWN buttons and
press the OK button, you can see the Calendar.
4.5.2 Game
Press the OK button to move to the GAME folder of the File List.
Select the GAME file on the HDD to play the game.
4.5.3 Demonstration
Select “Demonstration” in the Utility menu with the UP/DOWN
buttons and press the OK button, you can see the Automatic Operation
Function.
Press the EXIT button to quit the Automatic Operation Function
completely.
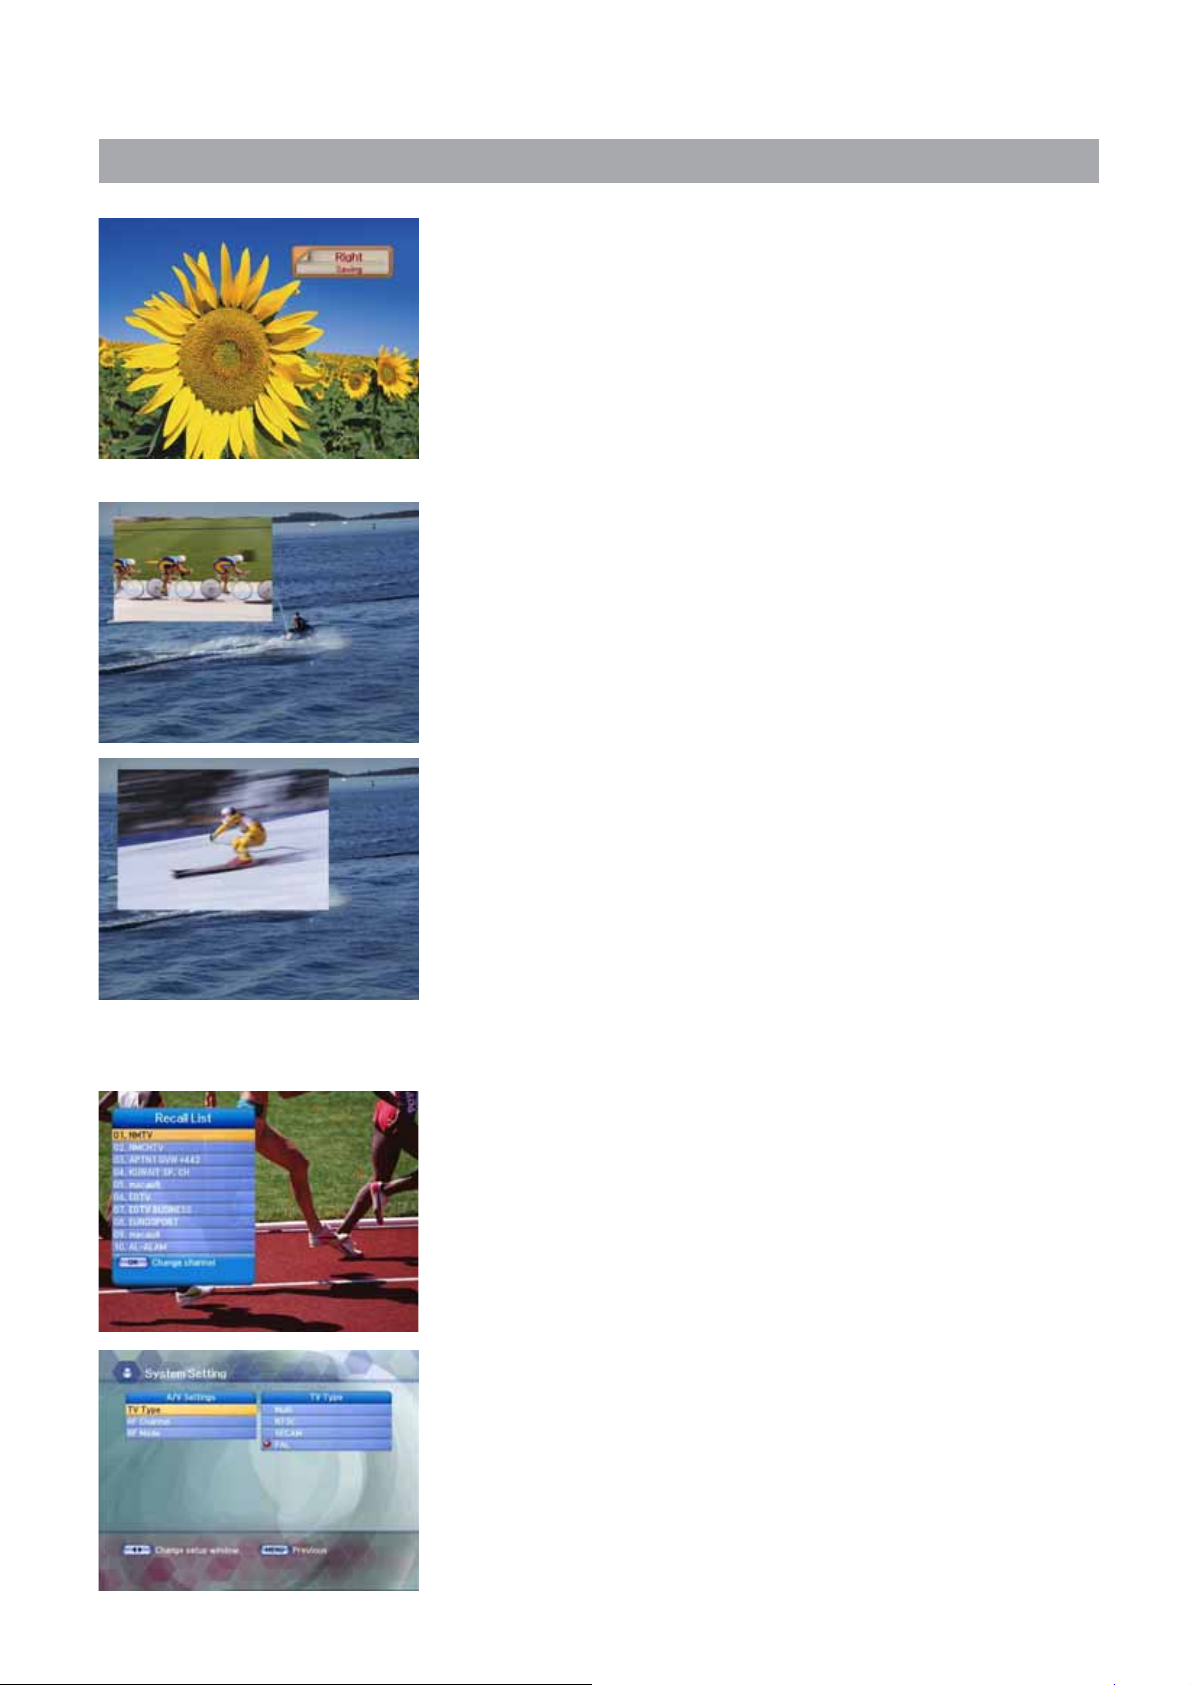
4.5.4 Zoom
Select “Zoom” in the Utility menu with the UP/DOWN buttons and
press the OK button, the white frame will appear.
• Select the size and position of video you want to expand with the
RED/GREEN, LEFT/ RIGHT buttons and press the OK button.
You can see the expanded video.
• Press the YELLOW button in the video only, you can then see the
white frame.
• Press EXIT button in the video only, you can see the white frame.
• Press EXIT button to quit the expanded video completely.
• RED : Expand the size
• GREEN : Reduce the size
4.5.5 Set to Set
Select “Set to Set” in the Utility menu with the UP/DOWN buttons and
press the OK button, upgrade Modules will appear.
• Connect the serial port Set To Set.
• You can receive the Application and Channels through the Set To Set
function.
Page 34
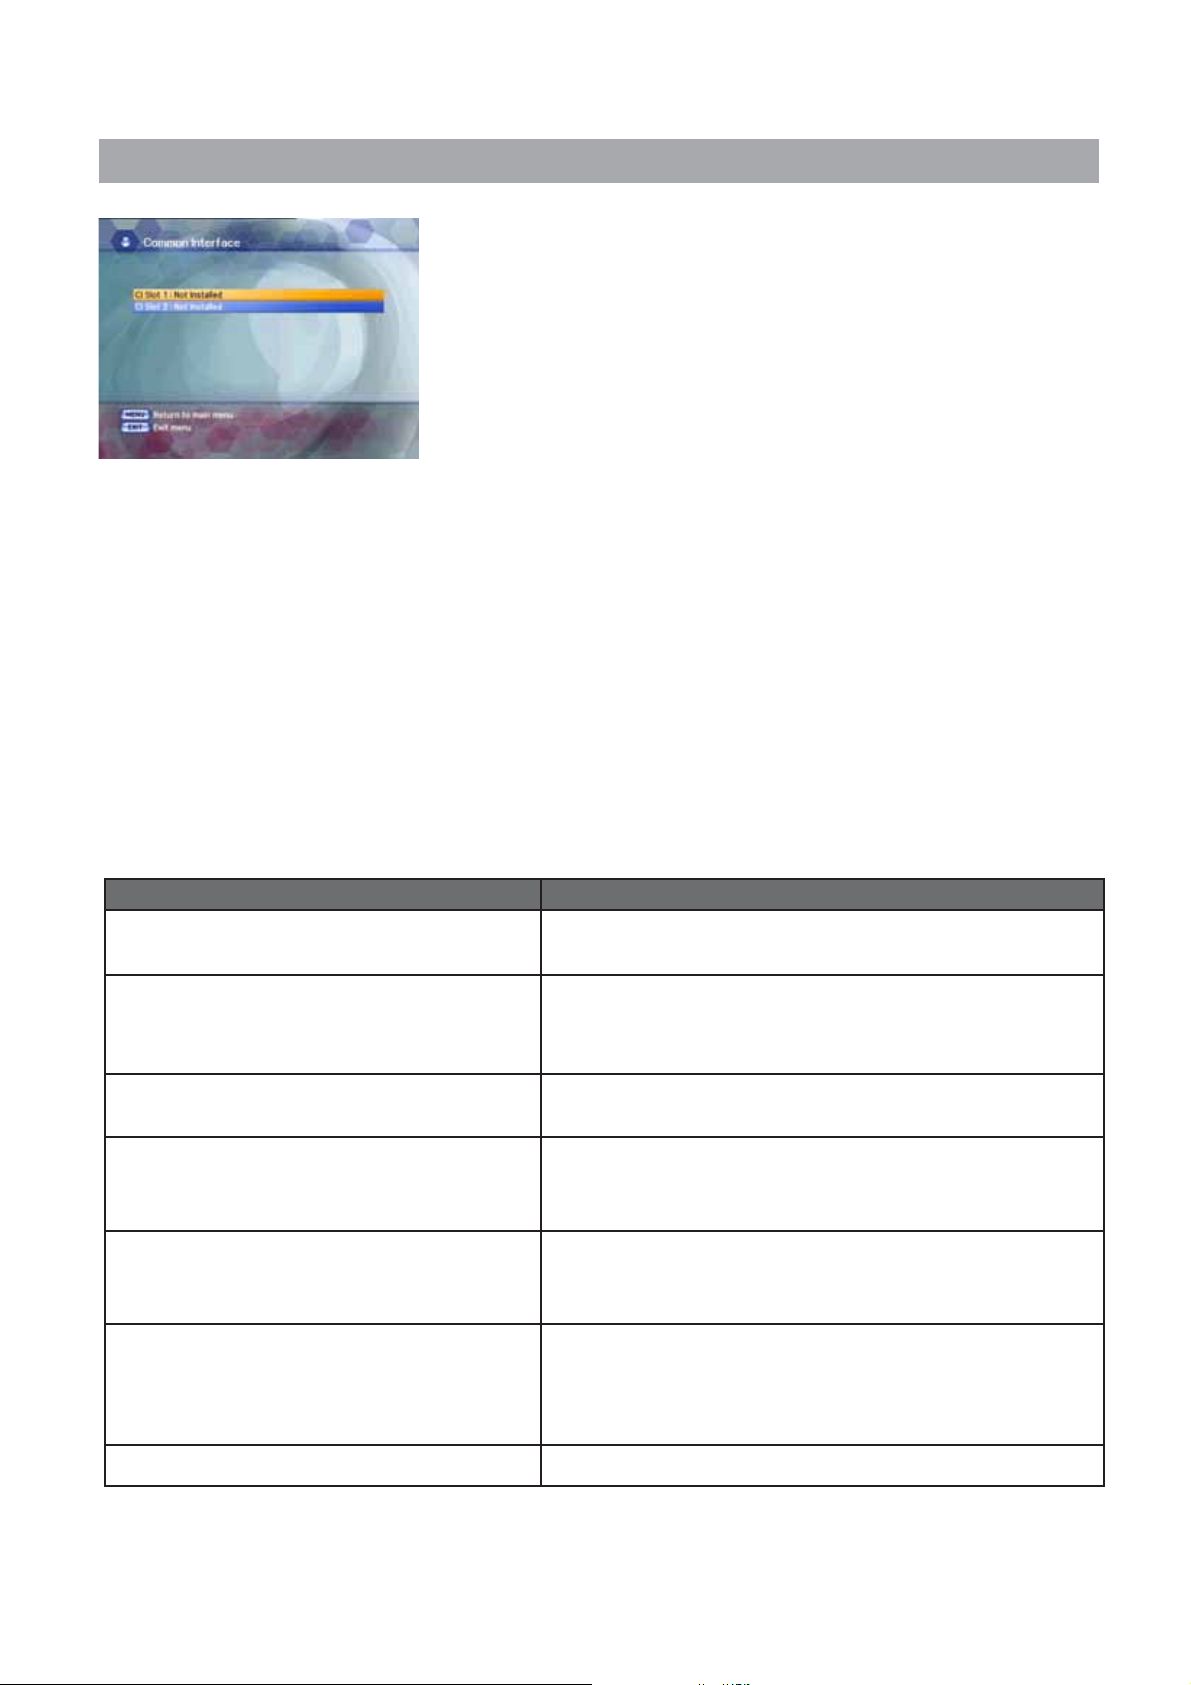
4.6 Common Interface
The menus are provided by the CA module and its smart card.
Your receiver is equipped with two slots of Common Interface(CI),
accepting both Type 1 and Type 2 PCMCIA. Plug in the appropriate CI
module together with a valid smart card. You will then have access to
the respective scrambled and Pay-Per-View services.
Insert the smart card into the CI module, and the CI module into the
slot behind the flap on the front panel.
The CI and smart card modules determine the programs that can be
de-scrambled.
The receiver supports two CI slots so you can plug in two different
modules, automatically provide access to both services. Each smart card contains your subscription details. You
can view your entitlement via the COMMON INTERFACE menu by using the MENU button as below.
• Press the MENU button and select Common Interface then Slot1 and Slot2 will be showed up on the screen
and the menu will be appeared. Select the item and then you will see information for card.
Press EXIT button if you wish to exit from this menu.
• If you inserted the smart card with CAM into the receiver, and switch on the receiver.
Then you will see “CAM Initializing icon” on the top screen.
• If you do not insert the smart card, you will see the message “Insert the valid smart card”.
If you insert the smart card into the CI module then you can watch your selected channel.
5. Troubleshooting
Problem Solution
No display LED on the front panel.
No power supply
No Picture Ensure that the STB is switched on.
Poor picture quality Check the signal level, if this is low then try adjusting
No Sound Check the volume level of the TV and STB.
Remote Control does not operate Point remote control directly towards the receiver.
Service is not running or scrambled Check the whether the Common Interface module and
Power cord plug in correctly.
Check connection and correct.
Check channel and video output and correct
the alignment of your dish.
Check the mute status of the TV and STB.
Check the connection of audio cord.
Check and replace batteries.
Check that nothing blocks the front panel.
smart card is correctly inserted.
Check that the smart card is appropriate for the selected
service.
You have forgotten your secret PIN code Refer to Change PIN code of this owner's manual.
34
Page 35
6. Technical Specifications
35
Tuner
Satellite
Demodulation
FEC Modes Rate
Input Connector
Frequency Range
Symbol Rate
QPSK
1/2, 2/3, 3/4, 5/6, 7/8
F type female (75 Ohm)
950MHz ~ 2150MHz
2 ~ 45 Mbaud
Demodulation
Guard Interval Modes
Terrestrial
RF Modulator
PLL type
TV Standard
RF Connector
Frequency Range
MPEG TS A/V Decoder
Video Resolution
Input Bit Rate
Transport Stream
Audio Decoding
Audio Mode
A/V & Data Input/Output
Video
Audio
RS-232C
USB
System Resources
Flash Memory
SDRAM
Main CPU MPEG Chip
Power Supply
Input Voltage
Power Consumption
Protection
Type
Physical Specification
Size(W x H x D)
Net Weight
Operating Temperature
Storage Temperature
Option Function
FEC Modes Rate
Input Connector
Frequency
Channel Bandwidth
COFDM 2K/8K-Carrier
1/32, 1/16, 1/8, 1/4
1/2, 2/3, 3/4, 5/6, 7/8
IEC 169-2, Female
UHF : 470 ~ 860 MHz, S-Band, VHF : 174 ~ 230MHz
7MHz, 8MHz
CH 21-69 for the modulation
PAL B/G, I, SECAM L, NTSC M selectable
75 Ohms, 169-2, Male/Female
UHF: 470 ~ 860MHz
720 x 576
Max. 90 Mbit/s
MPEG-2 ISO/IEC 13818-1
MPEG/Musicam Layer 1 & 2
Single / Dual Channel
RCA/Cinch, Video Output(CVBS)/SCART(CVBS, RGB)
S-VIDEO OUT
RCA/Cinch Volume & Mute Control (Resolution: 20 bits DAC,
Max 2Vrms) S/PDIF of Dolby Digital Bitstream Out
Transfer rate 115Kbps, 9 PIN D-Sub Type
2.0 Device
4 Mbytes
64 Mbytes
μPD61130
AC 90-250V, 50/60Hz
45W
Separate Internal Fuse
SMPS
340 x 60 x 250
3kg
0°C ~ 50°C
-20°C ~ -60°C
Common Interface
PVR
SW Upload
2 DVB -CI Slots
HDD 160 GB
RS232C (Optional Via OTA)
Page 36

www.triax.com
 Loading...