

Page 1

Seite 1 von 72
HDTV Combi-Receiver
(SAT + TER)
ST-220 Part No. 305030
User manual
Page 2

Seite 2 von 72
Copyright © Triax GmbH
Änderungen und Irrtümer vorbehalten. Für Druckfehler übernehmen wir keine Haftung.
Page 3

Seite 3 von 72
Content
Content ........................................................................................... 3
Preamble ........................................................................................ 5
Symbols ................................ ................................ ......................... 5
Saftey instructions ......................................................................... 6
Basic Saftey Information .......................................................... 6
Replace the batteries with the same type always.............................. 8
Explanation of Safety Inscructions.................................................... 9
Content ......................................................................................... 10
Description ................................................................................... 11
General.......................................................................................... 11
Productdescription ................................ ................................ ......... 14
Remote control unit ........................................................................ 15
Connect your receiver ................................................................. 18
Set-up with HDMI cable ................................................................. 19
...................................................................................................... 19
Connectivity with YUV-Components ............................................... 20
Connectivity with Digital-Audio-Receivers (optical Digital Out) ........ 21
Set up ........................................................................................ …21
Remote control .............................................................................. 21
Point the remote at the front of the receiver and press the
corresponding key once ................................................................. 21
Receiver ................................................................ ........................ 22
Erstinstallation ................................................................ ............. 23
Select the menu language.............................................................. 23
Select your country ........................................................................ 24
...................................................................................................... 24
Video disply set up ......................................................................... 24
Satellite reception .......................................................................... 25
DVB-T reception ............................................................................ 26
Bedienen ...................................................................................... 27
information when changing channels.............................................. 27
Benutzer-Oberfläche auf dem TV-Bildschirm .................................. 28
Menü-Set up .................................................................................. 29
Page 4

Seite 4 von 72
Navigate within the menu ............................................................... 31
Change of channel list (Symbol: TV) .............................................. 32
Installation DVB-S (Symbol: Sat-Antenna) ..................................... 37
Installation DVB-T (Symbol: Sat-Antenna) .................................... 44
Sytem settings (Symbol: gearwheel) ................................ .............. 45
Settings (Symbol: Case) ................................................................ 49
External HDD (Symbol: movie role) ................................................ 56
Buttons with special functionality............................................... 58
Switching TV/R .............................................................................. 58
0 - Sleeptimer ................................................................................ 58
CH- / CH+ ...................................................................................... 58
VOL+ / VOL- .................................................................................. 58
MENU ............................................................................................ 58
TEXT ............................................................................................. 58
BACK ............................................................................................ 58
OK ................................................................................................. 59
V+ / V- ................................ ........................................................... 59
CH+ / CH- ...................................................................................... 59
FAV ................................................................ ............................... 59
EPG............................................................................................... 60
INFO.............................................................................................. 61
SUB ............................................................................................... 62
AUDIO ................................................................ ........................... 62
Button for PVR functionality (optional) ....................................... 63
Cleaning the receiver ................................................................... 64
Dismantle the receiver ................................................................. 64
Tips and Hints ............................................................................. 65
Disposal ................................ ................................ ....................... 68
Technical Data ............................................................................. 69
Declaration of Conformity ........................................................... 71
Manufacturer ................................................................................ 72
Page 5

Seite 5 von 72
Preamble
This manual will help in the
• designated,
• safe and
• advantageous
use of digital satellite receiver, also called receiver.
We assume that the user of the receiver has general knowledge of
consumer electronics devices.
Any person that this receiver
• mounted
• connects,
• operates,
• cleans or
• disposed of,
must have taken the full content of this document. Keep this manual in
a place near the receiver.
Symbols
Various elements of the manual are provided with specific typographic
design. So you can easily distinguish whether it is a
normal text,
• Listings, or
action steps
concerns.
Page 6
Seite 6 von 72
Safety instructions
Read the safety instructions carefully before using the receiver operating.
Follow all warnings and information on the device and in the manual.
Basic Safety Information
Electrical Connection
In case of malfunction, disconnect the receiver from the power
source. Note: despite turning off power switch on the rear the re-
ceiver is still energized.
To avoid fire hazard and risk of electrical shock, do not expose the
receiver to rain or moisture
Never open the housing. There is a danger of electric shock. Con-
nect the receiver only to a professionally installed mains socket of
100-240 V, 50-60 Hz.
The total power consumption by the antenna connection of the
receiver "LNB IN" must not exceed 300 mA.
Unplug the power cord from the wall outlet when the unit is not
used for an extended period. Unplug the AC power plug, not the
cord.
Pull out the power plug during a thunderstorm on the receiver from
the wall outlet. During a thunderstorm, also remove the cable of the
LNB from the receiver.
Should any solid object or liquid fall into the receiver, unplug the
power cord from the outlet. Have the unit checked by qualified personnel before bringing it back into operation. There is a danger of
electric shock. Please note that the current source (socket) should
be easily accessible.
Do not bend or crimp the power cord.
If the power cord is damaged, you have to repair the receiver of
personnel before they use it again. Otherwise there is a risk of
electric shock.
Never leave children unattended to use the receiver, or play with
the antenna system .Refer servicing to qualified personnel.
Page 7

Seite 7 von 72
Obtain replacement parts only from the manufacturer. Changes to the
unit will void the warranty.
Caution!
Note on power disconnection:The Standby button does not completely disconnect the unit from the mains. The receiver will also
be in standby mode to power. To completely turn off (without electricity), press the power switch on the back.
To completely disconnect from AC power (eg in connection work,
thunderstorms), unplug the power cord from the outlet.
Correct location
Place the receiver on a firm, level surface.
Avoid the vicinity of::
- Heat sources such as radiators,
- Naked flames, such as candles,
- Devices with strong magnetic fields, such as speakers.
- Do not place any objects filled with liquids (such as vases) on
the receiver.
Avoid direct sunlight and places with an extremely high amount of
dust. Never cover the ventilation holes. Ensure adequate ventila-
tion of the receiver.
Do not place heavy objects on the receiver.
If you take the receiver from a cold to a warm environment, low
humidity is reflected in the interior of the receiver. Wait in this case
about an hour before turning it into operation. Keep the power cord
and antenna cable so that no one can step on or trip over them.
Batteries may contain toxic substances. Make sure that batteries
are not in the hands of children. Children can put batteries in their
mouth and swallow it.
Leaking batteries can cause damage to the remote control. If the
receiver is not used for a long time, remove the batteries from the
remote control.
Batteries may contain toxic substances that damage the environ-
ment. Dispose of batteries in accordance with the respective laws
Page 8

Seite 8 von 72
of their country.Never expose batteries open fire or strong heat, as
they may explode. Replace the batteries with the same type always
Page 9
Seite 9 von 72
Explanation of Safety Instructions
In the manual you will find the following categories of safety instructions:
Danger!
Instructions with the word DANGER warn of possible personal injury.
Caution!
Instructions with the word CAUTION warn of possible property or
environmental damage.
These notes provide tips and information to the general use
of the receiver.
Correct use: the receiver is designed for the reception of free to air
and encrypted digital satellite and digital terrestrial programs in the
private sector. It is intended solely for this purpose and should only be
for used. This includes attention to all information of this manual, especially the safety.
Any other use is considered improper and may result in property damage or even personal injury. It also means the immediate loss of warranty.
The manufacturer assumes no liability for any damage caused by
improper use.
Page 10

Seite 10 von 72
Content
Check the delivery after purchase.
Pos.
Pcs
Description
1 1 Receiver
2 1 Remote Control
3 2 Batteries Type LR 03/AAA/1,5 V
- 1 User Manual (not shown)
Coaxial Cable, HDMI cable and Scart cable not supplied.
Page 11

Seite 11 von 72
Description
General
With this receiver you can receive unencrypted (free-to-air) and encrypted (depending on type of smartcard with CI module) digital satellite channels and digital terrestrial programs.
You don’t need not to program the receiver yet. Only perform the first
time installation.
The main TP and satellites are preprogrammed.
The satellite antenna must be aligned to the desired satellite.
The receiver searches for other new programs as soon as you start
the automatic station search. Not preprogrammed satellites can be
added.
All receiver settings can be made easily using the user interface
(menu) on the TV screen.
The multilingual user interface supports the following languages:
German
Italian
Spanish
Portugese
Russian
Turkish
Polish
Arabic
Danish
English
French
Following Satellites are pre-programmed by default:
Astra1 19° E
Hotbird 13° E
Türksat 42° E
Sirius2 5° E
Page 12

Seite 12 von 72
Amos/Atlantic 4-5° W
HispaSat 30° W
Eutelsat W2 16° E
HellaSat 39° E
Astra 23,5° E
Astra 28,2° E
More features:
HDTV & SDTV
Upscaling of SDTV-Programms
Software-Update via Satellit ASTRA 19,2° Ost (prepared, not ac-
tive) or via USB-interface
Supports Unicable (SCR) Technology
Encrypted channels can be played at insertion of a CI or CI + mod-
ule and smartcard.
Automatic save the last channel watched (Last Station Memory)
3 buttons on front panel
Plug and Play
Low Power Consumption in stand by < 1W
Power supply 100–240 V, 50/60 Hz
4500 channels
Parental control (default password: 0000)
12 favorite lists
Automatic Channel Scan
Channel editor
Optical digital out (Dolby Digital Sound)
1 Euro-SCART-interface for TV- or DVR
HDMI-out
YPbPr (YUV)-out
Super-Fast- Videotext with a memory of 800 pages
Digital DVB-Radio-reception with background display
Page 13

Seite 13 von 72
When switching channels you can obtain further programm infor-
mation.
DiSEqC 1.0, 1.2, USALS is supported
TV-Formats adjustable to 4:3, 16:9 and letterbox
8 Timer, Sleep-Timer
Electronic Program Guide EPG (up to 7 days, depending on pro-
gram)
.
Page 14
Seite 14 von 72
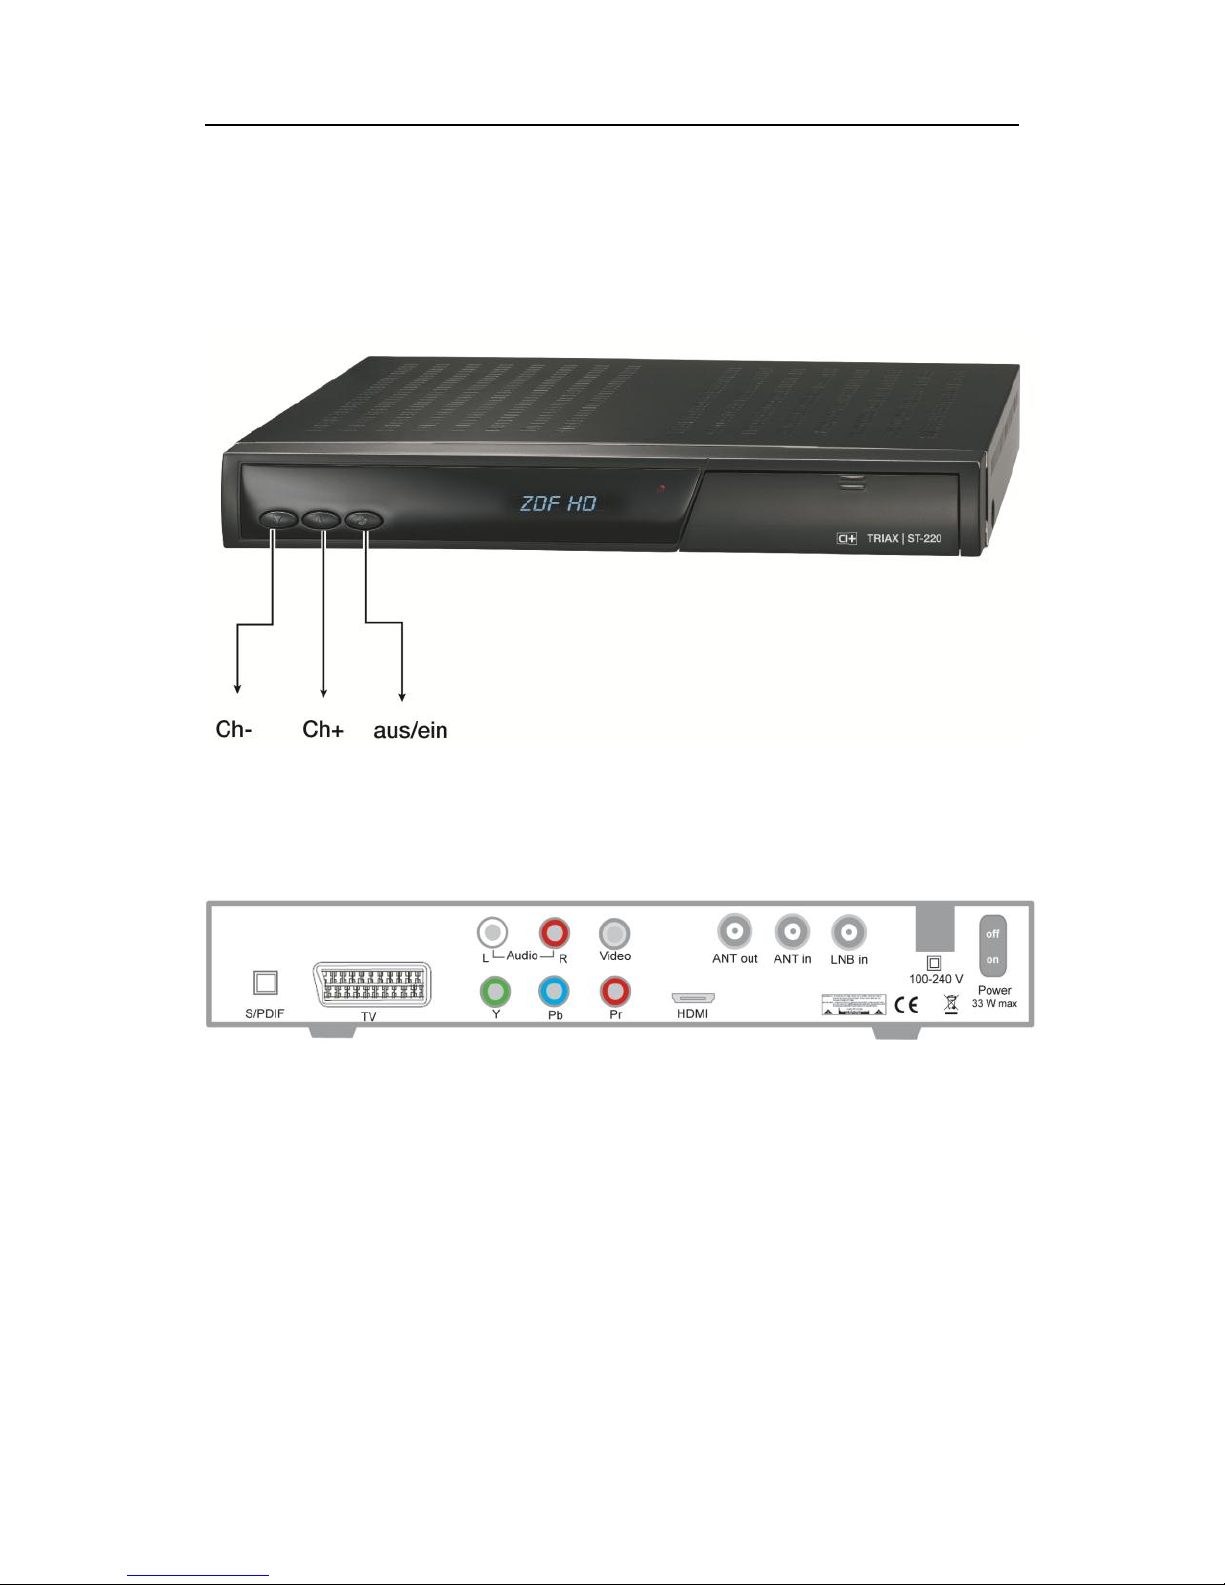
Product description
Receiver Front Panel
Receiver Rear Panel
Page 15
Seite 15 von 72
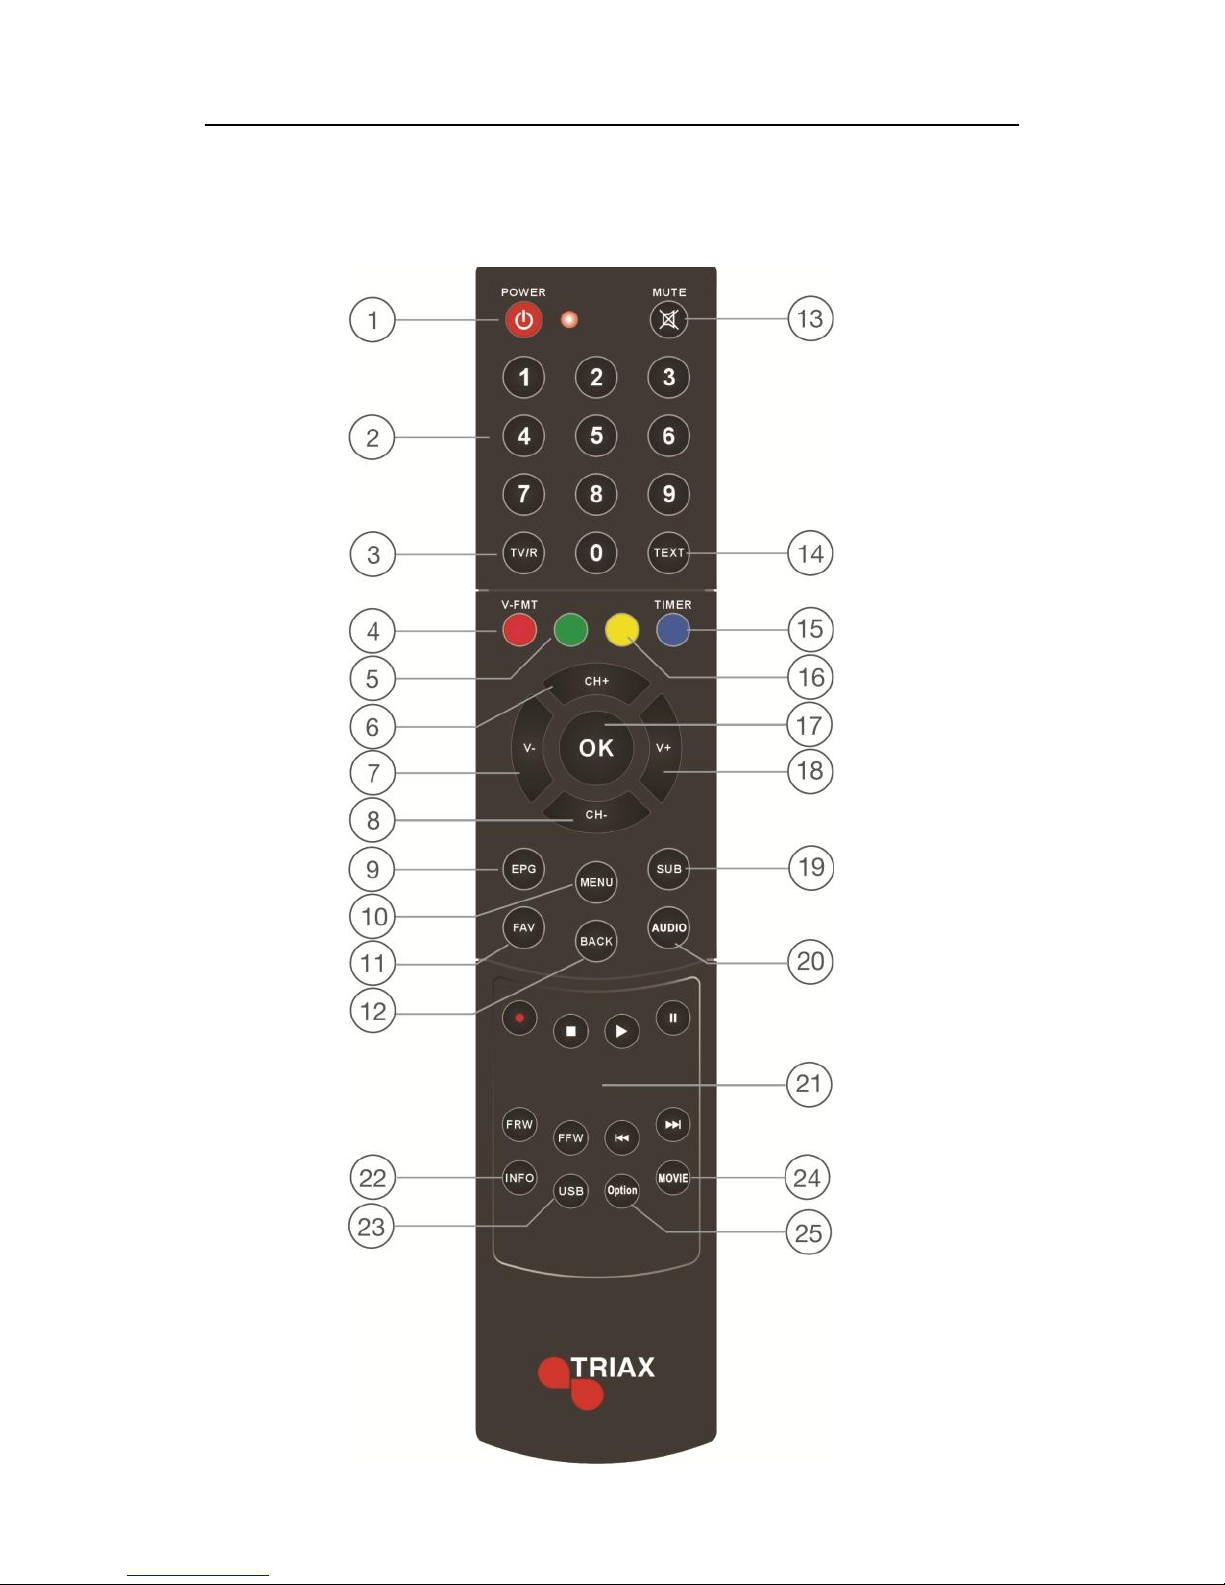
Remote control unit
Page 16
Seite 16 von 72
Pos.
Symbol
Short Description
1
Standby
Power on and off (Standby-function)
2
0-9
Numeric input of channel numbers
3
TV/R
Switch from TV to radio and vise versa
4
V-FMT
Change Video resolution,
5
green
no primal function
6
CH+
Switch to the next channel / move cursor up
7
V-
Volume down / move curser left
8
CH-
Switch to previous channel / move cursor down
9
EPG
Show EPG
10
MENU
Got to Main Menu
11
FAV
Go to favorite list
12
BACK
Exit or back sub menu
13
Mute
14
TEXT
Teletext
15
TIMER
Timer
16
yellow
no primal function
17
OK
Show current channel list,
In main menu: submit
18
V+
Volume up / move cursor right
Page 17
Seite 17 von 72
Pos.
Symbol
Short description
19
SUB
Subtitling
20
AUDIO
Change audio stream
21
PVR
Buttons reserved for PVR functionality
22
INFO
Current channel information
23
USB
Direct access of USB folder
24
MOVIE
Direct access to recorded streams
25
Option
Multifeed option for sub channels
Page 18
Seite 18 von 72
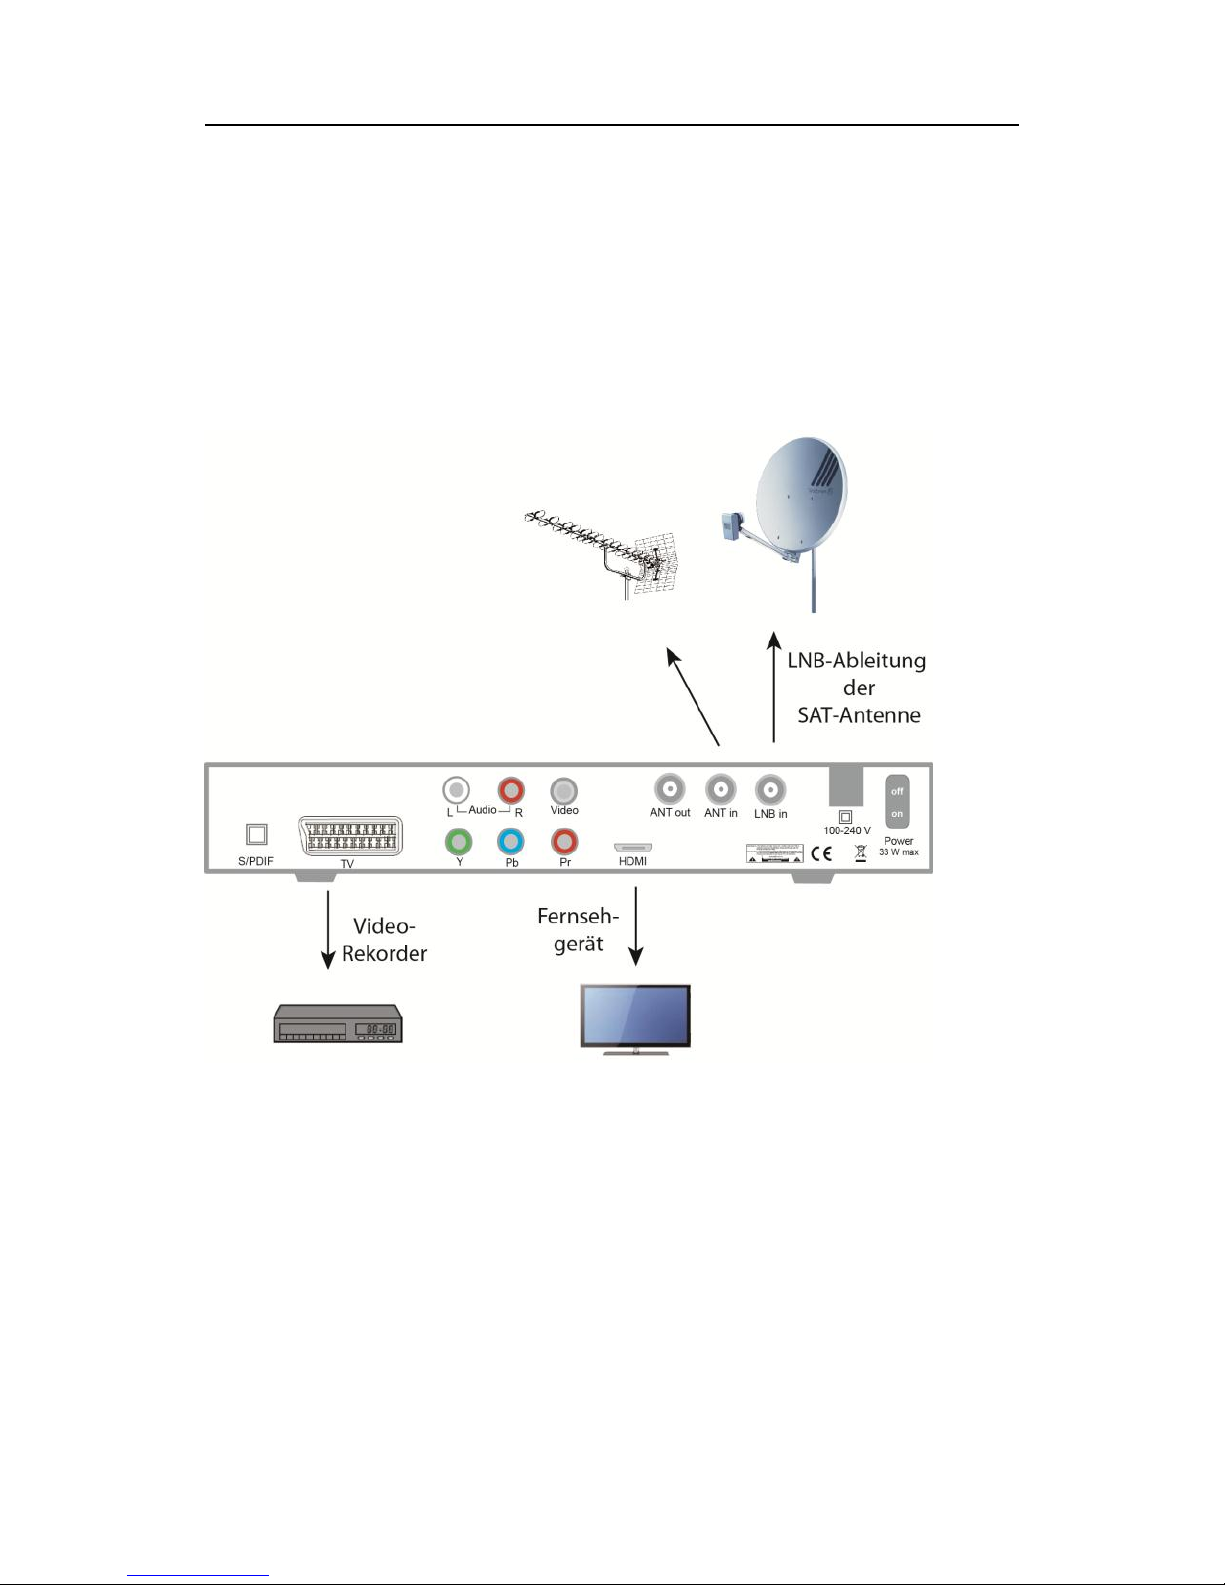
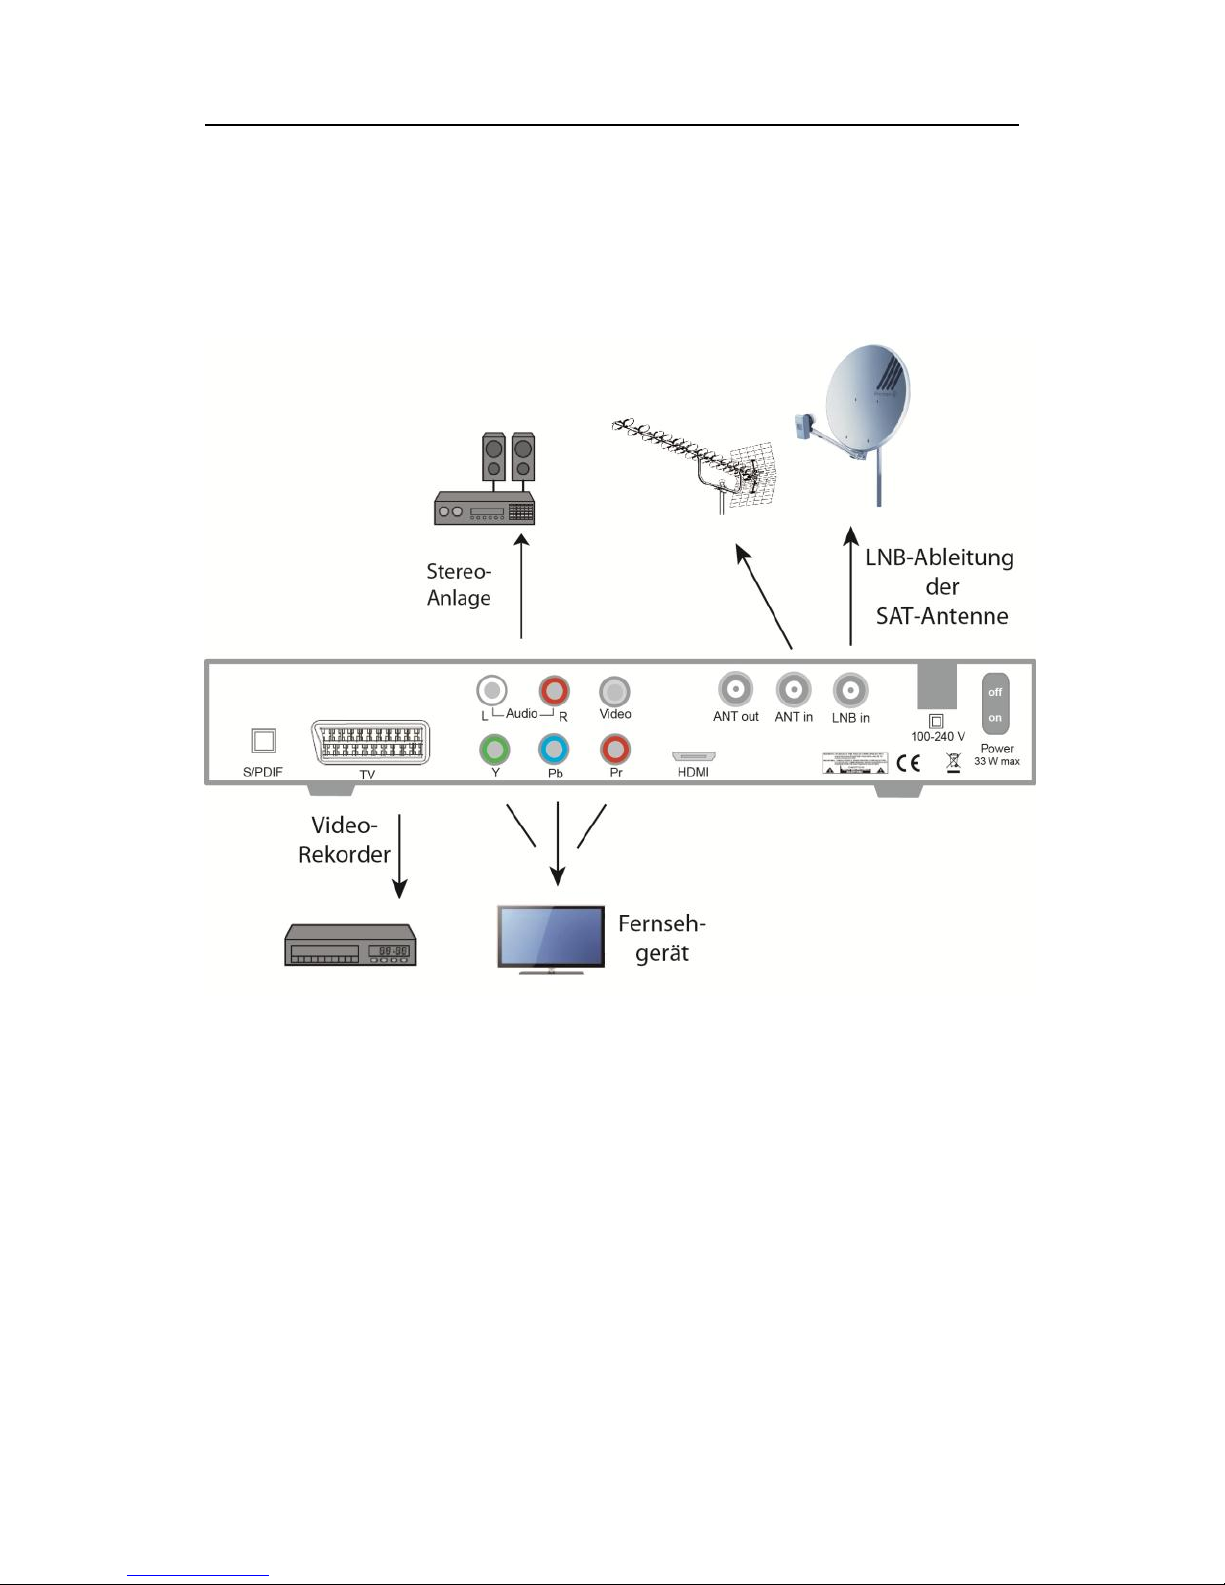
Connect your receiver
Connect your receiver via a coaxial cable to the antenna outlet
Coaxial cable is not supplied with this package.
Attention!
Connect the receiver to the mains when you have connected it to
all equipment and the antenna. Otherwise, the receiver may be
damaged.
The wire mesh and the inner core of the coaxial cable carry current during operation.
Attention!
Note for network separation: The standby button does not disconnect the device from the mains. In standby mode the device consumes power. To completely disconnect from the mains set power
switch to "off" please.
Page 19
Seite 19 von 72
Set-up with HDMI cable
Please note that Scart and HDMI cable is not supplied with
this package.
Page 20
Seite 20 von 72
Connectivity with YUV-Components
Page 21
Seite 21 von 72
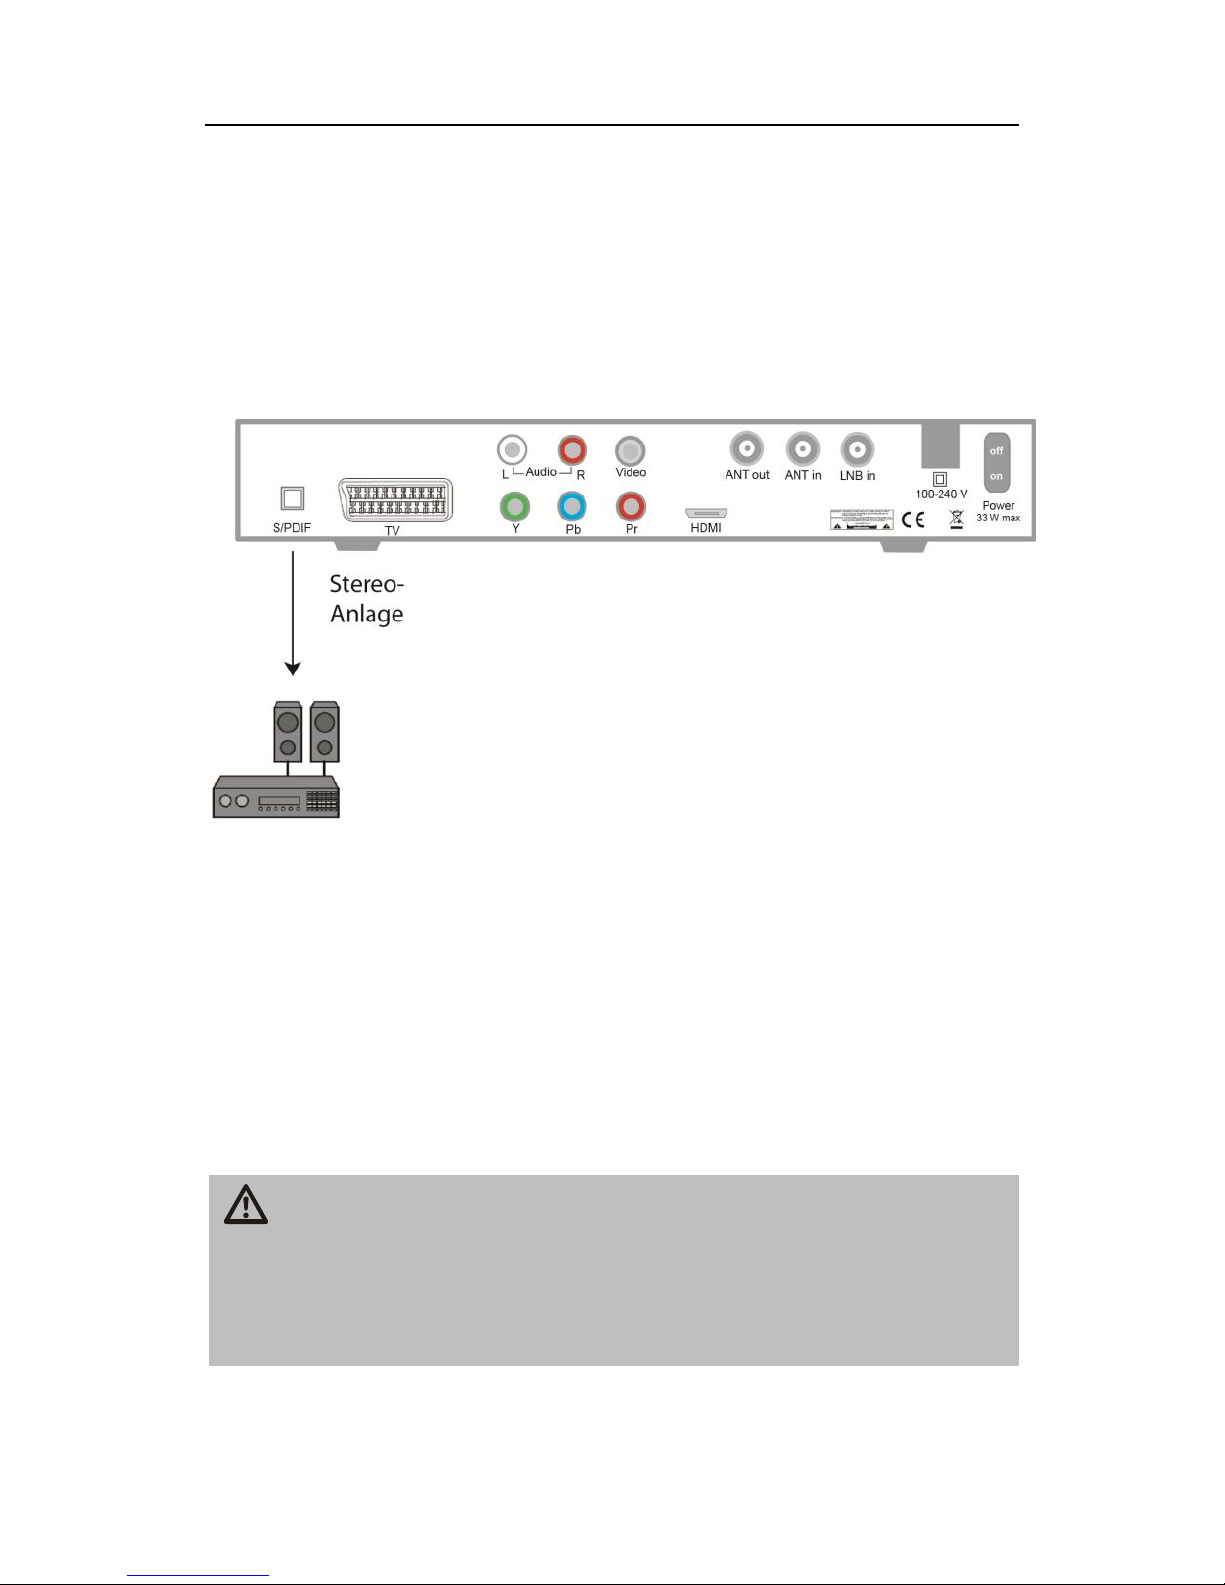
Connectivity with Digital-Audio-Receivers (optical
Digital Out)
Remote control
The remote control uses two Micro type batteries:
LR 03/AAA/1,5 V
Insert two batteries according to polarity into the battery
compartment and replace the battery cover carefully until it
locks.
Caution!
Batteries may contain toxic substances that are hazardous to
health and the environment. Dispose of batteries in correspondingly to the relevant statutory provisions. Do not throw the batteries in your household rubbish.
The remote control transmits infrared signals to the receiver. For the
function of the buttons in the overview of the remote control. Point the
Page 22

Seite 22 von 72
remote at the front of the receiver and press the corresponding key
onceReceiver
Caution!
Check the connections of all equipment and the antenna before
connecting the receiver to the mains.
Insert the power plug of the connected devices into the
mains socket and turn on the connected equipment. Turn the
appropriate channel (eg HDMI) on the TV set. Insert the
power plug of the receiver into the wall socket. Turn on the
receiver back on the power switch. The device is in normal
mode. The current program number is displayed. The receiver is supplied with preset TV channels and can be used
directly after the initial installation process. To determine
whether there are new programs please run a program
search. .
Page 23

Seite 23 von 72
First Time Installation wizard
After you have read the safety instructions and the chapter "Connecting your receiver" successfully please connect the device to the power
supply and the set the power switch on the back to "on". The initial
booting takes about 15 seconds (display "boot")
During the booting process the display will show "Strt" and the screen
displays the welcome screen of the installation wizard. Make sure that
the TV is connected to the HDMI or the TV Scart output of the receiver!
With the help of the installation wizard, you can adjust very easily the
most important settings on your digital receiver
Select the menu language
The first installation step is to select your preferred language using the CH + or CH-
buttons and confirm with OK. Then press the blue function key for the next step.
Page 24

Seite 24 von 72
Select your country
In the next step, you specify which country the digital receiver is operated. The selection
of the country is with the V- or V +. With the blue function key to go to the next step.
Video disply set up
In the now following step of the installation wizard, select your preferred settings for picture
and sound. Alternate between the menu items with CH + or CH-.
Video Resolution: Select the video resolution with V + and V-.
Screen Format: Here you set the aspect ratio of your TV.
Video Signal: Here you set the video signal with V-or V +.
Digital Audio Output: Set here whether the sound from the digital audio output as bitstream
or LPCM.
With the blue function key to get to the next step.
Page 25

Seite 25 von 72
Satellite reception
In this step of the installation wizard, select the satellite you want to see using the CH + or
CH- confirm with OK. A standard program list is loading in the background. Press the blue
button to the next step
Page 26

Seite 26 von 72
DVB-T reception
Confirm DVB-T with ok button to run an automatic search for all terrestrial channels.
Otherwise exit with submitting End.
Page 27

Seite 27 von 72
Control the Receiver
Information when changing channels
When changing channels on the screen for 5 seconds (adjustable via
the menu item "Settings - OSD Setup - OSD delay) displays an information bar.
In this you will find the following information
Program name
Received satellite or reception via DVB-T
Current date
Current time
Memory
TTXSymbol
Appears when the selected frequency Teletext offers.
EPGSymbol
Icon is displayed when the selected broadcasting station offers
the program guide.
HeartSymbol
The heart symbol is displayed if you recorded the program in
your favorites list.
$-Symbol
The $ symbol is displayed when the selected channel is a
encrypted pay tv channel
ProgramGroupSymbol
The corresponding channel-group symbol is displayed if you
have taken the program in your program list.
Information
Information about current and next program
Page 28

Seite 28 von 72
On-Screen-Display
With the menu in the user interface, you can adjust individual settings
of your receiver. This requires the receiver and TV set is switched on
and a connected via a cable (e.g. HDMI)
Press the "MENU" button. The main menu is displayed. Use the
"BACK" button or you press "MENU" button to exit this menu again..
To orient yourself within the menu
Top: Menu name
left: Menu symbols
middle: Sub menu items
Page 29

Seite 29 von 72
Menu set up
Main Menu
Sub menu
Channel list
(Symbol:
TV set)
TV-Channel list
Radio Channel list
Delete all
Installation
(Symbol: SatAntenna)
DVB-S Installation
DVB-T Installation
System settings
(Symbol: gear
wheel)
Language
TV-System
Local Time
Timer settings
PIN
OSD setting
Favorite
Others
Settings
(Symbol:
Case)
Information
Factory reset
Common Interface
Software-Update
Disconnect USB device
Page 30

Seite 30 von 72
Sudoku
Othello
Page 31

Seite 31 von 72
Navigate within the menu
With the different menu you browse using the buttons CH+, CH-, V+,
V-. Active menu items will be highlighted. You submit with the OKbutton. To exit the menu you have to press the BACK-button. All
changes have to be submitted first. Some changes will ask you to
submit with a double confirmation.
Page 32

Seite 32 von 72
Change of channel list (Symbol: TV)
On the following pages we’ll describe all the submenu and actions
with the menu item “change channel list”.
Page 33

Seite 33 von 72
• TV- Channel list
The channel you want to change is highlighted with a yellow bar.
The editing options on the following 5 keys can be activated
1. FAV:
FAV button on the remote control. The "FAV" is raised and thus enabled. Select the desired program, which is to be assigned to a favorites list and confirm by pressing the OK button. Now arrange
the selected program to the desired favorite list and press the OK
button again. The Favorites group is now marked with a tick. Leave
the selection of the favorite groups with the BACK button. The program is now marked with a heart symbol. Press the FAV button to turn
it off. When leaving the menu with the back button, confirm the prompt
to save your favorites.
2. Lock:
Press the red key on the remote control. The "lock" is raised and has
been activated. Select the desired program, which should be marked
for blocking, and then press the OK button. After entering the PIN, the
current program will be marked with a lock. You can now select additional programs and select by pressing the OK button to lock. Press
Page 34

Seite 34 von 72
the red function key to disable the function. When leaving the menu
with the back button, and confirm the prompt with a lock marked programs are blocked. These programs can now be seen only after entering the current PIN.
Note: In the menu under System Settings - PIN must be enabled to
select channel lock. Is it disabled, the locks are shut down until the
selection program lock is reactivated
3. Skip:
Green function button on the remote control. The "Skip" is raised and
has been activated. Select the desired program, which should be
skipped out. This is highlighted by pressing the OK button with an
arrow. You can now select other programs and select by pressing the
OK button to skip. Press the green function key to disable the function.
When leaving the menu with the back button, and confirm the prompt
to skip the stored programs. At the "zapping" of the programs, these
programs are skipped.
Were the changes in items FAV and Lock enabled and skip
through confirmation of the question, they may in the same
manner as described above, be reversed..
4. Move:
Press the yellow button on the remote control. The "Move" is raised
and has been activated. Select the desired program, which is to be
moved by pressing the OK button.
You can move multiple programs simultaneously, by selecting them by pressing the OK button.
Select using the CH + and CH- buttons your preferred channel number. Press the yellow function key, the shift is performed. Exit this
menu with the back button, and confirm the security question.
5. Edit:
Press the blue button on the remote control. A new menu opens.
Page 35

Seite 35 von 72
Item „ABC“: Press red function key The different filters to sort your
channel list will be displayed.
Item „edit“: Green function key. The program name of the current sta-
tion can be changed.
Item „erase“: Select the programs that you want to delete, and press
the OK button. The programs to be deleted are marked with an X.
When leaving the menu with the back button and confirm the prompt
changes of these 3 fields are performed. You return to the previous
menu.
When leaving the menu item "TV Channel List" confirm the prompt to
perform the changes. If the prompt is not confirmed, you exit the menu
without changes.
• Radio Channel list
All actions are the same as under TV Channel list
• Delete All
Page 36

Seite 36 von 72
After entering the current password and confirm the prompt all stored
TV and radio programs are deleted. By performing the factory settings, you can set default program lists again.
Page 37

Seite 37 von 72
Installation DVB-S (Symbol: Sat-Antenna)
• Antenna setting
Here you can specify whether you want a fixed antenna
or an antenna with a rotary motor connected to the receiver
have connected.
• Satellite list
The list of all known satellites is shown. Now you can activate or deactivate by pressing the OK button the desired satellite The activation is
represented by a heart symbol.
Change (red button): Editing of the satellite name and posi-
tion. Important for antenna rotator.
New (green button): Manual addition of satellites.
Erase (blue button): Erase a satellite and its channels
Page 38

Seite 38 von 72
• Antenna Setup
a.) Instructions for setting "Permanently fixed antennas"
Satellite: Satellite selection. The satellites are listed, which
are activated in the sub satellite list. Select to edit satellite.
LNB frequency: for the selected satellite set the LNB fre-
quency. Choose Universal or Unicable (SCR). Default setting is universal.
Unicable:
A new window will open.
With IF Channel you can set the corresponding channel, at
Centre Freq. you can set the corresponding frequency .
Example: The first receiver is given IF Channel 1 and frequency 1076 MHz.
The channels and the corresponding frequencies are speci-
fied by the SCR devices (LNB, multiswitch)
Transponder: list of programmed transponder.
DiSEqC1.0: adjustment for multiple satellite reception
22K: Automatically set by the receiver.
Polarisation: default setting is "AUTO". However, horizontal
or vertical LNB supply voltage can be set.
.
b.) instruction for setting „Rotator Antenna“
(Antenna with rotator)
LNB Typ: Set the selected satellite, the corresponding LNB
frequency. Default setting is universal.
Motor type: Sets the type of rotator.
local length/width: Only when "USALS" is selected in Item
rotator type
Page 39

Seite 39 von 72
Delete all: You can delete all previously made satellites posi-
tions. Not Available when selecting "USALS" in Item rotator
type
Rotator setting: access to the DiSEqC 1.2 control center. In-
dividual satellite positions are stored here.
Limitation: Definition of the turning radius.
• Single satellite search
In this submenu, you can search a complete satellite for (new) programs.
Satellite: Select the satellite you want to scan.
Only FTA: FTA = Free To Air received programs.
YES = only FTA programs will be displayed
NO = Both free and encrypted programs will be displayed
Channel search: Select if only for TV programs, radio pro-
grams only, or both will be searched.
Network search: Smart search. Available only if the following
is selected "Search Preset".
Search Mode:
Select „Auto Search“: The complete satellite is searched. No
data is required. Select "Search - default": only already created transponders are searched.
Search: Press the OK button on the search starts. The pro-
grams found are added to the end of the general satellite list.
• Multi Satellite Search
Here you have the option of all in the sub menu entitled "Satellite List"
active satellites to be searched at once. The setting of the filters described in the previous sub-menu item.
Page 40

Seite 40 von 72
• TP list
In this menu you can edit the transponder which you have activated in
the sub menu Satellite list .
Edit (red button): Editing the parameters of the selected
transponder. Note that this change has effect on the programs of the modified transponderder!
New (green button): Add a new transponder which is not yet
saved.
Delete (yellow button): Delete the selected transponder
Search (blue button): Scan the selected transponder for new
programs
Example of program search:
You know that on a certain frequency new programs will be broadcasted.
Satellite: ASTRA 19,2° Ost - Frequency 10836 MHz
Symbolrate: 22.000 Ks/s - Polarisation: horizontal
Proceed as follows
Submenu TP-List
Press the green function key on your remote control. The
"TP add" opens.
Enter the frequency 10836 with the 0-9 keys on the remote
control.
Enter the symbol rate 22000 with the 0-9 keys on the remote
control.
Set the polarization H for horizontal using V+ and V-.
Save the entries by confirming “save” with OK.
Page 41

Seite 41 von 72
The newly created transponder will be created at the end of the transponder list of ASTRA 19.2 ° East and appears accordingly in the
transponder list.
Page 42

Seite 42 von 72
Press the blue button on your remote control. The "TP Scan"
window opens.
Set the search filter.
Start the search by clicking on the following "OK" by press-
ing the OK button.
Page 43

Seite 43 von 72
The new programs will be added at the end of the existing
Channel list.
Page 44

Seite 44 von 72
Installation DVB-T (Symbol: Sat-Antenna)
• DVB-T Channel Scan
Search a specific channel for programs.
• DVB-T Auto Scan
Search the entire terrestrial frequency range for programs. You can
set the filter in order to search only for free or encrypted programs.
• LCN
Logic Channel Numbering.
• Power Supply
Set the 5V power supply for an external terrestrial antenna.
Page 45

Seite 45 von 72
Sytem settings (Symbol: gear wheel)
• Language
Language: Select the menu language
First Audio Channel: Pre selection of audio language (if of-
fered by the broadcaster)
Second Audio Channel: Pre selection of audio language ( if
offered by the broadcaster)
Teletext: Character selection for Teletext
• TV-System
Video resolution: Selection of the max video resolution
HDTV like quality for HD channels starting from 720p
Color scheme used in the video signal: CVBS
Port used: HDMI
Page 46

Seite 46 von 72
Display-Format: 4:3 LB, 4:3 PS, 16:9, Auto
Video-Signal: Setting the color scheme. To obtain the HD
quality of HD programs CVBS must be set.
Digital audio out: select the preferred audio stream
• Local time
The clock will automatically be set during the initial installa-
tion process and can not be changed.
Page 47

Seite 47 von 72
• Timer setting
With the timer function, you can program the receiver to a specific
time an operation such as record. There are 8 independent Timer
slots available.
Untermenü
Beschreibung
Timer Number
Select the timer 1-8
Timer Mode
Once, daily, weekly, off. Timer will be deactivated when setting “off” is chosen
Timer Service
Channel: At the programmed time the receiver switches to the programmed event.
Recording: If an external USB storage device
is connected properly, you can schedule
recording a program (service is dependent
on the broadcaster).
Star Channel
Selection of channel
Start Date
Enter the date when the event starts.
Start Time
Enter the time when the event starts
Duration
Enter the duration of the event
Save the settings by clicking on the following "Save" with the
OK button.
Page 48

Seite 48 von 72
• PIN (Default Password: 0000)
Menu Lock: When enabled, the main menu items that serve
the basic setting of the receiver will be blocked.
Program lock (Parental control): Enable/Disable to release
the locked programs in submenu TV Channel list
New Password: Setting a new password. (New password
remember here)
Passwort bestätigen: Confirm new password by re-entering.
• OSD setting
OSD delay: Menu display time
OSD transparency: off/10%/20%/30%/40%
• Favorite
Allows you to rename the favorite groups individually.
• Others
LNB power: turn the LNB power supply on and off. Default is
on. If you have connected an antenna system or a SCR system without a power supply to the receiver, turn off for the
LNB power supply.
Sound: Turn on and off the built-in acoustic satellite finder
signal.
Auto Standby – ON/OFF
Page 49

Seite 49 von 72
Settings (Symbol: Case)
• Information
Information about the SW and Loader version currently installed on
your receiver.
• Factory settings (requires password entry)
Reset the receiver to factory settings. All changes made will be lost.
The receiver will start up with first time installation menu.
Page 50

Seite 50 von 72
• Games, e.g. Othello / Sudoku
The mentioned games are available
• Common Interface
CI + / CI module and smart card are not included with
this package
With this receiver, you can also view encrypted programs. You must
have the smart card of the party and an appropriate CI or CI + module.
The receiver has a CI + module slot.
The term refers to the Common Interface "Common Interface" to plugin CI + / CI modules (also known as CAM). This item provides information on the inserted CI + / CI module. The menu depends on the
inserted CI + / CI module.
To insert the module, turn off the receiver first completely off the power switch on the rear panel. Then you open the door of the Common
Interface slot on the receiver front panel.
First, run the CI + / CI module into the Common Interface slot until it
stops. The push button on the right side of the Common Interface slot
appears.
Caution:
When you insert the CI + / CI module or smart card incorrectly, the
receiver, the module or smart card may be damaged. Please note
the instruction of the supplier of your receiver, your CI + / CI module
and your smart card.
Now insert the smart card into the module. Then you turn the receiver
on again. The module is being initialized. Depending on broadcaster a
message appears on your screen. Please follow these instructions.
This process can take several minutes to complete.
Close the flap of the Common Interface slot, if no external USB storage device is plugged. This will help protect the inside of your receiver
from dirt.
As long as you want to watch the program to be decrypt-
Page 51

Seite 51 von 72
ed, the CI+ or CI module with the smart card must be
inserted in the Common Interface slot correctly.
To remove the module from the Common Interface slot, open the flap
and press the button on the right side of the Common Interface slot.
You can now remove the module with the inserted smart card.
• Software-Update (requires password entry)
USB-Update: Software-Update via USB port.
The software update via the USB interface is the fastest
and most convenient way of software updates. If you
perform a software update, the method via the USB interface is preferable. Current software under www.triaxgmbh.de.
Update via satellite: The necessary data are preset. The
process starts when you confirm "Start" and press the OK
button. The receiver is prepared for this service, ie not always a new software version has to be available on a satellite.
The software update via satellite has nothing to do with
the storage of new TV channels, but only serves to update the system software of the receiver.
The software update is not for the ordinary operation of
the receiver
You have to adjust your satellite system to the satellite
ASTRA 1 at 19.2 ° East, in order to perform the software
upgrade
The software update may take up to an hour.
It is recommended in addition to the upgrade to load the default setting. Please note that your specially created channel list will be lost.
Page 52

Seite 52 von 72
Save channel list
Save current program on a connected USB storage device.
You can edit this list with the channel-list editor on a PC. The
finished list can be uploaded on the next submenu item on
the receiver.
Load channel list
Uploading an edited list from a USB storage device.
Page 53

Seite 53 von 72
The following features are limited to the USB PVR function.
Media Player (only active when inserted USB-readable storage
medium)
Plug a USB drive into the USB port on the receiver's front panel. Detected files and folders are displayed.
Page 54

Seite 54 von 72
Press the EPG button to switch between the different categories.
Choose from images, video, recordings and music.
Known image files are in the black box also displayed as a preview, if
they are marked.
Image files (jpg-files)
Image files which are shown in the preview can be shown in
full-screen by pressing the OK button. Do you want to show
several pictures you can create a slideshow. If you have already created a slideshow, you can play this by pressing the
yellow function key. Press the FAV button with the function
"Playlist ADD" you can individually add pictures to a slide
show. Confirm and it appears the slideshow and the files related to it.
Use the red button to play the slide show. Use the back button to
stop the slideshow.
Page 55

Seite 55 von 72
With the “info” button adjust the slideshow to your wishes.
Time: Duration of the image-display during the slideshow.
Repeat: Enable or disable continuous playback of the slideshow.
With the yellow function key remove the currently highlighted picture
file in the slideshow list. With the blue function key remove all images
from the slideshow list.
• Remove USB devioce
To safely remove external USB storage media from receiver.
Page 56

Seite 56 von 72
External HDD (Symbol: movie role)
When using this main menu item, a USB storage device
has to be properly connected.
Encrypted recorded programs can only be decrypted with
the corresponding CI + / CI module and smart card inserted in the CI+ slot. Depending if the service is supported by the program providers.
• HDD infomation
Information on the USB storage medium.
• PVR settings (optional)
Timeshift
With the time-shift function you can interrupt a running program and see further at a later date. The receiver will record
the program on the USB storage device. The screen image
is frozen, so you can look further at this point. To use this
feature, you have to enable Timeshift here. Press the pause
button again during normal operation. Once you want to see
Page 57

Seite 57 von 72
the program continue, press the play button. You can see
the program now from the time you pressed the PAUSE button. If this item is turned off, then the image is frozen when
you press the pause button only.
The recording of the time-shift function is not permanently
stored on the hard drive. By switching or stop recording,
timeshift recording is discarded. The shift function has a
capacity of up to 90 minutes.
Timeshift to record
Enable / disable time shift for the recording of programs.
Page 58

Seite 58 von 72
Buttons with special functionality
Switching TV/R
With the TV/R button you can switch between TV and the radio function back and forth.
During radio broadcasting there will be a wallpaper displayed on the
screen.
0 - Sleeptimer
The sleep timer can be reached during normal operation over the 0
key.
You have the following setting by repeatedly pressing the 0 key: off
(OFF), 10, 30, 60, 90, 120 minutes. After this time the receiver turns
off automatically..
CH- / CH+
Channel up and down
VOL+ / VOL-
Volume up and down
MENU
Acess main menu. Also serves as a back function in any sub menu
TEXT
Teletext is an information system that displays teletext on your TV set.
For teletext reception, the selected channel must support this function.
When changing the channel you will see a TXT icon in the information
bar.
BACK
To exit menu or any other Applications.
Page 59

Seite 59 von 72
OK
TV mode: Display Channel list.
Main menu: Confirmation
V+ / V-
TV- / radio mode: Volume up and down
In active channel list: switching 10-by10.
In menu: move of cursor
CH+ / CH-
TV mode/channel list: Switch channel one by one
In menu: move of cursor
FAV
Press the FAV button will display the favorite lists
Choose the favorite list you like to access and confirm with OK
Page 60

Seite 60 von 72
EPG
Electronic Program Guide
The EPG provides program information in tabular form, if they are
made available from the broadcaster.
Information will be provided to the airtime and program content.
With V-, V+, CH- and CH+ you move within these EPG tables.
Additional information about an event / program is available by selecting it and then press the OK button. An additional window will open...
Use the green button "Timer" you can set the highlighted event directly
to the timer.
Use the red button "Next" you will receive information about events of
the following days.
Page 61

Seite 61 von 72
In the footer, you can select by pressing OK, V-and V + the following
commands:
Back to previous page (BACK).
Back to current airtime.
Scroll between the events
Browse in 2-hour interval
Day way scroll between events.
INFO
Acoustic signal for directing the satellite antenna
For its use, no external USB device has to be connected.
Press the INFO button. It will show current program content information. Press the INFO button again while the display of program
information, you will receive current parameters, including the signal
strength and signal quality. The beeper sounds if in the System Settings menu – Other - sound signal is activated.
Page 62

Seite 62 von 72
A stronger and higher signal indicates a better alignment
of the antenna.
SUB
Provides a program a digital subtitle signals, you can turn it on and off
with the SUB button.
Subtitle refers to these subtitles, which is sent on the program not via
teletext.
AUDIO
Select of audio streams.
Page 63

Seite 63 von 72
Button for PVR functionality (optional)
●
Press once: Direct recording of the current program.
Press again: Setting the recording duration in hh: mm
Press once to stop recording after confirming the security question.
►
Playback button. By pressing this button, the playback of the selected
recording is started or continued.
First, press the MOVIE button to call up the list of recordings of the
receiver.
PVR mode: pause playback
Normal mode: enable time-shift when the time-shift function menu
External Memory - Setting PVR - Timeshift is enabled. If this is disabled, only the current program is "frozen".
FRW / FFW
Rewind / Fast forward
Repeated pressing will give you different speeds.
/
Jump button in playback mode.
MOVIE
Direct access to recordings. Possible only if external USB storage
device is connected properly and the receiver recordings are stored.
USB
Accessing the images data directory.
Page 64

Seite 64 von 72
Cleaning the receiver
Caution!
The receiver should not be wet. Never clean it with a wet cloth.
Do not use solvent-based cleaning agents such as benzine or
thinner. These can damage the surface of the housing.
Clean the exterior of the receiver only with a dry cloth.
Clean the display of the receiver with a slightly damp cloth.
Dismantle the receiver
Disconnect the receiver and connected equipment from the
power supply.
Loosen the LNB cable from the receiver.
Remove the batteries from the remote control if you do not
use the receiver for a longer time.
Pack the receiver, the cables and the remote control in the
box.
Store the receiver and all accessories in a dry, dust-free ar-
ea.
Protect it from frost.
Page 65

Seite 65 von 72
Tips and Hints
If the solutions listed here do not eliminate the malfunctions, perform a
factory reset as follows:
Press and hold the standby button on the front of your receiver for
longer than 10 seconds. Now the factory settings will be reloaded.
Caution!!! Thereby you lose your personal settings
Symptom
Possible cause and remedy
Satellite can not
be found, or no
signal
For instance: ASTRA19E
Numeric button 1 (Pre programed on: „Das Erste“)
Button INFO („Das Erste“, FR11837)
Signal and Quality is both 0 %
Align the vertical dish to the south a few millimeters to
the left, wait about 3 seconds and repeat until signal
AND quality are displayed. When a signal of about 60%,
the black background and the TV picture.
For another satellite you select a current program from
the preset channel list and then press the INFO button.
Display on front panel
is black
The power cord is not connected.
Connect the power cable to the mains socket.
Possibility of a short circuit at the antenna feeder: Check
connections
No sound or picture,
but receiver menus
available
The antenna is not directed towards the satellite.
Point the antenna properly.
No signal (with symbol).
Check the cable connection from the LNB to the receiver
and from the receiver to the connected devices.
Adjust the antenna.
On front display
channel number is
visible, TV has no
picture.
The system is not connected properly.
Check the connection of HDMI-/SCART-cables
The TV set is not in HDMI-/AV-Modus.
Turn on the TV set to the respective AV input.
Page 66

Seite 66 von 72
Poor image, blocking
error, pixeling, no
sound
The antenna is not directed exactly towards the satellite.
Point the antenna more precisely. Purpose, use the
INFO button on the remote control. Signal indicator for
antenna alignment is displayed.
LNB is faulty. Replace the LNB.
No picture, no sound,
signal strength available, no signal quality
Satellite dish is aligned to the wrong satellite.
Software crash (the
receiver can not be
operated)
In the unlikely event of a software crash, unplug the
receiver from the mains. Plug it in again after 10 seconds.
Please note that a software crash is not a malfunction.
For technical devices (eg PC also, wireless network, etc.)
can be a software crash on this path solve quickly and
easily.
The remote control
does not work.
The batteries are exhausted.
Replace both batteries.
The remote control is misaligned.
Point the remote at the front of the receiver and make
sure that there is nothing between the remote control
and the receiver.
Program has received a new frequency and is not
transmitted with the
current data
Delete the appropriate program, then perform automatic
search.
Exit favorit list
FAV button, press one button.
Password
The default password is 0000
Personal Password
Please contact the service hotline if you forgot your
password.
Channel Editor
On the homepage www.triax-gmbh.de you find a channel
list editor for download.
Page 67

Seite 67 von 72
External USB
storage media is
not detected.
Please turn off receiver with the power switch.
USB storage device to be connected again.
Switch on receiver again
The well-known, commercially available USB storage
devices are compatible with this receiver. For larger USB
hard drives, use an external power supply, in accordance
with the instructions of the USB drive.
If a malfunction can not be rectified in spite, please contact your dealer.
Page 68

Seite 68 von 72
Disposal
Receiver
European waste directive 2002/96/EG
Don’t throw the receiver in your normal household waste. Check with
your municipal or local authorities about possibilities of a umweltund
proper disposal of equipment.
Batterie
Never dispose of batteries in the general household waste. Batteries
may contain toxic substances.
Dispose of the batteries in accordance with applicable regulatory requirements in the context of the legal obligation to return. Ask at your
local council or local authority on environmentally-friendly options and
proper disposal. Return used batteries to a collection. This will make a
positive contribution to the environment.
Page 69

Seite 69 von 72
Technical Data
Receiver
Dimension mm (W × D × H)
310 x 200 x 50
Weihgt (g)
Receiver 1400 g
Remote control 80 g (without batteries)
Inputfrequency range
Terrestrial
Sat
50,5 MHZ – 865 Mhz
950 MHz ~ 2150 MHz
IF-Bandwidth
55 MHz/8 MHz (< 5MS/s)
Voltage, LNB
13/18 V, 0,30 A max.
LNB-control
22 KHz ± 2 KHz, 0,6 V pp ± 0,2 V
DiSEqC-control
Version 1.0, Version 1.2, Tone-Burst
A/B
Symbolrate
1 ~ 45 MS/s
Bit Stream
MPEG-2 ISO/IEC 115200 Bit-StromSpezifikation
Error rate (FEC)
1/2, 2/3, 3/4, 5/6, 7/8, auto
Video
MPEG-2 MP@ML
Audio
MPEG -1/2 Audio-Layer 1 oder Layer 2
Aspect ratio
4:3 LB, 4:3 PS, 16:9, Auto
Video resolution
720 x 576 (Pal), 720 x 480 (NTSC)
1280 x 720, 1920 x 1080
Audio mode
Links, Rechts, Stereo, Mono, AC3Digitalton
Connectivity
LNB IF-infout
Typ F, IEC 169-24
TV-SCART (output)
Video output YUV, RGB, Audio L, R
RCA (CINCH)
Audio L,R
COAXIAL
Digital Audio Out
HDMI - Ausgang
Connection for digital transmission of
audio and video signal
Page 70

Seite 70 von 72
YPbPr
Components
USB
USB 2.0 port
CI Slot
CI+ interface (1 x)
Power Supply
AC input voltage
100-240 V ~, 50/60 Hz
Supply Voltage
ca. 15 W (Operation with Single LNB)
ca. 1 W (Stand by)
max. 33 W
Operating temperature
0 ºC ~ +40 ºC
Storage temperature
– 40 ºC ~ + 65 ºC
Page 71

Seite 71 von 72
Declaration of Conformity
The manufacturer declares that this product complies with the following directives and standards:
Low Voltage Directive 73/23/EWG
EN 60 065
Electromagnetic Compatibility Directive 89/336/EWG
EN 55 013
EN 55 020
EN 61000-3-2
EN 61000-3-3
Page 72

Seite 72 von 72
Manufacturer
Dear Customer,
Past experience has shown that many reasons for complaints can be
solved by a simple telephone call.
If you have problems with your device, please contact our Technical
Support Line only. This procedure saves you time and possible irritation
At our technical support line explains you the exact procedure of the
warranty, if you need to send in your device.
Triax A/S
www.triax.com
 Loading...