

Page 1

User manual
TRIAX DVB-S2 Reciever
Article
Article no.
TRIAX DVB-S2 Receiver
305216
Version
A
Date
10/2016
EN
Page 2

User manual
EN
2
Attention! / Achtung! / Consignes de sécurité!
EN
Failure to comply with the specified precautionary measures may cause serious injury to persons or damage to property. The
installation and commissioning may only be performed by suitably qualified persons, technicians or installers in compliance with
safety regulations.
Damage due to improper installation and commissioning, defective connectors on cables or any other incorrect handling will void
the warranty.
CAUTION: The safety requirements are according to EN 60728-11 and must be observed.
Disconnect mains power before working on electrical systems.
Any additional electrical wiring requirements should always be installed by a suitably qualified person(s).
Installation or service work should NEVER be undertaken during electrical / thunderstorms.
DE
Gewährleistung
Die gesetzliche Gewährleistung nach Paragraph 437 BGB beträgt 24 Monate.
Bei unsachgemäßer Installation und Handhabung erlischt jeglicher Garantieanspruch.
Bestimmungsgemäße
Und sachwidrige Verwendung
Die Montage und Inbetriebnahme darf nur von eingewiesenen Personen, Technikern
oder Installateuren unter Beachtung der Sicherheitsbestimmungen durchgeführt werden.
Schaden durch falsche Montage und Inbetriebnahme sowie durch unsachgemaβe Handhabung fuhren zum Erlöschen des
Garantieanspruchs.
FR
Veillez à bien respecter les consignes de sécurité ci-dessous. Leur non-respect peut provoquer des dommages matériels ou
corporels.
L’installation et la mise en route ne peuvent être effectués que par des techniciens ou des installateurs qualifiés en respectant les
consignes de sécurité.
La garantie ne sera pas appliquée lors de dégâts causés par une erreur de montage, de mise en route ou par un mauvais
raccordement ou toute autre manipulation incorrecte.
PRUDENCE : avant toute intervention, votre installation doit être conforme aux exigences définies par les dispositions Européennes
EN 50083 (conformité des installations collectives) et EN 60065 (normes en vigueur pour la protection électrique).
Débranchez l’appareil avant toute intervention, car certains composants sous tension sont dangereux (risque
d’électrocution).
Toute intervention sur l’installation ou travaux de maintenance sont à proscrire en cas d’orage.
Table of contents / Inhaltsverzeichnis / Sommaire
Attention! / Achtung! / Consignes de sécurité! ....................................................................................................... 2
1. Remote controller ........................................................................................................................................ 4
2. DTV mode .................................................................................................................................................... 6
2.1 System Initialization ................................................................................................................................................................................ 6
2.2 Entering the DVB System and Power On/Off ............................................................................................................................................ 7
2.3 Volume Adjustment and Mute Control ..................................................................................................................................................... 7
2.4 TV/Radio Switching ................................................................................................................................................................................. 7
2.5 Channel Switching ................................................................................................................................................................................... 7
2.6 Program info display ............................................................................................................................................................................... 9
2.7 Program BACK (Back to the previous channel) ........................................................................................................................................ 9
2.8 Program Language and Left/Right Channels Switching ........................................................................................................................... 9
2.9 Screen Scaling (V-FMT) ......................................................................................................................................................................... 10
2.10 Electronic Program Guide (EPG) ....................................................................................................................................................... 10
Electronic Program Guide (EPG) - continued .................................................................................................................................................... 11
2.11 Teletext ............................................................................................................................................................................................. 11
2.12 Subtitle.............................................................................................................................................................................................. 12
2.13 TTX Subtitle ...................................................................................................................................................................................... 12
Page 3

User manual
3
EN
3. Multimedia mode ....................................................................................................................................... 13
3.1 Multimedia and USB .............................................................................................................................................................................. 13
3.2 USB storage device ............................................................................................................................................................................... 14
3.3 Movie .................................................................................................................................................................................................... 15
3.4 Music .................................................................................................................................................................................................... 16
3.5 Image .................................................................................................................................................................................................... 17
3.6 Record manager .................................................................................................................................................................................... 18
4. Main menu ................................................................................................................................................. 19
4.1 Installation ............................................................................................................................................................................................ 19
4.1.1 Antenna setup ................................................................................................................................................................................... 20
4.1.2 Satellite list ....................................................................................................................................................................................... 20
4.1.3 Transponder list (TP) ........................................................................................................................................................................ 21
4.1.4 Motor setting .................................................................................................................................................................................... 22
4.1.5 Limit setup ........................................................................................................................................................................................ 22
4.1.6 Search example ................................................................................................................................................................................ 22
4.2 Channel ................................................................................................................................................................................................. 23
4.2.1 Channel manager .............................................................................................................................................................................. 23
4.2.2 Favorite ............................................................................................................................................................................................. 24
4.2.3 Delete all channels ............................................................................................................................................................................ 25
4.3 Preference ............................................................................................................................................................................................. 25
4.3.1 Language .......................................................................................................................................................................................... 26
4.3.2 OSD transparency ............................................................................................................................................................................. 26
4.3.3 Preferred audio ................................................................................................................................................................................. 27
4.3.4 DVR configuration ............................................................................................................................................................................. 27
4.4 Setting ................................................................................................................................................................................................... 28
4.4.1 Timers ............................................................................................................................................................................................... 29
4.4.2 Parental lock ..................................................................................................................................................................................... 30
4.4.3 Local time setting ............................................................................................................................................................................. 30
4.4.4 Factory setting .................................................................................................................................................................................. 31
4.4.5 Upgrade ............................................................................................................................................................................................ 31
4.4.6 Version.............................................................................................................................................................................................. 31
4.4.7 Auto shut down ................................................................................................................................................................................. 31
4.5 AV ......................................................................................................................................................................................................... 32
4.5.1 Contrast ............................................................................................................................................................................................ 32
4.5.2 Brightness ......................................................................................................................................................................................... 32
4.5.3 Saturation ......................................................................................................................................................................................... 33
4.5.4 HUE ................................................................................................................................................................................................... 33
4.5.5 S/PDIF mode ..................................................................................................................................................................................... 33
4.5.6 Aspect mode ..................................................................................................................................................................................... 34
4.5.7 Aspect mode ..................................................................................................................................................................................... 34
5. Record & Timeshift .................................................................................................................................... 35
5.1.1 Record .............................................................................................................................................................................................. 35
5.2 Timeshift ............................................................................................................................................................................................... 36
5.2.1 Timeshift: Auto ................................................................................................................................................................................. 36
5.2.2 Timeshift: Pause ............................................................................................................................................................................... 36
5.2.3 Timeshift: Off .................................................................................................................................................................................... 36
6. Upgrade ..................................................................................................................................................... 37
6.1 Upgrade by USB / OTA ........................................................................................................................................................................... 37
6.2 Upgrade by USB ..................................................................................................................................................................................... 37
Page 4
User manual
EN
4
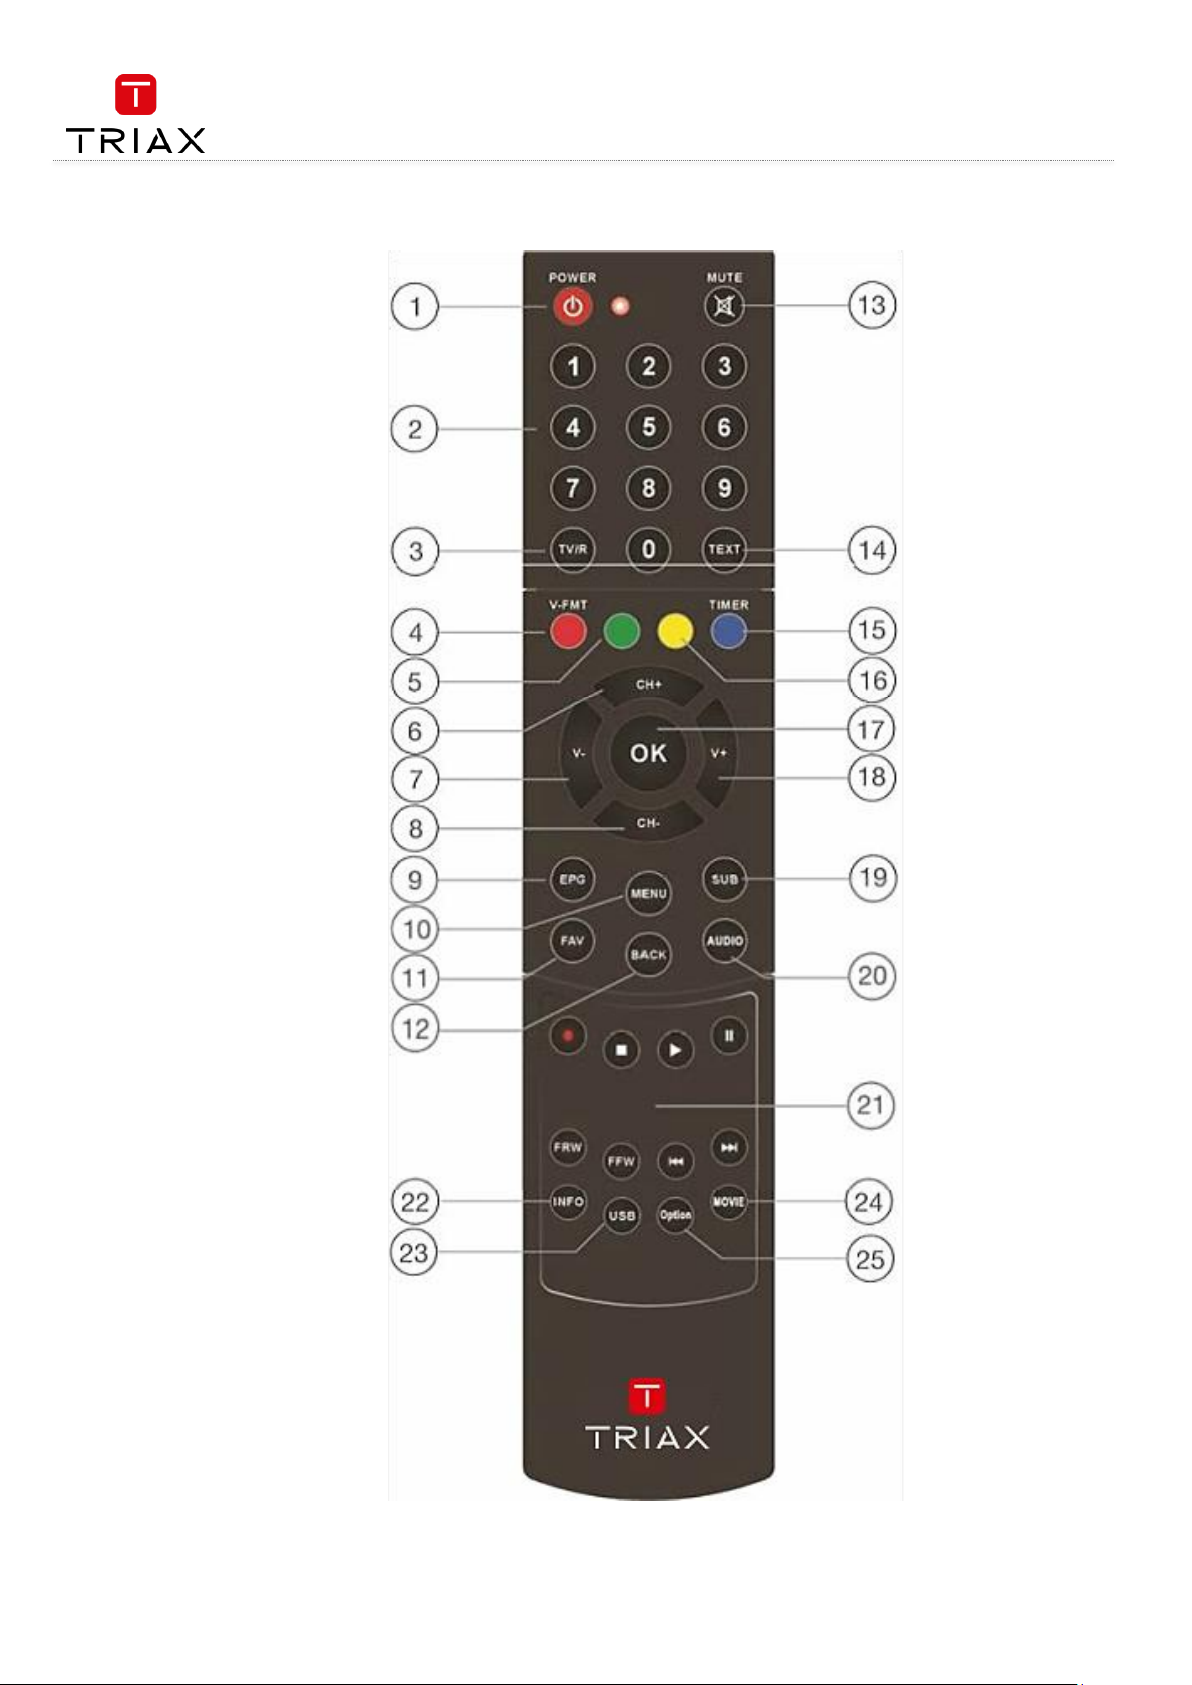
1. Remote controller
Page 5
User manual
5
EN
Button
Function
Nr
Power
Switch STB on/standby
1
MUTE
Turn sound off/on
13
0…9
Enter numeric values and select the channel
directly by entering it's number
2
TV/R
Switch between TV and Radio mode
3
TEXT
Open interactive service
14
RED/GREE
N/
YELLOW/
BLUE
For interactive function/Submenu
function buttons
4,5,
15,16
V +/-
Volume up/down
7, 18
Ch +/-
Channel up/down
6,8
OK
Enter Main menu or confirm selected
17
EPG
Open up Electronic Program Guide Menu
9
MENU
Open and close the menu screen
10
SUB
Enter the program subtitle selection menu.
19
FAV
Open favorite list
11
BACK
Return to the upper level menu.
Return to the previously played
program while in full screen playing
state.
Return to the media type switch menu
while in Multi-media mode (The Multimedia mode is for viewing information
on a USB device)
Exit the current menu.
12
AUDIO
Select audio mode to change
language / channel
20
Record the TV program
21
■
Stop program playback or recording
21
►
PLAY
21
Pause timeshift function or multimedia
playback
21
FRW/FFW
Search backward /forward
zoom images in/out
21
►►I /
I◄◄
In multimedia, go to previous or next file
21
INFO
Show or hide program info.
Show the information of the selected
item while in EPG state.
Show the detailed information of the
being played media file while in
multimedia playback state.
22
USB
Select and show information about
USB device
23
MOVIE
Switch between multimedia / DTV
24
OPTION
Not used
25
Page 6
User manual
EN
6
2. DTV mode
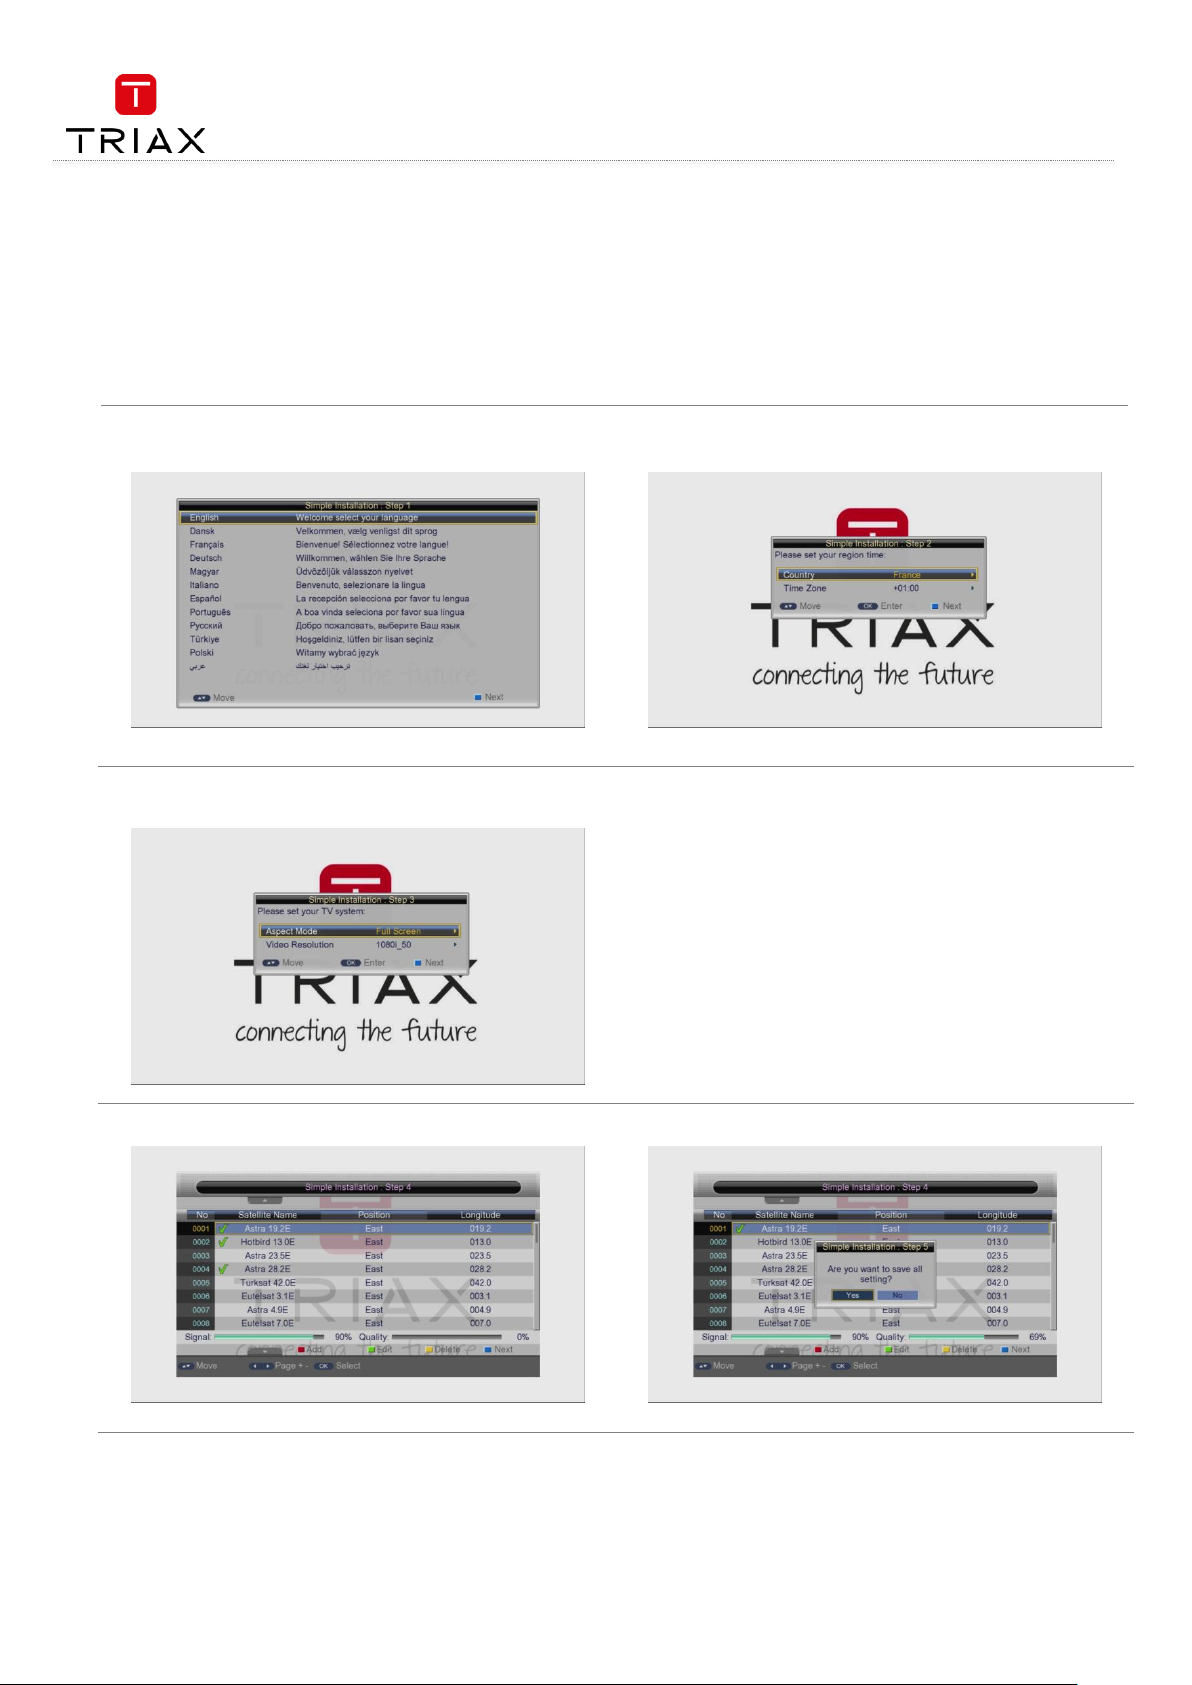
2.1 System Initialization
When entering the system for the first time, you should do some initialization settings on the system including language, country (region), time
zone, active antenna and logical channel number, etc. See the figure below for the setting menu.
After setting, select the blue funtion key option and then press OK key to start auto scan. When the scan completes, the scanned programs can
be auto saved.
Page 7
User manual
7
EN
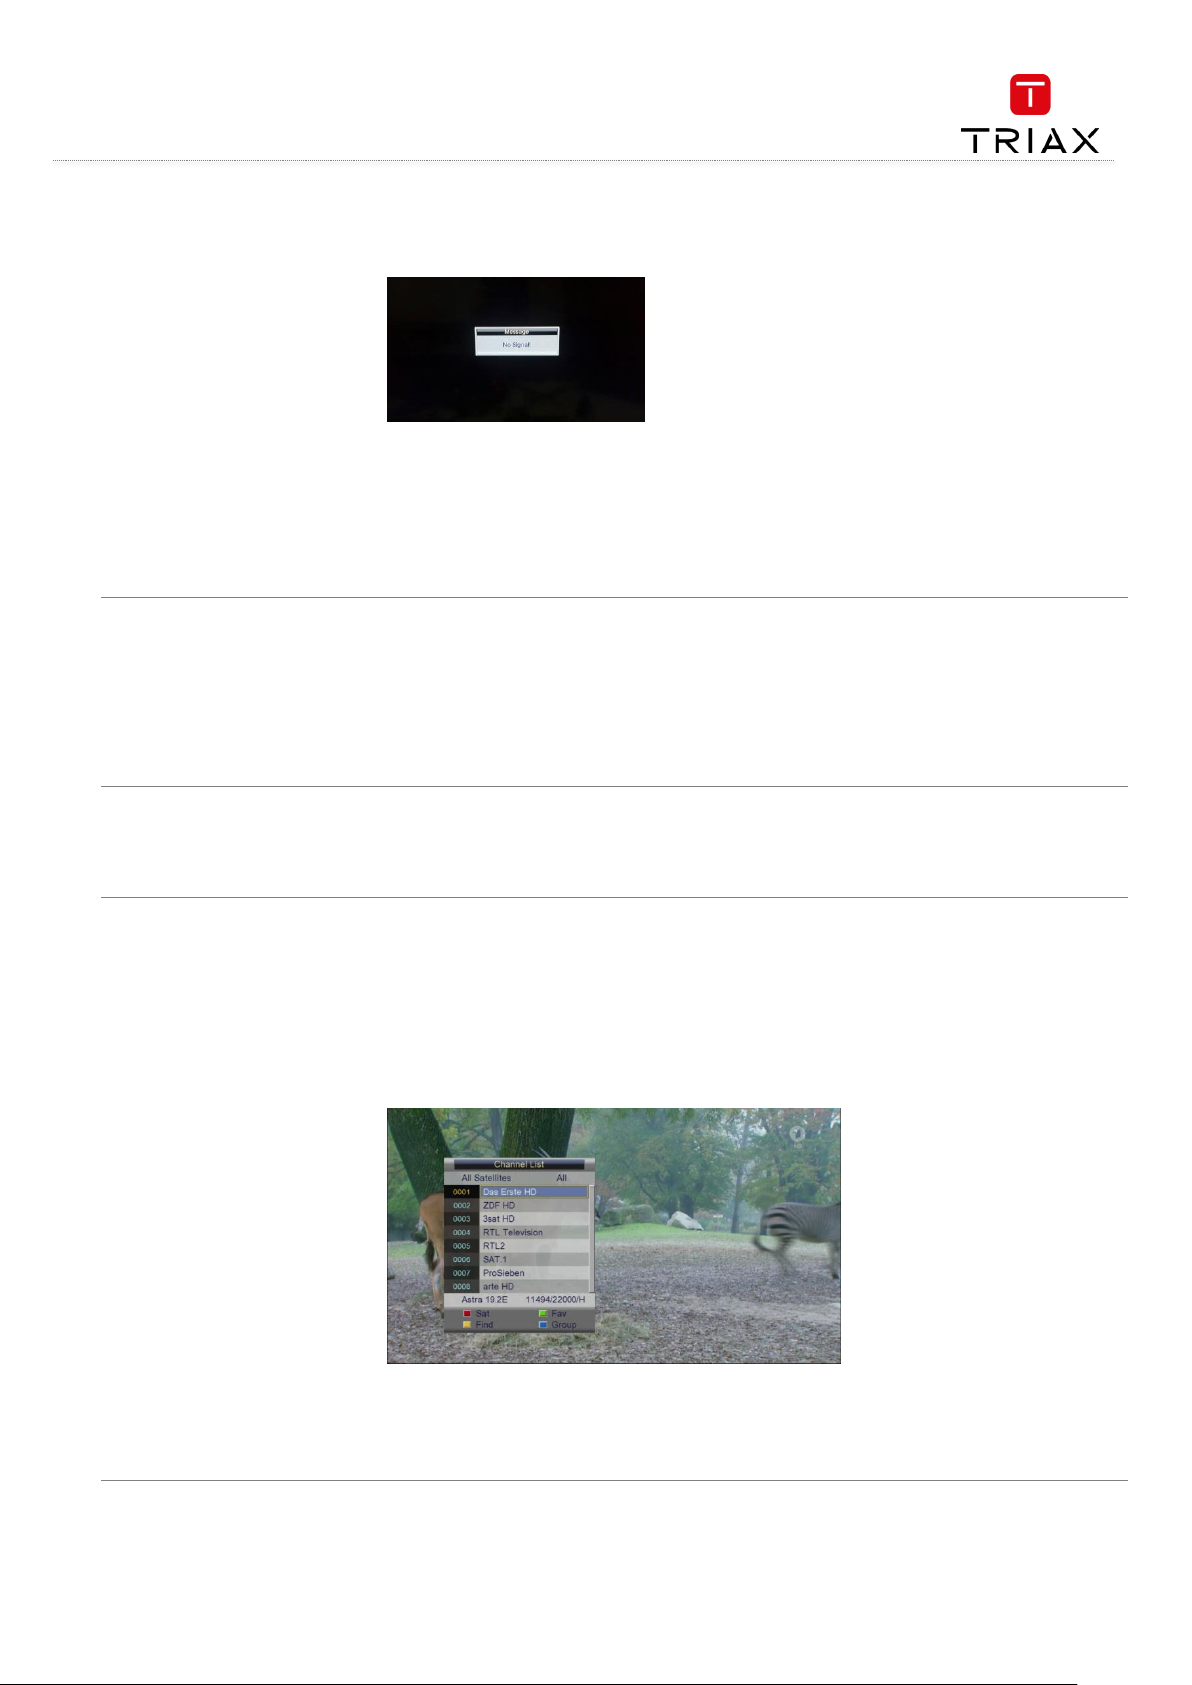
2.2 Entering the DVB System and Power On/Off
After power on, the system will enter the DVB mode. If there is no program data in the database, the following message will appear:
Otherwise, the last program being played before the previous power off will be played. If the system fails to play the program, please check the
power connection and antenna connection.
Power on
When the machine is in Standby mode, press POWER key to turn it on.
Power off
When the machine is running, pressing POWER key at any time can make it into the Standby mode.
2.3 Volume Adjustment and Mute Control
Volume Adjustment
While in playing state without menu display, press V+/- keys to adjust the volume. A volume bar will appear, which has 0~100 levels.
Mute Control
While in playing state without menu display, press MUTE key to enter the mute state. Pressing MUTE key again can exit the mute
state.
2.4 TV/Radio Switching
While in full screen playing state, press TV/R key to switch between the TV mode and the Radio mode.
2.5 Channel Switching
The system provides many methods to switch channels. See the descriptions below:
Method 1: While in full screen playing state, press CH+/- keys to play the next or previous TV program channels or radio stations.
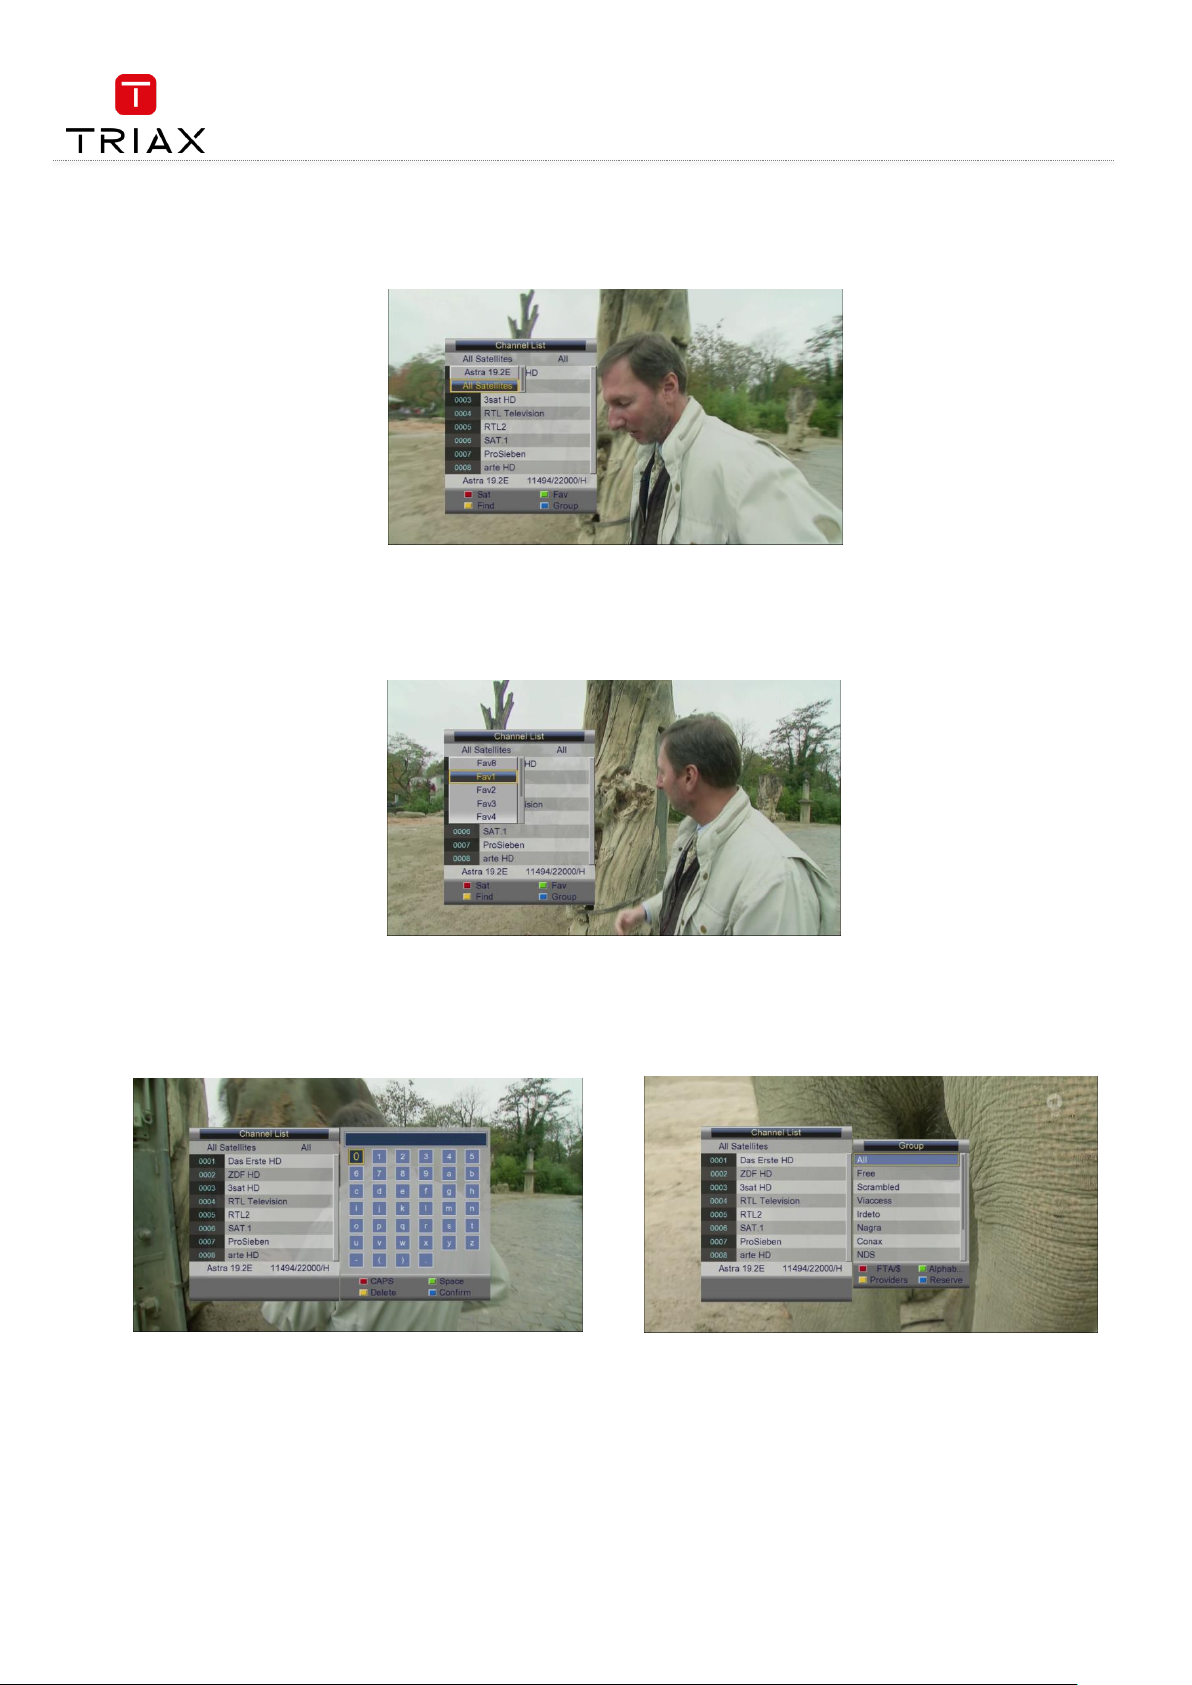
Method 2: While in full screen playing state, press OK key to enter the Channel List menu (see the figure below) to quickly select a
channel you want to play. In which you can press V+/- keys to select a channel group and then press CH+/- keys to choose a desired
channel.
Press OK key to confirm your selection and switch to the selected channel to play. Pressing BACK key can exit the menu.
Method 3: Press number keys to input the number of the channel you want to play (TV: 0~674; Radio: 0~228).
Method 4: Press the red function key to select another satellite to play, see the figure below on next page:
Page 8
User manual
EN
8
After power on, the system will enter the DVB mode. If there is no program data in the database, the following message will appear:
Method 5: If you have set favorite programs, press the green function key and a Favorite list will appear (see the figure below). At this
point, you can press CH+/- keys to select a FAV item and then press OK key to enter its program list.
Pressing back exits the menu
Method 6: Press the yellow function key while in the state of Error! Reference source not found., and you can search for a channel by n
ame.
The figure below will appear:
Press CH+/- / V+/- keys to select a character and then press OK key to input. When you have finished inputting a channel name, press the blue
function key to confirm your input. (Pressing the red function key can change case. Number keys cannot be used to input numbers here.)
Method 7: Press the blue function key while in the state of Error! Reference source not found., and the channel group list appears (see t
he figure below), which includes free, scramble and so on.
Page 9
User manual
9
EN
2.6 Program info display
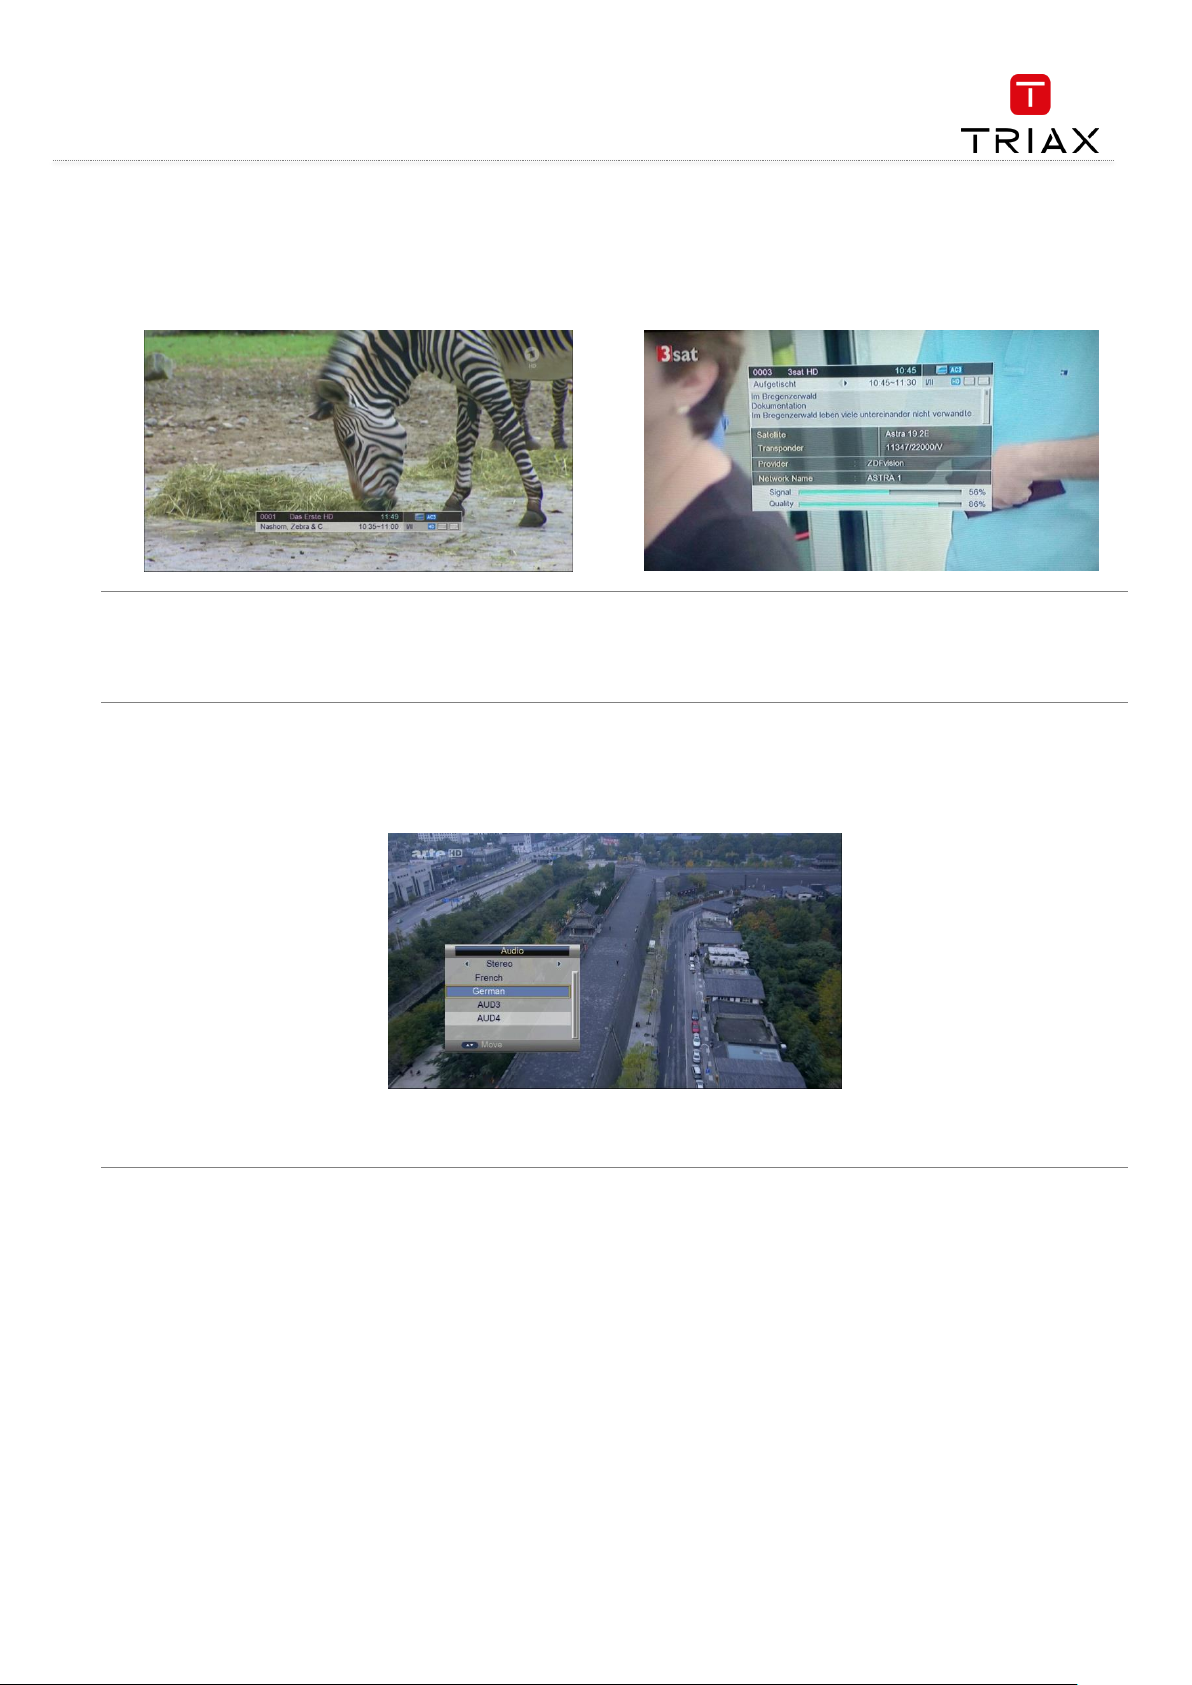
While in full screen playing state, press INFO key to show the brief information of the being played program. See left figure.
Press INFO key again, and the detailed information of the program can be found. See right figure.
2.7 Program BACK (Back to the previous channel)
While in full screen playing state, press BACK key to return to the previously played TV program channel or radio station.
2.8 Program Language and Left/Right Channels Switching
While in full screen playing state, press AUDIO key to call out the following menu to change the audio language and sound channels.
Press V+/- keys to change sound channels among Left, Right and Stereo; press CH+/- keys to choose audio language.
Press OK key to confirm the setting and return to the program playing state.
Page 10
User manual
EN
10
2.9 Screen Scaling (V-FMT)
At present the screen scaling function is invalid in the DTV mode, and valid only when playing images in the Multimedia mode.
2.10 Electronic Program Guide (EPG)
To get the information of programs being played or to be played in coming days, press EPG key to enter the electronic program guide (EPG).
EPG info has three modes: Now/Next Mode, Daily Mode and Weekly Mode. The system will enter the Now/Next mode by default, and you can
press the red function key to change to other modes. Press BACK or EPG keys to exit EPG.
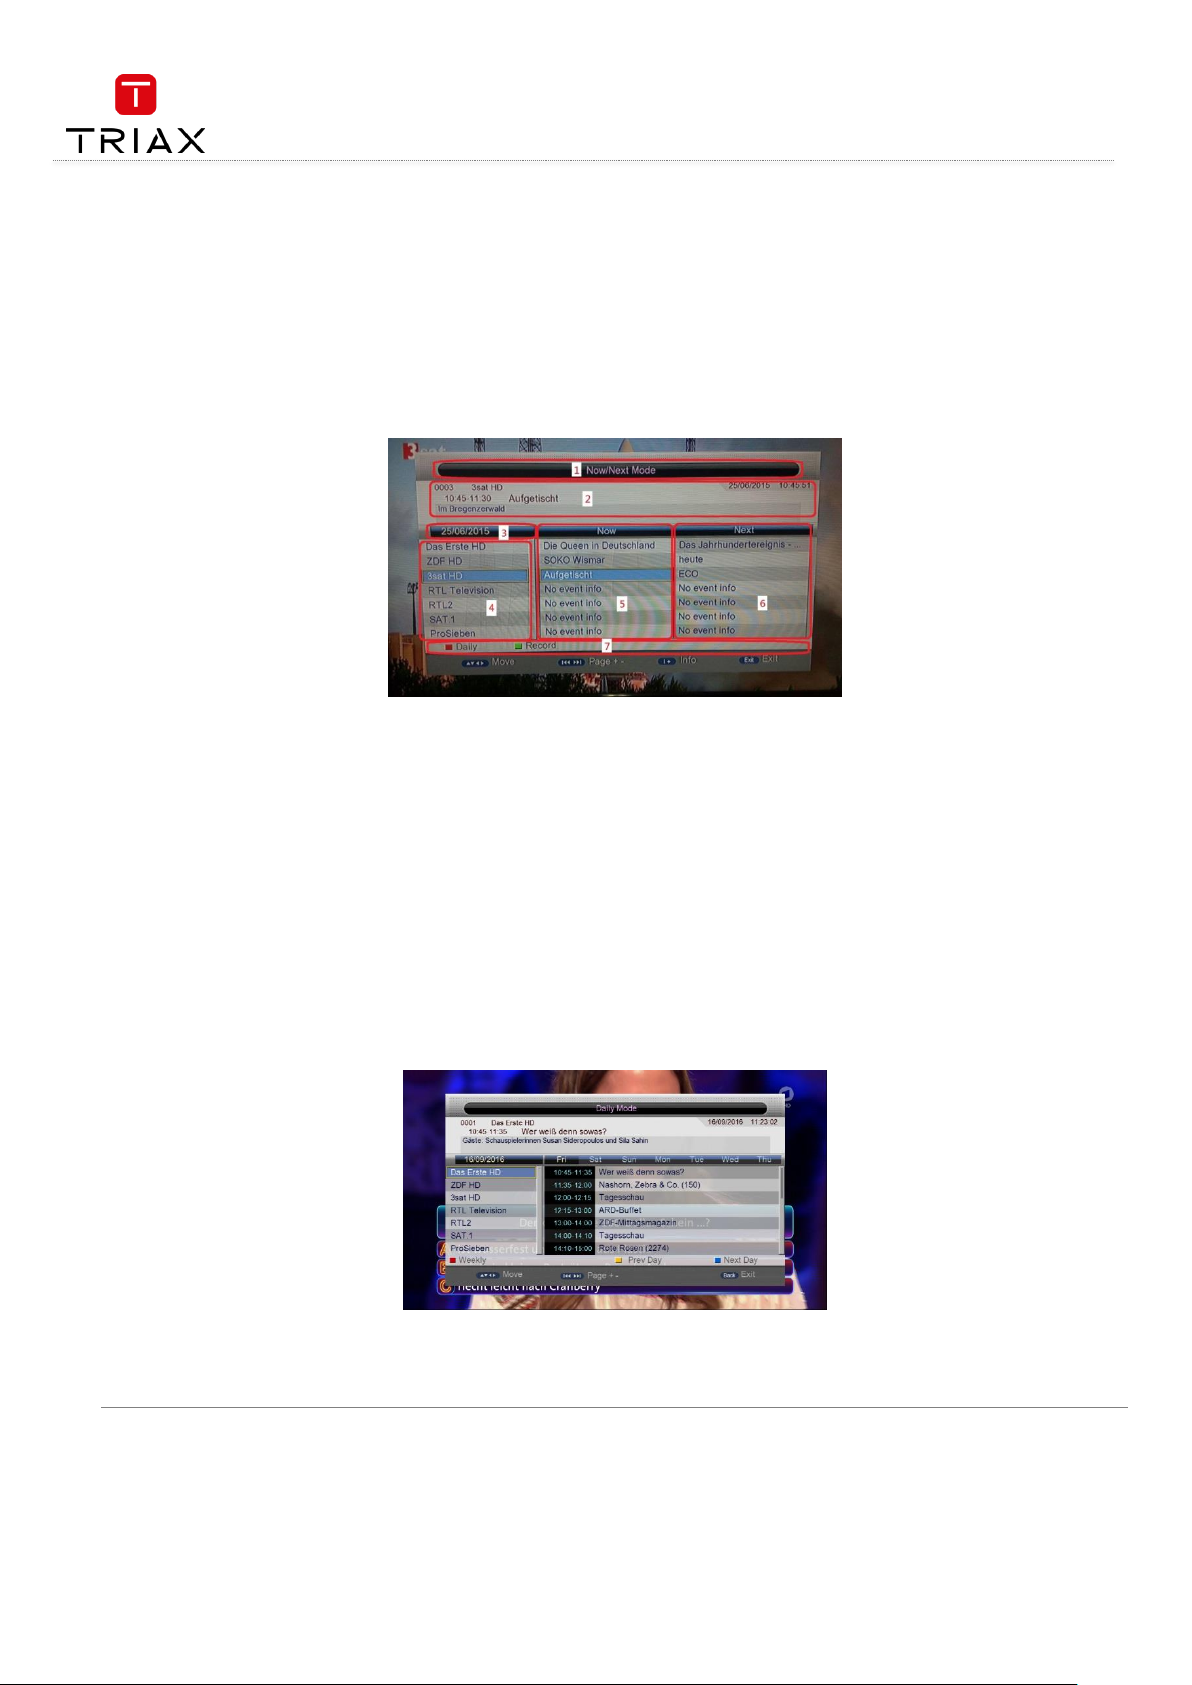
Now / Next mode:
Area 1 – Current EPG mode
Area 2 – Current system time and date as well as the name and information of the being-played program.
Area 3 – Program date
Area 4 – Channel list. When the highlight is in this area, you can press CH+/- keys to switch among the channels listed in this area;
press PAGE-/+ keys to turn pages.
Area 5 – Being-played program list corresponding to channels in Area 4 (Now Event). When the highlight is in this area, you can press
CH+/- keys to switch among the channels listed in Area 4; press V+/- keys to switch between the Now and Next lists.
Area 6 – To-be-played program list corresponding to channels in Area 4 (Next Event).
Area 7 – Key operation tips, corresponding to color function keys on the remote control:
Red function key: Enter the Daily Mode.
Green function key: When the highlight is in Area 5, press this key to record the selected program. When the highlight is in Area 6,
press this key to schedule to record the selected program (Scheduled Record).
In addition, press INFO key to show the detailed information of the selected program.
Daily mode:
In Daily Mode, you can find the information of the programs on a day. See the figure below:
Red function key: Enter the Weekly Mode.
Yellow or blue function keys: Press one of the two keys to switch days from Monday to Sunday.
Page 11
User manual
11
EN
Electronic Program Guide (EPG) - continued
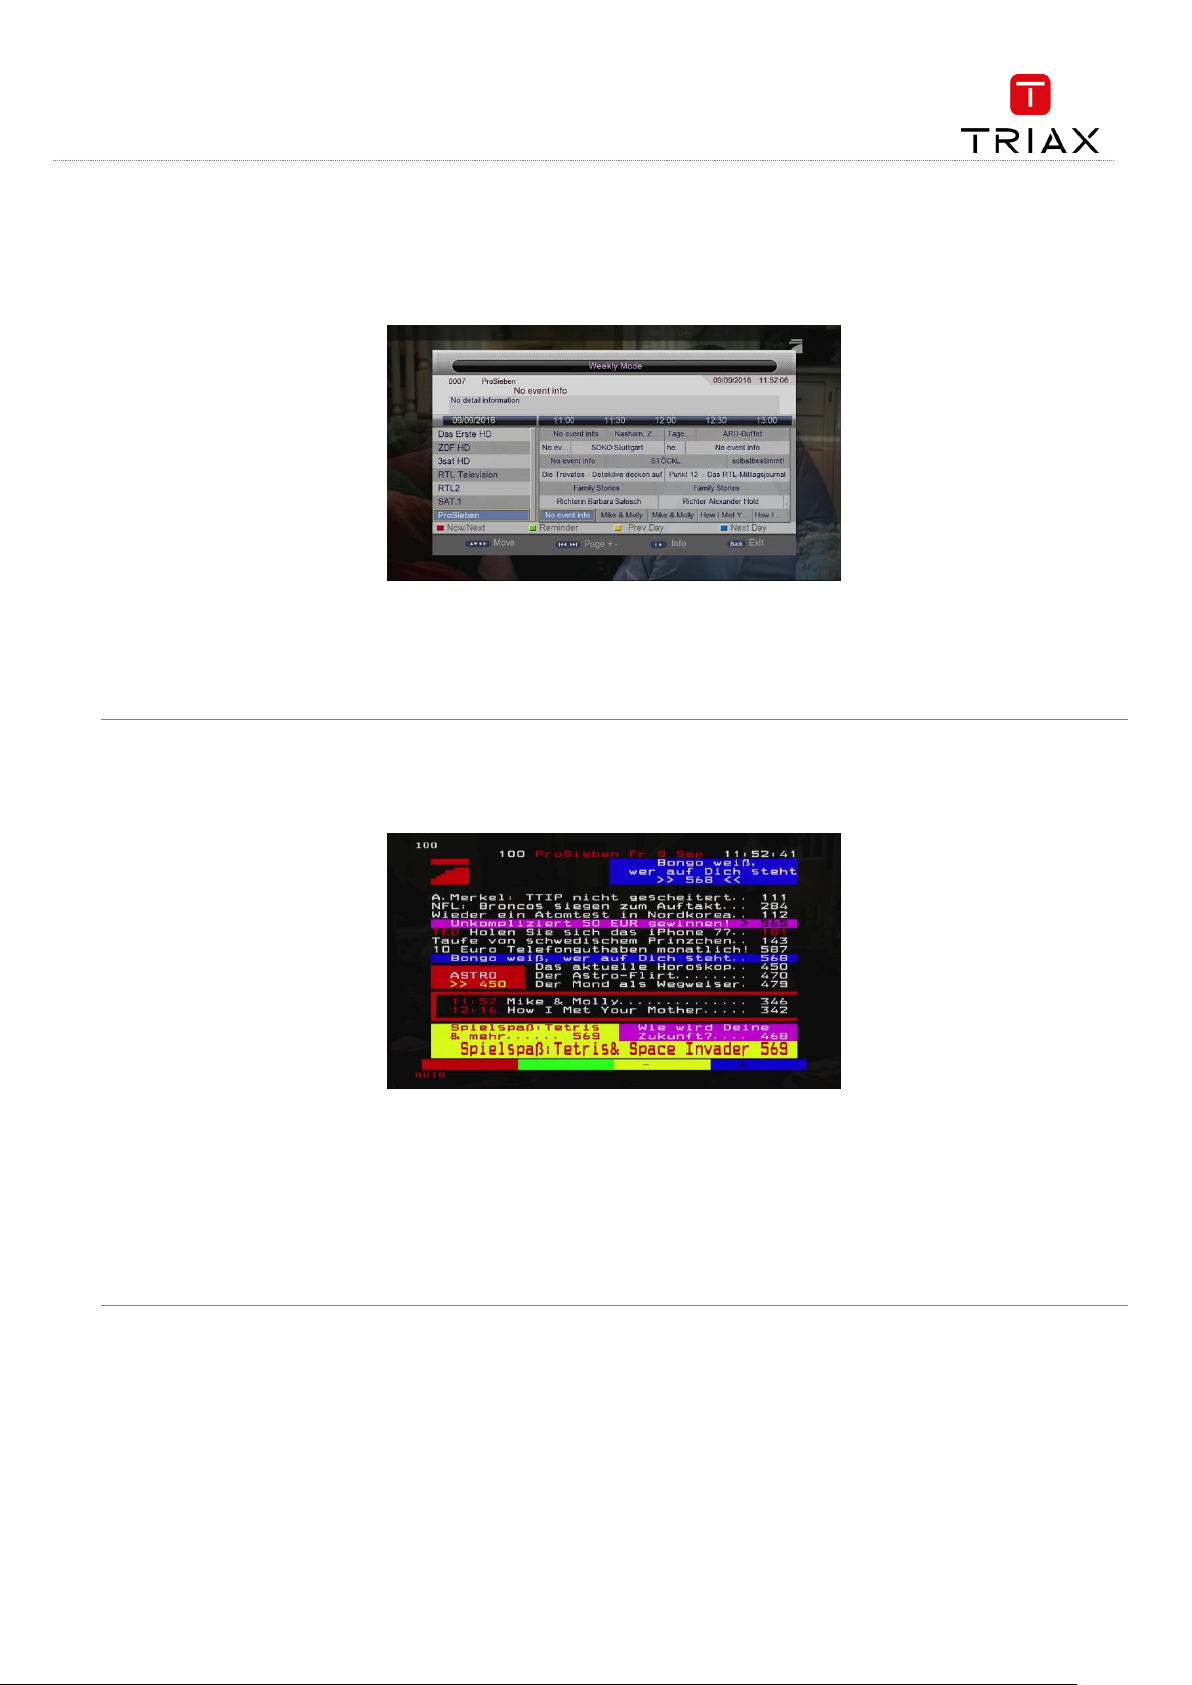
Weekly mode:
In Weekly Mode, you can find the information of the programs within a week. See the figure below:
Press V+/- keys to switch the highlight between the two list windows.
Press the red function key to enter the Now/Next Mode.
Press the yellow or blue function keys to switch to the page of the previous or next days.
If the selected program is being played, pressing the green function key can record the program. If the selected program has not been
played yet, pressing this key can schedule to play or record the program.
2.11 Teletext
Press TEXT key to enter the Teletext mode. See the figure below:
Basic Operations
At the bottom of a Teletext page, enter a page number (range: 100~899) to go to corresponding page.
Press CH+/- keys to turn to the previous or next pages. The pages that have no teletext contents will be auto skipped.
Long press CH+/- keys to quickly turn pages.
Press OK key to change the transparency of the background.
Press V+/- keys to enter the previous or next sub pages of the current page if there exists. If the AUTO option is selected, the sub
pages will be auto turned.
The four color function keys are navigation keys. Their concrete functions depend on the streaming.
Press TEXT or BACK keys to exit the teletext mode.
Page 12
User manual
EN
12
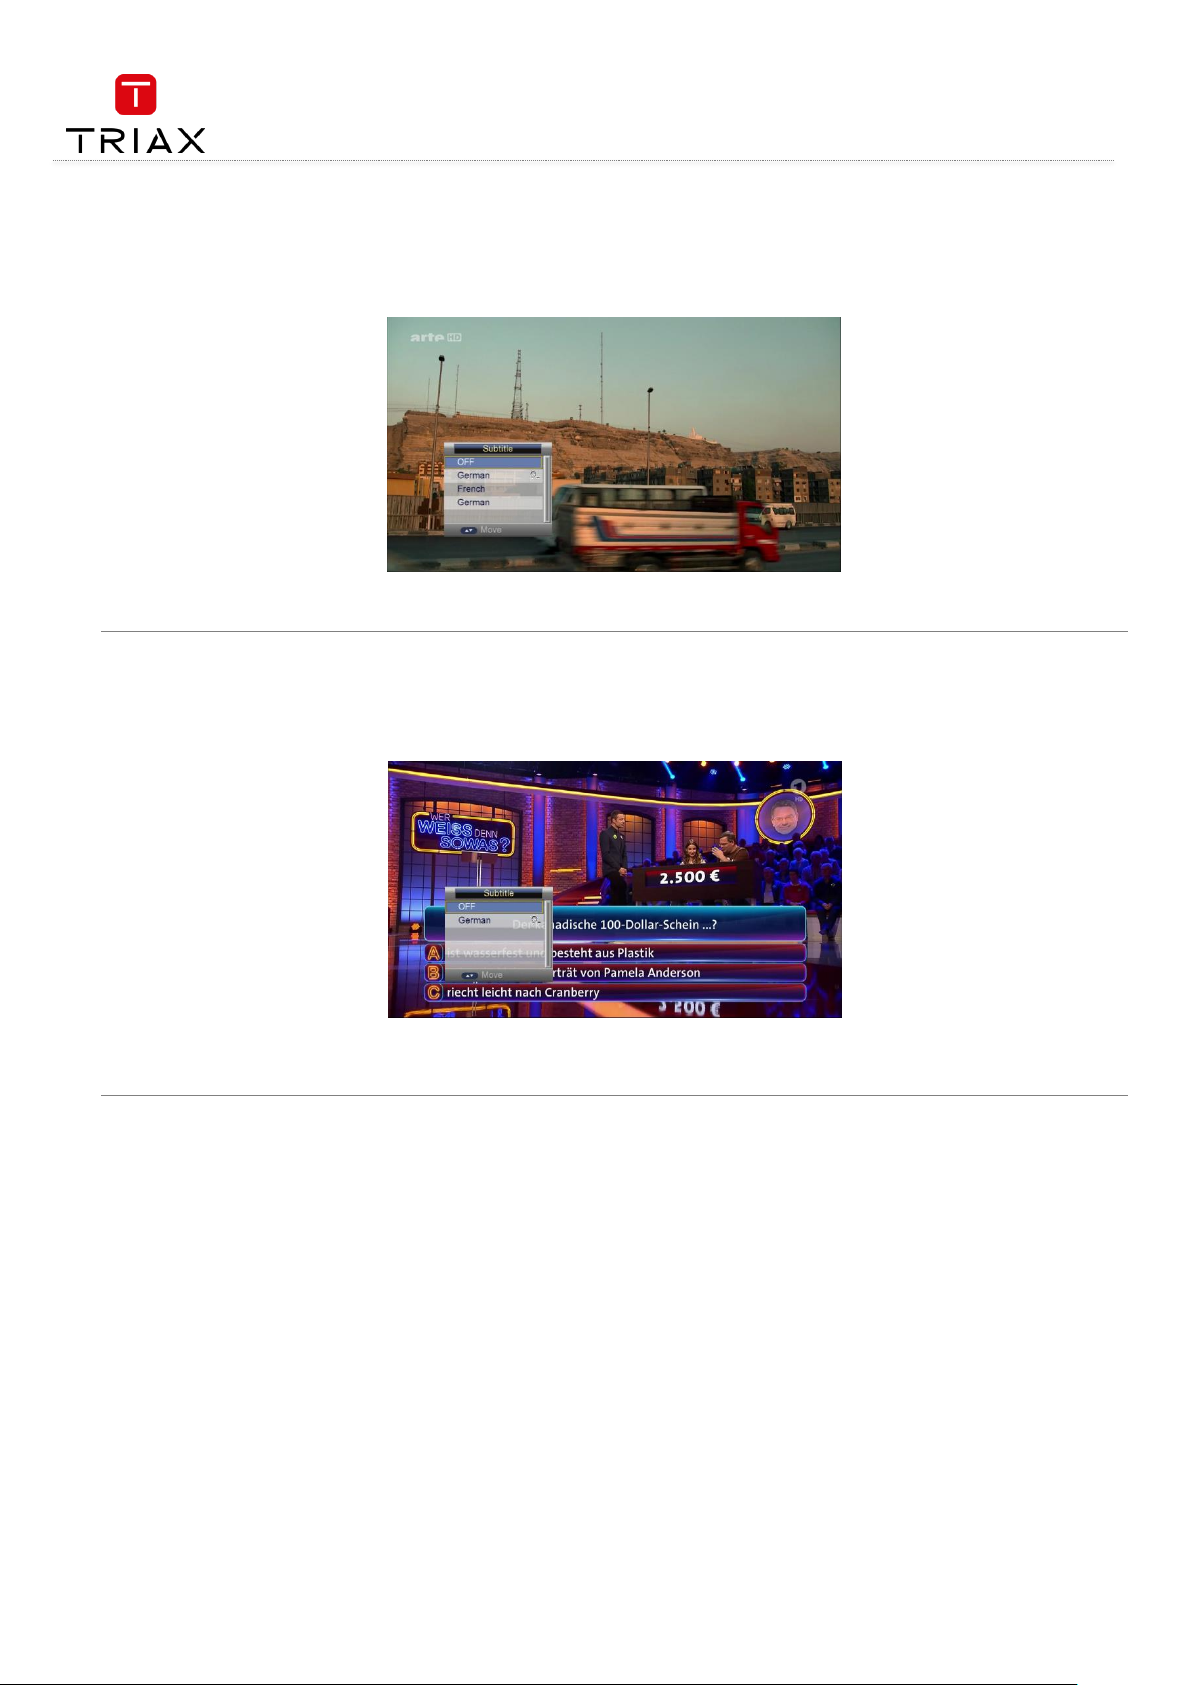
2.12 Subtitle
Subtitle is closed by default. To open it:
Press SUB key to enter the Subtitle menu. See the figure below:
Press CH+/- keys to select a subtitle language to play.
2.13 TTX Subtitle
Subtitle is closed by default. To open it:
Press SUB key to enter the Subtitle menu. See the figure below:
Note that, in the above figure, there is an icon behind the language menu item. This icon indicates that the item is a TTX subtitle language.
Press CH+/- keys to select a subtitle language to play.
Page 13

User manual
13
EN
3. Multimedia mode
3.1 Multimedia and USB
In Multimedia mode, you can play multimedia files and games; also
can carry out record management and disk management.
See the figure :
Module Select :displays the current multimedia type: Movie, Music, Image, Record Manager. The ‘Home’ menu as figure below:
When the system has started, press OK key to switch to the Multimedia mode. The system will auto check whether there is a storage device
(USB). If there is no USB device, the following message will appear:
Page 14

User manual
EN
14
3.2 USB storage device
Once a USB device is found, the system will initialize the USB device. When complete, the following interface will appear:
If the USB device has more than one partition, all the partitions can be displayed. At present the system support the following partition formats:
FAT and FAT32.
In Multimedia Mode, the interface can be divided into 4 areas (see the figure above):
List Area (A) displays the file and folder list of the current partition or directory.
Preview Area (B) is used to preview photos.
File Info Area (C) shows the information of the selected media file.
User Operation Tips Area (D) shows the available keys and their functions.
After entering the Multimedia mode, the highlight is in the area A by default. You can -
Press V+/- keys to switch among the multimedia types to operate.
Press CH- key to enter the List Area (A).
In the List Area,
press OK or V+ keys to enter the current partition or directory;
press V- key to go to the upper level directory;
press BACK key to move the highlight back to the area A to select other media type.
A – List Area
B – Preview Area
C – File Info
D – User Operation Tips
Page 15

User manual
15
EN
3.3 Movie
The Movie module is for playing video files stored on the USB device. In the Module Select Area, press V+/- keys to select the Movie type, then
press OK or CH- keys to enter the video file list area. If there is no video file, the screen will appear. See the figure below:
After selecting a movie, you can press OK key to play it. The play interface is as below:
Press CH+/- keys to select the previous or next video files.
Press OK/V+ keys to play the selected video file. (If the video file is under a folder, pressing V- key can exit the folder.)
Video Info: When a video playback starts, the information of the video file will be shown for 3 seconds. You can press INFO key to
show the information again after it disappears.
Fast Play: Press FRW/FFW keys to fast move forward or backward through the video. The max fast play speed is x32. Press ► key to
resume the normal playback.
Switch Video: Press∣◄◄/►►∣keys to go to the previous or next video files to play.
Stop: Press █ key to stop the current playback and return to the Multimedia Mode interface.
Pause: Press‖key to pause the current playback. Pressing ► key can resume the playback.
Exit: Press MENU or BACK keys to exit the playback state.
Page 16

User manual
EN
16
3.4 Music
The Music module is for playing audio files stored on the USB device. Most popular audio formats are all supported. In the Module Select Area,
press V+/- keys to select the Music type, then press OK or CH- keys to enter the audio file list area. See the figure below:
Press CH+/- keys to select the previous or next audio files.
Press OK/V+ keys to play the selected audio file. (If the audio file is under a folder, pressing V- key can exit the folder.)
Fast Play: Press FRW/FFW keys to fast move forward or backward through the audio file. The max fast play speed is x32. Press ►
key to resume the normal playback.
Switch Audio: Press∣◄◄/►►∣keys to go to the previous or next audio files to play.
Stop: Press █ key to stop the current playback.
Pause: Press‖key to pause the current playback. Pressing ► key can resume the playback.
Exit: Press MENU or BACK keys to exit the playback interface and return to the multimedia type select interface. (Note that if the
background play function has been turned on, the music will not stop but become background music.)
Page 17

User manual
17
EN
3.5 Image
The Image module is for playing image files stored on the USB device. Most popular image formats are all supported. In the Module Select Area,
press V+/- keys to select the Photo type, then press OK or CH- keys to enter the image file list area. See the figure below:
Press OK/V+ keys to play the selected image in full screen mode. By default the system will enable the slideshow function to play all
the images in the current directory. See the figure below:
Switch Image: Press∣◄◄/►►∣keys to play the previous or next images.
Image Info: Press INFO key to show the detailed information of the image.
Rotate: Press V+/- keys to rotate the image 90° anticlockwise or clockwise.
Flip: Press CH+/- keys to flip the image up or down.
Exit: Press EXIT or RECALL keys to exit the playback state.
Page 18

User manual
EN
18
3.6 Record manager
The Record Manager module is for users to carry out record setting and view the programs recorded. See the figure below:
If the USB device has more than one partition, you should manually set the partition in which record files will be saved.
Red function key: Set the selected partition as the default record partition.
Yellow function key: Format the selected partition into NTFS format.
Blue function key: Format the selected partition into FAT32 format
To view record files, select the partition that stores the record files and then press ENTER key to enter it. The system will auto list all the
recorded programs, see below:
To play a record file: press CH+/- keys to select the record file first and then press OK/V+ keys to play it.
During playback, the things you can do only include to press FRW/FFW keys to fast backward or forward play the file, and to press
BACK key to return to the record file list. Both file switching and repeat mode setting cannot be done.
When the playback completes, the system will auto return to the record file list.
To delete a record file: select it first and then press the red function key.
To rename a record file: select it first and then press the green function key.
Page 19

User manual
19
EN
4. Main menu
The Main Menu has six items: Installation, Channel, Preference, Setting, and AV, which include all setting items of the system.
Press MENU key to enter the Main Menu, see the figure below:
4.1 Installation
There are five sub items:
Antenna Setup: Antenna and LNB settings
Satellite List: Satellite list setting
TP List: Transponder list setting
Motor Setting: Polar axis motor setting
Limit Setup: Polar axis move limit setting
To search for programs or add new programs, you should enter the Installation menu.
To enter the Installation menu, press CH+/- keys in the Main Menu to highlight the Installation item and then press OK or V+ keys. A password
input dialog pops out. After entering a correct password (default password is ‘0000’), the Installation menu appears. See the figure below.
Page 20

User manual
EN
20
4.1.1 Antenna setup
In the Installation menu press CH+/- keys to highlight the Antenna Setup sub item and then press OK or V+ keys to enter the Antenna Setup
page (See Error! Reference source not found.).
There are these setting items:
Satellite: Select a satellite from the existing satellite list.
LNB Type: Set the working frequency band for LNB (three options: Ku Band, C Band User, Unicable and JESS).
LNB Frequency: Set the local oscillation frequency of LNB.
Transponder: Select a transponder from the existing transponder list.
22KHz: Turn on or off the 22KHz switch (On, Off).
LNB Power: Set whether or not there is a STB to supply power to LNB.
Tone Burst Mode: Select tone burst mode (three potions: Tone Burst A, Tone Burst B, NONE).
DiSEqC (Digital Satellite Equipment Control) Mode: Select input signal. When more than one LNB is used, DiSEqC can be used to
select one LNB to input.
In the Antenna Setup page, you can press CH+/- keys to highlight a setting item and then press OK key to enter corresponding editing state. In
the editing state press CH+/- keys to select an option and then press OK key to exit editing.
4.1.2 Satellite list
The Satellite List (see figure left) shows all the satellites, the system has stored. Users can press color function keys on the remote controller to
edit the list, for example to add a satellite (by pressing the red function key), to delete a satellite (by pressing the yellow function key), to search
the selected satellite (by pressing the blue function key), etc.
Also you can press the green function key to edit the detailed information of the selected satellite: Satellite Name, Position and Longitude. See
the figure to the right.
Page 21

User manual
21
EN
4.1.3 Transponder list (TP)
In the Installation menu, press CH+/- keys to highlight the Transponder List item and then press OK or V+ keys to enter the Transponder List
page. See the figure below:
The TP List stores the transponders of current satellite of current system. Each transponder may have multiple frequencies. You can press color
function keys on the remote controller to edit the list, for example to add a transponder (by pressing the red function key), to edit a transponder
(by pressing the green function key), to delete a transponder (by pressing the yellow function key), to search transponders (by pressing the blue
function key), etc.
After pressing the green function key, you can edit the selected transponder’s detailed information such as frequency, symbol rate and
polarisation. When finished, press OK key to exit the editing state.
Page 22

User manual
EN
22
4.1.4 Motor setting
Through the Motor Setting page you can control the polar axis motor to adjust the direction of antenna so as to make the antenna accurately
point to the satellite. There are these setting items in this page (see Error! Reference source not found.):
Satellite: Select a satellite.
Transponder: Select a transponder.
Motor setting: Set the polar axis motor.
If you have already selected a satellite and a transponder, when moving the polar axis you will find the signal strength and quality indicators at
the bottom of the page..
4.1.5 Limit setup
There are three sub items:
Limit Setup: Polar axis move limit setting.
Continuing Move: Enable polar axis continuous move.
Move Step: Enable polar axis step move. After setting, you can press V+/- keys to move the polar axis east or west step by step.
4.1.6 Search example
Press MENU key to enter the Main Menu and then directly press OK key. Key in a correct four-digit password (default password: 0000)
in the pop-up dialog to enter the Installation menu.
Enter the Satellite List item. If there are satellites, press CH+/- keys and OK key to select a satellite. Before the selected satellite name,
a green check mark appears. Press the blue function key to pop out the Search menu and then press OK key with default settings. The
system will then start to auto scan.
Page 23

User manual
23
EN
4.2 Channel
The Channel menu has three items: Channel Manager, Favorite and Delete All Channel. To enter the Channel menu, press CH+/- keys in the Main
Menu to highlight the Channel item and then press OK or V+ keys. The Channel menu is shown as below:
4.2.1 Channel manager
The system provides powerful channel management function. You can through the Channel Manager menu to manage your channels such as
deleting, locking, sorting, skipping or renaming.
To enter the Channel Manager menu, in the Channel menu press CH+/- keys to select the Channel Manager item and then press OK key. See the
figure below:
If there is no program channel data in the database, ‘No Program’ message will appear and both the Channel Manager and Favorite List menus
cannot be accessed.
The Channel Manager menu contains these functions: Channel Delete, Channel Skip, Channel Lock and Channel Rename. Press CH+/- keys to
select the channel and then press the four color function keys on the remote control to manage it: press the red function key to lock or unlock
the selected channel; the green function key to delete the selected channel; the yellow function key to skip or cancel skipping the selected
channel; the blue function key to rename the selected channel. After setting, corresponding icons will appear.
To delete a channel, press CH+/- keys to select the channel and then press the green function key. Key in a correct four-digit
password (default password: 0000) in the pop-up dialog, a green check mark will appear in the delete column of the selected channel.
When exiting the Channel Manager menu, you will be asked to confirm the deletion. Select YES and enter the correct password
(default password: 0000), and the channel will be deleted. To cancel the deletion state on a channel, select the channel first and then
press the green function key again.
To change a channel’s number or resort the channels list, press CH+/- keys to select the channel you want to move, then press OK
key. The selected channel item will flicker. Next, press CH+/- keys to the destination position, then press OK key again. Thus the
channel’s position in the list is changed.
To rename a channel, press CH+/- keys to select the channel, then press the blue function key to enter the channel name edit page.
See the figure below:
Page 24

User manual
EN
24
After editing, press OK key to confirm.
To lock a channel, after selecting the channel press the red function key, and then key in a correct four-digit password (default
password: 0000) in the pop-up dialog. When switching to the locked channel you will be asked to give a correct password to watch it.
Press BACK key to exit the Channel Manager menu.
Press BACK key to go back to the channel play state.
4.2.2 Favorite
The system provides a favorite channels list function. You can through the Favorite menu to add, delete or group your favorite channels.
To enter the Favorite menu, in the Channel menu press CH+/- keys to select the Favorite item and then press number keys.
See the figure below:
There are total 8 favorite lists. You can press the four color function keys to add channels to corresponding favorite list. One channel
can be added into multiple favorite lists.
Press BACK key to exit the Favorite menu.
Press BACK key to go back to the channel play state.
Page 25

User manual
25
EN
4.2.3 Delete all channels
Press OK key to confirm to delete all channels. See the figure below::
4.3 Preference
The Preference menu is mainly used to change language and audio settings.
To enter the Preference menu, in the Main Menu press CH+/- keys to select the Preference item and then press OK or V+ keys.
See the figure below:
Page 26

User manual
EN
26
4.3.1 Language
The Language item defines the language of menu and prompts. To change the language, press CH+/- keys to highlight this item and then press
OK or V+ keys to pull down a language list. In this list, you can press CH+/- keys to select a language and then press OK key to confirm. See the
figure below:
4.3.2 OSD transparency
Through the OSD Transparency item you can adjust the transparency of OSD display in the Main Menu.
To change the OSD transparency, in the Preference menu press CH+/- keys to highlight the OSD Transparency item and then press OK or V+
keys to pull down a transparency list. The list has seven transparency levels from 0% to 60%. The bigger the level value is, the higher the
transparency is. After selecting a transparency, press OK key to confirm. See the figure below:
Page 27

User manual
27
EN
4.3.3 Preferred audio
The Preferred Audio item is used to set the default audio language. When a program has audios of multiple languages, the system will auto
search the matched audio to play according to the settings here. Two preferred audios can be set and the first one has a higher priority. See the
figure below:
4.3.4 DVR configuration
Through the DVR Configuration item you can do some settings on Timeshift and Record functions. See the figure below for the DVR
Configuration setting menu.
Timeshift: Set a method to start the timeshift function. Three options: Auto, Pause and Off.
Timeshift to Record: Set that during timeshift if you press REC key the system will whether or not to record the data that have been
buffered by timeshift. If On is selected, after you press REC key the data that have been buffered by timeshift will be saved into a file
first and new data will then be saved into another file. If Off is selected, the buffered data will be removed first and then the system
will start to record new data.
Page 28

User manual
EN
28
4.4 Setting
Through the Setting menu you can configure and upgrade the system. After entering the Setting menu, the following interface appears:
Page 29

User manual
29
EN
4.4.1 Timers
Through the Timers item, you can manage scheduled programs. In the Timers menu you can view and edit the scheduled program’s name, start
time, schedule type and so on. See the figure below:
In the above figure the fields from left to right are: Timer No., Program Name, Date, Time, Mode and Type. Program Name indicates the
scheduled program. Data and Time indicate the scheduled time. Mode indicates the schedule mode: Once, Daily, or Weekly. Type indicates the
behaviors after the scheduled time is reached.
In this list, you can -
Press the red function key to delete all timers in the list.
Press the green function key to delete the selected timer.
Press the yellow function key or OK key to edit the selected timer. The following edit menu will appear.
Date: Scheduled date. To edit it, highlight the Date item first and then press V+ key to enter its editing state.
Program Name: Scheduled program. To edit it, highlight the Program Name item first and then press V+ key to enter its editing state.
Start Time: Start time of schedule. To edit it, highlight the Start Time item first and then press V+ key to enter its editing state.
End Time: Cannot be set by hand. When the Type item is set as ‘Record’, this parameter will auto change according to the Start Time
and Duration settings; when the Type item is set as others, this parameter is the same with the Start Time.
Duration: Schedule duration. Available only when the Type item is set as ‘Record’. To edit it, highlight the Duration item first and then
press V+ key to enter its editing state.
Mode: Schedule mode. Three options: Once, Daily and Weekly.
- Once:
In this mode, the scheduled behavior will happen only once at the specified time. After that, the timer will be deleted.
- Daily:
In this mode, the scheduled behavior will happen at the specified time every day.
- Weekly:
In this mode, the scheduled behavior will happen at the specified time every week.
Type: Schedule type. Five options: Record and Channel.
- Record:
The system will record the scheduled program when the scheduled time is reached. Users can select whether or not to
record AD, TTX and Subtitle.
- Channel:
The system will auto switch to the scheduled program to play when the scheduled time is reached.
AD Record, Subtitle Record, Teletext Record: Set whether to record AD, TTX and Subtitle or not. Available only when the Type item is
set as ‘Record’.
Page 30

User manual
EN
30
4.4.2 Parental lock
The Parental Lock item is to set a program lock in order to protect children from watching some improper programs to their ages.
After highlighting the Parental Lock item in the Setting menu press OK key, and a password input dialog will appear. Input a correct password
(default: 0000) to enter the Parental Lock menu. See the figure below:
There are three menu items:
System Lock: Turn on or off the parental lock function.
Parental Rating: Set rating from 4 ages to 18 ages. If set as 0, no limit.
Change Pin Code: Change the password of the parental lock. When this item gets the highlight, press OK key to call out the
Change Pin Code dialog.
See the figure below:
In this dialog, enter the correct old password first and then give a new password twice. Thus the password is changed completely.
4.4.3 Local time setting
Through the Local Time Setting item you can set the system time and time zone. To enter the Local Time Setting menu, highlight the Date Time
item in the Setting menu and then press OK key.
Page 31

User manual
31
EN
If the Date Time Mode item is set as ‘Auto’, both the Date and Time items will be grayed (cannot be set by hand). If the Date Time Mode item is
set as ‘Manual’, users can set the Date and Time items by hand, but other items cannot be set.
If the Time Zone item is set as ‘Auto’, the Day Light Saving item will be grayed (cannot be set by hand). If the Time Zone item is set as a concrete
time zone, you can set whether or not to use the daylight saving time according to the selected time zone.
4.4.4 Factory setting
Through the Factory Setting item you can reset the system to factory settings.
Press CH+/- keys to highlight this item and then press OK key, and a password input dialog will appear. Input a correct password (default: 0000),
and the system will then start to reset to factory settings. When finished, the Init Install menu (see Error! Reference source not found.) will show, t
hrough which you can re-initialize the system.
4.4.5 Upgrade
The Upgrade item is for software upgrade. See chapter Error! Reference source not found. for details about software upgrade.
4.4.6 Version
Through the Version item you can view the version information of system hardware and software as well as the build date of the system.
See the figure below:
4.4.7 Auto shut down
The Auto Shut Down item sets whether the system will enter the standby mode if there is no any operation for a certain time period.
If the Auto Shut Down item is set as ‘On’, the system will auto enter the standby mode after one, two or three hours of no operations.
Page 32

User manual
EN
32
4.5 AV
The AV menu is to carry out video output related settings such as brightness, resolution and output format. In the Main Menu, press CH+/- keys
to highlight the AV menu item and then press OK key to enter the AV menu. See the figure below:
4.5.1 Contrast
The Contrast item determines the contrast level of the system. After highlighting the Contrast item, press OK key to enter its setting interface,
see the figure below:
Press V+/- keys to adjust the contrast level from 0 to 24. After setting, press OK key or just wait for 3 seconds to return to the AV menu. In
addition, in this interface pressing CH+/- keys can switch between the contrast setting and brightness setting interfaces.
4.5.2 Brightness
The Brightness item is to adjust the brightness level of the system. After highlighting the Brightness item, press OK key to enter its setting
interface, see the figure below:
Press V+/- keys to adjust the brightness level from 0 to 24. After setting, press OK key or just wait for 3 seconds to return to the AV menu. In
addition, in this interface pressing CH+/- keys can switch between the contrast setting and brightness setting interfaces.
Page 33

User manual
33
EN
4.5.3 Saturation
The Saturation item is to adjust the saturation level of the system from 0 to 24. See the figure below:
4.5.4 HUE
The HUE item is to adjust the hue level of the system from -30 to 30. After highlighting this item, press ENTER key to enter its setting interface,
see the figure below:
4.5.5 S/PDIF mode
The S/PDIF mode item is to set the output format of digital audios. After highlighting this item, press OK key to pop out an option list, see the
figure below:
The list has three options: PCM, Bitstream and Mute.
Page 34

User manual
EN
34
4.5.6 Aspect mode
The Aspect mode item is to set the proportion between the length and width of output videos. After highlighting this item, press OK key to pop
out an option list, see the figure below:
The list has four options: 16: 9, Full Screen, 4: 3 LB (Letter Box) and 4: 3 PS (Pan Scan).
The list has three options: YUV, RGB and SVideo.
4.5.7 Aspect mode
The Video Resolution item is to set the resolution (up to 1080p_60 (Full HD)) and refresh rate of video output. After highlighting this item, press
OK key to pop out an option list, see the figure below:
The list has following options (‘p’ indicates progressive scan; ‘i' indicates interlaced scan):
Auto Detect
480p_60, 480i_30
576p_50, 576i_25
720p_60, 720p_50
1080p_60, 1080p_50, 1080i_30, 1080i_50
.
Page 35

User manual
35
EN
5. Record & Timeshift
5.1.1 Record
In full screen mode, if you want to record the being-played program, just press REC key. If there is no USB device inserted, corresponding
message will appear. See the figure below:
If there has been a USB device, the system will initialize the USB device and then start to record. See the figure below.
During recording, to pause the recording, press‖key. During recording, to stop recording, press █ key. A confirmation dialog will appear. See the
figure below left:
During recording, pressing INFO key can show the recording information. Pressing INFO key again will show the record file list.
See the figure top right.
Page 36

User manual
EN
36
5.2 Timeshift
The Timeshift function is to play the programs that have already been played just before. At present there are three methods to start the
Timeshift function, which can be set through Main Menu -> Preference -> DVR Configuration. See the figure below:
Three options of the Timeshift item:
Auto: Auto start the Timeshift function 5 seconds after entering any channel.
Pause: During full-screen playing, press ‖ key to start the Timeshift function.
Off: During program recording, press ‖ or ► keys to start the Timeshift function.
5.2.1 Timeshift: Auto
If you choose the ‘Auto’ method for the Timeshift item, you should also configure the Timeshift Length and Timeshift to Record items to set the
time length of timeshift and whether or not to turn on the record function during timeshift. After setting, the Timeshift function will auto work 5
seconds after entering any channel.
To watch the program content before current time, press FRW key to go back to the desired time period. Press █ key to exit the timeshift play.
5.2.2 Timeshift: Pause
If you choose the ‘Pause’ method for the Timeshift item, you should also configure the Timeshift Length and Timeshift to Record items. After
that, while watching a program if you want to start the Timeshift function, just press‖key. The system will then start to save a video piece from
the current time for you to watch later.
5.2.3 Timeshift: Off
If you choose the ‘Off’ method for the Timeshift item, the Timeshift Length and Timeshift to Record items are unavailable. In this case, you can
press‖or ► keys to start the Timeshift function only when recording program. The timeshift length depends on the free space of the USB device.
Page 37

User manual
37
EN
6. Upgrade
6.1 Upgrade by USB / OTA
You can carry out system software upgrade through Main Menu -> Setting -> Upgrade. See the figure below:
At present the system supports two methods to upgrade the system software: Upgrade by USB and S/W Upgrade by OTA.
6.2 Upgrade by USB
Highlight the Upgrade by USB item and then press OK key to enter the following USB Upgrade interface. If there is no USB device inserted,
corresponding prompt will appear.
Select the partition in which rom.bin is stored, then press OK key to enter a file list. From the file list, select rom.bin and then press OK key to
start the USB upgrade. The interface will be as below:
When the USB Upgrade completes, the system will auto restart.
Page 38

Copyright © 2016 TRIAX. All rights reserved. The TRIAX Logo and TRIAX, TRIAX Multimedia are
registered trademarks or trademarks of the TRIAX Company or its affiliates.
All specifications in this guide are subject to change without further notice.
TRIAX A/S | Bjørnkærvej 3 | Hornsyld | Denmark
triax.com/support
For further information
and updated manuals go to
 Loading...