

Page 1
Model Item no.
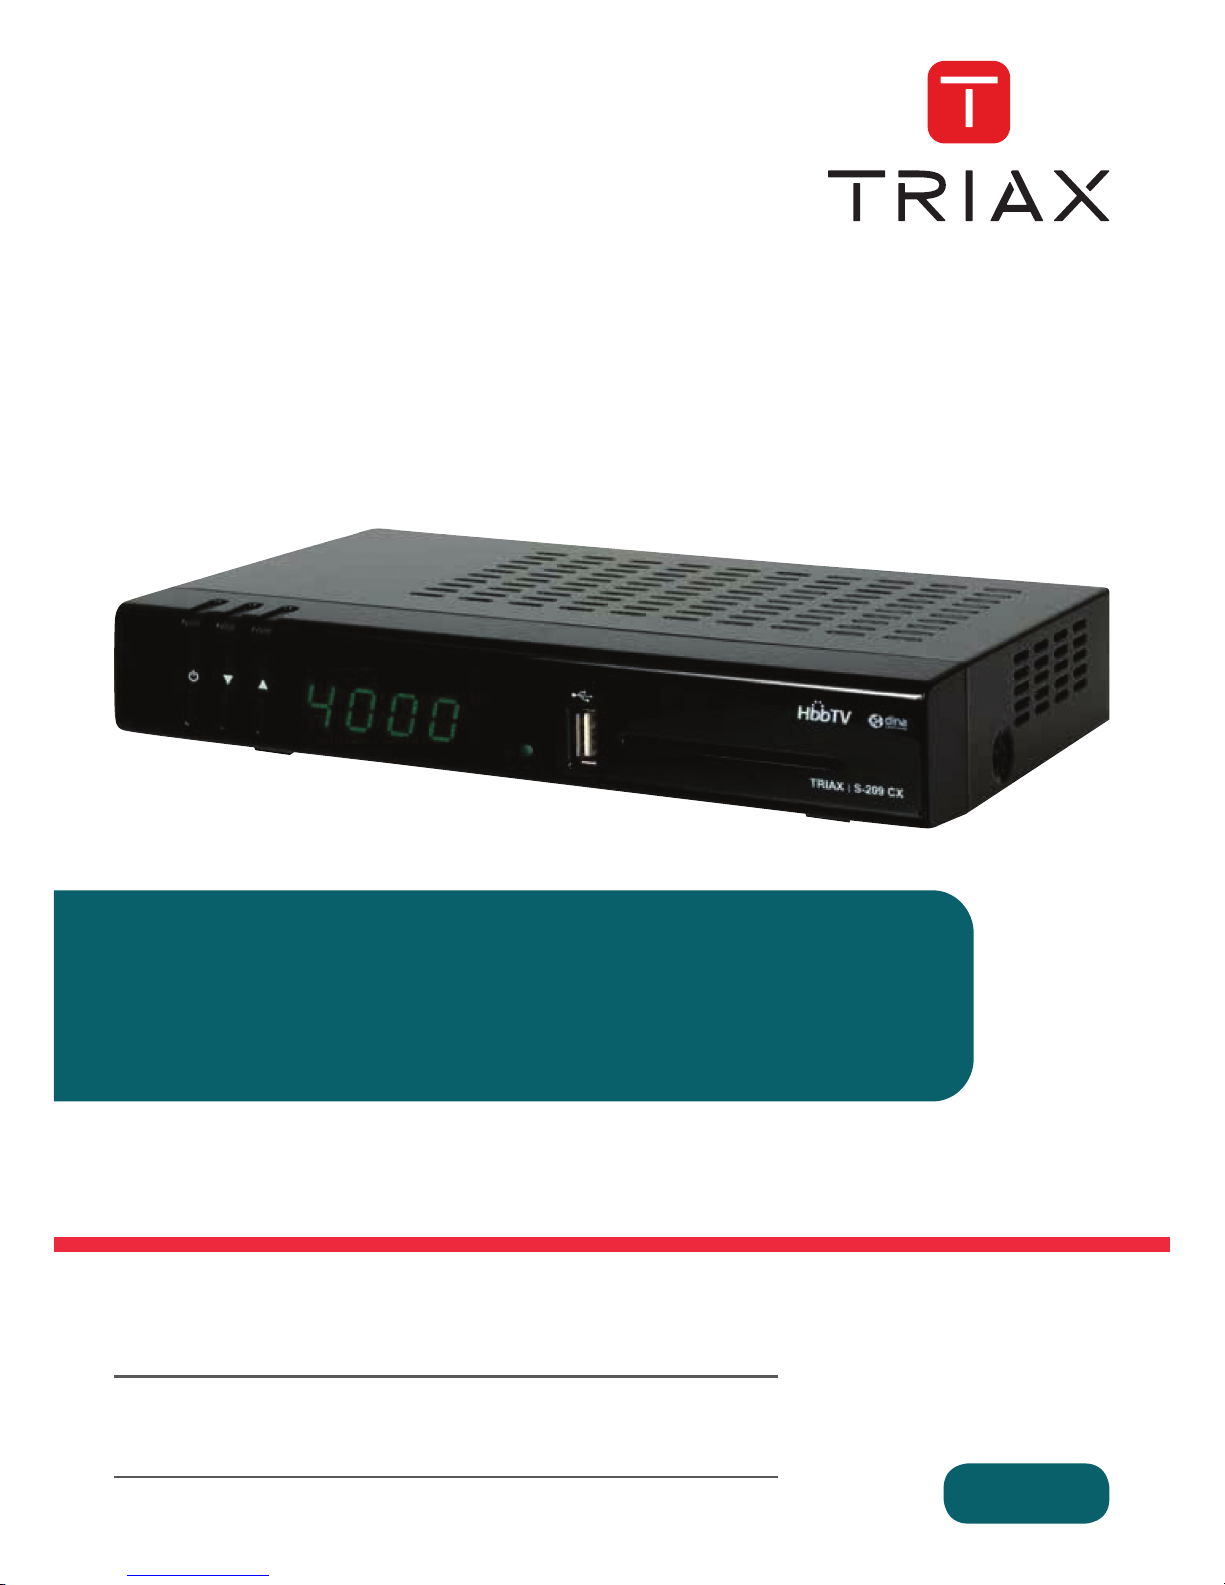
TRIAX S-209CX 305219
Version 06 - 2014 EN
triax.com
User Manual
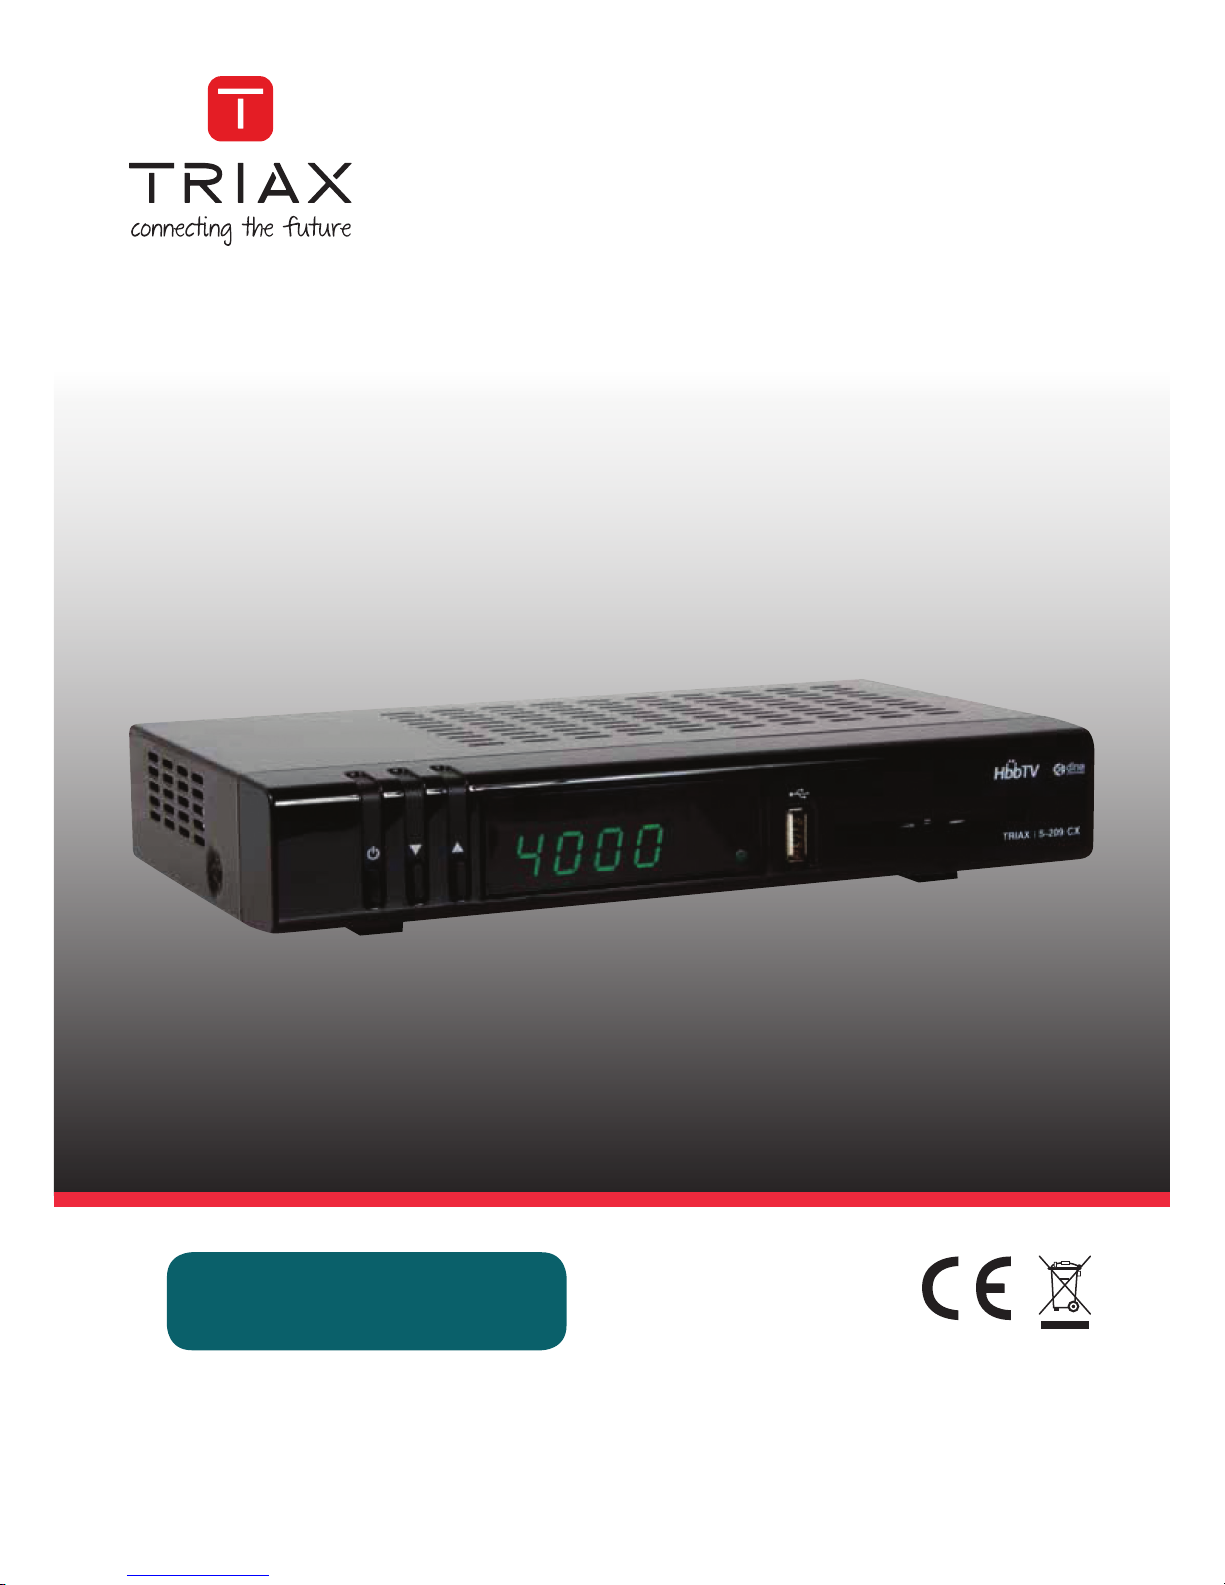
Digital HDTV Receiver With built in Conax Cardreader
Page 2
Safety Information
Important - Read these instructions fully before installing or operating
Introduction
• Read this manual thoroughly before operating
this device,.
• Retain this manual for future reference.
Safety Precautions
Power Source
The set must only be operated with 220-240V AC,
50 Hz power supply.
• Ensure that the correct voltage setting is selected
if variable voltage power supply is used.
WARNING: Disconnect power from the device if
it is not to be used for an extended period of time.
Power Cord
• Do not place objects on the power cord or tie a
knot in it.
• Occasionally check the condition of the power
cord. Repair to or replacement of the power cord
must only be performed by a qualied technician.
Receiver
• Do not expose the receiver to external heat
sources.
• Do not expose the receiver to high humidity, uid,
or condensation.
• Place the receiver on a solid and safe surface.
• Ensure that good air circulation is provided. Do
not place the receiver on a surface, such as fabric,
that can impede correct ventilation.
Symbols used in this manual
The following symbols are used in this manual.
WARNING
Ignoring instructions indicated with
WARNING can
result in serious injury or death.
CAUTION
Ignoring instructions indicated with
CAUTION can
result in injury or damage to the device.
IMPORTANT
Important instructions relating to correct usage of the
device. Read these instructions carefully to avoid
damaging the device.
NOTE: Relevant information about a particular
operation are marked with
NOTE.
Batteries
Warning: Incorrect installation of batteries may
cause battery leakage and corrosion, resulting in
damage to the remote control.
Do not mix old and new batteries, or batteries of
different types.
Do not attempt to recharge non-rechargeable
batteries.
Do not dispose of batteries in a re.
Do not dispose of batteries with normal household
waste, take to a local recycling centre.
2
Page 3

Contents
Contents
Contents 3
Introduction 2
Safety information 2
Power Cord 2
Receiver 2
Symboles used in this manual 2
Batteries 2
Features 4
Accessories included 4
Remote Control 5
Viewing Controls and Connections 6
Front Panel 6
Back Panel 6
Inserting Batteries in the Remote Control 7
Antenna Connection 7
Connecting the Set-Top Box to a TV Set 7
Network Connection 7
Power Connection - ON/OFF 7
First Time Installation 8
Selcting Language 8
Specifying Country 8
Direct Scan 8
UniCable 8
DiSEqC switch 8
Motor 9
Automatic Channel Scan 9
Basic Operations 10
Changing Channel 10
Adjusting Volume 10
Viewing On-Screen Information 10
Viwing EPG 10
Viewing EPG Content 11
Instant Recording 11
Time Shifting 11
Text TV 11
Managing Channels/Favorites 12
Channel Management 12
Channel Management - deleting 12
Renaming Channels 12
Moving Channels 13
Locking Channels 13
Setting Favourites 13
Media browser 14
USB - Videos 14
USB - Photos & Music 15
Media Server 16
Advanced Features 17
Internet Portal 17
SETUP
Channel Installation 18
Main Menu 18
Autimatic Channel Scan 18
Manual Search 19
Country - Output settings - Upgrade 20
Country 20
Output Settings 20
Menu Locking - Time - Power - Language 21
Recording - Format HDD - Internet 22
Recording Conguration 22
Internet Settings 22
Recording Library 23
Play Options 23
Loading & Saving Settings, Timers 24
Load Settings 24
Save Settings 24
Timers 24
Conditional Access 25
Product Support 26
Trouble Shooting 26
General Characteristics 27
Hardware Conguration 27
Digital Capabilities 27
Demodulator 27
Video 27
Audio 27
Remote Control 28
Tuners 28
USB Power Supply 28
Front Panel 28
Audio (Output) 28
Digital Audio 28
A/V & Data In/Out 28
Notes 29
3
Page 4

• 4000 TV channels and radio programs
• Media Browser ( USB 2.0 ) support
• DVB-C Compliant
• HDMI Output ( 576p, 720p, 1080i resolutions
support)
• HBBTV support
• Timeshifting
• Channel lock
• Present/Next event information (7-DAY-EPG)
• Recording Timer
• Parental lock at menu
• Signal strength bar for transponders
• Multi language audio support
• Digital audio port (optical)
• Remote Control
• Coax-F connector adapter
• Batteries: 2 x AAA
• Instruction Book
NOTE: Check the accessories after purchasing.
Getting Started
Features
Accessories included
• Teletext function support ( DVB )
• Resetting to factory settings option
• TV SCART
• Various channel search options:
• Network search
• Auto PID correction (except user dened PIDs)
• Digital Decoding Properties:
• Video Out: PAL
• 32-bit OSD color, 720x576 pixels for PAL
• System switching (TV/RADIO)
• Last watched channel saving
• IR remote control
4
Page 5
Getting Started
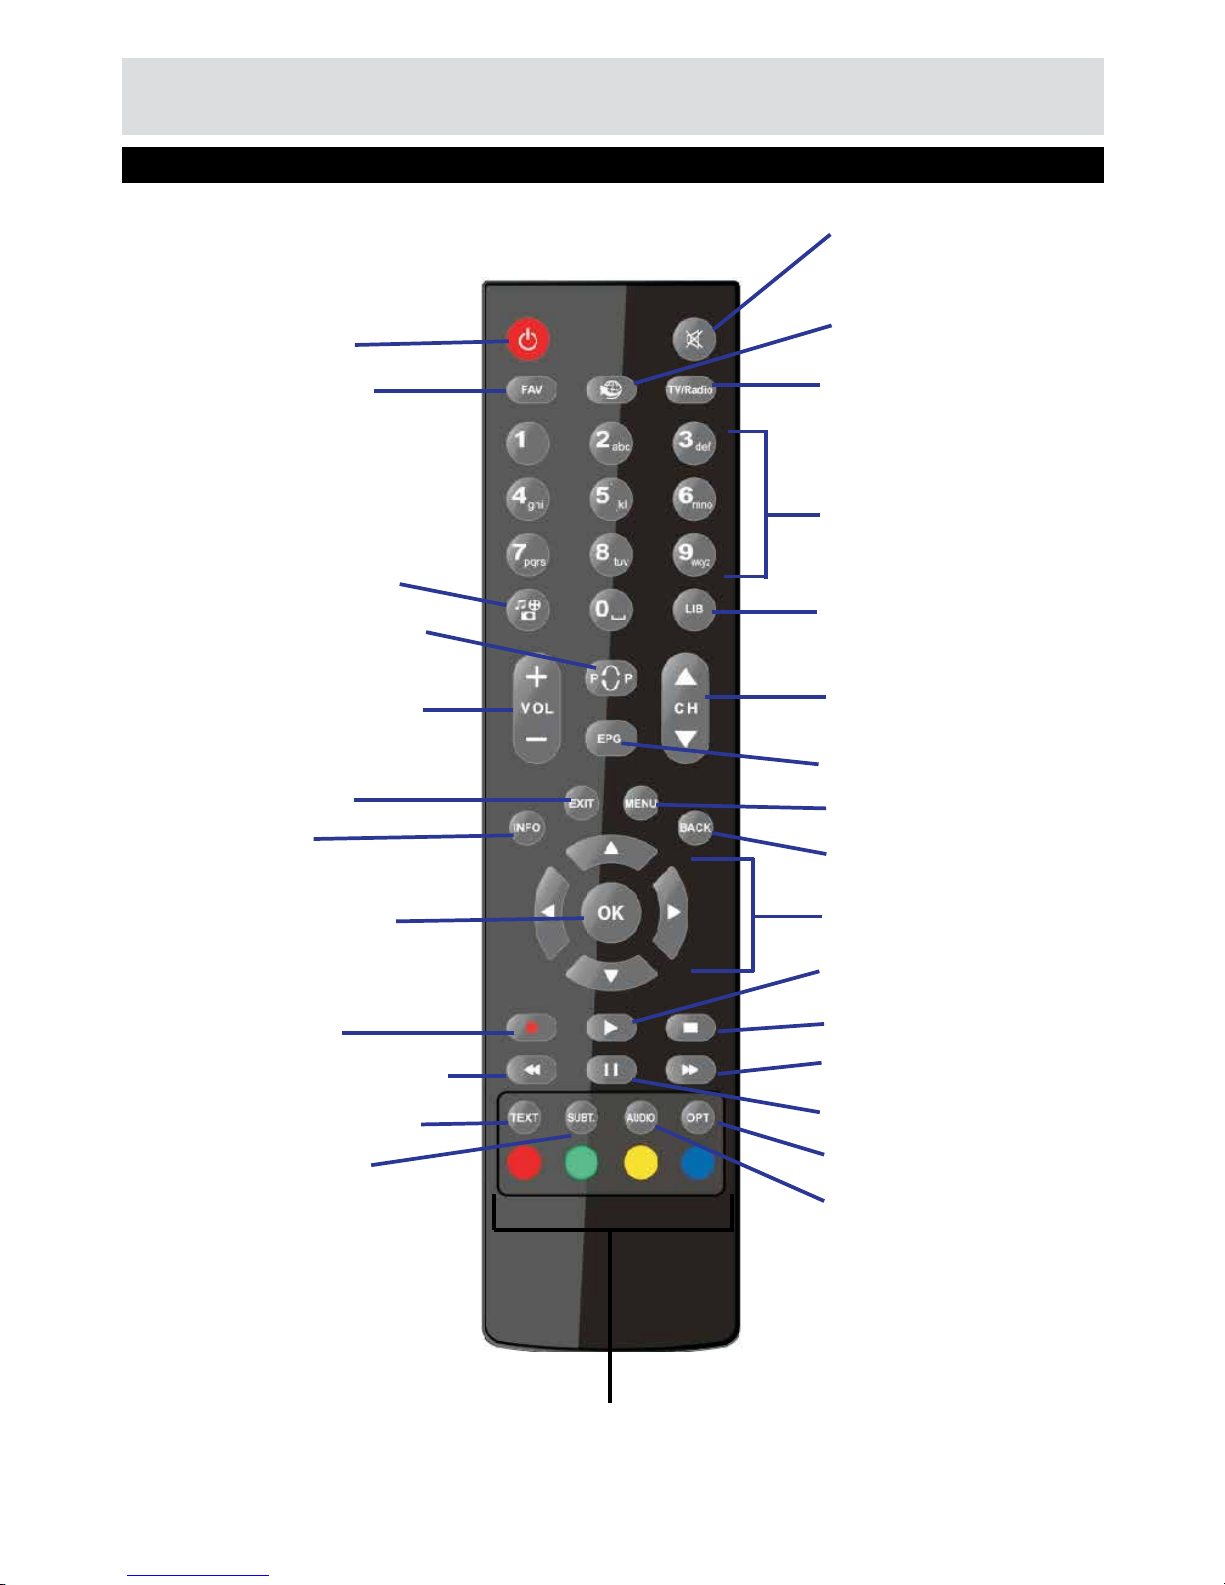
Remote Control
Coloured buttons
Standby
Favorite list
Media browser
Volume Up/Down
Previous channel
Exit
Info
OK/Channel list
Record
Search backwards
Display Teletext
Subtitles
Mute
Internet portal
Switch betweenTV/Radio
broadcasts
Numeric buttons
Library of recordings
Channel Up/Downd
Electronic Programme
Guide
Menu
Back
Navigation
Play
Stop
Search forwards
Pause/Timeshift
Options
Language
5
Page 6
Getting Started
Viewing Controls and Connections
1. AUDIO: Audio Output
2. RF OUT/TV: To watch analogue channels on the TV.
3. LNB IN:Stik til satellitkabel.
4. HDMI OUT: HDMI connection.
5. LAN: Ethernet input.
6. SCART (TV): For connecting to the TV via a a SCART cable.
7. DIGITAL AUDIO OUT: Outputs digital audio to an external device. Refer to the audio system’s instruction book for
further information.
8. DC IN: Tc connect the supplied AC power adapter.
Front Panel
Back Panel
1. On/Off
2. Channel down
3. Channel up
4. USB port
5. Cardreader
1
2
3
4
5
8
1 7 2 3 4 6
5
6
Page 7
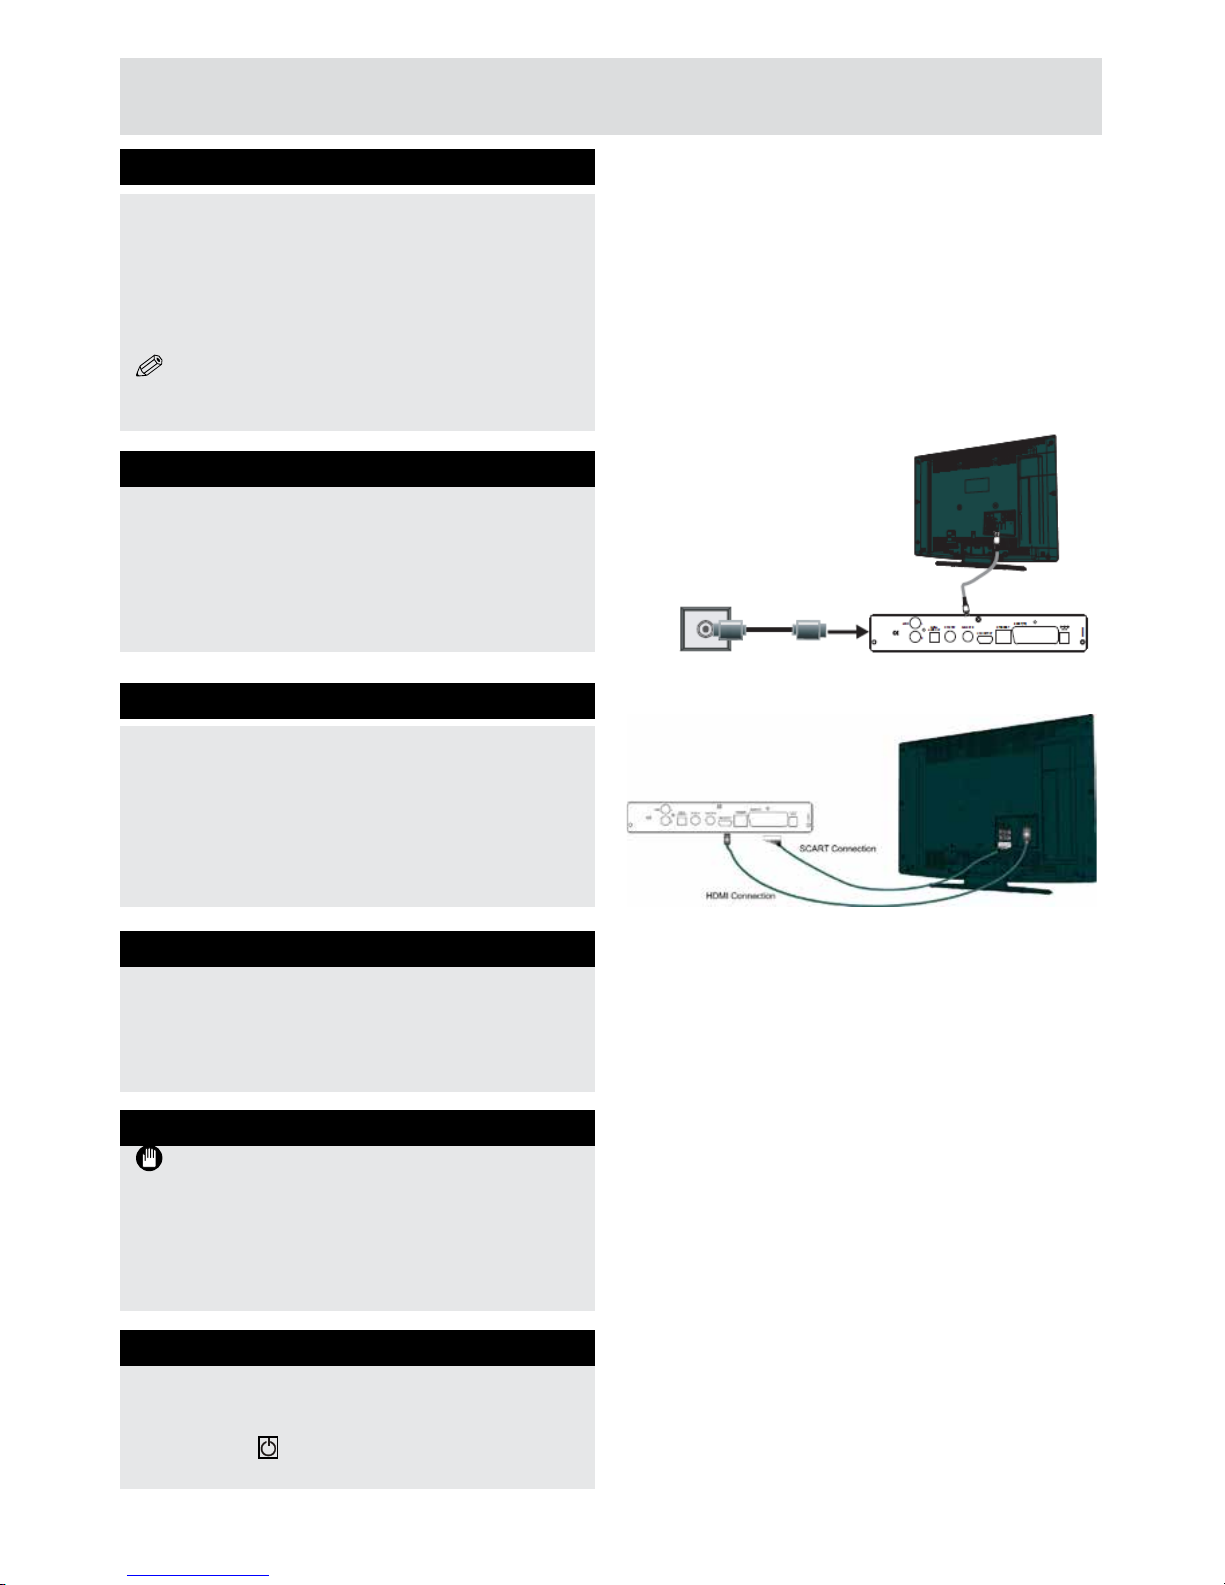
Antenna Connection
• Connect the antenna cable to the CABLE RF IN
port on the back of the set-top box. Use the Coax-F
connector adapter (supplied).
The RF OUT/TV port is used to send the cable
signal directly to the TV without using the
functionality supplied by the set-top box.
Network Connection (Optional)
A network cable can be used with the set-top box.
• Connect a network cable to the LAN port on the
back of the set-top box.
Getting Started
Inserting Batteries in the Remote Control
• Remove the battery cover located on the back of
the remote control.
• Place two AAA/R3 (2 X 1.5Volt) batteries in the
remote control and attach the battery cover.
• The approximate range of the remote control is
7m/23ft.
NOTE: Remove the batteries from the remote
control when it is not to be used for a long
period.
Connecting the Set-Top Box to a TV Set
• Connect the set-top box to the TV with either a
scart or HDMI cable.
High denition quality signals are sent to the TV
if the HDMI Out port is used. This is the preferred
connection method.
RGB or CVBS signals are provided via the scart
(TV) port.
Power ON/OFF
A red light (Standby) is displayed on the set-top
box when the initialization is complete.
• Press the
“ ” Standby button on the remote
control.
Power Connection
IMPORTANT: The set top box is designed to
operate on 220-240V AC, 50 Hz.
• Connect the power adaptor to the mains power and to
the DC-IN port on the back of the set-top box..
The set-top box will start initializing and INIT is
displayed on the front panel.
7
Page 8
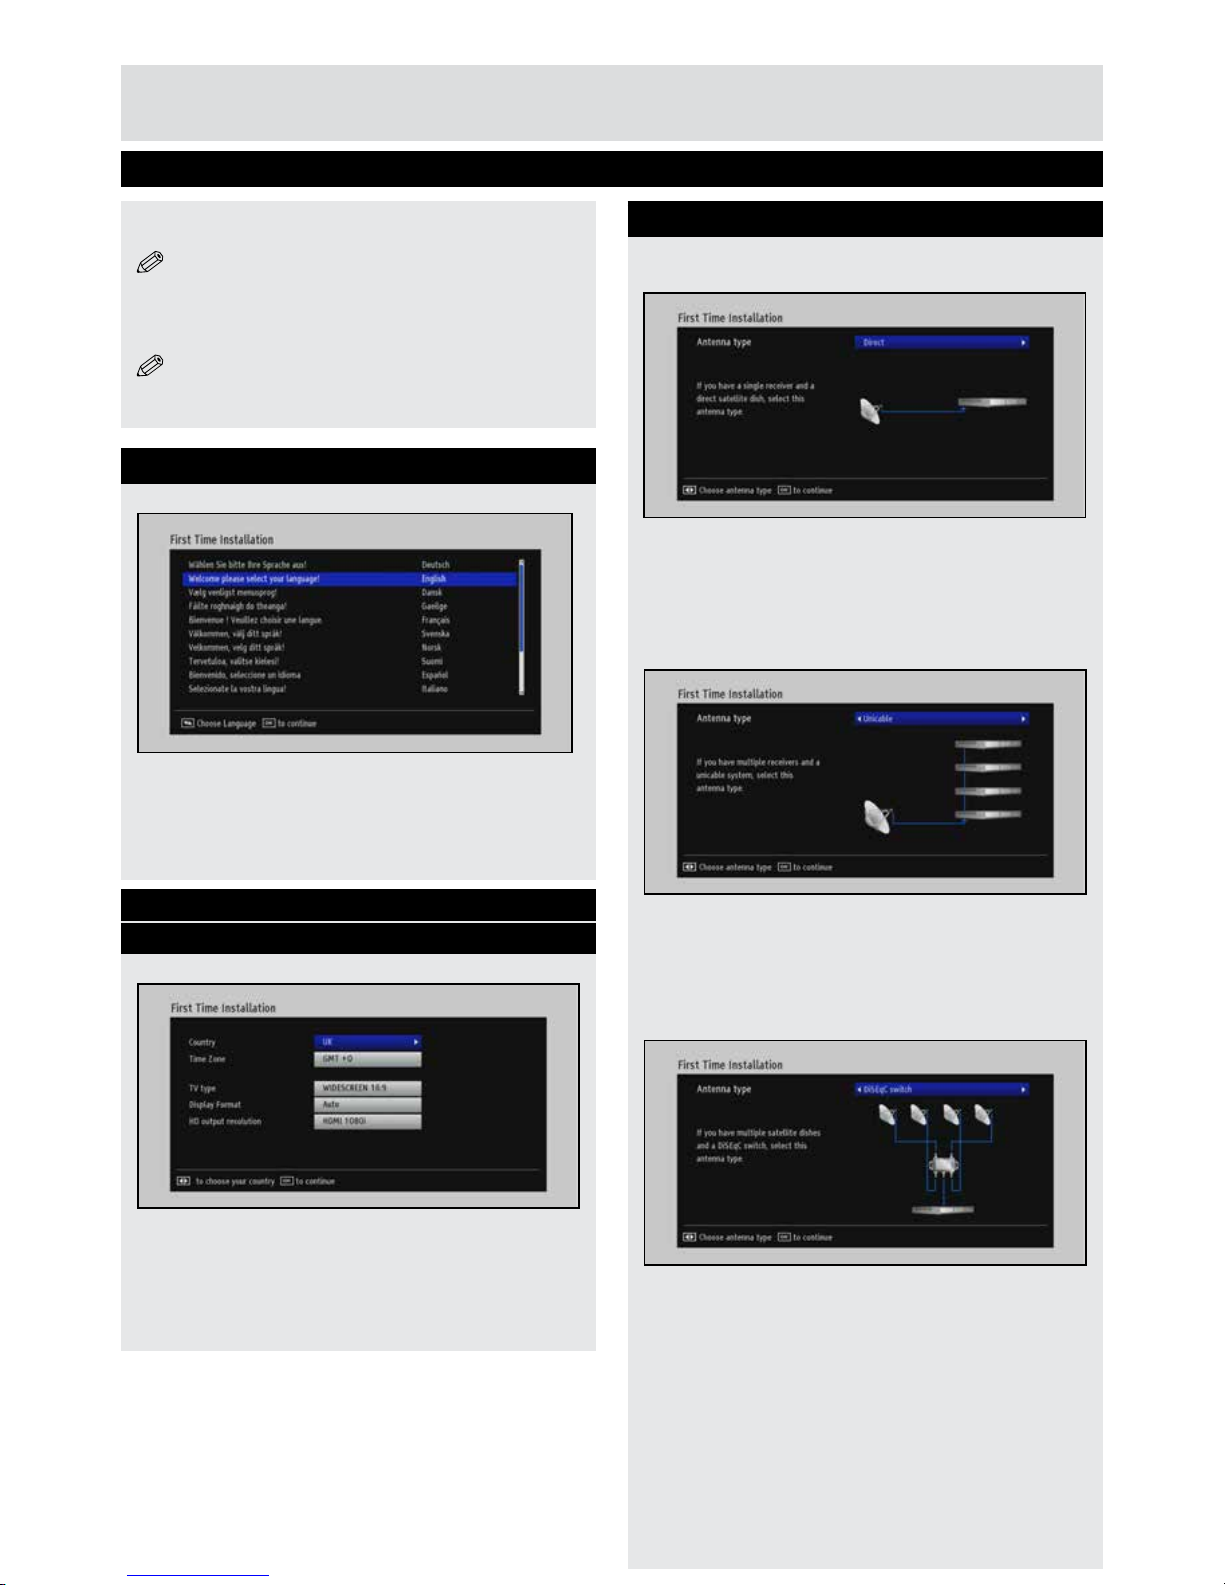
First Time Installation
8
Getting Started
Selecting Language
• Select the desired language (with “▲”/“▼”
buttons).
• Press OK.
The First Time Installation menu is displayed
when the set-top box is started for the rst time.
NOTE: The First Time Installation menu is
also displayed when the set-top box is started from
standby mode AND there no channels are stored
in the channel list.
NOTE:The set-top box is also reset by selecting
the First Time Installation function.
Specifying Country, TV Type, Display
Format, Resolution
• Select the relevant Country, TV type, Display
Format and HD output resolution (with “
▲”/“▼”
and
“◄”/“►” buttons).
• Press OK.
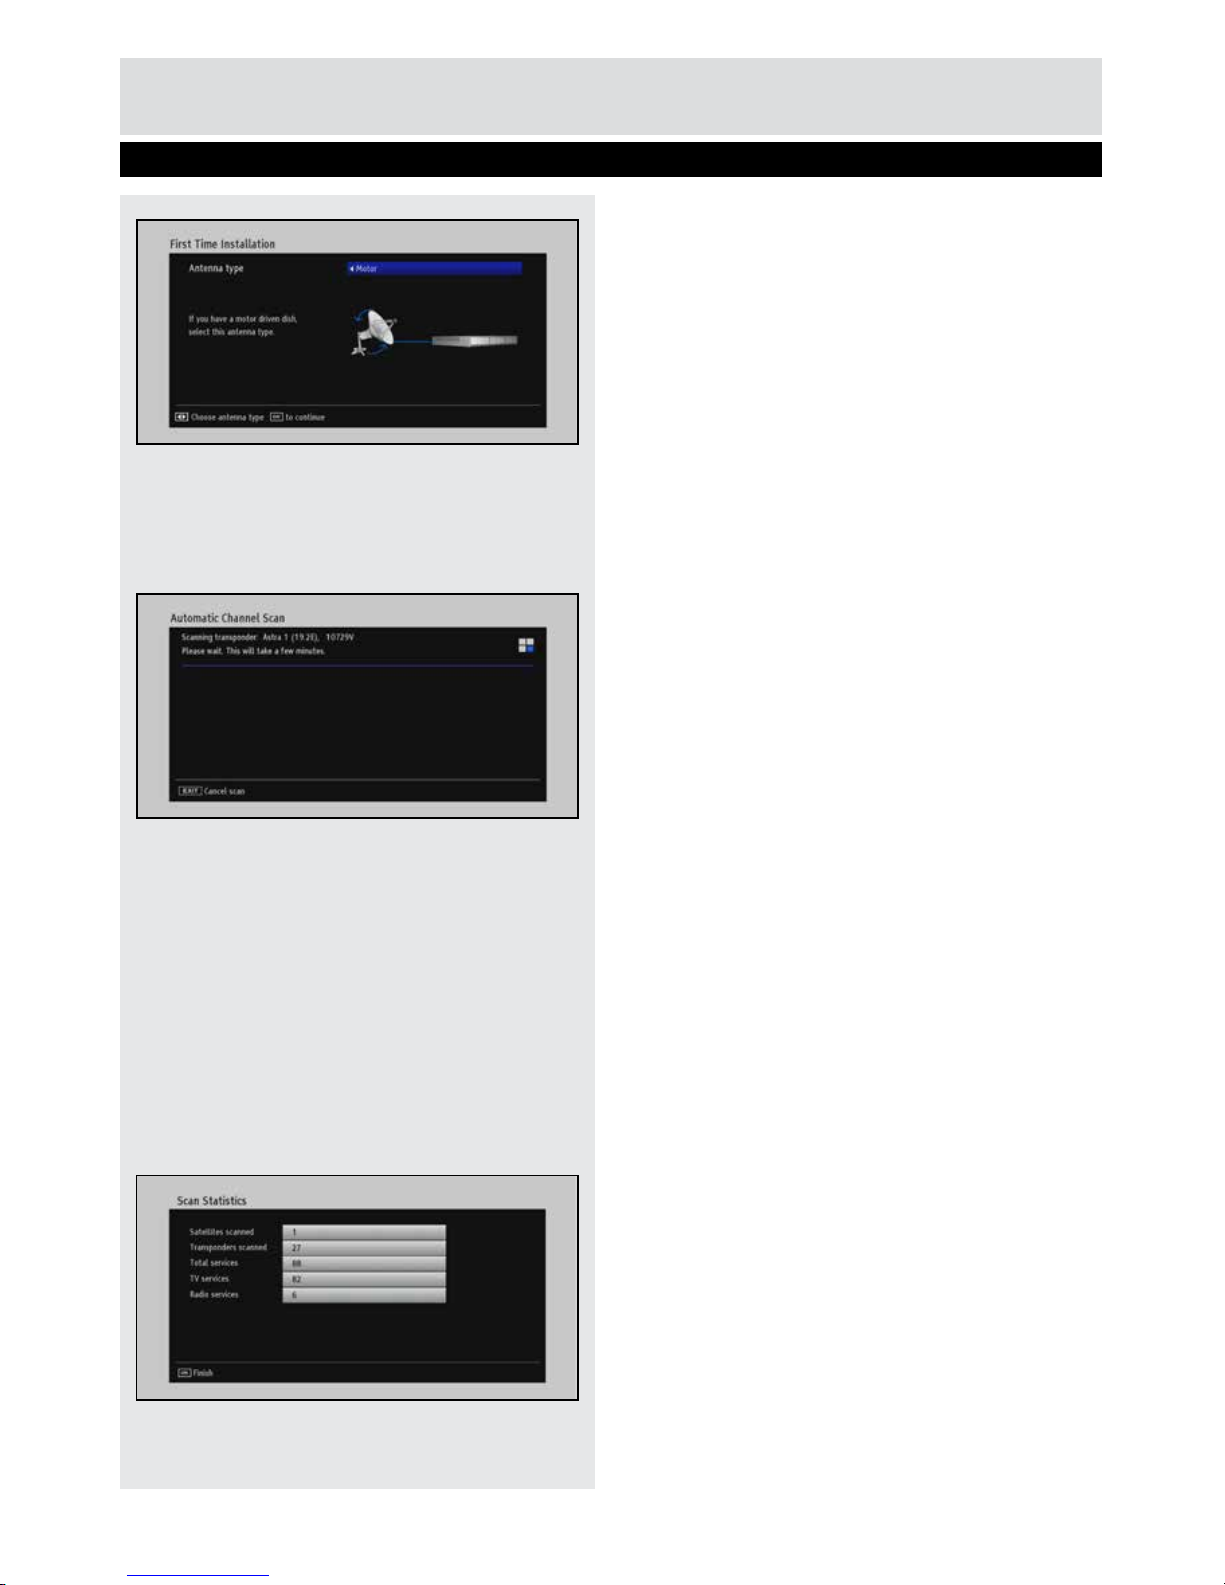
Automatic Channel Scan
• Select one of the four following antenna types
with the
“◄”/“►” buttons:
Direct:
• Select this antenna type it it is directly connected
to the receiver, and press OK..
• Choose a satellite in the next window and press
OK to start searching for channels.
Unicable:
• Select this antenna type if multiple receivers are
used within a unicable system, and press OK.
• Follow the instructions on the screen and press
OK to start searching for channels.
DiSEqC switch:
• Select this antenna type if multiple antennas and
an DiSEqC switch are used, and press OK.
• Follow the instructions on the screen and press
OK to start searching for channels.
Page 9
First Time Installation
9
Getting Started
Motor:
• Select this antenna type if a motorized antenna
is used, and press OK.
• Follow the instructions on the screen and press
OK to start searching for channels.
Once you have selected satellite in the initial
installation will be the window manually search
for Astra 1 satellite view. NIT search can also be
performed from this window. Use the navigation
buttons to select the desired conguration. Set Select
the network search to “Yes” to obtain information from
the NIT (Network Information Table). When you are
nished, press OK to search for channels. .
The receiver starts searching for channels. The
channel search may take several minutes. You can
follow the channelsearch process via the process bar.
After the search, the rst installation to be completed
and the search results are displayed on the screen.
Page 10
10
Changing Channels
Use either of the following methods to select a
channel:
• Use the numeric buttons (0-9). Press the numeric
butons quickly to enter two or three digit channel
numbers.
• Press the CH
▲/▼ buttons to move up or down
to the next channel.
• Press the OK button to display the channel list,
select the desired channel (with “
▲”/“▼” buttons)
and press OK.
Adjusting Volume
The set-top box’s volume setting is independent
of the volume setting on the TV set.
• Increase or decrease the volume with the VOL+/-
buttons.
The specied volume level is saved in the set-top
box and is active when it is restarted.
IMPORTANT: Ensure that the volume levels
on the set-top box and the TV are synchronised to
avoid high volume levels upon TV start-up.
Mute
• Press to mute the sound on the set-top box.
• Press
again or use the VOL +/- buttons to
cancel unmute.
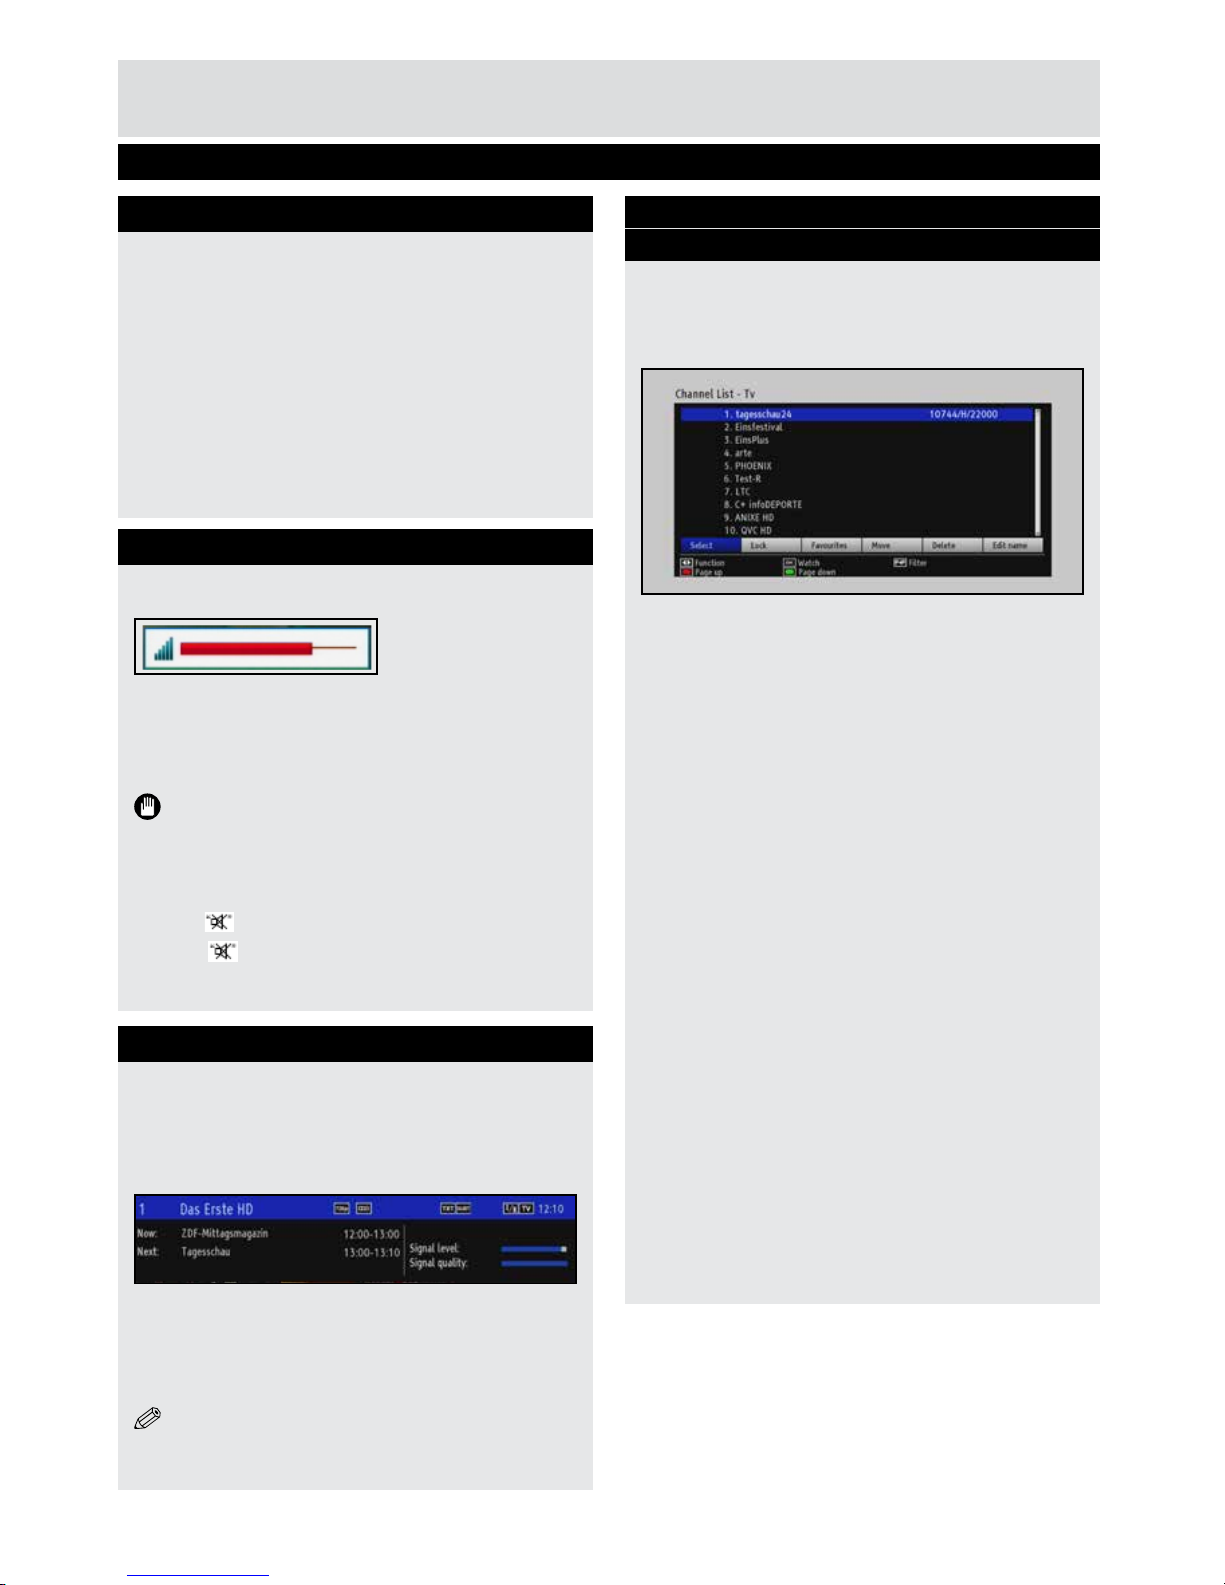
Viewing On-Screen Information
• Press the INFO button to view information on the
active channel:
Current event name, next event name, start and
end time, resolution, channel number and name,
teletext availability, and favourite status.
• Additional information on the programme
currently being shown can be viewed by pressing
INFO again.
• Press EXIT to close the INFO pane.
NOTE: The information displayed is dependant
on the service distributor.
Viewing Electronic Programme Guide
(EPG)
EPG receives programme information for channels
via the 7-DAY-EPG. An info bar showing all available
commands is displayed.
• Press the EPG button to view the EPG menu.
CH▼: Displays the previous day’s programmes.
CH
▲: Displays the next day’s programmes.
Yellow button (Zoom): Changes the size of the info
boxes.
Blue button (Search channel): Displays channel
search options.
Red button : Page Up.
Green button : Page Down.
OK: Opens the options menu. Views current
broadcast and sets reminders/records for
programmes
Info (Details): Displays the programmes in detail.
Now (►) : Jumps to the current time.
Choose genre(SUBT): Genre selection option.
Select Channel
• Use this option to switch to the selected
programme.
Page Left(
►►): Shifts page forwards.
Page Right(
◄◄): Shifts page backwards.
Search(Text): Provides programme search
functionality. Press the TEXT button to view the
Search menu.
Record: The set-top box will record the selected
progamme.
Getting Started
Basic Operations
Page 11
11
Getting Started
Basic Operations
Viewing Electronic Programme Guide
(EPG) Cont.
Record Programme
NOTE: A USB storage device must be connected
to use the Record function.
• Select the desired programme in the EPG menu
and press OK.
The Event Options screen will be displayed.
• Select Record and press OK.
The recording is dened.
Delete Timer
Dened records are deleted by higlighting the
programme, pressing the OK button and selecting
the “Cancel Record” option.
NOTE: Only channels that are being recorded can
be viewed IF
two recordings are active.
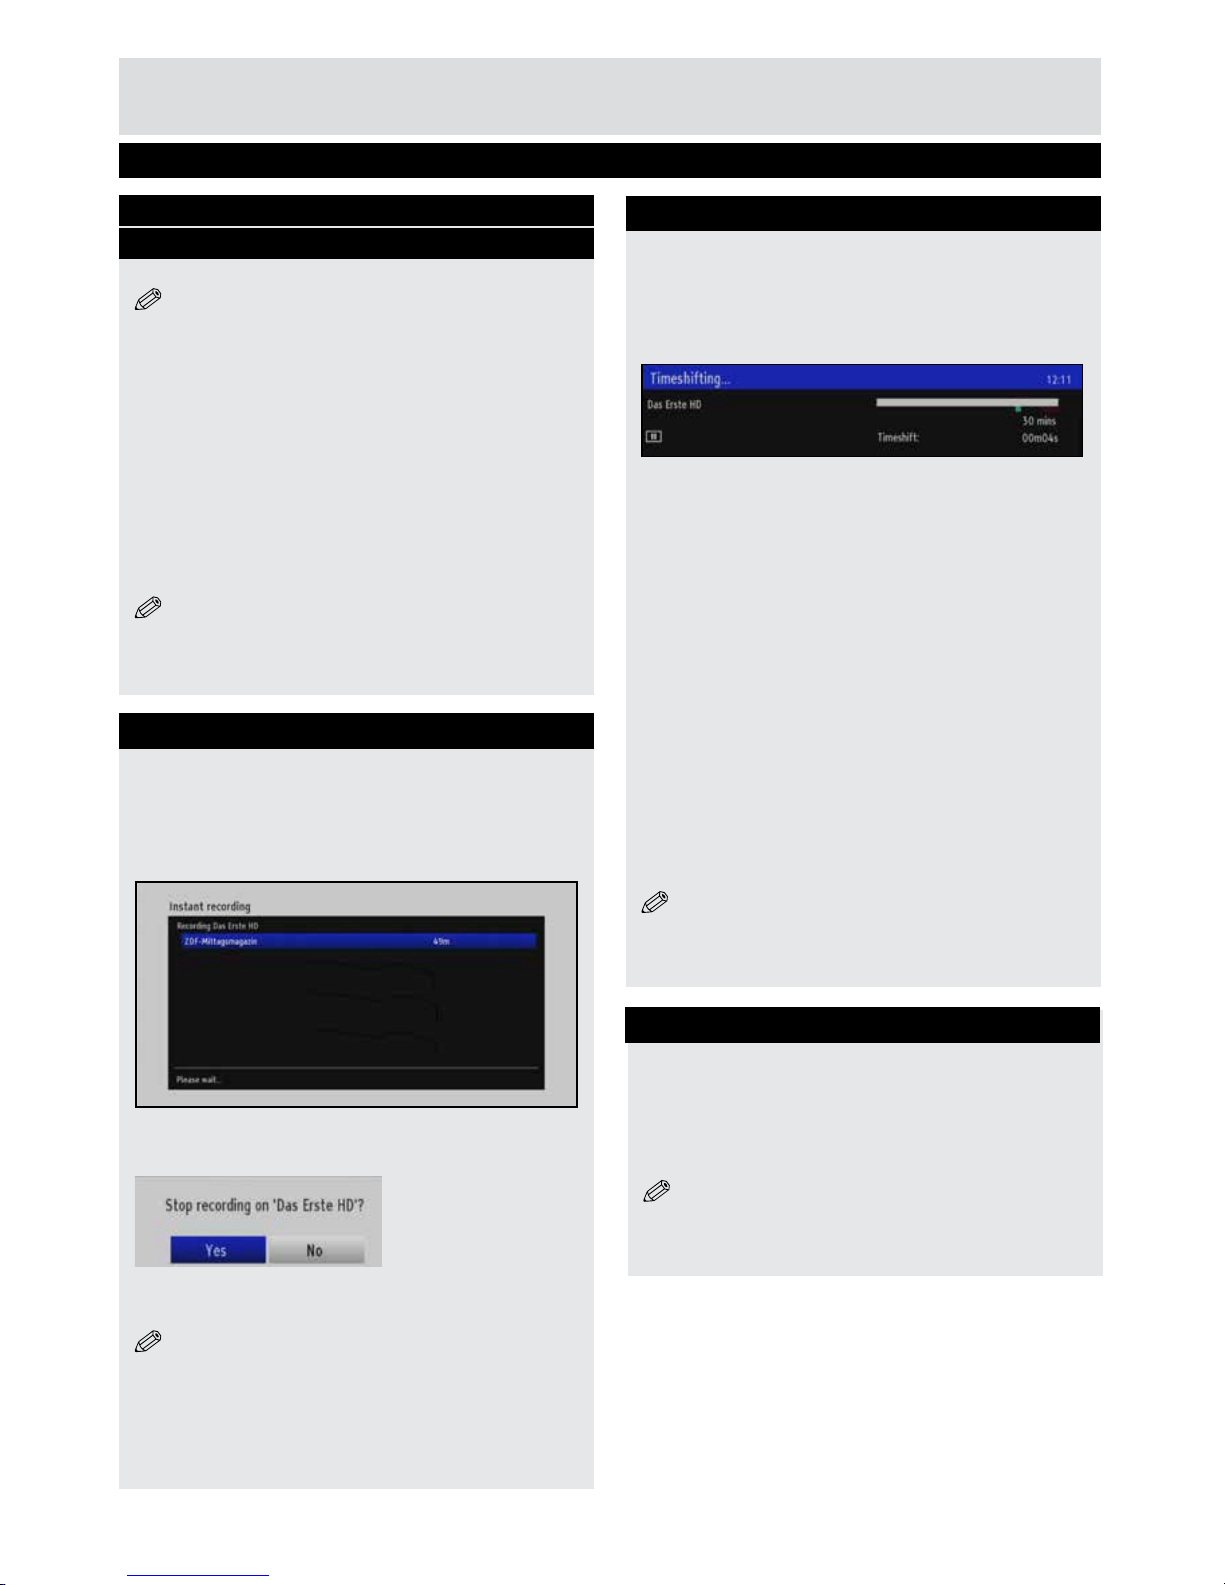
Instant Recording
Recordings for up to four events can be scheduled
via Instant Recording.
• Press the (Record) button to start recording an
event while watching a programme. The following
OSD is displayed and recording starts:
• Press the ■ (STOP) button to cancel instant
recording. The following OSD will be displayed:
• Select Yes and press OK to cancel instant
recording.
NOTE: Only channels being recorded can be
viewed if two recordings are active.
Time Shifting
In timeshifting mode, the programme is paused
and simultaneously recorded to the connected
USB storage device.
• Press
▌▌ (PAUSE) button while watching a
broadcast to switch to timeshifting mode.
• Press the (PLAY) button to resume watching
the paused programme.
Playback is performed at x1 playback speed.
The timeshift difference between the real and the
timeshifted programme is displayed in the info bar.
• Use the ◄◄/ ►► (PREVIOUS/NEXT) buttons to
move forwards or backwards through the timeshift
playback.
• Press the
■
(STOP) button to exit timeshifting
mode.
(*) The available duration of simultaneous
timeshifting recordings is determined by the
capacity of the connected USB storage device and
via Max. Timeshift in the Recordings Conguration
menu. See the section, “Recordings” for more
information on the Max. Timeshift setting.
Note: It is not possible to switch to a different
broadcast or source, or view the main menu when
time shifting is active.
Press the TEXT button to activate the Teletext
broadcasting. Use the RED, GREEN, YELLOW and
BLUE buttons as idicated on the TEXT screen
Press MENU to exit from Teletext.
NOTE: Teletext function’s availability depends
on the broadcaster.
Text TV
Page 12
12
Basic Features
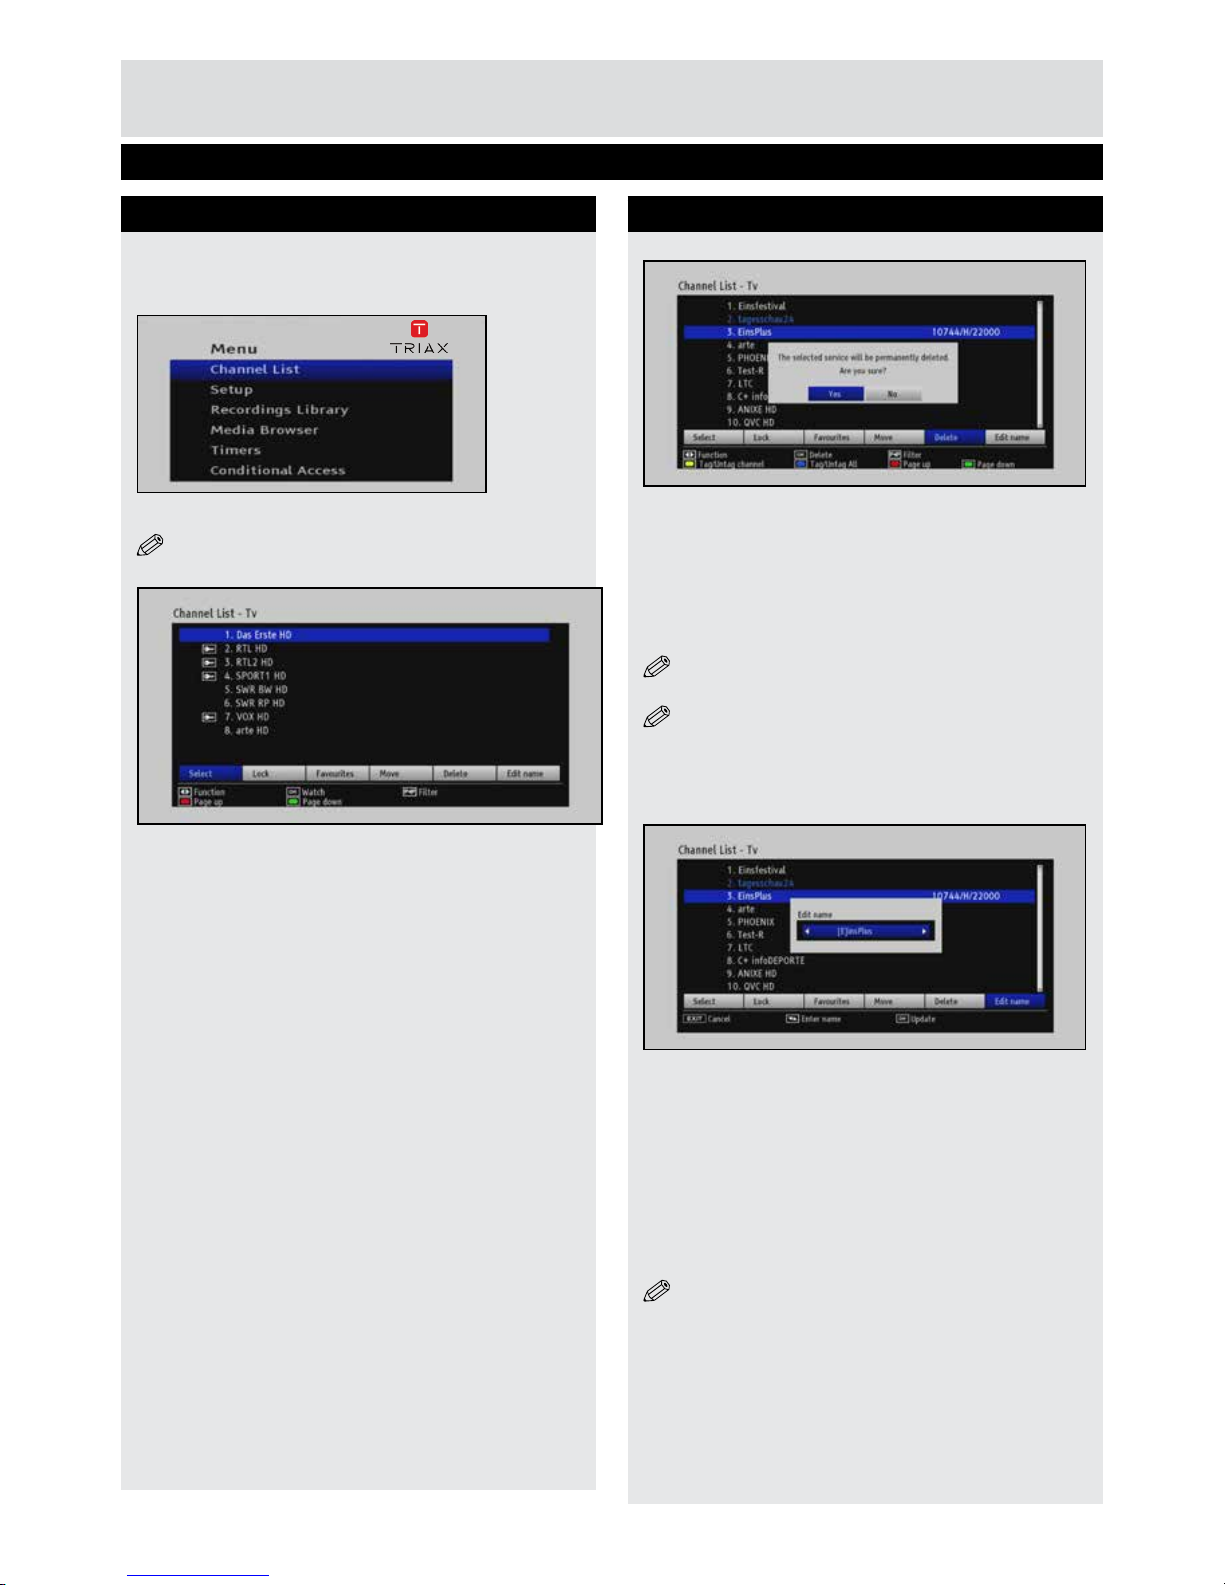
Managing Channels/Favourites
Channel Management
Stations stored in the set-top box are displayed in
Channel List.
Press MENU on the remote control.
• Select Channel List and press OK.
NOTE: The channel list is also displayed by
pressing the OK button when viewing a broadcast.
Operating the Channel List
• Move through the channels with the “
▲”/“▼”
buttons.
• Press the “RED” or “GREEN” buttons to move
page up or page down.
• Highlight the desired channel (“
▲”/“▼” buttons),
highlight the “Select” item (
“◄”/“►” buttons) and
press the “OK” button.
Filtering Channels
This option denes which type of channels are
visible in the channel list and therefore selectable
via the CH
▲/▼ buttons on the remote control.
• Press the P<P button on the remote control.
• Select which channel types are to be ltered.
Channel Management
Deleting Channels
• Select the channel to be deleted.
• Select Delete and press OK.
• A conrmation message will be displayed.
• Select YES to delete the selected channel or NO
to cancel.
• Press OK.
NOTE: Use the Yellow button to select a channel
or use the Blue button to select all channels.
NOTE: It is not possible to delete a channel if
it is currently being viewed.
Renaming Channels
• Select the channel to be renamed.
• Select Edit Name and press OK.
• Specify the new name, e.g., ‘b’ character changes
to ‘a’ by pressing “
▲” or to ‘c’ by pressing “▼”.
• Navigate between the characters with the
“◄”/“►” buttons.
• The numeric buttons ‘0...9’ can also be used to
replace the current character; e.g. press ‘1’ twice
to replace the current character with ‘B’
• Press OK to save the new name.
NOTE: Press MENU to cancel editing.
Page 13

13
Managing Channels/Favourites Cont.
Moving Channels
• Select the channel to be moved.
• Select Move and press OK.
• Enter the new number for the selected channel
and press OK.
Locking Channels
• Select the channel to be locked.
• Select Lock and press OK.
• Enter the PIN numer and press OK.
Note: The active PIN number will be (0000) if it
has not previously been changed.
Basic Features
Favourite Management
Setting Favourites
• Press MENU or EXIT when finished. Select
Favourites and press “OK”.
The Edit Favourite List menu is displayed.
Adding a Channel to Favourites List
• Select the channel to be added to the favourites
list and press “OK”.
A ‘Star’ icon is displayed next to the channel.
• Continue adding channels to the favourites list.
• Press MENU or EXIT when nished.
• Press FAV on the remote control to make the settop box function in FAV mode.
NOTE: Only channels specified as being
favourites can be selected when the set-top box
functions in FAV mode.
Removing a Channel from Favourite List
• Select the channel to be removed from the
favourite list and press “OK”.
• Press MENU or EXIT when nished.
NOTE: Use the Yellow button to select a channel
or use the Blue button to select all channels.
Page 14

14
Video Files
• Select USB-Device and press OK.
• Select VIDEOS and press OK. All video les are
displayed.
Jump (Letter buttons): Jumps to the selected le
using the numeric buttons.
Play This (OK button): Plays the selected le.
Play (► button): Plays all media les in the folder
starting with the selected le.
AUDIO: Sorts les by name.
BLUE: Changes media type.
Play (► button): Play les.
Pause (
▌▌ button) : Pauses the playback.
Stop ( ■ button) : Stops playing the le.
Rewind (
◄◄ button): Goes backward.
Fast Forward (
►► button): Goes forward.
GREEN : Jumps to the selected time.
AUDIO: Sets subtitle or audio.
YELLOW : Sets subtitle time correction.
RED: Sets subtitle position on the screen.
BLUE: Sets subtitle size.
SUBT: Enables/disables subtitles.
EXIT : Exit video.
MENU: Go to the previous menu.
Supported video types: .avi / mpg / mkv / mp4
NOTE: Rewind and Fast Forward features are
unavailable while playing videos via DLNA.
Media Browser
The set-top box can play media music, video and
picture les that are located on a USB storage
media or on a DLNA media server (network
connection required).
• Press MENU on the remote control.
• Select Media Browser and press OK.
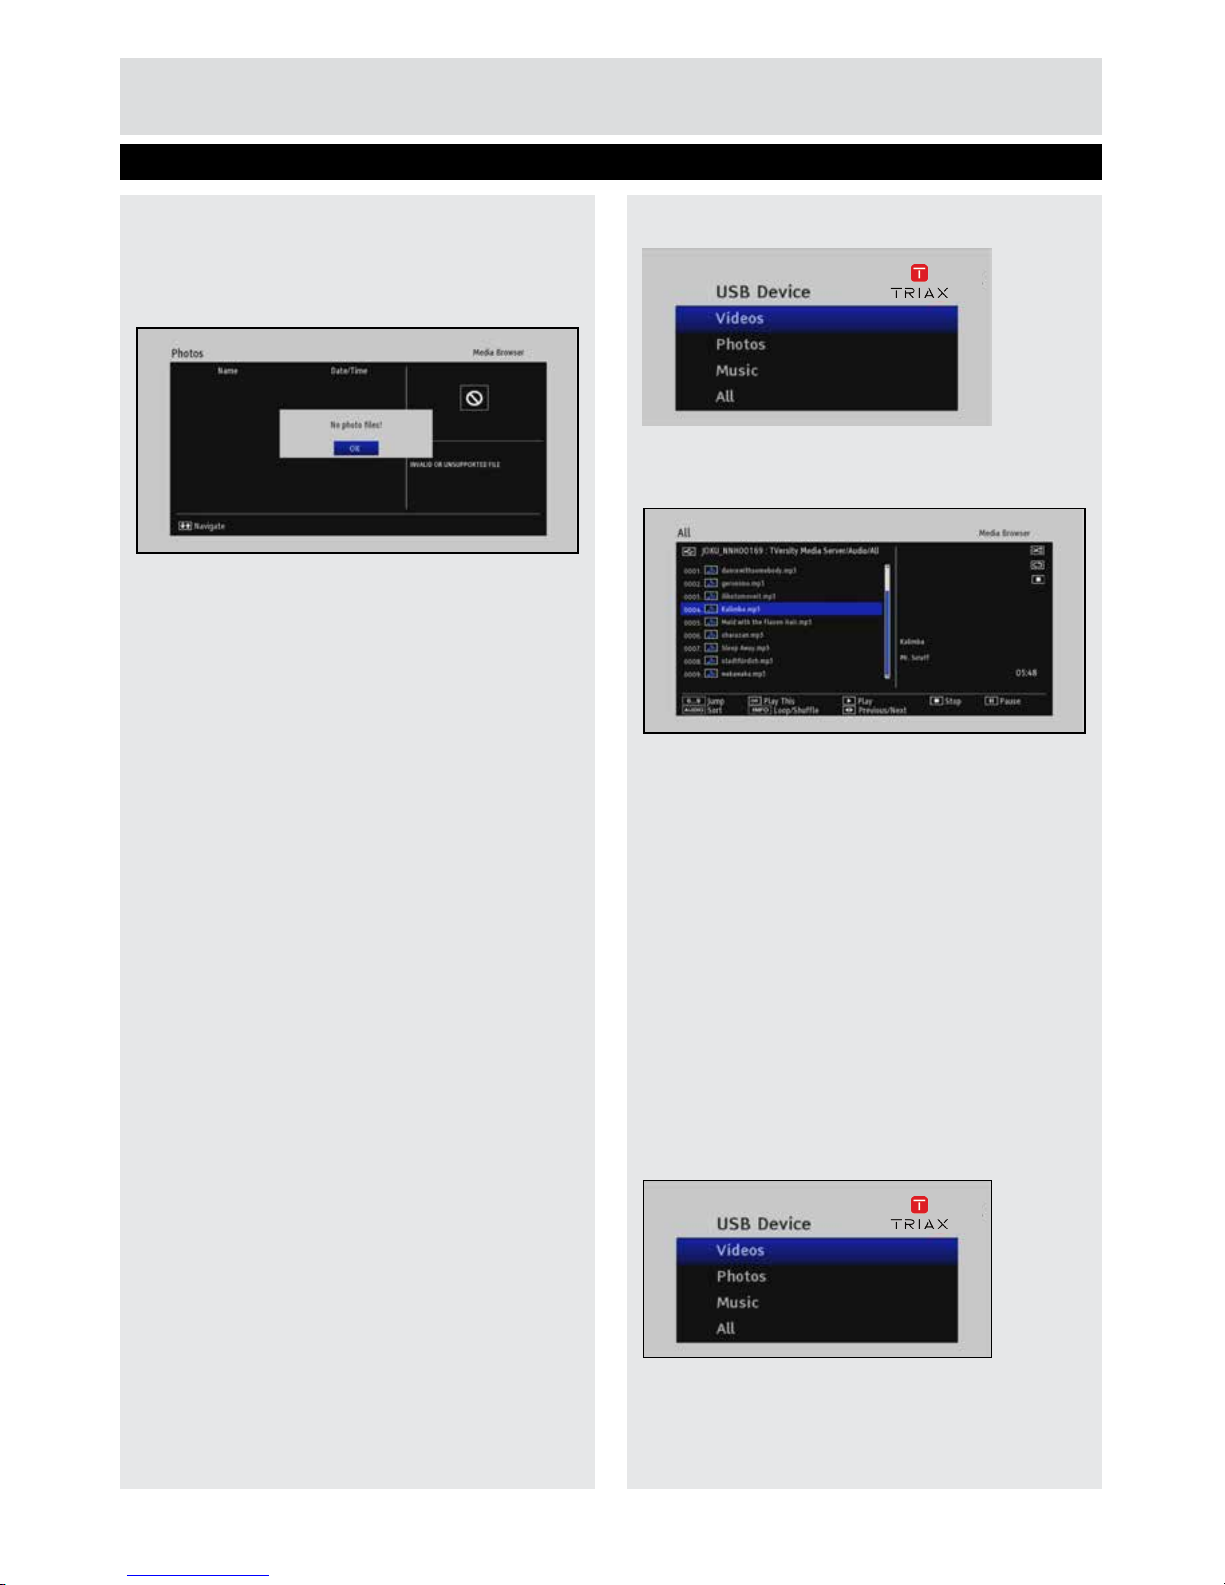
Viewing USB Storage Device Contents
This option plays music, video and photos from a
USB storage device.
Important: Disconnect power to the set-top
box before connecting the USB storage device.
Connect the USB storage device and turn on the
set-top box.
Formating the USB storage device can resolve
certain technical problems. See Format HDD for
more information.
NOTE: Some USB compliant devices may not
be supported.
Media Browser
USB - Videos
Page 15
15
Photos les
• Select USB-Device and press OK.
• Select PHOTOS and press OK.
All photo les are listed.
Jump (Numeric buttons) : Jump to the desired le.
OK : (OK) Displays the selected picture in full
screen.
Slideshow (►): Starts the slideshow containing
all photos in the folder.
AUDIO: Sorts les by date.
BLUE: Changes media type.
YELLOW: Sets the slideshow interval.
Slideshow Options
• Select USB-Device and press OK.
• Select PHOTOS and press OK.
All photo les are displayed.
Play ► to start the slideshow.
Pause (
▌▌) : Pauses the slideshow.
Stop (
■
) : Stops playing the le.
GREEN : Activates Loop/Shufe mode.
Previous/Next (
“◄”/“►”) Jumps to previous or
next le.
Rotate (“
▲”/“▼”) : Rotates the photo.
Exit : Returns to the le list.
.
Music les
• Select USB-Device and press OK.
• Select MUSIC and press OK.
All music les are listed.
Jump (Numeric buttons): Jumps to the selected
le using the numeric buttons.
Play This (OK button): Plays the selected le.
Play (►): Plays all media les in the folder starting
with the selected one.
Stop (
■
): Stops playing the le.
Pause (
▌▌): Pauses playing the le.
AUDIO: Sorts the les.
INFO: Activates loop/shufe mode.
BLUE: Changes media type.
Previous/Next (
“◄”/“►”): Jumps to previous or
next le.
ALL Files
• Select USB-Device and press OK.
• Select ALL and press OK.
All les on the USB storage device, regardless of
le type, are displayed. The playback functionality
used is based on the type of le selected.
Media Browser
USB - Photos & Music
Page 16

16
Media Browser
Media Server
This option plays music, video and photos from
a DLNA media server.
• Press MENU on the remote control.
• Select Media Browser and press OK.
The DLNA media server(s) located on the
network are listed.
• Select the desired DLNA media server and
press “Search”.
The selected media server screen will show up
The audio les located on the server are listed.
The following is displayed if a DLNA media server
cannot be located on the network.
• Check the status of the network via the Internet
Settings menu.
• Check that the media server is powered on and
attached to the network, and that it is correctly
congured as a DLNA media server.
• Press the Search button to attempt to locate the
DLNA server.
Page 17

17
Advanced Features
Internet Portal
Internet portal feature adds your set-top box a
feature that allows you connect a server on the
Internet and view content via icons/shortcuts.
NOTE: The speed and stability of the network/
internet connection is of high importance when
using the internet portal. An 8 mbit connection is
recommended.
• Press the portal button on the remote.
• Use the “◄”/“►” ,“▲”/“▼” buttons on the
remote to navigate the internet portal.
• Press the OK button to activate the selected
content.
• Follow the on-screen instrructions provided by
the service provider.
NOTE: Pictures, links, services displayed in
the internet portal are controlled by the content
service provider, and are subject to change.
Page 18

18
Automatic Channel Scan
This option populates the channel list by
automatically searching for available channels.
NOTE: Existing channel and favourite lists
are deleted when an automatic channel search is
performed.
• Select Automatic Channel Search and press OK.
Med Automatisk kanalsøgning kan du søge på udvalgte eller alle satelliter.
• Brug
“▲”/“▼” knapperne til at vælge Automatisk kanalsøgning fra
menuen Installation og tryk på OK knappen.
Indstillingsmulighederne i vinduet Automatisk satel-litsøgning afhænger
af hvilken antennetype der blev angivet i førstegangsinstallationen. Angiv
de ønskede satellitværdier. Tryk på OK knappen for at søge på den valgte
satellit. Tryk på den Blå knap for at se listen over transpondere. Tryk på
OK knap for at søge på alle satelitter.
• Press OK to start the search.
The set-top box starts searching for available
channels, with the blue bar showing the progress
of the scan.
NOTE: Press EXIT to stop the channel search.
Main Menu
Detailed settings can be congured to suit personal
preferences or hardware compatibility issues.
• Press MENU on the remote control.
• Select Setup and press OK.
• Select Installation and press OK.
Setup
Channel Installation
Page 19

19
Setup
Channel Installation
Manual Search
This option adds a user-dened channel to the
channel list.
• Select Manual Search and press OK.
• Enter the desired Frequency, Modulation and
Symbol Rate with the numeric buttons.
• Press OK.
The new channel (if found) will be added to the
channel list.
NOTE: Press MENU to stop the channel
search.
• Select the frequency ranges to be scanned via
the Start and Stop Frequency elds.
• Set Search Step to 8000 KHz or 1000 KHz.
NOTE: Selecting 1000 KHz results in the
channel search being more detailed, and extends
the search time accordingly.
• Press OK to start the search.
NOTE: Press MENU to cancel the channel
search.
First Time Installation
This option restores the set-top-box to the default
factory conguration.
Refer to Getting Started/First time installation
section for more information.
Page 20

20
• Press MENU on the remote control.
• Select Setup with the “▲”/“▼” buttons and press
the OK button.
• Select Conguration with the “▲”/“▼”buttons and
press the OK button.
Country
This select displays the country that was selected
when the set-top box was installed for the rst
time.
The country setting can only be modied by
running First Time Installation again.
Setup
Country - Output Settings - Receiver Upgrade
Output Settings
Select Output Settings and press OK.
The following elds are displayed:
TV Type. Select 16:9 format for wide-screen TV sets
and 4:3 format for standard TV’ sets.
Display Format. Select Auto, Letter Box or Pan &
Scan for 4:3 format TV sets and Auto, Pillar Box
or Zoom for 16:9 format TV sets.
SCART mode. Select ‘RGB’ or ‘CVBS’.
Although the RGB format results in better quality
pictures, not all equipment accomodate RGB
signals.
Prefer Dolby Digital. Select ‘Yes’ or ‘No’.
SPDIF Output. Select ‘LPCM’ or ‘Dolby D.
HDMI Resolution. Select 576P, 720P or 1080i.
AUDIO Delay. Specify the value that the audio is
to be delayed by.
Note: This setting is used to correct audio/video
syncronization issues when Optical Audio is used for
audio signal transmission.
Receiver Upgrade
This setting ensures that the set-top box always
has the most up to date information.
• Select Receiver Upgrade and press OK.
• Set Automatic scanning to “Enabled” if the set-top
box is or “Disabled”.
• Select Scan for upgrade and press OK to commence
the upgrade.
Page 21

21
Setup
Menu Locking - Time - Power - Language
Menu Locking
This setting limits menu accessibilty.
• Select Menu Locking and press OK.
The following elds are displayed:
Menu Lock
• Select the Menu Lock Mode to be used.
DISABLED : All menus are accessible.
ALL MENUS : All menus are accessible if the
correct PIN code has been entered.
INSTALLATION : The installation menu is only
accessible if the correct PIN code has been entered.
All other menus are available.
Set Pin
This setting is used to change the PIN number.
Note: The active PIN number will be (0000) if it
has not previously been changed.
• Select Set PIN and press OK.
• Enter the new four digit PIN number with the
numeric buttons .
• Verify the new PIN number by entering it a second
time.
Important: Record the new PIN number.
Time Settings
• Select Time Settings and press OK.
• Select Time Zone.
• Select “Auto” or “Manual”.
The Time Zone eld can only be modied if “Manual”
has been selected.
• Use the
“◄”/“►” buttons to set the time zone
between GMT-12 og GMT+12.
The Actual Time will be changed in accordance with
the selected time zone.
Low Power
This setting defines whether the set-top box
will function in low power mode, which reduces
electricity usage.
• Select Low Power.
• Set this setting to “Yes” or “No”.
Note: Low power is activated by default.
Automatic Power Down
This setting defines if the set-top box will
automatically power off when not used for a long
period of time.
• Select Automatic Power Down.
• Set this setting to ‘Yes’ or ‘No’.
Note: Automatic Power Down is activated by
default.
Language Settings
• Press MENU on the remote control.
• Select Setup and press OK.
• Select Language Settings and press OK.
Language Menu
This setting is used to dene the language output
by the set-top box.
• Menu: Select the language used in the menus
and press OK.
• Audio: Select the audio language and press OK.
• Subtitle: Select the subtitle language and press
OK.
• Guide: Select the EPG language and press OK.
• Press MENU when nished..
Page 22

22
Setup
Recording - Format HDD - Internet
Internet Settings
The Internet Settings tool is used to congure a
wired network connection for accessing Internet
and/or DLNA Media Server content.
• Check that a network cable has been inserted
into the set-top box’s network port.
• Press MENU on the remote control.
• Select Setup and press the OK button.
• Select Internet Settings and press the OK button.
The following options are available:
Disable (Red button). Network access will be
disabled.
Static (Yellow button). Allows manual conguration
of the elds in the Internet Settings window.
Dynamic (Blue button). The default setting;
automatically populates the elds with data from
the router.
Internet Speed Test (Green button). Used to test
the data transfer speed from the router to the settop box.
Recording Conguration
Select Recording Conguration and press OK.
The following options are available:
Discard
This setting denes if exisitng recording les will be
deleted when the USB storage device is full AND
a timer is set to record.
None: No recordings will be deleted and the
requested timer recording will not start.
Oldest: The oldest recordings will be deleted to make
space for the timer recording.
Longest: The longest (largest le size) recordings
will be deleted to make space for the timer recording.
Shortest: The shortest (smallest le size) recordings
will be deleted to make space for the timer recording.
Unplayed: Recordings that have not been played will
not be deleted if EXCLUDED is selected. Selecting
INCLUDED results in recordings being deleted if they
have been played.
Format HDD
The Format HDD tool can be used to help solve
most USB storage media problems. ALL content
on the attached USB hard-disk or memory stick
is deleted, and the storage media is formatted in
FAT32 format.
Important: Back up important recordings on
the USB storage media before using the Format
HDD tool.
• Select Format HDD and press OK.
• Enter the PIN number when requested and press
the OK.
Note: The PIN number is ‘0000’ unless this has
previous been modied.
• Select YES and press OK to format the hard disk
or select NO and press OK to cancel.
Max Timeshift
• Select the maximum period to be recorded when
timeshift recording is used.
Page 23

23
Play Options
Play from start: Plays the recording from the
beginning.
Resume: Begins with playing from the last stopped
position.
Play from offset: Playback commences after the
time specied in the Play from offset option.
Manage chapters : Displays marked chapters.
Displaying Chapter Options
• Press MENU while playing a recording to display
the Chapter Options menu.
Create new chapter mark: Inserts a chapter mark
in the recording.
Forwards to next chapter: Scrolls to the next
chapter.
Back to start of chapter. Scrolls to the start of the
chapter currently being viewed.
Back to previous chapter: Scrolls to the previous
chapter.
Recordings Library
A USB storage device must be connected to
the set-top box for the recording features to be
available.
Important: Disconnect power to the set-top
box before connecting the USB storage device.
Connect the USB storage device and turn on the
set-top box.
• Press MENU on the remote control.
• Select Recordings Library and press OK.
All saved recordings are listed in the recordings
library.
• Select the desired recording.
BLUE button (Delete) :Deletes the selected
recording.
P<P button (Edit): Permits changes to the selected
recording.
Back to Start Of Chapter: Scrolls to the beginning
of the current chapter.
TEXT button (Sort): Changes the order of the
recordings.
► (Resume): Resumes recording.
INFO (Details): Displays the short extended
programmes in detail.
OK button: Activates the play options menu:
NOTE: The main menu and menu items are
not available during the playback.
Setup
Recordings Library
Page 24

24
Load Settings
This setting loads the most recently saved channel
table and settings prole.
• Press MENU on the remote control.
• Select Setup and press the OK button.
• Select Load Settings and press OK.
A conrmation message will be displayed
• Select YES and press OK to conrm loading the
settings, or select NO and press OK to cancel.
Save Settings
This setting saves channel tables and settings as
a setting prole, which can be loaded via the use
of the Load Settings menu item.
• Press MENU on the remote control.
• Select Setup and press the OK button.
• Select Save Settings and press the OK button.
A conrmation message will be displayed.
• Select YES and press the OK button to conrm
saving the settings.
Timers
• Press MENU on the remote control.
• Select Timers and press OK.
• Press the YELLOW button on the remote control.
The Add Timer window is displayed.
Channel: Use the“◄”/“►” buttons to navigate the
through the channel list.
Record Type: Record type will be displayed.
Date: The date that the record is to start.
Start: When the record is to start.
End: When the record is to stop.
Duration: Duration between Start and End time.
Repeat: Species if the record is to occur only
once or on a daily, or weekly basis.
Playback: Use parental settings or select allow/
disallow to set parental playback options.
Change/Delete: Permits or prohibits other users
from making modications.
Green button: Saves the modication.
Red button: Cancels the modication made.
Blue button: Deletes saved recording times.
Setup
Loading & Saving Settings, Timers
Page 25

25
Setup
Filtering Channels
• Press the P<P button to activate the Channel
List Filter function.
and use “
▲”/“▼” button to set the desired option.
Only Filtered channels will be available for viewing
if lter mode is not disabled.
• Press the YELLOW button on the remote control.
The “Add Timer” window is displayed.
Channel: Use the
“◄”/“►” buttons to navigate
the through the channel list.
Record Type: Record type will be displayed.
Date: Enter the date that the record is to start via
the
“◄”/“►” and numeric buttons.
Start: Enter the time that the record is to start via
the
“◄”/“►” and the numeric buttons.
End: Enter the time that the record is to nish via
the
“◄”/“►” and the numeric buttons.
Duration: Duration between Start and End time.
Repeat: Specify if the record is to occur only once
or on a daily, or weekly basis.
Playback: Use parental settings or select allow/
disallow to set parental playback options.
Change/Delete: Permits or prohibits other user
from making modications.
Green button: Saves the modication.
Red button: Cancels the modication made.
Blue button: Deletes saved recording times.
Conditional Access
Conditional Access/Cardreader
Some channels cannot be accessed without use
of a smartcard.
• Switch off the set-top box and unplug to from the
mains.
• Insert the smard card into the set-top box.
• Connect the set-top box to the mains supply.
• Turn on the set-top box and wait until the card is
activated.
• Press MENU.
• Select Conditional Access and press OK.
• Refer to the smard card instruction manual for
details of the settings.
IMPORTANT: The smart card or the set-top box
may be damaged if the card is forcefully inserted.
Page 26
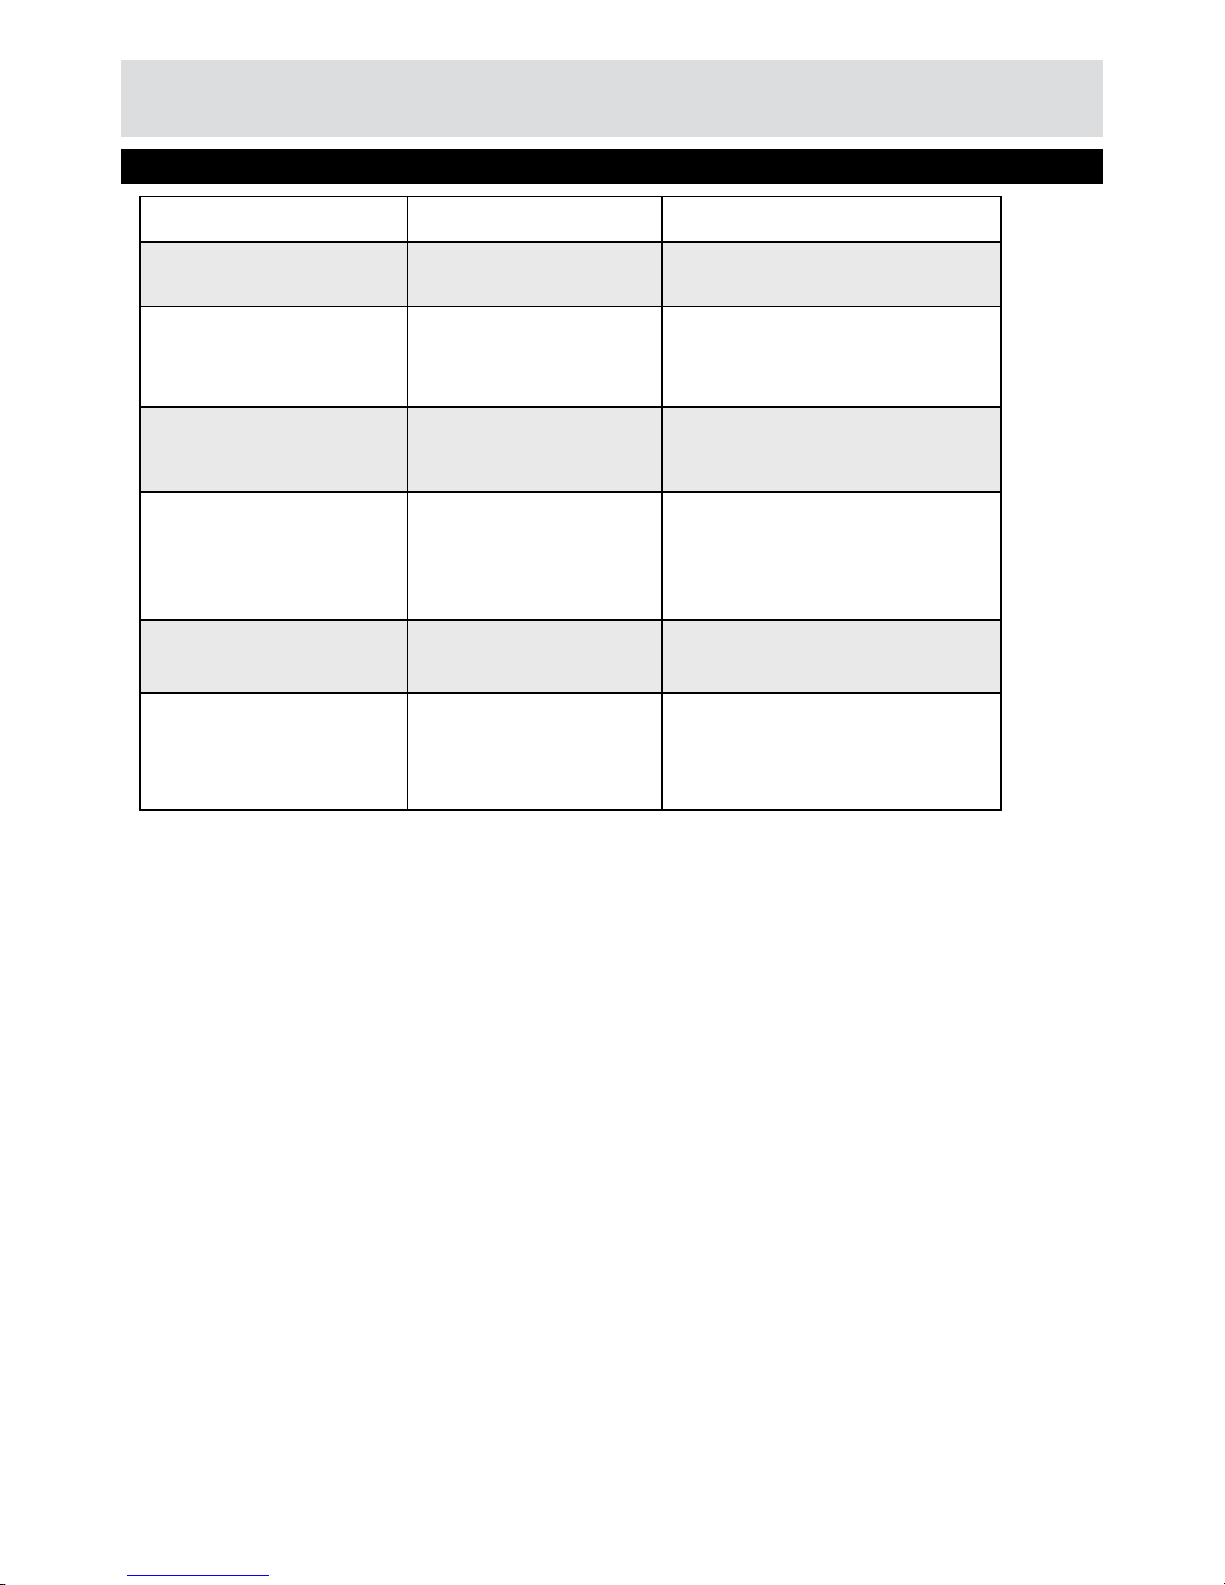
Problem Possible Reason What To Do
LED is not lit. Power is not supplied to the
set-top box.
Check that the power cable is
connected to the set-top box.
No picture or sound. No signal or weak signal. Check the antenna cable on the set-top
box and wall socket.
Check the HMDI/SCART cables on the
set-top box and the TV.
Changes made to settings
have not been saved.
Power to the set-top box was
disconnected before the settop box entered STANDBY.
Ensure that the set-top box enters
STANDBY mode before powering off
the set-top box.
Remote control does not
function. virker ikke.
The set-top box is in
STANDBY mode.
The remote control is out of
range.
Batteries are wear or dead..
Press the Standby button.
Check that the remote control is in
range and that the IR receiver on the
set-top box is not blocked.
Replace the batteries.
PIN-Code is unknown. Perform a First Time Installation.
This resets the PIN-Code to ‘0000’.
Recordings are unavailable USB storage device is
unrecognized.
Remove the USB storage device.
Power off the set-top box.
Connect the USB storage device.
Power up the set-top box.
26
Product Support
Trouble Shooting
Page 27

.
.
.
Product Support
Power supply for set-top box: 12 V DC
Preffered DC Adaptor: 220 - 240 V AC, 50-60Hz
Input Frequency : 54 - 1002 MHz
Maximum Power Consumption : 14 W
Standby power consumption : less than 1 W
Operating temperature : 5ºC - +40ºC
Storage temerature : -20ºC ile +70ºC
Humidity : 25 to 75 % rel
Physical Dimensions : 307x210x46 mm
Weight : 1300 gr
GENERAL CHARACTERISTICS
Main Processor : BROADCOM BCM7325
Flash Memory : 32 Mbyte
DDRAM : 256 Mbyte
HARDWARE CONFIGURATION
DVB-C, MPEG2
DVB-C, MPEG4
DIGITAL CAPABILITIES
Modulation: 4-QAM , 16-QAM , 32-QAM ,64-QAM, 128-QAM and
256-QAM
DEMODULATION
All MPEG2 MP@ML formats with up-conversion and ltering to CCIR601 format.
Mpeg1
Mpeg2 MP@ML (SD), MP@HL(HD)
Mpeg4 Part10 H264/AVC, HP@L4(HD), MP@L4(HD), MP@L3(SD), MP@HL(HD)
CVBS analogue output
RGB output
VIDEO
All MPEG1 Layer 1 and 2 modes
Sampling frequencies supported are 32, 44.1 & 48kHz
Mpeg1/Mpeg2 L1/L2
Mpeg1/Mpeg2 L3 (MP3)
AUDIO
27
Page 28

Product Support
28
Operating Distance 7 m Max.
Batteries 2x1.5V Micro (R-03/AAA)
REMOTE CONTROL
1 xRF In IEC-type, female (75Ohm)
1 x RF Out (loop through) IEC-type, male (75Ohm)
TUNERS
5V @ 500mA max
USB POWER SUPPLY
Display : VFD display
Remote Control Keys
On / Off
Built-in CONAX cardreader
FRONT PANEL
Output 2 Vrms, 0 dBfs / Z = 10 kohm
AUDIO
Output Optical SPDIF
DIGITAL AUDIO
Scart TV scart
RGB Video Output TV scart
Analog Audio Output TV scart
Digital Audio Output Optical output
A/V & DATA IN/OUT
Page 29

29
Notes
Page 30
Copyright © 2016 TRIAX. All rights reserved. The TRIAX Logo and TRIAX, TRIAX Multimedia
are registered trademarks or trademarks of the TRIAX Company or its afliates.
All specications in this guide are subject to change without further notice.
TRIAX A/S | Bjørnkærvej 3 | DK-8783 Hornsyld | Denmark
triax.com/support
 Loading...