

Guide d'installation rapide
TEW-656BRG
1.01

Table of Contents
Français 1
1. Avant de commencer 1
2. Installation du matériel 3
3. Configuration du TEW-656BRG 4
4. Voyants 5
Troubleshooting 9
Wireless Tips 11
Version 04.05.2010
1. Avant de commencer
Contenu de l'emballage
TEW-656BRG
Ÿ
ŸGuide de l'utilisateur sur CD-ROM
ŸGuide d´installation rapide en plusieurs
langues
ŸCâble d'alimentation USB
ŸAdaptateur secteur (5V DC, 1.2A)
ŸMalette de transport
Configuration nécessaire
Un ordinateur avec adaptateur réseau sans fil correctement installé.
Ÿ
ŸNavigateur Internet: Internet Explorer (6.0 ou supérieur)
ŸService Internet 3G fonctionnant et activé
ŸAdaptateur USB 3G*
* Pour une liste des adaptaeurs USB 3G compatibles, veuillez vous rendre sur
http://www.trendnet.com/products/TEW-656BRG.
1
Obtenez les informations de votre fournisseur d'accès Internet (FAI)
Lors de l'installation du TEW-656BRG, l'assistant d'installation détectera
automatiquement votre type de connexion auprès d'un FAI. Si le routeur n'y arrive pas,
vous pouvez indiquer manuellement le type de connexion. Veuillez vérifier le type de
votre connexion Internet auprès de votre FAI et assurez-vous de disposer de toutes les
informations pour l'un des types suivants de connexions:
1. 3G (détection automatique)
Code Pin (Optionnel): ________________
2. 3G (Manuel)
Pays: ________________
Télécom: ________________
Réseau 3G : ________________
APN (Optionnel): ________________
Code Pin (Optionnel): ________________
Numéro composé: ________________
Compte (optionnel): ________________
Mot de passe (optionnel): ________________
3. iBurst
Compte: _________
Mot de passe: ________________
DNS principal:_____. _____._____._____
DNS Secondaire:_____. _____._____._____
Nom du service (optionnel): ________________
Adresse IP assignée (optionnel): ________________
2
2. Installation du matériel
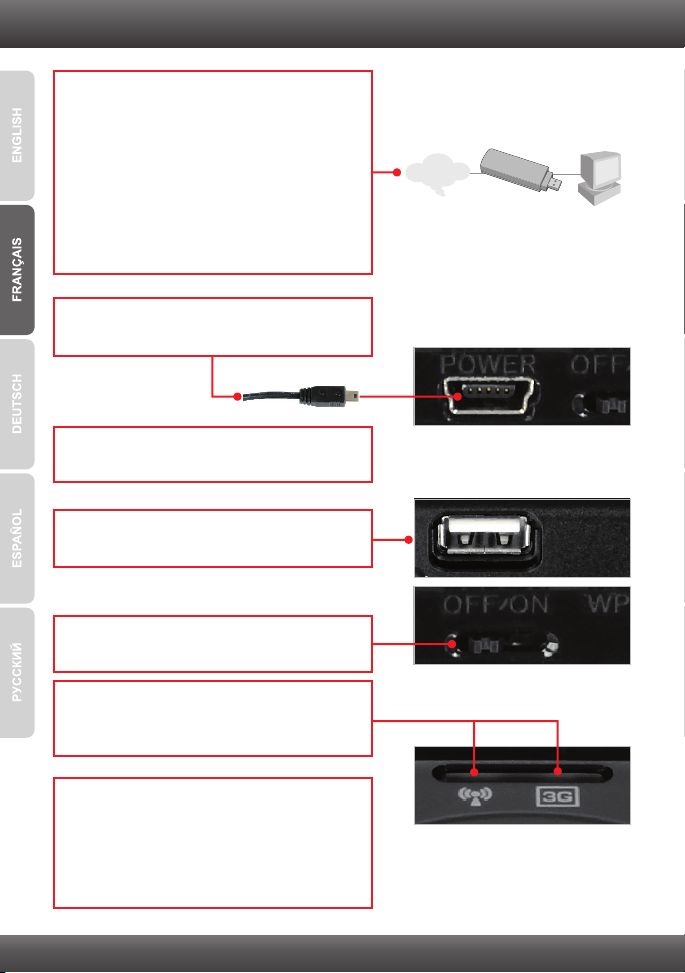
1. Vérifiez que vous disposez d'une connexion
Internet lorsque vous connectez votre
adaptateur USB 3G à votre ordinateur. Ouvrez
votre navigateur (p. ex. Internet Explorer) et
tapez une URL (p. ex.http://www.trendnet.com)
dans la barre d'adresse.
Remarque : Il se peut que vous deviez activer
votre connexion Internet. Veuillez contacter
votre FAI pour plus d'informations.
2. Branchez l'extrémité Mini-USB de l'adaptateur
secteur au TEW-656BRG.
3. Branchez l'adaptateur secteur à une prise de
courant.
4. Branchez votre adaptateur USB 3G au port
USB du TEW-656BRG.
Internet
Adaptateur 3G USB
5. Déplacer l'interrupteur d'alimentation en
position marche.
6. Vérifiez que les voyants lumineux suivants, se
trouvant sur l'avant, sont allumés:
Sans Fil (Blue) and 3G (USB) (Blue).
7. Connectez votre ordinateur en mode sans fil
au TEW-656BRG. Le SSID (nom du réseau
sans fil) par défaut du TEW-656BRG est
TRENDnet656. Contactez le fabricant de votre
adaptateur réseau sans fil et assurez-vous que
ce dernier est configuré avec le SSID correct.
’
3

3. Configuration du TEW-656BRG
Remarque:
Avant de débuter, réunissez toutes les informations concernant votre connexion
Internet. En cas de besoin, contactez votre fournisseur d'accès Internet (FAI).
1. Ouvrez votre navigateur Internet, tapez-y
l'adresse http://192.168.10.1 et appuyez sur la
touche Enter (Entrez).
2. Saisissez le mot de passe système et cliquez
ensuite sur Login. Par défaut :
Mot de passe système : admin
3. Sélectionnez l'assistant et cliquez sur Enter.
4. Cliquez sur Next (Suivant)
5. Saisissez l'ancien mot de passe (par défaut, le
mot de passe est admin), saisissez un nouveau
mot de passe et cliquez sur Next (Suivant).
Remarque:
1. Mettre un mot de passe empêche que les autres utilisateurs aient accès à la
configuration du TEW-656BRG.
2. Nous conseillons de saisir un nouveau mot de passe. Si vous décidez de modifier ce
paramètre, veuillez inscrire le nouveau mot de passe.
3. Le mot de passé est limité à 8 caractères
4

6. Sélectionnez votre fuseau horaire et cliquez sur
Next (Suivant).
7. Sélectionnez 3G ou iBurst (l'exemple illustré est
le 3G). Cliquez ensuite sur Next (Suivant).
Configurez les paramètres en vous conformant
aux informations fournies par votre FAI. Suivez
les instructions de l'assistant pour terminer la
configuration.
Remarque : Chaque type de WAN peut avoir
des options différentes.
Remarque:
L'exemple ci-dessous illustre la détection automatique. Si l'assistant d'installation ne
détecte pas automatiquement votre connexion Internet, sélectionnez Manual et
saisissez les informations fournies par votre FAI.
8. Sélectionnez Auto-detect (détection
automatique), et cliquez ensuite sur Next
(Suivant).
9. Vous devrez configurer les éléments suivants :
Wireless Module (Module sans fil)
(Enable/Disable – Activé/Désactivé) : Le
paramètre par défaut Enable (Activé) doit être
sélectionné.
Network ID (ID réseau) (SSID): Le SSID est le
nom de votre réseau sans fil (p. ex. routeur ou
point d'accès sans fil). Indiquez un SSID
exclusif. N'utilisez pas un nom qui pourrait être
identifié comme “Réseau de la famille Martin”.
Choisissez un nom que vous reconnaitrez
facilement lorsque vous cherchez des réseaux
sans fil disponibles.
Channel (Canal) : Dans la majorité des cas,
l'indication par défaut devrait être correcte.
5

Remarque:
1. Pour protéger votre réseau de tout accès non autorisé, il est recommandé d'activer le
cryptage sans fil.
2. Les exemples ci-dessous concernent la sécurisation WPA2-PSK. Si vous
sélectionnez WPA2-PSK ou WPA2-PSK, assurez-vous que vos adaptateurs sans fil
supportent le WPA ou le WPA2. Si vos adaptateurs sans fil ne supportent pas le WPA
ou le WPA2, sélectionnez le WEP.
10. Sélectionnez le mode d’authentification et le
type de cryptage désirés et saisissez les
caractères de votre clé pré-partagée et cliquez
ensuite sur Next (Suivant). Pour le WPA-PSK
ou le WPA2-PSK, la clé pré-partagée doit
comprendre entre 8 et 63 caractères ASCII ou
64 caractères HEX. Assurez-vous de noter la
clé de cryptage.
11. Cliquez sur Apply Settings
(Appliquez les paramètres).
12. Cliquez sur OK.
13. Attendez une quarantaine de secondes
pendant que le TEW-656BRG redémarre.
6

14. Cliquez sur Finish (Terminer).
15. Ouvrez votre navigateur et saisissez-y une
URL (p. ex. www.trendnet.com) afin de vérifiez
que vous disposez d'une connexion Internet.
L'installation est maintenant complète.
Si vous désirez des informations détaillées sur la configuration et les paramètres avancés du
TEW-656BRG, veuillez consulter la rubrique Dépannage, le guide de l'utilisateur sur
CD-ROM ou le site Internet de TRENDnet sur http://www.trendnet.com.
Enregistrez votre produit
Afin d’être sûr de recevoir le meilleur niveau de service clientèle et le meilleur support
possibles, veuillez prendre le temps d’enregistrer votre produit en ligne sur:
www.trendnet.com/register Nous vous remercions d’avoir choisi net.
TREND
7

4. Voyants
Sans Fil
Bleu (fixe) :
Le sans fil est activé
Bleu (clignotant) :
il y a une activité sur ce lien
Eteint :
Le mode sans fil n’est pas activé ou le
TEW-656BRG n’est pas alimenté en courant
3G(USB)
Bleu (fixe) :
La connexion 3G est établie
Bleu (clignotant) :
il y a une activité sur ce lien
Eteint :
La connexion 3G n’est pas établie
8

Troubleshooting
1. I typed http://192.168.10.1 in my Internet Browser's Address Bar, but an error message
says “The page cannot be displayed.” How can I get into the TEW-656BRG's web
configuration page?
1. Check your hardware settings again by following the instructions in Section 2.
2. Make sure the Wireless light is lit.
3. Enter http://192.168.10.1 into the browser instead. This is the default IP address of the
TEW-656BRG.
4. Make sure your network adapter's TCP/IP settings are set to Obtain an IP address
automatically (see the steps below).
5. Reset the TEW-656BRG. To reset the TEW-656BRG, press the WPS button for 20
seconds, then let go. Wait 30 seconds, and then type 192.168.10.1 into your browser.
Windows 7
1. Go into the Control Panel, Network and
Internet, click Network and Sharing Center,
click Change Adapter Settings and then
right-click the Local Area Connection icon and
then click Properties.
2. Click Internet Protocol Version 4 (TCP/IPv4)
and then click Properties. Then click on Obtain
an IP address automatically.
Windows Vista
1. Go into the Control Panel, click Network and
Internet, click Network and Sharing Center,
click Manage Network Connections and then
right-click the Local Area Connection icon and
then click Properties.
2. Click Internet Protocol Version 4(TCP/IPv4)
9
and then click Properties. Then click on Obtain
an IP address automatically.

Windows XP/2000
1. Go into the Control Panel, double-click the
Network Connections icon and then right-click
the Local Area Connection icon and then click
Properties.
2. Click Internet Protocol (TCP/IP) and then click
Properties. Then click on Obtain an IP
address automatically.
2. I am not sure what type of Internet Account Type I have for my Internet connection. How
do I find out?
Contact your Internet Service Provider's (ISP) support service for the correct information.
3. I went through the Wizard, but I can not get onto the Internet. What should I do?
1. Verify that you can get onto the Internet by connecting your 3G USB adapter directly to
your computer.
2. Contact your ISP and verify all the information that you have in regards to your Internet
connection settings is correct.
3. Verify that the 3G USB adapter is firmly connected to the USB port on the TEW-656BRG.
4. Power cycle the TEW-656BRG. Move the power switch to the off position. Wait 30
seconds, then move the power switch back to the on position.
4. I cannot make a wireless connection to the TEW-656BRG. What should I do?
1. Double check that the wireless LED on the TEW-656BRG is lit.
2. Power cycle the TEW-656BRG. Move the power switch to the off position. Wait 30
seconds, then move the power back to the on position.
3. Contact the manufacturer of your wireless network adapter and make sure the wireless
network adapter is configured with the proper SSID. The default SSID is
TRENDnet656.
4. Please refer to the Wireless tips section if you continue to have wireless connectivity
problems.
If you still encounter problems or have any questions regarding the TEW-656BRG, please contact
TRENDnet's Technical Support Department.
10

Wireless Tips
The following are some general wireless tips to help minimize the impact of interference within an
environment.
Assign your network a unique SSID
Do not use anything that would be identifying like “Smith Family Network”. Choose
something that you would easily identify when searching for available wireless networks.
Do not turn off the SSID broadcast
The SSID broadcast is intended to be on and turning it off can cause connectivity issues.
The preferred method of securing a wireless network is to choose a strong form of encryption
with a strong and varied encryption key.
Note: after setting up the SSID, encryption type and encryption key/passphrase, please
make a note of them for future reference. You will need this information to connect your
wireless computers to the wireless router/access point.
Change the channel
Most wireless access points and routers are defaulted to channel 6. If you have a site survey
tool that will display the channels you can plan your channel selection around neighboring
access points to minimize interference from them. If your site survey tool does not display
the channel try using channels 1 or 11.
Change the channel bandwidth
If you are using an 802.11n router or access point you can also make the following changes.
Change the channel bandwidth to 20/40MHz. This will provide the highest possible
performance using an 802.11n device. Also, if using 802.11n you should be securing the
network with WPA2 security.
Note: Due to Wi-Fi certification considerations if you choose WEP, WPA or WPA2-TKIP
encryption this device may operate in legacy wireless mode (802.11b/g). You may not get
802.11n performance as these forms of encryption are not supported by the 802.11n
specification.
Avoid stacking hardware on top of each other to prevent overheating issues
Maintain enough free space around the hardware for good ventilation and airflow. There
should also be plenty of free space around the antennas to allow the wireless signal to
propagate. Please also make sure that the wireless hardware is not placed in any type of
shelving or enclosures.
There are a number of other environmental factors that can impact the range of wireless
devices.
1. Adjust your wireless devices so that the signal is traveling in a straight path, rather than at
an angle. The more material the signal has to pass through the more signal you will lose.
11

2. Keep the number of obstructions to a minimum. Each obstruction can reduce the range of
a wireless device. Position the wireless devices in a manner that will minimize the amount
of obstructions between them.
3. Building materials can have a large impact on your wireless signal. In an indoor
environment, try to position the wireless devices so that the signal passes through less
dense material such as dry wall. Dense materials like metal, solid wood, glass or even
furniture may block or degrade the signal.
4. Antenna orientation can also have a large impact on your wireless signal. Use the wireless
adapter's site survey tool to determine the best antenna orientation for your wireless
devices.
5. Interference from devices that produce RF (radio frequency) noise can also impact your
signal. Position your wireless devices away from anything that generates RF noise, such
as microwaves, HAM radios, Walkie-Talkies and baby monitors.
6. Any device operating on the 2.4GHz frequency will cause interference. Devices such as
2.4GHz cordless phones or other wireless remotes operating on the 2.4GHz frequency
can potentially drop the wireless signal. Although the phone may not be in use, the base
can still transmit wireless signals. Move the phone's base station as far away as possible
from your wireless devices.
If you are still experiencing low or no signal consider repositioning the wireless devices or installing
additional access points. The use of higher gain antennas may also provide the necessary
coverage depending on the environment.
12

0984


Copyright © 2011. All Rights Reserved. TRENDnet.
 Loading...