

Page 1

C1
D
A
C2
D
C1
A
C2
Mitre Lock
10/97 &
C189
10/99 &
C188
MITRE LOCK
REF. 10/97 & C189, 10/99 & C188
Thank you for purchasing this Trend router
cutter, which should give lasting performance if
used in accordance with these instructions.
These instructions can be used in conjunction
with the two sizes of mitre lock offered by Trend.
The following symbols are used throughout these
instructions.
Denotes risk of personal injury, loss
of life or damage to the tool in case
of non-observance of the
instructions.
Refer to the instruction manual of
your power tool.
This cutter must not be put into service until it
has been established that the power tool to be
connected to this unit is in compliance with
2006/42/EC (identified by the CE marking on the
power tool).
INTENDED USE
The small mitre lock cutters reference
10/97X1/4TC and C189X1/4TC can be used
with material of minimum thickness of 8mm and
INST/10/99 v6.0
up to a maximum material thickness of 12mm.
The larger mitre lock cutters reference
10/99X1/2TC and C188X1/2TC can be used
with material of minimum thickness of 15mm
and up to a maximum work piece thickness of
25mm. Due to the large diameter of these tools
the spindle speed should be reduced to 16,000
rpm.
SAFETY
Please read and understand the safety
points at the end of this instruction as well as
the power tool instructions before use.
PLEASE KEEP THESE INSTRUCTIONS IN
A SAFE PLACE.
The attention of UK users is drawn to The
Provision and Use of Work Equipment
Regulations 1998, and any subsequent
amendments.
Users should also read the HSE/HSC Safe
Use of Woodworking Machinery Approved
Code of Practice and Guidance Document
and any amendments.
Users must be competent in using
woodworking equipment before using our
products.
Attention should be made to the HSEʼs Safe
Use of Vertical Spindle Moulding machines
Information Sheet No. 18 and any revisions.
Please keep children away from tools and
work area.
All power tools will have a residual risk, so
must therefore be operated with caution.
ITEMS REQUIRED
n Router with suitable collet fitted.
n Router table or overhead router stand.
n Hand tools.
n Jig making equipment & materials.
n Workholder.
Mitre lock cutters must only be used in a
router table.
Recommended speed for 10/97 & C189 is
24,000 rpm. Recommended speed for 10/99
& C188 is 16,000 rpm.
Ref. 10/97X1/4TC
& C189X1/4TC
A=45°
D=38.1mm
C1=12.7mm
C2=4.0mm
24,000
Ref.
10/99X1/2TC
& C188X1/2TC
A=45°
D=68mm
C1=30mm
C2=12.5mm
It is not advisable to re-sharpen this tool as
this will result in a change in tool
dimension and will therefore affect the joint
cut. The tool should be cleaned regularly
and honed only on a diamond whetstone.
16,000
Mitre Lock Joint
A mitre lock joint is a corner joint where two
pieces of the material meet at 90°. This very
strong corner joint is ideal to produce speaker
cabinets, boxes, frames, columns and posts.
The cutters can be used on Medium Density
Fibreboard (MDF), certain plastics and on
natural timbers.
The cutter is designed with a tapered tongue
which self-locks against the groove in the
opposing piece. This allows for easier
assembly and gluing up as the joint selftightens when pushed together.
Extra care must be taken with the resulting
tongue cut on the joint as this can be broken
off due to sudden impact or poor clamping
when gluing up. This is particularly so when
using the smaller mitre lock cutter on MDF.
The mitre lock cutters can also be used to glue
joint pieces of material to make a wider board.
The mitre lock cutters should only be used in a
stationary mode with the router held inverted in
a router table. A fine height adjuster fitted to
the router is strongly recommended.
Ensure the back fence and hole size in the
table is suitable for the cutter diameter. The
hole should be about 4mm larger in diameter
than the cutter. If the table aperture is too
small it may be possible to enlarge the hole by
fitting a false table top onto the table surface.
This false table top has a larger hole cut into it
and it is secured to the table top. The cutter is
then fitted into the router from the top.
PTO
ENVIRONMENTAL PROTECTION
Recycle raw materials instead of disposing
as waste.
Packaging should be sorted for
environmental-friendly recycling.
The product and its accessories at the end of
its life should be sorted for environmentalfriendly recycling.
GUARANTEE
All Trend products are guaranteed against any
defects in either workmanship or material,
except products that have been damaged due
to improper use or maintenance.
© Trend Machinery & Cutting Tools Ltd. 2012 E&OE
® All trademarks acknowledged
Trend Machinery & Cutting Tools Ltd.
Odhams Trading Estate St Albans Road
Watford WD24 7TR England
Tel: 0044(0)1923 249911
[email protected]
www.trend-uk.com
RS 28982
Stockholding
& Supply
RECYCLABLE
Page 2
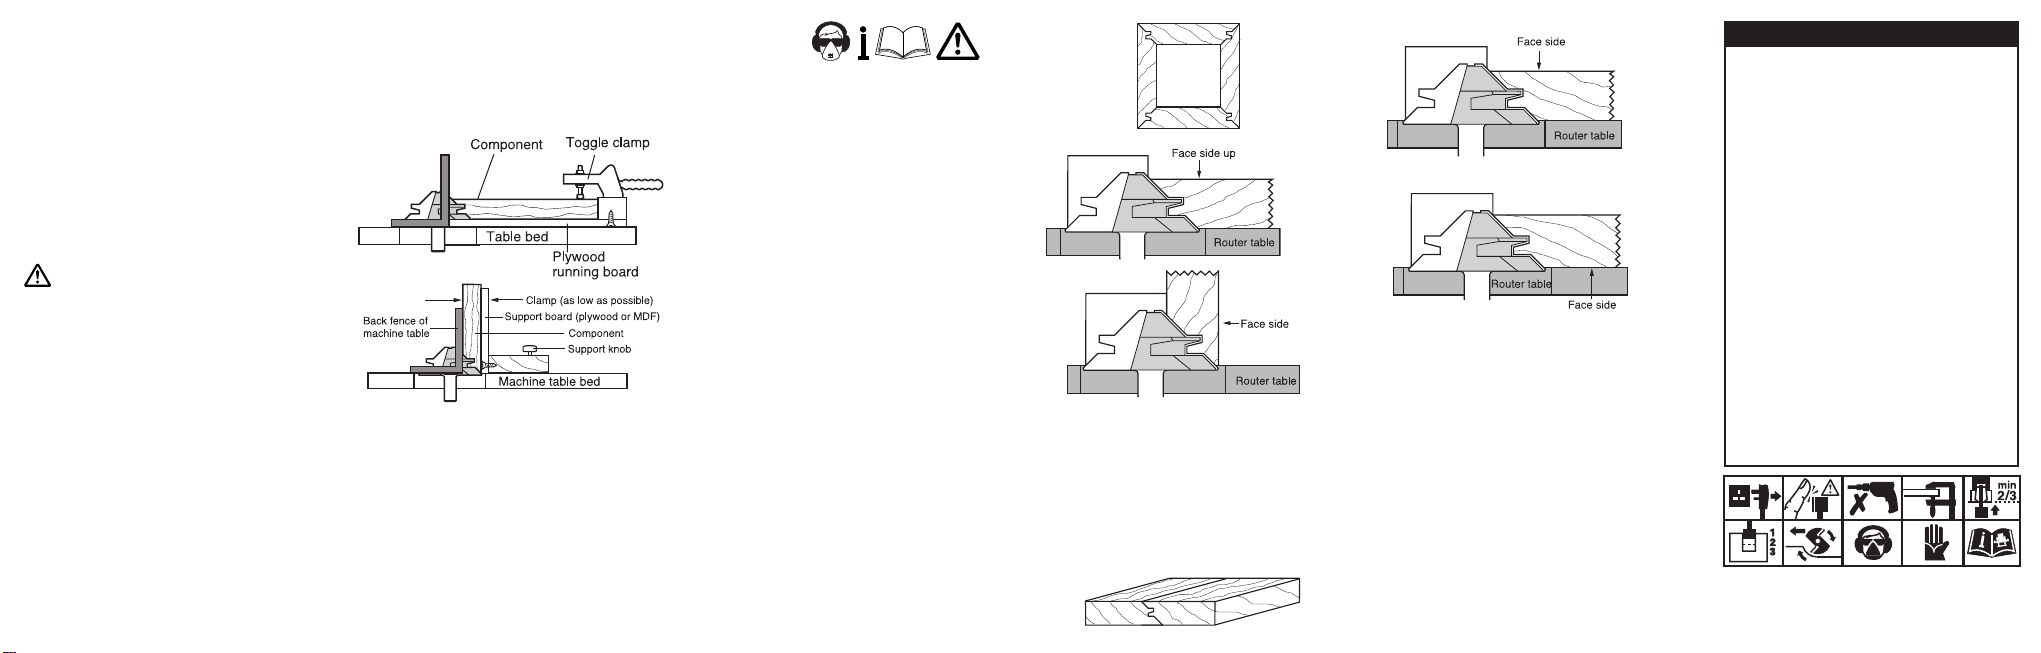
It is strongly advisable that work holding jigs
are made to hold the timber whilst routing as
this prevents the fine edge created by the
jointing cutter becoming damaged. It is
advisable that trial cuts on waste pieces of
material machined to the same thickness as
the work piece should be carried out first, to
check the fit of the joint. Once the joint is
made, use the waste pieces to set the cutter
for the cuts on the work piece.
If cutting across the grain it is advisable that
the grain or veneer is scribed beforehand to
reduce break out. A cutting gauge or knife can
be used for this purpose.
Consider working environment before using
tools. Ensure working position is
comfortable and component is clamped
securely.
Work Holding Jigs
The jig for the first cut with the workpiece face
down comprises of a plywood running board
with a batten fitted to one end. The batten can
be fitted with toggle clamps to secure the
workpiece. The running board and batten
should be the same length as the workpiece.
The plywood running board edge runs against
the router table back fence and prevents the
fine edge of the workpiece from being
damaged.
The second part of the joint requires the
workpiece to be held on its edge. To hold the
workpiece a second work holding jig is
needed. This jig will have a right angled
plywood support board and block fitted which
supports the workpiece upright. A G-cramp
can be used to hold the workpiece against the
support board. Again, the board should be
the same length as the workpiece to prevent
damage to the edge of the jointed workpiece.
First cut
Second Cut
OPERATION
Carefully remove the protective wax from the
cutter and dispose of carefully.
Insert the cutter shank into the collet at least
all the way to the marked line indicatedon the
shank. This ensures at least 3/4 of the shank
length is held in the collet.
Corner Joint Method
Making trial cuts first, set the cutter height so
that the centre of the cutter is centred on the
middle of the material thickness. The back
fence can then be adjusted to ensure the
correct depth into the material is routed.
Once set correctly the workpiece can be
routed. Rout one piece flat on the work table
with the face side uppermost, and ensure a
constant feed speed is maintained. Top
pressure guards should be used to ensure
down pressure is applied.
The opposite face of the joint (material on its
side) is routed with the face side facing away
from the back fence. Set the cutter height
and back fence in position to match the
previous joint. A high back fence will reduce
the likelihood of the workpiece tilting. If a
work holding jig is not used, a side pressure
guard should be fitted to maintain side
pressure and prevent the bottom edge from
sliding away from the cutter. Cut this joint on
a waste piece of wood, check the fit of the
joint and adjust if necessary. Once set
correctly the workpiece can then be routed.
First cut
Second cut
Glue Joint Method
For perfectly matched glue joints, rout both
pieces with the panel held flat against the work
table. One part of the joint must be routed
face side uppermost, the other part with the
face side down. Cut the joints on waste pieces
first, then check the fit of the joint. Once the
joint is obtained on the waste piece rout the
joint on the workpiece.
First cut
Second cut
MAINTENANCE
Continual satisfactory operation depends upon
proper tool care and regular cleaning.
Cleaning
n Ensure clamping surfaces are cleaned to
remove dirt, grease, oil and water.
n Remove resin build-up regularly.
n Apply a rust protector to shanks. Do not
use rust protector on ball bearing guides
Lubrication
n Use a PTFE dry lubricant spray on tool.
Storage
n Return cutter to its packaging after use.
Safety Points
1. Disconnect power tool and attachment from power supply when not in
use, before servicing, when making adjustments and when changing
accessories such as cutters. Ensure switch is in “off” position and
cutter has stopped rotating.
2. Read and understand instructions supplied with power tool, attachment
and cutter.
3. Current Personal Protective Equipment (PPE) for eye, ear and
respiratory protection must be worn. Keep hands, hair and clothes
clear of the cutter.
4. Before each use check cutter is sharp and free from damage. Do not
use if cutter is dull, broken or cracked or if any damage is noticeable or
suspected.
5. The maximum speed (nmax) marked on tool or in instructions or on
packaging shall not be exceeded. Where stated, the speed range
should be adhered to.
6. Insert the shank into the router collet at least all the way to the marked
line indicated on the shank. This ensures at least 3/4 of shank length is
held in collet. Ensure clamping surfaces are clean.
7. Check all fixing and fastening nuts, bolts and screws on power tool,
attachment and cutting tools are correctly assembled, tight and to
correct torque setting before use.
8. Ensure all visors, guards and dust extraction is fitted.
9. The direction of routing must always be opposite to the cutter’s
direction of rotation.
10. Do not switch power tool on with the cutter touching the workpiece.
11. Trial cuts should be made in waste material before starting any project.
12. Repair of tools is only allowed according to tool manufacturers
instructions.
13. Do not take deep cuts in one pass, take shallow passes to reduce the
side load applied to the cutter.
Please see www.trend-uk.com/safety for more safety advice.
Our policy of continuous improvements mean that
specifications may change without notice. Trend
Machinery & Cutting Tools Ltd. cannot be held liable for
any material rendered unusable, or for any form of
consequential loss.
 Loading...