

Page 1
Visitez Traxxas.com/manuals pour télécharger
les instructions dans votre langue.
Visite la página Traxxas.com/manuals para
descargar el instrucciones en su idioma.
Auf Traxxas.com/manuals, können Sie
anleitung in Ihrer Sprache downloaden.
LED Light Kit Installation Instructions
Kit contents:
• 3-volt accessory power supply
• Electronic speed control (ESC) power tap
• 3x10mm button-head cap screws (2)
• Roof skid plate with front and rear LED light bars
• Front bumper with LED light bar
• Body template
• Zip ties (3)
Tools needed:
• 2.0mm hex wrench
• 2.5 mm hex wrench
• Tapered body reamer (part #3433 or #3433X, sold separately)
• Body scissors (part #3431 or #3432, sold separately)
1
2
Covers Part #6795
CAUTION: RISK OF INJURY!
Use care with hobby knives, tapered reamers, and other cutting tools as
they are extremely sharp and can cause severe injury, deep cuts, and/or punctures.
CAUTION: RISK OF DAMAGE TO BATTERIES!
Do not attach the power tap to the battery connector. Attach to the
electronic speed control (ESC) connector only. Always disconnect the battery
from the ESC when not in use to prevent the possiblity of over-discharge.
3x12mm CS
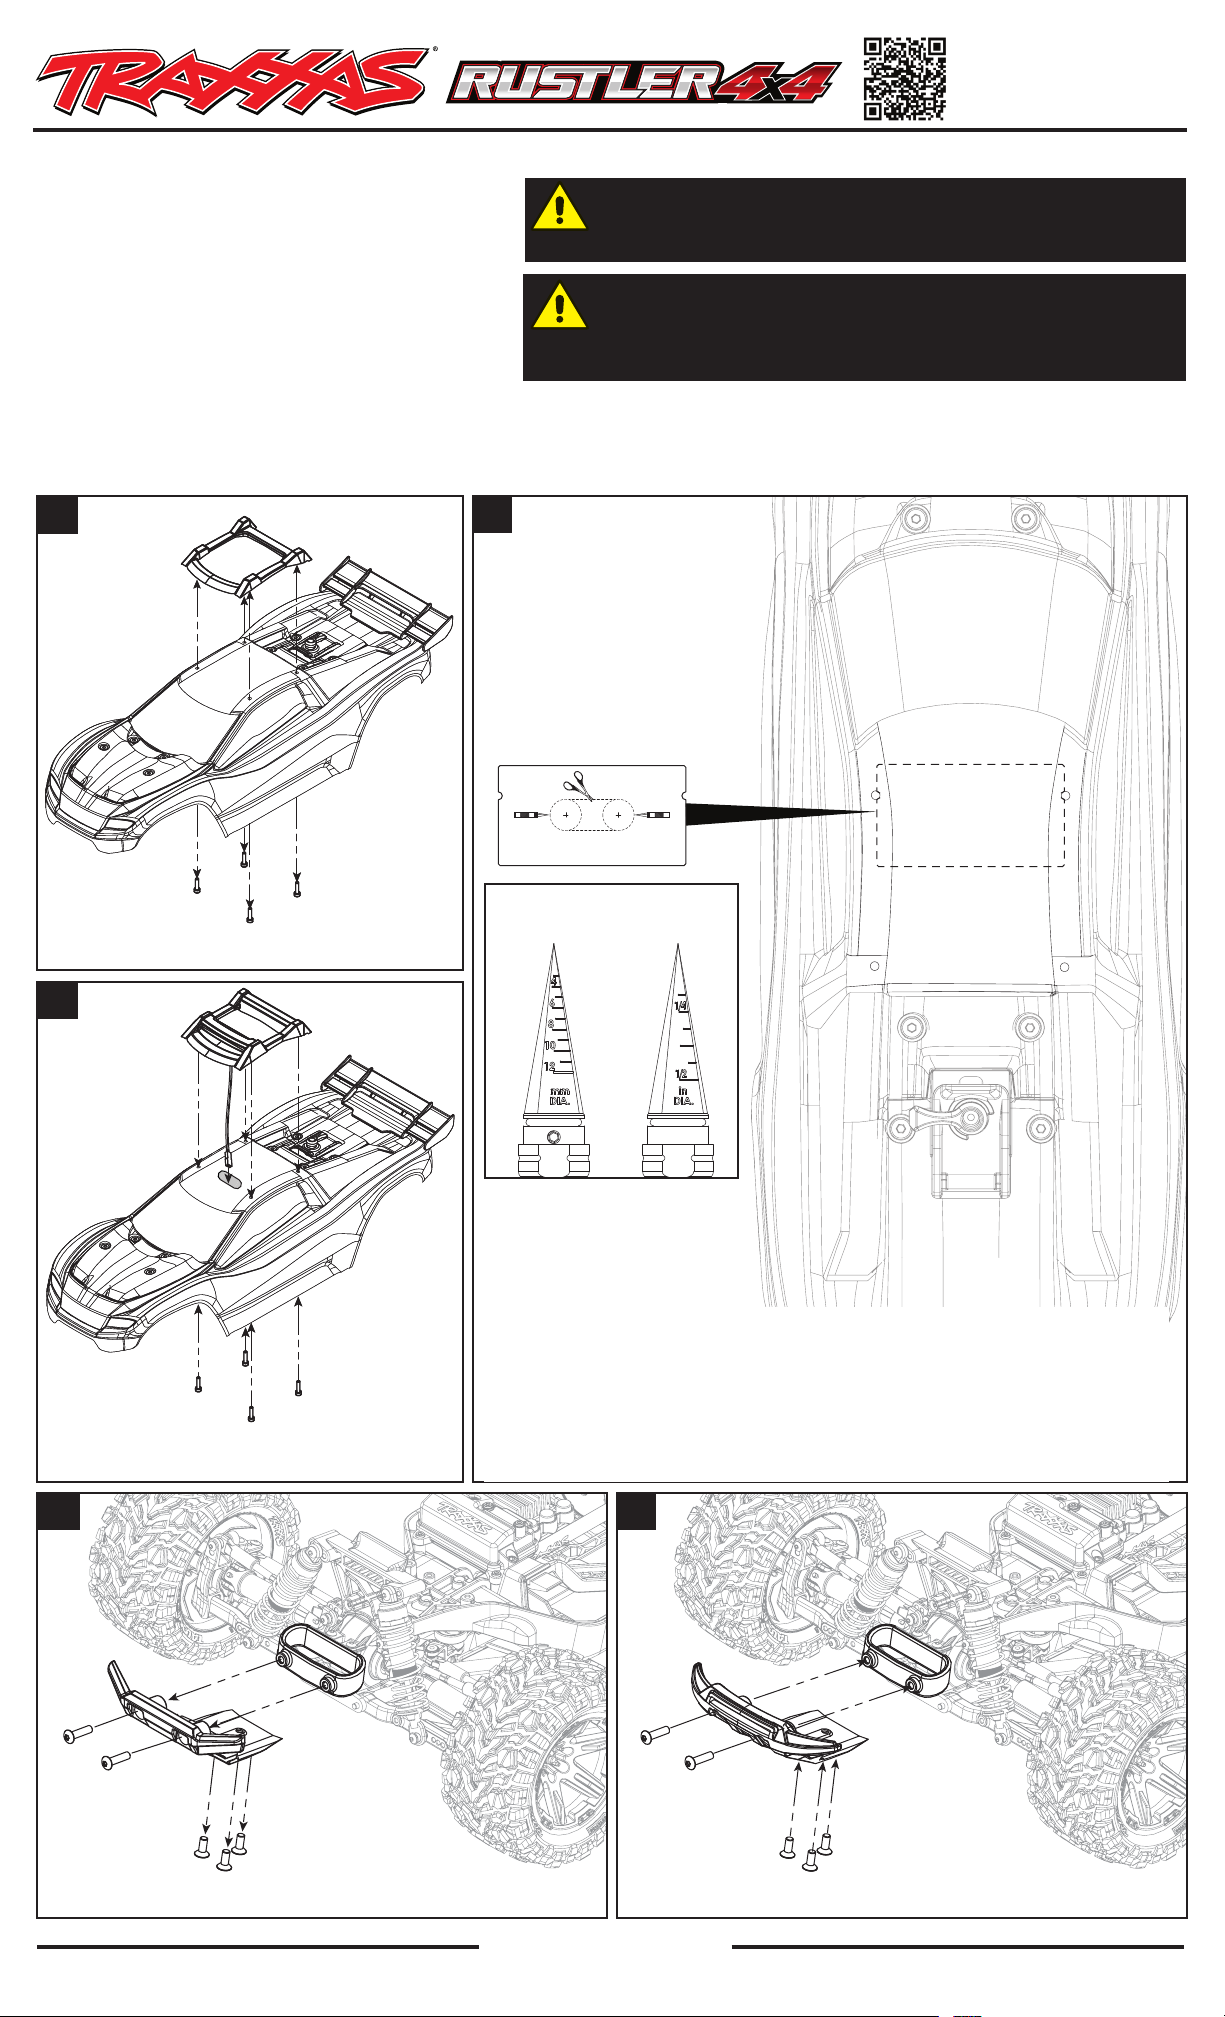
Remove the existing roof skid plate.
3
3x12mm CS
Install the new roof skid plate; feed the wire harness
connector through the hole in the roof.
12mm
0.5"
12mm
0.5"
Tapered Body Reamer
Diameter Measurements
Body modification:
Before installation of the new roof skid plate, the vehicle body will need modification.
Peel the backing from the included self-adhesive cutting template. Install the template on
the vehicle body, aligning the holes in the template with the front screw holes in the roof.
Using a tapered body reamer, carefully cut holes in the roof to the dotted lines on the
template (note the hole diameters indicated on the template and the corresponding
diameter measurements on the body reamer). Use body scissors to cut out the section
between the two holes as indicated.
4
4x16mm BCS
4x10mm CCS
Remove the existing front bumper.
Traxxas, 6250 Traxxas Way, McKinney, TX 75070,
5
4x16mm BCS
4x10mm CCS
Install the new front bumper. See step 9 for wire routing.
TRAXXAS.com
Phone: 972-549-3000, Fax: 972-549-3011, e-mail: [email protected]
HKC19045-R04 Rev 201023
Page 2
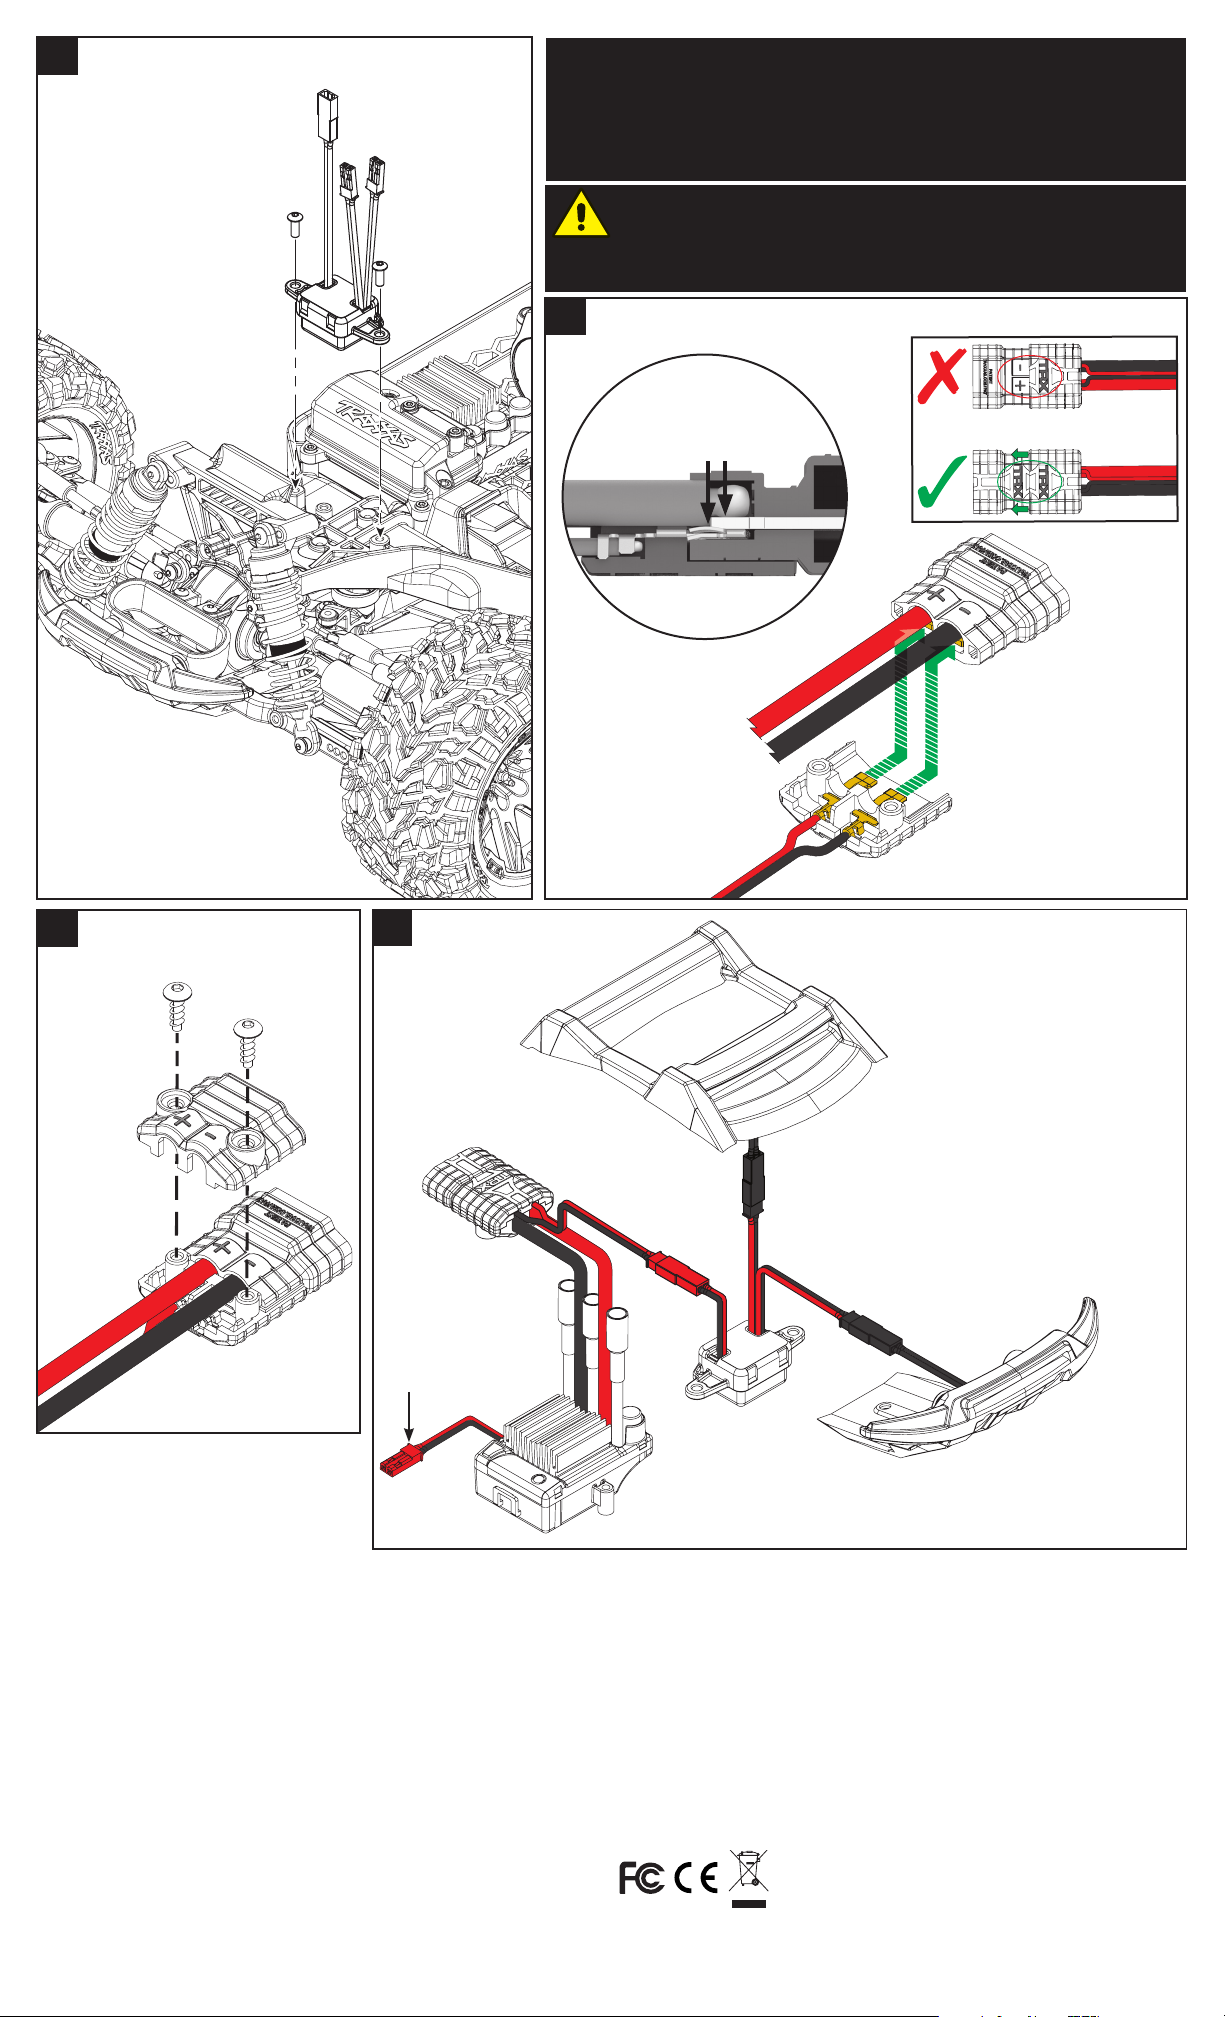
Install the accessory power supply on the chassis.
6
3x10mm BCS
Important Note! Use the included power tap as the direct battery source for
the accessory power supply. Do not connect to the accessory BEC power output
on the ESC (if equipped). Connecting high-load accessories to the power supply
while it is plugged directly into the ESC could overload the speed control’s BEC
circuit. This may cause the speed control to go into thermal protection mode or
could cause damage to the speed control.
CAUTION: RISK OF DAMAGE TO
Note the polarity and wire color on the
ACCESSORIES!
pre-installed wires on the power tap. Ensure the polarity is correct during
installation on the High-Current Connector: red (+) (positive), black (-) (negative).
Attach the power tap to the High-Current Connector of the electronic speed
7
control (ESC).
Install the cover on the power tap.
8
2.6x8mm BCS
(self-tapping)
ESC Power
Tap Cover
9
Wiring Diagram
High-Current Connector
with installed Power Tap
Roof Skid Plate
During installation, be sure that
the terminals of the High-Current
Connector and the power tap
make full contact.
ESC Wiring
Power Tap
ESC Wiring
Wire colors
mismatched
High-Current
Connector
ESC
Power Tap
Route the wire harness from the front bumper to
the accessory power supply. Use the included
zip ties (3) to secure the harness. Note: Ensure
the wire harness is kept away from any
moving parts and heated surfaces.
Plug the black male connectors
from the accessory power supply
into the black female connectors
from the front bumper and roof
skid plate wire harnesses.
Plug the red power tap male connector into the
red female connector from the accessory power
supply. The accessory power supply and LED
lights will turn on when a battery is connected.
Always disconnect the battery when not in use.
ESC Wiring
Do not use for
this accessory
Warranty Information
Traxxas electronic components are warranted to be free from
defects in materials and workmanship for a period of 30 days from
the date of purchase.
Limitations: Any and all warranty coverage does not cover
replacement of parts and components damaged by abuse, neglect,
improper or unreasonable use, crash damage, water or excessive
moisture, chemical damage, improper or infrequent maintenance,
accident, unauthorized alteration or modification or items that are
considered consumable. Traxxas will not pay for the cost of shipping
or transportation of a defective component to us.
If you have questions or need technical assistance, call Traxxas at
1-888-TRAXXAS
(1-888-872-9927) (U.S. residents only)
Accessory Power
Supply
Electronic Speed
Control
Front Bumper
Traxxas Lifetime Electronics Warranty
After the expiration date of the warranty period, Traxxas will repair
electronic components for a flat rate. Please visit Traxxas.com/
support for a current schedule of warranty costs and fees. The
covered repairs are limited to non-mechanical components that
have NOT been subjected to abuse, misuse, or neglect. Products
damaged by intentional abuse, misuse, or neglect may be subject
to additional charges. Traxxas liability, in no case, shall be greater
than the actual purchase price of this product. For replacement,
product must be returned in brand new condition, with packaging
and itemized sales receipt.
This device complies with FCC Part 15 & IC RSS-210
rules subject to the following conditions: 1) This
device may not cause harmful interference, and 2) This
device must accept all interference received, including
interference that may cause undesired operation.
 Loading...