

Page 1
User‟s Manual
DrivePro 220
Car Video Recorder
(Version 1.0)
Page 2

Table of Contents
Introduction︱ .........................................................................................................................2
Package Contents︱ ...............................................................................................................3
Features︱ ...............................................................................................................................5
System Requirements︱ ........................................................................................................5
Safety Precautions︱..............................................................................................................6
Getting Started︱ ....................................................................................................................7
Inserting a microSD Memory Card .......................................................................................... 7
Mounting the DrivePro ............................................................................................................. 9
Connecting to Power.............................................................................................................. 10
Recording Screen ................................................................................................................... 11
Function Buttons .................................................................................................................... 11
Setting the Date and Time ..................................................................................................... 12
Setting UTC Timezone ........................................................................................................... 13
Recording Videos︱ ............................................................................................................. 13
Emergency Recording ........................................................................................................... 14
Low Battery ............................................................................................................................. 15
Browse and Play Videos︱ .................................................................................................. 16
Playing Videos / Browsing Photos ........................................................................................ 16
Protecting Videos ................................................................ ................................................... 17
Settings︱ .............................................................................................................................. 18
Installing the DrivePro App︱ .............................................................................................. 22
Connecting to the DrivePro using iOS and Android Devices︱ ....................................... 23
Using the DrivePro App on iOS and Android Devices︱ ................................................... 24
Transferring Files to a Computer︱ .................................................................................... 27
Troubleshooting︱................................................................................................................ 30
Specifications︱ ................................................................................................................... 31
Recycling and Environmental Protection︱ ....................................................................... 32
Federal Communications Commission (FCC) Statement ................................................. 33
Two-year Limited Warranty︱ .............................................................................................. 34
GNU General Public License (GPL) Disclosure ................................................................. 35
End-User License Agreement (EULA) ................................................................................ 35
Page 3

2
Introduction︱
Thank you for purchasing Transcend DrivePro 220 - an advanced car video recorder (CVR) that is
specifically designed to capture real time video of events happening outside your vehicle while driving.
Mounted on your car’s windshield, the DrivePro uses a 130° Wide Angle Lens for the best field of view, and
records videos in crystal clear Full HD 1080P to ensure all the important details of your trip are recorded.
DrivePro 220 has built-in GPS receivers to record your driving history. In addition, the WI-FI connection
allows you to adjust the settings and download the recorded videos from your mobile devices. Videos are
saved on a microSD memory card as the vehicle is driven. The DrivePro bundles with a 16GB Transcend
microSD memory card, letting you record around 2 hours of a Full HD footage without the need to purchase
additional storage. In addition, its built-in camera allows you to take photos while recording by just one click.
This User’s Manual will give you step-by-step instructions and advices to help you get the best experience
from your new device. Please read it carefully before using the DrivePro.
Page 4
3
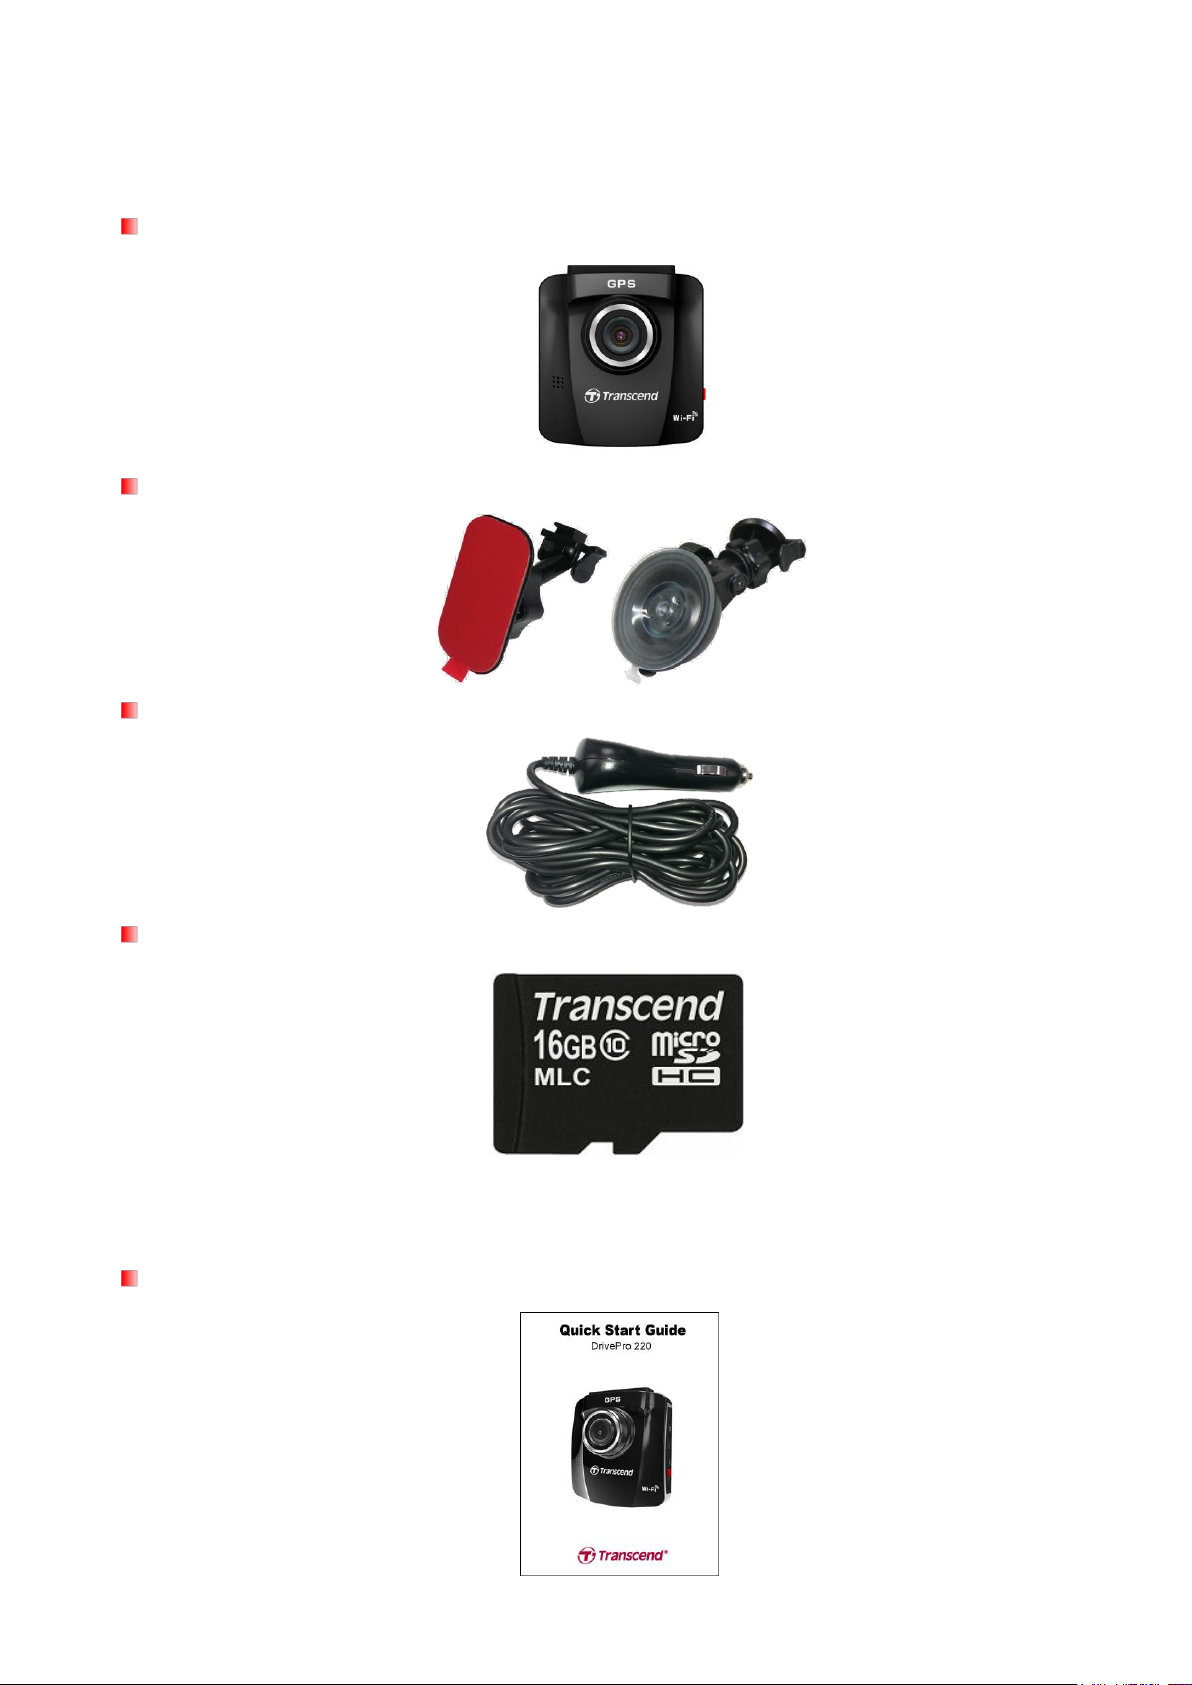
Package Contents︱
The DrivePro Car Video Recorder package includes the following items:
A DrivePro Car Video Recorder
An Adhesive Mount or a Suction Mount
A Car Adapter
A 16GB microSD Memory Card
A Quick Start Guide
Page 5

4
A Warranty Card
Page 6

5
Features︱
Smooth, detailed Full HD 1080P recording at 30fps resolution
Built-in GPS receivers to locate your position
Built-in Wi-Fi function to let you operate the DrivePro on your mobile device
Bright 2.4-inch color LCD screen
130 degree wide angle lens
Bundled with a 16GB Transcend microSD memory card
Built-in camera to capture real-time images while recording
Hi-Speed USB 2.0 connector for easy computer connectivity and fast file transfers
Record videos in .MP4 file format with 15Mbps high video bit rate
Built-in microphone
Built-in Li-ion battery
Built-in speaker
Support 13 languages
System Requirements︱
System requirements for connecting the DrivePro to a computer:
A desktop or a laptop with a working USB port
Windows®
Windows Vista®
Windows® 7
Windows® 8
Mac®
Linux®
XP
OS X 10.8.2 or later
Kernel 2.6.38 or later
Page 7

6
Safety Precautions︱
WARNING: Remove the DrivePro carefully if it is mounted on a tinted window to prevent
damages to the tint film.
These usage and safety guidelines are IMPORTANT! Please follow them carefully to ensure your own
personal safety, and help protect your DrivePro from potential damages.
General Use
For in-car use only.
For your safety, do not operate the DrivePro, or use the DrivePro App while driving.
Avoid placing the DrivePro in an extreme temperature environment.
Avoid splashing water or any other liquids on the DrivePro and accessories.
Do not use the DrivePro in an environment with strong magnetic fields or excessive vibration.
Only use the car adapter provided by Transcend. Other car adapters may not compatible with the
DrivePro.
Lighter sockets of some types of vehicles will still supply power after the car engine is turned off. If
your car is of this type, please unplug your car video recorder from the lighter socket to avoid
unnecessary power consumption and unexpected issues.
The GPS system is subject to changes which could affect its accuracy and performance. Transcend
does not guarantee the accuracy of GPS data, which should not influence your personal judgment
while driving.
GPS signals cannot penetrate buildings and metallic tinted films. The accuracy of GPS data
depends on the surroundings including the weather and the location it is being used (e.g. high
buildings, tunnels, undergrounds and forests).
Mounting Location
Never place the DrivePro where the driver’s view or deployment of airbags is obstructed.
Mount the DrivePro within the range of the windshield wipers to ensure clear visibility in rain.
Backing up Data
Transcend does NOT take any responsibility for data loss or damage during operation. We
strongly advise that you regularly back up data in your memory card to a computer or other storage
medium.
To ensure Hi-Speed USB 2.0 data transfer rates when connecting your DrivePro to a computer,
please check if the computer is installed correct USB drivers. If you are not sure how to check this,
please refer to the User’s Manual of the computer or motherboard for USB driver information.
Page 8
7
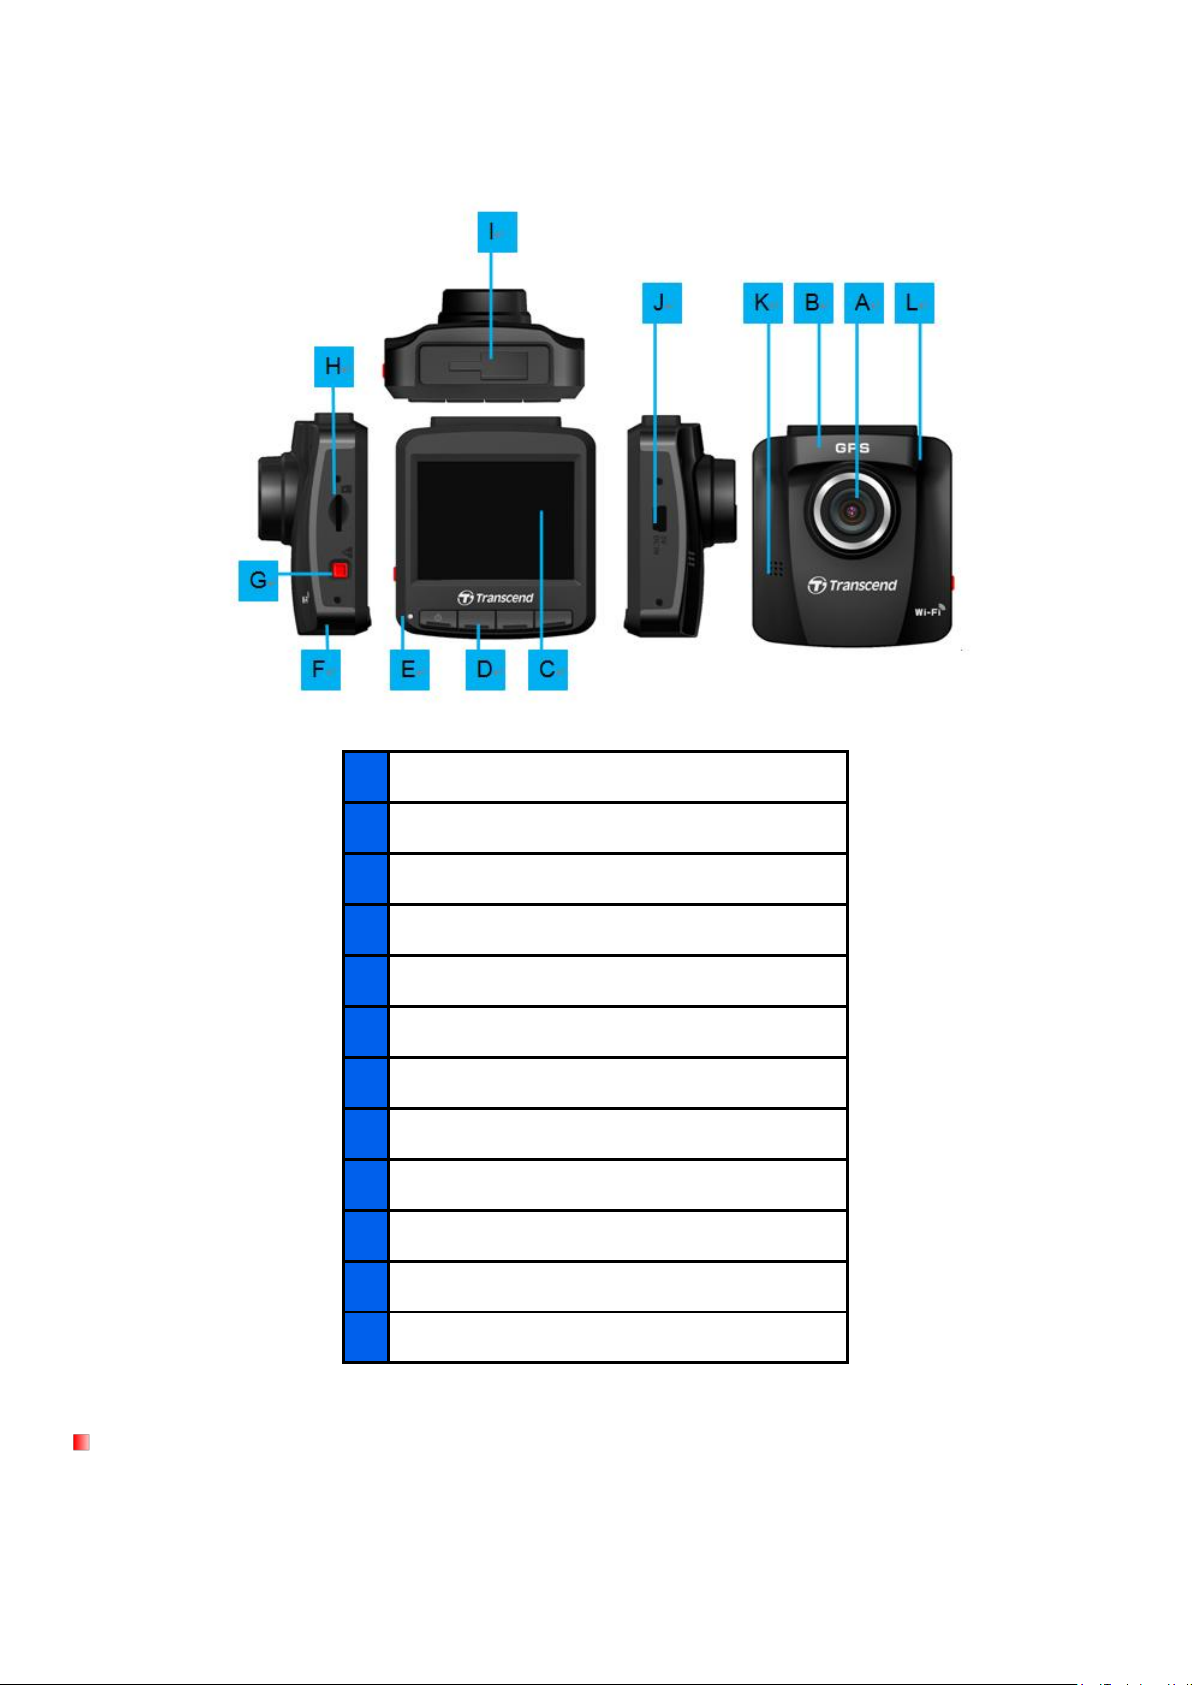
Getting Started︱
A
Wide Angle Lens
B
GPS Receivers
C
2.4” LCD Display
D
Function Buttons
E
LED Indicator
F
Reset Button
G
Emergency Button
H
Memory Card Slot
I
Bracket Socket
J
USB Connector
K
Built-in Microphone
L
Built-in Speaker
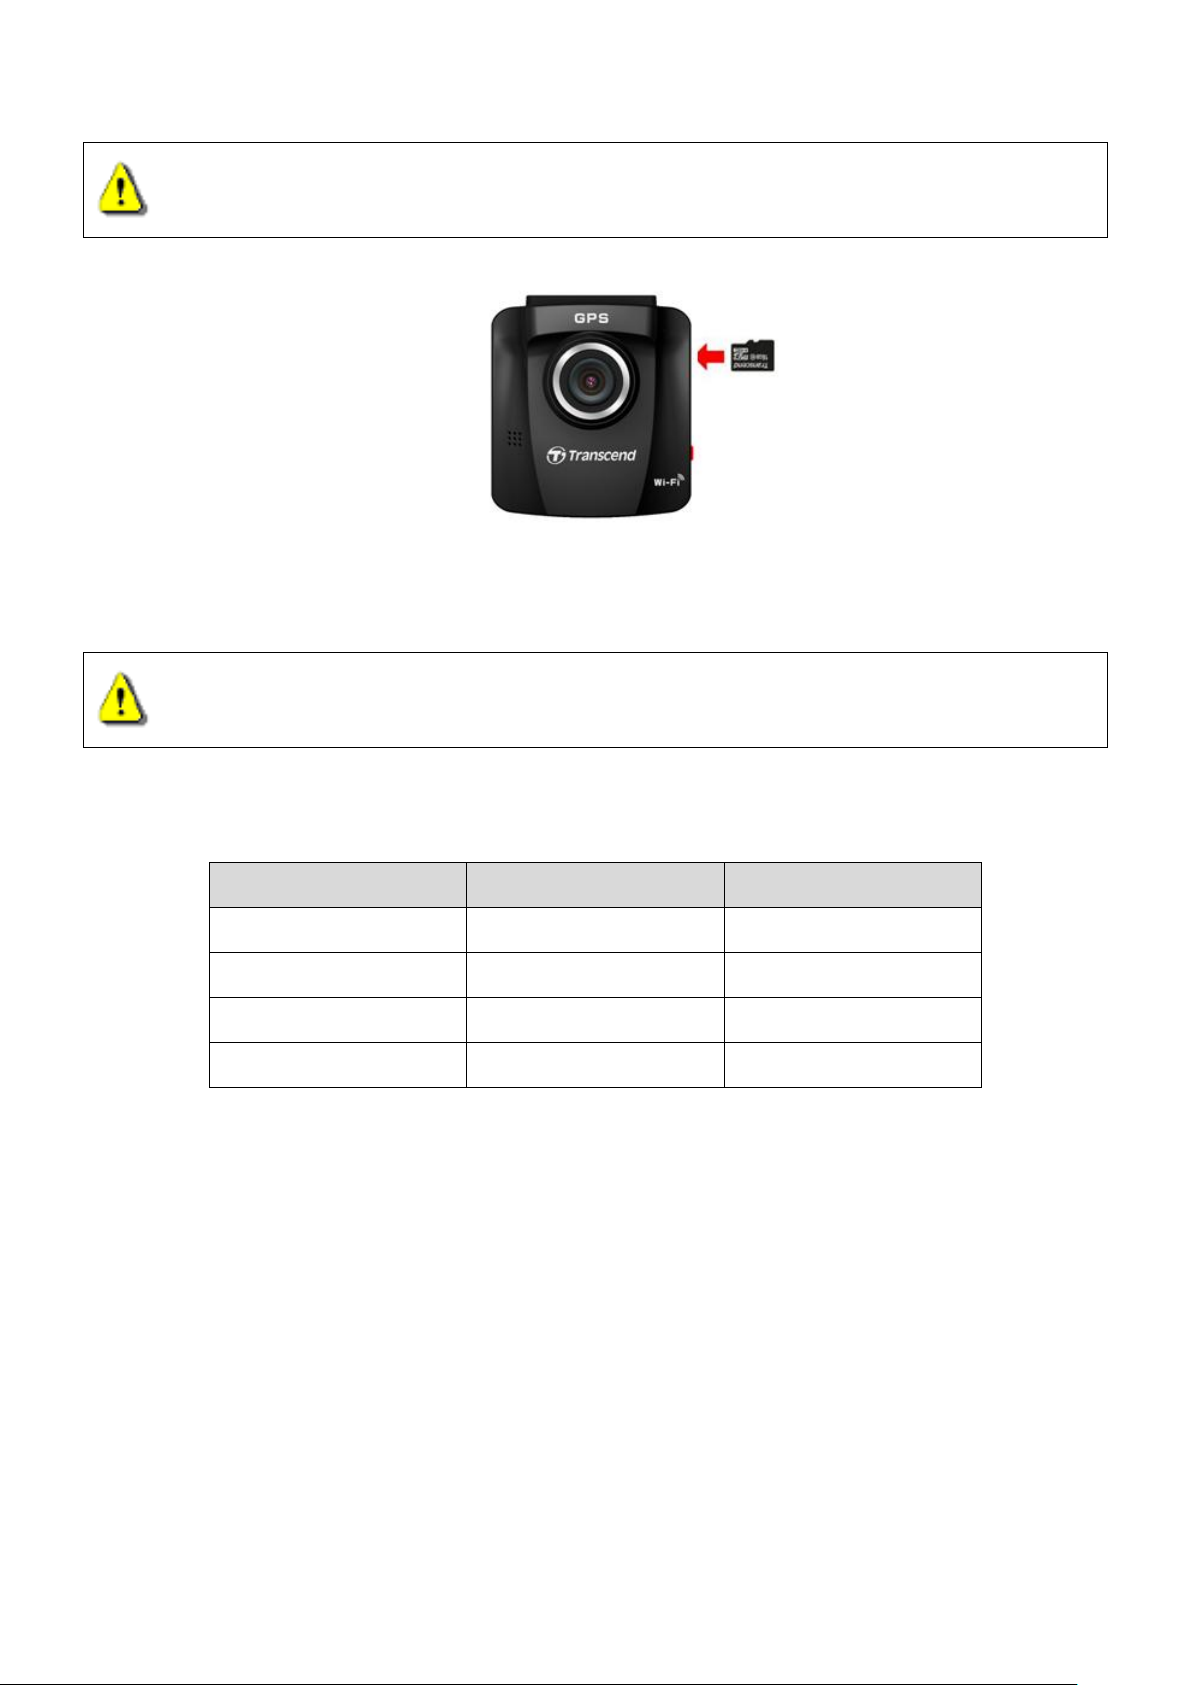
Inserting a microSD Memory Card
You must insert a microSD memory card into the DrivePro before you can start recording. Please use a
Class 6 or above microSD memory card with 8GB, 16GB, 32GB or 64GB capacity.
1. Insert a microSD memory card into the appropriate card slot on the left-hand side of the DrivePro.
Page 9
8
Note: Always format new memory cards in the DrivePro before using them for the first time. To
WARNING: TS16GDP220 can only support FAT32 and exFAT file format, but not NTFS.
WARNING: Do not remove the memory card during shutdown to avoid damages to the
memory card and loss of recorded videos
Card Capacity (FAT32)
Full HD 1080P 30fps
HD 720P 30fps
8GB
1 hr 10 min
2 hr 10 min
16GB
2 hr 20 min
4 hr 20 min
32GB
4 hr 40min
8 hr 50 min
64GB
9 hr
18 hr
format a new memory card, press the Settings button during recording, and select Format Card.
2. To remove, push to eject the memory card out of the slot
The following table shows approximate recording time according to capacity and resolution (for
reference only):
Page 10
9
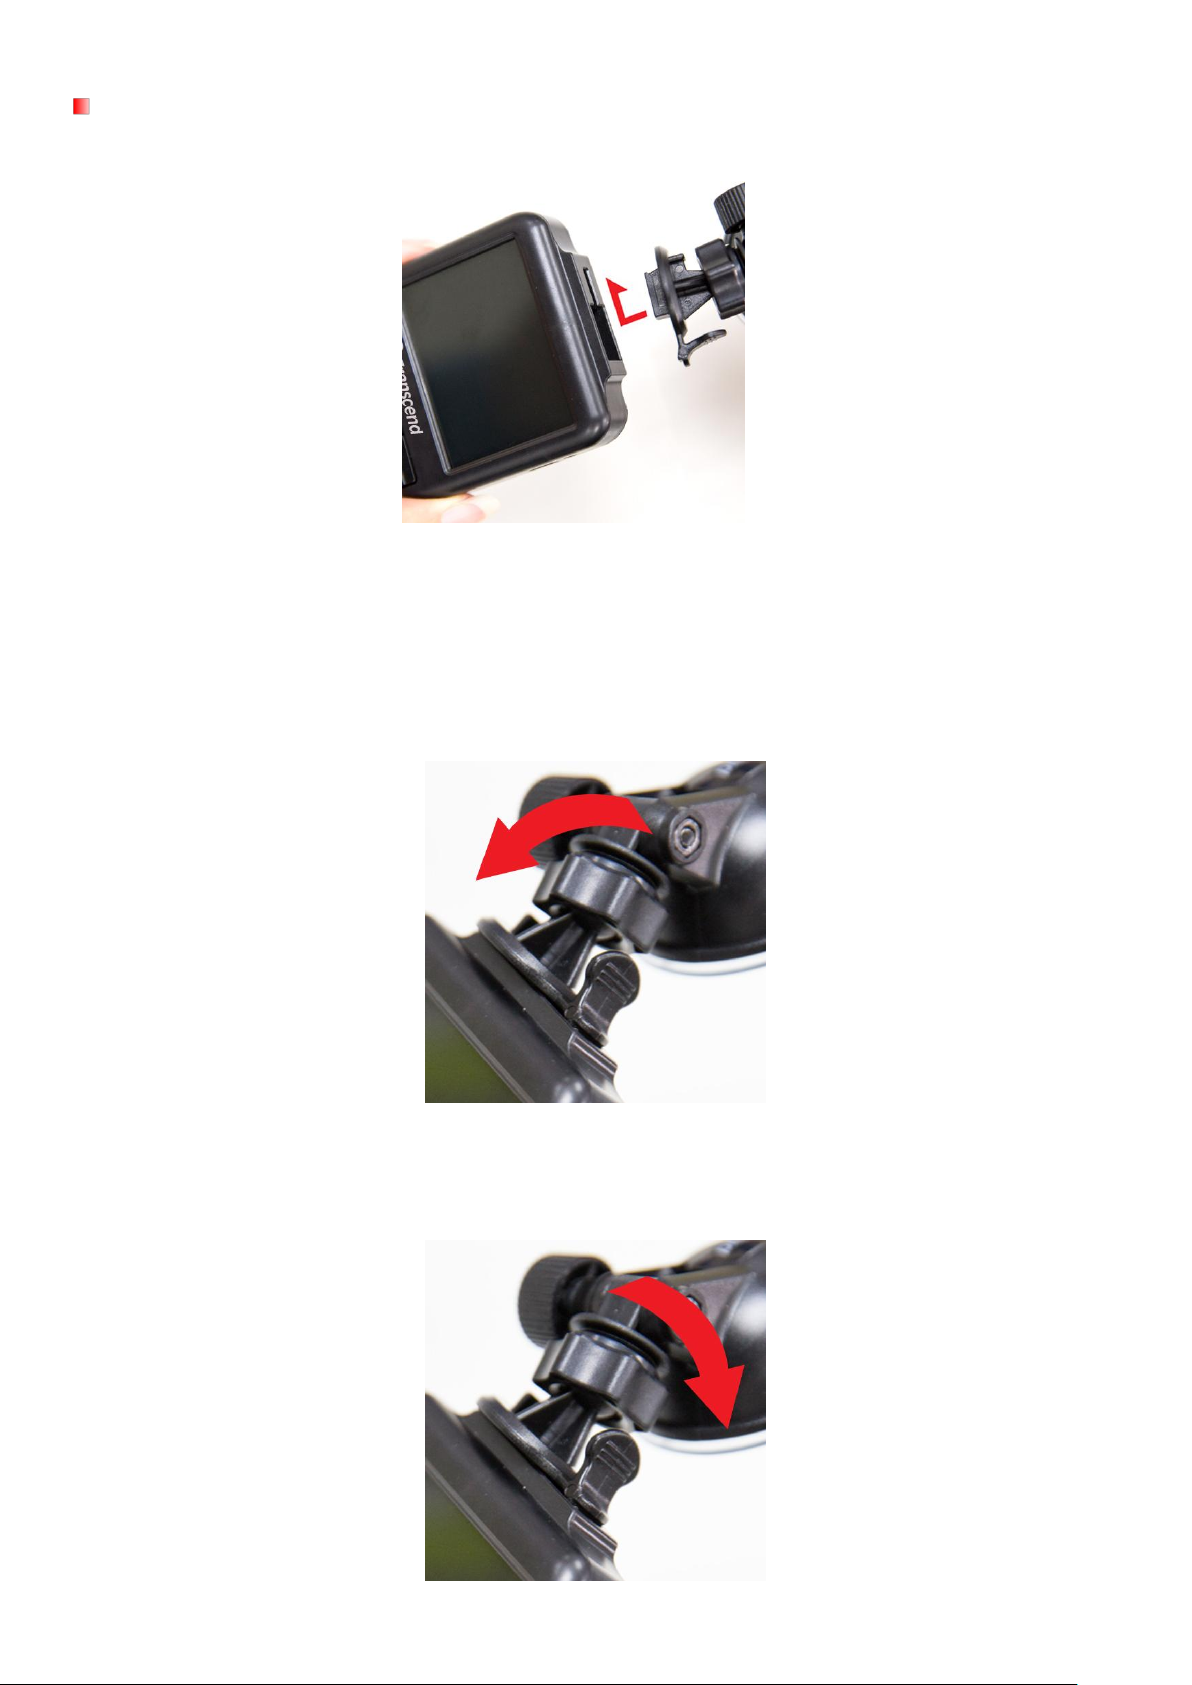
Mounting the DrivePro
1. Insert the mount bracket into the top of the DrivePro, and slide sideways until you hear a click.
2. Thoroughly clean and dry the area of the windshield you wish to mount the DrivePro. If possible,
mount the DrivePro in the middle of the windshield near the rear-view mirror for the best field of view.
3. Peel off the protective film from the mount bracket’s foam sticker, and firmly attach the DrivePro to
the windshield.
4. Turn the adjustment knob anticlockwise to loosen, and then adjust the DrivePro’s position.
5. After the DrivePro is in the best position, turn the adjustment knob clockwise to make sure that the
DrivePro is securely locked in place.
Page 11
10
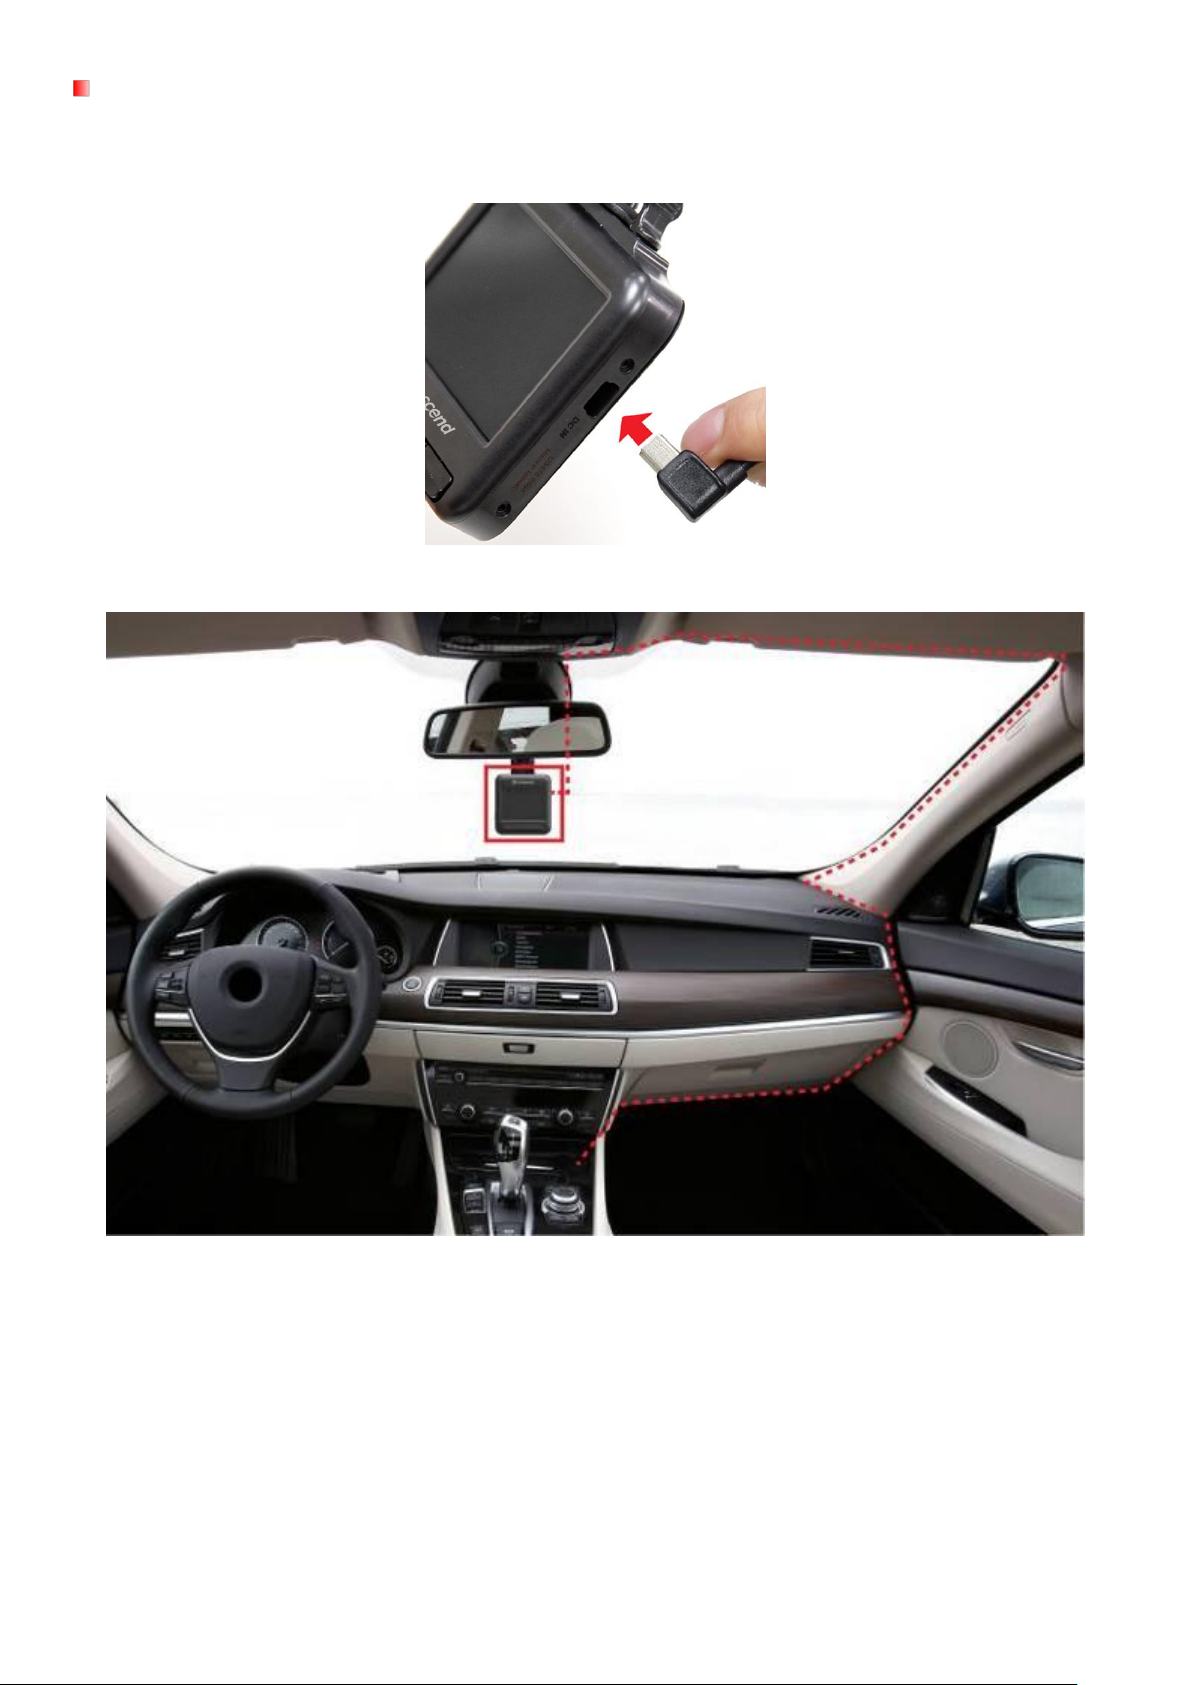
Connecting to Power
Note: Insert a microSD memory card before connecting the DrivePro to your car’s lighter socket.
1. Connect the small end of the car adapter to the USB connector of the DrivePro.
2. Connect the other end of the car adapter to your car’s lighter socket.
3. After the car engine is switched on, the DrivePro will automatically turn on and start recording.
4. After the car engine is switched off, the DrivePro will automatically save the current recording, and
power off.
Note: Lighter sockets of some types of vehicles will still supply power after the car engine is turned
off. If your car is of this type, please unplug your car video recorder from the lighter socket to
avoid unnecessary power consumption and unexpected issues.
Page 12
11
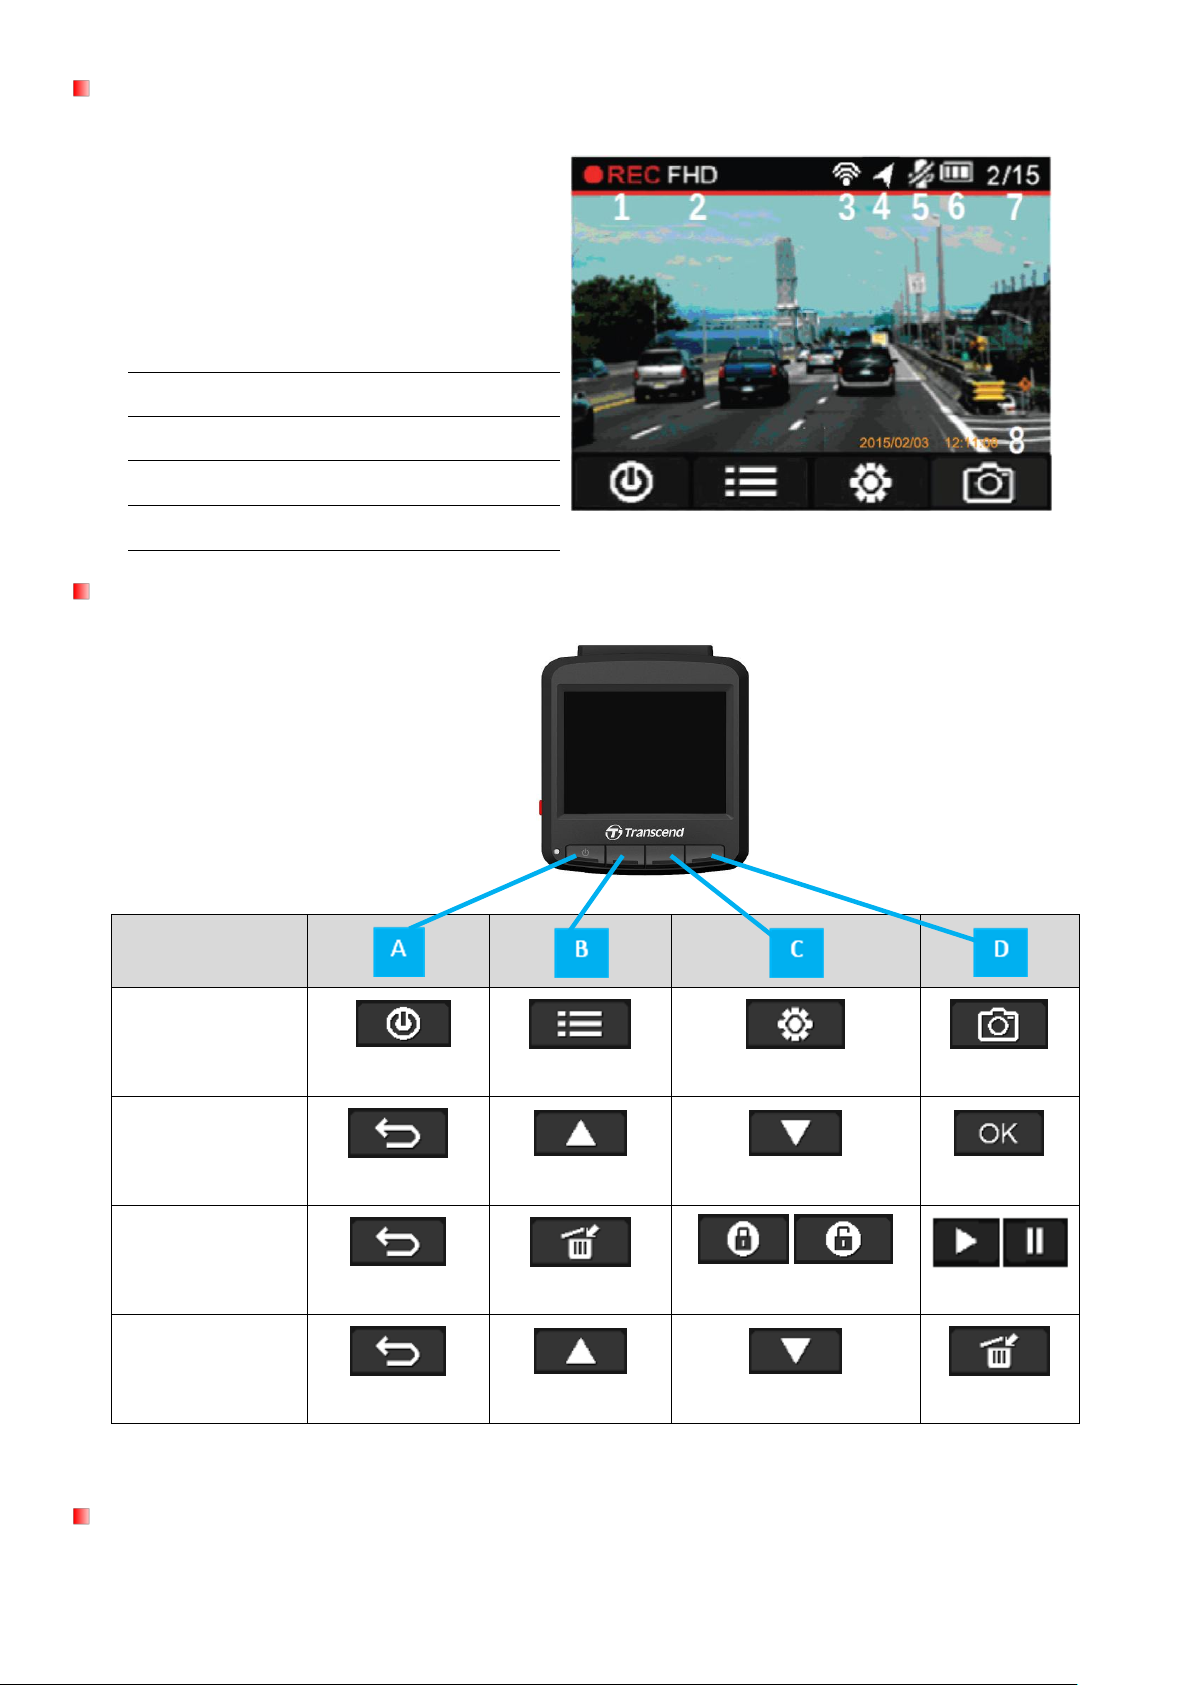
Recording Screen
① Recording status indicator
② Video resolution
③ WIFI on indicator
④ GPS fix indicator
⑤ Voice recrod status
⑥ Battery status
⑦ Numbers of protected files
⑧ Time/Speed
Mode
Video Recording
Power On/Off*
Browse Files
Settings
Take Photos
Browse/Settings
Back*
Up Down
OK
Video Playback
Back*
Delete
/
Protected/Unprotected
Play/Pause
View Photos
Back*
Up Down
Delete
Function Buttons
*Press and hold the Power On/Off button for 3 seconds to manually turn on/off the DrivePro in any
mode.
Emergency Recording
During video recording, press the emergency button on the left-hand side of the DrivePro to manually
Page 13

12
activate emergency recording mode.
LED Status
Definition
Solid Red
Standby
Flashing Red
Recording
LED Indicator Reference Chart
Setting the Date and Time
To set the current date and time:
1. During video recording, press the Settings button .
2. Use / to select Date/Time Settings, and press .
3. Use / to adjust values, and press to move to the next block.
4. Repeat step 3 above until the date and time settings are complete.
Page 14

13
Setting UTC Timezone
To ensure the accuracy of GPS data:
1. During video recording, press the Settings button .
2. Use / to select UTC, and press .
3. Use / to adjust values, and press .
Recording Videos︱
After the car engine is switched on, the DrivePro will automatically turn on and start recording.
By default, one video file is saved for every 3 minute of recording. To adjust the recording length, please
refer to the Settings section in this manual.
c
After the car engine is switched off, the DrivePro will automatically save the current recording and power off.
Note: Lighter sockets of some types of vehicles will still supply power after the car engine is turned off. If
your car is of this type, please unplug your car video recorder from the lighter socket to avoid
unnecessary power consumption and unexpected issues.
Page 15

14
Emergency Recording
In emergency Recording mode, the DrivePro records data 30 seconds before and 30 seconds after the
event occurs (totally 1 minute). The DrivePro can save up to 15 emergency video files. Video files recorded
in emergency mode are protected from being overwritten.
Manual Event Recording: During video recording, press the emergency button on the left-hand side of the
DrivePro to manually activate emergency recording mode. The emergency icon will appear on the screen
when activated.
G-Sensor Event Recording: During video recording, the DrivePro will automatically activate Emergency
Recording mode when detecting a collision.
If the G-Sensor sensitivity is set to “High”, even minor shocks will activate Emergency Recording
mode.
If the G-Sensor sensitivity is set to “Low”, only significant shocks will activate Emergency Recording
mode.
G-Sensor sensitivity can be adjusted or disabled in the Settings menu.
Note: The message, “Max number of emergency files reached,” will pop up when 15 emergency files have
been saved. The earliest emergency file will then be overwritten by the latest emergency file
recorded.
Page 16

15
Low Battery
Please charge the DrivePro immediately after viewing the Low Battery warning to avoid errors happening to
the system time. Please avoid using the built-in battery to record videos directly.
Note: Please fully charge DP220 before using.
Page 17

16
Browse and Play Videos︱
Playing Videos / Browsing Photos
1. During video recording, press the Browse button .
2. Use / to select either Video Files, or Protected Files or Photos, and press .
3. Use / to select the desired video file, and press .
4. Press to pause playback. Press again to resume playback.
5. Press to return to the video file list.
Page 18

17
Deleting Videos
1. During playback of a video file, press . The message, “Are you sure you want to delete this
file?”, will pop up.
2. Use / to select “Yes,” and press to delete the file.
Protecting Videos
1. During playback of a normal video file, press . The message, “Are you sure you want to
protect this file?”, will pop up.
2. Use / to select “Yes,” and press to protect the file.
Page 19

18
Settings︱
In the Settings menu, you can adjust settings of video resolution, recording time and G-Sensor sensitivity. You
can also set the date/time, change the interface language, format the memory card, and upgrade firmwares.
1. During video recording, press the Settings button .
2. Use / to select the desired menu option, and press .
3. Use / to select the desired setting, and press .
4. Press to return to the Settings menu.
Page 20

19
Menu Options
Wi-Fi Connection: Enable/disable Wi-Fi connection on DP220.
Available options: On / Off
Resolution: Set the resolution/quality for video recording.
Available options: 1080P (FHD) / 720P (HD)
Exposure Value: Adjust exposure composition value to lighten or darken the preview screen.
Available options: +2.0 / +1.5 / +1.0 / +0.5 / 0 / -0.5 / -1.0 / -1.5 / -2.0
Video Length: Set the recording length of each recorded video file.
Available options: 1 min / 3 mins / 5 mins
Video Stamp: Display the current time of the event or GPS information of the video being
recorded.
Available options: Disable / Time / GPS / Both
Voice Recording: Turn on/off the microphone during video recording.
Available options: Enable / Disable
Volume: Set the speaker volume level.
Available options 0 / 1 / 2 / 3 / 4 / 5 (You can choose 0 to switch on Silent Mode)
G-Sensor: Adjust the sensitivity of the G-Sensor.
Available options: Disable / Low / Medium / High
Lane Departure Warning System (LDWS): Alert the driver if the driving speed exceeds the value
set ahead.
Available options: Disable / 40 kilometers (miles) / ... / 180 kilometers (miles)
Forward Collision Warning System (FCWS): Alert the driver if the driving speed exceeds the
value set ahead.
Available options: Disable / 40 kilometers (miles) / ... / 180 kilometers (miles)
Speed Alarm: Alert the driver with warning beeps if the driving speed exceeds the value set
ahead.
Available options: Disable / 40 kilometers (miles) / ... / 180 kilometers (miles)
Speed Unit: Set the measurement unit of speed.
Available options: Kilometer / Mile
Page 21

20
Parking Mode: Determine if continuous recording is necessary according to motion detection
WARNING: Formatting will erase all the data stored in the card.
after the car engine is switched off (this mode will drain DP220 battery).
Available options: Enable / Disable
Auto Turn Off Display: Set duration for display to automatically turn off after recording begins.
Available options: Never / After 1 min / After 3 mins
Delay Power Off: Schedule the DrivePro to shut down at a certain time.
Available options: Disable / 10 secs / 30 secs
GPS Status: Display the number of GPS satellites received and GPS signal intensity.
Navigation System: Select a navigation system according to your preference.
Available options: GPS / Glonass
Timezone: Set the current timezone.
Date/Time Settings: Set the current date and time.
Date/Time Format: Set the date format to Y/M/D or M/D/Y, and the time format to AM/PM or 24H.
This setting applies to both Time Stamp and System Time.
Language: Set the on-screen display menu language (13 languages are available).
Available options: English / 繁 體中文 / 简体中文 / 日本語 / Deutsch / Español / Ελληνικά /
Français / Italiano / Россия / Português / Türkçe / 한국어
Light Frequency: Select the appropriate frequency to avoid flashing A/C light.
Available options: 50Hz / 60Hz
Information: Display the DrivePro’s current firmware version, card capacity and free space.
Format: Format the microSD memory card.
Available options: No / Yes
Firmware Upgrade: Keep your DrivePro up-to-date with the latest version downloaded from
Transcend website http://www.transcend-info.com/Support/service.
1. After downloading the firmware from Transcend website, decompress it and put it in the
“SYSTEM” folder in the microSD memory card.
Page 22

21
WARNING: NEVER remove the power cord or the microSD memory card while the
firmware is being upgraded.
If the DrivePro cannot be turned on due to firmware upgrade failure, please contact Transcend
customer service for technical support.
2. Insert the microSD memory card that contains the latest firmware version.
3. Select Firmware Upgrade from the Settings menu, and press to start the firmware
detection process. The DrivePro will automatically find the latest firmware file.
Restore Defaults: Reset all settings to factory default settings.
Available options: No / Yes
Page 23

22
Installing the DrivePro App︱
3. Tap FREE to start the
download process.
4. Tap INSTALL to
complete installation.
3. Tap INSTALL to start
the download process.
4. Tap Accept &
download to complete
installation.
Developed specifically for iOS (iPhone/iPad) and Android devices, the free download DrivePro App
allows you to wirelessly view real-time video footages during recording, control DrivePro functions and play
videos directly from your smartphone or tablet.
Installing the App on an iOS device:
1. Open the App Store on your iOS device to search for the DrivePro App.
2. Select the suitable DrivePro App.
Installing the App on an Android device:
1. Open Google Play on your Android device to search for the DrivePro App.
2. Select the suitable DrivePro App.
Once the installation is complete, the App will be displayed on the home screen of your device. Before using
the App, please refer to the DrivePro instructions.
Page 24

23
Connecting to the DrivePro using iOS and Android Devices︱
(on your iOS device)
4. Tap Settings to turn on Wi-Fi.
5. Select DrivePro 220 from Choose a Network.
6. Enter the Wi-Fi security key: “12345678”.
(on your Android device)
4. Tap System Settings to turn on Wi-Fi.
5. Select DrivePro 220 from Wi-Fi.
6. Enter the Wi-Fi security key: “12345678”.
To wirelessly store DP220 video files using your iOS/Android device, you have to first connect to the
DrivePro’s dedicated wireless network.
(on your DrivePro)
1. During video recording, press the button of the DrivePro to turn on the Wi-Fi function.
2. When the icon is displayed, you can connect your mobile device to the DrivePro.
3. After turning on the Wi-Fi, please wait around 10 seconds for the network to appear.
To change the default SSID and to setup Wi-Fi security key, please see the Using the DrivePro App on iOS
and Android Devices/Settings section in this manual for detailed instructions.
When connected to the DrivePro, your mobile device will not have Internet access. Additionally, the DrivePro
function buttons (Browse/ Settings) will also be disabled. The following image will be displayed:
Page 25

24
Using the DrivePro App on iOS and Android Devices︱
WARNING: After tapping Browse, the DrivePro will automatically stop recording. To resume
recording, go back to the real-time view page.
Normal video files
Emergency video files
After the DrivePro App is launched while the DrivePro is connected, the real-time screen will be displayed in
landscape view.
Here you can see real-time video footages, recording format, microphone status, current time and recording
status.
Browse
1. Tap Browse from the DrivePro App home page.
2. Tap the Normal tab to view Normal video files or tap the Emergency tab
to view Emergency video files.
Page 26

25
iOS: Video Player
Android: Video Player
File function bar
Playing Videos
Tap the thumbnail image of the desired video from the file list.
For iOS: Automatically play the selected file.
For Android: Automatically play the selected file.
Downloading Videos
1. Tap the information next to the thumbnail image of the desired video. The file function bar will appear
below the video file.
2. From the file function bar, tap the download icon .
For iOS: The file will be downloaded to the Camera Roll in the iOS device.
For Android: The file will be downloaded to the /sdcard/DrivePro folder in the Android device.
Note: You can edit the default download path in Settings on your Android device.
Deleting Videos
1. Tap the information next to the thumbnail image of the desired video. The file function bar will appear
below the video file.
2. From the file function bar, tap the delete icon .
Page 27

26
3. Tap OK to delete the file.
File information
Viewing Video Information
1. Tap the information next to the thumbnail image of the desired video. The file function bar will appear
below the video file.
2. From the file function bar, tap the information icon to view the file date/time, size and length.
Page 28

27
Transferring Files to a Computer︱
DP220 package does not contain any USB cable.
To transfer files between the DrivePro’s memory card and your computer:
Option 1: Take the microSD memory card out of the DrivePro, and insert to a compatible card reader to
transfer files to your computer.
Option 2:
1. Insert the microSD memory card into the DrivePro.
2. Plug the small end of a USB cable into the Mini-B USB port located on the right-hand side of the
DrivePro.
3. Plug the large end of the cable into an available USB port on your desktop or laptop.
The DrivePro will display the following screen when connected to a computer:
Windows® XP, Vista, 7 and 8
No drivers are required for connecting the DrivePro to your desktop or laptop. Windows® Operating Systems
have built-in drivers to support your DrivePro. Upon successful connection to your computer, a new
Removable Disk drive with a newly assigned drive letter representing the DrivePro will automatically appear
in My Computer, and a Removable Hardware
icon will appear in the Windows System Tray.
Page 29

28
*Note: (I:) is an example drive letter – the letter in your “My Computer” window may differ.
Your DrivePro is now ready to transfer data just like an external hard drive. To transfer videos, simply
drag-and-drop files from the folder that represents the DrivePro.
Proper removal of your DrivePro from Windows:
1. Click once on the Removable Hardware icon
in the system tray.
2. A Safely Remove Hardware window will pop up. Click to continue.
3. A window stating, “The „USB Mass Storage Device‟ device can now be safely removed from the
system,” will pop up. Unplug your DrivePro from the USB port after seeing this message.
Mac® OS X 10.8.2 or later
No drivers are required. Plug your DrivePro into an available USB port directly, and your computer will
automatically detect it.
Proper removal of your DrivePro from Mac OS:
Drag-and-drop the Disk icon corresponding to your DrivePro into the trashcan, and then unplug your DrivePro
from the USB port.
Page 30

29
1. WARNING: To prevent data loss, always follow the proper removal procedures when
disconnecting the DrivePro from your computer.
2. When the DrivePro is connected to a computer, it can only be used for transferring
files. You will not be able to use any of the DrivePro’s features at this time. Please
disconnect your DrivePro from the computer to resume normal function.
3. NEVER use the “format” or “initialize disk” function while the DrivePro is connected to
your computer, even if prompted to do so.
Page 31

30
Troubleshooting︱
If a problem occurs to your DrivePro, please first check the instructions listed below before sending your
DrivePro for repair. If you cannot find any ideal solution to your question below, please consult your dealer,
service center, or local Transcend branch office for further help. You can also visit Transcend website for FAQ
and Technical Support services. For any Hardware issues, please refer to the DrivePro User’s Manual.
My computer operating system cannot detect my DrivePro
Please check the followings:
1. Is your DrivePro properly connected to the USB port? If not, unplug and connect it again. Make sure that
both ends of the USB cables are properly connected as shown in the User’s Manual.
2. Is your DrivePro connected to the Mac keyboard? If yes, try to plug it in an available USB port on your
Mac Desktop directly.
3. Is the computer’s USB ports enabled? If not, refer to the user’s manual of your computer (or
motherboard) to enable them.
None of the DrivePro buttons are responding (hangs / lags / stalls)
Try unplugging the car adapter from your DrivePro, and reconnecting it to your DrivePro again.
My DrivePro cannot play videos stored in my memory card.
Edited videos may not be displayed properly on your DrivePro.
Nothing happens when I press the “Emergency Recording” button.
Emergency Recording only works in the recording mode.
Page 32

31
Specifications︱
Panel:
2.4" color LCD
Speaker / Microphone:
1.0 Watt / 0.5 mA (built-in)
Connect Interface:
USB2.0
Storage Capacity:
MicroSD, 8GB / 16GB / 32GB / 64GB (Class 6 or above)
Control buttons:
4 function buttons
1 emergency recording button
1 reset button
Dimensions:
70.2 mm (L) × 63.1mm (W)× 34.5mm (H)
Weight:
90g
Power Supply
(car charger):
Input DC12V~24V
Output DC5V / 1A
Operating Temperature:
-20°C (-4°F) ~ 65°C (149°F)
Video Formats:
H.264 (MP4: up to 1920x1080 30fps)
Lens:
F/1.8, 130° wide angle
Resolution / Frame Rate
Full HD (1920 x 1080) 30fps
HD (1280 x 720) 30fps
Global Navigation
Satellite System
GPS/Glonass
WiFi
802.11b/g/n
Certification:
CE, FCC, NCC, BSMI
Warranty:
2 years
Page 33

32
Recycling and Environmental Protection︱
Recycling the Product (WEEE): Your product is designed and manufactured with high quality materials and
components, which can be recycled and reused. When you see the crossed-out wheel bin symbol attached to
a product, it means that the product is covered by the European Directive 2002/96/EC:
Never dispose of your product with other household waste. Please inform yourself about the local rules on the
separate collection of electrical and electronic products. The correct disposal of your old product helps prevent
potential negative consequences on the environment and human health.
Battery Disposal: Your product contains a built-in rechargeable battery covered by the European Directive
2006/66/EC, which cannot be disposed of with normal household waste. Please inform yourself about the local
rules on separate collection of batteries. The correct disposal of batteries helps prevent potentially negative
consequences on the environment and human health.
For products with non-exchangeable built in batteries: The removal of (or the attempt to remove) the battery
invalidates the warranty. This procedure is only to be performed at the end of the product’s life.
Page 34

33
Federal Communications Commission (FCC) Statement
This device complies with Part 15 FCC Rules. Operation is subject to the following two conditions: (1) This
device may not cause harmful interference. (2) This device must accept any interference received including
interference that may cause undesired operation.
This Equipment has been tested and found to comply with the limits for a Class B digital device, pursuant to
Part 15 of the FCC rules. These limits are designed to provide reasonable protection against harmful
interference in a residential installation. This equipment generates, uses and can radiate radio frequency
energy and, if not installed and used in accordance with the instructions, may cause harmful interference to
radio communications. However, there is no guarantee that interference will not occur in a particular
installation. If this equipment does cause harmful interference to radio or television reception, which can be
determined by turning the equipment off and on, the user is encouraged to try to correct the interference by
one or more of the following measures:
- Reorient or relocate the receiving antenna.
- Increase the separation between the equipment and receiver.
- Connect the equipment into an outlet on a circuit different from that to which the receiver is connected.
- Consult the dealer or an experienced radio/TV technician for help.
RF Exposure Statement:
This equipment complies with FCC RF radiation exposure limits set forth for an uncontrolled
environment. This equipment should be installed and operated with a minimum distance of 20cm between
the radiator and your body.
You are cautioned that changes or modifications not expressly approved by the part responsible for
compliance could void the user’s authority to operate the equipment.
FCC RF Radiation Exposure Statement:
This Transmitter must not be co-located or operating in conjunction with any other antenna or transmitter.
Page 35

34
Two-year Limited Warranty︱
Transcend Information, Inc.
www.transcend-info.com
This product is covered by a Two-year Limited Warranty. Should your product fail under normal use within two years
from the original purchase date, Transcend will provide warranty service pursuant to the terms of the Transcend
Warranty Policy. Proof of the original purchase date is required for warranty service. Transcend will inspect the product
and in its sole discretion repair or replace it with a refurbished product or functional equivalent. Under special
circumstances, Transcend may refund or credit the current value of the product at the time the warranty claim is made.
The decision made by Transcend shall be final and binding upon you. Transcend may refuse to provide inspection,
repair or replacement service for products that are out of warranty, and will charge fees if these services are provided for
out-of-warranty products.
Limitations
Any software or digital content included with this product in disc, downloadable, or preloaded form, is not covered under
this Warranty. This Warranty does not apply to any Transcend product failure caused by any accident, abuse,
mishandling or improper usage (including use contrary to the product description or instructions, outside the scope of the
product’s intended use, or for tooling or testing purposes), alteration, abnormal mechanical or environmental condition
(including prolonged exposure to humidity), acts of nature, improper installation (including connection to incompatible
equipment), or problems with electrical power (including undervoltage, overvoltage, or power supply instability). In
addition, damage or alteration of warranty, quality or authenticity stickers, and/or product serial or electronic numbers,
unauthorized repair or modification, or any physical damage to the product or evidence of opening or tampering with the
product casing will also void this Warranty. This Warranty shall not apply to the transferees of Transcend products and/or
anyone who stands to profit from this Warranty without Transcend’s prior written authorization. This Warranty only
applies to the product itself, and excludes integrated LCD panels, rechargeable batteries, and all product accessories
(such as card adapters, cables, earphones, power adapters, and remote controls).
Transcend Warranty Policy
Please visit www.transcend-info.com/warranty to view the Transcend Warranty Policy. By using the product, you
agree that you accept the terms of the Transcend Warranty Policy, which may be amended from time to time.
Online Registration
To expedite warranty service, please access www.transcend-info.com/register to register your Transcend product
within 30 days of the purchase date.
*The Transcend logo is a registered trademark of Transcend Information, Inc.
*The specifications mentioned above are subject to change without notice.
*All logos and marks are trademarks of their respective companies.
Page 36

35
GNU General Public License (GPL) Disclosure
Firmware incorporated into this product and/or software used for this product may include third party copyrighted software licensed
under the GPL (hereinafter referred to as “GPL Software”). In accordance with the GPL, if applicable: 1) the source code for the GPL
Software may be downloaded at no charge or obtained on CD for a nominal charge by calling Customer Support within three years of
the date of purchase; 2) you may copy, re-distribute and/or modify the GPL Software under the terms of the GNU General Public
License as below or any later version, which may be obtained at http://www.gnu.org/licenses/gpl.html; 3) the GPL Software is
distributed WITHOUT ANY WARRANTY, without even implied warranty of MERCHANTABILITY or FITNESS FOR A PARTICULAR
PURPOSE. The entire risk as to the quality and performance of the GPL Software is with you. Transcend does not provide any
support for the GPL software.
End-User License Agreement (EULA)
Software license terms and conditions
1. Generally. Transcend Information, Inc. ("Transcend") is willing to grant the following license to install or use the software and/or firmware
(“Licensed Software”) pursuant to this End-User License Agreement (“Agreement”), whether provided separately or associated with a
Transcend product (“Product”), to the original purchaser of the Product upon or with which the Licensed Software was installed or associated
as of the time of purchase ("Customer") only if Customer accepts all of the terms and conditions of this Agreement. PLEASE READ THESE
TERMS CAREFULLY. USING THE SOFTWARE WILL CONSTITUTE CUSTOMER'S ACCEPTANCE OF THE TERMS AND CONDITIONS
OF THIS AGREEMENT. IF YOU DO NOT AGREE TO THE TERMS AND CONDITIONS OF THIS AGREEMENT, DO NOT INSTALL OR
USE THE LICENSED SOFTWARE.
2. License Grant. Transcend grants to Customer a personal, non-exclusive, non-transferable, non-distributable, non-assignable,
non-sublicensable license to install and use the Licensed Software on the Product in accordance with the terms and conditions of this
Agreement.
3. Intellectual Property Rights. As between Transcend and Customer, the copyright and all other intellectual property rights in the
Licensed Software are the property of Transcend or its supplier(s) or licensor(s). Any rights not expressly granted in this License are reserved
to Transcend.
4. License Limitations. Customer may not, and may not authorize or permit any third party to: (a) use the Licensed Software for any
purpose other than in connection with the Product or in a manner inconsistent with the design or documentations of the Licensed Software; (b)
license, distribute, lease, rent, lend, transfer, assign or otherwise dispose of the Licensed Software or use the Licensed Software in any
commercial hosted or service bureau environment; (c) reverse engineer, decompile, disassemble or attempt to discover the source code for
or any trade secrets related to the Licensed Software, except and only to the extent that such activity is expressly permitted by applicable law
notwithstanding this limitation; (d) adapt, modify, alter, translate or create any derivative works of the Licensed Software; (e) remove, alter or
obscure any copyright notice or other proprietary rights notice on the Licensed Software or Product; or (f) circumvent or attempt to circumvent
any methods employed by Transcend to control access to the components, features or functions of the Product or Licensed Software.
5. Copying. Customer may not copy the Licensed Software except that one copy of any separate software component of the Licensed
Software may be made to the extent that such copying is necessary for Customer's own backup purposes.
6. Open Source. The Licensed Software may contain open source components licensed to Transcend pursuant to the license terms
Page 37

36
specified as below,
(a) GNU General Public License (GPL), the terms of which is currently available at
http://www.gnu.org/licenses/gpl.html;
(b) GNU Lesser General Public License (LGPL), the terms of which is currently available at
http://www.gnu.org/copyleft/lesser.html;and/or
(c) Code Project Open License (CPOL), the terms of which is currently available at
http://www.codeproject.com/info/cpol10.aspx
The above license terms will control solely with respect to the open source components. In the event that this Agreement conflicts with
the requirements of the above one or more terms with respect to the use of the corresponding open source components, Customer agrees to
be bound by such one or more license terms.
7. Disclaimer. TRANSCEND MAKES NO WARRANTY AND REPRESENTATIONS ABOUT THE SUITABILITY, RELIABILITY,
AVAILABILITY, TIMELINESS, LACK OF VIRUSES OR OTHER HARMFUL COMPONENTS AND ACCURACY OF THE INFORMATION,
LICENSED SOFTWARE, PRODUCTS, SERVICES AND RELATED GRAPHICS CONTAINED WITHIN THE LICENSED SOFTWARE FOR
ANY PURPOSE. ALL SUCH INFORMATION, LICENSED SOFTWARE, PRODUCTS, SERVICES AND RELATED GRAPHICS ARE
PROVIDED "AS IS" WITHOUT WARRANTY OF ANY KIND. TRANSCEND HEREBY DISCLAIMS ALL WARRANTIES AND CONDITIONS
WITH REGARD TO THIS INFORMATION, LICENSED SOFTWARE, PRODUCTS, SERVICES AND RELATED GRAPHICS, INCLUDING
ALL IMPLIED WARRANTIES AND CONDITIONS OF MERCHANTABILITY, FITNESS FOR A PARTICULAR PURPOSE, WORKMANLIKE
EFFORT, TITLE, AND NON-INFRINGEMENT.
IN NO EVENT SHALL TRANSCEND BE LIABLE FOR ANY DIRECT, INDIRECT, PUNITIVE, INCIDENTAL, SPECIAL, CONSEQUENTIAL
DAMAGES OR ANY DAMAGES WHATSOEVER INCLUDING, WITHOUT LIMITATION, DAMAGES FOR LOSS OF USE, DATA OR
PROFITS, ARISING OUT OF OR IN ANY WAY CONNECTION WITH THE USE, PERFORMANCE OR ACCURACY OF THE LICENSED
SOFTWARE OR WITH THE DELAY OR INABILITY TO USE THE LICENSED SOFTWARE, OR THE PRODUCT WITH WHICH THE
LICENSED SOFTWARE IS ASSOCIATED, WHETHER BASED ON CONTRACT, TORT, NEGLIGENCE, STRICT LIABILITY OR
OTHERWISE, EVEN IF TRANSCEND HAS BEEN ADVISED OF THE POSSIBILITY OF SUCH DAMAGES.
8. Limitation of Liability. IN ANY CASE, TRANSCEND 'S LIABILITY ARISING OUT OF OR IN CONNECTION WITH THIS AGREEMENT
WILL BE LIMITED TO THE TOTAL AMOUNT ACTUALLY AND ORIGINALLY PAID AT RETAIL BY CUSTOMER FOR THE PRODUCT. The
foregoing Disclaimer and Limitation of Liability will apply to the maximum extent permitted by applicable law. Some jurisdictions do not allow
the exclusion or limitation of incidental or consequential damages, so the exclusions and limitations set forth above may not apply.
9. Termination. Transcend may, in addition to any other remedies available to Transcend, terminate this Agreement immediately if
Customer breaches any of its obligations under this Agreement.
10. Miscellaneous. (a) This Agreement constitutes the entire agreement between Transcend and Customer concerning the subject matter
hereof, and it may only be modified by a written amendment signed by an authorized executive of Transcend. (b) Except to the extent
applicable law, if any, provides otherwise, this Agreement will be governed by the law of the Republic of China, excluding its conflict of law
provisions. (c) If any part of this Agreement is held invalid or unenforceable, and the remaining portions will remain in full force and effect. (d)
A waiver by either party of any term or condition of this Agreement or any breach thereof, in any one instance, will not waive such term or
condition or any subsequent breach thereof. (e) Transcend may assign its rights under this Agreement without condition. (f) This Agreement
will be binding upon and will inure to the benefit of the parties, their successors and permitted assigns.
 Loading...