

Trane GAM5 Series, GAM5A0C42M31SAA, GAM5A0C48M41SAA, GAM5A0C60M51SAA, GAM5A0A18M11SAA Installer's Manual
...Page 1

18-GJ04D1-2
Installer’s Guide
Convertible Air Handlers
1-1/2 – 5 Ton
GAM5A0A18M11SAA
GAM5A0A24M21SAA
GAM5A0B30M21SAA
GAM5A0C42M31SAA
GAM5A0C48M41SAA
GAM5A0C60M51SAA
GAM5A0B36M31SAA
ALL phases of this installation must comply with NATIONAL, STATE AND LOCAL CODES
Important: This Document is customer property and is to remain with this unit. Please return to service information
pack upon completion of work.
These instructions do not cover all variations in systems
nor provide for every possible contingency to be met in
connection with the installation. Should further information be desired or should particular problems arise which
are not covered sufficiently for the purchaser’s purposes,
the matter should be referred to your installing dealer or
local distributor.
Note: The manufacturer recommends installing ONLY
A.H.R.I. approved, matched indoor and outdoor systems.
Some of the benefits of installing approved matched
indoor and outdoor split systems are maximum efficiency, optimum performance, and the best overall system
reliability.
Note: Condensation may occur on the surface of the air
handler when installed in an unconditioned space. When
units are installed in unconditioned spaces, verify that
all electrical and refrigerant line penetrations on the air
handler are sealed completely.
The GAM5 air handlers will only use
the following internal electric heaters:
BAYEAAC05BK1AA
BAYEAAC05LG1AA
BAYEAAC08BK1AA
BAYEAAC08LG1AA
BAYEAAC10BK1AA
BAYEAAC10LG1AA
BAYEABC15BK1AA
BAYEABC20BK1AA
BAYEACC25BK1AA
Page 2

Table of Contents
Section 1. Safety Information. ......................................................................... 3
Section 2. Unit Design. ........................................................................................ 4
Section 3. Unit Preparation. ............................................................................. 6
Section 4. Optional Cabinet Disassembly. ............................................... 7
Section 5. Place Unit at Location. ............................................................... 12
Section 6. Unit Location Considerations. ............................................... 13
Section 7. Setting the Unit - Vertical Installation. ................................ 18
Section 8. Setting the Unit - Horizontal Installation. ......................... 20
Section 9. Connecting the Duct work. ...................................................... 21
Section 10. Refrigerant Line. ......................................................................... 22
Section 11. Refrigerant Line Brazing. ....................................................... 23
Section 12. Condensate Drain Piping. ...................................................... 26
Section 13. Electrical - Low Voltage. .......................................................... 28
Section 14. Electrical - High Voltage. ......................................................... 33
Section 15. Time Delay Switch Adjustment. .......................................... 35
Section 16. Filters. ............................................................................................... 35
Section 17. Unit Outline Drawing. ............................................................... 36
Section 18. Start Up. ........................................................................................... 37
Section 19. Sequence of Operation. .......................................................... 39
Section 20. Checkout Procedures. ............................................................. 40
Note: Representative illustrations only included in this
document. Most illustrations display the upflow configuration.
2
Page 3
Section 1. Safety Information
▲
WARNING
!
▲
CAUTION
!
▲
WARNING
!
▲
CAUTION
!
▲
CAUTION
!
SAFETY HAZARD! This information is intended for use
by individuals possessing adequate backgrounds of electrical and
mechanical experience. Any attempt to repair a central air conditioning product may result in personal injury and/or property damage.
The manufacturer or seller cannot be responsible for the interpretation of this information, nor can it assume any liability in connection
with its use.
LIVE ELECTRICAL COMPONENTS! During instal-
lation, testing, servicing, and troubleshooting of this product, it may
be necessary to work with live electrical components. Failure to follow all electrical safety precautions when exposed to live electrical
components could result in death or serious injury.
HAZARDOUS VAPORS! Do not install an air handler
with a non-ducted return in the same closet, alcove, or utility
room as a fossil fuel device. Hazardous vapors can be distributed
throughout the conditioned space and equipment damage can
result.
CORROSION HAZARD! To prevent shortening its service
life, the air handler should not be used during the finishing phases
of construction. The low return air temperatures can lead to the
formation of condensate. Condensate in the presence of chlorides
and fluorides from paint, varnish, stains, adhesives, cleaning compounds, and cement creates a corrosive condition which may cause
rapid deterioration of the cabinet and internal components.
SAFETY HAZARD! Sharp Edge Hazard. Be careful of sharp
edges on equipment or any cuts made on sheet metal while installing or servicing. Personal injury may result.
Important: Due to the unique design of this unit, which
allows the electrical wiring to be routed within the insulation, do not screw, cut, or otherwise puncture the unit
cabinet in any location other than the ones illustrated in
this Installer Guide or in an approved accessory’s Installer Guide.
Important: Under no conditions should metal strapping
be attached to the unit to be used as support mechanisms for carrying or suspension purposes.
3
Page 4
Section 2. Unit Design
Screws can be drilled
into bottom of unit.
(1/2” max. screw length)
(Typical all sides)
Screws, saw cuts, and
other penetrations
are allowed in the
blower section for
installation of Side
Return Kit.
(Typical both sides)
Screws are allowed up to 3- 3/4”
from the top of the cabinet
(heater compartment).
(Typical both sides)
Screws for ange kit
attachment are allowed
along the interior of
the cabinet (see arrows)
(Typical all sides)
No penetrations
allowed.
(Typical all sides)
Screws allowed only in
the rst 3/4” of front
bottom of unit (in cross
member)
2.1 Cabinet Penetration
Important: Due to the unique design of this unit,
which allows the electrical wiring to be routed within
the insulation, do not screw, cut, or otherwise puncture the unit cabinet in any location other than the
ones illustrated.
Important: Under no conditions should metal strapping be attached to the unit to be used as support
mechanisms for carrying or suspension purposes.
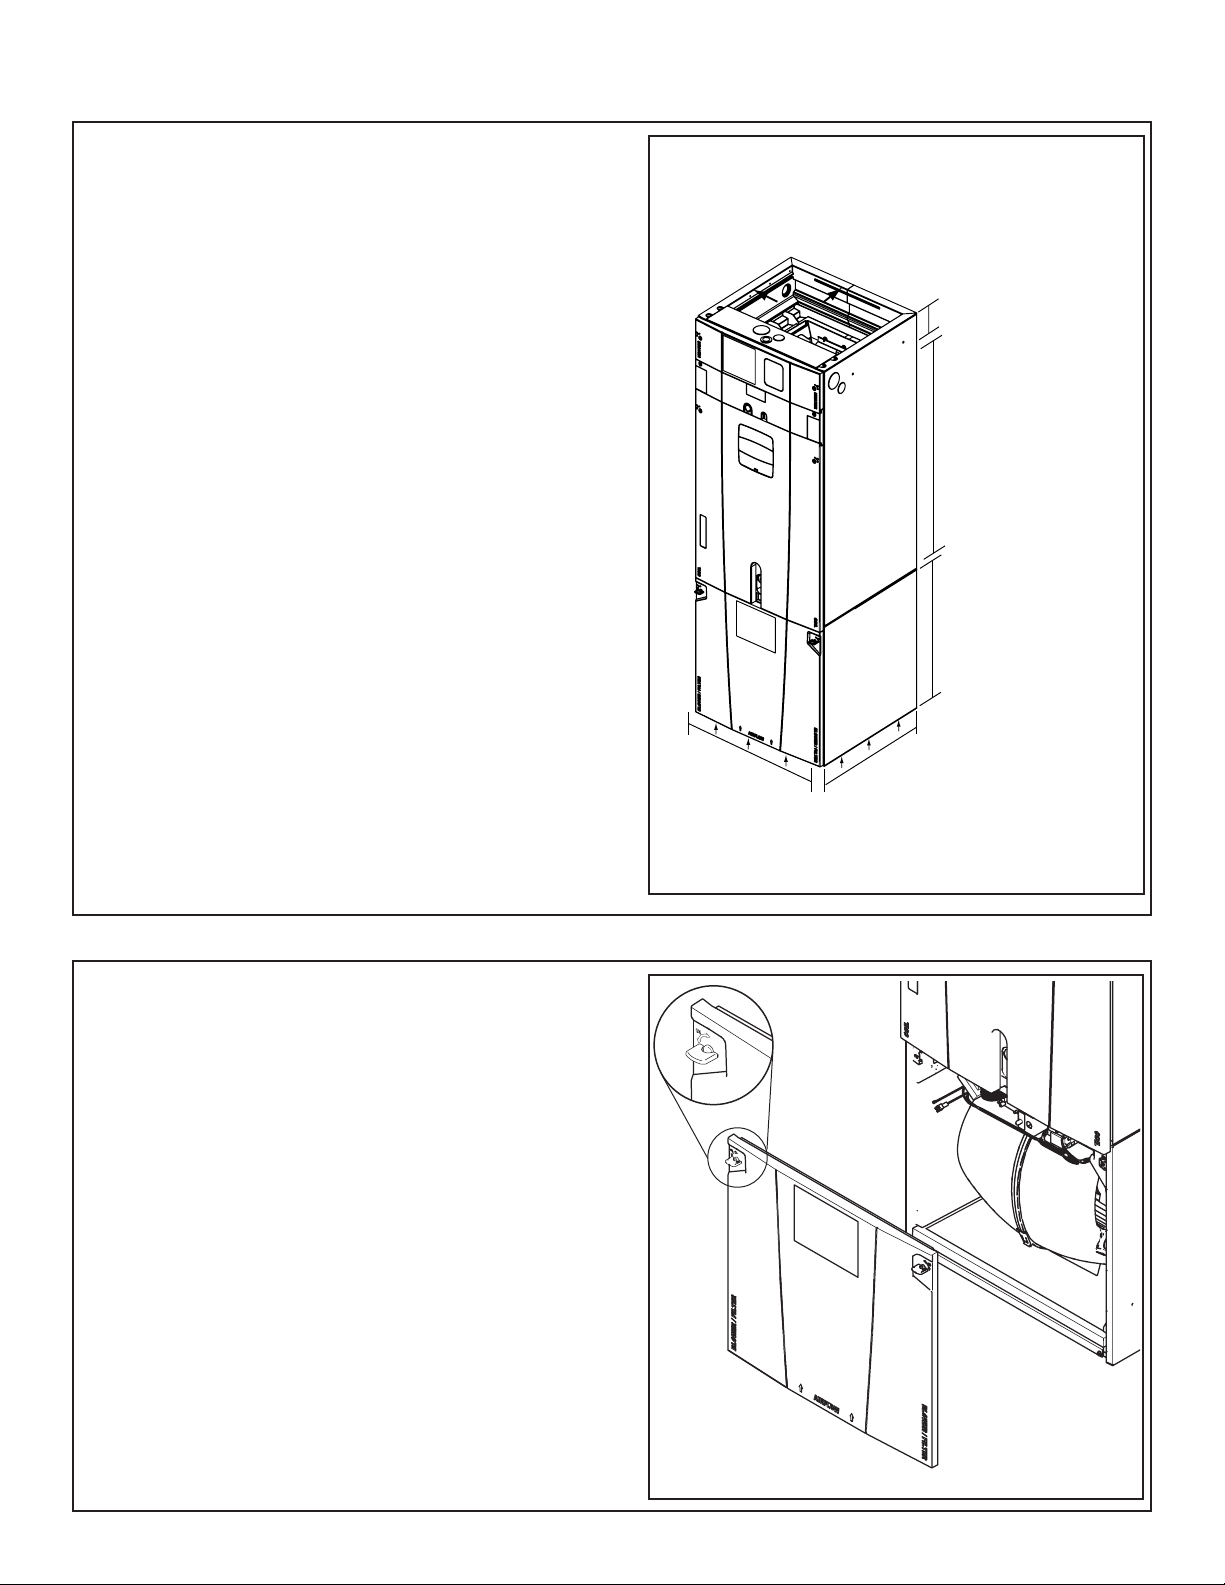
2.2 Panel Removal
The unit contains four (4) access panels: Blower/Filter, Coil, Line Set, and Heater.
The Blower/Filter panel is removed using 1/4 turn
thumb screws.
1. Turn thumb screws on Blower/Filter panel.
2. Pull top of panel out, away from cabinet.
3. Lift panel up out of channel.
4. Set aside.
4
Page 5
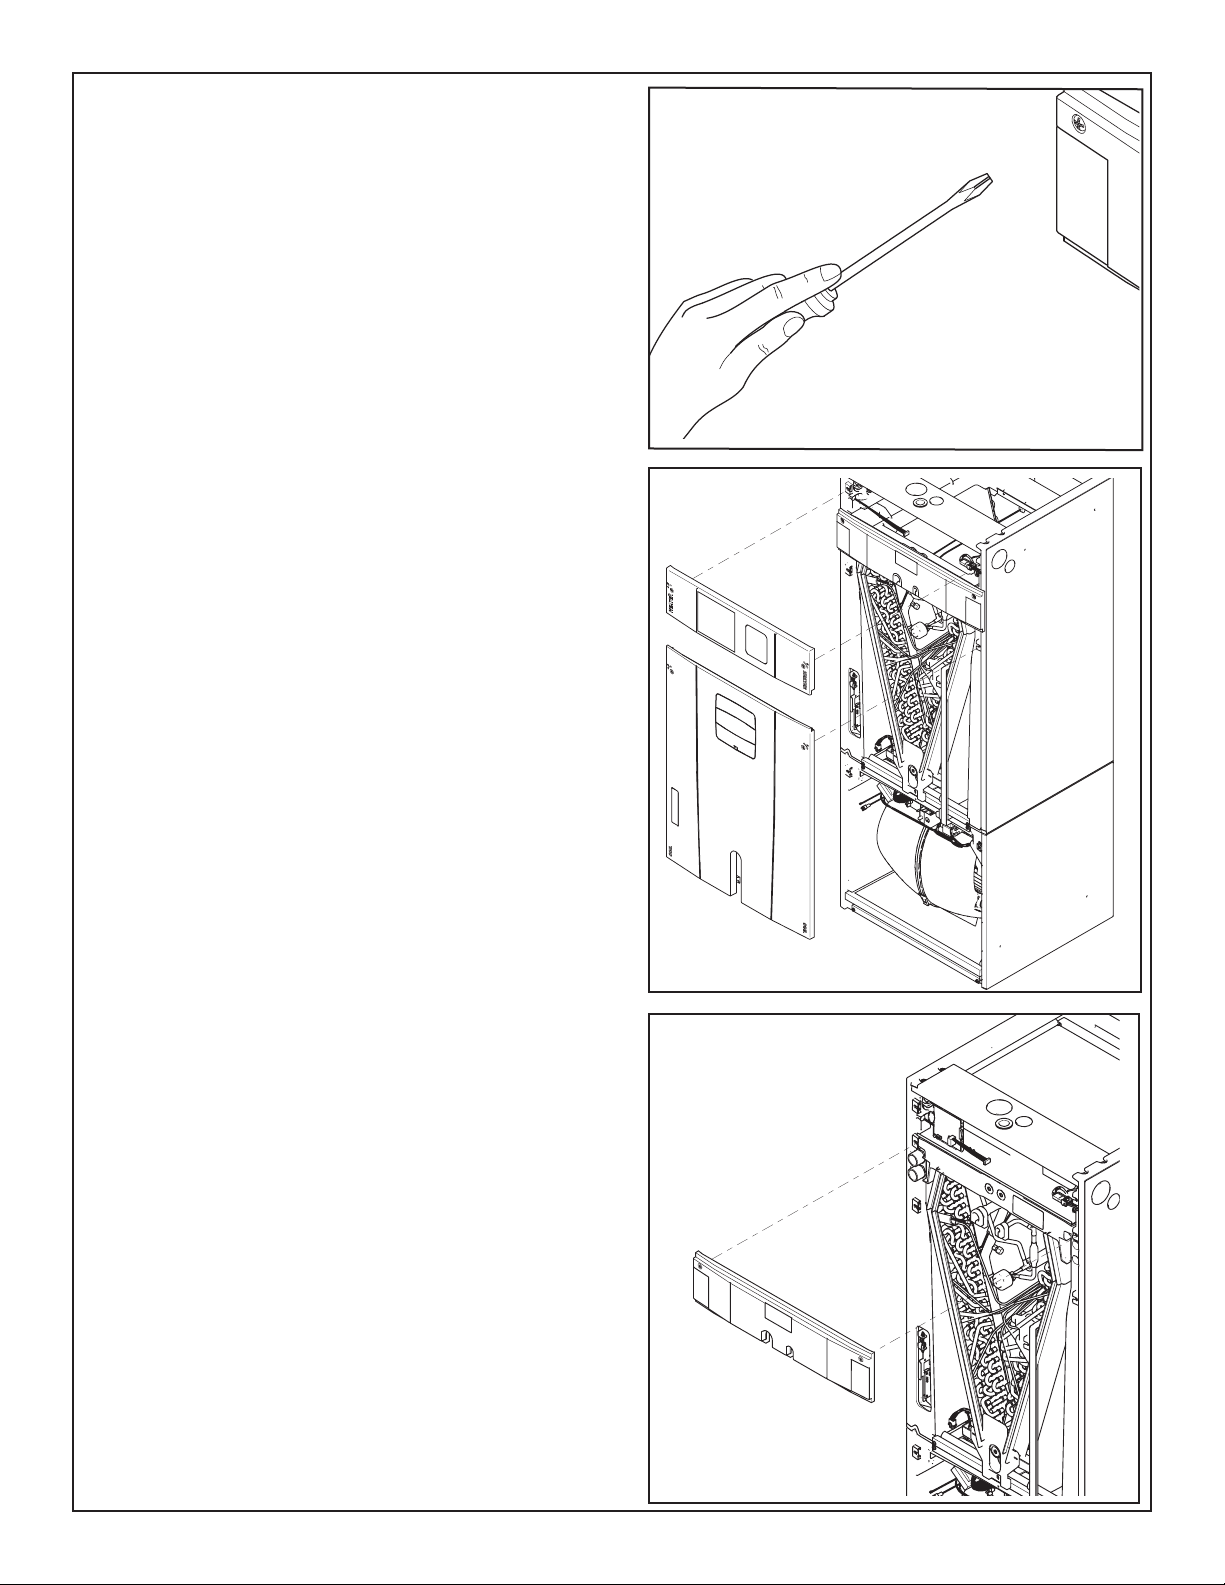
The Coil, Line Set, and Heater panels are removed
using Phillips head screws.
Coil and Heater panels must be removed prior to removing the Line Set panel.
To remove Coil Panel:
1. Turn screws on Coil panel.
2. Pull bottom of panel out, away from cabinet.
3. Pull panel down and out of channel.
4. Set aside.
#3 Size Phillips
To remove Heater Panel:
1. Turn screws on Heater panel.
2. Pull panel straight out, away from cabinet.
3. Set aside.
Removal of the Line Set panel is required for all refrigerant line brazing and some condensate line assembly
depending on your orientation.
To remove Line Set panel:
1. Remove both Heater and Coil panels.
2. Turn screws on Line Set Panel.
2. Pull panel straight out, away from cabinet.
3. Set aside.
5
Page 6
Section 3. Unit Preparation
3.1 Prepare The Unit For Installation
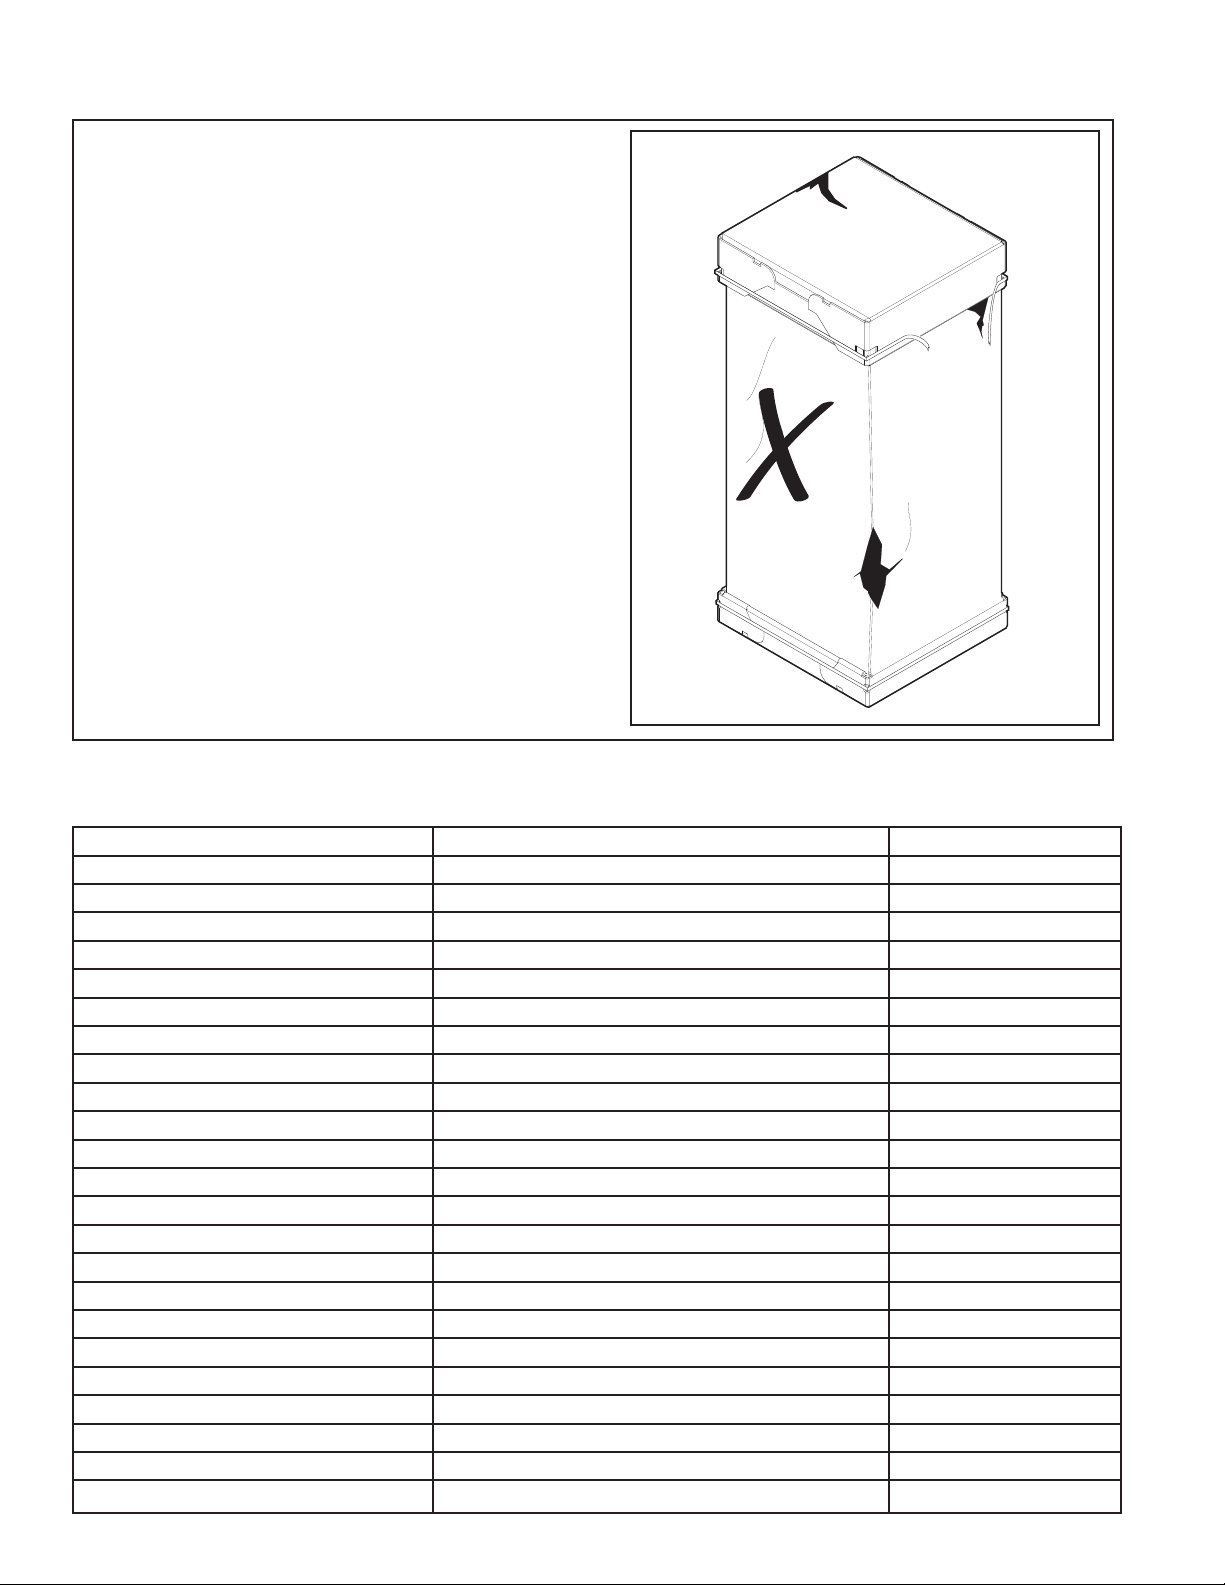
STEP 1 - Check for damage and report promptly to
the carrier any damage found to the unit.
Note: The unit is shipped “upside-down” in the
downflow orientation and may be easiest to transport to the job site in that orientation. If the unit
must be transported in a horizontal position, it must
be laid on its back (marked “REAR” on carton).
Note: After the unit is removed from the carton,
depress the Schrader valve to verify coil is pressurized.
3.2 Unit Accessories
Accessory Number Description Fits Cabinet Size
BAYEAAC05BK1A Electric Heater, 5kW, Breaker, 24V Control, 1 Ph A to C
BAYEAAC05LG1A Electric Heater, 5kW, Lugs, 24V Control, 1 Ph A to C
BAYEAAC08BK1A Electric Heater, 8kW, Breaker, 24V Control, 1 Ph A to C
BAYEAAC08LG1A Electric Heater, 8kW, Lugs, 24V Control, 1 Ph A to C
BAYEAAC10BK1A Electric Heater, 10kW, Breaker, 24V Control, 1 Ph A to C
BAYEAAC10LG1A Electric Heater, 10kW, Lugs, 24V Control, 1 Ph A to C
BAYEABC15BK1A Electric Heater, 15kW, Breaker, 24V Control, 1 Ph B to C
BAYEABC20BK1A Electric Heater, 20kW, Breaker, 24V Control, 1 Ph B to C
BAYEACC25BK1A Electric Heater, 25kW, Breaker, 24V Control, 1 Ph C
BAYSUPFLGA Supply Duct Flange A A
BAYSUPFLGBA Supply Duct Flange B B
BAYSUPFLGCA Supply Duct Flange C C
BAYRETFLGAA Return Duct Flange A A
BAYRETFLGB Return Duct Flange B B
BAYRETFLGCA Return Duct Flange C C
TASB175 Plenum Stand A A
TASB215 Plenum Stand B B
TASB235 Plenum Stand C C
BAYSRKIT100A Side Return Kit A to C
BAYICSKIT01A Internal Condensate Switch Kit A to C
BAYHHKIT001A Horizontal Hanger Kit A to C
BAYUVCLK001A UVC Lights A to C
BAYLVKIT100A Low Voltage Conduit Entry Kit A to C
Table 3.2
6
Page 7
Section 4. Optional Cabinet Disassembly
4.1 Disassemble cabinet for installation in tight areas or as needed.
Note: The unit is shipped “upside-down” in the
downflow orientation and may be easiest to transport
to the job site in that orientation. If the unit must be
transported in a horizontal position, it must be laid
on its back (marked “REAR” on carton).
Note: To reassemble cabinet, follow the steps in
reverse order. Ensure electrical connections are
secure and the plug clips are engaged.
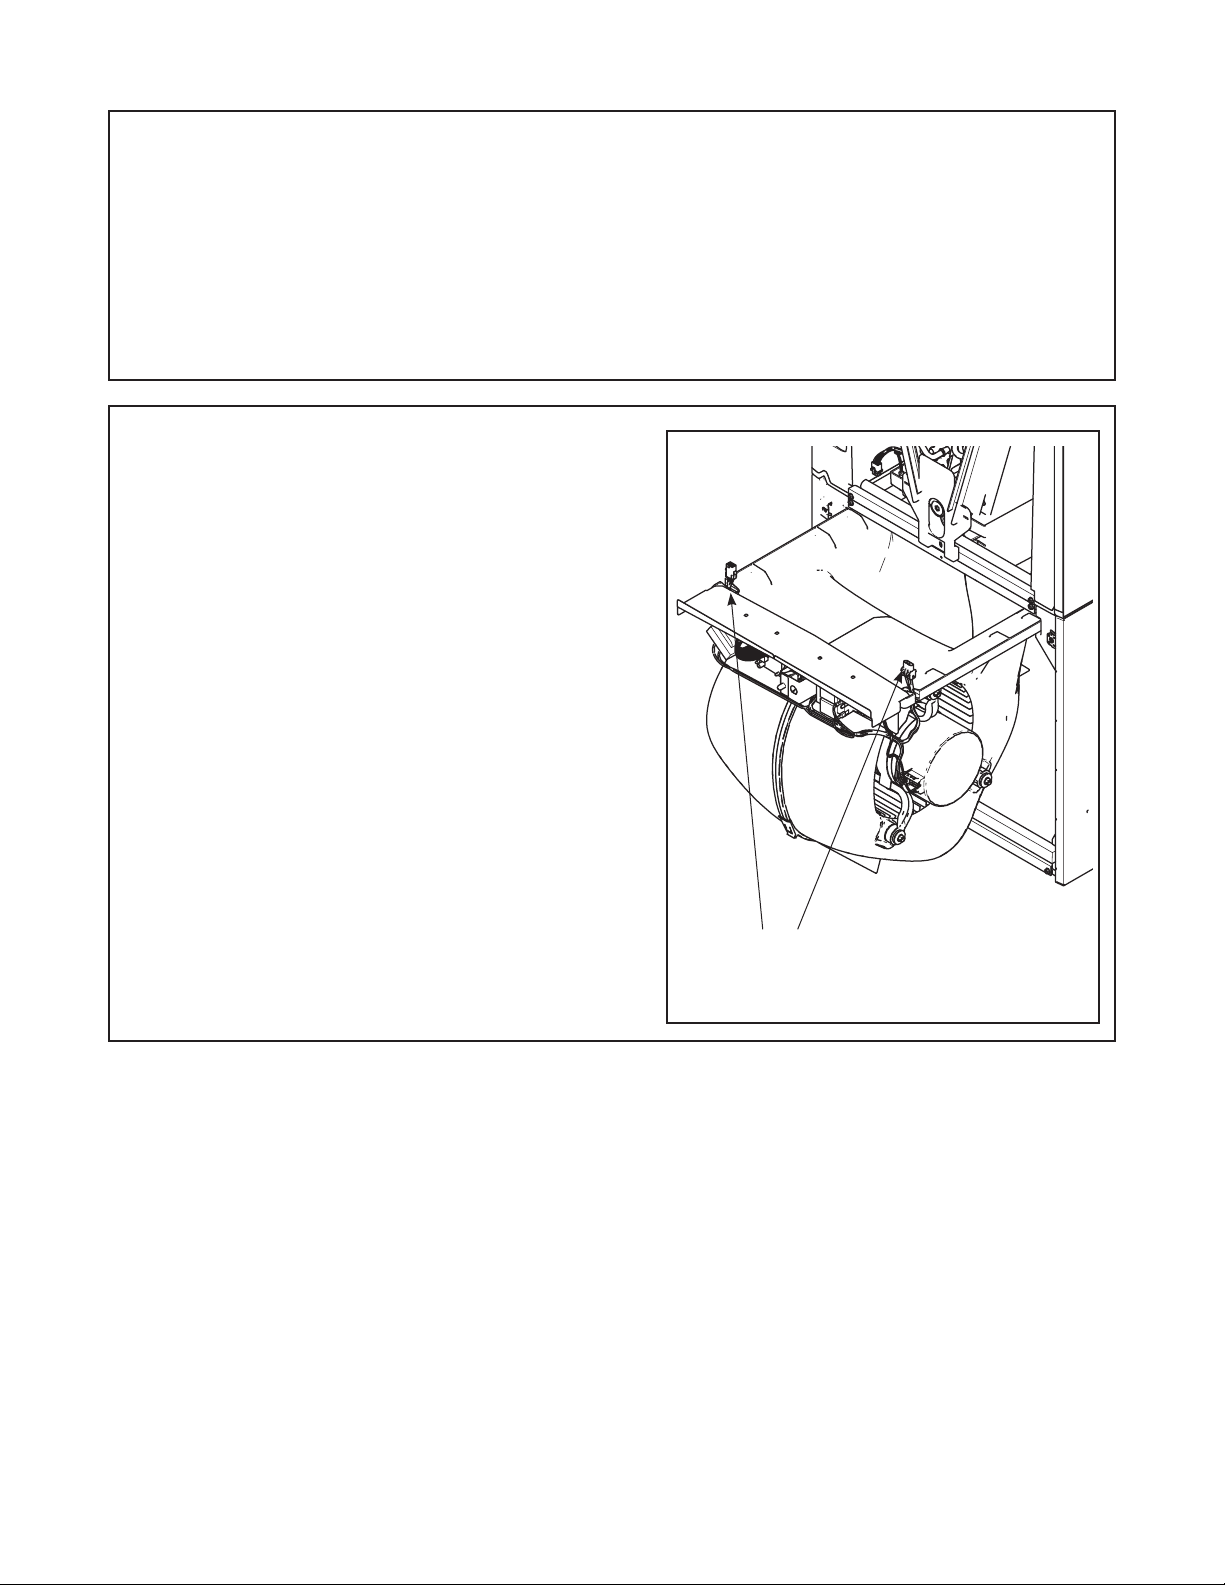
STEP 1 - Remove all four front panels. See Section
2.2.
Blower Electrical
Connections
7
Page 8
STEP 2 - Disconnect the two wiring connections
routed to the blower assembly.
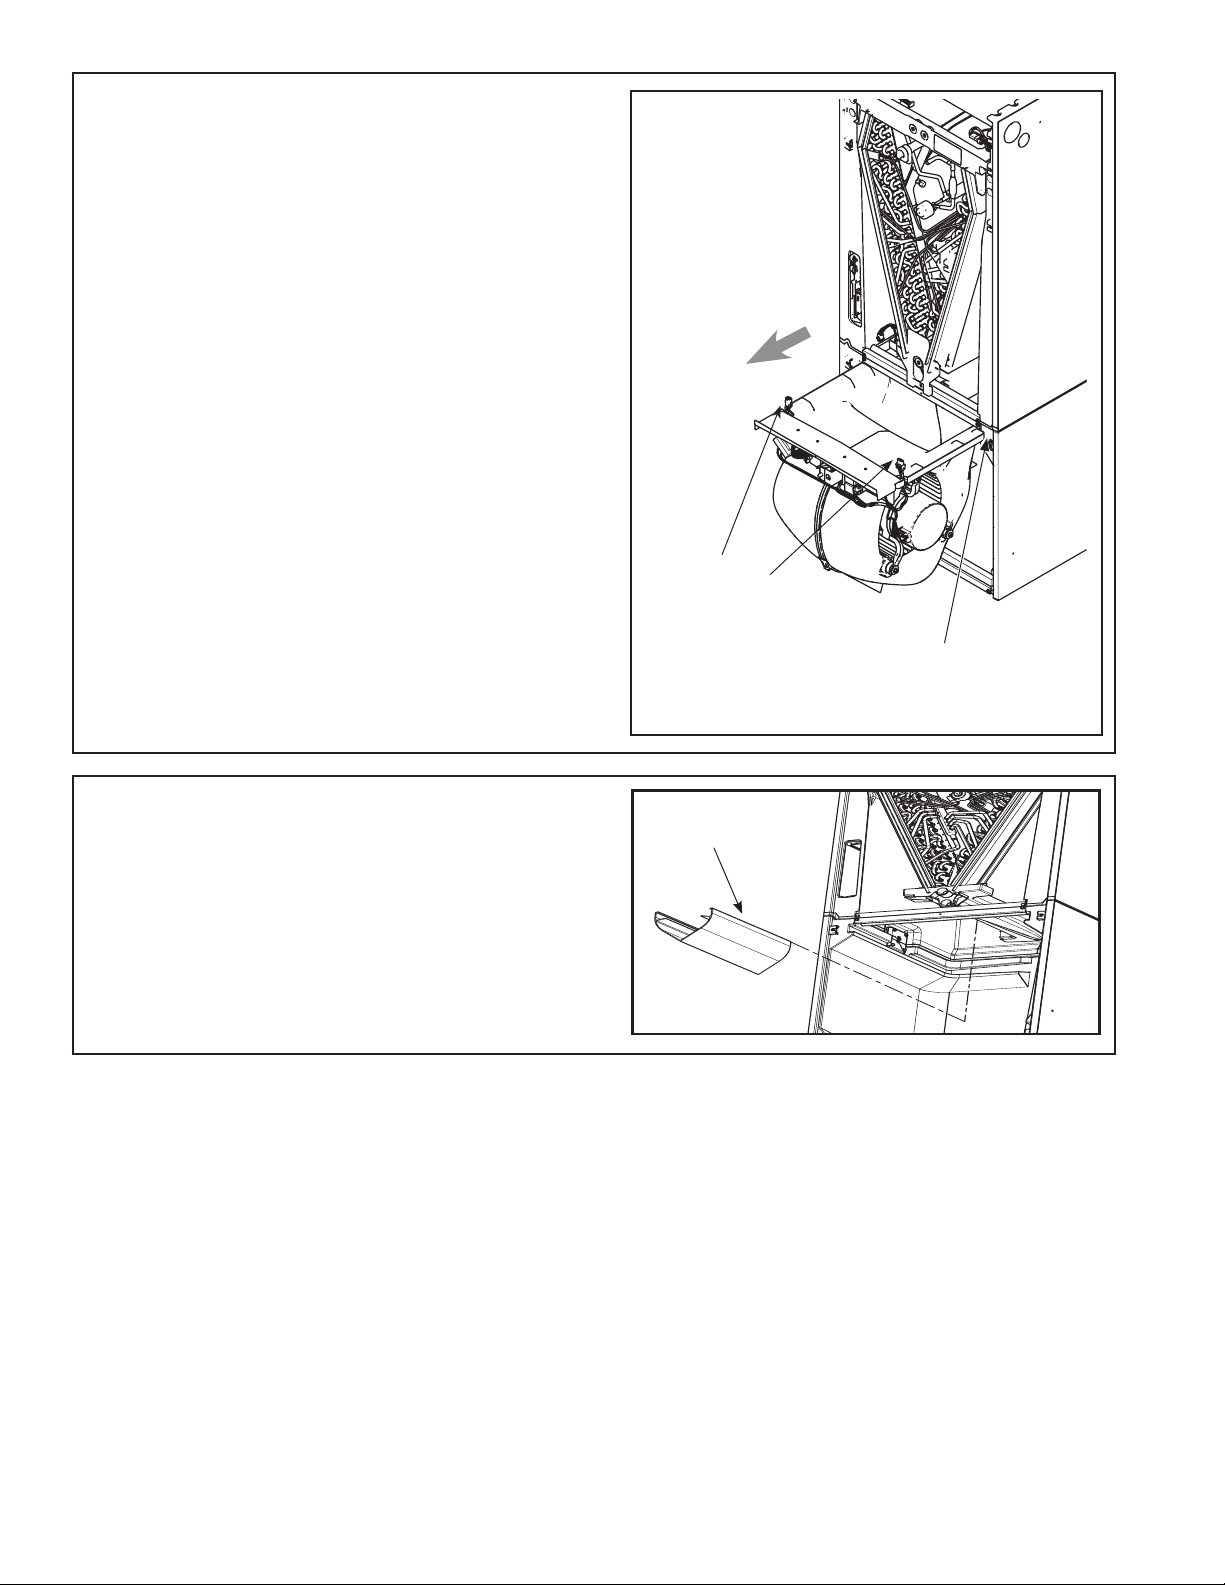
STEP 3 - Slide Blower assembly out of unit using
built-in blower support channels and set aside.
Wiring
Connections
Blower Support
Channel
STEP 4 - Remove airflow diverter from the bottom of
coil drain pan by gripping the plastic diverter, using
your thumbs to spread the top of the diverter slightly
outwards, and then pulling down and out through the
blower opening as illustrated.
Diverter
8
Page 9
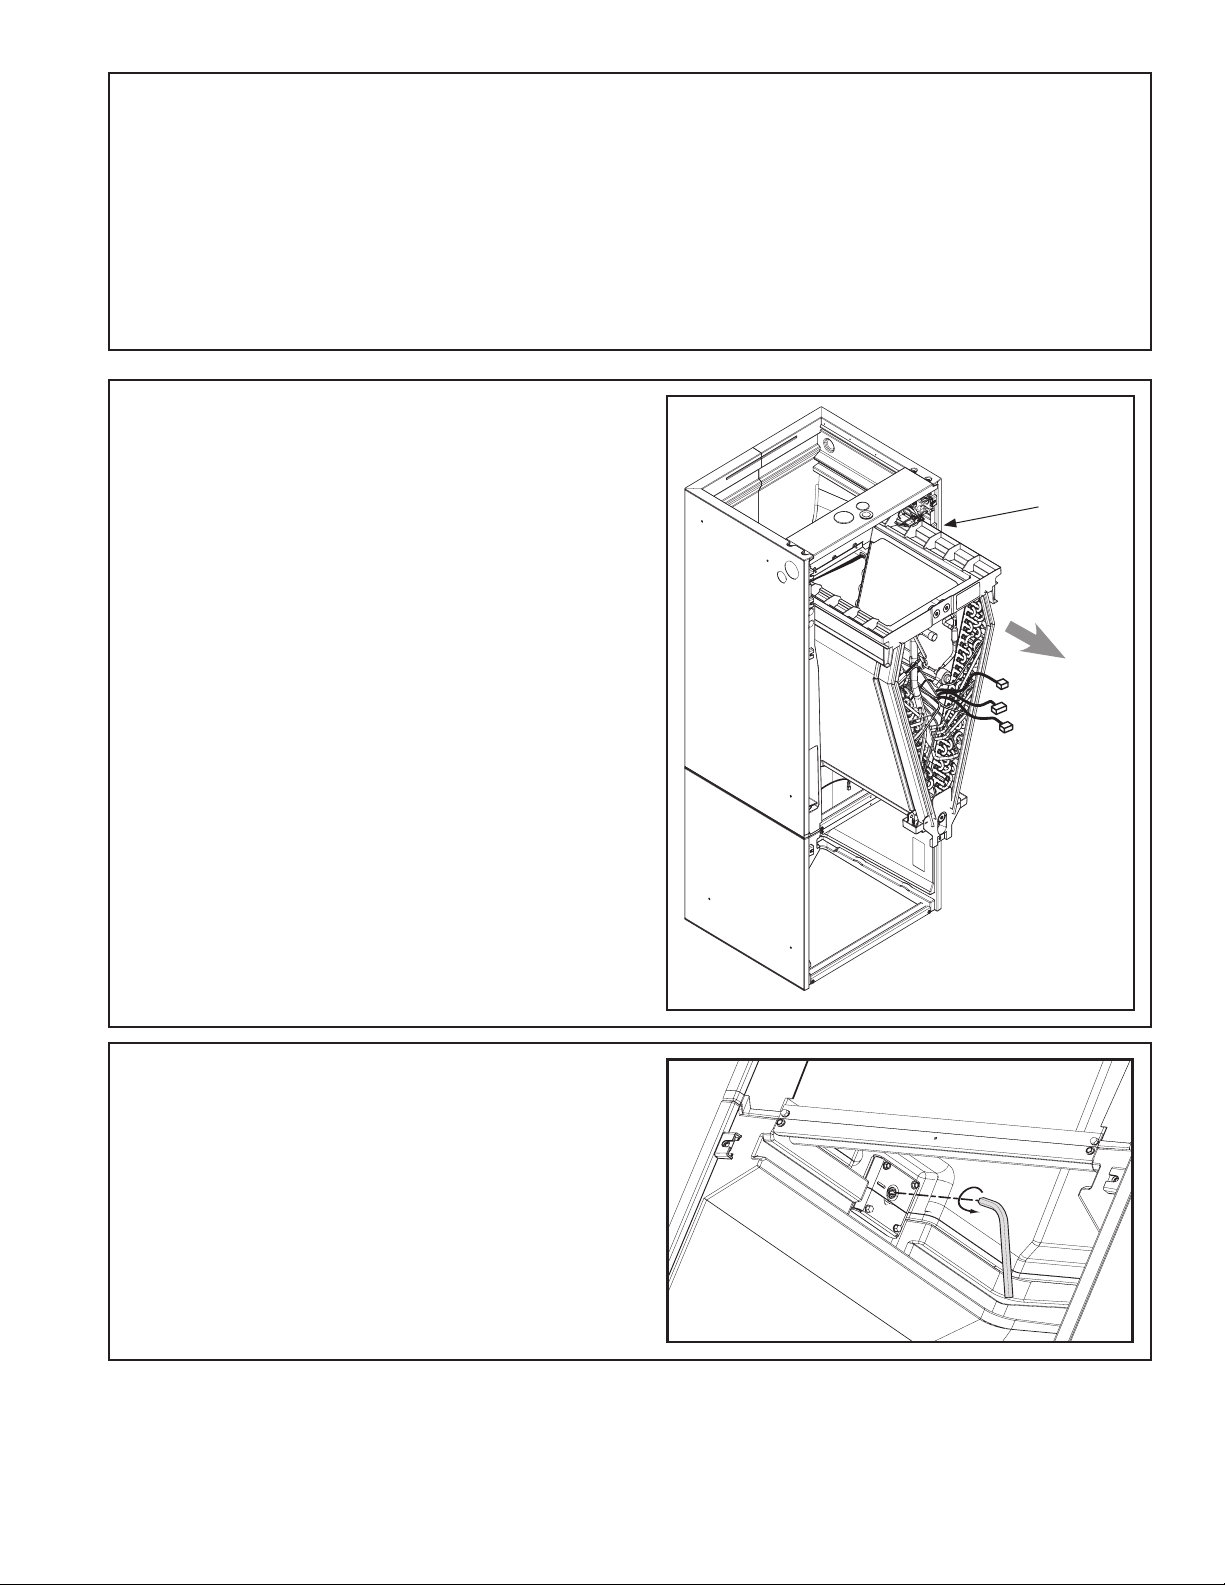
STEP 5 - Disconnect wires to the EEV motor and
sensors inside the coil assembly. Cut the wire ties
on those wire harnesses.
STEP 6 - Slide Coil assembly out of unit using builtin coil support channels and set aside.
Coil Support
Channel
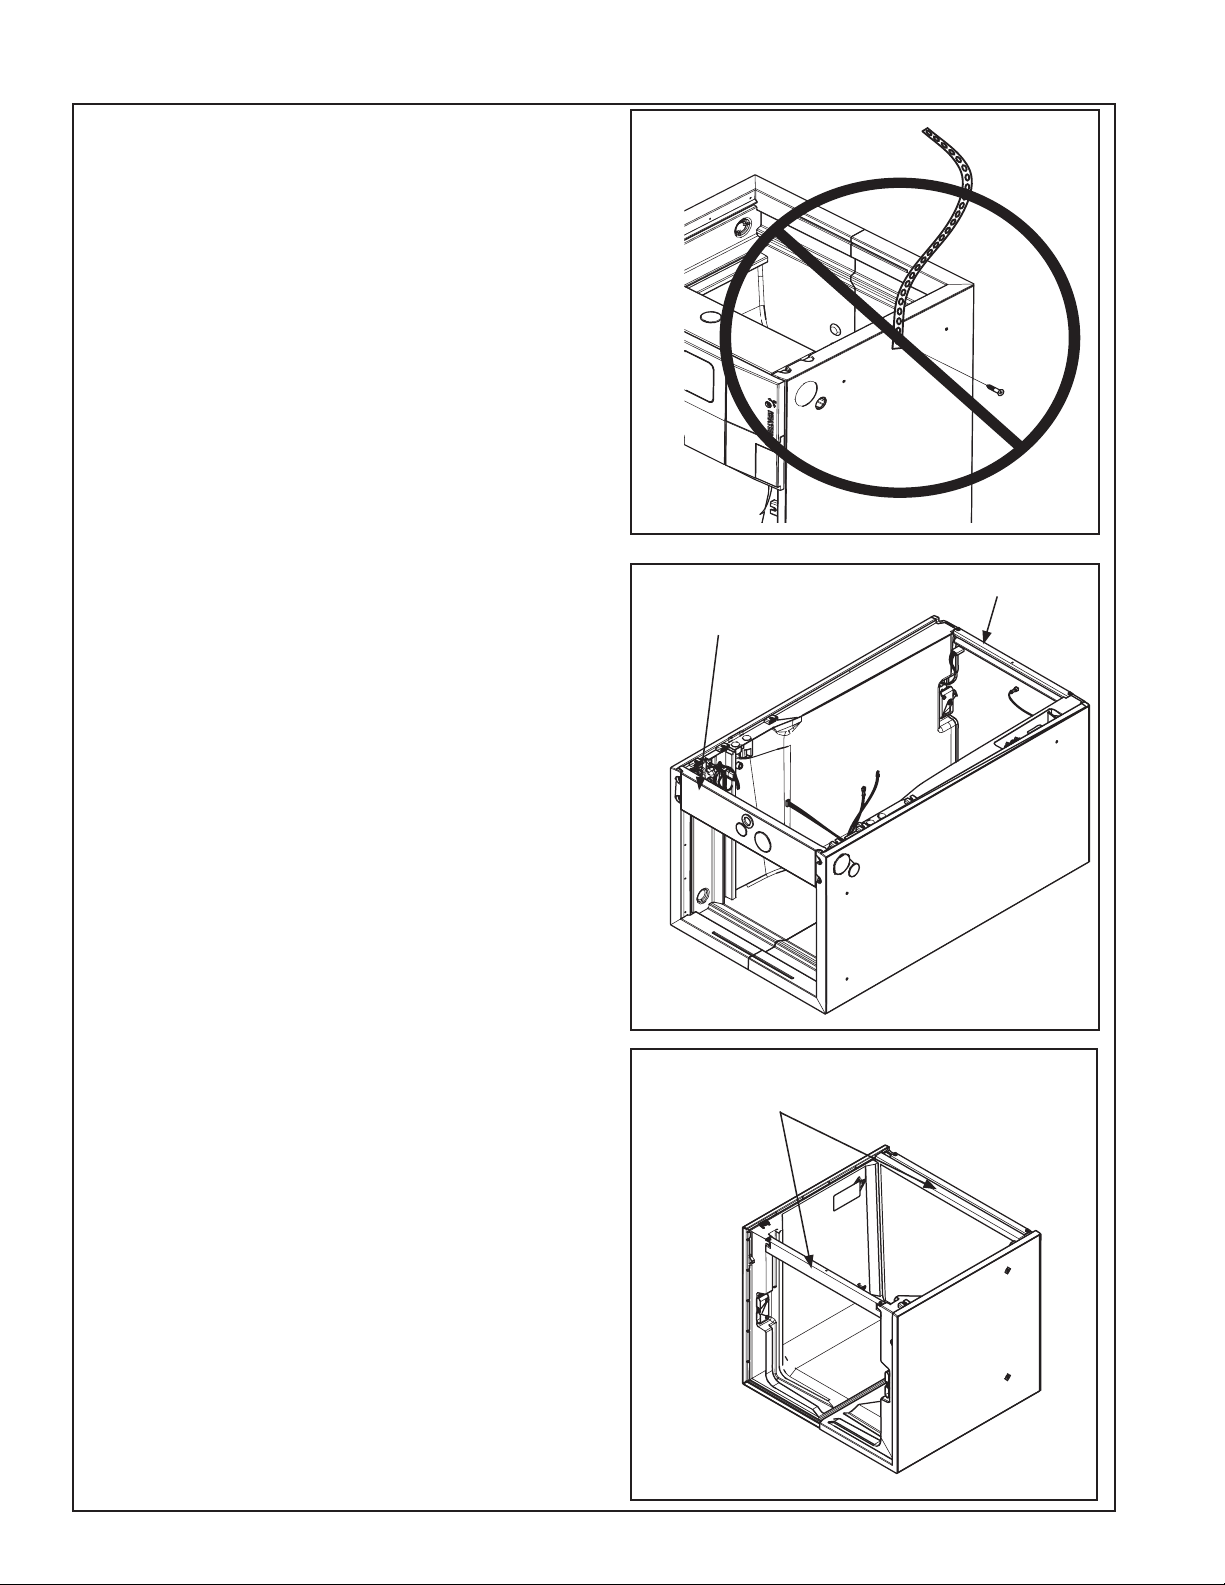
STEP 7 - Use a 5/16 Allen wrench on the locking
mechanism on each side of the bottom half of the
cabinet to loosen the locking mechanism. The locks
loosen by turning counter-clockwise approximately
3/4 of a turn.
9
Page 10
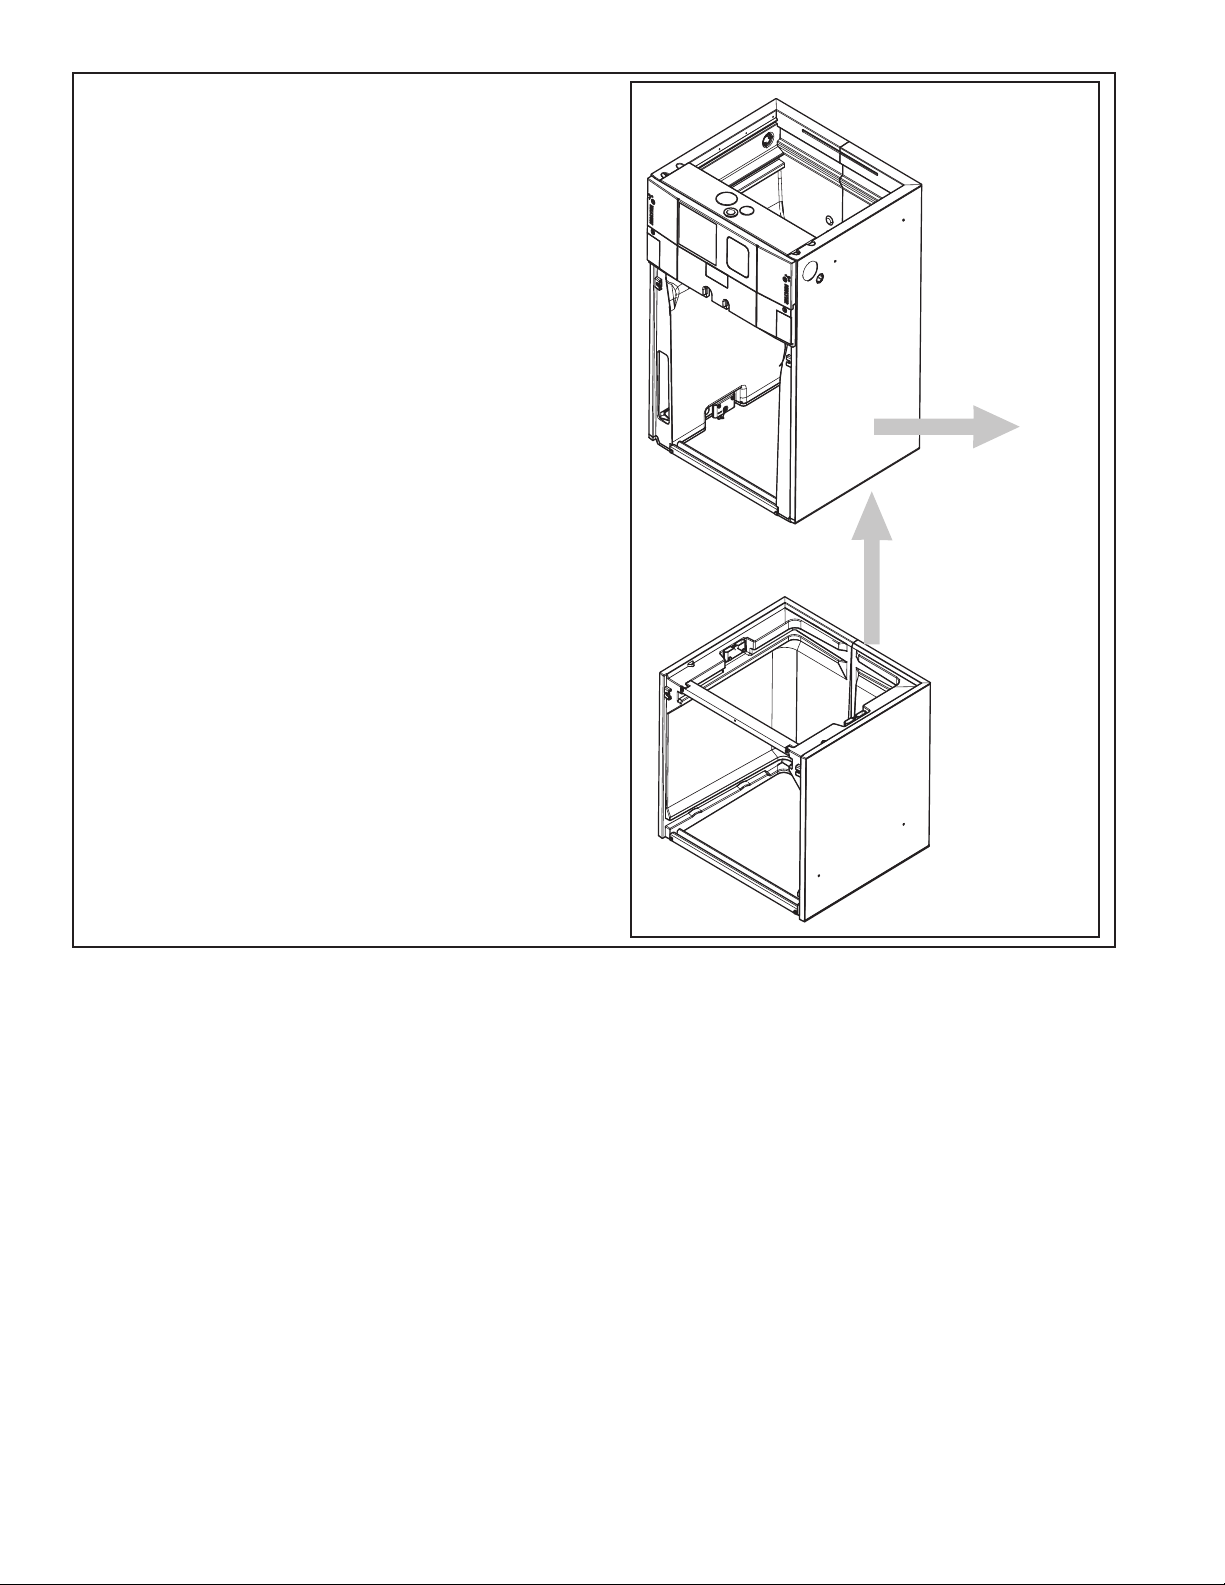
1
2
STEP 8 - Lift the Coil section up and away from the
Blower section. Set aside.
10
Page 11
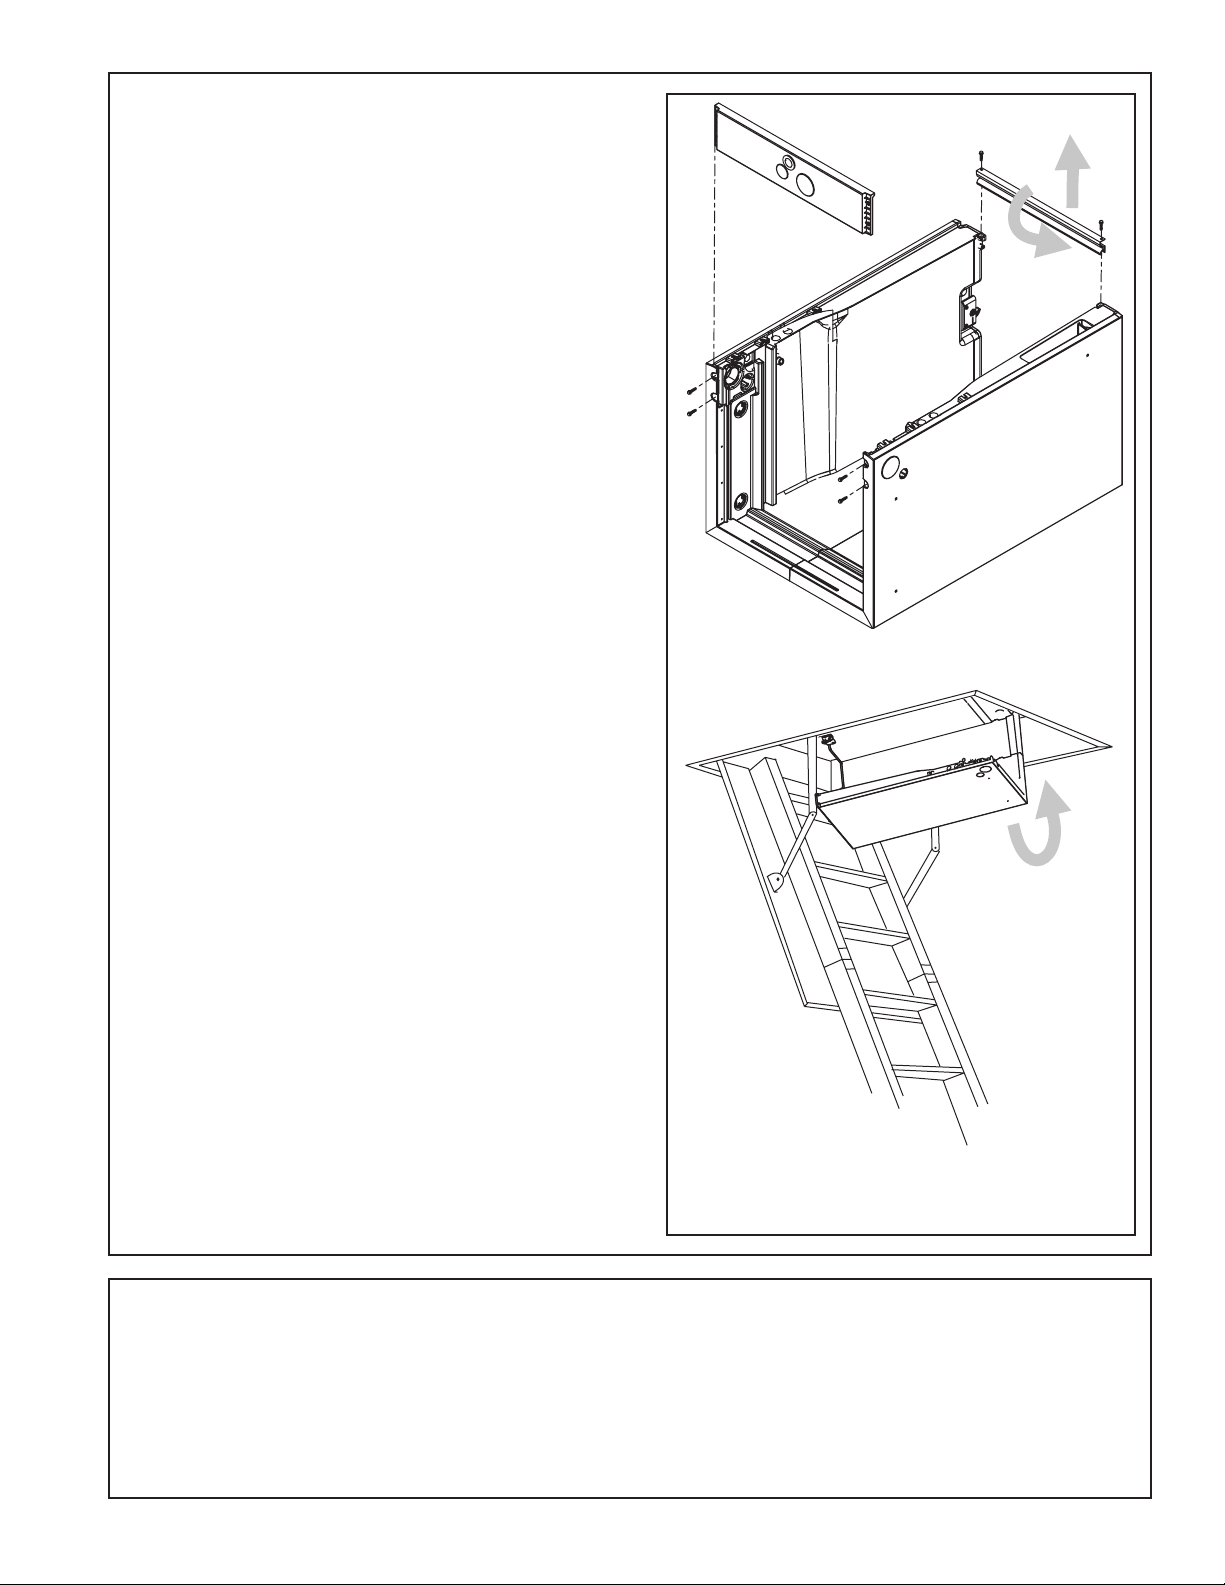
STEP 9 - For extremely tight spaces where the
cabinet needs to be rotated through a small opening,
remove the top panel and all cross members. Use a
manual driver to avoid stripping screw holes.
Note: Cross Members are removed by rotating them
toward the door opening and then lifting up and out
of the unit.
2
1
STEP 10 - Continue preparation by following the
proper carrying procedures shown in Section 5.
11
Page 12
Section 5. Place Unit at Location
5.1 Carry Unit
STEP 1 - Carry the unit to the installation location.
STEP 2 - Reassemble by reversing the steps listed in
Section 4 if disassembly was required.
Important: Under no conditions should metal strapping be attached to the unit to be used as support
mechanisms for carrying or suspension purposes.
Approved carrying:
1. Hold by the cross members within the cabinet
or unit top plate and use as handles for lifting
and carrying the coil and blower sections.
Cross Member
Unit Top Plate
12
Cross Members
Page 13

2. Slip a flexible strap through both of the side
D
H
W
electrical conduit entry points and use the flexible strap to lift and carry the coil section of the
unit.
Section 6. Unit Location Considerations
6.1 Unit Dimensions and Weight
Flexible strap
Table 7.1
Model
Number
H x D x W
in.
*Blower
Compartment
in.
Unit
Net Weight
lbs.
GAM5A0A18H21SAA 50 x 22 x 17 1/2 22 120
GAM5A0A24H21SAA 50 x 22 x 17 1/2 22 120
GAM5B0A30H31SAA 52 x 22 x 21 22 133
GAM5B0A36H31SAA 56 x 22 x 21 22 143
GAM5C0A42H41SAA 57 x 22 x 23 1/2 22 158
GAM5C0A48H41SAA 62 x 22 x 23 1/2 22 174
GAM5C0A60H51SAA 62 x 22 x 23 1/2 22 178
*Subtract from total height to get Coil and Heater compartment height.
13
Page 14

6.2 Four-Way Conversion
To place the unit in the configuration your application requires (upflow, downflow, horizontal right, or horizontal left),
simply turn the unit to that orientation.
Note: The air handlers are shipped from the factory suitable for four-way conversion. They are shipped in the downflow orientation.
Refrigerant
Connections
Airflow
Low Voltage
Connections
inside unit
Low Voltage
Connections
inside unit
Downflow Configuration
(as shipped)
Control
Pocket
Inside unit
Refrigerant
Connections
Downflow
Condensate
Drains
Control
Pocket
Inside unit
Upflow
Condensate
Drains
Airflow
Upflow Configuration
14
Page 15

Airflow
Refrigerant
Connections
Airflow
Horizontal Left
Condensate
Drains
Low Voltage
Connections
inside unit
Horizontal Left Configuration
Control
Pocket
Inside unit
Control
Pocket
Inside unit
Low Voltage
Connections
inside unit
Refrigerant
Connections
Horizontal Right Configuration
Horizontal Right
Condensate Drains
15
Page 16

6.3 Non Ducted Applications
▲
CAUTION
!
HAZARDOUS VAPORS! Do not install an air handler
with a non-ducted return in the same closet, alcove, or utility
room as a fossil fuel device. Hazardous vapors can be distributed
throughout the conditioned space and equipment damage can
result.
Non-Ducted Return Installations:
Installation in a closet, an alcove, or a utility •
room without a return duct requires the use
of a plenum accessory kit as it uses the area
space as a return air plenum. Minimum clearances to combustible materials and service
access must be observed (see outline drawing).
This area may also be used for other purpos- •
es, including an electric hot water heater, but
in no case shall a fossil fuel device be installed
and/or operated in the same closet, alcove, or
utility room.
Review local codes to determine limitations if •
the unit is installed without a return air duct.
Supply Duct
Plenum
Accessory
with safety guard
Non-Ducted
Return
6.4 Ducted Applications
Ducted Return Installations:
Installation in an attic, garage, or crawl space with •
ducted supply and return air is appropriate. Minimum
clearances to combustible materials and service access must be observed (see outline drawing).
Supply Duct
Return Duct
Ducted Return
16
Page 17

6.5 Additional Unit Preparation Considerations
For proper installation the following items must be considered prior to moving the unit to its installation site:
Pursuant to Florida Building Code 13-610.2.A.2.1, this •
unit meets the criteria for a factory sealed air handler.
If a side return is needed for your application, the side •
return MUST be prepared prior to moving the air handler to its installation location. See the Side Return Kit
# BAYSRKIT100A Installer Guide for detailed instructions.
Study the unit’s outline drawing and dimensions prior •
to selecting the installation site. Note in advance
which electrical conduit entry points and condensate
drain holes are to be used, so that proper clearance
allowances can be made for installation and future
maintenance.
Installation of the air handler must be made prior to, •
or at the same time as, the installation of the outdoor
unit in order to allow access for refrigerant lines.
Consider the overall space needed when external •
accessories are used, additional height and width
requirements may exist.
These units are not approved for outdoor installation. •
These units must be installed in the proper air flow •
direction.
Any third-party heater accessories, including •
hydronic coils and duct heaters must be downstream
of the unit.
Note: No atomizing style humidifier is allowed in the •
return plenum with the use of this unit.
Excessive bypass air may cause water blow-off, •
which will adversely affect system operation and air
cleaner performance. To verify bypass airflow, follow the Bypass Humidifier Pre-Installation Checkout
and Set-Up Procedures available through your local
distributor. Ask for publication number 18-CH37D1-*
Steam and Flow-through Fan Power Duct-mounted
Humidifiers. Follow the humidifier installation instructions. These should only be installed on the supply
air side of the system.
Note: The air handlers have been evaluated in accordance with the Code of Federal Regulations, Chapter
XX, Part 3280 or the equivalent. “SUITABLE FOR
MOBILE HOME USE.”
17
Page 18

Section 7. Setting the Unit - Vertical Installation
7.1 Considerations
Provide a minimum height of 14 inches for proper
unrestricted airflow below the unit. Allow a minimum
of 21 inches clearance in front of the air handler to
permit maintenance and removal of filter.
Position unit on suitable foundation. If a manu- •
facturer approved accessory is not used, a frame
strong enough to support the total weight of the
unit, accessories, and duct work must be provided.
Isolate unit from the foundation using a suitable •
isolating material.
Typical Closet Installation
7.2 Upflow Installation
TASB Installation
1. Assemble the TASB using the TASB’s Installer
Guide.
TASB accessories can be purchased from:
Miami Tech Inc.
3611 NW 74 Street
Miami, FL 33147
Phone: 800-339-2290
Fax: 305-693-6152
www.miamitech.com
TASB175 for use with 17.5” cabinets
TASB215 for use with 21.5” cabinets
TASB235 for use with 23.5: cabinets
Airflow
AirflowAirflow
18
Typical TASB Installation
Page 19

Plenum Installation
1. Assemble the plenum using the plenum’s
Installer Guide.
On units with sheet metal returns: Return plenum
must be flanged. Sheet metal drill point screws
must be 1/2” in length or shorter.
7.3 Downflow Installation
Downflow installation must comply with national, •
state, and local codes.
The air handlers are rated for zero clearance from •
combustible materials.
Airflow
Typical Plenum Installation
STEP 1 - Prepare the location site as appropriate for
your application and per national, state, and local code
requirements.
STEP 2 - Set the unit in position.
Representative Illustration
Typical Downflow Installation
19
Page 20

Section 8. Setting the Unit - Horizontal Installation
8.1 Secure Coil (Horizontal Applications Only)
STEP 1 - Remove Coil Panel.
STEP 2 - Remove screw from documentation packet.
STEP 3 - While the air handler is in the upflow posi-
tion, use the supplied screw to secure the coil seal
plate to cross member as shown.
Important: The Coil Seal Plate and screw secure the
coil in the center of the air handler. Failure to follow
these steps can prevent the Coil Panel from being easily replaced on the unit.
8.2 Considerations
Important: Due to the unique design of this unit,
which allows the electrical wiring to be routed within
the insulation, do not screw, cut, or otherwise puncture
the unit cabinet in any location other than the ones
illustrated in this Installer Guide or in an approved accessory’s Installer Guide.
Important: Under no conditions should metal strapping be attached to the unit to be used as support
mechanisms for carrying or suspension purposes.
STEP 1 - Support the unit from the bottom (near both
ends). The service access must remain unobstructed.
Important: The unit can only be supported from the
bottom. Do not drill or screw supports into any area
of the cabinet.
Note: Do not allow the unit to be used as strain relief.
Approved bottom support methods are rails, u- •
channels (Unistrut®), or other load bearing materials.
The unit must be isolated carefully to prevent •
sound transmission. Field supplied vibration isolators are recommended.
Field Supplied
Isolators
Auxiliary Drain
Pan
Bottom Support
Near Both Ends
STEP 2 - Install an auxiliary drain pan under the
horizontal air handler to prevent possible damage to
ceilings.
Isolate the auxiliary drain pan from the unit and •
from the structure.
Connect the auxiliary drain pan to a separate drain •
line and terminate according to local codes.
20
Page 21

Section 9. Connecting the Duct work
9.1 Duct Connection Considerations
Important: Due to the unique design of this unit,
which allows the electrical wiring to be routed within
the insulation, do not screw, cut, or otherwise puncture the unit cabinet in any location other than the
ones illustrated in this Installer Guide or in an approved accessory’s Installer Guide.
Important: Under no conditions should metal strapping be attached to the unit to be used as support
mechanisms for carrying or suspension purposes.
Important: On units with sheet metal returns: Return
air plenum must be flanged. Sheet metal drill point
screws must be 1/2” in length or shorter.
The supply and return air ducts must be connected •
to the unit with non flammable duct connectors.
See the Outline drawing for sizes of the duct con- •
nections.
After the ducts are secured, seal around the sup- •
ply and return ducts to prevent air leakage.
Insulate all duct work that will be outside of condi- •
tioned spaces.
Convertible Duct Flange Kits are available to con- •
nect the supply plenum or for mounting on the
discharge opening to provide a “flush fit” for 1-1/2”
duct board applications.
If front or rear return is required, the air handler •
must be elevated - placed on a pedestal or plenum
and duct must be connected to this pedestal or
plenum.
If side return is required, the Side Return Kit # •
BAYSRKIT100A accessory must be used. A remote filter will be required.
To ensure maximum efficiency and system perfor- •
mance, the existing supply and return duct system
static pressures must not exceed the total available
static pressure of the air handler. Reference ACCA
Manual D, Manual S and Manual RS along with
the air handler Product Data and Service Facts for
additional information.
3/4”
Screws allowed in
first 3/4” of bottom
cross member.
Note: Side return is not approved without Side
Return Kit # BAYSRKIT100. More than one Side
Return Kit may be necessary depending on the
application. Refer to the Installation Guide in
BAYSRKIT100 for approved duct connections,
sizing, number, transitions, and accessory
application.
Note: Duct work must be supported as appropriate.
See National and local codes for guidelines. Do not
depend on the unit to support duct work.
21
Page 22

Section 10. Refrigerant Line
10.1 Refrigerant Line Connection Sizes
Model
GAM5A0A18H21SAA
GAM5A0A24H21SAA
GAM5B0A30H31SAA
GAM5B0A36H31SAA
GAM5C0A42H41SAA
GAM5C0A48H41SAA
GAM5C0A60H51SAA
10.2 Refrigerant System Layout
Table 8.1
Refrigerant Line Connection Sizes
Vapor Line
Connection
3/4 3/8
3/4 3/8
3/4 3/8
7/8 3/8
7/8 3/8
7/8 3/8
7/8 3/8
Liquid Line
Connection
Vapor Line
Sensor
Saturation
Sensor
Vapor Line
Check Valve
Liquid Line
Strainer
EEV Motor
22
Page 23

Section 11. Refrigerant Line Brazing
11.1 Braze The Refrigerant Lines
STEP 1 - Remove Heater, Coil, and Line Set panels.
(See Section 2.2 Panel Removal)
Important: Do NOT unseal coil refrigerant connection stubs until ready to make connections.
STEP 2 - Remove the plastic cap and Schrader valve
core from the gas line.
STEP 3 - Wrap the vapor sensor with a wet rag.
Important: Care must be taken during solder cap
removal and brazing to avoid damage to unit components
Heater
Panel
Line Set
Panel
Coil
Panel
1
3
2
STEP 4 - Apply low heat to the solder cap to slowly
heat the solder. (Do not apply direct heat to the vapor line) Use adjustable pliers to grab the flare fitting
and remove the solder cap.
STEP 5 - Remove the sealing plug from the indoor
coil liquid connection.
STEP 6 - Connect, but do not braze, field line set to
indoor coil.
Allow a minimum of three (3) inches of refrigerant
line set before using an elbow coupling. The service
access must remain unobstructed.
3” MIN
23
Page 24

STEP 7 - Braze refrigerant line connections.
150 PSI
Note: The suction line must be insulated prior to
brazing the line set to the air handler stubs.
1. Pull back the insulation before brazing the suction line.
2. Wrap the Vapor Sensor with wet rag.
3. Braze the refrigerant line connections.
Important: Care must be taken during solder cap
removal and brazing to avoid damage to unit components.
STEP 8 - Pressurize the refrigerant lines and evaporator coil to 150 PSIG using dry nitrogen.
Wet Rag on
Vapor Sensor
STEP 9 - Check for leaks by using a soapy solution
or bubbles at each brazed location.
24
Page 25

Important: Do not open the service valves until the
1 MIN.
0350
Microns
ON
OFF
refrigerant lines and indoor coil leak check and evacuation are complete.
STEP 10 - Evacuate until the micron gauge reads no
higher than 350 microns, then close off the valve to the
vacuum pump.
STEP 11 - Observe the micron gauge. Evacuation is
complete if the micron gauge does not rise above 500
microns in one (1) minute.
Once evacuation is complete blank off the vacuum
pump and micron gauge, and close the valves on the
manifold gauge set.
Note: Charge system using Outdoor unit’s Installer
Guide or Service Facts.
STEP 12 - Replace the Line Set panel.
1. Allow time for tubing to cool.
2. Install grommets to line set piping.
3. Slide the bottom of the Line Set panel down over the
refrigerant lines and grommets. The grommets will seal
the line openings.
4. Tighten screws.
25
Page 26

PVC
CEMENT
Section 12. Condensate Drain Piping
12.1 Condensate Drain Piping Considerations
Condensate drain plumbing must comply with na- •
tional, state, and local codes.
Route condensate drain lines away from air handler •
so they do not interfere with access panels.
Slope the drain lines downward a minimum of 1/4” •
per foot, support per local codes.
Do not use reducing fittings in the condensate drain •
lines.
12.2 Connect Condensate Drain Piping
STEP 1 - Select the drain connections that are ori-
ented for your application.
STEP 2 - Prepare the condensate drain connections.
From the factory, the unit comes with plugs in both •
upflow condensate drains and an additional plug in
the documentation packet.
For upflow applications, remove upflow condensate •
plug(s) and connect condensate piping.
For all other applications, do not remove upflow •
condensate plugs. Remove the cover from the
needed condensate drain connections and connect
condensate piping.
If the secondary drain connection is not used, close •
secondary drain with plug from documentation
packet (all applications except for upflow).
Note: Upflow and horizontal orientations require the
Coil panel to be removed in order to make the drain
connections. Note: Make certain that the unit has
been installed in a level position to allow for proper
draining.
Do not connect the drain line to a closed drain •
system.
Do not use a torch or flame near the plastic drain •
pan coupling.
A P-trap is not required for proper drainage due to •
the positive pressure of the air handler; however,
it is recommended to prevent efficiency loss of
conditioned air.
Downflow
Condensate
Drains
P
S
Horizontal Left
Condensate Drains
Condensate
S P
S
P
Upflow
Drains
Condensate Drains
Horizontal Right
P
S
STEP 3 - Connect 3/4” PVC pipe to the primary drain
connection (and the secondary drain connection if
used) using threaded drain nipples.
Use Teflon tape on the air handler drain line con- •
nections. Do not use pipe joint compound or PVC/
CPVC cement on drain nipple.
Hand tighten the drain pipe. •
26
Teflon Tape
Drain Nipple
3/4” PVC pipe
PVC/CPVC Cement
Page 27

STEP 4 - Install a clean-out tee in the primary
drain line for future maintenance. It is recommended that you install a cap on the top of the
tee.
STEP 5 - Insulate the primary drain line to
prevent sweating where dew point temperatures
may be met. (Optional depending on climate
and application needs.)
Cap
Tee
Insulation
Provide a means of drainage to prevent winter
freeze-up of condensate line. (Optional depending on climate and application needs.)
STEP 6 - Support the condensate piping outside
the unit per local codes for proper drainage and
to prevent sagging.
Allow 1/4” of downward slope for each foot of
pipe.
Condensate
Piping
Supports
27
Page 28

Section 13. Electrical - Low Voltage
5”
13.1 Low Voltage Maximum Wire Length
Table 11.1 defines the maximum total length of low
voltage wiring from the outdoor unit, to the indoor
unit, and to the thermostat.
13.2 Low Voltage Hook-up Instructions
STEP 1 - Route control wiring to unit. Remove the
external sheathing of the wiring approximately 5”.
STEP 2 - Remove Coil panel by turning the quarter
turn Phillips head door fasteners, rotating the door
away from the cabinet, and removing..
Table 11.1
24 VOLTS
WIRE SIZE MAX. WIRE LENGTH
18 AWG 150 Ft.
16 AWG 225 Ft.
14 AWG 300 Ft.
28
Page 29

STEP 3 - Remove the control board from the control
1
2
pocket by sliding the control pocket mounting plate
out until the first stop is reached.
Control
Pocket
Inside
unit
Control
Board
For Horizontal Right installations Only
Remove the control board completely from the
control pocket. Rotate the control board180 degrees.
Place the control board 4-6 inches back into the control pocket. Attach wiring per appropriate hook-up
diagram or perform service.
Important: After wires have been connected or service performed, the control board MUST be rotated
back to the original orientation before inserting into
control pocket in the cabinet.
29
Page 30

STEP 4 - Make connections per hookup diagrams.
Air Handler Hook-up Diagram
Cooling
Red
Yellow
Green
White
Blue
Yellow
Green
White
Blue
B
B - Blue
Blue
W
G
Y
Y - Yellow
Yellow
R
Red
O
Orange
Comfort Control
Air Handler
Air Conditioner
Field wiring
O **
R **
B
YI
W1
YO
G
W2
W3
30
* For multiple stages of electric heat, jumper W1, W2, and W3 together if comfort control has only one stage of heat. •
** R to • O jumper must be in place as shown for cooling only, non-heat pump systems for proper operation.
YI and YO connections must be made as shown for freeze protection and internally mounted condensate overflow circuits to work properly. •
Internally mounted condensate switch is optional and must be ordered separately. •
If 3rd party condensate overflow switches are installed, they should be wired in series between YO and Y to the outdoor unit. •
Page 31

Air Handler Hook-up Diagram
Heat Pump
Comfort Control
Air Handler
Field wiring
Yellow
Blue
Black
(X2)
Red
Orange
Heat Pump
Red
Yellow
Orange
Green
White
Blue
Yellow
Green
White
Blue
B
B - Blue
W
G
Y
Y - Yellow
R
Red
O
Orange
O **
R **
B
YI
W1
YO
G
W2
W3
R - Red
O - Orange
W1 - White
SW1
410
22
1
2
3
SW1
410
22
1
2
3
SW1
410
22
** R to O jumper must be removed for heat pump system. •
* For multiple stages of electric heat, jumper W1, W2, and W3 together if comfort control has only one stage of heat •
YI and YO connections must be made as shown for freeze protection and internally mounted condensate overflow circuits •
to work properly
Internally mounted condensate switch is optional and must be ordered separately •
If a 3rd party condensate overflow switch is installed, it should be wired in series between YO and Y to the outdoor unit •
STEP 5 - Secure the sheathed wiring to the control
pocket mounting plate using the factory supplied zip
ties attached to the tabs to as shown.
STEP 6 - Refrigerant Switch
Set the system refrigerant to either R-410A or R-22
using the Refrigerant Switch located on the Expansion
Valve Control board (EVC) in the Control Pocket.
Factory default is R-410A.
Note: The power must be shut off and then reapplied in order for the EVC to recognize the
change.
Wire Ties
31
Page 32

STEP 7 - Slide control plate assembly into the control
pocket until fully seated. The control plate should be
flush with the outer edge of the unit.
STEP 8 - Replace Coil panel making sure that the
wires are located within the wire pass-through provided in the panel.
32
Pass through
notch in coil
access door
Page 33

Section 14. Electrical - High Voltage
▲
WARNING
!
14.1 High Voltage Power Supply
The high voltage power supply must match the
equipment nameplate.
Power wiring, including ground wiring, must comply
with national, state, and local codes.
Field wiring diagrams for supplementary electric
heaters are shipped with the heater.
14.2 Make Electrical Connections
LIVE ELECTRICAL COMPONENTS!
During installation, testing, servicing, and troubleshooting of this
product, it may be necessary to work with live electrical components. Failure to follow all electrical safety precautions when
exposed to live electrical components could result in death or
serious injury.
STEP 1 - Route High Voltage wiring to unit.
STEP 2 - Select a conduit entry point.
1. Select the entry point you will use to bring in your
high voltage wiring.
2. Remove plug from the entry point.
Conduit Entry Points
33
Page 34

BLACK
RED
GREEN - GROUND
GREEN
GROUND
WIRES CIRCLE
BACK AND GO
THROUGH
STRAIN RELIEF
CLAMP
STEP 3 - Route conduit (if used) to the entry point
and connect.
1. Remove the plug from the entry point.
2. Use one hand to secure the conduit nut from inside of
the heater compartment.
3. Connect a field supplied 3/4" or 1-1/2" conduit to
conduit nut.
Note: Reducing bushings may be required for your
application.
STEP 4 - Connect L1, L2, and ground wiring
to pigtail harness and single green ground in
Heater Compartment using wire nuts. The incoming ground wiring will mate up with both the
green wires shown in the illustration.
STEP 5 - If the L1, L2, and ground wires enter
the case from the left side, use a field supplied
1/2”-5/8” maximum length screw and wire tie to
hold the wires to the top center of the Heater
Compartment.
34
Page 35

Section 15. Time Delay Switch Adjustment
90
0
15.1 Remove the blower door panel.
The Blower/Filter panel is removed using 1/4 turn
thumb screws.
1. Turn thumb screws on Blower/Filter panel.
2. Pull top of panel out, away from cabinet.
3. Lift panel up out of channel.
4. Set aside.
15.2 Time Delay Relay (TDR) Switch
Set the fan off delay setting using the Fan Delay
Relay Switch (TDR) located on the blower control
mounting plate located on the front of the blower.
Factory default delay is 90 seconds.
Section 16. Filters
16.1 Filter Considerations
A filter must be installed within the system. •
A filter channel is provided in the unit, at the bot- •
tom of the Blower/Filter compartment.
For customer ease of fil ter maintenance, it is •
recommended that a properly sized remote filter
grill(s) be installed for units that are difficult to
access. Airflow should not exceed the maximum
rated velocity of the filter being used.
Choke Coil
3/4 &1 HP
motors only
Door Switch
Fan Delay
Relay Switch
Transformer
Table 16.1 Filter Sizes
Cabinet Size* A B C
Filter Size 16 x 20 20 x 20 22 x 20
* Cabinet size is indicated by the 7th digit in model number.
Filter in
air handler
cabinet
(Upflow
Application)
35
Page 36

Section 17. Unit Outline Drawing
36
Page 37

Section 18. Start Up
18.1 System Charge Adjustments
The following combinations should be charged to 8
degrees sub-cooling to maintain rated HSPF.
Indoor Unit Model No. Outdoor Unit Model No.
GAM5A0A18M11SAA 4A6B4018E1
4A6H5018E1
GAM5A0A24M21SAA 4A6B4024E1
4A6H5024E1
GAM5A0B30M21SAA 4A6B4030E1
4A6H5030E1
GAM5A0B36M31SAA 4A6B4036E1
4A6H5036E1
GAM5A0C42M31SAA
GAM5A0C48M41SAA 4A6B4048E1
4A6H5048E1
4A6B4049E1
4A6H5049E1
GAM5A0C60M51SAA 4A6B4060E1
4A6H5060E1
4A6B4061E1
4A6H5061E1
All other non-rated matches must be charged
per the nameplate charging instructions.
The following combinations should be charged to 8
degrees sub-cooling to maintain rated HSPF.
Indoor Unit Model No. Outdoor Unit Model No.
GAM5A0A18M11SAA 4TWB4018E1
4TWR5018E1
GAM5A0A24M21SAA 4TWB4024E1
4TWR5024E1
GAM5A0B30M21SAA 4TWB4030E1
4TWR5030E1
GAM5A0B36M31SAA 4TWB4036E1
4TWR5036E1
GAM5A0C42M31SAA
GAM5A0C48M41SAA 4TWB4048E1
4TWR5048E1
4TWB4049E1
4TWR5049E1
4TWX5049E1
GAM5A0C60M51SAA 4TWB4060E1
4TWR5060E1
4TWB4061E1
4TWR5061E1
4TWX5061E1
All other non-rated matches must be charged
per the nameplate charging instructions.
37
Page 38

OFF
DON
E
CANCEL
ON
OFF
ON
DON
E
CANCEL
18.2 System Start Up
STEP 1 - Make sure all panels are securely in place
and that all wiring has been properly dressed and
secured.
STEP 2 - Set the system thermostat to OFF.
STEP 3 - Turn on electrical power disconnect(s) to
apply power to the indoor and outdoor units.
STEP 4 - Set the system thermostat to ON.
38
Page 39

Section 19. Sequence of Operation
19.1 Sequence of Operation
GAM5 Sequence of Operation:
Abbreviations
• TDR = Time Delay Relay
• EVC = Expansion Valve Control
• EEV = Electronic Expansion Valve
• YI = Y signal into the EVC from the comfort control
• Yo = Y signal out of the EVC from the comfort control
• OEM = Original Equipment Manufacturer
See unit, electric heat, and field wiring diagrams for ad-
ditional information.
Continuous Fan
IMPORTANT: If the indoor air exceeds 60% relative humidity or simply feels uncomfortably humid, it
is recommended that the indoor fan only be used in
the AUTO mode.
1. R-G contacts close on comfort control sending 24VAC
to the G terminal on the fan TDR
2. Low speed contacts close in the TDR and send
24VAC on terminal labeled “LOW’.
3. Blower motor will now run on low speed. Speed is
field selectable.
Heat Pump OD (cooling)
1. R-Y contacts close on the comfort control sending
24VAC to Y terminal on TDR and the YI (Y In) terminal on the EVC.
2. R-G contacts also close on the comfort control send-
ing 24VAC to the G terminal on the TDR. (The combination of 24VAC on terminals Y and G on the TDR
will close the high speed contacts of the TDR)
3. R-O contacts on the comfort control close sending
24VAC to the O terminal on the EVC. This signals
the EVC that the unit is in cooling mode. The EVC
will control the EEV to maintain the correct superheat.
4. Normally closed contacts on the EVC will pass 24VAC
to the Yo terminal providing power to the outdoor unit
control circuit
5. The blower motor will now run on high speed. Speed
is field selectable.
Heat Pump OD (heating)
1. R-Y contacts close on the comfort control sending
24VAC to Y terminal on TDR and the YI (Y In) terminal on the EVC
2. R-G contacts also close on the comfort control
sending 24VAC to the G terminal on the TDR. (The
combination of 24VAC on terminals Y and G on the
TDR will close the high speed contacts of the TDR)
The blower motor will now run on high speed.
3. The combination of 24VAC on the Y terminal and zero
volts on the O terminal signals the EVC that the unit is in
heat-pump heating mode.
4. Normally closed contacts on the EVC will pass 24VAC
to the Yo terminal providing power to the outdoor unit
control circuit
5. The blower motor will now run on high speed
Cooling OD
1. R-Y contacts close on the comfort control sending 24VAC
to Y terminal on TDR and the YI (Y In) terminal on the
EVC
2. R-G contacts also close on the comfort control sending
24VAC to the G terminal on the TDR. (The combination
of 24VAC on terminals Y and G on the TDR will close
the high speed contacts of the TDR)
3. R-O jumper on the TDR sends 24VAC to the O terminal
on the EVC. This signals the EVC that the unit is in cooling mode. The EVC will control the EEV to maintain the
correct superheat.
4. Normally closed contacts on the EVC will pass 24VAC
to the Yo terminal providing power to the outdoor unit
control circuit
5. The blower motor will now run on high speed
Electric Heating
1. R-W contacts close on the comfort control sending 24VAC
to the W terminal on the TDR. 24VAC is also sent to
EHC to energize the heat relay.
2. R-G contacts close on the comfort control sending 24VAC
to the G terminal on the TDR. (The combination of
24VAC on terminals W and G on the TDR will close the
high speed contacts of the TDR)
3. WJ contacts on the TDR close providing an interlock
circuit to allow the electric heat relays to operate.
The comfort control must be setup to control R-G contacts
with a call for electric heat. This closes the interlock
circuit and allows the heat relay circuit to be energized.
Optional Condensate Switch
1. An optional OEM condensate switch can be installed
within the unit. This switch is only available through the
National Distribution Center or Global Parts.
2. Switch contacts are normally open and close when water
level rises. The closed switch will interrupt current flow to
the Yo terminal and de-energize the OD unit.
3. Switch is only operational during cooling mode. Condensate overflow is not operational during heating or defrost
modes.
Standard aftermarket condensate switches cannot be used
within the unit but can be installed exterior of the unit.
Switch should be wired in series with Yo wiring to the
OD unit.
39
Page 40

Freeze Protection
1. The EVC control has the ability to sense when the coil is
beginning to ice. When this event occurs, the contacts to
the Yo circuit will open and de-energize the OD unit.
2. The indoor blower motor will continue to run to aid in defrosting the coil. After the coil has sufficiently defrosted,
the Yo contacts will close and cooling operation will
begin again.
Fan Off Delay
1. The TDR has a dip switch that can enable a 90 second
fan off delay anytime a fan call is made from the comfort
control. The factory default is ON. To disable the delay,
turn power off to the unit, turn the dip switch to the off
position and turn power back on to the unit.
Section 20. Checkout Procedures
20.1 Operational And Checkout Procedures
Final phases of this installation are the unit Operational and Checkout Procedures. To obtain proper performance,
all units must be operated and charge adjustments made in accordance with procedures found in the Service
Facts of the Outdoor Unit.
CHECKOUT PROCEDURE
After installation has been completed, it is recommended that the entire system be checked against the following list:
1. Be sure unit suspension (if used) is secure and that there
are no tools or loose debris in or around or on top of the
unit. .............................................................................. [ ]
2. Properly insulate suction lines and fittings. .................. [ ]
3. Properly secure and isolate all refrigerant lines. .......... [ ]
4. Verify that all electrical connections are tight. .............. [ ]
5. Check all duct outlets; they must be open and unrestrict-
ed. ................................................................................ [ ]
6. Check drain lines and be sure all joints are tight. ........ [ ]
7. Be sure the return air filter is installed. ......................... [ ]
8. Be sure that the correct airflow setting is used.
(Indoor Blower Motor). ................................................. [ ]
9. Operate complete system in each mode to
verify proper performance. Verify operation of supplemen-
tary electric heater. ....................................................... [ ]
6200 Troup Highway
Tyler, TX 75707
www.trane.com
www.americanstandardair.com
The manufacturer has a policy of continuous product and product
data improvement and it reserves the right to change design and
specifications without notice.
© Trane U.S. Inc. 2010
 Loading...