

Toyota Avalon 2007 Owner's Manual

SECTION 1−
OPERATION OF INSTRUMENTS AND
CONTROLS
Overview of instruments and controls
Instrument panel overview 2. . . . . . . . . . . . . . . . . . . . . . . . . . . . . . . . . . . . .
Instrument cluster overview 7. . . . . . . . . . . . . . . . . . . . . . . . . . . . . . . . . . . .
Center cluster overview 8. . . . . . . . . . . . . . . . . . . . . . . . . . . . . . . . . . . . . . .
Indicator symbols on the instrument p anel 9. . . . . . . . . . . . . . . . . . . . . . .
1
1
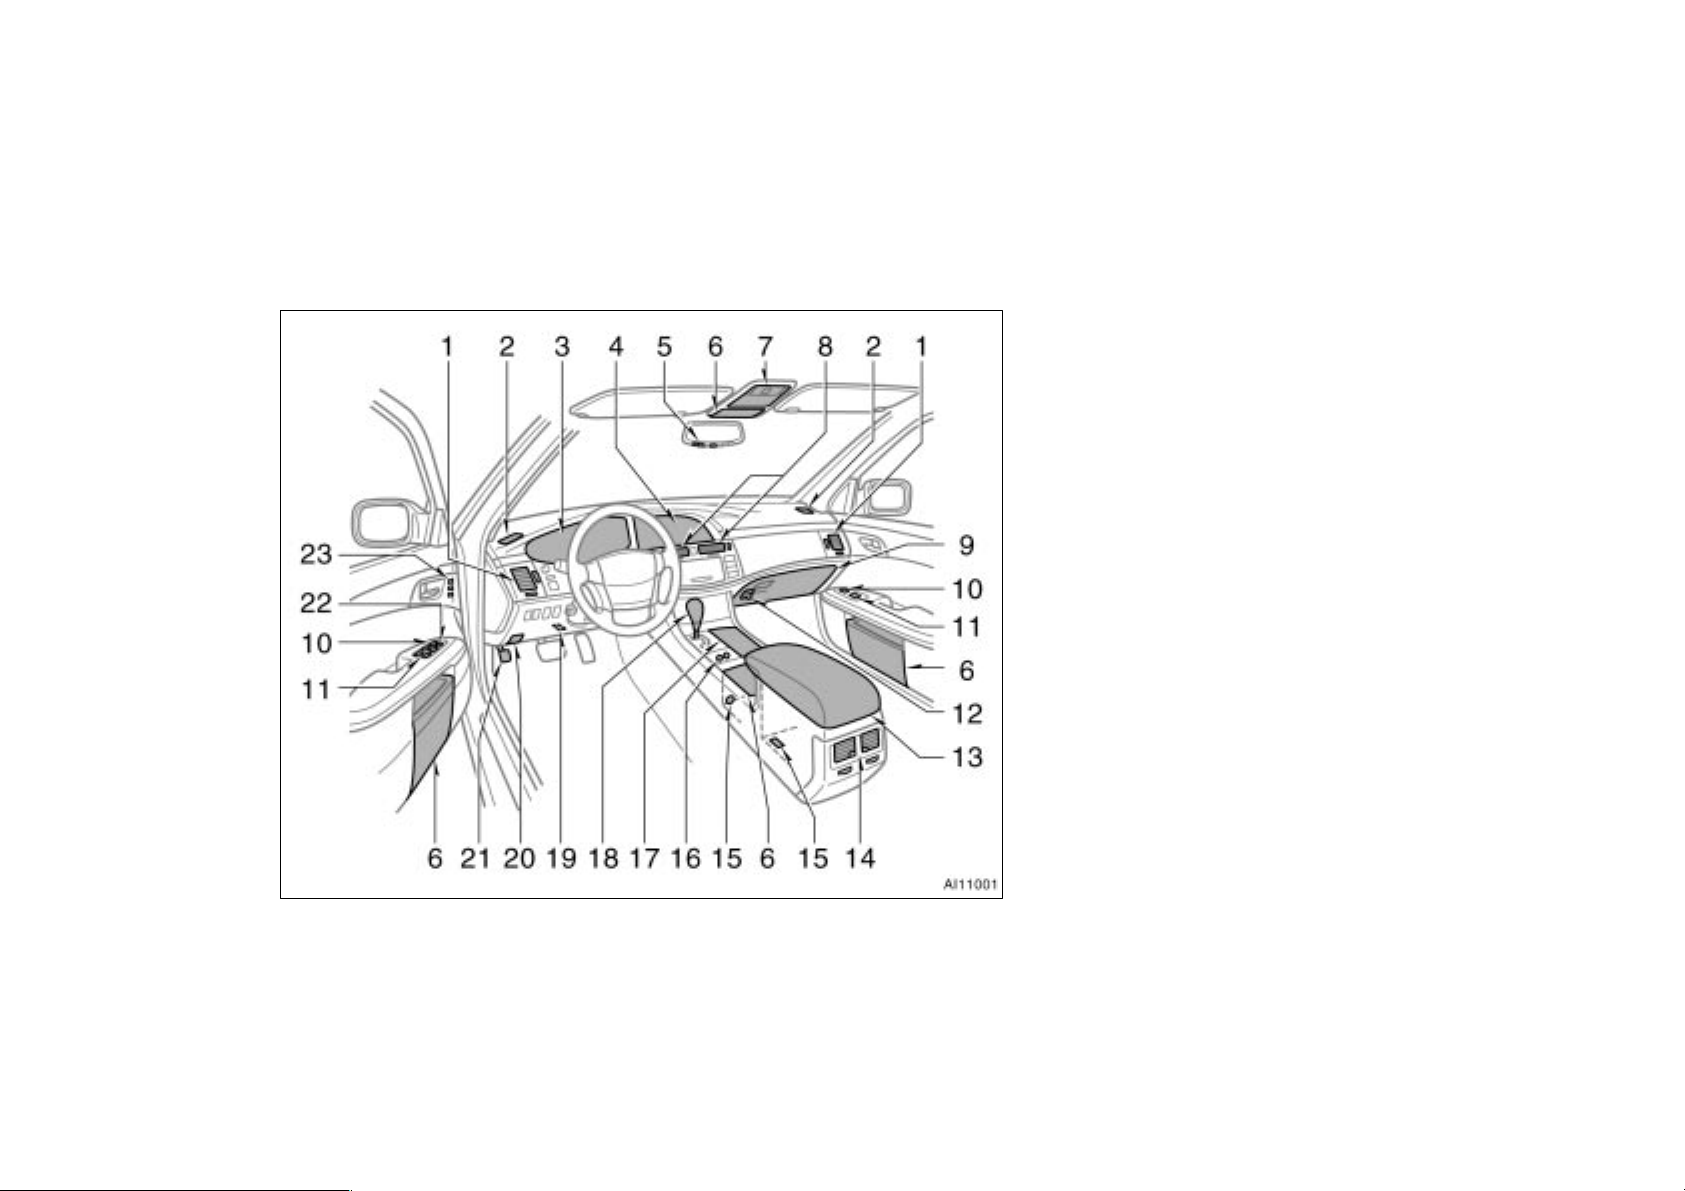
Instrument panel overview
View A
1. Side vents
2. Side defroster o utlets
3. Instrument cluster
4. Center cluster
5. Garage door opener switches
6. Auxiliary boxes
7. Front personal lights, interior light
and/or electric moon roof switches
8. Center vents
9. Glove box
10. Power door lock switches
11. Power window switches
12. Trunk opener main switch
13. Rear console box
14. Rear vents
15. Power outlets
16. Seat ventilator/heater switches
17. Cup holder
18. Automatic transmission selector lever
19. Tire pressure warning reset switch
(On bott om of the instrument panel)
20. Hood lock release lever
21. Parking b rake pedal
22. Window lock switch
23. Drivi ng position memory s witches
2

View B (with key cylinder−type ignition switch)
1. Instrument panel light control knob
2. Headlight, turn signal and front fog
light switches
3. Audio remote control switches
4. Speech command switch (See the
separate “Navigation System Owner’s
Manual.”)
5. Climate remote control switches
6. Wiper and washer switches
7. Rear window and outside rear view
mirror defogger switch
8. Emergency flasher switch
9. Audio system
10. Air conditioning controls
11. Cigarette lighter and ashtray, auxiliary
box, cassette player or navigation
system controller (For the navigation
system, see the separate “Navigation
System Owner’s M anual.”)
12. Ignition switch
13. Cruise control switch
14. Tilt steering lock release lever
15. Telescopic steering lock release lever
3

16. Glass breakage sensor
17. Trunk opener switch
18. Fuel filler door opener switch
19. Power rear view mirror control switches
4

View B (with smart key system)
1. Instrument panel light control knob
2. Headlight, turn signal and front fog
light switches
3. Audio remote control switches
4. Speech command switch (See the
separate “Navigation System Owner’s
Manual.”)
5. Climate remote control switches
6. Wiper and washer switches
7. Rear window and outside rear view
mirror defogger switch
8. Emergency flasher switch
9. Audio system
10. Air conditioning controls
11. Cigarette lighter and ashtray, auxiliary
box, cassette player or navigation
system controller (For the navigation
system, see the separate “Navigation
System Owner’s M anual.”)
12. Ignition switch (engine switch)
13. Cruise control switch
14. Distance switch
15. Tilt steering lock release lever
5

16. Telescopic steering lock release lever
17. Glass breakage sensor
18. Rear electric sunshade switch
19. Trunk opener switch
20. Fuel filler door opener switch
21. Power rear view mirror control switches
6
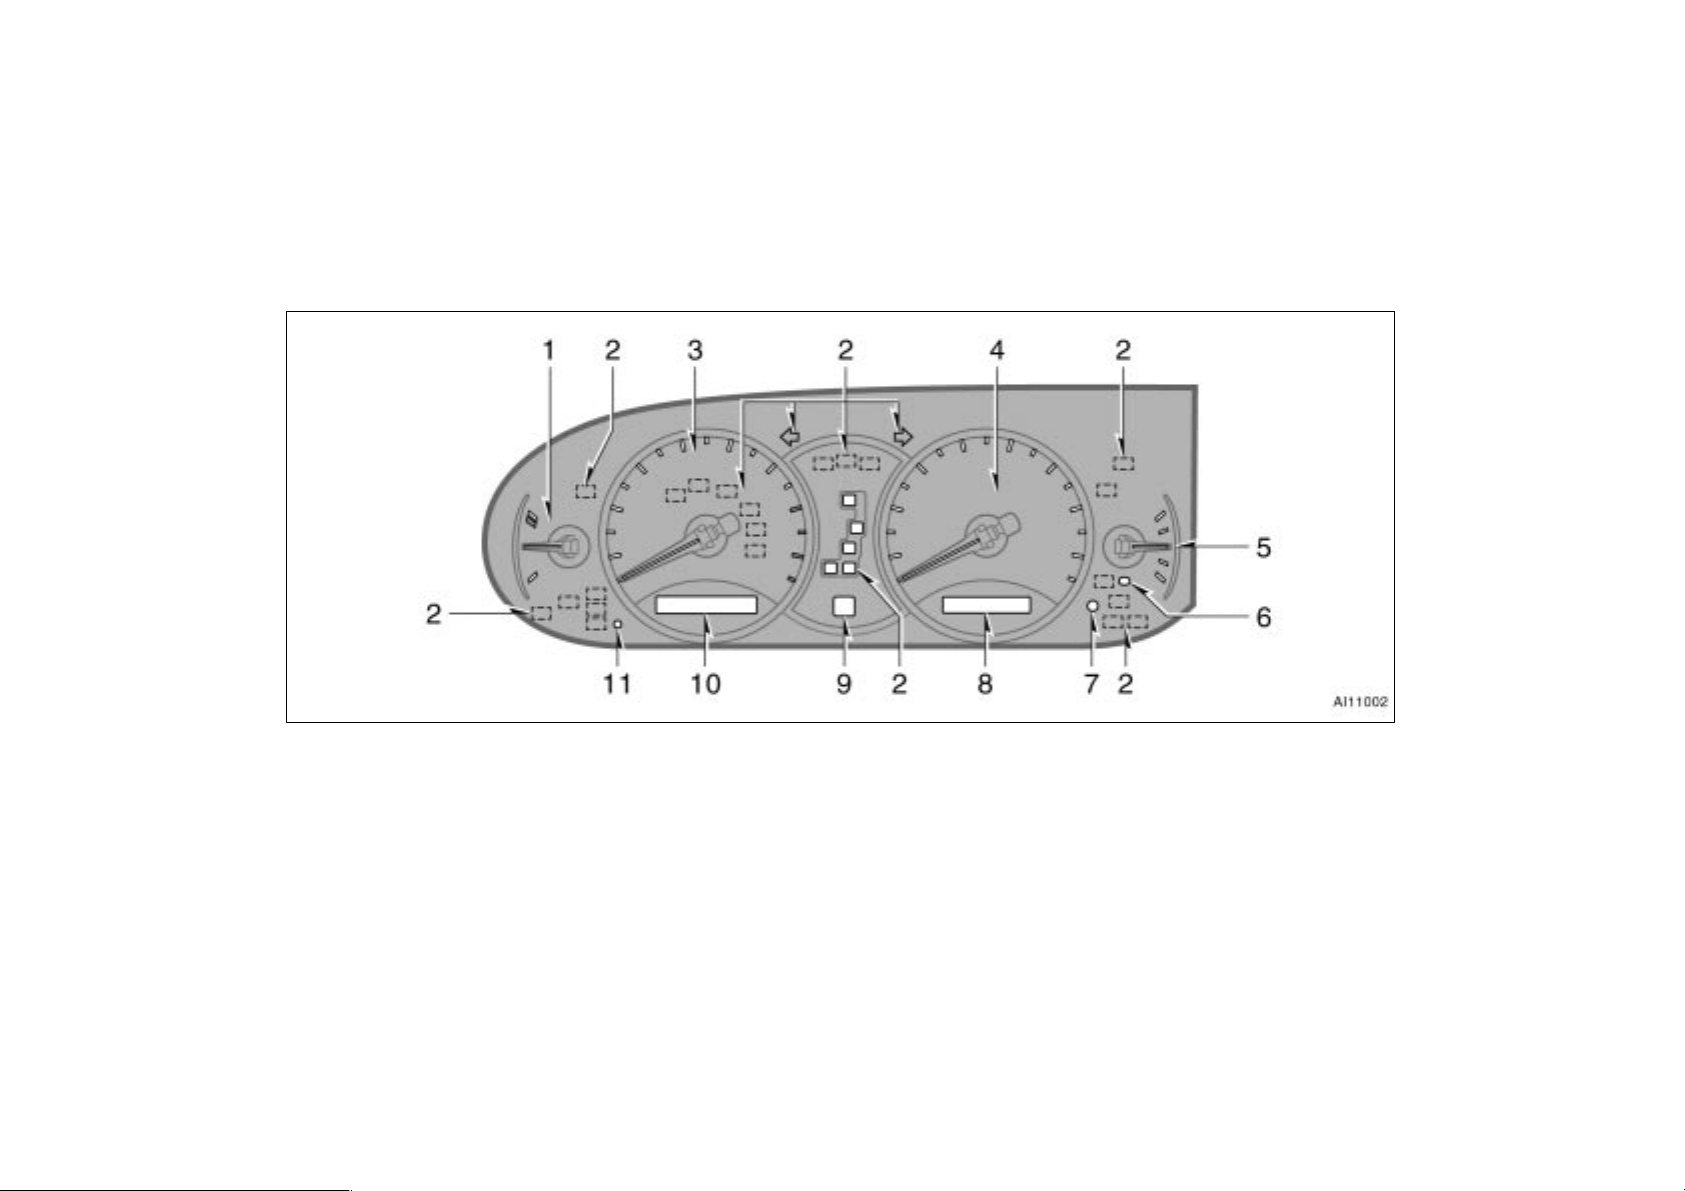
Instrument cluster overview
1. Engine coolant temperature gauge
2. Service reminder indicators and
indicator lights
3. Tachometer
4. Speedometer
5. Fuel gauge
6. Low fuel level warning light
7. Trip m eter res et knob
8. Odometer and two trip meters
9. Automatic transmission shift range
position display
10. Dynamic laser cruise control display
11. Dynamic laser cruise control master
warning light
7

Center cluster overview
1. Clock
∗
2. Center display
3. Front passenger’s seat belt reminder
∗
2
light
∗
1
: If your vehicle is equipped with navigation system, see the separate “Navigation System Owner’s Manual”.
∗
2
: For details, see “Service reminder indicators and warning buzzers” on page 145 in Section 1−6.
1
4. “AIRBAG ON” and “AIRBAG OFF”
indicator lights
5. Pattern selector knob (for center
display)
8

Indicator symbols on the instrument panel
∗
or
Brake system warning li ght
1
Open door warni ng light
∗
SRS war ning light
1
∗
1
∗
Driver’s seat belt reminder light
Charging system warning light
Low engine oil p ressure warni ng light
or
or
Malfunction indicator lamp
Anti−lock brake system warning light
1
∗
1
∗
1
∗
1
∗
1
Vehicle stability control system and traction
control system warni ng li ght
Low tire pressure warning light
Low windshield washer fluid level warning
∗
1
light
Automatic headlight leveling system warning
∗
1
light
Engine oil replacement reminder light
Smart key system warning light
∗
1
∗
1
∗
1
∗
1
Engine immobilizer/theft deterrent system
indicator light
9
Headlight indicator light
Tail light indicator light
Headlight high beam indicator light
Turn signal indicator lights
Automatic transmission indicator lights
Slip indicator/traction control system off light
∗
Cruise control indicator light
cruise control indicator light
2
or dynamic laser
∗
3
Dynamic laser cruise control ready mode
indicator light
Conventional cruise control mode indicator light
∗
1
: For details, see “Service reminder indicators and warning
buzzers” on page 145 in Section 1−6.
∗
2
: If this light flashes, see “Cruise control” on page 176 in
Section 1−7.
∗
3
: If this light flashes, see “Dynamic laser cruise control” on
page 179 in Section 1−7.
10

SECTION 1−
OPERATION OF INSTRUMENTS AND
CONTROLS
Keys and Doors
Keys 12. . . . . . . . . . . . . . . . . . . . . . . . . . . . . . . . . . . . . . . . . . . . . . . . . . . . . . .
Engine immobilizer system 16. . . . . . . . . . . . . . . . . . . . . . . . . . . . . . . . . . .
Wireless remote control 18. . . . . . . . . . . . . . . . . . . . . . . . . . . . . . . . . . . . . .
Smart key system 27. . . . . . . . . . . . . . . . . . . . . . . . . . . . . . . . . . . . . . . . . . . .
Side doors 34. . . . . . . . . . . . . . . . . . . . . . . . . . . . . . . . . . . . . . . . . . . . . . . . . .
Power windows 41. . . . . . . . . . . . . . . . . . . . . . . . . . . . . . . . . . . . . . . . . . . . . .
Trunk lid 44. . . . . . . . . . . . . . . . . . . . . . . . . . . . . . . . . . . . . . . . . . . . . . . . . . . .
Hood 48. . . . . . . . . . . . . . . . . . . . . . . . . . . . . . . . . . . . . . . . . . . . . . . . . . . . . . .
Theft deterrent system 49. . . . . . . . . . . . . . . . . . . . . . . . . . . . . . . . . . . . . . .
Fuel tank cap 51. . . . . . . . . . . . . . . . . . . . . . . . . . . . . . . . . . . . . . . . . . . . . . .
Electric moon roof 52. . . . . . . . . . . . . . . . . . . . . . . . . . . . . . . . . . . . . . . . . . .
2
11

Keys (with key cylinder−type
ignition switch)
A transponder chip for engine immobilizer
system has been placed in the head of
the master and sub keys. These chips are
needed to enable the system to function
correctly, so be careful not to lose these
keys. If you make your own duplicate key,
you will not be able to cancel the system
or start the engine.
To protect items locked in the trunk or
glove box when using valet parking, leave
the sub key with the attendant.
Your vehicle is supplied with two kinds
of keys.
1. Master keys (black)—These keys work
in every lock. Your Toyota dealer will
need one of them to make a new key
with a built−in transponder chip.
2. Sub key (gray)—This key will not work
in the locks of the glove box and the
door located behind the rear seat armrest.
12
NOTICE
When using a key containing a transponder chip, observe the following
precautions:
When starting the engine, do not
use the key with a key ring resting
on the key grip and do not press
the key ring against the key grip.
Otherwise the engine may not start,
or may stop soon after it starts.
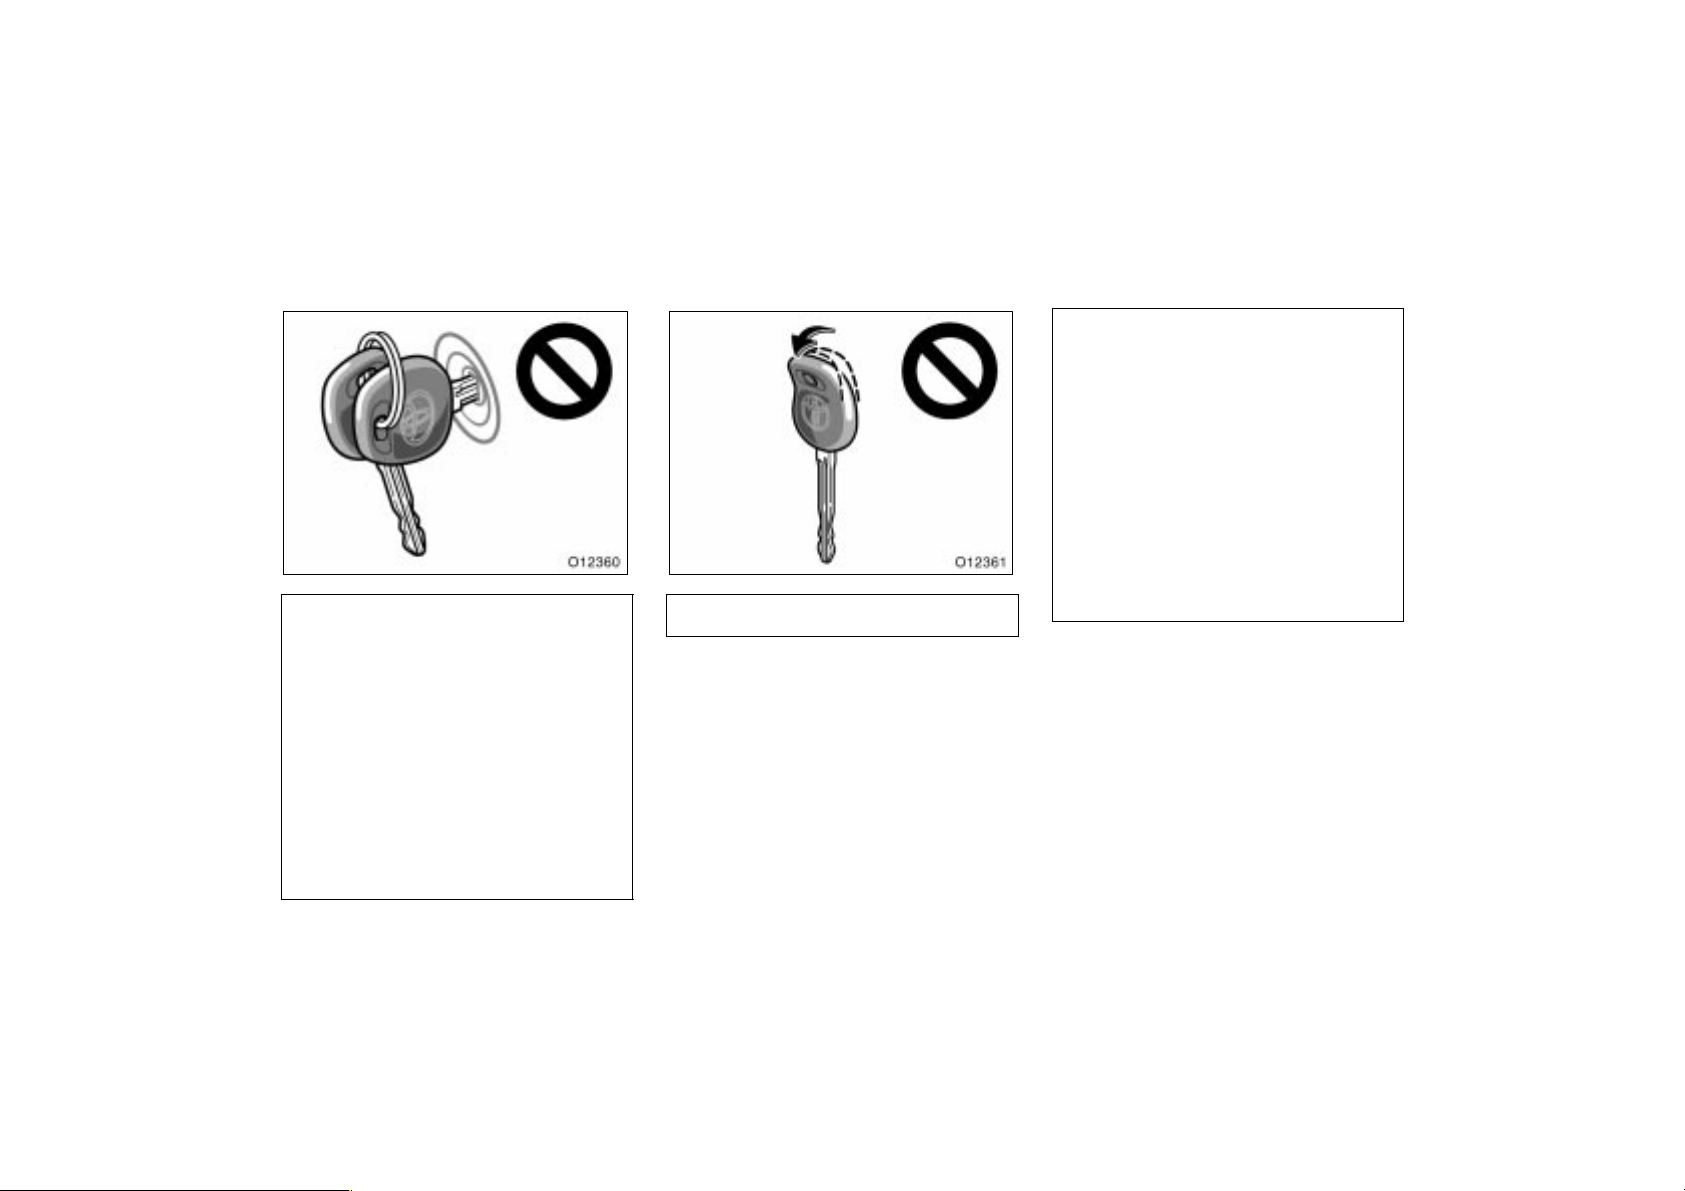
When starting the engine, do not
use the key with other transponder
keys around (including keys of other vehicles) and do not press other
key plates against the key grip.
Otherwise the engine may not start,
or may stop soon after it starts. If
this happens, remove the key once
and then insert it again after removing other transponder keys (including keys of other vehicles) from the
ring or while gripping or covering
them with your hand to start the
engine.
Do not bend the key grip.
Do not cover the key grip with any
material that cuts off electromagnetic waves.
Do not knock the key hard against
other objects.
Do not leave the key exposed to
high temperatures for a long period,
such as on the dashboard and hood
under direct sunlight.
Do not put the key in water or
wash it in an ultrasonic washer.
Do not use the key with electromagnetic materials.
13

KEY NUMBER PLATE
Your key number is shown on the plate.
Keep the plate in a safe place such as
your wallet, not in the vehicle.
If you should lose your keys or if you
need additional keys, duplicates can be
made by a Toyota dealer using the key
number.
We recommend writing down the key number and storing it in a safe place.
Keys (with smart key system)
The key consists of an electronic key
and a mechanical key. The mechanical
key is for emergency use. If the electronic key does not operate, you can
open the driver’s door using the mechanical key.
1. Electronic keys—These keys can lock
or unlock all the doors and can open
the trunk by using the wireless remote
control function or entry function of the
smart key system.
2. Mechanical keys—These keys can lock
or unlock the driver’s door, the glove
box and the door located behind the
rear seat armrest.
Spare keys should not be left in the
cabin. In the event that a spare key is
left in the cabin, the smart key system
will remain actuated even after the
doors have been locked. Under these
circumstances, the trunk can be opened
even after the driver has exited and
locked the vehicle, increasing the danger of theft. (Refer to “OPENING
TRUNK WITH SMART KEY SYSTEM” on
page 45 in this Section.)
To protect items locked in the trunk or the
glove box when using valet parking, lock
the trunk opener switch and leave the
electronic key with the attendant. Keep the
mechanical key with you. For details about
locking the trunk opener switch, see
“—Luggage security system” on page 46
in this Section.
A transponder chip for engine immobilizer
system has been placed in the electronic
keys. These chips are needed to enable
the system to function correctly, so be
careful not to lose these keys.
14

CAUTION
People with implanted pacemakers
or cardiac defibrillators should keep
away from the smart key system
antennas, because the radio waves
may affect the operation of such
devices. For the antenna locations
see “ANTENNA LOCATION” on page
29 in this Section.
Users of any electrical medical de-
vice other than implanted pacemakers and implanted cardiac defibrillators should consult the manufacturer of the device for information
about its operation under the influence of radio waves. Radio waves
could have unexpected effects on
the operation of such medical devices.
If necessary, the entry function can
be disabled. See “DISABLING THE
SMART KEY SYSTEM” on page 33
in this Section.
NOTICE
When using a electronic key containing a transponder chip, observe the
following precautions:
Do not affix any material that cuts
off electromagnetic waves (such as
a metal seal) on the electronic key.
Do not knock the electronic key
hard against other objects.
Do not leave the electronic key exposed to high temperatures for a
long period, such as on the dashboard or hood under direct sunlight.
Do not put the electronic key in
water or wash it in an ultrasonic
washer.
Do not keep the electronic key together with the products emitting
electromagnetic waves such as a
cellular phone.
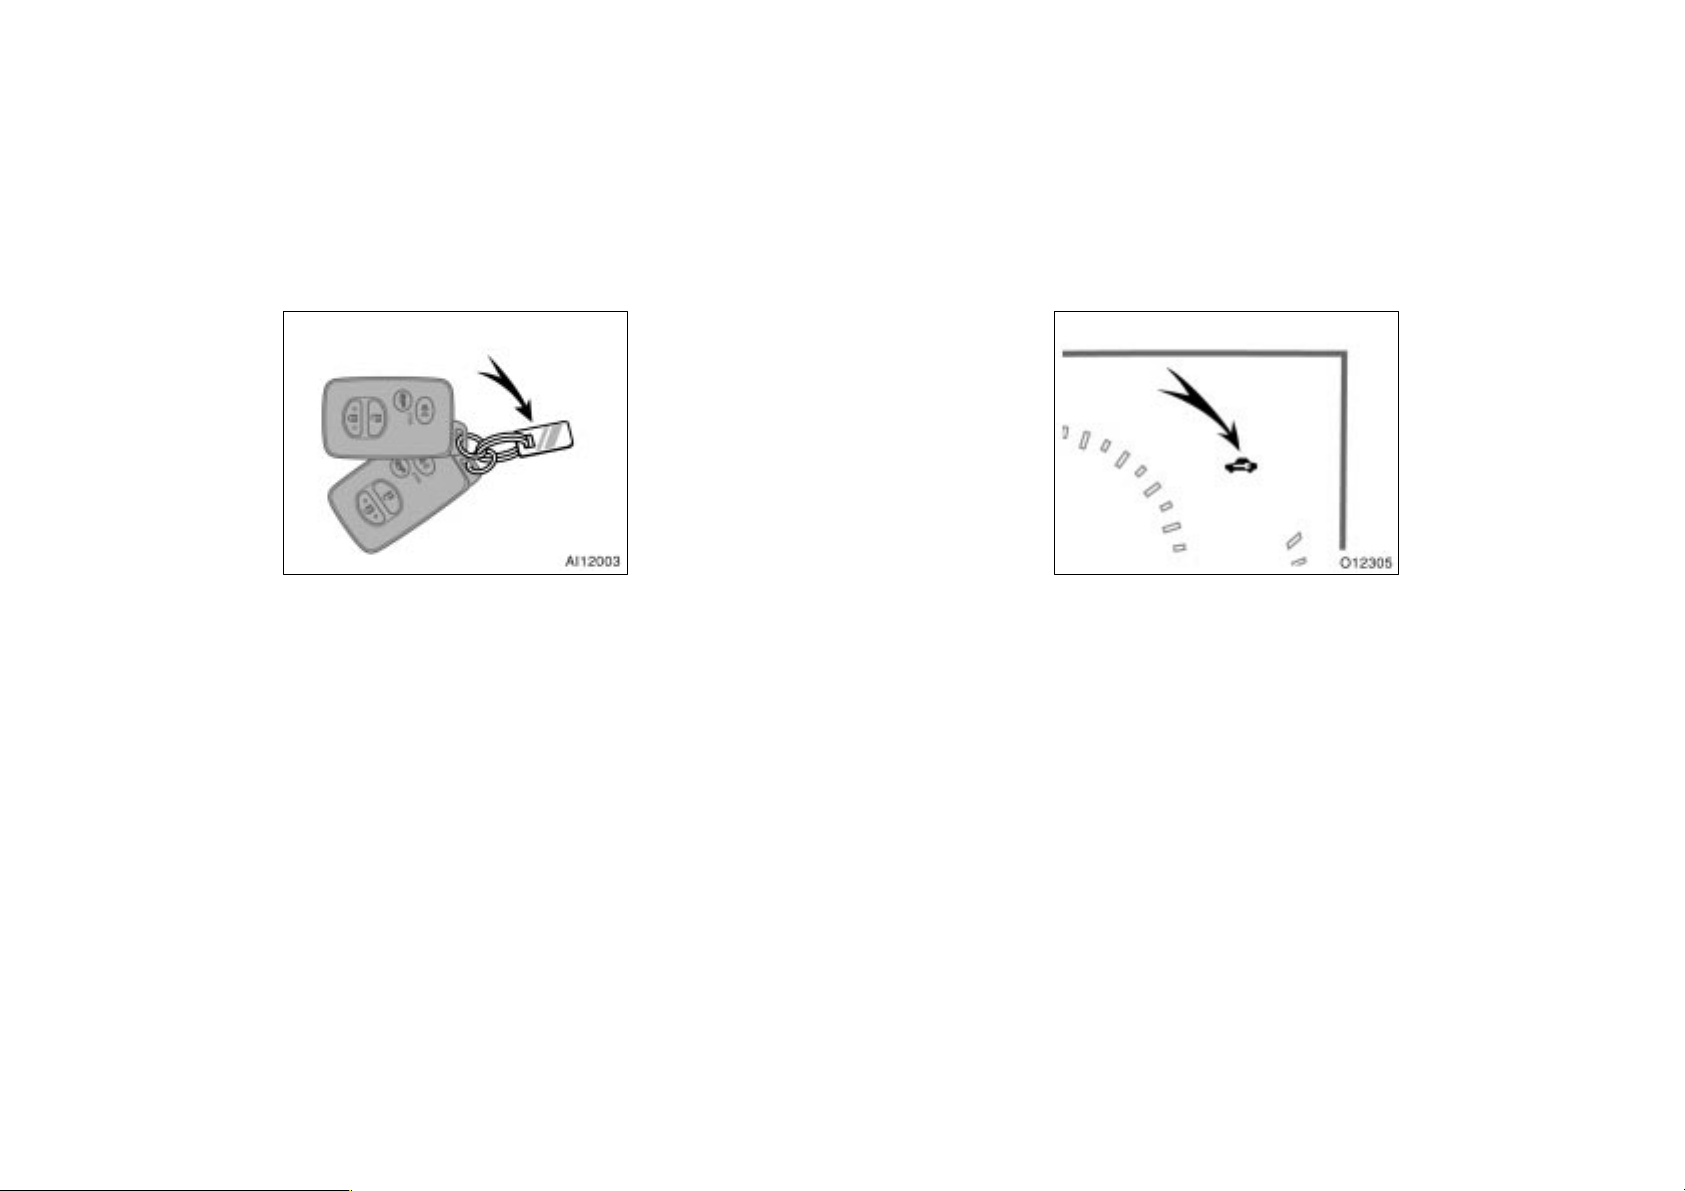
USING A MECHANICAL KEY
When you use the mechanical key push
the release button and take out the mechanical key as shown. Be sure to put the
mechanical key back when not it use.
15
Engine immobilizer system
The engine immobilizer system is a
theft prevention system using an electronic code. The transponder chip in
the key has an electronic code and
transmits the code to the vehicle. Only
when the electronic code in the chip
corresponds to the register ID code for
the vehicle, the engine immobilizer system will be canceled and the engine
will start.
KEY NUMBER PLATE
Your key number is shown on the plate.
Keep the plate in a safe place such as
your wallet, not in the vehicle.
If you should lose your keys or if you
need additional keys, duplicates can be
made by Toyota dealer using the key
number.
We recommend writing down the key number and storing it in a safe place.
16
The engine immobilizer system is automatically set when:
Vehicles with key cylinder−type ignition
switch—The key is removed from the ignition switch.
Vehicles with smart key system—The ignition switch is turned off.
The indicator light will start flashing to
show that the system is set.

If any of the following indicator conditions
occur, contact your Toyota dealer.
The indicator light remains on.
The indicator light does not start flash-
ing under the following situations.
Vehicles with key cylinder−type ignition
switch—When the key is removed from
the ignition switch.
Vehicles with smart key system—When
the ignition switch is turned off.
The indicator light flashes inconsistent-
ly.
The engine immobilizer system is automatically canceled when:
Vehicles with key cylinder−type ignition
switch—
You insert the key to the ignition switch.
Vehicles with smart key system—
You enter the vehicle carrying a key with
smart key system and press the “ENGINE
START STOP” switch (engine switch).
Even if the key battery is discharged, the
engine can be started. See “Smart key
system” on page 27 in this Section.
When the system is canceled, the indicator light will go off.
For your Toyota dealer to make you a
new key with built−in transponder chip,
your dealer will need your key number
and master key (vehicles with key cylinder−type ignition switch) or electronic key
(vehicles with smart key system). However, there is a limit to the number of additional keys your Toyota dealer can make
for you.
NOTICE
Do not modify, remove or disassemble the engine immobilizer system. If any unauthorized changes or
modifications are made, proper operation of the system cannot be guaranteed.
For vehicles sold in U.S.A.
FCC ID: MOZRI−21BTY
FCC ID: NI4TMIMB−1
This device complies with Part 15 of the
FCC Rules. Operation is subject to the
following two conditions:
(1) This device may not cause harmful
interference, and (2) this device must
accept any interference received, including interference that may cause undesired operation.
CAUTION
Changes or modifications not expressly approved by the party responsible for compliance could void the
user’s authority to operate the equipment.
17

For vehicles sold in Canada
This device complies with RSS−210 of
Industry Canada. Operation is subject to
the following two conditions:
(1) This device may not cause interference, and (2) this device must accept
any interference, including interference
that may cause undesired operation of
the device.
Wireless remote control—
1. Lock switch
2. Unlock switch
3. Alarm switch
4. Trunk opener switch
5. Indicator light (vehicles with smart key
system only)
Vehicles with key cylinder−type ignition
switch
18
Vehicles with smart key system

The wireless remote control function is
designed to lock or unlock all the
doors, open the trunk lid, or activate
the alarm from a distance within
approximately 1 m (3 ft.) of the vehicle.
When you operate any switch, push it
slowly and securely.
Vehicles with smart key system only—
When the switch is operated, the indicator
light flashes once. If not, the battery may
be discharged. Replace the battery at the
earliest opportunity.
The wireless remote control transmitter is
an electronic component. Observe the following instructions in order not to cause
damage the key.
Do not leave the transmitter in places
where the temperature becomes high
such as on the dashboard.
Do not disassemble it.
Avoid knocking it hard against other
objects or dropping it.
Avoid putting it in water.
You can use up to 4 wireless remote control transmitters (for vehicles with key cylinder−type ignition switch) or 7 wireless
remote control transmitters (for vehicles
with smart key system) for the same vehicle. Contact your Toyota dealer for detailed information.
If the wireless remote control transmitter
does not actuate the doors, or does not
operate from a normal distance, or if the
indicator on the transmitter is dimmed or
does not come on:
Check for closeness to a radio trans-
mitter such as a radio station or an
airport which can interfere with normal
operation of the transmitter.
The battery may have been consumed.
Check the battery in the transmitter. To
replace the battery, see “—Replacing
battery” on pages 24 or 25 in this Section.
If you lose your transmitter, contact your
Toyota dealer as soon as possible to
avoid the possibility of theft, or an accident. (See “If you lose your wireless remote control transmitter” on page 332 in
Section 4.)
For vehicles sold in U.S.A.
This device complies with Part 15 of the
FCC Rules. Operation is subject to the
following two conditions:
(1) This device may not cause harmful
interference, and (2) this device must
accept any interference received, including interference that may cause undesired operation.
19
—Locking and unlocking
doors
NOTICE:
This equipment has been tested and
found to comply with the limits for a
Class B digital device, pursuant to Part
15 of the FCC Rules. These limits are
designed to provide reasonable protection against harmful interference in a
residential installation. This equipment
generates, uses and can radiate radio
frequency energy and, if not installed
and used in accordance with the instructions, may cause harmful interference to
radio communications. However, there is
no guarantee that interference will not
occur in a particular installation. If this
equipment does cause harmful interference to radio or television reception,
which can be determined by turning the
equipment off and on, the user is encouraged to try to correct the interference by one or more of the following
measures:
Reorient or relocate the receiving an-
tenna.
Increase the separation between the
equipment and receiver.
Connect the equipment into an outlet
on a circuit different from that to
which the receiver is connected.
Consult the dealer or an experienced
radio/TV technician for help.
FCC WARNING:
Changes or modifications not expressly approved by the party responsible for compliance could void the
user’s authority to operate the equipment.
For vehicles sold in Canada
Operation is subject to the following two
conditions:
(1) this device may not cause interference, and (2) this device must accept
any interference, including interference
that may cause undesired operation of
the device.
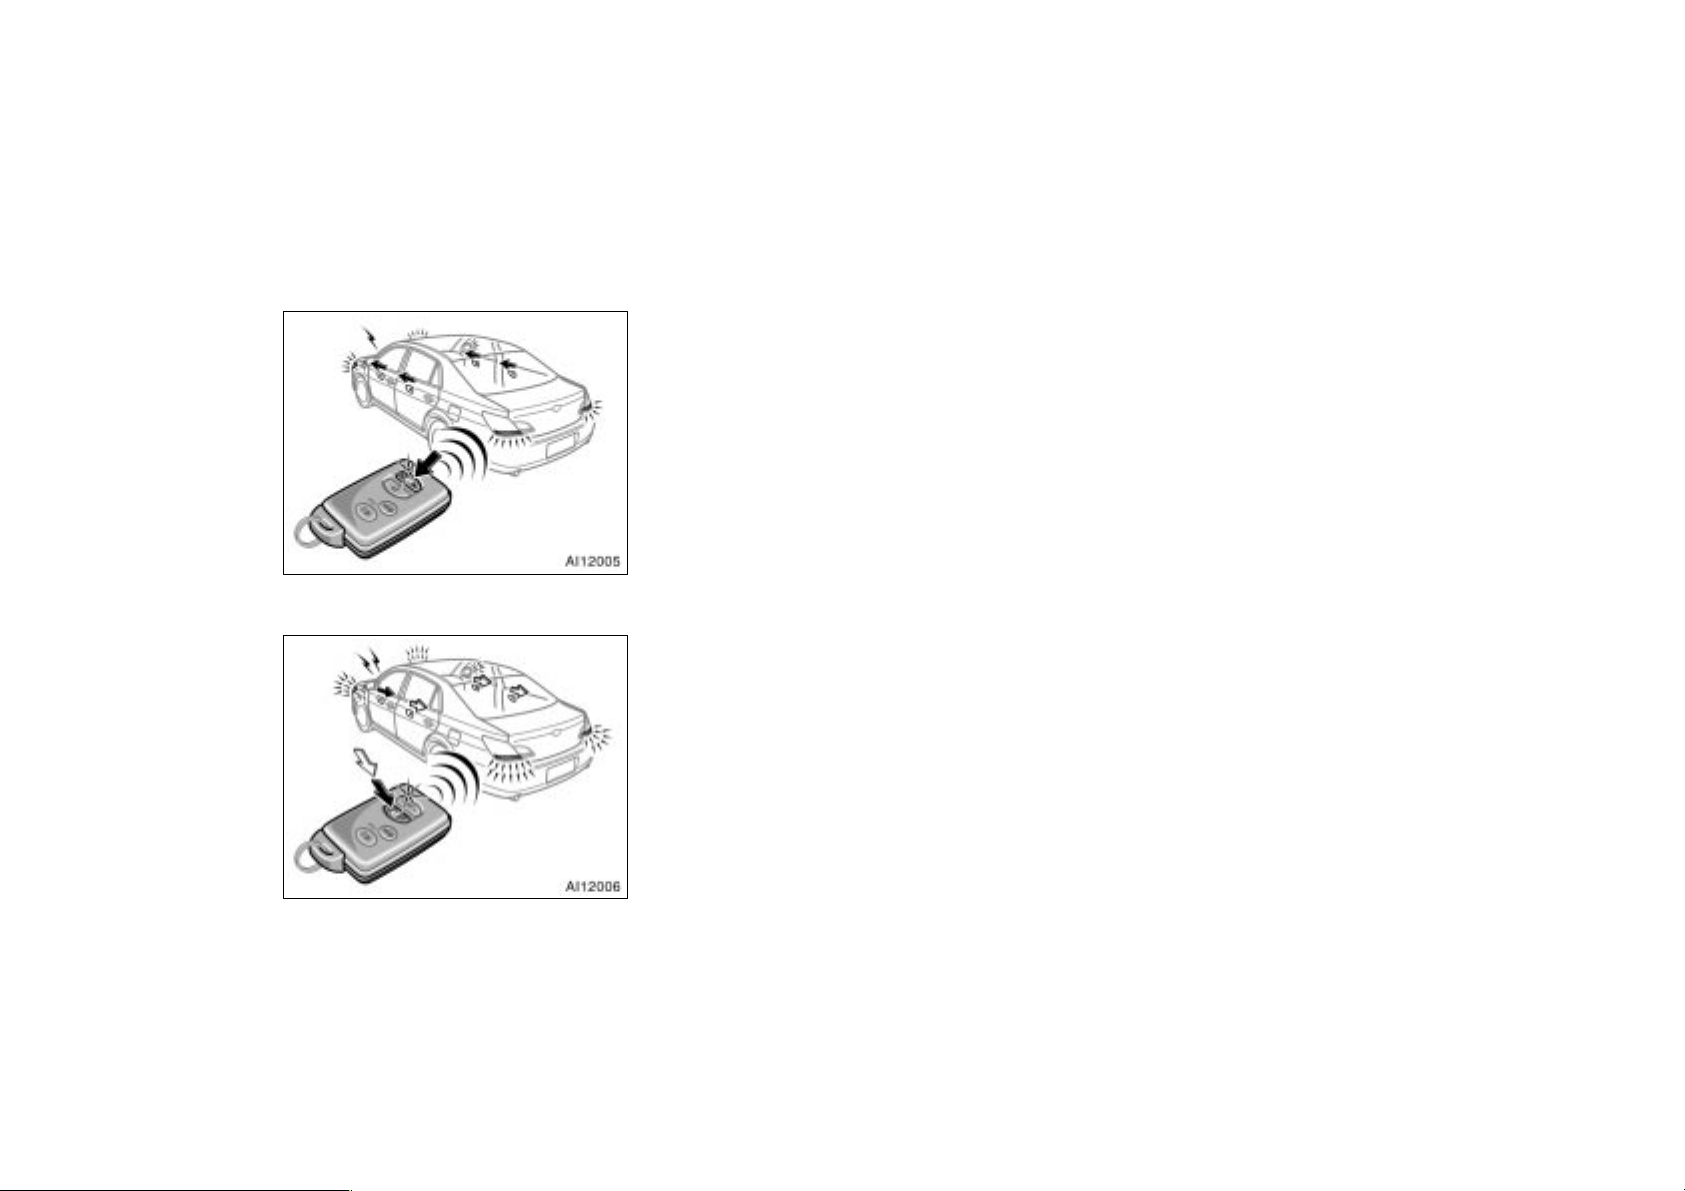
Locking operation (vehicles with key cylinder−type ignition switch)
20
Unlocking operation (vehicles with key
cylinder−type ignition switch)
Locking operation (vehicles with smart
key system)
Unlocking operation (vehicles with smart
key system)
To lock or unlock all the doors, push
the switches slowly and securely.
To lock: Push the lock switch. All the
doors are locked simultaneously. At this
time one beep will sound and turn signal
lights flash once.
Vehicles with smart key system—For 3
seconds after the doors have been locked,
the doors cannot be re−unlocked via the
smart key system.
Check to see that the doors are securely
locked.
If any of the doors is not securely closed,
or if the key is in the ignition switch (vehicles with key cylinder−type ignition
switch) or key left in the vehicle (vehicles
with smart key system), locking cannot be
performed by the lock switch and a beep
will sound continuously for 10 seconds.
To stop the beep, take out the key from
the vehicle or push the unlock switch.
To unlock: Push the unlock switch once to
unlock the driver’s door alone. Pushing
the switch twice within 3 seconds unlocks
all the doors simultaneously. Each time
the unlock switch is pushed, two beeps
will sound and turn signal lights flash
twice.
This double switch operation to unlock all
doors can be changed to a single switch
operation. For details, contact your Toyota
dealer.
If the key is in the ignition (vehicles with
key cylinder−type ignition switch) or the
ignition switch is set to ACC or ON (vehicles with smart key system), the vehicle
cannot be unlocked via the unlock switch.
When all the doors are unlocked simultaneously with a key, wireless remote control or entry function of the smart key
system, the following lights come on for
about 15 seconds and then fade out, even
if the door is not opened.
Vehicles with key cylinder−type ignition
switch—Ignition switch light, interior light,
front personal lights and rear personal
lights
Vehicles with smart key system—Interior
light, front personal lights, rear personal
lights and exterior foot lights
21
(For further information, see “Illuminated
entry system” on page 135 in Section
1−5.)
You have 30 seconds to open a door after
using the wireless remote unlock feature.
If a door is not opened by then, all the
doors will be automatically locked again.
If the wireless remote control is used to
lock the doors near the window or door
handle, there is a possibility that the door
may not unlocked by entry function of
smart key system. Under these circumstances, use the wireless remote control
to unlock the doors.
The time before automatic door lock function can be changed. For details, contact
your Toyota dealer.
If the lock or unlock switch is kept
pressed in, the locking or unlocking operation is not repeated. Release the switch
and then push again.
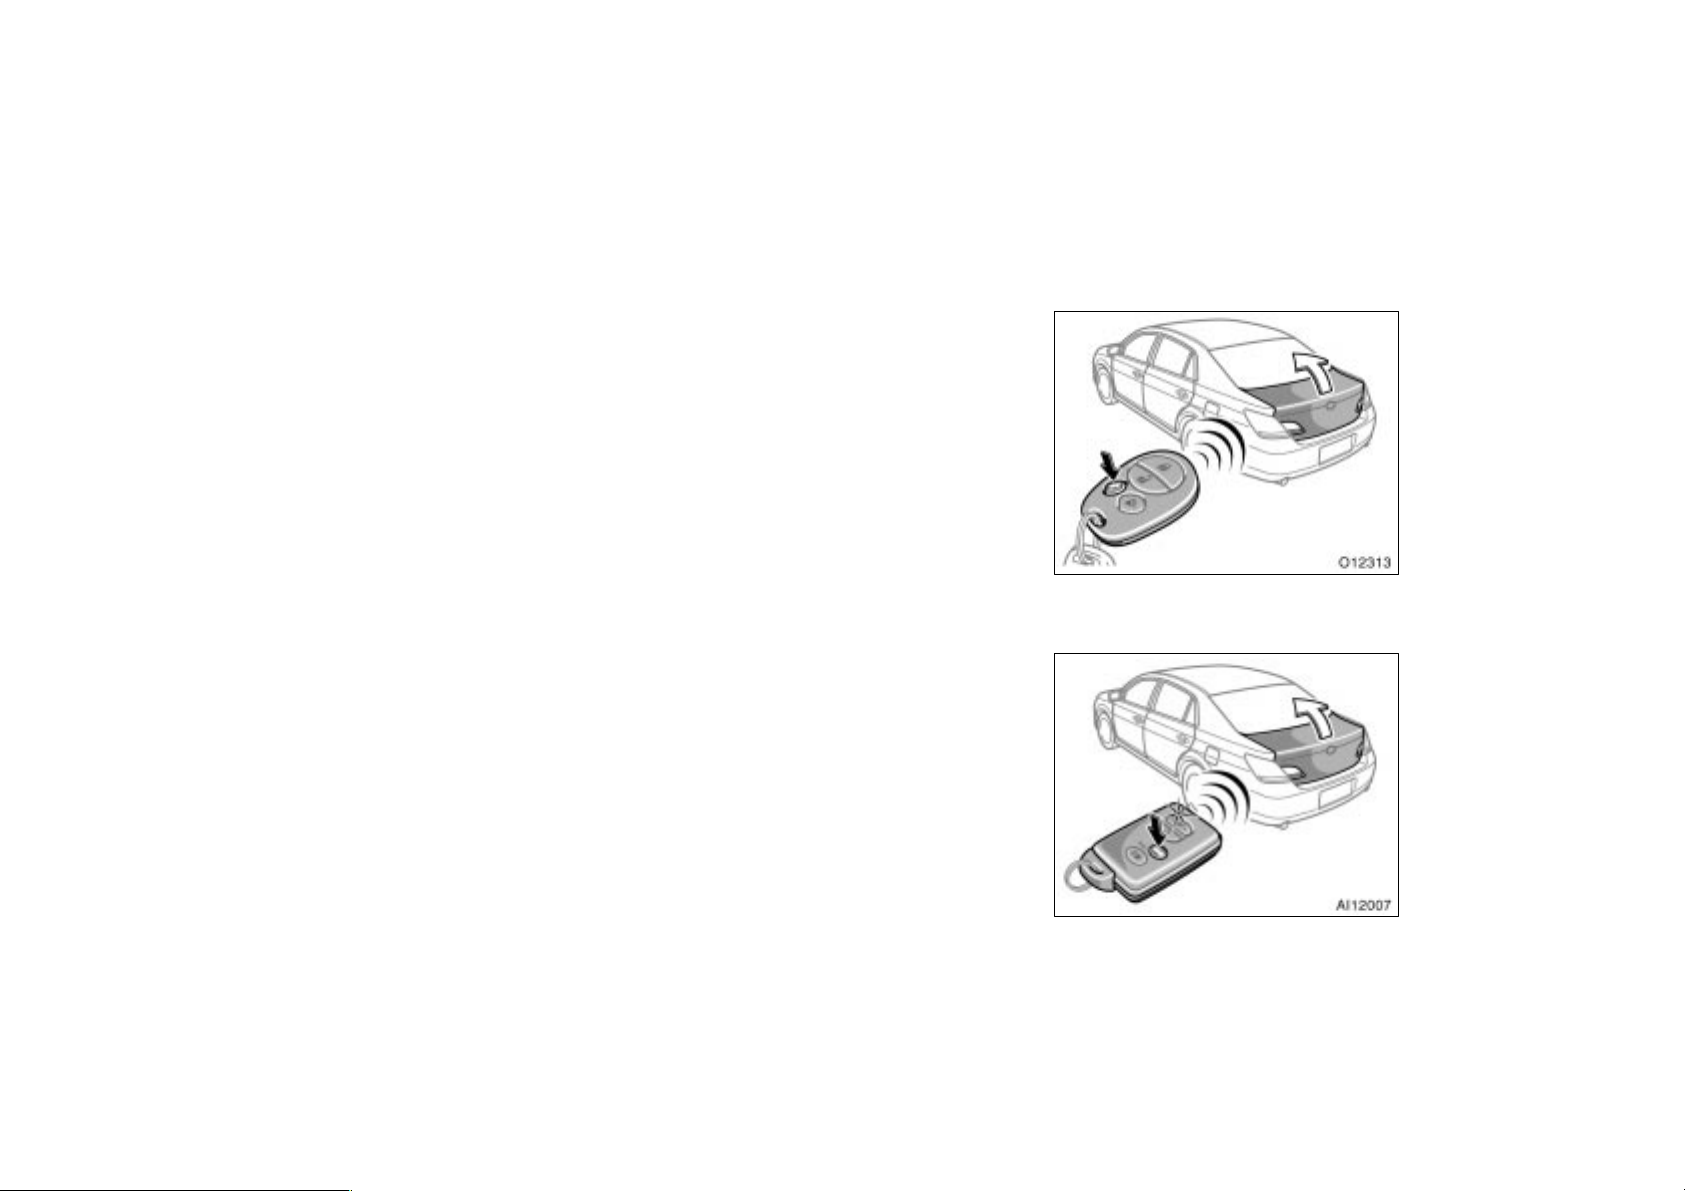
—Opening trunk lid
The following adjustments can be made in
this system. For details, contact your
Toyota dealer.
Cancelling the wireless door locking or
unlocking function
Cancelling the flash of the turn signal
lights
Cancelling the beep sound
Vehicles with key cylinder−type ignition
switch
22
Vehicles with smart key system

To open the trunk lid, push the trunk
opener switch of the transmitter for 1
second. A long beep will sound.
If the key is in the ignition (vehicles with
key cylinder−type ignition switch) or the
ignition switch is set at ACC or ON (vehicles with smart key system), the trunk
lid cannot be opened by the trunk opener
switch.
Opening of the trunk lid with the wireless
remote control can be changed as follows.
Contact your Toyota dealer for details.
Trunk lid opens by pushing the trunk
opener switch twice in succession.
Trunk lid opens by pushing the trunk
opener switch once regardless of how
long the switch is being pressed.
Opening of the trunk lid is disabled
using the wireless remote control transmitter.
—Activating alarm
Vehicles with key cylinder−type ignition
switch
Pushing the alarm switch for 1 second
blows the horn intermittently and
flashes the headlights, turn signal
lights, tail lights and interior light.
Vehicles with smart key system
only—When pushing the switch, the indicator light flashes.
The alarm switch is used to deter vehicle
theft when you witness anyone attempting
to break into or damage your vehicle.
The alarm will last for one minute. To stop
the alarm midway, push the switch once
again, unlock a door with the transmitter,
or set the ignition switch to ON.
If the key is in the ignition (vehicles with
key cylinder−type ignition switch) or the
ignition switch is set at ACC or ON (vehicles with smart key system), the alarm
does not work.
This alarm function can be disabled. For
details, contact your Toyota dealer.
Vehicles with smart key system
23
—Replacing battery
(with key cylinder−type
ignition switch)
For replacement, use a CR2016 lithium
battery or equivalent.
CAUTION
Special care should be taken to prevent small children from swallowing
the removed transmitter battery or
components.
NOTICE
When replacing the transmitter battery, be careful not to lose the components.
Replace only with the same or
equivalent type recommended by a
Toyota dealer.
Dispose of used batteries according
to the local laws.
Replace the transmitter battery by following these procedures:
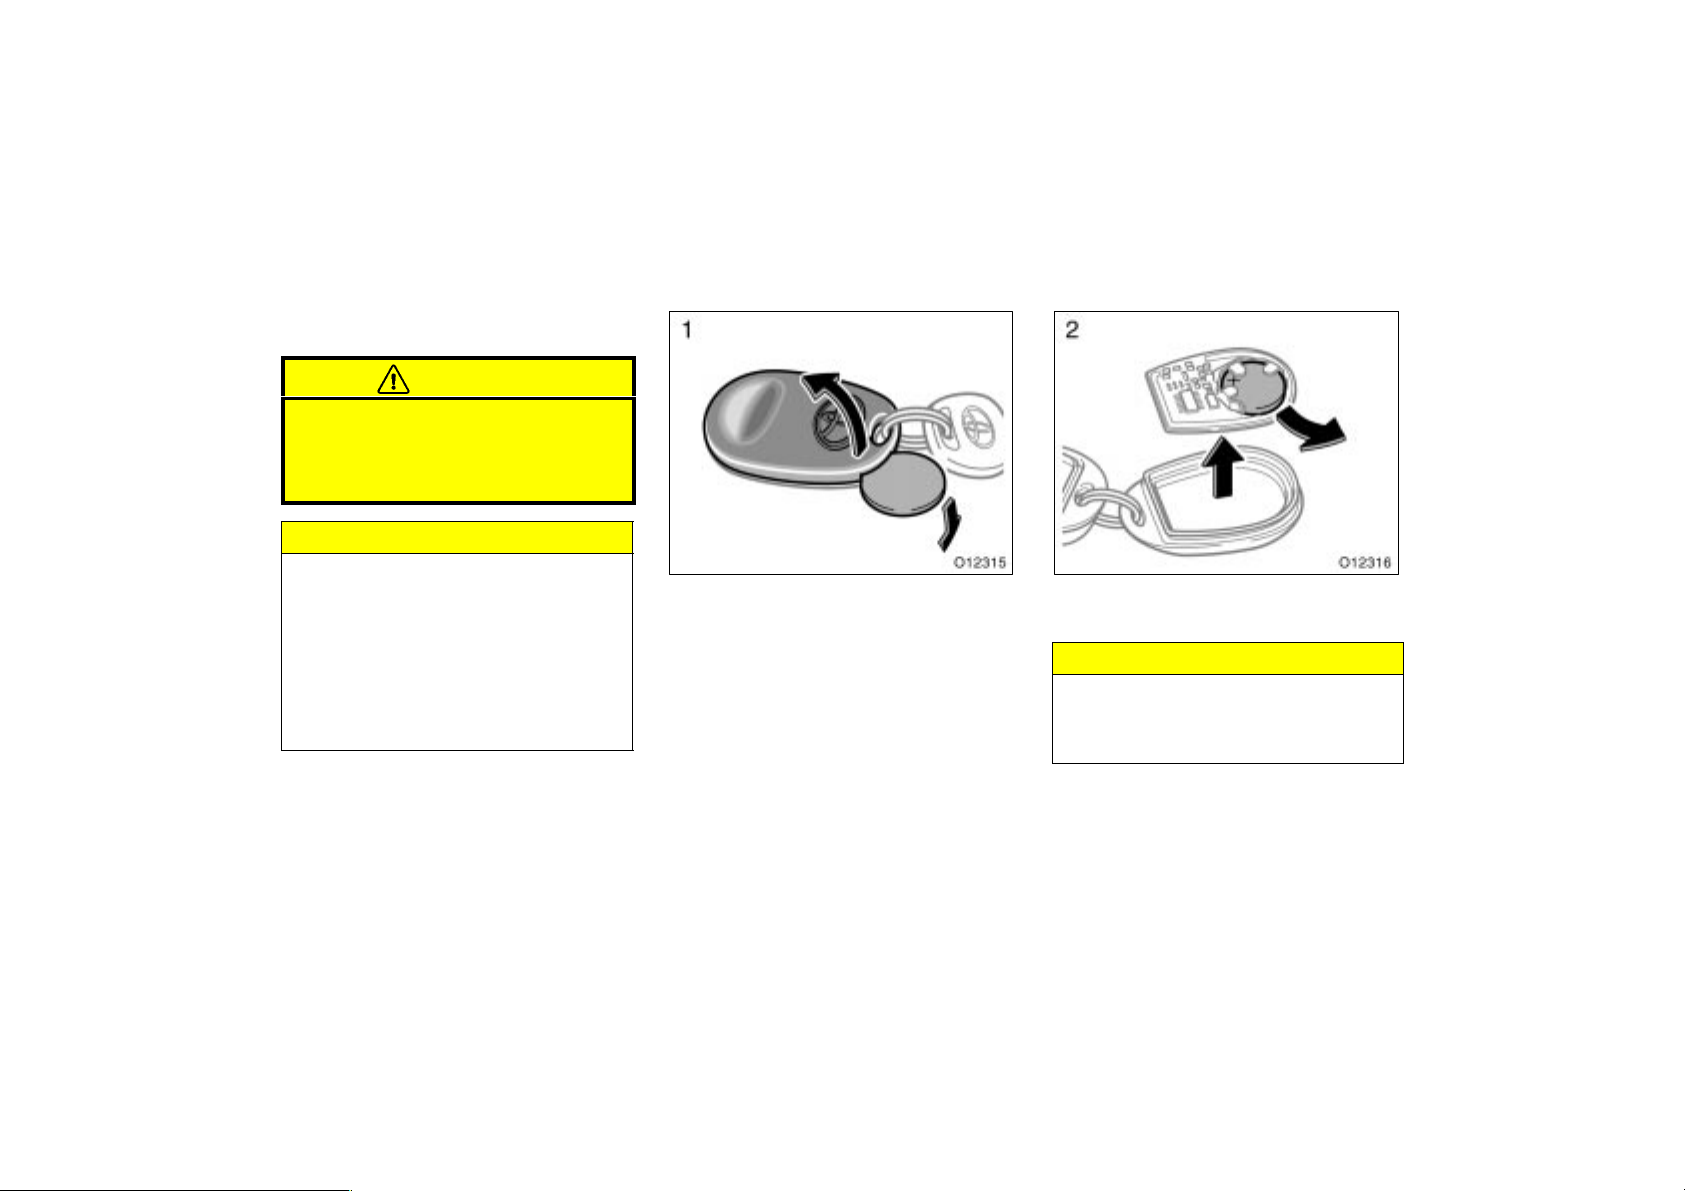
1. Using a coin or equivalent, open the
transmitter case.
2. Remove the circuit board, then remove
the discharged transmitter battery.
NOTICE
Take care not to damage the circuit
board.
Do not bend the terminals.
24

Be careful not to bend the electrode
when inserting the transmitter battery and that dust or oils do not
adhere to the transmitter case.
Close the transmitter case securely.
—Replacing battery
(with smart key system)
The transmitter can easily be damaged
when replacing the battery. We recommend having the battery replaced by your
Toyota dealer. If you have to do it yourself, use a CR1632 lithium battery or
equivalent and a flathead screwdriver.
3. Put in a new transmitter battery with
positive (+) side up. Install the circuit
board into the transmitter case.
Close the transmitter case securely.
NOTICE
Make sure the positive side and
negative side of the transmitter battery are faced correctly.
Do not replace the battery with wet
hands. Water may cause unexpected
rust.
Do not touch or move any components inside the transmitter, or it
may interfere with proper operation.
After replacing the battery, check that the
transmitter operates properly. If the transmitter still does not operate properly, contact your Toyota dealer.
CAUTION
Special care should be taken to prevent small children from swallowing
the removed transmitter battery or
components.
NOTICE
Be careful not to touch the circuit,
as this may generate static electricity that can damage the transmitter.
When replacing the transmitter battery, be careful not to lose the components.
Replace only with the same or
equivalent type recommended by a
Toyota dealer.
Dispose of used batteries according
to the local laws.
Replace the transmitter battery by following these procedures:
25
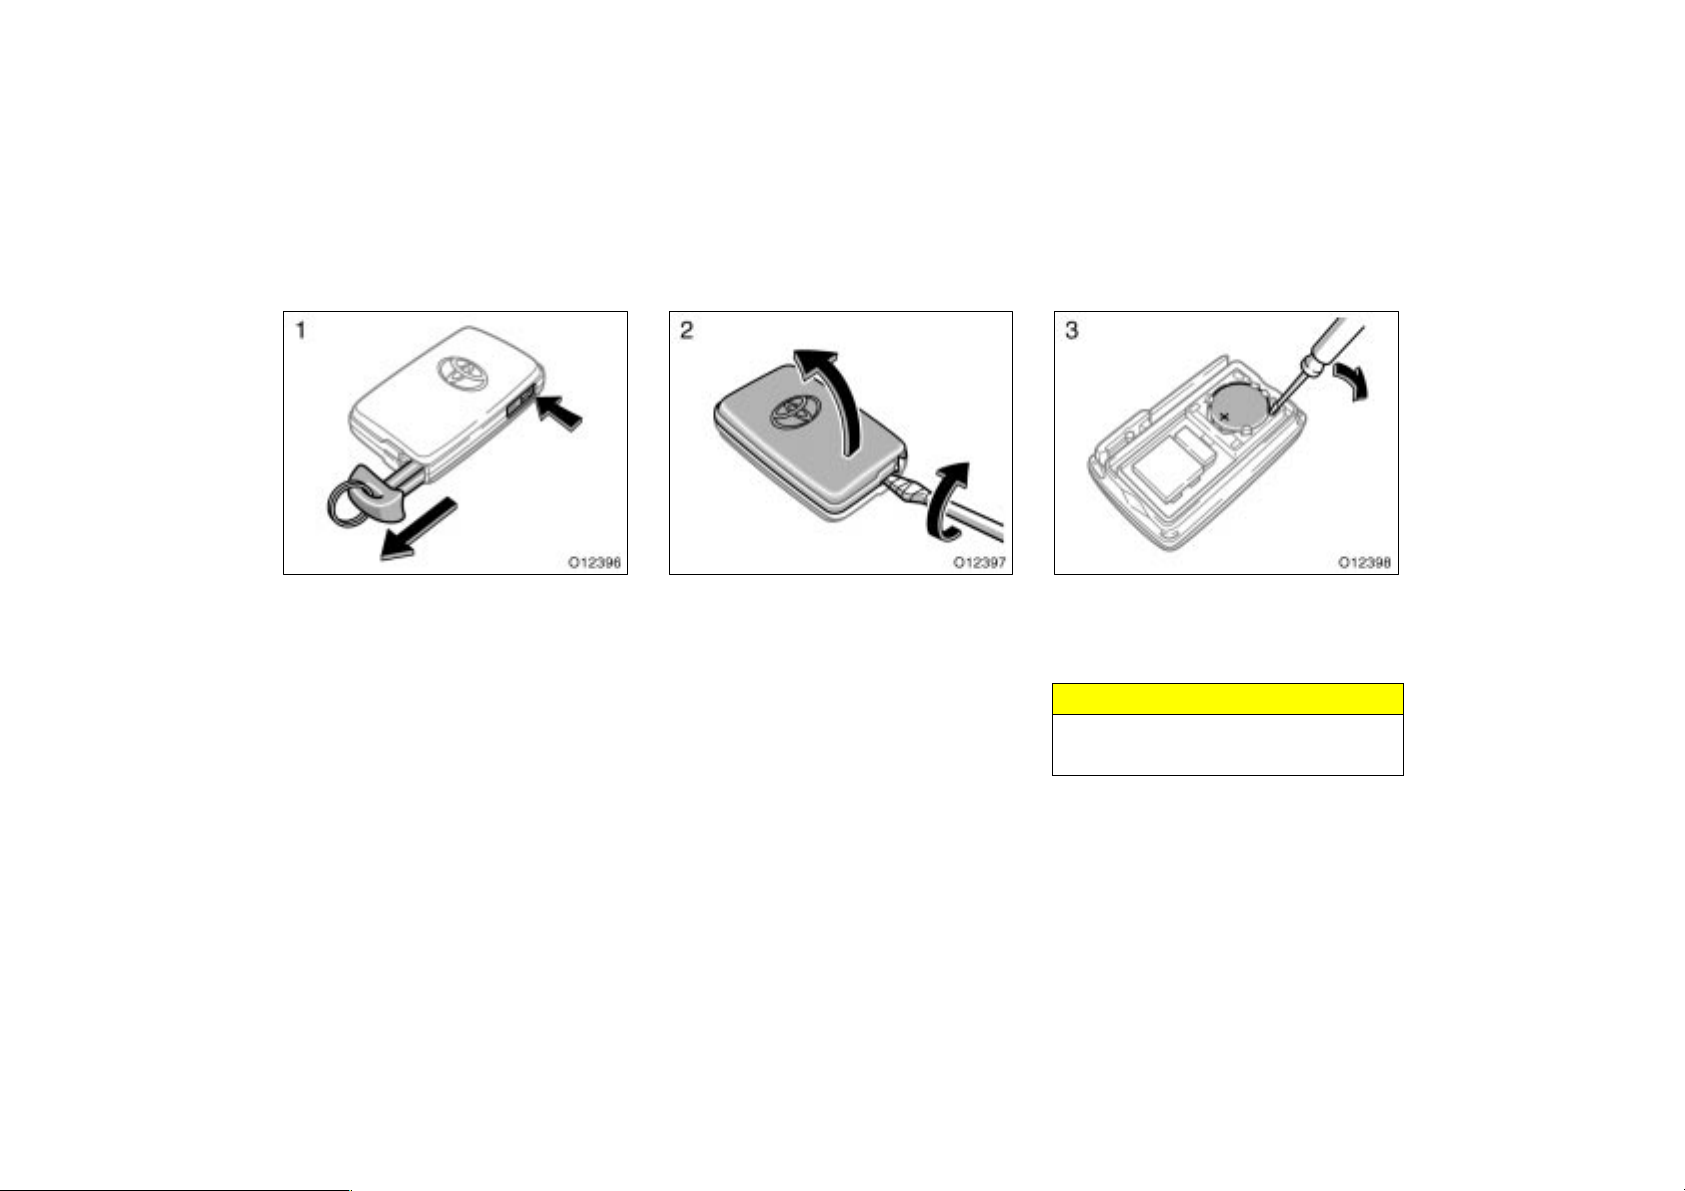
1. Push the release button and take out
the mechanical key.
26
2. Using a flathead screwdriver or equivalent, open the transmitter case.
3. Remove the discharged transmitter battery by flathead screwdriver or equivalent. Insert the guide groove and lift as
shown in the above illustration.
NOTICE
Do not modify the battery case. It
may cause a trouble.

4. Put in a new battery with the positive
(+) side up. Install the cover and insert
the mechanical key into the transmitter.
Close the transmitter case securely.
NOTICE
Make sure the positive side and
negative side of the battery are
faced correctly.
Do not replace the battery with wet
hands. Water may cause unexpected
rust.
Do not touch or move any components inside the transmitter, or it
may interfere with proper operation.
Be careful not to bend the electrode
when inserting the transmitter battery and that dust or oils do not
adhere to the case.
Close the transmitter case securely.
After replacing the battery, check that the
transmitter operates properly. If the transmitter still does not operate properly, contact your Toyota dealer.
Smart key system
The smart key system consists mainly
of the following functions.
Engine immobilizer function (For de-
tails, see “Engine immobilizer system”
on page 16 in this Section.)
Wireless remote control function (For
details, see “Wireless remote control”
on page 18 in this Section.)
Push button start function (For details,
see “How to start the engine” on page
296 in Section 3.)
Entry function and start function (See
“ENTRY FUNCTION AND START
FUNCTION” described below.)
Steering lock function (See “STEERING
LOCK FUNCTION” described below.)
27
CAUTION
People with implanted pacemakers
or cardiac defibrillators should keep
away from the smart key system
antennas, because the radio waves
may affect the operation of such
devices. For the antenna locations
see “ANTENNA LOCATION” on page
29 in this Section.
Users of any electrical medical de-
vice other than implanted pacemakers and implanted cardiac defibrillators should consult the manufacturer of the device for information
about its operation under the influence of radio waves. Radio waves
could have unexpected effects on
the operation of such medical devices.
If necessary, the entry function can
be disabled. See “DISABLING THE
SMART KEY SYSTEM” on page 33
in this Section.
Entry function
ENTRY FUNCTION AND START
FUNCTION
By carrying the key, you can lock and
unlock the doors and start the engine.
Entry function—You can lock and unlock
the doors and open the trunk without inserting the key in the keyhole. For further
information, see “Side doors” on page 34
and “Trunk lid” on page 44 in this Section.
Start function—You can shift the power
supply mode and start the engine when
the electronic key is in the vehicle. For
further information, see “Ignition switch”
on page 159 in Section 1−7 and “How to
start the engine ”on page 296 in Section
3.
28
Start function

STEERING LOCK FUNCTION
When the driver’s door is opened after
turning off the engine, the steering wheel
will lock.
The steering lock is automatically unlocked when the “ENGINE START STOP”
switch (engine switch) is pressed. If the
indicator light on the “ENGINE START
STOP” switch flashes green, this indicates
that the steering wheel remains locked. If
the amber indicator light flashes, this indicates that the steering lock is malfunctioning. For details, see “How to start the
engine” on page 296 and “Driving and
parking using smart key system” on page
300 in Section 3.
ANTENNA LOCATION
1. Antenna inside cabin and trunk
2. Antenna outside cabin and trunk
29
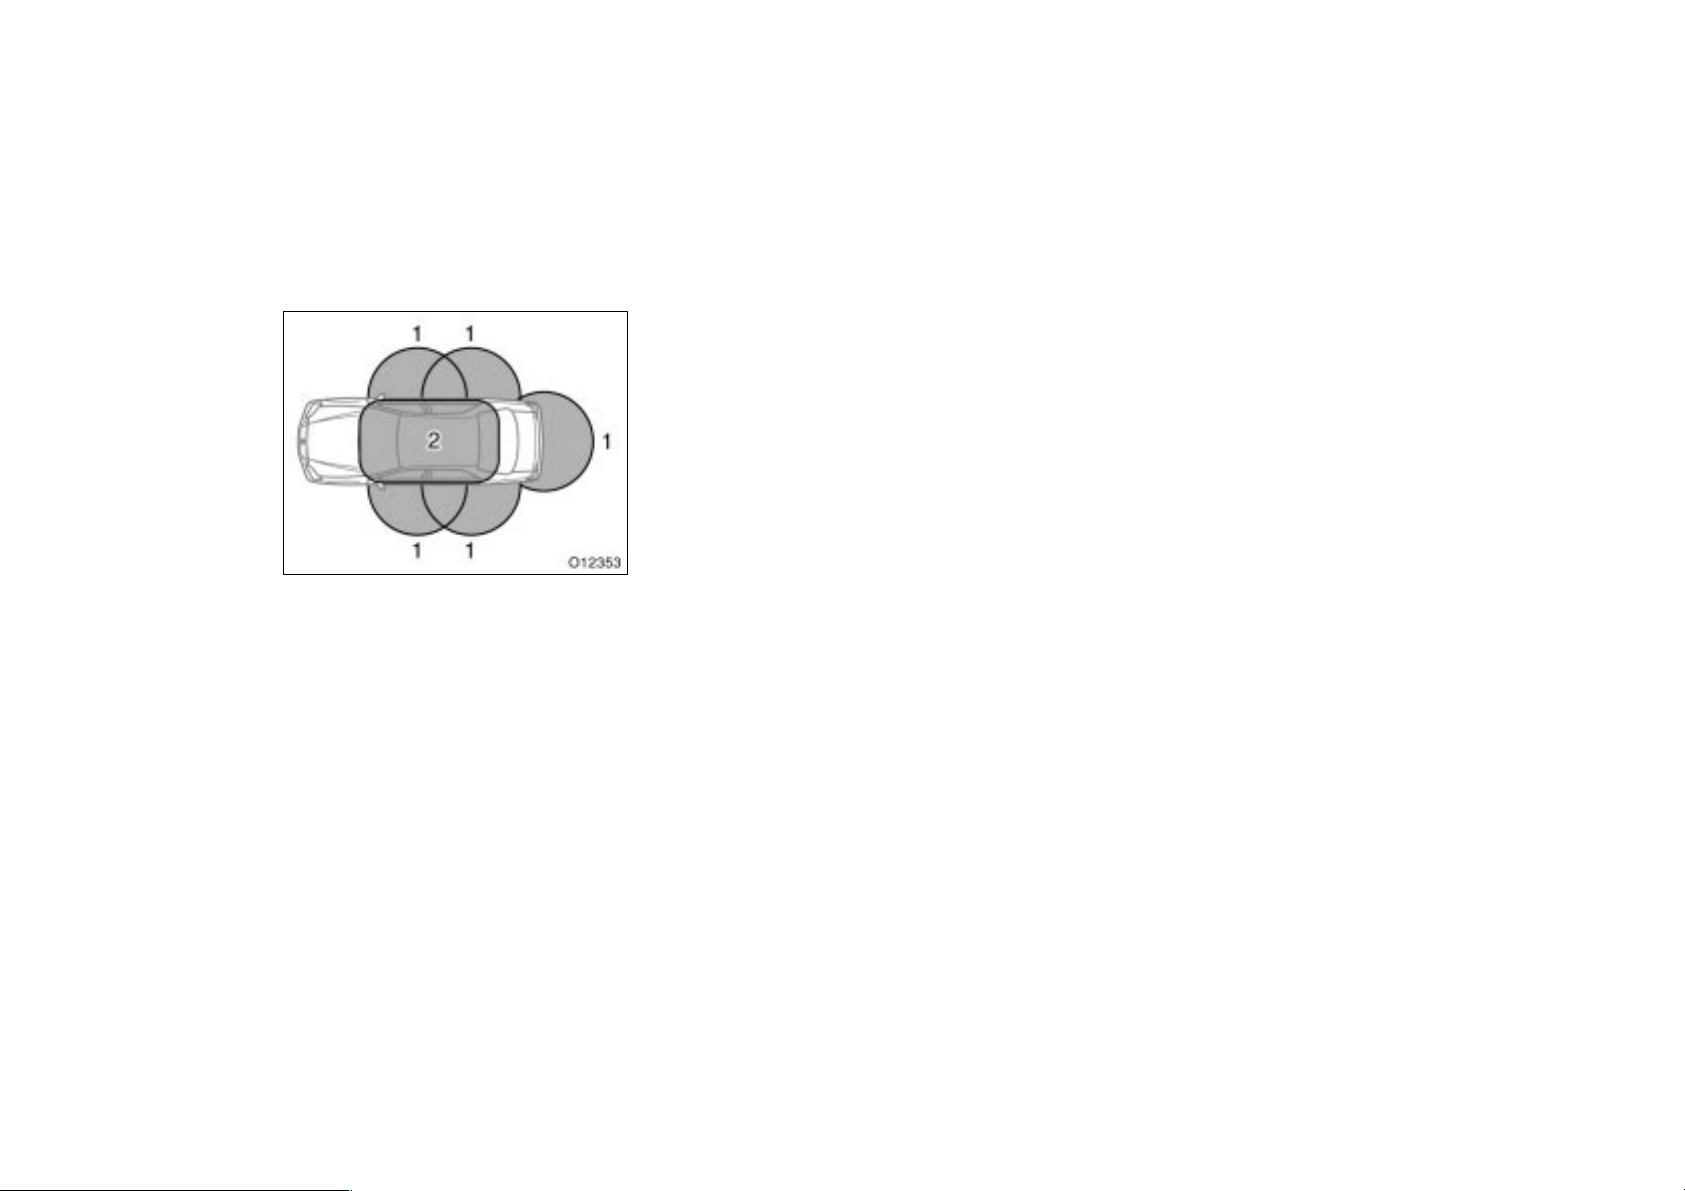
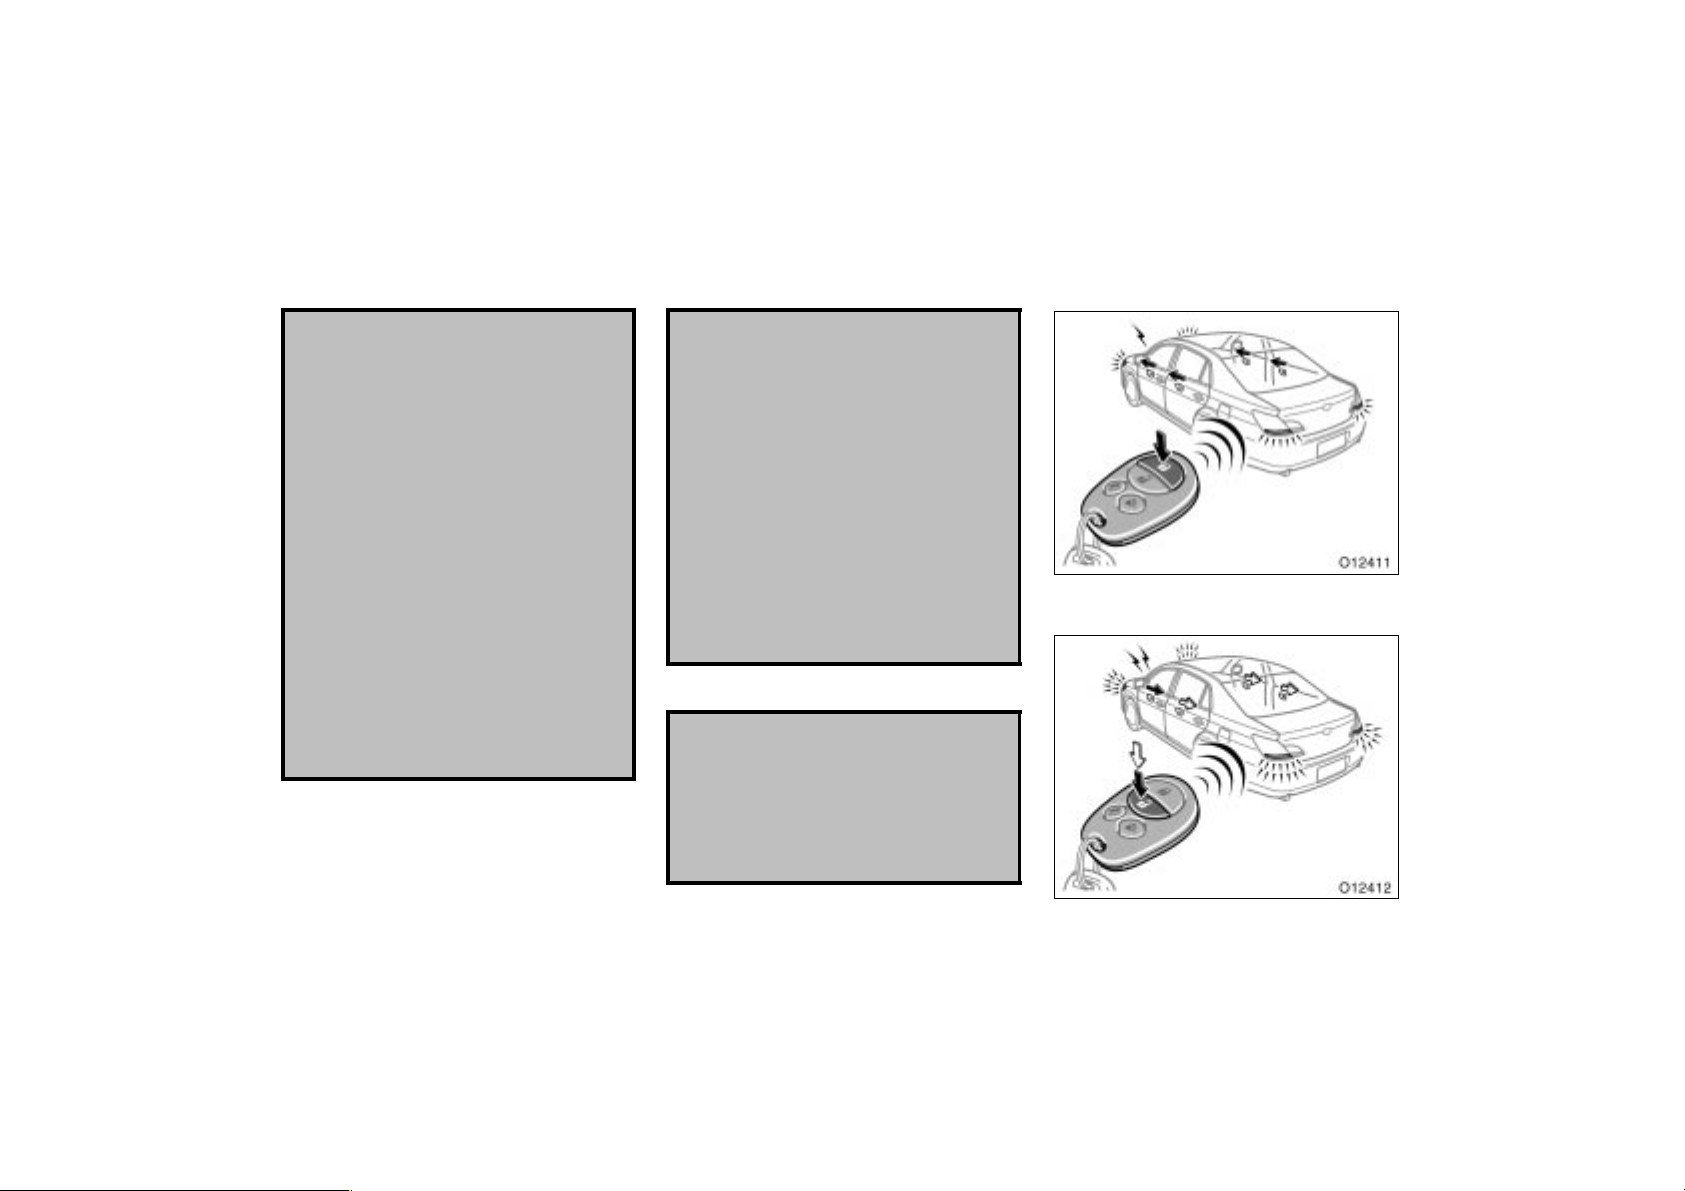
ACTUATION AREA
The entry function and start function
are available to use when a registered
key is in the actuation area.
1. Entry function actuation area—About
1 m (3 ft.) from each outside door
handle and trunk opener switch.
If the key is close to a door handle,
a window, the center of the rear bumper, on the ground or above the roof,
the entry function may not operate
properly.
2. Start function actuation area—Inside
of the cabin.
The start function may not be activated
if the key is on the instrument panel,
on the package tray, in the glove box
or on the floor, etc.
In the following cases, the smart key system may not operate properly.
When facilities issuing strong electro-
magnetic waves such as TV towers,
electric power stations, broad casting
stations are nearby.
In places where automated payment fa-
cilities are installed (such as gas stations).
When you are carrying an electronic
key together with a mobile communications system such as a two−way radio
or cellular phone.
When the electronic key is in contact
with or covered by a metallic object.
When another person is operating a
wireless remote control function on
another vehicle near your vehicle.
When the battery is discharged. To re-
place the battery, see “—Replacing battery” on page 25 in this Section.
When the electronic key is near a
high−voltage or noise−emitting device.
When you are carrying an electronic
key together with a key for another
smart key system equipped vehicle or
another instrument emitting radio
waves.
Depending on the position of the key
or vehicle body shape the key may not
work well even within the actuation
area.
When the key surface is covered by a
sticker, etc. that may cut off electromagnetic wave.
If the smart key system does not operate properly and you cannot enter, you
can lock and unlock all the doors by
using mechanical key attached to the
master key or wireless remote control
function.
30
 Loading...