

Page 1
OWNER’S MANUAL
EXERCISE SYSTEM
For Models 2000, 3000, XL, and XLS
OWNER’S PURCHASE RECORD
Total Gym®Exerciser
Date Purchased
Purchased From
Serial Number
(located at the bottom of the support column)
CONTACTS
Customer Service, Parts, and Accessories - Call: 1.888.811.9740
Additional Accessories - www.TotalGymCatalog.com
© 2009, 2007, 2002, 1999, 1998 Total Gym Fitness, LLC. All rights reserved. Total Gym®is a registered
trademark. U.S. Patents #D 405,132, #5,967,955; ROC Patents #ND-060792; PRC Patent #ZL 97 2
28552.0. No part of this booklet may be reproduced or utilized in any form by any means, electronic,
mechanical or otherwise, without express written consent of the copyright holder.
2/09
Page 2
— 3 — — 2 —
Congratulations on purchasing your new Total Gym®!
With this product in your home, you have everything you need to start
your own workout program, to tone and strengthen the important muscle
groups of your upper and lower body. This is vital for all of us, regardless
of age, sex, or fitness level, and regardless of whether your primary goal
is body sculpting, weight control, health maintenance, or more energy for
daily activities.
Strength training not only tones and conditions the muscles we use every
day to stand, walk, lift, and turn; it can actually transform our body composition. By reducing body fat and increasing the proportion of lean muscle in our bodies, strength training can effectively turn up our metabolic
thermostat, so that we burn up to 30% more calories all the time, no matter what we’re doing.
It’s easy—all you have to do is spend 10 to 15 minutes a day on your
Total Gym®to start realizing the benefits.
Be sure to read through this owner’s manual carefully.
It is the authoritative source of information about your Total Gym®.
Table of Contents
Product Specifications.........................................................................3
Safety Instructions...............................................................................4
Set Up..................................................................................................5-7
Optional Accessories...........................................................................8-10
Starting Out .........................................................................................11
Inspection, Maintenance & Storage ....................................................12-13
Exploded Drawing and Parts List........................................................14
Work Out Progress Chart....................................................................15
Limited Lifetime Warranty....................................................................16
Total Gym
®
Starter Program .................................................................17-19
Owner’s Purchase Record ..................................................................back cover
Contacts ..............................................................................................back cover
(Model XLS shown on cover)
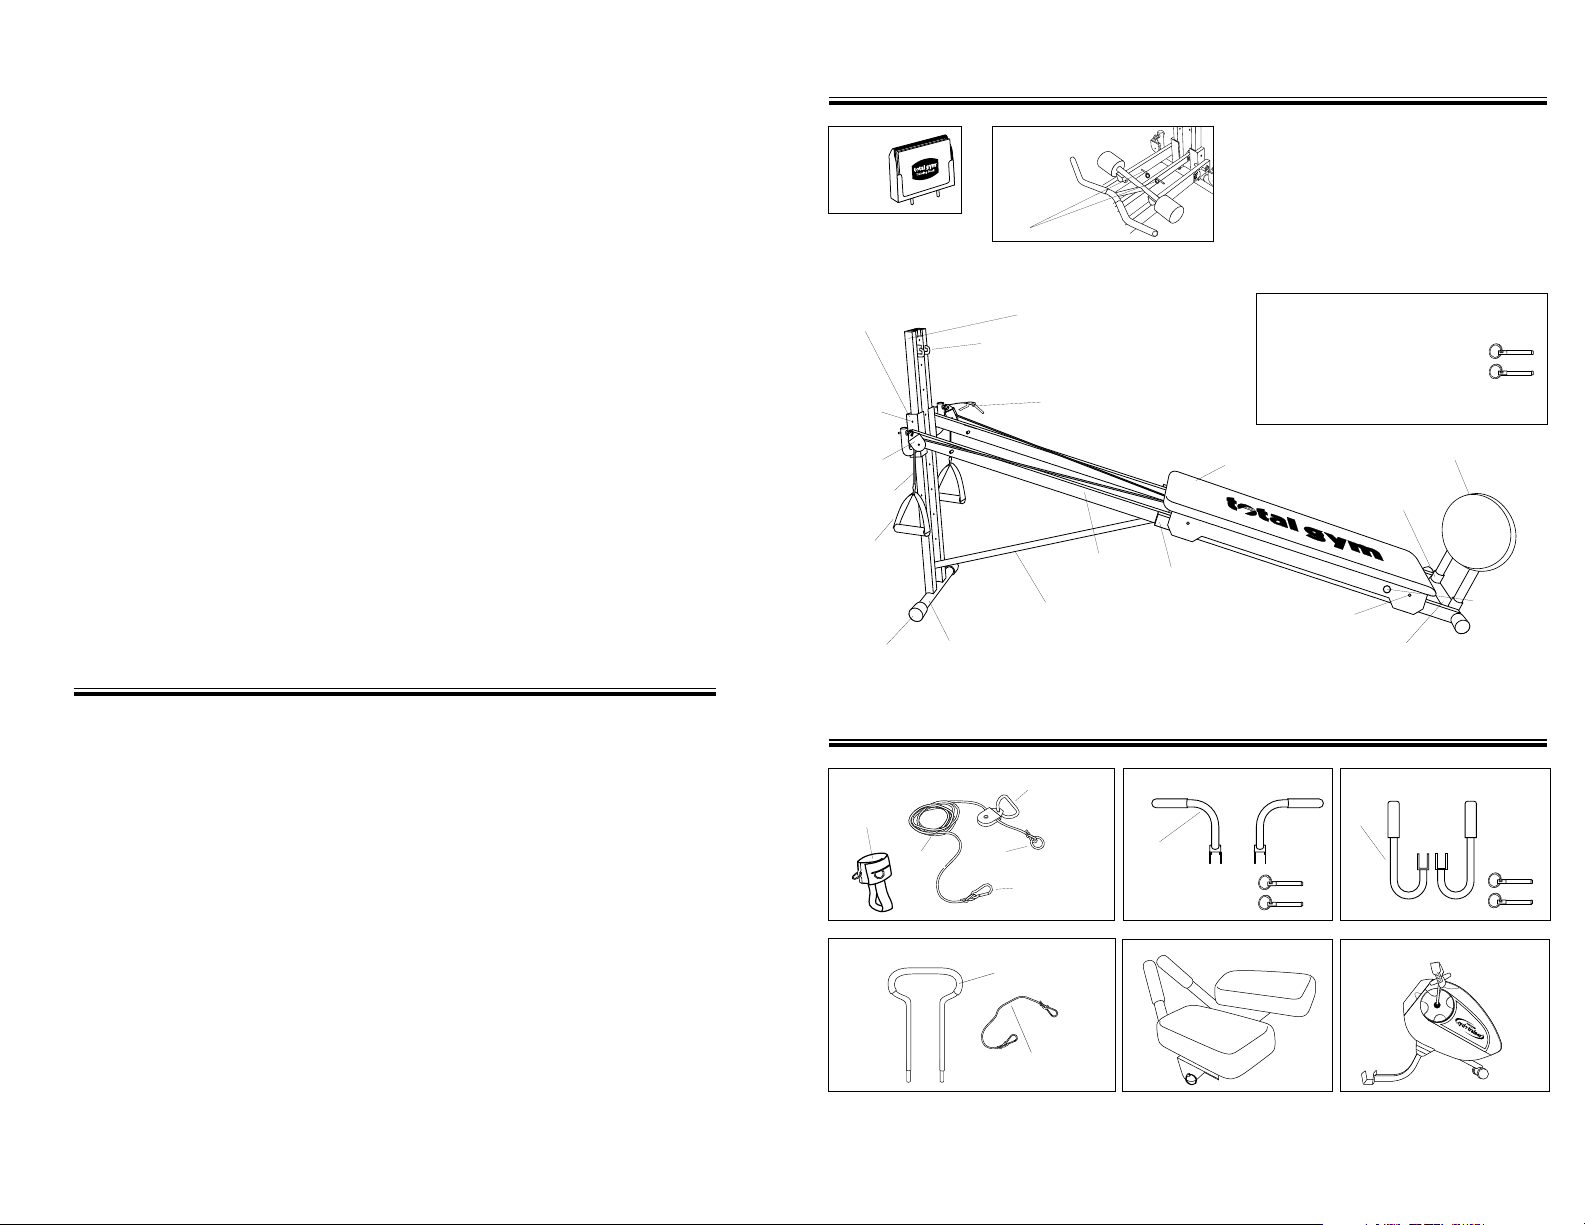
PRODUCT SPECIFICATIONS
Support Column
Handle
Glideboard
Outer Rail
Inner Rail
Rollers
Cable
Center Support Rail
Squat Stand (Optional)
Total Gym
Training
Deck
(Optional)
Back Crossbar
Weight Bar accessory also available.
(Model XLS pictured above)
Front Crossbar
Leg Pull Accessory
Press Up Bars
Height Adjustment
Slide Mechanism
(Includes the Height
Adjustment Lever)
Pulley
Assembly
Squat Stand
Receptacles
Hole for optional
weight bar
Leg Pull Bracket—
For use with optional leg pull
accessory only.
Hitch Pin—
Connected with a lanyard to
height adjustment column.
Safety Hitch Pins (short) 2—
• 1 in Literature Pack– use in storage
hole when storing unit.
• 1 connected with a lanyard to
height adjustment slide mechanism.
Use in safety hole during exercise.
Rope
Pulley/D-Ring
Assembly
O-ring
Clip
Foot
Harness (2)
Safety Hole
Storage Hole
Wing Attachment
(Optional)
Press up bar
AbCrunch
Total Gym Cyclo Trainer
™
Requires 2 long hitch pins
OPTIONAL ACCESSORIES AVAILABLE FOR PURCHASE (1.888.811.9740)
Dip Bars
Dip bar
Requires
2 short
hitch pins
LENGTH: folded 51.5”
in use 90”
HEIGHT: folded 8.875”
in use 43”
WIDTH: 18.5”
WEIGHT: 68 lbs.
MAX. USER WEIGHT: 400 lbs.
Pilates Toe Bar
24-inch leg pulley
rope extension
Pilates Accessory Kit*
*Kit also includes
2 foot harnesses
and Pilates exercise video.
Requires 2 short
hitch pins
Page 3
— 5 —
— 4 —
SAFETY
Before beginning this or any exercise program, consult a physician or health
professional, who can assist you in planning a program appropriate for your age
and physical condition. This is especially important if you are over age 35 or have
pre-existing health problems.
Do not overexert yourself. Stop exercising immediately and consult your doctor if
you experience pain or tightness in your chest, irregular heart beat, shortness of
breath, or if you feel faint, nauseous, or dizzy.
This product is designed for home use only. It is not intended for commercial or
institutional use. Use only as instructed.
Do not stand on the product.
Adult supervision is required whenever a child is on or near this exerciser.
Keep fingers, loose clothing, and hair away from moving parts.
Inspect your exerciser before each use to ensure proper operation.
Do not use
this equipment unless all moving parts are working properly. If any part is broken or
missing, stop using your Total Gym
®
and contact Total Gym Customer Service at
1.888.811.9740.
Use only the accessory items recommended by the manufacturer.
Care should be taken at all times when getting on and off this or any exercise
equipment. Falling on or off the product could result in injury, or possibly death.
WARNING
FAILURE TO READ AND FOLLOW THE SAFETY INSTRUCTIONS IN THIS
MANUAL MAY RESULT IN SERIOUS INJURY OR DEATH FROM FALLING,
OVEREXERTION, STRAINED MUSCLES, OR PINCHED FINGERS.
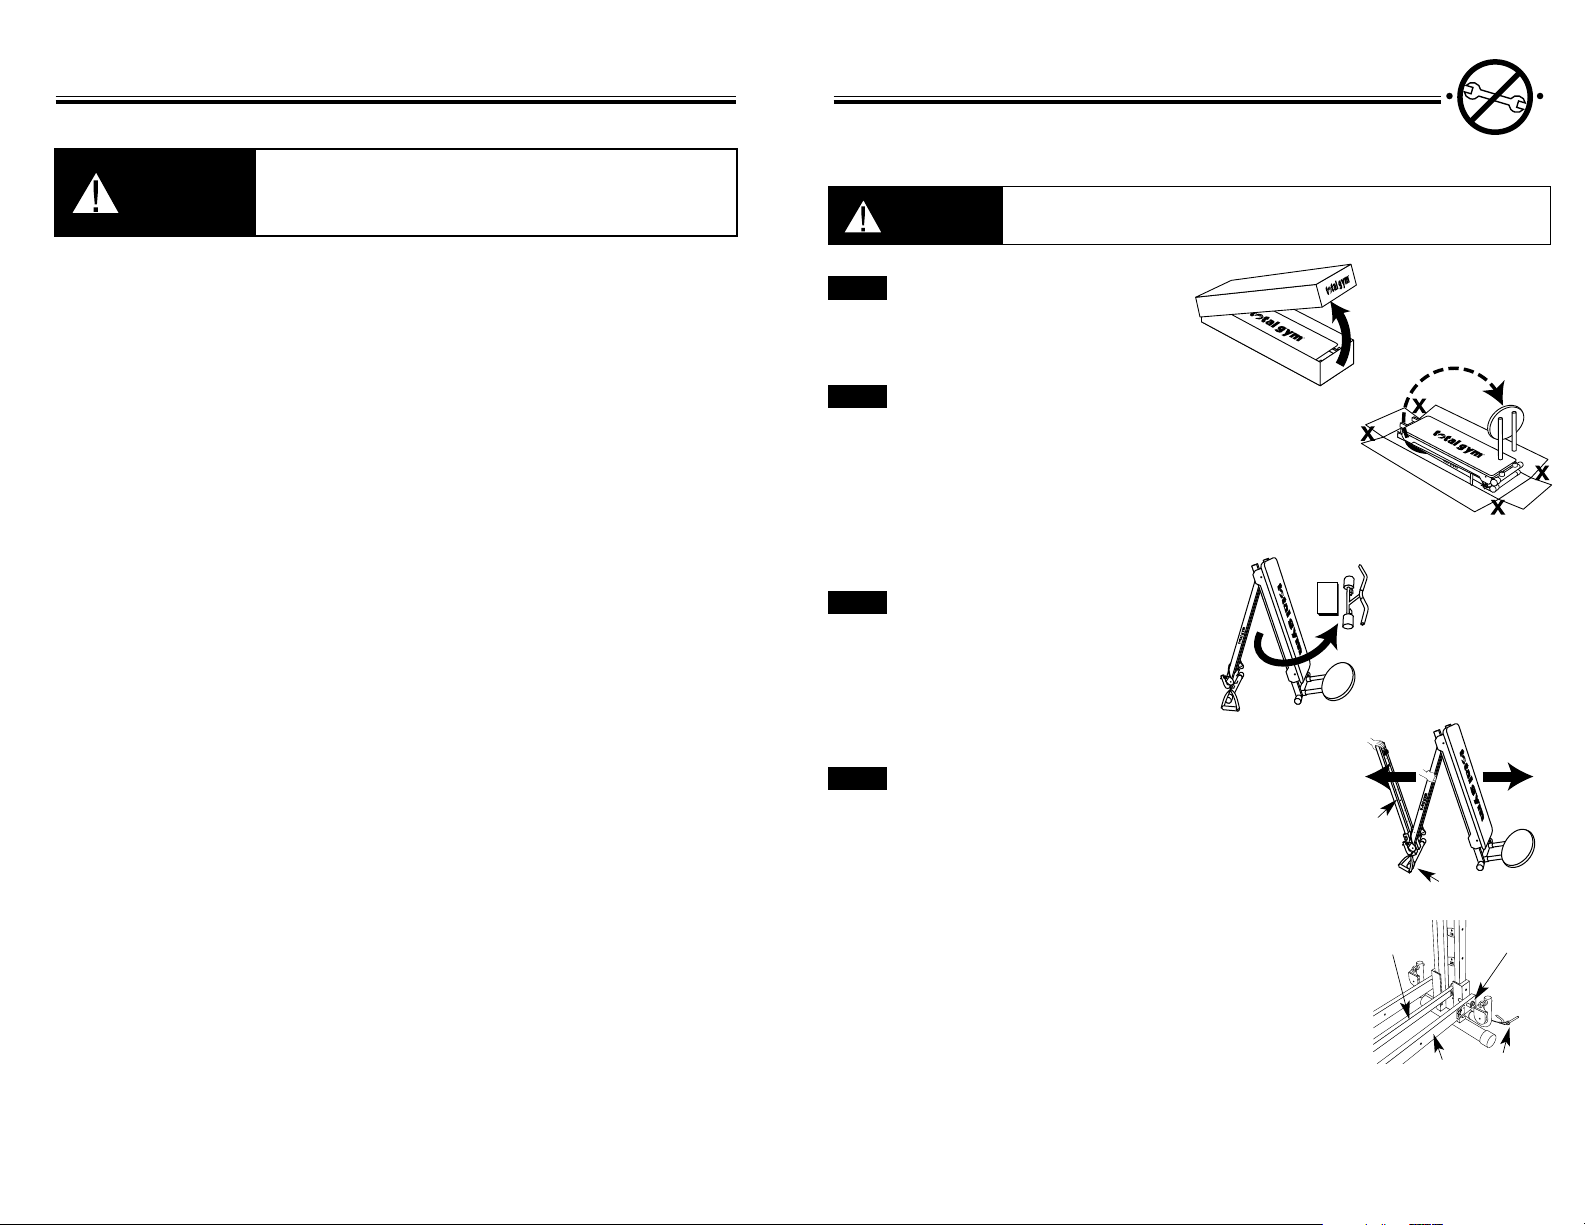
SET UP
(See next page for additional set up information.)
WARNING
KEEP HAIR, FINGERS, LOOSE CLOTHING, CHILDREN AND PETS AWAY FROM HINGES AND OTHER MOVING
PARTS TO AVOID SERIOUS INJURY. ALSO, BE SURE TO HAVE THE HEIGHT ADJUSTMENT LEVER PIN AND
SAFETY HITCH PIN LOCKED IN PLACE BEFORE GETTING ON YOUR TOTAL GYM TO AVOID SEVERE INJURY.
Set up your Total Gym®in 5 easy steps.
FULLY ASSEMBLED! • NO TOOLS REQUIRED!
Lay shipping box flat and open carton top.
Remove corner tape from the carton bottom (as indicated by
the X’s). Remove all packaging materials, including cardboard
inserts, from your Total Gym
®
. Remove the squat stand
(optional) from under the gym (as shown to the right) and
install on opposite end into receptacles.
Lift gym up from opposite end of squat
stand. Make sure that it rests solidly
on the squat stand. Remove the two
accessories from under the bench.
Extend Total Gym
®
out in the following manner:
(4a) Place one hand on the edge of the frame. With your
other hand, take hold of the support column and begin to
pull it out until the frame is lying flat on the floor.
Be sure to support the frame in the center to avoid
having the product drop suddenly onto the floor.
(4b) The spring-loaded pin on the right rail will automatically
engage during set-up. This pin prevents the support
column from collapsing when the height adjustment pin
is locked into the bottom storage hole.
Step 1
Step 2
2.
1.
4b.
Center Rail
Right Rail
Spring-loaded Pin
Hitch Pin and
Lanyard
Step 3
Step 4
3.
Back Crossbar
Support
Column
4a.
S
S
E
M
A
B
Y
L
L
U
F
N
O
T
O
L
E
D
D
E
R
I
U
O
Q
L
E
S
R
Page 4

— 7 — — 6 —
Hitch Pin—
Connected with a
lanyard to height
adjustment column
Safety Hole
Height Adjustment
Slide Mechanism
Total Gym
Training Deck and
Holder
5c.
5d.
Height
Adjustment
Lever
5a.
Height
Adjustment
Lever
5b.
Raise the Total Gym®to the desired incline level by
positioning one foot on the back crossbar to keep the
product from lifting off the floor.
(5a) With one hand on a side rail, grasp the height
adjustment lever on the height adjustment slide
mechanism and raise to one of the lower levels.
(5b) Push the lever back to its original position
(it
should be flat against the support column)
. Slide
the frame until you hear the lever pin
snap into
place. Look on the inside of the support column
to make sure the lever pin is through the hole and
locked into place.
Never sit or exercise on Total
Gym
®
without the adjustment lever and safety
hitch pin securely locked into place.
(5c) Insert the safety hitch pin connected to the lanyard
through the safety hole on the side of the height
adjustment slide mechanism until it is through the
support column.
Never sit or exercise on Total
Gym
®
without the adjustment lever and safety
hitch pin securely locked into place.
(5d) Insert the Training Deck holder into the two holes
located on the top of the support column.
Step 5
Begin using Total Gym®at a low incline. As your fitness level increases, raise the incline
to increase the intensity of your workout and improve your muscle strength.
If you have questions about your Total Gym®,
please call Customer Service at 1.888.811.9740.
Be sure to check out the instructional video entitled “Total Gym: Start It Up!”
full of valuable tips to get the most out of your new Total Gym®.
SET UP IS COMPLETE!
BOTTOM HOLE IN THE SUPPORT COLUMN IS FOR STORAGE ONLY.
ATTEMPTING TO EXERCISE WITH THE HEIGHT ADJUSTMENT LEVER PIN IN
THIS BOTTOM HOLE POSITION WILL CAUSE THE SUPPORT COLUMN TO
COLLAPSE FORWARD AND COULD RESULT IN SERIOUS INJURY.
FAILURE TO SECURELY LOCK THE HEIGHT ADJUSTMENT PIN AND SAFETY
HITCH PINS INTO PLACE MAY RESULT IN SERIOUS INJURY OR EVEN DEATH.
WARNING
HOW TO INSTALL AND USE THE WING ATTACHMENT:
Pull ups:
1. Locate the holes at the top of the right and left rails on the
support column end of the unit.
2. With the attachment angled
toward the glideboard, line up
the brackets on the attachment with the holes on the rails.
3. Insert the 2 long hitch pins through the holes on the attachment brackets and the hole on the rails as indicated by
arrows in Fig. 1.
4. You are now ready to perform pull up and chin up exercises
to work the arms, lats and back.
Leg Pull, Crunches, and Sit ups:
1. Locate the holes at the top of the right and left rails on the
support column end of the unit.
2. With the attachment angled
away from the glideboard, line
up the brackets on the attachment with the holes on the rails.
3. Insert the 2 long hitch pins through the holes on the attachment brackets and the hole on the rails, as indicated by arrow
in Fig. 2
4. Insert feet under each angled “wing” of the attachment. You are now ready to perform leg
pulls, crunches and sit up exercises to work the abdominals, waist and legs.
Hitch Pin placement
(follow small arrows)
1.
2.
WARNING
FAILURE TO SECURELY LOCK THE SAFETY HITCH PINS INTO PLACE MAY RESULT IN SERIOUS
INJURY OR EVEN DEATH.
ALL HITCH PIN LOCATIONS
• One (1) short pin and two (2) long pins are held within the Total Gym Training Deck holder.
• One (1) short pin is connected by a lanyard to the height adjustment slide mechanism on the
support column.
Page 5

OPTIONAL ACCESSORIES
Follow the instructions below on how to attach the optional accessories to your Total Gym®.
PRESS UP BARS (OPTIONAL)
1. Attach each press up bar to the frame with
the short hitch pins included with your
Total Gym
®
.
Note: Hitch pins are included with the
press up bars.
Simply line up each bar with
the holes at the bottom of the frame.
2. Slide one short hitch pin through the hole of
one of the press up bars and through frame.
Repeat
Steps 1 and 2 for attaching the other
press up bar.
Make sure to securely attach
each press up bar to each side of the
frame before using.
See Total Gym: Start It Up!, section “Optional Accessories” for tips on how to utilize the
press up bars. Remove the press up bars when you are not exercising with them.
— 9 — — 8 —
DIP BARS (OPTIONAL)
1. Attach each dip bar to the frame with the short
hitch pins included with your Total Gym
®
.
Note: Hitch pins are included with the dip
bars.
Simply line up each bar with the holes in
the upper portion of the bottom frame.
2. Slide one short hitch pin through the hole of
one of the dip bars and through frame. Repeat
Steps 1 and 2 for attaching the other dip bar.
Make sure to securely attach each dip bar
to each side of the frame before using.
WEIGHT BAR
(OPTIONAL)
1. Slide weight bar through the hole near the
bottom of the Total Gym glideboard rails.
2. Add free weights equally and evenly to both
sides of the weight bar when stacking weights.
Weight clips must be installed on each side to
prevent the weights from slipping off the bar.
Weights and clips not included.
Dip Bar Hole
Optional Dip Bars
Dip bars
2 short hitch pins
1. and 2.
Dip Bars
Hitch Pin
Press Up Bars
Press Up Bar Hole
1. and 2.
Optional Press Up Bars
Press up bars
2 short hitch pins
Slide through
here
Weight bar
OPTIONAL ACCESSORIES (continued)
LEG PULL (OPTIONAL)
1. Detach the pulley mechanism
from the hook on the underside of the glideboard.
2. Connect the D-ring/pulley
combination of your leg pull
accessory to the leg pull bracket on the support column.
3. Next, connect the O-ring (the one that is connected to
the rope) to the hook on the underside of the glideboard.
4. Attach the foot harness to one of your feet by placing
your foot in the harness so the sewn-in-ring is on the
bottom of your foot. Pull tightly on the belt so the
harness is secure.
5. Position yourself on the glideboard correctly for the
specific exercise you want to perform. See
Total Gym:
Start It Up!, section “Optional Accessories”
for tips on
how to utilize the leg pull accessory.
Connect the clip on the end of the rope to an O-ring on
the harness attached to your foot. Depending on the
exercise you are performing, connect the clip to the
proper O-ring. You are now ready to exercise using the
leg pull accessory.
Leg Pull Bracket
D-ring/ pulley
combination
Rope
2.
Stirrup
O-Ring
O-Ring
4.
Clip
O-Ring
5.
Fig. 1
Fig. 2
Optional Leg Pull Accessory
Rope
Pulley/D-Ring
Assembly
O-ring
Clip
Foot Harness (2)
AbCrunch (OPTIONAL)
ASSEMBLY
1. Match AbCrunch Handle labeled ® to the Elbow Pad labeled ®.
2. Insert Handle into Elbow Pad bracket and attach by inserting
short hitch pin. See fig. 1.
3. Repeat for left side.
INSTALLATION – How to Install the AbCrunch
1. Locate the holes at the top of the right and left rails on the support column end of the unit.
2. Install the AbCrunch arm labeled ® onto the right side rail with
the handle facing the support column.
3. Insert the short hitch pin through the holes on the attachment
bracket and through the hole on the right rail as indicated by
arrows in Figure 2.
4. Repeat for left AbCrunch arm.
You are now ready to perform all of the AbCrunch exercises.
Page 6

— 11 — — 10 —
OPTIONAL ACCESSORIES (continued)
PILATES KIT(OPTIONAL)
To begin your Pilates Exercise Program carefully follow the assembly
instructions below.
1. Insert Pilates Toe Bar into squat stand receptacles
2. Assemble Pilates 24-inch leg pulley rope
extension
a. Detach the pulley mechanism from the hook on the
underside of the glideboard.
b. Next, connect the D-ring/pulley combination of your
leg pull accessory to the leg pull bracket on the
support column.
c. Attach the foot harnesses to your feet by placing
your foot in the harness so the sewn-in-ring is on
the bottom of your foot. Pull tightly on the belt so
the harness is secure.
d. Connect the clip on the end of the leg pulley rope
to the O-ring on one of the foot harnesses.
e. Connect one end of the Pilates 24-inch rope to the
O-ring on the leg pulley rope.
f. Next, connect the other end of the Pilates 24-inch
rope to the O-ring on the other foot harness.
You are now ready to begin your Pilates exercise program.
Pilates Toe Bar
24-inch leg pulley
rope extension
1.
2b. 2c.
2e.
2f.
2d.
*Kit also includes
Pilates exercise
video.
Pulley/D-Ring
Assembly
Foot Harness (2)
Pilates Equipment Components*
STARTING OUT
Wear athletic shoes and comfortable light clothing when exercising on your Total
Gym
®
. Do not exercise barefoot. Check your exerciser before use to ensure that all the
parts are in place and working properly
(see page 12 for details of the inspection
process).
Adult supervision is required whenever a child is on or near this exerciser.
Begin using the product at a low incline. As your fitness level progresses, increase
the incline to increase the intensity and improve your muscle strength. Don’t be in a
hurry to exercise at a high intensity level; start out easily and build gradually. Total
Gym
®
is as easy as 1-2-3 to use, so read on.
1. Important Things to Remember When Using Total Gym
®
• Always have control of the glideboard before getting on and off the exerciser.
• Keep your feet on the floor when getting on and off the exerciser. Only remove
them from the floor for the duration of the exercise.
• If you are using the handles, hold onto them as you get on and off the
glideboard.
2. Exercising with the Handles Only
Grasp the handles which are attached to the cable and slide the glideboard to
a position in which you can comfortably sit or lay down on when performing the
desired exercise. Be sure to keep your feet on the floor until you are
in the correct position for the specific exercise. Then, if the exercise calls for
your feet to be off the floor, place your feet as specified in the instructions.
3. Exercising with the Squat Stand Only
Slide the glideboard to a position in which you can comfortably sit or lay down
on when performing the desired exercise. Keep your feet on the ground until
you are in the correct position and feel comfortable. Then, place your feet in the
proper position and begin to exercise.
When starting your exercise program, begin with the basic exercises in the
Training
Deck
included with your Total Gym®to familiarize yourself with the movements. Use
the lowest incline level to start with—you can work up to a higher incline level in the
weeks and months to come.
For the specific Total Gym®exercises and programs, follow the exercises in
the
Total Gym Training Deck included with your Total Gym®.
Page 7

3. Position one foot on back crossbar to
keep the product from lifting off the
floor. (a) With one hand on the frame,
grasp the height adjustment lever and
lower the frame until it rests on the back
crossbar. (b) Then, push the lever back
to its original position.
(It should be flat against the support
column.)
4. Pull the spring-loaded pin (red knob) to
disengage it and lower the support
column onto the center rail.
5. (a) With caution, to avoid pinched fingers or hands, lift up at the center of the
frame and fold the exerciser together.
(b) When it is completely folded, the
exerciser should be at a 90 degree
angle with the floor. The exerciser will
rest on the squat stand for support.
(Squat stand is an optional accessory).
6. You can store the exerciser in a closet
or against the wall. To store it under a
bed, simply lower the exerciser to the
floor, remove the squat stand, and roll
under the bed.
TO REMOVE THE GLIDEBOARD
You can also remove the glideboard if you need to fit the exerciser under
a narrow space (between 6” and 8”).
1. Remove the short safety hitch pin from the storage hole.
2. Disconnect the pulley from the hook on the underside of the
glideboard.
3. Next, lift up the glideboard and slide it off the frame of the exerciser.
When the bench is completely off the exerciser, set it aside.
4. Next, lower the exerciser to the floor, remove the squat stand, and
roll the exerciser under the desired area.
(Squat stand is an optional accessory).
— 13 — — 12 —
INSPECTION AND MAINTENANCE
INSPECT YOUR TOTAL GYM®PRIOR TO EACH USE
Before using your Total Gym®for your workout session, be sure to make the following
inspection:
• Make sure the equipment is fully opened and sitting on a solid level surface with
plenty of clearance on all sides.
• Check that the pulley is attached securely to the hook on the front underside of the
glideboard, as well as the uprights on the support column.
• Make sure that the eyebolts are securely fastened to each upright on the
support column.
• Check that the cables are traveling correctly in the groove of each pulley.
• Make sure the cable is securely fastened to each hand grip.
• Check the cable for signs of wear and tear.
• Check that the squat stand is installed correctly in the squat stand receptacles.
• Make sure the glideboard is gliding smoothly along the frame.
• Make sure all the safety hitch pins and height adjustment pin are securely in place
and locked into position.
ROUTINE MAINTENANCE
• Wipe down your Total Gym®after each use with a clean, damp (not wet) cloth. Do
not leave towels or workout clothing laying or hanging on the equipment.
• Periodically check the following parts for signs of fraying or other wear: the cable,
the pulleys, the wheels, the glideboard, the squat stand and the frame. If a part
needs replacement, do not use the equipment until it is repaired or replaced.
• Periodically remove the glideboard to clean rails and glideboard wheels.
See page 13, section “To Remove the Glideboard”, for details.
TO STORE YOUR TOTAL GYM
®
Follow these easy steps to store your Total Gym®properly:
1. First, remove all accessories and attachments.
2. Install a safety hitch pin (short) into the storage hole on
the glideboard.
(Continued...)
2.
5a. 5b.
Height
Adjustment
Lever
Frame
Support Column
3a.
3b.
Frame
Support Column
Squat Stand
(Optional)
3.
Squat Stand
(Optional)
Short Safety Hitch Pin
Weight Bar Hole
4.
Center Rail
Support Column
Spring-loaded Pin (Red Knob)
Hitch Pin and
Lanyard
CAUTION
USE CAUTION WHEN FOLDING THE EXERCISER—SERIOUS INJURY COULD RESULT
FROM PINCHED FINGERS OR HANDS.
CAUTION
THE GLIDEBOARD WEIGHS APPROXIMATELY 22 LBS. USE CAUTION WHEN LIFTING
IT OFF OF THE EXERCISER. LIFTING INCORRECTLY MAY RESULT IN USER INJURY.
Back Crossbar
Page 8

— 15 — — 14 —
TOTAL GYM®PARTS LIST
Key Part No. Part Description Qty
No.
1 805-213-00 Tube Cap - 32mm 2
2 S-250 Oval Squat Stand 1
3 805-152-00 Tube Cap - 50mm 2
4 805-156-00 Rubber Stop 3
5 805-142-00 Tube Cap - 25mm x 50mm 6
6 805-127-50 Tube Roller 2
7 805-162-00 Eyebolt - 8mm x 93mm 2
8 805-171-00 Washer - 8mm - Flat 6
9 805-179-01 Nylock Nut - 8mm 2
10 805-177-00 Tube Cap - 25mm Round 2
11 805-40950 Pulley Line Assembly 1
12 S-350 Glideboard Assembly 1
13 805-363000 Wheel 4
14 805-WA2 Wing Attachment 1
15 805-403-00 Accessory Hitch Pin(long) 2
Key Part No. Part Description Qty
No.
16 805-278-00 Lanyard w/Safety Hitch Pin 1
17 CT-1488 Training Deck 1
18 TFC-3500 Training Deck Holder 1
19 409-50H Nylon Strap Handles 2
20 41000 Quick Link 2
805-165-00 Safety Hitch Pin (short) 3
Not shown: (Optional)
805-PPB Press Up Bars 2
805-LPA Leg Pull Accessory 1
805-DBS Dip Bars 2
805-288-00 Weight Bar Kit 1
805-PILS Pilates Kit 1
S-805-217 Pilates Toe Bar 1
805-PILS24 Pilates 24-inch Rope 1
50005 Water Bottle 1
14
15
18
17
14
19
20
5
10
9
8
16
7
6
5
3
2
1
4
13
12
11
10
7
14
WORKOUT PROGRESS CHART
Use this sheet to keep a record of your workout progress over time. Before writing on it, make as many copies as you think you’ll need. We suggest you keep these in a notebook.
You will find it both informative and motivational to look back at what you’ve done. Plus, this data will help you to chart future fitness goals as you progress.
EXERCISE DATA PERSONAL DATA (Update weekly)
DATE WORKOUT EXERCISE(S) PERFORMED INCLINE REPS SETS DATE WEIGHT CHEST WAIST HIPS
TIME LEVEL (15-25) (1–3)
Page 9

— 17 — — 16 —
LIMITED LIFETIME WARRANTY
Total Gym Fitness, LLC warrants that under normal residential use, Total Gym®is
free from defects in material or workmanship. The duration of coverage of this
warranty varies depending on the part of equipment that is defective
(see chart
below).
This warranty is effective from the date of original purchase. This warranty
is valid only for the original owner of this exerciser and is not transferable.
The Total Gym Fitness, LLC obligation under this warranty is limited to replacing the
defective part(s); or, at its option, repairing or replacing (or refund in its sole
discretion) the product.
For service on this equipment, call 1.888.811.9740.
Improper or incorrectly performed repairs voids this warranty.
This warranty does not cover product damage attributable to misuse, abuse, neglect,
accidents, unauthorized alterations or repairs, failure to follow manufacturer’s
directions for use, improper maintenance, vandalism, usage for commercial or rental
purposes, or “ordinary wear and tear”. This warranty does not cover any separately
sold items, parts, or accessories.
Except for other written warranties issued by Total Gym Fitness, LLC applicable to new
Total Gym Fitness, LLC product or parts, no other express warranty is given or
authorized by Total Gym Fitness, LLC. Any implied warranty of merchantability or
fitness for a particular purpose is limited to the duration of this warranty. No agent or
retailer of Total Gym Fitness, LLC has authority to modify this warranty in any respect.
Total Gym Fitness, LLC may not be held liable for indirect or consequential damages
arising out of use or performance of this product. These include—but are not
necessarily limited to—loss of use of the product; loss of time, enjoyment, or
revenue; inconvenience; installation or removal costs; or other incidental or
consequential damages.
Some states do not allow limitations on how long an implied warranty lasts, or the
exclusion or limitation of incidental or consequential damages, so the above
limitation may not apply to you. This warranty gives you specific legal rights; you
may also have other rights which vary from state to state.
For service, call our Customer Service Department at: 1.888.811.9740
Part Warranty Coverage
Frame Lifetime Replace frame that is structurally defective
with a new frame or replace the entire unit.
All other parts 6 months Repair or replace defective part or product.
(includes wheels,
pulleys, cables)
TOTAL GYM®STARTER PROGRAM
The following workout, for men and women of all fitness levels, will get you
acquainted with your new Total Gym. You can view this workout in its
entirety as a work-along program in your
Total Gym: Start It Up! Video.
Follow this guide as you work-along or use it as a reference when you
can’t watch the workout.
This starter program has been designed as a circuit training program to maximize cardio
and strength training benefits. Start off with 15 repetitions of each exercise, moving from
one to the other with little or no rest in between. If you find that 15 reps are too easy,
increase the incline level on your Total Gym. If you are struggling with 10-12 reps, then
decrease your incline level.
See Total Gym: Start It Up! video for the work-along version of this program.
1. Squats 2. Single Leg Squats 3. Pull Ups
(Total Gym Starter Program continues on pages 18 - 19.)
A
B
A
B
A
B
Page 10

— 19 — — 18 —
4. Leg Curls (Seated or Lying) 5. Cross Cable Row 6. Bicep Curl
7. Outer Hip & Thigh 8. Oblique Twister 9. Seated Chest Press
10. Pullover 11. Pullover with Crunch 12. Lying Triceps Extension
13. Shoulder Press 14. Core Extension 15. Toe Touch Stretch
A
B
A
B
A
B
A
B
A
B
A
B
A
B
A
B
A
B
A
B
A
B
A
 Loading...