

Toshiba VTV2134 User Guide

MODEL VTV2134 USER GUIDE
5B50201 Cov.-In 3/4/2002, 15:421
Combination 21" TV/
Video Recorder
FASTEXT
IMPORTANT
Unauthorized recording of copyright television programmes, films, video tapes and other materials
may infringe on the rights of copyright owners and be contrary to copyright laws.
WARNING
To prevent fire or shock hazard, do not expose this equipment to rain or moisture.
MAINS SUPPLY
This unit is designed to operate from AC 230~240V 50Hz household mains supply.
This unit is supplied with an approved 13 amp (BS 1363) fused mains plug. When replacing the fuse
always use a 5 amp (BS 1362) approved type.
If the mains sockets in your home differ or are not suitable for the type of plug supplied, then the plug
should be cut from the mains lead and a suitable type fitted.
WARNING: If the mains plug is cut from the mains lead of this appliance the plug must be destroyed. A
mains plug with bared wires is hazardous if engaged in a mains output line socket.
You must use a 13 amp plug (BS 1363) and fit a 5 amp fuse (BS 1362). If any other type of plug is used
a 5 amp fuse must be fitted, either in the plug, adaptor or at the distribution board.
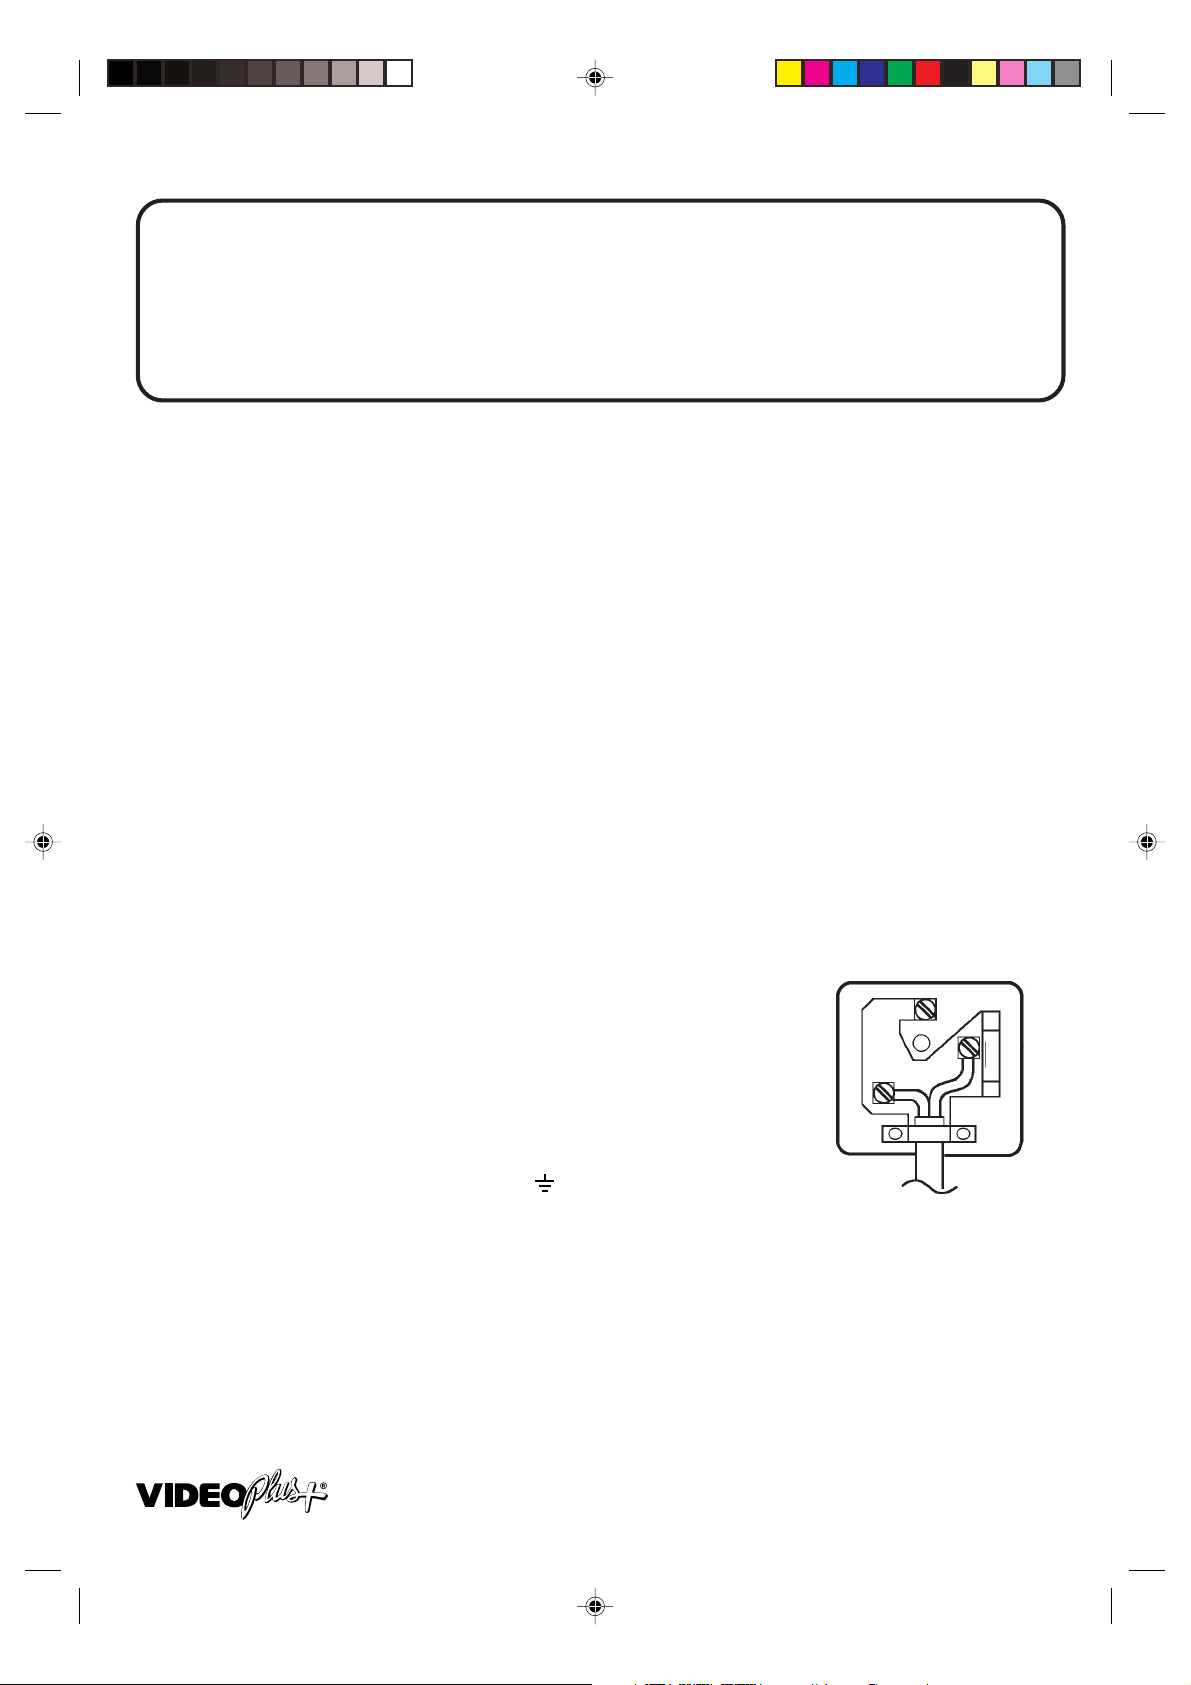
WIRING INSTRUCTIONS
The wires in the mains lead are coloured in accordance with the following code:
BLUE — NEUTRAL
BROWN — LIVE
As the colours of the wires in the mains lead of the appliance may not
correspond to the coloured markings identifying the terminals in your
plug, proceed as follows:
The wire which is coloured BLUE must be connected to the terminal
which is marked with the letter N or coloured black.
The wire which is coloured BROWN must be connected to the terminal
which is marked with the letter L or coloured red.
No connection is to be made to the Earth (E, ) terminal.
HQ
This TV/VTR is equipped with HQ (High Quality) recording capability. A built-in detail enhancer is used to
boost the recorded signal for cleaner, sharper images and maximum picture playback.
VIDEO Plus+ and PlusCode are registered trademarks of Gemstar Development Corporation.
The VIDEO Plus+ system is manufactured under license from Gemstar Development Corporation.
5B50201 Cov.-In 3/4/2002, 15:422
FEATURES
• Auto Set Up (Channel and Clock)
• FASTEXT Function
• 1 Month, 8 Programmes Timer
• One-Touch Timer Recording (OTR)
• 30 Minutes Back Up
• Real Time Tape Counter with Zero Return
• NTSC Playback (PAL 60Hz)
• Picture Control Adjustments
• TV Monitor
®
• VIDEO Plus+
Recording System
• NICAM Stereo
• Video Index Search System
• Digital Auto Tracking
• Auto Head Cleaning
• ON/OFF Timer
• Auto Power On/Auto Play
• Auto Rewind/Auto Eject
• Dual Picture Search
• 2 Speed (SP/LP) Record/ Playback
• Sleep Timer
• Auto Repeat Play
• Slow Motion
• Frame Advance
CONTENTS
PREPARATION
PRECAUTIONS .................................................................................................................................................... 2
LOCATION OF CONTROLS ................................................................................................................................. 4
REMOTE CONTROL ............................................................................................................................................ 5
AERIAL CONNECTIONS ...................................................................................................................................... 7
TV OPERATION
AUTO SET UP ....................................................................................................................................................... 8
MANUAL CLOCK SETTING .................................................................................................................................. 9
MANUAL TUNING ............................................................................................................................................... 10
TV OPERATION .................................................................................................................................................. 12
PICTURE CONTROL ADJUSTMENTS ............................................................................................................... 14
TO SET THE ON TIMER ..................................................................................................................................... 16
TO SET THE OFF TIMER....................................................................................................................................17
PLAYBACK
LOADING AND UNLOADING THE VIDEO CASSETTE TAPE ........................................................................... 18
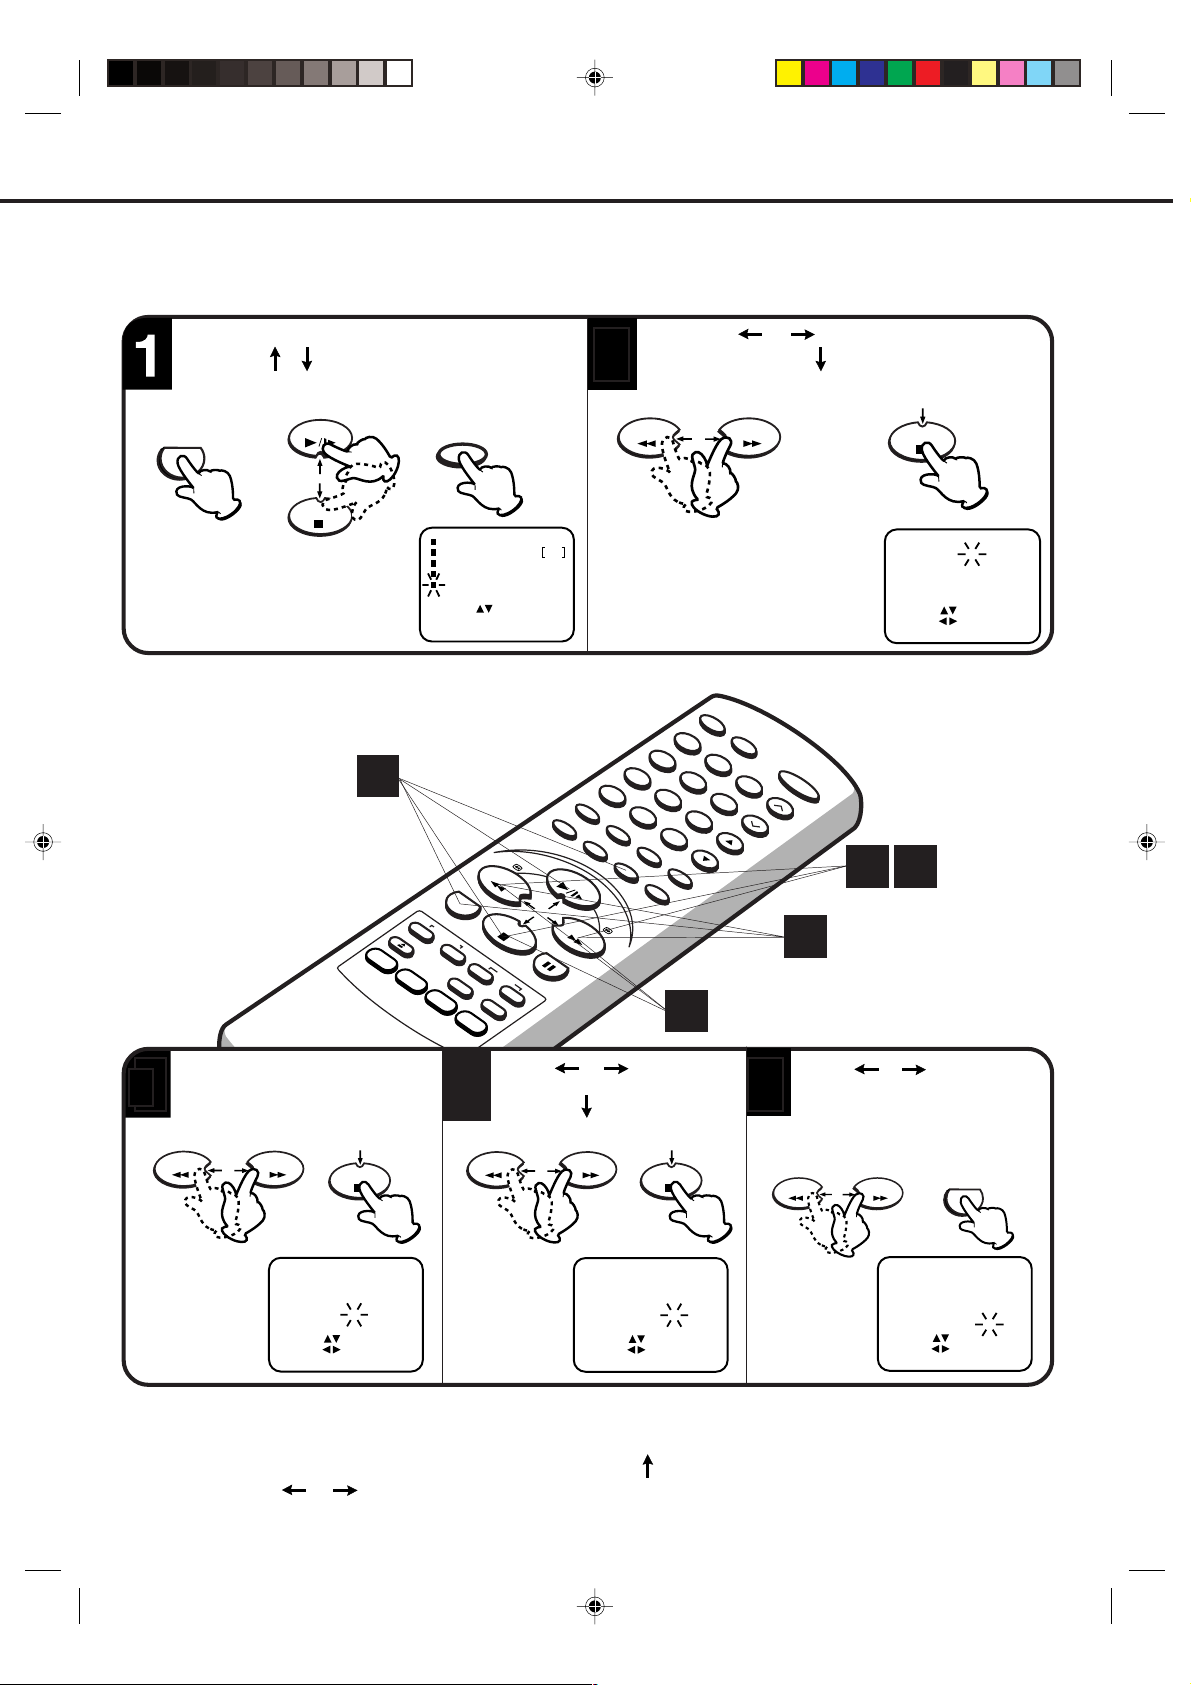
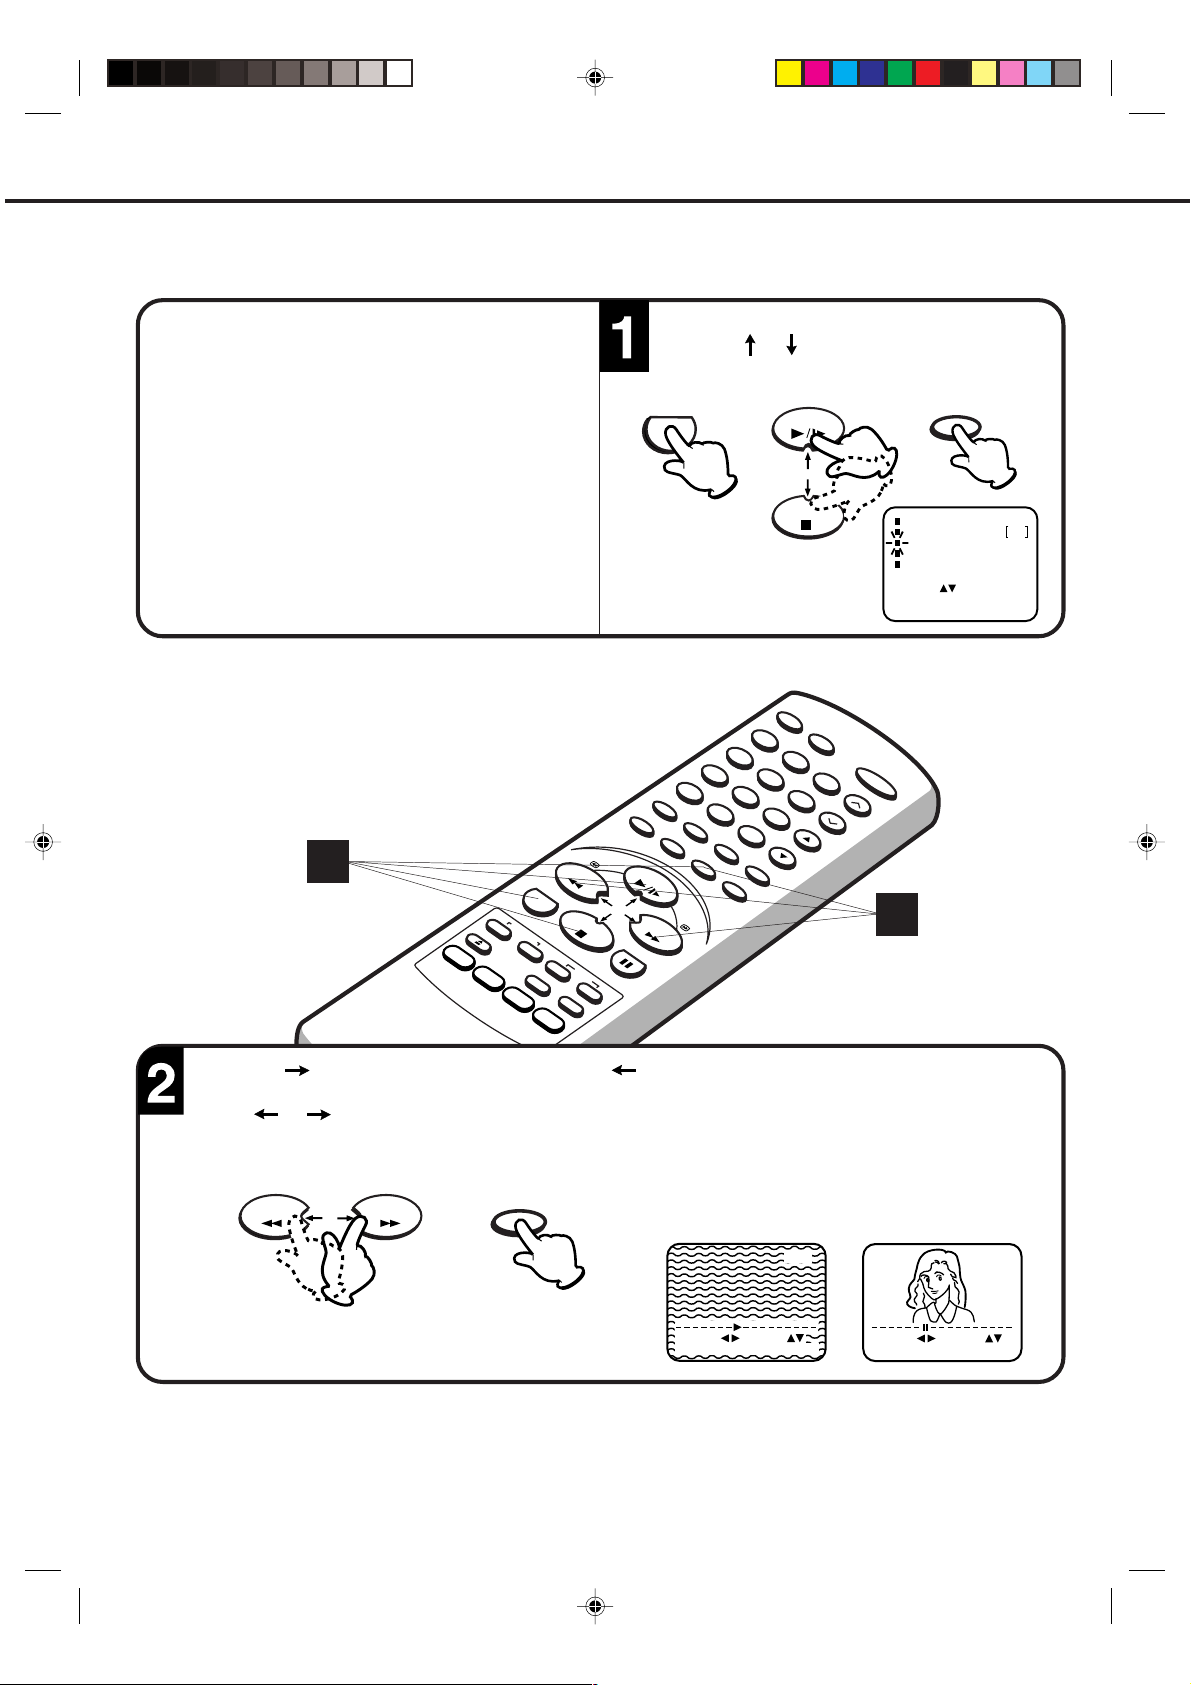
PLAYBACK .......................................................................................................................................................... 20
SPECIAL PLAYBACK ..........................................................................................................................................22
RECORDING
RECORDING A TV PROGRAMME ..................................................................................................................... 24
VIDEO PLUS+ TIMER RECORDINGS ................................................................................................................26
TIMER RECORDING ...........................................................................................................................................28
OTHER FUNCTIONS FOR TIMER RECORDING ............................................................................................... 30
ONE-TOUCH TIMER RECORDING (OTR) ......................................................................................................... 31
NICAM STEREO RECORDING AND PLAYBACK .............................................................................................. 32
OTHER FUNCTIONS
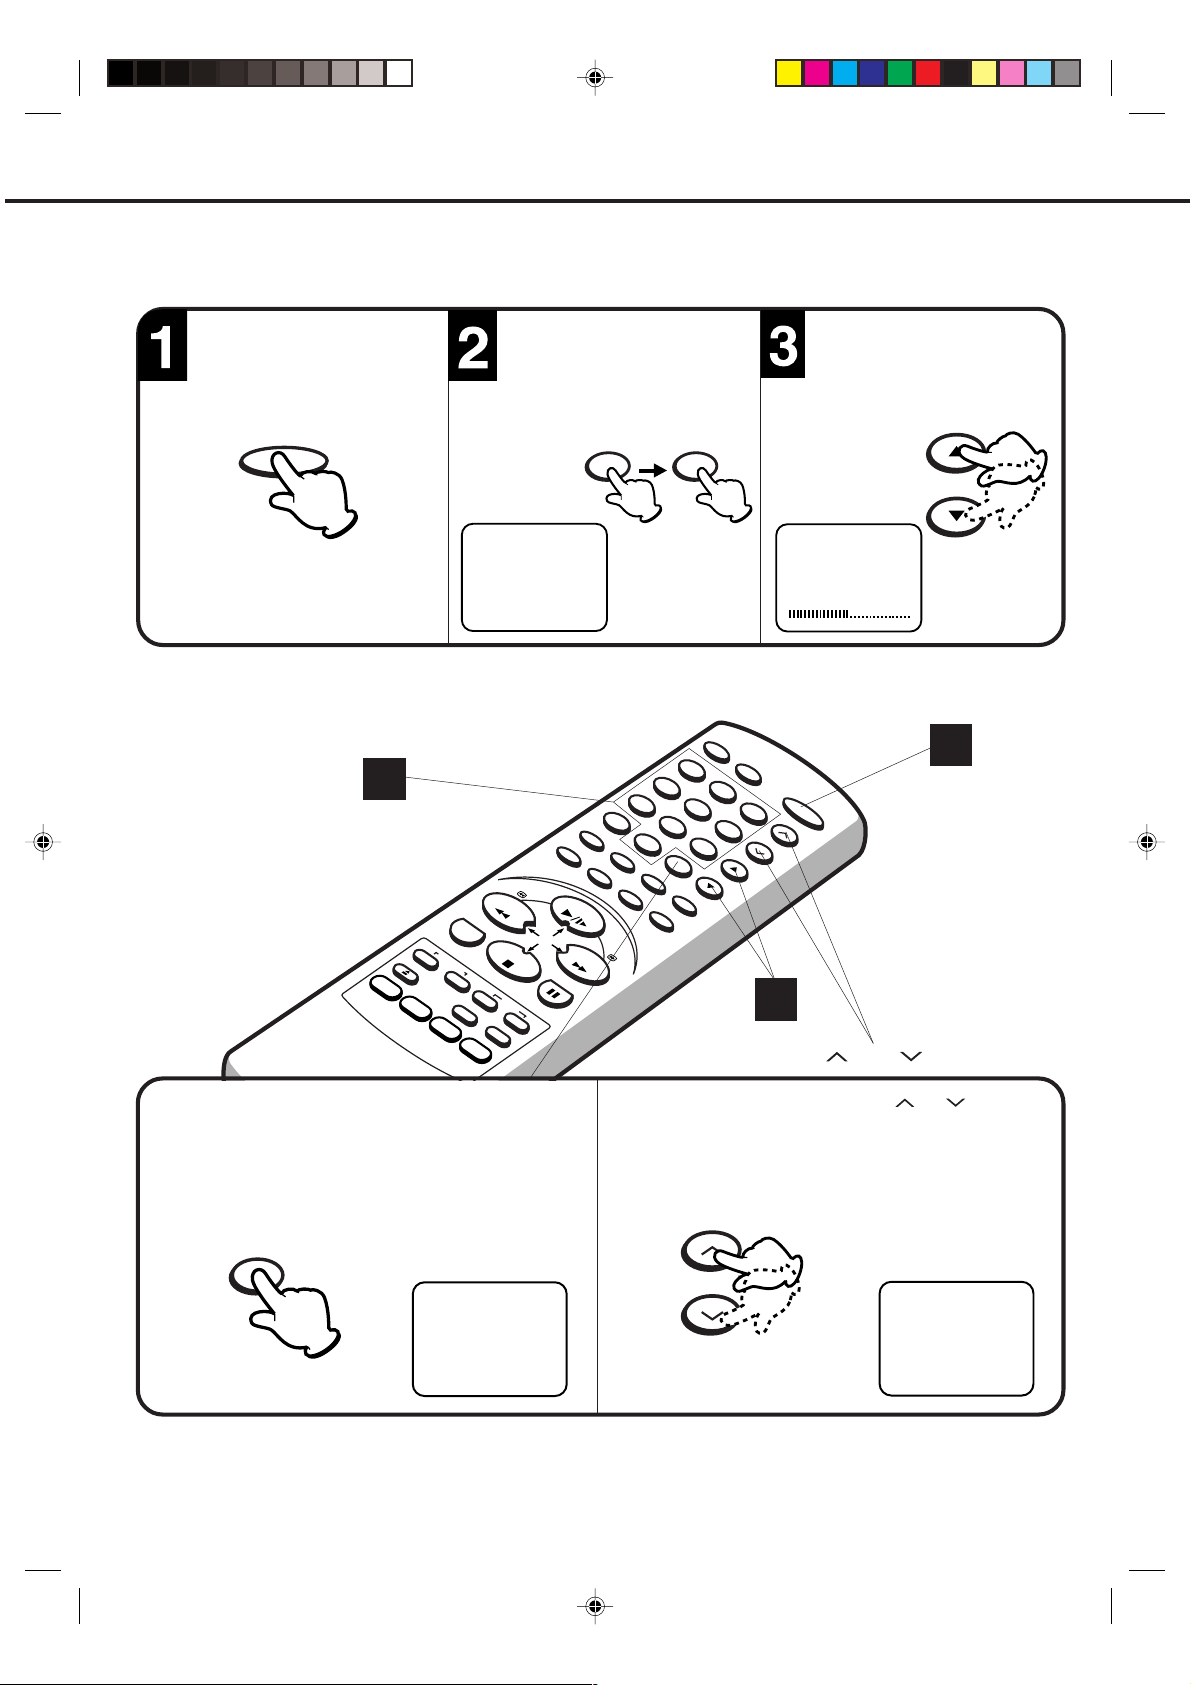
USING THE REAL TIME TAPE COUNTER ........................................................................................................ 34
USING ZERO RETURN .......................................................................................................................................35
VIDEO INDEX SEARCH SYSTEM (INDEX) ........................................................................................................ 36
DUPLICATING A VIDEO TAPE ...........................................................................................................................37
FASTEXT .............................................................................................................................................................38
BEFORE REQUESTING SERVICE ..................................................................................................................... 40
RECEPTION DISTURBANCE ............................................................................................................................. 42
SPECIFICATIONS ............................................................................................................................................... 43
5B50201 P01-09 3/4/2002, 15:421
1
PRECAUTIONS
DO read the operating instructions before you attempt to use the equipment.
DO consult your dealer if you are ever in doubt about the installation, operation or safety of your
equipment.
DO NOT remove any fixed cover as this may expose dangerous voltages.
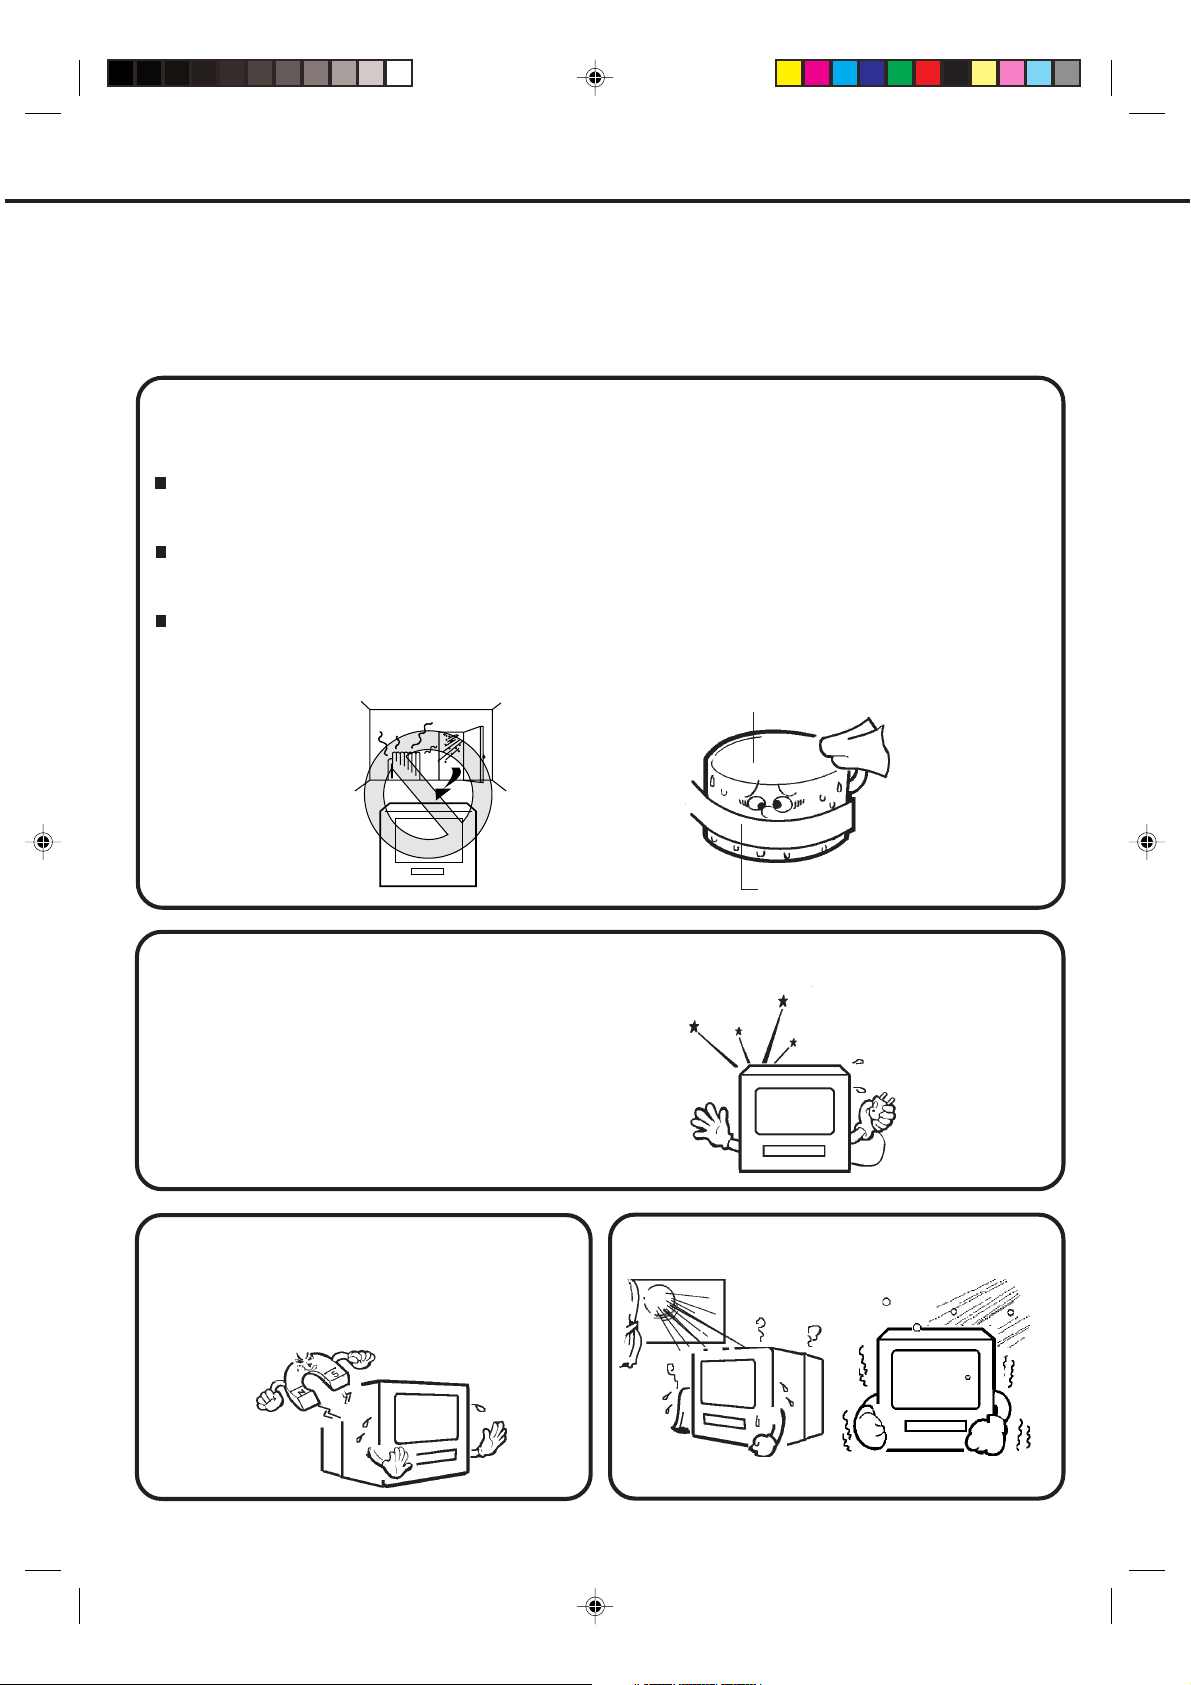
DO NOT place hot objects such as candles or nightlights on, or close to, the equipment. High
temperatures can melt plastic and lead to fires.
MOISTURE CONDENSATION
If the unit is suddenly moved from a cold place to a warm place, moisture may form inside the unit. In
this case, do not operate it for two or three hours.
WHAT IS MOISTURE CONDENSATION?
When cold water is poured into a glass, for, example, water vapor in the air will condense on the surface of
the glass. This is called moisture condensation.
MOISTURE WILL CONDENSE ON THE UNIT IN THE FOLLOWING CASES;
• When you move the unit from a cold to a warm place.
• After heating a cold room or under extremely humid conditions.
IF YOU EXPERIENCE THE ABOVE CONDITIONS;
Plug the AC cord to AC outlet, set the Main Power Switch to ON and leave the unit at the room temperature
until moisture condensation disappears. Depending on the surrounding conditions, this may take two or
three hours.
Head Drum
Video Tape
Under certain conditions, such as low humidity or walking across wool carpet, you may experience
a static discharge when touching the TV/VTR. If this happens and it fails to function, follow the
procedure below.
1)
Un-plug the TV/VTR from the AC outlet.
2)
Wait for static charge to disappear, this may
take two or three hours.
3)
Re-plug the unit again.
Do not place the unit on or near appliances
which may cause electromagnetic interference
eg. TV or hi-fi speakers, etc. Doing so may
affect operation of unit causing erratic playing
or recording, picture or sound distortion, or
noise.
Avoid extreme heat and cold.
2
5B50201 P01-09 3/4/2002, 15:422
Avoid extreme moisture and dust.
The ventilation holes prevent overheating.
Do not block or cover these holes. Especially
avoid covering the holes with soft materials
such as cloth or paper.
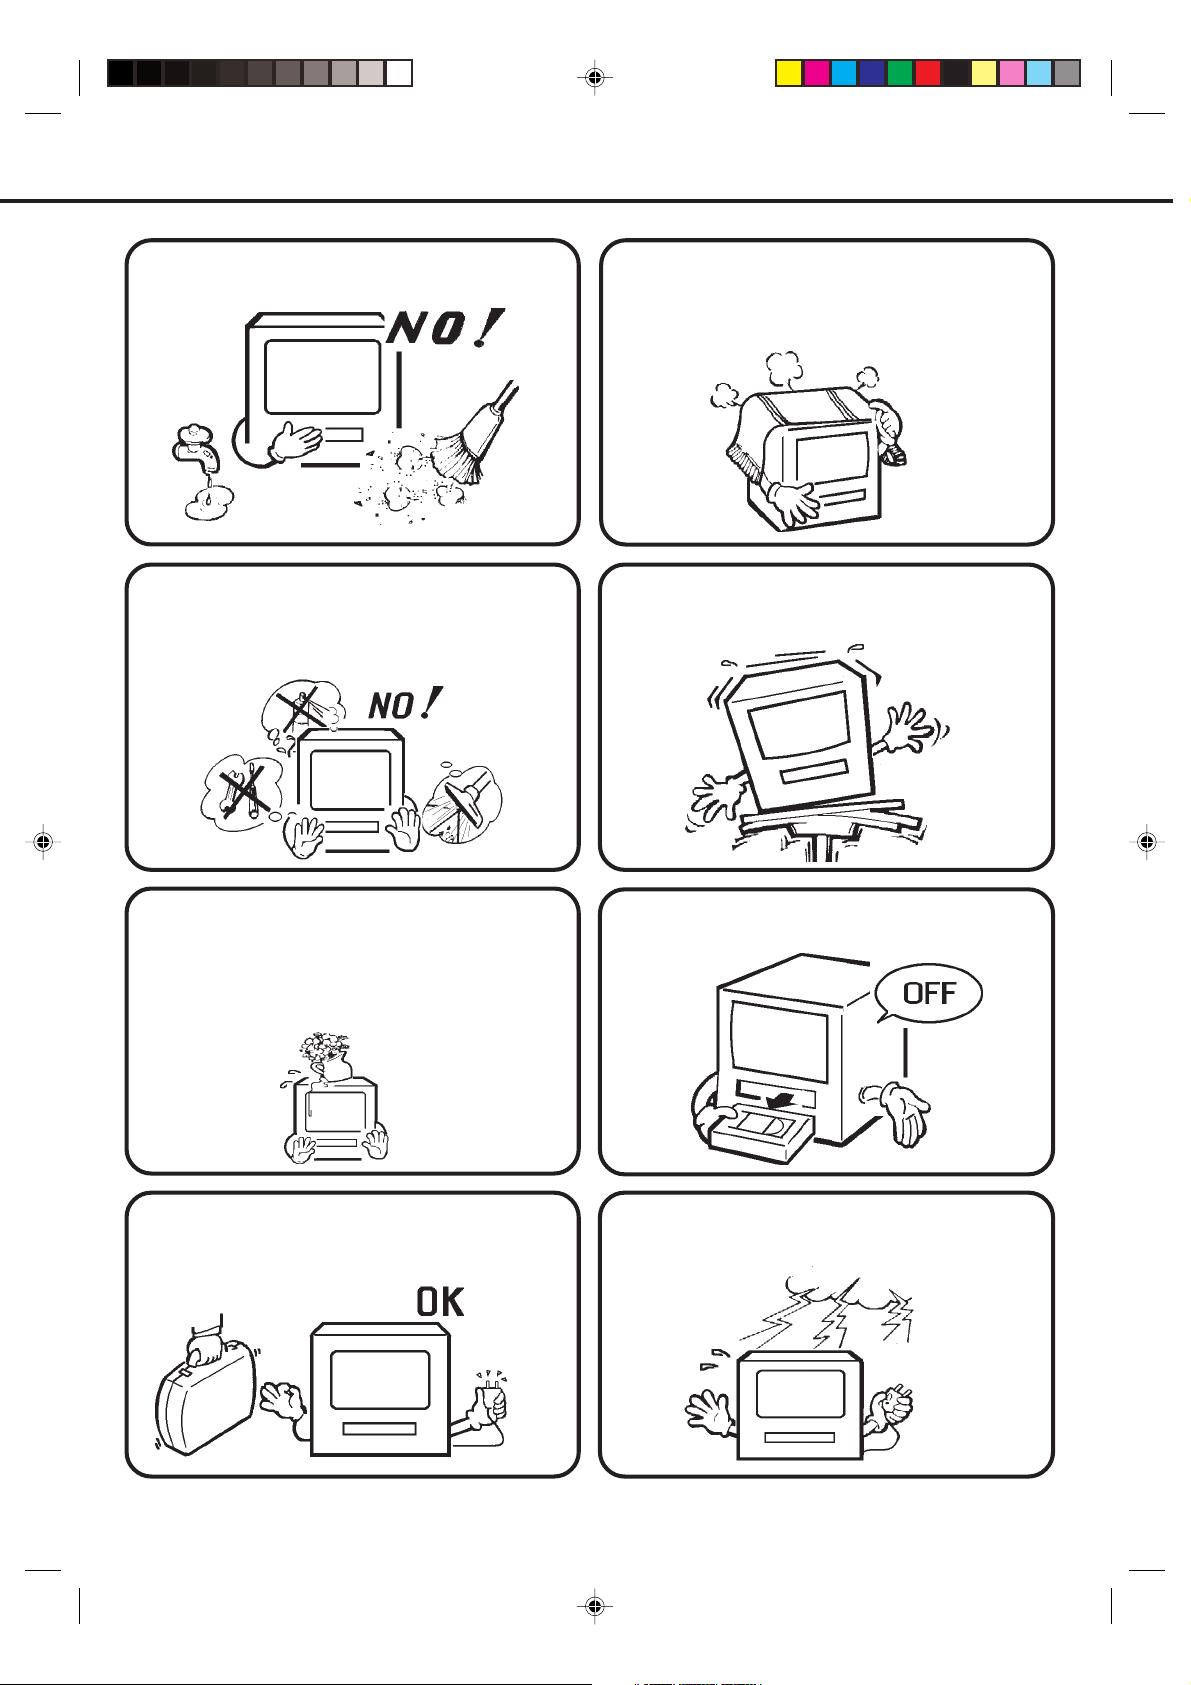
Do not insert fingers or any other objects into
the cassette loading slot. Do not spray
cleaner or wax directly on the unit or use
forced air to remove dust.
Keep the unit away from flower vases, sink etc.
Liquids spilled into the unit can cause serious
damages. Switch OFF the Power Supply to the
unit and consult a qualified service personnel
before attempting to use the unit again.
Place the unit on a flat, stable, level surface,
and never subject it to violent shaking or any
other shock or impact.
When you finish operating the unit, always
unload the cassette and turn off the power.
When you leave your home for a long period of
time, unplug the AC mains lead.
5B50201 P01-09 3/4/2002, 15:423
To protect the unit during a thunder storm,
unplug the AC mains lead from the wall outlet
and disconnect the antenna.
3
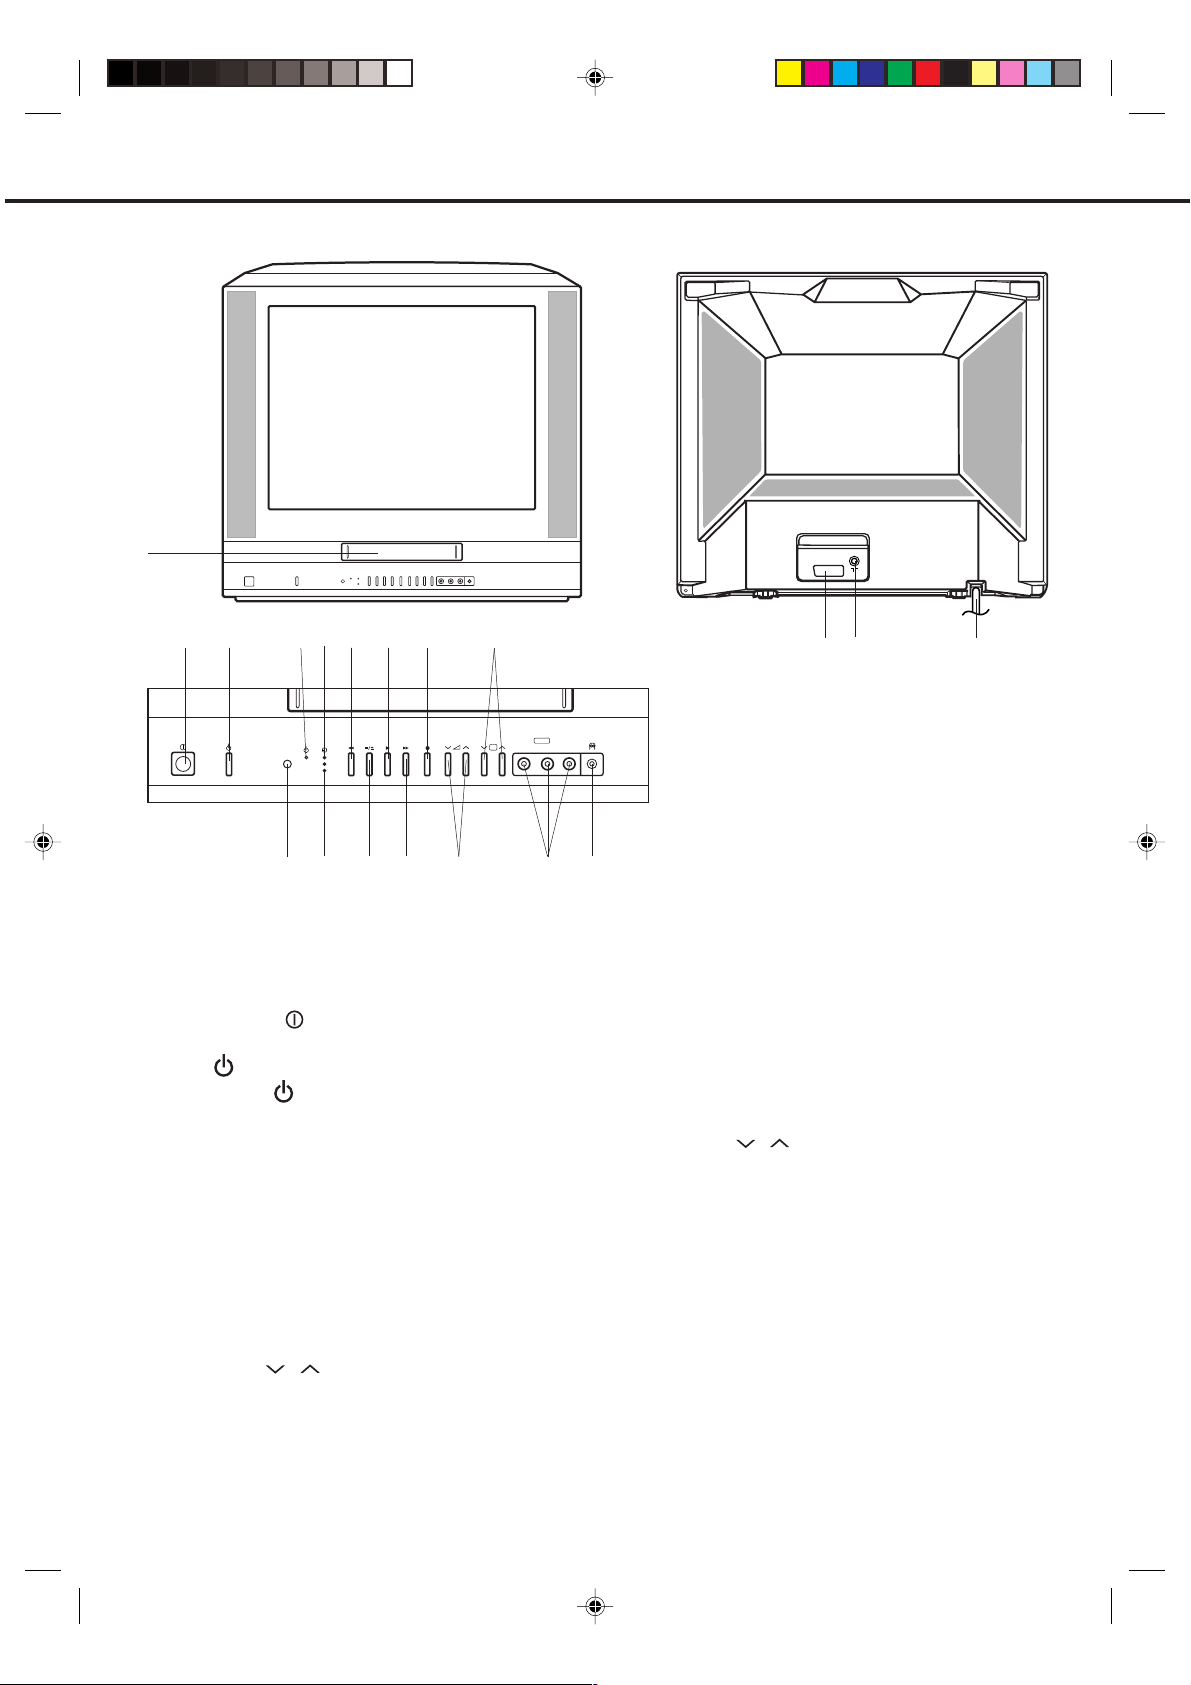
LOCATION OF CONTROLS
REARFRONT
1
2 3 4 6 7
10
1211
REC/OTR
8 95
AV 2
VIDEO
L/MONO-AUDIO-R
P
1513 14
DESCRIPTION OF CONTROLS
FRONT:
1. Cassette Loading Slot - To insert or remove a
video tape.
2. Main Power (
on or off completely.
3. ON (
) Button - Press to turn the TV/VTR on or off.
4. STANDBY (
Power switch is turned on.
5. TIMER REC Indicator - This lights when the
TIMER REC buttons are pressed.
6. REW (Rewind) Button - In the Stop mode, this
button rapidly winds the tape backwards. In the
Play mode, this button activates reverse search.
7. PLAY Button - Press to play a prerecorded tape.
8. REC/OTR Button - Press once to start normal
recording. Additional presses activate One-Touch Timer
Recording.
9. CHANNEL / Buttons - Press to select a
channel for viewing or recording.
10. Remote Sensor - Signals from the Remote Control
are received here.
) switch - Turn the TV/VTR power
) Indicator - Lights when the Main
4
AERIAL
AV1
17 18
19
16
11. REC/OTR Indicator - Lights when the TV/VTR is
recording.
12. STOP/EJECT Button - Press once to stop the tape
in any mode. Press again to eject the tape.
13. FF (Fast Forward) Button - In the Stop mode, this
button rapidly winds the tape forward. In the Play
mode, this button activates forward search.
14. VOLUME / Buttons - Press to raise or lower
the volume of the sound.
15. AUDIO (L/R)/VIDEO IN Jacks - Audio and video signal cables from an external source can be connected
here.
16. PHONES socket - Plug stereo headphones or an
earphone with a 3.5 mm miniplug into this socket
for private listening.
REAR:
17. 21 pin SCART socket - Scart lead from an external
source can be connected here.
18. Aerial socket - Connect an outdoor aerial to this
socket.
19. MAINS LEAD - Connect to a 230~240V, 50Hz AC
outlet.
5B50201 P01-09 3/4/2002, 15:424
FFREW
STOP
MENU PAUSE/STILL
TIMER
REC
REC/OTR
TEXT/MIX/TV A. SELECT
EJECT
VIDEO PLUS+/
PROGRAM
SP/LP
CALL 0 / AV MUTE
SLEEP
CH/PAGE/TR
ON/
STANDBYTV MONI.
VOLUME
ENTER/
HOLD
CANCEL/
F/T/B
INDEX
SUB PAGE
ATR
REVEAL
COUNTER
RESET
ZERO
RETURN
PLAY/SLOW
0
879
654
321
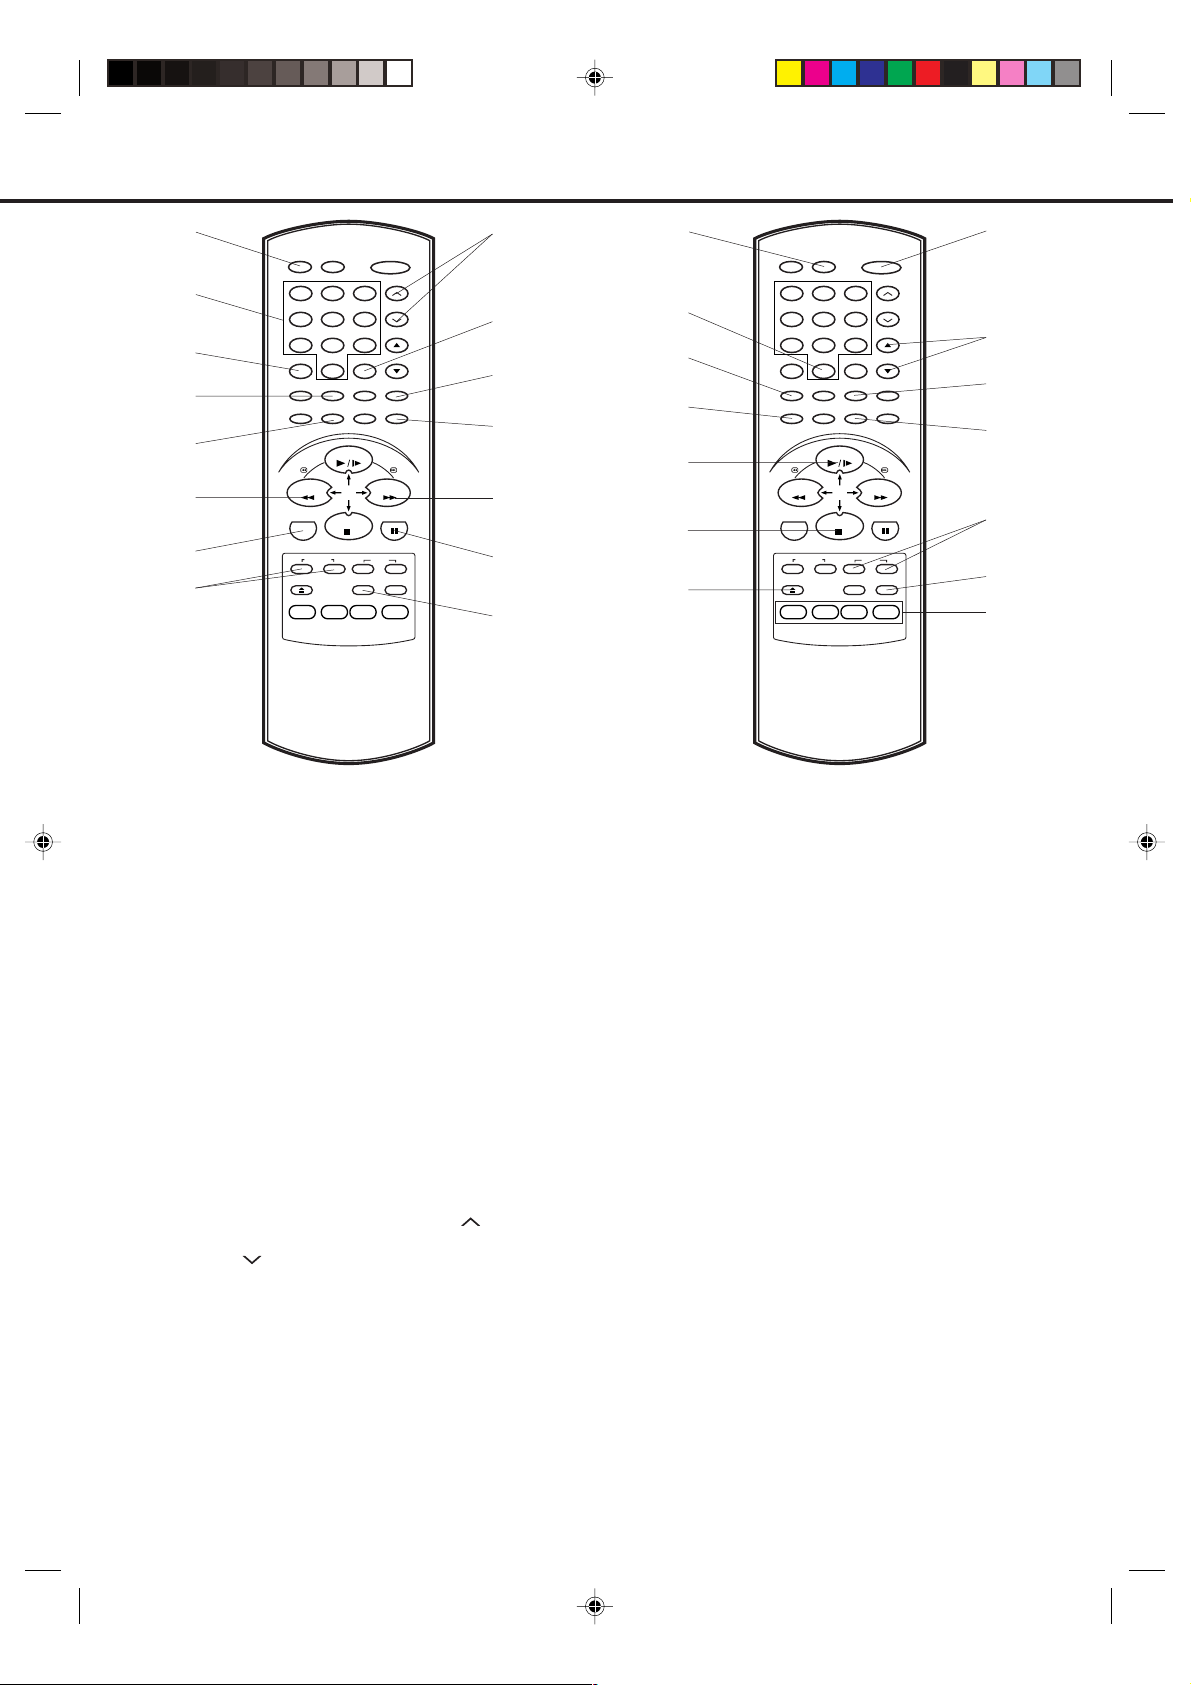
REMOTE CONTROL
1. TV MONI. Button - Used to temporarily view a TV
2. Direct Channel Selection Buttons (0-9) - Allows
3. CALL Button - Displays the present time/day of the
4. ZERO RETURN Button - Used to stop the tape
5. SP/LP Button - Sets the tape speed for recording.
6. REW (Rewind) Button - In the Stop mode, this
7. MENU Button - Press to display the On-Screen
8. REC/OTR Buttons - Press once to start normal
9. CH/PAGE/TR Buttons - Press the
10. MUTE Button - Press to turn off the sound. Press
11. ATR (Auto Tracking) REVEAL Button - Automatic
12. CANCEL F/T/B Button - Used to clear the selected
13. FF (Fast Forward) Button - In the Stop mode, this
1
SLEEP
2
3
4
CALL 0 / AV MUTE
COUNTER
RESET
RETURN
VIDEO PLUS+/
PROGRAM
ON/
STANDBYTV MONI.
321
CH/PAGE/TR
654
879
VOLUME
0
INDEX
SUB PAGE
ENTER/
HOLD
ATR
REVEAL
CANCEL/
F/T/B
ZERO
SP/LP
9
10
11
12
5
6
7
8
PLAY/SLOW
FFREW
MENU PAUSE/STILL
STOP
REC/OTR
EJECT
TIMER
REC
TEXT/MIX/TV A. SELECT
13
14
15
DESCRIPTION OF CONTROLS
channel selected on the TV/VTR while in the
playback or recording.
direct access to any channel.
week, channel, counter, speed selection (and VTR
mode if VTR is playing) on the TV screen.
when the counter reaches 00:00:00.
button rapidly winds the tape backwards. In the Play
mode, this button activates reverse search. Used to
go backward the tape one frame at a time during
still playback. Used to set or adjust in the menu mode.
menu function.
recording. Additional presses activate On-touch
Timer Recording.
change a higher numbered channel set into memory.
Press the
channel set into memory. During playback, they are
used to adjust tracking manually. Or used to utilize the
Fastext.
button to change to a lower numbered
again to turn the sound back on.
adjustment of tracking to minimize picture noise during playback. Or used to utilize the Fastext.
program or used to utilize the Fastext.
button rapidly winds the tape forward. In the Play
mode, this button activates forward search. Used to
go forward the tape one frame at a time during still
playback. Used to set or adjust in the menu mode.
button to
16
23
17
24
18
25
19
26
20
21
22
27
28
29
14. PAUSE/STILL Button - During recording, this button
temporarily stops the tape. During playback, it stops
the tape and displays a still image on the TV screen.
15. TEXT/MIX/TV Button - Press the TEXT/MIX/TV
button to select fastext operation.
16. SLEEP Button - Sets the TV to turn off automatically
after up to 120 minutes.
17. AV Button - Select input signal source when
recording from an external unit.
18. COUNTER RESET Button - Used to reset the
counter to 00:00:00.
19. VIDEO PLUS+/PROGRAM Button - Press to confirm
the programmed timer recording and ON/OFF timer
used to utilize the VIDEO Plus+ timer recordings.
20. PLAY/SLOW Button - Press to play a prerecorded
tape. Press to play back a tape in slow motion. Used
to set or adjust in the menu mode.
21. STOP Button - Press once to stop the tape. Used
to set or adjust in the menu mode.
22. EJECT Button - Press to eject the tape.
23. ON/STANDBY Button - Press to turn the TV/VTR
on. Press again to turn the TV/VTR off.
24. VOLUME ▲ / ▼ Buttons - Press the ▲ button to
increase, or the ▼ button to decrease the volume level.
25. INDEX SUB PAGE Button - Used to search for the
INDEX mark or used to utilize the Fastext.
26. ENTER/HOLD Button - Use to enter information in
the menu mode or used to utilize the Fastext.
27. TIMER REC Buttons - Used to set the TV/VTR to
start recording at a preset time.
28. A. SELECT Button - Switches sound between mono
and stereo.
29. FOUR COLORED FASTEXT Buttons - Press one
of the button to access the Fastext information
(See page 38 for details).
5
5B50201 P01-09 3/4/2002, 15:425

REMOTE CONTROL (CONTINUED)
BATTERY INSTALLATION
Open the battery compartment cover.
Install two “AAA/R03/UM-4”
(penlight size) batteries.
Replace the cover.
BATTERY CAUTIONS
• Use two "AAA/R03/UM-4" size penlight batteries for the remote control transmitter.
• The batteries may last approximately one year depending on how much the remote control is used. For best
performance it is recommended batteries be replaced on a yearly basis, or when remote operation becomes
erratic.
• Do not mix old and new batteries.
• Weak batteries can leak and severely damage the remote control transmitter. Always remove batteries as
soon as they become weak.
EFFECTIVE DISTANCE OF THE REMOTE CONTROL TRANSMITTER
NOTE: • When direct sunlight, an incandescent lamp, fluorescent lamp or any other strong light shines on the
remote sensor, the remote operation may be unstable.
• When there is an obstacle between the TV/VTR and the transmitter, the remote control transmitter may
not operate.
6
5B50201 P01-09 3/4/2002, 15:436
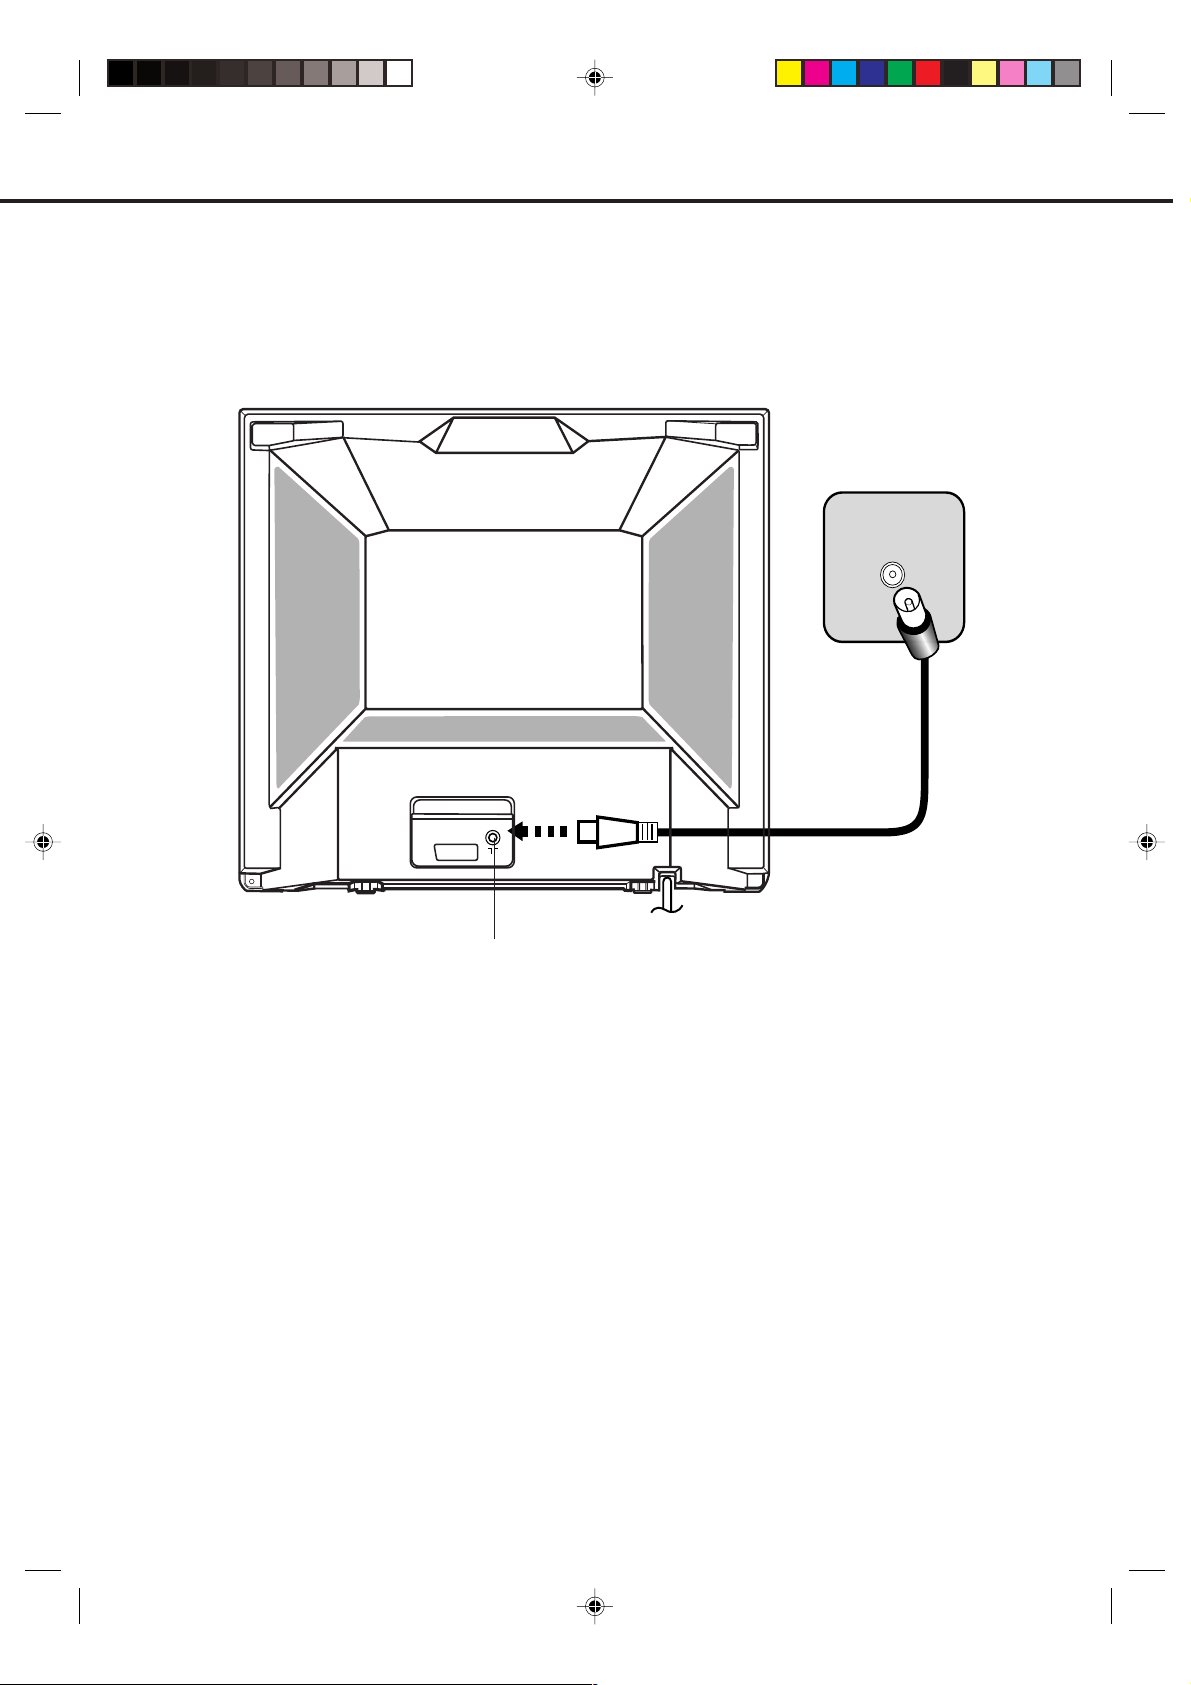
AERIAL CONNECTIONS
Connect an aerial to the aerial socket at the rear panel as shown below.
For all aerial circuit problems, please consult your local dealer.
AERIAL
Wall Socket
AERIAL
AV1
Aerial socket
EXTERNAL AERIAL
The type of aerial required depends on the position of your home, it's distance from the transmitter and local
interference. If you do not have an aerial and you are uncertain of what to buy, you should seek the advice of a
local aerial contractor.
5B50201 P01-09 3/4/2002, 15:437
7
AUTO SET UP
Make sure an aerial lead is connected from your household aerial (page 7).
You must follow the instructions on this page carefully.
Your TV/VTR will not function properly until Auto Set Up has been completed.
What is Auto Setup
• The AUTO SET UP feature makes installing your
TV/VTR easy. It automatically searches and tunes
all available TV Stations and stores them in your
TV/VTR, it then sets the correct time and date.
• During a power failure or disconnection of the
mains lead, the clock and all its programmed
setting will remain in the memory for 30 minutes. If
the power failure is longer than 30 minutes you will
have to reset the present time.
Make sure an aerial lead is connected from your
household aerial or cable box (if you subscribe to
a cable service).
Plug your TV/VTR into a mains socket.
Press MAIN POWER (
VTR. The STANDBY indicator on the TV/VTR
2
lights.
NOTES: • To re-start AUTO SET UP, press and hold CHANNEL and buttons on the TV/VTR together for
more than a few seconds.
• Once you conduct AUTO SET UP, the previous settings will be cancelled.
) switch on the TV/
Press ON ( ) button on the TV/VTR. The
STANDBY indicator on the TV/VTR turns off.
3
"AUTO TUNING" appears on the screen. Your
TV/VTR is now automatically tuning in all available
TV stations and setting the correct time and date.
If the desired TV stations could not be preset,
set the channels manually. See page 10. If the
clock could not be set, set the clock manually.
See page 9.
AUTO TUNING
8
5B50201 P01-09 3/4/2002, 15:438
MANUAL CLOCK SETTING
FFREW
STOP
You must set the correct time and date on your TV/VTR before you make Timer recordings. You should only need to
set the time manually if it was not set during Auto Set Up.
EXAMPLE: Setting the clock to 11:30, 26th October, 2002.
Press the MENU button.
Press the or button to select the CLOCK SET
mode, then press the ENTER button.
MENU
PLAY/SLOW
STOP
ENTER/
HOLD
TIMER REC SET
AUTO REPEAT OFF
CH TUNING
TV SETUP
CLOCK SET
:
SELECT
: ENTER
ENTER
: MENU
EXIT
1
REW
MENU
TEXT/M
STOP
TIMER
REC
IX/TV
A. SELECT
EJECT
REC/OTR
VIDEO PLUS+/
PROGRAM
PLAY/SLOW
FF
PAUSE/STILL
2
COUNTER
RESET
SP/LP
Press the or button to select the current
day, then press the button.
CALL
RETURN
ZERO
HOLD
7
ENTER/
0
O / AV
SUB PAGE
INDEX
4
8
CANCEL/
F/T/B
1
MUTE
REVEAL
5
ATR
9
TV MONI.
2
6
VOLUME
FFREW
SLEEP
3
CH/PAGE/TR
STANDBY
ON/
STOP
CLOCK SET
SELECT
SET
OK
2 3
DAY
MONTH
YEAR
TIME
AUTO TIME ON
5
4
:
:/ 0-9
: ENTER
26 SAT
1
2002
0:00
EXIT
: MENU
Set the month, year and hour
in the same way as in step 2.
3
NOTE:
FFREW
CLOCK SET
SELECT
SET
OK
During a power failure or disconnection of the mains lead the clock and all its programmed setting will
•
STOP
DAY
10
MONTH
2002
YEAR
11: 00
TIME
AUTO TIME ON
:
:/ 0-9
: ENTER
remain in the memory for 30 minutes. If the power failure is longer than 30 minutes you will have to reset
the present time.
If you want to correct the digits while setting, press the button until the item you want to correct, then
•
press the
5B50201 P01-09 3/4/2002, 15:439
or button to correct the desired setting.
26 SAT
EXIT
: MENU
Press or button to
select current minute, then
4
press the button. The time
and date will be displayed.
FFREW
CLOCK SET
SELECT
SET
OK
26 SAT
DAY
10
MONTH
2002
YEAR
11: 30
TIME
AUTO TIME ON
:
:/ 0-9
EXIT
: ENTER
: MENU
5
Press or button to select
ON. Your TV/VTR automatically
corrects the clock setting every
hour once you set AUTO TIME
to ON. Press MENU button to
return to normal TV screen.
MENU
CLOCK SET
SELECT
SET
OK
26 SAT
DAY
10
MONTH
2002
YEAR
11: 30
TIME
AUTO TIME ON
:
:
EXIT
: ENTER
: MENU
9
MANUAL TUNING
You should only need to manually tune channels on your TV/VTR if the Auto Set Up missed one station or you wish to
tune.
• Make sure that the MAIN POWER switch on the front
panel is pushed in (ON).
(The STANDBY indicator lights up.)
• Press the ON button to turn on the TV/VTR.
(The STANDBY indicator goes off.)
1
EJECT
REC/OTR
TEXT/M
MENU
IX/TV
A. SELECT
REW
STOP
TIMER
REC
Press the MENU button.
Press the or button to select the CH
TUNING mode, then press the ENTER button.
MENU
VIDEO PLUS+/
PROGRAM
PLAY/SLOW
FF
PAUSE/STILL
COUNTER
RESET
SP/LP
CALL
ZERO
RETURN
ENTER/
HOLD
7
O / AV
0
SUB PAGE
4
INDEX
CANCEL/
F/T/B
PLAY/SLOW
STOP
TV MONI.
1
SLEEP
2
5
ATR
9
6
VOLUME
3
CH/PAGE/TR
8
MUTE
REVEAL
TIMER REC SET
AUTO REPEAT OFF
CH TUNING
TV SETUP
CLOCK SET
SELECT
ENTER
EXIT
STANDBY
ON/
2
ENTER/
HOLD
:
: ENTER
: MENU
Press the button to search up the waveband or button to search down the waveband.
Each time a station is found the search will stop.
Press or button to continue searching until the station you want is found. When the cursor stops
flashing press ENTER button to store the station you have selected.
10
5B50201 P10-15 3/4/2002, 15:4310
ENTER/
FFREW
HOLD
SEARCH
EXIT
::/ F.TUNE
: MENU
CH 1
SEARCH
OK
: / F.TUNE
: ENTER
EXIT : MENU
CH 1
:

If you can not get a clear picture, press the or
button until the picture becomes clear.
When you have a clear crisp picture store this
setting by pressing ENTER button.
ENTER/
HOLD
PLAY/SLOW
Press the or button to select your required
channel number (1-80).
4
Press ENTER button to store the channel number.
ENTER/
HOLD
PLAY/SLOW
STOP
SEARCH
EXIT
3 4
6
The TV/VTR channels can be preset to different
TV broadcast channels at anytime simply repeat
5
steps 2-4.
: / F.TUNE
: MENU
EJECT
REC/OTR
MENU
TEXT/MIX/TV
CH 1
REW
TIMER
REC
A. SELECT
STOP
VIDEO PLUS+/
PROGRAM
PLAY/SLOW
FF
PAUSE/STILL
STOP
:/ 0-9
COUNTER
RESET
SP/LP
CALL
RETURN
ZERO
7
ENTER/
HOLD
0
O / AV
SUB PAGE
INDEX
4
8
CANCEL/
F/T/B
1
MUTE
REVEAL
OKCH: ENTER
TV M
ON
I.
SLEEP
2
5
6
9
VO
LUME
ATR
3
CH/PAGE/TR
STANDBY
ON/
EXIT : MENU
When all required stations have been set,
press the MENU button repeatedly to return to
normal TV screen.
CH 1
2
MENU
4
To skip a channel
If you wish to skip an unwanted channel when using CH/PAGE/TR or button, press CANCEL button when the
channel is displayed.
To cancel the skip function, select the channel with the number buttons then press CANCEL button.
5B50201 P10-15 3/4/2002, 15:4311
11
TV OPERATION
21
Press the ON button.
ON/
STANDBY
2
EJECT
REC/OTR
Press the Direct Channel
Selection buttons.
1-9:
Press one of keys 1-9
as required.
10-80:
Press the two digits in
order from left to right.
CH 2
VIDEO PLUS+/
PROGRAM
PLAY/SLOW
FF
PAUSE/STILL
TEXT/M
MENU
IX/TV
REW
STOP
TIMER
REC
A. SELECT
COUNTER
RESET
SP/LP
CALL
RETURN
ZERO
ENTER/
HOLD
The VOLUME can be adjusted
to a desired level by pressing
the VOLUME ▲ or ▼ button.
The VOLUME control is represented
by a green bar on the screen.
VOLUME
VOLUME 32
TV MONI.
1
5
ATR
9
2
6
VOLUME
SLEEP
3
CH/PAGE/TR
STANDBY
ON/
1
4
7
8
O / AV
0
MUTE
SUB PAGE
INDEX
REVEAL
CANCEL/
F/T/B
3
MUTE
To cut off the sound, press this button once. The TV/VTR
will be silenced and the symbol "MUTE" will appear on
the screen. The muting can be released by pressing the
USING CH/PAGE/TR OR BUTTON
Press and release the CH/PAGE/TR or button.
For channels to change properly, they must be tuned into
the TV/VTR memory.
MUTE button again or the VOLUME ▲ / ▼ buttons.
MUTE
MUTE
CH/PAGE/TR
NOTE: If the station being viewed stops broadcasting, the TV will shut off after 15 minutes.
12
5B50201 P10-15 3/4/2002, 15:4312
CH 2
CALL
Press the CALL button. The current time, channel number, real time tape counter, tape speed and VTR operation
will be indicated.
Press CALL button again to disappear the call display.
Current time
VTR operation
CALL
EJECT
REC/OTR
MENU
TEXT/MIX/TV
REW
STOP
TIMER
REC
A. SELECT
VIDEO PLUS+/
PROGRAM
PLAY/SLOW
FF
PAUSE/STILL
11 : 30 SAT
CH 2
01 : 30 : 21 SP
Real Time Tape Counter
TV MONI.
1
4
COUNTER
RESET
SP/LP
CALL
RETURN
ZERO
HOLD
7
0
ENTER/
O / AV
SUB PAGE
8
INDEX
CANCEL/
F/T/B
MUTE
REVEAL
2
5
9
VOLUME
ATR
Channel No.
Auto Repeat
Tape In
Tape Speed
SLEEP
STANDBY
3
6
CH/PAGE/TR
ON/
SLEEP
To set the TV to turn off at a set time, press the SLEEP button on the remote control. The clock will count down 10
minutes each time the button is pressed in the order of 120, 110.....20, 10, 0. After the sleep time is programmed,
the display will disappear and will reappear every 10 minutes. To confirm the sleep time setting, press the SLEEP
button once and the remaining time will be a momentarily displayed. To cancel the sleep time, press the SLEEP
button repeatedly until the display turns to 0.
SLEEP
SLEEP
90
NOTE: If the SLEEP button is pressed when the TV/VTR is the REC mode, the clock will count down and the picture
will shut off at the set time, but the recording continues.
5B50201 P10-15 3/4/2002, 15:4313
13
 Loading...