

Page 1

User’s Manual
Slim Port Replicator III
Page 2

Slim Port Replicator III
DANGER
WARNING
CAUTION
CAUTION
NOTE
WARNING
User’s Manual
Safety Icons
This manual contains safety instructions that must be observed to avoid
potential hazards that could result in personal injuries, damage to your
equipment, or loss of data. These safety cautions have been classified
according to the seriousness of the risk, and icons highlight these
instructions as follows:
Signal Words Meaning
Indicates an imminently hazardous situation
which, if not avoided, will result in death or
serious injury.
Indicates a potentially hazardous situation which,
if not avoided, could result in death or serious
injury.
Indicates a potentially hazardous situation which,
if not avoided, may result in minor injury or
moderate injury.
Indicates a potentially hazardous situation which,
if not avoided, may result in property damage.
Provides important information.
Safety Instructions
Always read the safety instructions carefully:
Do not disassemble, modify, tamper with or repair your product
n Do not attempt to disassemble, modify, tamper with or repair product
(including AC adaptor ). Disassembly, modification, tampering or
repairing the product could cause fire or electric shock, possibly
resulting in serious injury.
Please contact an authorized Toshiba service provider for any repair
service.
Handling the AC adaptor and power cables/cords or plugs
n When handling the power cable/cord, follow these precautions:
n Never tamper with the power cable/cord or plug.
n Never splice or alter a power cable/cord.
n Never bend or twist a power cable/cord.
n Never pull on a power cable/cord to remove a plug from a socket.
Always grasp the plug directly.
n Never place heavy objects on a power cable/cord.
EN-2 User’s Manual
Page 3

Slim Port Replicator III
n Never run a power cable/cord through a pinch point such as a door
or window.
n Never place a power cable/cord near a heat source.
n Never use nails, staples or similar objects to fasten or attach cord in
place.
n Never attempt to disassemble or repair an AC adaptor.
Doing any of the above may damage the cables, and/or result in a fire
or electric shock, possibly resulting in serious injury.
Attaching the power cable/cord
n Always confirm that the power plug (and extension cable plug if used)
has been fully inserted into the socket, to ensure a secure electrical
connection. Failure to do so may result in a fire or electric shock,
possibly resulting in serious injury.
n Be careful if you use a multiple connector. An overload on one socket
could cause a fire or electric shock, possibly resulting in serious injury.
Dust on the power plug connectors or connector base
n If dust gets on the power plug connectors or connector base, turn the
power off and disconnect the power plug. Then clean the connector
and/or connector base with a dry cloth. Continuing to use the product
without cleaning the power plug may result in a fire or an electric shock,
possibly resulting in serious injury.
Only use TOSHIBA AC adaptor
n Always use the TOSHIBA AC adaptor that was provided with your
product (that may have been provided with your product), or use AC
adaptors specified by TOSHIBA to avoid any risk of fire or other
damage to the product. Use of an incompatible AC adaptor could cause
fire or damage to the product possibly resulting in serious injury.
TOSHIBA assumes no liability for any damage caused by use of an
incompatible adaptor or charger.
Use correct power source
n Never plug the AC adaptor into a power source that does not
correspond to both the voltage and the frequency specified on the
regulatory label of the unit. Failure to do so could result in a fire or
electric shock, possibly resulting in serious injury.
Only use approved power cables/cords
n Always use or purchase power cables/cords that comply with the legal
voltage and frequency specifications and requirements in the country of
use. Failure to do so could result in a fire or electric shock, possibly
resulting in serious injury.
Do not handle the power plug with wet hands
n Never attempt to connect or disconnect a power plug with wet hands.
Failure to follow this instruction could result in an electric shock,
possibly resulting in serious injury.
User’s Manual EN-3
Page 4

Slim Port Replicator III
CAUTION
Choking hazards
n Never leave small parts such as covers, caps and screws within the
reach of infants or small children. Swallowing a small part may cause
choking and suffocation resulting in death or serious injury. If a part is
swallowed, immediately take appropriate emergency action and consult
a doctor.
Avoid liquids, moisture and foreign objects
n Never allow any liquids to spill into any part of your product, and never
expose the product to rain, water, seawater or moisture. Exposure to
liquid or moisture can cause electric shock or fire, resulting in damage
or serious injury. If any of these eventualities should accidentally occur,
immediately:
1. Turn off the product.
2. Disconnect the AC adaptor from the power plug socket and product.
Do not turn on the power again, until you have taken the product to an
authorized service center. Failure to follow these instructions could
result in serious injury or permanent damage to the product.
Never place your product or AC adaptor on a heat sensitive surface
n Never place your product or AC adaptor on a wooden surface, furniture,
or any other surface that could be marred by exposure to heat since the
product base and AC adaptor’s surface increase in temperature during
normal use.
n Always place your product or AC adaptor on a flat and hard surface that
is resistant to heat damage.
Never place your product in locations with excess heat
n Never place your product where it will be exposed to excess heat, such
as in direct sunlight, an unventilated vehicle or near a heater. This may
result in a system failure, malfunction, loss of data or damage to the
product.
Never place your product in a location with extremely low
temperatures
n Never place your product in a location where it will be exposed to
extremely low temperatures. This may result in a system failure,
malfunction or loss of data.
Never subject your product to sudden temperature variations
n Never subject your product to sudden temperature variations. This may
result in condensation, causing a system failure, malfunction or loss of
data.
Never operate your product during a thunderstorm
n Never operate your product on AC power during a thunderstorm. If you
see lightning or hear thunder, immediately turn off the product. An
electric surge caused by the storm, may result in a system failure, loss
of data or hardware damage.
EN-4 User’s Manual
Page 5

Table of Contents
Chapter 1 Introduction
Equipment Checklist . . . . . . . . . . . . . . . . . . . . . . . . . . . . . . . . . . . . . . . . 6
Features. . . . . . . . . . . . . . . . . . . . . . . . . . . . . . . . . . . . . . . . . . . . . . . . . . . 6
Quick Tour. . . . . . . . . . . . . . . . . . . . . . . . . . . . . . . . . . . . . . . . . . . . . . . . . 7
Special Features . . . . . . . . . . . . . . . . . . . . . . . . . . . . . . . . . . . . . . . . . . . 10
Chapter 2 Setting Up and Using the Slim Port Replicator III
Setting Up the Slim Port Replicator III . . . . . . . . . . . . . . . . . . . . . . . . . 11
Disconnecting the Slim Port Replicator III. . . . . . . . . . . . . . . . . . . . . . 13
Security Lock . . . . . . . . . . . . . . . . . . . . . . . . . . . . . . . . . . . . . . . . . . . . . 14
Connecting to a network . . . . . . . . . . . . . . . . . . . . . . . . . . . . . . . . . . . . 15
Configuring audio ports (Line out/Microphone) . . . . . . . . . . . . . . . . . 16
Chapter 3 Troubleshooting
Power issues. . . . . . . . . . . . . . . . . . . . . . . . . . . . . . . . . . . . . . . . . . . . . . 19
External display issues . . . . . . . . . . . . . . . . . . . . . . . . . . . . . . . . . . . . . 20
USB issues . . . . . . . . . . . . . . . . . . . . . . . . . . . . . . . . . . . . . . . . . . . . . . . 21
Network issues . . . . . . . . . . . . . . . . . . . . . . . . . . . . . . . . . . . . . . . . . . . . 21
Hardware issues . . . . . . . . . . . . . . . . . . . . . . . . . . . . . . . . . . . . . . . . . . . 22
Audio issues . . . . . . . . . . . . . . . . . . . . . . . . . . . . . . . . . . . . . . . . . . . . . . 22
TOSHIBA Support. . . . . . . . . . . . . . . . . . . . . . . . . . . . . . . . . . . . . . . . . . 23
FCC Information . . . . . . . . . . . . . . . . . . . . . . . . . . . . . . . . . . . . . . . . . . . 24
Copyright Statement . . . . . . . . . . . . . . . . . . . . . . . . . . . . . . . . . . . . . . . 24
Disclaimer . . . . . . . . . . . . . . . . . . . . . . . . . . . . . . . . . . . . . . . . . . . . . . . . 25
Trademarks . . . . . . . . . . . . . . . . . . . . . . . . . . . . . . . . . . . . . . . . . . . . . . . 25
Regulatory Statements. . . . . . . . . . . . . . . . . . . . . . . . . . . . . . . . . . . . . . 25
Following information is only valid for EU-member States:. . . . . . . . 26
Following Information is only for EU-member States: . . . . . . . . . . . . 26
Slim Port Replicator III
Appendix A Specifications
Appendix B AC Power Cord and Connectors
Index
User’s Manual EN-5
Page 6

Slim Port Replicator III
Introduction
Thank you for your purchase of the TOSHIBA Slim Port Replicator III. This
manual tells you how to set up and begin using your Slim Port Replicator III
and provides tips on care and troubleshooting.
Equipment Checklist
Carefully unpack your Slim Port Replicator III. Save the box and packing
materials for future use.
Check to make sure you have all of the following items:
n Slim Port Replicator III
n Universal AC adaptor
n CD (Slim Port Replicator III User’s Manual)
n Quick Start Guide
n Warranty Leaflet
Chapter 1
Features
In addition to the ports available on the computer, the Slim Port Replicator
III provides six USB 2.0 ports, audio in/out ports, a LAN jack, a DVI output
port, a VGA output port and a DC IN 15V jack. The Slim Port Replicator III
connects directly to the docking interface on the bottom of the computer.
The AC Adaptor connects the Slim Port Replicator III to a power source.
EN-6 User’s Manual
Page 7
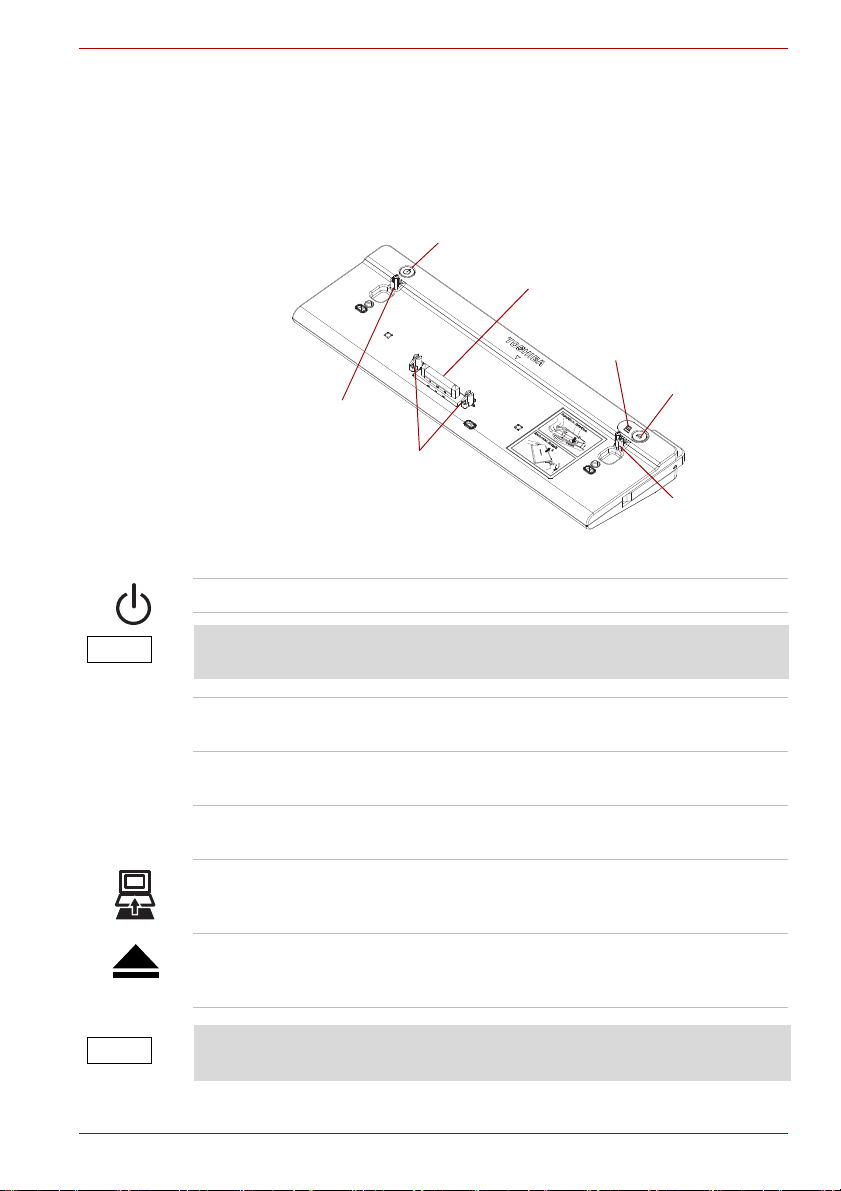
Quick Tour
Power Switch
Computer Connector
Docking LED
Eject Button
Guide Pin
Hooks
Guide Pin
NOTE
NOTE
This section identifies the various components of the Slim Port Replicator III.
Front View
Figure 1-1 shows the Slim Port Replicator III’s front side.
Power Switch Turns the docked computer’s power on and off.
Slim Port Replicator III
Figure 1-1 The front side of the Slim Port Replicator III
Pressing the power switch has no effect if a computer is not connected to
the Slim Port Replicator III.
Computer
Connects to the computer’s docking port.
Connector
Hooks Secure the computer to the Slim Port Replicator
III.
Guide Pins Engage holes on the bottom of the computer to
ensure a proper connection.
Docking LED Glows blue during normal operation. Turns off
when the computer completes its disconnect
sequence.
Eject Button Begins the computer’s disconnect sequence.
When the docking LED goes out it is safe to
disconnect the computer.
Once the Eject button is pressed, the dock stops working. Redock before
User’s Manual EN-7
using the Slim Port Replicator III again.
Page 8
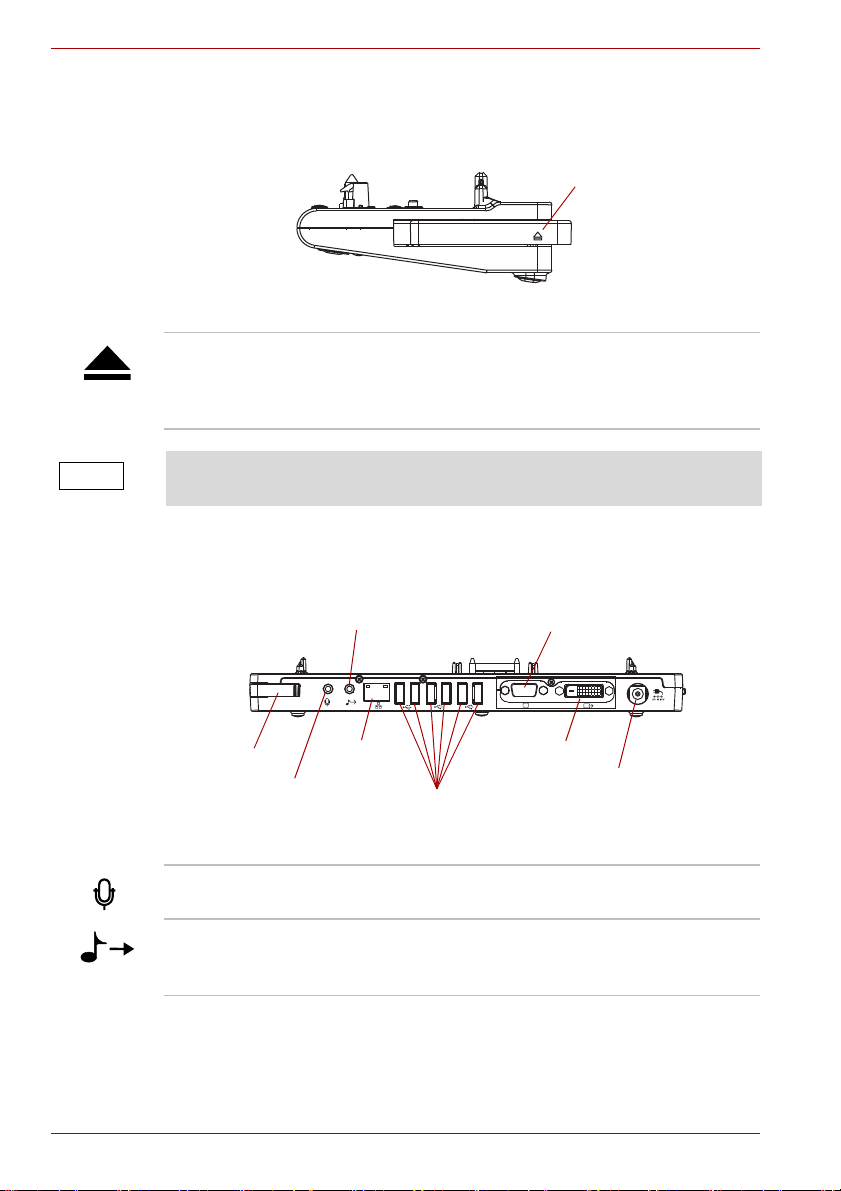
Slim Port Replicator III
Eject Lever
NOTE
VGA Port
Line-out
Eject Lever
Microphone
LAN Jack
USB Ports
DVI Port
DC IN 15V
Right View
Figure 1-2 shows the Slim Port Replicator III’s right side.
Figure 1-2 The right side of the Slim Port Replicator III
Eject Lever Disengages the computer from the Slim Port
Replicator III. Refer to chapter 2 to learn how to
disconnect your computer from the Slim Port
Replicator III properly.
When the Computer Lock Switch is in the lock position, the eject lever
cannot be moved.
Back View
Figure 1-3 shows the Slim Port Replicator III’s back side.
Figure 1-3 The back side of the Slim Port Replicator III
Microphone A standard 3.5 mm mini jack for mono audio input
from a microphone or other recording device.
Line-out
(Headphones,
Speakers)
A standard 3.5 mm mini jack for audio output to
speakers, a headphone or headset, or other audio
out devices.
EN-8 User’s Manual
Page 9
Slim Port Replicator III
NOTE
NOTE
NOTE
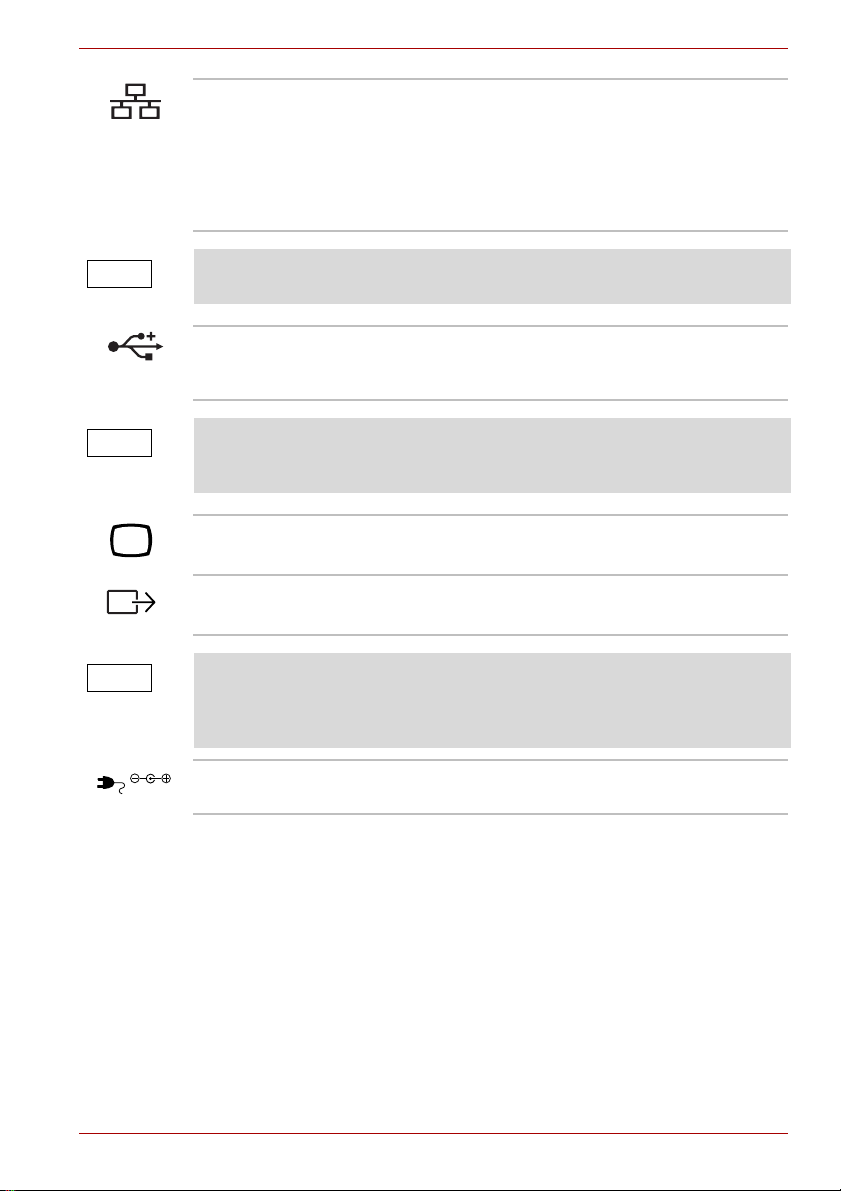
DC IN 15V
LAN Jack Connection point for a network cable. Supports:
n Ethernet (10 megabits per second, 10BASE-T)
n Fast Ethernet (100 megabits per second,
100BASE-T)
n Gigabit Ethernet (1000 megabits per second,
1000BASE-T)
Gigabit Ethernet support is only available if your computer model also
supports it.
Universal Serial
Bus (USB 2.0) Ports
Connection points for USB 2.0 or 1.1 devices. Six
USB ports are provided on the back of the Slim
Port Replicator III.
You can connect an optical media device such as a CD-ROM drive or a
Hard Disk Drive, etc. to any of the six USB ports on the Slim Port
Replicator III, but you cannot connect more than one such drive at a time.
VGA Port Connection point for an analog VGA monitor.
DVI Port Connection point for an DVI monitor.
Depending on computer model connected to the Slim Port Replicator III,
you may be able to connect external monitors to the DVI port and the VGA
port simultaneously and display information on both monitors at the same
time. Check your computer documentation for more information.
DC IN 15V Socket for AC adaptor.
User’s Manual EN-9
Page 10

Slim Port Replicator III
Computer Lock Switch
Security Lock Slot
NOTE
Left View
Refer to Figure 1-4 for the location of items on the Slim Port Replicator III’s
left side.
Security Lock Slot Attachment point for an optional security cable
Computer Lock
Switch
Special Features
The Slim Port Replicator III supports the following power-saving features, if
they are available on your computer. Refer to your computer
documentation for details.
Figure 1-4 The left side of the Slim Port Replicator III
(not included) used to deter theft.
In the locked position, helps prevent disconnection
of the computer from the Slim Port Replicator III.
Wake On LAN When a computer in standby or hibernation mode
is connected to the Slim Port Replicator III, this
feature turns on the computer when a wake-up
signal is received from a connected LAN cable.
Wake Up (USB) When a computer in standby mode is connected
n When the Slim Port Replicator III is used on PORTÉGÉ R500, LED will
off when PC sleep with USB wake up enable.
n When the Slim Port Replicator III is used on PORTÉGÉ R600/
PORTÉGÉ A600, LED will on when PC sleep with USB wake up
enable.
EN-10 User’s Manual
to the Slim Port Replicator III, this feature turns
on the computer when a wake-up signal is
received from a device connected to a USB port.
Page 11

Slim Port Replicator III
NOTE
Chapter 2
Setting Up and Using the Slim Port
Replicator III
This chapter explains how to set up the Slim Port Replicator III and dock/
undock your computer.
When the Slim Port Replicator III is connected to the computer, do not use
the ports of the computer. If you use the ports on both the computer and
the Slim Port Replicator III simultaneously, it may harm the computer and/
or data contained in it.
Setting Up the Slim Port Replicator III
To set up the Slim Port Replicator III, follow the steps below.
1. Disconnect all cables/cords from your computer’s.
2. Align the computer’s connector and holes with the connector and Guide
Pins on the Slim Port Replicator III.
3. Press down on the computer to ensure a firm connection.
Figure 2-1 Connecting a computer to the Slim Port Replicator III
4. Attach the external devices or cables to the Slim Port Replicator III’s
ports.
5. Connect the included AC adaptor to the port replicator.
User’s Manual EN-11
Page 12

Slim Port Replicator III
WARNING
WARNING
To supply AC power to the computer, connect the AC adaptor according
to the steps below:
a. Connect the power cord to the AC adaptor.
b. Connect the AC adaptor to the Slim Port Replicator III.
The supplied power cord conforms to safety rules and regulations in
the region where the product was purchased. Do not use the AC
adaptor that was included with your computer. Always use the
Toshiba AC adaptor that was provided with this product or use
Toshiba recommended alternate adaptors to avoid any risk of fire
and/or other damage to the computer and/or port replicator. Use of
an incompatible AC adaptor could cause fire and/or damage to the
computer and/or port replicator, possibly resulting in serious injury.
TOSHIBA assumes no liability for any damage caused by use of an
incompatible adaptor.
Figure 2-2 Connecting the power cord to the AC adaptor
Figure 2-3 Connecting the AC adaptor
c. Connect the power plug to a live electrical outlet.
When you connect the AC adaptor to the Slim Port Replicator III,
always follow the steps in the exact order as described above.
Connecting the power cable to a live electrical outlet should be the
last step, otherwise the adaptor DC output plug could hold an
electrical charge and cause an electrical shock or minor bodily injury
when touched. As a general safety precaution, avoid touching any
metal parts.
EN-12 User’s Manual
Page 13

When the Slim Port Replicator III is connected to the computer
NOTE
CAUTION
successfully, the docking LED will glow blue if the computer is turned
on.
The Slim Port Replicator III is now ready for use.
Disconnecting the Slim Port Replicator III
To disconnect the Slim Port Replicator III, follow the steps below and save
all your work first.
1. Slide the Computer lock switch to the unlock position:
Figure 2-4 Sliding the Computer lock switch
2. Make sure you perform one of the following:
n Perform any software disconnect operation required by the
operating system.
n Turn off the computer’s power in any mode: boot, suspend or
hibernation.
n Press the eject button on the Slim Port Replicator III.
Slim Port Replicator III
User’s Manual EN-13
Figure 2-5 Pressing the Eject Button
Make sure the Docking LED is out. Do not try to disconnect the
computer while the Docking LED is glowing.
Page 14

Slim Port Replicator III
CAUTION
Unlock
Lock
3. To disconnect the computer, pull the eject lever towards you while
sliding the computer backwards.
4. Lift off the computer.
Figure 2-6 Disconnecting a notebook from the Slim Port Replicator III
Figure 2-7 Lifting the Computer
Do not lift up the computer without sliding the computer backwards,
otherwise the Slim Port Replicator III’s hooks may be damaged.
Security Lock
The security lock slot enables you to connect a security cable (not
provided) to help prevent unauthorized removal of the Slim Port Replicator
III. When a security cable is properly attached to the Slim Port Replicator III
and the computer lock switch is set to the locked position, the Eject lever
cannot be operated. This helps prevent unauthorized removal of your
computer from the Slim Port Replicator III.
There are two positions for the computer lock.
Unlock: You can disconnect the computer from the Slim Port Replicator III.
Lock: You cannot disconnect the computer from the Slim Port Replicator III.
Figure 2-8 Security lock
EN-14 User’s Manual
Page 15

Follow these steps to secure your computer and the Slim Port Replicator III:
NOTE
1. Attach your security cable (purchased separately) to a desk or other
large object, following the instructions included with your security cable.
2. Set the computer lock switch on the Slim Port Replicator III to the
locked position.
3. Insert the lock end of the security cable into the Slim Port Replicator III’s
security lock slot.
4. Turn the key or set the combination on the end of the security cable.
Connecting to a network
The network port on the Slim Port Replicator III provides a connection point
for a local area network (LAN) cable.
Slim Port Replicator III
Figure 2-9 Security lock
LAN speed Use this type of cable:
Gigabit Ethernet (1000 megabits/second)
Fast Ethernet (100 megabits/second)
Ethernet LAN (10 megabits/second)
CAT5 or CAT5E
CAT5
CAT5 or CAT3
Connecting a LAN cable
The computer may need to be configured before connecting to a LAN.
Check with your LAN administrator regarding set up procedures.
To connect the LAN cableto the Slim Port Replicator III, follow the steps
below:
User’s Manual EN-15
Page 16

Slim Port Replicator III
NOTE
NOTE
NOTE
NOTE
1. Plug one end of the network cable into the Slim Port Replicator III’s LAN
jack. Gently push the cable connector in until you hear the latch click
into place
Figure 2-10 Connecting the LAN cable
2. Plug the other end of the cable into a LAN hub connector.
When the computer is exchanging data with the LAN, the LAN Active
indicator glows orange. When the computer is connected to a LAN hub but
is not exchanging data, the Link indicator glows green.
Configuring audio ports (Line out/Microphone)
You can playback or record audio either through the Slim Port Replicator
III’s audio ports or the docked computer’s audio ports. However, you cannot
use the audio ports on the docked computer and on the Slim Port
Replicator III at the same time.
By default, the audio ports on the port replicator are automatically enabled
each time you dock the computer. When you undock the computer, the
audio ports on the computer are automatically re-enabled.
To change the default settings, you may need to manually adjust the audio
settings in Windows®, as described in this section.
If your media player is running when you undock or dock, you must close
the application and wait approximately 10-15 seconds for the new settings
to take effect before restarting the application.
Audio devices connected to the port replicator via the 3.5 mm audio jacks
will appear as USB Multimedia Audio Devices in Windows® although they
are not connected to a USB port. This does not affect the operation of the
devices.
When your computer is docked in the port replicator, SPDIF and Line in
ports may display in Windows
should appear as “Currently unavailable” and are actually not provided by
the Slim Port Replicator III.
EN-16 User’s Manual
®
audio properties dialog boxes. These ports
Page 17

Slim Port Replicator III
Windows Vista
®
NOTE
Windows® XP
NOTE
Configuring audio playback ports (Line out) in
®
Windows Vista
1. Right-click the speaker icon in the Notification Area of your Windows®
desktop.
If the speaker icon is not visible in the Notification Area, access the audio
configuration utility through the Start menu as follows:
Click Start, Control Panel, Hardware and Sound, and then Sound.
2. Select Playback Devices from the menu.
3. On the Playback tab of the dialog box, select one of the following:
n A Realtek High Definition Audio device—to use the docked
n A USB Multimedia Audio Device device—to use the port
4. Click Set Default.
5. Click OK.
6. Connect your playback device to the port you enabled in step 3.
computer’s Headphone jack
replicator’s Line out jack
Configuring audio playback ports (Line out) in Windows® XP
1. Right-click the speaker icon in the system tray of your Windows®
desktop.
If the speaker icon is not visible in the Notification Area, access the audio
configuration utility through the Start menu as follows:
Click Start, Control Panel, Sounds, and then Audio Devices.
2. Select Adjust Audio Properties from the menu.
3. From the Sound playback drop-down list on the Audio tab of the
dialog box, select one of the following:
n A Realtek High Definition Audio—to use the docked computer’s
Headphone jack
n A USB Multimedia Audio Device—to use the port replicator’s Line
out jack
4. Click OK.
5. Connect your playback device to the port you enabled in step 3.
User’s Manual EN-17
Page 18

Slim Port Replicator III
Windows Vista
®
NOTE
Windows® XP
NOTE
Configuring audio recording ports (Microphone) in
®
Windows Vista
1. Right-click the speaker icon in the Notification Area of your Windows®
desktop.
If the speaker icon is not visible in the Notification Area, access the audio
configuration utility through the Start menu as follows:
Click Start, Control Panel, Hardware and Sound, and then Sound.
2. Select Recording Devices from the menu.
3. On the Recording tab of the dialog box, select one of the following:
n A Realtek High Definition Audio device—to use the docked
n A USB Multimedia Audio Device device—to use the port
4. Click Set Default.
5. Click OK.
6. Connect your recording device to the port you enabled in step 3.
computer’s Microphone jack
replicator’s Microphone jack
Configuring audio recording ports (Microphone) in
Windows
®
XP
1. Right-click the speaker icon in the system tray of your Windows®
desktop.
If the speaker icon is not visible in the Notification Area, access the audio
configuration utility through the Start menu as follows:
Click Start, Control Panel, Sounds, and then Audio Devices.
2. Select Adjust Audio Properties from the menu.
3. From the Sound recording drop-down list on the Audio tab of the
dialog box, select one of the following:
n A Realtek High Definition Audio device—to use the docked
computer’s Microphone jack
n A USB Multimedia Audio Device device—to use the port
replicator’s Microphone jack
4. Click OK.
5. Connect your recording device to the port you enabled in step 3.
EN-18 User’s Manual
Page 19

Troubleshooting
This chapter provides tips to correct problems, should any occur. It also
describes how to contact TOSHIBA should you encounter problems that
you cannot resolve.
Before you call Toshiba, please refer to the general troubleshooting advice
in this manual and in your computer’s user manual. You may also want to
consult with your system administrator or company technical support staff.
This chapter provides troubleshooting guidance for the following issues:
n Power issues
n External display issues
n USB issues
Slim Port Replicator III
Chapter 3
n Network issues
n Hardware issues
n Audio issues
Power issues
If your computer is connected to the AC adaptor and you cannot turn on the
computer, check your computer’s DC IN 15V indicator.
Problem Solution(s)
Docked computer will
not turn on (Your
computer’s AC power
light does not turn on)
User’s Manual EN-19
Check the connections. Make sure the power
cord is firmly connected to the port replicator and
a live electrical power outlet.
Check the condition of the power cord and plug
prongs. If the cord is frayed or damaged or the
plug prongs are bent, replace the cord. If the plug
prongs are soiled, wipe them with a clean cloth.
Disconnect and reconnect the AC adaptor and
try again to turn on the computer.
Page 20

Slim Port Replicator III
Problem Solution(s)
Docked computer
enters Resume mode
and shuts down
If the computer’s internal temperature becomes
too high, the computer will automatically enter
Resume mode and shut down. Leave the
computer off until its interior reaches room
temperature.
If the computer has reached room temperature
and still does not start, or if it starts but shuts
down quickly, contact Toshiba support.
Docked computer shuts
down and its AC power
light is flashing
Indicates a problem with the heat dispersal
system of the computer. Please contact Toshiba
support.
External display issues
IRefer also to your computer and monitor documentation.
Problem Solution(s)
External display does
not turn on
Cannot display
information to a
DVD-D and VGA
Monitor at the same
time
Display error Check that the cable connecting the monitor to
Press hotkeys Fn + F5 to change the display
setting. Choose a setting that displays
information to an external monitor. Refer to your
computer user’s manual for more information on
display settings.
Make sure that the monitor’s power switch is on.
Confirm that the monitor’s power cable is
plugged into a live electrical power outlet.
Try adjusting the contrast and brightness controls
on the monitor.
Check that the cables connecting the monitors
are firmly attached on both ends.
Some computer models do not support output to
DVI and VGA monitors simultaneously. Check
the documentation for your computer model.
the port replicator is firmly attached.
If the problem persists, contact Toshiba support.
EN-20 User’s Manual
Page 21

USB issues
NOTE
This section refers to the TOSHIBA Hardware Setup diagnostic utility. To
learn how to access the TOSHIBA Hardware Setup utility, please refer to
your computer user’s guide.
Problem Solution(s)
USB device does not
work
Slim Port Replicator III
Check that the cable connection between the
USB ports on the Slim Port Replicator III and the
USB device is secure.
Make sure the USB device drivers are properly
installed. Refer to your operating system
documentation and the documentation that came
with your USB device for more information.
USB keyboard or
mouse does not work
Network issues
Problem Solution(s)
Cannot access the local
area network (LAN)
Check that the USB Legacy Emulation item in the
TOSHIBA Hardware Setup diagnostic utility is set
to Enabled. Refer to your computer
documentation for information on accessing the
TOSHIBA Hardware Setup utility.
If you have connected the device to the port
replicator via any connection other than a firsttier hub, the computer operating system must be
running before the device will work. Check to see
that the operating system is running.
If the problem persists, contact Toshiba support.
Check that your computer is properly configured
to communicate with the network before
connecting the LAN cable to the port replicator. If
necessary, contact your system administrator for
assistance.
Check that the network cable is properly
connected to the port replicator. For more
information, see Connecting to a network.
If the problem is related to the port replicator
hardware, contact Toshiba support.
User’s Manual EN-21
Page 22

Slim Port Replicator III
Hardware issues
Problem Solution(s)
Cannot operate the
computer lock switch
The computer lock switch cannot be operated
when a security cable is attached to the security
lock slot. Remove the security cable from the slot
and then move the computer lock switch.
Cannot operate the
Eject lever
Audio issues
Problem Solution(s)
There is no sound
coming from my
external audio device
connected to the Slim
Port Replicator III
Remove the security cable from the security lock
slot, if applicable, and set the computer lock
switch to the unlocked position. Then operate the
Eject lever again.
Check that the Mute all/Mute checkboxes in
Windows
settings, double-click the speaker icon in your
Windows
Close your media player application, if it is
running. Wait approximately 10-15 seconds for
the operating system to recognize the audio
device connected to the port replicator, and then
restart your media player application.
The audio port on the Slim Port Replicator III may
be disabled. To enable the port, follow the
instructions in Configuring audio ports (Line out/
Microphone).
®
are not selected. To locate these
®
system tray/Notification Area.
EN-22 User’s Manual
Page 23

Problem Solution(s)
There is no sound
coming from the internal
speakers of my docked
computer, or from the
headphones/headset
connected directly to
my docked computer
After I undocked my
computer, I discovered
there is no sound
coming from my
computer’s internal
speakers or from the
headphones/ headset
connected to my
computer.
TOSHIBA Support
Need help?
For the latest driver updates, user manuals & FAQs please have a look at
the TOSHIBA options & services support page:
computers.toshiba.eu/options-support
Please see computers.toshiba.eu/options-warranty
for the TOSHIBA hotline numbers.
Slim Port Replicator III
Check that the Mute all/Mute checkboxes in
Windows
settings, double-click the speaker icon in your
Windows
®
are not selected. To locate these
®
system tray/Notification Area.
By default, the internal speakers and audio ports
on the computer are disabled when the computer
is docked in the port replicator. To enable the
port, follow the instructions in Configuring audio
ports (Line out/Microphone).
Check that the Mute all/Mute checkboxes in
Windows
settings, double-click the speaker icon in your
Windows
®
are not selected. To locate these
®
system tray/Notification Area.
Close your media player application, if it is
running. Wait approximately 10-15 seconds for
the operating system to recognize the audio
device connected to the computer, and then
restart your media player application.
User’s Manual EN-23
Page 24

Slim Port Replicator III
WARNING
FCC Information
FCC notice “Declaration of Conformity Information”
This equipment has been tested and found to comply with the limits for a
Class B digital device, pursuant to part 15 of the FCC rules. These limits
are designed to provide reasonable protection against harmful interference
in a residential installation. This equipment generates, uses and can radiate
radio frequency energy and, if not installed and used in accordance with the
instructions, may cause harmful interference to radio communications.
However, there is no guarantee that interference will not occur in a
particular installation. If this equipment does cause harmful interference to
radio or television reception, which can be determined by turning the
equipment off and on, the user is encouraged to try to correct the
interference by one or more of the following measures:
n Reorient or relocate the receiving antenna.
n Increase the separation between the equipment and receiver.
n Connect the equipment into an outlet on a circuit different from that to
which the receiver is connected.
n Consult the dealer or an experienced radio/TV technician for help.
Changes or modifications made to this equipment, not expressly
approved by TOSHIBA or parties authorized by TOSHIBA could void
the user’s authority to operate the equipment.
FCC Conditions
This equipment has been tested and found to comply with Part 15 of the
FCC Rules. Operation is subject to the following two conditions:
(1) This device may not cause harmful interference
(2) This device must accept any interference received, including
interference that may cause undesired operation.
Contact
Address: TOSHIBA America Information Systems, Inc.
9740 Irvine Boulevard
Irvine, California 92618-1697
Telephone: (949) 583-3000
Copyright Statement
No part of this publication may be reproduced in any form by any means
without prior written permission. Other trademarks or brand names
mentioned herein are trademarks or registered trademarks of their
respective companies.
EN-24 User’s Manual
Page 25

Disclaimer
Information in this document is subject to change without notice. The
manufacturer does not make any representations or warranties (implied or
otherwise) regarding the accuracy and completeness of this document and
shall in no event be liable for any loss of profit or any commercial damage,
including but not limited to special, incidental, consequential, or other
damage.
January 2009, Rev1.0
Trademarks
Microsoft, Windows and Windows Vista are either registered trademarks or
trademarks of Microsoft Corporation in the United States and/or other
countries.
Other brands and product names are trademarks or registered trademarks
of their respective companies.
Regulatory Statements
CE Compliance
This product is CE marked in accordance with the
requirements of the applicable EU Directives. Responsible
for CE-marking is Toshiba Europe GmbH, Hammfelddamm
8, 41460 Neuss, Germany. A copy of the official
Declaration of Conformity can be obtained from following
website: http://epps.toshiba-teg.com/
Slim Port Replicator III
Working Environment
The Electromagnetic Compliance (EMC) of this product has been verified
typically for this product category for a so called Residential, Commercial &
Light Industry Environment. Any other working environment has not been
verified by Toshiba and the use of this product in these working
environments is maybe restricted or cannot be recommended. Possible
consequences of the use of this product in non verified working
environments can be: Disturbances of other products or of this product in
the nearby surrounding area with temporarily malfunction or data loss/
corruption as result. Example of non verified working environments and
related advices:
n Industrial environment (e.g. where three-phase 380V mains is being
used mainly): Danger of disturbances of this product due to possible
strong electromagnetic fields especially near to big machinery or power
units.
User’s Manual EN-25
Page 26

Slim Port Replicator III
n Medical environment: The compliance to the Medical Product Directive
has not been verified by Toshiba, therefore this product cannot be used
as a medical product without further verification. The use in usual office
environments e.g. in hospitals should be no problem if there is no
restriction by the responsible administration.
n Automotive environment: Please search the owner instructions of the
related vehicle for advices regarding the use of this product (category).
n Aviation environment: Please follow the instructions of the flight
personnel regarding restrictions of use.
Additional Environments not Related to EMC
n Outdoor use: As a typical home/office equipment this product has no
special resistance against ingress of moisture and is not strong shock
proofed.
n Explosive atmosphere: The use of this product in such special working
environment (Ex) is not allowed.
Following information is only valid for EU-member States:
REACH - Compliance Statement
The new European Union (EU) chemical regulation, REACH (Registration,
Evaluation, Authorization and Restriction of Chemicals), entered into force
on 1 June 2007.
Toshiba will meet all REACH requirements and is committed to provide our
customers with information about the chemical substances in our products
according to REACH regulation.
Please consult the following website
www.toshiba-europe.com/computers/info/reach for information about the
presence in our articles of substances included on the candidate list
according to article 59(1) of Regulation (EC) No 1907/2006 (“REACH”) in a
concentration above 0.1 % weight by weight.
Following Information is only for EU-member States:
Disposal of products
The crossed out wheeled dust bin symbol indicates that products must
be collected and disposed of separately from household waste.
The black bar indicates that the product was placed on the market after
August 13, 2005.
By participating in separate collection of products, you will help to assure
the proper disposal of products and thus help to prevent potential
negative consequences for the environment and human health.
For more detailed information about the collection and recycling
programmes available in your country, please visit our website
(http://eu.computers.toshiba-europe.com) or contact your local city
office or the shop where you purchased the product.
EN-26 User’s Manual
Page 27

Specifications
This appendix summarizes the Slim Port Replicator III’s technical
specifications.
Physical Dimensions
Weight about 420g (14.8 ounces)
Size
Environmental Requirements
Slim Port Replicator III
Appendix A
Width: 283mm (11.2")
Height: 25mm (1")
Depth: 90mm (3.5")
Conditions Ambient temperature Relative humidity
Operating 5°C (41°F) to 35°C (95°F) 20% to 80%
Non-operating -20°C (-4°F) to 65°C (149°F) 10% to 95%
Thermal Gradient 20°C (68°F) per hour maximum
Wet-bulb temperature 26°C (78.8°F) maximum
Conditions Altitude (from sea level)
Operating -60 to 3,000 meters
(-197 to 9843 feet)
Non-operating -60 to 10,000 meters maximum
(-197 to 32,808 feet)
Power Requirements
AC adaptor 100 - 240 volts AC
50 or 60 hertz (cycles per second)
15 VDC
5.0 amperes
User’s Manual EN-27
Page 28

Slim Port Replicator III
Appendix B
AC Power Cord and Connectors
The power cord’s AC input plug must be compatible with the various
international AC power outlets and the cord must meet the standards for
the country/region in which it is used. All cords must meet the following
specifications:
Length: Minimum 1.7 meters
Wire size: Minimum 0.75 mm
Current rating: Minimum 2.5 amperes
Voltage rating: 100 to 240 VAC
(depending on country/region’s power standards)
Certification agencies
2
U.S. and Canada: UL listed and CSA certified
No. 18 AWG, Type SVT or SPT-2
Australia: AS
Japan: DENANHO
Europe:
Austria: OVE Italy: IMQ
Belgium: CEBEC The Netherlands: KEMA
Denmark: DEMKO Norway: NEMKO
Finland: FIMKO Sweden: SEMKO
France: LCIE Switzerland: SEV
Germany: VDE United Kingdom: BSI
In Europe, two conductors power cord must be VDE type, H05VVH2-F or
H03VVH2-F and for three conductors power cord must be VDE type,
H05VV-F.
EN-28 User’s Manual
Page 29

Slim Port Replicator III
USA
United Kingdom
Australia Europe
Canada
UL approved
BS approved
AS approved
Approved by the
appropriate agency
CSA approved
For the United States and Canada, two pin plug configuration must be a
2-15P (250V) or 1-15P (125V) and three pin plug configuration must be
6-15P (250V) or 5-15P (125V) as designated in the U.S. National Electrical
code handbook and the Canadian Electrical Code Part II.
The following illustrations show the plug shapes for the U.S.A. and Canada,
the United Kingdom, Australia and Europe.
User’s Manual EN-29
Page 30

Slim Port Replicator III
Index
C
CAT5 CAT5 CAT5E cables 15
configuring
audio ports
playback ports (Line out) 17
recording ports (Line in) 18
connecting
LAN cable
16
15
D
DC-IN 15V 9
E
Eject 7
Eject Button
Eject button 7
Eject LED 7
Eject lever
Eject switch 7
Equipment checklist 6
7
8
P
port
Line out (headphones,
speakers)
Port Replicator
connecting 11
disconnecting
8
13
T
TOSHIBA support 23
Troubleshooting
AC power
troubleshooting
power 19
19
W
Windows Vista
(Line in) 18
(Line out)
Windows® XP
(Line in) 18
(Line out)
®
17
17
Q
quick tour 7
S
Security lock slot 10
using 14
EN-30 User’s Manual
Page 31

GMH300063E20
*GMH300063E20*
 Loading...