

Introduction
2
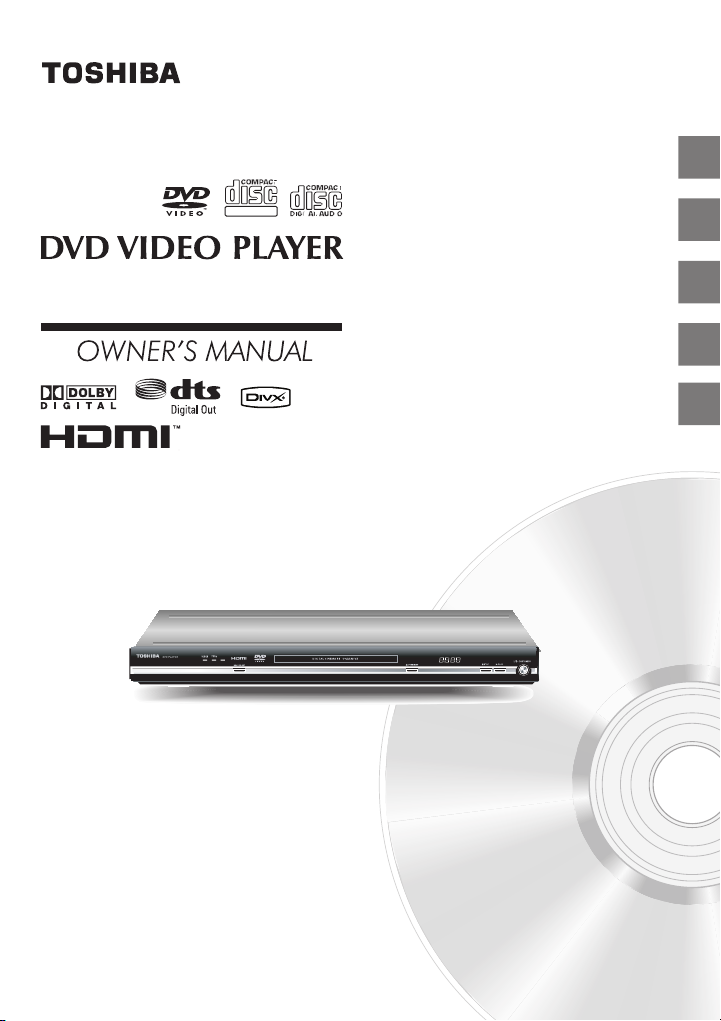
DIG ITAL VID EO
SD-370EKE
576p
Disc playback
Connections
Function setup
Others
18
22
29
35
© 2007 Toshiba Corporation
Introduction
SAFETY PRECAUTIONS
WARNING: TO REDUCE THE RISK OF FIRE OR ELECTRIC SHOCK, DO NOT EXPOSE THIS APPLIANCE
CAUTION: This Digital Video Disc Player employs a Laser System.
TO RAIN OR MOISTURE . DANGEROUS HIGH VOLTAGES ARE PRESENT INSIDE THE
ENCLOSURE. DO NOT OPEN THE CABINET. REFER SERVICING TO QUALIFIED PERSONNEL
LY.
ON
To ensure proper use of this product, please read this owner’s manual carefully and retain for
future reference. Should the unit require maintenance, contact an authorized service location.
of controls or adjustments or performance of procedures other than those specified herein
Use
may result in hazardous radiation exposure.
To prevent direct exposure to laser beam, do not try to open the enclosure.
Visible and invisible laser radiation when open and interlocks defeated.
DO NOT STARE INTO BEAM.
CLASS 1
PRODUCT
LASER
In the spaces provided below, record the Model and Serial No. located on the rear panel of your DVD video player.
No. Serial No.
Model
Retain this information for future reference.
Location of the required label
rating plate and the safety caution are
The
the rear of the unit.
on
2

IMPORTANT SAFETY INSTRUCTIONS
1. Read these i nstruction s.
2. Keep these instructions.
3. Heed all warnings.
4. Follow all in structions.
5. Do not us e this ap parat us near wa ter.
6. Clean only wit h dr y c loth.
Introduction
7. Do n ot block any ventila tion openings. Install in accordance wit h th e ma nufacturer’s instructions.
8. Do not restrict the ai r flow of the unit by plac ing it in a place with poor air flow, b y cover ing i t with a clo th,
or
by placing it on carpeting.
3

Introduction
IMPORTANT SAFETY INSTRUCTIONS
9. Do not install near any heat sources such as radiators, heat registers, stoves, or othe r apparatus
uding amplifi ers) that pro duce heat.
(incl
. Prote ct t he power cord from bein g wal ked on or pinched particularly at plugs, conven ience
10
receptacles, and
. Only use attachments/ac cesso ries specified by the manu facturer.
11
12
. Unplu g th is apparatus du ring ligh tning storms or when unused for long per iods of time.
13
. Refer all ser vicin g to qualified ser vice personnel. Servic ing is requir ed when the apparatus has
been damaged
obj ects have fallen into the apparatus, the appara tus has be en exposed to rain o r moist ure, does
or
not
operat e normally, or has been dro pped.
the poin t where they exi t from th e apparatus.
in any way, such as power-sup ply cord or plug is damag ed, liquid has be en s pilled
4

ADDITIONAL SAFETY INSTRUCTIONS
. When you use headphones, keep the volum e at a moderate level. If you use the headphones
14
nuously with high volum e sound, it m ay cause hearing damage.
conti
15
. Do not overload wall outlets; extension cords, or integral co nvenience receptac les a s this can result
a risk of fire or electric shock.
in
16
. Keep your fingers well clear of the disc tray as it is closing. Neglecting to do so may cause
serious personal injury.
17
. Do not place a heavy object on or ste p on the app aratu s. The object may fall, causing ser ious
personal inju
18. Do not us e a cracked, defor med, or repaired disc . These di scs are easily b roken and may cau se
rious person al injur y a nd apparatus malfunction.
se
ry and serio us damage to the appar atus.
Introduction
19
. Be sure t o use the un it near the wall outlet. If a malfunction occur s, disc onnect the plug from
wa ll outl et at once.
the
. The m ains plug is used as the d iscon nect device, the disconnect device shall remain readily
20
ope
rable a t any time.
5

Introduction
IMPORTANT SAFETY INSTRUCTIONS
SOME DOS AND DON’TS ON THE SAFE USE OF EQUIPMENT
This equipment has been designed and manufactured to meet international safety standards but, like any electrical
equipment, care must be taken if you are to obtain the best results and safety is to be assured. So, please read the
points below for your own safety. They are of a general nature, intended to help you with all your electronic consumer
products and some points may not apply to the goods you have just purchased.
**************
DO read the operating instructions before you attempt to use the equipment.
DO ensure that all electrical connections (including the mains plug, extension leads and inter- connections between the
pieces of equipment) are properly made and in accordance with the manufacturer’s instructions.
Switch off and withdraw the mains plug before making or changing connections.
DO
consult your dealer if you are ever in doubt about the installation, operation or safety of your equipment.
DO be careful with glass panels or doors on equipment
**************
DON’T remove any fixed cover as this may expose dangerous voltages.
DON’T obstruct the ventilation openings of the equipment with items such as newspapers, tablecloths, curtains, etc.
Overheating will cause damage and shorten the life of the equipment.
DON’T allow electrical equipment to be exposed to dripping or splashing, or objects filled with liquids, such as vases,
to be placed on the equipment.
DON’T place hot objects or naked flame sources such as lighted candles or nightlights on, or close to equipment.
High temperatures can melt plastic and lead to fires.
DON’T use makeshift stands and NEVER fix legs with wood screws - to ensure complete safety always fit the
manufacturer’s approved stand or legs with the fixings provided according to the instructions.
DON’T use equipment such as personal stereos or radios so that you are distracted from the requirements of traffic
safety. It is illegal to watch television whilst driving.
DON’T listen to headphones at high volume, as such use can permanently damage your hearing.
DON’T leave equipment switched on when it is unattended unless it is specifically stated that it is designed for
unattended operation or has a stand-by mode. Switch off using the switch on the equipment and make sure that your
family know how to do this. Special arrangements may need to be made for infirm or handicapped people.
DON’T continue to operate the equipment if you are in any doubt about it working normally, or if it is damaged in
any way -switch off, withdraw the mains plug and consult your dealer.
ALL
ABOVE
—NEVER let anyone especially children push anything into holes, slots or any other opening in
the case - this could result in a fatal electrical shock;
—NEVER guess or take chances with electrical equipment of any kind
—it is better to be safe than sorry!
*************
6

Precautions
Notes on handling
When shipp ing the DVD video player, the orig inal
shipping
carton and packing materials come in handy.
For maximum protection, repack the unit as it was
originally packed at the factory. Take care not to give it
a shock or shake when carrying.
Do not use volatile liquids, such as insect spray, near
DVD video player. Do not leave rubber or plastic
the
products
in contact with the DVD video player for a long
e. They will leave marks on the finish.
tim
The top and rear panels of the DVD video player may
become
warm after a long period of use. This is not a
.
malfunction
When the DVD video player is not in use, be sure to
remo
ve the disc and turn off the power.
If you do not use the DVD video player for a long period,
unit may not function properly in the future. Turn on
the
and
use the DVD video player occasionally.
Notes on locating
Place the DVD video player on a level surface. Do not
it on a shaky or unstable surface such as a wobbling
use
ta
ble or inclined stand. The loaded disc may come off
proper position and cause damage to the DVD video
the
pl
ayer.
When you place this DVD video player near a TV, radio,
or
VCR, the playback picture may become poor and
the
sound may be distorted. In this case, place the DVD
player away from the TV, radio, or VCR.
video
Notes on cleaning
Use a soft, dry cloth for cleaning.
For stubborn dirt, soak the cloth in a weak detergent
wring well and wipe. Use a dry cloth to wipe it
solution,
dr
y.
not use any type of solvent, such as thinners and
Do
ben
zene, as they may damage the surface of the DVD
player.
video
If you use a chemical saturated cloth to clean the unit,
follow that product’s instructions.
Inspection and Maintenance
This DVD video player is a high technology, precision
device. If the optical pick-up lens and disc drive parts
become
dir ty or wor n down, the picture quality may be
. To avoid reducti on in pictu re quali ty, it is
redu ced
recommended
(cleaning
hours
consumer electronics deale
that regular inspection and maintenance
or par ts replacement) be performed every 1,000
of use. For further details, contact your nearest
r.
Notes on moisture condensation
Moisture condensation damages the DVD video player.
Please
read the following carefully.
Moisture
condensation occurs, for example, when you pour
a cold drink into a glass on a war m day. Drops of water
form on the outside of the glass. In the same way, moisture
may condense on the optical pick-up lens inside this unit,
of the most crucial internal parts of the DVD video
one
player.
Moistu re condensati on occurs during the fo llowin g
cases.
When you bring the DVD video player directly from a
place to a warm place.
cold
When you use the DVD video player in a room where
you just turned on the heater, or a place where the cold
from the air conditioner directly hits the unit.
wind
In summer, when you use the DVD video player in a hot
and
humid place just after you move the unit from an
conditioned room.
air
When you use the DVD video player in a humid place.
Do not use the DVD video player when moisture
condensation
If
you use the DVD video player in such a situation, it
may damage discs and internal parts. Remove the disc,
connect
wall outlet, turn on the DVD video player, and leave it
for two or three hours. After two or three hours, the DVD
video
moistur
wall outlet and moisture condensation will seldom occur.
may occur.
the power cord of the DVD video player to the
player will have warmed up and evaporated any
e. Keep the DVD video player connected to the
Introduction
7
Introduction
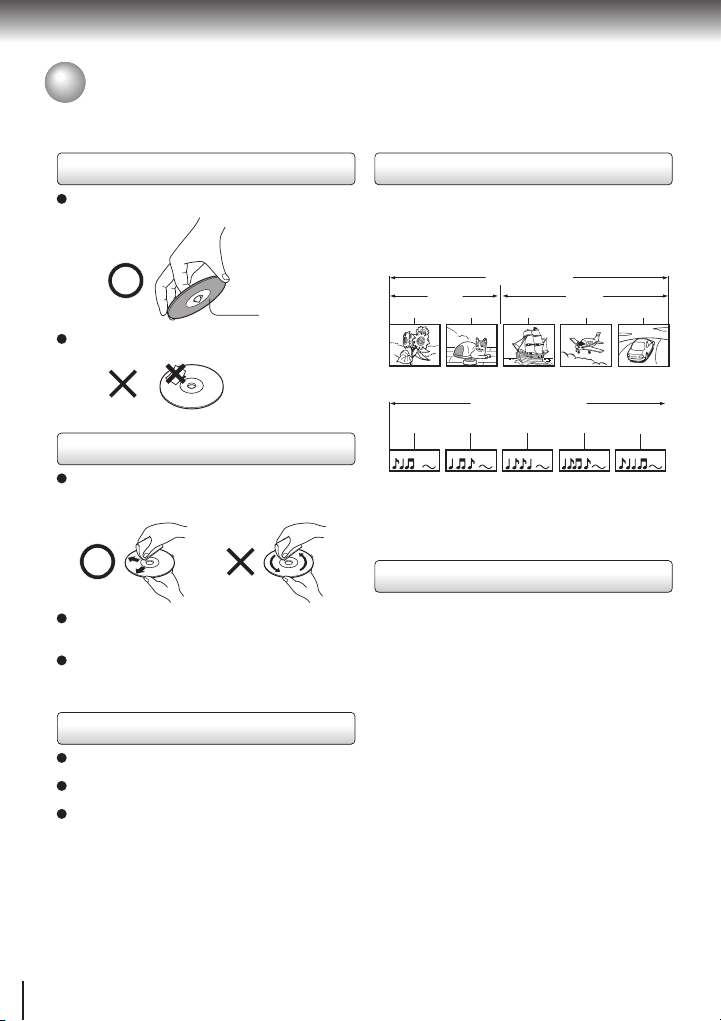
Notes on Discs
On handling discs
Do not touch the playback side of the disc.
Playback side
Do not attach paper or tape to discs.
On cleaning discs
Fingerprints and dust on the disc cause picture and
deter ioration. Wipe the disc from the centre
sound
out
wards with a soft cloth. Always keep the disc clean.
If you cannot wipe off the dust with a soft cloth, wipe
the
disc lightly with a slightly moistened soft cloth and
with a dry cloth.
finish
Do not use any type of solvent such as thinner, benzine,
commercially
nyl LPs. It may damage the disc.
vi
available cleaners or antistatic spray for
On storing discs
Do not store discs in a place subject to direct sunlight
near heat sources.
or
Do not store discs in places subject to moisture and
dust such as a bathroom or near a humidifie
Store discs ver tically in a case. Stacking or placing
on d iscs outs ide of their case may cause
objec ts
warping.
r.
Structure of disc contents
Normally, DVD video discs are divided into titles, and the
title
s are sub-divided into chapters. VIDEO CDs and audio
are divided into tracks.
CDs
DVD video disc
Title 1 Title 2
Chapter 1 Chapter 2 Chapter 1 Chapter 2 Chapter 3
VIDEO
CD/audio CD
Track 1 Track 2 Track 3 Track 4 Track 5
title, chapter or track is assigned a number, which is
Each
called “title number”, “chapter number” or “track number”
respectively.
may be discs that do not have these numbers.
There
DVD video disc
VIDEO CD/audio CD
Notes on copyright
The unauthorized recording, use, distribution, or revision
of
copyr ighted materi als including, witho ut limitation,
tel
evision programs, videotapes, and DVDs, is prohibited
the Copyright Laws of the United States and other
under
count
ries, and may subject you to civil and criminal liability.
This product incorporates copyright protection technology
is protected by method claims of certain U.S. patents
that
and
other intellectual property rights owned by Macrovision
rporation and other rights owners. Use of this copyright
Co
protection
technology must be author ized by Macrovision
rporation, and is intended for home and other limited
Co
vi
ewing use s only unles s othe rwise autho ri zed by
ovi si on Corp or ation . Rever se engi ne er ing or
Macr
disassem
bly is prohibited.
8
About this owner’s manual
This owner’s manual explains the basic instructions of
this DVD video player. Some DVD video discs are
produced in a manner that allows specific or limited
operation during playback. As such, the DVD video player
may not respond to all operating commands. This is not
a defect in the DVD video player. Refer to instruction
notes of discs.
“ ” may appear on the TV screen during operation.
A “ ” means that the operation is not permitted by
the DVD video player or the disc.
About
The icons on the heading bar show
the playable discs for the function described under that
heading.
: You can use this function with DVD video
discs.
: You can use this function with Video CDs.
: You can use this function with Audio CDs/CD R/RW.
Notes on region numbers
The region number of this DVD video player is 2.If region
numbers, which stand for their playable area, are printed
on your DVD video disc and you do not find or ,
disc playback will not be allowed by the player. (In this
case, the DVD video) player will display a message onscreen.)
Some DVDs that have no region code label may still be
subject to area restrictions and therefore not playable.
2
On VIDEO CDs
This DVD video player supports VIDEO CDs equipped
with the PBC (Version 2.0) function. (PBC is the
abbreviation of Playback Control.)
You can enjoy two playback variations depending on
types of discs.
• VIDEO CD not equipped with PBC function (Ver 1.1).
Sound and movie can be played on this DVD video
player in the same way as an audio CD.
• VIDEO CD equipped with PBC function (Ver 2.0).
In addition to operation of a VIDEO CD not equipped
with the PBC function, you can enjoy playback of
interactive software with search function by using the
menu displayed on the TV screen (Menu Playback).
Some of the functions described in this owner’s
manual may not work with some discs.
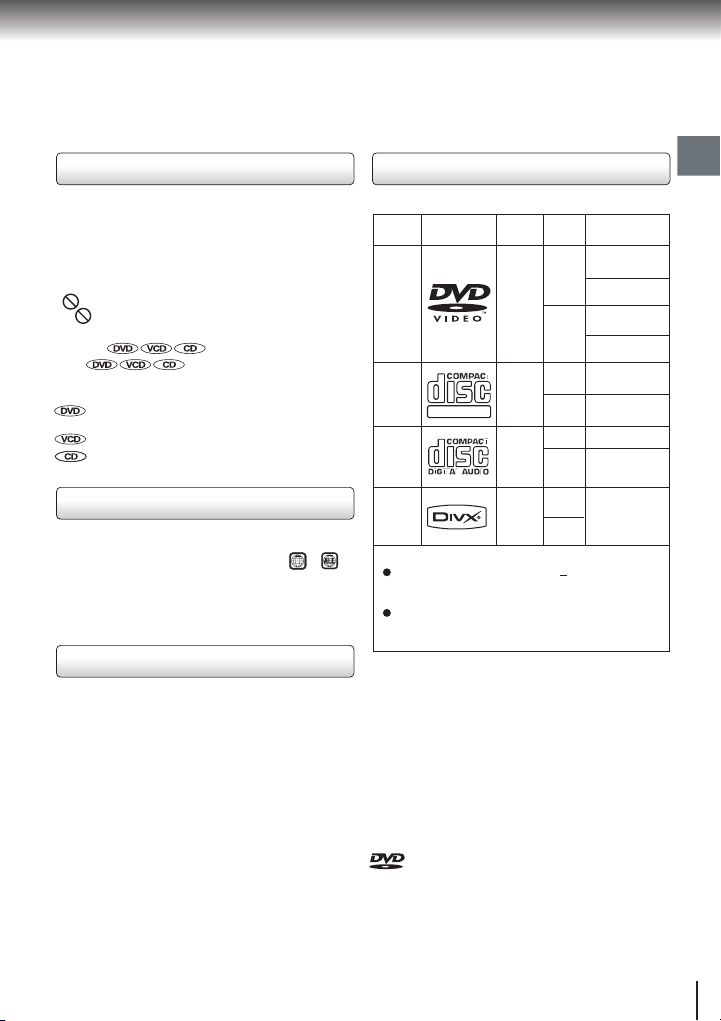
Playable discs
This DVD video player can play the following discs.
Maximu
Disc
Disc Mark
DVD
video
s
disc
VIDEO
CD
s
DIG ITAL VID EO
Audio
s
CD
®
DivX
The following discs are also available.
DVD-R/RW, DVD+R/RW, DVD R DL and
DVD-ROM discs of DVD video format or DivX
format. DVD ROM disc not support DAT format.
CD-R/CD-RW discs of CD-DA, Video CD, SVCD,
MP3, DivX or JPEG format.
Some of these discs may be incompatible.
• You cannot play discs other than those listed above.
• You cannot play DVD-RAM discs or non-standardized
disc
s, etc., even if they may be labeled as above.
• This DVD video player uses the NTSC/PAL colour
system, and
in
any other colour system (SECAM, etc.).
Because of problems and errors that can occur during
the creation of DVD and CD software and/or the
manufacture of DVD and CD discs, Toshiba cannot assure
that this DVD video player will successfully play every disc
bearing the DVD and CD logos. As one of the creators of
DVD technology, Toshiba DVD players are manufactured
using the highest standards of quality, and as a result,
such incompatibilities are rare.
Contents
Audio
+
vide
(m
oving
pictures
Audio
+
vide
oving
(m
pictures
Audio
Audio
+
vide
(movin
pictures
ze
Si
12
cm
o
)
8 cm
cm
12
o
8 cm
)
cm
12
8 cm
D
(C
single
)
cm
12
o
g
8 cm
)
+
®
cannot play DVD video discs recorded
is a trademark of DVD Format/Logo Licensing
Corporation.
m
ayback time
pl
Approx. 4 hours
(single
sided disc)
ox. 8 hours
Appr
ble sided disc)
(dou
ox. 80 minutes
Appr
sided disc)
(single
Approx. 160 minutes
(double sided disc)
Appr
ox. 74 minutes
Appr
ox. 20 minutes
Appr
ox. 74 minutes
ox. 20 minutes
Appr
depends on DivX
It
quality
®
®
Introduction
9

Introduction
Table of Contents
Introduction
SAFETY PRECAUTIONS ............................ 2
IMPORTANT SAFETY INSTRUCTIONS .... 3
Precautions ................................................. 7
Notes on Discs ........................................... 8
Notes on region numbers ................................... 9
Table of Contents ....................................... 10
Identification of Controls .......................... 11
Front panel ..................................................... 11
Rear
panel ...................................................... 12
DVD display ....................................................... 12
control ............................................... 13
Remote
Loading
batteries ........................................... 16
rating with the remote control .................. 16
Ope
Disc playback
Playing a Disc..........................................17
Basic playback ........................................17
Resuming playback from the same
location.................................................... 18
Locating a specific chapter or track ........ 18
Playing MP3/JPEG/DivX /Audio CD
®
Files .........................................................19
Connections
Connecting to a TV .................................... 21
Connecting to a TV (Using the SCART socket)
..........................................................................
Connecting to a TV (Using the phono type jacks)
..........................................................................
Connecting to a TV (Using the component video
ja
cks) ............................................................... 22
Connecting
(Using
Connecting to Optional Equipment ........ 25
Connecting to an amplifier equipped with a
Connecting to an amplifier equipped with
Connecting to an amplifier equipped with a
Connecting to an amplifier equipped with an
Connecting to an amplifier equipped with a
to a display
TM
a HDMI
cable) ..................................... 23
®
Digital decoder .................................... 26
Dol
by
by Surround Pro Logic ............................ 26
Dol
®
DTS decode
MPEG2
digital
r ............................................... 27
audio decoder ................................. 27
audio input ......................................... 27
21
21
Function setup
Customizing the Function Settings ...... 28
Setting procedure ........................................... 28
details ................................................. 28
Setting
Others
Table of Languages ................................ 34
Before Calling Service Personnel ......... 35
Specifications......................................... 37
10
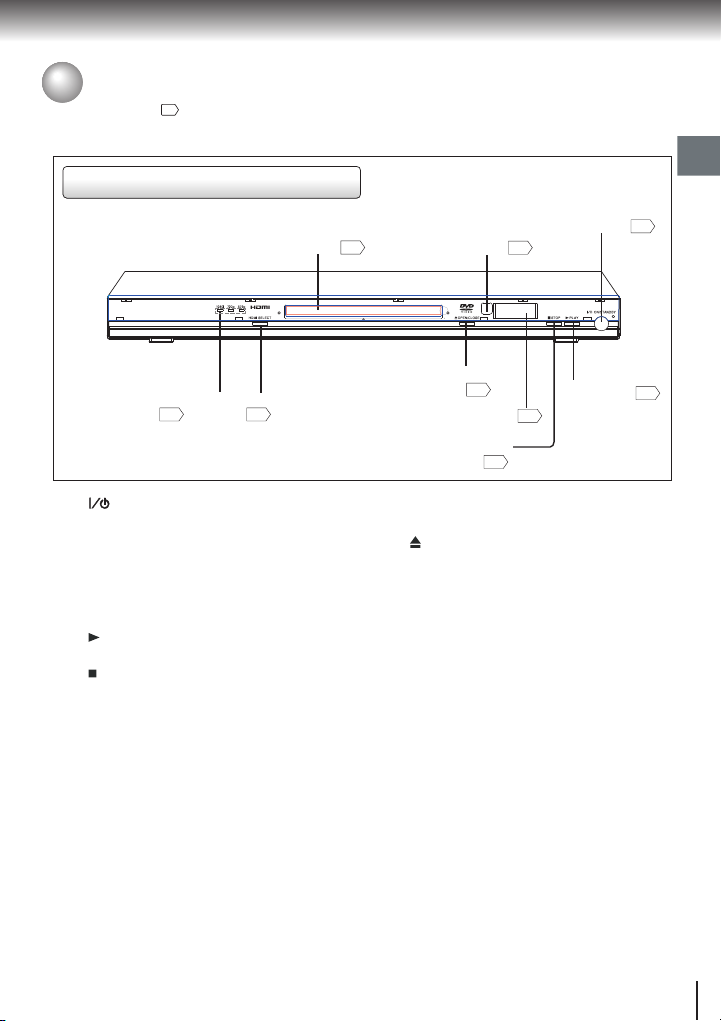
Identification of Controls
See the NO. in for details.
Front panel
Disc tray
HDMI indicator8HDMI SELECT button
9
1. ON/STANDBY button
Press to toggle the unit ON and OFF.
2.Remote sensor
Point the remote control here to operate the player.
3.Disc tray
When loading a disc, place the disc in the
disc tray with the label side facing up.
4. PLAY button
Press to play the disc.
5. STOP button
During DVD playback, press once to stop
playback. The unit records the stopped point,
depending on the disc. Press PLAY button to
resume playback from the stopped point. If you
press this button again, the unit will clear the
stopped point. The disc will return to the
beginning of the disc when playback starts again.
3
Remote sensor
OPEN/CLOSE
button
7
DVD display
STOP button
5
6.DVD display
Display current disc information.
7. OPEN/CLOSE button
Press to open and close the disc tray.
8.HDMI SELECT button
Press to
receive a suitable video quality
in stop mode.
9.HDMI indicator
576p,720p and 1080i indicate the
resolution of the picture, see page 24 .
ON/STANDBY button
2
PLAY button
6
Introduction
1
4
11
Introduction
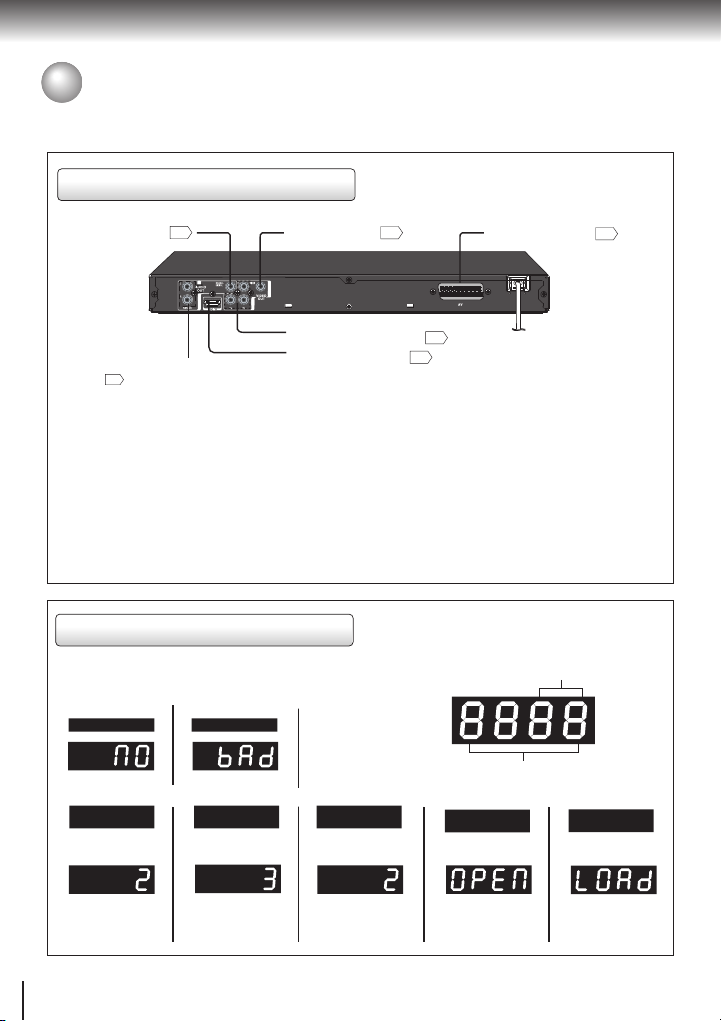
Identification of Controls (continued)
Rear panel
COAXIAL DIGITAL
AUDIO OUT jack
4
VIDEO OUT jack
3
AV (SCART) socket
6
VIDEO OUT (Y/PB/PR)
(Component video) jacks
ANALOG AUDIO OUT (L/R)
jacks
1
1.ANALOG AUDIO OUT (L/R) jacks
Use Audio/Video cable supplied to connect to TV or
monitor with audio/video inputs.
2.HDMI OUTPUT jack
Connect to a HDMI compatible port of a television or
other display equipment.
3.VIDEO OUT jack
Connect the video output to TV or monitor with audio
/video inputs capability.
HDMI OUTPUT jack
DVD display
The indicators vary depending on the kinds of discs you play.
No disc Bad disc
• During playback:
Example
Some discs may
only display chaper
numbers.
Bad disc
• During playback:
Example
Some discs may
only display track
numbers.
Audio CDVIDEO CDDVD video disc
• During playback:
Example
Some discs may
only display track
numbers.
5
2
4.COAXIAL DIGITAL AUDIO OUT jack
Use to output digital audio recorded on discs by
connecting to the coaxial digital audio input on an
AV amplifier or receiver with digital audio input
capability, but first you need to change the setting
to digital audio output on the SETUP MENU.
5.VIDEO OUT (Y/P
If your TV or monitor or other similar devices has
component video inputs, you can produce a higher
quality picture on it by connecting its component
video cable to the Y/PB/PR jack on this unit.
6.AV (SCART) socket
Connect to the scart socket on your TV.
B/PR)(Component video) jacks
Chapter/Track
number Indicator
Multifunctional indicator (indicates
operating status or messages, etc.)
OPEN
LOAD/CLOSE
12

The instructions in this manual describe the functions on the remote control.
Remote control
2
3
4
5
6
8
9
10
12
13
14
16
Introduction
1
7
11
15
17
HDMI
HDMI button
18
19SEARCH button
20
21
22
23
24
25
26
27
28
29
30
31
32
33
13

Introduction
Identification of Controls (continued)
The instructions in this manual describe the functions on the remote control. Please see below:
OPEN/CLOSE button
Press to OPEN/CLOSE the disc tray.
Number buttons
Press number buttons to play relevant chapter/track.
E.P.M. button
Use to select the picture enhancement.
Brightness
Sharpness
Select the picture enhancement by pressing / ,
then press / to make your selections.
To exit the picture enhancement selection, press
E.P.M. again.
8
8
E.A.M. button
Use to toggle the sound enhancement on or off
when DVD discs is Dolby Digital 5.1Ch and “Digital
Output” is PCM or Off.
ANGLE button
While playing a scene recorded with multiple angles,
press
the ANGLE button.
.
e.g
Number changes to show the number of the
current angle. (The maximum number of
possible angles is 9.)
ANGLE button is also use to change the picture
transition mode of JPEG playback.
Press ANGLE button during JPEG playback will
change the picture transition mode as follows:
Wipe Down
Wipe Up
Center In
Center Out
Blind Down
Blind Up
Random
None
During slide show playback and when loading is in
progress, ANGLE button is not allowed to operate.
The prohibited sign “ Not allowed at the moment ”
will be displayed on the TV screen.
SUBTITLE button
For DVD discs, press this button to change the
language of the subtitle.
To turn off the subtitle, press SUBTITLE several
times until “ .... Off ” appears on the screen.
Notes
The numbers of languages vary with the DVD discs.
When you select a subtitle language which is not
included on the disc, the DVD video player plays a
prior language programmed on the disc.
During some scenes, the subtiltes may not appear
immediately after you change the subtitle language.
14
PAUSE/STEP button
Press PAUSE/STEP to freeze playback.
During still playbacks, each time you press the
PAUSE/STEP button, the picture advances one
frame.
SKIP button
Press SKIP once within 5 seconds of playback
to skip to the previous chapter/track. If you press the
button after 5 seconds, it will start playback from the
beginning of the current chapter/track.
REV button
Press to change the fast reverse playback speed.
X2 X8 X30 X100
Direction buttons
Use UP/DOWN/RIGHT/LEFT to select a function
in the setup menu.
During JPEG playback, press the repeatedly to
rotate the image clockwise by 90,180 or 270 degree.
Press the repeatedly to rotate the image counter
clockwise by 270, 180 or 90 degree. When in Zoom
mode, this function does not work.
TOP MENU button
Display the title menu on DVD Disc.
If you display the top menu during playback and
press the TOP MENU button again without selecting
any title, the DVD video player may resume playback
from the point where you first pressed the TOP
MENU button(depending on the actual DVD video
disc.).
When playing JPEG, if you press TOP MENU in
full-screen review, the DVD video player will display
a menu of 9 thumbnail images.
CLEAR button
Use CLEAR to delete the scheduled program or to
cancel input data in the setting mode.
DISPLAY button
Bring up the on-screen display showing the
information of the current playing status.
MEMORY button
Press this button, the OSD will show as below:
Title/Chapter
Memory Input
Play Memory
1
2
Clear All
3
You can use the cursor button( / / / ) and
number buttons to input your desired title/chapter
/track. You can program up to 12 selections into the
memory (Memory playback). When you have finished
programming, you can move the cursor to the Play
Memory, then press the ENTER button to start the
playback. The programmed selections will be cleared
when you open the disc tray or turn the power off.
Pause Step
Track
Memory Input
Play Memory
1
2
Clear All
3

PLAY MODE button
Press PLAY MODE button to select desired features
using / and then press ENTER button to toggle
desired mode.
Off
On
Chapter: Repeats the current chapter.
Title: Repeats all chapters within the current title.
Track: Repeats the current track.
All: Repeats the entire disc.
Off: Resumes normal playback.
SETUP button
Access the on-screen Setup menu for settings
adjustment.
PROGRESSIVE button
Press to change the output signal for better picture
quality during stop mode. (See page 22.)
POWER button
Turn the unit on or set the unit to Standby mode.
SEARCH button
Press SEARCH once and then press / to
select Title search / Chapter or Track search and
Time search.
number greater than "10", press number "1" plus
any single number. For example, if you want to
select chapter/track 12, just press the number
button "1" and "2". The chapter /track number
"12" will appear on the Search menu screen.
Then press ENTER. But if you want to select
chapter/track number 10, press +10 and then
ENTER. If you input a wrong number, press
CLEAR button.
Title
Chapter
Time
Press
SEARCH
appears, then press ENTER to mark the desired
scene. Press / and then ENTER to play the
favourite bookmark. Press
off this display.
Notes
For VCD, Search function is not possible if the
PBC mode is on.
The marking is cancelled when you open the disc
tray or turn the power off.
SLOW buttons
Reverse/Forward slow playback. Press this button
to toggle among the following modes:
Play Mode
Random : Off
Repeat : Off
Off
On
Off
Chapter
Title
Track
When you select a chapter/track
Search
Track
Track Time
Disc Time
Search
twice, the display of Bookmark
SEARCH
again to turn
Bookmark 1
Bookmark 2
Bookmark 3
Off
All
1/2 1/4 1/8
1/2 1/4 1/8
Note
Reverse slow playback is not applicable for DivX
file.
AUDIO button
For DVD discs, press this button to toggle between
different audio modes. The selected audio mode
will be displayed on the screen. The abbreviation of
the language will appear instead of the language
name. Refer to the list of languages and their
abbreviations on page 34. For stereo discs, press to
switch the audio channel output. For bilingual edition
VCD discs, press the AUDIO button to select your
audio channel (Left,Right,Mix or Stereo).
PLAY button
Press to start playback.
STOP button
Press once to stop playback and hold the last
position in memory. Playback can be resumed
where it was left off by pressing PLAY. Press
twice to clear the last playback position.
SKIP button
Advanced to the next chapter/track on DVD and
other discs.
FWD button
25
Press to change the fast forward playback speed.
X2 X8 X30 X100
ENTER button
Selects options in menus. Plays a disc, chapter or
track with some discs. For other discs, press PLAY.
MENU button
Display the menu of DVD disc.
RETURN button
When navigating disc menus, press to return to the
previous menu accessed.
NAVI button
Press to display and access features and settings.
Select by pressing / then press ENTER to
access the feature.
1/2 1/4 00:00:05
Title/Track
number
PBC button
Press to toggle between PBC On and PBC Off.
(Only applicable to VCD2.0/SVCD discs)
A-B REPEAT button
Set the beginning and end points of a section to
repeat.
Notes
Some discs may not permit A-B repeat operation.
There may be a slight difference between point
and the location where playback actually resumes
depending on the disc.
ZOOM button
Press this button to zoom in the current picture.
There are three zooming modes. Press cursor
buttons ( / / / ) to view a different part of the
zoom in image. You may move the image from the
centre position to UP, DOWN, LEFT, RIGHT
direction. To resume normal playback, press ZOOM
button repeatedly until the “ Off ” is displayed.
Notes
The magnification level varies depending on the
picture size you select.
Some discs may not respond to ZOOM feature.
®
HDMI button
Press to switch the video quality. See pages 23-24.
Elapsed time
Chapter number
Introduction
15

Introduction
Identification of Controls (continued)
Loading batteries
Open the cover.
1
Insert batteries (AAA size).
2
Make sure to match the + and - on the
batteries to the marks inside the battery
compartment.
Caution:
Never throw batteries into a fire.
Notes
• Be sure to use AAA size batteries.
• Dispose of batteries in a designated disposal area.
• Batteries should always be disposed of with the
environment in mind.
Always dispose of batteries in accordance with
applicable laws and regulations.
• If the remote control does not operate correctly, or
if the operating range becomes reduced, replace
batteries with new ones.
• When necessary to replace batteries in the remote
control, always replace both batteries with new ones.
Never mix battery types or use new and used
batteries in combination.
•
Always remove batteries from remote control if they
are dead or if the remote control is not to be used
for an extended period of time. This will prevent
battery acid from leaking into the battery compartment.
Operating with the remote control
Point the remote control at the remote sensor
and press the buttons.
Distance: About 7 m (23 feet) from the front
:
e
of the remote sensor.
Angle: About 30 in each direction of the
* Do not expose the remote sensor of the DVD
video player to a strong light source such as
direct sunlight or other illumination. If you do
so, you may not be able to operate the DVD
video player via the remote control.
Notes on the remote control
• Direct the remote control at the remote sensor of the
DVD video player.
• When using the remote control, press the buttons at
intervals of about 1 second to ensure the correct
mode of operation.
• Do not drop or give the remote control a shock.
Do not leave the remote control near an extremely
•
hot or humid place.
• Do not spill water or put anything wet on the remote
control.
• Do not open the remote control.
°
front of the remote sensor.
16

Playing a Disc
This section shows you the basics on how to play a disc.
CAUTION
Keep your fingers well clear of the disc tray as it is closing.
Neglecting to do so may cause serious personal injury.
SELECT
Basic playback
Preparations
• When you want to view a disc, turn on the TV and select the video input connected to the DVD video player.
• When you want to enjoy the sound of discs from the audio system, turn on the audio system and select the
input
connected to the DVD video player.
Disc playback
Press the ON/STANDBY button.
1
Press OPEN/CLOSE.
The DVD video player turns on.
2
The disc tray opens.
Place the disc on the disc tray.
3
With
the playback
side
down
• There are two different disc sizes. Place the
disc
in the correct guide on the disc tray. If
the
disc is out of the guide, it may damage
disc and cause the DVD video player to
the
malfunction.
• Do not place a disc which is unplayable in
this
DVD video player.
Press OPEN/CLOSE to close the disc tray.
4
If you insert a DVD video disc that contains a
top menu, a menu may appear. Use the /
/ / to select the title you want to view, then
press ENTER to start playback.
• You may need to press the TOP MENU or
MENU button to display disc menu
(depending on the actual DVD video disc.)
Notes
• If the disc tray is holding a disc you have already
pl
ayed, playback will begin from the location where you
last stopped
• Some video CD are recorded with PBC (Playback
Cont
on the
ma
the PBC
or
switching from
will
. For resuming playback, see page 19.
rol), a menu with recorded contents may appear
TV if you have turned the PBC On. You can
ke your selection according to its PBC menu. Press
button on the remote control to turn PBC On
Off anytime during Video CD playback. When
start from the beginning of the disc.
To start playback in the stop mode
Press PL
AY.
Playback starts.
PBC Off to PBC On mode, playback
17

Disc playback
Playing a Disc (continued)
Resuming playback from the same location
PAUSE/STEP
2 PLAY
1 STOP
SKIP
FWD
REV
Press STOP at the location where you want to
interrupt
Press PLAY.
s
playback.
The DVD video player memorizes
the location where playback is
stopped.
The
DVD video player resumes
pl
ayback from the location where
you stopped playback.
1
2
Note
• Resuming cannot function when:
–you play a PBC-featured VIDEO CD while PBC is
On.
–you open the disc tray.
–you disconnect the power plug of the DVD video
player.
• There may be a difference in the location where
playback resumes depending on the disc.
• Settings you changed using the on-screen displays
while the DVD video player keeps a location in the
memory may function only after the memory is
cleared.
Locating a specific chapter or track
Press SKIP or repeatedly to access the
chapter or track number you want.
Playback starts from the selected chapter or track.
To locate succeeding chapters or tracks by
pressing the button once.
To locate previous chapter or track by
pressing the button once within 5 seconds
after playback.
If you press the button once after 5 seconds,
it will start playback from the beginning of the
current chapter or track.
To start playback from the beginning regardless
of the location where you stopped playback
STOP twice.
1 Press
The DVD video player deletes the
memory of the location.
PLAY.
2 Press
• If you want to return to the beginning of a DVD video
dis
c, open and close the disc tray once with the
OPEN/CLOSE
Note
Some titles may not display chapter numbers.
Playback starts from the
beginning of the current title.
Playback starts from the
beginning of the disc.
Playback starts from the
beginning of the current track.
button before press the PLAY button.
18

Playing MP3/JPEG/DivX /Audio CDFiles
®
Play modes for MP3/JPEG/DivX /Audio CD
When you play MP3/JPEG/DivX /Audio CD, users
are able to modify the Play modes through the Toolkit
which appears on the right of below picture on the
screen. Press / button to navigate between the
windows and / button to select files/tracks or play
mode items. Then press ENTER button. Please refer to
below steps to playback files/tracks in the Memory
View list:
1) Select Edit Mode in the Toolkit then press ENTER
button to start Edit Mode.
2) Select a file/track or more files/tracks you want in the
Original View list.
3) Select Add To Memory in the Toolkit then press
ENTER. “ ” will disappear from the screen. It
means that the files/tracks you have selected already
added into the Memory View list.
4) Select Memory View in the Toolkit then press ENTER
to open the files/tracks in the Memory View list that
you already selected in step 2.
5) Press PLAY to playback all files/tracks in the Memory
View list.
The current
files name
MP3/Audio
CD icon
DivX/MPEG icon
JPEG icon
The Toolkit has the following play mode items:
• Filter (Audio/Photo/Video): Sets file filters.
• Repeat (Off/Track/All):
Off : Resumes normal playback.
Track : Repeats the current track/file.
All : Repeats all files on the current folder or all
tracks on the disc.
• Mode (Normal/Shuffle/Random/Intro):
Normal: Resumes normal playback.
Shuffle: Playbacks track/file in random order.
Random: Playbacks track/file in random order, and will
repeat playback the same track/file more
than one time.
Intro: Only playbacks the first 10 seconds of all the
files on the current folder or all tracks on the
disc.
• Edit Mode: Memory operation works only when
Edit Mode is selected.
• Memory View: To view tracks/files in the Memory
View list. It is disabled when the
Memory View list is empty.
• Add To Memory: Add files/tracks to the Memory View
list. It is disabled if the Edit Mode is
not selected. (Only 10 files/tracks
can be selected each time to add to
memory. The maximum number of
files/tracks can be added is 30.)
• Browser View : To view files/tracks in the Original
View list.
/T02_DivX_1.5Mbp.AVI
T02_DivX_1.5Mbp.AVI
T02_DivX_3Mbps.AVI
T03_DivX_4Mbps.AVI
®
®
• Clear: Delete the files/tracks in the Memory View
list. Select a file/track or more you want to delete in
stop mode. “ ” will appear beside the deleted
file/track. Select Clear and then press ENTER.
It is disabled if the Edit mode is not selected.
Notes
• When you finish storing the files/tracks you want into
the program list, select “Edit Mode” again and press
ENTER to release edit mode.
®
•
For DivX and JPEG files, Intro mode is not applicable.
•
Filter is not applicable to Audio CD.
Playable files
MP3 disc compatibility with this pl
• Playable discs:
• Sampling Frequency:
• Bit rate: MP3:
• CD physical format:
• File system:
• File name:
• Total number of folders:
• Total number of files:
* CBR = Constant Bit Rate
This DVD player requires discs/recordings to meet
certain technical standards in order to achieve
optimal playback quality. There are many different
types of recordable disc formats (including CD-R
containing MP3 files). Not all recordable discs will
operate or produce optimal playback quality. The
technical criteria set forth in this owner's manual are
meant only as a guide. Use of CD-RW for MP3 files
is not recommended.
You must obtain any required permission from
copyright owners to download or use copyrighted
content. Toshiba cannot and does not grant such
permission.
Notes
• When the MP3 file is out of the above specifications,
song may skip or mute with counter moving.
the
• During MP3 and DivX playback, press SEARCH
button to search “Track Time”.
ayer is limited as follows:
CD-R (650MB / 74 min. only)
CD-RW maybe not
recommenda
44.1 kHz onl
Mode
ISO9660
A file name should be in alphabet
and
inco
e.g.“********.MP3”
Less
Less
®
ble.
y
32 kbps - 320 kbps (CBR*)
1, Mode 2 XA Form 1
Level 1, 2 or Joliet
numerals only, and must
rporate “MP3” extension.
than 256
than 1000
Disc playback
19

Disc playback
Playing MP3/JPEG/DivX /Audio CDFiles (continued)
JPEG files compatibility
Discs whose compatibility with this DVD video player has been confirmed by TOSHIBA are as follows. Many of
these discs, when loaded, will make the DVD video player enter the automatic mode to play a prescribed folder
in the disc. To play other folders, display a folder list and select a folder.
QuickCD FUJICOLOR
CANON
JPEG
disc compatibility with this DVD video player is limited as follows:
• Playable discs: CD-R (650MB / 74 min. only)
CD-
• CD physical format: Mode 1, Mode 2 XA Form 1
• File system: ISO9660 Level 1, 2 or Joliet
• File name: A file name should be in alphabet and numerals only, and must
inco
file
• Total number of folders: Less than 256
• Total number of files: Less than 1000
Depending
on the file size, some files may not display the entire image.
Some
discs may not permit this operation. Especially, the following conditions of included files will increase the
’s disability.
disc
1. Pixels over 3072 x 2048 in height and/or width
2. File format except Exif
®
DivX Playable files
®
Div
X
disc compatibility with this player is limited as follows:
• Playable discs: CD-R (650MB / 74 min. only)
• Audio format: CBR MP3, VBR MP3, DivX® AC3
• Enhance video: GMC, Qpel, Progressive B-frames
• Frame rate: 8 to 25 fps
• CD physical format: Mode 1, Mode 2 X A Form 1
• File system: ISO9660 Level 1, 2 or Joliet
• File name: A file name should be in alphabet and numerals only, and must
inco
• Total number of folders: Less than 256
• Total number of files: Less than 1000
®
CD Kodak Picture CD NORITSU
RW maybe not recommendable.
rporate “JPG” extension. e.g.“********.JPG” (Do not name the
with “JPE” or “JPEG” extension.)
CD-
RW maybe not recommendable.
rporate “AVI” extension. e.g. “ *******.AVI ”
QSS CD
DivX, DivX Certified, and associated logos are trademarks of DivX, Inc. and are used under license.
Notes
• It is recommended to record same kind of files in a CD-R.
• Some DivX Video-On-Demand files may require registration code of your DVD Video player, you may get the
code in Default Setting. (Page 33)
®
20

Connecting to a TV
Connect the DVD video player to your TV.
Connecting to a TV (Using the SCART socket)
Normal TV
Connections
• Make the following setting.
To SCART input
RT cable
SCA
(not supplied)
On-screen display
“Video
Output”
Select:
Composite
Component
RGB
P-Scan
HDMI
Connecting to a TV (Using the phono type jacks)
Normal TV
To video
input
(yellow)
Notes
• Refer to the owner’s manual of the connected TV as well.
• When you connect the DVD video player to your TV, be sure to turn off the
power and unplug both units from the wall outlet before making any connections.
• If your television set has one audio input, connect the left and right audio outputs
of
the DVD video player to a Y cable adapter (not supplied) and then connect to
your TV.
• Connect the DVD video player directly to your TV. If you connect the DVD video
ayer to a VCR, TV/VCR combination or video selector, the playback picture
pl
may be distorted as DVD video discs are copy protected.
• Analogue audio out will not have sound if DTS playback is selected.
To audio
input
Audio/Video cables (supplied)
To 2ch
AUDIO
OUT
: red,
(R
L:white)
To VIDEO
OUT
(yellow)
Page
31
• Make the following setting.
On-screen display Select:
“Digital Output”
“Video Output”
“PCM” or
“Bitstream”
Composite
Componen
RGB
P-Scan
HDMI
To wall outlet
To AV
To wall outlet
t
Page
32
31
21

Connections
Connecting to a TV (continued)
Interlaced outputs
Some TVs or monitors are equipped with component video
s. Connecting to these inputs allows you to enjoy higher
input
quality
picture playback.
labels for component video inputs may vary depending
Actual
the TV manufacturer. (ex. Y, R-Y, B-Y or Y, CB, CR)
on
In
some TVs or monitors, the colour levels of the playback
may be reduced slightly or the tint may change. In
picture
su ch
a cas e, adj ust the T V or mon it or for op ti mu m
formance.
per
Connecting to a TV (Using the component video jacks)
To Y video
input
To P
B
video
input
To PR video
input
To audio input
To 2ch AUDIO OUT
: red, L:white)
(R
Audio cable
Progressive outputs
Some TVs or monitors are equipped with component video
that are capable of reproducing a progressively scanned
inputs
signal. Connecting to these inputs allows you to view the
video
highest
quality pictures with less flicker.
sh ould note that not all hig h def inition television
Consumers
are fully compatible with this product and may cause
sets
artifacts to be displayed in the picture. In case of 525 or 625
gressive scan picture problems, it is recommended that
pro
user switch the connection to the “ standar d definition”
the
ou
tput. If th ere are questions regarding our TV set compatibility
this model 525p or 625p DVD player, please contact ou r
with
Customer
Service Center.
To wall outlet
Sw it ch in g the outp ut sign al (in ter la ce d /
progressive) using the remote control
You can temporarily switch the output signal for better
pict
ure quality.
s PROGRESSIVE on the remote control in
Pres
mode.
stop
Pres
s PROGRESSIVE repeatedly to turn off
gressive mode.
pro
If
your TV does not support the progressive scan format,
the picture will appear scrambled or blank. To return to
no
rmal picture, press PROGRESSIVE button repeatedly
to turn off progressive mode.
Notes
• Refer to the owner’s manual of the connected equipment as well.
• When you connect the DVD video player to other equipment, be sure to turn off the power and unplug all of the
• If you place the DVD video player near a tuner or radio, the radio broadcast sound might be distorted. In this case,
• The output sound of the DVD video player has a wide dynamic range. Be sure to adjust the receiver’s volume to a
• Turn off the amplifier before you connect or disconnect the DVD video player’s power cord. If you leave the amplifier
• When the TV system is set to NTSC mode, all output will be forced to NTSC type (eg. 525p (480p), 525i (480i), etc.)
• When the TV system is set to PAL mode, all output will be forced to PAL type (eg. 625p (576p), 625i (576i), etc.)
• Analogue audio out will not have sound if DTS playback is selected.
from the wall outlet before making any connections.
equipment
place
the DVD video player away from the tuner and radio.
moderate listening
level. Otherwise, high volume sound may damage your hearing as well as the speakers.
power on the speakers may be damaged.
• Make the following setting.
On-screen display
Output”
“Digital
Output”
“Video
* Only for TV equipped with component
video input jacks which support the
gressive scan.
pro
Select
“PCM” or
“Bitstream”
Component
*P-Scan
(Pro
gressive)
HDMI
Page
:
22
32
31

About HDMI
HDMI (High Defi nition Multimedia Interface) supports both
and audio on a single digital connection for use with
video
DVD players, DTV, set-top boxes, and other AV devices. HDMI
was developed to provide the technologies of High Bandwidth
Content Protection (HDCP) as well as Digital Visual
Digital
Inter
face (DVI) in one specification. HDCP is used to protect
content transmitted and received by DVI-compliant or
digital
HDMI-compliant
displays.
Connecting to a display (Using a HDMI cable)
has the capability to support standard, enhanced, or high-
HDMI
definition
video plus standard to multi-channel surround-sound
o. HDMI features included uncompressed digital video, a
audi
bandwidth
of up to 2.2 gigabyte s per second (with HDTV)
one con nec tor (in ste ad of severa l cab les and
sig nals) ,
connectors),
AV devices such as DTVs.
HDMI, the HDMI logo and High-Definition Multimedia Interface
are
and communication between the AV source and
trademarks or registered trademarks of HDMI licensing LLC.
TM
Connections
To HDMI
Output
HDMI Ca
If the TV has the HDMI input, connect the DVD Player
and make the setting as follows:
1) Connect the DVD player to your TV with the
composite cable(yellow), then press SETUP button
on the remote control.
2) In the Setup menu, first select “Video” and then select
“Video Output”. Then change the mode to “HDMI”.
3) Connect the DVD player to your TV with the HDMI
cable. Disconnect the composite yellow cable.
4) Change Video input on your TV to HDMI input.
5) If no sound is heard, change the Audio Digital Output
setting to "PCM" see page 31.
Available output signals are below:
• 576p (progressive)
• 720p (progressive)
• 1080i (interlaced)
• Make the following setting.
On-screen display
Output”
“Digital
“Video
Output”
Select
“PCM”
HDMI
Page
:
32
31
To wall outlet
ble (not supplied)
HDMI-compatible
ay
Switching the video quality (HDMI mode)
using HDMI button on the remote control
HDMI SELECT button on the front panel
Press HDMI on the remote control or HDMI
SELECT button on the front panel to receive a
suitable video
quality
feature and suitable quality. Please also check your
TV owner’s manual.
Press this button to change the output signals as
belo
approp
Press
576
p, 720p and 1080i are signals created with this DVD
Player from original 480i/576i signal. The resolution of the
pic
ture may not be increased even if they are selected.
quality in STOP mode. The video
is required to match your TV having HDMI
w. See the HDMI indicator and select the
riate output signal.
HDMI indicator Video output signal
illuminates “ • 1080i” 1080i (Interlaced)
illuminates
illuminates
displ
.
Press
“ • 720p” 720p (Progressive)
Press
“ • 576p” 576p (Progressive)
or
23

Connections
Connecting to a TV (continued)
Content of the output for each output jack is shown in the following table and
differ depending on user setting/operation:
"Video Output" HDMI Output HDMI Video Component AV
Setting Setting * Output Output Output Output
RGB Invalid - Composite - RGB
Composite Invalid - Composite - Composite
Component Invalid - Composite 576i Composite
(Interlaced)
P-Scan Invalid - Composite 576p Com posite
(Progressive)
HDMI
720p 720p - - -
* Settings for HDMI output format are performed using the HDMI button
on the remote control or HDMI SELECT button on the front panel.
Notes
• Refer to the owner’s manual of the connected TV as well.
• When you connect the DVD video player to your TV, be sure
to turn off the power and unplug both units from the wall outlet
before making any connections.
• If you have a HDMI (with HDCP) equipped monitor or display,
you can connect it to this player using a HDMI cable.
• The HDMI connector outputs uncompressed digital video, as
well as almost every kind of digital audio that the player is
compatible with, including DVD-Video, Video CD/Super VCD,
CD and MP3.
• This unit has been designed to be compliant with HDMI (High
Definition Multimedia Interface) Version 1.1 depending on the
component you have connected. Using a HDMI connection
may result in unreliable signal transfers.
• When using HDMI cable, do not connect to other analogue video
outputs.
• Because HDMI is an evolving technology, it is possible that some
devices with an HDMI input may not operate properly with this DVD
player.
• No sound will be output from the HDMI cable if the digital out
is not set to PCM, see page 32.
• HDMI output is only available when the Video Output is set to
“HDMI”. Otherwise the HDMI button is invalid, see page 31.
• If the TV with HDMI doesn't support DTS output decoding, when playing
DTS CD discs,there will be noise during HDMI output.
576p 576p Composite 576p Composite
10
80i 1080i - - -
Content of output for each output jackOn-Screen Display Setting
24

Connecting to Optional Equipment
You can enjoy high quality dynamic sounds by connecting the DVD video player to optional audio equipment.
• For connection to your TV, see “Connecting to a TV”
(see pages 21~23).
• This section uses the following reference marks.
: Front speaker
: Rear speaker
: Sub woofer
: Center speaker
: Signal flow
Notes
• DO NOT connect the COAXIAL DIGITAL AUDIO OUT
ja
ck of the DVD video player to the AC-3 RF input of
Dolby Digital Receiver. This input on your A/V Receiver
a
is
reserved for Laserdisc use only and is incompatible with
the
COAXIAL DIGITAL AUDIO OUT jack of the DVD
player.
video
• Connect the COAXIAL DIGITAL AUDIO OUT jack of
the
DVD video player to the “DIGITAL (COAXIAL)”
input
of a Receiver or Processor.
• Refer to the owner’s manual of the connected
equipment as
• When you connect the DVD video player to other
equipment, be
the
connections.
• The output sound of the DVD video player has a
wide dynamic
volume
spea
sound.
• Turn off the amplifier before you connect or disconnect
the
amplifier
well.
sure to turn off the power and unplug all of
equipment from the wall outlet before making any
range. Be sure to adjust the receiver’s
to a moderate listening level. Otherwise, the
kers may be damaged by a sudden high volume
DVD video player’s power cord. If you leave the
power on, the speakers may be damaged.
Warning
• When you are connecting (via the COAXIAL
DIGI
TAL AUDIO OUT jack) an AV decoder that does
t have Dolby Dig ita l, Digit al The ater Sys te ms
no
( D
TS) or MPEG 2 decoding function, be sure to set
Output” to “PCM” from the on-screen displays
“Digital
see page 32.
damage
• When playing DTS-encoded discs (DVD Video discs
and audio
from
possi
ta
output
to
Surround™
Dig it al
connected
of the
Otherwise, high volume sound may
your hearing as well as the speakers.
CDs), excessive noise may be output
the analogue audio output jacks. To avoid
ble damage to the audio system, you should
ke proper precautions when the analogue audio
jacks of the DVD video player are connected
an amplification system. To enjoy DTS Digital
playback, an external 5.1 channel DTS
Surr ou nd ™ dec od er syst em must be
to the COAXIAL DIGITAL AUDIO OUT jack
DVD video player.
Connections
25

Connections
Connecting to Optional Equipment (continued)
Connecting to an amplifier equipped with a Dolby Digital decoder
Dolby Digital
Dol
by Digital is the surround sound technology used in theaters showing the latest
movies, and is now available to reproduce this realistic effect in the home. You can
enj
oy motion picture and live concer t DVD video discs with this dynamic realistic
sound
by connecting the DVD video player to a 6 channel amplifier equipped with a
Dol
by Digital decoder or Dolby Digital processor. If you have a Dolby Surround Pro
Logic
decoder, you will obtain the full benefit of Pro Logic from the same DVD
movies that provide full 5.1-channel Dolby Digital soundtracks, as well as from titles
wi
th the Dolby Surround mark.
®
Ma
nufactured under license from Dolby
Labo
ratories. “ Dolby ” and the double-D
are trademarks of Dolby
symbol
Labo
ratories.
• Use DVD video discs encoded via
the Dolby Digital recording system.
• Make the following setting.
Amplifier equipped with a
Dol
by Digital decoder
To COAXIAL
type digital
audio input
75
Ω coaxial cable (not supplied)
To COAXIAL
DIGITAL
AUDIO OUT
On-screen display Select:
“PCM” or
Output”
“Digital
“Bitstream”
Connecting to an amplifier equipped with Dolby Surround Pro Logic
Dolby Surround Pro Logic
You can enjoy the dynamic realistic sound of Dolby Surround Pro Logic by connecting
an
amplifier and speaker system (right and left front speakers, a center speaker,
and one or two rear spea
With an amplifier equipped with Dolby Digital
Connect
the equipment the same way as described in “Connecting to an amplifier
equipped
with a Dolby Digital decoder.” Refer to that amplifier’s owner’s
ma
nual and set the amplifier so you can enjoy Dolby Surround Pro Logic sound.
With an amplifier not equipped with Dolby Digital
Connect
the equipment as follows.
kers).
®
• Make the following setting.
On-screen display
“Digital Output”
Select
“PCM” or
“Bitstream”
Page
32
:
Page
32
26
Amplifier equipped with
Dol
by Surround Pro Logic
To audio
input
To ANALOG
AUDIO OUT
Audio cable (not supplied)
* Connect one or two rear speakers.
output sound from the rear speakers will
The
monaural even i f you connect two rear
be
spea
kers.

Connecting to an amplifier equipped with a DTS decoder
Digital Theater Systems (DTS)
DTS
is a high quality surround technology used in theaters and now available for
home
use, on DVD video discs or audio CDs.
If
you have a DTS decoder or processor, you can obtain the full benefit of 5.1
channel
DTS encoded sound tracks on DVD video discs or audio CDs.
Amplifier equipped with a
by Digital decoder
Dol
To COAXIAL
type digital
audio input
75
Ω coaxial cable (not supplied)
To COAXIAL
DIGITAL
AUDIO OUT
®
“DTS” and “DTS Digital Out” are registered
trademarks of DTS, Inc.
• Use DVD video discs or audio CDs
encoded
via the DTS recor ding
system
.
• Make the following setting.
On-screen display Select:
“Digital Output”
“Bitstream
Connecting to an amplifier equipped with an MPEG2 audio decoder
MPEG2 sound
You can enjoy motion picture and live concert DVD video discs with dynamic realistic
sound
by connecting an amplifier equipped with an MPEG2 audio decoder or
MPEG2
audio processor.
Amplifier equipped with an
MEPG2 audio decoder
To COAXIAL
type digital
audio input
75
Ω coaxial cable (not supplied)
To COAXIAL
DIGITAL
AUDIO OUT
• Use DVD video discs encoded via
the MPEG2 recording system.
• Make the following setting.
On-screen display
Output”
“PCM” or
“Bitstream
“Digital
Connecting to an amplifier equipped with a digital audio input
Select
Connections
Page
”
32
:
Page
32
”
2 channel digital stereo
You can enjoy the dynamic sound of 2 channel digital stereo by connecting an
amplifier
equipped with a digital audio input and speaker system (right and left front
spea
kers).
Amplifier equipped with
a digital audio input
To COAXIAL
type digital
audio input
75
Ω coaxial cable (not supplied)
To COAXIAL
DIGITAL
AUDIO OUT
• Make the following setting.
On-screen display
Output”
“Digital
Select
“PCM”
:
Page
32
27

Function setup
Customizing the Function Settings
Setting procedure
Setting procedure
Press the SETUP button to display the main
menu on the screen. When the setup menu is
shown, the playback will be automatically paused.
1.Press / buttons to select the desired setup,
then press button.
2.Press / button to select the sub menu, then
press ENTER
3.Change the selection by / buttons, by referring
to the corresponding pages, then press ENTER
4.To select another option, press button to go
back to step 1.
5.Press SETUP button again to exit the setup
menu from the screen.
.
About the screen saver
When you leave the unit in DVD stop mode for
oximately 2 minutes, the screen saver of the
appr
DVD video player automatically appears. To turn
the screen saver, press the PLAY button.
off
Setting details
Language
OSD
Menu
English: To view on-screen displays in English.
To view on-screen displays in French.Français:
Español:
Deutsch:
Portugues:
Nederlands:
Dansk:
Suomi:
Polski:
To view on-screen displays in Spanish.
To view on-screen displays in
German.
To view on-screen displays in Italian.Italiano:
To view on-screen displays in
Portuguese
To view on-screen displays in Danish
.
To view on-screen displays in Dutch.
To view on-screen displays in Finnish
To view on-screen displays in Polish
:
To view on-screen displays in Turkish
28
Unicode (UTF-8)
Deutsch
Italiano
Portugues
Nederlands
Dansk
Tray Lock
Press SETUP button, and then press the number
button 2005 to lock the tray.
Note
After the tray is locked, “Tray Lock Is On” will
appear on the screen when OPEN/CLOSE button
is pressed.
To unlock the tray, just follow the same procedure
as above.
.
Automatic Power Off function
If the DVD video player is stopped, or the screen
saver is engaged for approximately 20 minutes,
the DVD video player will automatically turn itself
off.
Subtitle
English: To display subtitles in English.
French:
Spanish:
German:
Italian:
Portuguese:
Dutch:
Danish:
Finnish:
Polish:
Turkish:
Auto:
Off: To disable subtitles.
.
.
.
Notes
.Turkiçe
•
Some DVD video discs may be set to display
subtitles in a different language other than you
selected. A prior subtitle language may be
programmed on the disc.
Some DVD video discs allow you to change
•
subtitle selections only via the disc menu. If
this is the case, press MENU button and
choose the appropriate subtitle language from
the selection on the disc menu.
DVD
To display subtitles in French.
To display subtitles in Spanish.
To display subtitles in German.
To display subtitles in Italian.
To display subtitles in Portuguese
To display subtitles in Dutch.
To display subtitles in Danish
To display subtitles in Finnish
To display subtitles in Polish
To display subtitles in Turkish
To display subtitles in different
languages other than you selected.
French
Spanish
German
Italian
Portuguese
Dutch
Dannish
.
.
.
.
.

Setting details
DivX
Subtitle
If your DivX files include a subtitle file, then you
may select a supported DivX subtitle language
by region:
Unicode (UTF-8):
Western European:
Standard: Albanian, Danish, Dutch,
English, Finnish, French,
Gaelic, German,
talian, Kurdish (Latin),
Norwegian, Portuguese,
Central European:
English, German, Hungarian,
Irish, Polish, Romanian,
Slovak, Slovene and Serbian
Cyrillic
Greek: English and modern Greek
Hebrew:
Arabic:
Baltic:
Vietnam:
Chinese:
Korean:
®
®
Uniform byte's encode
standard, adopt double byte
to encode byte.
Albanian, Breton, Catalan,
Danish, Dutch, English,
Faroese, Finnish, French,
Gaelic,German, Icelandic,
Irish, Italian, Norwegian,
Portuguese, Spanish and
Swedish
Spanish, Swedish and Turkish
Albanian, Croat, Czech, Dutch,
:
Bulgarian, Belorussian,
English, Macedonian,
Moldavian, Russian,
Serbian and Ukrainian
English and modern Hebrew
Arabic
Baltic
Vietnamese
Chinese
Korean
DVD
Audio
French
Spanish
German
Italian
Portuguese
Dutch
Dannish
: To play sound tracks in English.
English
:
French
Spanish
German:
Italian:
Portuguese:
Dutch:
Danish:
Finnish:
Polish:
Turkish:
Note
Some DVD video discs may not be played in a
different language that you selected. A prior
language may be programmed on the disc.
DVD Menu
English: To display DVD menus in English.
French:
Spanish:
German:
Italian:
Portuguese:
Dutch:
Danish:
Finnish:
Polish:
Turkish:
To play sound tracks in French.
:
To play sound tracks in Spanish.
To play sound tracks in German.
To play sound tracks in Italian.
To play sound tracks in Portuguese
To play sound tracks in Dutch.
To play sound tracks in Danish
To play sound tracks in Finnish
To play sound tracks in Polish
To play sound tracks in Turkish
DVD
To display DVD menus in French.
To display DVD menus in Spanish.
To display DVD menus in German.
To display DVD menus in Italian.
To display DVD menus in Portuguese
To display DVD menus in Dutch.
To display DVD menus in Danish
To display DVD menus in Finnish
To display DVD menus in Polish
To display DVD menus in Turkish
.
Function setup
.
.
.
.
.
.
.
.
.
Défault
Notes
• If your DivX files do not include the subtitle
file, you cannot use this selection.
Supported subtitle file formats:
•
.srt, .sub, .txt, .smi, .ssa, .ass, .psb.
®
French
Spanish
German
Italian
Portuguese
Dutch
Note
Some DVD video discs may not include your
pre-selected language. In this case, the DVD
video player automatically displays disc menus
consistent with the disc’s initial language setting.
Dannish
29

Function setup
Customizing the Function Settings(continued)
Setting details
TV Shape
: 4:3TV Shape
: Auto FitView Mode
: PALTV System
: HDMIVideo Output
: 480p/576pHD Resolution
: OffHD Jpeg Mode
: 5 SecondsJPEG Interval
: 4:3
4:3
16:9
: Auto FitView Mode
: PALTV System
: HDMIVideo Output
: 480p/576pHD Resolution
: OffHD Jpeg Mode
: 5 SecondsJPEG Interval
Video
TV Shape
4:3
16:9
DVD
Select when a standard 4:3 TV is
connected.
Displays pictures cropped to fill your
TV screen.
Either or both sides of the picture
are cut off.
Select when a 16:9 TV is connected
Notes
• The displayable picture size is preset on the
DVD video disc.
Therefore, the playback picture of some DVD
video discs may not conform to the picture size
you select.
• When you play DVD video discs recorded in the
4:3 picture size only, the playback picture always
appears in the 4:3 picture size regardless of the
TV shape setting. But, if video output is set to
HDMI 720p/1080i, then picture will be 16:9 only.
If you select “16:9 ” and you own a 4:3 TV set, the
•
DVD playback picture will be horizontally distorted
during playback. Images will appear to be
horizontally compressed. Always be sure that your
TV shape conforms to the actual TV in use.
View Mode
The user may select one of the following
options:
:
Fill
Fill the screen with decoded image.
:
Original
Display image as its original size.
Height Fit
:
Fit the screen height with image
height.
:
Width Fit
Fit the screen width with image
width.
Auto Fit:
Automatically fit the decoded image
on screen without distortion.
Pan Scan:
Automatically display decoded
image on full screen without
distortion.
Pan Scan
Auto Fit
Note
Depending on the DVD discs, you may not be
able to view the mode as selected.
Select when a standard 4:3
is connected. Displays pictures
cropped to fill your TV screen.
Either or both sides of the picture
are cut off.
Automatically fit the decoded
image on screen without
distortion. Black bars will be
present on top/bottom or left /
right of screen.
TV Shape
View Mode
: 4:3
: NTSC TV System
: HDVideo Output
: 720pHD Resolution
: OffHD Jpeg Mode
: 5 SecondsJPEG Interval
TV System
: 4:3
TV Shape
View Mode
: Auto Fit
: NTSC
TV System
NTSC
: HDVideo Output
PAL
Auto
: 720pHD Resolution
: OffHD Jpeg Mode
: 5 SecondsJPEG Interval
NTSC:
Select if your TV system is NTSC.
PAL:
Select if your TV system is PAL.
Auto:
The DVD video player automatically
idenfities PAL or NTSC video system
of a disc. Connect a multisystem TV
(PAL/NTSC) compatible) to view a
picture.
A playback picture may be distorted
when detected a signal change
between PAL and NTSC on the disc.
For the case of Progressive mode, your
multisystem TV must be able to support
both 525p and 625p.
30

Setting details
Video Output
Composite: Select if you connect the DVD to your
Component: Select if you connect the DVD to your
RGB:
P-Scan:
(Progressive)
HDMI:
HD Resolution
The resolution of the picture quality can be
changed to 480p/576p, 720p or 1080i.
DVD VCD CD
: 4:3
TV Shape
: Auto FitView Mode
: NTSC TV System
Composite
Video Output
Component
RGB
: 720pHD Resolution
P-Scan
: OffHD Jpeg Mode
HDMI
: 5 SecondsJPEG Interval
TV via composite video (yellow) input.
TV which has component video inputs.
Select if you connect the DVD to your
TV via SCART input.
Select if you connect the DVD to your
TV which has component video inputs
that support progressive scan.
If your TV does not support
progressive scan, distorted picture or
blank screen will appear when “ Yes ”
option is selected.
In this case, just wait for 15 seconds
for auto recovery.
High Definition Multimedia Interface
Select if you connect the DVD to TV
via HDMI input.
CD
TV Shape
TV System
Video Output
HD Resolution
HD Jpeg Mode
: 4:3
: Auto FitView Mode
: PAL
: HDMI
: 720p
: Off
: 5 SecondsJPEG Interval
480p/576p
720p
1080i
HD Jpeg Mode
TV Shape
: 4:3
View Mode
: Auto Fit
TV System
: PAL
Video Output
: HDMI
HD Resolution
: 480p/576p
On
HD Jpeg Mode
Off
: 5 Seconds
JPEG Interval
On:
JPEG image is displayed in a suitable
picture quality (480p/576p, 720p, 1080i).
Off:
The picture quality is fixed to 480p/576p.
Note
If the Video Output mode is not set to “HDMI”, you
cannot select the “HD Jpeg Mode”.
JPEG Interval
TV Shape
: 4:3
View Mode
: Auto Fit
TV System
: PAL
: HDMIVideo Output
: 480p/576pHD Resolution
: OffHD Jpeg Mode
Off
5 Seconds
JPEG Interval
10 Seconds
15 Seconds
Off: Plays back one file at a time.
5 Seconds: Plays back images in the form of a
slide show at 5 seconds interval.
10 Seconds: Plays back images in the form of a
slide show at 10 seconds interval.
15 Seconds: Plays back images in the form of a
slide show at 15 seconds interval.
Function setup
Note
If the Video Output mode is not set to “HDMI”, you
cannot select the “HD Resolution”.
31

Function setup
Customizing the Function Settings(continued)
Setting details
Audio
Digital Output
Selects the output sound format corresponding
to
your system connection.
Off
: No digital audio will be output.
PCM: Select when connected to a 2 channel
digital stereo amplifier. The DVD video
player outputs sound in the PCM 2
channel format when you play a DVD
video disc recorded on the Dolby Digital,
MPEG1 or MPEG2 recording system.
Bitstre
am: Disc audio bitstream data will be output.
Note
When you make a connection to a TV, Dolby
Surround Pro
analogue audio
“Bitstre
Logic or stereo system via the
jacks, select “PCM” or
am”.
Night Mode
Night Mode is equivalent to Dynamic Range
Compress. When it is On, it reduces the
between loud and soft sounds
can still hear softer sounds and dialogue even in very
low volume.
Note
Night mode is Dynamic Range Control (DRC)
option for analogue audio output.
in audio
variation
output. You
Rating
Parental
DVD discs equipped with the password function
are
The
and
vary
For example, if the disc allowed, you could edit
out violent scenes
replace them
could lock out playback of the disc altogether.
• DVD video discs may or may not respond to the
parental
DVD
with
1
2
3
4
note, this is pre-setting password of this unit.)
Then press ENTER
Press ENTER again to list the parental level.
The parental lock level is equivalent to the
following
Parentals:
Level 1:Kid Safe
Level 2:G
Level 3:PG
Level 4:PG-13
Level 5:PG-R
Level 6:R
Level 7:NC-17
Level 8:Adult
DVD
rated
according to their content.
contents allowed by a parental lock level
the way a DVD disc can be controlled may
from disc to disc.
unsuitable for children and
with more suitable scenes, or you
lock
settings. This is not a defect in the
video player. Make sure
your DVD video discs.
) Press SETUP button.
) Press buttons to select the Rating.
/
) Press button,then the ENTER button to select
) Press “8888” using number buttons. (Please
Parental.
“Enter Password” screen will appear.
this function works
.
32

Setting details
)
/
5
Press to select the Parental from 1 to
8 and then press ENTER. Parental one (1) has
the most restrictions while Parental eight(8) can
virtually playback all DVD software.
) Press OPEN/CLOSE button to activate the
6
Parental Level
If the DVD disc has been designed to
temporarily cancel the Parental Level, the screen
will change depending on which disc is played.
If you select “ YES ” with the ENTER button,
“ Enter Password ” screen will appear. Input the
4- digit password as you have set then followed
by ENTER button and playback will start. If
“ NO ” is selected, press the OPEN/CLOSE
to remove the disc.
Notes
• If you input wrong password, press CLEAR
button
• You cannot play DVD discs rated higher than the
level you selected unless you cancel the
parental
Set Password
New Password can be set to replace the
default password.
1) Press SETUP button.
2)Press buttons to select the Rating.
3)Press button, then the buttons to select
Set Password.
4)Press ENTER button. “Enter Password” screen
will appear.
5) Press the number buttons to input the current
password (If the password has not been set
yet after you purchase this unit, it is “8888”).
Then press ENTER
6) Press ENTER button again, “Enter New
Password” screen will appear. Press the
number buttons to input the new password.
7) Press ENTER button. Now your new password
has been set.
If you forget the password, you can erase
your current password by pressing
number button 8 on the remote control
four times, then press ENTER button to
confirm the setting.
setting.
and re-enter your 4-digit password again.
lock function.
DVD
/
/
.
Be sure to remember this number!
PASSWORD: 8888
Default
Use Default Settings
If you want to return the initial language setting
such as Language, Video, Audio and etc. to the
factory default, select “Yes” from the following
menu.
Note
When you reset the DVD video player to the
factory default, the DVD video player will take
3-5 seconds to reset.
DivX Registration
Some DivX Video-On-Demand files require
registration code, please get the code of your
DVD video player as follow:
Note
This registration code is for DivX Video-OnDemand only. Do not apply this code for other
applications or websites.
®
®
Function setup
33

Others
Table of Languages
Table of languages and their abbreviations
Abbreviation
– – –
CHI (ZH)
DUT
(NL)
ENG
(EN)
FRE (
FR
GER
(DE)
ITA (IT)
JPN
(JA)
KOR (KO)
MAY (MS)
SPA (ES)
AA
AB
AF
AM
AR
AS
AY
AZ
BA
BE
BG
BH
BI
BN
BO
BR
CA
CO
CS
CY
DA
DZ
EL
EO
ET
EU
FA
FI
FJ
FO
FY
GA
GD
GL
)
Language
No
alternate
ag
langu
e
Chin
es
e
Du
tc
h
is
Engl
h
French
Ge
rman
ia
Ital
n
Japanese
Korean
Malay
Span
is
h
Afar
ia
Abkhaz
Af
rikaans
ha
Am
ric
Arabic
As
samese
Aymara
Azerbaijani
Bash
ki
r
Beloruss
Bul
ga
rian
ha
Bi
ri
Bisl
am
a
Bengali,
Bangla
ta
Tibe
n
Bre
to
n
Cata
la
n
ca
Corsi
n
Czech
Welsh
is
Dan
h
Bhut
ani
Greek
Es
pe
ranto
Eston
ia
n
Bas
qu
e
Persian
Finn
is
h
Fij
i
Faroese
Frisian
Irish
Scottish
Gaelic
Galic
ian
Abbreviation
GN
GU
HA
HI
HR
HU
HY
IA
IE
IK
IN
IS
IW
n
ia
n
JI
JW
KA
KK
KL
KM
KN
KS
KU
KY
LA
LN
LO
LT
LV
MG
MI
MK
ML
MN
MO
MR
MT
MY
NA
NE
NO
OC
OM
OR
PA
PL
PS
Lan
guage
Guarani
Gu
ja
rati
us
Ha
a
nd
Hi
i
Croat
ia
n
Hun
ga
rian
Armenian
te
In
rlingua
In
te
rlingue
Inupiak
Indones
ia
n
di
Icelan
c
Hebr
ew
Yiddish
Javanese
ia
Georg
n
Ka
zakh
di
Greenlan
Cambod
Kann
Kashmiri
Kurdish
Kirg
La
Ling
Laot
Lithuan
Latvian,
Malag
Mao
Macedon
Malayalam
Mongol
Mo
Ma
Malt
Bu
Na
Nep
Norweg
Occi
(A
Oriya
Panjabi
Polish
Pashto, Pushto
ia
n
ad
a
hi
z
ti
n
al
a
ia
n
ia
n
Lettish
as
y
ri
ia
ia
n
ld
avian
rathi
es
e
rmese
uru
al
i
ia
n
ta
n
fan) Oromo
c
n
Abbreviation
PT
QU
RM
RN
RO
RU
RW
SA
SD
SG
SH
SI
SK
SL
SM
SN
SO
SQ
SR
SS
ST
SU
SV
SW
TA
TE
TG
TH
TI
TK
TL
TN
TO
TR
TS
TT
TW
UK
UR
UZ
VI
VO
WO
XH
YO
ZU
Langua
ge
Portuguese
Quec
hu
a
Rhaeto-Roma
Ki
rundi
ia
Ruman
n
Russ
ia
n
Kin
yarwanda
sk
San
rit
Sin
dh
i
ng
Sa
o
Serbo-Croat
es
Singhal
e
Slo
vak
Slo
venian
Sam
oa
n
on
Sh
a
al
Som
i
Alban
ia
n
ia
Serb
n
Sis
wati
Seso
th
o
Sundan
ese
is
Swed
h
Swah
il
i
Tamil
Telugu
Tajik
Tha
i
Ti
grinya
Turkmen
Tagalog
Set
swana
Tongan
Turkish
Tsong
a
Tatar
Twi
ia
Ukrain
n
Urd
u
Uz
be
k
es
Vietnam
e
Volapük
Wolof
Xho
sa
Yor uba
Zulu
nc
e
ia
n
34

Before Calling Service Personnel
Check the following guide for the possible cause of a problem contacting service.
Symptoms and correction
Symptom
No power.
The DVD video
player turned off
by itself.
No picture or
abnormal colour
(pinkish, greenish,
etc.).
No sound.
The playback
picture has
occasional
distortion.
Brightness is
unstable or noises
are present in the
playback pictures.
Cause
• The power plug is disconnected.
• The automatic power off function
turned the unit off.
• The TV is not set to receive DVD
n
sig
al output.
• The video/HDMI cable is not
connected securely.
• Mismatch setting between TV
and this unit.
• Wrong connection.
• PROGRESSIVE button is
pressed on a TV equipped with
component video input jack
but does not support progressiv
.
scan
• The equipment connected with
e audio cable is not set to
th
e
rec
ive DVD signal output.
• The audio cable is not
connect
ed securely.
• The audio receiver or TV is
turned off.
• The setting of output sound
format is incorrect.
• The disc is dirty.
• It is in fast forward or fast reverse
playback.
• The effect of copy protection.
s
Correction
• Connect the power plug securely into the wall
outlet.
• Press the PLAY button.
• Selec
t the appropriate video input mode
so the picture from the DVD
on the TV screen.
• Connect the video/HDMI cable securely into the
appropriate jacks.
• Select the correct Video Output sett
• Check the connection.
Press PROGRESSIVE button repeatedly to turn
•
off progressive mode.
e
• Select the correct input mode of the
player.
• Connect the audio cable securely int
opriate jacks.
appr
• Turn on the equipment connected wit
cable.
• Select the proper audio setting.
• Remove the disc and clean it.
• Sometimes a small amount of pictur
app
ear. This is not a
• Connect the DVD video player directl
Avoid connecting the DVD
or TV/VCR combination.
e so you can listen to th
malfunction.
player appears
deo
vi
sou
nd from the DVD video
vid
eo player to a VCR
on the TV
ing.
dio receiver
au
o the
h
the audio
tortion may
dis
e
the TV.
y to
Others
35

Others
Before Calling Service Personnel (continued)
Symptoms and correction
Symptom Cause Correction
The DVD video
player does not
start playback.
Playback does not
follow the course
of the disc’s
program.
Buttons do not
work.
The
remote
ro
cont
l does not
work properly.
Th
e logo and
playing picture of
DVD player
become poor.
Th
e DVD player
tray does not
open.
• No disc is inserted.
• An unplayable disc is inserted.
• The disc is placed upside down.
• The disc is not placed within the
guide.
• The disc is dirty.
• The parental lock function is set.
• It is in the mode of repeat
playback, memory
playback, etc.
• Power supply fluctuations or other
abnormalities such as static
ec
el
tricity may inte
erations.
op
• The remote control is not pointed
at the remote sensor of the
video player.
• The remote control is too far from
the DVD vide
• The
batteries in the remote
l are exhausted.
ro
cont
• Adjusted sharpness is too small
or too large.
• Tray Lock mode has been enable.
rrupt correct
DVD
o player.
• Insert a disc.
• Insert a playable disc. (Check the disc type and
co
lour system.)
• Place the disc with the playback side down.
• Place the disc correctly inside the
tray.
• Clean the disc.
• Cancel the parental lock function or
parental lock level.
• These operations may prevent a proper
the contents.
• Press and hold the ON/STANDBY
fr
ont panel for more than
vi
it on. If the buttons still do not work,
power plug and insert it
• Point the remote control at the remote
DVD video player.
• Operate the remote control within
• Replace
• Adjust Brightness or Sharpness to a
• Disable the Tray Lock function.
turns off. Pres
deo player
the batteries with new ones.
gu
e on th
id
an
ch
ge
pr
button on th
t 3 secon
disconn
ab
ds. The DVD
sen
ou
t 7 m.
certain lev
ou
ab
the button again to turn
s
int
o the wall outlet again.
e disc
th
gress of
o
ect the
r of the
so
e
e
el.
36

Specifications
DVD Video player/outputs/supplied accessories
DVD Video player
Power supply 100V-240V AC ~ 50/60 Hz
Power consumption 10 W
Mass 1.63kg
External dimensions 430 x 40 x 199 mm (W/H/D)
Signal system PAL/NTSC
Laser Semiconductor laser, wavelength 650/780 nm
Frequency range DVD linear sound: 48 kHz sampling 4 Hz to 22 kHz
Signal-to-noise ratio More than 100 dB
Audio dynamic range More than 93 dB
Harmonic distortion Less than -70dB
Wow and flutter Below measurable level (less than ±0.001 % (W.PEAK))
Operating conditions Temperature: 5 °C to 35 °C, Operation status: Horizontal
Outputs
Video output (SCART with RGB)
Video output
1.0 V (p-p), 75 Ω ,
Component video output (Y) 1.0 V (p-p), 75 Ω , negative sync., pin jack x 1
Audio output (COAXIAL DIGITAL)
Audio output (ANALOG)
HDMI output
Supplied Accessories
Audio/video cable ..................................................................................................1
Remote control (SE-R0217) ................................................................................1
Batteries (AAA) .................................................................................................... 2
0.5V
0V (p-p), 75Ω, SCART socket x 1
1.
(P
)/(PR) 0.7 V (p-p), 75 Ω, pin jack x 2
B
(p-p), 75 Ω , pin jack x 1
2.0 V (rms), 680 Ω, pin jacks (L, R) x 1
19 pin
96 kHz sampling 4 Hz to 44 kHz
negati ve sync., pin jack x 1
Others
• This model complies with the above specifications.
• Designs and specifications are subject to change without notice.
• This model may not be compatible with features and/or specifications that may be added in the future.
Following information is only for EU-member states:
The use of the symbol indicates that this product may not be treated as househ old waste. By
ensuring this product is disposed of correctly, you will help prevent po tential negative
consequences for the environment and human health, which could otherwise be caused by
inappropriate waste handling of this product. For more detailed information about recycling of
this product, please co ntact your local city office, your household waste disposal service or the
shop where you purch ased the product.
37

70% Recycle paper
Printed in China
TSDAC10058A
 Loading...