

Toshiba RAS-M10N3KVP Series, RAS-M13N3KVP Series, RAS-M16N3KVP Series Owner's Manual
1110255103
OWNER’S MANUAL
AIR CONDITIONER (MULTIPLE TYPE)
For general public use
Indoor unit
RAS-M10, 13, 16N3KVP Series
ENGLISH
SVENSKA
SUOMI
NORSK
DANSK
1110255103_EN.indd 11110255103_EN.indd 1 9/26/12 3:14 PM9/26/12 3:14 PM
PRECAUTIONS FOR SAFETY
The manufacturer shall not assume any liability for the damage caused by not observing the description of this manual.
Store this owner’s manual in a location where it can be easily accessed when needed.
Be sure to read this owner’s manual carefully before operating.
It is recommended that maintenance be performed by a specialist when the unit has been operated for a long time and/or makes a strange noise.
This appliance is not intended for use by person (including children) with reduced physical, sensory or mental capabilities, or lack of experience and knowledge,
unless they have been given supervision or instruction concerning use of the appliance by a person responsible for their safety.
Children should be supervised to ensure that they do not play with the appliance.
Be sure to follow the precautions provided here to avoid safety risks.
The symbols and their meanings are shown below.
0 DANGER
It indicates that incorrect use of this unit can result in a high possibility of severe injury(*1) or death.
0 WARNING
It indicates that incorrect use of this unit may cause severe injury or death.
0 CAUTION
It indicates that incorrect use of this unit may cause personal injury(*2), or property damage(*3).
*1: A severe injury refers to blindness, injury, burns (hot or cold), electrical shock, bone fracture, or poisoning that leaves aftereffects and requires hospitalization or
extended out-patient treatment.
*2: Personal injury means a slight accident, burn, or electrical shock which does not require admission or repeated hospital treatment.
*3: Property damage means greater damage which affects assets or resources.
1
Never do.
4
Beware of rotating parts
5
Electrical hazard. Contact with water will cause electric shock.
Do NOT touch with wet hands. Always unplug when not in use.
3
Risk of fi nger injury
2
Always follow the instructions
6
Do not get the product wet
0
DANGER
5
Do not install, repair, open or remove the cover. It may expose you to dangerous voltages. Ask the dealership or the specialist to do this.
5
Turning off the power supply will not prevent potential electric shock.
2
The appliance shall be installed in accordance with national wiring regulation.
2
Means for disconnection from the supply having a contact separation of at least 3 mm in all poles must be incorporated in the fi xed wiring.
1
Do not place a spray can near the air outlet grille less than 1 m.
The warm air from indoor and outdoor units may cause an explosion of the spray can.
0
WARNING
2
Installation must be requested from the supplying retail dealership or professional installation vendors. Installation requires special knowledge and
skill. If customers install on their own, it can be a cause of fi re, electric shock, injury or water leakage.
1
Do not use any refrigerant different from the one specifi ed for complement or replacement. Otherwise, abnormally high pressure may be generated in
the refrigeration cycle, which may result in a failure or explosion of the product or an injury to your body.
1
Do not disassemble, modify or relocate the unit by yourself. It may become the cause of fi re, electric shock, or water leakage. For repair or relocation,
please request service from the supplying retail dealership.
2
When relocating or repairing the unit, please contact the supplying retail dealership. When there is a kink in the wiring, it may be the cause of electric
shock or fi re.
1
Do not select a location for installation where fl ammable gas may leak. If there is any gas leakage or accumulation around the unit, it can be a cause
of fi re.
1
Do not select a location for installation where there may be excessive water or humidity, such as a bathroom. Deterioration of insulation may be a
cause of electric shock or fi re.
2
Earth work should be requested from the supplying retail dealership or professional vendors. Insuffi cient grounding work may be the cause of electric
shock. Do not connect the earth wire to a gas pipe, water pipe, lightning conductor, or telephone earth wire.
2
You must use an independent power outlet for the power supply. If a power outlet other than the independent outlet is used, it may cause a fi re.
2
Check that the circuit breaker is installed correctly. If the circuit breaker is not properly installed, it may cause an electric shock. To check the
installation method, please contact the supplying retail dealership or the professional vendor who installed the unit.
2
During an error (such as a burning odor, not cooling, or not warming), stop operating the unit and turn off the circuit breaker.
Continuous operation may be a cause of fi re, or electric shock. Please request repair or service from the supplying retail dealership.
1
Do not turn ON/OFF the circuit breaker or operate buttons with a wet hand. It may be a cause of electric shock.
1
Do not insert any material (metal, paper, or water, etc) into the air outlet or air intake opening. Fan may be rotating at high speed inside or there are
high voltage sections, which may cause an injury or electric shock.
1110255103_EN.indd 21110255103_EN.indd 2 9/26/12 3:14 PM9/26/12 3:14 PM
2
When the air-conditioning unit does not cool or warm, there may be a leakage of refrigerant. Please consult the supplying retail dealership.
The refrigerant used in the air-conditioning unit is safe. It will not leak under normal operating conditions but if it leaks into the room and contacts a
heat source such as a heater, or stove, it may cause a harmful reaction.
2
When water or other foreign substances enter the internal parts, stop operating the unit immediately and turn off the circuit breaker.
Operating the unit continuously may cause fi re or electric shock. Please contact the supplying retail dealership for repair.
1
Do not clean the inside of the air-conditioning unit yourself. Please request internal cleaning of the air-conditioning unit from the supplying retail
dealership. Incorrect cleaning may cause breakage of resin parts or insulation defects of electrical parts, causing water leakage, electric shock or fi re.
1
Do not damage or modify the power cable. Do not connect the cable midway, or use a multiple outlet extension cord that is shared by other devices.
Failure to do so may cause fi re.
1
Do not place heavy objects on the power cable, expose it to heat, or pull it. To do so may cause electrical shock or fi re.
1
Do not expose your body directly to cool air for a long time.
1
Do not insert your fi nger or any article into the air inlet/outlet.
0
CAUTION
2
Ensure that drained water is discharged. When the discharging water process is not suffi cient, water may leak, causing water damage to furniture.
To check that the installation method used is correct, please contact the supplying retail dealership or the professional vendor who installed the unit.
2
If the indoor unit piping outlet is exposed due to relocation, close the opening, Touching internal electrical parts may cause injury or electric shock.
1
Do not wash the main air-conditioning unit with water. It may cause an electric shock.
1
Do not place any containers such as a vase containing fl uid on the unit. It might cause water to enter the unit and deteriorate the electrical insulation,
causing an electric shock.
2
When using the unit in a closed room, or operating with other combustion appliances, make sure to open a window occasionally for ventilation.
Insuffi cient ventilation may cause suffocation due to a lack of oxygen.
1
Do not use combustion appliances in the direct fl ow of the air from the air-conditioning unit. Poor combustion of a combustion appliance may cause
suffocation.
1
Avoid operating for long periods in a high humidity environment (over 80%) such as with the windows or doors open. There may be condensation on
the indoor unit and droplets may fall onto the furniture.
2
When the unit won’t be used for a long time, turn off the main switch or the circuit breaker.
2
At least once a year check if the mounting table of the outdoor unit is damaged or not. If a damaged state is ignored, the unit may fall or over-turn,
causing an injury.
1
Stand on a sturdy ladder when attaching/detaching the front panel/air fi lter/air cleaning fi lter. Failure to do so may cause a fall or injury.
1
Do not stand on the outdoor unit or place anything on the unit. It may be the cause of injury due to falling or over-turning.
Any damage to the unit may cause an electric shock or fi re.
2
Do not place anything around the outdoor unit or allow fallen leaves to accumulate around it. If there are fallen leaves, small animals could enter and
contact internal electrical parts, causing a failure or fi re.
1
Do not place animals and plants in places where wind from the air-conditioning unit fl ows directly. It may have a negative infl uence on the animal or
plant.
1
Do not use for special applications such as storage of food or animals, or to display plants, precision devices, or art objects.
Do not use on ships or in other vehicles. It may cause a failure in the air-conditioning unit. In addition, it may damage these items.
1
Do not place other electrical appliances or furniture under the unit. Water droplets might fall, causing damage or failure.
2
When performing maintenance, you must stop operating the unit and turn off the circuit breaker. Since the fan inside may be rotating at high speed,
it may cause an injury.
2
After the front panel/air fi lter is cleaned, wipe away any water and allow to dry. If water remains, it may cause an electric shock.
1
Once the front panel is removed, do not touch the metal parts (aluminum fi ns, etc.) of the unit. It may cause an injury.
2
When you hear thunder and there might be a lightning strike, stop operating the unit and disconnect the circuit breaker. If lightning strikes, it may
cause a failure.
• Batteries for remote control unit:
- Should be inserted with correct polarity (+) and (-).
- Should not be recharged.
- Do not use batteries for which the “Recommended usage period” has expired.
- Do not keep used batteries inside the remote control unit.
- Do not mix different types of batteries, or mix new batteries with old ones.
- Do not directly solder the batteries.
- Do not short-circuit, disassemble, heat, or throw batteries into a fi re. If batteries are not disposed of correctly, they may burst or be the cause of fl uid leakage,
resulting in burns or injuries. If touching the fl uid, wash thoroughly with water. If it touches devices, wipe off to avoid direct contact.
- Do not place within reach of small children. If a battery is swallowed, consult a doctor immediately.
• When you press CLOCK ●, CHECK ●, FILTER ● and RESET ● button, do not let any foreign substances enter and remain inside of the remote control.
EN
FI
NO
DK
SV
1110255103_EN.indd 31110255103_EN.indd 3 9/26/12 3:14 PM9/26/12 3:14 PM
5412 3
6
385(
5(6(7
1
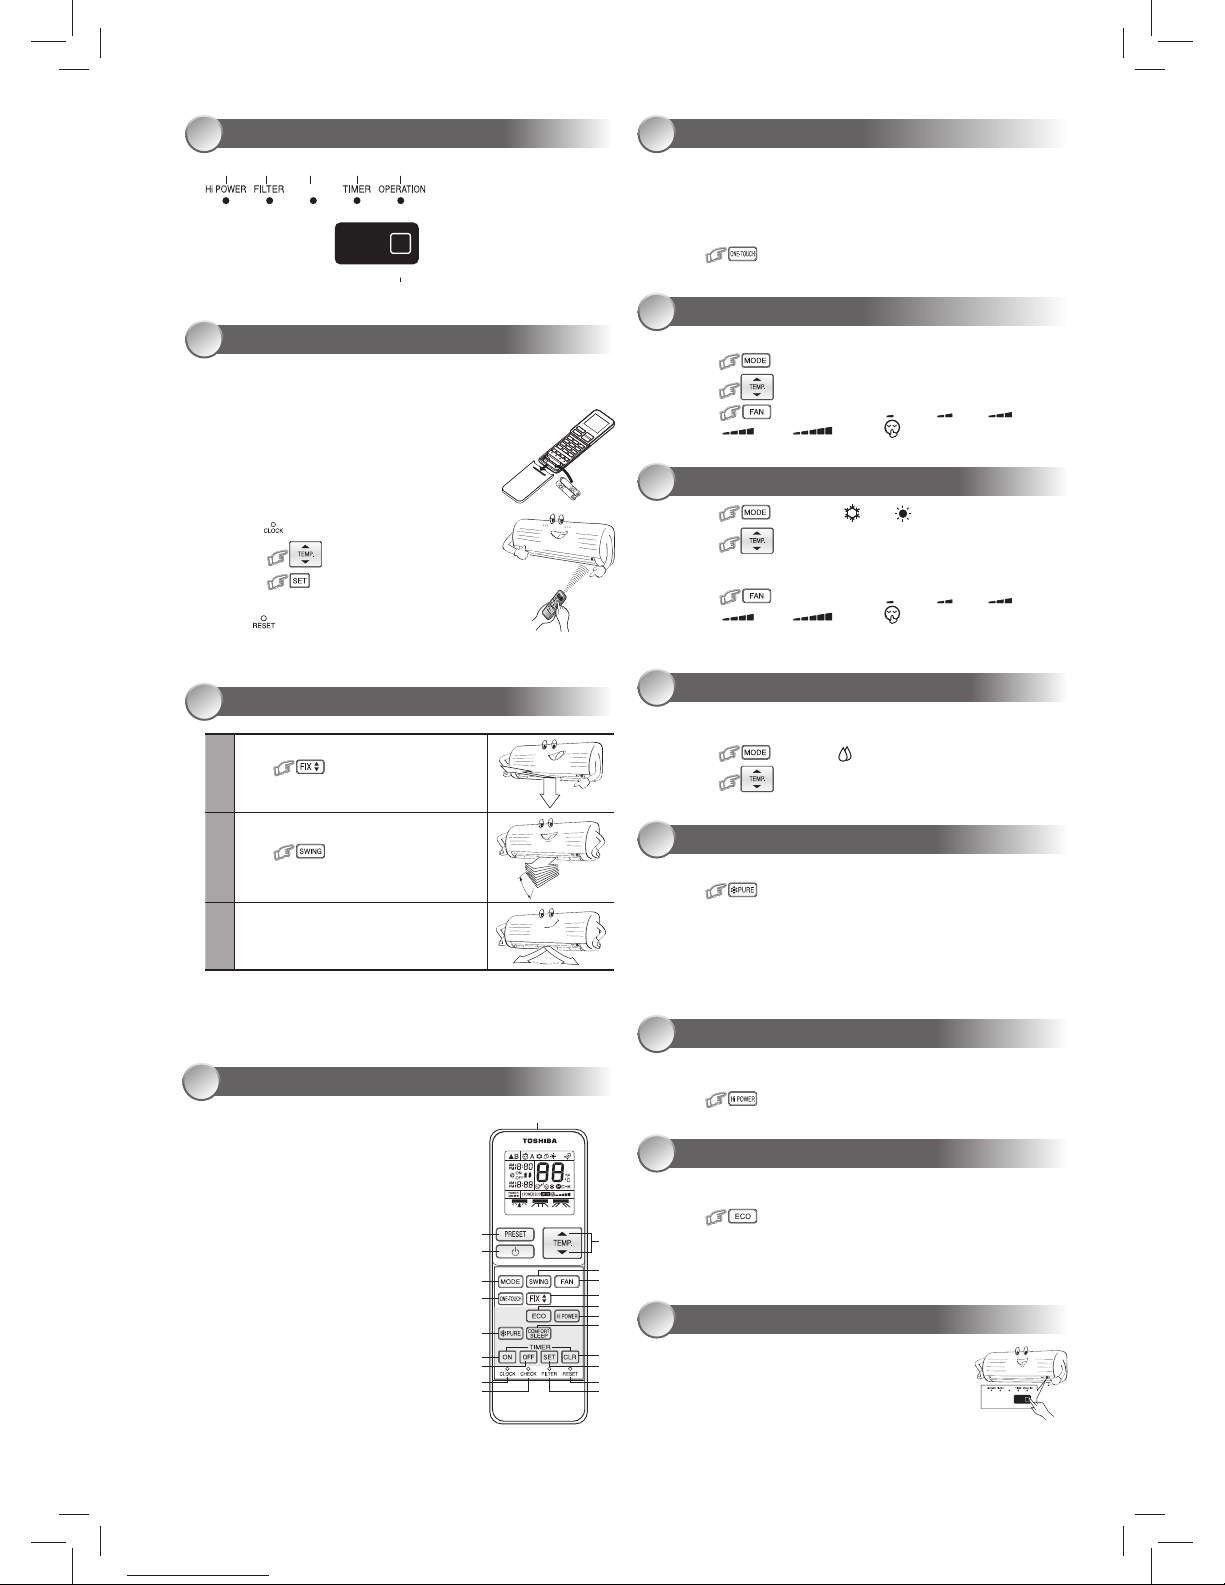
Press : Move the louver in the
desired vertical direction.
2
Press : Swing the air automatically
and press again to stop.
3
For horizontal direction, adjust manually.
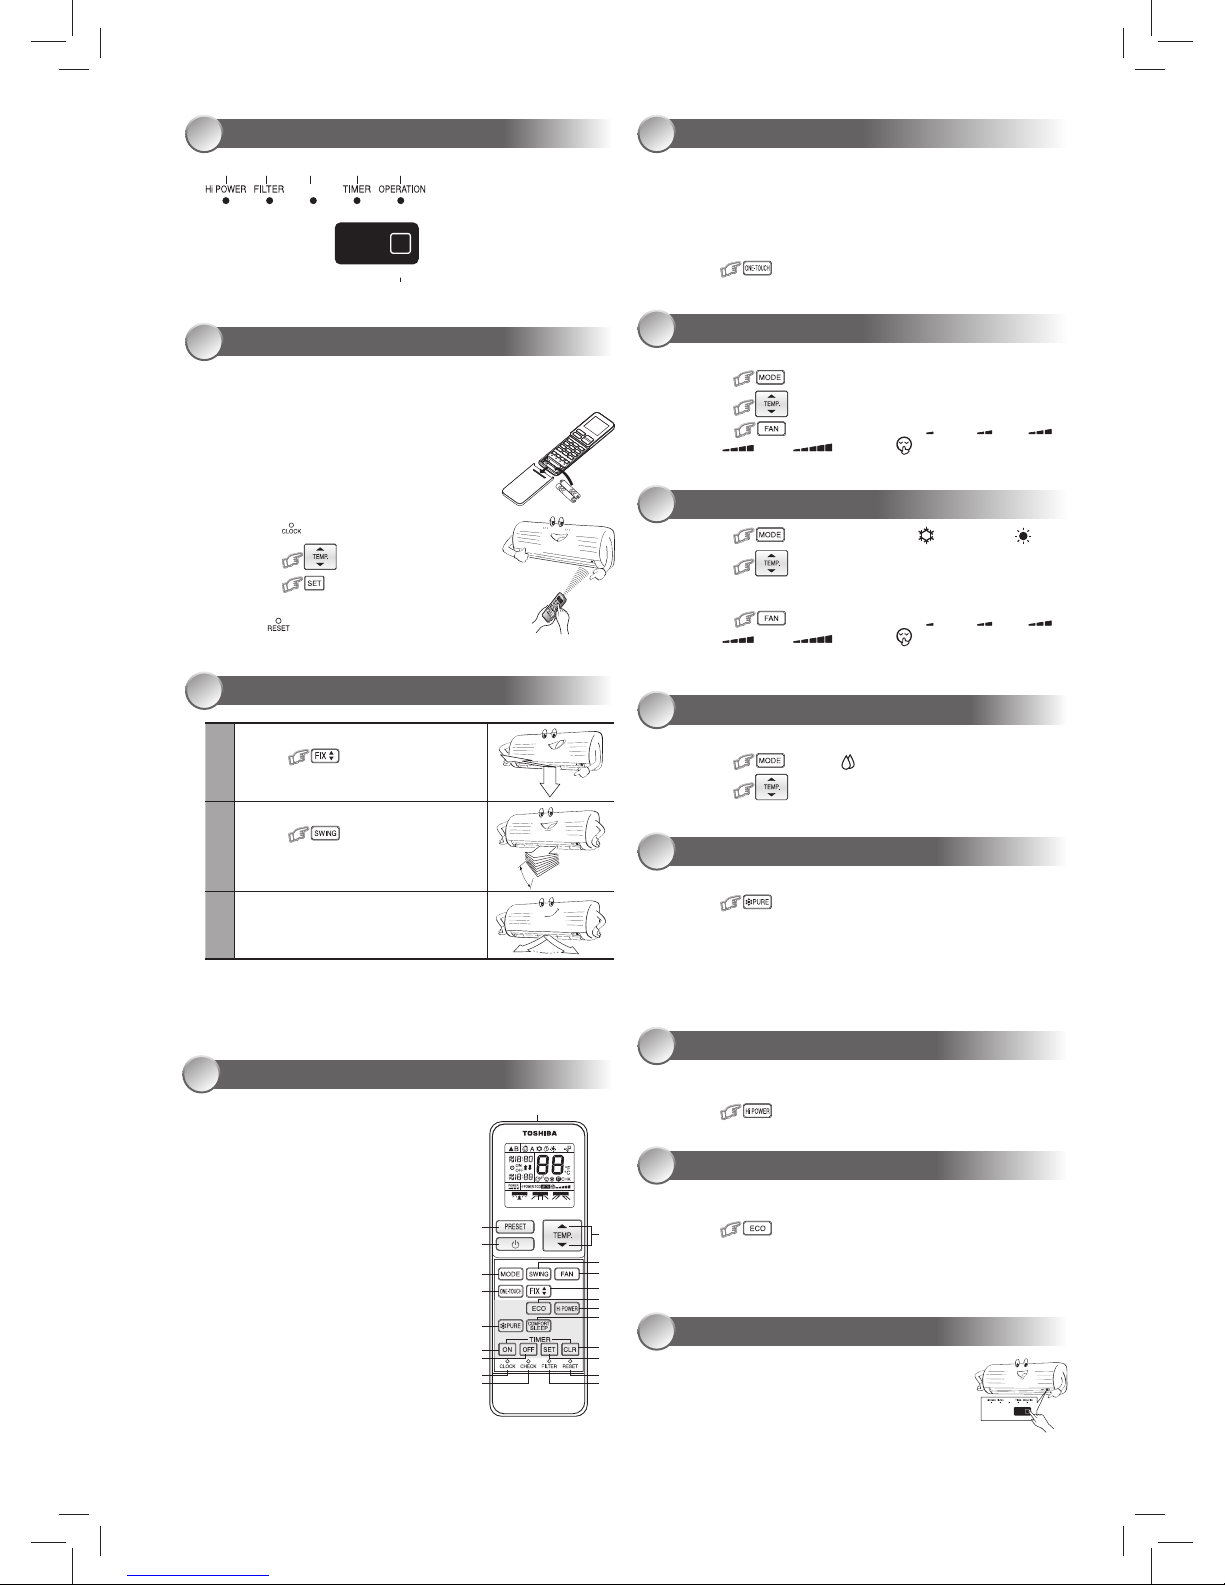
INDOOR UNIT DISPLAY
1
Hi POWER (Green)
2
FILTER (Orange)
3
PURE (Blue)
4
TIMER (Yellow)
5
OPERATION (Green)
6
RESET button
1
Infrared signal emitter
2
Memory and preset button (PRESET)
3
Start/Stop button
4
Temperature up/down and
Timer or clock up/down button (TEMP.)
5
Mode select button (MODE)
6
Swing louver button (SWING)
7
Fan speed button (FAN)
8
One Touch button (ONE-TOUCH)
9
Set louver button (FIX)
-
Economy button (ECO)
=
High power button (Hi-POWER)
q
Plasma Air Purifi er button (PURE)
w
Comfort sleep button (COMFORT SLEEP)
e
On timer button (ON)
r
Off timer button (OFF)
t
Setup button (SET)
y
Clear button (CLR)
u
Clock setup button (CLOCK)
i
Check button (CHECK)
o
Filter reset button (FILTER)
p
Reset button (RESET)
1
PREPARATION BEFORE USE
2
Preparing Filters
1. Open the air inlet grille and remove the air fi lters.
2. Attach the fi lters. (see detail in the accessory sheet).
AIRFLOW DIRECTION
3
Note:
• Do not move the louver manually by others.
• The louver may automation positioning by some operation mode.
REMOTE CONTROL
4
ONE-TOUCH
5
Press the “ONE-TOUCH” button for fully automated operation that is
customised to the typical consumer preferences in your region of the world.
The customised settings control temperature air fl ow strength, air fl ow
direction and other settings to provide you alternate contact with “ONETOUCH” of the button. If you prefer other settings you can select from the
many other operating functions of your Toshiba unit.
Press
: Start the operation.
AUTOMATIC OPERATION
6
To automatically select cooling, heating, or fan only operation
1. Press
: Select A.
2. Press
: Set the desired temperature.
3. Press
: Select AUTO, LOW , LOW+ , MED ,
MED+
, HIGH , or Quiet .
COOLING / HEATING OPERATION
7
1. Press : Select Cool , Heat .
2. Press
: Set the desired temperature.
Cooling: Min. 17°C, Heating: Max. 30°C, Fan Only: No temperature
indication
3. Press
: Select AUTO, LOW , LOW+ , MED ,
MED+
, HIGH , or Quiet .
Note: QUIET is supper low fan speed for quiet operation.
DRY OPERATION (COOLING ONLY)
8
For dehumidifi cation, a moderate cooling performance is controlled
automatically.
1. Press
: Select Dry .
2. Press
: Set the desired temperature.
AIR PURIFYING OPERATION
9
During air conditioner operation
Press
to start and stop plasma air purifi er and air ionizer
operation.
The plasma air purifi er and air ionizer can be activated or deactivated during
air conditioner is stopped and the air ionizer starts in conjunction with plasma
air purifi er operation.
Note: The FILTER indicator (orange) turns on after PURE operation is
performed for about 1000 hours.
Hi-POWER OPERATION
10
To automatically control room temperature and airfl ow for faster cooling or
heating operation (except in DRY and FAN ONLY mode)
Press
: Start and stop the operation.
ECO OPERATION
11
To automatically control room to save energy (except in DRY and FAN ONLY
mode)
Press : Start and stop the operation.
Note: Cooling operation; the set temperature will increase automatically 1
degree/hour for 2 hours (maximum 2 degrees increase). For heating
operation the set temperature will decrease.
1
4
6
7
9
=
w
y
t
p
o
3
2
5
8
q
e
r
u
i
TEMPORARY OPERATION
12
In case of the misplaced or discharged remote control
• Pressing the RESET button, the unit can start or stop
without using the remote control.
• Operation mode is set on AUTOMATIC operation,
preset temperature is 25°C and fan operation is
automatic speed.
385(
5(6(7
Loading Batteries
1. Remove the battery cover.
2. Insert 2 new batteries (AAA type) following
the (+) and (–) positions.
Clock Setup
1. Push
by tip of the pencil.
2. Press
: adjust the time.
3. Press : Set the time.
Remote Control Reset
Press
for reset.
1110255103_EN.indd 41110255103_EN.indd 4 9/26/12 3:14 PM9/26/12 3:14 PM
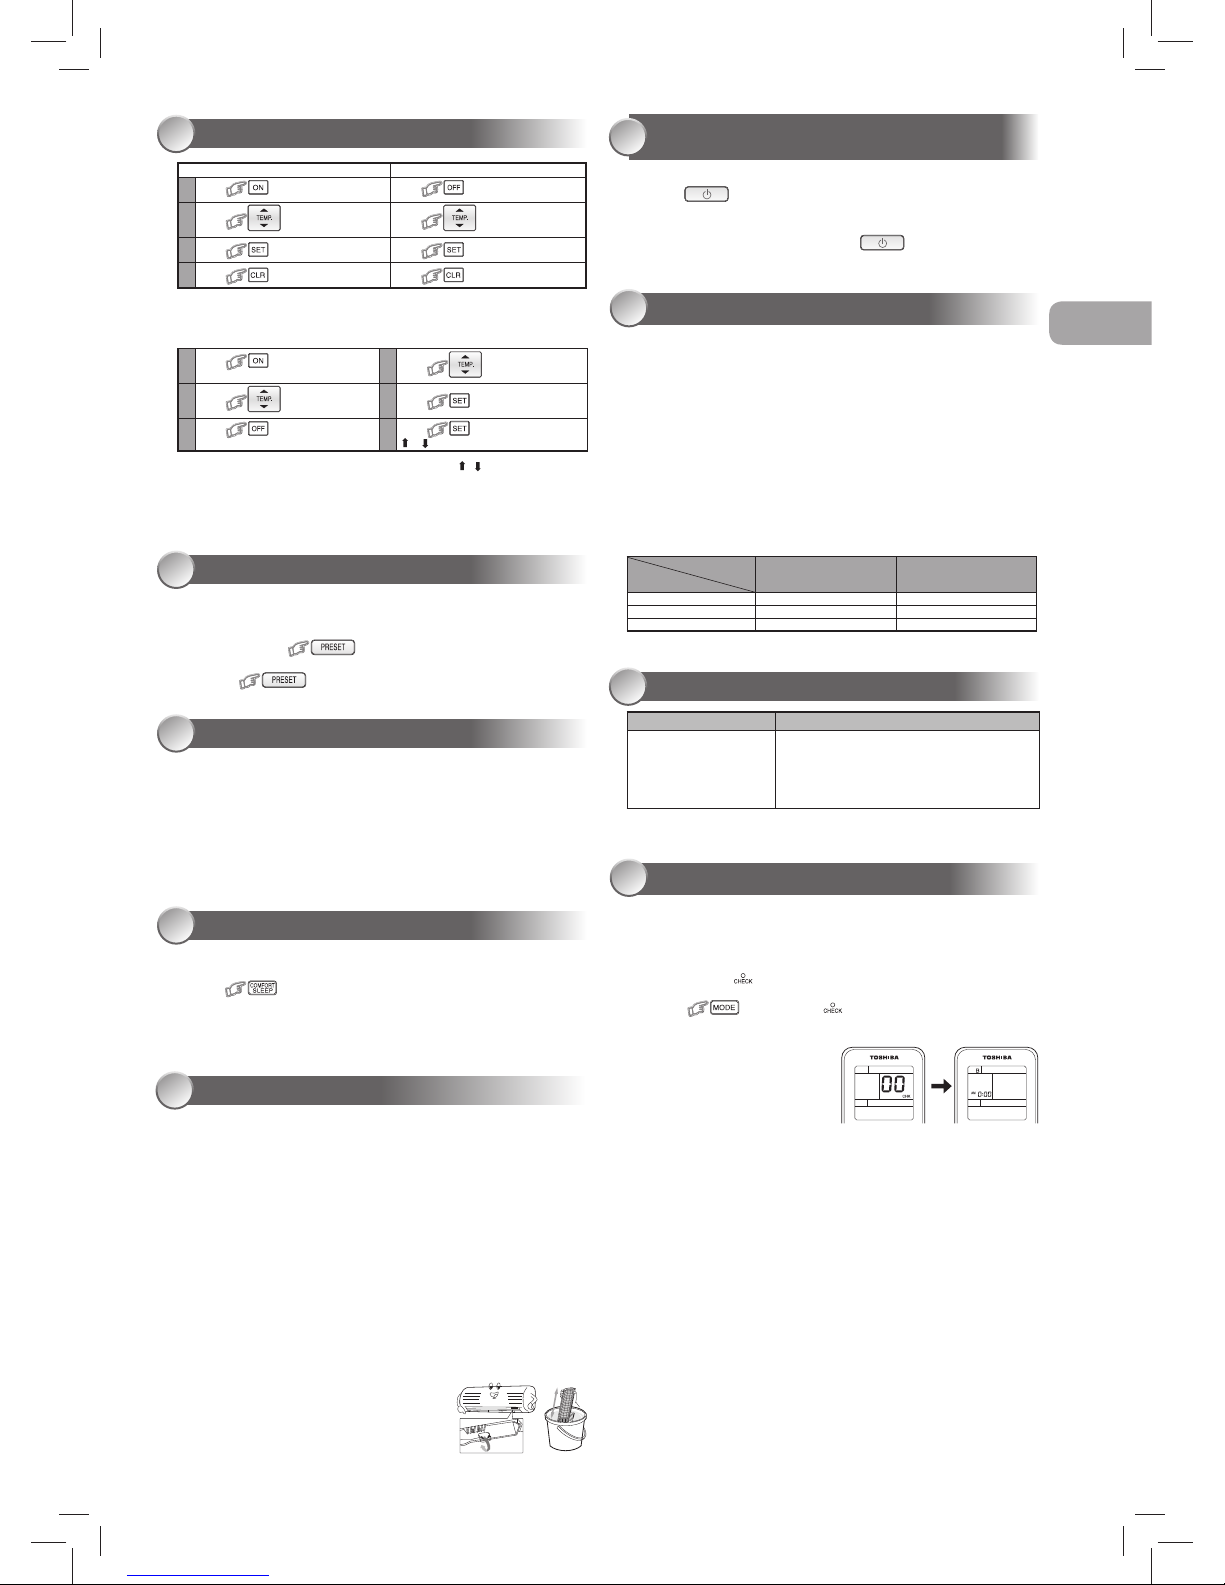
TIMER OPERATION
13
Daily timer allows the user to set both the ON & OFF timers and will be
activated on a daily basis.
Setting Daily Timer
Setting the ON Timer Setting the OFF Timer
1
Press for enter ON timer setting
Press
for enter OFF timer setting
2
Press for select desired ON
timer.
Press for select desired OFF
timer.
3
Press for set timer. Press for set timer.
4
Press for cancel timer. Press for cancel timer.
1
Press for enter ON timer
setting
4
Press for select desired OFF
timer.
2
Press for select desired
ON timer.
5
Press .
3
Press for enter OFF timer
setting
6
Press again during the
(
or ) blink.
• During the daily timer is activating, both arrows ( , ) are indicated.
Note:
• Keep the remote control in accessible transmission to the indoor unit;
otherwise, the time lag up to 15 minutes will occur.
• The setting will be saved for the next same operation.
PRESET OPERATION
14
Set your preferred operation for future use. The setting will be memorized by
the unit for future operation (except airfl ow direction).
1. Select your preferred operation.
2. Press and hold for 3 seconds to memorize the setting.
The P mark displays.
3. Press
: Operate the preset operation.
AUTO RESTART OPERATION
15
To automatically restart the conditioner after the power failure (Power of the
unit must be on.)
Setting
1. Press and hold the RESET button on the indoor unit for 3 seconds to set the
operation. (3 beep sound and OPERATION lamp blink 5 time/sec for 5 seconds)
2. Press and hold the RESET button on the indoor unit for 3 seconds to cancel the
operation. (3 beep sound but OPERATION lamp does not blink)
•
In case of ON timer or OFF timer are set, AUTO RESTART OPERATION does
not activate.
To save energy while sleeping, automatically control air fl ow and
automatically turn OFF.
Press
: Select 1, 3, 5 or 9 hrs for OFF timer operation.
Note: The cooling operation, the set temperature will increase automatically
1 degree/hour for 2 hours (maximum 2 degrees increase). For heating
operation, the set temperature will decrease.
COMFORT SLEEP OPERATION
16
SELF CLEANING OPERATION
(COOL AND DRY OPERATION ONLY)
18
OPERATION AND PERFORMANCE
19
1. Three-minute protection feature: To prevent the unit from being activated for 3
minutes when suddenly restarted or switched to ON.
2. Preheating operation: Warm up the unit for 5 minutes before the heating
operation starts.
3. Warm air control: When the room temperature reaches the set temperature, the
fan speed is automatically reduced and the outdoor unit will stop.
4. Automatic defrosting: Fans will stop during defrost operation.
5. Heating capacity: Heat is absorbed from outdoors and released into the room.
When the outdoor temperature is too low, use another recommended heating
apparatus in combination with the air conditioner.
6. Consideration for accumulated snow: Select the position for outdoor unit where
it will not be subjected to snow drifts, accumulation of leaves or other seasonal
debris.
7. Some minor cracking sound may occur when unit operating. This is normal
because the cracking sound may be caused by expansion/contraction of plastic.
Note: Item 2 to 6 for Heating model
Air conditioner operating conditions
Temp.
Operation
Outdoor Temperature Room Temperature
Heating –15°C ~ 24°C Less than 28°C
Cooling –10°C ~ 46°C 21°C ~ 32°C
Dry –10°C ~ 46°C 17°C ~ 32°C
The unit does not operate. Cooling or Heating is abnormally low.
•
The power main switch is
turned off.
•
The circuit breaker is activated
to cut off the power supply.
•
Stoppage of electric current
•
ON timer is set.
•
The fi lters are blocked with dust.
•
The temperature has been set improperly.
•
The windows or doors are opened.
•
The air inlet or outlet of the outdoor unit is blocked.
•
The fan speed is too low.
•
The operation mode is FAN or DRY.
TROUBLESHOOTING (CHECK POINT)
20
REMOTE CONTROL A-B SELECTION
21
To separate using of remote control for each indoor unit in case of 2 air
conditioner are installed nearly.
Remote Control B Setup.
1. Press RESET button on the indoor unit to turn the air conditioner ON.
2. Point the remote control at the indoor unit.
3. Push and hold button on the Remote Control by the tip of the pencil.
“00” will be shown on the display.
4. Press
during pushing . “B” will show on the display and
“00” will disappear and the air conditioner will turn OFF. The Remote
Control B is memorized.
Note:
1. Repeat above step to reset
Remote Control to be A.
2. Remote Control A has not “A”
display.
3. Default setting of Remote Control
from factory is A.
0
Firstly, turn off the circuit breaker.
Filter Reset (Some models only)
FILTER lamp lights on; the fi lter must be cleaned.
To turn off the lamp, push the RESET button on the indoor unit or the FILTER button on
the remote control.
Indoor Unit and Remote Control
•
Clean the indoor unit and the remote control with a wet cloth when needed.
•
No benzine, thinner, polishing powder or chemically-treated duster.
Cleaning the air ionizer (Once every six months)
1. Turn off air conditioner using remote control and power supply.
2. Fully open the vertical air fl ow louvers by hand.
3. Use a toothbrush to rub the ends of metal pin three or four times.
Note: Do not use cotton swabs or other objects with fl uff.
Cleaning the plasma air purifi er unit (About every 1000 hours performed)
1. Turn off air conditioner using remote control and power supply.
2. Take out the air inlet grille (See detail in installation manual).
3. Take out the plasma air purifi er by grasp the handle, and the pull it out.
4. Soak in hot water at 40°C to 50°C for about 10 to 15 minutes and rub up, down,
left, right and rub surface gently with a sponge.
5. Allow to dry thoroughly in the shade.
6. Attach the plasma air purifi er by grasp the handle
and insert into the right and left guide rails.
7. Press both ends of the plasma air purifi er until the
protrusions on both sides of the plasma air purifi er
are completely inserted.
8. Attach the air fi lter, and then close the air inlet grille.
MAINTENANCE
17
To protect bad smell caused by the humidity in the indoor unit.
1. If the
button is pressed once during “Cool” or “Dry” mode,
the fan will continue to run for other 30 minutes, then it will turn off
automatically. This will reduce the moisture in the indoor unit.
2. To stop the unit immediately, press the
more 2 times within 30
seconds.
EN
FI
NO
DK
SV
1110255103_EN.indd 51110255103_EN.indd 5 9/26/12 3:14 PM9/26/12 3:14 PM

SÄKERHETSANVISNINGAR
Tillverkaren tar inte på sig något ansvar för skador som orsakats av att inte följa beskrivningen av denna handbok.
Förvara den här handboken på en lättillgänglig plats, så att den enkelt kan tas fram när den behövs.
Läs den här handboken noga före användning.
Det rekommenderas att underhållning sköts av specialist när enheten har använts under en längre period och/eller ger ifrån sig ett konstigt ljud.
Denna apparat är inte ämnad att användas av personer (inklusive barn) med fysiska, sensoriska eller mentala förhinder, eller med otillräcklig erfarenhet eller
kunskap, om de inte är försedda med övervakning eller instruktioner angående användandet av apparaten av en person som är ansvarig för deras säkerhet.
Barn skall övervakas så att de inte leker med apparaten.
Se till att vidta de försiktighetsåtgärder som anges här för att undvika risker.
Alla symboler och deras innebörd visas nedan.
0 FARA
Detta betyder att felaktig användning av enheten kan innebära stor risk för allvarlig skada(*1) eller dödsfall.
0 VARNING
Detta betyder att felaktig användning av enheten kan förorsaka allvarlig skada eller dödsfall.
0 VAR FÖRSIKTIG
Detta betyder att felaktig användning av enheten kan förorsaka allvarlig personskada(*2) eller materiell skada(*3).
*1: Med allvarlig skada avses blindhet, kroppsliga men, brännskador eller köldskador, elstötar, benbrott eller förgiftning med efterverkningar och läkarvård eller
långvarig poliklinisk behandling.
*2: Med personskada avses mindre olycksfall, brännskador eller elstötar som inte kräver läkarvård eller inläggning på sjukhus.
*3: Med materiell skada avses stora skador som påverkar tillgångar eller resurser.
1
Gör aldrig.
4
Se upp för rörliga delar
5
Elchock Kontakt med vatten kan ge elstötar. Vidrör ALDRIG med
våta händer. Dra alltid ut kontakten när enheten inte används.
3
Risk för fi ngerskada
2
Följ alltid instruktionerna
6
Vät inte ned produkten
0
FARA
5
Kåpan får inte monteras, repareras, öppnas eller tas bort. Detta medför fara för högspänning. Vänd dig till återförsäljaren eller en specialist.
5
Risken för elektriska stötar kvarstår även efter att strömförsörjningen kopplats ur.
2
Aggregatet ska installeras enligt nationella föreskrifter om elinstallationer.
2
Anslutning till nätspänning ska ske i form av fast installation via en huvudbrytare med ett kontaktavstånd på minst 3 mm.
1
Placera aldrig sprayfl askor närmare luftuttaget än 1 m.
Den varma luften från utrustningen för inomhus-eller utomhusbruk kan förorsaka explosion av en sprayfl aska.
0
VARNING
2
Installation måste efterfrågas från den tillhandahållande återförsäljaren eller professionella installationsförsäljare. Installationen kräver speciell
kunskap och färdighet. Om kunder installerar på egen hand, kan det resultera i eldsvåda, elstöt, personskada eller vattenläckage.
1
Använd inget avkylningsmedel som skiljer sig från det som är angivet för ett komplement till eller ersättning. Annars kan ett onormalt högt tryck
genereras i kylcykeln, vilket kan resultera i ett misslyckande eller explosion av produkten eller en skada på din kropp.
1
Ta inte isär enheten, utför inga förändringar på den och placera inte om den på ett annat ställe själv. Det kan resultera i eldsvåda, elstöt, eller
vattenläckage. För reparation eller omplacering, var god efterfråga service från den tillhandahållande återförsäljaren eller.
2
Om enheten ska omplaceras eller repareras, var god kontakta den tillhandahållande återförsäljaren. Om det fi nns en knut på kabelledningen,
kan det resultera i elstöt eller eldsvåda.
1
Välj inte en plats för installationen där antändbar gas kan läcka ut. Om det fi nns något gasläckage eller någon ansamling av gas runt enheten,
kan det orsaka eldsvåda.
1
Välj inte en plats för installationen där det kan fi nnas mycket vatten eller fukt, som ett badrum. Försämringar på isoleringen kan resultera i elstöt eller
eldsvåda.
2
Jordningsarbete bör efterfrågas från den tillhandahållande återförsäljaren eller professionella försäljare. Otillräcklig jordningsledning kan orsaka elstöt.
Anslut inte jordningsledningen till ett gasrör, vattenrör, blixtledare, eller telefonjordningsledning.
2
Du måste använda ett eget separat strömuttag för strömtillförseln. Om ett strömuttag används som inte är eget separat, kan det resultera i eldsvåda.
2
Kontrollera så att strömbrytaren är korrekt installerad. Om strömbrytaren inte är riktigt installerad kan det resultera i elstöt. För att kontrollera
installationsmetoden, var god kontakta den tillhandahållande återförsäljaren eller den professionella försäljare som installerade enheten.
2
Under ett uppvisat fel (så som bränd lukt, utebliven nedkylning eller utebliven uppvärmning), sluta använda enheten och stäng av strömbrytaren.
Fortsatt användning kan resultera i eldsvåda, eller elstöt. Var god efterfråga reparation eller service från den tillhandahållande återförsäljaren.
1
Stäng inte av/sätt inte på (ON/OFF) strömbrytaren och tryck inte på knapparna om din hand är våt. Det kan resultera i elchock.
1
För inte in något material (metall, papper, eller vatten, etc) i luftutloppet eller luftintagsöppningen. Fläkten kan rotera med hög hastighet där inne och
det kan fi nnas delar med högspänning, som kan orsaka personskada eller elstöt.
1110255103_SV.indd 21110255103_SV.indd 2 9/26/12 3:17 PM9/26/12 3:17 PM
EN
SV
FI
NO
DK
2
Om luftkonditionerarenheten inte kyler ner eller värmer upp, kan det fi nnas ett kylmedelsläckage. Var god rådfråga den tillhandahållande
återförsäljaren. Kylmedlet som används i luftkonditionerarenheten är säkert. Det läcker inte ut under normala användaromständigheter men om det
läcker ut i rummet och kommer i kontakt med en värmekälla som ett värmeelement, eller en ugn, kan det orsaka fara.
2
Om vatten eller andra främmande ämnen kommer in i de inre delarna, sluta använda enheten direkt och stäng av strömbrytaren.
Fortsatt användande av enheten kan orsaka eldsvåda eller elstöt. Var god kontakta den tillhandahållande återförsäljaren för reparation.
1
Gör inte rent inuti luftkonditionerarenheten själv. Var god efterfråga rengöring av luftkonditionerarenhetens inre från den tillhandahållande
återförsäljaren. Oriktig rengöring kan orsaka att hartsdelar går sönder och att isoleringsdefekter uppstår på de elektriska delarna, vilket kan orsaka
vattenläckage, elstöt eller eldsvåda.
1
Skada inte och utför inga ändringar på strömkabeln. Anslut inte kabeln halvvägs, och använd inte en förlängningskabel med förgrening med andra
enheter anslutna. I annat fall kan eldsvåda uppstå.
1
Placera inga tunga föremål på strömkabeln, utsätt den inte för hetta, och dra inte i den. Om du gör det kan det resultera i elstöt eller eldsvåda.
1
Utsätt inte kroppen direkt för den kalla luftströmmen under längre perioder.
1
Stick inte in fi ngrarna eller något annat i in-/utblåset.
0
VAR FÖRSIKTIG
2
Kontrollera så att dränerat vatten avtappas. Om avtappningsprocessen inte är tillräckligt utförd, kan vatten läcka ut, vilket kan resultera i vattenskador
på möblerna. För att kontrollera att installationsmetoden som använts var den korrekta, var god kontakta den tillhandahållande återförsäljaren eller
den professionella försäljare som installerade enheten.
2
Om inomhusenhetens rörledningsutlopp utsätts på grund av omplacering, stäng öppningen. Att vidröra inre elektriska delar kan resultera i
personskada eller elstöt.
1
Tvätta inte huvudluftkonditionerarenheten med vatten. Risk för elektriska stötar.
1
Placera inga behållare som till exempel en vas innehållande vätska på enheten. Det kan resultera i att vatten kommer in i enheten och försämrar den
elektriska isoleringen, vilket kan orsaka elstöt.
2
Om du använder enheten i ett stängt rum, eller använder annan förbränningsutrustning, se till att ha ett fönster öppet tillfälligt för ventilation.
Otillräcklig ventilation kan orsaka kvävning på grund av syrebrist.
1
Använd inte förbränningsutrustning i det direkta fl ödet av luft från luftkonditionera renheten. Dålig förbränning hos en förbränningsutrustning kan
orsaka kvävning.
1
Undvik användning under längre perioder i en omgivning med hög fuktighet (över 80%) som till exempel med fönster eller dörrar öppna.
Det kan uppstå kondens på inomhusenheten och vattendroppar kan falla ner på möblerna.
2
Stäng av huvudströmbrytaren eller strömbrytaren när aggregatet inte ska användas på länge.
2
Kontrollera minst en gång om året så att inte utomhusenhetens monteringsplatta skadats. Om den är skadad och ingen åtgärd görs, kan enheten falla
ner eller välta, och resultera i att man skadar sig.
1
Stå på en stabil stege då du fäster/tar loss frontpanelen/luftfi ltret/luftrengöringsfi ltret. Om detta inte görs kan det leda till att du faller ner eller skadar dig.
1
Stå inte på utomhusenheten och placera ingenting på enheten. Det kan resultera i att du skadar dig till följd av fall eller vältning.
Alla skador på enheten kan orsaka elstöt eller eldsvåda.
2
Placera ingenting runt utomhusenheten och låt inte fallande löv samlas runt den. Om där fi nns fallna löv, kan små djur komma in i enheten och i
kontakt med inre elektriska delar, och orsaka fel eller eldsvåda.
1
Placera inte djur eller växter på platser där vind från luftkonditionerarenheten strömmar direkt. Det kan drabba djuret eller växten på ett negativt sätt.
1
Använd inte till speciella tillämpningar som till exempel till förvaring av mat eller djur, eller till användning på växter, precisionsutrustning, eller
konstföremål. Använd inte på skepp eller i andra fordon. Det kan orsaka fel på luftkonditionera renheten. Dessutom, kan det skada dessa föremål.
1
Placera inte annan elektrisk utrustning eller möbler under enheten. Vattendroppar kan falla ner, och orsaka skador eller fel.
2
Vid underhåll måste du sluta använda enheten och stänga av den med strömbrytaren. Eftersom fl äkten på insidan kan rotera i höghastighet kan den
orsaka skador.
2
Efter att frontpanelen/luftfi ltret rengjorts, torka bort allt vatten och låt stå och torka. Om vatten lämnas kvar, kan det orsaka elstöt.
1
Då frontpanelen avlägsnats, rör inte enhetens metalldelar. Detta kan orsaka personskada.
2
Om du hör åskan och det fi nns risk för blixtnedslag, sluta använda enheten och koppla ur strömbrytaren. Om blixten slår ner, kan det orsaka fel.
• Batterier för fjärrkontrollenhet:
- Ska sättas i med rätt polaritet (+) och (-).
- Ska inte laddas upp.
- Använd inte batterier för vilka "Rekommenderad användningsperiod" har löpt ut.
- Förvara inte använda batterier inuti fjärrkontrollenheten.
- Blanda inte olika typer av batterier eller blanda nya batterier med gamla.
- Löda inte direkt på batterierna.
- Kortslut inte, ta inte isär, värm inte eller kasta batterier i öppen eld. Om batterierna inte avyttras på rätt sätt kan de spricka eller orsaka läckage, vilket resulterar
i brännskador eller skador. Vid kontakt med vätskan, tvätta noggrant med vatten. Vid kontakt med enheter, torka bort för att undvika direkt kontakt.
- Placera dem inte inom räckhåll för små barn. Om ett batteri sväljs, kontakta läkare omedelbart.
• När du trycker på CLOCK ●, CHECK ●, FILTER ● och RESET ● knappen, låt inte några främmande ämnen komma in i och stanna kvar inne i fjärrkontrollen.
1110255103_SV.indd 31110255103_SV.indd 3 9/26/12 3:17 PM9/26/12 3:17 PM
5412 3
6
385(
5(6(7
1
Tryck på : Flytta luftriktarspjällen i
önskad riktning (vertikalt).
2
Tryck på : Gör att luftströmmen
svänger omväxlande upp och ned.
Tryck igen för att avbryta.
3
Luftströmmens horisontella inriktning justeras
manuellt.
INOMHUSENHETENS DISPLAY
1
MAXDRIFT (Grön)
2
FILTER (Orange)
3
PURE (Blå)
4
TIMER (Gul)
5
DRIFT (Grön)
6
ÅTERSTÄLLNINGS-knapp
1
Infraröd signalsändare
2
Minnes- och snabbvalsknapp (PRESET)
3
Av/på-knapp
4
Temperatur upp / ned och timer eller klocka
upp / ned-knappen (TEMP.)
5
Knapp för funktionsval (MODE)
6
Knapp för svängning av luftspjällen (SWING)
7
Fläkthastighetsknapp (FAN)
8
Knapp för Ett Tryck (ONE-TOUCH)
9
Inställningsknapp för luftriktarspjällen (FIX)
-
Energisparknapp (ECO)
=
Maxdrift (Hi-POWER)
q
Knapp för Plasmaluftrengöring (PURE)
w
Komfortknapp för viloläge (COMFORT SLEEP)
e
ON TIMER-knapp (ON)
r
OFF TIMER-knapp (OFF)
t
Timerbekräftelse (SET)
y
Rensa-knapp (CLR)
u
Klocka setup-knappen (CLOCK)
i
För servicepersonal (CHECK)
o
Filteråterställningsknapp (FILTER)
p
Återställningsknappen (RESET)
1
FÖRBEREDELSER FÖRE ANVÄNDNING
2
Förbereda fi ltren
1. Öppna gallret på aggregatets framsida och ta ut luftfi ltren.
2. Sätt fast fi ltren. (se detaljerad beskrivning i tillbehörsbladet).
LUFTFLÖDETS RIKTNING
3
Obs:
• Flytta ej luftspjällen på annat sätt.
• Luftspjällen kanske ställer in läget automatiskt då användarläget
aktiveras.
FJÄRRKONTROLL
4
ETT-TRYCK
5
Tryck på knappen “ONE-TOUCH” för en helt automatiserad användning
som är anpassad efter den typiske kundens önskemål i den del av världen
där du befi nner dig. De anpassade inställningarna kontrollerar temperatur,
luftfl ödesstyrka, luftfl ödesriktning samt andra inställningar för att ge
dig alternativ med “ONE-TOUCH” på en knapp. Om du föredrar andra
inställningar kan du välja bland många andra användarfunktioner på din
Toshiba-enhet.
Tryck på
: Påbörja användandet.
AUTOMATISK DRIFT
6
Används för automatiskt val av kyla, värme, eller endast fl äkt-drift
1. Tryck på
: Välj A.
2. Tryck på
: Ställ in önskad temperatur.
3. Tryck på
: Välj mellan AUTO, LOW , LOW+ , MED ,
MED+
, HIGH , eller Quiet .
KYLA / VÄRME DRIFT
7
1. Tryck på : Välj mellan Cool (Kyla) , Heat (Värme) .
2. Tryck på
: Ställ in önskad temperatur.
Kyla: Min. 17°C, Värme: Max. 30°C, Endast fl äkt: Ingen
temperaturangivelse
3. Tryck på
: Välj mellan AUTO, LOW , LOW+ , MED ,
MED+
, HIGH , eller Quiet .
Obs: QUIET är super låg fl äkthastighet för tyst drift.
AVFUKTNING (ENDAST KYLA)
8
För avfuktningens skull styrs en lagom kyla automatiskt.
1. Tryck på
: Välj Torr .
2. Tryck på
: Ställ in önskad temperatur.
LUFTRENGÖRING
9
Under användning av luftkonditioneraren
Tryck på
för att starta och stoppa plasmaluftrengöringen och
luftjoniseringen.
Plasmaluftrengöringen och luftjoniseraren kan aktiveras och desaktiveras då
luftkondioneraren är stoppad och luftjoniseraren startar i kombination med
plasmaluftrengöringen.
Obs: FILTER-indikatorn (orange) sätts på efter att PURE-funktionen har
utförts i ca 1000 timmar.
MAXDRIFT
10
För att automatiskt kontrollera rumstemperaturen och luftfl ödet för snabbare
nedkylning eller uppvärmning (förutom i lägena avfuktning och Endast fl äkt)
Tryck på
: Stäng av och slå på driften.
ENERGISPARDRIFT
11
För att automatiskt kontrollera rummet för att spara energi (förutom i lägena
avfuktning och Endast fl äkt)
Tryck på
: Stäng av och slå på driften.
Obs: Kyla; den inställda temperaturen kommer automatiskt att stiga med 1
grad/timme i 2 timmar (maximalt 2 graders ökning). Vid uppvärmning
kommer den inställda temperaturen att sjunka.
1
4
6
7
9
=
w
y
t
p
o
3
2
5
8
q
e
r
u
i
TILLFÄLLIG DRIFT
12
Om fjärrkontrollen har kommit bort eller är urladdad
• Tryck på knappen RESET så kan luftkonditioneringen
slås på och av utan fjärrkontrollen.
• Användarläget är satt till AUTOMATIC, den
förinställda temperaturen till 25°C och fl äktdriften går
med automatisk hastighet.
385(
5(6(7
Sätta i batterier
1. Avlägsna batterilocket.
2. Sätt i två nya AAA-batterier (ej uppladdningsbara)
med (+) och (–) polerna rätt vända.
Inställning av Klocka
1. Tryck på med en pennspets.
2. Tryck på
: justera tiden.
3. Tryck på : Ställ in timern.
Nollställa fjärrkontrollen
Tryck på
för återställning.
1110255103_SV.indd 41110255103_SV.indd 4 9/26/12 3:17 PM9/26/12 3:17 PM
 Loading...