

Toshiba RAS-M10SMUCV-E, RAS-M13SMUV-E, RAS-M13SMUCV-E, RAS-M16SMUV-E, RAS-M10SMUV-E User Manual
...Page 1
MANUEL DU PROPRIETAIRE
MANUALE DEL PROPRIETARIO
MANUAL DEL PROPIETARIO
MANUAL DO UTILIZADOR
AIR CONDITIONER (SPLIT TYPE)
CLIMATISEUR (TYPE SPLIT)
KLIMAGERÄT (SPLIT-TYP)
CONDIZIONATORE D'ARIA (TIPO SPLIT)
AIRE ACONDICIONADO (TIPO SPLIT)
КЛЙМБФЙУФЙКП (ДЙБЙСПХМЕНПХ ФХРПХ)
AR CONDICIONADO (TIPO SPLIT)
OWNER’S MANUAL
BETRIEBSANLEITUNG
ПДЗГЙЕУ ЧСЗУЗУ
BRUKSANVISNING
Not accessible to the general public
Vente interdite au grand public
Kein öffentlicher Zugang
Non accessibile a clienti generici
No destinado al público en general
Мз рспувЬуймп брь фп генйкь кпйнь
Não acessível ao público em geral
Inte tillgänglig för allmänheten
LUFTKONDITIONERINGSAPPARAT (SPLIT TYP)
<4-Way Air Discharge Cassette Type>
<Type cassette à 4 voies de soufflage>
<4-Wege-Belüftungskassette>
<Tipo a cassetta con scarico d'aria a 4 vie>
<Modelo de casete de distribución de aire de 4 vías>
<ЕкспЮ бЭсб 4-Дйехиэнуещн Фэрпх КбуЭфбт>
<Descarga de ar tipo cassete de 4 vias>
<Apparat med 4-vägars luftutsläpp>
Indoor Unit
Unité intérieure/Raumeinheit/Unità interna/Unidad interior
ЕущфесйкЮ МпнЬдб/Unidade interior/
Heat Pump Model Cooling Only Model
Modèle à thermopompe Modèle à froid seul
Geräte mit Heizung Geräte nur zur Kühlung
Modello con pompa di riscaldamento Modello solo per raffreddamento
Modelo con bomba de calor Modelo de refrigeración únicamente
МпнфЭлп ме БнфлЯб Иесмьфзфбт МпнфЭлп Шэозт брпклейуфйкЬ
Modelo de bomba térmica Modelo Apenas para Refrigeração
/Inomhusenhet
Värmepumpsmodell Modell endast för avkylning
RAS-M10SMUV-E RAS-M10SMUCV-E RB-B11MC(W)E
RAS-M13SMUV-E RAS-M13SMUCV-E
RAS-M16SMUV-E RAS-M16SMUCV-E
Page 2
ADOPTION OF NEW REFRIGERANT
This Air Conditioner is a new type which adopts the new
refrigerant HFC (R410A) instead of the conventional
refrigerant R22. R410A is an ozone friendly refrigerant.
Thank you very much for purchasing TOSHIBA Air Conditioner.
Please read this owner's manual carefully before using your Air Conditioner.
• Be sure to obtain the “Owner’s manual” and “Installation manual” from the
installer (or dealer).
Request to the installer or dealer
• To clearly explain the contents of the Owner’s manual prior to hand over.
UTILISATION DU NOUVEAU REFRIGERANT
Ce nouveau type de climatiseur utilise le nouveau
réfrigérant HFC (R410A) au lieu du traditionnel R22.
Le R410A est un réfrigérant qui respecte la couche
d’ozone.
EINFÜHRUNG EINES NEUEN KÜHLMITTELS
Dies ist ein neuartiges Klimagerät. Anstatt des
herkömmlichen Kältemittels R22 verwendet es das neue
HFC Kältemittel R410A. R410A schont die Ozonschicht.
ADOZIONE DI UN NUOVO REFRIGERANTE
Questo condizionatore d’aria è di dipo nuovo e impiega il
nuovo refrigerante HFC (R410A) invece del R22,
tradizionalmente usato. R410A è un refrigerante
ecologicamente rispettoso dello strato d’ozono.
ADOPCIÓN DE NUEVO REFRIGERANTE
Este acondicionador de aire es un tipo Nuevo que
adopta el refrigerante nuevo HFC (R410A) en vez del
refrigerante convencional R22. El R410A es un
refrigerante que no daña la capa de ozono.
ХЙПИЕФЗУЗ НЕПХ ШХКФЙКПХ
Фп рбсьн Клймбфйуфйкь еЯнбй нЭпх фэрпх кбй хйпиефеЯ фп
нЭп шхкфйкь HFC (R410A) бнфЯ гйб фп ухмвбфйкь шхкфйкь
R22.
Фп R410A еЯнбй Энб шхкфйкь цйлйкь щт рспт фп ьжпн.
ADOPÇÃO DO NOVO REFRIGERANTE
O presente aparelho de ar condicionado é um novo tipo
que adopta o novo refrigerante HFC (R410A) em vez do
refrigerante convencional R22. O R410A é um
refrigerante que não prejudica o ozono.
Nous vous remercions d’avoir choisi un climatiseur TOSHIBA.
Veuillez lire attentivement ce Manuel du propriétaire avant d’utiliser votre
climatiseur.
• Assurez-vous que le monteur (ou le revendeur) vous remette le “ Manuel
du propriétaire ” et le “ Manuel d’installation ”.
Demandez au monteur ou au revendeur
• d’expliquer clairement le contenu du Manuel du propriétaire avant de
vous remettre.
Wir danken Ihnen, dass Sie sich für ein TOSHIBA Klimagerät entschieden
haben. Bitte lesen Sie, bevor Sie Ihr Klimagerät benutzen, diese
Betriebsanleitung sorgfältig.
• Lassen Sie sich die “Bedienungsanleitung” und das “InstallationsHandbuch” unbedingt vom Installateur oder vom Lieferanten
aushändigen.
Eine Bitte an den Installateur oder Lieferanten:
• Bitte erklären Sie dem Käufer den Inhalt der Bedienungsanleitung und
händigen sie ihm aus.
Grazie di aver acquistato un condizionatore d’aria TOSHIBA.
Prima di cominciare ad usare il condizionatore d’aria, leggere attentamente
il Manuale del proprietario.
• Farsi consegnare dall’installatore (o dal rivenditore) sia il “Manuale
d’installazione” che il “Manuale del proprietario”.
Richiedere all’installatore o al rivenditore
• Di spiegare chiaramente le istruzioni contenute nel Manuale del
proprietario, prima di consegnarlo.
Muchas gracias por haber adquirido este acondicionador de aire
TOSHIBA.
Lea atentamente este manual del usuario antes de utilizar el aparato de
aire acondicionado.
• Asegúrese de que el instalador (o distribuidor) le proporcione el “Manual
del usuario” y el “Manual de instalación”.
Solicítelo al instalador o distribuidor
• Para explicar con claridad el contenido del Manual del usuario, antes de
efectuar la entrega.
Убт ехчбсйуфпэме рплэ рпх рспфймЮубфе гйб фзн бгпсЬ убт Энб
Клймбфйуфйкь TOSHIBA.
Рбсбкблпэме дйбвЬуфе рспуечфйкЬ фйт пдзгЯет чсЮузт рсйн брь фз чсЮуз
фпх Клймбфйуфйкпэ.
• ЦспнфЯуфе нб рспмзиехфеЯфе фп “ЕгчейсЯдйп ЙдйпкфЮфз” кбй фп “ЕгчейсЯдйп
ЕгкбфЬуфбузт” брь фпн кбфбукехбуфЮ (Ю фпн рщлзфЮ).
ЖзфЮуфе брь фпн кбфбукехбуфЮ Ю фпн рщлзфЮ
• Нб убт еозгЮуей ме убцЮнейб фб ресйечьменб фпх ЕгчейсйдЯпх ЙдйпкфЮфз
рсйн убт фп рбсбдюуей.
Agradecemos o facto de ter adquirido este aparelho de ar condicionado da
TOSHIBA.
Lei atentamente o presente manual do utilizador antes de utilizar o
aparelho de ar condicionado.
• Peça o “Manual do Utilizador” e o “Manual de Instalação” ao técnico de
instalação (ou concessionário).
Peça ao técnico de instalação ou representante
• que explique claramente o conteúdo do Manual do Utilizador antes de
proceder à sua entrega.
ANVÄNDANDE AV NY KYLVÄTSKA
Denna luftkonditioneringsapparat är en ny typ som
använder den nya kylvätskan HFC (R410A) i stället för
den vanliga kylvätskan R22. R410A är en kylvätska som
inte är skadlig för ozonskiktet.
Tack för att du ville köpa denna luftkonditioneringsapparat från TOSHIBA.
Läs denna bruksanvisning noga innan du använder
luftkonditioneringsapparaten.
• Försäkra dig om att du får “BRUKSANVISNING” och
“INSTALLATIONSHANDBOK” från installationsteknikern
(eller återförsäljaren).
Be installationsteknikern eller återförsäljaren
• Att tydligt förklara innehållet i BRUKSANVISNINGEN innan han lämnar
over den.
Page 3
ACCESSORIES (SOLD SEPARATELY) ......................................................................................................... 1
PRECAUTIONS FOR SAFETY ....................................................................................................................... 1
PARTS NAME................................................................................................................................................. 3
PARTS NAME OF RECEIVER SECTION ....................................................................................................... 4
PARTS NAME OF REMOTE CONTROLLER .................................................................................................5
NAMES AND FUNCTIONS OF INDICATIONS ON THE REMOTE CONTROLLER ....................................... 6
PREPARATION AND CHECK BEFORE USE ................................................................................................7
HANDLING THE REMOTE CONTROLLER .................................................................................................... 8
AUTOMATIC OPERATION ............................................................................................................................. 9
AUTOMATIC OPERATION (AUTO CHANGEOVER) ...................................................................................... 9
COOLING/HEATING/FAN ONLY OPERATION ............................................................................................ 10
DRY OPERATION......................................................................................................................................... 10
CONTENTS
HIGH POWER OPERATION ......................................................................................................................... 11
ECO (1, 3, 5, 9H OFF) TIMER ....................................................................................................................... 11
TIMER OPERATION ..................................................................................................................................... 12
MEMORY/PRESET OPERATION ................................................................................................................. 14
ADJUSTING AIR FLOW DIRECTION .......................................................................................................... 15
HOW THE AIR CONDITIONER WORKS ...................................................................................................... 16
TEMPORARY OPERATION ......................................................................................................................... 17
MAINTENANCE ........................................................................................................................................... 18
AIR CONDITIONER OPERATIONS AND PERFORMANCE ........................................................................ 19
RE-INSTALLATION ...................................................................................................................................... 20
TROUBLES AND CAUSES .......................................................................................................................... 20
TROUBLE AND CAUSES (Concerning Remote Controller) ..................................................................... 22
ENGLISHFRANCAISDEUTSCHITALIANOESPAÑOLЕЛЛЗНЙКБPORTUGUÊS
ACCESSOIRES (VENDUS SEPAREMENT).................................................................................................23
MESURES DE SECURITE ........................................................................................................................... 23
NOM DES PIECES ....................................................................................................................................... 25
NOM DES PIECES DU RÉCEPTEUR .......................................................................................................... 26
NOM DES PIECES DE LA TELECOMMANDE ............................................................................................ 27
NOM ET FONCTIONS DES INDICATIONS DE LA TELECOMMANDE ....................................................... 28
PREPARATION ET VERIFICATION AVANT UTILISATION .......................................................................... 29
MANIPULATION DE LA TELECOMMANDE ................................................................................................ 30
FONCTIONNEMENT AUTOMATIQUE ......................................................................................................... 31
FONCTIONNEMENT AUTOMATIQUE (CHANGEMENT AUTOMATIQUE) ..................................................31
REFROIDISSEMENT / CHAUFFAGE / VENTILATION SEULE .................................................................... 32
DESHUMIDIFICATION ................................................................................................................................. 32
ZUBEHÖR (GESONDERT ERHÄLTLICH) ................................................................................................... 45
SICHERHEITSVORKEHRUNGEN................................................................................................................ 45
TEILEBEZEICHNUNGEN ............................................................................................................................. 47
TEILEBEZEICHNUNG DES EMPFÄNGERS ............................................................................................... 48
TEILEBEZEICHNUNG DER FERNBEDIENUNG ......................................................................................... 49
BEZEICHNUNGEN UND FUNKTIONEN AUF DER FERNBEDIENUNGS-ANZEIGE .................................. 50
VORBEREITUNGEN UND TESTS VOR DER INBETRIEBNAHME .............................................................. 51
HANDHABUNG DER FERNBEDIENUNG ................................................................................................... 52
AUTOMATISCHER BETRIEB ....................................................................................................................... 53
AUTOMATISCHER BETRIEB (AUTOMATISCHER WECHSEL) .................................................................. 53
BETRIEBSART HEIZEN / KÜHLEN / NUR VENTILATOR ........................................................................... 54
BETRIEBSART ENTFEUCHTEN ................................................................................................................. 54
ACCESSORI (DA ACQUISTARE A PARTE) ................................................................................................ 67
PRECAUZIONI PER LA SICUREZZA .......................................................................................................... 67
NOME DELLE PARTI ................................................................................................................................... 69
NOME DELLE PARTI DEL RICEVITORE ..................................................................................................... 70
NOME DELLE PARTI DEL TELECOMANDO ............................................................................................... 71
NOME E FUNZIONE DELLE INDICAZIONI VISUALIZZATE SUL TELECOMANDO ................................... 72
PREPARAZIONE E CONTROLLO PRIMA DELL'USO ................................................................................ 73
USO DEL TELECOMANDO ......................................................................................................................... 74
FUNZIONAMENTO AUTOMATICO .............................................................................................................. 75
FUNZIONAMENTO AUTOMATICO (COMMUTAZIONE AUTOMATICA) ...................................................... 75
RAFFREDDAMENTO / RISCALDAMENTO / FUNZIONAMENTO CON SOLA VENTOLA .......................... 76
FUNZIONAMENTO DI DEUMIDIFICAZIONE ..............................................................................................
ACCESORIOS .............................................................................................................................................. 89
PRECAUCIONES DE SEGURIDAD ............................................................................................................. 89
NOMBRE DE LOS COMPONENTES ........................................................................................................... 91
DESCRIPCIÓN DE LOS BOTONES DE LA SECCIÓN DEL RECEPTOR ................................................... 92
DESCRIPCIÓN DE LOS BOTONES DEL CONTROL REMOTO .................................................................. 93
NOMBRE Y FUNCIONES DE LOS INDICADORES DEL CONTROL REMOTO .......................................... 94
PREPARACIÓN Y PRUEBA ANTES DEL USO............................................................................................ 95
USO DEL CONTROL REMOTO ................................................................................................................... 96
FUNCIONAMIENTO AUTOMÁTICO ............................................................................................................ 97
FUNCIONAMIENTO AUTOMÁTICO (CAMBIO AUTOMÁTICO) .................................................................. 97
FUNCIONAMIENTO DE REFRIGERACIÓN/CALEFACCIÓN/SÓLO VENTILADOR ................................... 98
FUNCIONAMIENTO CON AIRE SECO ........................................................................................................ 98
SOMMAIRE
INHALT
.76
CONTENIDO
FONCTIONNEMENT A HAUTE PUISSANCE .............................................................................................. 33
MINUTERIE ECO (1, 3, 5, 9H DÉSACTIVATION) ......................................................................................... 33
FONCTIONNEMENT PAR MINUTERIE ....................................................................................................... 34
MEMORISATION / PROGRAMMATION ....................................................................................................... 36
REGLAGE DU SENS DE DIFFUSION DE L’AIR .......................................................................................... 37
COMMENT FONCTIONNE LE CLIMATISEUR ............................................................................................ 38
FONCTIONNEMENT TEMPORAIRE ............................................................................................................ 39
ENTRETIEN .................................................................................................................................................. 40
FONCTIONNEMENT ET PERFORMANCES DU CLIMATISEUR ................................................................ 41
REINSTALLATION ....................................................................................................................................... 42
PROBLEMES ET CAUSES .......................................................................................................................... 42
PROBLEMES ET CAUSES (concernant la télécommande) ...................................................................... 44
HÖCHLEISTUNGSBETRIEB ....................................................................................................................... 55
ECO (1, 3, 5, 9H AUS) TIMER ....................................................................................................................... 55
ZEITVORGABEN .......................................................................................................................................... 56
BETRIEBSART SPEICHER/VOREINSTELLUNG ........................................................................................ 58
REGULIERUNG DER LUFTSTROMRICHTUNG ......................................................................................... 59
ARBEITSWEISE DES KLIMAGERÄTS ........................................................................................................ 60
VORÜBERGEHENDER BETRIEB ............................................................................................................... 61
WARTUNG ................................................................................................................................................... 62
FUNKTIONEN UND LEISTUNG DES KLIMAGERÄTS................................................................................ 63
NEU-INSTALLATION .................................................................................................................................... 64
STÖRUNGEN UND IHRE URSACHEN ........................................................................................................ 64
STÖRUNGEN UND IHRE URSACHEN (Fernbedienung) ........................................................................... 66
INDICE
FUNZIONAMENTO AD ALTA POTENZA ..................................................................................................... 77
TIMER ECO (1, 3, 5, 9 H, OFF) ..................................................................................................................... 77
FUNZIONAMENTO CON TIMER .................................................................................................................. 78
MEMORIA / FUNZIONAMENTO PREIMPOSTATO ...................................................................................... 80
COME REGOLARE LA DIREZIONE DEL FLUSSO D’ARIA ....................................................................... 81
MODI DI FUNZIONAMENTO DEL CONDIZIONATORE D’ARIA ................................................................. 82
FUNZIONAMENTO TEMPORANEO ............................................................................................................. 83
MANUTENZIONE ......................................................................................................................................... 84
OPERAZIONI E PRESTAZIONI DEL CONDIZIONATORE D'ARIA .............................................................. 85
RE-INSTALLAZIONE.................................................................................................................................... 86
PROBLEMI E CAUSE .................................................................................................................................. 86
PROBLEMI E CAUSE (Riguardanti il telecomando) ................................................................................. 88
FUNCIONAMIENTO CON POTENCIA ELEVADA ........................................................................................ 99
TEMPORIZADOR ECO (1, 3, 5, 9H APAGADO) ..........................................................................................99
FUNCIONAMIENTO DEL TEMPORIZADOR.............................................................................................. 100
MEMORIA/FUNCIONAMIENTO PRESELECCIONADO ............................................................................ 102
AJUSTE DEL SENTIDO DE CIRCULACIÓN DEL AIRE ............................................................................ 103
CÓMO FUNCIONA EL APARATO DE AIRE ACONDICIONADO ............................................................... 104
FUNCIONAMIENTO TEMPORAL ............................................................................................................... 105
MANTENIMIENTO ...................................................................................................................................... 106
FUNCIONES Y RENDIMIENTO DEL APARATO DE AIRE ACONDICIONADO ......................................... 107
REINSTALACIÓN ....................................................................................................................................... 108
PROBLEMAS Y CAUSAS .......................................................................................................................... 108
PROBLEMAS Y CAUSAS (Relacionadas con el control remoto) ........................................................... 110
РБСЕЛКПМЕНБ (РЩЛПХНФБЙ ОЕЧЩСЙУФБ) .......................................................................................... 111
РСПЦХЛБОЕЙУ БУЦБЛЕЙБУ .................................................................................................................... 111
ПНПМБ ФМЗМБФЩН ................................................................................................................................ 113
ПНПМБУЙБ ФМЗМБФЩН ФПХ ДЕКФЗ ..................................................................................................... 114
ПНПМБУЙБ ФМЗМБФЩН ФПХ ФЗЛЕЧЕЙСЙУФЗСЙПХ ............................................................................... 115
ПНПМБ КБЙ ЛЕЙФПХСГЙЕУ ФЩН ЕНДЕЙОЕЩН ФПХ ФЗЛЕЧЕЙСЙУФЗСЙПХ ............................................. 116
РСПЕФПЙМБУЙБ КБЙ ЕЛЕГЧПУ РСЙН БРП ФЗ ЧСЗУЗ ........................................................................... 117
ЧЕЙСЙУМПУ ФПХ ФЗЛЕЧЕЙСЙУФЗСЙПХ ..................................................................................................... 118
БХФПМБФЗ ЛЕЙФПХСГЙБ ......................................................................................................................... 119
БХФПМБФЗ ЛЕЙФПХСГЙБ (БХФПМБФЗ МЕФБВПЛЗ) ............................................................................. 119
ШХОЗ / ИЕСМБНУЗ / ЛЕЙФПХСГЙБ МПНП БНЕМЙУФЗСБ ...................................................................... 120
ОЗСЗ ЛЕЙФПХСГЙБ .................................................................................................................................... 120
ACESSÓRIOS (VENDIDO SEPARADAMENTE) ........................................................................................ 133
PRECAUÇÕES DE SEGURANÇA ............................................................................................................. 133
NOME DAS PARTES .................................................................................................................................. 135
NOME DAS PEÇAS DA SECÇÃO RECEPTORA ...................................................................................... 136
NOMES DAS PARTES DO CONTROLE REMOTO .................................................................................... 137
NOME E FUNÇÕES DAS INDICAÇÕES NO CONTROLE REMOTO ........................................................ 138
PREPARAÇÃO E VERIFICAÇÃO ANTES DO USO .................................................................................. 139
MANUSEIO DO CONTROLE REMOTO ..................................................................................................... 140
OPERAÇÃO AUTOMÁTICA ....................................................................................................................... 141
OPERAÇÃO AUTOMÁTICA (CONVERSÃO AUTOMÁTICA) .................................................................... 141
OPERAÇÃO DE REFRIGERAÇÃO / AQUECIMENTO / APENAS VENTILADOR .................................... 142
OPERAÇÃO DE SECAGEM....................................................................................................................... 142
TILLBEHÖR (SÄLJES SEPARAT) ............................................................................................................. 177
FÖRSIKTIGHETSÅTGÄRDER SOM GÄLLER SÄKERHETEN ................................................................ 177
DELARNAS BENÄMNING ......................................................................................................................... 179
DELARNAS BENÄMNING I MOTTAGNINGSSEKTIONEN ....................................................................... 180
FJÄRRKONTROLLENS FUNKTIONER ..................................................................................................... 181
NAMN OCH FUNKTIONER FÖR FJÄRRKONTROLLENS INDIKATIONER ............................................. 182
FÖRBEREDELSE OCH KONTROLL FÖRE ANVÄNDNINGEN ................................................................ 183
ATT HANTERA FJÄRRKONTROLLEN ..................................................................................................... 184
AUTOMATISK FUNKTIOn .......................................................................................................................... 185
AUTOMATISK FUNKTION (AUTOMATISK VÄXLING) ............................................................................... 185
LUFTKONDITIONERANDE/UPPVÄRMANDE/FLÄKT FUNKTION ........................................................... 186
LUFTTORKNINGSFUNKTION ................................................................................................................... 186
РЕСЙЕЧПМЕНБ
INNEHÅLL
ЛЕЙФПХСГЙБ ХШЗЛЗУ ЙУЧХПУ ................................................................................................................. 121
ECO (1, 3, 5, 9H OFF) ЧСПНПДЙБКПРФЗУ ............................................................................................. 121
ЛЕЙФПХСГЙБ ЧСПНПДЙБКПРФЗ .............................................................................................................. 122
ЛЕЙФПХСГЙБ МНЗМЗУ / РСПКБИПСЙУМПХ ........................................................................................... 124
ДЙПСИЩУЗ ФЗУ КБФЕХИХНУЗУ СПЗУ ФПХ БЕСБ ............................................................................... 125
РЩУ ЛЕЙФПХСГЕЙ ФП КЛЙМБФЙУФЙКП ...................................................................................................... 126
РСПУЩСЙНЗ ЛЕЙФПХСГЙБ ........................................................................................................................ 127
УХНФЗСЗУЗ .............................................................................................................................................. 128
ЛЕЙФПХСГЙЕУ КЛЙМБФЙУФЙКПХ КБЙ БРПДПУЗ ...................................................................................... 129
ЕГКБФБУФБУЗ ЕК НЕПХ ......................................................................................................................... 130
РСПВЛЗМБФБ КБЙ БЙФЙЕУ ....................................................................................................................... 130
РСПВЛЗМБФБ КБЙ БЙФЙБ (УчефйкЬ ме фп ФзлечейсйуфЮсйп) ................................................................... 132
ÍNDICE
OPERAÇÃO DE ALTA POTÊNCIA ............................................................................................................ 143
ECO (1, 3, 5, 9H DESLIGAR) TEMPORIZADOR ........................................................................................ 143
OPERAÇÃO DO REGULADOR ................................................................................................................. 144
OPERAÇÃO MEMÓRIA / PRÉ-AJUSTE ................................................................................................... 146
REGULAR A DIRECÇÃO DO CAUDAL DE AR......................................................................................... 147
MODO DE FUNCIONAMENTO DO APARELHO DE AR CONDICIONADO .............................................. 148
OPERAÇÃO TEMPORÁRIA ....................................................................................................................... 149
MANUTENÇÃO .......................................................................................................................................... 150
OPERAÇÃO E FUNCIONAMENTO DO AR CONDICIONADO ................................................................. 151
REINSTALAÇÃO ........................................................................................................................................ 152
PROBLEMAS E CAUSAS .......................................................................................................................... 152
PROBLEMAS E CAUSAS (Relativos ao Controle Remoto) .................................................................... 154
FUNKTION MED HÖG EFFEKT ................................................................................................................ 187
ECO (1, 3, 5, 9H OFF) TIMER ..................................................................................................................... 187
TIMERFUNKTION ...................................................................................................................................... 188
FUNKTION MINNE/FÖRINSTÄLLNING .................................................................................................... 190
REGLERA LUFTFLÖDETS RIKTNING ..................................................................................................... 191
HUR LUFTKONDITIONERINGSAPPARATEN FUNGERAR ...................................................................... 192
TILLFÄLLIG FUNKTION ............................................................................................................................ 193
UNDERHÅLL .............................................................................................................................................. 194
LUFTKONDITIONERINGSAPPARATENS FUNKTION OCH PRESTANDA ............................................... 195
OMINSTALLATION ..................................................................................................................................... 196
PROBLEM OCH FELSÖKNING ................................................................................................................. 196
PROBLEM OCH FELSÖKNING (för fjärrkontrollen) ................................................................................ 198
SVENSKA
Page 4
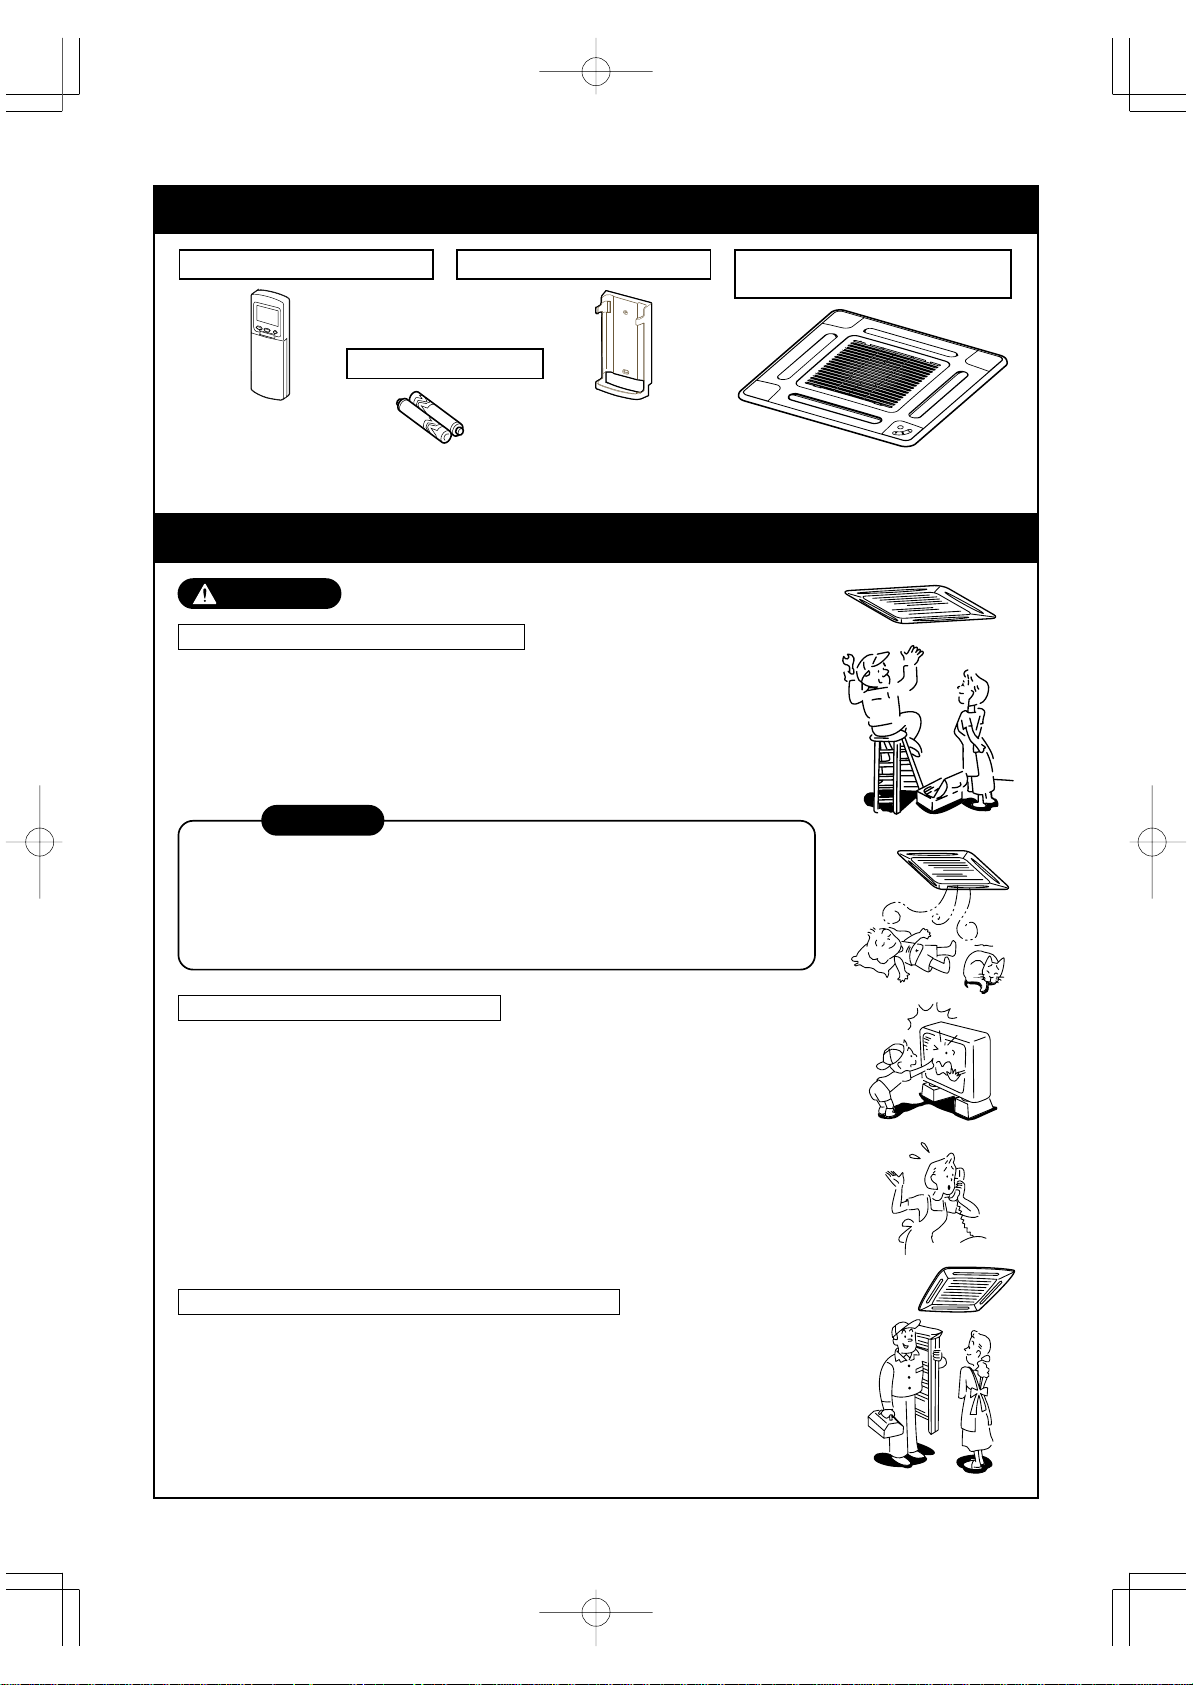
ACCESSORIES (SOLD SEPARATELY)
Remote controller
Battery (two pcs.)
Remote controller holder
cassette panel optional parts
PRECAUTIONS FOR SAFETY
WARNING
W ARNINGS ABOUT INSTALLA TION
• Ensure installation is carried out by a qualified professional.
If the unit is incorrectly installed there is a risk of water damage, electric shock or
fire.
• Ensure unit is earthed correctly.
Do not connect earth wiring to gas pipes, water pipes, lightning rods or earths
provided for telephone cables.
CAUTION
TO DISCONNECT THE APPLIANCE FROM THE MAIN SUPPLY
A switch or circuit breaker that can disconnect all poles must be included in the
fixed wiring. Be sure to use an approved circuit breaker or switch.
The installation fuse (16A) must be used for the power supply of this air
conditioning system.
Standard 4-way
W ARNINGS ABOUT OPERATION
• Cleaning of the air filter and other parts of the air filter can involve dangerous
work at heights. Ensure to this work is carried out by service engineer.
Do not attempt this yourself. The cleaning diagram for the air filter is detailed for
the service engineer, and not for the customer.
• Be aware of the potential health issues which could arise due to the exposure of
the human body to cold draughts or by over-cooling the room.
• When you notice something abnor mal with the air conditioner (smells like something scorching poor cooling, etc.), immediately turn off the main switch and the
circuit breaker from the mains to stop the air conditioner. Contact the dealer.
If the air conditioner is continuously operated abnormally, it may cause machine
failure, electric shock or fire.
W ARNINGS ABOUT MOVEMENT AND REPAIR
• Do not move or repair any unit by yourself.
This must be carried out by a qualified professional.
• Whenever the air conditioner needs repair, make sure that you consult your
dealer.
If the unit is repaired incorrectly this could cause possible electric shock or fire.
• When moving the air conditioner for reinstallation in another location consult your
dealer. An incorrect installation may cause electric shock or fire.
1
Page 5
CAUTION
CAUTIONS ABOUT INSTALLA TION
• Ensure to confirm the following cautions.
• Ensure that the condensate drainage is sealed throughout the
system to prevent any possible water damage.
• Ensure that the air conditioner is connected to a separate power
supply of the correct voltage.
• Do not install the unit in a place where flammable gases may leak.
If flammable gas accumulates around the unit, this may cause a fire.
CAUTIONS ABOUT OPERATION
• Carefully read this manual before starting the air conditioner.
There are many important things to keep in mind during daily operation.
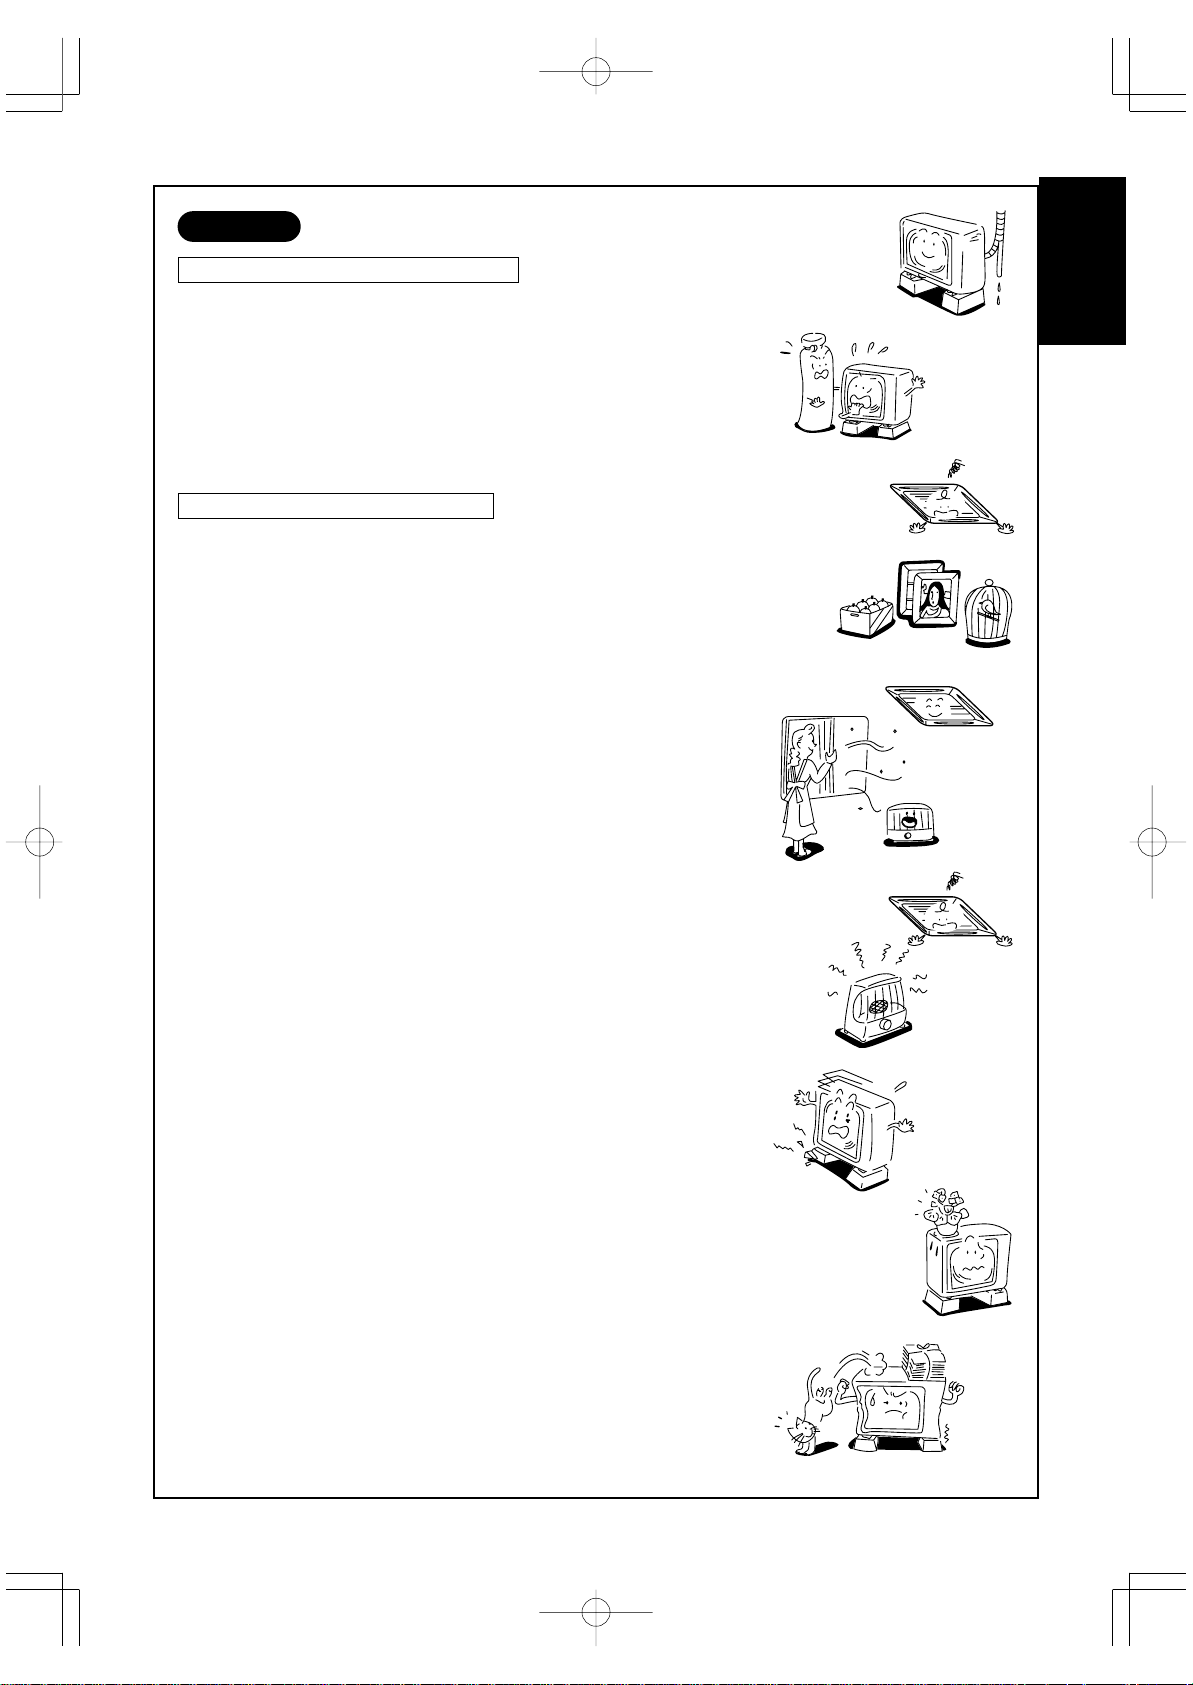
• Do not use this air conditioner for special purposes such as preserving food, precision instruments, art objects, breeding animals, growing potted plants, etc.
• Avoid exposing potted plants and animals to the air flow of the air
conditioner, since it can affect their health and growth.
• When the air conditioner is operated in close proximity to a combustion device, pay careful attention to ventilation and let fresh air into
the room.
Poor ventilation causes oxygen shortage.
• Do not place any combustion appliance in a place where it is directly
exposed to the air flow of the air conditioner, otherwise it may cause
a combustion.
• When the air conditioner is used in a closed room, be careful to
ensure sufficient ventilation within the room.
Poor ventilation causes oxygen shortage.
• Do not touch any switches with wet hands; otherwise you may get an
electric shock.
• If the air conditioner won’t be used for a considerably long time, turn
off the main power supply at the circuit breaker for safety.
• Check the concrete blocks, etc. of the base of the outdoor unit occasionally.
If the base is left damaged or deteriorated, the unit may topple over
and inflict an injury to a person as a worst case.
• Do not put anything on the outdoor unit nor step onto it.
If you do, it may not only topple over, but could cause injury to your-
self.
• To make the air conditioner operate at its original performance,
operate it within the range of the operating temperature specified in
the instructions.
Otherwise this may cause a malfunction or a water leak from the unit.
• Prevent any liquid from falling on to the remote controller.
ENGLISH
2
Page 6
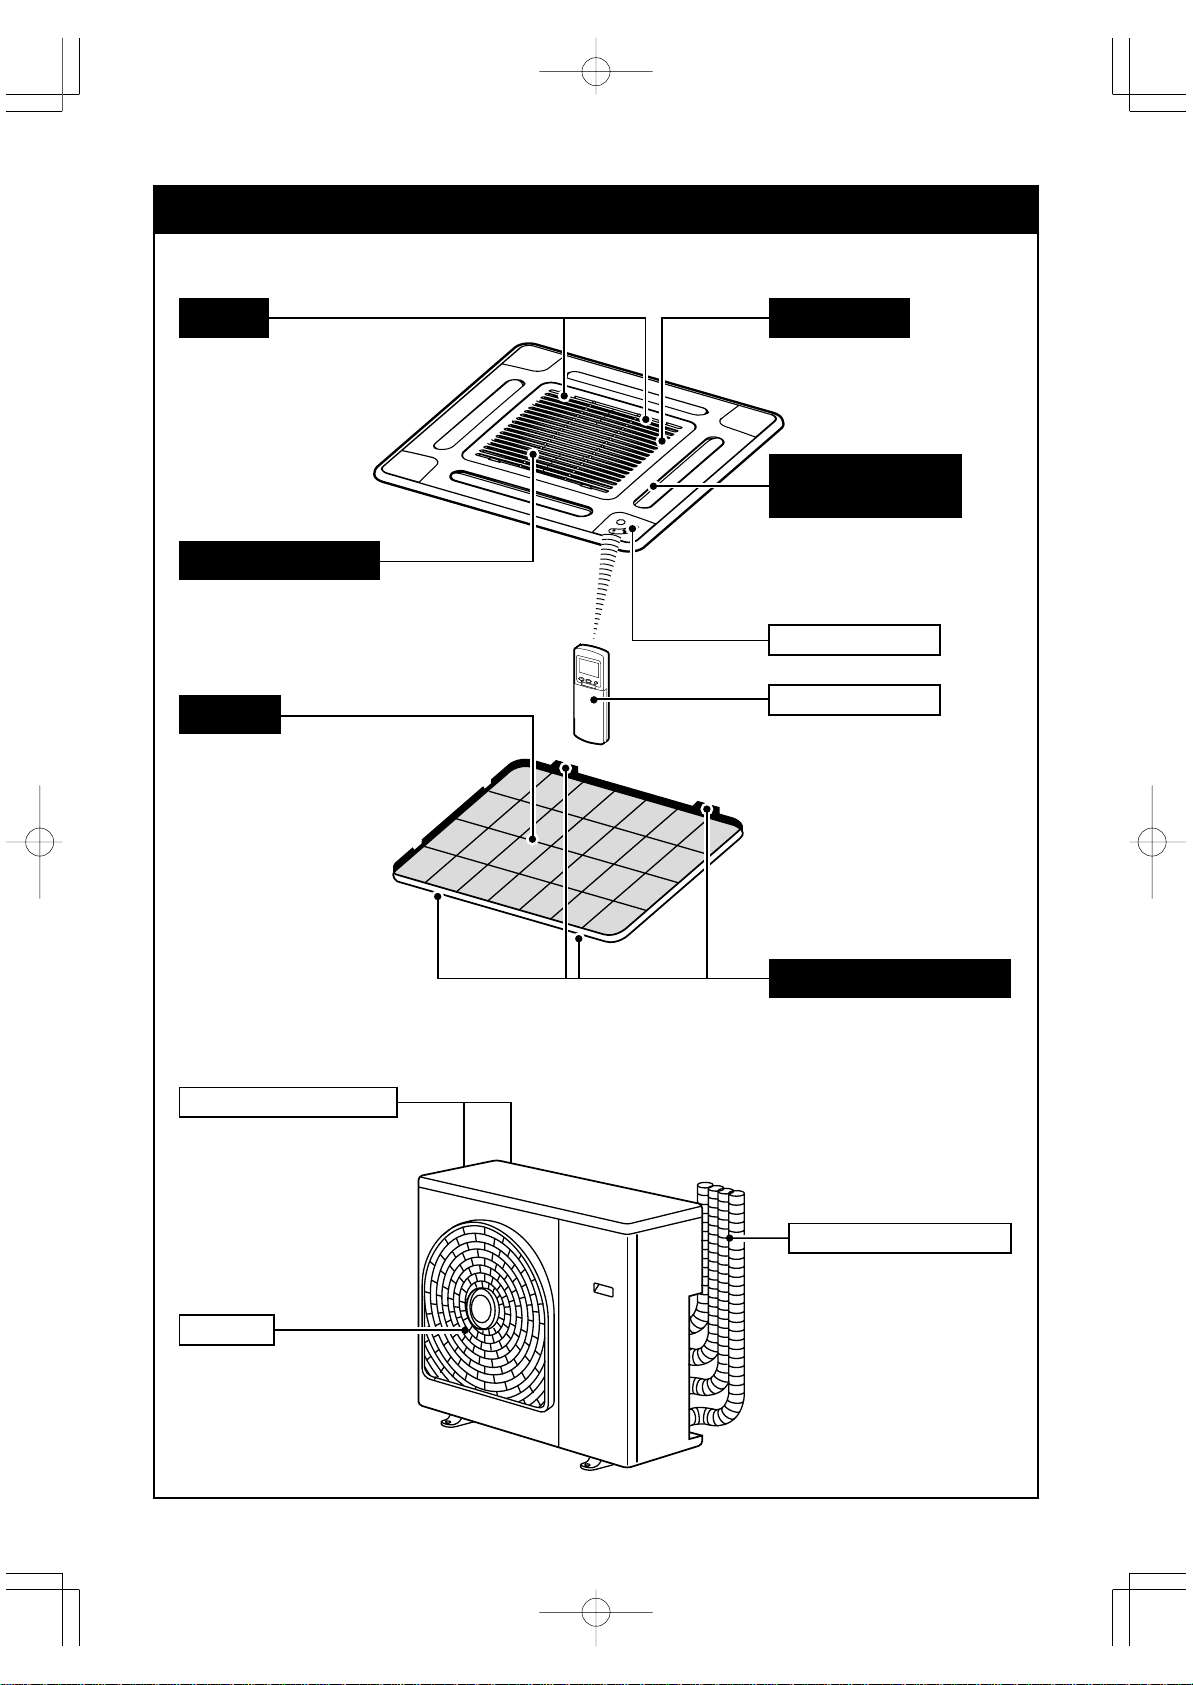
PARTS NAME
Indoor unit
Button
Button to open/close
the suction grille
Suction inlet grille
The air in the room is sucked
in through this grille.
Air filter
Removes dust particles.
(Attached to inlet grille.)
Earth screw
Located in the electric
parts box
Discharge louver
of discharge port
Change the direction of the air
to be discharged according to
cool/heat mode.
Receiver section
Remote controller
Outdoor unit
Air inlet (Side and rear)
Air outlet
Protrusion on air filter
Pipes and electric wires
3
Page 7
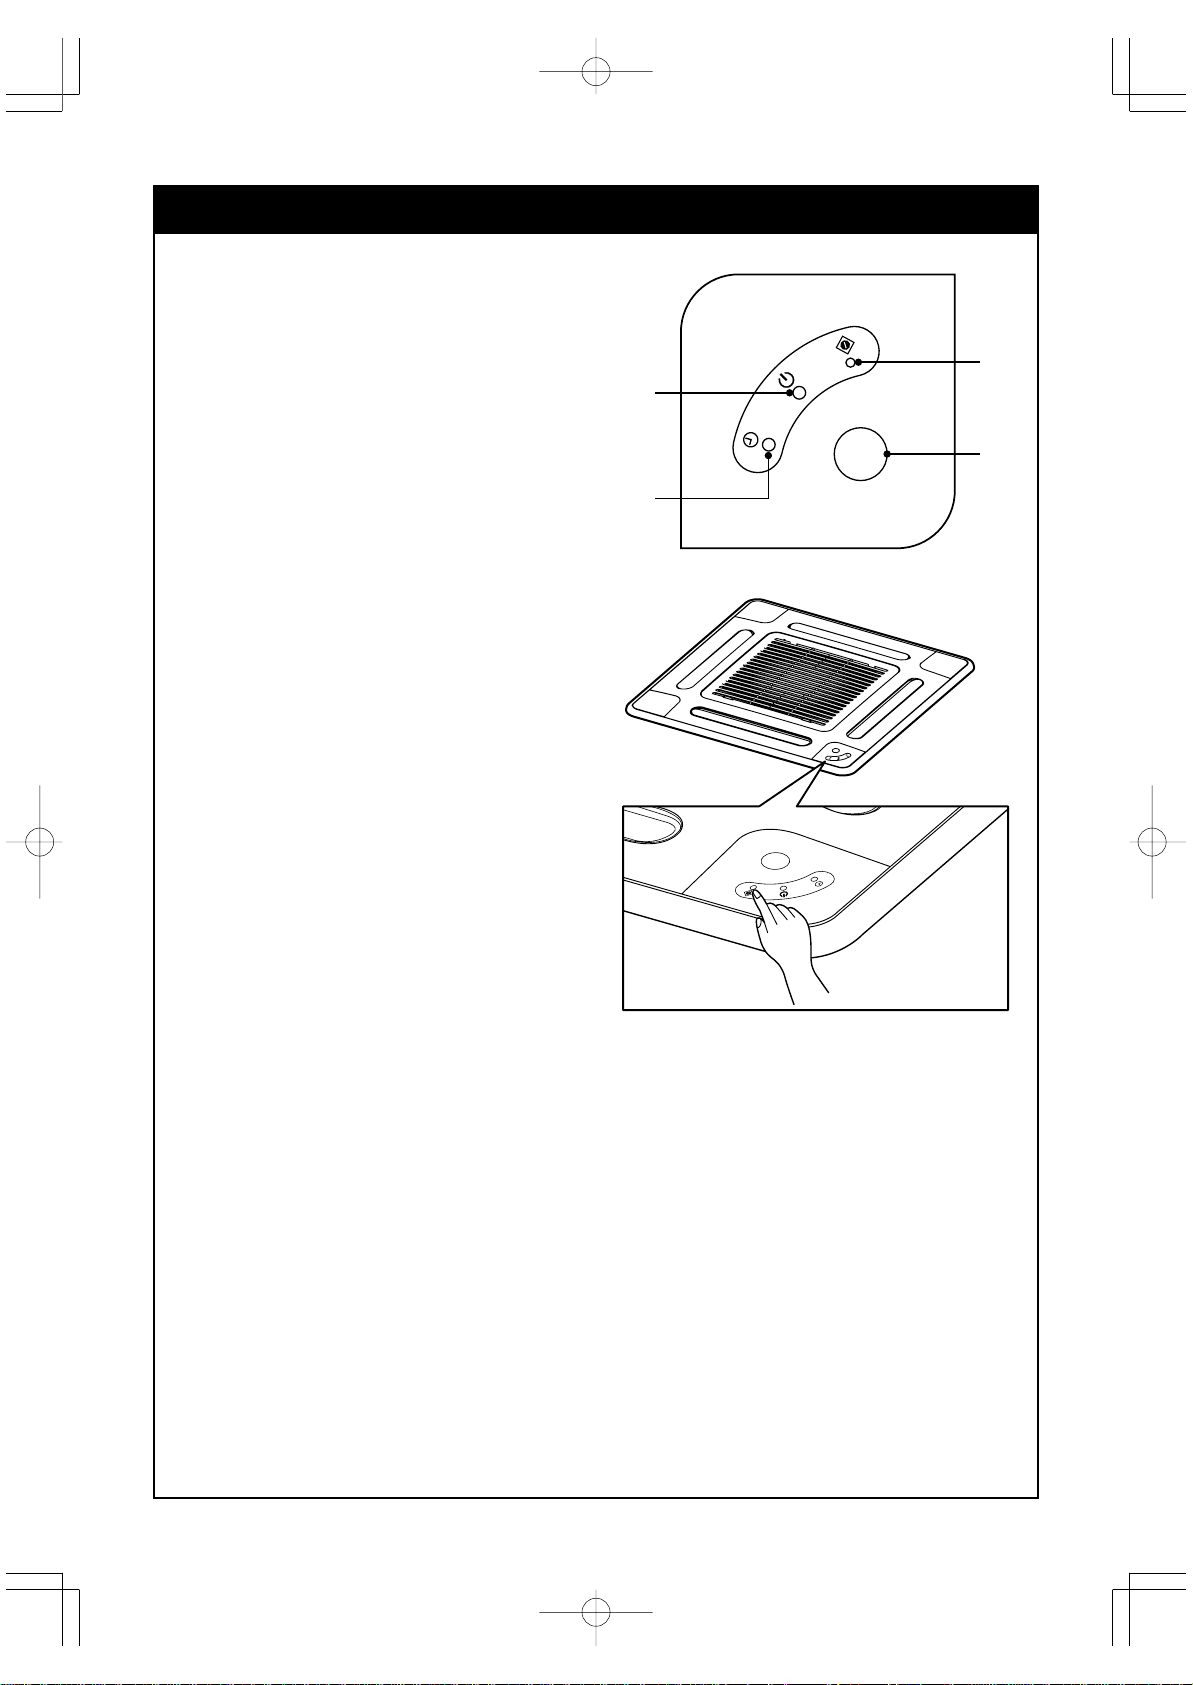
PARTS NAME OF RECEIVER SECTION
Receiver section
Display panel
The operating conditions are shown below.
1 RESET button
2 OPERATION indicator (Green)
The operation indicators flash rapidly (5 times
per second) when a safety protection feature
is activated.
3 TIMER indicator (Yellow)
4 Remote controller sensor
RESET button
If you misplace or loose the remote controller or
the batteries are fully discharged, push the RESET
button.
1. Push the RESET button to start the automatic
operation (AUTO). Push this button again to
stop operation. See page 17.
1
2
4
3
4
Page 8
TIMER
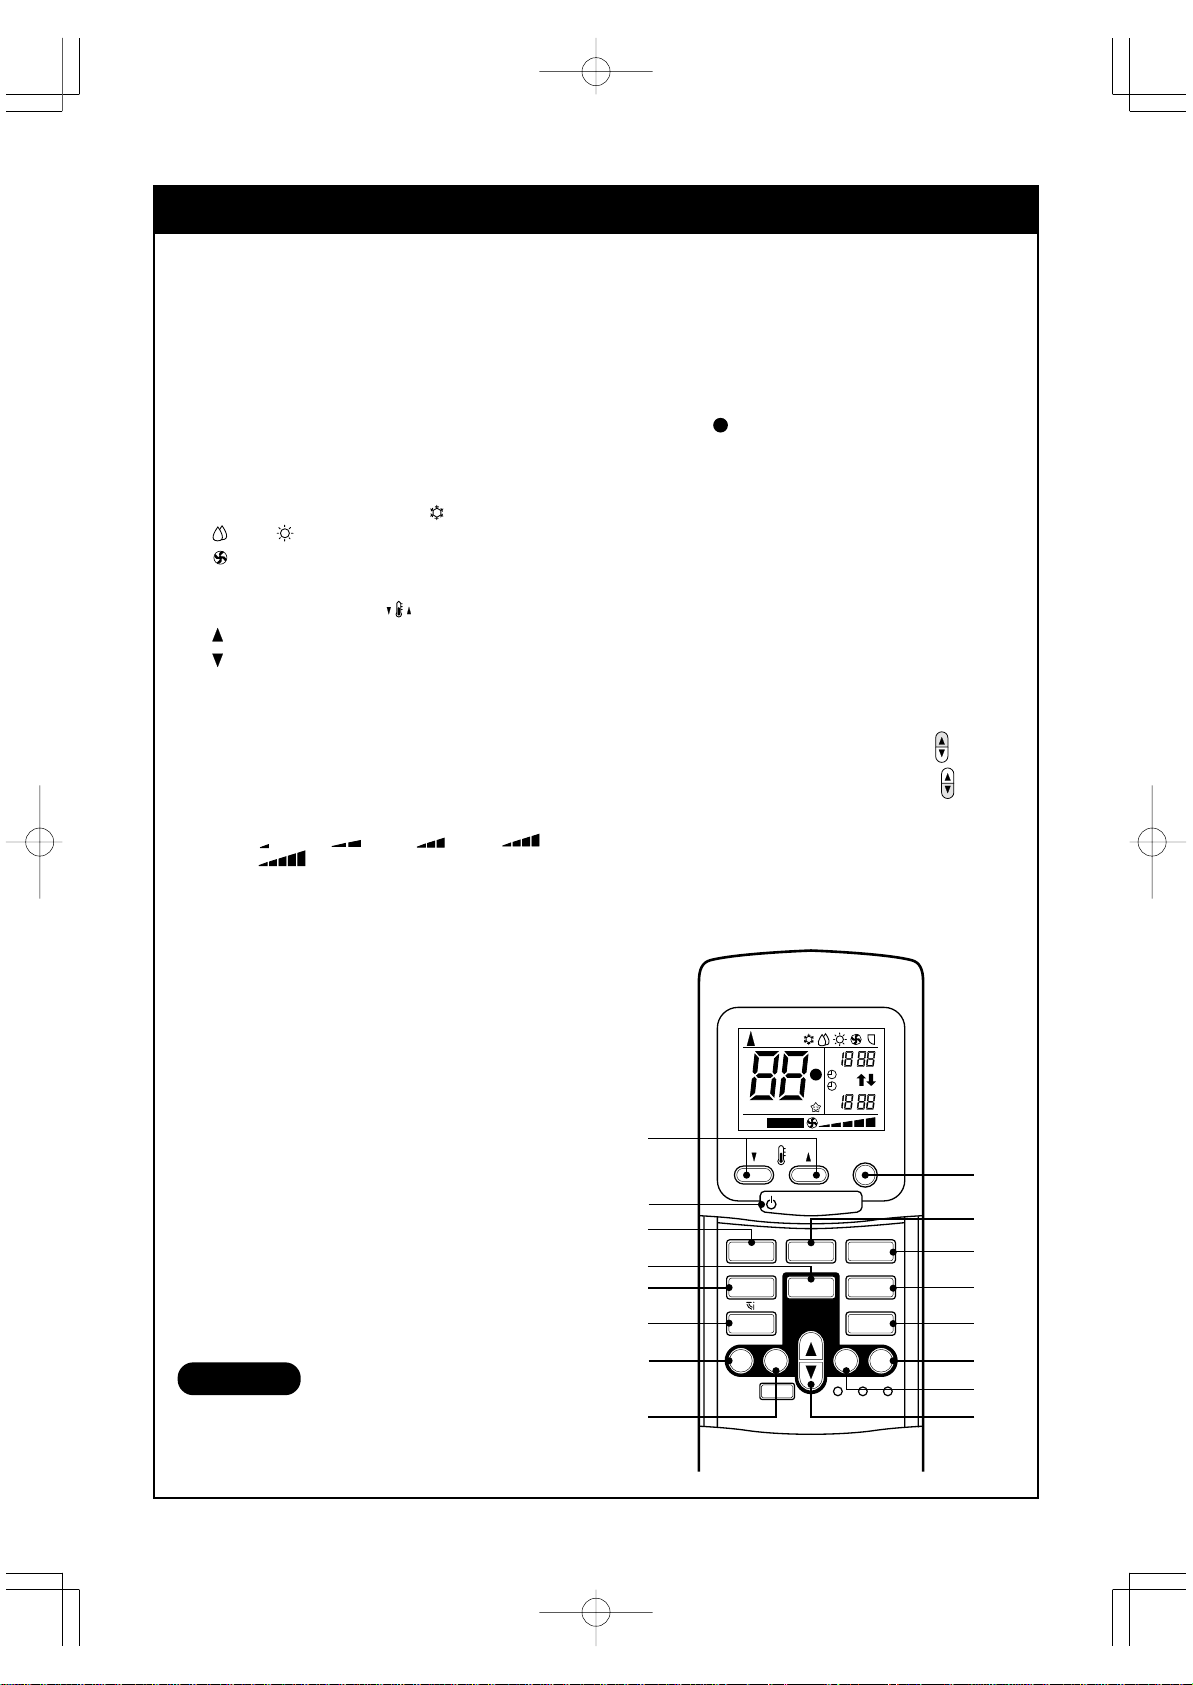
PARTS NAME OF REMOTE CONTROLLER
1 START/STOP button
Push the button to start operation.
(A receiving beep is heard.)
Push the button again to stop operation.
(A receiving beep is heard.)
If no sound is heard from the receiver, push the
button again.
2 Mode select button (MODE)
Push this button to select a mode.
Each time you push the button, a mode is selected
in a sequence.
A : Auto changeover control,
:Dry, : Heat (for Heat pump model only),
: Fan only (For Cooling only model), and back to
A. (A receiving beep is heard.)
: Cool,
3 Temperature button ( )
The set temperature can be raised to 30°C.
The set temperature can be lowered to 17°C.
(A receiving beep is heard.)
4 Fan speed button (FAN)
Push this button to select fan speed. When you
select AUTO, the fan speed is automatically
adjusted according to the room temperature.
You can also manually select the desired fan
speed. There are five settings.
(LOW
, LOW+ , MED , MED
HIGH
) (A receiving beep is heard.)
+
5 Auto louver button (SWING)
Push this button to swing the louver.
(A receiving beep is heard.)
Push the SWING button to stop the louver s winging.
(A receiving beep is heard.)
6 Set louver button (FIX)
Push this button to adjust the air flow direction.
(A receiving beep is heard.)
7 Off timer button (OFF)
Push this button to set the OFF timer.
8 On timer button (ON)
Push this button to set the ON timer.
9 Reserve button (SET)
Push this button to reserve time settings.
(A receiving beep is heard.)
10 Cancel button (CLR)
Push this button to cancel ON timer and OFF
timer. (A receiving beep is heard.)
CAUTION
• When pushing the “FILTER” button.
The indoor unit does not operate and the receiver
does not sound a beep.
11 High power button (Hi POWER)
Push this button to start the high power
operation.
12 Memory button (MEMO)
Push this button to store the settings.
Push the button again for 3 seconds or more to
store the setting indicated on the remote control-
P
ler and
(Refer to “MEMORY/PRESET OPERATION”)
mark is indicated.
13 ECO timer button (ECO)
Push this button to start the ECO timer (OFF
timer) operation.
You can select the OFF timer duration.
There are four settings (1, 3, 5 or 9 hours).
14 PRESET button
Push this button to operate the air conditioner
according to the settings memorized by the
MEMO button.
15 TIMER button
Use this button to change the clock, to set the
On and Off durations.
To forward the time, push the “TIMER
To set back the time, push the “TIMER
button.
,
16 Automatic operation button (AUTO)
Push this button to operate the air conditioner
automatically. (A receiving beep is heard.)
(Refer to “AUTOMATIC OPERATION”)
3
AUTOA
HiPOWER
CHK
AUT O
AM
:
B
PM
ON
P
OFF
C
AM
˚
:
PM
PRESET
” button.
”
14
1
4
13
5
6
8
7
ST AR T/STOP
MODE AUTOFAN
SWING
ON
ECO
TIMER
OFF SET CLR
FILTER
Hi POWER
MEMOFIX
RESET CLOCK CHECK
2
16
11
12
10
9
15
5
Page 9

NAMES AND FUNCTIONS OF INDICATIONS ON THE REMOTE CONTROLLER
Display
All indications, except for the clock indication, are displayed by pushing the START/STOP button.
1 Transmission mark
This transmission mark indicates when the
remote controller transmits a signal to the indoor
unit.
2 Mode display
Indicates the current operation mode.
• Heat Pump model
(AUTO : Automatic control, A : Auto changeover
control,
• Cooling Only model
(AUTO : Automatic control, A : Auto changeover
control,
: Cool, : Dry, : Heat)
: Cool, : Dry, : Fan only)
P
7
(MEMORY) display
Flashes for 3 seconds when the MEMO button is
pushed during operation.
P
mark is displayed when the button is not
pushed for more than 3 seconds while the mark
is flashing.
Push another button to turn off the mark.
8 ECO TIMER display
Indicates when the ECO TIMER is in operation.
Each time you push the ECO button, the display
changes in sequence between 1, 3, 5, or 9h.
3 Temperature display
Indicates the temperature setting (17°C to 30°C).
When you set the operating mode to
Fan only, no temperature setting is displayed.
(for Cooling only model)
4 FAN speed display
Indicates the selected fan speed.
AUTO or one of five fan speed levels (LOW ,
LOW+ , MED , MED+ , HIGH )
can be displayed.
AUTO is displayed when the operating mode is
either in AUTO or
: Dry.
5 TIMER and clock display
The time set for timer operation or the clock is
displayed.
The present time is always indicated except
when in TIMER operation.
6 High power display
Indicates when the High power operation starts.
Push the Hi POWER button to start and stop the
operation.
3
1
AUTOA
HiPOWER
CHK
AUTO
2
97
AM
B
˚
:
PM
ON
P
OFF
C
AM
:
PM
:
9 A, B change indicatior remote controller
When the remote controller switching function is
set, “B” appears on the remote controller display.
(When the remote controller setting is “A” there is
no indication in this position.)
Remote controller switching function
• If two indoor units are installed in the same
room or adjoining rooms, both units may start
and stop at the same time when the remote
controller is operated. This can be prevented
by setting the switching function so that each
indoor unit is operated only by the correspond-
ing remote controller.
• To use the remote controller switching function,
contact the air conditioner dealer or the
installation company.
Resetting of the remote controller switching
To exchange the battery while using remote
controller switching function, reset the remote
controller switching.
• Exchange the battery with a new one.
• Push the “CHECK” point and “MODE” button at
the same time, to change the remote controller
setting from “A” to “B”.
(Priority is given to “A” setting.)
• Check that the changed remote controller can
or cannot operate the indoor unit.
A
AUTO
PM
OFF
:
• In the illustration, all indications are indicated for
explanation.
84
65
During operation, only the relevant indications will
be displayed on the remote controller.
6
Page 10

TIMER
TIMER
TIMER
PREPARATION AND CHECK BEFORE USE
TIMER
Loading the remote controller batteries.
1 Remove the cover and insert the batteries.
2 Push the RESET button.
The clock display flashes. Adjust the clock.
Place back the cover.
Batteries
• To replace the batteries, use two new batteries (AAA type).
• In normal use, the batteries last about one year.
• Replace the batteries if there is no beep from the receiver of the
indoor unit or when the air conditioner cannot be operated using
the remote controller.
• To avoid malfunctions caused by battery leakage, remove the
batteries when not using the remote controller for over one
month.
• Slide off the cover while
pushing the sides.
• Battery replacement
Be careful not to reverse the
(+) position and the (–)
position.
Setting the clock
Before you start operating the air conditioner, set the clock of the
remote controller using the procedures given in this section.
The clock panel on the remote controller indicates the time regardless of whether the air conditioner is in use or not.
Initial setting
When batteries are inserted in the remote controller, the clock
panel indicates AM 0:00 and flashes.
1 TIMER button
Push the TIMER
Each time the TIMER button is pushed, it changes the time on
one minute basis.
When the TIMER button is held down, it changes the time on
one ten minutes basis.
2 SET
SET
button.
Push the SET
The current time is displayed and the clock starts.
button to set the current time.
SET
button.
MODE AUTOFAN
ECO
SWING
TIMER
ON
OFF SET CLR
FILTER
ST ART/ST OP
MODE AUTOFAN
ECO
SWING
TIMER
ON
OFF SET CLR
FILTER
Hi POWER
MEMOFIX
RESET CLOCKCHECK
AM
:
PRESET
Hi POWER
MEMOFIX
RESET CLOCKCHECK
2
2 1
Clock adjusting
1 CLOCK button
Push the CLOCK button.
The CLOCK display flashes.
2 TIMER button.
Push the TIMER
current time.
Each push of the TIMER button changes
the time by one minute.
Holding down the TIMER button
changes the time by ten minutes.
3 SET
Push the SET
The current time is displayed and the clock starts.
SET
button.
button to set the
SET
button.
SWING
ON
7
MODE AUTOFAN
ECO
Hi POWER
TIMER
MEMOFIX
OFF SET CLR
FILTER
RESET CLOCK CHECK
Push CLOCK
2
3
AUTO
ST ART/ST OP
MODE AUTOFAN
ECO
SWING
TIMER
ON
OFF SET CLR
FILTER
:
PM
PRESET
Hi POWER
MEMOFIX
RESET CLOCK CHECK
1
Page 11

HANDLING THE REMOTE CONTROLLER
CAUTION
• The air conditioner will not operate if curtains, doors or other materials are blocking the signals sent
from the remote controller to the indoor unit.
• Prevent any liquid from falling onto the remote controller.
• If the infrared signal receiver on the switch panel is exposed to direct sunlight, the air conditioner may
not function properly.
Use curtains to prevent direct sunlight being exposed to the receiver.
• If the air conditioner is installed in a room which has fluorescent lights with electronic starters or inverter systems, signals may not be properly received and the air conditioner cannot start or stop while
the lights are on.
If you plan to use the fluorescent lights in the same room where the air conditioner operates, consult
your local dealer.
• If other electrical appliances react to the remote controller of the air conditioner, either remove these
appliances or consult your local dealer.
Location of the remote controller
• Keep the remote controller where its signals can reach
the receiver on the panel. (maximum distance is 7 m)
• When you select the timer operation, the remote
controller automatically transmits a signal to the indoor
unit at the specified time.
If you keep the remote controller in a position that
hinders proper signal transmission, a time lag of up to
15 minutes may occur.
Approx. 7m
Transmitting section
of remote controller
Receiver section
of main unit
Remote controller holder
Installing the remote controller holder
• Before you install the remote controller holder on a wall or
pillar, check whether the remote controller signals can be
received by the indoor unit.
Mounting and removing the remote controller
• To mount the remote controller, hold it parallel to the remote
controller holder and push it in fully.
To remove the remote controller, slide the remote controller
upwards and take it out from the holder.
Receiver section of main unit
When the receiver section receives the signal,
the receiver at the indoor unit sounds.
pip, pip : Operation
Long pip : Stop
pip : Change
8
Page 12

TIMER
TIMER
AUTOMATIC OPERATION
When you set the air conditioner in AUTO mode, it will automatically select either cooling, heating, or fan only
operation depending on the outdoor temperature. (Refer to page 15.)
In addition, fan speed is automatically controlled.
Start
1 START/STOP button
Push this button to start the air conditioner.
2 AUTO button (AUTO)
Push AUTO button.
3 Temperature button ( )
Set the desired temperature.
• The OPERATION lamp (green) on the panel of the indoor unit illuminates. The operating mode is selected in accordance with the room
temperature and the operation starts after approximately 3 minutes.
• If the AUTO mode is uncomfortable, you can select the desired
conditions manually.
• Fan speeds and louver position can be changed.
When it is changed, the MODE is also changed from AUTO to A.
At the same time, fan speed indication is displayed.
Stop
START/STOP button
Push this button to stop the air conditioner.
3
1
2
SWING
ON
C
AM
˚
:
PRESET
ST ART/ST OP
MODE AUTOFAN
ECO
Hi POWER
TIMER
MEMOFIX
OFF SET CLR
FILTER
RESET CLOCK CHECK
AUTOMATIC OPERATION (AUTO CHANGEOVER)
When you set the air conditioner in A mode or switch over from AUTO operation because setting may have
been changed, it will automatically select either cooling, heating or fan only operation depending on the
outdoor temperature. (Refer to page 15.)
Start
1 START/STOP button
Push this button to start the air conditioner.
2 Mode select button (MODE)
Select A.
3 Temperature button ( )
Set the desired temperature.
4 Fan speed button (FAN)
Select one of “AUTO” LOW , LOW+ , MED , MED
HIGH
• The OPERATION indicator (green) on the panel of the indoor unit
illuminates. The operating mode is selected according to the room
temperature and operation starts after approximately 3 minutes.
• The temperature, fan speeds and louver position can be changed.
You can select the desired conditions manually.
Stop
START/STOP button
Push this button to stop the air conditioner.
.
3
+
,
1
4
2
SWING
ON
C
AM
˚
:
AUTUTO
PRESET
ST ART/ST OP
MODE AUTOFAN
ECO
Hi POWER
TIMER
MEMOFIX
OFF SET CLR
FILTER
RESET CLOCK CHECK
9
Page 13

TIMER
TIMER
COOLING/HEATING/FAN ONLY OPERATION
Start
1 START/STOP button
Push this button to start the air conditioner.
2 Mode select button (MODE)
Select Cool
(For cooling only models)
, Heat (For heat pump models), Fan only .
3 Temperature button ( )
Set the desired temperature.
When the air conditioner is in FAN ONLY operation, the temperature
display is not displayed. (For cooling only models)
4 Fan speed button (FAN)
Select one of “AUTO”, LOW
HIGH
.
• The OPERATION lamp (green) on the panel of the indoor unit
illuminates. Operation starts after approximately 3 minutes.
(If you select FAN ONLY mode, the unit will start immediately.)
• The
: Fan only mode does not control temperature.
Therefore, perform only steps
Stop
START/STOP button
Push this button to stop the air conditioner.
, LOW+ , MED , MED+ ,
1, 2 and 4 to select this mode.
3
1
4
2
AUTUTO
ST ART/ST OP
MODE AUTOFAN
ECO
SWING
TIMER
ON
OFF SET CLR
FILTER
C
AM
˚
PRESET
RESET CLOCK CHECK
:
Hi POWER
MEMOFIX
DRY OPERATION
Start
1 START/STOP button
Push this button to start the air conditioner.
2 Mode select button (MODE)
Select DRY
3 Temperature button ( )
Set the desired temperature.
• The fan speed display indicates AUTO.
• The OPERATION lamp (green) on the panel of the indoor unit
illuminates, and operation starts after approximately 3 minutes.
Stop
START/STOP button
Push this button to stop the air conditioner.
3
1
2
AUTUTO
ST ART/ST OP
MODE AUTOFAN
ECO
SWING
TIMER
ON
OFF SET CLR
FILTER
C
AM
˚
PRESET
RESET CLOCK CHECK
:
Hi POWER
MEMOFIX
10
Page 14

TIMER
TIMER
HIGH POWER OPERATION
High power (Hi POWER)
• The High power (High power operation) mode automatically controls room temperature, operation mode so
that the room is quickly cooled in summer and warmed in winter. (Refer to page 15.)
Setting High power mode
1 Hi POWER button
Push the Hi POWER button.
The “Hi POWER” mark on the remote controller is displayed.
Canceling High power mode
1 Hi POWER button
Push the Hi POWER button again.
The “Hi POWER” mark on the remote controller goes out.
CAUTION
The High POWER mode cannot be activated in the DRY and FAN
ONLY operation or when the ON TIMER operation is reserved.
1
SWING
ON
C
AM
˚
HiPOWER
AUTUTO
ST ART/ST OP
MODE AUTOFAN
ECO
TIMER
OFF SET CLR
FILTER
RESET CLOCK CHECK
:
PRESET
Hi POWER
MEMOFIX
ECO (1, 3, 5, 9H OFF) TIMER
The air conditioner stops after operating for the set time (1, 3, 5 or 9 hours)
1 ECO button
Push the ECO button (during operation).
• There is a short beep and the timer indicator comes on. The time
at which the air conditioner will stop is indicated on the remote
controller display (1H: about 1 hour after the current time).
• Push the button again while 1H is displayed (about 3 seconds) to
change to the 3H indicator, push again to change to the 5H indicator, and push again to change to the 9H indicator.
• After selecting the time you want, do not push any other buttons.
(When the 1H, 3H, etc. indicator goes off the timer is set.)
2 CLR button
Push the CLR button to cancel the timer.
• The timer is cancelled but the air conditioner continues to operate.
• The 1, 3, 5 or 9H OFF timer operation is also cancelled if the OFF
button is pushed after setting.
INFORMATION
• When using the timer in combination with the ON timer, first set 1,
3, 5 or 9H OFF timer and then set the ON timer.
• If the ECO button is pushed while the ON (OFF) timer has been set,
the ON (OFF) timer is canceled and only the 1, 3, 5 or 9H OFF
timer is set.
1
2
HiPOWER
AUTUTO
ST ART/ST OP
MODE AUTOFAN
ECO
SWING
TIMER
ON
OFF SET CLR
FILTER
OFF
:
PM
PRESET
Hi POWER
MEMOFIX
RESET CLOCK CHECK
11
Page 15

TIMER
TIMER OPERATION
ON timer and OFF timer
Setting TIMER
1 ON/OFF TIMER button
Push the ON or OFF TIMER buttons as required.
• The previous timer setting is displayed and flashes at the same time
as the ON/OFF TIMER display.
2 TIMER button
Push the TIMER
Set the timer to the desired time.
Each push of the TIMER button changes the time by ten minute incre-
ments.
Pushing the TIMER button continually changes the time in one hour
increments.
3 SET
SET
button
Push the SET
The set time for the timer is displayed and the timer starts.
button.
SET
button to set the timer.
4 CLR button
Push the CLR
button to cancel the timer setting.
1
2
3
4
AUTUTO
ST ART/ST OP
MODE AUTOFAN
ECO
SWING
TIMER
ON
OFF SET CLR
FILTER
AM
ON
OFF
C
AM
˚
PRESET
RESET CLOCK CHECK
:
:
Hi POWER
MEMOFIX
CAUTION
• When you select the timer operation, the remote controller automatically transmits the timer signal to
the indoor unit at the specified time.
Therefore, keep the remote controller in a location where it can tr ansmit the signal to the panel properly.
SET
• If you do not push the SET
celled.
Once you select the timer operation mode, the settings are saved in the remote controller.
Thereafter, the air conditioner will start operating under the same conditions when you simply push the ON/
OFF button of the remote controller.
If the clock display is flashing, you cannot set the timer.
Follow the instructions in the section “Setting the clock” on page 7 to set the clock and then set the timer.
button within 30 seconds after setting the time, the setting will be can-
12
Page 16

TIMER
Combined timer (Setting both ON and OFF timers simultaneously)
OFF timer
→→
→ ON timer (Operation
→→
→→
→ Stop
→→
→→
→ Operation)
→→
This feature is useful when you want to stop the air conditioner after you go to sleep or away from home and
to start it again in the morning when you wake up or you return home.
Example:
To stop the air conditioner and start it again next morning.
Setting the combined TIMER
1) Push the OFF button.
2) Push the TIMER
3) Push the ON
4) Push the TIMER
5) Push the SET
ON timer
→→
→ OFF timer (Stop
→→
button to adjust the OFF timer.
button.
button to adjust the ON timer.
SET
button.
→→
→ Operation
→→
→→
→ Stop)
→→
Operation
Operation again
Stop
You can use this setting to start the air conditioner when you wake up and stop it when you leave the house.
Example:
To start the air conditioner next morning and stop the operation
Setting combined TIMER
1) Push the ON button.
2) Push the TIMER
3) Push the OFF
4) Push the TIMER
5) Push the SET
• Either ON or OFF timer function which ever is the closest to the current time is activated first.
• If the same time is set for both the ON and OFF timers, no timer operation is performed.
Also, the air conditioner may stop operating.
button to adjust the ON timer.
button.
button to adjust the OFF timer.
SET
button.
Operation
StopStop
Every day combined timer
(Setting both ON and OFF timer simultaneously and activate every day.)
This feature is useful when you want to use combined timer at the same time every day.
Setting combined TIMER
1) Push the ON button.
2) Push the TIMER
3) Push the OFF
4) Push the TIMER
5) Push the SET
6) After step 5), an arrow mark (
flashing, push the SET
• When the every day timer is activated, both arrows (
button to adjust the ON timer.
button.
button to adjust the OFF timer.
SET
button.
or ) flashes for about 3 seconds, whilst
SET
button.
, ) are displayed.
Cancel the timer operation
Push the CLR button.
Clock display
During the TIMER operation (ON-OFF, OFF-ON, OFF timer) the clock display is
not displayed therefore not showing the setting time.
To see the present time, push SET button briefly.
The present time is displayed for about 3 seconds.
AUTUTO
ST ART/ST OP
MODE AUTOFAN
ECO
SWING
TIMER
ON
OFF SET CLR
FILTER
AM
ON
OFF
C
AM
˚
PRESET
RESET CLOCKCHECK
:
:
Hi POWER
MEMOFIX
13
Page 17

UT
TIMER
UT
TIMER
MEMORY/PRESET OPERATION
Store the frequently used operation setting by using the MEMO button for convenience.
Start the air conditioner in the operation mode that you want the remote controller to memorize.
Push the button as follows while the air conditioner is in operation.
1 MEMO button
Push this button briefly to store the setting.
All icons are currently displayed except for the clock display and
mark flashes.
2 MEMO button
Push and hold the MEMO button for more than 3 seconds while the
display flashes.
P
mark is indicated and the setting is memorized.
The
• If you do not push the MEMO button within 3 seconds or if you
push another button, the MEMORY setting is cancelled.
• Operation modes which can be memorized with using the MEMO
button are MODE, Temperature, FAN, TIMER and High power.
P
HiPOWER
SWING
1
2
ON
AM
:
PM
ON
P
OFF
C
AM
˚
:
PM
O
AUT
PRESET
ST ART/ST OP
MODE AUTOFAN
ECO
Hi POWER
TIMER
MEMOFIX
OFF SET CLR
FILTER
RESET CLOCK CHECK
To operate the air conditioner with the setting stored using the MEMO button.
1 PRESET button
Push the PRESET button.
The setting stored by the MEMO button will be indicated and the air
conditioner operates as per the setting.
• The OPERATION lamp (green) on the panel of the indoor unit is
illuminated, and operation starts after approximately 3 minutes.
• Initial setting :
MODE : AU TO
Temperature : 22
1
HiPOWER
O
AUT
ST ART/ST OP
MODE AUTOFAN
ECO
SWING
TIMER
ON
OFF SET CLR
FILTER
AM
PM
ON
P
OFF
C
AM
˚
PM
PRESET
RESET CLOCK CHECK
:
:
Hi POWER
MEMOFIX
14
Page 18

TIMER
TIMER
ADJUSTING AIR FLOW DIRECTION
• Adjust the air flow direction properly. Failure to do so could cause discomfort and cause uneven distribution of
room temperature.
• When the air conditioner stops, the louver (adjustment plate of up/down air flow direction) directs upward automatically.
• In heating operation, when starting the operation/executing defrost operation or when the room temperature has
reached the required set temperature, the fan stops or the air flow is vastly reduced and the louver directs
upward.
During this time, even if the SWING button or the FIX button are pushed, the louver does not move as it directs
upward. When starting the usual heating operation which blows hot air, the louver directs towards the set air
flow direction.
Adjusting the air flow direction
The air conditioner automatically adjusts the air flow direction according to
the operating conditions when AUTO or A mode is selected.
To set a selected air flow direction
Use this function when the air conditioner is operating.
1 FIX button
Hold down or briefly push the FIX button on the remote controller to
move the louver to the desired direction.
• Change the air flow louver direction within the range that is displayed.
• In subsequent operations, the air flow is automatically set to the
direction that you set the louver using the FIX button.
In HEAT/F AN ONLY operation In COOL/DRY operation
In STOP mode
Louver operating range
in HEAT/FAN ONLY mode
In STOP mode
Louver operating range
in COOL/DRY mode
Louver does not direct
downward in COOL/DRY mode.
1
AUTUTO
ST ART/ST OP
MODE AUTOFAN
ECO
SWING
TIMER
ON
OFF SET CLR
FILTER
C
AM
˚
RESET CLOCK CHECK
:
PRESET
Hi POWER
MEMOFIX
To automatically swing the air flow direction
Perform this function when the air conditioner is operating.
1 SWING button
Push the SWING button on the remote controller.
• To stop the function, push the SWING button.
• To change the swinging direction, push the FIX button.
• In COOL/DRY operation, the louver does not stop as it directs
downward. If stopping the louver as it directs downward during swing
operation, it stops after moving for a small duration.
CAUTION
• The FIX and SWING buttons will be disabled when the air
conditioner is not operating (including when the ON TIMER is set).
• Do not operate the air conditioner for an extended period of time
with the air flow direction set downward during the cooling or drying
operation: otherwise condensation may occur on the surface of the
air flow louver and cause water dripping.
• Do not move the air flow louver manually.
Always use the FIX button.
If you move the louv er man ually, it may malfunction during operation.
If the louver malfunctions, stop the air conditioner, and restart it.
• When the air conditioner is started immediately after it was
stopped, the air flow louver may not move for about 10 seconds.
1
In all modes
In STOP mode
Louver swing range in all
operating modes
C
AM
˚
ST ART/ST OP
MODE AUTOFAN
ECO
TIMER
RESET CLOCK CHECK
:
PRESET
Hi POWER
MEMOFIX
AUTUTO
SWING
ON
OFF SET CLR
FILTER
15
Page 19

HOW THE AIR CONDITIONER WORKS
Automatic Operation
As shown in Figures 1 and 2, Automatic Operation mode selects the operation based on the room temperature data (Ta) when operation begins.
Heat pump models Cooling only models
Room temperature when operation begins
or when selected again
Room temperature when operation begins
or when selected again
Room temperature
Setting temperature+1
Setting temperature
Setting temperature–1
Cooling operation
Fan only operation
Heating operation
Room temperature
Setting temperature+1
Setting temperature
Cooling operation
Fan only operation
Figure 1 Figure 2
The operation mode is selected again after the compressor has remained stopped for 15 minutes.
Hi POWER operation
When you push the Hi POWER button during cooling, heating or A operation, the air conditioner starts the
following operation.
• Cooling operation
The cooling operation is performed at 1°C lower than the temperature setting.
When the room temperature is higher than the temperature setting, the air flow is directed downward.
The fan speed is also set to high*.
Once the room temperature is within 1°C of the set temperature, the air flow is returned to its previous
direction.
* The noise level increases, according to the fan speed.
• Heating operation (heat pump models)
The heating operation is performed at 2°C higher than the set temperature.
The air flow direction and fan speed are automatically switched according to the operating condition.
ECO operation
When you push the ECO button during cooling, heating or A operation, the air conditioner starts the following
operation. The fan speed is controlled automatically.
• Cooling operation ( )
In the minimum operation zone, where the air conditioner is operated at minimum capacity, overcooling is
prevented by raising the set temperature.
The room temperature is thus regulated between the minimum operation zone and the set temperature.
• Heating operation ( ) (heat pump models)
In the minimum operation zone, where the air conditioner is operated at minimum capacity, overheating is
prevented by lowering of the set temperature.
The room temperature is thus regulated between the set temperature and the minimum operation zone.
Dry operation ( )
The dry mode automatically selects the cooling dry operation based on the difference between the set
temperature and the actual room temperature.
The fan speed indicator shows AUTO and low speed is used.
16
Page 20

Control
Gee, chilly
HINTS FOR ECONOMICAL OPERATION
Maintain room temperature at a comfortable level
Clean air filters
The clogged/dirty air filter impairs the performance of the air conditioner.
Never open doors and windows more often than necessary
To keep cool or warm air in the room, never open doors and windows more often than necessary.
Window curtains
In cooling, close the curtains to avoid direct sunlight.
In heating, close the curtains to keep the heat in.
Get uniform circulation of room air
Adjust the air flow direction for the even
circulation of room air.
Clean, please.
Please close
Blows upward
Cool and
dry air
Blows downward
Air flow adjustment
Warm
air
TEMPORARY OPERATION
This function is used to operate the unit temporarily in case you take a remote controller for the right one or
the batteries are fully discharged.
• Push the RESET button to start the automatic operation (AUTO).
• While the temporary operation is activated, the remote controller operation is disabled.
When you cannot use the
remote controller, the temporary operation
starts by pushing the RESET button.
17
Page 21

MAINTENANCE
Cleaning of the air filter
WARNING
Cleaning of the air filter and other parts of the air filter can involve dangerous work in high places, therefore ensure work is carried out by qualified service personnel.
Do not attempt it yourself.
NOTE
For Air conditioning systems which are operated regularly, cleaning and maintenance of the indoor/
outdoor units are strongly recommended.
As a general rule, if an indoor unit is operated for about 8 hours a day, the indoor/outdoor units will need
to be cleaned at least once every 3 months.
Cleaning and maintenance shall be carried out by a qualified person.
Failure to clean the indoor/outdoor units regularly will result in poor performance, icing, water leaking or
even compressor failure.
Cleaning of the remote controller
CAUTION
• Use a dry cloth to wipe the remote controller.
• A cloth dampened with cold water may be used on the indoor unit if it
is very dirty.
• Never use a damp cloth on the remote controller.
• Do not use a chemically-treated duster for cleaning nor leave such
materials on the unit for long.
It may damage or fade the surface of the unit.
• Do not use benzene, thinner, polishing powder or similar solvents for
cleaning. These may cause the plastic surface to crack or deform.
If you do not plan to use the unit for more than 1 month
1) Operate the fan for 3 to 4 hours to dry inside of the unit
• Operate “FAN” mode.
2) Stop the air conditioner and turn off the main power switch or the circuit
breaker.
Checks before operation
1) Check that the air filters are installed.
2) Check that the air outlet or inlet is not blocked.
3) Turn on the main power switch or the circuit breaker for the main power
supply to the air conditioner.
18
FAN operation
Page 22

AIR CONDITIONER OPERATION AND PERFORMANCE
3 minutes protection function
The outdoor unit will not operate for approximately 3 minutes after the air conditioner has been immediately
restarted after being stop, or the power supply has been turned on. This is to protect the system.
Power failure
Power failure during operation stops the unit completely.
• To restart the operation, push the START/STOP button on the remote controller.
• Lightning or a wireless mobile telephone operating nearby may cause the unit to malfunction.
Turn off the main power switch or circuit breaker and then turn them on again.
Push the START/STOP button on the remote controller to restar t.
Heating characteristics
Preheating operation
The air conditioner does not flow out warm air immediately after it is turned on.
Warm air starts to flow out approximately 5 minutes after the indoor unit heat exchanger warmed up.
Warm air control (In heating operation)
When the room temperature reaches the set temperature, the fan speed is automatically reduced or stop to
prevent blowing cold draft.
At this time, the outdoor unit stops.
Defrosting operation
If the outdoor unit frosts during the heating operation, defrosting starts automatically
(for approximately 2 to 10 minutes) in order to maintain the heating capacity.
• The fans in both indoor and outdoor units stops during the defrosting operation.
• During the defrosting operation, the defrosted water drains into the bottom plate of the outdoor unit.
Heating capacity
In the heating operation, the heat is absorbed from the outside and brought into the room.
This way of heating is called heat pump system.
When the outside temperature is too low, it is recommended using another heating apparatus in combination
with the air conditioner.
Attention to snowfall and freeze on the outdoor unit
• In snowy areas, the air inlet and air outlet of the outdoor unit are often or covered frozen up with snow.
If snow or the outdoor unit is frozen and is left as it is, it may cause machine failure or poor heating.
• In cold areas, pay attention to the drain hose so that it perfectly drains water without remaining any water
inside.
If water freezes in the drain hose or inside the outdoor unit, it may cause machine failure or poor heating.
19
Page 23

RE-INSTALLATION
DANGER
Ask the dealer or an installation professional to re-install the air conditioner in a new location and
to observe the following items.
If the air conditioner is incorrectly installed yourself, it may cause a risk of an electric shock
or a fire.
Do not install the air conditioner in the following places
• Do not install the air conditioner in any place within one meter from a TV, stereo, or radio set.
If the unit is installed in such a place, noise transmitted from the air conditioner may affect the operation of
these appliances.
• Do not install the air conditioner near to a high frequency appliance (sewing machine or massager for
business use, etc.), otherwise the air conditioner may malfunction.
• Do not install the air conditioner in a humid or oily place, or in a place where steam, soot, or corrosive
gases are generated.
• Do not install the air conditioner in a salty place such as a seaside area.
• Do not install the air conditioner in a place where large amounts of machine oil are used.
• Do not install the air conditioner in a place where it is usually exposed to strong winds, such as in a sea-
side area or on the roof of the upper floor of a building.
• Do not install the air conditioner in a place where sulfurous gases are generated, such as in a spa.
• Do not install the air conditioner in a vessel or a mobile crane.
Be careful with noise or vibrations
• Do not install the air conditioner in a place where noise or hot air from the outdoor units air outlets may
annoy neighbors.
• Install the air conditioner on a solid and stable foundation so that it prevents the transmission of resonating,
operation noise and vibration.
• If one indoor unit is operating, some sound may be audible
from other indoor units that are not operating.
TROUBLES AND CAUSES
CAUTION
If any of the following conditions occur, turn off the main power supply switch and immediately contact
your dealer :
• The operation lamps flash at short intervals (5 times per second) even though you have tried turning
off the power supply and turning on again after 2 or 3 minutes.
• Switch operation does not work correctly.
• The main power fuse often blows out, or the circuit breaker is often activated.
• A foreign matter or water inside of the air conditioner.
• Any other unusual conditions are observed.
20
Page 24

Before you ask for servicing or repairs, check the following points.
Inoperative
• The main power switch is turned off.
• The circuit breaker is activated to cut off power supply.
• The main power fuse has blown.
• No electrical current
Does not cool well or heat well
• The air inlet and/or outlet of the outdoor unit is blocked.
Recheck
• Doors or windows are opened.
• The fan speed is set to low.
• The air conditioner is set in the DRY mode.
• The set temperature is too high. (In cooling operation)
• The set temperature is too low. (In heating operation)
Indoor unit or outdoor unit makes a strange noise.
• When the temperature suddenly changes, the indoor or outdoor unit
occasionally makes a strange noise because of expansion/
contraction of parts or change of refrigerant flow.
The room air is smelly or a bad odor comes from the air conditioner.
• Smells impregnated in the walls‚ carpets, furniture, clothing, or furs, come out.
Outdoor unit is frosted in heating operation.
Water drains from the outdoor unit.
• The outdoor unit is sometimes frosted in heating operation.
In such case, the unit automatically performs defrosting
(for 2 to 10 minutes) for increasing of the heating efficiency.
• In defrosting operation, both the indoor and outdoor units stop air flow.
• A hiss sound is heard when flow of the refrigerant is changed for defrosting.
• Resultant water of automatic defrosting in heating operation drains from
outdoor unit.
Air flow changes though the FAN button is not set to the AUTO mode.
• When the temperature of the blown air drops in heating operation, the air
conditioner automatically changes or stops air flow from the indoor unit not
to prevent the person in the room feeling cold.
• Air flow from the indoor unit is occasionally changed in the cooling operation.
A white mist of chilled air or water is generated from the outdoor unit.
• The indoor unit in cooling operation or the outdoor unit in defrosting
These are not failures.
operation occasionally gives off steam.
The OPERATION indicator turns on and off.
• The indicator turns on and off (once per 1 second) when power is restored
after a power failure or when the power main switch is set to on.
If you use the remote controller for ON → OFF operation, the indicator
does not flash.
Automatic operation of air flow louvers
• When the room temperature or outdoor temperature is high dur ing the
heating operation, the vertical air flow louvers close once and then set
themselves automatically to the original position setting again.
Cool, Dry, or Heat operation cannot be performed.
• When the unit in other room operates previously in different mode,
Fan-only operation is performed because of first-push priority control.
(Cool operation and Dry operation can be concurrently performed.)
Calm
21
Page 25

TROUBLE AND CAUSES (Concerning Remote Controller)
Before you ask for ser vicing or repair work, check the following points:
Setting Change is Impossible
Symptoms
The fan speed can not be
changed.
Symptoms
The remote controller
signal is not transmitted
even when the ECONO.
FAN button is pushed.
Symptoms
The TEMP. indicator does
not go on.
(for cooling only model)
Causes
• Check whether the MODE indicated on the display is “AUTO”.
AUTO
• Check whether the MODE indicated on the display is “DRY”.
(DRY)
The T ransmission Indicator “
Causes
• Check whether the ON TIMER is
indicated on the display.
The Display Never Goes On
Causes
• Check whether the MODE indicated on the display is “FAN
ONLY”.
(FAN ONLY)
Reason and Disposal
When the automatic mode is selected, the air conditioner automatically selects the fan speed.
When dry operation is selected, the
air conditioner automatically selects
the fan speed.
” Never Goes On
Reason and Disposal
The remote controller signal is not
transmitted, because the air conditioner is off.
Reasons
The temperature can not be set
during fan only operation.
Symptoms
The indication on the
display disappears after a
lapse of time.
The TIMER indicators go
off after a certain time has
elapsed.
Symptoms
No receiving tone sounds
from the indoor unit even
when the START/STOP
button is pushed.
The Display Goes Off
Causes
• Check whether the timer operation
has come to an end when the OFF
TIMER is indicated on the display.
• Check whether the timer operation
has started when the ON TIMER
is indicated on the display.
The Signal Receiving Tone Does Not Sound
Causes
• Check whether the signal transmitter of the remote controller is
properly directed at the receiver of
the indoor unit when the START/
STOP button is pushed.
The air conditioner operation stops
as the set time has elapsed.
When the time set to start the air
conditioner has been reached, the air
conditioner will automatically start and
the appropriate indicator will go off.
Direct the signal transmitter of the
remote controller to the receiver of
the indoor unit and then repeatedly
push the START/STOP button twice.
22
Reasons
Disposal
 Loading...