

Toshiba RAS-10N3ACV Series, RAS-10N3KCV Series Owner's Manual
1113950107
OWNER’S MANUAL
AIR CONDITIONER (SPLIT TYPE)
For general public use
Indoor unit
RAS-10N3KCV Series
Outdoor unit
RAS-10N3ACV Series
ENGLISH
FRANÇAIS
BAHASA MELAYU
BAHASA INDONESIA
TIẾNG VIỆT
ESPAÑOL
1113950107_EN.indd 11113950107_EN.indd 1 6/18/12 6:34 PM6/18/12 6:34 PM
32:(56(/
6:,1*
)$1
),;
48,(7
+L32:(5
21(728&+
&20)257
6/((3
32:(56(/
4
5
p
=
e
t
8
1
2
w
y
o
r
q
3
i
7
6
u
9
CLEANING
RESET TIMER OPERATION
32 1
1
Press
),;
: Move the louver in
the desired vertical direction.
2
Press
6:,1*
: Swing the air
automatically and press again to stop.
3
For horizontal direction, adjust
manually.
PRECAUTIONS FOR SAFETY
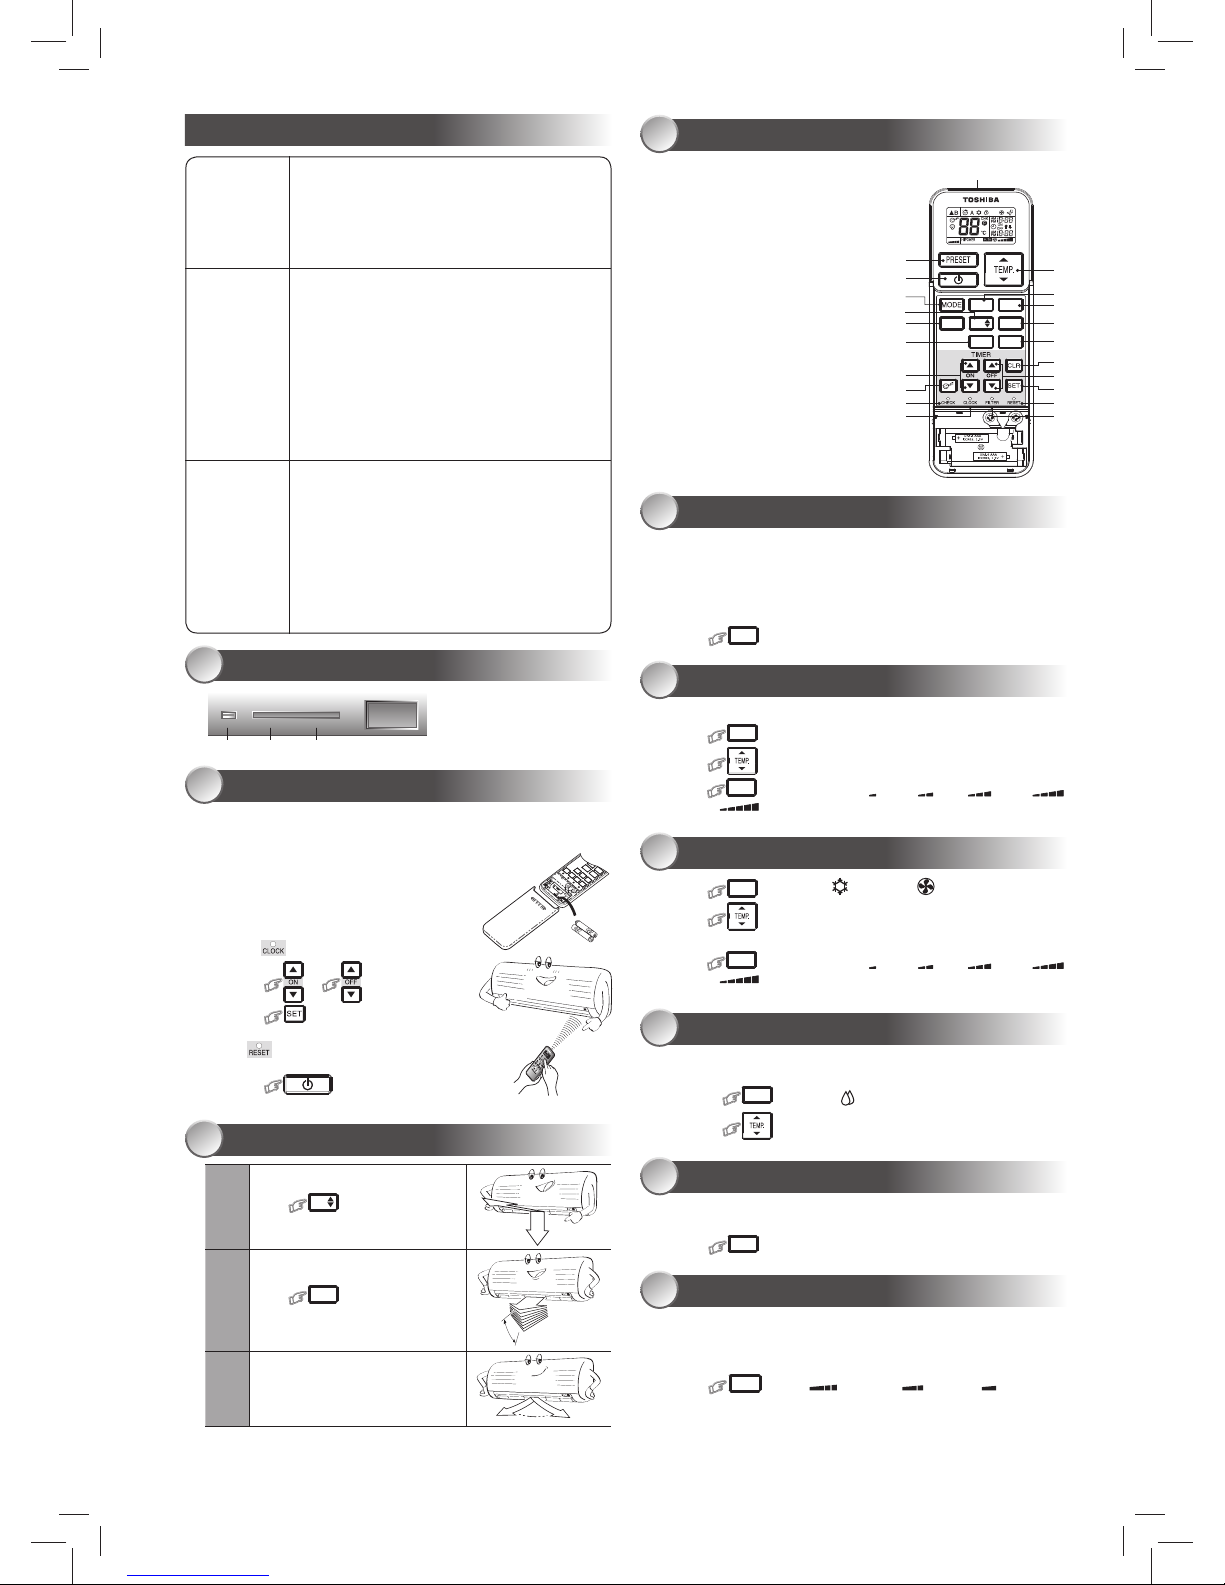
INDOOR UNIT DISPLAY
1
PREPARATION BEFORE USE
2
Preparing Filters
1. Open the air inlet grille and remove the air fi lters.
2. Attach the fi lters. (see detail in the accessory sheet).
Loading Batteries
1. Remove the slide cover.
2. Insert 2 new batteries (AAA type)
following the (+) and (–) positions.
Clock Setup
1. Push
by tip of the pencil.
2. Press
or : adjust the time.
3. Press
: Set the time.
Remote Control Reset
Push
by tip of the pencil.
1. Remove the battery.
2. Press .
3. Insert the battery.
AIR FLOW DIRECTION
3
Note:
• Do not move the louver manually by others.
• The louver may automation positioning by some operation mode.
REMOTE CONTROL
4
1
Infrared signal emitter
2
Start/Stop button
3
Mode select button (MODE)
4
Temperature button (TEMP)
5
Fan speed button (FAN)
6
Swing louver button (SWING)
7
Set louver button (FIX)
8
On timer button (ON)
9
Off timer button (OFF)
-
Setup button (SET)
=
Clear button (CLR)
q
Memory and Preset button (PRESET)
w
One-Touch button (ONE-TOUCH)
e
High power button (Hi-POWER)
r
Power selection button (POWER-SEL)
t
Quiet button (QUIET)
y
Comfort sleep button (COMFORT SLEEP)
u
Filter reset button (FILTER)
i
Set clock button (CLOCK)
o
Check button (CHECK)
p
Reset button (RESET)
ONE-TOUCH
5
Press the “ONE-TOUCH” button for fully automated operation that is
customised to the typical consumer preferences in your region of the world.
The customised settings control temperature air fl ow strength, air fl ow
direction and other settings to provide you alternate contact with “ONETOUCH” of the button. If you prefer other settings you can select from the
many other operating functions of your Toshiba unit.
Press
21(728&+
: Start the operation.
AUTOMATIC OPERATION
6
To automatically select cooling, or fan only operation
1. Press
02'(
: Select A.
2. Press
: Set the desired temperature.
3.
Press
)$1
: Select AUTO, LOW , LOW+ , MED , MED+ ,
or HIGH .
1. Press
02'(
: Select Cool , or Fan only .
2. Press
: Set the desired temperature.
Cooling: Min. 17
o
C, Fan Only: No temperature indication
3.
Press
)$1
: Select AUTO, LOW , LOW+ , MED , MED+ ,
or HIGH .
COOLING / FAN ONLY OPERATION
7
DRY OPERATION
8
For dehumidifi cation, a moderate cooling performance is controlled
automatically.
1. Press
02'(
: Select Dry .
2. Press : Set the desired temperature.
Hi-POWER OPERATION
9
To automatically control room temperature and airfl ow for faster cooling
operation (except in DRY and FAN ONLY mode)
Press
+L32:(5
: Start and stop the operation.
POWER-SELECTION OPERATION
10
This function is used when its circuit breaker is shared with other electrical
appliances. It limits the maximum current/power consumption to 100%, 75%
or 50%. The lower the percentage, the higher the saving and also the longer
the compressor lifetime.
Press
32:(56(/
: Select (for 100%), (for 75%), (for 50%)
• When the level is selected, PWR-SEL level fl ashes on LCD display for 3
seconds. In case of 75% and 50% level, number “75” or “50” also fl ashes
for 2 seconds.
• Due to the reason that POWER SELECT FUNCTION limits the maximum
current, inadequate cooling capacity may occur.
1
OPERATION (Green)
2
TIMER / CLEANING (Yellow)
3
RESET button
0
DANGER
•
Do not install, repair, open or remove the cover. It may expose you
to dangerous voltages. Ask the dealer or the specialist to do this.
•
Turning off the power supply will not prevent potential electric
shock.
•
The appliance shall be installed in accordance with national wiring
regulation.
•
Means for disconnection from the supply having a contact
separation of at least 3 mm in all poles must be incorporated in
the fi xed wiring.
0
WARNING
•
Do not expose your body directly to cool air for a long time.
•
Do not insert your fi nger or any article into the air inlet/outlet.
•
When an abnormality (burning smell, etc.) occurs, stop the air
conditioner and disconnect the power supply or turn off the
breaker.
•
This appliance is not intended for use by persons (including
children) with reduced physical, sensory or mental capabilities, or
lack of experience and knowledge, unless they have been given
supervision or instruction concerning use of the appliance by a
person responsible for their safety.
•
Children should be supervised to ensure that they do not play with
the appliance.
•
Do not use any refrigerant different from the one specifi ed for
complement or replacement. Otherwise, abnormally high pressure
may be generated in the refrigeration cycle, which may result in a
failure or explosion of the product or an injury to your body.
0
CAUTION
•
Do not wash the unit with water. It may cause an electric shock.
•
Do not use this air conditioner for other purposes such as
preserving food, breeding animal, etc.
•
Do not step or put anything on the indoor/outdoor unit. It may
cause an injury or damage the unit.
•
Do not touch aluminium fi n because it may cause an injury.
•
Before cleaning the unit, turn off the main switch or the circuit
breaker.
•
When the unit won’t be used for a long time, turn off the main
switch or the circuit breaker.
•
It is recommended that maintenance be performed by a specialist
when the unit has been operated for a long time.
•
The manufacturer shall not assume any liability for the damage
caused by not observing the description of this manual.
1113950107_EN.indd 21113950107_EN.indd 2 6/18/12 6:34 PM6/18/12 6:34 PM
12
TEMPORARY OPERATION
11
In case of the misplaced or discharged remote control
• Pressing the RESET button, the unit can start or
stop without using the remote control.
• Operation mode is set on AUTOMATIC operation,
preset temperature is 24°C and fan operation is
automatic speed.
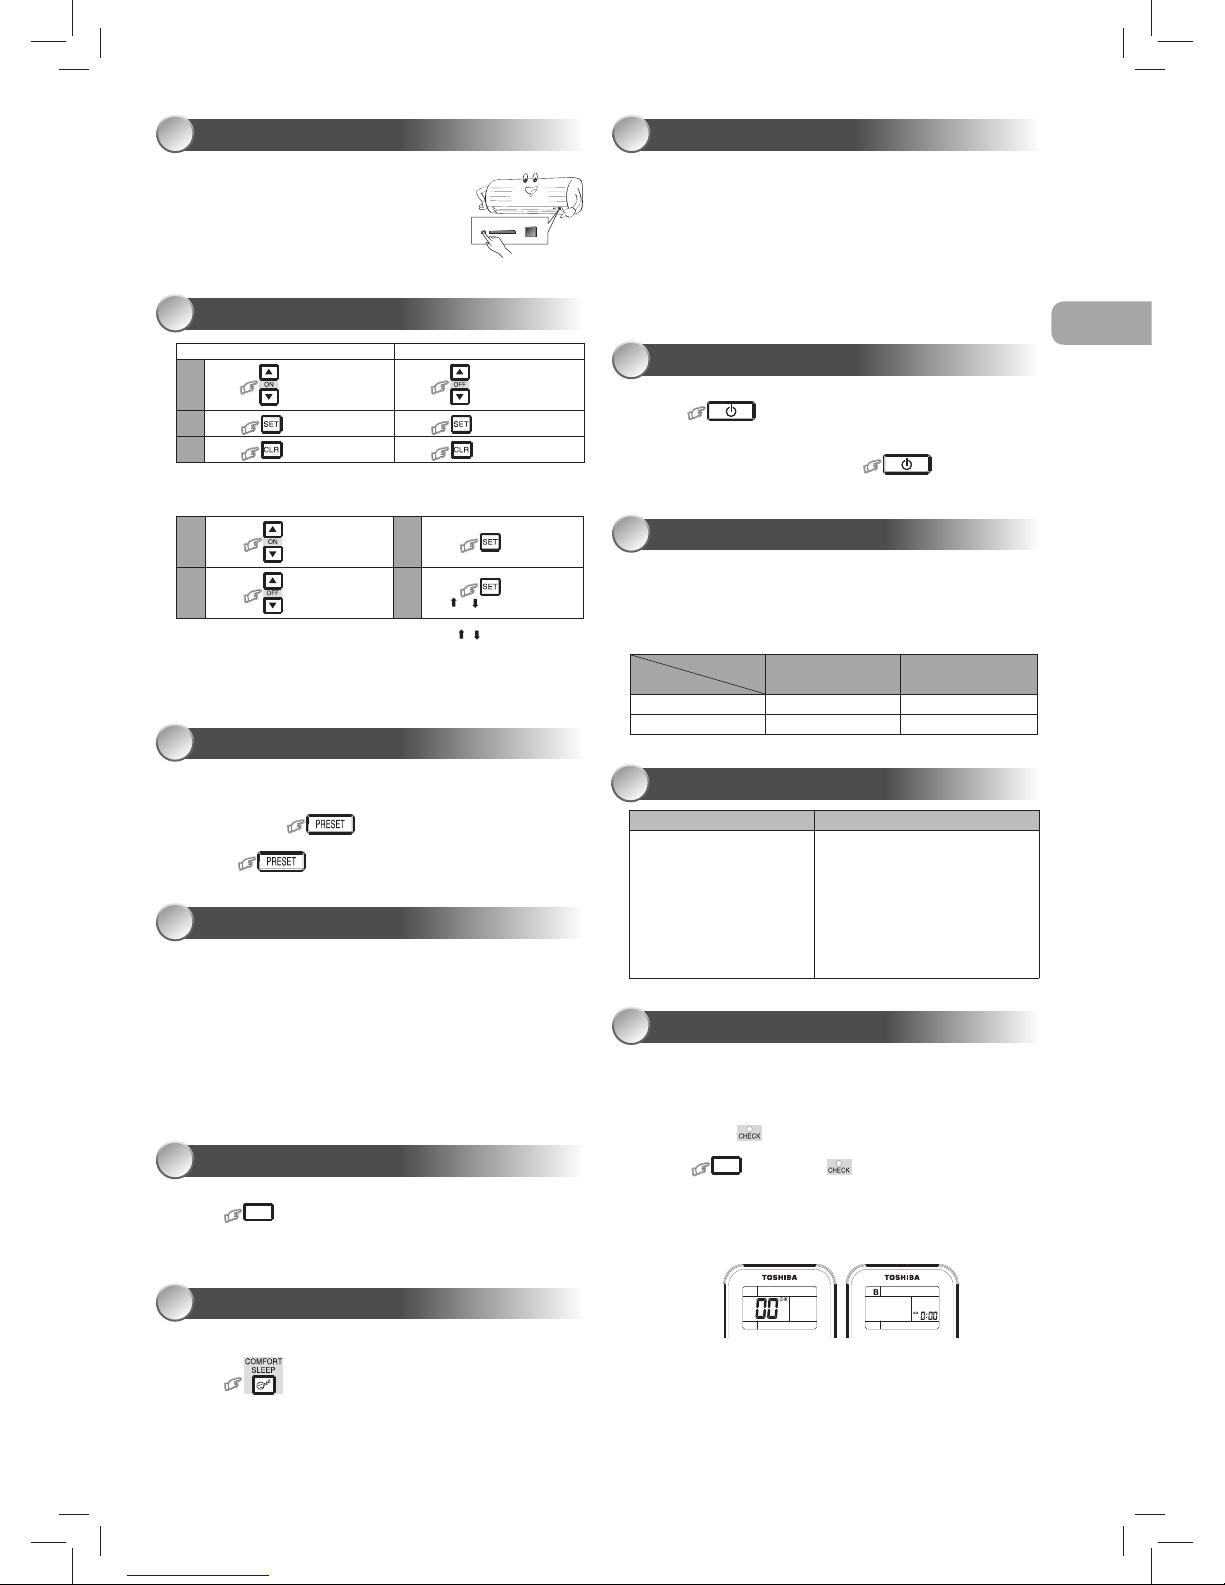
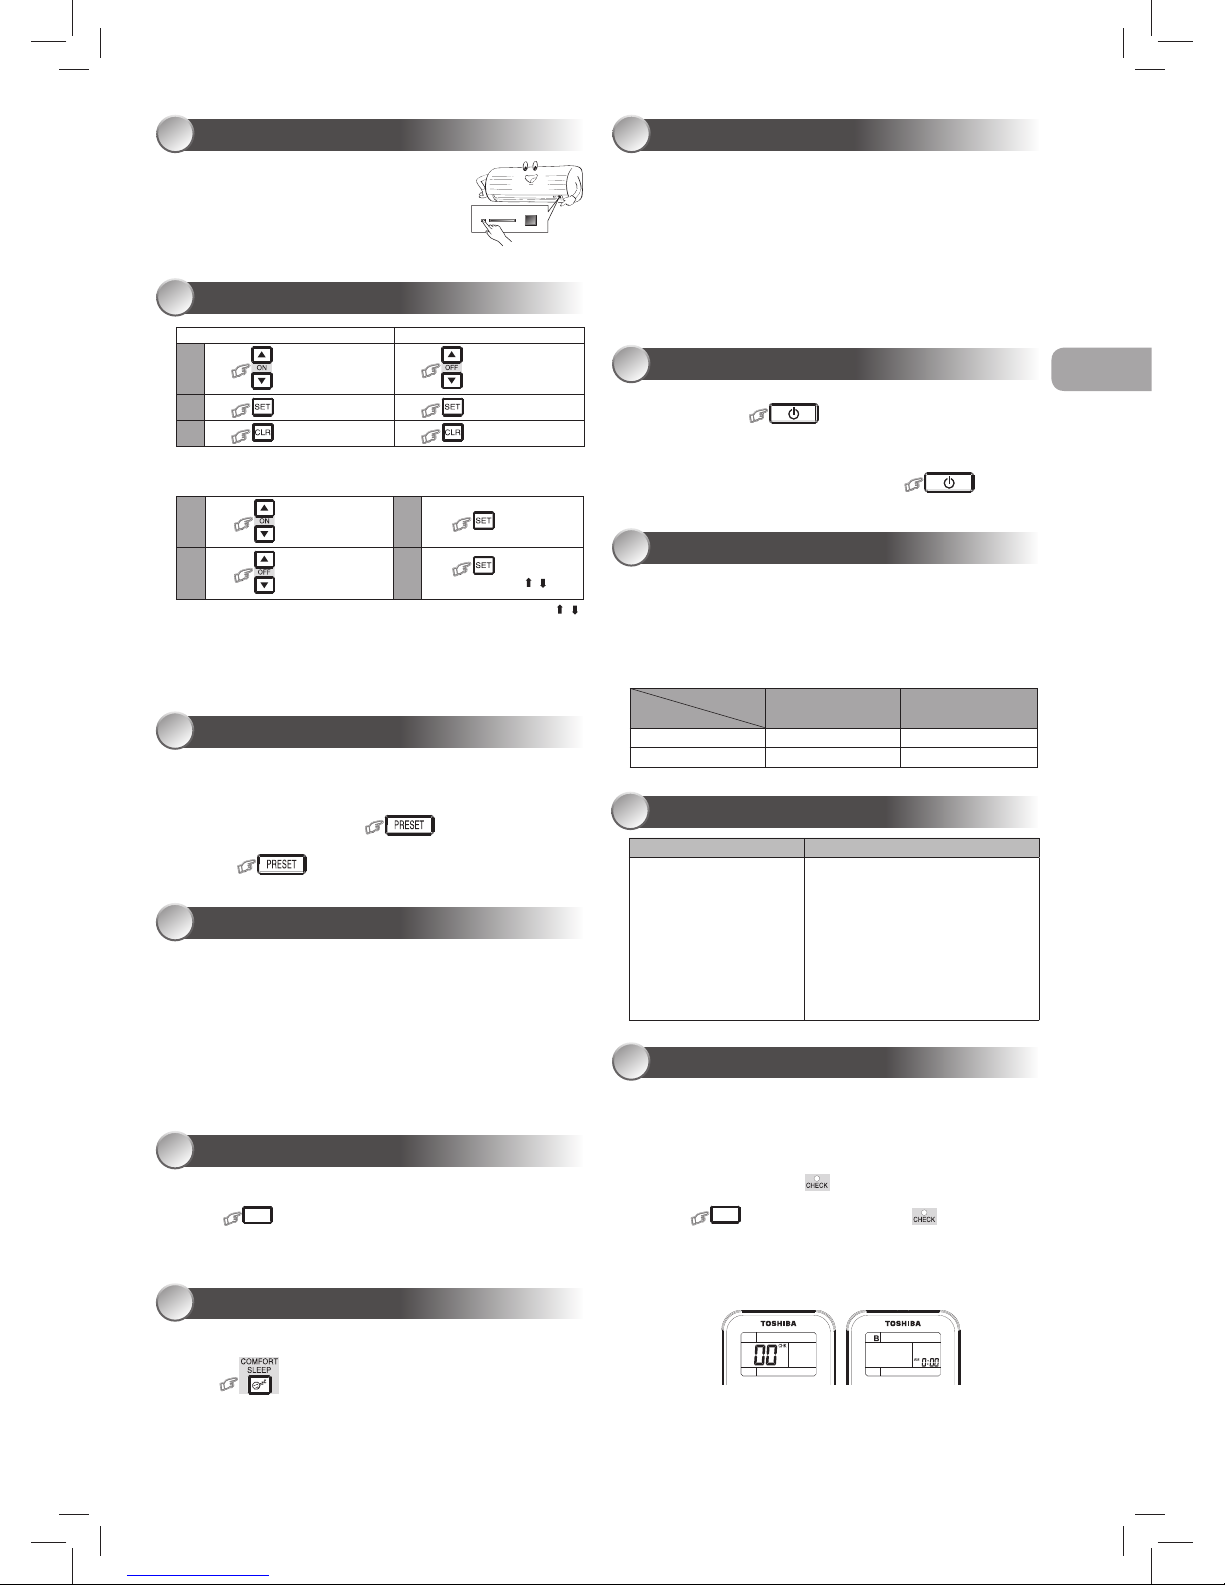
TIMER OPERATION
12
Daily timer allows the user to set both the ON & OFF timers and will be
activated on a daily basis.
Setting Daily Timer
Setting the ON Timer Setting the OFF Timer
1
Press : Set the desired ON
timer.
Press : Set the desired
OFF timer.
2
Press : Set the timer. Press : Set the timer.
3
Press : Cancel the timer. Press : Cancel the timer.
1
Press
: Set the ON timer.
3
Press .
2
Press
: Set the OFF timer.
4
Press button during
the ( or ) mark fl ashing.
• During the daily timer is activating, both arrows ( , ) are indicated.
Note:
• Keep the remote control in accessible transmission to the indoor unit;
otherwise, the time lag of up to 15 minutes will occur.
• The setting will be saved for the next same operation.
PRESET OPERATION
13
Set your preferred operation for future use. The setting will be memorized by
the unit for future operation (except airfl ow direction).
1. Select your preferred operation.
2. Press and hold
for 3 seconds to memorize the setting.
The P mark displays.
3. Press : Operate the preset operation.
AUTO RESTART OPERATION
14
To automatically restart the conditioner after the power failure (Power of the
unit must be on.)
Setting
1. Press and hold the RESET button on the indoor unit for 3 seconds to
set the operation. (3 beep sound and OPERATION lamp blink 5 time/
sec for 5 seconds)
2. Press and hold the RESET button on the indoor unit for 3 seconds to
cancel the operation. (3 beep sound but OPERATION lamp does not
blink)
• In case of ON timer or OFF timer are set, AUTO RESTART
OPERATION does not activate.
To operate at super low fan speed for quiet operation (except in DRY mode)
Press
48,(7
: Start and stop the operation.
Note: Under certain conditions, QUIET operation may not provide adequate
cooling due to low sound features.
To save energy while sleeping, automatically control air fl ow and
automatically turn OFF.
Press : Select 1, 3, 5 or 9 hrs for OFF timer operation.
Note: The cooling operation, the set temperature will increase automatically
1 degree/hour for 2 hours (maximum 2 degrees increase).
QUIET OPERATION
15
COMFORT SLEEP OPERATION
16
SELF CLEANING OPERATION
18
OPERATION AND PERFORMANCE
19
1. Three-minute protection feature: To prevent the unit from being
activated for 3 minutes when suddenly restarted or switched to ON.
2. Some minor cracking sound may occur when unit operating. This is
normal because the cracking sound may be caused by expansion /
contraction of plastic.
Air conditioner operating conditions
Temp.
Operation
Outdoor Temperature Room Temperature
Cooling 15°C ~ 43°C 21°C ~ 32°C
Dry 15°C ~ 43°C 17°C ~ 32°C
The unit does not operate.
Cooling is abnormally low.
• The power main switch is
turned off.
• The circuit breaker is
activated to cut off the power
supply.
• Stoppage of electric current
• ON timer is set.
• The fi lters are blocked with dust.
• The temperature has been set
improperly.
• The windows or doors are opened.
• The air inlet or outlet of the outdoor
unit is blocked.
• The fan speed is too low.
• The operation mode is FAN or DRY.
• POWER SELECT FUNCTION is set
at 75% or 50%.
TROUBLESHOOTING (CHECK POINT)
20
REMOTE CONTROL A-B SELECTION
21
To separate using of remote control for each indoor unit in case of 2 air
conditioners are installed nearly.
Remote Control B Setup.
1. Press RESET button on the indoor unit to turn the air conditioner ON.
2. Point the remote control at the indoor unit.
3. Push and hold button on the Remote Control by the tip of the
pencil. “00” will be shown on the display.
4. Press
02'(
during pushing . “B” will show on the display and
“00” will disappear and the air conditioner will turn OFF. The Remote
Control B is memorized.
Note: 1. Repeat above step to reset Remote Control to be A.
2. Remote Control A has not “A” display.
3. Default setting of Remote Control from factory is A.
0
Firstly, turn off the circuit breaker.
Filter Reset (Some models only)
FILTER lamp lights on; the fi lter must be cleaned.
To turn off the lamp, push the RESET button on the indoor unit or the FILTER
button on the remote control.
Indoor Unit and Remote Control
• Clean the indoor unit and the remote control with a wet cloth when
needed.
• No benzine, thinner, polishing powder or chemically-treated duster.
MAINTENANCE
17
To protect bad smell caused by the humidity in the indoor unit.
1. If the
button is pressed once during “Cool” or “Dry” mode,
the fan will continue to run for other 30 minutes, then it will turn off
automatically. This will reduce the moisture in the indoor unit.
2. To stop the unit immediately, press the
more 2 times
within 30 seconds.
EN
1113950107_EN.indd 31113950107_EN.indd 3 6/18/12 6:34 PM6/18/12 6:34 PM

32:(56(/
6:,1*
)$1
),;
48,(7
+L32:(5
21(728&+
&20)257
6/((3
32:(56(/
4
5
p
=
e
t
8
1
2
w
y
o
r
q
3
i
7
6
u
9
CLEANING
RESET TIMER OPERATION
32 1
1
Pulse
),;
: Mueva el defl ector
en la dirección vertical deseada.
2
Pulse
6:,1*
: La dirección del fl ujo
de aire oscila automáticamente; pulse
de nuevo para detener.
3
Ajuste la dirección horizontal
manualmente.
PRECAUCIONES SOBRE SEGURIDAD
PANEL DE INDICACIÓN DE LA UNIDAD INTERIOR
1
PREPARATIVOS PREVIOS
2
Preparación de los fi ltros
1. Abra la rejilla de entrada de aire y extraiga los fi ltros de aire.
2. Fije los fi ltros. (ver detalles en la hoja complementaria)
Carga de las pilas
1. Quite la tapa deslizante.
2. Inserte 2 pilas nuevas (tipo AAA) en las
posiciones correctas (+) y (–).
Confi guración del reloj
1. Pulse
con la punta del lápiz.
2. Pulse
o : para confi gurar la hora.
3. Pulse
: Ajuste el temporizador.
Reinicio del Control Remoto
Pulse
con la punta del lápiz.
1. Retire la batería.
2. Pulse .
3. Introduzca la batería.
DIRECCIÓN DEL FLUJO DE AIRE
3
Nota:
• No mueva el defl ector manualmente para otras direcciones.
• El defl ector se posicionará de modo automático mediante el modo de
operación.
CONTROL REMOTO
4
1
Emisor de señales infrarrojas
2
Botón de funcionamiento/parada
3
Botón selector de modo (MODE)
4
Botón de temperatura (TEMP)
5
Botón de velocidad del ventilador (FAN)
6
Botón de rotación del defl ector (SWING)
7
Botón de ajuste de dirección (FIX)
8
Botón del temporizador de encendido (ON)
9
Botón del temporizador de apagado (OFF)
-
Botón de Confi guración (SET)
=
Botón de borrado (CLR)
q
Botón de memoria y de presintonización (PRESET)
w
Botón de Único Toque (ONE-TOUCH)
e
Botón de alta potencia (Hi-POWER)
r
Botón de selección de encendido (POWER-SEL)
t
Botón de silenciamiento (QUIET)
y
Botón de confort nocturno (COMFORT SLEEP)
u
Botón de reinicio de fi ltro (FILTER)
i
Botón de Ajuste del reloj (CLOCK)
o
Botón de comprobación (CHECK)
p
Botón Reset (RESET)
ONE-TOUCH
5
Pulse el botón “ONE-TOUCH” para una operación totalmente automática,
personalizada según las preferencias por defecto del consumidor, de su
zona del mundo. La confi guración personalizada controla la fuerza de
salida de latemperatura del aire, la dirección de salida del aire, y otras
características para proporcionarle contacto alterno con “ONE-TOUCH” del
botón. Si prefi ere otra confi guración, puede seleccionarla desde cualquier
otra función operativa de su unidad Toshiba.
Pulse
21(728&+
: Empezar la operación.
FUNCIONAMIENTO AUTOMÁTICO
6
Para seleccionar automáticamente refrigeración, o la ventilación
1. Pulse
02'(
: Seleccione A.
2. Pulse
: Ajuste la temperatura deseada.
3.
Pulse
)$1
: Seleccione AUTO, LOW , LOW+ , MED ,
MED+ , o HIGH .
1. Pulse
02'(
: Seleccione Refrigeración , o Ventilación .
2. Pulse
: Ajuste la temperatura deseada.
Refrigeración: Min. 17
o
C, Ventilación: No hay indicación de temperatura
3.
Pulse
)$1
: Seleccione AUTO, LOW , LOW+ , MED ,
MED+ , o HIGH .
REFRIGERACIÓN / VENTILACIÓN
7
FUNCIONAMIENTO DE DESHUMIDIFICACIÓN
8
Para la deshumidifi cación, el rendimiento de refrigeración moderado se
controla automáticamente.
1. Pulse
02'(
: Seleccione Deshumidifi cación .
2. Pulse : Ajuste la temperatura deseada.
FUNCIONAMIENTO DE ALTA POTENCIA (Hi-POWER)
9
Para controlar automáticamente la temperatura ambiente y el fl ujo de aire
para una refrigeración más rápida (excepto en modo DRY o FAN ONLY)
Pulse
+L32:(5
: Inicia y detiene el funcionamiento.
OPERACIÓN DE SELECCIÓN DE POTENCIA
10
Esta función se utiliza cuando se comparte el disyuntor con otros electrodomésticos.
Limita la corriente/consumo de energía al 100%,75% o 50%. Cuanto más bajo el
porcentaje, más alto el ahorro y también más larga la vida útil del compresor.
Pulse
32:(56(/
: Seleccione (para 100%), (para 75%), (para 50%)
• Cuando se selecciona el nivel, PWR-SEL parpadea en la pantalla LCD por 3
segundos. En el caso de un nivel de 75% y 50%, el número “75” o “50” también
parpadea por 2 segundos.
• Debido a que la FUNCIÓN DE SELECCIÓN DE POTENCIA limita la corriente
máxima, es posible que ocurra una capacidad inadecuada.
1
OPERATION (Verde)
2
TIMER/CLEANING (Amarilla)
3
Botón RESET
0
PELIGRO
•
No instale ni repare la unidad, ni abra o retire la tapa. Si lo hace, se expone
a una descarga eléctrica. Solicite ayuda al distribuidor o a un especialista.
•
Aunque apague la fuente de alimentación no evitará una potencial
descarga eléctrica.
•
Este aparato debe instalarse según las normas de instalación eléctrica
de cada país.
•
En la instalación fi ja deben incorporarse dispositivos de desconexión
del suministro eléctrico con una separación de contacto de 3 mm como
mínimo en todos los polos.
0
ADVERTENCIAS
•
No exponga el cuerpo directamente a la corriente de aire frío durante
mucho tiempo.
•
No introduzca los dedos ni ningún artículo en la toma/salida de aire.
•
Cuando note alguna anomalía (olor a quemado, etc.), detenga el
acondicionador de aire y desconecte la línea de alimentación principal o
apague el disyuntor.
•
Este aparato no está pensado para ser utilizado por personas (incluyendo
niños) con capacidades mentales, sensoriales o físicas reducidas, o falta
de experiencia y conocimiento, a no ser que reciban la autorización al uso
o vigilancia de una persona responsable por su seguridad.
•
Los niños deberían ser vigilados para asegurar que no jueguen con el
aparato.
•
No utilice ningún refrigerante distinto al especifi cado para rellenar o
reemplazar. De lo contrario, podrá generarse una presión a normalmente
alta en el ciclo de refrigeración, lo cual puede producir roturas o explosión,
además de lesiones.
0
PRECAUCIÓN
•
No lave la unidad con agua. Puede ocasionar una descarga eléctrica.
•
No utilice el acondicionador de aire para fi nes especiales tales como
conservar alimentos, criar animales, etc.
•
No se pare sobre la unidad interior o exterior ni coloque nada sobre ella.
Podría lesionarse o dañar la unidad.
•
No tocar la aleta de aluminio ya que podría causar una lesión.
•
Antes de limpiar la unidad, desconecte el interruptor principal o el
disyuntor.
•
Cuando no se va a utilizar la unidad por un tiempo
considerable,desconecte el interruptor principal o el disyuntor.
•
Se recomienda que el mantenimiento sea realizado por un especialista,
cuando la unidad haya sido utilizada durante un largo período de tiempo.
•
El fabricante no asume responsabilidad alguna por los daños que resulten
de la falta deobservación de las descripciones de este manual.
1113950107_ES.indd 21113950107_ES.indd 2 5/4/12 3:00 PM5/4/12 3:00 PM
12
FUNCIONAMIENTO TEMPORAL
11
Si pierde el control remoto o las pilas están agotadas
• Pulse el botón RESET para activar o detener la
unidad sin necesidad de utilizar el control remoto.
• El modo de operación se confi gura en operación
AUTOMATIC, la temperatura preconfi gurada es
de 24°C y la operación de ventilación tiene una
velocidad utomática.
FUNCIONAMIENTO DEL TEMPORIZADOR
12
El temporizador diario permite al usuario ajustar los temporizadores ON
y OFF, y se activará a diario.
Ajuste del temporizador diario
Temporizador ON (encendido) Temporizador OFF (apagado)
1
Pulse : Ajuste el temporizador ON
deseado
Pulse
: Ajuste el temporizador OFF
deseado
2
Pulse : Ajuste el temporizador. Pulse : Ajuste el temporizador.
3
Pulse : Cancele el temporizador. Pulse : Cancele el temporizador.
1
Pulse
: Ajuste el temporizador ON.
3
Pulse .
2
Pulse
: Ajuste el temporizador OFF.
4
Pulse el botón
mientrasparpadea la fl echa ( o ) .
•
Mientras se activa el temporizador diario, se muestran las dos fl echas ( , ).
Nota:
• Tenga el control remoto donde sus señales puedan alcanzar el receptor
de la unidad interior; de no ser así, las señales pueden tener un retraso
de hasta 15 minutos.
• El ajuste se guardará para la próxima vez que se utilice esta función.
FUNCIONAMIENTO PREDEFINIDO
13
Ajuste la operación que prefi era para su uso en el futuro. La unidad
memorizará el ajuste para cada modo de funcionamiento (excepto dirección
del fl ujo de aire).
1. Seleccione la operación que prefi era.
2. Pulse y mantenga presionado
durante 3 segundos para
memorizar el ajuste. Se muestra la señal P.
3. Pulse : Se inicia el funcionamiento predefi nido.
FUNCIONAMIENTO DE REINICIO AUTOMÁTICO
14
Para que el acondicionador de aire se reinicie tras una interrupción del
suministro eléctrico (la unidad debe estar activada).
Ajuste
1. Mantenga pulsado el botón RESET de la unidad interior durante 3
segundos para realizar la operación. (3 pitidos y la luz de OPERATION
parpadea 5 veces por segundo durante 5 segundos).
2. Mantenga pulsado el botón RESET de la unidad interior durante
3 segundos para cancelar la operación. (3 pitidos, pero la luz de
OPERATION no parpadeará)
• Si el temporizador ON o el temporizador OFF están confi gurados, la
FUNCIONAMIENTO DE REINICIO AUTOMÁTICO no se activa.
Para funcionamiento a velocidad súper baja del ventilador en modo
silencioso (excepto en modo DRY)
Pulse
48,(7
: Inicia y detiene el funcionamiento.
Nota: Bajo ciertas condiciones, la operación QUIET no proporcionará una
refrigeración adecuada debido a las características de sonido bajo.
Para ahorrar energía durante la noche, controle la salida de aire
automáticamente y póngala en OFF.
Pulse : Seleccione 1, 3, 5 o 9 horas para el temporizador de apagado.
Nota: La operación de refrigeración, la temperatura actual aumentará
automáticamente 1 grado/hora durante 2 horas (incremento máximo
de 2 grados).
FUNCIONAMIENTO SILENCIOSO
15
FUNCIONAMIENTO DE CONFORT NOCTURNO
16
FUNCIONAMIENTO DE AUTOLIMPIEZA
18
FUNCIONAMIENTO Y RENDIMIENTO
19
1. Función de protección de tres minutos: Para evitar que la unidad se
active durante 3 minutos al ponerla en funcionamiento inmediatamente
después de haberla parado o cuando ponga en ON el conmutador.
2. Puede producirse algún pequeño sonido de rotura durante el
funcionamiento de la unidad. Esto es normal ya que el sonido de rotura
podría causarse por la expansión/contracción de plástico.
Condiciones de funcionamiento del acondicionador de aire
Temp.
Funcionamiento
Temperatura exterior
Temperatura
Ambiente
Refrigeración 15°C ~ 43°C 21°C ~ 32°C
Deshumidifi cación 15°C ~ 43°C 17°C ~ 32°C
La unidad no funciona. La unidad no refrigera bien.
• El interruptor principal de
alimentación está desactivado.
• El disyuntor se ha activado
para interrumpir el suministro
eléctrico.
• Interrupción de la corriente
eléctrica
• El temporizador ON está
ajustado.
• Los fi ltros están bloqueados por el polvo.
• La temperatura no se ha ajustado
correctamente.
• Hay puertas o ventanas abiertas.
• La entrada o salida de aire de la unida
exterior está bloqueada.
• La velocidad del ventilador es muy baja.
• El modo de funcionamiento es FAN o DRY.
• LA FUNCIÓN DE SELECCIÓN DE
POTENCIA está establecida en 75% o
50%.
SOLUCIÓN DE PROBLEMAS (PUNTOS DE COMPROBACIÓN)
20
SELECCIÓN A-B DEL CONTROL REMOTO
21
Para separar utilizando el control remoto para cada unidad interior en el caso
de que haya 2 unidades de aire acondicionado instaladas cerca.
Confi guración B del Control Remoto
1. Pulse el botón RESET de la unidad interior para activar el aire
acondicionado en ON.
2. Apunte el control remoto hacia la unidad interior.
3. Mantenga pulsado el botón del Control Remoto con la punta del
lápiz. Aparecerá “00” en la pantalla.
4. Pulse
02'(
mientras mantenga presionado . Aparecerá “B” en
la pantalla y “00” desaparecerá y el aire acondicionado se apagará. El
Control Remoto B se memorizará.
Nota: 1. Repita el paso de arriba para reiniciar el Control Remoto en A.
2. El Control Remoto A no dispone de “A”.
3.
La confi guración por defecto de fábrica del Control Remoto es la A.
0
Primero, desconecte el disyuntor.
Reinicio de Filtro (sólo en algunos modelos)
La luz FILTER se enciende; el fi ltro deberá limpiarse.
Para apagar la luz, pulse el botón RESET de la unidad interior o el botón
FILTER del control remoto.
Unidad interior y control remoto
• Limpie la unidad interior y el control remoto con un paño húmedo
cuando sea necesario.
• No utilice bencina, disolvente, crema para pulir ni un limpiador tratado
químicamente.
MANTENIMIENTO
17
Para evitar el mal olor que produce la humedad en la unidad interior
1. Si pulsa el botón
una vez durante el modo “Refrigeración”
o “Deshumidifi cación”, el ventilador seguirá funcionando durante 30
minutos, tras los cuales se desactivará automáticamente. Esto reducirá
la humedad de la unidad interior.
2. Para detener inmediatamente la unidad, pulse
2 veces
más en 30 segundos.
ES
1113950107_ES.indd 31113950107_ES.indd 3 5/4/12 3:00 PM5/4/12 3:00 PM
 Loading...