

Page 1

User’s Manual
User’s Manual
MINI 3D SOUND BAR
MINI 3D SOUND BAR
& SUBWOOFER
& SUBWOOFER
This manual is for three models below:
This manual is for three models below:
1) Mini 3D Sound Bar + Subwoofer (SBM1W)
1) Mini 3D Sound Bar + Subwoofer (SBM1W)
2) Mini 3D Sound Bar (SBM10)
2) Mini 3D Sound Bar (SBM10)
3) Subwoofer for Toshiba Mini 3D Sound Bar (SBW10)
3) Subwoofer for Toshiba Mini 3D Sound Bar (SBW10)
EN
CZ
DE
DK
ES
FI
FR
GR
HR
HU
IT
NL
NO
PL
PT
RS
SE
SK
SL
TR
Page 2

MINI 3D SOUND BAR & SUBWOOFER
User’s Manual
Contents
Introduction..................................................................................................2
Package Content.........................................................................................2
Safety Instructions.......................................................................................2
Quick Tour...................................................................................................3
Mini 3D Sound Bar ................................................................................4
Subwoofer .............................................................................................6
Remote control ......................................................................................6
Getting Started ............................................................................................8
Connecting the power adaptor ..............................................................8
Connecting the subwoofer.....................................................................9
Using the remote control .......................................................................9
Mini 3D Sound Bar and subwoofer placement ....................................10
Connecting to the audio device ...........................................................11
3D Sound ..................................................................................................14
Playback via Bluetooth
Frequently Asked Questions (FAQ) ..........................................................15
Specifications ............................................................................................16
Trademarks ...............................................................................................17
TOSHIBA Support.....................................................................................17
Regulatory Information..............................................................................18
REACH......................................................................................................19
Following information is only valid for EU-member States: .......................19
Additional Information................................................................................20
®
-enabled devices .................................................14
EN-1 User’s Manual
Page 3
Introduction
NOTE
User’s Manual
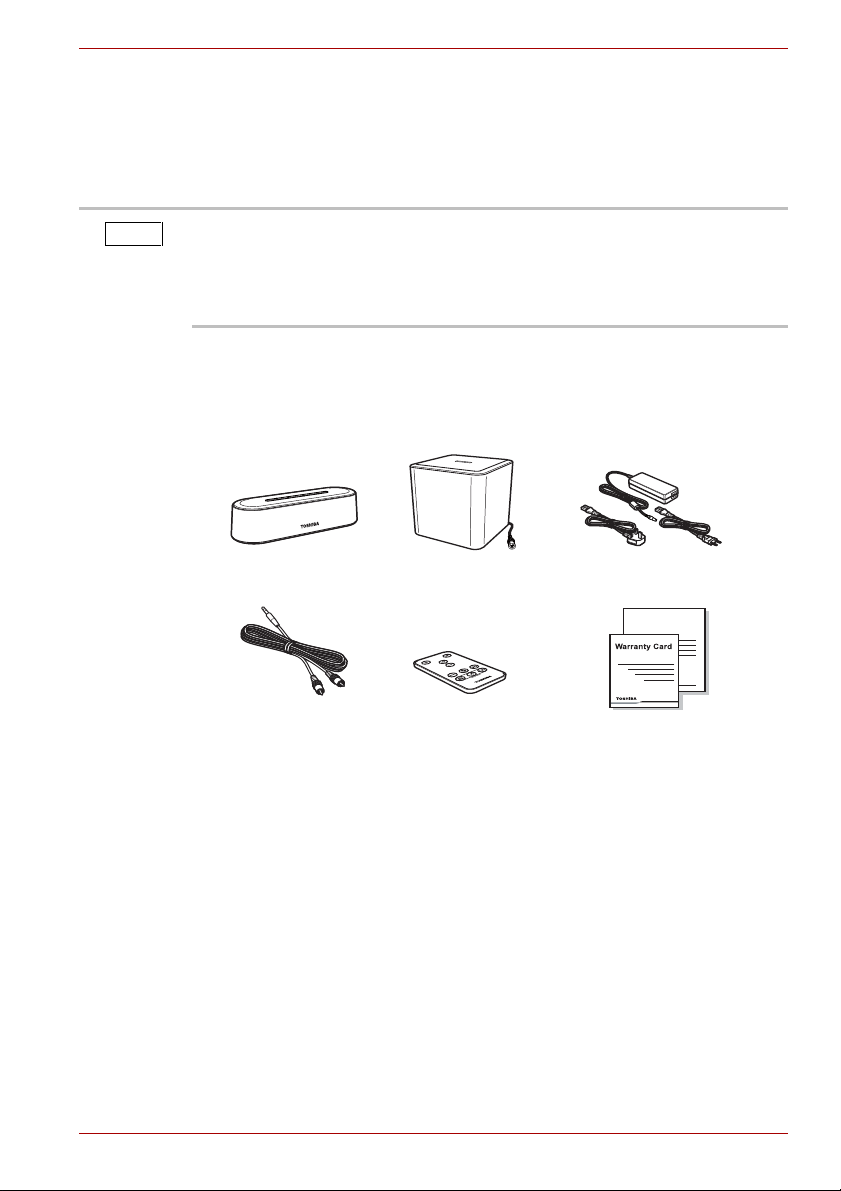
Mini 3D Sound Bar
Subwoofer
(if applicable)
AC adaptor
3.5mm - RCA audio cable
Remote control
with battery
User’s Manual &
Warranty Leaflet
Welcome and thank you for choosing a TOSHIBA product.
We recommend to reading this manual carefully and keep it with your
product documentation for future reference.
This manual covers both of the using of the Mini 3D Sound Bar and the
subwoofer. You can purchase the Mini 3D Sound Bar and the subwoofer
as a set, or any one of them separately as you like.
In this manual, the word “sound bar” refers to the Mini 3D Sound Bar for
short.
Package Content
Check to make sure you have all of the following items:
MINI 3D SOUND BAR & SUBWOOFER
Safety Instructions
User’s Manual EN-2
In order to avoid malfunction or damage of the product, please carefully
follow the precautions listed below.
■ Do not
■ open the enclosure or product
■ disassemble the product or parts of it
■ place liquids near or on the product, as it may damage the product,
cause personal injury or may result in an electrical shock or fire
■ bump, drop or jar the product
■ move the product while operating, as data damage may happen
Page 4

MINI 3D SOUND BAR & SUBWOOFER
NOTE
■ use other AC/DC adaptors than the one bundled with your device,
as otherwise your device may be damaged
■ disconnect cables while operating
■ expose the product to temperatures outside the range of 5°C - 35°C
while operating, and temperatures of -20°C - 60°C while switched
off
■ expose the product to wet or damp conditions
■ cover the product during operation, as it may become overheated
■ place the product close to hot appliances
■ throw the battery of the remote control (provided with the Mini 3D
Sound Bar) into a fire, as it may cause the battery to explode
■ leave the battery of the remote control within the reach of children,
as the button cell battery could be ingested by children
■ Immediately disconnect the product if
■ smoke or an unusual smell is coming from the product enclosure
■ water has entered the product enclosure or if it becomes wet
■ an object has entered the product enclosure
■ the cable has been damaged (in such case replace the cable with a
new one)
■ The Mini 3D Sound Bar contains magnets for the loudspeakers.
Magnets can erase data from magnetic storage media such as video
tapes, hard drives and credit cards. Therefore, keep the sound bar
away from those products.
If the product behaves not as expected or you have doubts about the
electrical safety, please contact immediately the TOSHIBA hotline or an
authorized reseller!
Quick Tour
This section identifies the various components of the Mini 3D Sound Bar
and the subwoofer. For a description of each component, please refer to
the table beneath each illustration.
Depending on your purchase, you may not have both of the Mini 3D Sound
Bar and the subwoofer.
EN-3 User’s Manual
Page 5
Mini 3D Sound Bar
1 2 4
7
6
5
3
NOTE
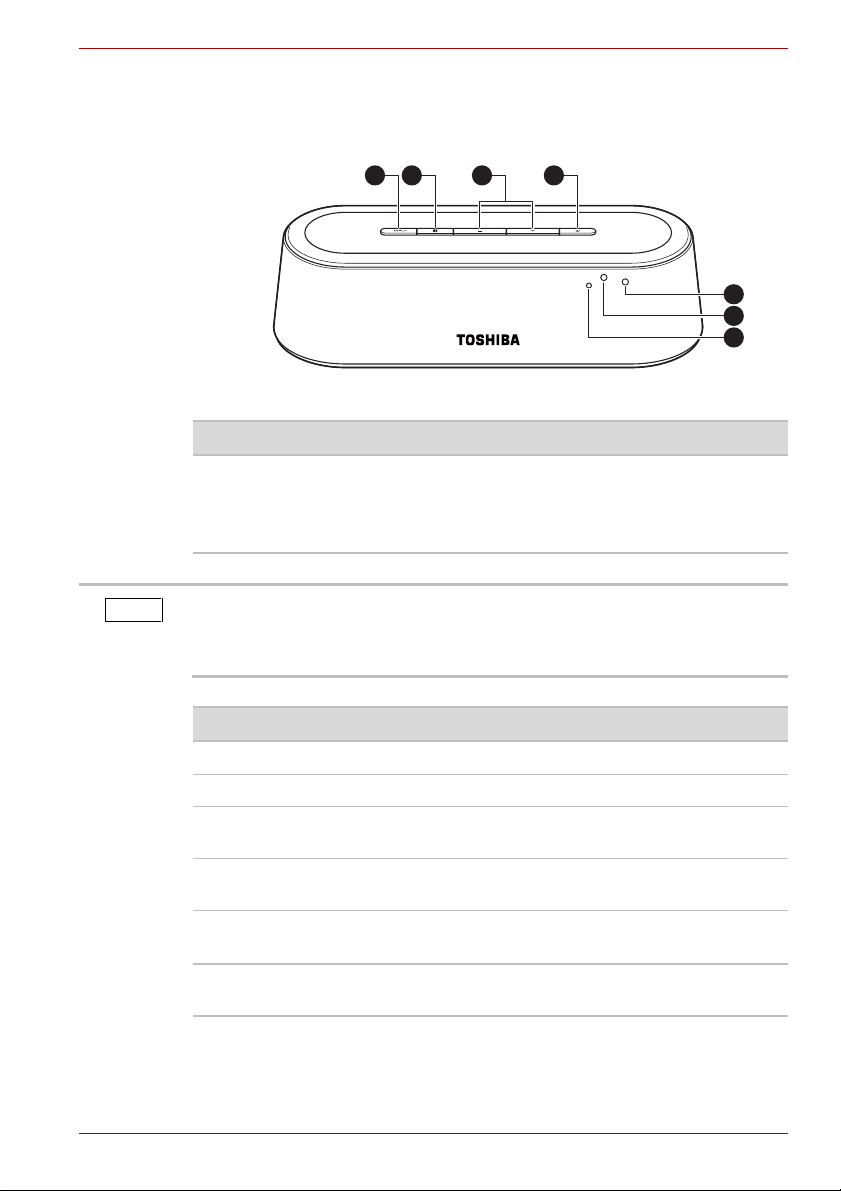
Front view
(Sample Illustration) The front view of the Mini 3D Sound Bar
Item Component Description
1 INPUT Selects the source (in the sequence of Aux-in,
The sound bar will restore from your last selected input when it is back
from the standby mode with the AC adaptor connected. But if you
disconnect the AC adaptor and connect it again, the sound bar will start
with Aux-in input by default.
MINI 3D SOUND BAR & SUBWOOFER
Line-in, Optical, Coaxial and then back to
Aux-in).
The sound bar is set to Aux-in mode by default.
Item Component Description
2
Bluetooth
®
Selects Bluetooth® mode.
3 Volume +/- Increases/decreases the volume.
4 Power Turns the sound bar on or puts it into the
standby mode.
5 Remote
Receives the remote control’s signals.
sensor
6
Bluetooth
®
indicator
User’s Manual EN-4
7Power
indicator
Glows blue while the sound bar is paired and
flashes blue while pairing.
Glows green while the sound bar is ON and red
while it is OFF or in the standby mode
Page 6
MINI 3D SOUND BAR & SUBWOOFER
1
2
3
7
6
54
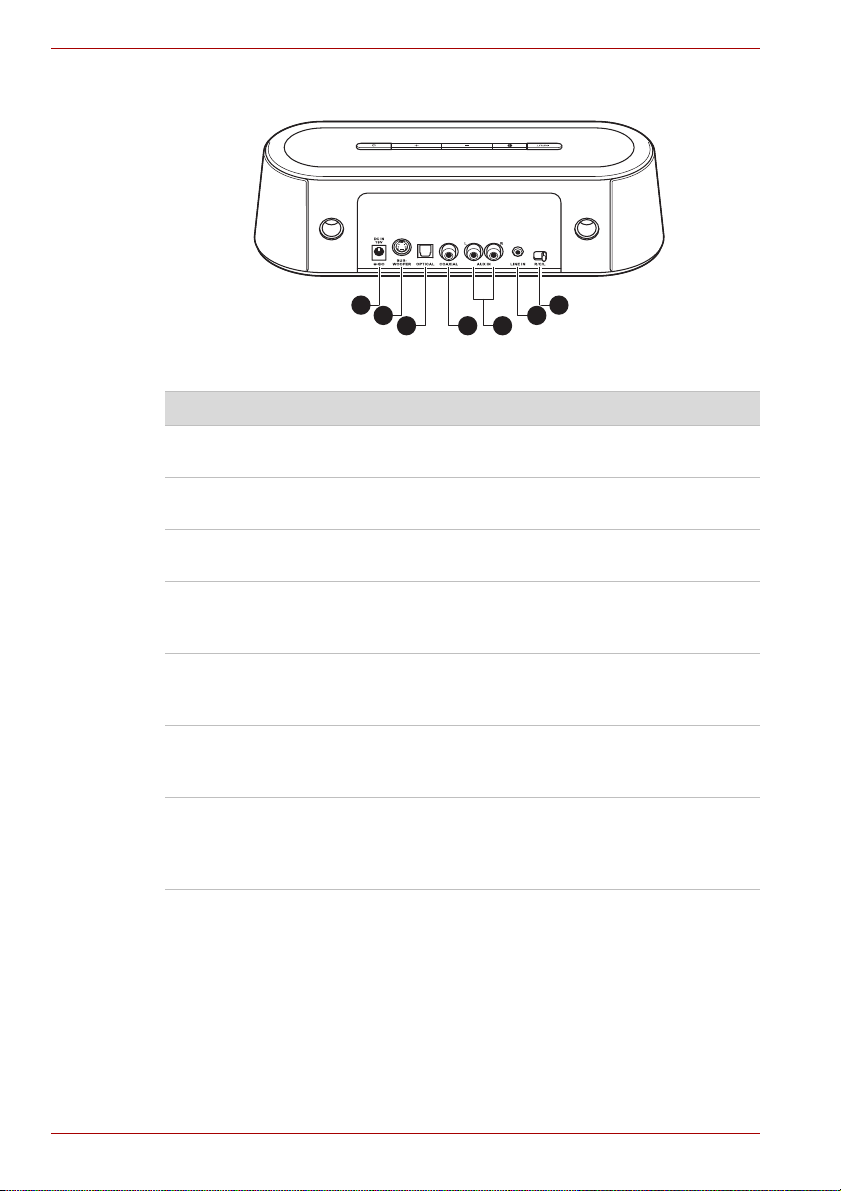
Rear view
(Sample Illustration) The back view of the Mini 3D Sound Bar
Item Component Description
1 DC IN jack Connection for the provided AC adaptor
2SUBWOOFER
jack
3 OPTICAL jack Connection for an optical audio output device
4 COAXIAL jack Connection for a coaxial audio output device
5 AUX IN jacks Connection for an audio output device using a
6 LINE IN jack Connection for an audio output device using a
7 R/C/L balance
slide switch
(provided with the Mini 3D Sound Bar).
Connection for the subwoofer.
using an optical audio cable (not provided).
using a coaxial digital audio cable (not
provided).
3.5mm - RCA audio cable (provided with the
Mini 3D Sound Bar).
3.5mm - RCA audio cable (provided with the
Mini 3D Sound Bar).
Selects the audio channel (right/center/left).
Adjusts the sound to center when the sound bar
is placed to the right/left side of the audio/video
device.
EN-5 User’s Manual
Page 7
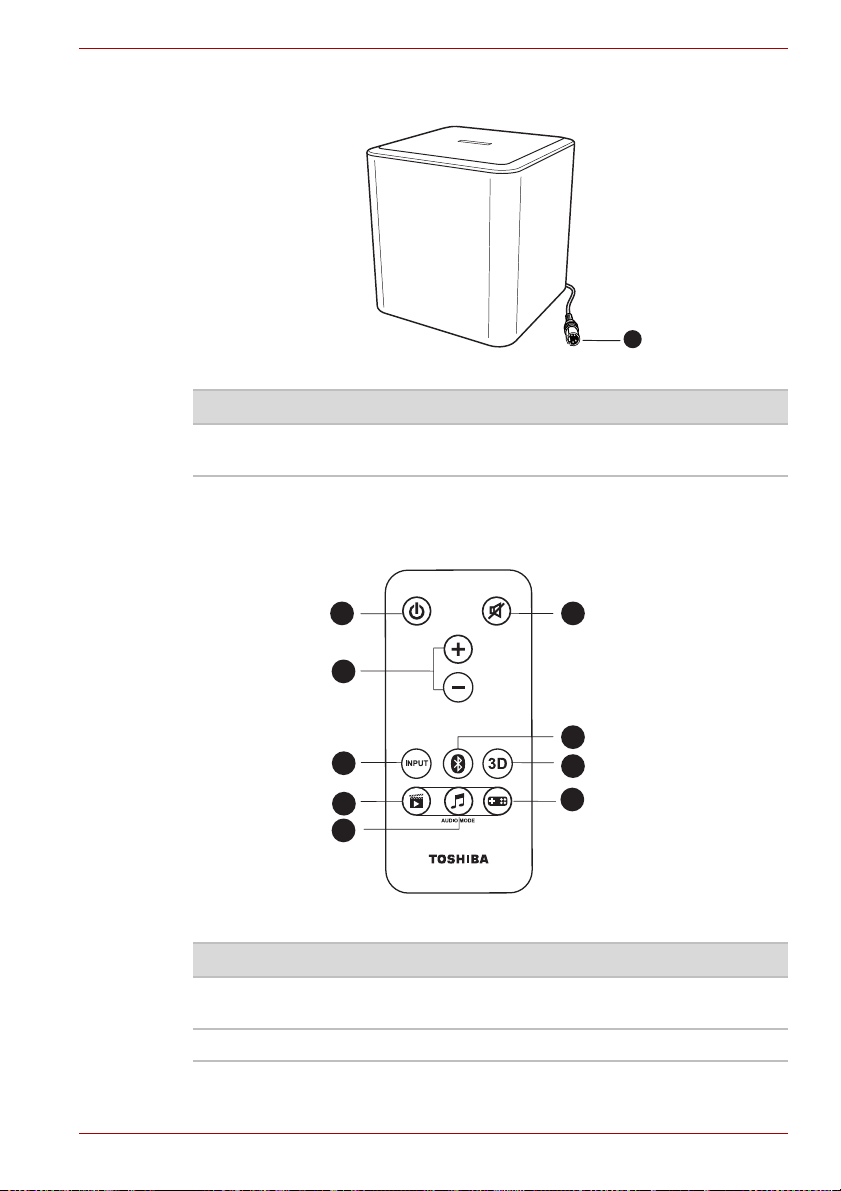
Subwoofer
1
1 2
3
4
5
6
7
9
8
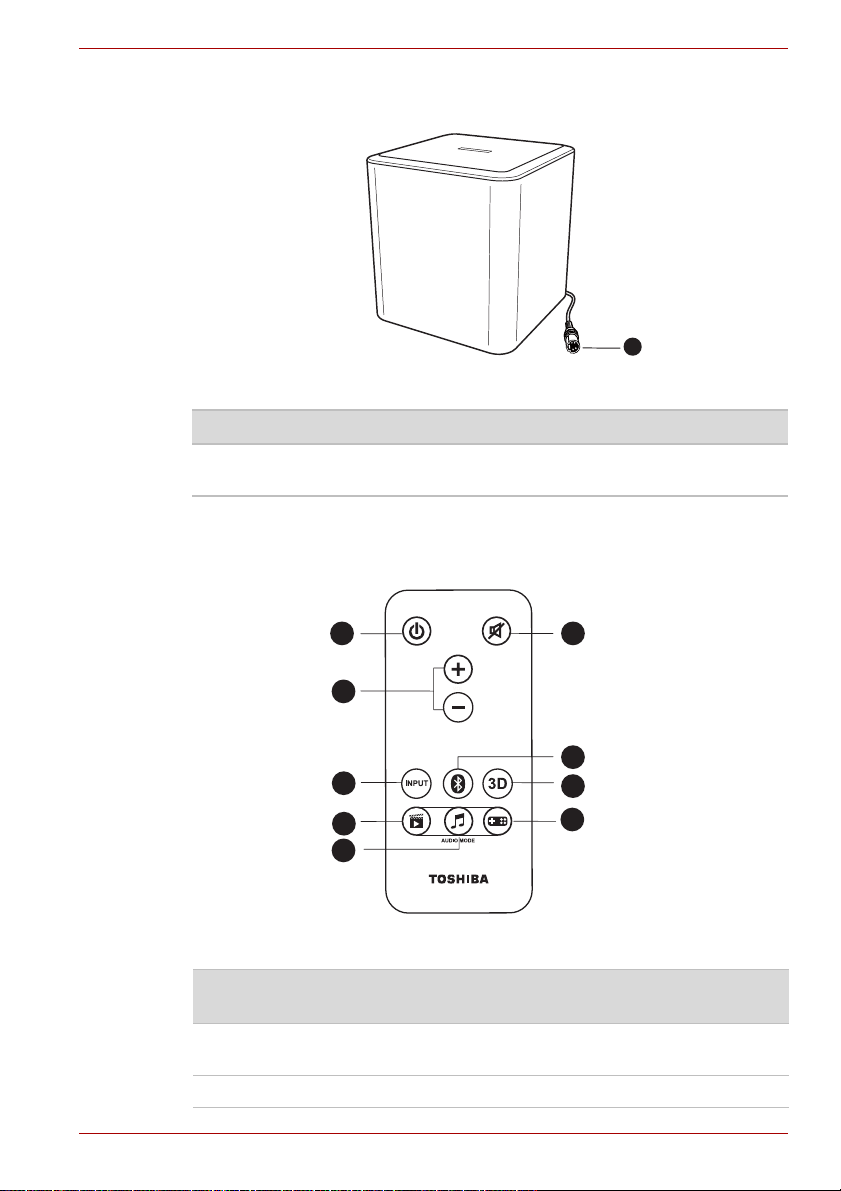
(Sample Illustration) The subwoofer view
Item Component Description
1 Subwoofer
Remote control
The Mini 3D Sound Bar is provided with a remote control.
MINI 3D SOUND BAR & SUBWOOFER
Connection to the SUBWOOFER jack.
plug
(Sample Illustration) The remote control
Item Button
1 POWER Press to turn the sound bar ON or put it into the
User’s Manual EN-6
2 MUTE Press to turn the sound on/off.
Function
name
standby mode.
Page 8

MINI 3D SOUND BAR & SUBWOOFER
NOTE
Item Button
Function
name
3 VOLUME +/- Press to increase/decrease the volume.
4 INPUT Press to select the source (in the sequence of
Aux-in, Line-in, Optical, Coaxial and then back to
Aux-in).
The sound bar is set to Aux-in mode by default.
5
Bluetooth
®
Press to select Bluetooth® mode. It functions the
same as the Bluetooth® button on the sound bar.
6 3D Press to toggle 3D mode ON/OFF. The 3D mode
is set to enable by default.
The 3D sound feature creates an immersive
listening experience by adding depth and
spaciousness to the sounds when using the 3D
sound button.
Please refer to the “3D Sound” section for more
details.
7 MOVIE Press to select the MOVIE audio mode (the
default mode).
The Movie mode has been optimized for the
vocal frequency bands by increasing the impact
of clearness in speech while brightening the
overall sound. The vocals become more precise,
crisp, and well-defined, accentuated by
outstanding sound clarity.
8 MUSIC Press to select the MUSIC audio mode.
The Music mode has been optimized for creating
a balanced, yet wide ambient soundscape to
enrich the musical composition.
9 GAME Press to select the GAME audio mode.
The Game mode has been optimized to deliver
an immersive listening experience with an
increase of bass and treble for impactful effects
that give a sense of movement of sound
surrounding the listeners.
The sound bar will restore from your last selected audio mode when it is
back from the standby mode with the AC adaptor connected. But if you
disconnect the AC adaptor and connect it again, the sound bar will start
with movie audio mode by default.
EN-7 User’s Manual
Page 9
Getting Started
AC Adaptor
AC Adaptor
NOTE
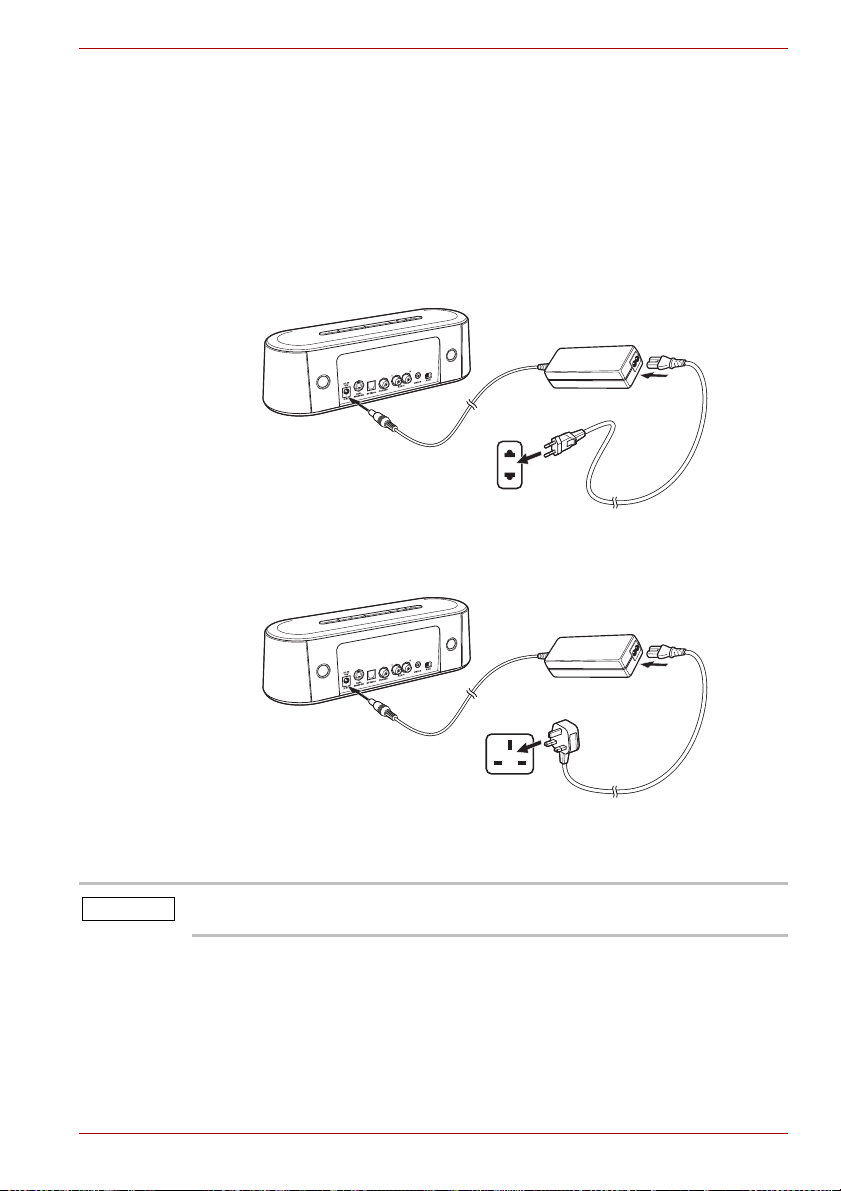
Check the illustrations below to setup your device properly.
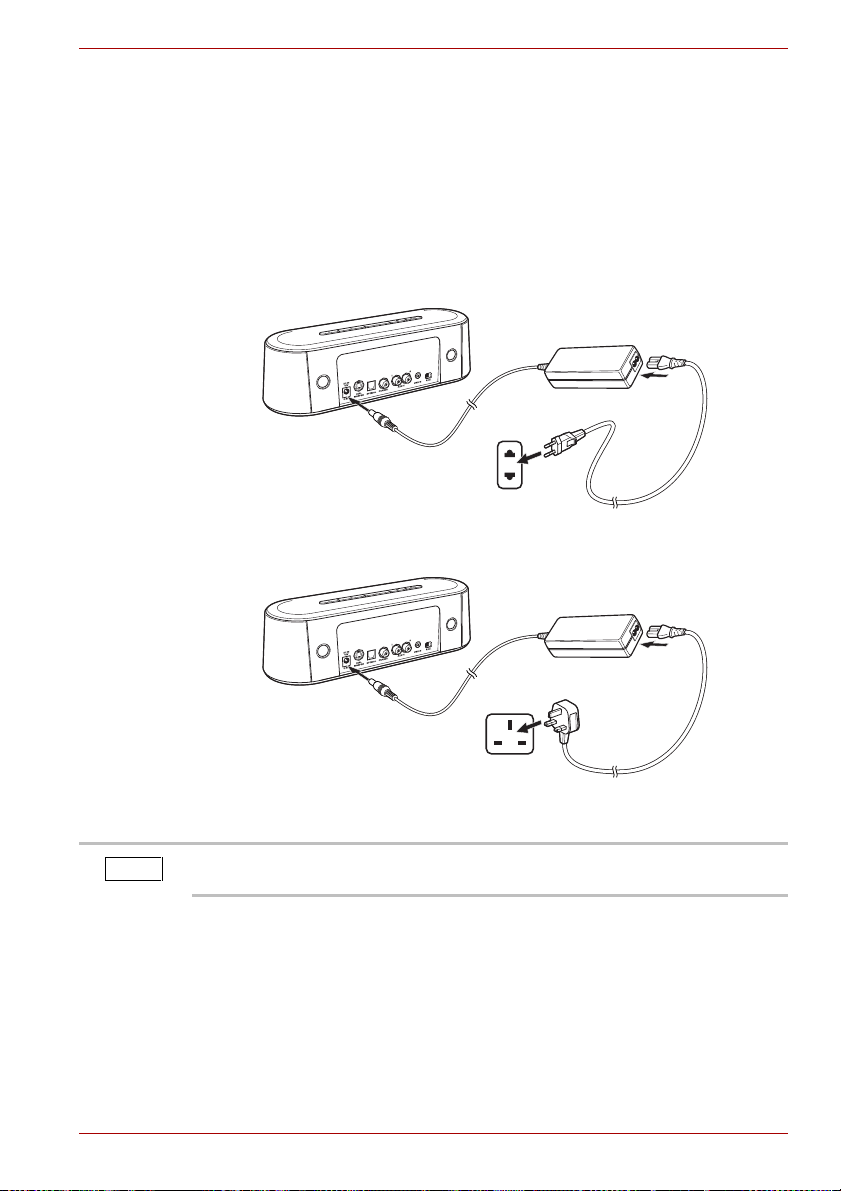
Connecting the power adaptor
Choose the proper plug to attach to an AC adaptor. Plug one end of the AC
adaptor cord/cable into the DC IN jack on the back of the sound bar, and
the other end to a live electrical outlet. The power indicator on the front
panel glows green when the sound bar is powered on.
(Sample Illustration) Connecting the power cord to the AC adaptor (2-pin plug)
MINI 3D SOUND BAR & SUBWOOFER
(Sample Illustration) Connecting the power cord to the AC adaptor (3-pin plug)
The sound bar will automatically go to the standby mode in 10 minutes if
no audio output.
User’s Manual EN-8
Page 10
MINI 3D SOUND BAR & SUBWOOFER
Subwoofer
NOTE
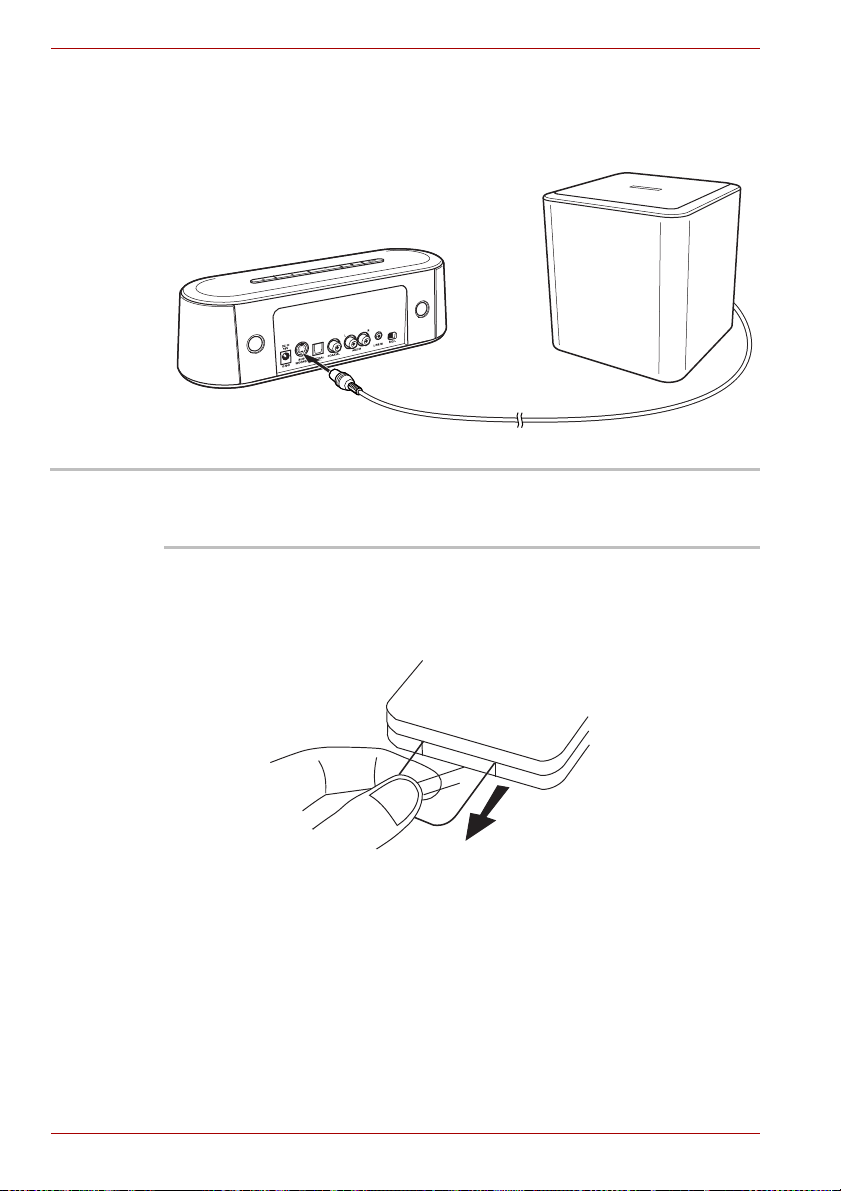
Connecting the subwoofer
Connect the subwoofer to the SUBWOOFER jack (if applicable) on the
back of the sound bar.
(Sample Illustration) Connecting the subwoofer
Please do not connect or disconnect the subwoofer when the sound bar is
powered up.
This subwoofer is compatible with Toshiba Mini 3D Sound Bar only.
Using the remote control
Remove the plastic sheet before operating the remote control for the first
time.
(Sample Illustration) Remove the plastic sheet before operating the remote
control
While using the remote control, please follow the instructions below:
■ Point the remote control at the remote sensor and press the buttons.
■ Distance: Approximately 5m from the front of the remote sensor.
■ Angle: About 30° in each direction from the front of the remote sensor.
EN-9 User’s Manual
Page 11
MINI 3D SOUND BAR & SUBWOOFER
NOTE
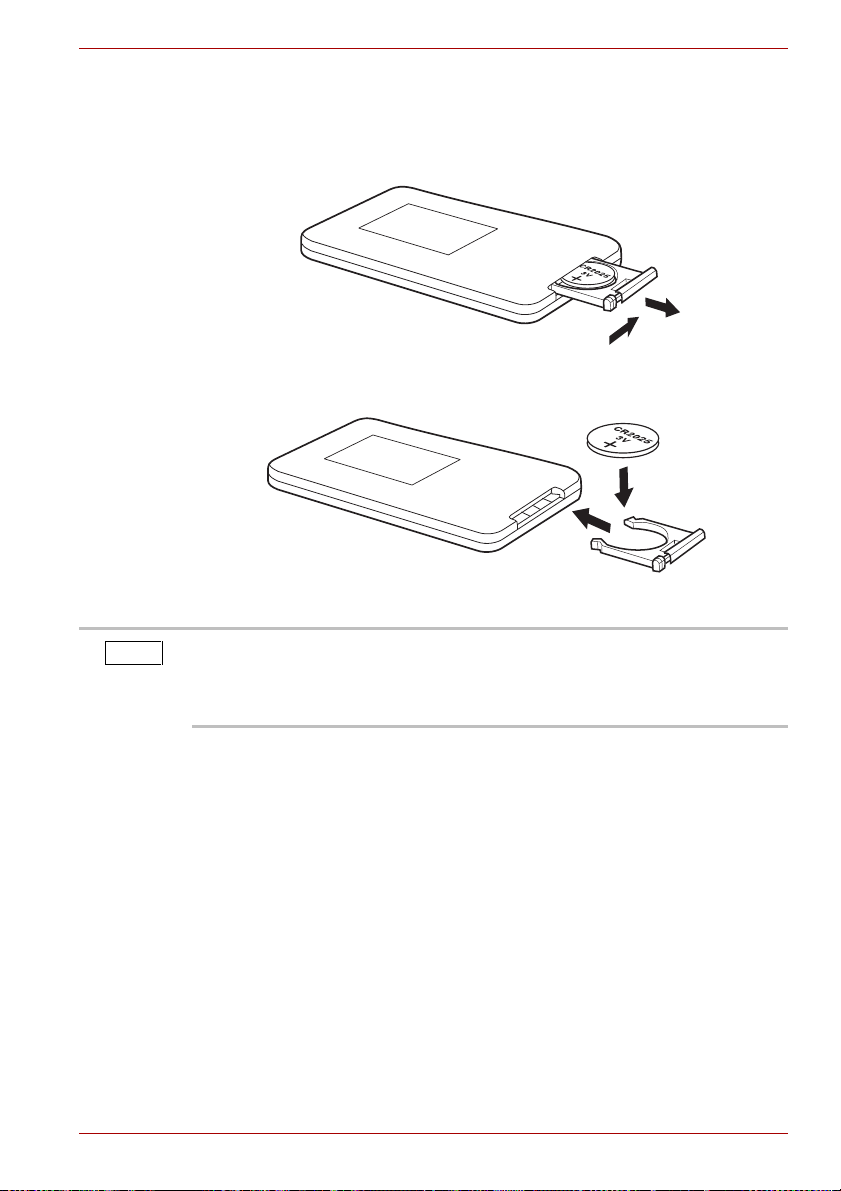
Replacing the battery
The remote control is provided with one CR2025 (3V) battery. To replace
the battery, please follow the instructions below.
1. Open the battery door.
(Sample Illustration) Open the battery door
2. Remove the exhausted battery and insert the new battery.
(Sample Illustration) Insert the new battery
If the remote control does not operate correctly, or if the operating range is
reduced, replace the battery with a new one.
Press the remote control buttons at intervals of approximately one second
to ensure correct operation.
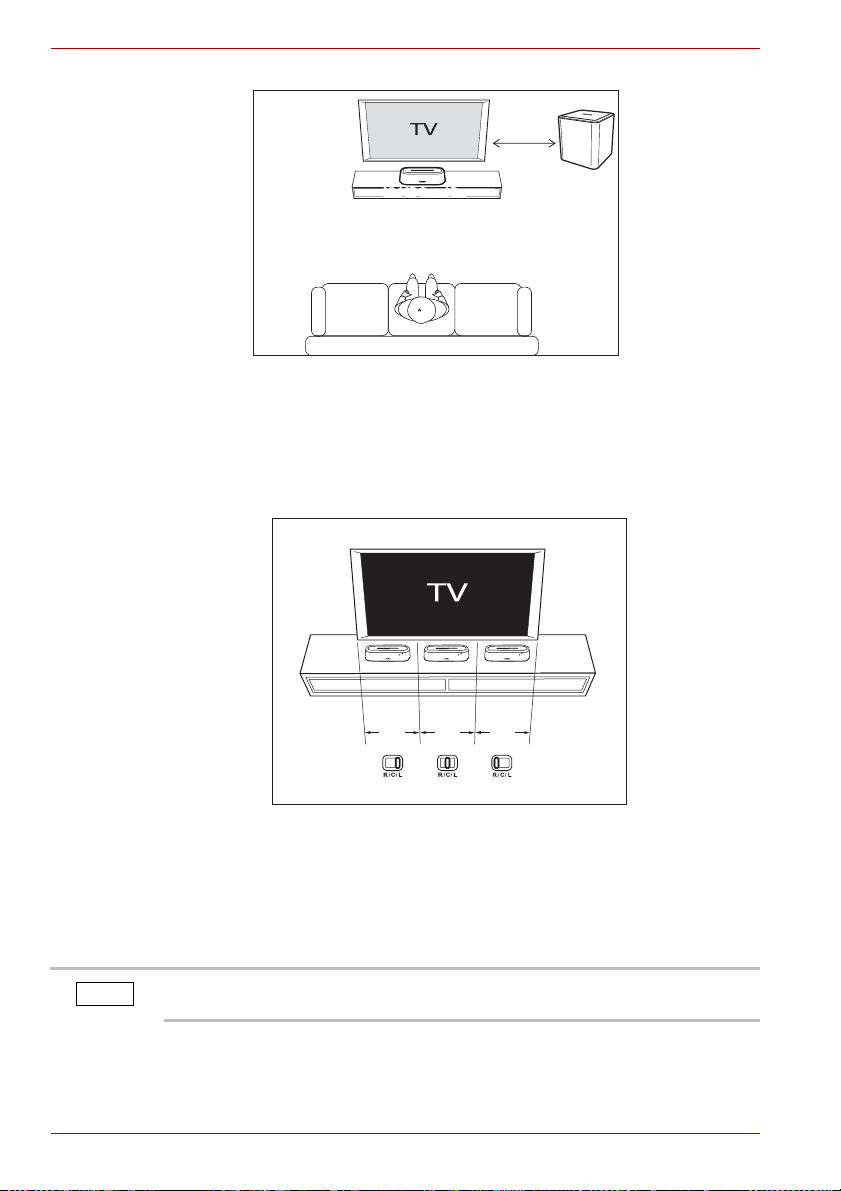
Mini 3D Sound Bar and subwoofer placement
The sound bar can be placed freestanding on a table with at least 30cm
away from the TV. For the best surround sound experience, it is
recommend to place your subwoofer directly below the sound bar, or at the
corner of the room (with 5~10cm away from the wall).
User’s Manual EN-10
Page 12
MINI 3D SOUND BAR & SUBWOOFER
Mini 3D Sound Bar
30cm
Subwoofer
Left
15.75 in.
(40 cm)
Center
15.75 in.
(40 cm)
Right
15.75 in.
(40 cm)
NOTE
(Sample Illustration) Mini 3D Sound Bar and subwoofer placement
Using the R/C/L balance slide switch
If the sound bar is placed to the right (left) side of the TV or other device,
you can slide the R/C/L balance switch on the back of the sound bar to
offset the sound to the center.
(Sample Illustration) Using the R/C/L balance slide switch
Connecting to the audio device
Follow these instructions to route external audio signals from devices such
as a TV to the sound bar via the AUX IN, LINE IN, OPTICAL and COAXIAL
jacks.
For best performance with a TV, we recommend using with a digital optical
cable (available separately).
EN-11 User’s Manual
Page 13
MINI 3D SOUND BAR & SUBWOOFER
NOTE
NOTE
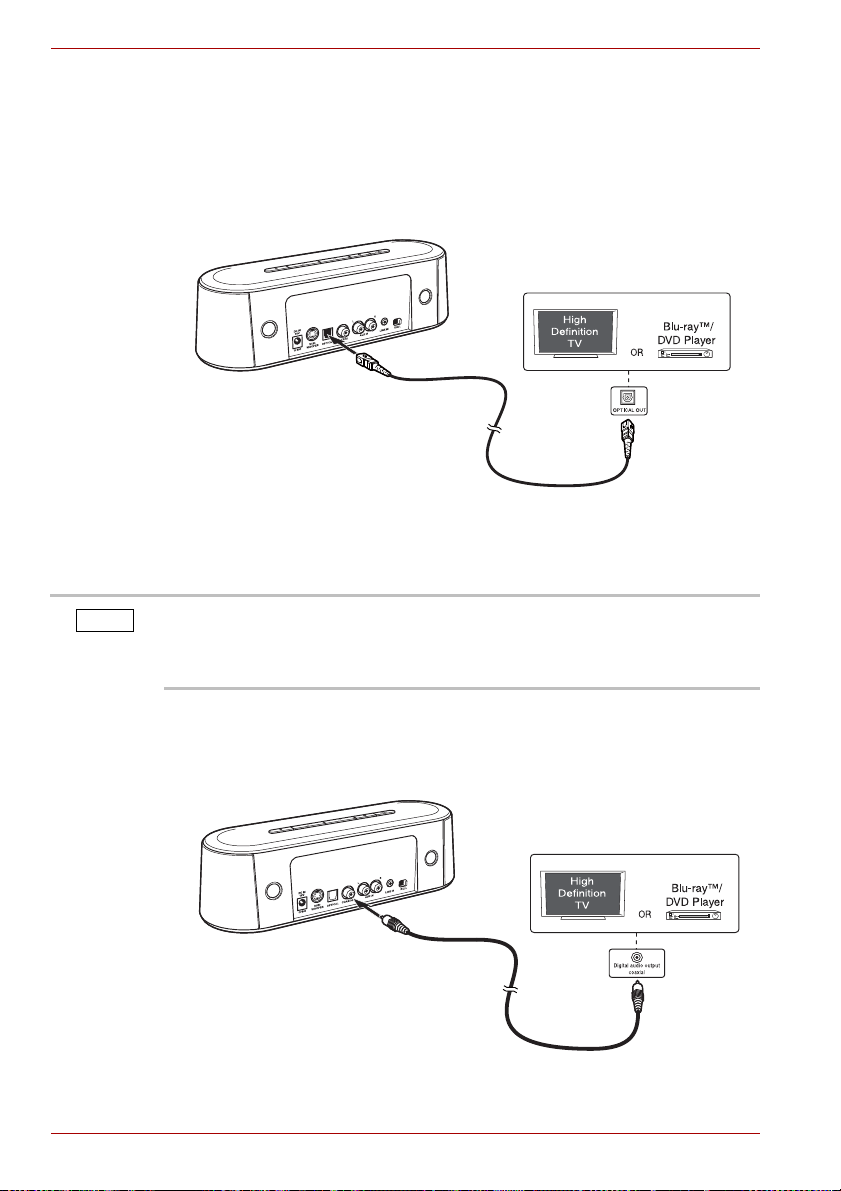
Using the AUX IN jacks
1. Connect a 3.5mm - RCA audio cable (provided with the sound bar) from
the L/R AUX IN jacks on the sound bar to the AUDIO OUT jacks on a
TV, DVD or other audio device.
(Sample Illustration) Analog audio cable connection
You can connect to the TV by using one of the cables below:
■ 3.5mm - RCA audio cable (provided with the sound bar)
■ RCA - RCA cable (not provided)
2 Press the INPUT button on the sound bar or the remote control to
switch to the AUX IN input.
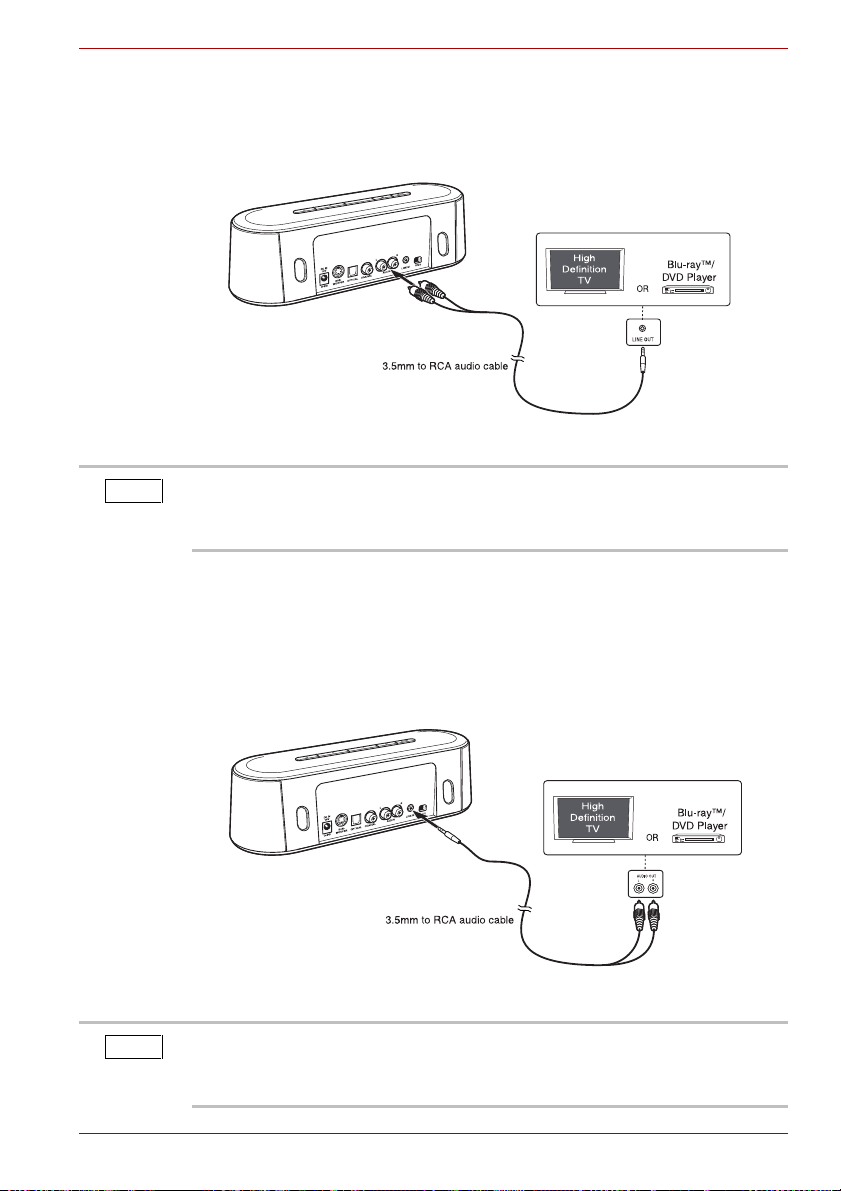
Using the LINE IN jack
1. Connect a 3.5mm - RCA audio cable (provided with the sound bar) from
the LINE IN jack on the sound bar to the LINE OUT jack on an audio
device.
(Sample Illustration) 3.5mm audio cable connection
You can connect to the TV by using one of the cables below:
■ 3.5mm - RCA audio cable (provided with the sound bar)
■ 3.5mm - 3.5mm audio cable (not provided)
User’s Manual EN-12
Page 14
MINI 3D SOUND BAR & SUBWOOFER
Digital optical cable
NOTE
Digital audio coaxial cable
2 Press the INPUT button on the sound bar or the remote control to
switch to the LINE IN input.
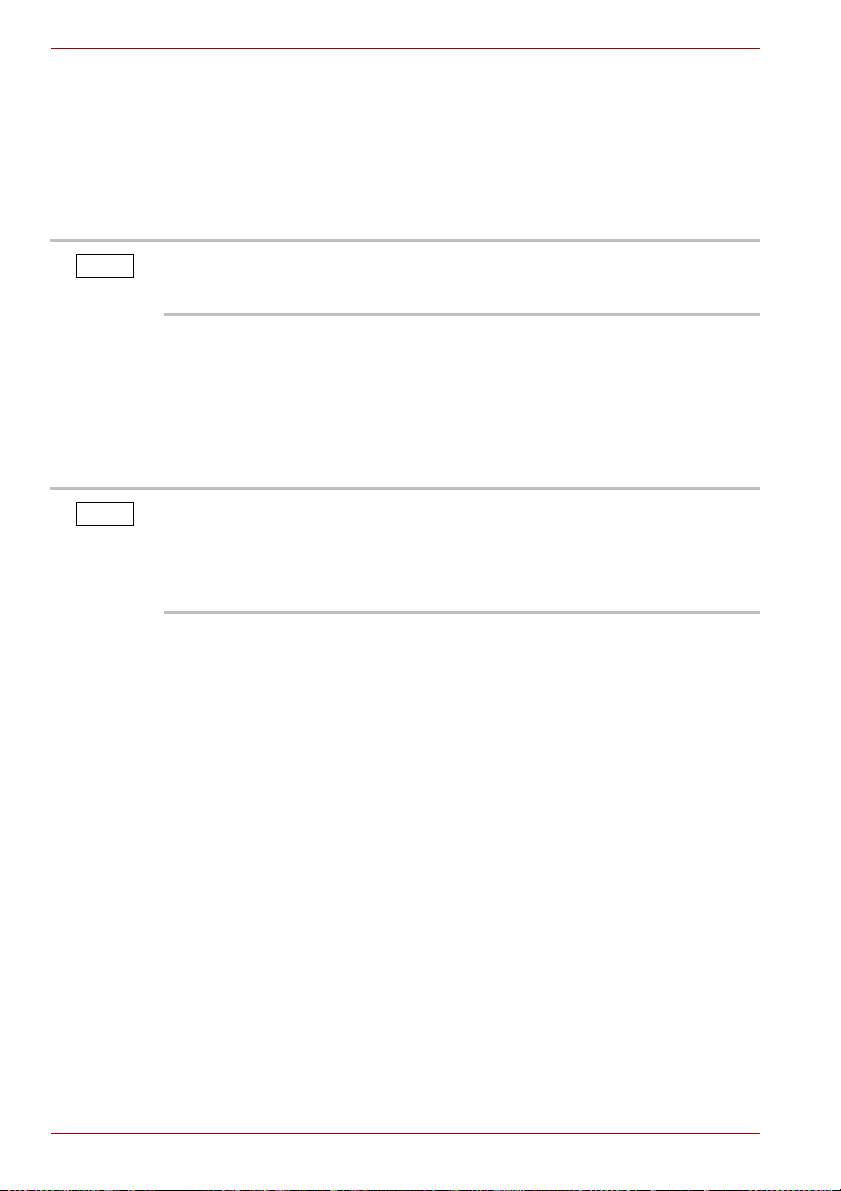
Using the OPTICAL jack
1. Connect an optical cable (not provided) from the OPTICAL jack on the
sound bar to the OPTICAL OUT jack on a TV, DVD or other audio
device.
(Sample Illustration) Optical cable connection
2 Press the INPUT button on the sound bar or the remote control to
switch to the OPTICAL input.
The sound bar is designed to support PCM (Pulse-code modulation) digital
signal only. To set the audio signal from external sources (e.g. Blu-ray
and DVD player), please do not select “DTS” or “Dolby Digital”. Otherwise,
there will be no sound from the sound bar.
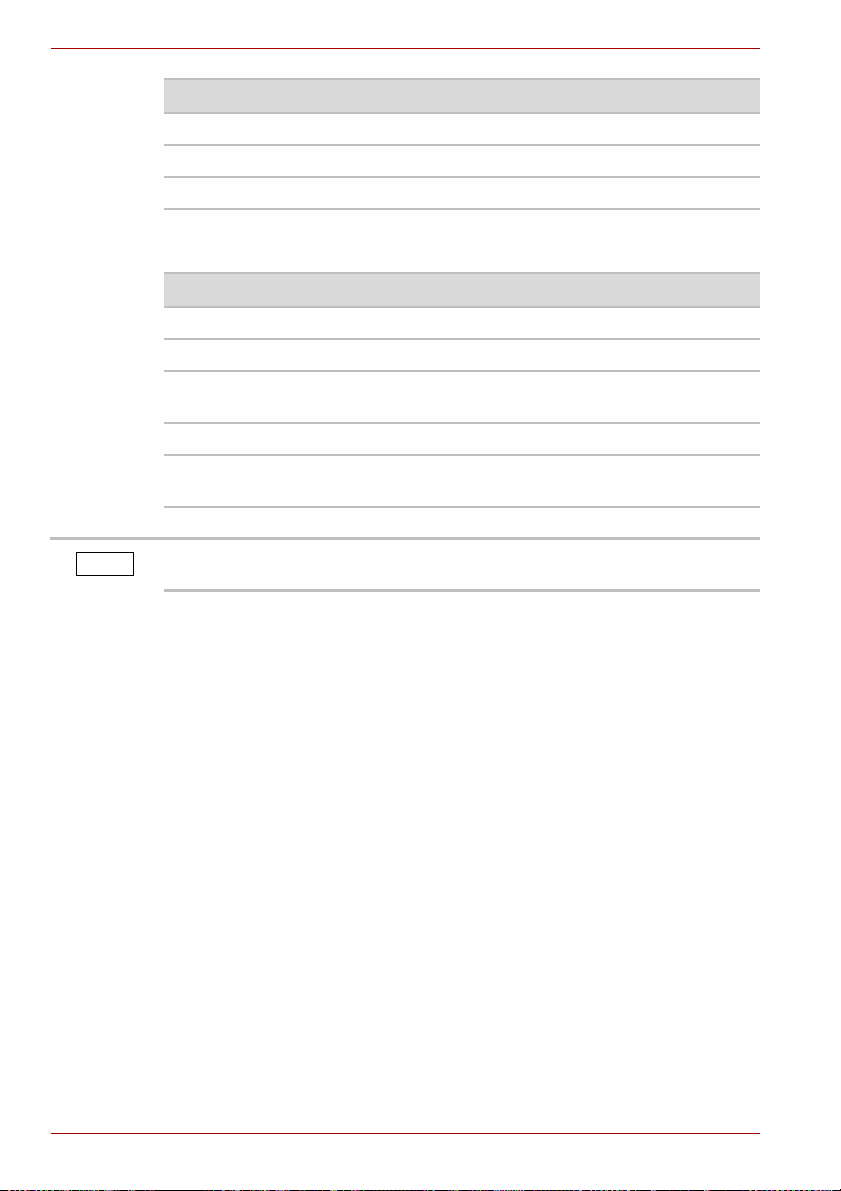
Using the COAXIAL jack
1. Connect a digital audio coaxial cable (not provided) from the COAXIAL
jack on the sound bar to the COAXIAL OUT jack on a TV, DVD or other
audio device.
(Sample Illustration) Digital audio coaxial cable connection
EN-13 User’s Manual
TM
Page 15

MINI 3D SOUND BAR & SUBWOOFER
NOTE
2 Press the INPUT button on the sound bar or the remote control to
switch to the COAXIAL input.
The sound bar is designed to support PCM (Pulse-code modulation) digital
signal only. To set the audio signal from external sources (e.g. Blu-ray
and DVD player), please do not select “DTS” or “Dolby Digital”. Otherwise,
there will be no sound from the sound bar.
3D Sound
The sound bar features Sonic Emotion® Absolute 3D sound technology that
delivers the ultimate listening experience from a single compact device,
without the clutter of additional cabling. Its plug and play device creates a
multi-use capability which attributes to the high-quality sound.
You can select from three different sound modes (Movie, Music, or Game),
depending on the type of sources you want to experience. Select a Sound
Mode based on the source material and your personal taste.
About Sonic Emotion® 3D Sound
Sonic Emotion® Absolute 3D is the listening experience. Absolute 3D uses
sound field control to transform the listener’s room to a virtually created
natural sound field.
With wave field synthesis being the foundation of sound field control, sound
waves are produced and dispersed throughout the entire listening area
ensuring all listeners to be amazed in an all enveloping room filled with high
quality sounds regardless of the listeners’ position. Exactly as in a natural
environment, sounds are heard from all around regardless of the device
location.
TM
Playback via Bluetooth®-enabled devices
To play files via Bluetooth®-enabled devices:
1. Turn on the sound bar.
®
2. Press the Bluetooth
mode.
The blue indicator will be flashing, meaning that it is searching for
available Bluetooth
3. Turn on the Bluetooth
Your other device will search the available Bluetooth arround it.
If your device does not automatically start searching, you may have to
enable the search feature on your device.
4. Once the sound bar is detected, select “Toshiba Mini 3D Sound Bar” on
your device for pairing.
User’s Manual EN-14
button on the sound bar to enable Bluetooth
®
-enabled devices.
®
mode of your other Bluetooth®-enabled device.
Page 16
MINI 3D SOUND BAR & SUBWOOFER
NOTE
NOTE
5. Once the two devices are paired successfully, “connected” will be
shown on your device and the blue indicator on the sound bar will stop
flashing.
6. Then the devices have been paired, you can play music/video files on
your other device and enjoy the sound from the sound bar.
Once disconnected, you need to repeat the above steps 4~6 for reconnection.
®
When pairing a new Bluetooth
enabled device, use the Bluetooth® button
on the sound bar speaker and not on the remote control. The remote
control can only be used to reconnect a previously paired device.
Pairing the sound bar with another Bluetooth® device
1. Disconnect your Bluetooth® device from the sound bar.
®
2. Press the Bluetooth
flashes.
3. Turn on the Bluetooth® mode of your other device, and select “Toshiba
Mini 3D Sound Bar” on it for pairing.
For details, please refer to the user’s manual of your Bluetooth® device.
The sound bar can only be paired with one Bluetooth
the sound bar is already paired with one Bluetooth
able to pair it with another Bluetooth
the name “Toshiba Mini 3D Sound Bar”.
button on the sound bar until the blue indicator
®
device, even though it may display
®
device at a time. If
®
device, you will not be
Frequently Asked Questions (FAQ)
Question 1:
The sound bar cannot be turned on.
Answer:
Make sure that the AC adapter is connected to the sound bar, and that it is
plugged into a wall socket correctly.
Press the power button on the top of the sound bar and check whether the
power indicator is glowing green.
Question 2:
There is no sound from the sound bar.
Answer:
This problem may have several causes. Check the following items:
■ Press the Volume +/- buttons of the sound bar.
■ Make sure that the source you have selected is sending audio. If you
are connected to your TV, please make sure that your TV is configured
to output audio.
■ Make sure that there are no loose audio connections.
EN-15 User’s Manual
Page 17

MINI 3D SOUND BAR & SUBWOOFER
■ Make sure that you have selected the correct source (input).
■ Press the MUTE button on the remote control to make sure that the
sound bar is not muted.
Question 3:
There is no sound from the subwoofer.
Answer:
Make sure that the subwoofer is connected properly.
Question 4:
The remote control does not work properly.
Answer:
This problem may have several causes. Check the following items:
■ Make sure that the plastic sheet is removed before operating the
remote control.
■ The remote control is pointed directly at the remote sensor of the
sound bar.
■ The remote control is not being used from too far a distance from
sound bar.
■ Nothing is obstructing the remote sensor (located in the front of the
sound bar).
Others
Accessories of this series of products may vary depending on the model.
Please refer to the packaging, packing list or contact your agent for
information.
Please understand no advance notice for further product improvement,
appearance design and specification update.
The illustration may be a little different from the real product.
Specifications
Mini 3D Sound Bar
General Information Description
Power requirements 19V DC, 3.42A
Power output 10 watts x 4 (per channel at 4ohms, 1 KHz /
Power consumption 40W
Impedance 4 ohms
Dimension (width x
height x depth)
User’s Manual EN-16
THD 10%)
11.4" x 2.8" x 3.9" (290 x 72 x 100mm)
Page 18
MINI 3D SOUND BAR & SUBWOOFER
NOTE
General Information Description
Weight About 1.87 lbs (0.85kg)
Frequency Response 95Hz – 19kHz
Distortion <10%
Subwoofer
General Information Description
Power output 20 watts at 8 ohms, 100Hz / THD 10%
Impedance 8 ohms
Dimension (width x
height x depth)
Weight About 6.24 lbs (2.83kg)
Frequency Response 38Hz – 19kHz (Mini 3D Sound Bar and
Appearance and specification may vary and can be changed without
notice.
8.6" x 9.6" x 8.6" (220 x 246 x 220mm)
Subwoofer)
Trademarks
The Bluetooth word mark and logos are registered trademarks owned by
Bluetooth SIG, Inc, and any use of such marks by TOSHIBA Corporation is
under license.
Sonic Emotion is a registered trademark of sonic emotion ag.
Other trademarks and registered trademarks not listed above may be used
in this manual.
TOSHIBA Support
Need help?
For the latest driver updates, User’s Manuals & FAQs please have a look at
the TOSHIBA options & services support page:
http://computers.toshiba.eu/options-support
Please see http://computers.toshiba.eu/options-warranty for the TOSHIBA
hotline numbers.
EN-17 User’s Manual
Page 19

Regulatory Information
CE compliance
This product is CE marked in compliance with the essential requirements
and other relevant provisions of Directive 1999/5/EC. Responsible for CE
marking is Toshiba Europe GmbH, Hammfelddamm 8, 41460 Neuss,
Germany. A copy of the official Declaration of Conformity can be obtained
from following website:
http://epps.toshiba-teg.com
This product and the original options are designed to observe the related
EMC (Electromagnetic Compatibility) and safety standards. However,
TOSHIBA cannot guarantee that this product still observes these EMC
standards if other units or cables not produced by TOSHIBA are connected.
In this case the persons who have connected those other units/cables have
to provide assurance that the system (sound bar plus options/cables) still
fulfills the required standards. To avoid general EMC problems, the
following guidance should be noted:
■ Only CE marked options should be connected/implemented
■ Only best shielded cables should be connected
.
MINI 3D SOUND BAR & SUBWOOFER
Working Environment
The Electromagnetic Compliance (EMC) of this product has been verified
typically for this product category. Your product is not intended for industrial
use, but for personal use only. Any other working environment has not been
verified by TOSHIBA and the use of this product in these working
environments is maybe restricted or cannot be recommended. Possible
consequences of the use of this product in non verified working
environments can be:
Disturbances of other products or of this product in the nearby surrounding
area with temporarily malfunction or data loss/corruption as result.
Example of non verified working environments and related advices:
Industrial environment (e.g. where 3-phase 380V mains is being used
mainly): Danger of disturbances of this product due to possible strong
electromagnetic fields especially near to big machinery or power units.
Medical environment: The compliance to the Medical Product Directive has
not been verified by Toshiba, therefore this product cannot be used as a
medical product without further verification. The use in usual office
environments e.g. in hospitals should be no problem if there is no restriction
by the responsible administration.
User’s Manual EN-18
Page 20
MINI 3D SOUND BAR & SUBWOOFER
REACH
Following information is only valid for EU-member States: REACH Compliance Statement
The new European Union (EU) chemical regulation, REACH (Registration,
Evaluation, Authorization and Restriction of Chemicals), entered into force
on 1 June 2007.
Toshiba will meet all REACH requirements and is committed to provide our
customers with information about the chemical substances in our products
according to REACH regulation.
Please consult the following website
www.toshiba-europe.com/computers/info/reach for information about the
presence in our articles of substances included on the candidate list
according to article 59(1) of Regulation (EC) No 1907/2006 (“REACH”) in a
concentration above 0.1 % weight by weight.
Following information is only valid for EU-member States:
Disposal of products
The crossed out wheeled dust bin symbol indicates that products must be
collected and disposed of separately from household waste. Integrated
batteries and accumulators can be disposed of with the product. They will
be separated at the recycling centres.
The black bar indicates that the product was placed on the market after
August 13, 2005.
By participating in separate collection of products and batteries, you will
help to assure the proper disposal of products and batteries and thus help
to prevent potential negative consequences for the environment and
human health.
For more detailed information about the collection and recycling
programmes available in your country, please visit our website
(http://eu.computers.toshiba-europe.com
the shop where you purchased the product.
) or contact your local city office or
Disposal of batteries and/or accumulators
The crossed out wheeled dust bin symbol indicates that batteries and/or
accumulators must be collected and disposed of separately from
household waste.
If the battery or accumulator contains more than the specified values of
lead (Pb), mercury (Hg), and/or cadmium (Cd) defined in the Battery
Directive (2006/66/EC), then the chemical symbols for lead (Pb), mercury
(Hg) and/or cadmium (Cd) will appear below the crossed out wheeled dust
bin symbol.
EN-19 User’s Manual
Page 21

By participating in separate collection of batteries, you will help to assure
the proper disposal of products and batteries and thus help to prevent
potential negative consequences for the environment and human health.
For more detailed information about the collection and recycling
programmes available in your country, please visit our website
(http://eu.computers.toshiba-europe.com
the shop where you purchased the product.
Additional Information
© 2012 TOSHIBA Europe GmbH. All rights reserved.
TOSHIBA reserves the right to make technical changes. TOSHIBA
assumes no liability for damages incurred directly or indirectly from errors,
omissions or discrepancies between this product and the documentation.
MINI 3D SOUND BAR & SUBWOOFER
) or contact your local city office or
User’s Manual EN-20
Page 22

MINI 3D SOUND BAR a SUBWOOFER
Tato příručka je určena pro tři modely uvedené níže:
1) Mini 3D Sound Bar + Subwoofer (SBM1W)
2) Mini 3D Sound Bar (SBM10)
3) Subwoofer pro Toshiba Mini 3D Sound Bar (SBW10)
Uživatelská příručka
Obsah
Úvod............................................................................................................2
Obsah balení...............................................................................................2
Bezpečnostní pokyny ..................................................................................2
Rychlé seznámení.......................................................................................3
Mini 3D Sound Bar ................................................................................4
Subwoofer .............................................................................................6
Dálkové ovládání ...................................................................................6
Začínáme ....................................................................................................8
Připojení napájecího adaptéru...............................................................8
Připojení subwooferu.............................................................................9
Používání dálkového ovládání...............................................................9
Umístění zvukové lišty Mini 3D Sound Bar a subwooferu ...................10
Připojení k audio zařízení ....................................................................11
3D zvuk .....................................................................................................14
Přehrávání pomocí zařízení s funkcí Bluetooth
Často kladené dotazy (FAQ).....................................................................15
Specifikace................................................................................................16
Obchodní známky .....................................................................................17
Podpora TOSHIBA....................................................................................17
Informace o předpisech.............................................................................18
REACH......................................................................................................19
Následující informace jsou určeny pouze pro členské státy EU:...............19
Doplňující informace..................................................................................20
®
.......................................14
CZ-1 Uživatelská příručka
Page 23

Úvod
POZNÁMKA
User’s Manual
Mini 3D Sound Bar
Subwoofer
(je-li součástí)
AC adaptér
3,5mm - RCA audio kabel
Dálkové ovládání
s baterií
Uživatelská příručka
a záruční leták
Vítejte a děkujeme, že jste si vybrali tento produkt TOSHIBA.
Doporučujeme pečlivé přečtení této příručky a její uschování spolu
s dokumentací produktu pro budoucí využití.
Tato příručka se zabývá používáním zvukové lišty Mini 3D Sound Bar
a subwooferu. Mini 3D Sound Bar a subwoofer je možné zakoupit v sadě
nebo samostatně.
Označení „zvuková lišta“ v této příručce znamená zařízení Mini 3D
Sound Bar.
Obsah balení
Přesvědčte se, zda máte všechny následující položky:
MINI 3D SOUND BAR a SUBWOOFER
Bezpečnostní pokyny
Uživatelská příručka CZ-2
Aby nedošlo k závadě nebo poškození produktu, je potřeba důsledně
dodržovat pokyny uvedené níže.
■ Nikdy
■ neotevírejte kryt nebo jednotku
■ nerozebírejte jednotku nebo její součásti
■ neumisťujte kapaliny vedle produktu nebo na něj, protože mohou
poškodit produkt, způsobit poranění, úraz elektrickým proudem
nebo požár
■ nevystavujte produkt nárazům, otřesům nebo pádům
■ nehýbejte s produktem za provozu, aby nedošlo k poškození dat
Page 24

MINI 3D SOUND BAR a SUBWOOFER
POZNÁMKA
■ nepoužívejte jiné AC/DC adaptéry, než je adaptér přibalený u
zařízení, aby nedošlo k poškození zařízení
■ neodpojujte kabely za provozu
■ nevystavujte produkt teplotám mimo rozsah 5°C – 35°C za provozu
a -20°C – 60°C ve vypnutém stavu
■ nevystavujte produkt mokru a vlhkosti
■ nepřikrývejte produkt za provozu, protože by mohlo dojít k jeho
přehřátí
■ nepokládejte produkt v blízkosti tepelných zdrojů
■ neodhazujte baterie z dálkového ovládání (které je součástí
zvukové lišty Mini 3D Sound Bar) do ohně, aby nedošlo k jejich
explozi
■ nenechávejte baterie z dálkového ovládání v dosahu dětí, aby je
nespolkly
■ Okamžitě odpojte produkt v těchto případech
■ z krytu produktu vychází kouř nebo neobvyklý zápach
■ do krytu produktu se dostala voda nebo je produkt mokrý
■ do krytu produktu pronikl cizí předmět
■ došlo k poškození kabelu (v takovém případě nahraďte kabel
novým)
■ Zvuková lišta Mini 3D Sound Bar má v reproduktorech magnety.
Magnety mají schopnost smazat data z magnetických úložných médií,
například z video pásků, pevných disků a z kreditních karet. Z tohoto
důvodu udržujte zvukovou lištu mimo dosah takových produktů.
Jestliže se produkt chová nečekaným způsobem nebo máte pochybnosti o
elektrické bezpečnosti, okamžitě se obrať
nebo na autorizovaného prodejce!
te na horkou linku TOSHIBA
Rychlé seznámení
V této části jsou popsány různé komponenty zvukové lišty Mini 3D Sound
Bar a subwooferu. Popis každé součásti je uveden v tabulce pod každou
ilustrací.
Podle rozsahu vašeho nákupu nemusíte mít obě zařízení, zvukovou lištu
Mini 3D Sound Bar i subwoofer.
CZ-3 Uživatelská příručka
Page 25

Mini 3D Sound Bar
1 2 4
7
6
5
3
POZNÁMKA
Pohled zepředu
(Ukázková ilustrace) Přední pohled na zvukovou lištu Mini 3D Sound Bar
Položka Komponenta Popis
1 VSTUP Slouží k výběru zdroje (v pořadí Aux-in,
Při návratu z pohotovostního režimu a při zapnutém AC adaptéru zvuková
lišta obnoví svůj poslední vybraný vstup. Pokud však AC adaptér odpojíte
a znovu připojíte, zvuková lišta bude opět nastavena na vstup Aux-in.
MINI 3D SOUND BAR a SUBWOOFER
Line-in, Optický, Koaxiální a znovu Aux-in).
Ve výchozím stavu je zvuková lišta
nastavena na režim Aux-in.
Položka Komponenta Popis
2
Bluetooth
®
Vyberte režim Bluetooth®.
3 Hlasitost +/- Zvýší/sníží hlasitost.
4 Napájení Zapne zvukovou lištu nebo ji uvede do
pohotovostního režimu.
5 Dálkový
snímač
6 Indikátor
Bluetooth
7 Indikátor
Uživatelská příručka CZ-4
napájení
Slouží k přijímání signálů z dálkového
ovládání.
Svítí bíle, když je zvuková lišta spárovaná a
®
bliká bíle v průběhu párování.
Svítí zeleně, když je zvuková lišta zapnutá a
svítí červeně, když je vypnutá nebo v
pohotovostním režimu.
Page 26

MINI 3D SOUND BAR a SUBWOOFER
1
2
3
7
6
54
Pohled zezadu
(Ukázková ilustrace) Zadní pohled na zvukovou lištu Mini 3D Sound Bar
Položka Komponenta Popis
1 Konektor
DC IN
2 Konektor pro
SUBWOOFER
3 OPTICKÝ
konektor
4 KOAXIÁLNÍ
konektor
5 Konektory
AUX IN
6 Konektor
LINE IN
7 Posuvný
spínač pro
nastavení
rovnováhy
P/C/L
Připojení pro AC adaptér (dodán společně
se zvukovou lištou Mini 3D Sound Bar).
Připojení pro subwoofer.
Připojení pro optické audio výstupní zařízení
pomocí optického kabelu (není přiložen).
Připojení pro koaxiální audio výstupní
zařízení pomocí koaxiálního digitálního
audio kabelu (není přiložen).
Připojení pro audio výstupní zařízení pomocí
3,5mm - RCA audio kabelu (dodává se se
zvukovou lištou Mini 3D Sound Bar).
Připojení pro audio výstupní zařízení pomocí
3,5mm - RCA audio kabelu (dodává se se
zvukovou lištou Mini 3D Sound Bar).
Vybere audio kanál (pravý/centr/levý).
Nastaví zvuk do středu, pokud je zvuková
lišta umístěna doprava/doleva vzhledem
k audio/video zařízení.
CZ-5 Uživatelská příručka
Page 27
Subwoofer
1
1 2
3
4
5
6
7
9
8
(Ukázková ilustrace) Pohled na subwoofer
Položka Komponenta Popis
1 Zásuvka pro
Dálkové ovládání
Zvuková lišta Mini 3D Sound Bar je vybavena dálkovým ovládáním.
MINI 3D SOUND BAR a SUBWOOFER
Připojení konektoru pro SUBWOOFER.
subwoofer
(Ukázková ilustrace) Dálkové ovládání
Položka Název tlačítka Funkce
1 NAPÁJENÍ Stiskem se zvuková lišta zapne nebo se
2 MUTE Stiskem se zapne nebo vypne zvuk.
Uživatelská příručka CZ-6
uvede do pohotovostního režimu.
Page 28

MINI 3D SOUND BAR a SUBWOOFER
POZNÁMKA
Položka Název tlačítka Funkce
3 HLASITOST +/- Stiskem se zvýší nebo sníží hlasitost.
4 VSTUP Stiskem se vybere zdroj (v pořadí Aux-in,
5
Bluetooth
6 3D Stiskem se zapíná/vypíná 3D režim.
7 VIDEO Stiskem se vybere audio režim VIDEO
8 HUDBA Stiskem se vybere audio režim HUDBA.
9 HRY Stiskem se vybere audio režim HRY.
Line-in, Optický, Koaxiální a znovu Aux-in).
Ve výchozím stavu je zvuková lišta
nastavena na režim Aux-in.
®
Stiskem se vybere režim Bluetooth®.
Funguje stejně jako tlačítko Bluetooth
®
na
zvukové liště.
3D režim je nastaven jako výchozí.
Funkce 3D zvuku umožňuje poutavý
posluchačský zážitek díky hloubce a
prostoru zvuku při použití tlačítka 3D zvuku.
Viz část „3D zvuk“, kde najdete další detaily.
(výchozí režim).
Filmový režim je optimalizován pro hlasová
frekvenční pásma díky zvýšení
srozumitelnosti řeči a projasnění celkového
zvuku. Hlasy jsou přesnější, ostré a dobře
definované, s důrazem na vynikající
hlasovou čistotu.
Hudební režim je optimalizován pro
dosažení vyváženého a širokého
prostorového zvukového obrazu, který
obohacuje hudební kompozice.
Herní režim je optimalizován pro poutavý
poslechový zážitek s využitím
zdůrazněných basů a výšek v nárazových
efektech, které naznačují pohyb zvuku
obklopujícího posluchače.
Při návratu z pohotovostního režimu a při zapnutém AC adaptéru zvuková
lišta obnoví svůj poslední vybraný zvukový režim. Pokud však AC adaptér
odpojíte a znovu připojíte, zvuková lišta bude opět nastavena na filmový
zvukový režim.
CZ-7 Uživatelská příručka
Page 29
Začínáme
AC Adaptor
AC Adaptor
POZNÁMKA
Podle ilustrací dole zapojte správně svoje zařízení.
Připojení napájecího adaptéru
Vyberte správnou zástrčku pro AC adaptér. Zapojte jeden konec kabelu AC
adaptéru do konektoru DC IN na zadní straně zvukové lišty a druhý konec
do funkční elektrické zásuvky. Je-li zvuková lišta zapnutá, indikátor
napájení na přední straně svítí zeleně.
(Ukázková ilustrace) Připojení napájecího kabelu k AC adaptéru
MINI 3D SOUND BAR a SUBWOOFER
(2pinová zástrčka)
(Ukázková ilustrace) Připojení napájecího kabelu k AC adaptéru
(3pinová zástrčka)
Po 10 minutách, kdy není k dispozici žádný zvukový vstup, zvuková lišta
přejde do pohotovostního režimu.
Uživatelská příručka CZ-8
Page 30

MINI 3D SOUND BAR a SUBWOOFER
Subwoofer
POZNÁMKA
Připojení subwooferu
Připojte subwoofer ke konektoru SUBWOOFER (pokud máte subwoofer)
na zadní straně zvukové lišty.
(Ukázková ilustrace) Připojení subwooferu
Nepřipojujte nebo neodpojujte subwoofer při zapnuté zvukové liště.
Tento subwoofer je kompatibilní pouze se zvukovou lištou Toshiba Mini 3D
Sound Bar.
Používání dálkového ovládání
Před prvním použitím odstraňte z dálkového ovládání plastovou fólii.
(Ukázková ilustrace) Sejmutí plastové fólie před prvním použitím dálkového
ovládání
Při používání dálkového ovládání se řiďte těmito pokyny:
■ Namiřte dálkové ovládání na vzdálený snímač a stiskněte tlačítko.
■ Vzdálenost: přibližně 5 m od přední části vzdáleného snímače.
■ Úhel: přibližně 30° v každém směru od přední části vzdáleného
snímače.
CZ-9 Uživatelská příručka
Page 31

MINI 3D SOUND BAR a SUBWOOFER
POZNÁMKA
Výměna baterie
Dálkové ovládání je napájeno jednou baterií CR2025 (3V). Při výměně
baterie postupujte podle následujících pokynů.
1. Otevřete dvířka pro baterii.
(Ukázková ilustrace) Otevření dvířek pro baterii
2. Vyjměte vybitou baterii a vložte novou.
(Ukázková ilustrace) Vložení nové baterie
Jestliže dálkové ovládání nefunguje správně nebo je omezen pracovní
dosah, vyměňte baterii.
Pro správnou funkci tiskněte tlačítka na dálkovém ovládání v intervalech
přibližně jedné sekundy.
Umístění zvukové lišty Mini 3D Sound Bar a subwooferu
Zvukovou lištu je možné samostatně položit na stůl do vzdálenosti nejméně
30 cm od TV. Pro dosažení co nejlepšího poslechového zážitku se
doporučuje umístit subwoofer přímo pod zvukovou lištu nebo do rohu
místnosti (ve vzdálenosti 5~10 cm od stěny).
Uživatelská příručka CZ-10
Page 32

MINI 3D SOUND BAR a SUBWOOFER
Mini 3D Sound Bar
30cm
Subwoofer
Left
15.75 in.
(40 cm)
Center
15.75 in.
(40 cm)
Right
15.75 in.
(40 cm)
POZNÁMKA
(Ukázková ilustrace) Umístění zvukové lišty Mini 3D Sound Bar a subwooferu
Používání posuvného spínače pro nastavení rovnováhy P/C/L
Jestliže je zvuková lišta umístěna doprava (nebo doleva) vzhledem k TV
nebo jinému zařízení, můžete posunout spínač pro nastavení rovnováhy
P/C/L vzadu na zvukové liště a nastavit tak zvuk do středu.
(Ukázková ilustrace) Používání posuvného spínače pro nastavení rovnováhy
P/C/L
Připojení k audio zařízení
Následující pokyny se týkají připojení externích audio signálů ze zařízení,
například z televize, do zvukové lišty s využitím konektorů AUX IN,
LINE IN, OPTICKÝ a KOAXIÁLNÍ.
Pro co nejlepší výkon ve spojení s TV doporučujeme použít digitální
optický kabel (k dostání samostatně).
CZ-11 Uživatelská příručka
Page 33

MINI 3D SOUND BAR a SUBWOOFER
POZNÁMKA
POZNÁMKA
Používání konektorů AUX IN
1. Připojte 3,5mm - RCA audio kabel (dodává se se zvukovou lištou) z
konektorů L/R AUX IN na zvukové liště do konektorů AUDIO OUT v TV,
DVD nebo v jiném audio zařízení.
(Ukázková ilustrace) Připojení analogového audio kabelu
TV je možné připojit jedním z kabelů dole:
■ 3,5mm - RCA audio kabel (dodává se se zvukovou lištou)
■ RCA - RCA kabel (není přiložen)
2 Stiskem tlačítka INPUT na zvukové liště nebo na dálkovém ovládání
přepněte na vstup AUX IN.
Používání konektoru LINE IN
1. Připojte 3,5mm - RCA audio kabel (dodává se se zvukovou lištou) z
konektoru LINE IN na zvukové liště do konektoru LINE OUT v audio
zařízení.
(Ukázková ilustrace) Připojení 3,5mm audio kabelu
TV je možné připojit jedním z kabelů dole:
■ 3,5mm - RCA audio kabel (dodává se se zvukovou lištou)
■ 3,5mm - 3,5mm audio kabel (není přiložen)
Uživatelská příručka CZ-12
Page 34

MINI 3D SOUND BAR a SUBWOOFER
Digital optical cable
POZNÁMKA
Digital audio coaxial cable
2 Stiskem tlačítka INPUT na zvukové liště nebo na dálkovém ovládání
přepněte na vstup LINE IN.
Používání OPTICKÉHO konektoru
1. Připojte optický kabel (není přiložen) z OPTICKÉHO konektoru na
zvukové liště do OPTICKÉHO VÝSTUPU v TV, DVD nebo v jiném
audio zařízení.
(Ukázková ilustrace) Připojení optického kabelu
2 Stiskem tlačítka INPUT na zvukové liště nebo na dálkovém ovládání
přepněte na OPTICKÝ vstup.
Zvuková lišta podporuje pouze digitální signál PCM (Pulse-code
modulation). Chcete-li nastavit audio signál z externích zdrojů (např.
TM
Blu-ray
„Dolby Digital“. Jinak nebude zvuková lišta vytvářet žádný zvuk.
a DVD přehrávače), nenastavujte možnost „DTS“ nebo
Používání KOAXIÁLNÍHO konektoru
1. Připojte digitální audio koaxiální kabel (není přiložen) z KOAXIÁLNÍHO
konektoru na zvukové liště do KOAXIÁLNÍHO VÝSTUPU v TV,
DVD nebo v jiném audio zařízení.
(Ukázková ilustrace) Připojení digitálního audio koaxiálního kabelu
CZ-13 Uživatelská příručka
Page 35

2 Stiskem tlačítka INPUT na zvukové liště nebo na dálkovém ovládání
POZNÁMKA
přepněte na KOAXIÁLNÍ vstup.
Zvuková lišta podporuje pouze digitální signál PCM (Pulse-code
modulation). Chcete-li nastavit audio signál z externích zdrojů (např.
TM
Blu-ray
a DVD přehrávače), nenastavujte možnost „DTS“ nebo
„Dolby Digital“. Jinak nebude zvuková lišta vytvářet žádný zvuk.
3D zvuk
Zvuková lišta je vybavena zvukovou technologií Sonic Emotion® Absolute
3D, která zajišťuje poslechové zážitky z jediného kompaktního zařízení bez
nutnosti zapojování dalších kabelů. Toto zařízení, které snadno uvedete do
provozu („plug and play“), má všestranné schopnosti, které přispívají k
dosažení vysoce kvalitního zvuku.
Na výběr máte tři různé zvukové režimy (Video, Hudba nebo Hry), podle
toho, jaký typ zdroje budete používat. Vyberte si zvukový režim na základě
zdrojového materiálu a vašeho osobního vkusu.
O technologii Sonic Emotion® 3D Sound
Sonic Emotion® Absolute 3D představuje výjimečný poslechový zážitek.
Absolute 3D používá řízení zvukového pole pro přeměnu místnosti
posluchače na virtuálně vytvořené přirozené zvukové pole.
Pomocí syntézy zvukového pole, která tvoří základ řízení zvukového pole,
jsou vytvářeny zvukové vlny, které jsou rozprostřeny v celém poslechovém
prostoru a umožňují posluchačům prožívat vysoce kvalitní zvuk po celé
místnosti, bez ohledu na pozici posluchače. Přesně jako v přirozeném
prostředí jsou zvuky vnímány z celého okolí bez ohledu na umístění
zařízení.
MINI 3D SOUND BAR a SUBWOOFER
Přehrávání pomocí zařízení s funkcí Bluetooth
®
Chcete-li přehrávat soubory pomocí zařízení s funkcí Bluetooth®:
1. Zapněte zvukovou lištu.
®
2. Stiskněte tlačítko Bluetooth
na zvukové liště za účelem zapnutí režimu
Bluetooth.
Modrý indikátor bude blikat, což znamená, že probíhá vyhledávání
dostupných zařízení s funkcí Bluetooth
®
3. Zapněte režim Bluetooth
Bluetooth
®
. Vaše další zařízení vyhledá dostupná zařízení s funkcí
ve vašich dalších zařízeních s funkcí
®
.
Bluetooth ve svém okolí.
Pokud zařízení nezahájí automatické vyhledávání, možná bude nutné
zapnout funkci hledání ve vašem zařízení.
Uživatelská příručka CZ-14
Page 36

MINI 3D SOUND BAR a SUBWOOFER
POZNÁMKA
POZNÁMKA
4. Jakmile je detekována zvuková lišta, vyberte v zařízení možnost
„Toshiba Mini 3D Sound Bar“ za účelem spárování.
5. Po úspěšném spárování zařízení bude zařízení indikovat stav
„připojeno“ a modrý indikátor na zvukové liště přestane blikat.
6. Po spárování zařízení můžete přehrávat hudební a video soubory
v dalším zařízení a užívat si kvalitního zvuku ze zvukové lišty.
Po odpojení je potřeba zopakovat kroky 4~6 výše za účelem opětovného
připojení.
Při párování nového zařízení s funkcí Bluetooth
Bluetooth
®
na reproduktoru zvukové lišty a ne na dálkovém ovládání.
Dálkové ovládání je možné použít jen pro opakované připojení již dříve
spárovaného zařízení.
®
použijte tlačítko
Spárování zvukové lišty s dalším zařízením Bluetooth
1. Odpojte zařízení Bluetooth® od zvukové lišty.
®
2. Stiskněte tlačítko Bluetooth
na zvukové liště, až se rozbliká modrý
indikátor.
3. Zapněte režim Bluetooth® na dalším zařízení a zvolte možnost
„Toshiba Mini 3D Sound Bar“ za účelem spárování.
Podrobnosti najdete v uživatelské příručce zařízení Bluetooth®.
Zvukovou lištu je možné spárovat jen s jedním zařízením Bluetooth
najednou. Jestliže je zvuková lišta spárována s jedním zařízením
Bluetooth
®
, nebude možné ji spárovat s jiným zařízením Bluetooth®,
přestože se v něm zobrazuje položka „Toshiba Mini 3D Sound Bar“.
Často kladené dotazy (FAQ)
Otázka 1:
Zvukovou lištu není možné zapnout.
Odpověď:
Zkontrolujte, zda je ke zvukové liště připojen AC adaptér a zda je připojen
do elektrické zásuvky.
Stiskněte tlačítko napájení nahoře na zvukové liště a zkontrolujte,
zda indikátor napájení svítí zeleně.
Otázka 2:
Ze zvukové lišty se neozývá žádný zvuk.
Odpověď:
Tento problém může mít několik příčin. Zkontrolujte následující body:
■ Stiskněte tlačítka hlasitosti +/- na zvukové liště.
■ Zkontrolujte, zda vybraný zdroj posílá audio signál. Jestliže jste připojeni
k TV, podívejte se, zda je TV nakonfigurovaná na výstup zvuku.
®
®
CZ-15 Uživatelská příručka
Page 37

MINI 3D SOUND BAR a SUBWOOFER
■ Zkontrolujte, zda nejsou uvolněné audio přípojky.
■ Ověřte, zda jste vybrali správný zdroj (vstup).
■ Stiskněte tlačítko MUTE (ztlumení zvuku) na dálkovém ovládání,
zda není na zvukové liště ztlumený zvuk.
Otázka 3:
Ze subwooferu se neozývá žádný zvuk.
Odpověď:
Zkontrolujte, zda je subwoofer správně připojen.
Otázka 4:
Dálkové ovládání správně nefunguje.
Odpověď:
Tento problém může mít několik příčin. Zkontrolujte následující body:
■ Zkontrolujte, zda je z dálkového ovládání odstraněna plastová fólie.
■ Dálkové ovládání je namířeno přímo na vzdálený snímač zvukové lišty.
■ Dálkové ovládání není používáno v příliš velké vzdálenosti od
zvukové lišty.
■ Vzdálený snímač není ničím zablokován (nachází se v přední
části zvukové lišty).
Ostatní
Příslušenství této řady se může lišit podle modelu.
Viz obal, seznam položek v balení, nebo se obraťte na obchodního
zástupce, který vám poskytne informace.
Oznámení týkající se dalšího zlepšení produktu, jeho vzhledu a aktualizace
specifikací nebudou předem poskytována.
Ilustrace se mohou mírně lišit od skutečného produktu.
Specifikace
Mini 3D Sound Bar
Obecné informace Popis
Požadavky na napájení 19 V DC, 3.42 A
Výkon 10 wattů x 4 (na kanál při 4 ohmech,
1 KHz / THD 10%)
Spotřeba energie 40 W
Impedance 4 ohmy
Rozměry
(šířka x výška x hloubka)
Uživatelská příručka CZ-16
11,4" x 2,8" x 3,9" (290 x 72 x 100 mm)
Page 38

MINI 3D SOUND BAR a SUBWOOFER
POZNÁMKA
Obecné informace Popis
Hmotnost Přibližně 1,87 lbs (0,85 kg)
Frekvenční rozsah 95 Hz-19 kHz
Zkreslení <10%
Subwoofer
Obecné informace Popis
Výkon 20 wattů při 8 ohmech, 100 Hz / THD 10%
Impedance 8 ohmů
Rozměry
(šířka x výška x hloubka)
Hmotnost Přibližně 6,24 lbs (2,83 kg)
Frekvenční rozsah 38 Hz-19 kHz (Mini 3D Sound Bar a
Vzhled a specifikace se mohou lišit a mohou být změněny bez oznámení.
8,6" x 9,6" x 8,6" (220 x 246 x 220 mm)
Subwoofer)
Obchodní známky
Slovní označení Bluetooth a loga jsou registrované ochranné známky
společnosti Bluetooth SIG, Inc. a použití těchto označení společností
TOSHIBA Corporation podléhá licenci.
Sonic Emotion je registrovaná ochranná známka společnosti sonic
emotion ag.
V této příručce mohou být použity také další obchodní známky a
registrované obchodní známky neuvedené výše.
Podpora TOSHIBA
Potřebujete poradit?
Nejnovější aktualizace ovladačů, uživatelské příručky a odpovědi na
často kladené dotazy najdete na stránce možností a servisní podpory
TOSHIBA:
http://computers.toshiba.eu/options-support
Viz stránku http://computers.toshiba.eu/options-warranty, kde jsou
uvedena čísla horké linky TOSHIBA.
CZ-17 Uživatelská příručka
Page 39

Informace o předpisech
Splnění CE
Tento produkt nese označení CE v souladu se základními požadavky a
dalšími příslušnými požadavky Směrnice 1999/5/EC. Odpovědnost za
označení značkou CE nese Toshiba Europe, Hammfelddamm 8, 41460
Neuss, Německo. Kopii oficiálního Prohlášení o shodě je možné získat
ztěchto webových stránek: http://epps.toshiba-teg.com.
Tento produkt a jeho původní vybavení jsou navrženy tak, aby vyhovovaly
příslušné EMC (elektromagnetické kompatibilitě) a bezpečnostním
normám. Společnost TOSHIBA nicméně nezaručuje soulad produktu s
požadavky těchto standardů EMC, pokud ostatní připojené vybavení nebo
kabely nejsou výrobkem společnosti TOSHIBA. V takovém případě musí
osoby, které připojily toto jiné vybavení/kabely, zajistit, že celý systém
(zvuková lišta plus doplňky/kabely) stále vyhovuje požadovaným normám.
Chcete-li se vyhnout problémům s kompatibilitou EMC, dodržujte
následující pravidla:
■ Připojujte/ implementujte pouze vybavení označené značkou CE
■ Připojujte pouze nejlepší stíněné kabely
MINI 3D SOUND BAR a SUBWOOFER
Pracovní prostředí
Elektromagnetická kompatibilita (EMC) tohoto produktu byla ověřena
typicky pro tuto kategorii produktu. Tento produkt není určen pro
průmyslové použití, pouze pro osobní použití. Všechna další prostředí
nebyla společností Toshiba ověřena a používání tohoto produktu v těchto
pracovních prostředích může být buď zakázáno nebo je nelze doporučit.
Možné následky použití tohoto produktu v neověřeném pracovním
prostředí jsou následující:
Rušení dalších produktů nebo tohoto produktu v blízkém okolí, včetně
dočasné nefunkčnosti nebo ztráty/porušení dat.
Příklad neověřeného pracovního prostředí a souvisejícího zařízení:
Průmyslové prostředí (např. tam, kde se používá především třífázové
napětí 380 V): Nebezpečí rušení tohoto produktu z důvodu výskytu
možných silných elektromagnetických polí, obzvláště v blízkosti velkých
strojů napájecích jednotek.
Zdravotnické prostředí: společnost Toshiba neověřovala splnění nařízení
pro zdravotnické produkty, tudíž tento produkt nelze používat jako
zdravotnický produkt bez dalšího ověření. Použití v běžném kancelářském
prostř
edí, např. v nemocnicích, by nemělo představovat problém, pokud
správa nemocnice nevydala zákaz.
Uživatelská příručka CZ-18
Page 40

MINI 3D SOUND BAR a SUBWOOFER
REACH
Následující informace platí pouze pro členské státy EU: REACH Prohlášení o splnění
1. června 2007 vstoupilo v platnost nové chemické nařízení Evropské unie
(EU) s názvem REACH (Registration, Evaluation, Authorization and
Restriction of Chemicals - Registrace, hodnocení, schvalování a zákazy
chemikálií).
Toshiba splní všechny požadavky REACH a je zavázána poskytovat svým
zákazníkům informace o chemických látkách ve svých produktech
v souladu s předpisem REACH.
Navštivte následující webové stránky
www.toshiba-europe.com/computers/info/reach
informace o uvádění látek v našich výrobcích, které jsou uvedeny v
kandidátském seznamu podle článku 59(1) Předpisu (EC) č. 1907/2006
(„REACH“) a mají koncentraci větší než 0,1 % hmotnostních.
, kde jsou uvedeny
Následující informace jsou určeny pouze pro členské státy EU:
Likvidace produktů
Přeškrtnutý symbol odpadové nádoby znamená, že produkty je nutné
sbírat a likvidovat odděleně od domácího odpadu. Vložené baterie a
akumulátory je možné likvidovat společně s produktem. Budou odděleny v
recyklačním středisku.
Černý pruh znamená, že produkt byl uveden na trh po 13. srpnu 2005.
Svou účastí na odděleném sběru produktů a baterií pomáháte zajistit
správnou likvidaci produktů a baterií a tím pomáháte předcházet
potenciálním negativním dopadům na životní prostředí a lidské zdraví.
Podrobnější informace o sběrných a recyklačních programech, které jsou k
dispozici ve vaší zemi, uvádějí naše webové stránky
(http://eu.computers.toshiba-europe.com
místním úřadě nebo u prodejce produktu.
) nebo je můžete získat na svém
Likvidace baterií a akumulátorů
Přeškrtnutý symbol odpadové nádoby znamená, že baterie a akumulátory
je nutné sbírat a likvidovat odděleně od domácího odpadu.
Jestliže baterie nebo akumulátor obsahují více než je uvedená hodnota
olova (Pb), rtuti (Hg) nebo kadmia (Cd) dle definice nařízení o bateriích
(2006/66/EC), pak pod symbolem přeškrtnuté nádoby na odpad budou
uvedeny chemické symboly pro olovo (Pb), rtuť (Hg) nebo kadmium (Cd).
Svou účastí na odděleném sběru baterií pomáháte zajistit správnou
likvidaci produktů a baterií a tím pomáháte předcházet potenciálním
negativním dopadům na životní prostředí a lidské zdraví.
CZ-19 Uživatelská příručka
Page 41

Podrobnější informace o sběrných a recyklačních programech, které jsou k
dispozici ve vaší zemi, uvádějí naše webové stránky
(http://eu.computers.toshiba-europe.com) nebo je můžete získat na svém
místním úřadě nebo u prodejce produktu.
Doplňující informace
© 2012 TOSHIBA Europe GmbH. Všechna práva vyhrazena.
TOSHIBA si vyhrazuje právo provádět technické změny. TOSHIBA
nepřebírá odpovědnost za škody vzniklé přímo nebo nepřímo na základě
chyb, opomenutí nebo rozporů mezi tímto produktem a dokumentací.
MINI 3D SOUND BAR a SUBWOOFER
Uživatelská příručka CZ-20
Page 42

MINI 3D SOUND BAR & SUBWOOFER
Dieses Handbuch gilt für die folgenden drei Modelle:
1) Mini 3D Sound Bar + Subwoofer (SBM1W)
2) Mini 3D Sound Bar (SBM10)
3) Subwoofer für Toshiba Mini 3D Sound Bar (SBW10)
Benutzerhandbuch
Inhalt
Einführung...................................................................................................2
Lieferumfang ...............................................................................................2
Sicherheitshinweise.....................................................................................2
Kurzübersicht ..............................................................................................3
Mini 3D Sound Bar ................................................................................4
Subwoofer .............................................................................................6
Fernbedienung ......................................................................................6
Erste Schritte...............................................................................................8
Anschließen des Netzadapters..............................................................8
Anschließen des Subwoofers ................................................................9
Verwenden der Fernbedienung .............................................................9
Aufstellung der Mini 3D Sound Bar und des Subwoofers....................10
Anschließen an Audiogeräte ...............................................................11
3D-Sound ..................................................................................................14
Wiedergabe über Bluetooth
Häufig gestellte Fragen (FAQ) ..................................................................15
Technische Daten .....................................................................................17
Marken ......................................................................................................18
TOSHIBA-Support.....................................................................................18
Zulassungsbestimmungen ........................................................................18
REACH......................................................................................................19
Die folgenden Informationen gelten nur für die Mitgliedstaaten der EU:...20
Zusätzliche Informationen .........................................................................20
®
-fähige Geräte..............................................14
DE-1 Benutzerhandbuch
Page 43

Einführung
HINWEIS
User’s Manual
Mini 3D Sound Bar
Subwoofer
(falls zutreffend)
Netzadapter
3,5-mm-zu-RCA-
Audiokabel
Fernbedienung
mit Batterie
Benutzerhandbuch &
Garantieunterlagen
Vielen Dank für den Kauf eines Toshiba-Produkts.
Bitte lesen Sie dieses Handbuch sorgfältig durch und bewahren Sie es
zusammen mit der Produktdokumentation zum späteren Nachschlagen auf.
In diesem Handbuch wird die Verwendung sowohl der Mini 3D Sound Bar
als auch des Subwoofers beschrieben. Sie können die Mini 3D Sound Bar
und den Subwoofer als Set erwerben oder jedes der Geräte einzeln.
In diesem Handbuch wird die Mini 3D Sound Bar kurz als „Soundbar“
bezeichnet.
Lieferumfang
Überprüfen Sie, ob Sie die folgenden Teile erhalten haben:
MINI 3D SOUND BAR & SUBWOOFER
Sicherheitshinweise
Benutzerhandbuch DE-2
Um Fehlfunktionen oder Schäden am Produkt zu vermeiden, befolgen Sie
bitte die nachstehenden Vorsichtsmaßnahmen.
■ Vermeiden Sie Folgendes:
■ Gehäuse oder Produkt öffnen
■ Produkt oder Produktkomponenten zerlegen
■ Flüssigkeiten neben oder auf dem Produkt abstellen; dies könnte
das Produkt beschädigen, Verletzungen oder einen elektrischen
Schock verursachen
■ Produkt stoßen, fallenlassen oder erschüttern
■ Produkt während des Betriebs bewegen, da es hierbei zu
Datenverlusten kommen kann
Page 44

MINI 3D SOUND BAR & SUBWOOFER
HINWEIS
■ andere Netzadapter als den mit dem Gerät mitgelieferten
verwenden, da das Gerät andernfalls beschädigt werden kann
■ Kabel während des Betriebs trennen
■ Produkt Temperaturen außerhalb des Bereichs 5°C-35°C (Betrieb)
bzw. –20°C-60°C (Lagerung) aussetzen
■ Produkt in nassen oder feuchten Umgebungen aufbewahren oder
verwenden
■ Produkt während des Betriebs abdecken, da dies zu einer
Überhitzung führen kann
■ Produkt in der Nähe von Wärme abstrahlenden Geräten aufstellen
■ Batterie der Fernbedienung (im Lieferumfang der Mini 3D Sound
Bar enthalten) in ein Feuer werfen, da sie dann explodieren könnte
■ Batterie der Fernbedienung in Reichweite von Kleinkindern
aufbewahren, da die Knopfzelle verschluckt werden könnte
■ Trennen Sie das Produkt unter den folgenden Bedingungen
unverzüglich von der Stromversorgung:
■ Rauch oder ein ungewöhnlicher Geruch kommt es aus dem
Produktgehäuse
■ Wasser ist in das Produktgehäuse eingedrungen oder das Produkt
ist nass geworden
■ ein Gegenstand ist in das Produktgehäuse gelangt
■ das Kabel wurde beschädigt (ersetzen Sie das Kabel durch ein
neues)
■ Die Mini 3D Sound Bar enthält Magnete für die Lautsprecher. Magnete
können Daten von magnetischen Speichermedien wie Videobändern,
Festplatten und Kreditkarten löschen. Lassen die Soundbar deshalb
nicht in die Nähe solcher Produkte gelangen.
Wenn sich das Produkt nicht wie erwartet verhält oder Sie Zweifel
bezüglich der elektrischen Sicherheit haben, wenden Sie sich bitte sofort
an die TOSHIBA-Hotline oder an einen autorisierten Händler!
Kurzübersicht
In diesem Abschnitt werden die einzelnen Komponenten der Mini 3D
Sound Bar und des Subwoofers vorgestellt. Die einzelnen Komponenten
werden in der Tabelle unter den einzelnen Abbildungen beschrieben.
Je nachdem, welche Produkte Sie gekauft haben, steht Ihnen eventuell
nur eines der Geräte zur Verfügung.
DE-3 Benutzerhandbuch
Page 45

Mini 3D Sound Bar
1 2 4
7
6
5
3
HINWEIS
Vorderansicht
(Beispielabbildung) Vorderseite der Mini 3D Sound Bar
Element Komponente Beschreibung
1 INPUT Wählt die Quelle aus (in der Reihenfolge
Wenn der Netzadapter angeschlossen ist und das Gerät aus dem
Standbymodus reaktiviert wird, wird die zuletzt verwendete Eingangsquelle
verwendet. Wenn Sie den Netzadapter trennen und wieder anschließen,
startet die Soundbar jedoch standardmäßig im Modus „Aux-in“.
MINI 3D SOUND BAR & SUBWOOFER
Aux-in, Line-in, Optical, Coaxial und wieder
Aux-in).
Standardmäßig ist die Soundbar auf
„Aux-in“ eingestellt.
Element Komponente Beschreibung
2
Bluetooth
®
Wählt den Bluetooth®-Modus aus.
3 Lautstärke +/- Erhöht/Verringert die Lautstärke.
4 Power Schaltet die Soundbar ein oder versetzt
sie in den Standbymodus.
5 Sensor für die
Empfängt die Signale der Fernbedienung.
Fernbedienung
6
Bluetooth
Anzeige
®
-
Leuchtet blau, wenn die Soundbar
gekoppelt ist, und blinkt blau, während die
Kopplung (Pairing) ausgeführt wird.
7 Betriebsanzeige Leuchtet grün, wenn die Soundbar
eingeschaltet ist, und rot, während sie
ausgeschaltet ist oder sich im Standby
befindet.
Benutzerhandbuch DE-4
Page 46

MINI 3D SOUND BAR & SUBWOOFER
1
2
3
7
6
54
Rückseite
(Beispielabbildung) Rückseite der Mini 3D Sound Bar
Element Komponente Beschreibung
1 DC IN-Buchse Anschluss für den im Lieferumfang der
2SUBWOOFER-
Buchse
3 OPTICAL-
Buchse
4COAXIAL-
Buchse
5AUX IN-
Buchsen
6 LINE IN-Buchse Anschluss für ein Audioausgabegeräte
7 R/C/L-
Balanceregler
Mini 3D Sound Bar enthaltenen
Netzadapter.
Anschluss für den Subwoofer.
Anschluss für ein optisches
Audioausgabegerät über ein optisches
Kabel (nicht im Lieferumfang enthalten).
Anschluss für ein KoaxialAudioausgabegerät über ein koaxiales
Digitalaudiokabel (nicht im Lieferumfang
enthalten).
Anschluss für ein Audioausgabegeräte
über ein 3,5-mm-zu-RCA-Audiokabel
(im Lieferumfang der Mini 3D Sound Bar
enthalten).
über ein 3,5-mm-zu-RCA-Audiokabel
(im Lieferumfang der Mini 3D Sound Bar
enthalten).
Wählt den Audiokanal (rechts/Mitte/links).
Regelt den Sound mittig, wenn die
Soundbar rechts oder links neben dem
Audio-/Videogerät aufgestellt wird.
DE-5 Benutzerhandbuch
Page 47

Subwoofer
1
(Beispielabbildung) Der Subwoofer
Element Komponente Beschreibung
Fernbedienung
Die Mini 3D Sound Bar wird mit einer Fernbedienung geliefert.
MINI 3D SOUND BAR & SUBWOOFER
1 Subwooferstecker Anschluss an die SUBWOOFER-Buchse.
1 2
3
5
4
7
8
(Beispielabbildung) Die Fernbedienung
6
9
Element Tastenname Funktion
1 POWER Drücken Sie diese Taste, um die Soundbar
einzuschalten oder in den Standbymodus
zu versetzen.
2 TON AUS Drücken Sie diese Taste, um den Sound
ein-/auszuschalten.
Benutzerhandbuch DE-6
Page 48

MINI 3D SOUND BAR & SUBWOOFER
Element Tastenname Funktion
3 LAUTSTÄRKE
+/-
4 INPUT Drücken Sie diese Taste, um den
5
Bluetooth
6 3D Drücken Sie diese Taste, um den 3D-
7 FILM Drücken Sie diese Taste, um den
8 MUSIK Drücken Sie diese Taste, um den
9 SPIELE Drücken Sie diese Taste, um den SPIELE-
Drücken Sie diese Taste, um die
Lautstärke zu erhöhen bzw. zu verringern.
Audioeingang zu wählen (in der
Reihenfolge Aux-in, Line-in, Optical,
Coaxial und wieder Aux-in).
Standardmäßig ist die Soundbar auf
„Aux-in“ eingestellt.
®
Drücken Sie diese Taste, um den
Bluetooth
®
-Modus auszuwählen. Diese
Taste funktioniert wie die Bluetooth®-Taste
an der Soundbar.
Modus ein- oder auszuschalten. Der 3DModus ist standardmäßig aktiviert.
Die 3D-Soundfunktion schafft ein
überwältigendes Klangerlebnis, indem
den Tönen Tiefe und Räumlichkeit
hinzugefügt wird.
Weitere Informationen finden Sie im
Abschnitt „3D-Sound“.
FILM-Audiomodus (Standardmodus)
auszuwählen.
Der Filmmodus wurde für die
Sprachfrequenzbänder optimiert, indem
Sprache klarer und der Gesamtsound
heller geregelt wird. Stimmen hören sich
deutlicher und gut artikuliert an und
werden durch hervorragende Klarheit des
Sounds ergänzt.
MUSIK-Audiomodus auszuwählen.
Der Musikmodus wurde für ein
ausgeglichenes, aber breites Klangbild
optimiert, um den Musikgenuss zu erhöhen.
Audiomodus auszuwählen.
Der Spielemodus wurde optimiert, um ein
realistisches Klangerlebnis zu schaffen,
das durch verstärkte Bässe und Höhen
ausdrucksvolle Effekte vermittelt.
DE-7 Benutzerhandbuch
Page 49

Wenn der Netzadapter angeschlossen ist und die Soundbar aus dem
HINWEIS
AC Adaptor
AC Adaptor
HINWEIS
Standby reaktiviert wird, wird der zuletzt ausgewählte Audiomodus
verwendet. Wenn Sie den Netzadapter trennen und dann wieder
anschließen, startet die Soundbar allerdings standardmäßig im
Filmmodus.
Erste Schritte
Orientieren Sie sich an den folgenden Abbildungen, um Ihr Gerät richtig
einzurichten.
Anschließen des Netzadapters
Wählen Sie den passenden Stecker für den Netzadapter. Schließen Sie ein
Ende des Netzadapterkabels an den Gleichstromeingang auf der
Rückseite der Soundbar an und das andere Ende an eine Steckdose.
Die Betriebsanzeige auf der Vorderseite leuchtet blau, wenn die Soundbar
eingeschaltet ist.
MINI 3D SOUND BAR & SUBWOOFER
(Beispielabbildung) Netzkabel an den Netzadapter (2-polig) anschließen
(Beispielabbildung) Netzkabel an den Netzadapter (3-polig) anschließen
Wenn keine Audioeingabe erfolgt, wechselt die Soundbar nach 10 Minuten
automatisch in den Standbymodus.
Benutzerhandbuch DE-8
Page 50

MINI 3D SOUND BAR & SUBWOOFER
Subwoofer
HINWEIS
Anschließen des Subwoofers
Schließen Sie den Subwoofer, falls vorhanden, an die SUBWOOFERBuchse auf der Rückseite der Soundbar an.
(Beispielabbildung) Subwoofer anschließen
Bei eingeschalteter Soundbar sollten Sie den Subwoofer weder
anschließen noch abtrennen.
Dieser Subwoofer kann nur mit der Mini 3D Sound Bar verwendet werden.
Verwenden der Fernbedienung
Entfernen Sie den Plastikschutz, bevor Sie die Fernbedienung zum ersten
Mal verwenden.
(Beispielabbildung) Plastikschutz vor Verwendung der Fernbedienung entfernen
Befolgen Sie bei der Verwendung der Fernbedienung die folgenden
Anweisungen:
■ Halten Sie die Fernbedienung in Richtung des Sensors und drücken
Sie auf die gewünschte Taste.
■ Entfernung: Bis zu ca. 5 m von der Vorderseite des Sensors.
■ Winkel: Ungefähr 30° in jeder Richtung von der Vorderseite
des Sensors.
DE-9 Benutzerhandbuch
Page 51

MINI 3D SOUND BAR & SUBWOOFER
HINWEIS
Auswechseln der Batterie
Die Fernbedienung wird mit einer 3-V-Batterie des Typs CR2025 geliefert.
Gehen Sie wie nachstehend beschrieben vor, um die Batterie bei Bedarf
zu ersetzen.
1. Öffnen Sie das Batteriefach.
(Beispielabbildung) Batteriefach öffnen
2. Nehmen Sie die leere Batterie heraus und setzen Sie die neue
Batterie ein.
(Beispielabbildung) Neue Batterie einsetzen
Wenn die Fernbedienung nicht korrekt funktioniert oder die Reichweite
nachlässt, ersetzen Sie die Batterie durch eine neue.
Drücken Sie die Tasten der Fernbedienung nach jeweils etwa einer
Sekunde Pause, um die richtige Funktion zu gewährleisten.
Aufstellung der Mini 3D Sound Bar und des Subwoofers
Die Soundbar kann frei auf einem Tisch mit mindestens 30 cm Abstand
zum Fernseher aufgestellt werden. Das beste Surroundsound-Erlebnis
erzielen Sie, wenn Sie den Subwoofer direkt unter der Soundbar oder in
der Ecke des Zimmers (mit 5 bis 10 cm Abstand zur Wand) platzieren.
Benutzerhandbuch DE-10
Page 52

MINI 3D SOUND BAR & SUBWOOFER
Mini 3D Sound Bar
30cm
Subwoofer
Left
15.75 in.
(40 cm)
Center
15.75 in.
(40 cm)
Right
15.75 in.
(40 cm)
HINWEIS
(Beispielabbildung) Aufstellung der Mini 3D Sound Bar und des Subwoofers
Verwenden des R/C/L-Balancereglers
Wenn die Soundbar rechts oder links neben dem Fernseher oder einem
anderen Gerät aufgestellt wird, können Sie den R/C/L-Balanceregler
einstellen, um mittigen Sound zu erzielen.
(Beispielabbildung) Verwenden des R/C/L-Balancereglers
Anschließen an Audiogeräte
Gehen Sie wie nachstehend beschrieben vor, um externe Audiosignale
von Geräten wie einem Fernseher über die Buchsen AUX IN, LINE IN,
OPTICAL und COAXIAL an die Soundbar zu leiten.
Die beste Leistung mit einem Fernsehgerät erzielen Sie mit einem
digitalen Glasfaserkabel (separat erhältlich).
DE-11 Benutzerhandbuch
Page 53

MINI 3D SOUND BAR & SUBWOOFER
HINWEIS
HINWEIS
Verwenden der AUX IN-Buchsen
1. Schließen Sie ein 3,5-mm-zu-RCA-Audiokabel (im Lieferumfang der
Soundbar enthalten) von den L/R AUX IN-Buchsen der Soundbar an
den Audioausgang eines Fernsehers, eines DVD-Players oder eines
anderen Audiogeräts an.
(Beispielabbildung) Analoge Audiokabelverbindung
Sie können mit einem der folgenden Kabel eine Verbindung zum
Fernsehgerät herstellen:
■ 3,5-mm-zu-RCA-Audiokabel (im Lieferumfang der Soundbar enthalten)
■ RCA-zu-RCA-Kabel (nicht im Lieferumfang enthalten)
2 Drücken Sie die INPUT-Taste der Soundbar oder der Fernbedienung,
um zum AUX IN-Eingang zu wechseln.
Verwenden der LINE IN-Buchse
1. Schließen Sie ein 3,5-mm-zu-RCA-Audiokabel (im Lieferumfang der
Soundbar enthalten) von der LINE IN-Buchse der Soundbar an die
LINE OUT-Buchse eines Audiogeräts an.
(Beispielabbildung) 3,5-mm-Audiokabelverbindung
Sie können mit einem der folgenden Kabel eine Verbindung zum
Fernsehgerät herstellen:
■ 3,5-mm-zu-RCA-Audiokabel (im Lieferumfang der Soundbar enthalten)
■ 3,5-mm-zu-3,5-mm-Audiokabel (nicht im Lieferumfang enthalten)
Benutzerhandbuch DE-12
Page 54

MINI 3D SOUND BAR & SUBWOOFER
Digital optical cable
HINWEIS
Digital audio coaxial cable
2 Drücken Sie die INPUT-Taste auf der Soundbar oder auf der
Fernbedienung, um zum LINE IN-Eingang zu wechseln.
Verwenden der OPTICAL-Buchse
1. Schließen Sie ein Glasfaserkabel (nicht im Lieferumfang enthalten) von
der OPTICAL-Buchse der Soundbar an die OPTICAL OUT-Buchse eines
Fernsehers, eines DVD-Players oder eines anderen Audiogeräts an.
(Beispielabbildung) Glasfaserverbindung
2 Drücken Sie die INPUT-Taste auf der Soundbar oder auf der
Fernbedienung, um zum OPTICAL-Eingang zu wechseln.
Die Soundbar unterstützt nur digitale PCM-Signale (Puls-Code-Modulation).
Um das Audiosignal von externen Quellen (z. B. Blu-ray
TM
- und DVD-Player)
festzulegen, wählen Sie bitte nicht „DTS“ oder „Dolby Digital“. Andernfalls
wird kein Ton von der Soundbar ausgegeben.
Verwenden der COAXIAL-Buchse
1. Schließen Sie ein digitales Audiokoaxialkabel (nicht im Lieferumfang
enthalten) von der COAXIAL-Buchse der Soundbar an die COAXIAL
OUT-Buchse eines Fernsehers, eines DVD-Players oder eines anderen
Audiogeräts an.
(Beispielabbildung) Digitale Audiokoaxialkabelverbindung
DE-13 Benutzerhandbuch
Page 55

MINI 3D SOUND BAR & SUBWOOFER
HINWEIS
2 Drücken Sie die INPUT-Taste auf der Soundbar oder der
Fernbedienung, um zum COAXIAL-Eingang zu wechseln.
Die Soundbar unterstützt nur digitale PCM-Signale (Puls-Code-Modulation).
Um das Audiosignal von externen Quellen (z. B. Blu-ray
festzulegen, wählen Sie bitte nicht „DTS“ oder „Dolby Digital“. Andernfalls
wird kein Ton von der Soundbar ausgegeben.
3D-Sound
Die Soundbar verfügt über Sonic Emotion® Absolute 3D Sound-Technologie,
die ein einzigartiges Hörerlebnis aus einem einzelnen, kompakten Gerät
ohne das Gewirr zusätzlicher Kabel. Das Plug-and-Play-Gerät schafft eine
Mehrzweckfunktionalität, die zum Sound hoher Qualität beiträgt.
Sie können aus drei verschiedenen Audiomodi (Film, Musik oder Spiele)
wählen, um das optimale Ergebnis für die verwendete Quelle zu erzielen.
Suchen Sie einen Audiomodus aus, der zum Quellmaterial und Ihren
persönlichen Vorlieben passt.
Info zu Sonic Emotion® 3D Sound
Sonic Emotion® Absolute 3D ist ein einzigartiges Hörerlebnis. Absolute 3D
verwendet die Sound Field Control, um den Raum des Zuhörers in ein
virtuelles natürliches Klangfeld zu verwandeln.
Die Wellenfeldsynthese ist die Basis der Sound Field Control.
Dabei werden Schallwellen durch den gesamten Hörbereich verteilt,
um sicherzustellen, dass alle Zuhörer unabhängig von ihrer Position im
Raum vollkommen vom Klang umhüllt werden. Genau wie in einer
natürlichen Umgebung wird der Sound unabhängig von der Geräteposition
aus allen Richtungen wahrgenommen.
TM
- und DVD-Player)
Wiedergabe über Bluetooth®-fähige Geräte
So spielen Sie Dateien über Bluetooth®-fähige Geräte ab
1. Schalten Sie die Soundbar ein.
®
2. Drücken Sie die Bluetooth
Modus zu aktivieren.
Die blaue Anzeige blinkt, während nach verfügbaren Bluetooth
fähigen Geräten gesucht wird.
3. Schalten Sie bei Ihrem anderen Bluetooth
Bluetooth®-Modus ein. Das andere Gerät sucht nach verfügbaren
Bluetooth-Geräten in der Nähe.
Falls das Gerät die Suche nicht automatisch beginnt, müssen Sie die
Suchfunktion des Geräts manuell aktivieren.
4. Nachdem die Soundbar erkannt wurde, wählen Sie „Toshiba Mini 3D
Sound Bar“ für die Kopplung.
Benutzerhandbuch DE-14
-Taste auf der Soundbar, um den Bluetooth-
®
-
®
-fähigen Gerät den
Page 56

MINI 3D SOUND BAR & SUBWOOFER
HINWEIS
HINWEIS
5. Nach der erfolgreichen Kopplung der beiden Geräte wird auf Ihrem
Gerät „Verbunden“ angezeigt, und die blaue Anzeige der Soundbar hört
auf zu blinken.
6. Wenn die Geräte gekoppelt sind, können Sie auf Ihrem anderen Gerät
Musik und Videos abspielen und den Klang über die Soundbar
genießen.
Nach einer Trennung müssen Sie die Schritte 4 bis 6 wiederholen, um die
Verbindung wiederherzustellen.
®
Beim Koppeln eines neuen Bluetooth
Bluetooth
®
-Taste auf der Soundbar, nicht auf der Fernbedienung. Die
-fähigen Geräts verwenden Sie die
Fernbedienung kann nur zur Steuerung eines Geräts verwendet werden,
mit dem zuvor eine Kopplung (Pairing) ausgeführt wurde.
Kopplung der Soundbar mit einem anderen Bluetooth®-Gerät
1. Trennen Sie das Bluetooth®-Gerät von der Soundbar.
®
2. Drücken Sie die Bluetooth
blinkt.
3. Schalten Sie den Bluetooth®-Modus des anderen Geräts ein und
wählen Sie darauf „Toshiba Mini 3D Sound Bar“, um die Kopplung
einzuleiten.
Lesen Sie dazu das Benutzerhandbuch Ihres Bluetooth®-Geräts.
Die Soundbar kann jeweils nur mit einem Bluetooth
werden. Wenn die Soundbar bereits mit einem Bluetooth®-Gerät gekoppelt
ist, können Sie keine Kopplung mit einem anderen Bluetooth
herstellen, auch wenn auf diesem möglicherweise „Toshiba Mini 3D Sound
Bar“ angezeigt wird.
-Taste auf der Soundbar, bis die blaue LED
®
-Gerät gekoppelt
®
-Gerät
Häufig gestellte Fragen (FAQ)
Frage 1:
Die Soundbar lässt sich nicht einschalten.
Antwort:
Stellen Sie sicher, dass der Netzadapter an die Soundbar angeschlossen
und in eine Steckdose eingesteckt ist.
Drücken Sie die Ein/Aus-Taste oben auf der Soundbar und überprüfen Sie,
ob die Betriebsanzeige grün leuchtet.
Frage 2:
Es kommt kein Ton aus der Soundbar.
Antwort:
Diese Problem kann verschiedene Ursachen haben. Überprüfen Sie
Folgendes:
■ Verstellen Sie die Lautstärketaste der Soundbar.
DE-15 Benutzerhandbuch
Page 57

MINI 3D SOUND BAR & SUBWOOFER
■ Vergewissern Sie sich, dass die ausgewählte Quelle tatsächlich Audio
sendet. Wenn Sie eine Verbindung zu einem Fernseher hergestellt
haben, vergewissern Sie sich, dass der Fernseher für die
Audioausgabe konfiguriert ist.
■ Vergewissern Sie sich, dass alle Audioverbindungen fest sind.
■ Überprüfen Sie, ob Sie die korrekte Quelle (Eingang) gewählt haben.
■ Drücken Sie die Taste TON AUS auf der Fernbedienung,
um sicherzustellen, dass die Soundbar nicht stummgeschaltet ist.
Frage 3:
Kein Sound vom Subwoofer.
Antwort:
Vergewissern Sie sich, dass der Subwoofer korrekt angeschlossen ist.
Frage 4:
Die Fernbedienung funktioniert nicht richtig.
Antwort:
Diese Problem kann verschiedene Ursachen haben. Überprüfen Sie
Folgendes:
■ Vergewissern Sie sich, dass Sie vor der ersten Verwendung der
Fernbedienung den Plastikschutz entfernt haben.
■ Die Fernbedienung muss direkt auf den Sensor an der Soundbar zeigen.
■ Die Fernbedienung muss innerhalb einer bestimmten Entfernung zu der
Soundbar verwendet werden.
■ Es dürfen sich keine Hindernisse zwischen der Fernbedienung und
dem Sensor an der Soundbar befinden.
Sonstige
Das Zubehör dieser Produktserie ist modellabhängig.
Weitere Informationen finden Sie auf der Verpackung oder auf der
Lieferliste, oder fragen Sie Ihren Händler.
Die technischen Spezifikationen oder das Design des Produkts können
ohne vorherige Ankündigung geändert werden.
Die Abbildungen im vorliegenden Handbuch können sich vom
tatsächlichen Produkt leicht unterscheiden.
Benutzerhandbuch DE-16
Page 58

MINI 3D SOUND BAR & SUBWOOFER
HINWEIS
Technische Daten
Mini 3D Sound Bar
Allgemeine
Informationen
Stromversorgung 19 V Gleichstrom, 3.42 A
Stromabgabe 10 Watt x 4 (pro Kanal bei 4 Ohm, 1 kHz /
Stromverbrauch 40W
Impedanz 4 Ohm
Abmessungen
(Breite x Höhe x Tiefe)
Gewicht Ca. 0,85 kg
Frequenzreaktion 95 Hz-19k Hz
Verzerrung <10%
Subwoofer
Allgemeine
Informationen
Stromabgabe 20 Watt bei 8 Ohm, 100 Hz/ THD 10%
Impedanz 8 Ohm
Abmessungen
(Breite x Höhe x Tiefe)
Gewicht Ca. 2,83 kg
Frequenzreaktion 38 Hz-19 kHz (Mini 3D Sound Bar und
Beschreibung
THD 10%)
290 mm x 72 mm x 100 mm
Beschreibung
220 mm x 246 mm x 220 mm
Subwoofer)
Design und technische Daten können variieren und ohne Ankündigung
geändert werden.
DE-17 Benutzerhandbuch
Page 59

Marken
Die Bluetooth-Marke und -Logos sind eingetragene Marken im Besitz von
Bluetooth SIG, Inc., und die Verwendung dieser Marken durch die
TOSHIBA Corporation erfolgt unter Lizenz.
Sonic Emotion ist eine eingetragene Marke der sonic emotion ag.
In diesem Handbuch können auch andere Marken und eingetragene
Marken als die oben aufgeführten verwendet werden.
TOSHIBA-Support
Brauchen Sie Hilfe?
Die neuesten Treiber-Updates, Benutzerhandbücher und FAQs finden Sie
auf der TOSHIBA-Support-Website für Optionen und Dienstleistungen:
http://computers.toshiba.eu/options-support
Die Telefonnummern der TOSHIBA-Hotline finden Sie unter
http://computers.toshiba.eu/options-warranty.
Zulassungsbestimmungen
Erfüllung von CE-Normen
MINI 3D SOUND BAR & SUBWOOFER
Dieses Produkt trägt die CE-Kennzeichnung in Übereinstimmung mit den
wesentlichen Anforderungen und anderen relevanten Bedingungen der
Direktive 1999/5/EG. Verantwortlich für die CE-Kennzeichnung ist die
Toshiba Europe GmbH, Hammfelddamm 8, 41460 Neuss, Deutschland.
Eine Kopie der offiziellen Konformitätserklärung finden Sie auf der
folgenden Webseite: http://epps.toshiba-teg.com
Dieses Produkt und die Originaloptionen (Zubehör/Erweiterungen) erfüllen
die zur CE-Konformität herangezogenen Normen bezüglich der
elektromagnetischen Verträglichkeit (EMV) und Sicherheit. TOSHIBA kann
jedoch nicht garantieren, dass dieses Produkt diese EMV-Normen auch
dann erfüllt, wenn Einheiten oder Kabel, die nicht von TOSHIBA hergestellt
oder vertrieben werden, angeschlossen werden. In diesem Fall ist die
Person, die diese anderen Einheiten/Kabel angeschlossen/eingebaut hat,
dafür verantwortlich, dass das gesamte System (Soundbar und Optionen/
Kabel) die erforderlichen Normen weiterhin erfüllt. Um generell Probleme mit
der EMV zu vermeiden, sollten die folgenden Hinweise beachtet werden:
■ Es sollten nur Optionen mit CE-Kennzeichnung angeschlossen
oder eingebaut werden
■ Es sollten nur bestmöglich abgeschirmte Kabel angeschlossen werden.
Benutzerhandbuch DE-18
.
Page 60

MINI 3D SOUND BAR & SUBWOOFER
Arbeitsumgebung
Die elektromagnetische Verträglichkeit (EMC) dieses Produkts wurde als
typisch für diese Produktkategorie festgestellt. Das Produkt ist nicht für den
industriellen Einsatz, sondern nur für die persönliche Verwendung gedacht.
Andere Arbeitsumgebungen wurden nicht von Toshiba getestet, und die
Verwendung dieses Produkts in anderen als den genannten
Arbeitsumgebungen ist möglicherweise eingeschränkt oder kann nicht
empfohlen werden. Mögliche Folgen der Verwendung dieses Produkts in
nicht zulässigen Arbeitsumgebungen sind:
Störungen von anderen Geräten in der Nähe oder durch andere Geräte in
der Nähe mit vorübergehender Fehlfunktion oder Datenverlusten.
Beispiele für nicht überprüfte Arbeitsumgebungen und damit
zusammenhängende Empfehlungen:
Industrieumgebungen (z. B. Bereiche, in denen mit einer Netzspannung
von 380 V und drei Phasen gearbeitet wird): Gefahr von Störungen dieses
Produkts aufgrund starker elektromagnetischer Felder, besonders in der
Nähe großer Maschinen oder Generatoren.
Medizinische Umgebungen: Die Erfüllung der Richtlinie für medizinische
Produkte wurde von Toshiba nicht überprüft, deshalb darf dieses Produkt
nicht ohne weitere Überprüfung als medizinisches Produkt eingesetzt
werden. Die Verwendung in normalen Büroumgebungen, auch in
Krankenhäusern, sollte kein Problem darstellen, solange keine
Einschränkungen durch die verantwortliche Verwaltung vorliegen.
REACH
Die folgenden Informationen gelten nur für Mitgliedsstaaten der EU:
REACH - Konformitätserklärung
Am 1. Juni 2007 trat die neue Chemikalienverordnung der Europäischen
Union (EU), REACH, in Kraft. REACH steht für Registration, Evaluation,
Authorization and Restriction of Chemicals (Registrierung, Bewertung,
Zulassung und Beschränkung von Chemikalien).
Toshiba erfüllt alle REACH-Anforderungen und ist verpflichtet, den Kunden
gemäß REACH-Verordnung über die chemischen Substanzen in ToshibaProdukten zu informieren.
Besuchen Sie die Website www.toshiba-europe.com/computers/info/reach,
um sich über Toshiba-Produkte zu informieren, die auf der Kandidatenliste
gemäß Artikel 59(1) der Verordnung (EG) Nr. 1907/2006 („REACH“)
aufgeführte Substanzen enthalten, und zwar in einer Konzentration von
mehr als 0,1 % Massenanteil.
DE-19 Benutzerhandbuch
Page 61

MINI 3D SOUND BAR & SUBWOOFER
Die folgenden Informationen gelten nur für die Mitgliedstaaten der EU:
Entsorgung von Produkten
Das Symbol mit der durchgestrichenen Mülltonne weist darauf hin, dass
Produkte getrennt vom Hausmüll gesammelt und entsorgt werden müssen.
Eingebaute Batterien und Akkus können zusammen mit dem Produkt
entsorgt werden. Sie werden in den Recyclingzentralen entnommen und
gesondert entsorgt.
Der schwarze Balken zeigt an, dass das Produkt nach dem 13.
August 2005 auf den Markt gebracht wurde.
Indem Sie Produkte und Batterien separat sammeln, tragen Sie zur
sicheren Entsorgung von Produkten und Batterien bei und helfen damit,
mögliche umwelt- oder gesundheitsschädliche Folgen zu vermeiden.
Genauere Informationen über Sammel- und Recycling-Programme, die in
Ihrem Land verfügbar sind, finden Sie auf unserer Website
(http://eu.computers.toshiba-europe.com
örtlichen Behörden oder das Geschäft, in dem Sie das Produkt gekauft
haben.
Entsorgung von Batterien und/oder Akkus
Das Symbol mit der durchgestrichenen Mülltonne weist darauf hin, dass
Batterien und/oder Akkus getrennt vom Hausmüll gesammelt und entsorgt
werden müssen.
Wenn die Batterie bzw. der Akku höhere als die in der Batterierichtlinie
(2006/66/EG) angegebenen Werte von Blei (Pb), Quecksilber (Hg) und/
oder Kadmium (Cd) enthält, werden die chemischen Symbole für Blei (Pb),
Quecksilber (Hg) und/oder Kadmium (Cd) unter dem durchgestrichenen
Mülltonnensymbol aufgeführt.
Indem Sie Batterien separat sammeln, tragen Sie zur sicheren Entsorgung
von Produkten und Batterien bei und helfen damit, mögliche umwelt- oder
gesundheitsschädliche Folgen zu vermeiden.
Genauere Informationen über Sammel- und Recycling-Programme, die in
Ihrem Land verfügbar sind, finden Sie auf unserer Website
(http://eu.computers.toshiba-europe.com
örtlichen Behörden oder das Geschäft, in dem Sie das Produkt gekauft
haben.
) oder wenden Sie sich an die
) oder wenden Sie sich an die
Zusätzliche Informationen
© 2012 TOSHIBA Europe GmbH. Alle Rechte vorbehalten.
Technische Änderungen vorbehalten. TOSHIBA übernimmt keine Haftung
für Schäden, die direkt oder indirekt aus Fehlern, Auslassungen oder
Abweichungen zwischen Produkt und Dokumentation resultieren.
Benutzerhandbuch DE-20
Page 62

MINI 3D SOUND BAR & SUBWOOFER
Denne håndbog gælder for de tre modeller nedenfor:
1) Mini 3D Sound Bar + subwoofer (SBM1W)
2) Mini 3D Sound Bar (SBM10)
3) Subwoofer til Toshiba Mini 3D Sound Bar (SBW10)
Brugerhåndbog
Indhold
Introduktion..................................................................................................2
Pakkens indhold..........................................................................................2
Sikkerhedsinstruktioner...............................................................................2
Hurtig rundvisning .......................................................................................3
Mini 3D Sound Bar ................................................................................4
Subwoofer .............................................................................................6
Fjernbetjening........................................................................................6
Introduktion..................................................................................................8
Tilslutning af netadapteren ....................................................................8
Tilslutning af subwooferen.....................................................................9
Brug af fjernbetjeningen ........................................................................9
Placering af Mini 3D Sound Bar og subwoofer....................................10
Tilslutning af audioenheden.................................................................11
3D-lyd........................................................................................................14
Afspilning via enheder, der understøtter Bluetooth
Ofte stillede spørgsmål (FAQ)...................................................................15
Specifikationer...........................................................................................16
Varemærker ..............................................................................................17
TOSHIBA-support .....................................................................................17
Oplysninger om regler...............................................................................18
REACH......................................................................................................19
Nedenstående information gælder kun for EU-lande: ............................... 19
Yderligere oplysninger...............................................................................20
®
..................................14
DK-1 Brugerhåndbog
Page 63

Introduktion
BEMÆRK
User’s Manual
Mini 3D Sound Bar
Subwoofer
(hvis det er relevant)
Netadapter
3,5 mm - RCA-audiokabel
Fjernbetjening
med batteri
Brugerhåndbog og
garantihæfte
Velkommen og tak for dit køb af et TOSHIBA-produkt.
Vi anbefaler, at du læser denne håndbog omhyggeligt og opbevarer den
sammen med dokumentationen til produktet, så du har den til rådighed på
et senere tidspunkt.
Denne håndbog omfatter både anvendelse af Mini 3D Sound Bar og
subwooferen. Du kan købe Mini 3D Sound Bar og subwooferen som et
sæt, eller du kan købe en af dem separat.
I denne håndbog henviser ordet “sound bar” til Mini 3D Sound Bar.
Pakkens indhold
Kontroller, at du har alle følgende komponenter:
MINI 3D SOUND BAR & SUBWOOFER
Sikkerhedsinstruktioner
Brugerhåndbog DK-2
For at undgå fejlfunktioner og skader på produktet bør du følge de
forholdsregler, der er anført nedenfor, omhyggeligt.
■ Undgå at
■ åbne kabinettet eller produktet
■ skille produktet eller dets dele ad
■ placere væsker tæt ved eller på produktet, da dette kan beskadige
produktet, forårsage personskader eller medføre elektrisk stød
eller brand
■ støde, tabe eller ryste produktet
■ flytte produktet, mens det arbejder, da dette kan medføre
beskadigelse af data
Page 64

MINI 3D SOUND BAR & SUBWOOFER
BEMÆRK
■ bruge andre vekselstrøm/jævnstrøm-adaptere end den, der følger
med enheden, da enheden ellers kan blive beskadiget
■ frakoble kabler, mens drevet arbejder
■ udsætte produktet for temperaturer uden for området 5° C - 35° C,
mens det arbejder, og temperaturer på -20° C - 60° C, mens det er
slukket
■ udsætte produktet for våde eller fugtige forhold
■ dække produktet til, mens det arbejder, da det kan blive
overophedet
■ placere produktet tæt på varme apparater
■ kaste fjernbetjeningens batteri (fjernbetjeningen følger med Mini 3D
Sound Bar) på åben ild, da dette kan få batteriet til at eksplodere
■ efterlade fjernbetjeningens batteri inden for børns rækkevidde,
da børn kan komme til at sluge knapbatteriet
■ Frakobl produktet med det samme, hvis
■ der kommer røg eller usædvanlige lugte ud af produktkabinettet
■ der er kommet vand ind i produktkabinettet, eller det er blevet vådt
■ der er kommet en genstand ind i produktkabinettet
■ kablet er blevet beskadiget (i så fald skal du erstatte kablet med
et nyt)
■ Mini 3D Sound Bar indeholder magneter til højttalerne. Magneter kan
slette data fra magnetiske lagermedier som f.eks. videobånd, harddiske
og kreditkort. Opbevar derfor din sound bar på afstand af sådanne
produkter.
Hvis produktet ikke fungerer som forventet, eller hvis du er i tvivl om den
elektriske sikkerhed, skal du straks kontakte TOSHIBAs hotline eller en
autoriseret forhandler!
Hurtig rundvisning
I dette afsnit identificeres de forskellige komponenter i Mini 3D Sound Bar
og subwooferen. Du finder en beskrivelse af de enkelte komponenter i
tabellen under illustrationerne.
Afhængigt af dit køb vil du muligvis ikke have både Mini 3D Sound Bar og
subwooferen.
DK-3 Brugerhåndbog
Page 65

Mini 3D Sound Bar
1 2 4
7
6
5
3
BEMÆRK
Set forfra
(Eksempel) Mini 3D Sound Bar set forfra
Element Komponent Beskrivelse
1 INPUT Vælger kilden (i rækkefølgen Aux-in,
MINI 3D SOUND BAR & SUBWOOFER
Line-in, Optisk, Koaksial og derefter
tilbage til Aux-in).
Din sound bar er som standard indstillet til
Aux-in-tilstand.
Din sound bar fortsætter fra den indgang, du sidst har valgt, når den
fortsætter fra standbytilstand med netadapteren tilsluttet. Men hvis du
fjerner netadapteren og tilslutter den igen, vil din sound bar starte med
Aux-in-indgangen som standard.
Element Komponent Beskrivelse
2
Bluetooth
®
Vælger Bluetooth®-tilstand.
3 Lydstyrke +/- Øger/reducerer lydstyrken.
4 Strøm Tænder din sound bar eller sætter den i
standbytilstand.
5 Fjernbetjenings-
Modtager fjernbetjeningens signaler.
sensor
6
Bluetooth®indikator
7 Strømindikator Lyser grønt, når din sound bar er tændt,
Lyser blåt, mens din sound bar er parret,
og blinker blåt, mens parringen finder sted.
og lyser rødt, når den er slukket eller i
standbytilstand
Brugerhåndbog DK-4
Page 66

MINI 3D SOUND BAR & SUBWOOFER
1
2
3
7
6
54
Set bagfra
(Eksempel) Mini 3D Sound Bar set bagfra
Element Komponent Beskrivelse
1 Jævnstrømsind-
gangsstik
2SUBWOOFER-
stik
3 OPTICAL-stik Stik til en optisk audiooutputenhed, som
4 COAXIAL-stik Stik til en koaksial audiooutputenhed,
5 AUX IN-stik Stik til en audiooutputenhed, som bruger et
6 LINE IN-stik Stik til en audiooutputenhed, som bruger et
7R/C/L-
balanceskyder
Stik til den medfølgende netadapter (følger
med Mini 3D Sound Bar).
Stik til subwooferen.
bruger et optisk audiokabel (medfølger
ikke).
som bruger et koaksialt digitalt audiokabel
(medfølger ikke).
3,5 mm - RCA-audiokabel (følger med Mini
3D Sound Bar).
3,5 mm - RCA-audiokabel (følger med Mini
3D Sound Bar).
Vælger lydkanalen (højre/center/venstre).
Justerer lyden til centrum, når din sound
bar er placeret i højre/venstre side af
audio/videoenheden.
DK-5 Brugerhåndbog
Page 67

Subwoofer
1
1 2
3
4
5
6
7
9
8
Element Komponent Beskrivelse
Fjernbetjening
Der følger en fjernbetjening med Mini 3D Sound Bar.
MINI 3D SOUND BAR & SUBWOOFER
(Eksempel) Subwooferen
1 Subwooferstik Tilslutning til SUBWOOFER-stikket.
(Eksempel) Fjernbetjeningen
Element Knappens
1 POWER Tryk for at tænde din sound bar eller sætte
Brugerhåndbog DK-6
2 MUTE Tryk for at slå lyden til/fra.
Funktion
navn
den i standbytilstand.
Page 68

MINI 3D SOUND BAR & SUBWOOFER
BEMÆRK
Element Knappens
Funktion
navn
3 LYDSTYRKE +/- Tryk for at øge/reducere lydstyrken.
4 INPUT Tryk for at vælge kilden (i rækkefølgen
Aux-in, Line-in, Optisk, Koaksial og
derefter tilbage til Aux-in).
Din sound bar er som standard indstillet til
Aux-in-tilstand.
5
Bluetooth
®
Tryk for at vælge Bluetooth®-tilstand.
Den fungerer på samme måde som
Bluetooth
®
-knappen på din sound bar.
6 3D Tryk for at slå 3D-tilstand TIL/FRA.
3D-tilstand er aktiveret som standard.
3D-lydfunktionen skaber en omsluttende
lytteoplevelse ved at tilføje dybde og
rumlighed til lyden, når du bruger
3D-lydknappen.
Du kan finde flere oplysninger i afsnittet
“3D-lyd”.
7 FILM Tryk for at vælge FILM-audiotilstanden
(standardtilstanden).
Filmtilstanden er optimeret til
stemmefrekvensbåndene ved at øge
talens tydelighed, samtidig med at lyden
som helhed bliver lysere. Stemmerne
bliver mere præcise, skarpe og
veldefinerede, hvilket understreges
yderigere af lydens fremragende klarhed.
8 MUSIK Tryk for at vælge MUSIK-audiotilstanden
Musiktilstanden er optimeret til at skabe en
afbalanceret, men stadig bred omgivende
lyd, som får musikken til at lyde
fremragende.
9 SPIL Tryk for at vælge SPIL-audiotilstanden
SPIL-tilstanden er optimeret til at skabe en
omsluttende lytteoplevelse med en øgning
af bas og diskant, hvilket giver stærke
effekter og giver lytteren en fornemmelse
af, at lyden bevæger sig.
Din sound bar fortsætter fra den audiotilstand, du sidst har valgt, når den
fortsætter fra standbytilstand med netadapteren tilsluttet. Men hvis du
fjerner netadapteren og tilslutter den igen, vil din sound bar starte med
flimaudiotilstanden som standard.
DK-7 Brugerhåndbog
Page 69

Introduktion
AC Adaptor
AC Adaptor
BEMÆRK
Se på illustrationerne nedenfor, så du kan klargøre din enhed korrekt.
Tilslutning af netadapteren
Vælg det korrekte stik for at tilslutte til en netadapter. Tilslut den ene ende
af netadapterens ledning/kabel til DC IN-stikket bag på din sound bar,
og tilslut den anden ende til en fungerende stikkontakt. Strømindikatoren
på frontpanelet lyser grønt, når din sound bar er tændt.
(Eksempel) Tilslutning af netledningen til netadapteren (stik med 2 ben)
MINI 3D SOUND BAR & SUBWOOFER
(Eksempel) Tilslutning af netledningen til netadapteren (stik med 3 ben)
Din sound bar skifter automatisk til standbytilstand, hvis der ikke er noget
audiooutput i 10 minutter.
Brugerhåndbog DK-8
Page 70

MINI 3D SOUND BAR & SUBWOOFER
Subwoofer
BEMÆRK
Tilslutning af subwooferen
Tilslut subwooferen til SUBWOOFER-stikket (hvis det er relevant) bag på
din sound bar.
(Eksempel) Tilslutning af subwooferen
Undgå at tilslutte eller frakoble subwooferen, når din sound bar er tændt.
Denne subwoofer er kun kompatibel med Toshiba Mini 3D Sound Bar.
Brug af fjernbetjeningen
Fjern plastikarket, inden du bruger fjernbetjeningen for første gang.
(Eksempel) Fjern plastikarket, inden du bruger fjernbetjeningen.
Følg instruktionerne nedenfor, når du bruger fjernbetjeningen:
■ Ret fjernbetjeningen mod fjernbetjeningssensoren, og tryk på
knapperne.
■ Afstand: Ca. 5 m fra forsiden af fjernbetjeningssensoren.
■ Vinkel: Ca. 30 ° i hver retning for forsiden af fjernbetjeningssensoren.
DK-9 Brugerhåndbog
Page 71

MINI 3D SOUND BAR & SUBWOOFER
BEMÆRK
Udskiftning af batteriet
Fjernbetjeningen anvender ét CR2025-batteri (3V). Hvis du vil udskifte
batteriet, skal du følge instruktionerne nedenfor.
1. Åbn batterilåget.
(Eksempel) Åbn batterilåget.
2. Fjern det gamle batteri, og sæt det nye batteri i.
(Eksempel) Sæt det nye batteri i
Hvis fjernbetjeningen ikke fungerer korrekt, eller hvis rækkevidden er
reduceret, skal du udskifte batteriet med et nyt.
Tryk på fjernbetjeningens knapper med et interval på ca. ét sekund for at
sikre, at fjernbetjeningen fungerer korrekt.
Placering af Mini 3D Sound Bar og subwoofer
Din sound bar kan placeres fritstående på et bord mindst 30 cm fra tv’et.
For at du kan opnå den bedste surroundsoundoplevelse, anbefales det,
at du placerer subwooferen direkte under din sound bar eller i et af
rummets hjørner (ca. 5-10 cm fra væggen).
Brugerhåndbog DK-10
Page 72

MINI 3D SOUND BAR & SUBWOOFER
Mini 3D Sound Bar
30cm
Subwoofer
Left
15.75 in.
(40 cm)
Center
15.75 in.
(40 cm)
Right
15.75 in.
(40 cm)
BEMÆRK
(Eksempel) Placering af Mini 3D Sound Bar og subwoofer
Brug af R/C/L-balanceskyderen
Hvis din sound er placeret i højre (venstre) side af tv’et eller en anden
enhed, kan du flytte R/C/L-balanceskyderen på bagsiden af din sound bar
for at forskyde lyden til centrum.
(Eksempel) Brug af R/C/L-balanceskyderen
Tilslutning af audioenheden
Følg disse instruktioner for at lede eksterne audiosignaler fra enheder som
f.eks. et tv til din sound bar via stikkene AUX IN, LINE IN, OPTICAL og
COAXIAL.
For at du kan opnå det bedste mulige resultat med et tv, anbefaler vi, at du
bruger et digitalt optisk kabel (købes separat).
DK-11 Brugerhåndbog
Page 73

MINI 3D SOUND BAR & SUBWOOFER
BEMÆRK
BEMÆRK
Brug af AUX IN-stikkene
1. Tilslut et 3,5 mm - RCA-audiokabel (følger med din sound bar) fra L/R
AUX IN-stikkene på din sound bar til AUDIO OUT-stikkene på et tv,
en dvd eller en anden audioenhed.
(Eksempel) Tilslutning via et analogt audiokabel
Du kan nu tilslutte tv’et ved at bruge et af kablerne nedenfor:
■ 3,5 mm - RCA-audiokabel (følger med din sound bar).
■ RCA - RCA-kabel (medfølger ikke).
2 Tryk på INPUT-knappen på din sound bar eller på fjernbetjeningen for
at skifte til AUX IN-indgangen.
Brug af LINE IN-stikket
1. Tilslut et 3,5 mm - RCA-audiokabel (følger med din sound bar) fra
LINE IN-stikket på din sound bar til LINE OUT-stikket på en audioenhed.
(Eksempel) Tilslutning via et 3,5 mm audiokabel
Du kan nu tilslutte tv’et ved at bruge et af kablerne nedenfor:
■ 3,5 mm - RCA-audiokabel (følger med din sound bar).
■ 3,5 mm - 3,5 mm-audiokabel (medfølger ikke).
Brugerhåndbog DK-12
Page 74

MINI 3D SOUND BAR & SUBWOOFER
Digital optical cable
BEMÆRK
Digital audio coaxial cable
2 Tryk på INPUT-knappen på din sound bar eller på fjernbetjeningen for
at skifte til LINE IN-indgangen.
Brug af OPTICAL-stikket
1. Tilslut et optisk kabel (medfølger ikke) fra OPTICAL-stikket på din
sound bar til OPTICAL OUT-stikket på et tv, en dvd eller en anden
audioenhed.
(Eksempel) Tilslutning via et optisk kabel
2 Tryk på INPUT-knappen på din sound bar eller på fjernbetjeningen for
at skifte til OPTICAL-indgangen.
Din sound bar er kun designet til at understøtte et digitalt PCM-signal
(impuls-kode-modulation). Når du indstiller audiosignalet fra eksterne
kilder (f.eks. Blu-ray
“Dolby Digital”. Ellers vil der ikke komme nogen lyd fra din sound bar.
TM
- og dvd-afspillere), må du ikke vælge “DTS” eller
Brug af COAXIAL-stikket
1. Tilslut et digitalt koaksialt kabel (medfølger ikke) fra COAXIAL-stikket
på din sound bar til COAXIAL OUT-stikket på et tv, en dvd eller en
anden audioenhed.
(Eksempel) Tilslutning via et digitalt koaksialt audiokabel
DK-13 Brugerhåndbog
Page 75

2 Tryk på INPUT-knappen på din sound bar eller på fjernbetjeningen for
BEMÆRK
at skifte til COAXIAL-indgangen.
Din sound bar er kun designet til at understøtte et digitalt PCM-signal
(impuls-kode-modulation). Når du indstiller audiosignalet fra eksterne
kilder (f.eks. Blu-ray
“Dolby Digital”. Ellers vil der ikke komme nogen lyd fra din sound bar.
3D-lyd
Din sound bar er udstyret med Sonic Emotion® Absolute 3D-lydteknologi, som
giver den ultimative lytteoplevelse fra en enkelt kompakt enhed uden det rod,
som yderligere kabler medfører. Dens plug and play-enhed giver en række
anvendelsesmuligheder, som bidrager til at skabe en lyd af høj kvalitet.
Du kan vælge mellem tre forskellige lydtilstande (Film, Musik eller Spil)
afhængigt af den type kilder, du vil bruge. Vælg en lydtilstand på grundlag
af kildematerialet og din egen smag.
Om Sonic Emotion® 3D Sound
Sonic Emotion® Absolute 3D er en lytteoplevelse. Absolute 3D bruger
lydfeltkontrol til at transformere lytterens rum til et virtuelt skabt naturligt
lydfelt.
Med bølgefeltsyntese som grundlaget for lydfeltkontrollen produceres der
lydbølger, som spredes ud over hele lytteområdet for at sikre, at alle lyttere
omsluttes af et rum fyldt med lyd af høj kvalitet uanset lytterens position.
Præcis som i et naturligt miljø høres lydene fra alle retninger uanset, hvor
enheden er placeret.
MINI 3D SOUND BAR & SUBWOOFER
TM
- og dvd-afspillere), må du ikke vælge “DTS” eller
Afspilning via enheder, der understøtter Bluetooth
Sådan afspiller du files via enheder, der understøtter Bluetooth®:
1. Tænd din sound bar.
®
2. Tryk på Bluetooth
tilstanden.
Den blå indikator blinker, hvilket angiver, at der søges efter tilgængelige
Bluetooth®-enheder.
3. Slå Bluetooth
enhed vil søge efter tilgængelige Bluetooth-enheder i nærheden.
Hvis din enhed ikke automatisk begynder at søge, skal du muligvis
aktivere søgefunktionen på din enhed.
4. Når din sound bar er blevet fundet, skal du vælge “Toshiba Mini 3D
Sound Bar” på din enhed for at parre dem.
5. Når de to enheder er parret, vises “tilsluttet” på din enhed, og den blå
indikator på din sound bar holder op med at blinke.
Brugerhåndbog DK-14
-knappen på din sound bar for at aktivere Bluetooth-
®
-tilstand til på den anden Bluetooth®-enhed. Den anden
®
Page 76

MINI 3D SOUND BAR & SUBWOOFER
BEMÆRK
BEMÆRK
6. Nu, hvor enhederne er parret, kan du afspille musik-/videofiler på din
anden enhed og høre lyden fra din sound bar.
Når forbindelsen er afbrudt, skal du gentage trin 4-6 ovenfor for at oprette
forbindelsen igen.
®
Når du parrer en ny Bluetooth
-enhed, skal du bruge Bluetooth®-knappen
på din sound bar-højttaler og ikke på fjernbetjeningen. Fjernbetjeningen
kan kun bruges til at tilslutte en enhed, der tidligere har været parret, igen.
Parring af din sound bar med en anden Bluetooth®-enhed
1. Frakobl din Bluetooth®-enhed fra din sound bar.
®
2. Tryk på Bluetooth
-knappen på din sound bar, indtil den blå indikator
blinker.
3. Slå Bluetooth®-tilstanden til på din anden enhed, og vælg “Toshiba Mini
3D Sound Bar” på den for at parre dem.
Du kan finde flere oplysninger i brugervejledningen til din Bluetooth®-enhed.
Din sound bar kan kun parres med én Bluetooth
Hvis din sound bar allerede er parret med en Bluetooth
ikke parre den med en anden Bluetooth
®
-enhed, selvom den eventuelt
viser navnet “Toshiba Mini 3D Sound Bar”.
Ofte stillede spørgsmål (FAQ)
®
-enhed ad gangen.
®
-enhed, kan du
Spørgsmål 1:
Din sound bar kan ikke tændes.
Svar:
Sørg for, at lysnetadapteren er tilsluttet din sound bar, og at den er sat
korrekt i en stikkontakt.
Tryk på tænd/sluk-knappen øverst på din sound bar, og tjek,
om strømindikatoren lyser grønt.
Spørgsmål 2:
Der kommer ingen lyd fra din sound bar.
Svar:
Dette problem kan have flere forskellige årsager. Kontroller følgende:
■ Tryk på knapperne Lydstyrke +/- på din sound bar.
■ Kontroller, at den kilde, du har valgt, sender audio. Hvis du har oprettet
forbindelse til dit tv, skal du sørge for, at dit tv er konfigureret til at
sende audio.
■ Kontroller, at der ikke er nogen løse audioforbindelser.
■ Kontroller, at du har valgt den korrekte kilde (indgang).
■ Tryk på MUTE-knappen på fjernbetjeningen for at kontrollere, at lyden
ikke er slået fra på din sound bar.
DK-15 Brugerhåndbog
Page 77

MINI 3D SOUND BAR & SUBWOOFER
Spørgsmål 3:
Der kommer ingen lyd fra subwooferen.
Svar:
Kontroller, at subwooferen er tilsluttet korrekt.
Spørgsmål 4:
Fjernbetjeningen fungerer ikke korrekt.
Svar:
Dette problem kan have flere forskellige årsager. Kontroller følgende:
■ Sørg for at fjerne plastikarket, inden du bruger fjernbetjeningen.
■ Fjernbetjeningen rettes direkte mod din sound bars
fjernbetjeningssensor.
■ Fjernbetjeningen bruges ikke for langt væk fra din sound bar.
■ Der er ikke noget, som står i vejen for fjernbetjeningssensoren (placeret
foran din sound bar).
Andet
Tilbehør til denne serie produkter kan variere afhængigt af modellen.
Du kan finde flere oplysninger findes på emballagen eller på listen over
pakkens indhold, eller du kontakte din forhandler.
Vær opmærksom på, at der ikke gives noget varsel om yderligere
produktforbedringer eller opdateringer af udseende, design eller
specifikationer.
Illustrationen kan afvige en smule fra det faktiske produkt.
Specifikationer
Mini 3D Sound Bar
Generelle oplysninger Beskrivelse
Strømforsyning 19 V jævnstrøm, 3.42 A
Udgangseffekt 10 watt x 4 (pr. kanal ved 4 ohm, 1 KHz /
Strømforbrug 40 W
Impedans 4 ohm
Mål (bredde x højde x
dybde)
Vægt Ca. 0,85 kg
Frekvensrespons 95 Hz-19 kHz
Forvrængning <10 %
Brugerhåndbog DK-16
THD 10 %)
290 x 72 x 100 mm
Page 78

MINI 3D SOUND BAR & SUBWOOFER
BEMÆRK
Subwoofer
Generelle oplysninger Beskrivelse
Udgangseffekt 20 watt ved ohm, 100 Hz / THD 10 %
Impedans 8 ohm
Mål (bredde x højde x
dybde)
Vægt Ca. 2,83 kg
Frekvensrespons 38 Hz-19 kHz (Mini 3D Sound Bar og
Udseende og specifikationer kan variere og kan ændres uden varsel.
Varemærker
Bluetooth-ordmærket og -logoerne er registrerede varemærker, der ejes af
Bluetooth SIG, Inc., og enhver brug af sådanne mærker fra TOSHIBA
Corporations side finder sted på licens.
Sonic Emotion er et registreret varemærke, der tilhører sonic emotion ag.
Der henvises muligvis til andre varemærker og registrerede varemærker,
som ikke er nævnt ovenfor, i brugerhåndbogen.
220 x 246 x 220 mm
Subwoofer)
TOSHIBA-support
Brug for hjælp?
Du kan finde de nyeste driveropdateringer, brugerhåndbøger og ofte
stillede spørgsmål på TOSHIBAs supportside for tilbehør og services:
http://computers.toshiba.eu/options-support
Du finder TOSHIBAs hotlinenumre på
http://computers.toshiba.eu/options-warranty
DK-17 Brugerhåndbog
Page 79

Oplysninger om regler
CE-overensstemmelse
Dette produkt er CE-mærket i overensstemmelse med de væsentlige krav
og andre bestemmelser i direktiv 1999/5/EF. Toshiba Europe GmbH,
Hammfelddamm 8, 41460 Neuss i Tyskland er ansvarlig for
CE-mærkningen. En kopi af den officielle overensstemmelseserklæring
kan hentes på følgende websted: http://epps.toshiba-teg.com.
Dette produkt og det oprindelige tilbehør er designet, så det opfylder de
relevante standarder for elektromagnetisk kompatibilitet og sikkerhed.
TOSHIBA kan imidlertid ikke garantere, at dette produkt stadig lever op til
EMC-standarderne, hvis der tilsluttes andre enheder eller kabler, som ikke
er fremstillet af TOSHIBA. I så fald skal de personer, som har tilsluttet disse
andre enheder/kabler, sørge for, at systemet (sound bar plus tilbehør/
kabler) stadig opfylder de nødvendige standarder. Følg nedenstående
vejledning for at undgå problemer med elektromagnetisk kompatibilitet
generelt:
■ Der bør kun forbindes/anvendes CE-mærket tilbehør
■ Der bør kun forbindes afskærmede kabler af høj kvalitet
MINI 3D SOUND BAR & SUBWOOFER
Arbejdsmiljø
Dette produkts elektromagnetiske kompatibilitet er blevet verificeret typisk
for denne produktkategori. Dit produkt er ikke beregnet til industriel brug,
men kun til personlig brug. Ingen andre arbejdsmiljøer er blevet kontrolleret
af Toshiba, og anvendelse af dette produkt i andre arbejdsmiljøer kan være
underlagt begrænsninger eller anbefales ikke. Mulige følger af brug af dette
produkt i ikke-kontrollerede arbejdsmiljøer kan være:
Forstyrrelser af andre produkter eller af dette produkt i områder i
nærheden, hvilket kan medføre midlertidige funktionsfejl eller tab/
beskadigelse af data.
Eksempel på ikke-kontrollerede arbejdsmiljøer og relaterede råd:
Industrimiljøer (f.eks. hvor der primært anvendes 3-faset 380 V lysnet): fare
for forstyrrelse af dette produkt som følge af muligheden for kraftige
elektromagnetiske felter, især i nærheden af store maskiner eller
kraftanlæg.
Medicinske miljøer: Overensstemmelse med medicinalproduktdirektivet er
ikke kontrolleret af Toshiba, og dette produkt kan derfor ikke bruges som et
medicinalprodukt uden yderligere kontrol. Anvendelse i almindelige
kontormiljøer på f.eks. hospitaler bør ikke være noget problem, hvis den
ansvarlige administration ikke har fastsat nogen begrænsninger.
Brugerhåndbog DK-18
Page 80

MINI 3D SOUND BAR & SUBWOOFER
REACH
De følgende oplysninger gælder kun for EU-medlemslande: REACH Overensstemmelseserklæring
EUs nye kemidirektiv REACH (registrering, evaluering, godkendelse og
begrænsning af kemikalier) trådte i kraft 1. juni 2007.
Toshiba vil overholde alle REACH-krav og tilstræber at give vores kunder
oplysninger om de kemiske stoffer i vores produkter i overensstemmelse
med REACH-reglerne.
På webstedet www.toshiba-europe.com/computers/info/reach kan du finde
oplysninger om tilstedeværelsen af stoffer i vores produkter, der findes på
kandidatlisten i henhold til artikel 59(1) i direktiv (EF) nr. 1907/2006
(“REACH”) i en koncentration på over 0,1 % (vægtprocent).
Nedenstående information gælder kun for EU-lande:
Bortskaffelse af produkter
Symbolet med en affaldsspand med et kryds over angiver, at produkter skal
indsamles og bortskaffes adskilt fra husholdningsaffald. Integrerede
batterier og akkumulatorer kan bortskaffes sammen med produktet.
De separeres på genbrugscentrene.
Den sorte linje angiver, at produktet blev sendt på markedet efter den 13.
august 2005.
Ved at deltage i separat indsamling af produkter og batterier vil du bidrage
til at sikre en korrekt bortskaffelse af produkter og batterier og dermed til at
forhindre potentielt negative konsekvenser for miljøet og den menneskelige
sundhed.
Du kan finde mere detaljerede oplysninger om de indsamlings- og
genbrugsprogrammer, der findes i dit land, ved at besøge vores websted
(http://eu.computers.toshiba-europe.com
kommune eller den butik, hvor du købte produktet.
) eller ved at kontakte din lokale
Bortskaffelse af batterier og/eller akkumulatorer
Symbolet med en affaldsspand med et kryds over angiver, at batterier og/
eller akkumulatorer skal indsamles og bortskaffes adskilt fra
husholdningsaffald.
Hvis batteriet eller akkumulatoren indeholder mere end de angivne værdier
for bly (Pb), kviksølv (Hg) og/eller cadmium (Cd), således som disse er
fastsat i batteridirektivet (2006/66/EF), vises de kemiske symboler for bly
(Pb), kviksølv (Hg) og/eller cadmium (Cd) under symbolet med en
affaldsspand med et kryds over.
Ved at deltage i separat indsamling af batterier vil du bidrage til at sikre en
korrekt bortskaffelse af produkter og batterier og dermed til at forhindre
potentielt negative konsekvenser for miljøet og den menneskelige sundhed.
DK-19 Brugerhåndbog
Page 81

Du kan finde mere detaljerede oplysninger om de indsamlings- og
genbrugsprogrammer, der findes i dit land, ved at besøge vores websted
(http://eu.computers.toshiba-europe.com) eller ved at kontakte din lokale
kommune eller den butik, hvor du købte produktet.
Yderligere oplysninger
© 2012 TOSHIBA Europe GmbH. Alle rettigheder forbeholdes.
TOSHIBA forbeholder sig retten til at foretage tekniske ændringer.
TOSHIBA påtager sig intet ansvar for skader, der opstår direkte eller
indirekte som følge af fejl, udeladelser eller uoverensstemmelser mellem
dette produkt og dokumentationen.
MINI 3D SOUND BAR & SUBWOOFER
Brugerhåndbog DK-20
Page 82

MINI 3D SOUND BAR Y SUBWOOFER
Este manual cubre los tres modelos indicados a continuación:
1) Mini 3D Sound Bar + Subwoofer (SBM1W)
2) Mini 3D Sound Bar (SBM10)
3) Subwoofer para Toshiba Mini 3D Sound Bar (SBW10)
Manual del usuario
Contenido
Introducción.................................................................................................2
Contenido del paquete ................................................................................2
Instrucciones de seguridad .........................................................................2
Descripción rápida.......................................................................................3
Mini 3D Sound Bar ................................................................................4
Subwoofer .............................................................................................6
Mando a distancia .................................................................................6
Para empezar..............................................................................................8
Conexión del adaptador de alimentación ..............................................8
Conexión del subwoofer........................................................................9
Utilización del mando a distancia ..........................................................9
Colocación de Mini 3D Sound Bar y subwoofer ..................................10
Conexión al dispositivo de audio .........................................................11
Sonido 3D..................................................................................................14
Reproducción a través de dispositivos con capacidad Bluetooth
Preguntas frecuentes ................................................................................15
Especificaciones........................................................................................17
Marcas comerciales ..................................................................................18
Servicio técnico de TOSHIBA ...................................................................18
Información sobre la legislación vigente ...................................................18
REACH......................................................................................................19
La siguiente información sólo es válida para los estados miembros
de la UE:....................................................................................................20
Información adicional ................................................................................20
®
............14
ES-1 Manual del usuario
Page 83

Introducción
NOTA
User’s Manual
Mini 3D Sound Bar
Subwoofer
(si resulta aplicable)
Adaptador de CA
Cable de audio
3,5 mm - RCA
Mando a distancia
con pila
Manual del usuario y
folleto de garantía
Bienvenido y gracias por elegir un producto TOSHIBA.
Recomendamos leer este manual detenidamente y conservarlo junto a la
documentación del producto para futuras consultas.
Este manual describe el uso de Mini 3D Sound Bar y del subwoofer.
Puede adquirir la Mini 3D Sound Bar y el subwoofer conjuntamente o por
separado.
Para abreviar, en este manual utilizamos el término “sound bar” para
referirnos a la Mini 3D Sound Bar.
Contenido del paquete
Asegúrese de que dispone de estos elementos:
MINI 3D SOUND BAR Y SUBWOOFER
Instrucciones de seguridad
Manual del usuario ES-2
Para evitar errores de funcionamiento o daños en el producto, adopte
cuidadosamente las precauciones enumeradas a continuación.
■ No
■ abra la carcasa o el producto
■ desmonte el producto ni ninguna de sus piezas
■ coloque líquidos encima del producto o en las proximidades de
este, ya que podría dañar el producto, provocar lesiones u originar
una descarga eléctrica o fuego
■ golpee, deje caer o sacuda el producto
■ mueva el producto mientras esté en funcionamiento, ya que podrían
producirse daños en los datos
Page 84

MINI 3D SOUND BAR Y SUBWOOFER
NOTA
■ utilice otros adaptadores de CA/CC distintos del que acompaña al
dispositivo; si lo hace, el dispositivo podría resultar dañado
■ desconecte los cables mientras esté en funcionamiento
■ exponga el producto a temperaturas situadas fuera del rango de
5°C - 35°C durante su funcionamiento o de -20° - 60°C mientras
esté apagada
■ exponga el producto a la humedad o al agua
■ cubra el producto durante su funcionamiento, ya que podría
recalentarse
■ coloque el producto cerca de aparatos calientes
■ arroje la pila del mando a distancia (suministrado con la Mini 3D
Sound Bar) al fuego, ya que podría explotar
■ deje la pila del mando a distancia al alcance de niños, ya que estos
podrían ingerir la pila de botón
■ Desconecte el producto inmediatamente si
■ del producto sale humo o un olor inusual
■ ha penetrado agua en la carcasa del producto o este está húmedo
■ ha penetrado un objeto en la carcasa del producto
■ el cable ha resultado dañado (en este caso, cámbielo por uno nuevo)
■ La Mini 3D Sound Bar contiene imanes para los altavoces. Los imanes
pueden borrar datos de soportes de almacenamiento magnético, como
cintas de vídeo, unidades de disco duro y tarjetas de crédito.
Por consiguiente, mantenga la sound bar alejada de estos productos.
Si el producto no se comporta de la forma esperada o tiene dudas sobre su
seguridad eléctrica, póngase en contacto de inmediato con la línea de
atención permanente de TOSHIBA o con un distribuidor autorizado.
Descripción rápida
En esta sección se identifican los diversos componentes de la Mini 3D
Sound Bar y el subwoofer. Para ver una descripción de cada componente,
consulte la tabla situada debajo de cada ilustración.
Dependiendo de lo que haya adquirido, es posible que no disponga de la
Mini 3D Sound Bar y el subwoofer.
ES-3 Manual del usuario
Page 85

Mini 3D Sound Bar
1 2 4
7
6
5
3
NOTA
Vista frontal
(Ilustración de ejemplo) Vista frontal de la Mini 3D Sound Bar
Elemento Componente Descripción
1 INPUT Selecciona la fuente (en la secuencia
MINI 3D SOUND BAR Y SUBWOOFER
Aux-in -entrada auxiliar-, Line-in -entrada
de línea-, Optical -señal óptica-, Coaxial señal de cable coaxial- y de nuevo Aux-in).
La sound bar está configurada de manera
predeterminada con el modo Aux-in.
La sound bar se restaurará con la última entrada seleccionada cuando
reanude su funcionamiento desde el modo de suspensión con el
adaptador de CA conectado. Sin embargo, si desconecta el adaptador de
CA y vuelve a conectarlo, la sound bar se iniciará de manera
predeterminada con la entrada Aux-in.
Elemento Componente Descripción
2
Bluetooth
®
Selecciona el modo Bluetooth®.
3 Volumen +/- Aumenta/reduce el volumen.
4 Alimentación Enciende la sound bar o la configura con el
modo de suspensión.
5 Sensor de
Recibe las señales del mando a distancia.
mando a
distancia
6 Indicador
Bluetooth
Se ilumina en azul cuando la sound bar
®
está emparejada y parpadea en azul
cuando se está emparejando.
7 Indicador de
Alimentación
Manual del usuario ES-4
Se ilumina en verde cuando la sound bar
está encendida y en rojo cuando está
apagada o en modo de suspensión.
Page 86

MINI 3D SOUND BAR Y SUBWOOFER
1
2
3
7
6
54
Vista posterior
(Ilustración de ejemplo) Vista posterior de la Mini 3D Sound Bar
Elemento Componente Descripción
1 Conector DC
IN (entrada de
CC)
2 Conector de
SUBWOOFER
3 Conector
OPTICAL
4 Conector
COAXIAL
5 Conectores
AUX IN
6 Conector
LINE IN
7 Interruptor
deslizante de
balance R/C/L
Conexión para el adaptador de CA
suministrado (suministrado con la Mini 3D
Sound Bar).
Conexión para el subwoofer.
Conexión para un dispositivo de salida de
audio óptico mediante cable de audio
óptico (no suministrado).
Conexión para un dispositivo de salida de
audio coaxial mediante un cable de audio
digital coaxial (no suministrado).
Conexión para un dispositivo de salida de
audio mediante cable de audio 3,5 mm RCA (suministrado con la Mini 3D
Sound Bar).
Conexión para un dispositivo de salida de
audio mediante cable de audio 3,5 mm RCA (suministrado con la Mini 3D
Sound Bar).
Selecciona el canal de audio (derecho,
central, izquierdo). Ajusta el sonido con el
canal central cuando la sound bar se sitúa
al lado derecho/izquierdo del dispositivo
de audio/vídeo.
ES-5 Manual del usuario
Page 87

Subwoofer
1
1 2
3
4
5
6
7
9
8
(Ilustración de ejemplo) Vista del subwoofer
Elemento Componente Descripción
1 Conector del
Mando a distancia
La Mini 3D Sound Bar se suministra con mando a distancia.
MINI 3D SOUND BAR Y SUBWOOFER
Conexión al conector del SUBWOOFER.
subwoofer
Manual del usuario ES-6
(Ilustración de ejemplo) Mando a distancia
Elemento Nombre del
botón
Función
1 POWER Pulse para encender la sound bar o hacer
2 MUTE Pulse para activar/desactivar el sonido.
que esta entre en modo de suspensión.
Page 88

MINI 3D SOUND BAR Y SUBWOOFER
Elemento Nombre del
Función
botón
3 VOLUMEN +/- Pulse para aumentar/reducir el volumen.
4 INPUT Pulse para seleccionar la fuente (en la
secuencia Aux-in -entrada auxiliar-,
Line-in -entrada de línea-, Optical -señal
óptica-, Coaxial -señal de cable coaxial- y
de nuevo Aux-in).
La sound bar está configurada de manera
predeterminada con el modo Aux-in.
5
Bluetooth
®
Pulse para seleccionar el modo
Bluetooth
que el botón Bluetooth
®
. Funciona de la misma forma
®
de la sound bar.
6 3D Pulse para activar/desactivar el modo 3D.
El modo 3D está activado de manera
predeterminada.
La función de sonido 3D crea una
experiencia de audición inmersiva
mediante la adición de profundidad y
espaciosidad a los sonidos al utilizar el
botón de sonido 3D.
Consulte la sección “Sonido 3D” para
obtener más detalles.
7 MOVIE Pulse para seleccionar el modo de audio
MOVIE (el modo predeterminado).
El modo Movie (película) ha sido
optimizado para las bandas de frecuencia
de la voz mediante el aumento del
impacto de la claridad en el habla,
mejorando al mismo tiempo el sonido
global. La voz adquiere precisión, nitidez y
definición, lo que se acentúa aun más con
una claridad de sonido sobresaliente.
8 MUSIC Pulse para seleccionar el modo de audio
MUSIC.
El modo Music ha sido optimizado para
crear un ambiente sonoro equilibrado y
amplio al mismo tiempo con el fin de
enriquecer la composición musical.
9 GAME Pulse para seleccionar el modo de audio
GAME.
El modo Game (juego) ha sido optimizado
para ofrecer una experiencia de audición
inmersiva, con un aumento de los bajos y
el brillo para lograr efectos impactantes
que dan sensación de movimiento del
sonido entorno al usuario.
ES-7 Manual del usuario
Page 89

La sound bar se restaurará con el último modo de audio seleccionado
NOTA
AC Adaptor
Adaptador de CA
AC Adaptor
Adaptador de CA
NOTA
cuando reanude su funcionamiento desde el modo de suspensión con el
adaptador de CA conectado. Sin embargo, si desconecta el adaptador de
CA y vuelve a conectarlo, la sound bar se iniciará de manera
predeterminada con el modo de audio Movie.
Para empezar
Consulte las siguientes ilustraciones para configurar correctamente el
dispositivo.
Conexión del adaptador de alimentación
Elija el conector correcto que debe ajustar al adaptador de CA. Conecte un
extremo del adaptador/cable de CA al conector DC IN situado en la parte
posterior de la sound bar y el otro extremo, a una toma eléctrica activa.
El indicador de alimentación del panel delantero se ilumina en color verde
cuando la sound bar está encendida.
MINI 3D SOUND BAR Y SUBWOOFER
(Ilustración de ejemplo) Conexión del cable de alimentación al adaptador de CA
(Ilustración de ejemplo) Conexión del cable de alimentación al adaptador de CA
La sound bar entrará automáticamente en modo de suspensión al
transcurrir 10 minutos sin salida de audio.
Manual del usuario ES-8
(conector de 2 clavijas)
(conector de 3 clavijas)
Page 90

MINI 3D SOUND BAR Y SUBWOOFER
Subwoofer
NOTA
Conexión del subwoofer
Conecte el subwoofer al conector SUBWOOFER (si resulta aplicable)
situado en la parte posterior de la sound bar.
(Ilustración de ejemplo) Conexión del subwoofer
No conecte ni desconecte el subwoofer cuando la sound bar esté
encendida.
Este subwoofer solo es compatible con Toshiba Mini 3D Sound Bar.
Utilización del mando a distancia
Retire la lámina de plástico antes de utilizar el mando a distancia por
primera vez.
(Ilustración de ejemplo) Retire la lámina de plástico antes de utilizar el mando a
distancia
Al utilizar el mando a distancia, siga estas instrucciones:
■ Apunte el mando a distancia hacia el sensor de mando a distancia y
pulse los botones.
■ Distancia: Aproximadamente 5 m desde la parte delantera del sensor
de mando a distancia.
■ Ángulo: Alrededor de 30° en cada dirección desde la parte delantera
del mando a distancia.
ES-9 Manual del usuario
Page 91

MINI 3D SOUND BAR Y SUBWOOFER
NOTA
Sustitución de la pila
El mando a distancia se suministra con una pila CR2025 (3V).
Para sustituir la pila, siga estas instrucciones.
1. Abra el compartimento de la pila.
(Ilustración de ejemplo) Abra el compartimento de la pila
2. Extraiga la pila gastada e introduzca la nueva pila.
(Ilustración de ejemplo) Introduzca la nueva pila
Si el mando a distancia no funciona correctamente o si el alcance de
funcionamiento se reduce, sustituya la pila por otra nueva.
Pulse los botones del mando a distancia a intervalos de aproximadamente
un segundo para asegurarse de que realizan las operaciones
correctamente.
Colocación de Mini 3D Sound Bar y subwoofer
La sound bar puede colocarse de pie por si sola sobre una mesa a una
distancia de al menos 30 cm del televisor. Para disfrutar de la mejor
experiencia sonora surround, se recomienda colocar el subwoofer
directamente debajo de la sound bar o en la esquina de la habitación
(a una distancia de 5~10 cm de la pared).
Manual del usuario ES-10
Page 92

MINI 3D SOUND BAR Y SUBWOOFER
Mini 3D Sound Bar
30cm
Subwoofer
Left
15.75 in.
(40 cm)
Center
15.75 in.
(40 cm)
Right
15.75 in.
(40 cm)
NOTA
(Ilustración de ejemplo) Colocación de Mini 3D Sound Bar y subwoofer
Utilización del interruptor deslizante de balance R/C/L
Si la sound bar se sitúa a la derecha (izquierda) del televisor o de otro
dispositivo, puede deslizar el interruptor de balance R/C/L situado en la
parte posterior de la sound bar para desplazar el sonido hacia el centro.
(Ilustración de ejemplo) Utilización del interruptor deslizante de balance R/C/L
Conexión al dispositivo de audio
Siga estas instrucciones para dirigir las señales de audio de dispositivos
como un televisor a la sound bar a través de los conectores AUX IN,
LINE IN, OPTICAL y COAXIAL.
Para obtener un funcionamiento óptimo con un televisor, recomendamos
utilizar un cable óptico digital (disponible por separado).
ES-11 Manual del usuario
Page 93

MINI 3D SOUND BAR Y SUBWOOFER
Cable de audio de 3,5 mm a RCA
NOTA
Cable de audio de 3,5 mm a RCA
NOTA
Utilización de los conectores AUX IN
1. Conecte un cable de audio 3,5 mm - RCA (suministrado con la sound
bar) de los conectores AUX IN L/R de la sound bar a los conectores
AUDIO OUT (salida de audio) de un televisor, DVD u otro dispositivo
de audio.
(Ilustración de ejemplo) Conexión de cable de audio analógico
Puede conectar con el televisor empleando uno de los siguientes cables:
■ Cable de audio 3,5 mm - RCA (suministrado con la sound bar)
■ Cable RCA - RCA (no proporcionado)
2 Pulse el botón INPUT de la sound bar o el mando a distancia para
cambiar a la entrada AUX IN.
Utilización del conector LINE IN
1. Conecte un cable de audio 3,5 mm - RCA (suministrado con la sound
bar) del conector LINE IN de la sound bar al conector LINE OUT del
dispositivo de audio.
(Ilustración de ejemplo) Conexión de cable de audio 3,5 mm
Puede conectar con el televisor empleando uno de los siguientes cables:
■ Cable de audio 3,5 mm - RCA (suministrado con la sound bar)
■ Cable de audio 3,5 mm - 3,5 mm (no suministrado)
Manual del usuario ES-12
Page 94

MINI 3D SOUND BAR Y SUBWOOFER
Digital optical cable
Cable óptico digital
NOTA
Digital audio coaxial cable
Cable coaxial de audio digital
2 Pulse el botón INPUT de la sound bar o el mando a distancia para
cambiar a la entrada LINE IN.
Utilización del conector OPTICAL
1. Conecte un cable óptico (no suministrado) del conector OPTICAL de la
sound bar al conector OPTICAL OUT (salida óptica) de un televisor,
DVD u otro dispositivo de audio.
(Ilustración de ejemplo) Conexión de cable óptico
2 Pulse el botón INPUT de la sound bar o el mando a distancia para
cambiar a la entrada OPTICAL.
La sound bar está diseñada exclusivamente para admitir señal digital PCM
(Pulse-code modulation). Para establecer la señal de audio de fuentes
externas (por ejemplo, un reproductor Blu-ray
“DTS” o “Dolby Digital”. De lo contrario, la sound bar no emitirá ningún sonido.
TM
o de DVD), no seleccione
Utilización del conector COAXIAL
1. Conecte un cable coaxial de audio digital (no suministrado) del
conector COAXIAL de la sound bar al conector COAXIAL OUT (salida
coaxial) de un televisor, DVD u otro dispositivo de audio.
(Ilustración de ejemplo) Conexión de cable coaxial de audio digital
ES-13 Manual del usuario
Page 95

2 Pulse el botón INPUT de la sound bar o el mando a distancia para
NOTA
cambiar a la entrada COAXIAL.
La sound bar está diseñada exclusivamente para admitir señal digital PCM
(Pulse-code modulation). Para establecer la señal de audio de fuentes
externas (por ejemplo, un reproductor Blu-ray
“DTS” o “Dolby Digital”. De lo contrario, la sound bar no emitirá ningún sonido.
Sonido 3D
La sound bar incluye tecnología sonora Sonic Emotion® Absolute 3D,
que ofrece lo último en experiencia sonora mediante un único dispositivo
compacto y sin las molestias que suponen cables adicionales.
El dispositivo plug-and-play crea una capacidad multiuso que contribuye a
la alta calidad del sonido.
Puede seleccionar entre tres modos de sonido diferentes (Movie, Music o
Game), dependiendo del tipo de fuente que desee utilizar. Seleccione el
modo de sonido en función del material de la fuente y de su gusto personal.
Acerca del sonido Sonic Emotion® 3D
Sonic Emotion® Absolute 3D es la experiencia de audición por
antonomasia. Absolute 3D utiliza el control de los campos sonoros para
transformar la habitación del usuario en un campo sonoro natural creado
virtualmente.
La síntesis de los campos de ondas constituye la base del control de los
campos sonoros, un proceso en el que las ondas sonoras se producen y
dispersan por todo el área de audición, lo que garantiza que todos los
usuarios queden maravillados en una sala envolvente llena de sonidos de
alta calidad, con independencia de cual sea la posición del usuario.
Exactamente igual que sucede en un entorno natural, los sonidos se oyen
desde todas direcciones, con independencia de cuál sea la ubicación del
dispositivo.
MINI 3D SOUND BAR Y SUBWOOFER
TM
o de DVD), no seleccione
Reproducción a través de dispositivos con
capacidad Bluetooth
Para reproducir archivos mediante dispositivos con capacidad Bluetooth®:
1. Active la sound bar.
2. Pulse el botón Bluetooth
Bluetooth.
El indicador azul parpadeará, lo que significa que está buscando
dispositivos con capacidad Bluetooth® que estén disponibles.
Manual del usuario ES-14
®
®
de la sound bar para activar el modo
Page 96

MINI 3D SOUND BAR Y SUBWOOFER
NOTA
NOTA
3. Active el modo Bluetooth® del otro dispositivo con capacidad
Bluetooth
®
. El otro dispositivo buscará los dispositivos Bluetooth
disponibles a su alrededor.
Si su dispositivo no inicia la búsqueda automáticamente, es posible que
tenga que activar la función de búsqueda en su dispositivo.
4. Una vez que se detecte la sound bar, seleccione “Toshiba Mini 3D
Sound Bar” en el dispositivo para realizar el emparejamiento.
5. Una vez que los dos dispositivos se hayan emparejado correctamente,
se mostrará “conectado” en su dispositivo y el indicador azul de la
sound bar dejará de parpadear.
6. Los dispositivos se han emparejado, lo que le permitirá reproducir
archivos de música/vídeo del otro dispositivo y disfrutar del sonido a
través de la sound bar.
Una vez desconectado, deberá repetir los pasos 4 a 6 anteriores para
reconectar.
Al emparejar un nuevo dispositivo con capacidad Bluetooth®, utilice el
botón Bluetooth® situado en el altavoz de la sound bar y no en el mando a
distancia. El mando a distancia solo puede utilizarse para reconectar un
dispositivo previamente emparejado.
Emparejamiento de la sound bar con otro dispositivo Bluetooth
1. Desconecte el dispositivo Bluetooth® de la sound bar.
®
2. Pulse el botón Bluetooth
indicador azul.
3. Active el modo Bluetooth® del otro dispositivo y seleccione “Toshiba
Mini 3D Sound Bar” en él para realizar el emparejamiento.
de la sound bar hasta que parpadee el
®
Para obtener detalles, consulte el manual del usuario de su dispositivo
Bluetooth
®
.
La sound bar solo puede emparejarse con un dispositivo Bluetooth
todo momento. Si la sound bar ya está emparejada con un dispositivo
Bluetooth
®
, no podrá emparejarla con otro dispositivo Bluetooth®, aunque
este muestre el nombre “Toshiba Mini 3D Sound Bar”.
Preguntas frecuentes
Pregunta 1:
No es posible encender la sound bar.
Respuesta:
Asegúrese de que el adaptador de CA está conectado a la sound bar y que
está correctamente conectado a una toma eléctrica.
Pulse el botón de alimentación situado en la parte superior de la sound bar
y compruebe si el indicador de alimentación se ilumina en verde.
ES-15 Manual del usuario
®
en
Page 97

MINI 3D SOUND BAR Y SUBWOOFER
Pregunta 2:
La sound bar no emite ningún sonido.
Respuesta:
Este problema puede deberse a diferentes causas. Compruebe lo siguiente:
■ Pulse los botones Volume +/- de la sound bar.
■ Asegúrese de que la fuente que ha seleccionado está enviando sonido.
Si está conectado a un televisor, asegúrese de que el televisor está
configurado para enviar sonido.
■ Asegúrese de que no haya conexiones de audio sueltas.
■ Asegúrese de que ha seleccionado la fuente (entrada) correcta.
■ Pulse el botón MUTE del mando a distancia para asegurarse de que la
sound bar no está silenciada.
Pregunta 3:
El subwoofer no emite ningún sonido.
Respuesta:
Asegúrese de que el subwoofer está correctamente conectado.
Pregunta 4:
El mando a distancia no funciona correctamente.
Respuesta:
Este problema puede deberse a diferentes causas. Compruebe lo siguiente:
■ Asegúrese de que ha retirado la lámina de plástico antes de utilizar el
mando a distancia.
■ El mando a distancia apunta directamente al sensor de mando a
distancia de la sound bar.
■ El mando a distancia no se está utilizando desde un lugar demasiado
lejano a la sound bar.
■ No hay ningún obstáculo delante del sensor de mando a distancia
(situado en la parte delantera de la sound bar).
Otros
Los accesorios de esta serie de productos pueden variar en función del
modelo.
Consulte el embalaje o la lista del paquete, o bien póngase en contacto con
su agente para obtener más información.
Rogamos comprendan que no podemos ofrecer aviso por adelantado
acerca de mejoras del producto o de actualizaciones en el diseño o las
especificaciones del producto.
Las ilustraciones pueden diferir ligeramente del producto real.
Manual del usuario ES-16
Page 98

MINI 3D SOUND BAR Y SUBWOOFER
NOTA
Especificaciones
Mini 3D Sound Bar
Información general Descripción
Requisitos de
alimentación
Salida de potencia 10 vatios x 4 (por canal a 4 ohmios, 1 KHz /
Consumo eléctrico 40 W
Impedancia 4 ohmios
Dimensiones (anchura x
altura x profundidad)
Peso Alrededor de 0,85 kg (1,87 libras)
Respuesta de
frecuencia
Distorsión <10%
Subwoofer
Información general Descripción
Salida de potencia 20 vatios a 8 ohms, 100 Hz / THD 10%
Impedancia 8 ohmios
Dimensiones (anchura x
altura x profundidad)
Peso Alrededor de 2,83 kg (6,24 libras)
Respuesta de
frecuencia
19 V CC, 3.42 A
THD 10%)
11,4 x 2,8 x 3,9 pulgadas (290 x 72 x 100 mm)
95 Hz-19 kHz
8,6 x 9,6 x 8,6 pulgadas (220 x 246 x 220 mm)
38 Hz-19 kHz (Mini 3D Sound Bar y
Subwoofer)
El aspecto y la especificación pueden variar y podrían modificarse sin
previo aviso.
ES-17 Manual del usuario
Page 99

MINI 3D SOUND BAR Y SUBWOOFER
Marcas comerciales
La marca de texto y los logotipos Bluetooth son marcas comerciales
registradas propiedad de Bluetooth SIG, Inc. Todo uso de dichas marcas
por parte de Toshiba se realiza bajo licencia.
Sonic Emotion es una marca comercial registrada de Sonic Emotion ag.
Es posible que en este manual se mencionen otras marcas comerciales y
registradas no enumeradas en esta lista.
Servicio técnico de TOSHIBA
¿Necesita ayuda?
Para obtener las actualizaciones más recientes del controlador, manuales
de usuario y preguntas frecuentes, consulte la página de soporte de
opciones y servicios de TOSHIBA:
http://computers.toshiba.eu/options-support
Visite http://computers.toshiba.eu/options-warranty para conocer los
números de asistencia telefónica de TOSHIBA.
Información sobre la legislación vigente
Homologación CE
Este producto incluye la marca CE de conformidad con los requisitos
esenciales y otras disposiciones de la Directiva 1999/5/EC. La obtención
de la marca CE es responsabilidad de Toshiba Europe GmbH,
Hammfelddamm 8, 41460 Neuss, Alemania. Puede obtener una copia de
la Declaración de conformidad en el siguiente sitio web:
http://epps.toshiba-teg.com
Este producto y sus opciones originales han sido diseñados conforme a las
normas aplicables sobre EMC (compatibilidad electromagnética) y
seguridad. No obstante, TOSHIBA no garantiza que el producto continúe
cumpliendo dichas normas sobre EMC si se conectan unidades o cables
no fabricados por TOSHIBA. En este caso, las personas que hayan
conectado dichas unidades/cables deberán ofrecer garantía de que el
sistema (la sound bar y las opciones/los cables) continúa cumpliendo las
normas exigidas. Para evitar problemas de EMC en general, siga estos
consejos:
■ Conecte/ instale únicamente opciones que cuenten con la marca CE
■ Conecte únicamente cables bien blindados
Manual del usuario ES-18
.
Page 100

MINI 3D SOUND BAR Y SUBWOOFER
Entorno de trabajo
Se ha comprobado el cumplimiento electromagnético (EMC) de este
producto con los valores típicos para esta categoría de producto.
El producto no está diseñado para uso industrial, sino para uso personal
exclusivamente. Toshiba no ha comprobado ningún otro entorno de
trabajo, por lo el uso de este producto en otros entornos de trabajo puede
estar restringido y no puede recomendarse. Las posibles consecuencias
del uso de este producto en entornos de trabajo no comprobados son:
Interferencias en otros productos situados en el área circundante o en este
producto que pueden provocar un funcionamiento erróneo temporal o
pérdidas/daños en los datos.
Ejemplos de entornos de trabajo no verificados y avisos relacionados:
Entornos industriales (por ejemplo, entornos en los que se utilice
principalmente una toma con tensión trifásica de 380V): Peligro de
interferencias de este producto debidas posibles campos
electromagnéticos intensos, especialmente en las proximidades de
maquinaria de gran tamaño y unidades de alimentación.
Entornos médicos: Toshiba no ha comprobado el cumplimiento de la
Directiva de productos médicos, por lo que este producto no puede
utilizarse como producto médico sin comprobaciones adicionales previas.
El uso en entornos de oficina normales, como por ejemplo, hospitales,
no debería suponer ningún problema a no ser que exista una restricción
por parte de la administración responsable.
REACH
La siguiente información sólo es válida para estados miembros de la UE:
REACH - Declaración de cumplimiento
La nueva normativa de la Unión Europea (UE) en materia de sustancias
químicas, REACH (Registro, Evaluación, Autorización y Restricción de
Sustancias y Preparados Químicos), entró en vigor el 1 de junio de 2007.
Toshiba cumplirá todos los requisitos exigidos por el reglamento REACH y
tiene el compromiso de ofrecer a sus clientes información relativa a las
sustancias químicas contenidas en sus productos, de conformidad con el
reglamento REACH.
Visite el sitio Web www.toshiba-europe.com/computers/info/reach
obtener información relativa a la presencia en nuestros artículos de
sustancias incluidas en la lista de sustancias candidatas, de conformidad
con el artículo 59(1) del reglamento (EC) Nº 1907/2006 (“REACH”) en una
concentración superior al 0,1 % peso/peso.
ES-19 Manual del usuario
para
 Loading...