

Page 1
Table of Contents
Page 2
TABLE OF CONTENTS
1. INTRODUCTION
1.1 APPLICABLE MODEL
1.2 ACCESSORIES
2. SPECIFICATION
2.1 PRINTER ..................................................
2.2 LABEL ....................................................
2.3 SERIAL INTERFACE (RS-232C)
2.4 OPTION ...................................................
3. OVERVIEW
3.1 FRONT/REAR VIEW
3.2 OPERATIONPANEL
3.3
3.4 KEYlAYOUT
4. PROCEDURE BEFORE OPERATION
5. LOADING LABELS
5.1 LOADING LABELS FOR BATCH ISSUE
5.2 LOADING LABELS FOR STRIP ISSUE
6. PROGRAMMING PROCEDURES
6.1
6.2
6.3
6.4
6.5
6.6
6.7
6.8
6.9
6.10
6.11
BATCH/STRIP SELECTION SWITCH
CHANGING UNIT PRICES . . . . . . . . . . . . . . . . . . . . . . . . . . . . . . . . . . . . . .
SETTING PLU DATA .a........................................
SETTING ADDRESSES . . . . . . . . . . . . . . . e . . . . . . . . . . . . . . . . . . . . . . . .
ADJUSTING PRINT POSITION . . . . . . . . . . . . . . . . . . . . . . . . . . . . . . . . . . .
SETTING DATE AND TIME
SETTING THE INITIAL STATUS . . . . . . . . . . . . . . . . . . . . . . . . . . . . . . . . . .
SETTING BAR CODE FORMATS
SETTING TITLE OF NUTRITION FACTS . . . . . . . . . . . . . . . . . . . . . . . . . . . .
SETTING INGREDIENT MESSAGE/COUPON/CARE INSTRUCTIONS/
DAYGLOWMESSAGE
SETTING NUTRITION INFORMATION
SENDING/RECEIVING PLU DATA
..................................................
.........................................
..............................................
..................................................
.....................................................
..........................................
..........................................
............... . . . . . . . . . . . . . . . . . . . . . . . . . . . . . . . .
...................................
................................................
......................................
. . . . . . . . . . . . . . . . . . . . . . . . . . . . . . . . . . . . .
. . . . . . . . . . . . . . . . . . . . . . . . . . . . . . . . . . ..a...
..................................
. : : : : : : : : : : : : : : : : : : : : : : : : : : : :
. . . . . . . . . . . . . . . . . . . . . . . . . . . . . . . . .
. . . : : : : : : : : : : : : : : : : : : : : : : : : : : : : :
Page
l- 1
l- 5
l- 5
2- 1
2- 1
2- 1
22- 1
3- 1
3- 1
3- 1
3- 1
3- 2
4- 1
5- 1
5- 1
5- 2
6- 1
6- 3
6- 4
6- 5
6- 5
6- 6
6- 6
6-10
6-12
6-13
6-14
6-17
1
Page 3
7. OPERATING PROCEDURES .........................................
7.1
STANDARDTYPE ...........................................
7.1 .l Weighing Operation ........................................
7.1.2 By Count Operation
7.1.3
Fix Mode Operation (Issuing labels with net weight statement)
........................................
7.1.4 Batch Print Mode (with 30 PLUS assignment) ......................
7.2 FLORISTTYPE .............................................
7.2.1 Scanning Operation ........................................
7.2.2
Item Correction
...........................................
7.2.3 Estimate ................................................
7.2.4 Printing Labels for Ready-made Commodities ......................
..........
Page
77-
7- 2
7- 5
7- 7
7-10
7-12
7-14
7-17
7-19
7-20
1
1
8. READ OPERATION
................................................
9. RESETOPERATION ...............................................
10. REMOVING JAMMED LABEL ........................................
11. CLEANING PROCEDURES ..........................................
PRINT HEAD/PLATEN/STRIP FEED ROLLER MECHANISM
11 .l
COVERS/PANELS
11.2
............................................
12. CARE/HANDLING OF THE LABEL .....................................
13. ERROR MESSAGE TABLE ..........................................
14. TROUBLESHOOTING ..............................................
..............
8-
9- 1
lo- 1
ll- 1
ll- 1
ll- 1
12- 1
13- 1
14- 1
1
CAUTION:
1. This manual may not be copied in whole or in part without prior written permission.
2. The contents of this manual may be changed without notification.
3. Please refer to your local Authorized Service representative with regard to any queries you
may have in this manual.
Copyright 0 1996
by TEC CORPORATION
All Rights Reserved
570 Ohito, Ohlto-cho. Taaata-sun. Shizuoka-ken. JAPAN
Page 4
1. INTRODUCTION
1. INTRODUCTION
1. INTRODUCTION
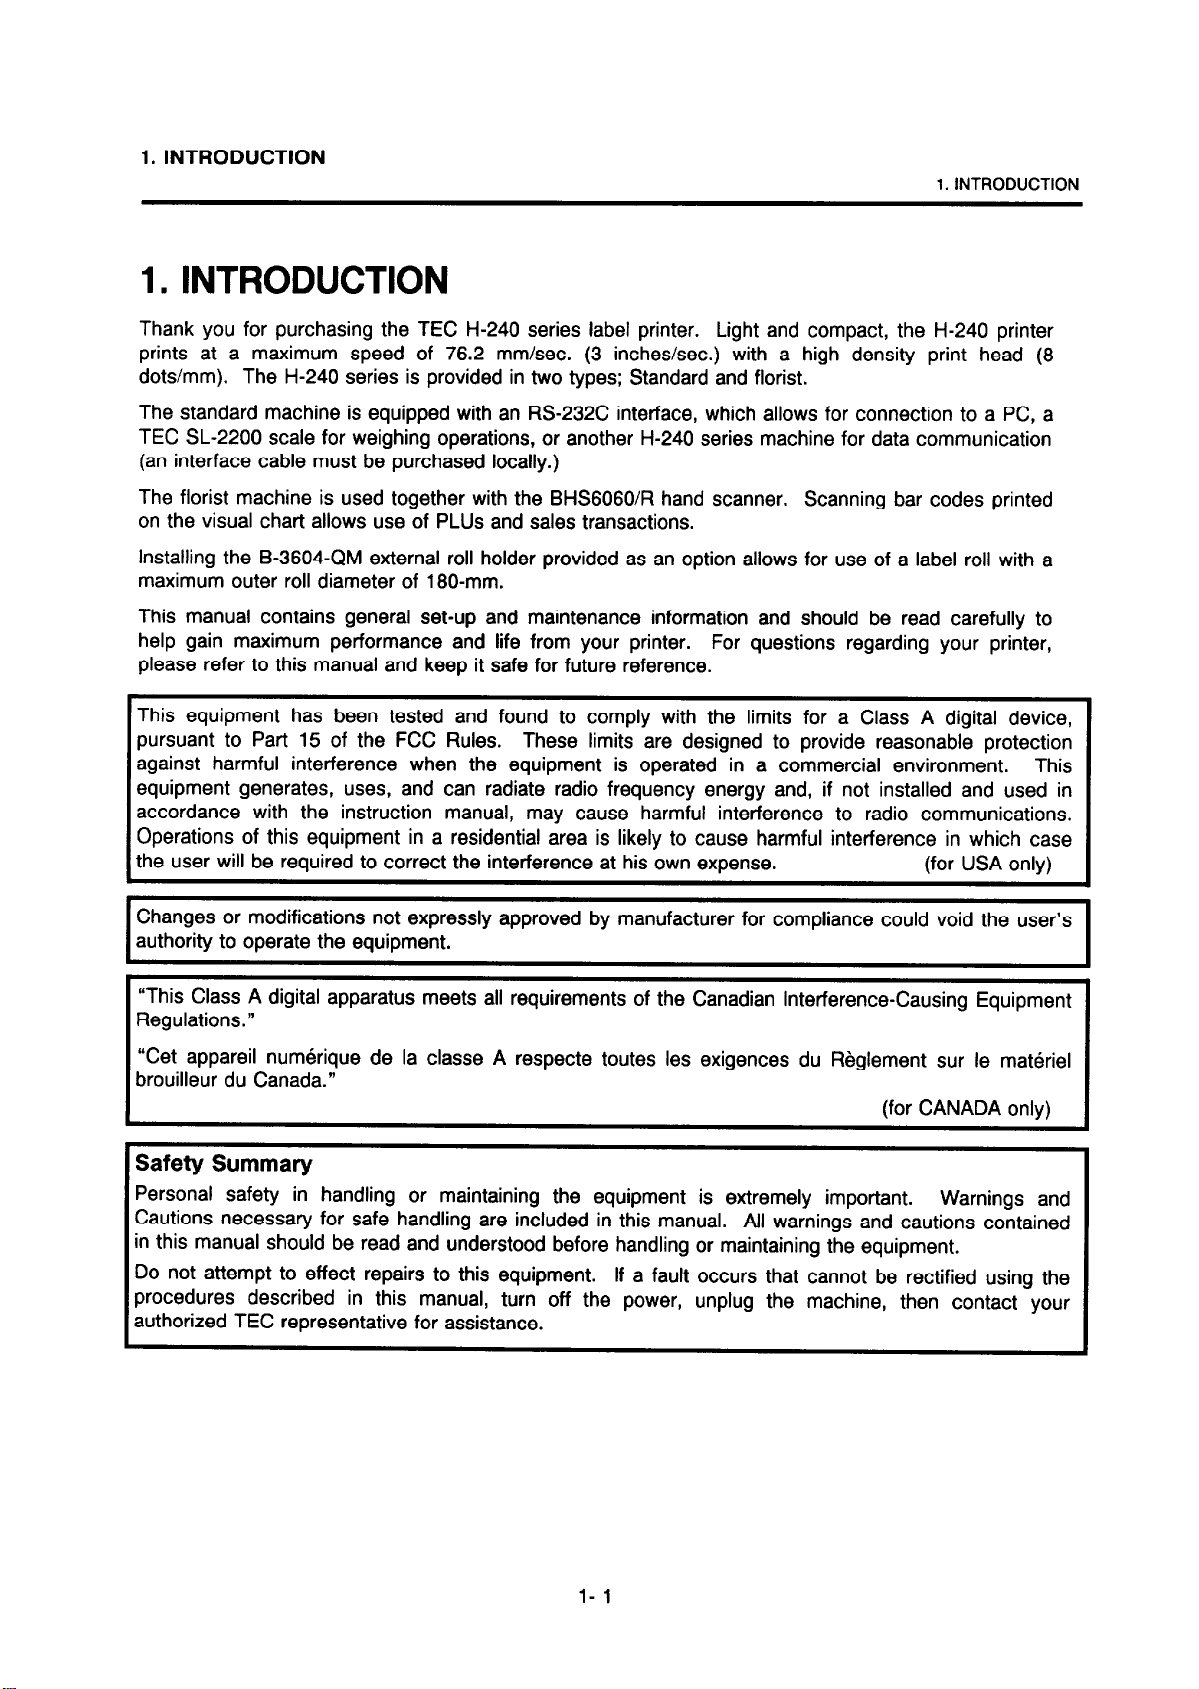
Thank you for purchasing the TEC H-240 series label printer.
prints at a maximum speed of 76.2 mm/set. (3 inchesisec.) with a high density print head (8
dots/mm). The H-240 series is provided in two types; Standard and florist.
The standard machine is equipped with an RS-232C interface, which allows for connection to a PC, a
TEC SL-2200 scale for weighing operations, or another H-240 series machine for data communication
(an interface cable must be purchased locally.)
The florist machine is used together with the BHS6060R hand scanner. Scanning bar codes printed
on the visual chart allows use of PLUS and sales transactions.
Installing the B-3604~QM external roll holder provided as an option allows for use of a label roll with a
maximum outer roll diameter of 180-mm.
This manual contains general set-up and maintenance information and should be read carefully to
help gain maximum performance and life from your printer. For questions regarding your printer,
please refer to this manual and keep it safe for future reference.
This equipment has been tested and found to comply with the limits for a Class A digital device,
pursuant to Part 15 of the FCC Rules. These limits are designed to provide reasonable protection
against harmful interference when the equipment is operated in a commercial environment.
equipment generates, uses, and can radiate radio frequency energy and, if not installed and used in
accordance with the instruction manual, may cause harmful interference to radio communications.
Operations of this equipment in a residential area is likely to cause harmful interference in which case
the user will be required to correct the interference at his own expense. (for USA only)
Light and compact, the H-240 printer
This
Changes or modifications not expressly approved by manufacturer for compliance could void the user’s
authority to operate the equipment.
I
“This Class A digital apparatus meets all requirements of the Canadian Interference-Causing Equipment
Regulations.”
“Cet appareil numerique de la classe A respecte toutes les exigences du Reglement sur le materiel
brouilleur du Canada.”
ffor CANADA only)
Safety Summary
Personal safety in handling or maintaining the equipment is extremely important. Warnings and
Cautions necessary for safe handling are included in this manual. All warnings and cautions contained
in this manual should be read and understood before handling or maintaining the equipment.
Do not attempt to effect repairs to this equipment.
procedures described in this manual, turn off the power, unplug the machine, then contact your
authorized TEC representative for assistance.
If a fault occurs that cannot be rectified using the
I
l- 1
Page 5
1. INTRODUCTION
Safety Precautions
This User’s Manual and the products (machines) which you have purchased contain indications which
should be observed in order to use the machines safely and prevent harm to yourself and others and
damage to property. The meanings of these indications and symbols are given below.
Read these indications and become familiar with their contents before reading this User’s Manual.
The following safety precaution will help to ensure proper use of the printer.
. Unplug the printer whenever you are working inside the printer.
. Keep your work environment static free.
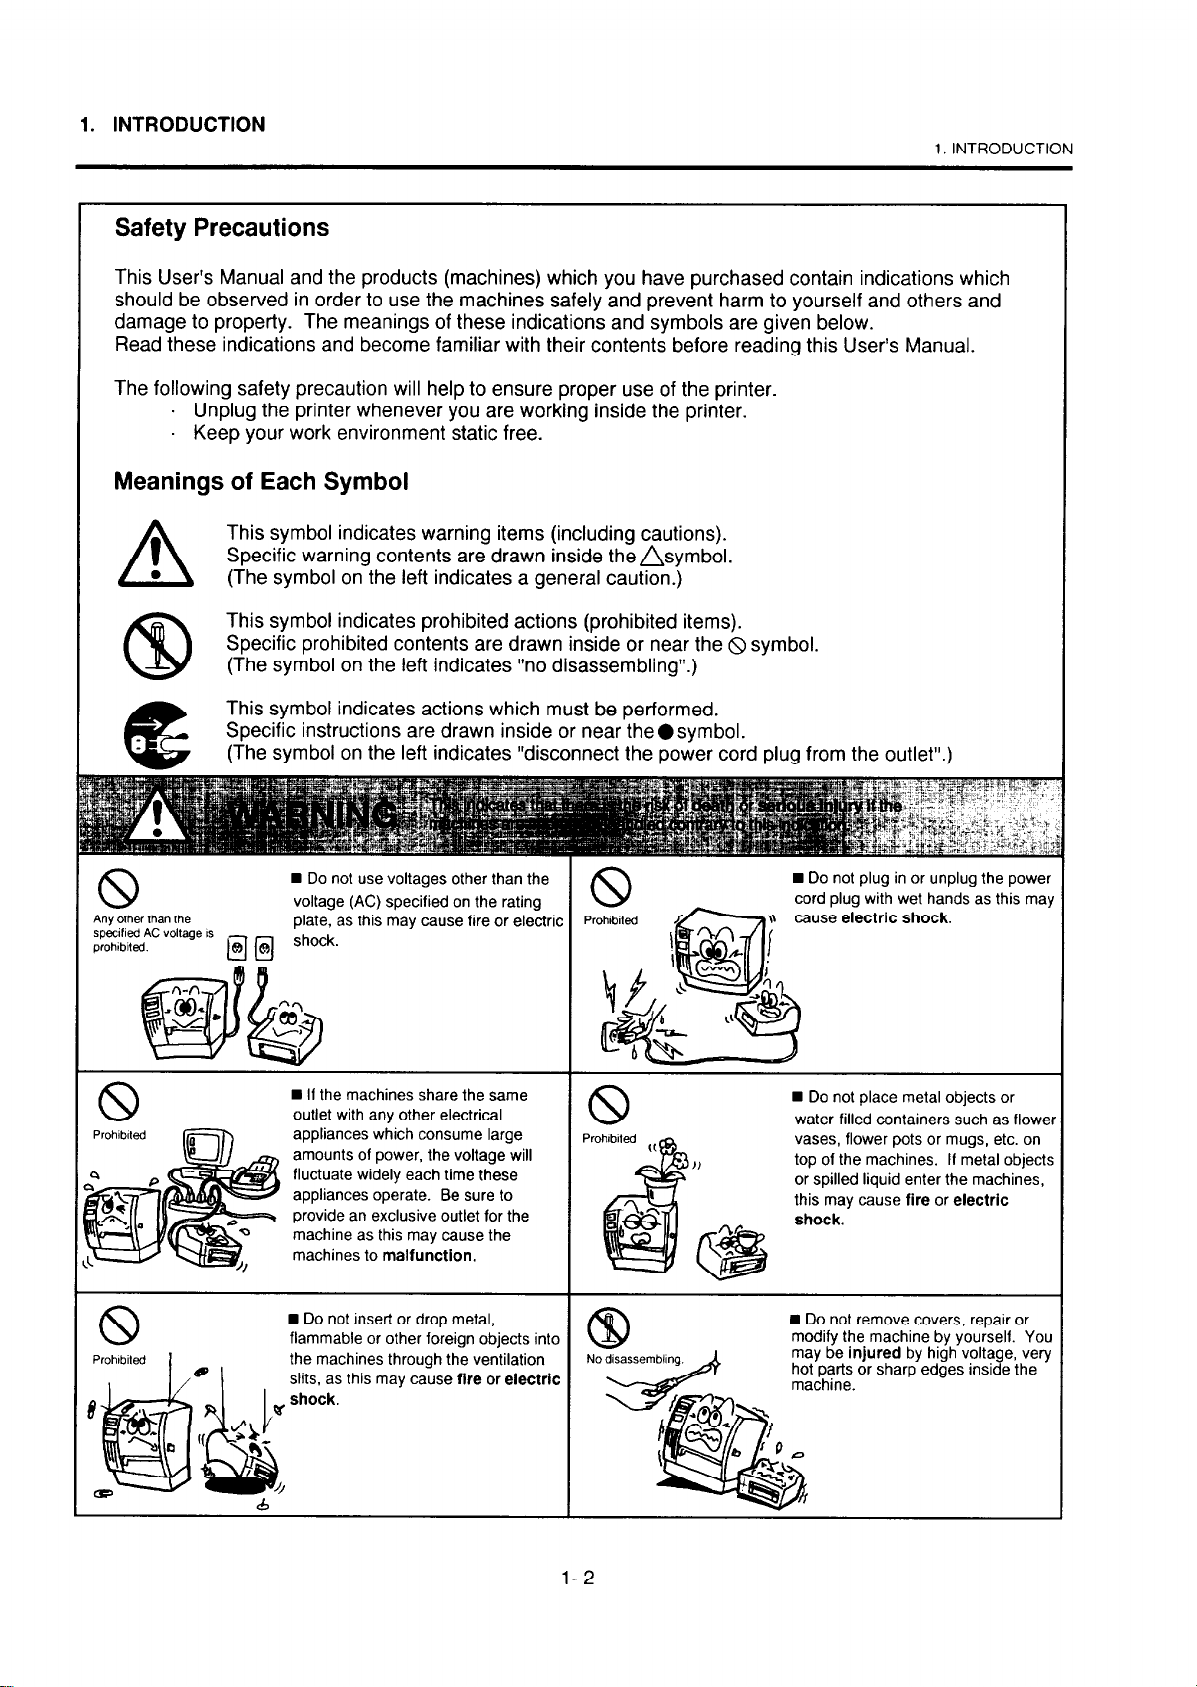
Meanings of Each Symbol
This symbol indicates warning items (including cautions).
Specific warning contents are drawn inside thensymbol.
(The symbol on the left indicates a general caution.)
This symbol indicates prohibited actions (prohibited items).
Specific prohibited contents are drawn inside or near the 8 symbol.
(The symbol on the left indicates “no disassembling”.)
This symbol indicates actions which must be performed.
Specific instructions are drawn inside or near the l symbol.
(The symbol on the left indicates “disconnect the power cord plug from the outlet”.)
A
@
e
1
l
1. INTRODUCTION
Any other than the
specikd AC voltage IS
prohlblted.
n
Do not use voltages other than the
voltage (AC) specified on the rating
n
If the machines share the same
outlet with any other electrical
appliances which consume large
amounts of power, the voltage will
fluctuate widely each time these
appliances operate. Be sure to
provide an exclusive outlet for the
machine as this may cause the
machines to malfunction.
n
Do not insert or drop metal,
flammable or other foreign objects into
the machines through the ventilation
slits, as this may cause fire or electric
n
Do not plug in or unplug the power
cord plug with
n
Do not place metal objects or
water-filled containers such as flower
vases, flower pots or mugs, etc. on
top of the machines. If metal objects
or spilled liquid enter the machines,
this may cause fire or electric
n
Do not remove covers, repair or
modify the machine by yourself. You
may be injured by high voltage, very
hot parts or sharp
wet hands as this may
edges inside the
l-2
Page 6
1. INTRODUCTION
1. INTRODUCTION
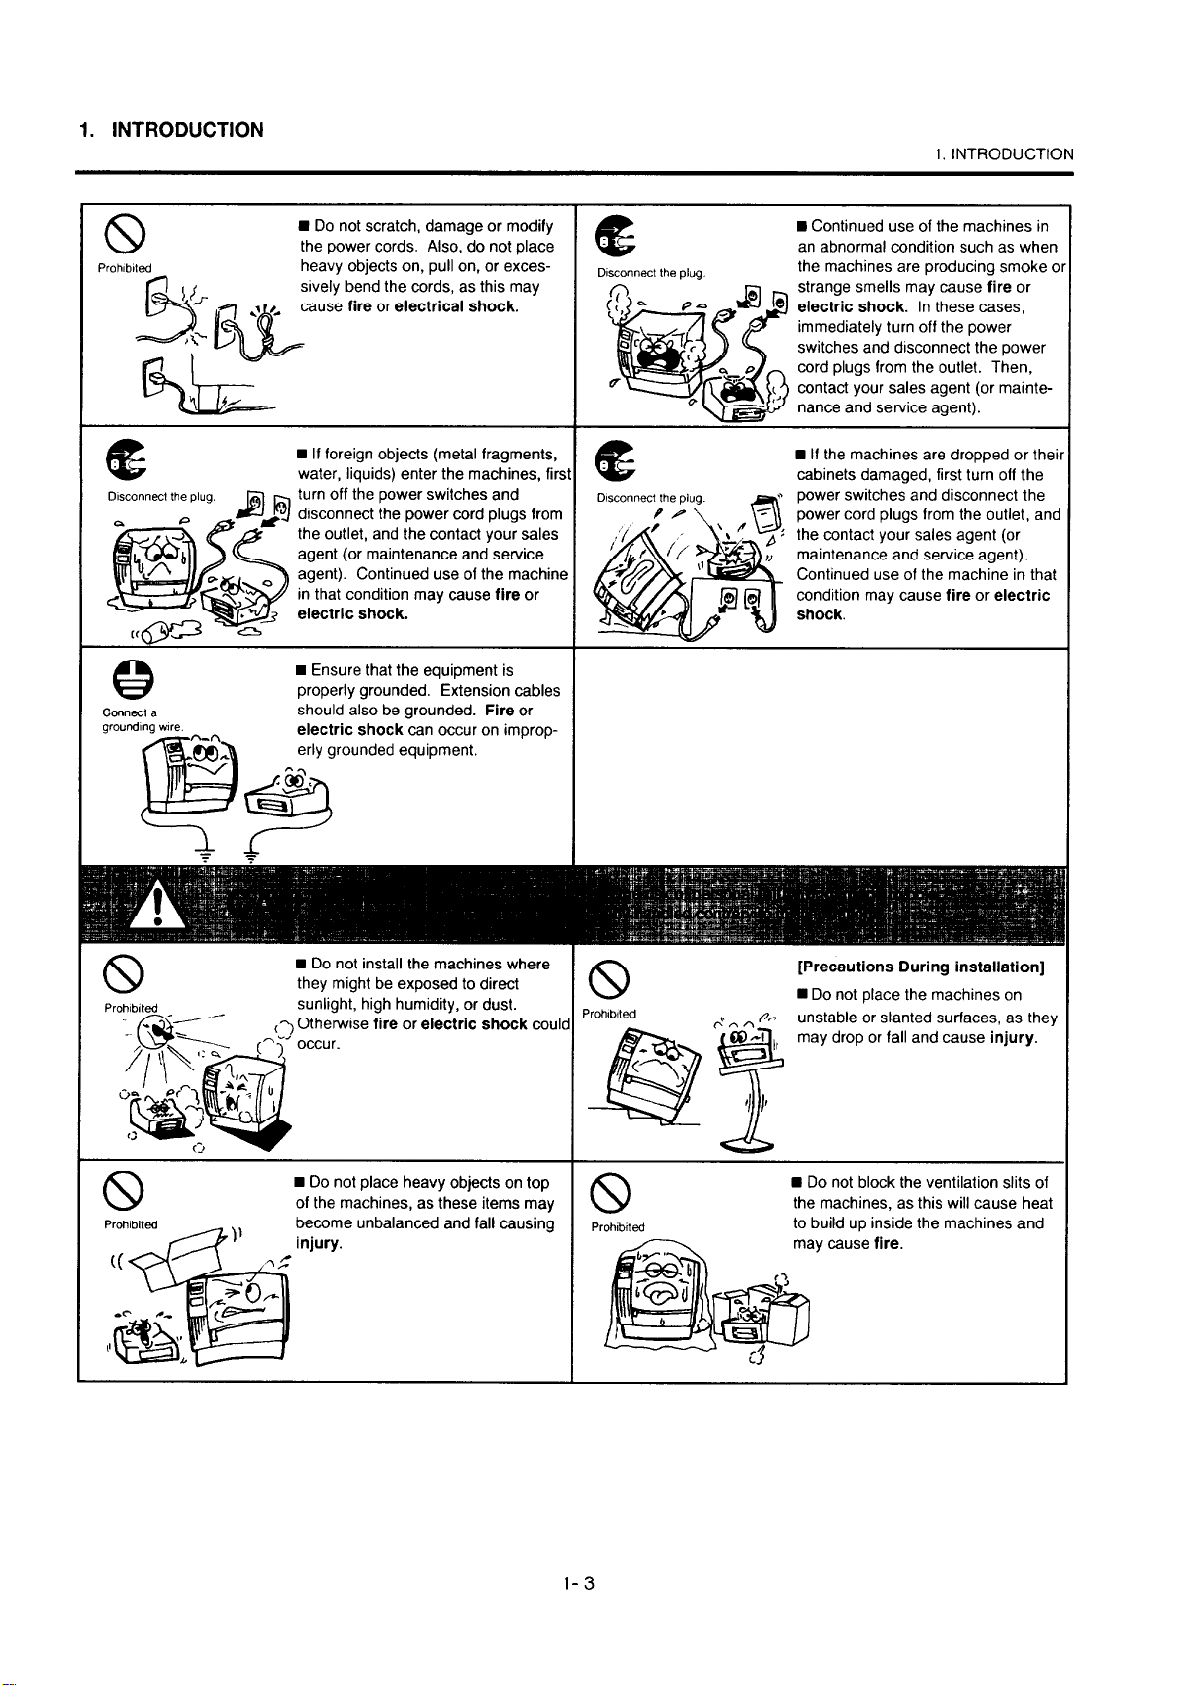
the power cords. Also, do not place
heavy objects on, pull on, or excessively bend the cords, as this may
cause fire or electrical shock.
n
If foreign objects (metal fragments,
water, liquids) enter the machines, first
turn off the power switches and
disconnect the power cord plugs from
agent (or maintenance and service
agent). Continued use of the machine
in that condition may cause fire or
electric shock.
W Ensure that the equipment is
properly grounded. Extension cables
should also be grounded. Fire or
electric shock can occur on improperly grounded equipment.
an abnormal condition such as when
the machines are producing smoke o
strange smells may cause fire or
electric shock. In these cases,
n
If the machines are dropped or thei
cabinets damaged, first turn off the
power cord plugs from the outlet, and
condition may cause fire or electric
Prohlblted
they might be exposed to direct
sunlight, high humidity, or dust.
Otherwise fire or electric shock could
n
Do not place the machines on
unstable or slanted surfaces, as they
may drop or fall and cause injury.
may cause fire.
l-3
Page 7
1. INTRODUCTION
1. INTRODUCTION
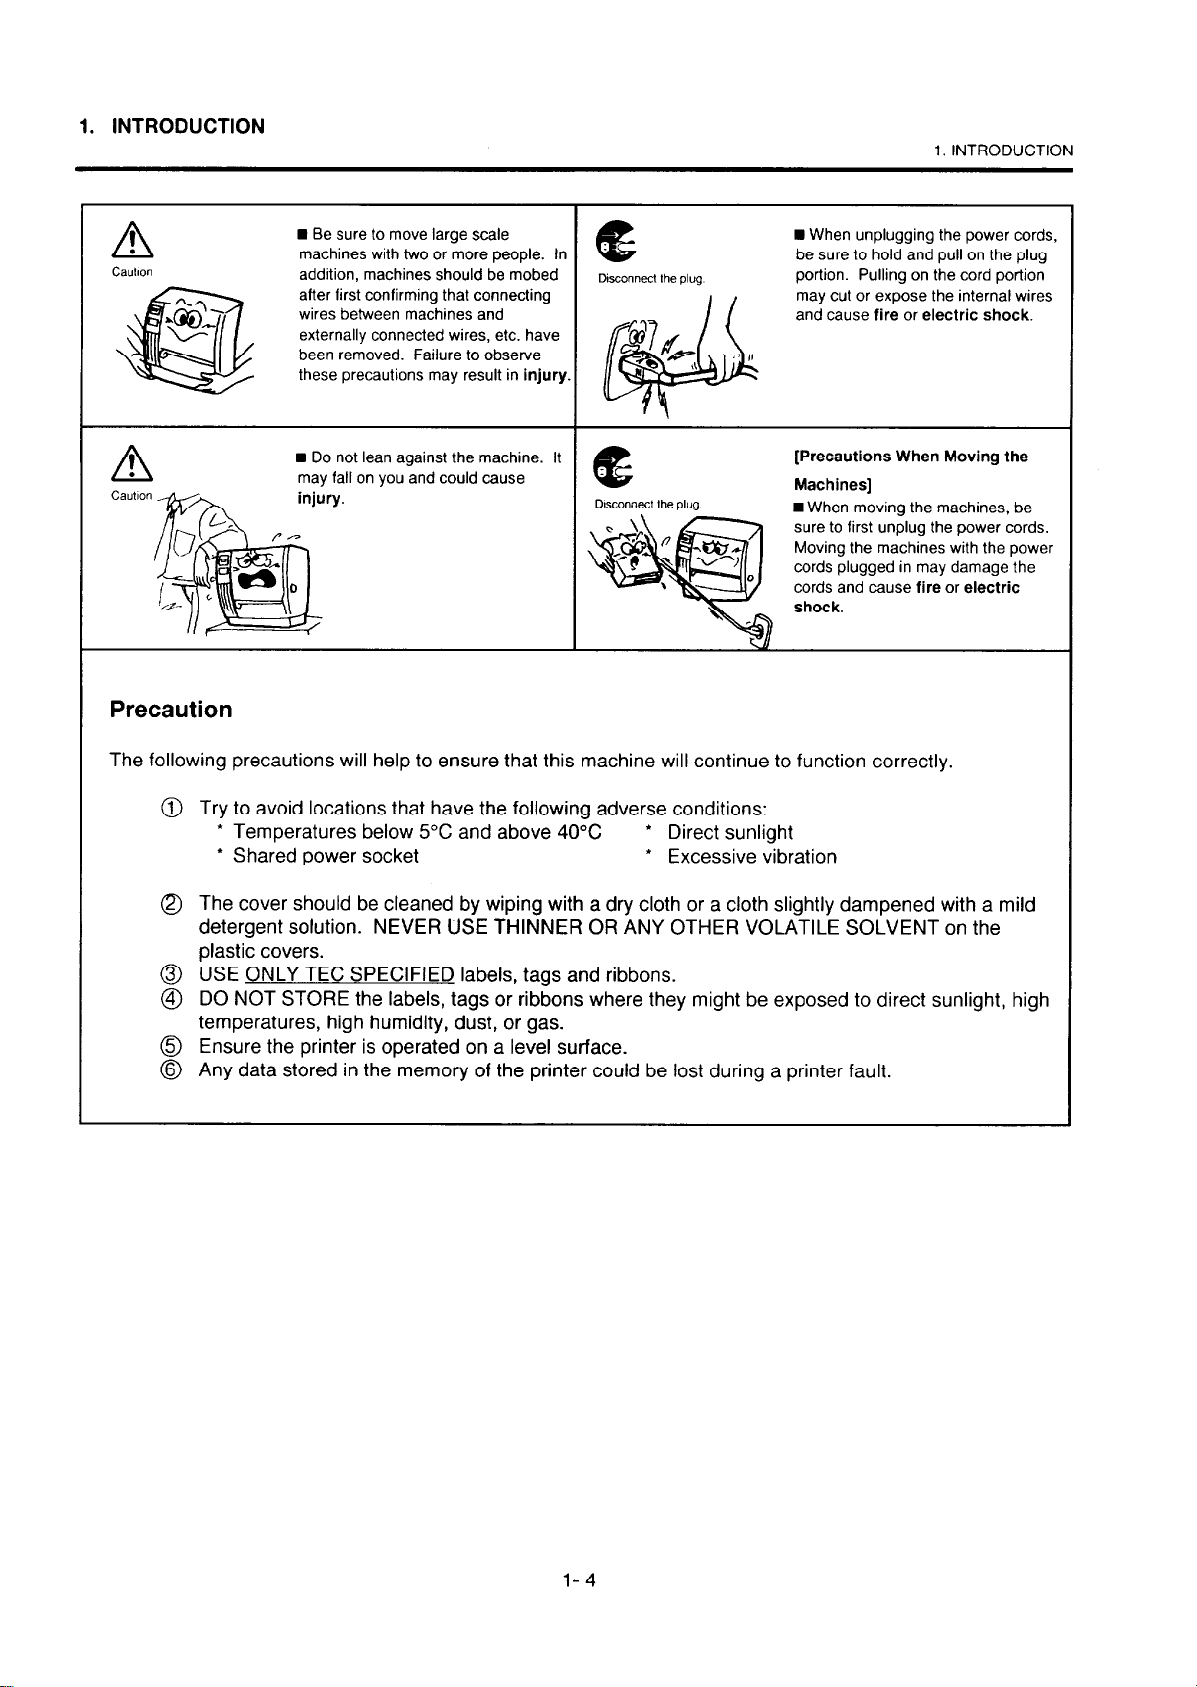
these precautions may result in
n
Do not lean against the machine. It
may fall on you and could cause
sconnec! the
injury.
plug
[Precautions When Moving the
Machines]
1 When moving the machines, be
sure to first unplug the power cords.
Moving the machines with the power
cords plugged in may damage the
cords and cause fire or electric
Precaution
The following precautions will help to ensure that this machine will continue to function correctly.
@ Try to avoid locations that have the following adverse conditions:
l
* Temperatures below 5°C and above 40°C
l
Shared power socket * Excessive vibration
Direct sunlight
0 The cover should be cleaned by wiping with a dry cloth or a cloth slightly dampened with a mild
detergent solution. NEVER USE THINNER OR ANY OTHER VOLATILE SOLVENT on the
plastic covers.
@ USE ONLY TEC SPECIFIED labels, tags and ribbons.
@ DO NOT STORE the labels, tags or ribbons where they might be exposed to direct sunlight, high
temperatures, high humidity, dust, or gas.
6J Ensure the printer is operated on a level surface.
@ Any data stored in the memory of the printer could be lost during a printer fault.
l-4
Page 8
1. INTRODUCTION
1 .I APPLICABLE MODEL
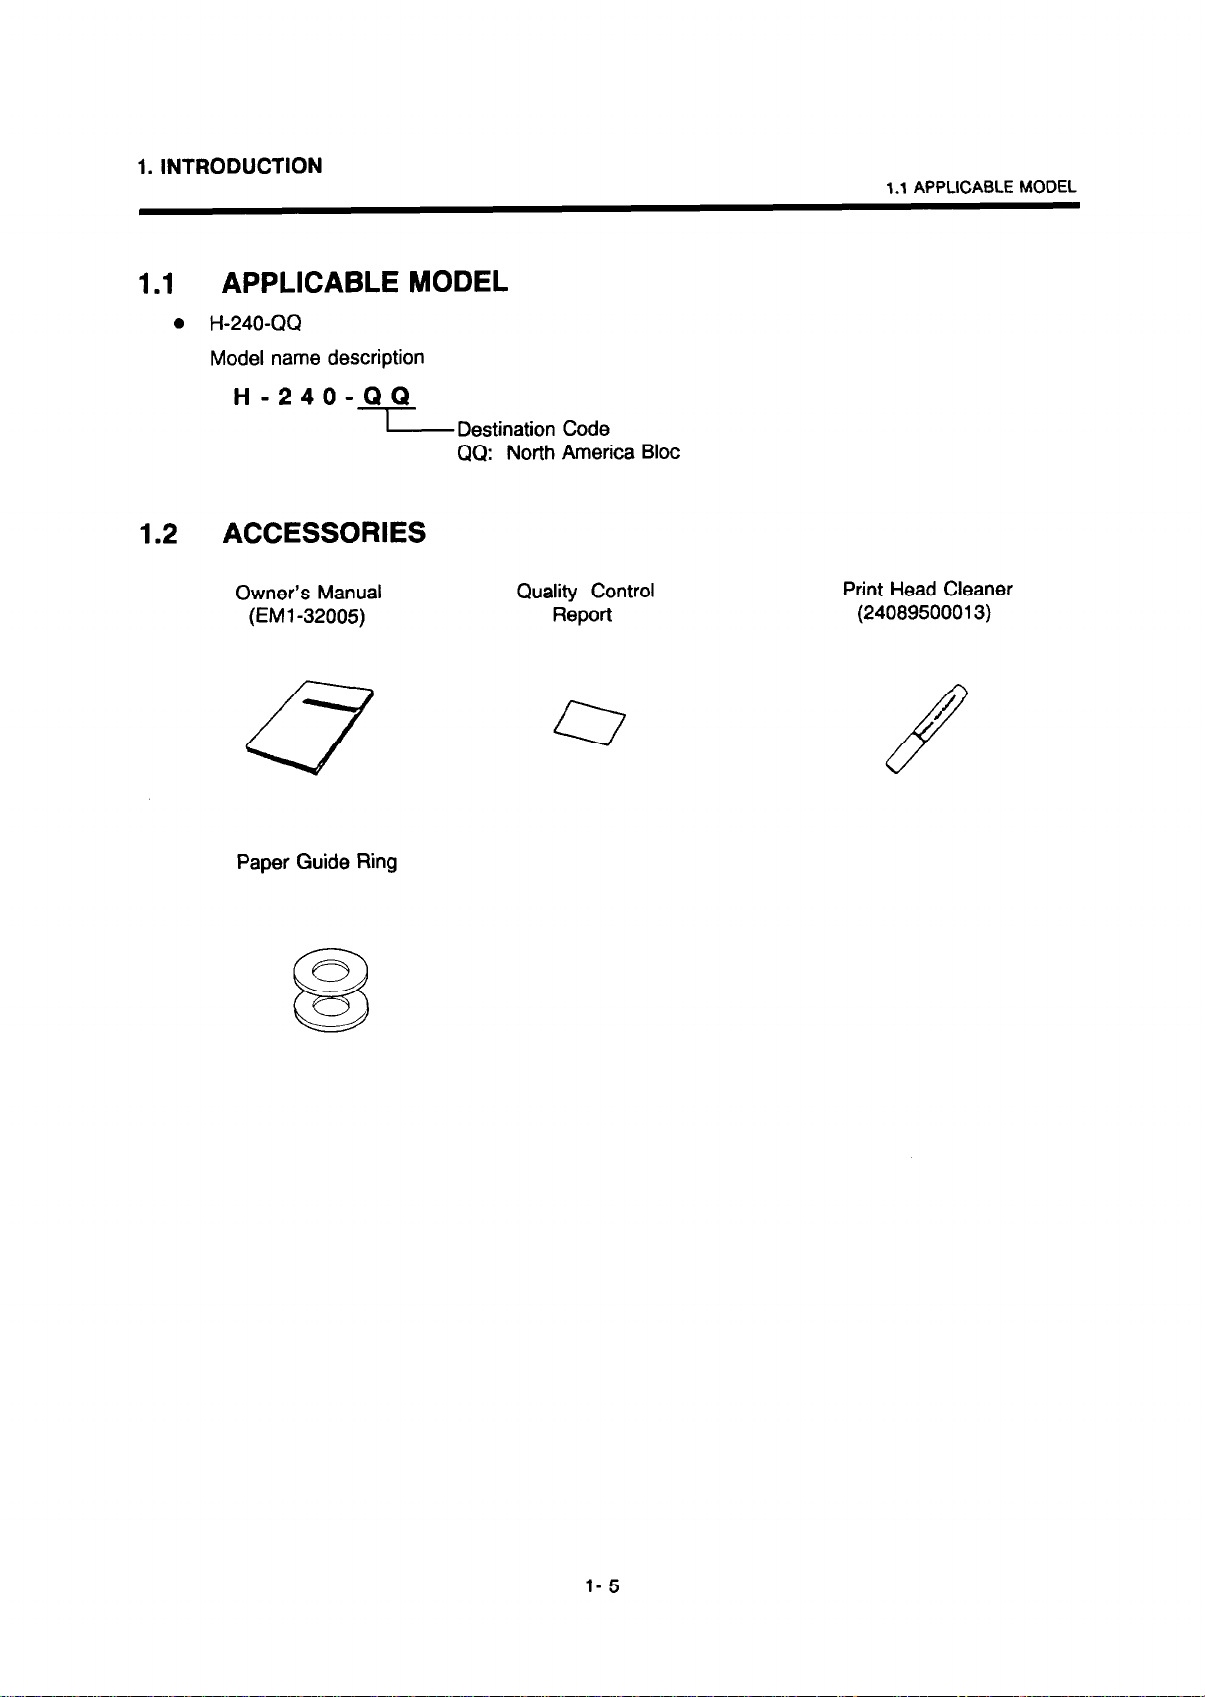
1.1
APPLICABLE MODEL
. H-240~QQ
Model name description
H-240-QQ
I
1.2 ACCESSORIES
Owner’s Manual
(EM1 -32005)
Paper Guide Ring
Destination Code
QQ: North America Bloc
Quality Control
Report
Print Head Cleaner
(24089500013)
l- 5
Page 9
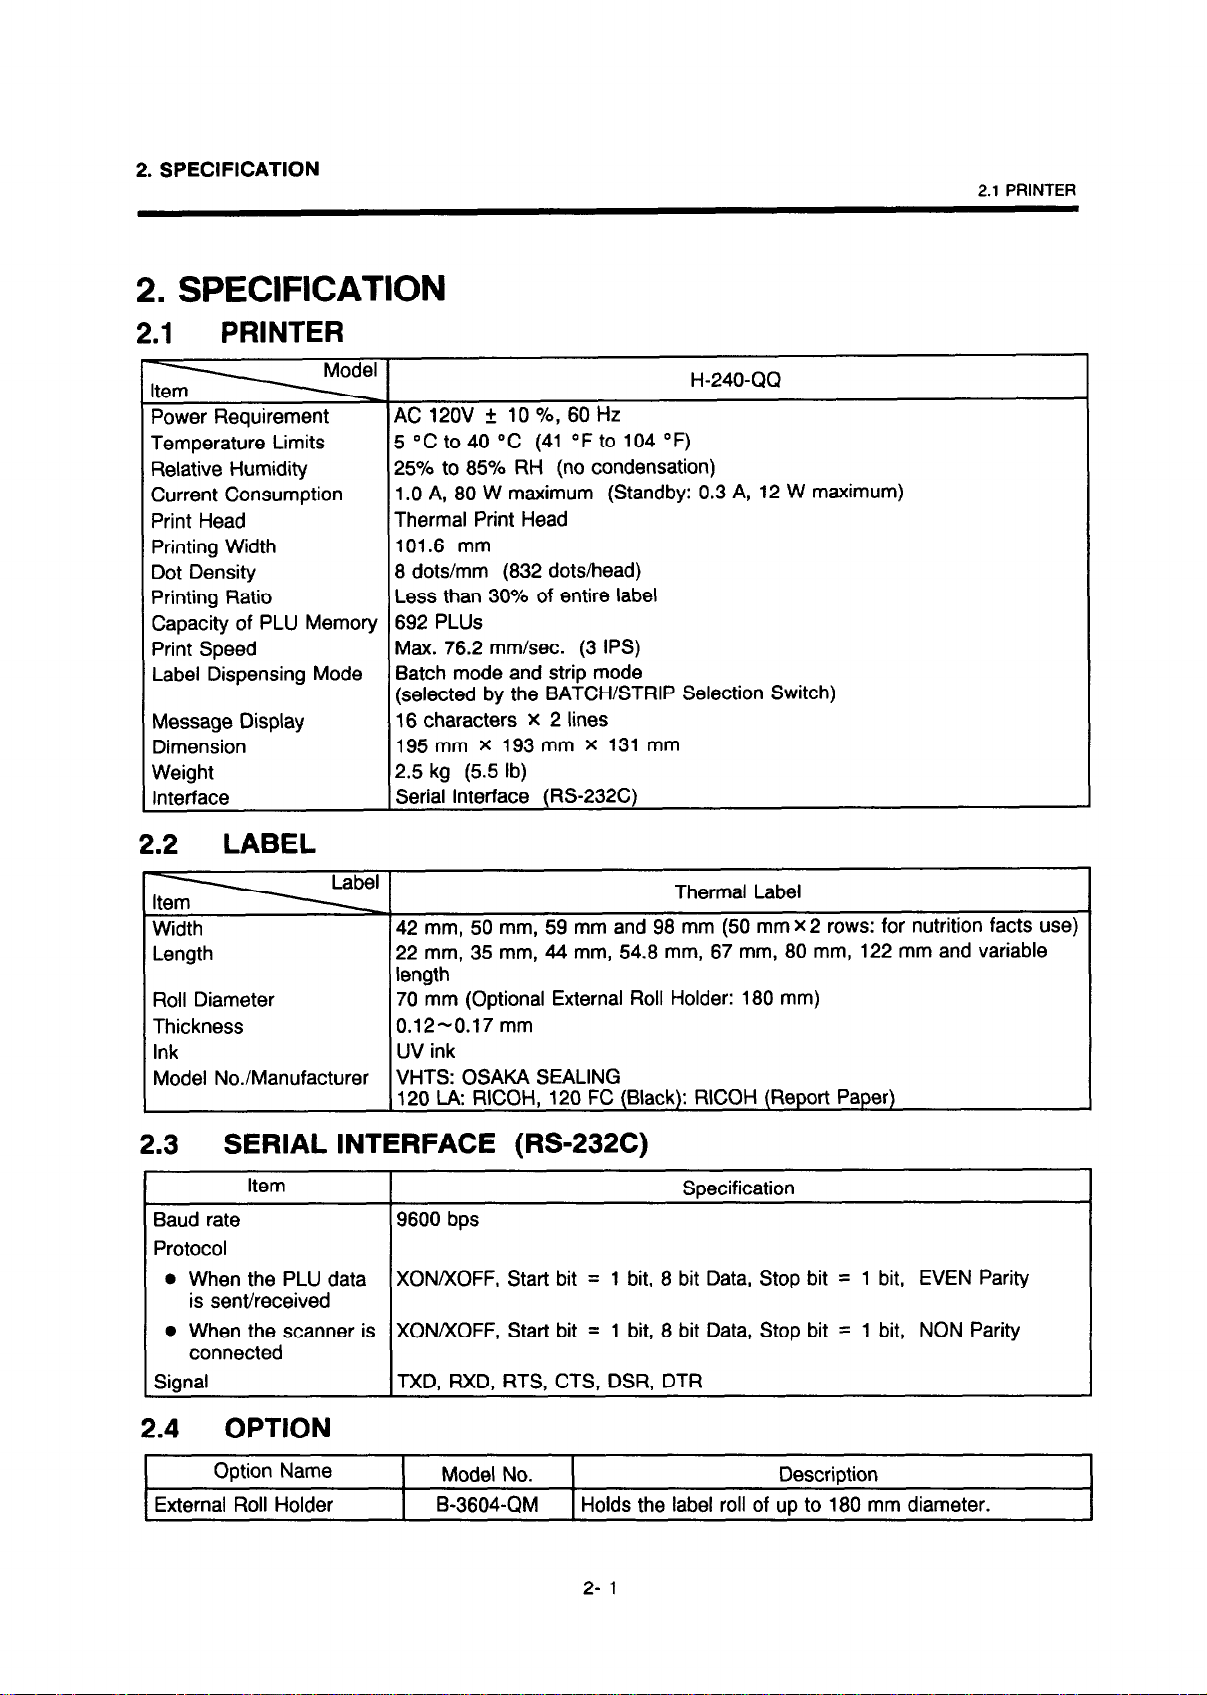
2. SPECIFICATION
2. SPECIFICATION
AC 120V + 10 %, 60 Hz
Temperature Limits
Relative Humidity
Current Consumption
Print Head
Printing Width
Dot Density
Printing Ratio
Capacity of PLU Memory
Print Speed
Label Dispensing Mode
Message Display
Dimension
Weight
Interface
5 “C to 40 “C (41 “F to 104 “F)
25% to 85% RH (no condensation)
1.0 A, 80 W maximum (Standby: 0.3 A, 12 W maximum)
Thermal Print Head
101.6 mm
8 dots/mm (832 dots/head)
Less than 30% of entire label
692 PLUS
Max. 76.2 mm/set. (3 IPS)
Batch mode and strip mode
(selected by the BATCH/STRIP Selection Switch)
16 characters X 2 lines
195mm X 193 mm x 131 mm
2.5 kg (5.5 lb)
Serial Interface (RS232C)
2.1 PRINTER
H-240~QQ
2.2
Width
Length
Roll Diameter
Thickness
Ink
Model No./Manufacturer
2.3
Baud rate
Protocol
1 ;gntti2FBnnBr is
LABEL
SERIAL INTERFACE (RS-232C)
Item
l
When the PLU data
is sent/received
Thermal Label
42 mm, 50 mm, 59 mm and 98 mm (50 mm X 2 rows: for nutrition facts use)
22 mm, 35 mm, 44 mm, 54.8 mm, 67 mm, 80 mm, 122 mm and variable
length
70 mm (Optional External Roll Holder: 180 mm)
0.12-0.17 mm
UV ink
VHTS: OSAKA SEALING
120 LA: RICOH, 120 FC (Black): RICOH (Report Paper)
Soecification
9600 bps
XON/XOFF, Start bit = 1 bit, 8 bit Data, Stop bit = 1 bit, EVEN Parity
XONIXOFF, Start bit = 1 bit, 8 bit Data, Stop bit = 1 bit, NON Parity
TXD, RXD, RTS, CTS, DSR, DTR
2.4 OPTION
Option Name
External Roll Holder B-3604-QM
Model No.
Description
Holds the label roll of up to 180 mm diameter.
2- 1
Page 10
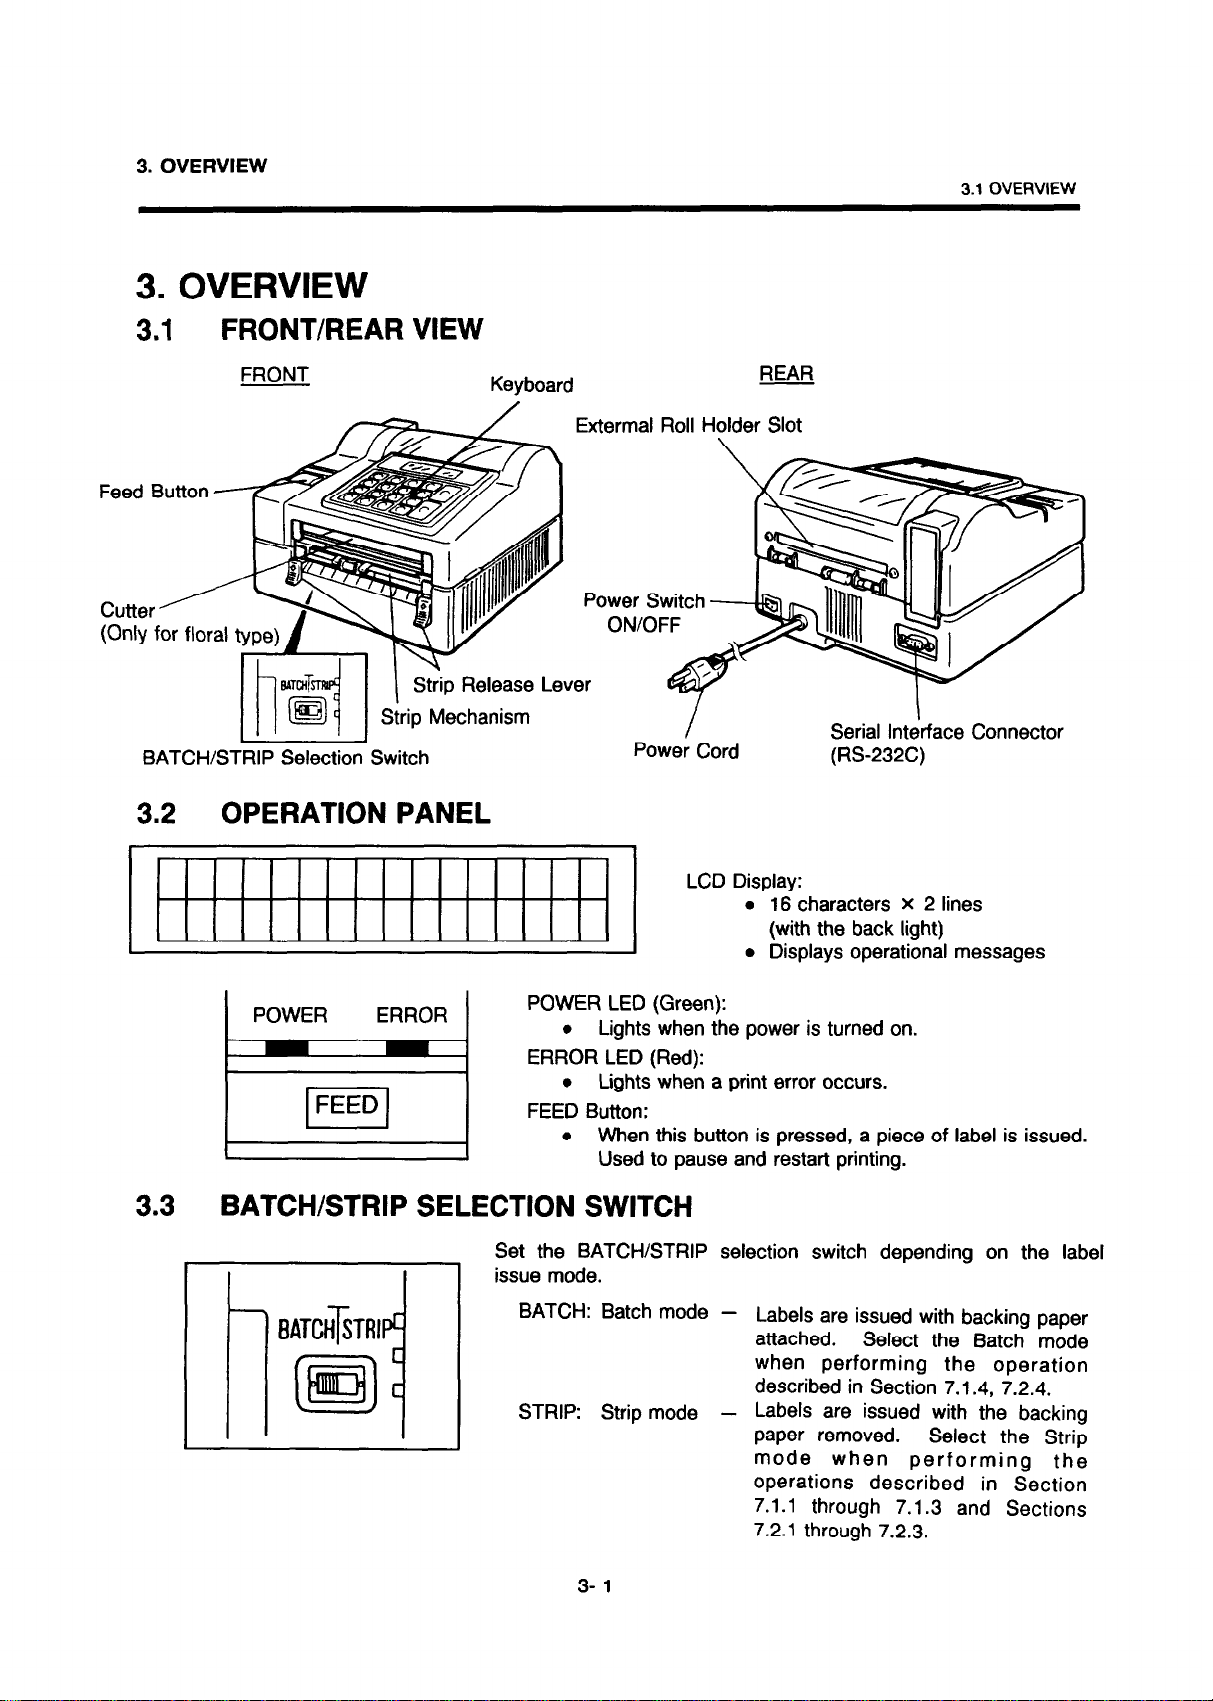
3. OVERVIEW
3. OVERVIEW
3.1 OVERVIEW
3.1
Feed Button 4
FRONT/REAR VIEW
FRONT
C”ttW A
(Only for flnral 1
BATCH/ST- Switch
3.2 OPERATION PANEL
T--J \
Strip Release Lever
Extermal Roll Holder Slot
,
/
47
Power Cord
LCD Display:
REAR
-.
Serial Interface Connector
(RS232C)
l
16 characters X 2 lines
(with the back light)
l
Displays operational messages
I
3.3
POWER ERROR
FEED
I
POWER LED (Green):
l
Lights when the power is turned on.
ERROR LED (Red):
l
Lights when a print error occurs.
FEED Button:
l
When this button is pressed, a piece of label is issued.
Used to pause and restart printing.
BATCH/STRIP SELECTION SWITCH
Set the BATCH/STRIP selection switch depending on the label
issue mode.
BATCH: Batch mode -
EATCHiTRl
P4
STRIP: Strip mode -
Labels are issued with backing paper
attached.
when performing the operation
described in Section 7.1.4, 7.2.4.
Labels are issued with the backing
paper removed.
mode when performing the
operations described in Section
7.1.1 through 7.1.3 and Sections
7.2.1 through 7.2.3.
Select the Batch mode
Select the Strip
3- 1
Page 11
3. OVERVIEW
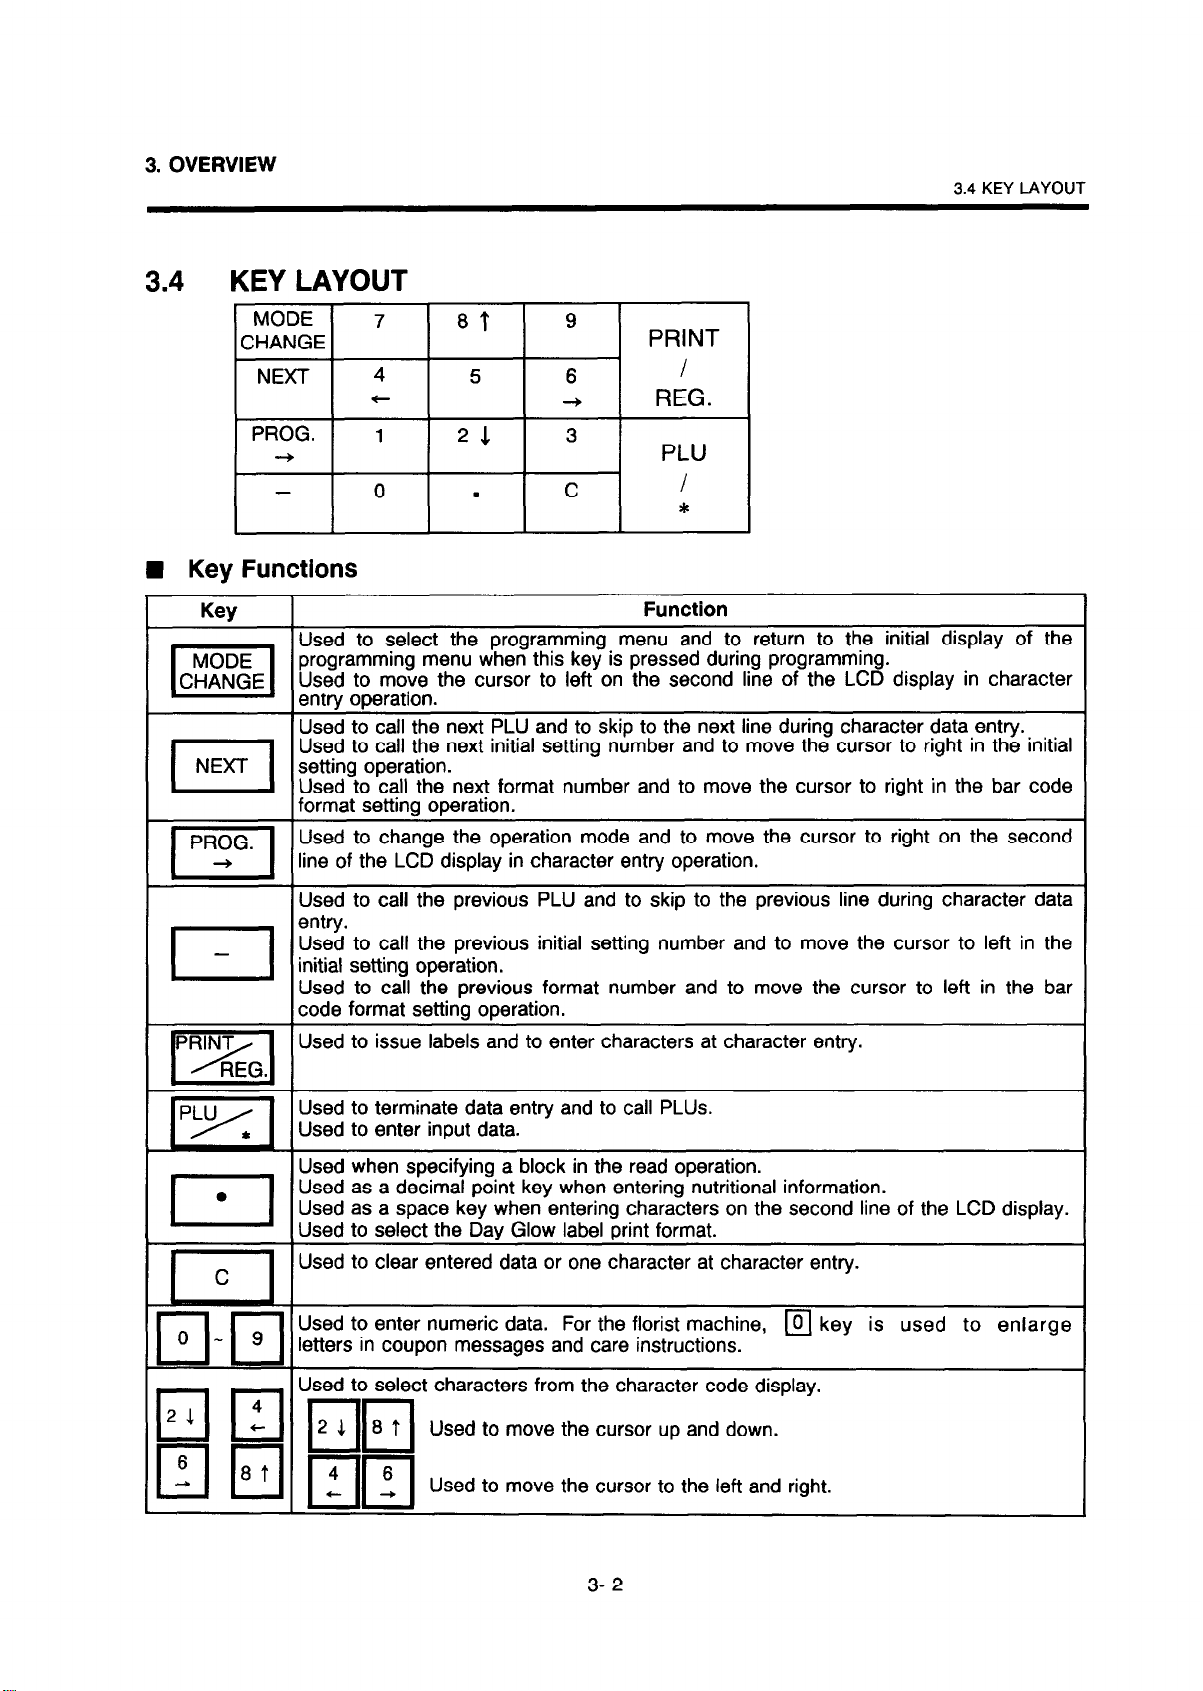
3.4 KEY LAYOUT
3.4 KEY LAYOUT
MODE 7 8t 9
CHANGE
NEXT 4 5 6 I
PROG. 1 21 3
+
- 0
n
Key Functions
Key
Used to select the programming menu and to return to the initial display of the
MODE
CHANGE
I
NEXT setting operation.
I
PROG.
I-I
-
I
pRYgG
m
pYc
programming menu when this key is pressed during programming.
Used to move the cursor to left on the second line of the LCD display in character
entry operation.
Used to call the next PLU and to skip to the next line during character data entry.
Used to call the next initial setting number and to move the cursor to right in the initial
Used to call the next format number and to move the cursor to right in the bar code
format setting operation.
Used to change the operation mode and to move the cursor to right on the second
line of the LCD display in character entry operation.
Used to call the previous PLU and to skip to the previous line during character data
entry.
Used to call the previous initial setting number and to move the cursor to left in the
initial setting operation.
Used to call the previous format number and to move the cursor to left in the bar
code format setting operation.
Used to issue labels and to enter characters at character entry.
Used to terminate data entry and to call PLUS.
Used to enter input data.
PRINT
t
-+
REG.
PLU
.
C
I
*
Function
Used when specifying a block in the read operation.
Used as a decimal point key when entering nutritional information.
Used as a space key when entering characters on the second line of the LCD display.
Used to select the Day Glow label print format.
Used to clear entered data or one character at character entry.
Used to enter numeric data. For the florist machine, m key is used to enlarge
letters in coupon messages and care instructions.
t characters from the character code display.
Used to move the cursor up and down.
Used to move the cursor to the left and right.
3- 2
Page 12
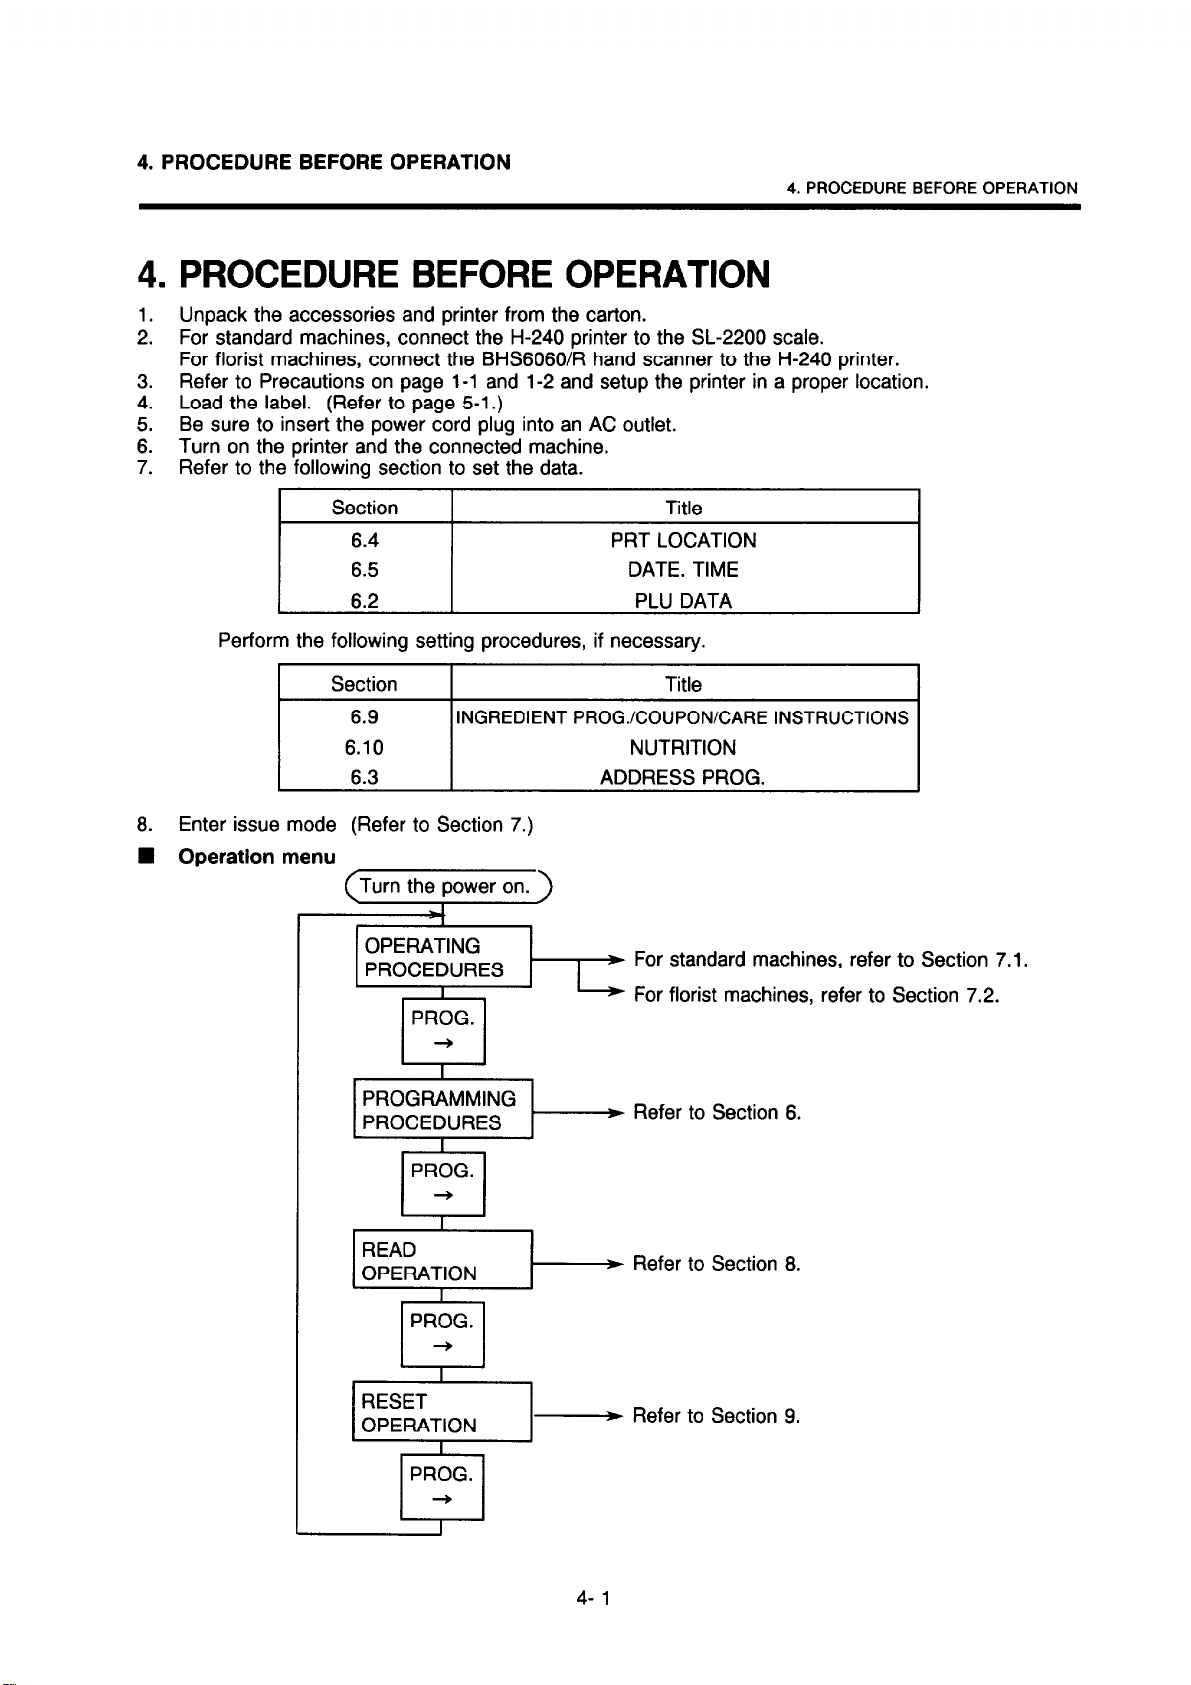
4. PROCEDURE BEFORE OPERATION
4. PROCEDURE BEFORE OPERATION
4. PROCEDURE BEFORE OPERATION
1. Unpack the accessories and printer from the carton.
2. For standard machines, connect the H-240 printer to the SL-2200 scale.
For florist machines, connect the BHS6060R hand scanner to the H-240 printer.
3. Refer to Precautions on page l-1 and l-2 and setup the printer in a proper location.
4.
Load the label. (Refer to page 5-l.)
Be sure to insert the power cord plug into an AC outlet.
::
Turn on the printer and the connected machine.
7. Refer to the following section to set the data.
Section Title
6.4 PRT LOCATION
6.5 DATE. TIME
6.2 PLU DATA
Perform the following setting procedures, if necessary.
INGREDIENT PROGXOUPONCARE INSTRUCTIONS
a.
Enter issue mode (Refer to Section 7.)
W Operation menu
urn the power on.
I 4
OPERATING
PROCEDURES
PROG.
+
PROGRAMMING
PROCEDURES
PROG.
+
READ
OPERATION
PROG.
I + I
* For standard machines, refer to Section 7.1.
I
I
I
For florist machines, refer to Section 7.2.
* Refer to Section 6.
* Refer to Section 8.
- Refer to Section 9.
Page 13
5. LOADING LABEL
5.1 LOADING LABELS FOR BATCH ISSUE
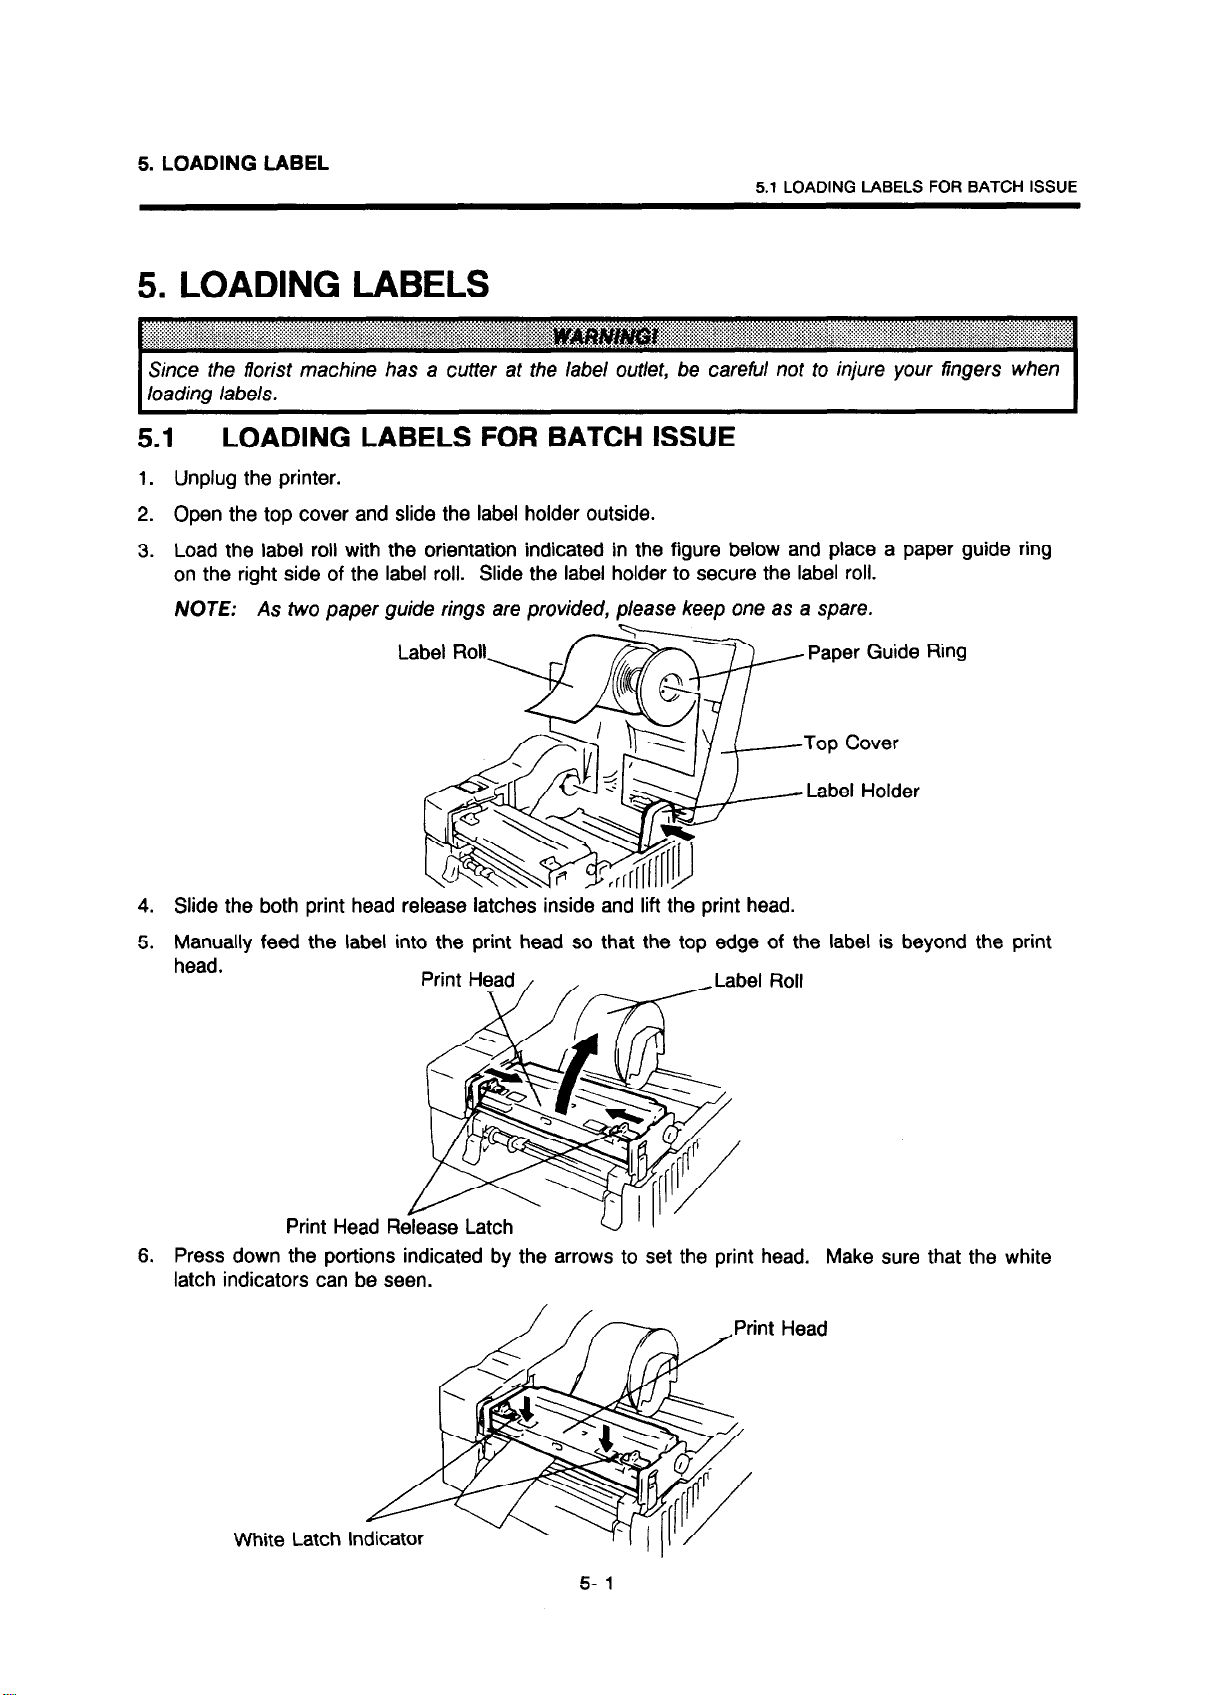
5. LOADING LABELS
Since the florist machine has a cutter at the label outlet, be careful not to injure your fingers when
loading labels.
5.1
1. Unplug the printer.
2. Open the top cover and slide the label holder outside.
3. Load the label roll with the orientation indicated in the figure below and place a paper guide ring
4. Slide the both print head release latches inside and lift the print head.
5. Manually feed the label into the print head so that the top edge of the label is beyond the print
LOADING LABELS FOR BATCH ISSUE
on the right side of the label roll. Slide the label holder to secure the label roll.
NOTE: As two
Ring
head.
Print Head Release Latch
6. Press down the portions indicated by the arrows to set the print head. Make sure that the white
latch indicators can be seen.
Page 14
5. LOADING LABEL
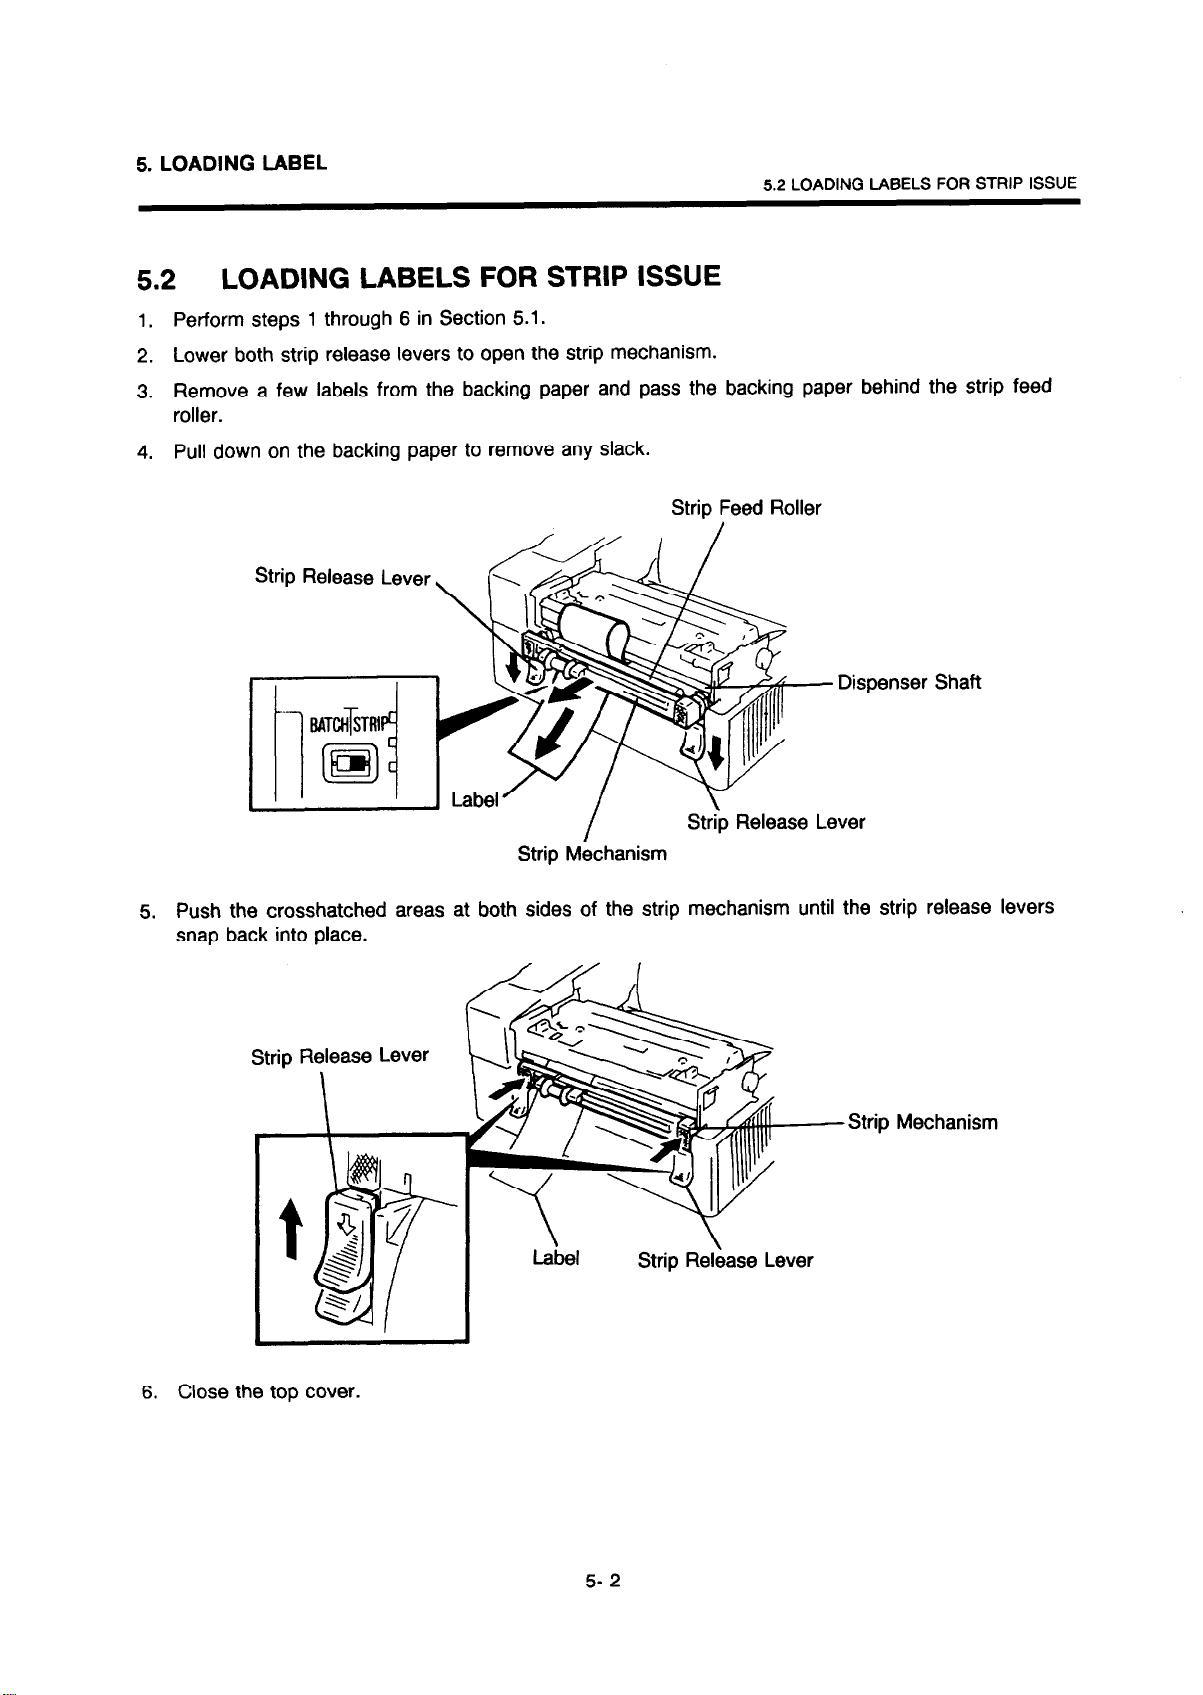
5.2 LOADING LABELS FOR STRIP ISSUE
5.2
1.
2. Lower both strip release levers to open the strip mechanism.
3. Remove a few labels from the backing paper and pass the backing paper behind the strip feed
4. Pull down on the backing paper to remove any slack.
LOADING LABELS FOR STRIP ISSUE
Perform steps 1 through 6 in Section 5.1.
roller.
Strip Feed Roller
Strip Release Lever
Strip Mbchanism
5. Push the crosshatched areas at both sides of the strip mechanism until the strip release levers
snap back into place.
Strip Release Lever
Strip Mechanism
Label
6. Close the top cover.
Strip Release Lever
5- 2
Page 15
6. PROGRAMMING PROCEDURES
6. PROGRAMMING PROCEDURES
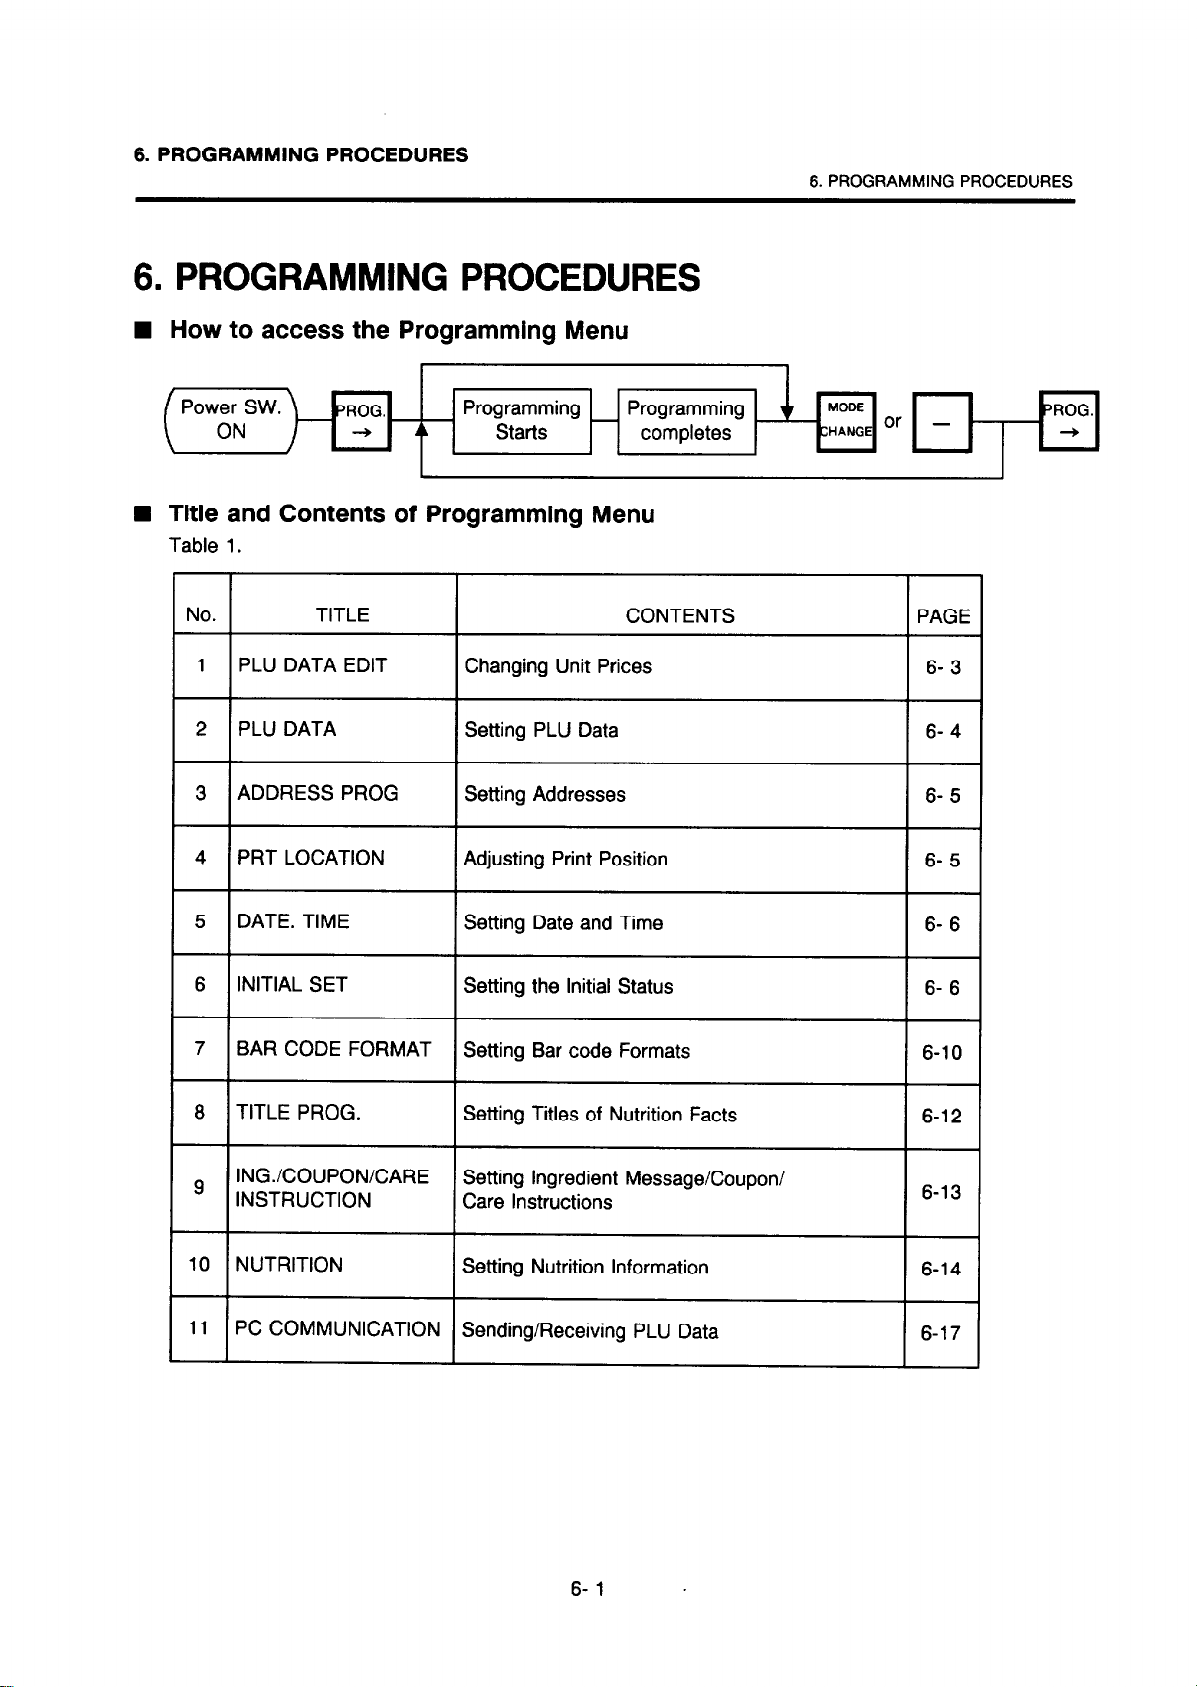
W How to access the Programming Menu
6. PROGRAMMING PROCEDURES
Power SW.
ON
W
Title and Contents of Programming Menu
Table 1.
r
JO.
1 PLU DATA EDIT
PLU DATA Setting PLU Data
2
3 ADDRESS PROG
PRT LOCATION Adjusting Print Position
4
5 DATE. TIME Setting Date and Time
6 INITIAL SET Setting the Initial Status
PROG.
+
TITLE CONTENTS
Programming
Starts
Changing Unit Prices
Setting Addresses
Programming
completes
PAGE
6- 3
6- 4
6- 5
6- 5
6- 6
6- 6
7 BAR CODE FORMAT
8 TITLE PROG.
INGXOUPONCARE Setting Ingredient Message/Coupon/
9
INSTRUCTION
IO NUTRITION Setting Nutrition Information
I1 PC COMMUNICATION Sending/Receiving PLU Data
Setting Bar code Formats
Setting Titles of Nutrition Facts
Care Instructions
6-l .
6-10
6-12
6-13
6-14
6-17
Page 16
6. PROGRAMMING PROCEDURES
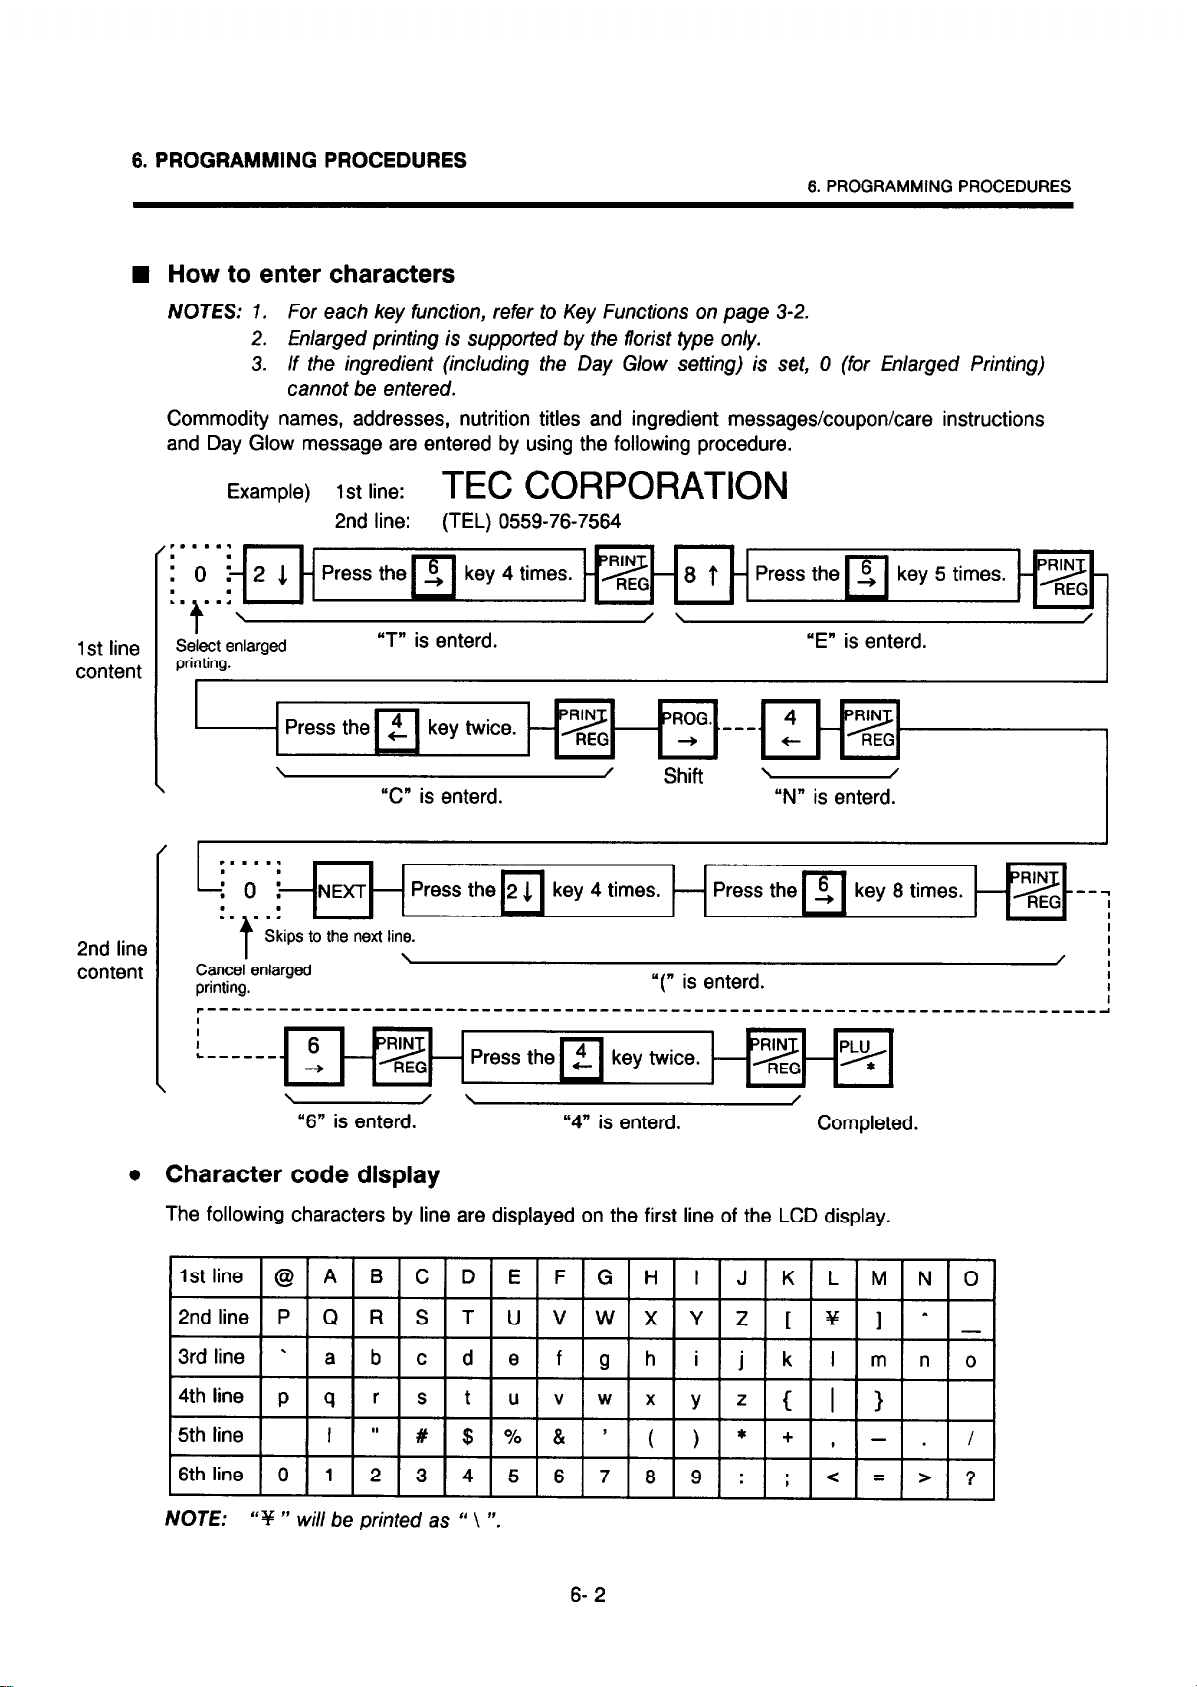
W How to enter characters
6. PROGRAMMING PROCEDURES
1st line
content
NOTES: 1.
Commodity names, addresses, nutrition titles and ingredient messages/coupon/care instructions
and Day Glow message are entered by using the following procedure.
For each key function, refer to Key Functions on page 3-2.
2.
Enlarged printing is supported by the florist type only.
3.
If the ingredient (including the Day Glow setting) is set, 0 (for Enlarged Printing)
cannot be entered.
Example) 1st line:
2nd line: (TEL) 0559-76-7564
TEC CORPORATION
P.....
i 0 !- 2 1
. .
. . . . . -
t ’
Select enlarged
printing.
\
/
. . . . . .
L
i 0 LNEXT-
- Press the !, key 4 times.
n-DzG- 8
-m
“T” is enterd. “E” is enterd.
Press the
\
“C” is enterd.
/
/ \
Shift -
-m-key-
7
“N” is enterd.
-
REG
/
I
2nd line
content
l
Skips to the next line.
I
Cancel enlarged
printing.
I
I
L - - - - - - _
\
6
+
\
“6” is enterd. “4” is enterd.
- Press then 2 key twice. - pzG - p*
/ \ /
“(, is enterd.
Completed.
Character code display
The following characters by line are displayed on the first line of the LCD display.
Y
NOTE: “Y ” will be printed as “ \ “.
z
i
j
z
y1--
k
I m n 0
C
I 1
I - .
< = :
ZF
/
6- 2
Page 17
6. PROGRAMMING PROCEDURES
6.1 CHANGING UNIT PRICES
6.1 CHANGING UNIT PRICES
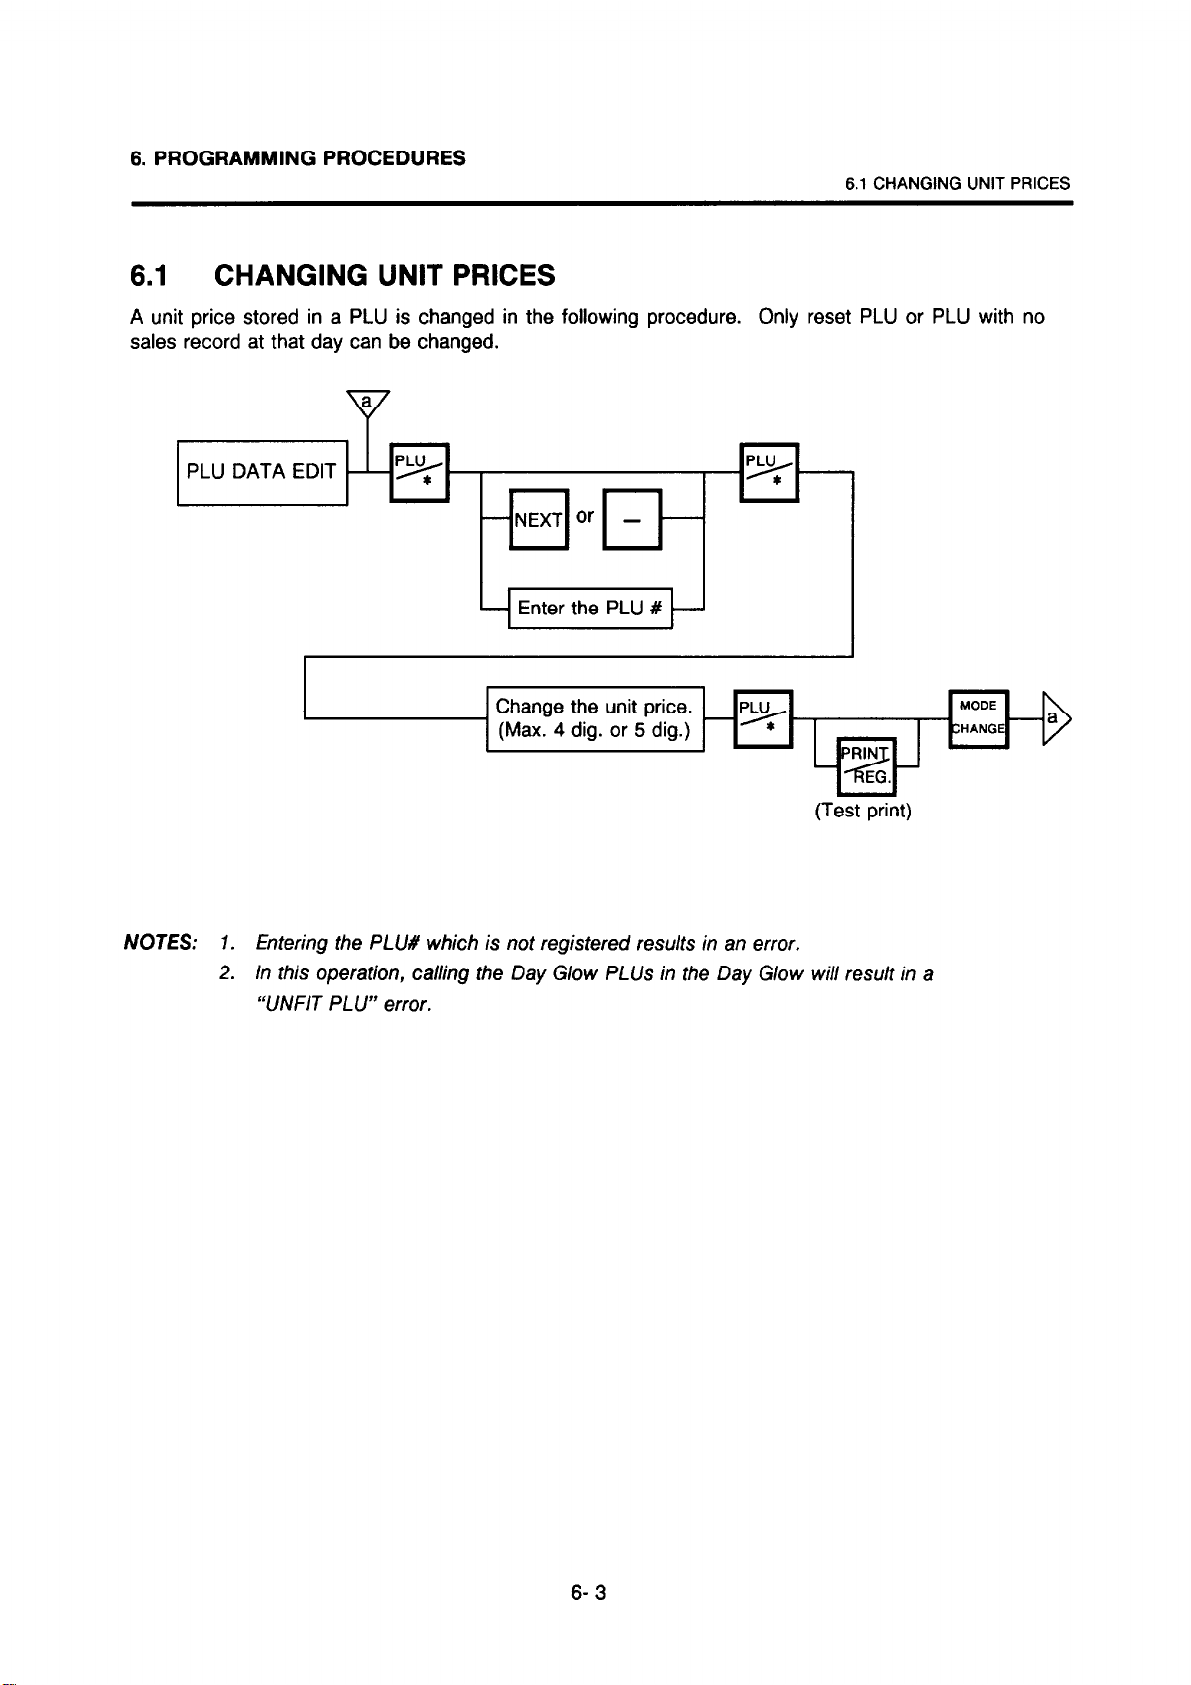
A unit price stored in a PLU is changed in the following procedure. Only reset PLU or PLU with no
sales record at that day can be changed.
a
Y
PLU DATA EDIT
I I - I b 1
NOTES: 1. Entering fhe PLU# which is not registered results in an error.
2. In this operation, calling the Day Glow PLUS in the Day Glow will result in a
“UNFIT PLU” error.
p* .e+---
-NEXT or - -
Enter the PLU #
Change the unit price.
(Max. 4 dig. or 5 dig.) -
p*-
RIN
LPdJ
EG.
(Test print)
MODE
CHANGE
6- 3
Page 18

6. PROGRAMMING PROCEDURES
6.2 SETTING PLU DATA
6.2 SETTING PLU DATA
PLU data (PLU#, UPC#, commodity name, etc.) are set or changed in the following operation mode.
A commodity name can consist of up to 26 characters by 4 lines, however, when the custom label 1,
2 or 3 is selected by the Initial Setting #o-l, the maximum number of characters per line is 24.
Only reset PLU or PLU with no sales record at that day can be changed.
PLU DATA
Enter the PLUX Enter the UPCX
-
Op3;onHmode
BY COUNT
FIX
Day Glow
t
I
I
I 1 -
Enter the unit price.
(max. 4 dig.) (max. 2 dig.)
Enter the tare.
or FIX
v
Enter the shelf life.
Enter the commodity name.
(max. 26 charas. x4 lines)
(Refer to pages 3-2 and
Enter the quantity for
that price. (max. 2 dig.)
6-2.)
-
Se&t changing or
deleting PLUX.
(Test print)
NOTES: 1. Changing a PLU# to an occupied PLU# will result in an error.
2. Tare /imit should be a mu&p/e of 1
multiple of 2 (2, 4, 6 ...), wirhin 7.000 i
3.
When setting a 0 (zero) for fhe shelf life, no data wi// be printed at the SELL BY column
1, 2, 3 . ..). within 30.00 /b for US fype, and a
g for CA type.
on labels.
4. For the Day Glow PLUS, all settings which follow the operation mode setting are
omitted.
5. LVp/k’e$e machine is set to fhe florist specification, selecting the Day Glow mode is nor
6- 4
Page 19
6. PROGRAMMING PROCEDURES
6.3 SElTNG ADDRESSES
6.3
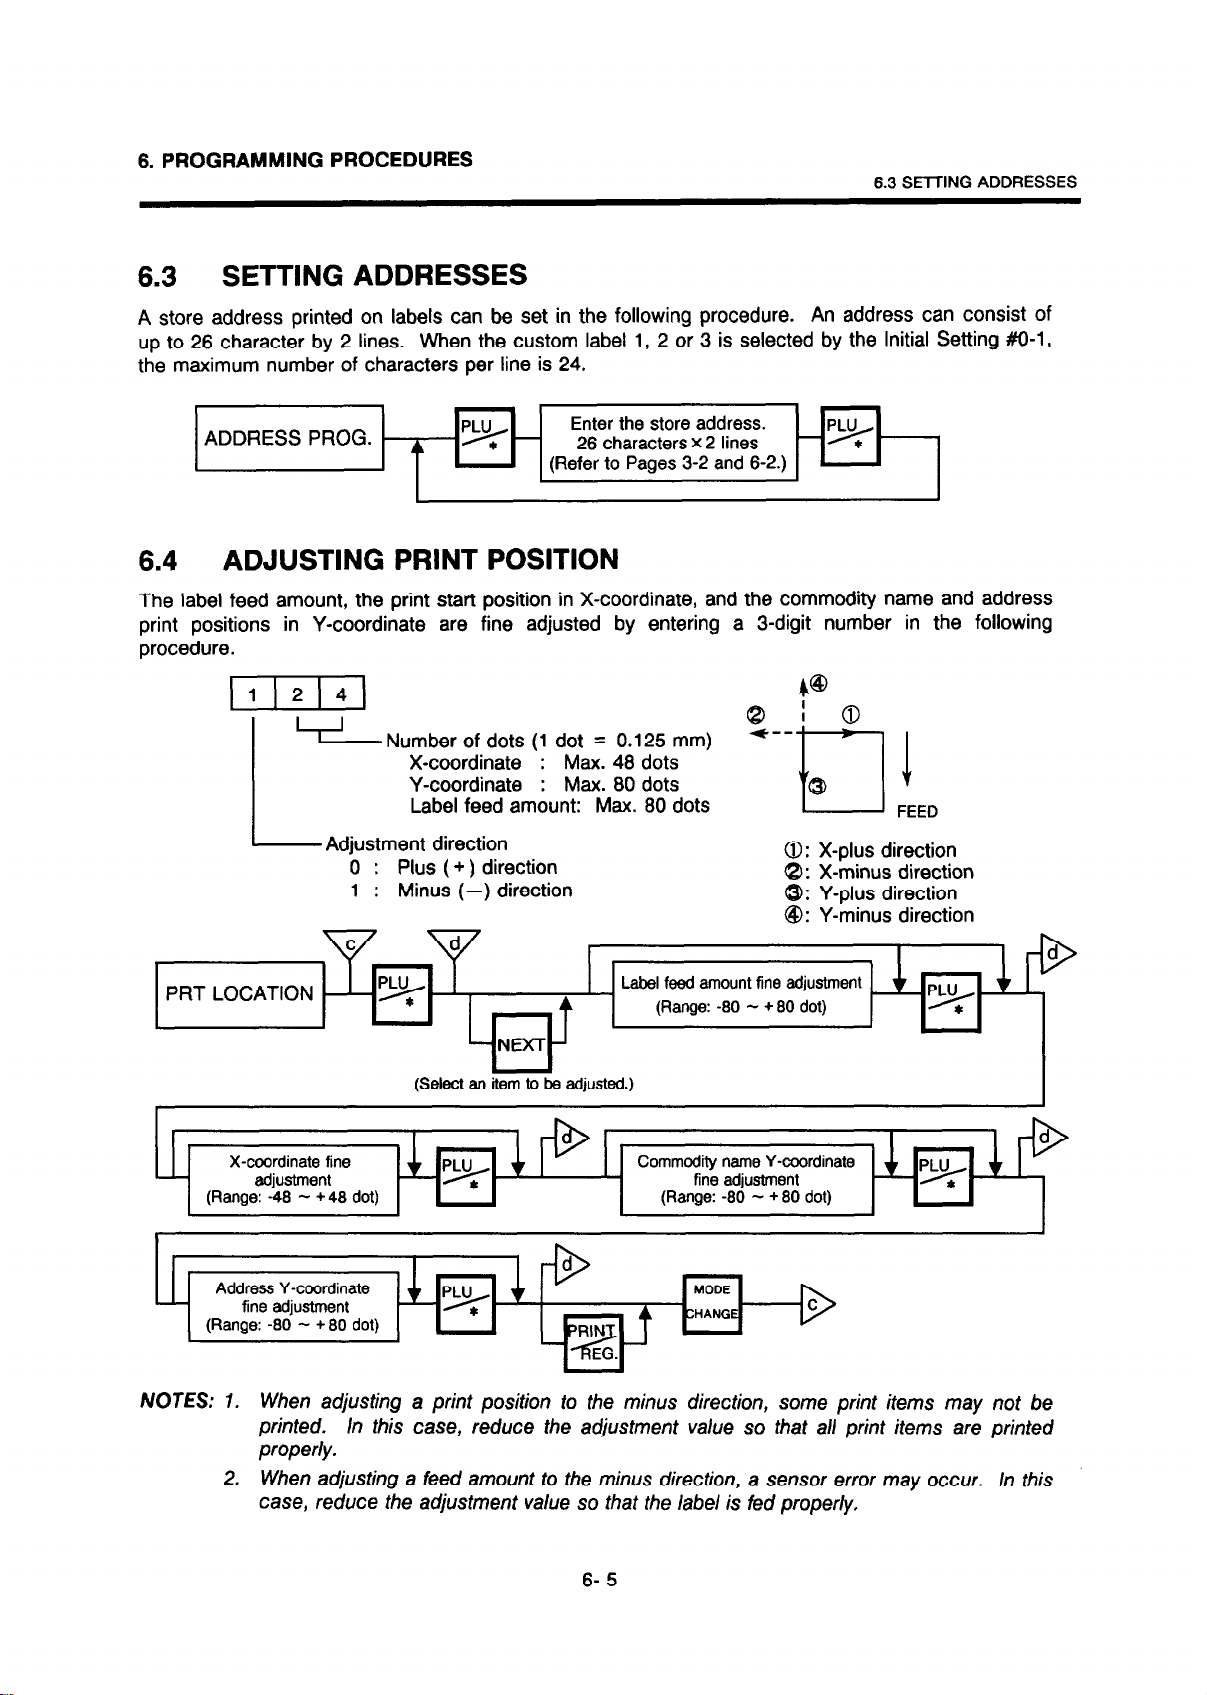
SETTING ADDRESSES
A store address printed on labels can be set in the following procedure. An address can consist of
up to 26 character by 2 lines.
When the custom label
1,
2 or 3 is selected by the Initial Setting #O-l,
the maximum number of characters per line is 24.
6.4
I
ADDRESS PROG.
p*-
A
ADJUSTING PRINT POSITION
Enter the store address.
26
characters X
2 lines
(Refer to Pages 3-2
and
-*
6-2.)
The label feed amount, the print start position in X-coordinate, and the commodity name and address
print positions in Y-coordinate are fine adjusted by entering a 3-digit number in the following
procedure.
llj2)41
Number of dots
X-coordinate
(1
dot = 0.125 mm)
: Max. 48 dots
4@
Y-coordinate : Max. 80 dots
Label feed amount: Max. 80 dots
Adjustment direction
0 : Plus ( + ) direction
1 :
Minus (-) direction
0: X-plus direction
8: X-minus direction
0: Y-plus direction
@: Y-minus direction
PRT LOCATION
(Select an item to be adjusted.)
X-coordinate fine
Address Y-coordinate
(Range: -80 - +80 dot)
Label feed amount fine adjustment
(Range: -80 - + 80 dot)
Commodity name Y-coordinate
fine adjustment
(Range: -80 - +80 dot)
MODE
CHANGE
NOTES: 1. When adjusting a print position to the minus direction, some print items may not be
printed. In this case, reduce the adjustment value so that all print items are printed
properly.
When adjusting a feed amount to the minus direction, a sensor error may occur. In this
2.
case, reduce the adjustment value so that the label is fed properly.
6- 5
Page 20
6. PROGRAMMING PROCEDURES
6.5 SETTING DATE AND TIME
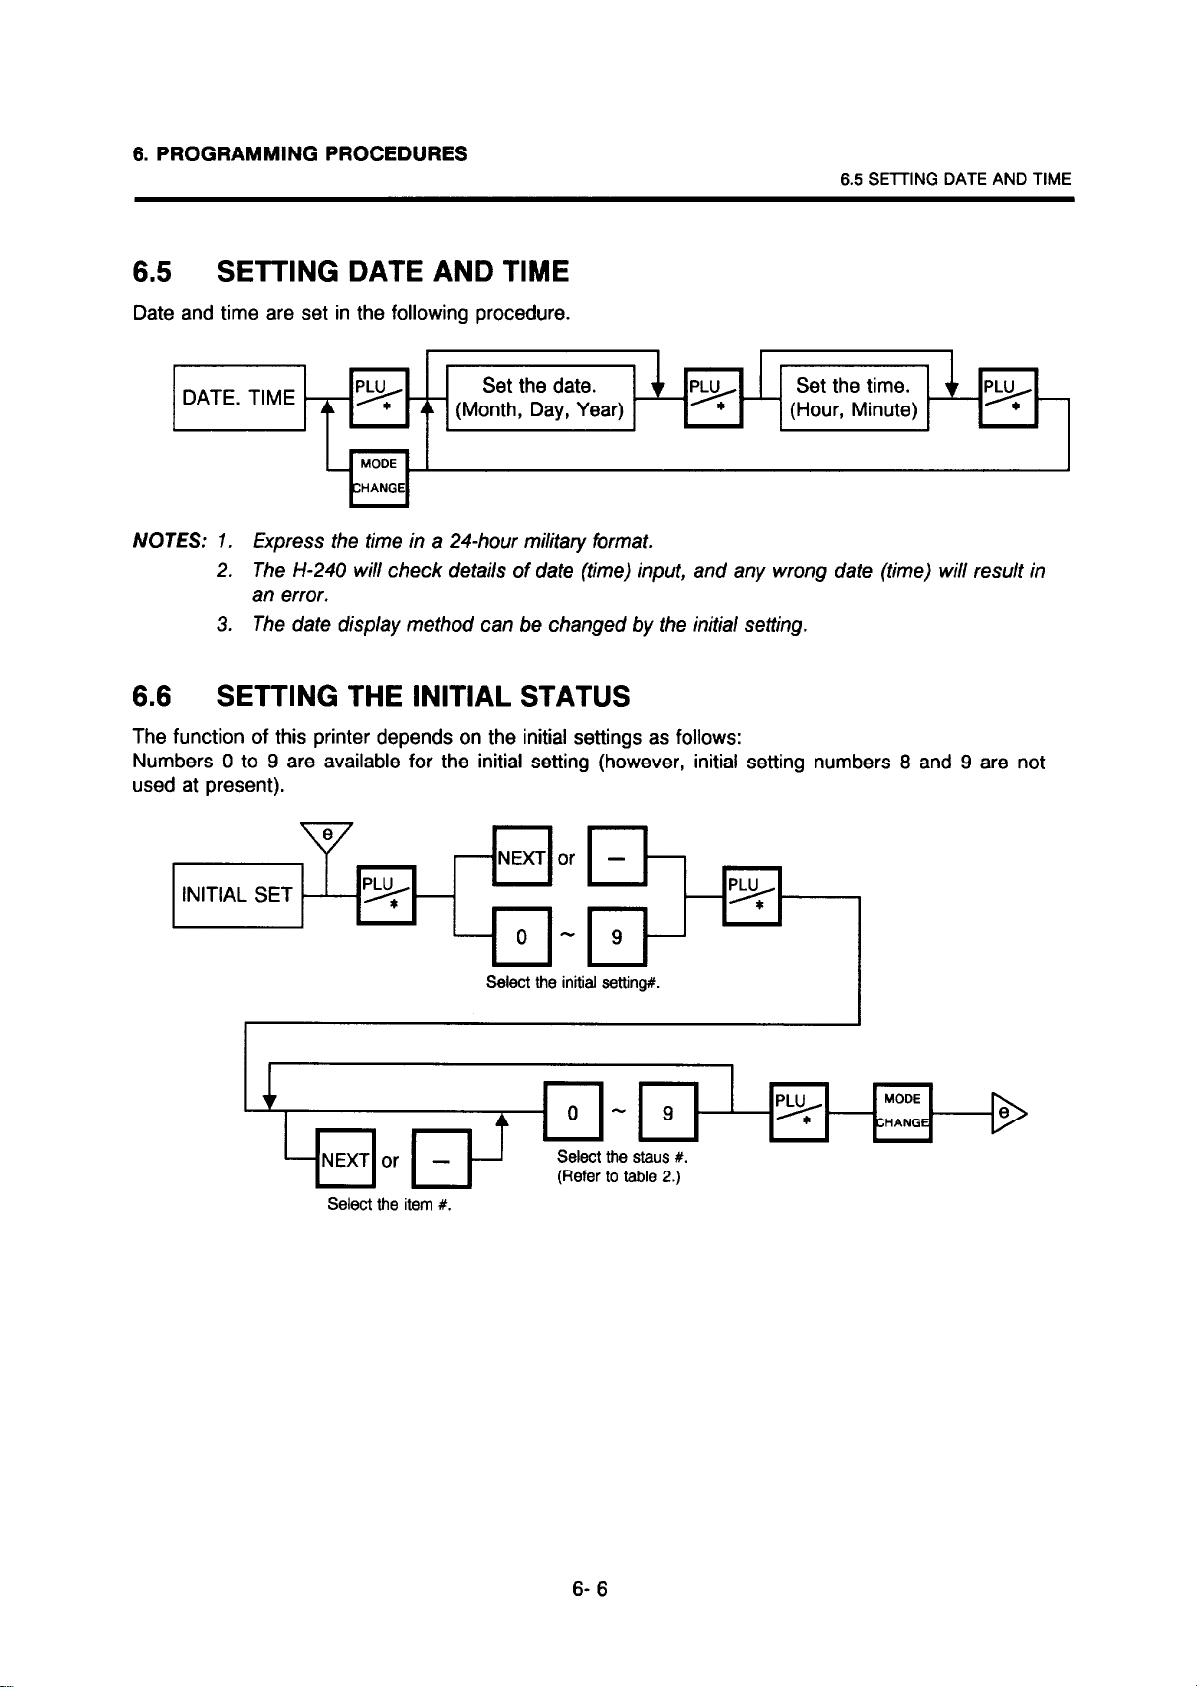
Date and time are set in the following procedure.
6.5 SElTlNG DATE AND TIME
p*
(Hour, Minute)
DATE. TIME
p*
MODE
ZHANGE
(Month, Day, Year)
NOTES: 1. Express the time in a 24-hour military format.
2. The H-240 will check details of date (time) input, and any wrong date (time) will result in
an error.
3. The date display method can be changed by the initial setting.
6.6 SETTING THE INITIAL STATUS
The function of this printer depends on the initial settings as follows:
Numbers 0 to 9 are available for the initial setting (however, initial setting numbers 8 and 9 are not
used at present).
or
Select the item #.
Select the initial setting#.
6- 6
Page 21

Table 2: Initial Setting Function Table
1) Initial Setting #0
Item
No.
Function
Label format
1
Bar code type UPC-A EAN-13 0
2
Status No.
0 123456789
NON POS
label
POS label
ING. 0
POS LW301
ING. 12
POS label
ING. 32
POS label
ING. 32
(for nutrition
facts)
CUSTOM
Label 1
(22mm)
CUSTOM
Label 2
(54.7 mm)
CUSTOM
Label 3
(54.7 mm)
FLORIST
label 1, 2
The status
selected by
the initial
Setting #8-1
6. PROGRAMMING PROCEDURES
Standard
Status No.
Standard: 1
Florist: 8
3
4
2) Initial Setting #1
Item
No.
6-7
1
2
3
4
3) Initial Setting #2
Item
No.
Print format for custom
label 1
Issue method Automatic Manual 0
Status No.
Function
Time mode on Label 12 hrs. 24 hr.. 1
Baud Rate when
communicating with a
scale
Number of digits of
TMCC Machine #
TMCC Baud Rate 4800 9600 0
Status No.
Function
Bar code
0 123456789
4800 BPS. 9600 BPS. 1
3 digit 1 digit 0
0 123456789
Bar code +
Price in
Small letters
Bar code +
Price in
capital
Standard
Status No.
Standard
Status No.
0
6.5 SETTING DATE AND TIME
Date setting order YY-MM-DD DD-MM-W MM-DD-YY 2
1
Type of data print Numeral
2
Change to unit prim in
REG
3
mode (BY COUNT: T.
Price)
Reset operation Not available Available 0
4
Not available Available 0
Print month
ex.) JA, FE
Print month
ex.) JAN,
FEB
US: 2
CA: 1
Page 22

4) Initial Setting #3
Item
No.
Function
Status No.
0 123456789
Standard
Status No.
6. PROGRAMMING PROCEDURES
1
2
3
4
5) Initial Setting #4
Item
No.
6-8
1
2
3
4
Open price selection
Change of weight and
price when issuing NET
WT. Statement label
No function 0
No function 0
Status No.
Function
Each country spec. US CA
Specification change Standard Florist
TMCC N/A Available 0
No function 0
Total amount
entry
Available
0 123456789
Unit price
entry
Not
Available
Standard
Status No.
US: 2
CA: 1
Standard: 0
Florist: 1
0
0
6) Initial Setting #5
Item
No.
Function
Unit price and total
1
amount capacity
Unit price shift in the
2
REG. Mode
PLU Preset Tare
3
No function 0
4
Status No.
0 123456789
Unit price 4
digits Total
amount 5 digits
Cyclic
Shift
Not
Available
Unit price 5
digits Total
amount 6 digits
End-off
Shift
Available 1
Standard
Status No.
0
1
6.5 SETTING DATE AND TIME
Page 23

7) Initial Setting #6
Item
No.
Function
Status No.
0 123456789
Standard
Status No.
6. PROGRAMMING PROCEDURES
1
2
3
4
8) Initial Setting #7
Item
No.
6-9
1
2
3
4
Decimal point position
Decimal point
Display/print
Print position of “PIECES”
in By count mode
No function 0
Status No.
Function
Printing PACKED ON
DATE
Printing SELL BY DATE Not print Print 1
Printing COMMODITY
NAME
Printing WEIGHT Not print Print 1
U. Price 0
T. Price 0
Comma
( , )
Unit price
Position
0 123456789
Not print Print
Not print Print 1
0.0
0.0
Period
( . )
Weight
position
0.00
0.00
0.000
0.000
0
0.0
Standard
Status No.
US: 0
CA: 1
2
1
1
9) Initial Setting #8
Item
No.
1
Function
Label format 2
Status No.
0 123456789
Net Wt.
Statement
Label
6.5 SETTING DATE AND TIME
Standard
Status No.
0
Page 24

6. PROGRAMMING PROCEDURES
6.7 SETTING BAR CODE FORMATS
6.7 SETTING BAR CODE FORMATS
With the H-240 label printer, three kinds of bar code formats are available. These formats can be
changed freely.
Example)
Current format 2 9 Cl
I
I I
Flag UPC #
C2 C3 C4 C5 C6 P2 P3 P4
I I I I
n
Price Total check digit
P5 C/D
v
Changed format 0 2
I
C2 C3 C4 C5 C6 PC/D
I I
UPC #
I I I I I I
P.rice check Price or weight
dlglt
Pl P2 P3
When changing the above example format into the weigh format described in NOTE 1,
following procedure.
Select the format #.
Format # 1: WEIGH
BAR CODE FORMAT
‘% - Format # 2: BY COUNT - ‘%
Format # 3: FIX PRICE
P4 C/D
Total check digit
use the
I
I
(Right)
(Move the cursor to
the column to be set.)
- WOG.
Switch over
UPC # -*PC/D check digit
NOTES:
- 1 -PROG.-
+
Set the price Switch over
1. When UPC-A is selected as a bar code type (initial set # O-2), the first line is not
printed. Therefore, the dag must be set to ‘02’.
In this printer the previous/y set bar code format is initialized to the following default by
2.
RAM clear or ALL clear.
Default
Bar
0 Weigh or Fix Price Format
0 2
@ By Count Format
l
Standard type
Set the flag.
ex\ C...*r uy\r)n
, LfllW “C
Switch over the setting
item. (Refer to NOTE 8 on
the following page.)
exl Press the kev twice to
select UPC # asa
setting item.
+
PC/D + Price
1 2 3 4 -p*-‘HANGE
Enter a price
Code Format:
C2 C3 C4 C5 C6 PC/D
WOG.
+
2 3 4 5 6-
Enter an UPC #.
MODE
Pl P2 P3
P4 C/D
0 0 0
l
Florist type
c2 c3 c4 c5 0 0 0 0 C6
0 0 0 0 0 0
PC/D PI P2 P3 P4 P5
6-10
C/D
C/D
Page 25

6. PROGRAMMING PROCEDURES
3. When the ppLu/*I key is pressed, the bar code format is checked. An error occurs in
the following cases.
@ Check digit (CID) is in other than digit-13.
@ Price check digit (PC/D) cannot be calculated. (Price and weight are other than 4
or 5 digits or no price/weight is programmed.)
@ Price is not set serially beginning from PI (PI to P4, or PI to P5).
@I Weight is not set serially beginning from W7 (WI to W4, or W7 to W5).
6.7 SETTING BAR CODE FORMATS
FLAG
PLU #
UPC #
PC/D
PRICE
WEIGHT
C/D
4. Digits and display of PLU #
PLU # 123456
HHHHHH
Display 123456
Digits and display of price
6.
Price # $12 .34
PP PP
Display 12 34
m-El
El -El
El-El
q
;lo
1
ilo
1
0
- 6
- 6
5. Digits and display of UPC #
UPC #
123456
cccccc
Display 123456
$123 .45
PPP PP
123 45
7. Display of weight Digits
Weight 1 2 . 3 4
ww ww
Display 1 2 3 4
8. Setting Items
1
- PLU #-UPC # - PC/D
C/D -Weight -Price
7
2
6 5
6-11
3
4
+J
Page 26

6. PROGRAMMING PROCEDURES
6.8 SETTING TITLE OF NUTRITION FACTS
6.6 SETTING TITLE OF NUTRITION FACTS
Titles of nutrition facts are set in the following procedure.
characters.
v
-NExTor - -
TITLE PROG.
p*-
Enter the title No.
Enter the title.
- (Refer to Pages 3-2 and 6-2.)
Table 3: Default title of nutrition facts
+ The title of additional information area 1.
(See NOTE 1.)
Each title can consist of up to 22
I
+-The title of additional information area 2.
+-The title of additional information area 3.
+ The title of additional information area 4.
t-The title of additional information area 5.
+ The title of additional information area 6.
The title of additional information area 7 and 8.
The title of additional information area 9 and 10.
The title of additional information area 11 and 12.
6-12
(See NOTE 1
and 2.)
!
Page 27

6. PROGRAMMING PROCEDURES
6.8 SElTlNG TITLE OF NUTRITION FACTS
NOTES: 1. The fit/es of the addil
Additional Information Area
Additional Information Area 1
1 Additional Information Area 5
1 Additional Information Area 6
onal information areas are displayed in the following positions.
Displayed position
No. 7 Additional Information Area 7 No. 24, column 1 to 18
No. 17 cclumn 1 to 18 Additional Information Area 8 No. 24, column 12 to 21
No. 18 column 1 to 18 Additional Information Area 9 No. 25, column 1 to 10
19 column 1 to 18 Additional Information Area 10 No. 25, column 12 to 21
No.
No. 20 column 1 to 18 Additional Information Area 11 No. 26, column 1 to 10
21 column 1 to 18 Additional Information Area 12 No. 26, column 12 to 21
No.
Additional Information Area Displayed position
2. Set a colon ‘I’ at the column 20 and a ‘g’ or ‘mg’ at the column 21 and 22 when
entering titles into No. 9 through No. 21.
6.9
SETTING INGREDIENT MESSAGE/COUPON/
CARE INSTRUCTIONS /DAY GLOW MESSAGE
Up to 45 characters by 32 lines of ingredient message, and 29 characters by 22 lines of coupon and
care instructions are set in the following procedure.
y$pqt.
Enter the PLUM.
(ING. + COUPON-+ Instruction)
+ I
Enter the message.
- (Refer to pages 3-2 and 6-2)
p*
LD%d
RIN
EG.
MODE
CHANGE
(Test print)
NOTES: 1. When customer label 2 or 3 is selected under initial Setting #O-l, the max. number of
characters per line is 41.
2. For the florist machine, coupon messages or care instructions can be enlarged to a
two-line size within 16 characters by 71 lines. The display shows as follows when
setting enlarged messages.
jl
N: Line No. is every other number
3. Though you can set characters outside of the above range, those characters are not
printed.
4. A maximum of 7 or 14 characters for Day Glow message can be set in the same way
as the ingredient message. A maximum of 45 characters can be set, however, only 7
or 14 characters can be printed.
(X4, 1 line: 7 characters, X2, 2 or 3 fines: 14 characters)
6-13
Page 28

6. PROGRAMMING PROCEDURES
6.10 SElTING NUTRITION INFORMATION
6.10 SETTING NUTRITION INFORMATION
Nutrition information and caloric intake are set in the following procedure.
Serving Size consists of a maximaum of 13 characters.
including title characters must not exceed 25.
However, total number of characters
NUTRITION
Enter the
Serving Size.
(Within 13 chars.)
Enter the Calories.
(O-9999)
Additional Information.
Area 1 (O-9999)
Enter the Total Fat.
(0.0-9999)
PROG.
+
4
Enter the PLU#
(max. 6 dig.) A
NEXT Or - -
Enter the Servings
- * - Per Container.
p*
(Within 3 chars.)
NEXT
,p*
I
I
- ‘*
A
0
Enter the cholesterol.
(0.0-9999)
Enter the Total
Carbohydrates.
(0.0-9999)
Enter the Sodium.
(0.0-9999)
6-14
Page 29

6. PROGRAMMING PROCEDURES
6.10 SETTING NUTRITION INFORMATION
I
NOTES: 1.
l
Set the Daily Value Table
Be careful that selecting a PLU# which is not stored in the PLU file results in an error.
2.
Nutrition file is saved each time the IpLu/*I key is pressed.
procedure along the way, data entered without pressing m/ key is not stored.
2: r-1 key.
3.
The additional information can be used only when its title has been registered in Section
6.8.
Basic Calories.
(Content No.
Enter the Basic
Saturated Fat.
(Content No. 3)
MODE
3iANGE
(lest print)
Thus, if you quit the
To exit
ress the [PLU/Sl key until “Enter the PLU” is displayed, and then press
1)
Basic Total Fat.
(Content No. 2)
-
p*
Basic Cholesterol.
(Content No. 4)
Enter the Enter the Basic
Basic Sodium.
(Content No. 5)
Enter the Basic
- Dietary Fiber.
(Content No. 7)
I ,
!3+
Total Carbohydrate. p*-
(Content No. 6)
.
L
NOTE: Caloric intake data is entered as 8 digits, however, only the first 4 digits are used and the
last 4 digits are ignored.
6-15
Page 30

6. PROGRAMMING PROCEDURES
l
Deleting
Nutrition
Data
6.10 SElTING NUTRITION INFORMATION
Nutrition
Facts
Enter the PLU# -
(max. 6 dig.)
!+-
Additional information area 1
9dditional information area 2
tdditional information area 3
tdditional information area 4
tdditional information area 5
9dditional information area 6
Nutrition
Serving Size 1234567690123
Servings Per Container 223
Amount Per Serving
Facts
Calories 3
Calories from Fat 4
X Daily Value*
Tatal Fat 5a 8%
Saturated Fat 60 30% I
Cholesterol
Sodium 8mg
Total Carbohydrate 9g 3%
Dietarv Fiber 10a
Sugars llg
Protein
Vitamin A 13X.Vitamin C 14%
Calcium
* Percent Daily Values are based on a 2,000
calorie dlat.
7mo
12g
15X.Iron
2%
0%
40%
16%
\dditional information area 7,8
4dditional information area 9,lO
l
Percent Dally Values are basad on a 2,000
calorla diet.
1 St Address _ _ _ _ _ _ _ _ _ _ _ _ _ _
2
nd Address _ _ _ _ _ _ _ _ _ _ _ _ _ _
idditional information area 11,12
1-0000000000000000000000-1
2-0000000000000000000000-2
(Sample label)
h\\b Area for titles:
v//k Area for entry data:
~~ Area for data:
NOTE: Nutrition facts can be printed only when the Initial Setting #O-l is set to 4.
When the Initial Setting #O-l is set to 4, the basic data and the nutrition facts
simultaneously on the 98-mm wide label (two pieces of labels are attached side by side on
one backing paper) to save printing time.
facts are printed on the right.
Set to No.1 to No.26 in Section 6.8
Set in this menu (Nutrition Setting procedure.)
Calculated on the basis of the entered data in Section 6.10
The basic data is printed on the left, the nutrition
are
printed
6-16
Page 31

6. PROGRAMMING PROCEDURES
6.11 SENDING/RECEIVING PLU DATA
6.11 SENDING/RECEIVING PLU DATA
The H-240 printers can communicate with each other, and with a PC if an exclusive application is
installed in it. Regarding the exclusive application, refer to the service representative. When
purchasing the interface cable, contact the service representative.
When communicating between the H-240 printers, get the receiving side ready before sending data.
PC COMMUNICATION
I
Receive
I I
t-l
(Starts receiving data.)
I
1:
Sending P
(Starts sending data.)
-
PROG.
+
ROG.
-9
Receiving
Sending !q
(Terminates sending data.)
C
(Abort)
C
+
b
(Terminates receiving data.)
+
NOTE: When an error occurs during data receiving, data sent after occurrence of the error is not
received. If an error occurs, contact the service representative.
\
01 (1) Character parity check method is incorrect.
(2) Baud rate setting is incorrect.
(3) Character length setting is incorrect.
02 The header text is incorrect. Check the format and contents of the header
03 The data text is incorrect. Check the format and contents of the data text.
04 The number of PLU set in the header text differs Check the number of PLU set in the header text
from that actually received.
05 The result of BCC calculation differs between
sent data and received data.
06 The sender controls XON/XOFF improperly.
Cause
(1) Change the parity check method to even.
(2) Set the baud rate to 9600 bps.
(3) Set the character length to 8 bit, stop bit to
1 bit.
text.
and that to be sent.
Check both BCC calculation methods.
Check the sender’s XONlXOFF control method.
6-17
Page 32

7. OPERATING PROCEDURES
7. OPERATING PROCEDURES
7.1 STANDARD TYPE
~
“““..“:::::,::,:,:;.;.
:::::::::.:.::::::‘:‘:~:::‘.‘.‘.’.:.:.:~~.~~.~.~.~.~:~:~:~:~:~:~:~:~:~:~:~:‘:‘:‘:‘:‘:‘:::~~:~~:::~:~:~:~:~:~~:::::::::::.:::::.:.:::::::.:::.:::::::::::::::.:.:::.::::::~:.:.:::.:~:::::::::: .,.. .,,,.,.: ,,.,,:,,,,,,.~.,‘, ..,,... .,.,.,,,.,.,.,.,: ,.,,,./,/,,,,. ,,,,,,, ,,.,,,, .., . ,,.;,. ,(,/,,,,, ,,,,., ,., ,.( ,..
:.:::.::.:::::::::.:........,
:.:.: ‘:.:‘:‘;
. . . . .A., ,. ., (, . . . . . . . . . . . . . . . . . . . . . . . . . . . . . . . ..~~.!~........................................,:,:
Since the florist machine has a cutter at the label outlet, be careful not to injure your fingers when
removing printed labels.
7.1 STANDARD TYPE
n NOTES BEFORE STARTING OPERATION
(1) Connect the TEC SL-2200 scale or PC to the H-240 printer.
(2) Set the BATCH/STRIP selection switch depending on your usage.
(3) Insert the power cord plug into the AC outlet.
(4) Check the date and time.
(5) Press the m button to feed a label.
(6) Remove the fed label.
(7) Press the IPRINT/REG.I key.
BATCH mode:
Label Print Head
STRIP mode:
Printing the label is ready.
The label is fed reversely
to the print start position.
Printing the label is completed.
Remove the printed label.
NOTES: 1. When the loaded label does not match the label format setting, print start and end
positions may become misaligned.
2. Labels will not be issued when the print head is raised, the label ended, or printed
label is detected by the strip sensor.
7- 1
Page 33

7. OPERATING PROCEDURES
7.1 .l Weighing Operation
7.1 .l Weighing Operation
The weighing operation is available only when the SL-2200 scale is connected to the printer
and the selection switch is set to STRIP side. This operation is performed on the SL-2200
scale.
The weigh mode is used to issue the label of a commodity for an unknown weight, printing the
Weight, Unit Price (price per unit weight), and the Total Price (calculated as a result of the
weighting operation). This mode may be applied to cases such as a store that weighs each
commodity and issues the label on demand of customers on the sales floor or that a store
issues that labels for repacked commodities of different kinds and weights.
NOTE: When printing the Day Glow label in weigh mode, set the selection switch to BATCH.
(For details, refer to “7.1.2 By Count Operation” and subsequent sections.)
l
Weighing a commodity and issuing a label
Example) T-BONE STEAK (PLU#lOl) sold at $3.00Ab is to be weighed and labeled.
Enter the PLU #.
Press:
Place a commodity on the
SL-2200 scale platter.
(Example: 5.00 lb)
1 Single label is issued. 1
AUTO
MANUAL
I
1 Single label is issued. 1
T-BONE STEAK
7- 2
*,r- ,//- m
TEC CORPORATION
(TEL)0559-76-7564
DC,‘: y gj
(Sample label)
Page 34

7. OPERATING PROCEDURES
l
Weighing a fixed price commodity and issuing a label
7.1 .l Weighing Operation
Example)
Press:
Enter the PLU #.
Press:
Place a commodity on the
SL-2200 scale platter.
(Example: 2.00 lb)
T-BONE STEAK (PLU#lOl) sold at $3.00/lb is purchased for 2 lb.
pz
1 0 1
6
PLU
9
I
I
Single
label
is issued. Single label is issued.
T -BONE STEAK
::- -- -’
APR 14
;F
_L.. F.
~~~lllllll~~llll~~llllll
2 00005 80030
2.00
Ia - ‘i;- an
TEC CORPORATION
(TEL)0559-76-7564
w.T 17 0
(Sample label)
APR 19
2
$3.00
7- 3
Page 35

7. OPERATING PROCEDURES
~~~lllllll~~~lll~
l
Counting a fixed price commodity and issuing a label
Example) T-BONE STEAK (PLU#lOl) sold at $3.00/lb is purchased for 10 pieces.
Enter the PLU #.
I
7.1 .l Weighing Operation
Press:
Press:
Enter the purchased
Quantity.
(maw: 99)
Press:
PLU
I
\
‘9
x
1 0
pz
I
I
Single label is issued.
T -BONE STEAK
:: .I- -,
APR 14
ii p,
2 00005
10 Fws
IlI /
80300 6
Ilk-‘:,- IEI lCL I:0 m ,,.. :
TEC CORPORATION
(TEL)0559-76-7564
APR 19
$30.00
(Sample label)
7- 4
Page 36

7. OPERATING PROCEDURES
IDONUTSp3
IOONUTSp3
7.1.2
By Count
Operation
7.1.2
In the by count mode, PLU cannot be called from the SL-2200 scale, but by the H-240 label
printer.
The by count mode is used to issue the label for packed commodities (or may be unpacked.)
The whole package quantity (or a certain quantity) and the whole package price (or the price
per quantity) are usually preset.
scale in such cases.
Example) When selling 3 DONUTS which are sold at $0.93 per 6 DONUTS. (When data of
Enter the PLU #.
Press:
Select the Day Glow message
print format.
Cancels the Day Glow message
print format.
By Count Operation
Thus, it is not necessary to weigh the commodities by the
$0.9316 DONUTS is set to the PLU #813.)
Press:
Enter the sold quantity.
(max. 99)
Press:
Press:
Open price:
Initial Setting #3-l : 0
Total amount
initial Setting #3-l : 1
Unit price
Press:
ex)
4 0
Initial Setting
x3-1: 0
w
7- 5
Page 37

7. OPERATING PROCEDURES
7.1.2 By Count Operation
TODAY’S
SPEC I AL
NOTES:
AUTO
A
Single label is issued in Single label is issued.
succession after peeling it.
Press to suspend label
issued temporarily.
I
C
0
Press to cancel label
issue
The display returns to
the initial screen.
The Day G/ow PLUS are printed on the Day G/ow (22-mm length) labels on/y.
1.
2. Issuing the Day Glow labels does not affect the memory.
MANUAL
Press to
resume label
issue
(Sample Day Glow label)
I
DONUTS
APR 22
;z
,_.. :i
‘~ ‘~.
APR
n
3
PIMS
,i;- ‘?,- m -RICE It 0 w ,..* T
21
$0.48
7- 6
Page 38

7. OPERATING PROCEDURES
7.1.3 Fix Mode Operation (Issuing labels wlth net weight statement)
In the Fix mode, PLU cannot be called from the SL-2200 scale, but by the H-240 label printer.
Data can be printed only on the label which accommodates 32 ingredient lines. (Set the initial
Setting #O-l to 3 or 4) Unit price and tare preset in each PLU are regarded and printed as
price and net weight, respectively.
Example) The preset Price is $2.10 and the preset Net Weight is 12 oz. The store knows that
the actual Net Weight of this commodity is 19 oz. and decides to sell it at $2.00.
Enter the PLU #.
7.1.3 Fix Mode Operation (Issuing labels with net weight statement)
Press:
Select the Day Glow message
print format.
Cancels the Day Glow message
print format.
Initial set #3-2:0
Enter the sold quantity.
(max. 99)
Press:
Enter the new weight.
(Unit of weight: oz)
(The numeric data is
displayed in the
incremental display
method, i.e., the data is
shifted to the left as each
digit value is entered.)
L
r
.
0
Y
4-c-
71 Initial set #3-2:l
I
IPRICE
I
/UT.
Press:
Enter the quantity.
(Max. 99)
-
0
3
9
A
0
I
I
7- 7
Page 39

7. OPERATING PROCEDURES
Press:
1 The label is issued. 1
7.1.3 Fix Mode Operation (Issuing labels with net weight statement)
The display returns to
the initial screen.
NOTES: 1. Weight data exceeding 480 oz results in an error.
2. Unit price calculation formula
(Step 1) Weight data is
(Round off the data to two decimal places.)
ex.) 21 oz + 1.3125 /b+ round + 1.31 lb
(Step 2) Price is divided by the value obtained above.
(Round off the data to two decimal p/aces.)
ex.) 1.5 $11.31 lb
3. When the unit price is less than $0.01//b or either the weight or price is 0, the unit price
will not be printed.
calculated
= 1.145 + round + $1.15//b
from royal lb into decimal lb.
This data is printed.
ENTER THE PLUX
I
P
I
7- 8
Page 40

7. OPERATING PROCEDURES
4. AMtiplication registration of NET WT. statement
The maximum quantify of a commodity is 99.
In the following cases, an error occurs when pressing the IPRT/REGI key to issue the
label.
(1) Quantity = 0
(2) Price X quantity ) max. price
LEMON MERINGUE PIE
7.13 Fix Mode Operation (Issuing labels with net weight statement)
I*~RfDIEYTF Urnbl fLmJR’30%, nERIffiVbl5%,
/
LElGU%
6iJllER=lO%. EGG-W!.
MEsE:s/.. swM%. stlt1:2%.
lWER’ll%.
PWED on
APR 22
SELL BY
8111111 lwlllllll
00003 30060
3 Pm
APR 25
6 %l!!!lCE
NET WT, 57t.U 16164
TEC CORPORATION
(TEL)0559-76-7564
Data set in Section 6.9 is printed here.
(Sample label)
5.
The Day Glow PLUS are printed on the Day Glow (22-mm length) labels only.
6.
Issuing the Day Glow labels does not affect the memory.
7- 9
Page 41

7. OPERATING PROCEDURES
7.1.4 Batch Print Mode (with 30 PLUS assignment)
A maximum of 30 PLUS can be printed in a range of 0 to 99 label pieces in batch mode.
(When entering 0 for the number of labels to be issued, printing will be canceled). As this
function accepts only PLUS set in the by count or fix mode, calling the PLU set in the weigh
mode will result in an error. When calling the PLU set in the fix mode, be sure to use the label
which accommodates 32 ingredient lines, otherwise an error occurs.
Before starting the procedure, set the BATCH/STRIP selection switch to the BATCH side.
7.1.4 Batch Print Mode (with 30 PLUS assignment)
Enter the PLU #.
Press:
Select the Day Glow message
print format.
Cancels the Day Glow message
print format.
FIX mode:Enter the new price.
By count mode: Enter the new
Purchased Quantity.
Press:
FIX mode: Enter the new weight.
Fix
ENTER THE PLUX
P 819
By Count I Day Glow mode
mode
Press:
FIX mode: Enter the new pieces.
Press:
Enter the number of labels to
be issued (max. 99)
7-10
Page 42

7. OPERATING PROCEDURES
7.1.4 Batch Print Mode (with 30 PLUS assianment)
Press:
The label is issued. 1
r
l
Stopping or cancelling the label issue
Clears an error or stops issuing
labels.
Cancels the PLU being printed.
Press:
Cancels all unprinted PLUS.
-
FEED
I I
C
Automatic issue
Manual issue
Automatic issue 1
Manual issue
1 ISSUING LABELS 1
f75pimy
1 ISSUING
I I
1 [PRINT] TO
I
LABELS
PRINT 1
I
I
EJOTES: 1. Selected PLUS are canceled in the following cases:
@ The power is turned off after selecting PLUS.
The -1 key is pressed to exit the registration mode.
@
@ The n
@ All the selected PLUS have been printed.
2. As more than 30 PLUS cannot be selected, selection of the 31st item will result
in an error when the
3. The following display will appear when the selected PLU is printed, aborted or a
print error is cleared.
#II(PPPPPP)NN MM
cccccccccccccccc
I
II: The serial number of the selected PLU which is aborted.
PP: PLU No.
NN:
The number of labels to be issued.
MM: The number of unprinted labels when aborting printing.
CC:
Commodity name of the PLU
4. The Day Glow PLUS are printed on the Day Glow (22-mm length) labels on/y.
5. Issuing the Day Glow labels does not affect the memory.
6. If the initial setting #O-l is set to other than 5 (custom label I: 22 mm), calling the
Day Glow PLUS in this mode is not allowed. Doing so will result in a ‘UNFIT
PLU’ error.
key is pressed to cancel all unprinted PLUS.
PRINTIREG
I
key is pressed.
7-11
Page 43

7. OPERATING PROCEDURES
7.2 FLORIST TYPE
7.2 FLORIST TYPE
NOTES BEFORE STARTING OPERATION
n
Connect the BHS6060/R hand scanner to the H-240 printer.
(1)
NOTES: 1. Be sure to turn off the printer before connecting the hand scanner to the H-240
printer. If the hand scanner is disconnected from the printer while the power is
on, turn off the printer, connect the hand scanner fo the printer again, and then
turn on the printer.
2. The florist machine cannot be connected to a scale. When connecting the printer
to a PC, be sure to use the cab/e exclusively for the H-240~QQ V2.0. Failure to
do this may result in ma/functions with the machine. (The cable is no1 enclosed
with the printer.)
Set the BATCH/STRIP selection switch depending on your usage.
(2)
Insert the power cord plug into the AC outlet.
(3)
Check the date and time.
(4)
Press the [FEED] button to feed a label.
(5)
Remove the fed label.
(6)
Press the 1-1
(7)
key.
BATCH mode: STRIP mode:
I -
Print Head
1,
Printing the label is ready.
Backing Paper
The label is fed reversely
to the print start position.
Printing the label is completed.
Remove the printed label.
L&w!?;;
Strip Plate
i
-
i
Label
+?F=
,
H-0
NOTES: 1. When the loaded label does not match the label format setting, print start and end
positions may become misaligned.
2. Labels will not be issued when the print head is raised, the label ended, or printed
label is detected by the strip sensor.
7-12
Page 44

7. OPERATING PROCEDURES
l
Sales Mode Outline
Sales Mode
7.2.1 Scanning Operation
I
I
I
+ I
1 7.2.2 Item Correction 1 1
7.2 FLORIST TYPE
1
When the slide switch is
set to STRIP.
When the slide switch is
set to BATCH.
I
I
t
7.2.4 Printing labels for 7.2.4 Printing labels for
ready-made commodities ready-made commodities
(The number of copies are (The number of copies are
specified.) specified.)
J
0
L
J.
@
7-13
Page 45

7. OPERATING PROCEDURES
7.2.1 Scanning Operatlon
Sales transactions are performed by scanning the bar codes, which represent the flower name,
quantity, and several functions, printed on the visual chart with the hand scanner in the
following procedure.
NOTES: 1. In sales mode, only the PI and the I] keys are available.
2. The CLEAR code is effective in the following cases:
(7) Right after a quantity entry.
(2) Right after scanning the SUBTRACT code.
(3) Right afier scanning the PREVIEW code.
3. When a commodity’s quantity is I, the quantity code need not be scanned.
7.2.1 Scanning Operation
4. PLUS to be sold by quantity only are entered.
in a “DATA ENTRY ERROR”.
5. Max. 20 items including VOID, CLEAR, CHARGE, etc. can be entered in one
sales transaction.
6. Be sure to match the slide switch status with the label type.
Florist label I:
Florist label 2:
7. a label will not be issued.
8. are printed in batch mode stops printing
. . . . . . . . . . . . . . . . . . . . . . . . . STRIP
. . . . . . . . . . . . . . . . . . . . . BATCH
Using the other PLUS will result
and the number of unprinted copies.
NN MM
NN: Total number of labels to be printed
MM: Unprinted labels
7-14
Page 46

7. OPERATING PROCEDURES
(1) Sample operation for a commodity entry
NOTE: Items enclosed by single rectangles indicate bar codes.
7.2.1 Scanning Operation
Sales Mode
a
2
b
ROSE
C
TOTAL
d
Label A is issued.
a
(Display)
ap2ifELL
bl
I
Ccl
A commodity is entered.
7-15
Page 47

7. OPERATING PROCEDURES
(2) Sample operation for plural commodities entry
Sales Mode
II
151
e
II
I
1 RO,SE ]
1 SUMMER BOUQUET 1
(Display)
f ROSE
I 5
7.2.1 Scanning Operation
$5.00
i
CARNATION
j
2
k
XxXx CHARGE
I
TOTAL
I
m
Label B is issued.
a
Plural commodities
are entered.
XXXX CHARGE
2
$5.00
$36.00
Please scan
the Visual chart
7-16
Page 48

7. OPERATING PROCEDURES
7.2.2 Item Correction
72.2 Item Correction
(Display)
al
12
bl
DAISY
cl
IRIS
dl
ALL VOID
I
el
SUMMER BOUQUET
a2
12
b2
I
I
All commodities are
canceled.
al
pimymyJ
bl
cl
dl
el
a2
b2
DAISY
12
ALL VOID
$6.00
DAISY
c2
c2
DAISY
12 $6.00
I
5
d2
d2
1
7-17
Page 49

7. OPERATING PROCEDURES
7.2.2 Item Correction
(Display)
f2,1
92
VOID
h2
Aiter displaying h2, e2 will be displayed.
I
SUBTRACT
i2
6
P
DAISY
k2
After displaying k2, e2 will be displayed.
4
12
PANSY
I
I
I
: _ The preceding
commodity and quantity
are canceled.
The entered commodity
l--
and quantity are
canceled by subtracting
them.
I
:
I
I
I
3
I
!Pjl
h2r1
I241
m2
TOTAL
n2
Display n2 is shown while a label is issued.
I
Label C is issued.
a
7-18
m214.[10)
t-Q 1 TOTAL
I
$17.00 1
1
Page 50

7. OPERATING PROCEDURES
7.2.3 Estimate
1 GIFT SPECIAL 1
7.23 Estimate
(Display)
a3-1
b3vl
h3
a
Total amount is displayed.
is shown. is shown.
Page 51

7. OPERATING PROCEDURES
7.2.4 Printing Labels for Ready-made Commodities
Issuing single label
(1)
7.2.4 Printing Labels for Ready-made Commodities
(Display)
I
Label E is issued.
+,
Issuing plural labels
(2)
v
I
DAISY
a4
b4
a
a4 ROSE
1 $1.00
b471
I
a5 DAISY
I
(Display)
2 $1.00
I
TOTAL
I
c5
3 pieces of label F are issued.
pziiT&q
a
I
b5
3
7-20
Page 52

7. OPERATING PROCEDURES
l
Label Samples
7.2.4 Printing Labels for Ready-made Commodities
Glorious Creations
Atlanta, Ga.
COUNT CT./PRICE PR I CE [$I
ROSE
2 l/l .oo
2.00
Total i!pcs, #!,OO
Sample label A
G I or i ous Creat ions
Atlanta, Ga.
COUNT CT./PRICE
ROSE
Ii l/l .oo
SUMMER BOUQUET
2 l/6.00
CARNAT I ON
8 l/2.00
XXXX CHARGE
2 l/2.50
PR I CE [$I
5.00
10.00
16.00
5.00
Total VPCS, $36,00
~llllllll~~lilill~l~l#
0 05555 00005
5
7-2-l
Sample label B
Page 53

7. OPERATING PROCEDURES
7.2.4
Printing Labels for Ready-made Commodities
Glorious Creations
Atlanta, Ga.
COUNT CT. /PR I CE PR I CE [$I
SUMMER BOUPUET
1 l/5.00 5.00
DAISY
12 2/l. 00 6.00
ROSE
5 l/l .oo 5.00
fA*RHT,fm- - - - - --^--- - - - -- ---- --- -
-se--- ----,. &..()(y __------- +6-m
DAISY
-6 2/l .oo -3.00
PANSY
4 l/l .oo 4.00
G I or i ous
Creat i ons
Atlanta, Ga.
COUNT CT./PRICE PR I CE [$I
SUMMER BOUQUET
1 l/5.00 5.00
GIFT SPECIAL
4
VIOLET
1 112.00 2.00
ROSE
I l/l.00 1.00
CARNAT I ON
8 l/2.00 16.00
113.00 12.00
Total 15~~ $36,00
Total I~PCS, $17.00
0
Sample label C
3
lilllllalllll111
0
03333 00003
Sample label D
1
7-22
Page 54

7. OPERATING PROCEDURES
7.2.4 Printing Labels for Ready-made Commodities
Glorious Creations
Atlanta. Ga.
ROSE
1 PNfS
Glorious Creations
Atlanta, Ga.
DAISY
2PIKR
$2.00
Sample label E
$1 . 00
How to care
for your
Water only
When soil is
completely dry.
Feed week I
when blooming.
How to care
for your plant:
~ Water only
When soil is
completely dry.
Feed week I
when blooming.
plant:
Y
Y
~llllllllllll~llll~lll~
0
02222 00002
8
Sample labels F
7-23
Page 55

8. READ OPERATION
8. READ OPERATION
In this mode, sales information and PLU data are checked by printing a report. A report is printed on
either label or receipt, however, when using the receipt, set the slide switch to the BATCH side.
The total data in the memory is not cleared after issuing a report.
dia selection)
(ME
I
8. READ OPERATION
-
m
NEXT
(Label CI Receipt)
jc
NOTES: 1. When checking “NUTRITION”, use the label which accommodates 32 lines of
ingredient message.
2. VOID TOTAL is summed for the florist machine only.
8-
1
Page 56

8. READ OPERATION
8. READ OPERATION
All total
I I
individual total
-12 0 0
H Sample Label
I,E' 'Vi- m
TEC CORPORATION
(TEL)0559-76-7564
Block total
Zone total
PROG.
+
. GRAND TOTAL
GRAND TOTAL
APR 25
O’:
0.00 7
r:?,-[ rO
12 . .
11 8 0
1
-12 5 0
-Read mark
13.05
I
(Print)
l
NUTRITION
Returns to each mode.
MODE
HANGE
. PLU PROGRAMED
DONUTS
CA.,:- ^,
., _/
APR 25
SE.. 2’
6 PIMS 5 B
000002 0.93 000002
'Z-h- II3 F3ICC It 0
TEC CORPORATION
(TEL)0559-76-7564
NOTE: Regardless of ingredient data amount, the label length
is fixed to the value set by the initial Setting #O-l.
8- 2
TEC CORPORATION
(TEL)0559-76-7564
Page 57

9. RESET OPERATION
9. RESET OPERATION
9. RESET OPERATION
In this mode, the sales information of all PLUS are printed on either a label or a receipt. When using
a receipt, set the slide switch to the BATCH side. After performing this operation, the memory will be
cleared.
This operation is available only when the Initial Setting #2-4 is set to
1.
(Media selection)
PROG.
-+
PROG.
-7
(Label c, Receipt)
-!q-
GRAND TOTAL
II !
0.00 7 13.05
Flf-‘i.- m ‘“IZi bf3
TEC CORPORATION
(TEL)0559-76-7564
(Sample Label)
I
APR 25
-Reset mark
NOTE: Regardless of ingredient data amount, the label length is fixed to the value set by the Initial
Setting #O- 1.
9- 1
Page 58

10. REMOVING JAMMED LABEL
10. REMOVING JAMMED LABEL
10. REMOVING JAMMED LABEL
Since the florist machine has a cutter
removing jammed
When the label jams, take the following action.
1) Turn the printer power off and open the top cover.
2) Open the print head by sliding the print head release latches to the open positions.
3) When the label jams in strip mode, open the strip mechanism by pushing down on the strip
release levers.
labels.
Print Head Rtfease Latch
Strip
Release
Le
at the label outlet, be caretid nor to injure your fingers when
Print Head,Release
Latch
Stric Release Lever
4) Carefully remove jammed label. Do not
5) Remove any glue residue from the print head, platen and paper guide (Refer to section 11).
6) Reload the label (Refer to section 5).
use
sharp objects.
lo- 1
Page 59

11. CLEANING PROCEDURES
11 .l PRINT HEAD/PLATEN/STRIP FEED ROLLER MECHANISM
Il. CLEANING PROCEDURES
Since the florist machine has a curter at the label outlet, be careful nor to injure your fingers when
cleaning adjacent parts.
I
11 .I PRINT HEAD/PLATEN/STRIP FEED ROLLER MECHANISM
The print head, platen, and strip feed roller should be cleaned
0
After any part of the mechanism becomes stained with glue.
0
If printing becomes blurred.
To clean the print head, platen, and strip feed roller, do the following:
Turn the printer power off.
1)
Open the top cover.
2)
Open the print head by sliding the print head release latches to the open positions.
3)
Open the strip mechanism by pushing down on the strip release levers.
4)
Clean the print head with the print head cleaner.
5)
Wipe the platen, strip feed roller, and paper guide with a cloth moistened with alcohol.
6)
I
I
Paper-Guide
I) Be sure to disconnect the power cord prior to performing any maintenance.
2) Do nor use any tool that may damage the Print Head.
3) DO NOT POUR WATER directly on the printer.
I
11.2 COVERS/PANELS
Clean the covers by wiping them with a dry cloth or with a cloth slightly damped with the cleaner.
NOTE:
I) DO NOT pour water directly on the printer.
2) DO NOT apply cleaner or detergent direct/y to the cover.
3) NEVER use thinner or other volatile solvent
4) DO NOT clean the printer cover with alcohol. The printer cover may become discolored, loose
Clean the printer cover with an electrostatic free cleaner for automated office equipment.
for
cleaning.
ifs shape, or develop structural damage if alcohol is used.
I
ll- 1
Page 60

12. CARE/HANDLING OF THE LABEL
12. CARE/HANDLING OF THE LABEL
12. CARE/HANDLING OF THE LABEL
CAUTION:
Be sure to read carefully and understand the Supply Manual. Use on/y labels which meet specified
requirements. Use of non-specified labels may shorten the print head life and result in problems
wirh bar code readability or print quality.
damage to the label or printer. Read the following guidelines
l
Do not store the label for longer than the manufacture’s recommended shelf life.
l
Store label rolls on the flat end, do not store them on the curved sides as this might flatten the
roll causing erratic label advance and poor print quality.
l
Store the label in plastic bags and always reseal after opening. Unprotected labels can get dirty
and the extra abrasion from the dust and dirt particles will shorten the print head life.
l
Store the label in a cool, dry place. Avoid areas where they would be exposed to direct sunlight,
high temperature, high humidity,
dust
For further information please contact your local distributor or your label manufacturer.
All labels should be handled with care to avoid any
carefully.
or gas.
12- 1
Page 61

13. ERROR MESSAGE TABLE
13. ERROR MESSAGE TABLE
13. ERROR MESSAGE TABLE
When an error message appears on the LCD display, follow the instructions below.
If you cannot solve the problem with the following solution instructions, do not attempt further trouble
shooting by yourself. Turn the power off, unplug the printer, then contact your Authorized Service
representative for assistance.
Do not attempt to repair or adjust on your own, because electrical equipment is dangerous.
Message Cause Solution
PAPER END Label runs out during printing Load a new label and press the IFEED
or feeding the label. button.
HEAD UP ERROR
SENSOR ERROR
The print head is not in
position when label is being
printed or going to be printed.
1. The loaded label does not
match the specified label
format.
2. Sensor failure
head in position and press
1. Load the correct label on the printer or
2. Call your authorized service
representative.
13- 1
Page 62

14. TROUBLESHOOTING
14. TROUBLESHOOTING
14. TROUBLESHOOTING
Problems
No print
Missing dot
Unclear (or blurred) 1. Dirty print head. --+ Clean the print head.
printing 2. Poor media quality. + Change media type.
Power does not come on.
n
Before You Call for Service
It is our primary concern to give you full satisfaction and better service. If, however, any problem
arises in connection with the operation of this printer, please check the following points before
calling for service:
A) Is the power plug fully plugged into an AC outlet?
6) Is the power turned ON?
C) Is AC power being properly supplied to the outlet? (Check it using another electric
appliance.)
D) Check the circuit breaker.
E) Has there been a power failure of any sort?
F) Has operation been carried out in the correct order?
1. Check that the media is loaded correctly.
2. Check whether the print head is set correctly or not.
Dirty print head. + Clean the print head.
Call your Authorized Service representative if necessary.
1. Plug power cord into an AC socket.
2. Check the circuit breakers or fuses.
3. Plug another appliance into the AC socket to check if there is
power supplied.
Call your Authorized Service representative if necessary.
Solution
This printer has been manufactured under strict quality control. If you have any
trouble, however, DO NOT ATTEMPT TO FIX IT BY YOURSELF. Pull the power plug
out of the outlet, and contact your Authorized Service representative.
14- 1
Page 63

Page 64

PRINTED IN JAPAN
E
 Loading...