

Toshiba Gigabeat F, Gigabeat X User Manual

The Rockbox Manual
for
Toshiba Gigabeat F and X Series
rockbox.org
April 30, 2017

Rockbox
http://www.rockbox.org/
Open Source Jukebox Firmware
2
Rockbox and this manual is the collaborative effort of the Rockbox team and
its contributors. See the appendix for a complete list of contributors.
c
2003-2013 The Rockbox Team and its contributors,c 2004 Christi Alice
Scarborough,c 2003 José Maria Garcia-Valdecasas Bernal & Peter Schlenker.
Version 3.14. Built using pdfLATEX.
Permission is granted to copy, distribute and/or modify this document under
the terms of the GNU Free Documentation License, Version 1.2 or any later
version published by the Free Software Foundation; with no Invariant Sections, no Front-Cover Texts, and no Back-Cover Texts. A copy of the license
is included in the section entitled “GNU Free Documentation License”.
The Rockbox manual (version 3.14) Toshiba Gigabeat F and X Series

Contents 3
Contents
1. Introduction 11
1.1. Welcome . . . . . . . . . . . . . . . . . . . . . . . . . . . . . . . . . . . . . 11
1.2. Getting more help . . . . . . . . . . . . . . . . . . . . . . . . . . . . . . . 11
1.3. Naming conventions and marks . . . . . . . . . . . . . . . . . . . . . . . . 12
2. Installation 13
2.1. Before Starting . . . . . . . . . . . . . . . . . . . . . . . . . . . . . . . . . 13
2.2. Installing Rockbox . . . . . . . . . . . . . . . . . . . . . . . . . . . . . . . 13
2.2.1. Automated Installation . . . . . . . . . . . . . . . . . . . . . . . . 14
2.2.2. Manual Installation . . . . . . . . . . . . . . . . . . . . . . . . . . 15
2.2.3. Finishing the install . . . . . . . . . . . . . . . . . . . . . . . . . . 16
2.2.4. Enabling Speech Support (optional) . . . . . . . . . . . . . . . . . 17
2.3. Running Rockbox . . . . . . . . . . . . . . . . . . . . . . . . . . . . . . . . 17
2.4. Updating Rockbox . . . . . . . . . . . . . . . . . . . . . . . . . . . . . . . 17
2.5. Uninstalling Rockbox . . . . . . . . . . . . . . . . . . . . . . . . . . . . . 17
2.5.1. Automatic Uninstallation . . . . . . . . . . . . . . . . . . . . . . . 17
2.5.2. Manual Uninstallation . . . . . . . . . . . . . . . . . . . . . . . . . 17
2.6. Troubleshooting . . . . . . . . . . . . . . . . . . . . . . . . . . . . . . . . . 18
3. Quick Start 19
3.1. Basic Overview . . . . . . . . . . . . . . . . . . . . . . . . . . . . . . . . . 19
3.1.1. The player’s controls . . . . . . . . . . . . . . . . . . . . . . . . . . 19
3.1.2. Turning the player on and off . . . . . . . . . . . . . . . . . . . . . 20
3.1.3. Putting music on your player . . . . . . . . . . . . . . . . . . . . . 20
3.1.4. The first contact . . . . . . . . . . . . . . . . . . . . . . . . . . . . 21
3.1.5. Basic controls . . . . . . . . . . . . . . . . . . . . . . . . . . . . . . 21
3.1.6. Basic concepts . . . . . . . . . . . . . . . . . . . . . . . . . . . . . 21
3.2. Customising Rockbox . . . . . . . . . . . . . . . . . . . . . . . . . . . . . 22
3.3. USB Charging . . . . . . . . . . . . . . . . . . . . . . . . . . . . . . . . . 22
4. Browsing and playing 23
4.1. File Browser . . . . . . . . . . . . . . . . . . . . . . . . . . . . . . . . . . . 23
4.1.1. File Browser Controls . . . . . . . . . . . . . . . . . . . . . . . . . 24
4.1.2. Context Menu . . . . . . . . . . . . . . . . . . . . . . . . . . . . . 25
4.1.3. Virtual Keyboard . . . . . . . . . . . . . . . . . . . . . . . . . . . . 27
4.2. Database . . . . . . . . . . . . . . . . . . . . . . . . . . . . . . . . . . . . 28
4.2.1. Introduction . . . . . . . . . . . . . . . . . . . . . . . . . . . . . . 28
The Rockbox manual (version 3.14) Toshiba Gigabeat F and X Series

Contents 4
4.2.2. Initializing the Database . . . . . . . . . . . . . . . . . . . . . . . . 28
4.2.3. The Database Menu . . . . . . . . . . . . . . . . . . . . . . . . . . 29
4.2.4. Using the Database . . . . . . . . . . . . . . . . . . . . . . . . . . 30
4.3. While Playing Screen . . . . . . . . . . . . . . . . . . . . . . . . . . . . . . 31
4.3.1. WPS Key Controls . . . . . . . . . . . . . . . . . . . . . . . . . . . 32
4.3.2. Peak Meter . . . . . . . . . . . . . . . . . . . . . . . . . . . . . . . 33
4.3.3. The WPS Context Menu . . . . . . . . . . . . . . . . . . . . . . . 33
4.4. Working with Playlists . . . . . . . . . . . . . . . . . . . . . . . . . . . . . 36
4.4.1. Playlist terminology . . . . . . . . . . . . . . . . . . . . . . . . . . 36
4.4.2. Creating playlists . . . . . . . . . . . . . . . . . . . . . . . . . . . . 37
4.4.3. Adding music to playlists . . . . . . . . . . . . . . . . . . . . . . . 38
4.4.4. Modifying playlists . . . . . . . . . . . . . . . . . . . . . . . . . . . 39
4.4.5. Saving playlists . . . . . . . . . . . . . . . . . . . . . . . . . . . . . 40
4.4.6. Loading saved playlists . . . . . . . . . . . . . . . . . . . . . . . . 40
4.5. Hotkeys . . . . . . . . . . . . . . . . . . . . . . . . . . . . . . . . . . . . . 40
5. The Main Menu 41
5.1. Introducing the Main Menu . . . . . . . . . . . . . . . . . . . . . . . . . . 41
5.2. Navigating the Main Menu . . . . . . . . . . . . . . . . . . . . . . . . . . 42
5.3. Recent Bookmarks . . . . . . . . . . . . . . . . . . . . . . . . . . . . . . . 42
5.4. Files . . . . . . . . . . . . . . . . . . . . . . . . . . . . . . . . . . . . . . . 43
5.5. Database . . . . . . . . . . . . . . . . . . . . . . . . . . . . . . . . . . . . 43
5.6. Now Playing/Resume Playback . . . . . . . . . . . . . . . . . . . . . . . . 43
5.7. Settings . . . . . . . . . . . . . . . . . . . . . . . . . . . . . . . . . . . . . 43
5.7.1. Sound Settings . . . . . . . . . . . . . . . . . . . . . . . . . . . . . 44
5.7.2. Playback Settings . . . . . . . . . . . . . . . . . . . . . . . . . . . 44
5.7.3. General Settings . . . . . . . . . . . . . . . . . . . . . . . . . . . . 44
5.7.4. Theme Settings . . . . . . . . . . . . . . . . . . . . . . . . . . . . . 44
5.7.5. Manage Settings . . . . . . . . . . . . . . . . . . . . . . . . . . . . 44
5.8. Playlists . . . . . . . . . . . . . . . . . . . . . . . . . . . . . . . . . . . . . 44
5.9. Plugins . . . . . . . . . . . . . . . . . . . . . . . . . . . . . . . . . . . . . 45
5.10. System . . . . . . . . . . . . . . . . . . . . . . . . . . . . . . . . . . . . . . 45
5.11. Quick Screen . . . . . . . . . . . . . . . . . . . . . . . . . . . . . . . . . . 45
5.12. Shortcuts . . . . . . . . . . . . . . . . . . . . . . . . . . . . . . . . . . . . 46
6. Sound Settings 48
6.1. Volume . . . . . . . . . . . . . . . . . . . . . . . . . . . . . . . . . . . . . 48
6.2. Bass . . . . . . . . . . . . . . . . . . . . . . . . . . . . . . . . . . . . . . . 49
6.3. Volume Limit . . . . . . . . . . . . . . . . . . . . . . . . . . . . . . . . . . 49
6.4. Treble . . . . . . . . . . . . . . . . . . . . . . . . . . . . . . . . . . . . . . 49
6.5. Balance . . . . . . . . . . . . . . . . . . . . . . . . . . . . . . . . . . . . . 49
6.6. Channels . . . . . . . . . . . . . . . . . . . . . . . . . . . . . . . . . . . . 49
6.7. Stereo Width . . . . . . . . . . . . . . . . . . . . . . . . . . . . . . . . . . 50
6.8. Crossfeed . . . . . . . . . . . . . . . . . . . . . . . . . . . . . . . . . . . . 50
The Rockbox manual (version 3.14) Toshiba Gigabeat F and X Series

Contents 5
6.9. Equalizer . . . . . . . . . . . . . . . . . . . . . . . . . . . . . . . . . . . . 51
6.10. Dithering . . . . . . . . . . . . . . . . . . . . . . . . . . . . . . . . . . . . 54
6.11. Timestretch . . . . . . . . . . . . . . . . . . . . . . . . . . . . . . . . . . . 54
6.12. Haas Surround . . . . . . . . . . . . . . . . . . . . . . . . . . . . . . . . . 54
6.13. Perceptual Bass Enhancement . . . . . . . . . . . . . . . . . . . . . . . . . 55
6.14. Auditory Fatigue Reduction . . . . . . . . . . . . . . . . . . . . . . . . . . 55
6.15. Compressor . . . . . . . . . . . . . . . . . . . . . . . . . . . . . . . . . . . 55
7. Playback Settings 57
7.1. Shuffle . . . . . . . . . . . . . . . . . . . . . . . . . . . . . . . . . . . . . . 57
7.2. Repeat . . . . . . . . . . . . . . . . . . . . . . . . . . . . . . . . . . . . . . 57
7.3. Play Selected First . . . . . . . . . . . . . . . . . . . . . . . . . . . . . . . 58
7.4. Fast-Forward/Rewind . . . . . . . . . . . . . . . . . . . . . . . . . . . . . 58
7.5. Anti-Skip Buffer . . . . . . . . . . . . . . . . . . . . . . . . . . . . . . . . 58
7.6. Fade on Stop/Pause . . . . . . . . . . . . . . . . . . . . . . . . . . . . . . 58
7.7. Party Mode . . . . . . . . . . . . . . . . . . . . . . . . . . . . . . . . . . . 58
7.8. Crossfade . . . . . . . . . . . . . . . . . . . . . . . . . . . . . . . . . . . . 58
7.9. Replaygain . . . . . . . . . . . . . . . . . . . . . . . . . . . . . . . . . . . 60
7.10. Track Skip Beep . . . . . . . . . . . . . . . . . . . . . . . . . . . . . . . . 61
7.11. Auto-Change Directory . . . . . . . . . . . . . . . . . . . . . . . . . . . . 61
7.12. Constrain Auto-Change . . . . . . . . . . . . . . . . . . . . . . . . . . . . 61
7.13. Pause on Headphone Unplug . . . . . . . . . . . . . . . . . . . . . . . . . 61
7.14. Last.fm Log . . . . . . . . . . . . . . . . . . . . . . . . . . . . . . . . . . . 62
7.15. Cuesheet Support . . . . . . . . . . . . . . . . . . . . . . . . . . . . . . . . 62
7.16. Skip Length . . . . . . . . . . . . . . . . . . . . . . . . . . . . . . . . . . . 62
7.17. Prevent Track Skipping . . . . . . . . . . . . . . . . . . . . . . . . . . . . 62
7.18. Rewind Before Resume . . . . . . . . . . . . . . . . . . . . . . . . . . . . . 63
7.19. Rewind on Pause . . . . . . . . . . . . . . . . . . . . . . . . . . . . . . . . 63
8. General Settings 64
8.1. Playlist . . . . . . . . . . . . . . . . . . . . . . . . . . . . . . . . . . . . . 64
8.2. File View . . . . . . . . . . . . . . . . . . . . . . . . . . . . . . . . . . . . 64
8.3. Database . . . . . . . . . . . . . . . . . . . . . . . . . . . . . . . . . . . . 66
8.4. Display . . . . . . . . . . . . . . . . . . . . . . . . . . . . . . . . . . . . . 66
8.5. System . . . . . . . . . . . . . . . . . . . . . . . . . . . . . . . . . . . . . . 69
8.5.1. Battery . . . . . . . . . . . . . . . . . . . . . . . . . . . . . . . . . 69
8.5.2. Disk . . . . . . . . . . . . . . . . . . . . . . . . . . . . . . . . . . . 69
8.5.3. Limits . . . . . . . . . . . . . . . . . . . . . . . . . . . . . . . . . . 70
8.5.4. Use Shortcuts Menu Instead of Quick Screen . . . . . . . . . . . . 70
8.5.5. Car Adapter Mode . . . . . . . . . . . . . . . . . . . . . . . . . . . 70
8.5.6. Button Light Timeout . . . . . . . . . . . . . . . . . . . . . . . . . 71
8.5.7. Button Light Brightness . . . . . . . . . . . . . . . . . . . . . . . . 71
8.5.8. Keyclick . . . . . . . . . . . . . . . . . . . . . . . . . . . . . . . . . 71
8.5.9. Touchpad . . . . . . . . . . . . . . . . . . . . . . . . . . . . . . . . 71
The Rockbox manual (version 3.14) Toshiba Gigabeat F and X Series

Contents 6
8.5.10. Advanced Key Lock . . . . . . . . . . . . . . . . . . . . . . . . . . 72
8.6. Startup/Shutdown . . . . . . . . . . . . . . . . . . . . . . . . . . . . . . . 72
8.6.1. Start Screen . . . . . . . . . . . . . . . . . . . . . . . . . . . . . . . 72
8.6.2. Idle Poweroff . . . . . . . . . . . . . . . . . . . . . . . . . . . . . . 73
8.6.3. Sleep Timer . . . . . . . . . . . . . . . . . . . . . . . . . . . . . . . 73
8.7. Bookmarking . . . . . . . . . . . . . . . . . . . . . . . . . . . . . . . . . . 73
8.8. Automatic resume . . . . . . . . . . . . . . . . . . . . . . . . . . . . . . . 75
8.9. Language . . . . . . . . . . . . . . . . . . . . . . . . . . . . . . . . . . . . 76
8.10. Voice . . . . . . . . . . . . . . . . . . . . . . . . . . . . . . . . . . . . . . . 76
8.11. Hotkey . . . . . . . . . . . . . . . . . . . . . . . . . . . . . . . . . . . . . . 78
9. Theme Settings 79
10.Time and Date 81
11.Plugins 82
11.1. Games . . . . . . . . . . . . . . . . . . . . . . . . . . . . . . . . . . . . . . 82
11.1.1. 2048 . . . . . . . . . . . . . . . . . . . . . . . . . . . . . . . . . . . 83
11.1.2. Blackjack . . . . . . . . . . . . . . . . . . . . . . . . . . . . . . . . 84
11.1.3. Boomshine . . . . . . . . . . . . . . . . . . . . . . . . . . . . . . . 85
11.1.4. BrickMania . . . . . . . . . . . . . . . . . . . . . . . . . . . . . . . 85
11.1.5. Bubbles . . . . . . . . . . . . . . . . . . . . . . . . . . . . . . . . . 86
11.1.6. Chessbox . . . . . . . . . . . . . . . . . . . . . . . . . . . . . . . . 87
11.1.7. Chopper . . . . . . . . . . . . . . . . . . . . . . . . . . . . . . . . . 89
11.1.8. Clix . . . . . . . . . . . . . . . . . . . . . . . . . . . . . . . . . . . 90
11.1.9. Codebuster . . . . . . . . . . . . . . . . . . . . . . . . . . . . . . . 91
11.1.10.Dice . . . . . . . . . . . . . . . . . . . . . . . . . . . . . . . . . . . 91
11.1.11.Doom . . . . . . . . . . . . . . . . . . . . . . . . . . . . . . . . . . 92
11.1.12.Flipit . . . . . . . . . . . . . . . . . . . . . . . . . . . . . . . . . . 94
11.1.13.Goban . . . . . . . . . . . . . . . . . . . . . . . . . . . . . . . . . . 95
11.1.14.Invadrox . . . . . . . . . . . . . . . . . . . . . . . . . . . . . . . . . 100
11.1.15.Jackpot . . . . . . . . . . . . . . . . . . . . . . . . . . . . . . . . . 101
11.1.16.Jewels . . . . . . . . . . . . . . . . . . . . . . . . . . . . . . . . . . 102
11.1.17.Maze . . . . . . . . . . . . . . . . . . . . . . . . . . . . . . . . . . . 102
11.1.18.MazezaM . . . . . . . . . . . . . . . . . . . . . . . . . . . . . . . . 103
11.1.19.Minesweeper . . . . . . . . . . . . . . . . . . . . . . . . . . . . . . 104
11.1.20.Pacbox . . . . . . . . . . . . . . . . . . . . . . . . . . . . . . . . . 105
11.1.21.Pegbox . . . . . . . . . . . . . . . . . . . . . . . . . . . . . . . . . 107
11.1.22.Pong . . . . . . . . . . . . . . . . . . . . . . . . . . . . . . . . . . . 108
11.1.23.Puzzles . . . . . . . . . . . . . . . . . . . . . . . . . . . . . . . . . 109
11.1.24.Reversi . . . . . . . . . . . . . . . . . . . . . . . . . . . . . . . . . 110
11.1.25.Robotfindskitten . . . . . . . . . . . . . . . . . . . . . . . . . . . . 110
11.1.26.Rockblox . . . . . . . . . . . . . . . . . . . . . . . . . . . . . . . . 111
11.1.27.Rockblox1d . . . . . . . . . . . . . . . . . . . . . . . . . . . . . . . 112
The Rockbox manual (version 3.14) Toshiba Gigabeat F and X Series

Contents 7
11.1.28.Sliding Puzzle . . . . . . . . . . . . . . . . . . . . . . . . . . . . . . 113
11.1.29.Snake . . . . . . . . . . . . . . . . . . . . . . . . . . . . . . . . . . 114
11.1.30.Snake 2 . . . . . . . . . . . . . . . . . . . . . . . . . . . . . . . . . 115
11.1.31.Sokoban . . . . . . . . . . . . . . . . . . . . . . . . . . . . . . . . . 116
11.1.32.Solitaire . . . . . . . . . . . . . . . . . . . . . . . . . . . . . . . . . 118
11.1.33.Spacerocks . . . . . . . . . . . . . . . . . . . . . . . . . . . . . . . 119
11.1.34.Star . . . . . . . . . . . . . . . . . . . . . . . . . . . . . . . . . . . 120
11.1.35.Sudoku . . . . . . . . . . . . . . . . . . . . . . . . . . . . . . . . . 121
11.1.36.Superdom . . . . . . . . . . . . . . . . . . . . . . . . . . . . . . . . 122
11.1.37.Wormlet . . . . . . . . . . . . . . . . . . . . . . . . . . . . . . . . . 124
11.1.38.Xobox . . . . . . . . . . . . . . . . . . . . . . . . . . . . . . . . . . 127
11.1.39.XWorld . . . . . . . . . . . . . . . . . . . . . . . . . . . . . . . . . 127
11.2. Demos . . . . . . . . . . . . . . . . . . . . . . . . . . . . . . . . . . . . . . 128
11.2.1. Bounce . . . . . . . . . . . . . . . . . . . . . . . . . . . . . . . . . 128
11.2.2. Credits . . . . . . . . . . . . . . . . . . . . . . . . . . . . . . . . . 129
11.2.3. Cube . . . . . . . . . . . . . . . . . . . . . . . . . . . . . . . . . . . 129
11.2.4. Demystify . . . . . . . . . . . . . . . . . . . . . . . . . . . . . . . . 130
11.2.5. FFT . . . . . . . . . . . . . . . . . . . . . . . . . . . . . . . . . . . 131
11.2.6. Fire . . . . . . . . . . . . . . . . . . . . . . . . . . . . . . . . . . . 131
11.2.7. Fractals . . . . . . . . . . . . . . . . . . . . . . . . . . . . . . . . . 132
11.2.8. Logo . . . . . . . . . . . . . . . . . . . . . . . . . . . . . . . . . . . 133
11.2.9. Matrix . . . . . . . . . . . . . . . . . . . . . . . . . . . . . . . . . . 133
11.2.10.Mosaique . . . . . . . . . . . . . . . . . . . . . . . . . . . . . . . . 134
11.2.11.Oscilloscope . . . . . . . . . . . . . . . . . . . . . . . . . . . . . . . 135
11.2.12.PictureFlow . . . . . . . . . . . . . . . . . . . . . . . . . . . . . . . 136
11.2.13.Plasma . . . . . . . . . . . . . . . . . . . . . . . . . . . . . . . . . 138
11.2.14.Rocklife . . . . . . . . . . . . . . . . . . . . . . . . . . . . . . . . . 138
11.2.15.Snow . . . . . . . . . . . . . . . . . . . . . . . . . . . . . . . . . . . 139
11.2.16.Starfield . . . . . . . . . . . . . . . . . . . . . . . . . . . . . . . . . 140
11.2.17.VU meter . . . . . . . . . . . . . . . . . . . . . . . . . . . . . . . . 141
11.3. Viewers . . . . . . . . . . . . . . . . . . . . . . . . . . . . . . . . . . . . . 141
11.3.1. Shortcuts . . . . . . . . . . . . . . . . . . . . . . . . . . . . . . . . 142
11.3.2. Chip-8 Emulator . . . . . . . . . . . . . . . . . . . . . . . . . . . . 143
11.3.3. Frotz . . . . . . . . . . . . . . . . . . . . . . . . . . . . . . . . . . . 144
11.3.4. Image Viewer . . . . . . . . . . . . . . . . . . . . . . . . . . . . . . 145
11.3.5. Lua scripting language . . . . . . . . . . . . . . . . . . . . . . . . . 146
11.3.6. Midiplay . . . . . . . . . . . . . . . . . . . . . . . . . . . . . . . . . 147
11.3.7. MPEG Player . . . . . . . . . . . . . . . . . . . . . . . . . . . . . . 147
11.3.8. MP3 Encoder . . . . . . . . . . . . . . . . . . . . . . . . . . . . . . 149
11.3.9. Rockboy . . . . . . . . . . . . . . . . . . . . . . . . . . . . . . . . . 150
11.3.10.Search . . . . . . . . . . . . . . . . . . . . . . . . . . . . . . . . . . 151
11.3.11.Shopper . . . . . . . . . . . . . . . . . . . . . . . . . . . . . . . . . 151
11.3.12.Sort . . . . . . . . . . . . . . . . . . . . . . . . . . . . . . . . . . . 152
11.3.13.Speedread . . . . . . . . . . . . . . . . . . . . . . . . . . . . . . . . 153
The Rockbox manual (version 3.14) Toshiba Gigabeat F and X Series

Contents 8
11.3.14.Text Viewer . . . . . . . . . . . . . . . . . . . . . . . . . . . . . . . 154
11.3.15.Theme Remove . . . . . . . . . . . . . . . . . . . . . . . . . . . . . 159
11.3.16.VBRfix . . . . . . . . . . . . . . . . . . . . . . . . . . . . . . . . . 160
11.3.17.ZXBox . . . . . . . . . . . . . . . . . . . . . . . . . . . . . . . . . . 161
11.4. Applications . . . . . . . . . . . . . . . . . . . . . . . . . . . . . . . . . . . 163
11.4.1. Alarm Clock . . . . . . . . . . . . . . . . . . . . . . . . . . . . . . 163
11.4.2. Battery Benchmark . . . . . . . . . . . . . . . . . . . . . . . . . . 163
11.4.3. Calculator . . . . . . . . . . . . . . . . . . . . . . . . . . . . . . . . 165
11.4.4. Calendar . . . . . . . . . . . . . . . . . . . . . . . . . . . . . . . . 166
11.4.5. Chess Clock . . . . . . . . . . . . . . . . . . . . . . . . . . . . . . . 167
11.4.6. Clock . . . . . . . . . . . . . . . . . . . . . . . . . . . . . . . . . . 168
11.4.7. Dict . . . . . . . . . . . . . . . . . . . . . . . . . . . . . . . . . . . 171
11.4.8. Disk Tidy . . . . . . . . . . . . . . . . . . . . . . . . . . . . . . . . 171
11.4.9. Keybox . . . . . . . . . . . . . . . . . . . . . . . . . . . . . . . . . 172
11.4.10.Lamp . . . . . . . . . . . . . . . . . . . . . . . . . . . . . . . . . . 172
11.4.11.Lrcplayer . . . . . . . . . . . . . . . . . . . . . . . . . . . . . . . . 173
11.4.12.Main Menu Configuration . . . . . . . . . . . . . . . . . . . . . . . 175
11.4.13.md5sum . . . . . . . . . . . . . . . . . . . . . . . . . . . . . . . . . 176
11.4.14.Metronome . . . . . . . . . . . . . . . . . . . . . . . . . . . . . . . 176
11.4.15.One-Time Password Client . . . . . . . . . . . . . . . . . . . . . . 179
11.4.16.Advanced Settings . . . . . . . . . . . . . . . . . . . . . . . . . . . 180
11.4.17.Periodic Table . . . . . . . . . . . . . . . . . . . . . . . . . . . . . 180
11.4.18.Random Folder Advance Configuration . . . . . . . . . . . . . . . 181
11.4.19.Resistor Calculator . . . . . . . . . . . . . . . . . . . . . . . . . . . 181
11.4.20.Rockpaint . . . . . . . . . . . . . . . . . . . . . . . . . . . . . . . . 182
11.4.21.Stats . . . . . . . . . . . . . . . . . . . . . . . . . . . . . . . . . . . 185
11.4.22.Stopwatch . . . . . . . . . . . . . . . . . . . . . . . . . . . . . . . . 186
11.4.23.Text Editor . . . . . . . . . . . . . . . . . . . . . . . . . . . . . . . 186
12.Advanced Topics 188
12.1. Customising the User Interface . . . . . . . . . . . . . . . . . . . . . . . . 188
12.1.1. Customising The Main Menu . . . . . . . . . . . . . . . . . . . . . 188
12.1.2. Getting Extras . . . . . . . . . . . . . . . . . . . . . . . . . . . . . 188
12.1.3. Loading Fonts . . . . . . . . . . . . . . . . . . . . . . . . . . . . . 188
12.1.4. Loading Languages . . . . . . . . . . . . . . . . . . . . . . . . . . . 189
12.1.5. Changing Filetype Colours . . . . . . . . . . . . . . . . . . . . . . 189
12.1.6. Loading Backdrops . . . . . . . . . . . . . . . . . . . . . . . . . . . 190
12.1.7. UI Viewport . . . . . . . . . . . . . . . . . . . . . . . . . . . . . . 191
12.2. Configuring the Theme . . . . . . . . . . . . . . . . . . . . . . . . . . . . . 191
12.2.1. Themeing – General Info . . . . . . . . . . . . . . . . . . . . . . . 191
12.2.2. Themes – Create Your Own . . . . . . . . . . . . . . . . . . . . . . 192
12.2.3. Info Viewport (SBS only) . . . . . . . . . . . . . . . . . . . . . . . 195
12.2.4. Additional Fonts . . . . . . . . . . . . . . . . . . . . . . . . . . . . 195
The Rockbox manual (version 3.14) Toshiba Gigabeat F and X Series

Contents 9
12.3. Managing Rockbox Settings . . . . . . . . . . . . . . . . . . . . . . . . . . 198
12.3.1. Introduction to .cfg Files . . . . . . . . . . . . . . . . . . . . . . . 198
12.3.2. Specifications for .cfg Files . . . . . . . . . . . . . . . . . . . . . . 198
12.3.3. The Manage Settings menu . . . . . . . . . . . . . . . . . . . . 199
12.4. Firmware Loading . . . . . . . . . . . . . . . . . . . . . . . . . . . . . . . 200
12.4.1. Using ROLO (Rockbox Loader) . . . . . . . . . . . . . . . . . . . . 200
12.5. Optimising battery runtime . . . . . . . . . . . . . . . . . . . . . . . . . . 200
12.5.1. Display backlight . . . . . . . . . . . . . . . . . . . . . . . . . . . . 200
12.5.2. Display power-off . . . . . . . . . . . . . . . . . . . . . . . . . . . . 200
12.5.3. Anti-Skip Buffer . . . . . . . . . . . . . . . . . . . . . . . . . . . . 200
12.5.4. Replaygain . . . . . . . . . . . . . . . . . . . . . . . . . . . . . . . 201
12.5.5. Peak Meter . . . . . . . . . . . . . . . . . . . . . . . . . . . . . . . 201
12.5.6. Audio format and bitrate . . . . . . . . . . . . . . . . . . . . . . . 201
12.5.7. Sound settings . . . . . . . . . . . . . . . . . . . . . . . . . . . . . 201
A. File formats 202
A.1. Supported file formats . . . . . . . . . . . . . . . . . . . . . . . . . . . . . 203
B. Audio and metadata formats 204
B.1. Supported audio formats . . . . . . . . . . . . . . . . . . . . . . . . . . . . 204
B.1.1. Lossy Codecs . . . . . . . . . . . . . . . . . . . . . . . . . . . . . . 204
B.1.2. Lossless Codecs . . . . . . . . . . . . . . . . . . . . . . . . . . . . . 205
B.1.3. Other Codecs . . . . . . . . . . . . . . . . . . . . . . . . . . . . . . 206
B.1.4. Codec featureset . . . . . . . . . . . . . . . . . . . . . . . . . . . . 207
B.2. Supported metadata tags . . . . . . . . . . . . . . . . . . . . . . . . . . . 208
B.2.1. Featureset for generic metadata tags . . . . . . . . . . . . . . . . . 208
B.2.2. Featureset for codec specific metadata . . . . . . . . . . . . . . . . 209
B.2.3. Limitations of metadata handling . . . . . . . . . . . . . . . . . . . 209
C. Album Art 210
C.1. Limitations . . . . . . . . . . . . . . . . . . . . . . . . . . . . . . . . . . . 210
C.2. Where to put album art . . . . . . . . . . . . . . . . . . . . . . . . . . . . 210
D. Theme Tags 212
D.1. Status Bar . . . . . . . . . . . . . . . . . . . . . . . . . . . . . . . . . . . . 212
D.2. Hardware Capabilities . . . . . . . . . . . . . . . . . . . . . . . . . . . . . 212
D.3. Information from the track tags . . . . . . . . . . . . . . . . . . . . . . . . 213
D.4. Viewports . . . . . . . . . . . . . . . . . . . . . . . . . . . . . . . . . . . . 213
D.5. Additional Fonts . . . . . . . . . . . . . . . . . . . . . . . . . . . . . . . . 214
D.6. Misc Coloring Tags . . . . . . . . . . . . . . . . . . . . . . . . . . . . . . . 214
D.7. Power Related Information . . . . . . . . . . . . . . . . . . . . . . . . . . 214
D.8. Information about the file . . . . . . . . . . . . . . . . . . . . . . . . . . . 215
D.9. Playlist/Song Info . . . . . . . . . . . . . . . . . . . . . . . . . . . . . . . 216
D.10.Playlist Viewer . . . . . . . . . . . . . . . . . . . . . . . . . . . . . . . . . 216
The Rockbox manual (version 3.14) Toshiba Gigabeat F and X Series

Contents 10
D.11.Runtime Database . . . . . . . . . . . . . . . . . . . . . . . . . . . . . . . 217
D.12.Sound (DSP) settings . . . . . . . . . . . . . . . . . . . . . . . . . . . . . 217
D.13.Hold . . . . . . . . . . . . . . . . . . . . . . . . . . . . . . . . . . . . . . . 217
D.14.Virtual LED . . . . . . . . . . . . . . . . . . . . . . . . . . . . . . . . . . 218
D.15.Repeat Mode . . . . . . . . . . . . . . . . . . . . . . . . . . . . . . . . . . 218
D.16.Playback Mode . . . . . . . . . . . . . . . . . . . . . . . . . . . . . . . . . 218
D.17.Current Screen . . . . . . . . . . . . . . . . . . . . . . . . . . . . . . . . . 218
D.18.List Title (.sbs only) . . . . . . . . . . . . . . . . . . . . . . . . . . . . . 219
D.19.Changing Volume . . . . . . . . . . . . . . . . . . . . . . . . . . . . . . . . 220
D.20.Settings . . . . . . . . . . . . . . . . . . . . . . . . . . . . . . . . . . . . . 220
D.21.Images . . . . . . . . . . . . . . . . . . . . . . . . . . . . . . . . . . . . . . 221
D.21.1.How to display the album art . . . . . . . . . . . . . . . . . . . . . 222
D.22.Alignment and language direction . . . . . . . . . . . . . . . . . . . . . . . 223
D.23.Conditional Tags . . . . . . . . . . . . . . . . . . . . . . . . . . . . . . . . 224
D.24.Subline Tags . . . . . . . . . . . . . . . . . . . . . . . . . . . . . . . . . . 224
D.25.Time and Date . . . . . . . . . . . . . . . . . . . . . . . . . . . . . . . . . 225
D.26.Text Translation . . . . . . . . . . . . . . . . . . . . . . . . . . . . . . . . 225
D.27.Bar Tags . . . . . . . . . . . . . . . . . . . . . . . . . . . . . . . . . . . . . 225
D.27.1.Options . . . . . . . . . . . . . . . . . . . . . . . . . . . . . . . . . 226
D.28.Other Tags . . . . . . . . . . . . . . . . . . . . . . . . . . . . . . . . . . . 227
E. Config file options 228
F. Menu Overview 233
G. User feedback 234
G.1. Bug reports . . . . . . . . . . . . . . . . . . . . . . . . . . . . . . . . . . . 234
G.1.1. Rules for submitting new bug reports . . . . . . . . . . . . . . . . 234
G.2. Feature ideas . . . . . . . . . . . . . . . . . . . . . . . . . . . . . . . . . . 234
G.2.1. Rules for submitting a new feature idea . . . . . . . . . . . . . . . 234
G.2.2. Features we will not implement . . . . . . . . . . . . . . . . . . . . 235
H. Credits 236
I. Licenses 240
I.1. GNU Free Documentation License . . . . . . . . . . . . . . . . . . . . . . 240
I.2. The GNU General Public License . . . . . . . . . . . . . . . . . . . . . . . 248
The Rockbox manual (version 3.14) Toshiba Gigabeat F and X Series

Chapter 1. Introduction 11
1. Introduction
1.1. Welcome
This is the manual for Rockbox. Rockbox is an open source firmware replacement
for a growing number of digital audio players. Rockbox aims to be considerably more
functional and efficient than your device’s stock firmware while remaining easy to use
and customisable. Rockbox is written by users, for users. Not only is it free to use, it
is also released under the GNU General Public License (GPL), which means that it will
always remain free both to use and to change.
Rockbox has been in development since 2001, and receives new features, tweaks and
fixes each day to provide you with the best possible experience on your digital audio
player. A major goal of Rockbox is to be simple and easy to use, yet remain very
customisable and configurable. We believe that you should never need to go through a
series of menus for an action you perform frequently. We also believe that you should
be able to configure almost anything about Rockbox you could want, pertaining to
functionality. Another top priority of Rockbox is audio playback quality – Rockbox,
for most models, includes a wider range of sound settings than the device’s original
firmware. A lot of work has been put into making Rockbox sound the best it can, and
improvements are constantly being made. All models have access to a large number
of plugins, including many games, applications, and graphical “demos”. You can load
different configurations quickly for different purposes (e.g. a large font for in your car,
different sound settings for at home). Rockbox features a very wide range of languages,
and all supported models also have the ability to talk to you – menus can be voiced and
filenames spelled out or spoken.
1.2. Getting more help
This manual is intended to be a comprehensive introduction to the Rockbox firmware.
There is, however, more help available. The Rockbox website at http://www.rockbox.org/
contains very extensive documentation and guides written by members of the Rockbox
community and this should be your first port of call when looking for further help.
If you cannot find the information you are searching for on the Rockbox website there
are a number of support channels you should have a look at. You can try the Rockbox
forums located at http://forums.rockbox.org/. The mailing lists are another option, and
can be found at http://www.rockbox.org/mail/. From that page you can subscribe to
the lists and browse the archives. To search the list archives simply use the search field
that is located on the left side of the website. Furthermore, you can ask on IRC. The
The Rockbox manual (version 3.14) Toshiba Gigabeat F and X Series

Chapter 1. Introduction 12
main channel for Rockbox is #rockbox on irc://irc.freenode.net. Many helpful developers
and users are usually around. Just join and ask your question (don’t ask to ask!) – if
someone knows the answer you’ll usually get an answer pretty quickly. More information
including IRC logs can be found at http://www.rockbox.org/irc/. We also have a web
client so that you can join the Rockbox IRC channel without needing to install additional
software onto your computer.
If you think you have found a bug please make sure it actually is a bug and is still
present in the most recent version of Rockbox. You should try to confirm that by using
the above mentioned support channels first. After that you can submit that issue to our
tracker. Refer to section G (page 234) for details on how to use the tracker.
1.3. Naming conventions and marks
We have some conventions (especially for naming) that are intended to be consistent
throughout this manual.
Manufacturer and product names are formatted in accordance with the standard rules
of English grammar, e.g. “Toshiba playback is currently unsupported”. Manufacturer
and model names are proper nouns, and thus are written beginning with a capital letter.
This manual has some parts that are marked with icons on the margin to help you
finding important parts or parts you could skip. The following icons are used:
Note: This indicates a note. A note starts always with the text “Note”. In order to
make finding notes easier each one is accompanied by an icon in the margin as here.
Notes are used to mark useful information that may help you to get the most out of
Rockbox.
Warning: This is a warning. In contrast to notes mentioned above, a warning should
be taken more seriously. Whereas ignoring notes will not cause any serious damage,
ignoring warnings could cause serious damage to your player. You really should read the
warnings, especially if you are new to Rockbox.
This icon marks a section that is intended especially for the blind and visually impaired. As they cannot read the manual in the same way sighted people do we have
added some additional descriptions. If you are not blind or visually impaired you can
probably completely skip these blocks. To make this easier, there is an icon shown in
the margin on the right.
Links to the wiki are abbreviated by the name of the wiki page. Those names are still
linked so you can simply follow them like any other link in this manual. If you want to
access a wiki page manually go to Z http://www.rockbox.org/wiki/ and type the page
name in the “Go” box at the top of the page. Links to wiki pages are also indicated by
the symbol Z in front of the page name.
b
!
¸
The Rockbox manual (version 3.14) Toshiba Gigabeat F and X Series

Chapter 2. Installation 13
2. Installation
Installing Rockbox is generally a quick and easy procedure. However before beginning
there are a few important things to know.
2.1. Before Starting
USB connection. To transfer Rockbox to your player you need to connect it to your
computer. For manual installation/uninstallation, or should autodetection fail
during automatic installation, you need to know where to access the player. On
Windows this means you need to know the drive letter associated with the player.
On Linux you need to know the mount point of your player. On Mac OS X you
need to know the volume name of your player.
The installation requires you to change a setting in the original firmware. Make
sure the option under Setup → Connections → PC Connections is set to
gigabeat room. Also, during installation, do not connect your player using the
cradle but plug the USB cable directly to the player.
2.2. Installing Rockbox
There are two ways to install Rockbox: automated and manual. The automated way is
the preferred method of installing Rockbox for the majority of people. Rockbox Utility
is a graphical application that does almost everything for you. However, should you
encounter a problem, then the manual way is still available to you.
There are three separate components, two of which need to be installed in order to
run Rockbox:
The Toshiba bootloader. The Toshiba bootloader is the program that tells your player
how to load and start the original firmware. It is also responsible for any emergency,
recovery, or disk modes on your player. This bootloader is stored in special flash
memory in your Toshiba and comes factory-installed. It is not necessary to modify
this in order to install Rockbox.
The Rockbox bootloader. The Rockbox bootloader is loaded from disk by the Toshiba
bootloader. It is responsible for loading the Rockbox firmware and for providing
the dual boot function. It directly replaces the Toshiba firmware in the player’s
boot sequence.
The Rockbox manual (version 3.14) Toshiba Gigabeat F and X Series

Chapter 2. Installation 14
Note: Dual boot does not currently work on the Gigabeat.
The Rockbox firmware. Similar to the Toshiba firmware, most of the Rockbox code is
contained in a “build” that resides on your player’s drive. This makes it easy to
update Rockbox. The build consists of a directory called .rockbox which contains
all of the Rockbox files, and is located in the root of your player’s drive.
Apart from the required parts there are some addons you might be interested in
installing.
Fonts. Rockbox can load custom fonts. The fonts are distributed as a separate package
and thus need to be installed separately. They are not required to run Rockbox
itself but a lot of themes require the fonts package to be installed.
Themes. The appearance of Rockbox can be customised by themes. Depending on your
taste you might want to install additional themes to change the look of Rockbox.
2.2.1. Automated Installation
To automatically install Rockbox, download the official installer and housekeeping tool
Rockbox Utility. It allows you to:
• Automatically install all needed components for using Rockbox (“Minimal Installation”).
b
• Automatically install all suggested components (“Complete Installation”).
• Selectively install optional components.
• Install additional fonts and themes.
• Install voice files and generate talk clips.
• Uninstall all components you installed using Rockbox Utility.
Prebuilt binaries for Windows, Linux and Mac OS X are available at the ZRockboxUtility
wiki page.
When first starting Rockbox Utility run “Autodetect”, found in the configuration
dialog (File → Configure). Autodetection can detect most player types. If autodetection
fails or is unable to detect the mountpoint, make sure to enter the correct values. The
mountpoint indicates the location of the player in your filesystem. On Windows, this is
the drive letter the player gets assigned, on other systems this is a path in the filesystem.
The Rockbox manual (version 3.14) Toshiba Gigabeat F and X Series

Chapter 2. Installation 15
Choosing a Rockbox version
There are three different versions of Rockbox available from the Rockbox website: Release version, current build and archived daily build. You need to decide which one you
want to install and get the appropriate version for your player. If you select either “Minimal Installation” or “Complete Installation” from the “Quick Start” tab, then Rockbox
Utility will automatically install the release version of Rockbox. Using the “Installation”
tab will allow you to select which version you wish to install.
Release. The release version is the latest stable release, free of known critical bugs.
For a manual install, the current stable release of Rockbox is available at http:
//www.rockbox.org/download/.
Development Build. The development build is built at each change to the Rockbox
source code repository and represents the current state of Rockbox development.
This means that the build could contain bugs but most of the time is safe to use.
For a manual install, you can download the current build from http://build.rockbox.
org/.
Archived Build. In addition to the release version and the current build, there is also
an archive of daily builds available for download. These are built once a day from
the latest source code in the repository. For a manual install, you can download
archived builds from http://www.rockbox.org/daily.shtml.
Note: Because current and archived builds are development versions that change frequently, they may behave differently than described in this manual, or they may introduce new (and potentially annoying) bugs. Unless you wish to try the latest and
greatest features at the price of possibly greater instability, or you wish to help with
development, you should stick with the release.
Please now go to section 2.2.3 (page 16) to complete the installation procedure.
2.2.2. Manual Installation
The manual installation method is still available to you, should you need or desire it by
following the instructions below. If you have used Rockbox Utility to install Rockbox,
then you do not need to follow the next section and can skip straight to section 2.2.3
(page 16)
Installing the firmware
1. Download your chosen version of Rockbox from the links in the previous section.
2. Connect your player to the computer via USB as described in the manual that
came with your player.
b
The Rockbox manual (version 3.14) Toshiba Gigabeat F and X Series

Chapter 2. Installation 16
3. Take the .zip file that you downloaded and use the “Extract all” command of
your unzip program to extract the files onto your player.
Note: The entire contents of the .zip file should be extracted directly to the root of
your player’s drive. Do not try to create a separate directory on your player for the
Rockbox files! The .zip file already contains the internal structure that Rockbox needs.
If the contents of the .zip file are extracted correctly, you will have a directory called
.rockbox, which contains all the files needed by Rockbox, in the main directory of your
player’s drive.
Installing the bootloader
• Download the Rockbox bootloader from http://download.rockbox.org/bootloader/
gigabeat/
• Starting at the root directory of your player browse into the directory GBSYSTEM
and from that into the subdirectory FWIMG. These directories are hidden. Make
sure that you have configured your browser to show hidden files or you may be
unable to see FWIMG.
• In that directory you’ll find a file called FWIMG01.DAT. This too may be hidden.
Rename the file to FWIMG01.DAT.ORIG. Make sure you spelled that name correctly
as it is needed for booting the Toshiba firmware.
Warning: If you do not complete this step then you will be unable to uninstall
Rockbox without a copy of the original firmware from the original install CD.
b
!
• Now copy the file FWIMG01.DAT you downloaded to that directory. Make sure the
spelling is correct.
2.2.3. Finishing the install
After installing you need to power-cycle the player by doing the following steps. Failure
to do so may result in problems.
• Safely eject / unmount your player and unplug the USB cable.
• Unplug any power adapter.
• Hold the Power button to turn off the player.
• Slide the battery switch located on the bottom of the player from ‘on’ to ‘off’.
• Slide the battery switch back from ‘off’ to ‘on’.
The Rockbox manual (version 3.14) Toshiba Gigabeat F and X Series

Chapter 2. Installation 17
2.2.4. Enabling Speech Support (optional)
If you wish to use speech support you will also need a voice file. Voice files allow Rockbox
to speak the user interface to you. Rockbox Utility can install an English voice file, or
you can download it from http://www.rockbox.org/daily.shtml and unzip it to the root
of your player. Rockbox Utility can also aid you in the creation of voice files with
different voices or in other languages if you have a suitable speech engine installed on
your computer. Voice menus are enabled by default and will come into effect after a
reboot. See section 8.10 (page 76) for details on voice settings. Rockbox Utility can also
aid in the production of talk files, which allow Rockbox to speak file and folder names.
2.3. Running Rockbox
When you turn the unit on, Rockbox should load.
2.4. Updating Rockbox
Rockbox can be easily updated with Rockbox Utility. You can also update Rockbox
manually – download a Rockbox build as detailed above, and unzip the build to the root
directory of your player as in the manual installation stage. If your unzip program asks
you whether to overwrite files, choose the “Yes to all” option. The new build will be
installed over your current build.
The bootloader only changes rarely, and should not normally need to be updated.
Note: If you use Rockbox Utility be aware that it cannot detect manually installed
components.
2.5. Uninstalling Rockbox
2.5.1. Automatic Uninstallation
You can uninstall Rockbox automatically by using Rockbox Utility. If you installed
Rockbox manually you can still use Rockbox Utility for uninstallation but will not be
able to do this selectively.
2.5.2. Manual Uninstallation
If you wish to clean up your disk, you may also wish to delete the .rockbox directory
and its contents. Turn the Toshiba off. Turn the player back on and the original Toshiba
software will load.
b
The Rockbox manual (version 3.14) Toshiba Gigabeat F and X Series

Chapter 2. Installation 18
2.6. Troubleshooting
“File Not Found” If you receive a “File Not Found” from the bootloader, then the
bootloader cannot find the Rockbox firmware. This is usually a result of not
extracting the contents of the .zip file to the proper location, and should not
happen when Rockbox has been installed with Rockbox Utility.
To fix this, either install Rockbox with the Rockbox Utility which will take care
of this for you, or recheck the Manual Install section to see where the files need to
be located.
The Rockbox manual (version 3.14) Toshiba Gigabeat F and X Series
Chapter 3. Quick Start 19
3. Quick Start
3.1. Basic Overview
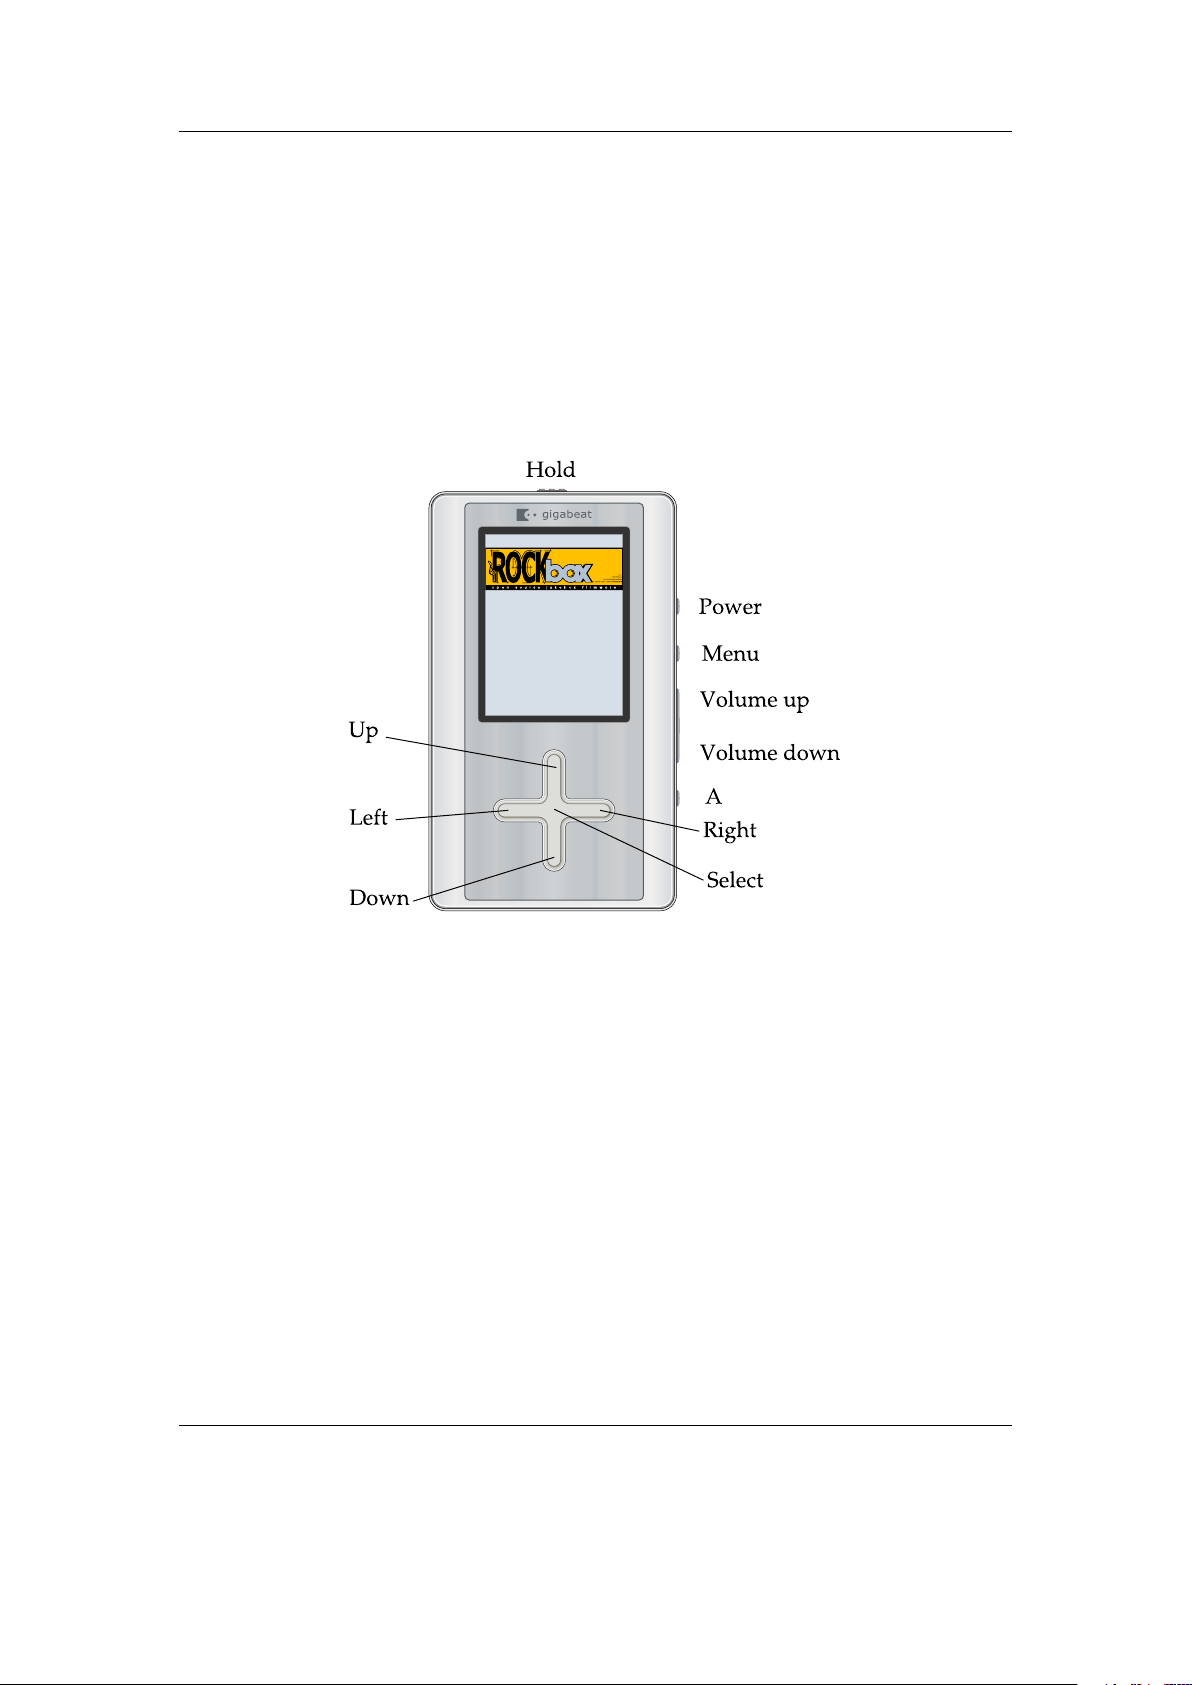
3.1.1. The player’s controls
WARNING! Image not found
Throughout this manual, the buttons on the player are labelled according to the
picture above. Whenever a button name is prefixed by “Long”, a long press of approximately one second should be performed on that button. The buttons are described in
detail in the following paragraph. Additional information for blind users is available on
the Rockbox website at ZBlindFAQ.
Note: The following description is for the Gigabeat F, but can also apply for the Gigabeat X. The Gigabeat F is slightly larger and more rectangular shaped, while the
Gigabeat X is smaller and has a slightly tapered back.
Hold the player with the screen on top and the controls on the right hand side. Below
the screen is a cross-shaped touch sensitive pad which contains the Up, Down, Left
and Right controls. On the Gigabeat X, this pad will feel slightly raised up, while it
will feel slightly sunken in on the Gigabeat F. On the top of the unit, from left to right,
are the power socket, the Hold switch, and the headphone socket. The Hold switch
The Rockbox manual (version 3.14) Toshiba Gigabeat F and X Series
¸
b

Chapter 3. Quick Start 20
puts the player into hold mode when it is switched to the right of the unit. The buttons
will have no effect when this is the case.
Starting from the left hand side on the bottom of the unit, nearer to the front than
the back, is a recessed switch which controls whether the battery is on or off. When this
switch is to the left, the battery is disconnected. This can be used for a hard reset of
the unit, or if the player is being placed in storage. Next to that is a connector for the
docking station and finally on the right hand side of the bottom of the unit is a mini
USB socket for connecting directly to USB.
Finally on the right hand side of the unit are some control buttons. Going from the
bottom of the unit to the top there is a small round A buttton then a rocker volume
switch with of the Volume down button below the Volume up button. Above that
is are two more small round buttons, the Menu button and nearest to the top of the
unit the Power button, which is held down to turn the player on or off. If you have a
Gigabeat X, these buttons are small metallic buttons that are place further up on the
right hand side, and closer together. The layout is still the same, however.
3.1.2. Turning the player on and off
To turn on and off your Rockbox enabled player use the following keys:
Key Remote Key Action
Power Start Rockbox
Long Power Shutdown Rockbox
On shutdown, Rockbox automatically saves its settings.
If you have problems with your settings, such as accidentally having set the colours to
black on black, they can be reset at boot time. See the Reset Settings in section 12.3.3
(page 199) for details.
In the unlikely event of a software failure, hardware poweroff or reset can be performed
by holding down the battery switch until the player shuts off or reboots.
3.1.3. Putting music on your player
With the player connected to the computer as an MSC/UMS device (like a USB Drive),
music files can be put on the player via any standard file transfer method that you would
use to copy files between drives (e.g. Drag-and-Drop). Files may be placed wherever
you like on the player, but it is strongly suggested NOT to put them in the /.rockbox
folder and instead put them in any other folder, e.g. /, /music or /audio. The default
directory structure that is assumed by some parts of Rockbox (album art searching, and
missing-tag fallback in some WPSes) uses the parent directory of a song as the Album
name, and the parent directory of that folder as the Artist name. WPSes may display
information incorrectly if your files are not properly tagged, and you have your music
organized in a way different than they assume when attempting to guess the Artist and
The Rockbox manual (version 3.14) Toshiba Gigabeat F and X Series

Chapter 3. Quick Start 21
Album names from your filetree. See section C (page 210) for the requirements for
Album Art to work properly. See section B.1 (page 204) for a list of supported audio
formats.
3.1.4. The first contact
After you have first started the player, you’ll be presented by the Main Menu. From
this menu you can reach every function of Rockbox, for more information (see section 5.1
(page 41)). To browse the files on your player, select Files (see section 4.1 (page 23)),
and to browse in a view that is based on the meta-data1of your audio files, select
Database (see section 4.2 (page 28)).
3.1.5. Basic controls
When browsing files and moving through menus you usually get a list view presented.
The navigation in these lists are usually the same and should be pretty intuitive. In the
tree view use Down and Up to move around the selection. Use Select or Right to
select an item. When browsing the file system selecting an audio file plays it. The view
switches to the “While playing screen”, usually abbreviated as “WPS” (see section 4.3
(page 31). The dynamic playlist gets replaced with the contents of the current directory.
This way you can easily treat directories as playlists. The created dynamic playlist can
be extended or modified while playing. This is also known as “on-the-fly playlist”. To
go back to the File Browser stop the playback with the Power button or return to
the file browser while keeping playback running using Select. In list views you can go
back one step with Left.
3.1.6. Basic concepts
Playlists
Rockbox is playlist oriented. This means that every time you play an audio file, a socalled “dynamic playlist” is generated, unless you play a saved playlist. You can modify
the dynamic playlist while playing and also save it to a file. If you do not want to use
playlists you can simply play your files directory based. Playlists are covered in detail
in section 4.4 (page 36).
Menu
From the menu you can customise Rockbox. Rockbox itself is very customisable. Also
there are some special menus for quick access to frequently used functions.
Context Menu
Some views, especially the file browser and the WPS have a context menu. From the file
browser this can be accessed with Long Select. The contents of the context menu vary,
1
ID3 Tags, Vorbis comments, etc.
The Rockbox manual (version 3.14) Toshiba Gigabeat F and X Series

Chapter 3. Quick Start 22
depending on the situation it gets called. The context menu itself presents you with
some operations you can perform with the currently highlighted file. In the file browser
this is the file (or directory) that is highlighted by the cursor. From the WPS this is
the currently playing file. Also there are some actions that do not apply to the current
file but refer to the screen from which the context menu gets called. One example is the
playback menu, which can be called using the context menu from within the WPS.
3.2. Customising Rockbox
Rockbox’ User Interface can be customised using “Themes”. Themes usually only affect
the visual appearance, but an advanced user can create a theme that also changes various
other settings like file view, LCD settings and all other settings that can be modified
using .cfg files. This topic is discussed in more detail in section 12.3 (page 198). The
Rockbox distribution comes with some themes that should look nice on your player.
Note: Some of the themes shipped with Rockbox need additional fonts from the fonts
package, so make sure you installed them. Also, if you downloaded additional themes
from the Internet make sure you have the needed fonts installed as otherwise the theme
may not display properly.
3.3. USB Charging
To charge your player over USB, hold any button while plugging it in. This will prevent
it from connecting to your computer and let you continue to use it normally. Your player
must already be in Rockbox for this to function.
Note: Be aware that this button may still perform its normal function, so it is recommended to use a button without harmful side effects, such as Menu.
b
b
The Rockbox manual (version 3.14) Toshiba Gigabeat F and X Series
Chapter 4. Browsing and playing 23
4. Browsing and playing
4.1. File Browser
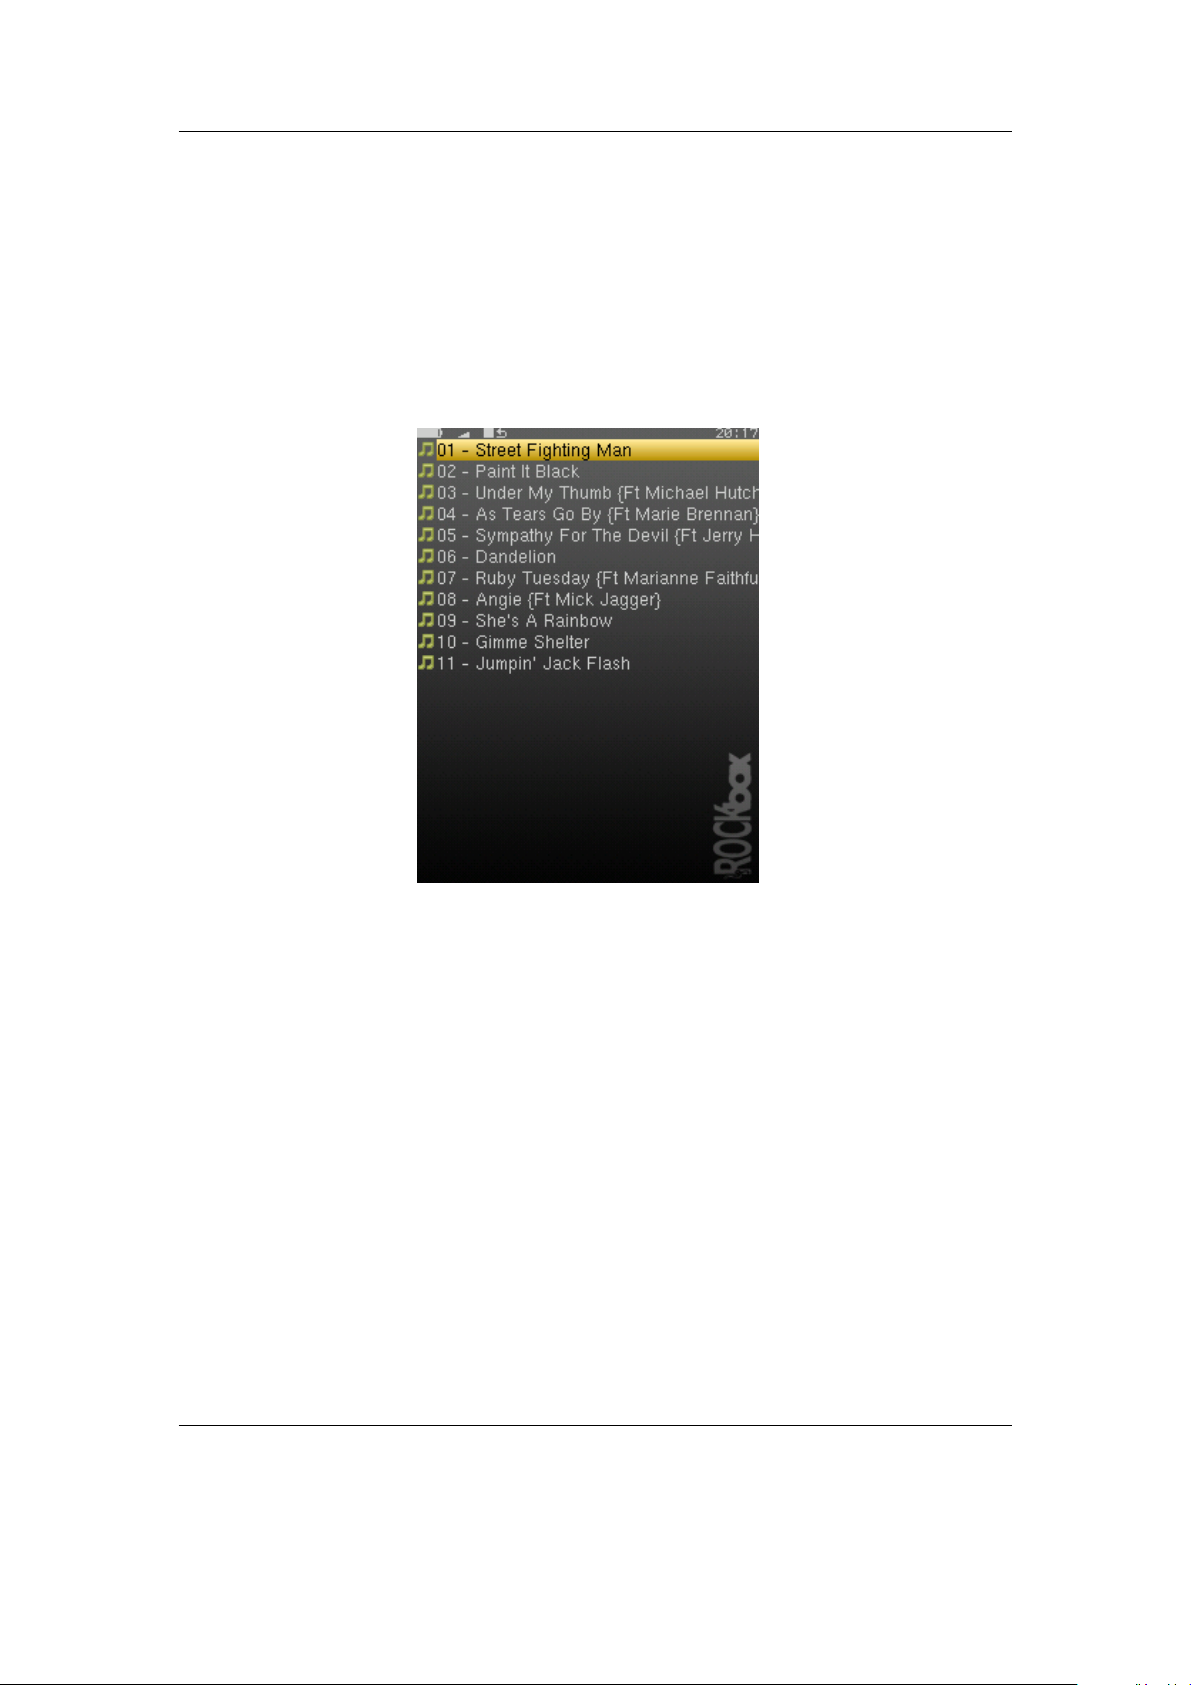
Figure 4.1.: The file browser
Rockbox lets you browse your music in either of two ways. The File Browser lets you navigate through the files and directories on your player, entering directories and executing the default action on each file. To help differentiate files, each file format is displayed with an icon.
The Database Browser, on the other hand, allows you to navigate through the
music on your player using categories like album, artist, genre, etc.
You can select whether to browse using the File Browser or the Database Browser
by selecting either Files or Database in the Main Menu. If you choose the File
Browser, the Show Files setting lets you select what types of files you wish to view.
See section 8.2 (page 65) for more information on the Show Files setting.
Note: The File Browser allows you to manipulate your files in ways that are not
available within the Database Browser. Read more about Database in section 4.2
(page 28). The remainder of this section deals with the File Browser.
The Rockbox manual (version 3.14) Toshiba Gigabeat F and X Series
b

Chapter 4. Browsing and playing 24
4.1.1. File Browser Controls
Key Remote Key Action
Up/Down Volume
Up/Volume
Down
Left Rewind Go to the parent directory.
Select or Right Forward Execute the default action on the se-
A Play If there is an audio file playing, return
Power Long Play Stop audio playback.
Long Select Long Menu Enter the Context Menu.
Menu Menu Enter the Main Menu.
Long Menu Long Rewind Switch to the Quick Screen (see sec-
A + Menu Activate the Hotkey function (see sec-
Go to previous/next item in list. If you
are on the first/last entry, the cursor will
wrap to the last/first entry.
lected file or enter a directory.
to the While Playing Screen (WPS)
without stopping playback.
tion 5.11 (page 45)).
tion 4.5 (page 40)).
The Rockbox manual (version 3.14) Toshiba Gigabeat F and X Series
Chapter 4. Browsing and playing 25
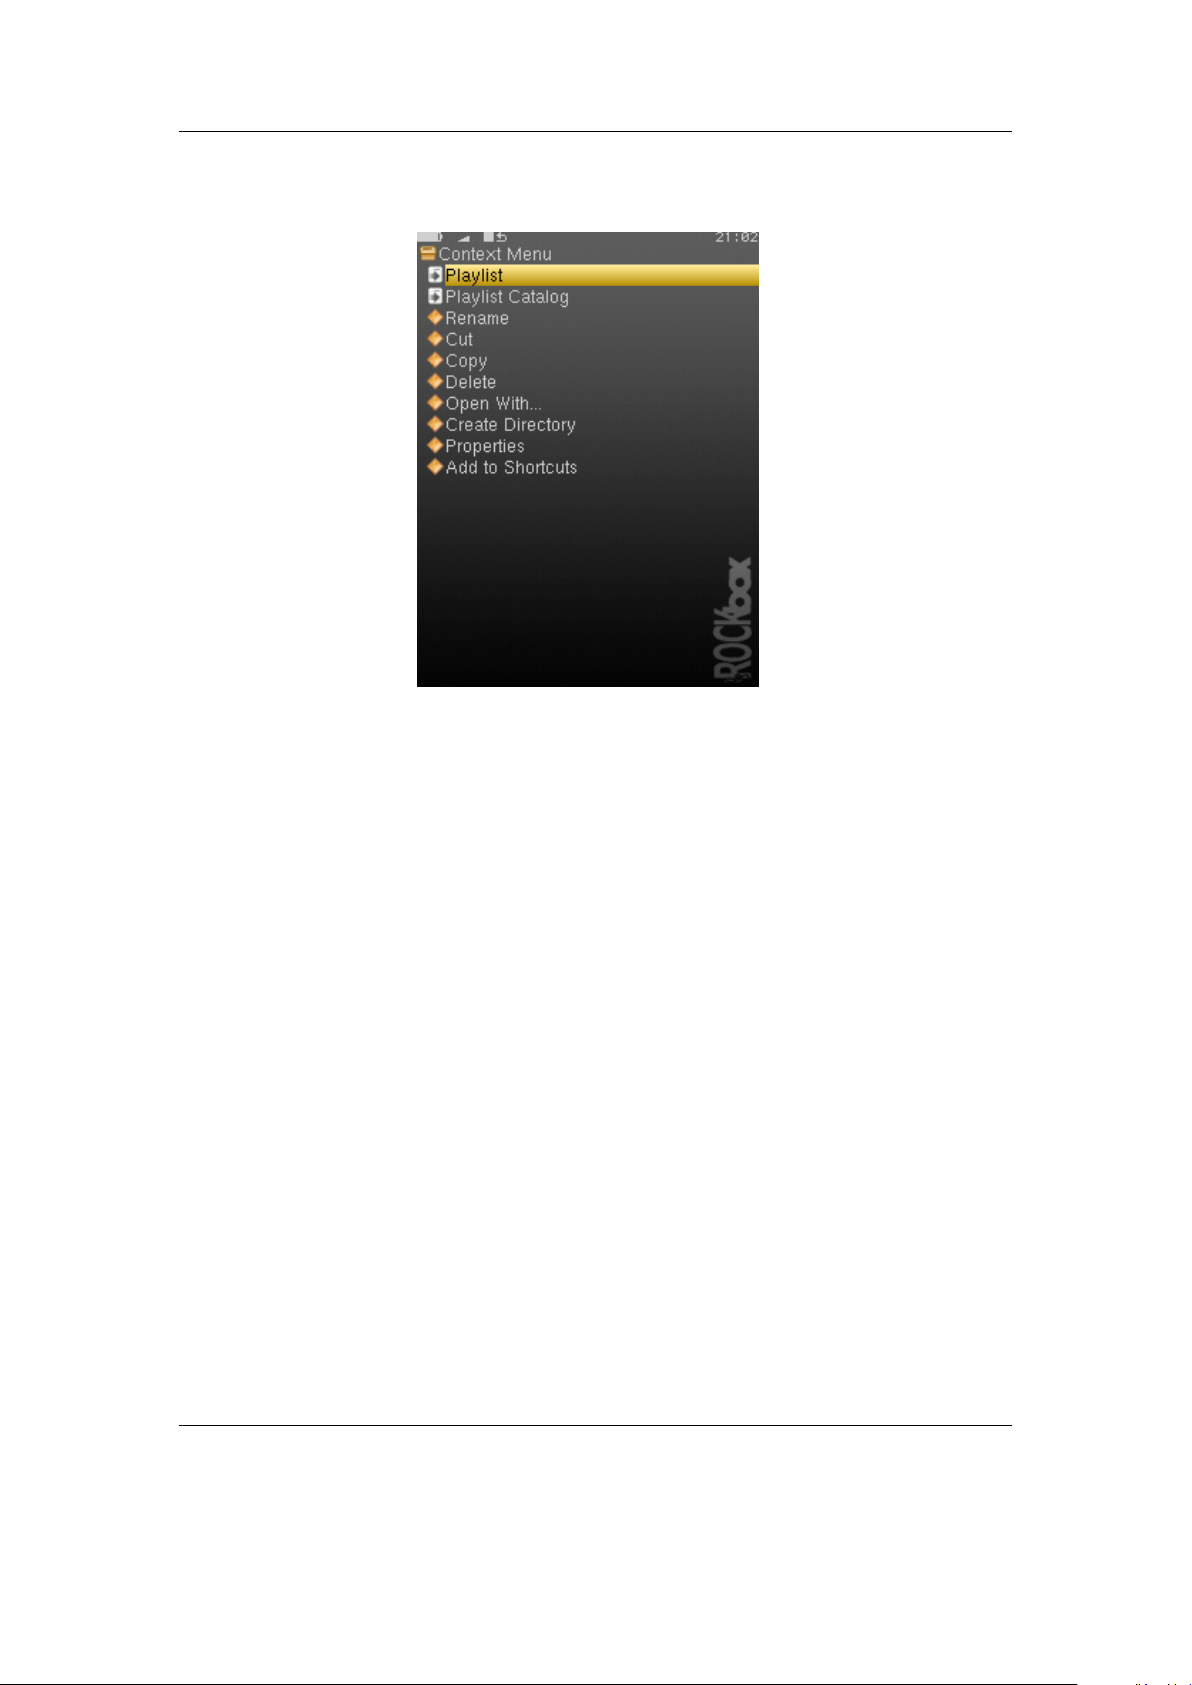
4.1.2. Context Menu
Figure 4.2.: The Context Menu
The Context Menu allows you to perform certain operations on files or directories.
To access the Context Menu, position the selector over a file or directory and access
the context menu with Long Select.
Note: The Context Menu is a context sensitive menu. If the Context Menu is
invoked on a file, it will display options available for files. If the Context Menu is
invoked on a directory, it will display options for directories.
The Context Menu contains the following options (unless otherwise noted, each option pertains both to files and directories):
Playlist. Enters the Playlist Submenu (see section 4.4.3 (page 38)).
Playlist Catalogue. Enters the Playlist Catalogue Submenu (see section 4.4.2 (page 37)).
Rename. This function lets the user modify the name of a file or directory.
Cut. Copies the name of the currently selected file or directory to the clipboard and
marks it to be ‘cut’.
b
Copy. Copies the name of the currently selected file or directory to the clipboard and
marks it to be ‘copied’.
The Rockbox manual (version 3.14) Toshiba Gigabeat F and X Series

Chapter 4. Browsing and playing 26
Paste. Only visible if a file or directory name is on the clipboard. When selected it will
move or copy the clipboard to the current directory.
Delete. Deletes the currently selected file. This option applies only to files, and not to
directories. Rockbox will ask for confirmation before deleting a file. Press Select
to confirm deletion or any other key to cancel.
Delete Directory. Deletes the currently selected directory and all of the files and subdi-
rectories it may contain. Deleted directories cannot be recovered. Use this feature
with caution!
Set As Backdrop. Set the selected bmp file as background image. The bitmaps need to
meet the conditions explained in section 12.1.6 (page 190).
Open with. Runs a viewer plugin on the file. Normally, when a file is selected in Rock-
box, Rockbox automatically detects the file type and runs the appropriate plugin.
The Open With function can be used to override the default action and select a
viewer by hand. For example, this function can be used to view a text file even if
the file has a non-standard extension (i.e., the file has an extension of something
other than .txt). See section 11.3 (page 141) for more details on viewers.
Create Directory. Create a new directory in the current directory on the disk.
Properties. Shows properties such as size and the time and date of the last modification
for the selected file. If used on a directory, the number of files and subdirectories
will be shown, as well as the total size.
Start File Browser Here. This option allows users to set the currently selected directory
as the default start directory for the file browser. This option is not available for
files.
Note: If you have Auto-Change Directory and Constrain Auto-Change
enabled, the directories returned will be constrained to the directory you have
chosen here and those below it. See section 7.12 (page 61)
Add to Shortcuts. Adds a link to the selected item in the shortcuts.link file. If the
file does not already exist it will be created in the root directory. Note that if you
create a shortcut to a file, Rockbox will not open it upon selecting, but simply
bring you to its location in the File Browser.
b
The Rockbox manual (version 3.14) Toshiba Gigabeat F and X Series
Chapter 4. Browsing and playing 27
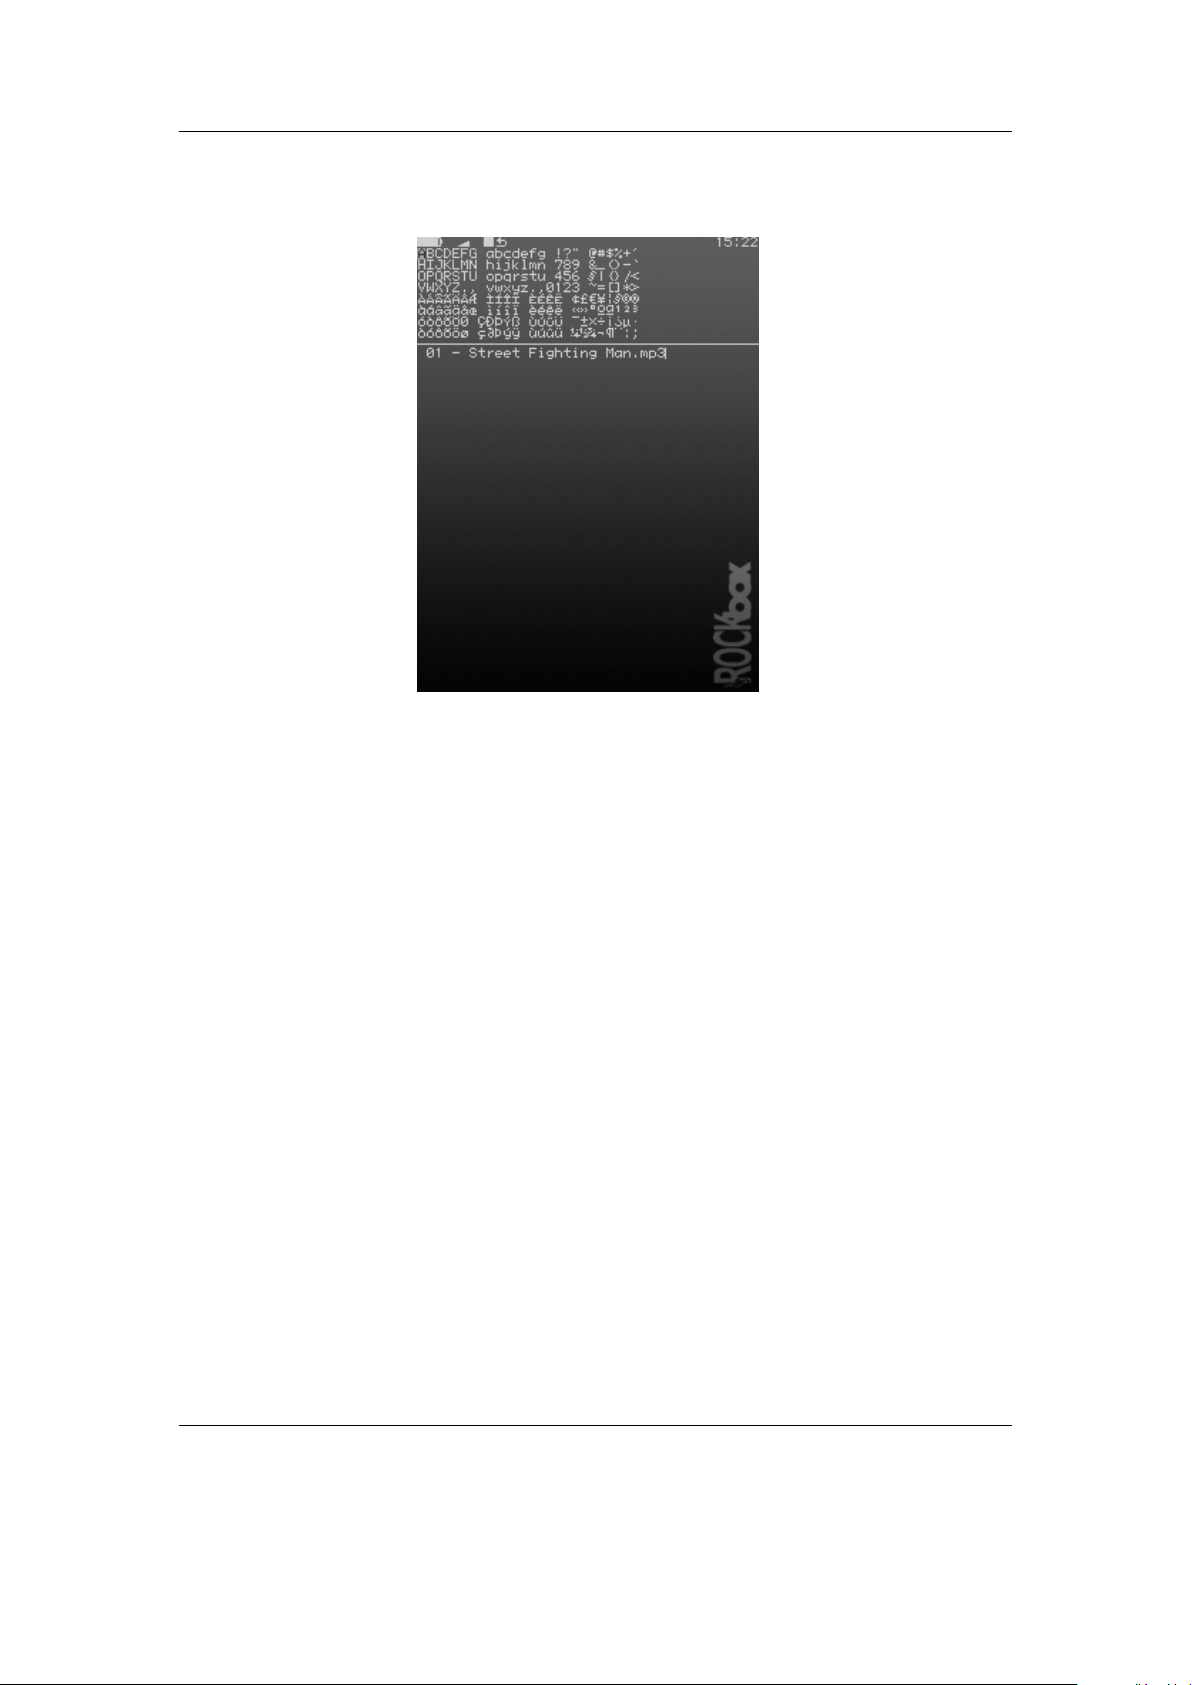
4.1.3. Virtual Keyboard
Figure 4.3.: The virtual keyboard
This is the virtual keyboard that is used when entering text in Rockbox, for example
when renaming a file or creating a new directory. The virtual keyboard can be easily
changed by making a text file with the required layout. More information on how to
achieve this can be found on the Rockbox website at ZLoadableKeyboardLayouts.
Also you can switch to Morse code input mode by changing the Use Morse Code
Input setting or by pressing A + Power in the virtual keyboard.
Note: When the cursor is on the input line, Select deletes the preceding character
b
The Rockbox manual (version 3.14) Toshiba Gigabeat F and X Series

Chapter 4. Browsing and playing 28
Key Remote Key Action
A + Left / A +
Right
Menu Delete the character before the line cur-
Left / Right / Move the cursor on the virtual keyboard.
Up / Down / Move the cursor on the virtual keyboard.
A + Menu Flip to the next page of characters (if
Select Insert the selected keyboard letter at the
A Exit the virtual keyboard and save any
Power Exit the virtual keyboard without saving
A + Power Toggle keyboard input mode and Morse
Select Tap to select a character in Morse code
/ Move the line cursor within the text line.
sor.
If you move out of the picker area, you
get the previous/next page of characters
(if there is more than one).
If you move out of the picker area you get
to the line edit mode.
there is more than one).
current line cursor position.
changes.
any changes.
code input mode.
input mode.
4.2. Database
4.2.1. Introduction
This chapter describes the Rockbox music database system. Using the information contained in the tags (ID3v1, ID3v2, Vorbis Comments, Apev2, etc.) in your audio files, Rockbox builds and maintains a database of the music files on your player and allows you to browse them by Artist, Album, Genre, Song Name, etc. The criteria the database uses to sort the songs can be completely customised. More information on how to achieve this can be found on the Rockbox website at ZDataBase.
4.2.2. Initializing the Database
The first time you use the database, Rockbox will scan your disk for audio files. This can
take quite a while depending on the number of files on your player. This scan happens
in the background, so you can choose to return to the Main Menu and continue to listen
to music. If you shut down your player, the scan will continue next time you turn it on.
The Rockbox manual (version 3.14) Toshiba Gigabeat F and X Series

Chapter 4. Browsing and playing 29
After the scan is finished you may be prompted to restart your player before you can
use the database.
Ignoring Directories During Database Initialization
You may have directories on your player whose contents should not be added to the
database. Placing a file named database.ignore in a directory will exclude the files in
that directory and all its subdirectories from scanning their tags and adding them to the
database. This will speed up the database initialization.
If a subdirectory of an ‘ignored’ directory should still be scanned, place a file named
database.unignore in it. The files in that directory and its subdirectories will be
scanned and added to the database.
4.2.3. The Database Menu
Load To RAM The database can either be kept on hard disk (to save memory), or
loaded into RAM (for fast browsing). Setting this to Yes loads the database to
RAM, allowing faster browsing and searching. Setting this option to No keeps
the database on the hard disk, meaning slower browsing but it does not use extra
RAM and saves some battery on boot up.
Note: If you browse your music frequently using the database, you should load
to RAM, as this will reduce the overall battery consumption because the disk will
not need to spin on each search.
Auto Update If Auto update is set to on, each time the player boots, the database
will automatically be updated.
Initialize Now You can force Rockbox to rescan your disk for tagged files by using the
Initialize Now function in the Database Menu.
Warning: Initialize Now removes all database files (removing runtimedb data
also) and rebuilds the database from scratch.
Update Now Update now causes the database to detect new and deleted files
Note: Unlike the Auto Update function, Update Now will update the database
regardless of whether the Directory Cache is enabled. Thus, an update using
Update now may take a long time.
Unlike Initialize Now, the Update Now function does not remove runtime
database information.
Gather Runtime Data When enabled, rockbox will record how often and how long a
track is being played, when it was last played and its rating. This information can
be displayed in the WPS and is used in the database browser to, for example, show
the most played, unplayed and most recently played tracks.
b
!
b
The Rockbox manual (version 3.14) Toshiba Gigabeat F and X Series

Chapter 4. Browsing and playing 30
Export Modifications This allows for the runtime data to be exported to the file
/.rockbox/database_changelog.txt, which backs up the runtime data in ASCII
format. This is needed when database structures change, because new code cannot
read old database code. But, all modifications exported to ASCII format should
be readable by all database versions.
Import Modifications. Allows the /.rockbox/database_changelog.txt backup to be
conveniently loaded into the database. If Auto Update is enabled this is per-
formed automatically when the database is initialized.
4.2.4. Using the Database
Once the database has been initialized, you can browse your music by Artist, Album, Genre, Song Name, etc. To use the database, go to the Main Menu and select
Database.
Note: You may need to increase the value of the Max Entries in File Browser
setting (Settings → General Settings → System → Limits) in order to view long
lists of tracks in the ID3 database browser.
There is no option to turn off database completely. If you do not want to use it just
do not do the initial build of the database and do not load it to RAM.
b
The Rockbox manual (version 3.14) Toshiba Gigabeat F and X Series
 Loading...