

Page 1

Expansion IO Card Option 1
ETB003Z Instruction manual
1. Make sure that this instruction manual is delivered to the end user of the expansion
IO card option.
2. Read this manual before installing or operating the expansion IO card option. Keep
it in a safe place for reference.
1. Make sure that this instruction manual is delivered to the end user of the
3. All information contained in this manual are subject to change without notice.
expansion IO card option.
Please confirm the latest information on our web site “www.inverter.co.jp”.
this manual before installing or operating the inverter unit, and store it in a
NOTICE
NOTE
E6581339⑥
© Toshiba Schneider Inverter Corporation
All rights reserved.
2005
Page 2
Safety precautions
On the inverter and in its instruction manual, important information is contained for
preventing injuries to users and damages to assets and for proper use of the device.
Read the instruction manual attached to VF-AS1/PS1 along with this instruction manual
for completely understanding the safety precautions and adhere to the contents of these
manuals.
Explanation of markings
Marking Meaning of marking
E6581339⑥
Warning
Caution
(*1) Such things as injury, burns or shock that will not require hospitalization or long periods of
outpatient treatment.
(*2) Physical property damage refers to wide-ranging damage to assets and materials.
Meanings of symbols
Marking Meaning of marking
Indicates prohibition (Don't do it).
Indicates something mandatory (must be done).
Indicates danger or warning.
Indicates that errors in operation may lead to death or serious injury.
Indicates that errors in operation may lead to injury (*1) to people or that these errors
may cause damage to physical property. (*2)
What is prohibited will be described in or near the symbol in either text or picture
form.
What is mandatory will be described in or near the symbol in either text or picture
form.
What is dangerous, or what the warning should be applied to will be described in or
near the symbol in either text or picture form.
1
1
Page 3
E6581339⑥
■ Limitation of use
Safety precaution
▼ Never use this unit with any device other than TOSVERT VF-AS1/PS1 series inverters. Doing so may
cause an accident.
■ General Operation
Warning
▼ Never disassemble, modify or repair.
Disassembly
prohibited
Prohibited
Doing so could result in electric shock, fire and injury. For repairs, call your sales
agency.
▼ Do not attach this option to any inverter other than the VF-AS1/PS1.
Doing so could result in electric shock or fire.
▼ Don't place or insert any kind of object into the ETB003Z (electrical wire cuttings, rods,
wires).
Doing so could result in electric shock or fire.
▼ Do not allow water or any other fluid to come in contact with the ETB003Z.
Doing so could result in electric shock or fire.
▼ If the inverter begins to emit smoke or an unusual odor, or unusual sounds, immediately
turn off the VF-AS1/PS1.
Mandatory
Mandatory
■ Transportation & installation
Prohibited
If the equipment is continued in operation in such a state, the result may be fire. Call
your local sales agency for repairs.
▼ Do not touch the sharp portions (such as leads of parts on the board, the corner of
board, or etc.) on this option. It may lead to injuries.
▼ This option is an electrostatic discharge sensitive device. Handle it, where the
environment is protected against electrostatic electricity.
Otherwise, permanent damage to device will result.
▼ Do not apply a dropping shock or other physical shocks.
Otherwise, damage or malfunction will result.
▼ Do not install or operate the inverter if it is damaged or any part of it is missing.
Operating a defective inverter may lead to electric shocks or fire.
For repairs, call your sales/repair agency.
▼ Do not put any flammable material near the product.
It may catch fire due to the product sparking in the case of a malfunction.
Caution
Warning
Mandatory
▼ Use this product under the environmental conditions prescribed in the instruction
manual.
Usage it under any other conditions may result in malfunction.
▼ An emergency stop device must be installed that fits with system specifications
(e.g. shut off input power then engage mechanical brake).
Operation cannot be stopped immediately by the inverter or this unit alone, thus risking
an accident or injuries.
2
Page 4
■ Wiring
Mandatory
■ Operations
Prohibited
E6581339⑥
Caution
▼ Electrical construction work must be done by a qualified expert.
Installation or connection of input power by someone who does not have that expert
knowledge may result in fire or electric shock.
▼ Shut off power when installing and wiring this option.
Wait at least 15 minutes and check to make sure that the charge lamp (VF-AS1/PS1)
is no longer lit.
▼ Tighten the screws on the terminal block to the specified torque (Refer to Section 2.2).
If the screws are not tightened to the specified torque, it may lead to fire.
Warning
▼ Do not pull on any cable itself.
Doing so could result in damage or malfunction.
▼ Do not touch switches when the hands are wet and do not try to clean the inverter with
a damp cloth.
Doing so could result in electric shock.
▼ Use this option under the environment specified in the instruction manual.
Mandatory
■ Disposal
Mandatory
■ Notes on use
▼ Use an additional safety device with your VF-AS1/PS1 or system to prevent a serious
▼ For safety's sake, do not dispose of the disused inverter yourself but ask an industrial
Usage under the environment other than them may cause damages or malfunctions or
an accident.
accident due to the unit malfunctions.
Usage without an additional safety device may cause an accident.
Caution
waste disposal agent (*).
If the collection, transport and disposal of industrial waste is done by someone who is
not licensed for that job, it is a punishable violation of the law. (Laws in regard to
cleaning and processing of waste materials)
(*) Persons who specialize in the processing of waste and known as “industrial waste
product collectors and transporters” or “industrial waste disposal persons.”
Notes
▼ Do not install the inverter where the temperature or the humidity will change rapidly.
▼ Keep a distance of 20cm or more between the inverter's power cable and the data
transmission cable.
Or the inverter might malfunction because of noise.
▼ Insert a magnetic contactor or similar device between the VF-AS1/PS1 and the power
supply to ensure that power is turned off if an emergency stop command is entered
through the network.
3
Page 5
Introduction
Thank you for purchasing a “Expansion IO card option 1” for industrial inverter
TOSVERT VF-AS1/PS1 inverter.
By the use of this option, the expansion of input/output terminal is possible. This
instruction manual describes connecting method and usage of the “Expansion IO card
option”. Read this manual carefully before using the unit.
Keep this manual near at hand of the operator who uses the “Expansion IO card option”
for future reference in the maintenance and inspection.
Type of expansion IO option card
E T B 0 0 3 Z - 0
E6581339⑥
Revision number
Without cable
Model number of expansion IO card option
Expansion IO card option
Confirmation on accessories
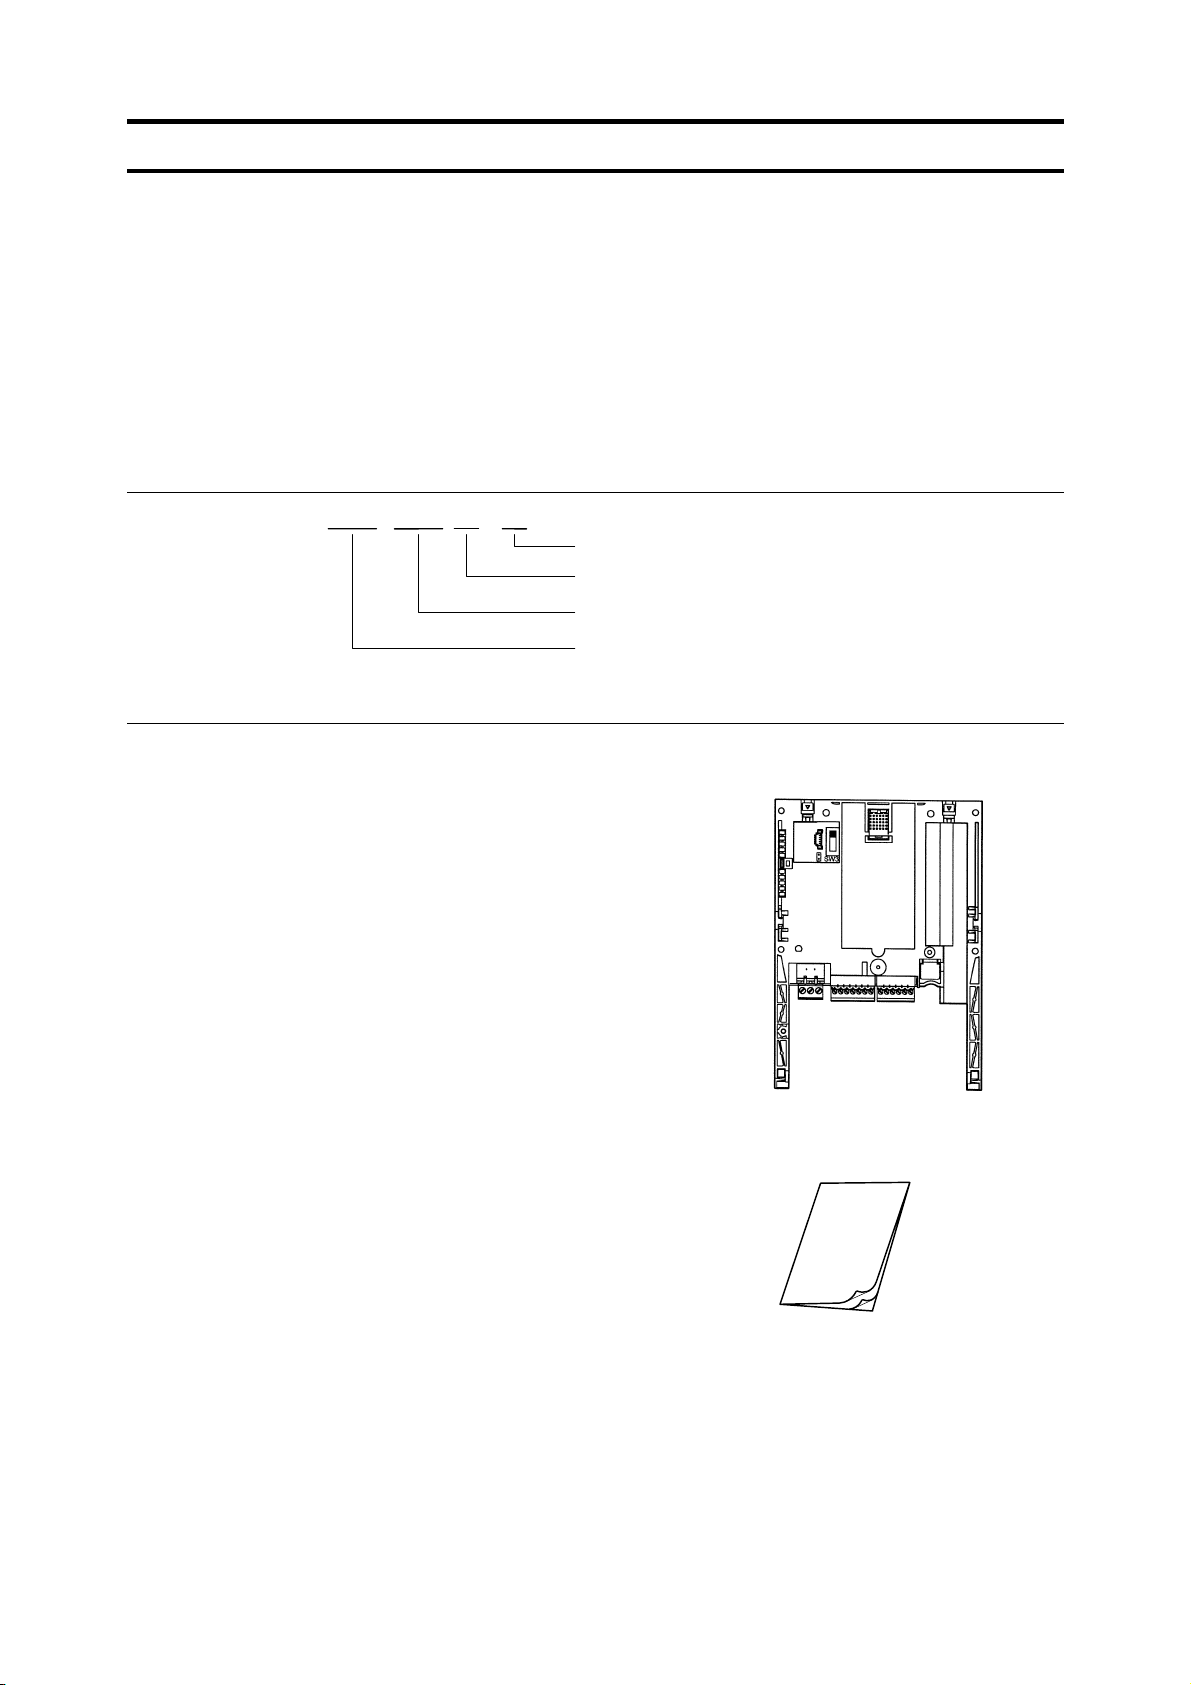
Following accessory parts are included in the expansion IO card option.
Upon unpacking, confirm on the following parts.
Expansion IO card option unit
(1) Instruction manual of expansion IO card option (this manual)
E6581339(English)
Manual
4
Page 6

E6581339⑥
Contents
1. Name and function of each section .............................................................................6
1.1 Appearance .......................................................................................................................................6
1.2 Name of each section (terminal) .......................................................................................................6
2. Installing the IO card option in the VF-AS1/PS1..........................................................7
2.1 Connection to the inverter .................................................................................................................7
2.2 Wiring ................................................................................................................................................8
3. Functional description ...............................................................................................10
3.1 Multi-function output terminal ..........................................................................................................10
3.2 Multi-function input terminal ............................................................................................................11
3.3 -10V power supply...........................................................................................................................11
3.4 External thermal trip input (TH1+, TH1-).........................................................................................12
4. External diagram ....................................................................................................... 13
5. Specification.............................................................................................................. 14
6. Warranty.................................................................................................................... 15
5
Page 7

1. Name and function of each section
Following figure shows appearance and name of each section of the expansion IO card
option.
1.1 Appearance
Inverter cover hook for the fixation
SINK/SOURCE Select SW
E6581339⑥
SOURCE
SINK(PLC)
SINK(INT)
1.2 Name of each section (terminal)
R1A Programmable relay output 1
T
B
R1B Programmable relay output 1
1
R1C Programmable relay output 1
N10 Analog input setting power output -10V
P24/PLC Common terminal of extension terminal input
LI1 Extension terminal input LI1
T
B
LI2 Extension terminal input LI2
2
LI3 Extension terminal input LI3
LI4 Extension terminal input LI4
CC Digital signal equipotential (0V)
TH1+ PTC input terminal (+)
TH1- PTC input terminal (-)
T
OUT3 Extension terminal output OUT3
B
OUT4 Extension terminal output OUT4
3
NO1 Output 3 and 4 common terminal
CC Digital signal equipotential (0V)
TB3
TB2
TB1
6
Page 8

2. Installing the IO card option in the VF-AS1/PS1
2.1 Connection to the inverter
(1) Turn off input power before installing.
E6581339⑥
Mandatory
Turn off the input power of VF-AS1/PS1 and wait for at least 15 minutes and then check
that the CHARGE lamp on VF-AS1/PS1 is no longer lit.
(2) Securing the option to the inverter
a) Insert a flat-blade screwdriver in each of the two holes at the upper part of the front
panel, release the panel mounting tab by pushing the screwdriver down, and
remove the front panel cover.
b) Install the
the slots at the lower part of the inverter front panel.
c) Make sure the option is securely attached to the inverter. Then, check whether the
plastic bosses on the inverter case have fitted in the holes at the upper and lower
parts of the
d) Insert the tabs at the lower part of the front cover into the slots at the lower part of
the inverter to attach the front cover to the inverter.
option in the inverter by fitting the tabs on the lower side of the option into
option*.
a)
* When installing this option to below capacities,
remove the Add-on type option case.
VFAS1: 200V 55, 75kW
VFPS1: 200V 55 - 90kW
400V 90 - 500kW
400V 90 - 630kW
b)
c)
d)
7
Page 9

2.2 Wiring
When conducting wiring, follow the instructions below.
• Use shield wire for control signal line and ground the unit with shield wire
(Use twisted pair shield cable for wiring of the analog monitor output.
• Never bind the signal line and main circuit connection wire together
• Fix the communication cables after connected.
Terminal Block Applicable wire size
The wire length of
peel off the end
Using screwdriver
(The blade tip)
E6581339⑥
)
.
Tightening
torque
TB1 0.2 to 2.5 mm2 About 7mm
TB2 and TB3 0.2 to 1.5mm2 About 5mm
< Input/output terminal interface >
Terminal
symbol
R1A
R1B
R1C
Function Electrical specification Internal circuit
Configuration of 1C contact point
Relay contact
point output
250Vac - 2A (cosφ=1)
250Vac - 1A (cosφ=0.4)
30Vdc - 1A
No voltage contact input
24Vdc - 5mA
Sink input (common voltage 24V)
ON :less than 10Vdc
OFF :16Vdc or more
Source input
ON :11Vdc or more
OFF :less than 5Vdc
LI1
LI2
LI3
LI4
Contact point
input Changeover
of sink or source
Note:
Even when an external power supply is
used (in sink logic mode i.e. when
SINK(PLC) is selected), connect
the reference potential-side (0V side)
cable from the power supply
to the CC terminal.
Lan current signal.
Chose low current contacts to
avoid poor attaching.
24Vdc power output (when SW1 is
in any position other than PLC)
24V internal output terminal
24Vdc - 60mA max
If SW1 is turned to the PLC position,
this terminal can be used as a common
terminal when an external power
supply is used.
PLC/
P24
24V power supply
Common terminal
for external power
supply
0.6mm thickness
and 3.5mm width.
0.4mm thickness
and 2.5mm width.
R1A
R1B
R1C
SINK Logic(SW=SINK(INT))
P24/
PLC
SINK
(INT)
LI1
LI2
LI3
LI4
2.2k ohm
CC
SINK Logic (SW=SINK(PLC))
P24/
PLC
SINK
(INT)
LI1
LI2
LI3
LI4
CC
SOURCE Logic (SW=SOURCE)
LI1
LI2
LI3
LI4
SINK
P24/
(INT)
PLC
CC
0.5 to 0.6 N・m
0.22 to 0.25 N・m
SW
2.2k ohm
SW
2.2k ohm
2.2k ohm
2.2k ohm
2.2k ohm
SW
Ry
SINK(PLC)
SOURCE
P24
SINK(PLC)
SOURCE
P24
P24
SOURCE
SINK(PLC)
8
Page 10

E6581339⑥
Terminal
symbol
Function Electrical specification Internal circuit
The resistance between TH1+ and TH1-
TH1+
TH1-
Thermal trip input
Tripping value: about under 70 ohm
Reset value: about 1.6k ohm
N10 -10V power upply DC-10V - 10mA
Open collector output
Drive current
OUT3
OUT4
NO1
Multifunction
programmable
open collector
output.
External power supply used: 50mA
Internal power supply used: 20mA
Drive voltage
12V min - 30V max
Isolated other circuit.
CC
Common to
input/output
Digital signal equipotential (0V) erminal
for the control circuit
or about over 2.5k ohm
9
TH1+
TH1-
N10
OUT4
NO1
100 ohm
20 ohmOUT3
20 ohm
P5
3k ohm
Voltage
detection
circuit
OP
Page 11

E6581339⑥
3. Functional description
In this section, functions added by the installation of this expansion IO card option, on
top of the standard inverter functions, are described.
* If the software version of inverter is less than V104, when OUT3 or OUT4 terminals is
set as negative logic, it may output a flash pulse at inverter reset.
3.1 Multi-function output terminal
Two output terminals and one relay output can be added. Function is similar to that of the
output terminals of the inverter, so refer to the inverter instruction manual.
Parameter
Title Function Adjustment range Default setting
f133
f134
f135
Output terminal function selection 4 (OUT3) 0 - 255
Output terminal function selection 5 (OUT4) 0 - 255
Output terminal function selection 6 (R1) 0 - 255
(Always OFF)
(Always OFF)
(Always OFF)
254
254
254
Monitor
Refer to the description on status monitor mode of inverter’s instruction manual.
The output terminal status can be monitored by the output terminal status parameter (fe07),
and the parameter can be monitor by the serial communication.
fe07
Note: The OUT5, OUT6 and R2 are the terminal function of the expansion IO card option 2.
bit No. 15 14 13 12 11 10 9 8 7 6 5 4 3 2 1 0
Symbol
--- --- --- --- --- --- ---
R2
OUT6 OUT
5
R1
OUT 4 OUT
3
FL
OUT2 OUT
1
10
Page 12

E6581339⑥
3.2 Multi-function input terminal
Four output terminals can be added. Function is similar to that of the input terminals of
the inverter, so refer to the inverter instruction manual.
Parameter
Title Function Adjustment range Default setting
f119Input terminal selection 9 (LI1) 0 - 135 0
f120Input terminal selection 10 (LI2) 0 - 135 0
f121Input terminal selection 11 (LI3) 0 - 135 0
f122Input terminal selection 12 (LI4) 0 - 135 0
f144 *Input terminal 5~12 response time selection 2 - 200ms 8
* VF-PS1 does not have this parameter.
Monitor
Refer to the description on status monitor mode of inverter’s instruction manual.
The input terminal status can be monitored by the input terminal status parameter
(fe06), and the parameter can be monitor by the serial communication.
fe06
bit No. 15 14 13 12 11 10 9 8 7 6 5 4 3 2 1 0
Symbol
LI8 LI7 LI6 LI5 LI4 LI3 LI2 LI1 S4 S3 S2 S1
Note: The LI5 ~ LI8 are the terminal function of the expansion IO card option 2.
3.3 -10V power supply
The frequency command can be input from RX terminal with pulse and negative voltage
using N10(-10V) and PP(+10V) power.
PP (+10)
RX
2k ohm
N10 (-10V)
Inverter Terminal
Option Terminal
RES
ST R F
Potentio meter
Center position: 0V command
Pulse side position: +10V command
Negative side position: -10V command
The recommended wiring cable length is
less than 1.5m with shielded cable.
11
Page 13

E6581339⑥
3.4 External thermal trip input (TH1+, TH1-)
By connecting the thermistor to TH1+ and TH1- terminal, when the thermistor value is
unusual, the inverter can be trip.
The resistor value
between TH1+ and TH1-
about under 70 ohm Thermistor short broken detection oh2 trip
about 70 - about 2.5k ohm Normal value ―――
about 1.6k ohm Thermistor fault reset ―――
about 3k ohm Thermistor fault detection oh2 trip
Parameter
Title Function Adjustment range Default setting
f637PTC thermal selection
Detect condition Movement
0: Deselect
1: Select
0
Expansion IO card option
P15
4.2k
PTC
thermistor
TH1+
TH1-
Voltage
detection
circuit
12
Page 14

4. External diagram
Do not forget to reserve the space for the options at time of installation.
External diagram of option (unit: mm)
Dimension of optional unit
E6581339⑥
The control panel depth increases about 21.6mm when the option is installed. Secure
the front space from the inverter control panel fully. The space which is necessary for the
option installation varies in the inverter capacity rate. Please refer to the inverter
instruction manual.
13
Page 15

5. Specification
<Environment Specification>
Item Specification
Indoor, less than 3,000 m from the sea level.
Use Environment
Ambient Temperature -10 to +60℃
Storage Temperature -25 to +65℃
Relative Humidity 20 to 93 % (No condensation)
Vibration 5.9m/s² (0.6G) or less (from 10Hz to 55Hz)
< Control specification >
Function Specification
Relay contact output
Multi-function programmable output
Contact point input
(Changeover of sink / source)
Multi-function programmable input
24V power supply DC24V - 60mA
External thermal trip input 1 circuit. The detection level is below.
-10V power supply DC-10V - 10mA
Open collector output
Multi-function programmable output
No direct sunlight, corrosive or explosive gas, steam, cutting dusts or
dusts, grinding solution, and grinding oil.
1 circuits for output of 1C contact point
250Vac - 2A (cosφ=1)
250Vac - 1A (cosφ=0.4)
30Vdc - 1A
4 contact inputs
Sink input (24V common voltage)
ON : less than 10Vdc
OFF : 16Vdc or more
Source input
ON : 11Vdc or more
OFF : less than 5Vdc
Tripping value : about under 70 ohm, or about over 2.5k ohm
Reset value : about 1.6k ohm
2 circuit
Current : 50mA max with external power supply
20mA max with internal power supply
Voltage : min. 12V, max 30V
E6581339⑥
14
Page 16

6. Warranty
TOSHIBA provides warranty with the product under the following conditions.
1. If and when a trouble occurs on the option unit properly installed and handled within
one year of delivery, and if the trouble is clearly attributable to defects inherent in our
design and manufacture, the product will be repaired free of charge.
2. The warranty covers only the delivered option unit.
3. Even in the term of the warranty, repair/adjustment service will be charged for the
following cases.
4. If there is another special warranty contracted for this option unit , the special
warranty has priority over this warranty.
E6581339⑥
1) Fault or damage resulting from misuse, unauthorized modification or repair.
2) Fault or damage resulting from falling down of the product or traffic accident
during transportation.
3) Fault or damage originating from fire, salt water/salty breezes, some kind of gas,
earthquake, storm or flood, lightning, abnormal supply voltage, other natural
disasters.
4) Fault or damage caused by improper use of this option unit as it is used for a
purpose out of its original function.
15
15E
 Loading...