

Toshiba DX1210 series User Manual

User’s Manual
TOSHIBA DX1210
Series

Table of Contents
Copyright. . . . . . . . . . . . . . . . . . . . . . . . . . . . . . . . . . . . . . . . . . . . . . . . . . v
Disclaimer . . . . . . . . . . . . . . . . . . . . . . . . . . . . . . . . . . . . . . . . . . . . . . . . . v
Trademarks . . . . . . . . . . . . . . . . . . . . . . . . . . . . . . . . . . . . . . . . . . . . . . . . v
FCC information . . . . . . . . . . . . . . . . . . . . . . . . . . . . . . . . . . . . . . . . . . . vi
Video Standard Notice . . . . . . . . . . . . . . . . . . . . . . . . . . . . . . . . . . . . . . vii
Important Safety Information for Computers with TV tuner. . . . . . . . vii
Disposing of the computer and the computer's batteries . . . . . . . . . vii
Optical disc drive safety instructions. . . . . . . . . . . . . . . . . . . . . . . . . viii
Precautions . . . . . . . . . . . . . . . . . . . . . . . . . . . . . . . . . . . . . . . . . . . . . . . . x
Preface
Conventions . . . . . . . . . . . . . . . . . . . . . . . . . . . . . . . . . . . . . . . . . . . . . . xi
General Precautions
Provide adequate ventilation. . . . . . . . . . . . . . . . . . . . . . . . . . . . . . . . xiv
Creating a computer-friendly environment . . . . . . . . . . . . . . . . . . . . xiv
Stress injury . . . . . . . . . . . . . . . . . . . . . . . . . . . . . . . . . . . . . . . . . . . . . . xv
Heat injury . . . . . . . . . . . . . . . . . . . . . . . . . . . . . . . . . . . . . . . . . . . . . . . . xv
Protective Earthing. . . . . . . . . . . . . . . . . . . . . . . . . . . . . . . . . . . . . . . . . xv
Pressure or impact damage . . . . . . . . . . . . . . . . . . . . . . . . . . . . . . . . xvi
Mobile phones . . . . . . . . . . . . . . . . . . . . . . . . . . . . . . . . . . . . . . . . . . . xvi
Instruction Manual for Safety and Comfort . . . . . . . . . . . . . . . . . . . . xvi
Chapter 1 Getting Started
Equipment checklist. . . . . . . . . . . . . . . . . . . . . . . . . . . . . . . . . . . . . . . 1-1
Getting Started . . . . . . . . . . . . . . . . . . . . . . . . . . . . . . . . . . . . . . . . . . . 1-2
System Recovery Options . . . . . . . . . . . . . . . . . . . . . . . . . . . . . . . . . 1-13
System Recovery . . . . . . . . . . . . . . . . . . . . . . . . . . . . . . . . . . . . . . . . 1-13
Chapter 2 The Grand Tour
Computer. . . . . . . . . . . . . . . . . . . . . . . . . . . . . . . . . . . . . . . . . . . . . . . . 2-1
Wireless Keyboard . . . . . . . . . . . . . . . . . . . . . . . . . . . . . . . . . . . . . . . . 2-9
Wireless Mouse . . . . . . . . . . . . . . . . . . . . . . . . . . . . . . . . . . . . . . . . . 2-10
Remote Controller . . . . . . . . . . . . . . . . . . . . . . . . . . . . . . . . . . . . . . . 2-11
Indicators . . . . . . . . . . . . . . . . . . . . . . . . . . . . . . . . . . . . . . . . . . . . . . 2-16
User’s Manual ii

Optical disc drives . . . . . . . . . . . . . . . . . . . . . . . . . . . . . . . . . . . . . . . 2-17
AC adaptor . . . . . . . . . . . . . . . . . . . . . . . . . . . . . . . . . . . . . . . . . . . . . 2-18
Chapter 3 Hardware, Utilities and Options
Hardware . . . . . . . . . . . . . . . . . . . . . . . . . . . . . . . . . . . . . . . . . . . . . . . . 3-1
Special features . . . . . . . . . . . . . . . . . . . . . . . . . . . . . . . . . . . . . . . . . . 3-5
Utilities and Applications. . . . . . . . . . . . . . . . . . . . . . . . . . . . . . . . . . . 3-7
Optional devices. . . . . . . . . . . . . . . . . . . . . . . . . . . . . . . . . . . . . . . . . 3-14
Memory media slot . . . . . . . . . . . . . . . . . . . . . . . . . . . . . . . . . . . . . . . 3-14
Optional accessories . . . . . . . . . . . . . . . . . . . . . . . . . . . . . . . . . . . . . 3-25
Chapter 4 Operating Basics
Touch Screen . . . . . . . . . . . . . . . . . . . . . . . . . . . . . . . . . . . . . . . . . . . . 4-1
Web Camera . . . . . . . . . . . . . . . . . . . . . . . . . . . . . . . . . . . . . . . . . . . . . 4-1
Using the TOSHIBA Face Recognition . . . . . . . . . . . . . . . . . . . . . . . . 4-3
Using optical disc drives . . . . . . . . . . . . . . . . . . . . . . . . . . . . . . . . . . . 4-6
Writing CD/DVD/Blu-ray
TM
discs . . . . . . . . . . . . . . . . . . . . . . . . . . . . . 4-9
TOSHIBA VIDEO PLAYER . . . . . . . . . . . . . . . . . . . . . . . . . . . . . . . . . 4-19
Using WinDVD BD for TOSHIBA . . . . . . . . . . . . . . . . . . . . . . . . . . . . 4-21
Media care . . . . . . . . . . . . . . . . . . . . . . . . . . . . . . . . . . . . . . . . . . . . . . 4-23
TV Tuner . . . . . . . . . . . . . . . . . . . . . . . . . . . . . . . . . . . . . . . . . . . . . . . 4-24
Sound System. . . . . . . . . . . . . . . . . . . . . . . . . . . . . . . . . . . . . . . . . . . 4-25
Wireless communications . . . . . . . . . . . . . . . . . . . . . . . . . . . . . . . . . 4-28
LAN . . . . . . . . . . . . . . . . . . . . . . . . . . . . . . . . . . . . . . . . . . . . . . . . . . . 4-31
Computer Handling . . . . . . . . . . . . . . . . . . . . . . . . . . . . . . . . . . . . . . 4-33
Using the TOSHIBA Sleep Utility. . . . . . . . . . . . . . . . . . . . . . . . . . . . 4-34
Heat dispersal . . . . . . . . . . . . . . . . . . . . . . . . . . . . . . . . . . . . . . . . . . . 4-37
Chapter 5 The Keyboard
Typewriter keys. . . . . . . . . . . . . . . . . . . . . . . . . . . . . . . . . . . . . . . . . . . 5-1
Function keys: F1 … F4 and F6 ... F8 . . . . . . . . . . . . . . . . . . . . . . . . . 5-2
Soft keys: FN key combinations . . . . . . . . . . . . . . . . . . . . . . . . . . . . . 5-2
Hot keys. . . . . . . . . . . . . . . . . . . . . . . . . . . . . . . . . . . . . . . . . . . . . . . . . 5-2
Windows special keys . . . . . . . . . . . . . . . . . . . . . . . . . . . . . . . . . . . . . 5-4
Generating ASCII characters. . . . . . . . . . . . . . . . . . . . . . . . . . . . . . . . 5-5
Chapter 6 Power and Power-Up Modes
Monitoring of power condition . . . . . . . . . . . . . . . . . . . . . . . . . . . . . . 6-1
Battery . . . . . . . . . . . . . . . . . . . . . . . . . . . . . . . . . . . . . . . . . . . . . . . . . . 6-2
Password Utility . . . . . . . . . . . . . . . . . . . . . . . . . . . . . . . . . . . . . . . . . . 6-2
Starting the computer by password . . . . . . . . . . . . . . . . . . . . . . . . . . 6-3
Power-up modes. . . . . . . . . . . . . . . . . . . . . . . . . . . . . . . . . . . . . . . . . . 6-3
System automatic Sleep/Hibernation . . . . . . . . . . . . . . . . . . . . . . . . . 6-4
Chapter 7 HWSetup
Accessing HWSetup. . . . . . . . . . . . . . . . . . . . . . . . . . . . . . . . . . . . . . . 7-1
HWSetup window . . . . . . . . . . . . . . . . . . . . . . . . . . . . . . . . . . . . . . . . . 7-1
User’s Manual iii

Chapter 8 Troubleshooting
Problem solving process. . . . . . . . . . . . . . . . . . . . . . . . . . . . . . . . . . . 8-1
Hardware and system checklist . . . . . . . . . . . . . . . . . . . . . . . . . . . . . 8-3
TOSHIBA support . . . . . . . . . . . . . . . . . . . . . . . . . . . . . . . . . . . . . . . . 8-14
Appendix A Specifications
Physical Dimensions . . . . . . . . . . . . . . . . . . . . . . . . . . . . . . . . . . . . . . A-1
Environmental Requirements . . . . . . . . . . . . . . . . . . . . . . . . . . . . . . . A-1
Appendix B Display Controller and Video mode
Display controller . . . . . . . . . . . . . . . . . . . . . . . . . . . . . . . . . . . . . . . . . B-1
Video mode . . . . . . . . . . . . . . . . . . . . . . . . . . . . . . . . . . . . . . . . . . . . . . B-1
Appendix C Information for Wireless Devices
Wireless LAN Interoperability . . . . . . . . . . . . . . . . . . . . . . . . . . . . . . . C-1
Bluetooth wireless technology Interoperability . . . . . . . . . . . . . . . . C-1
CAUTION about Wireless Devices . . . . . . . . . . . . . . . . . . . . . . . . . . . C-2
Wireless Devices and your health . . . . . . . . . . . . . . . . . . . . . . . . . . . C-2
Radio Regulatory Information . . . . . . . . . . . . . . . . . . . . . . . . . . . . . . . C-3
Radio approvals for wireless devices . . . . . . . . . . . . . . . . . . . . . . . . C-7
Appendix D AC Power Cord and Connectors
Certification agencies . . . . . . . . . . . . . . . . . . . . . . . . . . . . . . . . . . . . . D-1
Appendix E TOSHIBA PC Health Monitor
Starting the TOSHIBA PC Health Monitor. . . . . . . . . . . . . . . . . . . . . . E-2
If a TOSHIBA PC Health Monitor message is displayed . . . . . . . . . . E-2
Appendix F Legal Footnotes
Non-applicable Icons . . . . . . . . . . . . . . . . . . . . . . . . . . . . . . . . . . . . . . F-1
CPU . . . . . . . . . . . . . . . . . . . . . . . . . . . . . . . . . . . . . . . . . . . . . . . . . . . . F-1
Memory (Main System) . . . . . . . . . . . . . . . . . . . . . . . . . . . . . . . . . . . . F-2
Hard Disk Drive (HDD) Capacity . . . . . . . . . . . . . . . . . . . . . . . . . . . . . F-2
LCD . . . . . . . . . . . . . . . . . . . . . . . . . . . . . . . . . . . . . . . . . . . . . . . . . . . . F-3
Graphics Processor Unit ("GPU"). . . . . . . . . . . . . . . . . . . . . . . . . . . . F-3
Wireless LAN . . . . . . . . . . . . . . . . . . . . . . . . . . . . . . . . . . . . . . . . . . . . F-3
Copy Protection . . . . . . . . . . . . . . . . . . . . . . . . . . . . . . . . . . . . . . . . . . F-3
TV Tuner . . . . . . . . . . . . . . . . . . . . . . . . . . . . . . . . . . . . . . . . . . . . . . . . F-3
Safety Use for TV Tuner . . . . . . . . . . . . . . . . . . . . . . . . . . . . . . . . . . . . F-3
Glossary
Index
User’s Manual iv

Copyright
© 2011 by TOSHIBA Corporation. All rights reserved. Under the copyright
laws, this manual cannot be reproduced in any form without the prior
written permission of TOSHIBA. No patent liability is assumed, with respect
to the use of the information contained herein.
First edition March 2011
Copyright authority for music, movies, computer programs, databases and
other intellectual property covered by copyright laws belongs to the author
or to the copyright owner. Copyrighted material can be reproduced only for
personal use or use within the home. Any other use beyond that stipulated
above (including conversion to digital format, alteration, transfer of copied
material and distribution on a network) without the permission of the
copyright owner is a violation of copyright or author's rights and is subject to
civil damages or criminal action. Please comply with copyright laws in
making any reproduction from this manual.
Disclaimer
This manual has been validated and reviewed for accuracy. The
instructions and descriptions it contains are accurate for your computer at
the time of this manual’s production. However, succeeding computers and
manuals are subject to change without notice. TOSHIBA assumes no
liability for damages incurred directly or indirectly from errors, omissions or
discrepancies between the computer and the manual.
Trademarks
Intel, Intel SpeedStep, Intel Core and Centrino are trademarks or registered
trademarks of Intel Corporation.
Windows, Microsoft and Windows logo are registered trademarks of
Microsoft Corporation.
Bluetooth is a trademark owned by its proprietor and used by TOSHIBA
under license.
HDMI, the HDMI logo and High-Definition Multimedia Interface are
trademarks or registered trademarks of HDMI Licensing LLC.
Photo CD is a trademark of Eastman Kodak Company.
Memory Stick, Memory Stick Duo, Memory Stick PRO and Memory Stick
PRO Duo are trademarks or registered trademarks of Sony Corporation.
ConfigFree is a trademark of Toshiba Corporation.
Wi-Fi is a registered trademark of the Wi-Fi Alliance.
Blu-ray Disc
Association.
Secure Digital and SD are trademarks of SD Card Association.
MultiMediaCard and MMC are trademarks of MultiMediaCard Association.
User’s Manual v
™
, Blu-ray™ and the logos are trademarks of the Blu-ray Disc

Labelflash is a trademark of YAMAHA CORPORATION.
WinDVD and Corel Digital Studio are trademarks or registered trademarks
of Corel Corporations.
Manufactured under license from Dolby Laboratories.
Dolby and the double-D symbol are trademarks of Dolby Laboratories.
Other trademarks and registered trademarks not listed above may be used
in this manual.
FCC information
FCC notice "Declaration of Conformity Information"
This equipment has been tested and found to comply with the limits for a
Class B digital device, pursuant to part 15 of the FCC rules. These limits
are designed to provide reasonable protection against harmful interference
in a residential installation. This equipment generates, uses and can radiate
radio frequency energy and, if not installed and used in accordance with the
instructions, may cause harmful interference to radio communications.
However, there is no guarantee that interference will not occur in a
particular installation. If this equipment does cause harmful interference to
radio or television reception, which can be determined by turning the
equipment off and on, the user is encouraged to try to correct the
interference by one or more of the following measures:
■ Reorient or relocate the receiving antenna.
■ Increase the separation between the equipment and receiver.
■ Connect the equipment into an outlet on a circuit different from that to
which the receiver is connected.
■ Consult the dealer or an experienced radio/TV technician for help.
Only peripherals complying with the FCC class B limits may be attached to
this equipment. Operation with non-compliant peripherals or peripherals
not recommended by TOSHIBA is likely to result in interference to radio
and TV reception. Shielded cables must be used between the external
devices and the computer’s Universal Serial Bus (USB 2.0/3.0) ports,
HDMI port and microphone jack. Changes or modifications made to this
equipment, not expressly approved by TOSHIBA or parties authorized by
TOSHIBA could void the user’s authority to operate the equipment.
FCC conditions
This device complies with part 15 of the FCC Rules. Operation is subject to
the following two conditions:
1. This device may not cause harmful interference.
2. This device must accept any interference received, including
interference that may cause undesired operation.
User’s Manual vi

Contact
Address: TOSHIBA America Information Systems, Inc.
9740 Irvine Boulevard
Irvine, California 92618-1697
Telephone: (949) 583-3000
Video Standard Notice
THIS PRODUCT IS LICENSED UNDER THE AVC, THE VC-1 AND
MPEG-4 VISUAL PATENT PORTFOLIO LICENSE FOR THE PERSONAL
AND NON-COMMERCIAL USE OF A CONSUMER FOR (I) ENCODING
VIDEO IN COMPLIANCE WITH THE ABOVE STANDARDS ("VIDEO")
AND/OR (II) DECODING AVC, VC-1 AND MPEG-4 VIDEO THAT WAS
ENCODED BY A CONSUMER ENGAGED IN A PERSONAL AND
NONCOMMERCIAL ACTIVITY AND/OR WAS OBTAINED FROM A
VIDEO PROVIDER LICENSED BY MPEG LA TO PROVIDE SUCH
VIDEO. NO LICENSE IS GRANTED OR SHALL BE IMPLIED FOR ANY
OTHER USE. ADDITIONAL INFORMATION INCLUDING THAT
RELATING TO PROMOTIONAL, INTERNAL AND COMMERCIAL USES
AND LICENSING MAY BE OBTAINED FROM MPEG LA, L.L.C. SEE
HTTP://WWW.MPEGLA.COM.
Important Safety Information for Computers with TV tuner
ICE60950-1/EN60950-1 Information technology equipment - Safety Coaxial cable connection to this computer must only be used if the cable
outer conductive shielding has been grounded by the cable installer at the
building premises as close to the point of cable entrance, or attachment, as
practicable and the connection complies with all local cable installation
requirements that are applicable in your area.
Disposing of the computer and the computer's batteries
■ Discard this computer in accordance with applicable laws and
regulations. For further information, contact your local government.
■ Please be kind to our shared environment. Check with your local
government authority for details regarding where to recycle old batteries
or how to dispose of them properly.
User’s Manual vii

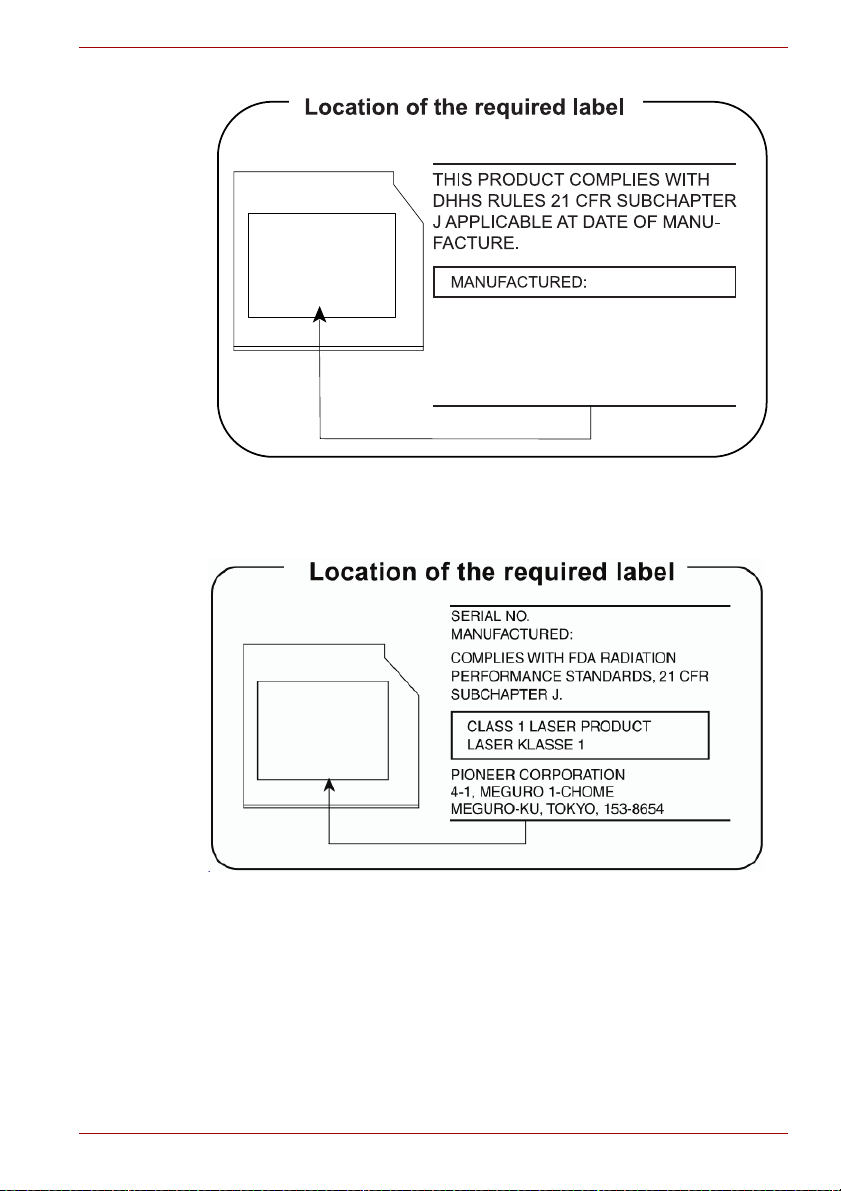
Optical disc drive safety instructions
Be sure to check the precautions at the end of this section.
■ The DVD Super Multi/Blu-rayTM Writer/Blu-rayTM Combo drive model
employs a laser system. To ensure proper use of this product, please
read this instruction manual carefully and retain for future reference.
Should the unit ever require maintenance, contact an authorized
service location.
■ Use of controls, adjustments or the performance of procedures other
than those specified may result in hazardous radiation exposure.
■ To prevent direct exposure to the laser beam, do not try to open the
enclosure.
Panasonic System Networks
■ DVD Super Multi UJ8A0
Panasonic System Networks Co., Ltd.
HITACHI-LG Data Storage, Inc.
■ Blu-ray
■ Blu-ray
User’s Manual viii
TM
Writer drive BT11F
TM
Combo drive CT31F
Pioneer Corporation
Hitachi-LG Data Storage, Inc.
22-23,KAIGAN 3-CHOME,
MINATO-KU,TOKYO,108-0022
JAPAN
■ Blu-ray
User’s Manual ix
TM
Writer drive BDR-TD04

Precautions
CAUTION: This appliance contains a
laser system and is classified as a
"CLASS 1 LASER PRODUCT."To use
this model properly, read the instruction
manual carefully and keep this manual
for your future reference. In case of any
trouble with this model, please contact
your nearest "AUTHORIZED service
station." To prevent direct exposure to the
laser beam, do not try to open the
enclosure.
User’s Manual x

Preface
Congratulations on your purchase of this computer. This powerful computer
provides excellent expansion capability, includes multimedia functionality,
and is designed to provide years of reliable, high-performance computing.
This manual tells how to set up and begin using your computer. It also
provides detailed information on configuring your computer, basic
operations and care, using optional devices and troubleshooting.
If you are a new user of computers or if you’re new to portable computing,
first read over the Chapter 1, Getting Started and Chapter 3, Hardware,
Utilities and Options chapters to familiarize yourself with the computer's
features, components and accessory devices. Then read Chapter 1,
Getting Started for step-by-step instructions on setting up your computer.
If you are an experienced computer user, please continue reading the
preface to learn how this manual is organized, then become acquainted
with this manual by browsing through its pages. Be sure to read the Special
features section in Chapter 3, Hardware, Utilities and Options to learn
about features that are uncommon or unique to this computer, as well as
the section on Chapter 7, HWSetup to understand how to setup and
configure these features.
Read Chapter 3, Hardware, Utilities and Options if connecting optional
products or external devices.
Conventions
This manual uses the following formats to describe, identify, and highlight
terms and operating procedures.
Abbreviations
On first appearance, and whenever necessary for clarity, abbreviations are
enclosed in parentheses following their definition. For example: Read Only
Memory (ROM). Acronyms are also defined in the Glossary.
User’s Manual xi

Icons
Icons identify ports, dials, and other parts of your computer. The indicator
panel also uses icons to identify the components it is providing information
on.
Keys
The keyboard keys are used in the text to describe many computer
operations. A distinctive typeface identifies the key top symbols as they
appear on the keyboard. For example, ENTER identifies the ENTER key.
Key operation
Some operations require you to simultaneously use two or more keys. We
identify such operations by the key top symbols separated by a plus sign
(+). For example, CTRL + C means you must hold down CTRL and at the
same time press C. If three keys are used, hold down the first two and at
the same time press the third.
ABC
Please note that all the descriptions about the operations of the keyboard
in this manual refer to the wireless keyboard, which you can also use the
touch screen to perform these operations.
When procedures require an action such as
clicking an icon or entering text, the icon's name
or the text you are to type in is represented in the
typeface you see to the left.
Display
S ABC
Names of windows or icons or text generated by
the computer that appear on its display screen
are presented in the typeface you see to the left.
Messages
Messages are used in this manual to bring important information to your
attention. Each type of message is identified as shown below.
Indicates a potentially hazardous situation, which could result in death or
serious injury, if you do not follow instructions.
Pay attention! A caution informs you that improper use of equipment or
failure to follow instructions may cause data loss or damage your
equipment.
Please read. A note is a hint or advice that helps you make best use of
your equipment.
User’s Manual xii

Terminology
This term is defined in this document as follows:
Start The word "Start" refers to the " " button in
Windows 7.
User’s Manual xiii

General Precautions
TOSHIBA computers are designed to optimize safety, minimize strain and
withstand the rigors of portability. However, certain precautions should be
observed to further reduce the risk of personal injury or damage to the
computer.
Be certain to read the general precautions below and to note the cautions
included in the text of the manual.
Provide adequate ventilation
■ Always make sure your computer and AC adaptor have adequate
ventilation and are protected from overheating when the power is
turned on or when an AC adaptor is connected to a power outlet (even if
your computer is in Sleep Mode). In this condition, observe the
following:
■ Never cover your computer or AC adaptor with any object.
■ Never place your computer or AC adaptor near a heat source, such
as anelectric blanket or heater.
■ Never cover or block the air vents including those located at the
base of the computer.
■ Always operate your computer on a hard flat surface. Using your
computer on a carpet or other soft material can block the vents.
■ Always provide sufficient space around the computer.
■ Overheating your computer or AC adaptor could cause system failure,
computer or AC adaptor damage or a fire, possibly resulting in serious
injury.
Creating a computer-friendly environment
Place the computer on a flat surface that is large enough for the computer
and any other items you are using, such as a printer.
Leave enough space around the computer and other equipment to provide
adequate ventilation. Otherwise, they may overheat.
User’s Manual xiv

To keep your computer in prime operating condition, protect your work area
from:
■ Dust, moisture, and direct sunlight.
■ Equipment that generates a strong electromagnetic field, such as
■ Rapid changes in temperature or humidity and sources of temperature
■ Extreme heat, cold, or humidity.
■ Liquids and corrosive chemicals.
Stress injury
Carefully read the Instruction Manual for Safety and Comfort. It contains
information on the prevention of stress injuries to your hands and wrists
that can be caused by extensive keyboard use. Instruction Manual for
Safety and Comfort also includes information on work space design,
posture and lighting that can help reduce physical stress.
Heat injury
■ Avoid prolonged physical contact with the computer. If the computer is
■ If the computer has been used for a long time, avoid direct contact with
■ The surface of the AC adaptor can become hot when in use but this
■ Do not lay the AC adaptor on a material that is sensitive to heat as the
stereo speakers (other than speakers that are connected to the
computer) or speakerphones.
change such as air conditioner vents or heaters.
used for long periods, its surface can become very warm. While the
temperature will not feel hot to the touch, if you maintain physical
contact with the computer for a long time, for example if you rest the
computer on your lap or if you keep your hands on the palm rest, your
skin might suffer a low-heat injury.
the metal plate supporting the various interface ports as this can
become hot.
condition does not indicate a malfunction. If you need to transport the
AC adaptor, you should disconnect it and let it cool before moving it.
material could become damaged.
Protective Earthing
Equipment connected to the protective earthing of the building installation
through the mains connection or through other equipment with a
connection to protective earthing and to a cable distribution system using
coaxial cable, may in some circumstances create a fire hazard. Connection
to a cable distribution system has therefore to be provided through a device
providing electrical isolation below a certain frequency range (galvanic
isolator, see EN 60728-11).
User’s Manual xv

Pressure or impact damage
Do not apply heavy pressure to the computer or subject it to any form of
strong impact as this can damage the computer's components or otherwise
cause it to malfunction.
Mobile phones
Please be aware that the use of mobile phones can interfere with the audio
system. The operation of the computer will not be impaired in any way, but
it is recommended that a minimum distance of 30cm is maintained between
the computer and a mobile phone that is in use.
Instruction Manual for Safety and Comfort
All important information on the safe and proper use of this computer is
described in the enclosed Instruction Manual for Safety and Comfort. Be
sure to read it before using the computer.
User’s Manual xvi
Getting Started
This chapter provides an equipment checklist, and basic information to start
using your computer.
Some of the features described in this manual may not function properly if
you use an operating system that was not pre-installed by TOSHIBA.
Equipment checklist
Carefully unpack your computer, taking care to save the box and packaging
materials for future use.
Hardware
Check to make sure you have all the following items:
■ TOSHIBA DX1210 Series Personal Computer
■ TOSHIBA Wireless Full Size Keyboard
■ TOSHIBA Wireless Laser Mouse
■ TOSHIBA Wireless Receiver (dongle)
■ Remote controller (Is included with some models)
■ AC adaptor and power cord (2-pin plug or 3-pin plug)
■ Five AA batteries (prepared for wireless keyboard/mouse and remote
controller)
Chapter 1
Documentation
■ User Information Guide
■ Instruction Manual for Safety and Comfort
If any of the items are missing or damaged, contact your dealer
immediately.
User’s Manual 1-1

Software
The following Windows® operating system and utility software are preinstalled.
■ Windows 7
■ TOSHIBA Value Added Package
■ TOSHIBA Recovery Media Creator
■ TOSHIBA VIDEO PLAYER
■ WinDVD BD for TOSHIBA
■ TOSHIBA Resolution+ Plug-in For Windows Media Player
■ Corel Digital Studio
■ Corel Label@Once (This application is the feature of Corel Digital
Studio in some models.)
■ TOSHIBA Assist
■ TOSHIBA ConfigFree™
■ TOSHIBA Disc Creator
■ TOSHIBA Face Recognition
■ TOSHIBA Flash Cards
■ TOSHIBA eco Utility
■ TOSHIBA Bulletin Board
■ TOSHIBA ReelTime
■ TOSHIBA Speech System
■ TOSHIBA Media Controller
■ Online Manual
■ TOSHIBA DX1210 Series User's Manual (This manual)
* You may not have all the softwares listed above depending on the
model you purchased.
Getting Started
Getting Started
■ All users should be sure to read the section Starting up for the first time.
■ Be sure to read the enclosed Instruction Manual for Safety and Comfort
for information on the safe and proper use of this computer. It is
intended to help you be more comfortable and productive while using a
computer. By following the recommendations in it you may reduce your
chance of developing a painful or disabling injury to your hand, arms,
shoulders or neck.
This section provides basic information to start using your computer. It
covers the following topics:
■ Connecting the AC adaptor
■ Connecting the keyboard/mouse to the computer
User’s Manual 1-2

■ Installing the battery of the keyboard and mouse
■ Turning on the power
■ Starting up for the first time
■ Turning off the power
■ Restarting the computer
■ System Recovery Options
■ Creating Recovery Media
■ Restoring the pre-installed software from the Recovery hard disk drive
■ Restoring the pre-installed software from your created Recovery Media
■ Use a virus-check program and make sure it is updated regularly.
■ Never format storage media without checking its content - formatting
destroys all stored data.
■ It is a good idea to periodically back up the internal hard disk drive or
other main storage device to external media. General storage media is
not durable or stable over long periods of time and under certain
conditions may result in data loss.
■ Before you install a device or application, save any data in memory to
the hard disk drive or other storage media. Failure to do so may result
in the loss of data.
Connecting the AC adaptor
Attach the AC adaptor when you want to operate the computer.
The AC adaptor can be connected to any power source supplying from 100
to 240 volts and 50 or 60 hertz.
Getting Started
User’s Manual 1-3

Getting Started
■ Always use the TOSHIBA AC adaptor that was included with your
computer, or use AC adaptors specified by TOSHIBA to avoid any risk
of fire or other damage to the computer. Use of an incompatible AC
adaptor could cause fire or damage to the computer possibly resulting
in serious injury. TOSHIBA assumes no liability for any damage caused
by use of an incompatible adaptor.
■ Never plug the AC adaptor into a power source that does not
correspond to both the voltage and the frequency specified on the
regulatory label of the unit. Failure to do so could result in a fire or
electric shock, possibly resulting in serious injury.
■ Always use or purchase power cables that comply with the legal
voltage and frequency specifications and requirements in the country of
use. Failure to do so could result in a fire or electric shock, possibly
resulting in serious injury.
■ The supplied power cord conforms to safety rules and regulations in
the region the product is bought and should not be used outside this
region. For use in other regions, please buy power cords that conform
to safety rules and regulations in the particular region.
■ Do not use a 3-pin to 2-pin conversion plug.
■ When you connect the AC adaptor to the computer, always follow the
steps in the exact order as described in the User’s Manual. Connecting
the power cable to a live electrical outlet should be the last step
otherwise the adaptor DC output plug could hold an electrical charge
and cause an electrical shock or minor bodily injury when touched. As
a general safety precaution, avoid touching any metal parts.
■ Never place your computer or AC adaptor on a wooden surface,
furniture, or any other surface that could be marred by exposure to heat
since the computer base and AC adaptor's surface increase in
temperature during normal use.
■ Always place your computer or AC adaptor on a flat and hard surface
that is resistant to heat damage.
Refer to the enclosed Instruction Manual for Safety and Comfort for
detailed precautions and handling instructions.
User’s Manual 1-4
Getting Started
2
1
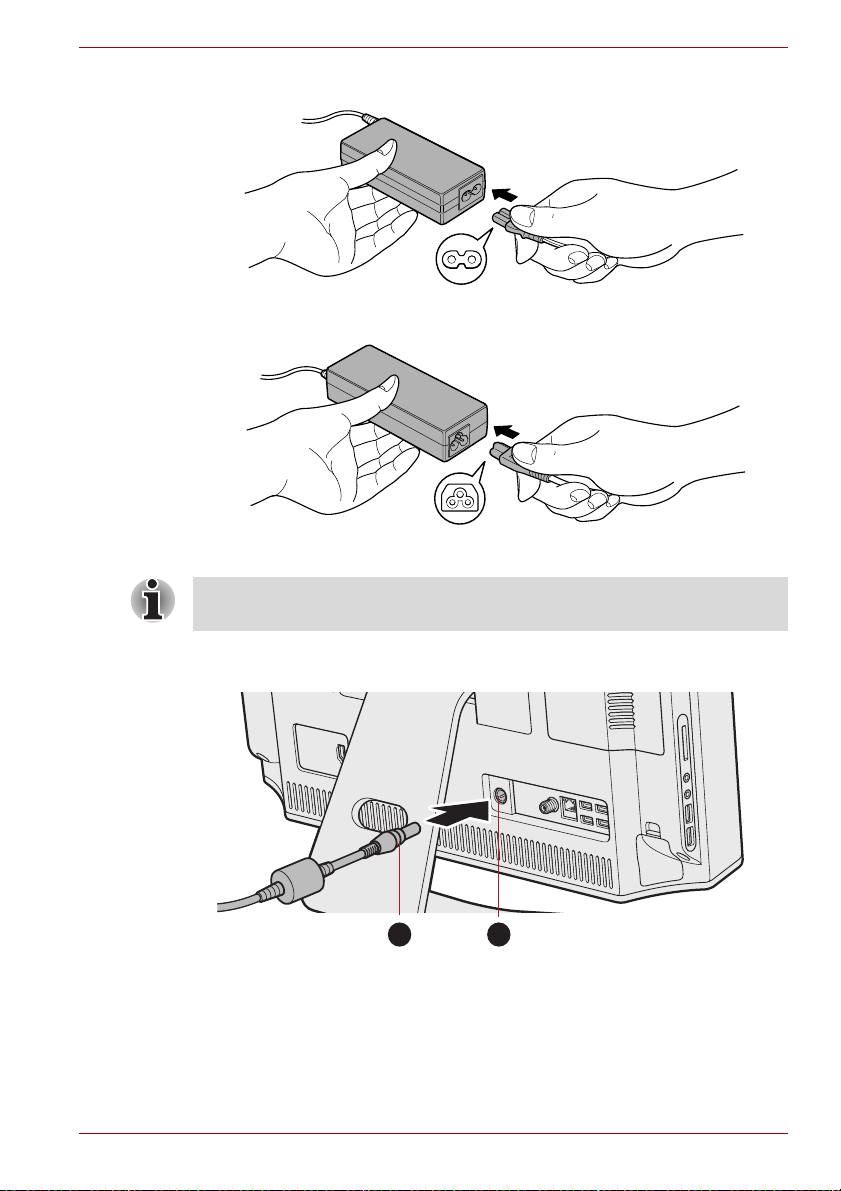
1. Connect the power cord to the AC adaptor.
Figure 1-1 Connecting the power cord to the AC adaptor (2-pin plug)
Figure 1-2 Connecting the power cord to the AC adaptor (3-pin plug)
Either a 2-pin or 3-pin adaptor/cord will be included with the computer
depending on the model.
2. Connect the AC adaptor’s DC output plug to the DC IN 19V jack on the
back side of the computer.
1. DC output plug
Figure 1-3 Connecting the DC output plug to the computer
2. DC IN 19V jack
3. Plug the power cord into a live wall outlet - the Power indicator on the
front of the computer should glow.
User’s Manual 1-5
Connecting the keyboard/mouse to the computer
In order to normally use the wireless keyboard and mouse, make a
connection between the computer and keyboard/mouse firstly, by the
following steps:
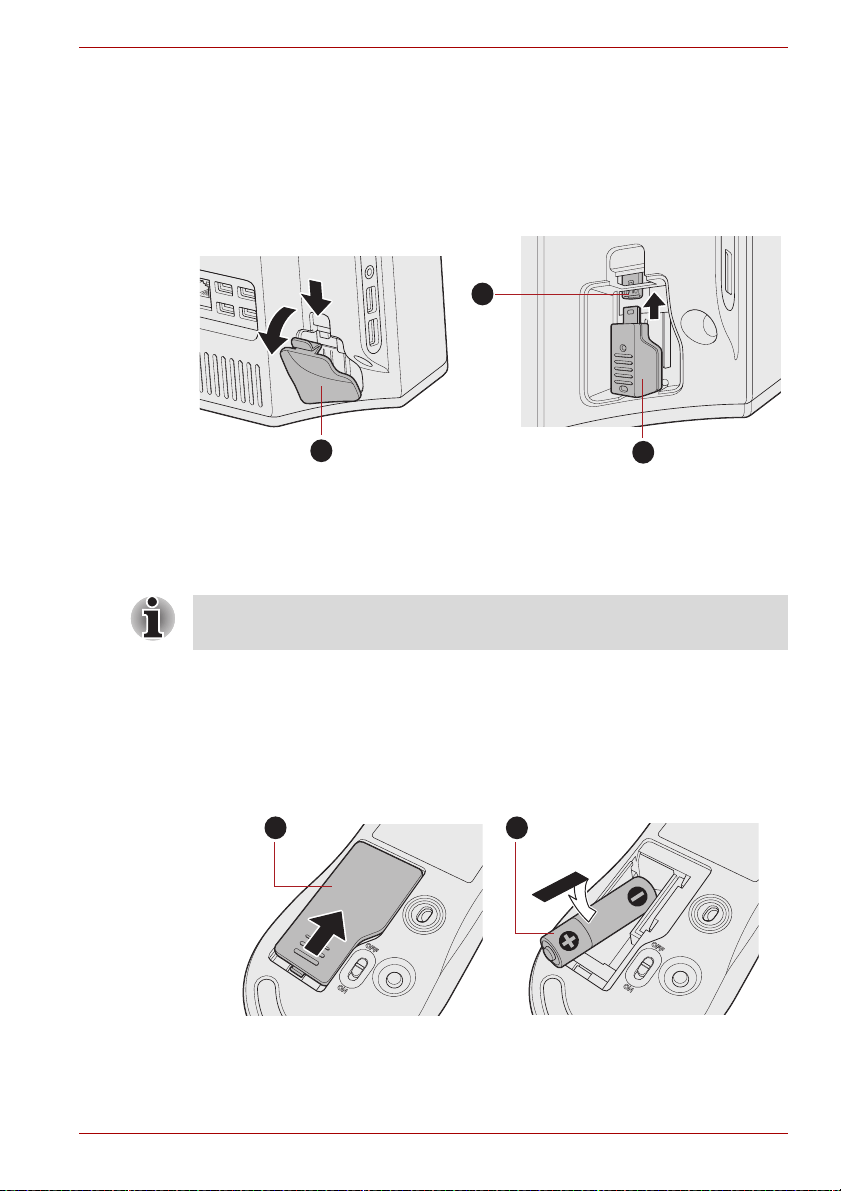
1. Open the wireless receiver cover on your computer.
2. Insert the wireless receiver into the wireless receiver connector.
2
Getting Started
1
1. Wireless receiver cover
2. Wireless receiver connector
Figure 1-4 Connecting the dongle to the computer
3. Wireless receiver (dongle)
3. Close the wireless receiver cover.
Keep the computer and wireless keyboard/mouse in a certain distance,
otherwise the keyboard/mouse will not work properly.
Installing the battery of the keyboard and mouse
Installing the battery of the mouse
1. Open the battery cover on your wireless mouse.
2. Put one AA battery into the battery groove.
1
2
3
1. Battery cover
Figure 1-5 Installing the battery of the mouse
User’s Manual 1-6
2. Battery
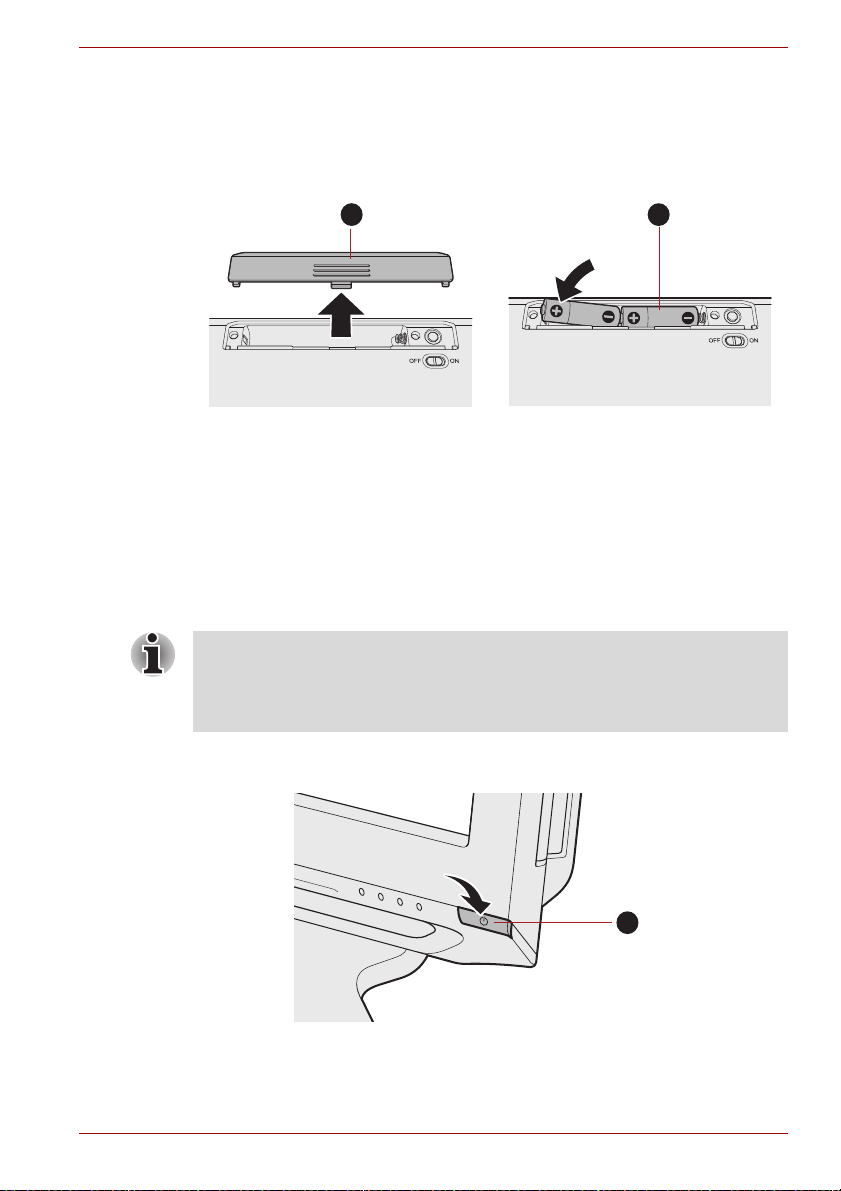
3. Close the battery cover.
1
2
1
Installing the battery of the keyboard
1. Open the battery cover on your wireless keyboard.
2. Put two AA batteries into the battery groove.
Getting Started
1. Battery cover
Figure 1-6 Installing the battery of the keyboard
2. Battery
3. Close the battery cover.
Turning on the power
This section describes how to turn on the power - the Power indicator will
then indicate the status. Please refer to the Monitoring of power condition
section in Chapter 6, Power and Power-Up Modes for more information.
■ After you turn on the power for the first time, do not turn it off until you
have set up the operating system. Please refer to the section Starting
up for the first time for more information.
■ Volume cannot be adjusted during Windows Setup.
You can turn on the power by one of the following ways:
■ Press and hold the computer’s power button for two or three seconds.
User’s Manual 1-7

1. Power button
1
Figure 1-7 Turning on the power
■ Press the power button on the wireless keyboard.
1. Power button
Figure 1-8 Pressing the power button
Starting up for the first time
The Windows 7 Startup Screen will be the first screen displayed when you
turn on the power. Follow the on-screen instructions on each screen in
order to properly install the operating system.
When it is displayed, be sure to read the Software License Terms
carefully.
Getting Started
Turning off the power
The power can be turned off in one of three modes, either Shut Down
Mode, Hibernation Mode or Sleep Mode.
Shut Down Mode
When you turn off the power in Shut Down Mode no data will be saved and
the computer will boot to the operating system's main screen the next time
it is turned on.
1. If you have entered data, either save it to the hard disk drive or to other
storage media.
2. Make sure all disk/disc activity has stopped before removing the
CD/DVD/Blu-ray Disc
User’s Manual 1-8
TM
.
Getting Started
■ Make sure the Hard Disk Drive/Optical Disc Drive/Memory Media
slot indicator is off. If you turn off the power while a disk (disc) is being
accessed, you may lose data or damage the disk.
■ Never turn off the power while an application is running. Doing so could
cause loss of data.
■ Never turn off the power, disconnect an external storage device or
remove storage media during data read/write. Doing so can cause data
loss.
3. Click Start.
4. Click the Shut down button ( ).
5. Turn off any peripheral devices connected to your computer.
Do not turn the computer or peripheral devices back on immediately - wait
a short period to avoid any potential damage.
Sleep Mode
If you have to interrupt your work, you are able to turn off the power without
exiting from your software by placing the computer into Sleep Mode. In this
mode data is maintained in the computer's main memory so that when you
turn on the power again, you can continue working right where you left off.
When you have to turn off your computer aboard an aircraft or in places
where electronic devices are regulated or controlled, always completely
shut down the computer. This includes turning off any wireless
communication functionalities, and cancelling settings that reactivate the
computer automatically, such as a timer recording function. Failure to
completely shut down the computer in this way could allow the operating
system to reactivate and run pre-programmed tasks or preserve unsaved
data, which could interfere with aviation or other systems, possibly causing
serious injury.
■ Before entering Sleep Mode, be sure to save your data.
■ Do not install or remove a memory module while the computer is in
Sleep Mode. The computer or the memory module could be damaged.
■ Do not disconnect the AC adapter while the computer is in Sleep Mode.
Data in memory could be lost.
User’s Manual 1-9
Getting Started
■ When the AC adaptor is connected, the computer will go into Sleep
Mode according to the settings in the Power Options (to access it, click
Start → Control Panel → System and Security → Power Options).
■ To restore the operation of the computer from Sleep Mode, press and
hold the power button or any key on the keyboard for a short amount of
time. Please note that keyboard keys can only be used if the Wake-up
on Keyboard option is enabled within the HW Setup utility.
■ If the computer enters Sleep Mode while a network application is
active, the application might not be restored when the computer is next
turned on and the system returns from Sleep Mode.
■ To prevent the computer from automatically entering Sleep Mode,
disable Sleep Mode within the Power Options (to access it, click Start
→ Control Panel → System and Security → Power Options).
■ By default, the Hybrid Sleep function is turned on in your computer.
When you execute Sleep mode, the computer will save your work into
both the memory and hard disk drive. In that case, Windows can
restore your work from your hard disk drive if a power failure occurs.
Benefits of Sleep Mode
The Sleep Mode feature provides the following benefits:
■ Restores the previous working environment more rapidly than does the
Hibernation Mode feature.
■ Saves power by shutting down the system when the computer receives
no input or hardware access for the time period set by the System
Sleep Mode feature.
Executing Sleep Mode
You can also enable Sleep Mode by pressing FN + F3 - please refer to
Chapter 5, The Keyboard, for further details.
You can enter Sleep Mode in one of the following ways:
■ Click Start, point to the arrow icon ( ) and then select
Sleep from the menu.
■ Press the power button. Please note that this feature must be enabled
within the Power Options (to access it, click Start → Control Panel →
System and Security → Power Options).
When you turn the power back on, you can continue where you left when
you shut down the computer.
■ When the computer is in Sleep Mode, the power indicator will blink
amber.
Sleep Mode limitations
Sleep Mode will not function under the following conditions:
■ Power is turned back on immediately after shutting down.
■ Memory circuits are exposed to static electricity or electrical noise.
User’s Manual 1-10
Getting Started
Hibernation Mode
The Hibernation Mode feature saves the contents of memory to the hard
disk drive when the computer is turned off so that, the next time it is turned
on, the previous state is restored. Please note that the Hibernation Mode
feature does not save the status of any peripheral devices connected to the
computer.
■ Save your data. While entering Hibernation Mode, the computer saves
the contents of memory to the hard disk drive. However, for safety
sake, it is best to save your data manually.
■ Data will be lost if you disconnect the AC adaptor before the save is
completed. Wait for the Hard Disk Drive/Optical Disc Drive/Memory
Media slot indicator to go out.
■ Do not install or remove a memory module while the computer is in
Hibernation Mode. Data will be lost.
Benefits of Hibernation Mode
The Hibernation Mode feature provides the following benefits:
■ Saves data to the hard disk drvie.
■ You can return to your previous working environment immediately when
you turn on the computer.
■ Saves power by shutting down the system when the computer receives
no input or hardware access for the time period set by the System
Hibernate feature.
Starting Hibernation Mode
You can also enable Hibernation Mode by pressing FN + F4 - please refer
to Chapter 5, The Keyboard, for further details.
To enter Hibernation Mode, follow the steps below.
1. Click Start.
2. Point to the arrow icon ( ) and then select Hibernate
from the menu.
The Hibernate option would be hidden if the Hybrid sleep function is
turned on. You can turn Hybrid sleep off by the following way:
Click Start → Control Panel → System and Security → Power Options
→ Change plan settings → Change advanced power settings.
In the Advanced settings tab, double click Sleep → Allow hybrid sleep
and then select Off from the pull-down menu.
User’s Manual 1-11

Automatic Hibernation Mode
The computer can be configured to enter Hibernation Mode automatically
when you press the power button. In order to define these settings, you can
follow the steps as described below:
1. Click Start and click the Control Panel.
2. Click System and Security and click Power Options.
3. Click Choose what the power button does.
4. Enable the desired Hibernation Mode settings for When I press the
power button.
5. Click the Save changes button.
Data save in Hibernation Mode
When you turn off the power in Hibernation Mode, the computer will take a
moment to save the current data in memory to the hard disk drive. During
this time, the Hard Disk Drive/Optical Disc Drive/Memory Media slot
indicator will glow.
After you turn off the computer, and the content of memory has been saved
to the hard disk drive, turn off the power to any peripheral devices.
Do not turn the computer or devices back on immediately. Wait a moment
to let all capacitors fully discharge.
Restarting the computer
Certain conditions require that you reset the computer, for example if:
■ You change certain computer settings.
■ An error occurs and the computer does not respond to your keyboard
commands.
If you need to restart the computer, there are three ways this can be
achieved:
■ Click Start, point to the arrow icon ( ) and then select
Restart from the menu.
■ Press CTRL, ALT and DEL simultaneously (once) to display the menu
window, then select Restart from the Shut down options.
■ Press the power button and hold it down for five seconds. Once the
computer has turned itself off, wait between ten and fifteen seconds
before turning the power on again by pressing the power button.
Getting Started
User’s Manual 1-12

System Recovery Options
There is a hidden partition allocated on the hard disk drive for the System
Recovery Options.
This partition stores files which can be used to repair the system in the
event of a problem.
System Recovery Options
The System Recovery Options feature is installed on the hard disk when
shipped from the factory. The System Recovery Options menu includes
tools to repair startup problems, run diagnostics or restore the system.
See the Windows Help and Support content for more information about
Startup Repair.
The System Recovery Options can also be run manually to repair
problems.
The procedure is as follows. Follow the instructions shown on the onscreen menu.
1. Turn off the computer.
2. While holding the F8 key, turn on the computer.
3. The Advanced Boot Options menu will be displayed. Use the arrow
keys to select Repair Your Computer and press ENTER.
4. Follow the on-screen instructions.
Check your Windows® manual for more information on backing up your
system (including the system image backup feature).
Getting Started
System Recovery
This section describes the creation of Recovery Media and their use.
Creating Recovery Media
This section describes how to create Recovery Media.
User’s Manual 1-13

Getting Started
■ Be sure to connect the AC adaptor when you create Recovery Media.
■ Be sure to close all other software programs except the Recovery
Media Creator.
■ Do not run software such as screen savers which can put a heavy load
on the CPU.
■ Operate the computer at full power.
■ Do not use power-saving features.
■ Do not write to the media when the virus check software is running.
Wait for it to finish, then disable virus detection programs including any
software that checks files automatically in the background.
■ Do not use utilities, including those intended to enhance hard disk drive
access speed. They may cause unstable operation and damage data.
■ Do not shut down/log off or Sleep/Hibernate while writing or rewriting
the media.
■ Set the computer on a level surface and avoid places subjected to
vibrations such as airplanes, trains, or cars.
■ Do not use on an unstable surface such as a stand.
A recovery image of the software on your computer is stored on the hard
disk drive, and can be copied to either DVD or USB Flash Memory by using
the following steps:
1. Select either blank DVD or USB Flash Memory.
The application will allow you to choose from a variety of different media
onto which the recovery image can be copied including DVD-R, DVD-R
DL, DVD-RW, DVD+R, DVD+R DL, DVD+RW and USB Flash Memory.
■ Please note that some of the above media may not be compatible with
the optical disc drive installed into your computer. You should therefore
verify the optical disc drive supports the blank media you have chosen
before proceeding.
■ USB Flash Memory will be formatted and all the data in the USB Flash
Memory will be lost when proceeding.
2. Turn on your computer and allow it to load the Windows 7 operating
system from the hard disk drive as normal.
3. Insert the media into the computer.
■ Insert the first blank disc into the optical disc drive tray, or
Insert the USB Flash Memory into one available USB port
4. Double click the Recovery Media Creator icon on the Windows 7
desktop, or select the application from Start Menu.
5. After Recovery Media Creator starts, select the type of media and the
title you wish to copy, and then click the Create button.
User’s Manual 1-14
 Loading...