

Page 1

Toshiba USB DVB-T
TV Tuner
PX1211E-1TVD
User Guide
Page 2

Index
About the DVB-T Dongle ......................................................................................... 3
System Requirements ............................................................................................. 3
Package Contents .................................................................................................. 3
Software Installation ................................................................................................ 4
Connecting the DVB-T Dongle ................................................................................ 6
Initial Setup ............................................................................................................. 7
Description of Toolbars ........................................................................................... 8
Watching Digital TV................................................................................................. 9
Launching the Savvy TV Software ................................................................ 9
Changing Channel ....................................................................................... 9
Adjusting the Volume .................................................................................... 9
Choosing Audio Stream ............................................................................... 9
Mute ............................................................................................................ 9
Snapshot ..................................................................................................... 9
Viewing Modes ............................................................................................ 10
Display as Wallpaper ......................................................................... 10
Minimise Window .............................................................................. 10
Full Screen ........................................................................................ 10
Recording ............................................................................................................... 11
Live Recording............................................................................................. 11
Time Shift Recording.................................................................................... 11
Scheduled Recording................................................................................... 13
Watching a Recorded Programme ............................................................... 15
Teletext.................................................................................................................... 16
EPG (Electronic Program Guide) ............................................................................ 18
Troubleshooting Guide ............................................................................................ 19
No picture .................................................................................................... 19
No sound ..................................................................................................... 19
Cannot tune stations..................................................................................... 19
Picture performance is poor ......................................................................... 19
Error message “Please plug in the tuner” ..................................................... 19
2
Page 3

About the DVB-T Dongle
The DVB-T dongle is a digital video broadcast receiver that plugs straight into the USB
port of your computer and requires no additional power source, making it extremely
portable. It can scan for and save all available digital TV stations and play any of these on
your computer screen.
Minimum System Requirements
- USB port
- DirectX 9c
- Windows 2000/XP
- Pentium III 800MHz or equivalent
- 256MB RAM
- DirectX 9c compatible sound card
- DirectX 9c compatible video card
- 32MB HDD space (installation only)
Package Contents
- DVB-T dongle
- Software CD
- Quickstart guide
- Antenna
- Adaptor
* Please note that the antenna has a magnetic base and should not be placed near
any items that can be affected by magnetic fields, for example, computer or TV
screens, floppy disks, or credit cards.
Following information is only for EU-member states:
The use of the symbol indicates that this product may not be
treated as household waste. By ensuring this product is disposed of correctly, you will help prevent potential negative
consequences for the environment and human health, which
could otherwise be caused by inappropriate waste handling of
this product. For more detailed information about recycling of
this product, please contact your local city office, your household waste disposal service or the shop where you purchased
the product.
Note that Microsoft, Windows, Windows 2000 and Windows XP are registered trademarks of Microsoft
Corp.
3
Page 4

Software Installation
Please install all necessary software BEFORE connecting your DVB-T dongle.
- Insert the provided CD-ROM into the CD drive of your computer.
- The installation screen will appear. However, if it does not, click on Start>Run and type
D:\setup.exe , where D refers to the letter assigned to your CD drive.
- You will be asked to choose the setup language, as follows:
Choose a language and then click OK. You will now be asked to accept the End User
License Agreement. Be sure to check the I accept the terms in the license agreement
box, then click on Next.
4
Page 5

After a few seconds, the following screen will appear. Click on Install to continue the
installation.
Once the software has finished being installed, you will be asked to restart the computer.
Press Yes.
5
Page 6

Connecting the DVB-T Dongle
Remove the cap from the DVB-T dongle, locate a free USB port on your computer and
plug in the dongle. Once the computer recognises the new hardware, the New Hardware
wizard will begin.
As the DVB-T is a Hi-Speed device, you may receive the following message if it is plugged
into an older USB 1.1 port. The DVB-T will still work with USB 1.1. Simply click on the X in
the top right-hand corner of this message.
You will see several messages during the installation of the DVB-T dongle. Please be
patient, as this process make take a few minutes.
6
Page 7

Initial Setup
Double-click on the Savvy TV icon, which appears on your desktop.
The Savvy TV display panel and control panel will appear in the
background and the following Setup screen will appear on top.
Top window (all
channels found
by auto scan)
Bottom window
(all channels
available to
user)
On the Left
- Time Shift Buffer : Specify the maximum Time Shift allowed.
- Time Shift File Drive : Browse to the location where you would like to temporarily store
time shifted programs (Also shows available maximum space available for Time Shift).
- Record Video Folder : Browse to the location where recorded programs will be stored.
- Snapshot Folder : Browse to the location where you would like to store snapshot
images
- Select Skin : Choose your preferred skin for the Savvy TV software.
- UI Language : Choose which language you would like for the user interface.
- Always on Top : Tick this box if you prefer the display panel not to be hidden by other
windows.
- Panorama / 16:9 / 4:3 : Choose the screen proportions that best suit your needs.
On the Right
The top window displays all the channels found by pressing Auto Scan*. The bottom
window displays the channels that you wish to be available to you. You can add individual
channels by highlighting the channel of your choice (in the top window) and clicking on Add.
To remove individual channels from the bottom window, highlight the channel you wish to
remove, and then click on Delete. To rename any channels in the bottom window, highlight
the channel you wish to rename, click on Rename and enter a name.
*Auto Scan : Press to automatically scan for and save all available channels (Ensure that
the correct region is chosen first). This must be done before you can watch TV.
7
Page 8

Description of Toolbars
Minimise
Set TV as wallpaper
Full screen
Signal Strength Indicator
Mode
Volume control
Channel up/down
Display / choose channel
Choose audio stream
Subtitles
Volume indicator
Time shift recording
Mute
Teletext
Manually resize window
Record
Minimise
Exit
Setup
Schedule record
Open file
EPG
Reveal / hide
extended toolbar
Snapshot
8
Page 9

Watching Digital TV
Launching the Savvy TV Software
To start watching TV, simply double-click on the Savvy TV icon,
which appears on your desktop. Please be patient, as the software
may take a few seconds to appear.
Changing Channel
There are two ways to change channel.
1. Moving through the channels one at a time, by using the Channel
up/down buttons (You can also use the up/down cursor keys on the
computer keyboard).
2. Jumping straight to a channel, by choosing a channel from the
drop-down list (click on this window to display list).
Adjusting the Volume
To adjust the volume, click on the left (decrease) or right (increase)
volume buttons (You can also use the left/right cursor keys on the
computer keyboard).
The volume indicator bar will show you how loud the volume is.
Choose Audio Stream
On certain channels you may be offered more that one audio
stream (for example, a second language may be offered). If this is
the case, you can click here to choose which stream you prefer.
Note that this service is not available on all channels.
Mute
To mute the sound, press the mute button beside the volume
indicator. When the sound is muted, a red line will appear through
the speaker symbol. To cancel the mute, click again.
Snapshot
To take a snapshot of the image currently on screen, click on this
button. To later view the image, browse to the location of the
snapshots (specified in the Setup screen) and double-click on the
file. It will be opened by your default image viewing software.
9
Page 10

Viewing Modes
Display as Wallpaper
This option will set the TV screen as the computer wallpaper.
In effect, it will be set as full screen and moved to the back.
Any other windows or icons will be placed on top of the TV
screen. Normal viewing mode can be restored from the
Windows taskbar (see note below).
Minimise Window
This option will minimise the screen. It can be restored from
the Windows taskbar (See note below).
Full Screen
This option will display the TV full screen, and remove the
control panel. Click anywhere on the screen to return to normal
viewing mode.
Both the display screen and the control panel can be restored from the Windows taskbar
as follows:
- Right-click on the Savvy TV tab in the Windows taskbar.
- Select Restore Display Panel or Restore Control Panel.
Note that if you are currently in Wallpaper mode, you will need to choose the Window Mode
option to return to normal viewing mode.
10
Page 11

Recording
Live Recording
To record what is currently being shown on the screen, simply press the record button.
Pressing this button will instantly start recording the current program.
To stop recording, press the stop button.
Time Shift Recording
Time Shift recording is very useful when you are watching a programme and may have to
leave just for a moment, for example if the phone rings.
To activate Time Shift recording, simply press the time shift button.
This will start time shifting the programme currently being shown. The computer may now
be left unattended.
When you return to the computer, you can use the forward wind or rewind buttons to search
within the recording. You can also press the play button to start watching the programme, or
the pause button to pause what you are viewing. None of these buttons will affect the recording process. To stop time shift recording, press the stop button. Please see next page
for more information about the recording/playback control panel.
11
Page 12

The recording/playback control panel differs slightly from the standard control panel, with
the following buttons added:
- Rewind
- Pause
- Play
- Stop
- Forward Wind
- Slider bar, shows how far through the recording you are.
During playback, you can also drag the slider with the mouse
rather than using the rewind / forward wind buttons.
12
Page 13

Scheduled Recording
Press on the schedule record button in the extended toolbar.
This will open the Schedule Record window, as follows:
To schedule a recording, you will need to enter the following information:
1. The date
Do this by clicking on a date in the top right-hand window, thus highlighting it by
turning it blue. By default, today’s date will already be highlighted.
2. The start and end times of the recording
These must be written in 24 hour format, e.g. half past three in the afternoon would
be written 15 30.
3. The channel
Choose a channel from the list.
4. The frequency of the recording
For Frequency, you can choose the following from the drop-down list:
1 Time Record (will be displayed in orange),
Daily Record (will be displayed in purple), or
Weekly Record (will be displayed in green).
Once you have programmed the recording, press Add. You can then add more
programmed recordings to the list, remembering to press Add after each one.
13
Page 14
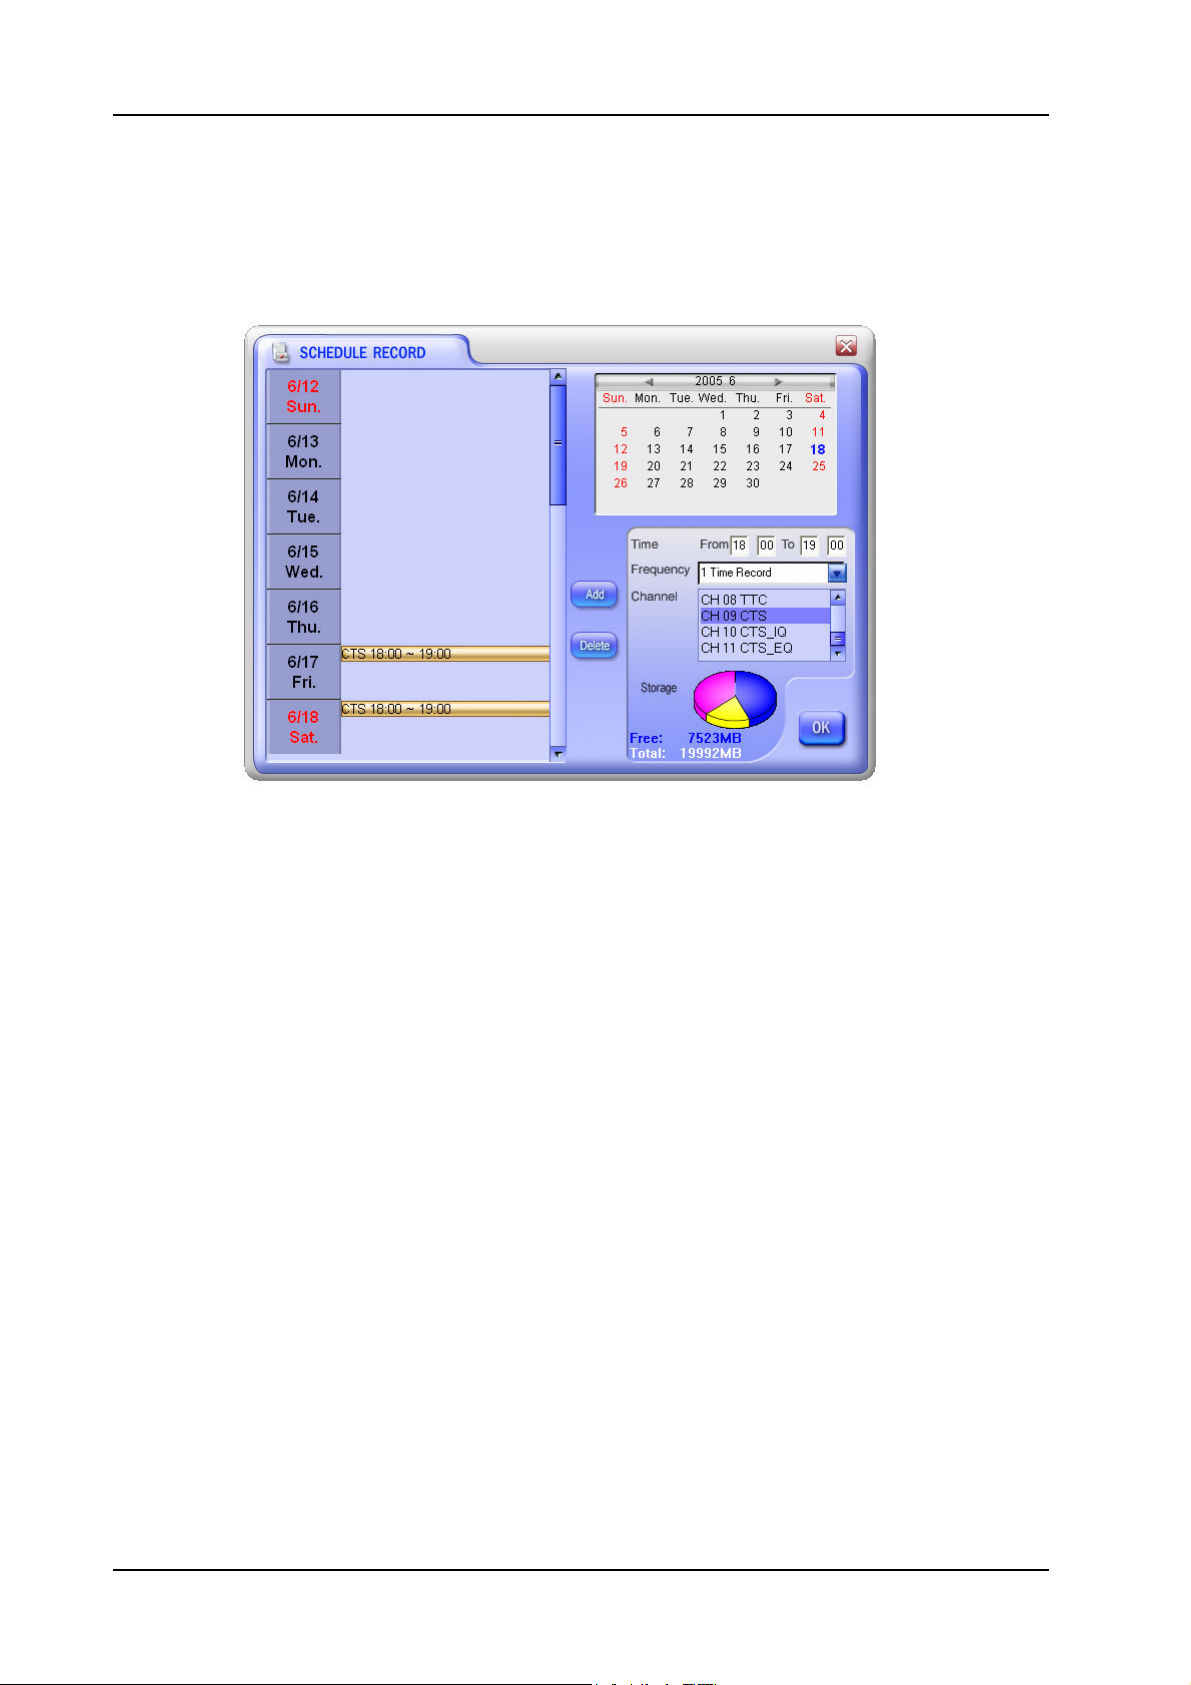
Below the channel list, you will see a representation of the disc space assigned to store
recordings. The blue area shows what disk space has already been used, the yellow is
which space has been allocated for scheduled recordings, and red shows available disk
space.
Note that the Savvy TV software will have to be running when it is time to start the scheduled recording. If you are watching another channel at the time the scheduled
recording is due to start, the software will automatically change channel.
14
Page 15

Watching a Recorded Programme
Press the recorded files button (in the extended toolbar).
Pressing this button will open up a browser window which will allow you to search for
recorded mpg/mpeg files. Note that this method allows you to view both scheduled
recordings and live recordings.
15
Page 16

Teletext
The Savvy TV software can also access Teletext. To do so, click on the Teletext button on
the control panel.
The Teletext control panel and the Teletext display screen will appear as follows :
Coloured hotkeys
Arrow keys
Go to Page button
Action button
Page number display
16
Page 17

There are several ways to navigate whilst in Teletext mode.
The left/right arrow keys can be used to move through the teletext pages one at a time. If
subpages are available, then the up/down cursor keys can be used to navigate through
these. In the above picture, for example, the page is 100, and the subpage is 08.
The page number display field can also be typed into directly. After the page number is
typed, click on the Go to Page button in order to go to that page.
The four coloured buttons (red, green, yellow and blue) can be used at hotkeys to go
directly to the coloured links which appear at the bottom of the teletext display screen.
The action button enables you to choose any page number displayed within the screen.
Once the action button has been pressed, it will change colour. You can then use the up/
down arrow keys to navigate within the screen. Once the page you would like to go to is
highlighted, press the action button again to go to that page.
17
Page 18

EPG (Electronic Program Guide)
The Savvy TV software is EPG compatible. This means that you can get instant access to
the list of programmes available to you.
To access this feature, click on the EPG button on the control panel.
This will open up the following screen:
You will find a list of channels down the left-hand side. These can be scrolled through, using
the up and down arrows above and below the list. Clicking on any of the channels will
change which channel you are currently viewing (highlighted in green, with programmes
highlighted in blue).
In the top left-hand corner, you will see the date. This can also be changed, using the
accompanying arrows.
To the top of the main section, you will see the time. Again, this can be scrolled through,
using the arrows.
Note that some channels may not offer the EPG function.
18
Page 19

Troubleshooting Guide
Problem
No picture
No sound
Cannot tune stations
Possible Reason
Currently viewing radio
station
Mute mode is activated
Volume level is set too low
Poor signal
Wrong country is chosen in
Setup
Solution
No picture will appear on
radio channels
Click on the speaker icon
beside the volume indicator
to restore the sound
Increase volume
Move the antenna for better
reception
Choose the correct country
in Setup
Picture performance is poor
Error message appears
when starting software,
saying “Please plug in the
tuner”.
Not using latest version of
Direct X
Computer hardware does
not meet minimum
requirements
Too many programs are
being used at the same time
Poor signal
Laptop computer is using
battery power
Tuner is not plugged in
Download latest version of
Direct X
Upgrade hardware to meet
minimum requirements
Close unnecessary
programs
Move the antenna for better
reception
Try plugging the laptop into
its power supply
Plug in tuner, or if
necessary, disconnect and
then reconnect.
19
 Loading...