

Page 1
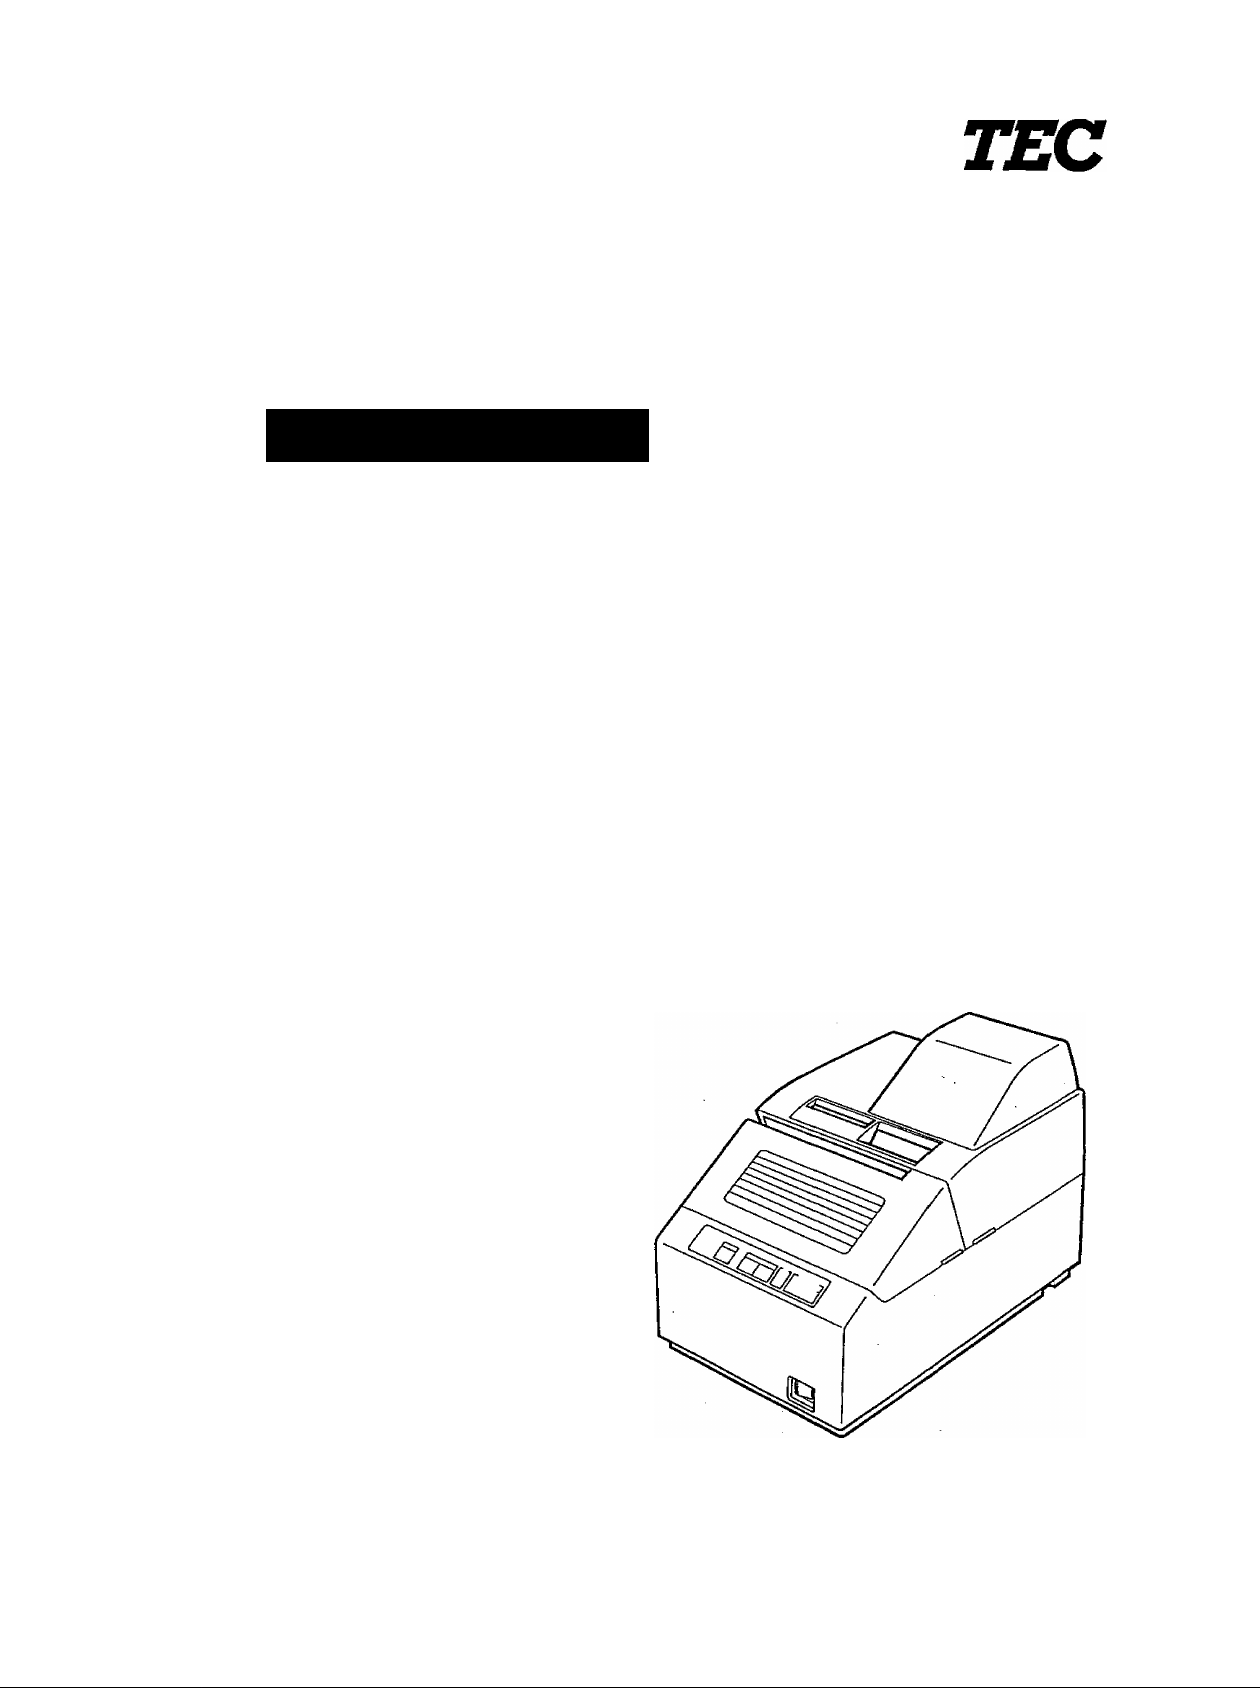
TEC Receipt/Journal Printer
DRJST-51
Owner’s Manual
TOSHIBA TEC CORPORATION
Page 2

DECLARATION OF CONFORMITY ifor EU only)
Manufacturer
Address
: TOSHIBA TEC CORPORATION
: 570 Ohito, Ohito-cho, Tagata-gun,
Shizuoka-ken, Japan
declares, in sole responsibility, that the product
Product Name : Remote R/J Printer
Model Number
; DRJST-51
conforms to the following standards under EMC Directive (89/336/EEC, 93/68/EEC) and
Low Voltage Directive {73/23/EEC, 93/68/EEC) :
EMC
: EN50082-1 (1992)
IEC801-2 (1991)
ENV50140 (1993)
1EC801-4 (1988)
EN55022 (1994) - Class A
LVD
: EN60950 (1992) + A1 and A2
Supplementary Information :
The product was tested in a typical system configuration with a TEC POS terminal.
NOTICE
This equipment has been tested and found to comply with the limits for a Class A digital
device, pursuant to Part 15 of the FCC Rules. These limits are designed to provide reasonable
protection against harmful interference when the equipment is operated in a commercial
environment. This equipment generates, uses, and can radiate radio frequency energy and,
If not installed and used in accordance with the instruction manual, may cause harmful
interference to radio communications. Operation of this equipment in a residential area is
likely to cause harmful interference in which case the user wil! be required to correct the
interference as his own expense. Changes or modifications not expressly approved by
manufacturer for compliance could void the user’s authority to operate the equipment.
WARNING
This is a Class A product. In a domestic environment this product may cause radio interference
in which case the user may be required to take adequate measures.
Warnung
Dies ist ein Klasse A Produkt. In einer örtlichen Umgebung kann dieses Gerät Funkstörungen
verursachen.
ATTENTION
Ce produit est de classe A. Dans un environnement domestique, il peut causer des interférences
radio. Auquel cas, l’utilisateur sera amené à prendre les mesures adéquates.
Atención
Este es un producto de la clase A. En ambientes domésticos éste producto puede causar
radio interferencias en cuyo caso el usuario deberá tomar las medidas oportunas.
VERWITTIGING
Dit is een klasse A produkt. Het gebruik hiervan kan radio interferenties veroorzaken die de
gebruiker ertoe kunnen dwingen sommige maatregelen te moeten treffen.
Schaliemission : 77.3 dB{A) nach DIN 45635 {IS07779)
Cc^yright ©2000
by TOSHIBA TEC CORPORATION
All Rights Reserved
570 Ohrto, Ohito-cho, Tagata-gun, Shizuoka-ken. JAPAN
Page 3
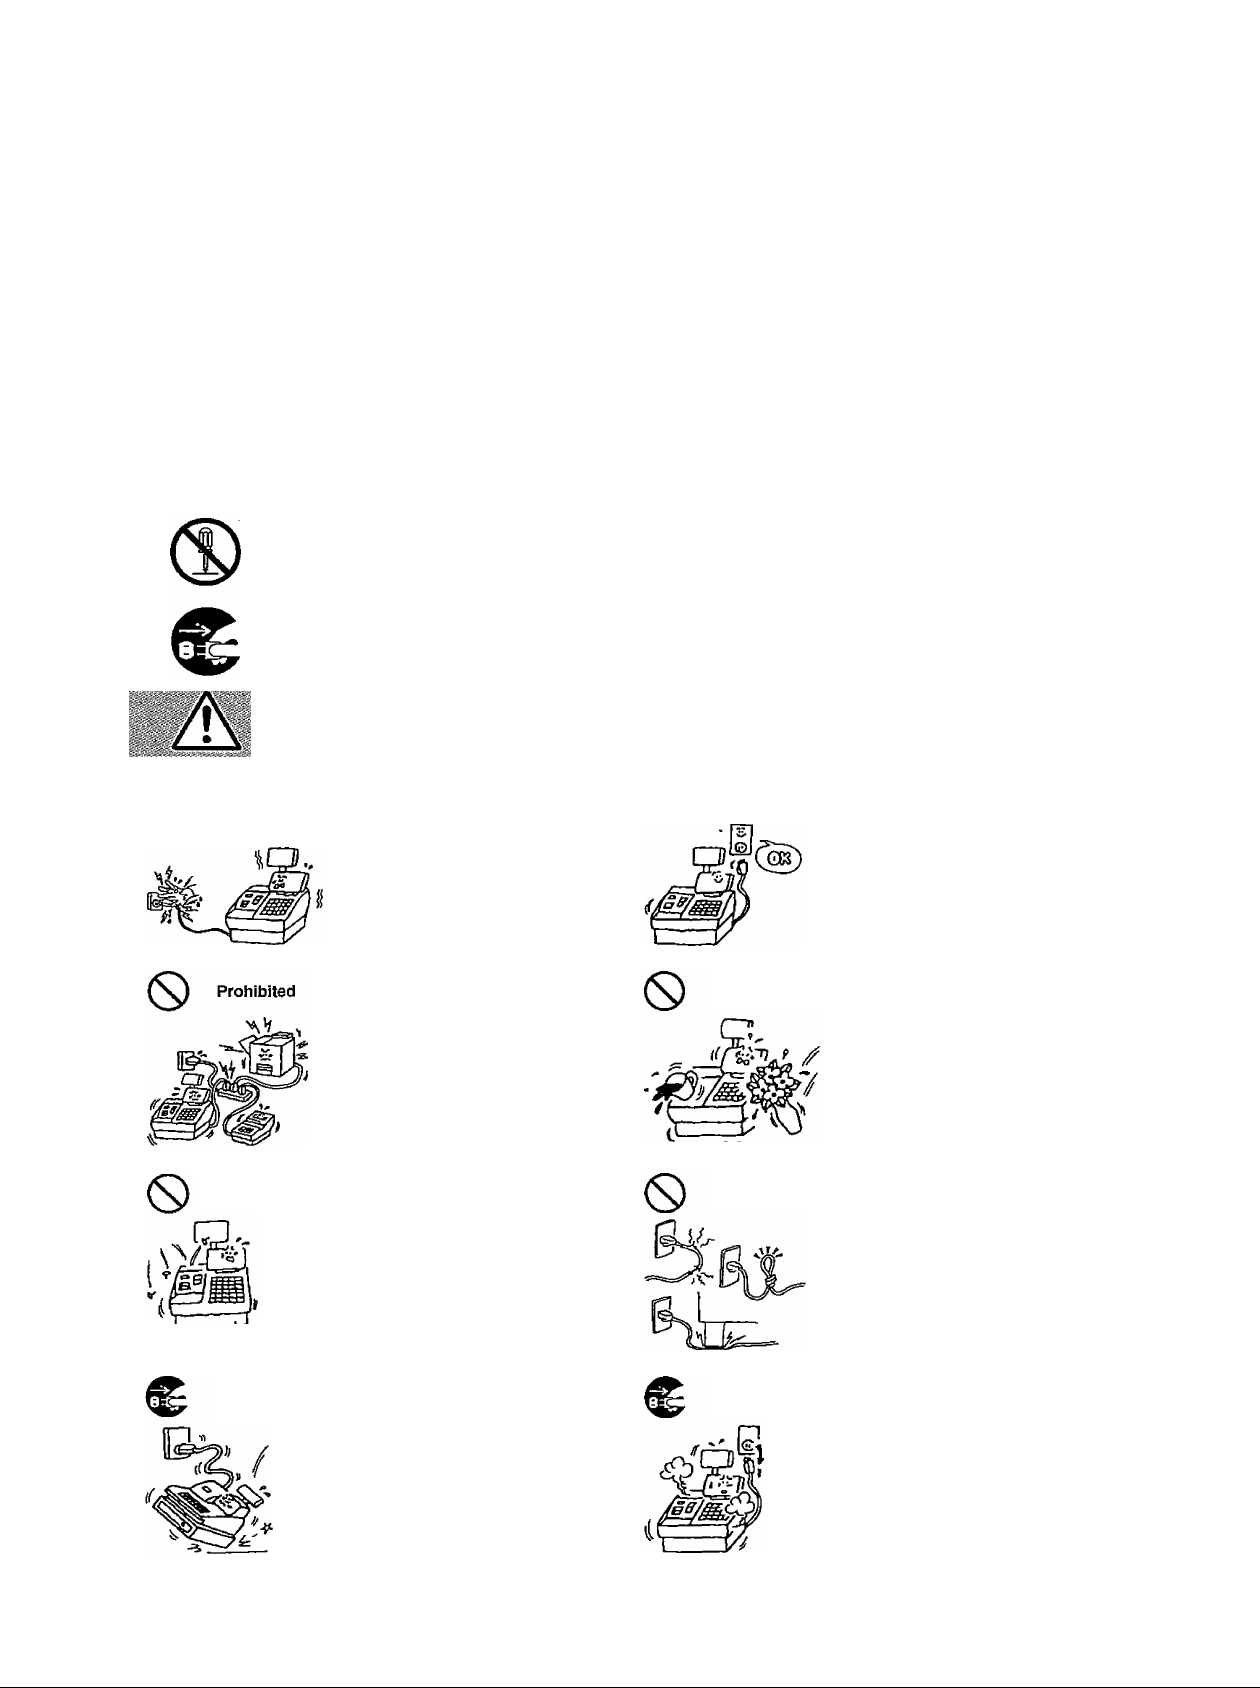
Safety Summary
Safety Summary
Personal safety in handling or maintaining the equipment is extremely important. Warnings and Cautions
necessary for safe handling are included in this manual. All warnings and cautions contained in this
manual should be read and understood before handling or maintaining the equipment.
Do not attempt to effect repairs or modifications to this equipment. If a fault occurs that cannot be rectified
using the procedures described in this manual, turn off the power, unplug the machine, then contact your
authorized TOSHIBA TEC representative for assistance.
Meanings of Each Symbol
This symbol indicates warning items including cautions).
Specific warning contents are drawn inside the A symbol.
E01-13010
A
0
(The symbol on the left indicates a general caution.)
This symbol indicates prohibited actions (prohibited items).
Specific prohibited contents are drawn inside or near the ® symbol.
(The symbol on the left indicates “no disassembling”)
This symbol indicates actions which must be performed.
Specific instructions are drawn inside or near the#symbol.
(The symbol on the left indicates “disconnect the power cord plug from the outlef.)
Prohibited
■ Do not plug in or unplug the power
cord plug with wet hands as this may
cause eiectric shock.
■ If the machines share the same
outlet with any other electrical
appliances which consume large
amounts of power, the voltage will
fluctuate widely each time these
appliances operate. Be sure to
provide an exclusive outlet for the
machine as this may cause the
machines to malfunction.
sSS A?votoge ■ voltages other than the
Is prohibited. voltage (AC) specified on the rating
plate, as this may cause fire or
electric shock.
Prohibited
■ Do not place metal objects or
water-filled containers such as flower
vases, flower pots or mugs, etc. on
top of the machines. If metal objects
or spilied liquid enter the machines,
this may cause fire or electric
shock.
Prohibited
Disconnect
the piug.
■ Do not insert or drop metal,
flammable or other foreign objects into
the machines through the ventilation
slits, as this may cause fire or electric
shock.
■ If the machines are dropped or their
cabinets damaged, first turn off the
power switches and disconnect the
power cord plugs from the outlet, and
then contact your authorized
TOSHIBA TEC representative for
assistance. Continued use of the
machine in that condition may cause
fire or electric shock.
(i)
Prohibited
Disconnect
the plug.
■ Do not scratch, damage or modify
the power cords. Also, do not place
heavy objects on, pull on, or exces
sively bend the cords, as this may
cause fire or electric shock.
■ Continued use of the machines in an
abnormal condition such as when the
machines are producing smoke or
strange smells may cause fire or elec
tric shock. In these cases, immedi
ately turn off the power switches and
disconnect the power cord plugs from
the outlet. Then, contact your author
ized TOSHIBA TEC representative for
assistance.
Page 4
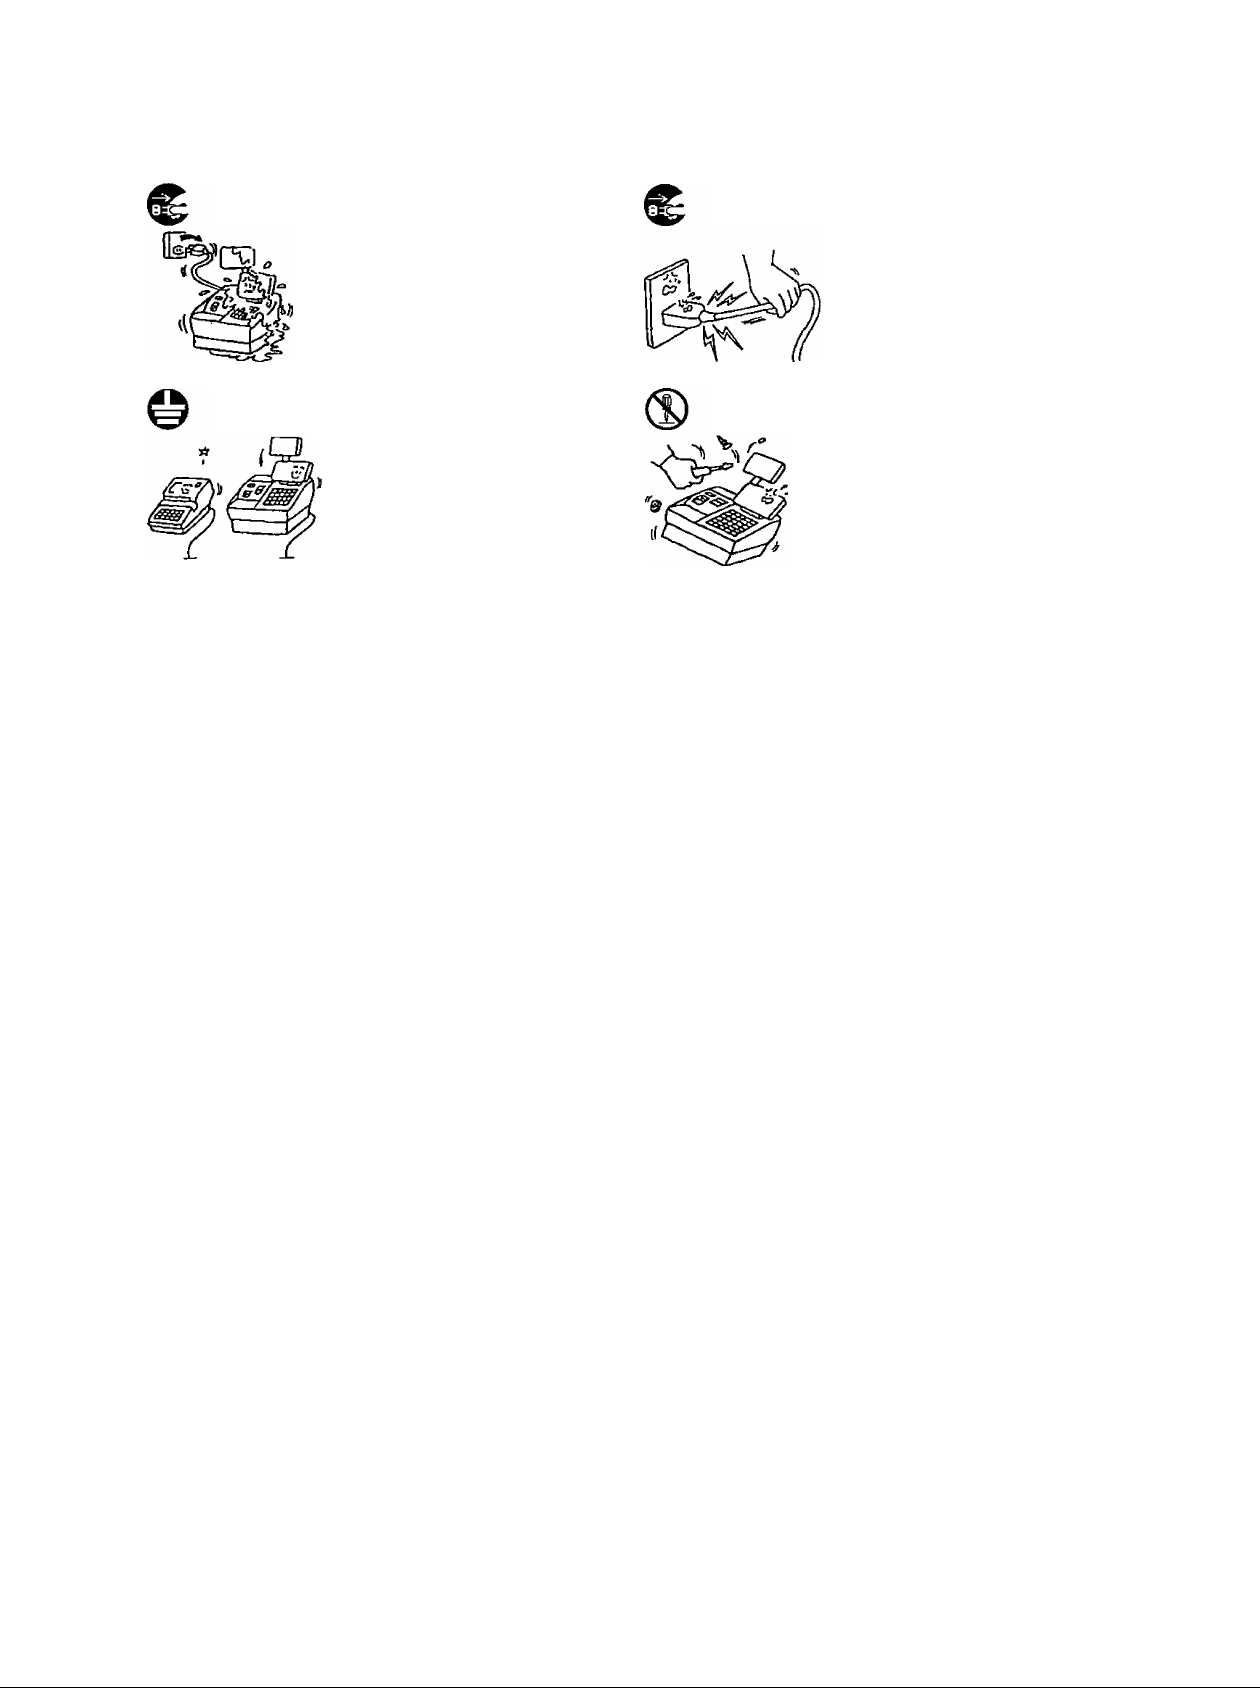
Safety Summary
E01-13010
Disconnect
the plug.
Connect a
grounding
wire.
■ If foreign objects (metal fragments,
water, liquids) enter the machines,
first turn off the power switches and
disconnect the power cord plugs from
the outlet, and then contact your
authorized TOSHIBA TEC repre
sentative for assistance. Continued
use of the machine in that condition
may cause fire or electric shock.
■ Ensure that the equipment is
properly grounded. Extension cables
should also be grounded. Fire or
electric shock can occur on improp
erly grounded equipment.
Disconnect
the plug.
No
disassembling.
■ When unplugging the power
cords, be sure to hold and pull on
the plug portion. Pulling on the cord
portion may cut or expose the inter
nal wires and cause fire or electric
shock.
■ Do not remove covers, repair or
modify the machine by yourseif. You
may be injured by high voltage, very
hot parts or sharp edges inside the
machine.
Unauthorized modification is prohib
ited.
This indicates that there is the risk of personal Injury or damage to
Acaution
objects if the machines are improperly handled contrary to this indication.
Precaution
The following precautions will help to ensure that this machine will continue to function correctly.
• Try to avoid locations that have the following adverse conditions:
* Temperatures out of the specification * Direct sunlight * High humidity
* Shared power socket * Excessive vibration * Dust/Gas
Do not subject the machine to sudden shocks.
Do not press the keys too hard. Keys will operate correctly if they are touched lightly.
Clean the cover and keyboard, etc. by wiping with a dry cloth or a cloth soaked with detergent and wrung out
thoroughly. Never use thinner or other volatile solvent for cleaning.
At the end of the day, turn the power OFF, then clean and inspect the exterior of the machine.
Try to avoid using this equipment on the same power supply as high voltage equipment or equipment likely to
cause mains interference.
USE ONLY TOSHIBA TEC SPECIFIED consumables.
DO NOT STORE the consumables where they might be exposed to direct sunlight, high temperatures, high
humidity, dust, or gas.
When rpoving the machine, take hold of the drawer and lift the machine.
Do not place heavy objects on top of the machines, as these items may become unbalanced and fall causing
injury.
Do not block the ventilation slits of the machines, as this will cause heat to build up inside the machines and
may cause fire.
Do hot lean against the machine. It may fall on you and could cause injury.
Request Regarding Maintenance
• utilize our maintenance services.
After purchasing the machines, contact your authorized TOSHIBA TEC representative for assistance once per year or
so to have the inside of the machines cleaned. Othenwise, dust will build up inside the machines and may cause fire or
malfunction. Cleaning is particularly effective before humid rainy seasons.
• Our maintenance service performs the periodic checks and other work required to maintain the quality and
performance of the machines, preventing accidents beforehand.
For details, please consult your authorized TOSHIBA TEC representative for assistance.
• Using insecticides and other chemicals
Do not expose the machines to insecticides or other volatile solvents, as this will deteriorate the cabinet or other parts
or cause the paint to peel.
(ii)
Page 5

TABLE OF CONTENTS
1. INTRODUCTION............................................................................................... 1
1.1 Applicable Model.........................................................................................1
2. APPEARANCE AND NOMENCLATURE......................................................... 2
E01-13010
DRJST-51 SERIES
Page
3. OPERATION PANEL
4. INSTALLING THE PRINTER............................................................................ 4
4.1 Parallel Interface Type.................................................................................4
4.2 Serial Interface Type
5. HANDLING OFTHE PRINTER
6. SPECIFICATIONS
6.1 Printer Unit.................................................................................................13
6.2 Ink Ribbon................................................................................................. 13
................................................................................... 3
...................................................................................
............................................................................6
..........................................................................................
13
5
Page 6

E01-13010
DRJSnr-51 SERIES
1. INTRODUCTION
Thank you for purchasing the TEC DRJST-51 Receipt/Joumal Printer. This printer is a high-speed dot
matrix printer. The interface complies with the 8-bit parallel interface (conforming to Centronics
interface) or Serial interface (conforming to RS-232C), which enables connection with various devices.
This printer contains three stations; receipt, journal and slip. Up to 40 digits can be printed on the
receipt and journal, and up to 88 digits on the slip for the 58-mm wide; And up to 24 digits can be printed
on the receipt and journal, and up to 55 digits on the slip for the 45-mm wide.
This manual describes the functions and handling of this Printer and should be read carefully to help
gain maximum performance and life from your Printer. For most queries please refer to this manual
and keep it safe for future reference.
1.1 Applicable Model
• DRJST-51 SERIES
Model name description
DRJST-51D
'
-------------
Destination
QM: English Standard
TW: Taiwan
____
Option
Paper Width
Blank: 58mm
---------
_
Blank: without Paper Cover Lock, Full Cut,
A: 45mm
Cable Specification
Blank: Power supply Cable only
1: Power supply Cable and 1/F Cable
l/F Specification
P; Parallel l/F
S: Serial l/F
Single Validation
1: with Paper Cover Lock, Full Cut,
Single Validation
2: without Paper Cover Lock, Full & Stub Cut,
Single Validation
3: with Paper Cover Lock, Full & Stub Cut,
Single Validation
4: without Paper Cover Lock, Full Cut,
Multi-validation
5: with Paper Cover Lock, Full Cut,
Multi-validation
6: without Paper Cover Lock, Full & Stub Cut,
Multi-validation
7: with paper Cover Lock, Full & Stub Cut,
Multi-validation
-1 -
Page 7

2. APPEARANCE AND NOMENCLATURE
EOM3010
DRJST-51 SERIES
Accessory Parts
Paper Roll (2 pcs.)
58 mm x 0 50 mm
45 mm x 0 50 mm
Cable Clamp (1 pc.) Double Sems Screw M 3x8 (1 pc.) Journal Take-up Reel (1 pc.)
or
Stamp Ink {1 pc.)
Paper Cover Lock Keys (2 pcs.)
(with Paper Cover Lock model only)
-2-
Parallel or Serial l/F Cable
(Option ; 1 pc.)
Page 8

3. OPERATION PANEL
E01-13010
DRJST-51 SERIES
-PAPER OUT-I
1 1 RECEIPT
1 iJOURNAL
POWER LED:
Lights:
Not lights:
ON LINE LED:
Lights:
Not lights:
Blinks:
1
ONLINE
RECEIPT
Green
Power On
Power off
Green
Online
Offline
Mechanical error detected
FEED
[—VALl—1
CD
JOURNAL
ON LINE Switch
This switch selects online or offline.
When the printer is in an online state, printing can be done in usual mode. When offline is
selected, the printer stops printing after printing the line currently being printed.
RECEIPT FEED Switch
This switch feeds the receipt.
This switch is effective only when the ONLINE LED does not light (offline mode). Even If this
switch is pressed while the ONLINE LED lights, the receipt is not fed.
When this key is pressed within the set time (Note i) after validation paper is loaded on the
multi-validation model, validation printing is started.
JOURNAL FEED Switch
This switch feeds the journal.
This switch is effective only when the ONLINE LED does not light (offline mode). Even if this
switch is pressed while the ONLINE LED lights, the journal is not fed.
When this key is pressed within the set time (Note i) after validation paper is loaded on the
multi-validation model, validation printing is started.
VALILED: Green
Lights: Validation mode
Not lights: Receipt/journal mode
Blinks: Waiting for Validation paper
RECEIPT OUT LED: Red
When receipt paper almost runs out, the red LED lights. This LED does not light in usual
states.
JOURNAL OUT LED: Red
When journal paper almost runs out, the red LED lights. This LED does not light in usual
states.
Note 1: The set time indicates the time until printing is started automatically after the
validation is detected. It can be set from the host side. When no entry is made, it is
set to 2 seconds.
-3-
Page 9

4, INSTALLING THE PRINTER
Connecting the Printer Cable and Power Cable
WARNING!
Turn the POWER SWfTCH to OFF of ENGINE Box before connecting the power cord
or cables.
Follow these steps to connect the printer to the TEC POS Terminal ST-5500 Series.
4.1. Parallel Interface Type
1) Connect the printer cable and printer power cable to the printer. The cables are secured with the
attached cable clamp as shows below.
E01-13010
DRJST-51 SERIES
2) Connect the printer cable and the power cable of the R/J Printer to PRT and P24V of the
ENGINE Box, respectively.
-4-
Page 10

DRJST-51 SERIES
4.2. Serial Interface Type
1) Connect the printer cable and printer power cable to the printer. The printer cables are secured
with the attached cable clamp as shows below.
EOM3010
2) Connect the printer cable and the power cable of the R/J Printer to COM2 and P24V of the
ENGINE Box, respectively.
-5-
Page 11

DRJST-51 SERIES
5. HANDLING OF THE PRINTER
• Removing the paper cover
Remove the paper cover when the receipt or journal paper roll is replaced with a new one or when the
store name/message stamp Ink must be replenished.
1. Removing the paper cover
1) For the model equipped with the paper
cover lock, insert the cover lock key into the
cover lock and turn it 90 degrees to the
frontward to open the lock (Fig. 1).
E01-13010
2) Remove the paper cover by lifting up o
both edges of the paper cover (Fig. 2).
2. Attaching the paper cover (Fig. 3)
Page 12

• Removing the ribbon cover
Remove the ribbon cover when the ribbon cassette must be replaced
1. Remove the ribbon cover
1) Remove the paper cover. (Refer to the
"Remove the papeTcover".)
2) Remove the ribbon cover by lifting up on
both edges of the ribbon cover. (Fig. 1)
2. Attaching the ribbon cover (Fig. 2)
1) Make the daws on the front of the ribbon
cover with the hoies in the top cover.
2) Push down the rear side as it ciicks.
EOM3010
DRJST-51 SERIES
Installing the receipt roll
1) Removing the paper cover. (Refer to the
"Removing the paper cover".)
2) Cut the paper end to make it sharp. (Fig. 1)
3) Place the paper end on the left holder so
that paper will be fed from the bottom of the
paper roll. (Fig. 2)
4) Insert the paper end into the paper inlet
until it stops, then feed the paper by
pressing the RECEIPT FEED Switch.
(Fig. 3)
Note: When paper is inserted into the
paper inlet of the printer for Taiwan,
the paper is automatically fed and cut
Remove the cut paper.
Fig. 1
Fig. 2
5) Attaching the paper cover with the paper
end coming out of the receipt outlet. (Refer
to the "Attaching the paper cover".)
-7-
Page 13

Installing the journal roll
1) Follow Steps 1) and 2) for "Installing the
receipt roil" in the preceding section.
2) Place the paper end on the right holder so
that paper will be fed from the bottom of the
paper roll. (Fig. 1)
3) Insert the paper end into the paper inlet
until it stops, then feed the paper by
pressing the JOURNAL FEED Switch until
the leading edge of the paper comes out
about 25 cm. (Fig. 2)
E01-13010
DRJST-51 SERIES
Note: When paper is inserted into the
printer for Taiwan, the paper is
automatically fed.
4) Insert the paper end into the slit on the
take-up Reel and wind it around the reel
two or three turns. (Fig.3)
Place the take-up reel on thetake-up holder.
(Fig. 4)
5) Push the take-up reel rearward until slack
in paper is eliminated.
6) Attaching the paper cover. (Refer to the
"Attaching the paper cover".)
-8-
Page 14

Setting the ribbon cassette
1) Removing the paper cover and the ribbon
cover. (Refer to the "Removing the paper
cover" and the "Removing the ribbon
cover.")
2) Push down the ribbon cassette as it clicks.
(Fig-1)
EOM3010
DRJST-51 SERIES
3) Turn the knob of the ribbon cassette in the
arrow direction several times to remove
the slack on the ribbon. (Fig. 2)
4) Attach the ribbon cover and the paper
cover. (Refer to the "Attaching the ribbon
cover" and the "Attaching the papercover.")
-9-
Page 15

Replacing the receipt roll
1) Removing the paper cover. (Refer to the
"Removing the paper cover".)
2) Lift the green lever on the receipt side.
(Fig-1)
E01-13010
DRJST-51 SERIES
3) Remove the remaining paper roll from the
rear side of the printer. (Fig. 2)
4) Lower the green lever. (Fig. 3)
5) Install a new paper roll according to steps
2) to 5) of the procedure "Installing the
receipt roll".
-10-
Page 16

Replacing the journal roll
1) Removing the paper cover. (Refer to the
"Removing the paper cover".)
2) Cut the journal paper as shown in the
figure. {Fig. 1)
3) Lift the green lever on the journai side. Lift
the take-up reel to remove paper. (Fig. 2)
E01-13010
DRJST-51 SERIES
4) Lower the green lever. (Fig. 3)
5) Install a new paper roll according to steps
1) to 6) of the procedure "Instaiiing the
journal roll".
Replacing the ribbon cassette
1) Removing the paper cover and the ribbon
cover. (Refer to the "Removing the paper
cover" and the "Removing the ribbon
cover".)
2) Removing the old ribbon cassette by
pulling it upward. (Fig. 1)
3) Set a new ribbon cassette according to
steps 2) to 4) of the procedure "Setting
the ribbon cassette."
11
Page 17

E01-13010
DRJST-51 SERIES
• Replenishing the ink to the store name/message stamp
When the store name/message stamp, if installed, printing appears too dim, replenish the ink in the
following procedure.
1) Remove the paper cover. (Refer to the
"Remove the paper cover".)
2) Remove the store name/message stamp
by pulling it in the figure. (Fig. 1)
3) Apply ink only two or three drops.
Stamp may not print dark immediately.
Allow time for ink to saturate the stamp.
{Fig. 2)
4) Install the stamp by inserting it in the
direction of the arrow mark as it clicks.
(Fig-3)
-12-
Page 18

6. SPECIFICATIONS
6,1. Printer Unit
Item
Printing Type
Printable Digits
Font Components
Character size (Unit: mm) DRJST-51
Kinds of Fonts
Print Speed
Receipt Cut
Roll Paper Size
Validation Slip
External Dimensions 190 mm (W) X 300 mm (D) x 219 mm (H) (including the rubber feet)
Weight 4.0 kg
Interface with the control
Unit
Interface Cable Length
Power Required
Power Consumed 2.0A
Environmental Conditions
Impact Dot Matrix Printing
Receipt/Journal
Validation Slip
Regular-sized Character ;7 (W) x 9 (H) dots
Double-width Character :17 (W) x 9 (H) dots
Regular-sized
Double-width
Alphanumeric: 95 characters
Katakana/Hiragana: 64 characters each
Kanji: 235 characters
Kanji (Chinese): 135 characters
Extended graphics: 128 characters
International char.: 32 characters
Approx. 2.6 line/s (DRJST-51)
Approx. 4.0 line/s (DRJST-51 A)
Full cut (standard)
45/58 +0.1 -0.5mm (W) x 0 Max. 80 mm / Thickness: 0.07 to 0.09 mm
Norma! paper + carbon paper or pressure sensitive paper
Up to 3 duplicate sheets (including the original)
Single Sheet Thickness : 0.07 to 0.14 mm
Total Thickness : 0.2 mm max.
Size Portrait: 135 to 210 (W) x 77 to 135 (H) mm
Landscape: 70 to 135 (W) x 135 to 210 (H) mm
Maximum number of printed lines: 11 (multi-validation)
8-bit parallel interface (conforming to Centronics) or Serial interface
(conforming to RS-232C)
2 m (option)
DC 24V (supplied by the Control Unit or Adapter)
0°C to 35°C /10% to 90% RH (non-condensing
Description
DRJST-51
40/40 digits
88 digits
0.81 (W) x 2.82 (H)
2.17 (W)x 2.82 (H)
DRJST-51 A
DRJST-51 A
1.04 (W)x 2.82 (H)
2.77 (W) x 2.82 (H)
E01-13010
DRJST-51 SERIES
24/24 digits
55 digits
6.2. Ink Ribbon
Item
Ribbon type Ribbon cassette
Dimension
Material & Color
Life
Ribbon: 13 mm (W) x 6 m (L)
Nylon, Purple
Approx. 6 million characters
Description
-13-
Page 19

TOSHIBA TEC CORPORATION
PBlNTEDJt^JAR
EOi-i3pi6^
iiziL-
 Loading...