

Page 1

32DB833B
42DB833B
LCD TV /
Blu-ray™
COMBI Series
Page 2

English
Safety Precautions ....................5
Contents
Frequently Asked Questions ....21
Air Circulation ...................................... 5
Heat Damage ...................................... 5
Mains Supply ....................................... 5
Do ........................................................ 5
Do not .................................................. 5
Installation and important
information .................................6
Where to install.................................... 6
When using a Wall Bracket ................. 6
The Remote Control ..................12
Inserting Batteries ............................... 13
Effective Range of the Remote ........... 13
Connecting External
Equipment ..................................14
HDMI-LINK Connections ...........15
Connecting an HDMI or DVI
device to the HDMI input ...........16
To connect an HDMI device ................ 16
To connect a DVI device...................... 17
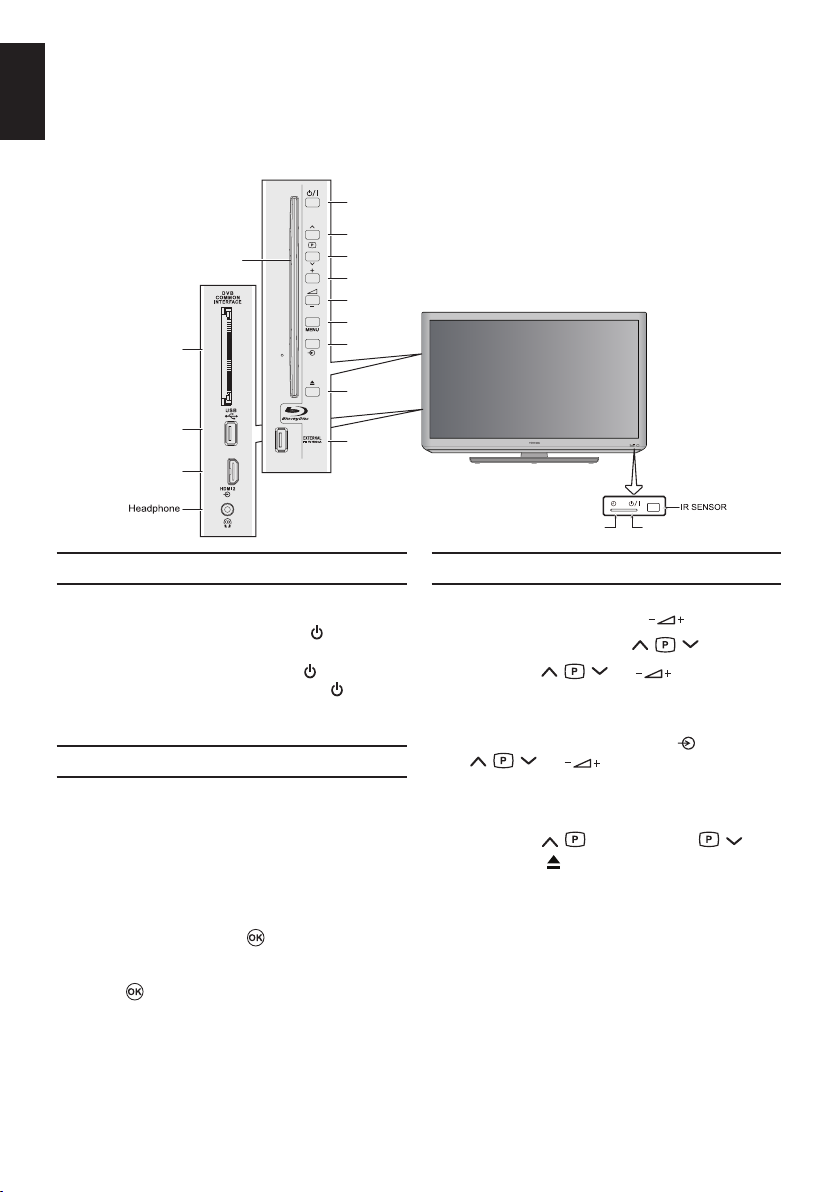
Using the Controls ....................24
Switching On ....................................... 24
Using the Remote Control ................... 24
Using the Side-Key Controls ............... 24
Tuning the Television ................25
Quick Setup ......................................... 25
Setting the Channels .................27
Auto Tuning ......................................... 27
Manual Tuning ..................................... 28
Automatic Power Down ....................... 30
Reset TV ............................................. 30
DTV Settings ..............................31
Channels ............................................. 31
Channel Options.................................. 32
Subtitle and Audio ............................... 33
Password............................................. 33
Parental ............................................... 33
Common Interface ............................... 33
General Controls .......................34
Connecting a Computer ............18
To connect a PC to the HDMI
terminal................................................ 18
Acceptable Video signals through
HDMI terminals .................................... 19
Acceptable PC signals through HDMI
terminals .............................................. 19
Digital On-Screen Information
and Programme Guide ..............20
Information .......................................... 20
On-Screen Information Icons .............. 20
Guide ................................................... 20
Selecting Channels ............................. 34
Stereo and Bilingual Transmissions .... 34
Quick Access Menu ............................. 34
Subtitles............................................... 34
Picture Still .......................................... 34
Input Selection..................................... 34
Sound Controls ..........................35
Volume Controls and Mute Sound....... 35
Dual ..................................................... 35
Bass, Treble and Balance ................... 35
Stable Sound ....................................... 35
2
Page 3

Surround Sound .................................. 35
Bass Boost .......................................... 35
SPDIF Type ......................................... 35
Audio Description ................................ 36
Widescreen viewing ..................37
Available Picture Size and Position
Control ................................................. 38
Picture Controls .........................39
Picture Position ................................... 39
Picture Mode ....................................... 39
Picture Preferences ............................. 39
Black/White Level ................................ 40
Cinema Mode ...................................... 40
Colour Temperature ............................. 40
Static Gamma...................................... 40
Reset ................................................... 40
Active Backlight ................................... 40
3D Colour Management ...................... 40
Base Colour Adjustment ...................... 41
Digital Noise Reduction ....................... 41
MPEG NR – Noise Reduction ............. 41
Enjoy Photos through USB
Port .............................................42
View Photo Files .................................. 43
Using Slide Show ................................ 43
Repeat Settings for Slideshow ............ 43
Set Interval Time ................................. 44
Using the Play List............................... 44
Background Music ............................... 44
Photo Info ............................................ 44
Enjoy Music through USB
Port .............................................45
Play Music Files .................................. 45
Repeat Settings ................................... 46
Using the Play List............................... 46
Music Info ............................................ 46
English
Enjoy Videos through USB
Port .............................................47
Play Video Files ................................... 48
Repeat Settings ................................... 49
Set ...................................................... 49
Using the Play List............................... 49
Slow Forward ...................................... 49
Step Forward ....................................... 49
Video Info ............................................ 49
Aspect Ratio ........................................ 49
Picture Mode ....................................... 49
Goto Time ............................................ 50
HDMI-LINK Controls ..................51
Equipment Control............................... 51
Input Source Selection ........................ 51
HDMI-LINK Menus .....................52
One Touch Play ................................... 52
System Standby .................................. 52
System Audio Control .......................... 52
Enable HDMI-LINK .............................. 52
Auto Power On .................................... 52
Auto Standby ....................................... 53
Amplier Control .................................. 53
Speaker Preference ............................ 53
Preference Controls ..................54
On Timer .............................................. 54
Sleep Timer ......................................... 54
EPG ..................................................... 55
Panel Lock........................................... 56
Auto Format (Widescreen) .................. 56
4:3 Stretch ........................................... 56
Blue Screen ......................................... 56
Side Panel ........................................... 56
System Information ............................. 56
3
Page 4

Software Upgrade ............................... 57
English
Text Services and Text
Information .................................58
Setting the Modes ............................... 58
Navigating Pages using Auto .............. 58
Navigating Pages using LIST .............. 58
Control Buttons.................................... 58
PC Settings ................................59
Horizontal and Vertical Position........... 59
Horizontal Width .................................. 59
Clock Phase ........................................ 59
Reset ................................................... 59
System Information ............................. 73
Information on DivX
Operating On-Screen Control Menu.... 74
®
Video ................. 73
Connecting to Network (For
BD-LIVE™) .................................76
IP Setting ............................................. 76
Internet Connection ............................. 77
Connection Test ................................... 77
BD-Live Connection ............................ 77
Proxy Setting ....................................... 77
Trademarks and License...........78
Notes on Copyright.............................. 79
Input Selection and AV
Connections ...............................60
HDMI1 Audio ....................................... 60
Lip Sync Mode .................................... 60
Input Signal Selection.......................... 60
Disc Playback ............................61
Wide Playback Compatibility ............... 61
Blu-ray Disc™ Applications ................. 61
Loading a Disc..................................... 61
Loading a USB Flash Drive
(For BD-LIVE™ Contents) ................... 62
Notes on Discs .................................... 62
Playable Discs ...........................63
Language Settings .............................. 64
Playing Discs on the Market ................ 64
BD-LIVE™ ........................................... 65
Playing BD-R/RE, DVD±R/RW ............ 66
Playback Function ............................... 66
Playing Music/Video/Picture Files ....... 69
System Settings .................................. 70
Playback Settings ................................ 71
Security Settings ................................. 72
License Information on the
Software Used in This Product ...82
4
Page 5

Safety Precautions
This equipment has been designed and manufactured to meet international safety standards but, like
any electrical equipment, care must be taken to obtain the best results and for safety to be assured.
Please read the points below for your own safety. They are of a general nature, intended to help with all
electronic consumer products and some points may not apply to the goods you have just purchased.
Air Circulation
Leave more than 10cm clearance around the
TV to allow adequate ventilation. This will prevent overheating and possible damage to the
TV. Dusty places should also be avoided.
DO NOT REMOVE ANY FIXED COVERS AS
THIS WILL EXPOSE DANGEROUS AND ‘LIVE’
PARTS.
THE MAINS PLUG IS USED AS A DISCONNECTING DEVICE AND THEREFORE
SHOULD BE READILY OPERABLE.
English
Heat Damage
Damage may occur if the TV is left in direct
sunlight or near a heater. Avoid places subject
to extremely high temperatures or humidity.
Place in a location where the temperature
remains between 5°C (41°F) min. and 35°C
(94°F) max.
Mains Supply
The mains supply required for this equipment
is 220-240V AC 50/60Hz. Never connect to a
DC supply or any other power source. DO ensure that the TV is not standing on the mains
lead. Use only the supplied lead.
Do not cut off the mains plug from this
equipment, this incorporates a special Radio
Interference Filter, the removal of which will
impair its performance. In the UK, the fuse
tted in this plug is approved by ASTA or BSI
to BS1362.
It should only be replaced by a correctly rated
and approved type and the fuse cover must be
retted.
IF IN DOUBT PLEASE CONSULT A COMPETENT ELECTRICIAN.
Do
DO read the operating instructions before you
attempt to use the equipment.
DO ensure that all electrical connections
(including the mains plug, extension leads and
inter-connections between pieces of equipment) are properly made and in accordance
with the manufacturers’ instructions. Switch off
and withdraw the mains plug before making or
changing connections.
DO consult your dealer if you are ever in doubt
about the installation, operation or safety of
your equipment.
DO be careful with glass panels on equipment.
Do not
DO NOT obstruct the ventilation openings of
the equipment with items such as newspapers,
tablecloths, curtains, etc. Overheating will cause
damage and shorten the life of the equipment.
DO NOT allow electrical equipment to be
exposed to dripping or splashing or objects lled
with liquids, such as vases, to be placed on the
equipment.
DO NOT place hot objects or naked ame
sources, such as lighted candles or nightlights
on, or close to equipment. High temperatures
can melt plastic and lead to res.
DO NOT use makeshift stands and NEVER
x legs with wood screws. To ensure complete
safety, always t the manufacturers’ approved
stand, bracket or legs with the xings provided
according to the instructions.
DO NOT leave equipment switched on when
it is unattended, unless it is specically stated
that it is designed for unattended operation or
has a standby mode. Switch off by withdrawing
the plug, make sure your family know how to
do this. Special arrangements may need to be
made for people with disabilities.
DO NOT continue to operate the equipment if
you are in any doubt about it working normally,
or it is damaged in any way – switch off, withdraw the mains plug and consult your dealer.
WARNING – excessive sound pressure from earphones or headphones can cause hearing loss.
ABOVE ALL
NEVER let anyone, especially children, push or
hit the screen, push anything into holes, slots or
any other openings in the case - this could result
in a fatal electrical shock.
NEVER guess or take chances with electrical
equipment of any kind – it is better to be safe
than sorry.
5
Page 6
English
Locate the TV away from direct sunlight and strong
lights, soft, indirect lighting is recommended for
comfortable viewing. Use curtains or blinds to
prevent direct sunlight falling on the screen.
Place the TV set on a stable, level surface that
can support the weight of the TV. As an additional
safety measure you secure the TV to the level
surface or a wall, as shown in the illustration, using
sturdy strap.
Otherwise secure the TV on the level surface
(Fall prevention hole in stand) using the mounting
screw.
The LCD display panels are manufactured using
an extremely high level of precision technology,
however sometimes some parts of the screen may
be missing picture elements or have luminous
spots. This is not a sign of a malfunction.
Make sure the TV is located in a position where it cannot be pushed or hit by objects, as pressure
will break or damage the screen. Also, please be certain that small items cannot be inserted into
slots or openings in the case.
Cleaning the screen and cabinet...
Turn off the power, and clean the screen and cabinet with a soft, dry cloth. We recommend that you
do not use any proprietary polishes or solvents on the screen or cabinet as this may cause damage.
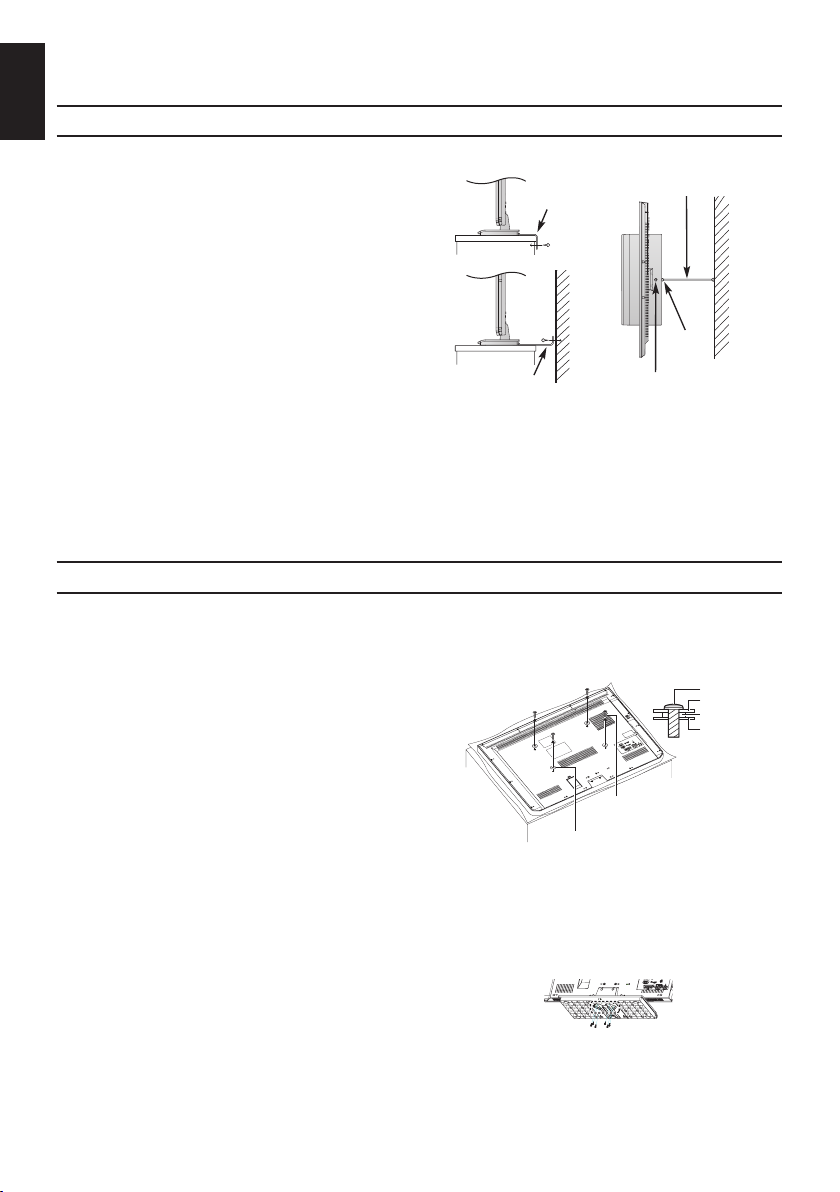
Please use a wall bracket appropriate for the size and weight of the LCD TV.
• Two people are required for installation.
• Never use the four screws attached to the TV.
• To install a wall-mount from another manufacturer, use the SPACERS (supplied).
1. Unplug and remove any cables and/or other
component connectors from the rear of the TV.
2. Carefully lay the front of the unit face down on a at,
cushioned surface such as a quilt or blanket.
3. Follow the instructions provided with your wall
bracket. Before proceeding, make sure the appropriate bracket(s) are attached to the wall and
the back of the TV as described in the instructions provided with the wall bracket.
4. Make sure to place the spacers supplied between the bracket and the back of the TV.
5. Always use the screws supplied or recommended by the wall mount manufacturer.
Removing the Pedestal Stand:
1. Carefully lay the front of the unit face down on
a at, cushioned surface such as a quilt or a
blanket. Leave the stand protruding over the
edge of the surface.
NOTE: Extreme care should always be used when
removing the pedestal stand to avoid damage to the LCD panel.
Where to install
Fixing strap
Fixing strap
Stand style is dependent on model
When using a Wall Bracket
*Screw Type for Wall Bracket:
• 32DB833B: M6/10mm/20KG
• 42DB833B: M8/12mm/20KG
2. Remove the screws.
3. Once you have removed all six screws
holding the pedestal stand in place, remove
the pedestal stand from the TV by sliding
the pedestal stand away from the TV.
Sturdy tie (as short as possible)
Fall prevention hole in stand
Remove four screws.
(Do not reuse these screws for
attaching a wall bracket.)
Place four spacers (supplied).
Stand clip
Installation and important information
Screw
Wall bracket
Spacer
(supplied)
TV back panel
6
Page 7
Please take note
EXCLUSION CLAUSE
Toshiba shall under no circumstances be liable for loss and/or damage to the product caused by:
i) re;
ii) earthquake;
iii) accidental damage;
iv) intentional misuse of the product;
v) use of the product in improper conditions;
vi) loss and/or damage caused to the product while in the possession of a third party;
any damage or loss caused as a result of the owner’s failure and/or neglect to follow the in-
vii)
structions set out in the owner’s manual;
any loss or damage caused directly as a result of misuse or malfunction of the product when
viii)
used simultaneously with associated equipment;
Furthermore, under no circumstances shall Toshiba be liable for any consequential loss and/or
damage including but not limited to the following, loss of prot, interruption of business, the loss of
recorded data whether caused during normal operation or misuse of the product.
• If stationary images generated by 4:3 broadcasts, text services, channel identication logos,
computer displays, video games, on-screen menus, etc. are left on the TV-screen for any length
of time they could become conspicuous, it is always advisable to reduce both the brightness and
contrast settings.
• Very long, continuous use of the 4:3 picture on a 16:9 screen may result in some retention of the
image at the 4:3 outlines, this is not a defect of the LCD TV and is not covered under the manufacturers warranty. Regular use of other size modes (e.g.: Super Live) will prevent permanent
retention.
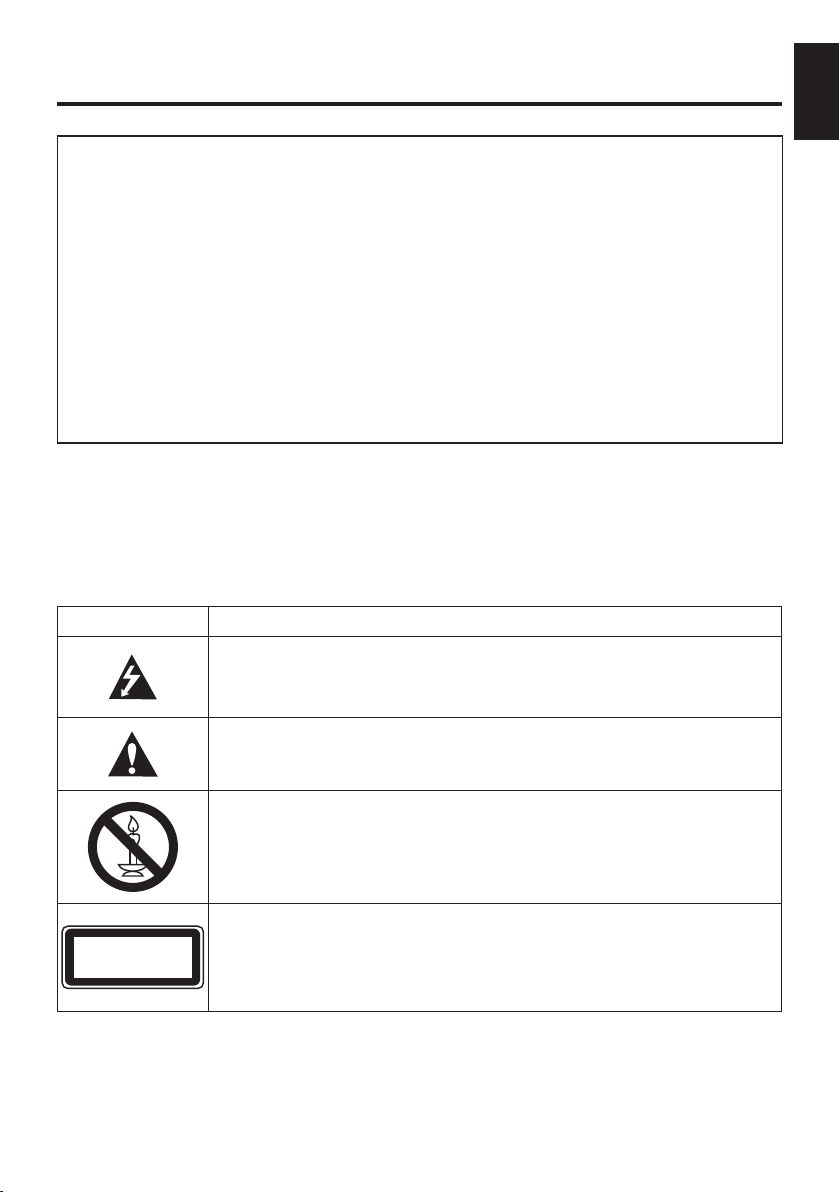
SYMBOL SYMBOL DEFINITION
DANGEROUS VOLTAGE: The lightening ash with arrowhead symbol, within
an equilateral triangle, is intended to alert the user to the presence of uninsulated “DANGEROUS VOLTAGE” within the product’s enclosure that may
be of sufcient magnitude to constitute a risk of electric shock to people.
INSTRUCTIONS: The exclamation point within an equilateral triangle is
intended to alert the user to the presence of important operating and maintenance (servicing) instructions in the literature accompanying the appliance.
English
CLASS 1
LASER PRODUCT
WARNING: To prevent the spread of re, keep candles or other open ames
away from this product at all times.
LASER CAUTION:
• Use of controls or adjustments or performance of procedures other than
those specied herein may result in hazardous radiation exposure.
• To prevent direct exposure to laser beam, do not try to open the enclosure.
• Visible and invisible laser radiation when open and interlocks defeated.
• DO NOT STARE INTO BEAM.
7
Page 8
EnglishEnglish
English
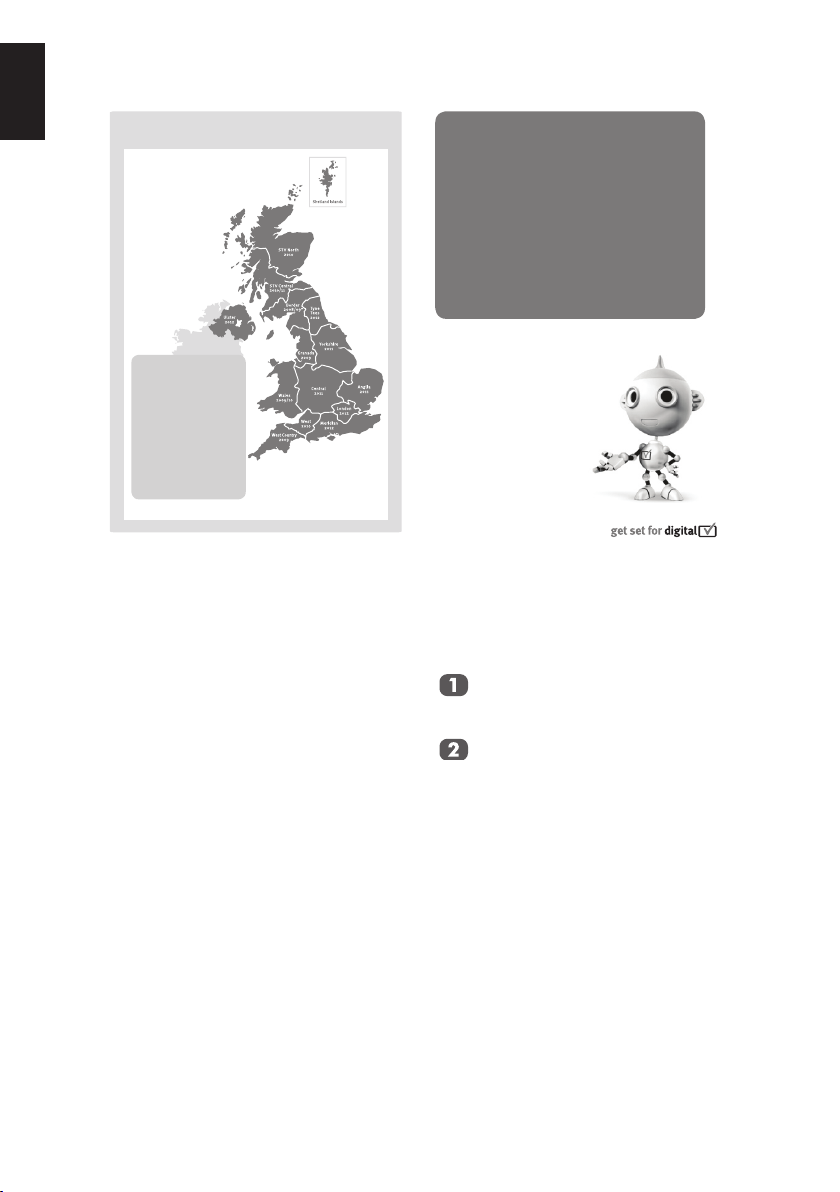
When does switchover happen?
*Copeland switches on October 17, 2007
Keep this impo rtant
information about
The exact date you
switch depends on the
transmitter you are
how to r e-tune your
served by. To check
when you switch,
go to Digital UK’s
postcode checker on
TV during the
www.digitaluk.co.uk
Check your ITV news
service or look at Teletext
TV switchover
page 106 to see what TV
region you’re in.
Television in the UK is going digital, bringing
us all more choice and new services. Starting
in late 2007 and ending in 2012, television
services in the UK will go completely digital, TV
region by TV region.
Please see above to nd out when your area
switches to digital.
Digital UK is the independent, non-prot
organisation leading the process of digital
TV switchover in the UK. Digital UK provides
impartial information on what people need to
do to prepare for the move to digital, and when
they need to do it.
How the switchover affects your TV
equipment:
Your new TV has a digital tuner built in, which
means it is ready to receive the Freeview signal by simply plugging it into your aerial socket
(check if you can get digital TV through your
aerial now, or whether you’ll have to wait until
switchover, at www.digitaluk.co.uk).
When the TV switchover happens in your area,
there are at least two occasions when you will
need to re-tune your TV in order to continue receiving your existing TV channels, and also to
pick up new ones, Digital UK, the body leading
the digital TV switchover, will advise you when
you need to re-tune during the switchover.
If you choose to connect your TV to satellite
or cable with a digital box then it will not be
affected by switchover, and you won’t need to
re-tune.
Digital Switchover
Keep this impo rt ant
EnglishEnglish
information about
how to r e-tune your
TV during the
TV switchover
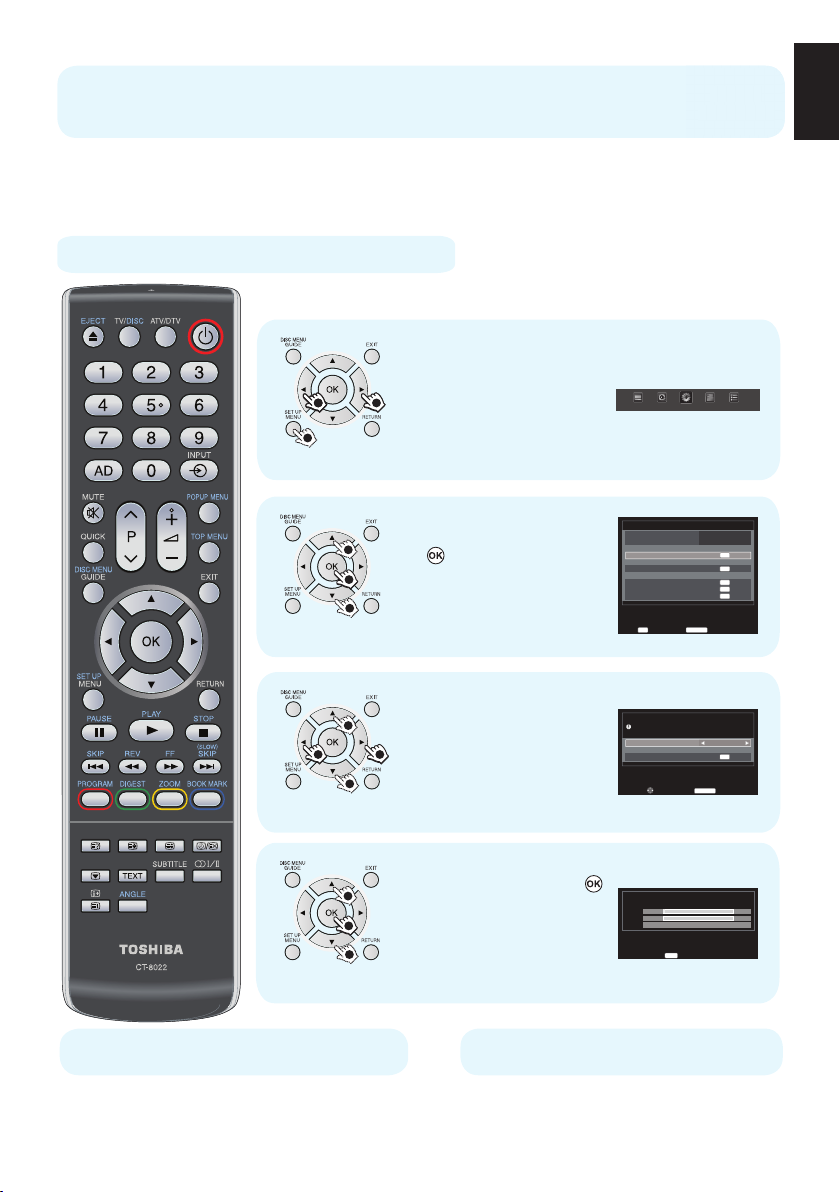
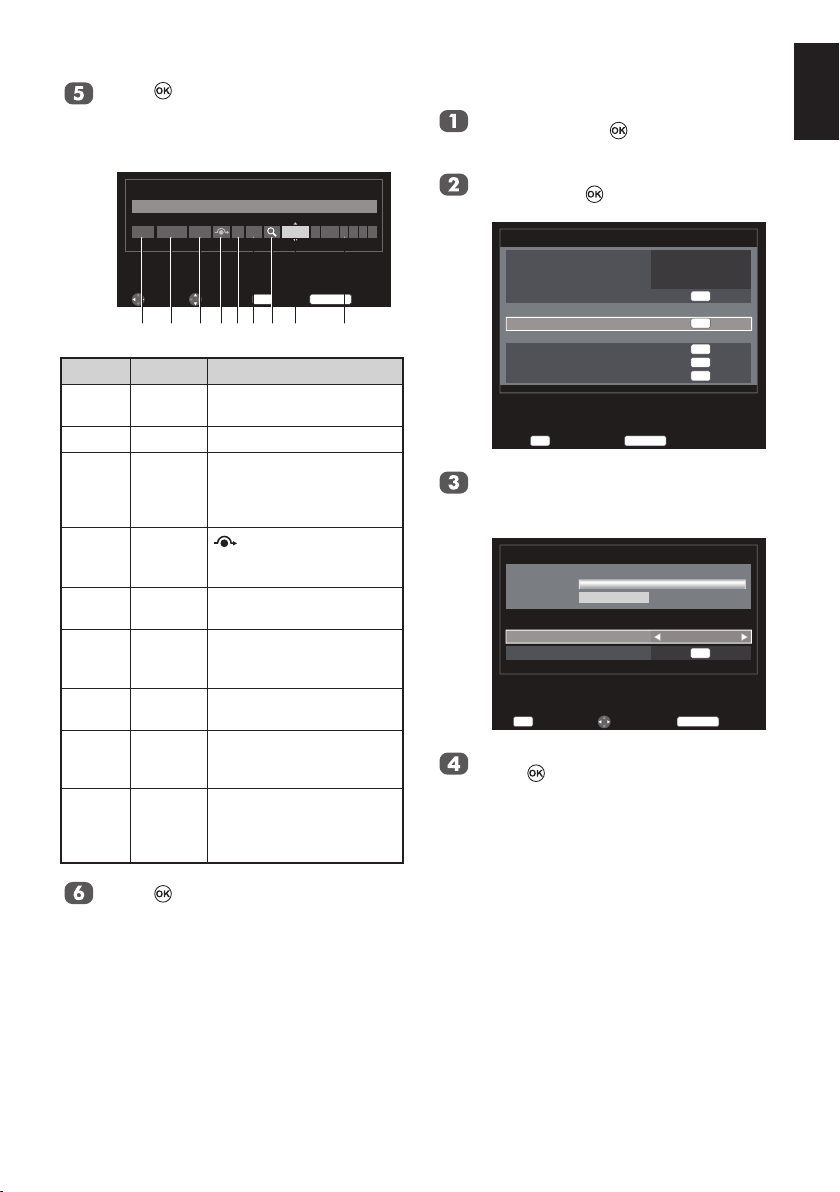
How to re-tune:
As new services are broadcast it will be necessary to re-tune the television in order to view
them. Auto tuning will completely retune the
television and can be used to update the channel list.
Press MENU button on the remote
control unit.
Select Auto tuning option.
A screen will appear warning that previous digital programmes and settings will
be deleted.
You must allow the television to com-
plete the search......
When the search is complete the Auto tuning
screen will display the total number of service
found.
Note:
Further detailed instructions on Auto tuning
can be found in the TV owners manual.
If you are missing channels, it may be that
they are not available in your area, or that your
aerial needs upgrading.
If you have any further questions, please
contact your equipment supplier or call Digital
UK on 08456 50 50 50 or visit www.digitaluk.
co.uk
8
digita l
Page 9
Re-tuning: TOSHIBA
PICTURE SOUND
SETUP
APPLICATIONS PREFERENCES
Language
Country
Tuner Mode
Auto tuning
ATV Manual Tuning
DTV Manual Tuning
DTV Settings
AV connection
Picture Position
Quick Setup
English
UK
Antenna
Enter
OK
Back
RETURN
1/2SET UP
OK
OK
OK
OK
OK
Auto tuning
Tuning Mode
Start Scan
ATV and DTV
OK
Previous settings will be lost !
Press EXIT for no change.
Back
RETURN
Edit
Auto tuning
ATV
DTV
Stop
EXIT
Progress
2 %
0 %
Channel: C4 Station:
Found
0
0
Freeview products
4 Steps
(Steps 1-4)
This guide can be used to help you re-tune the following product with the remote control below:
English
TOSHIBA Digital TV
2 22 2
1
2 2
Make sure your TV is on and press 80
for the BBC News channel
Press MENU and press
1 )
◄ or ► to select SETUP.
Press ▲ or ▼ to select
2 )
1
2
1
1
Auto tuning, and press
to enter the sub-
menu.
Press ▲ or ▼ to select
3 )
Tuning Mode and press
◄ or ► to select ATV ,
DTV or ATV and DTV.
1
Press ▲ or ▼ to select
4 )
1
2
1
TOSHIBA Customer Helpline: 0844 856 0730
* This process may affect any saved information stored on your product, including your favourites list.
Please consult your instruction manual or contact the manufacturer using the details above.
Start Scan and press
to start Auto tuning
TOSHIBA Online Support:
www.toshiba.co.uk/tv-dvd-support
9
.
Page 10
English
Your guide to
Manual re-tuning
If you are comfortable with technical information and your basic re-tune hasn’t worked,
you can use this manual re-tune guide.
If your Freeview TV or box picks up a di erent regional service to your
preferred service (e.g. BBC England instead of BBC Scotland, or ITV Central
instead of ITV Anglia), you can use this manual re-tune guide.
800 or above, this guide will help you put them in your preferred position.
retailer or installer. This is a guide only, Freeview models operate slightly
di erently. Some early models do not o er a manual re-tune facility –
check your instruction book.
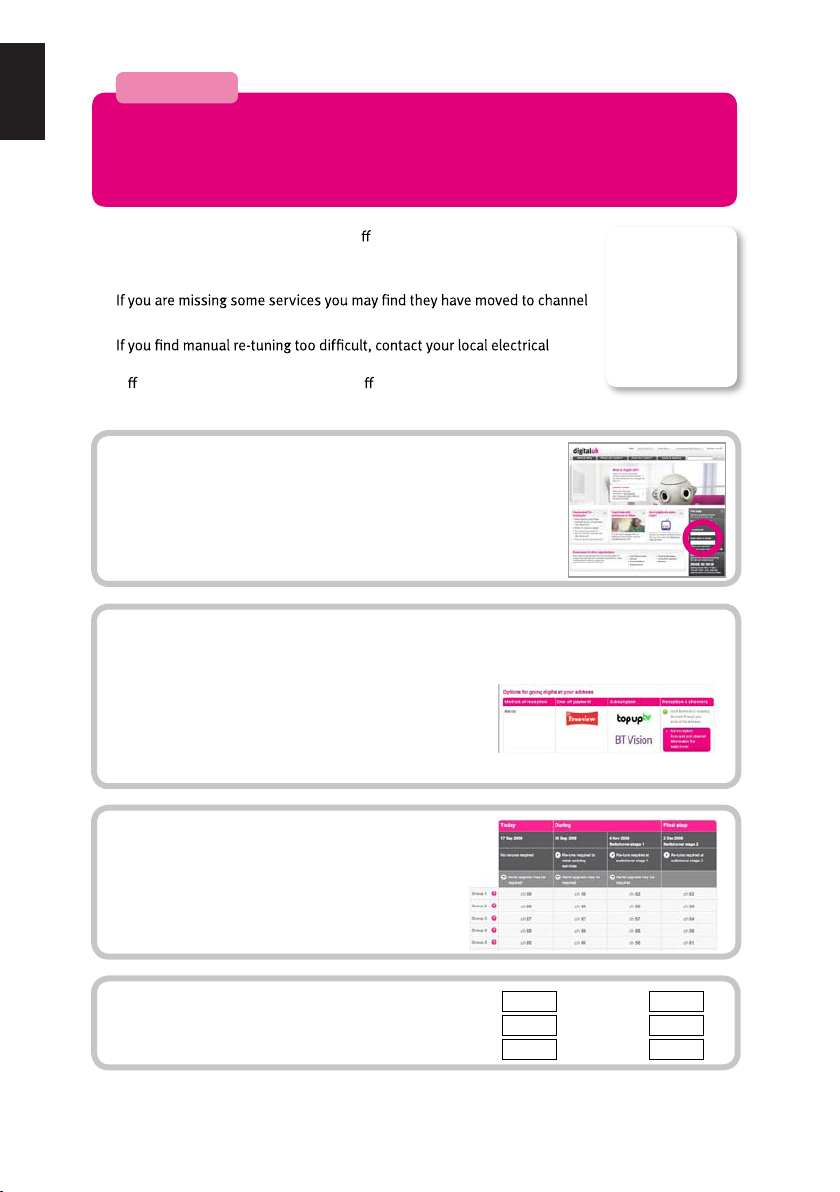
Go to the Postcode Checker at digitaluk.co.uk
1
Enter your postcode on the right hand side of the web page.
Remember to include your house number or name.
If you do not have internet access, contact the Digital UK
helpline on 08456 50 50 50
guide support.
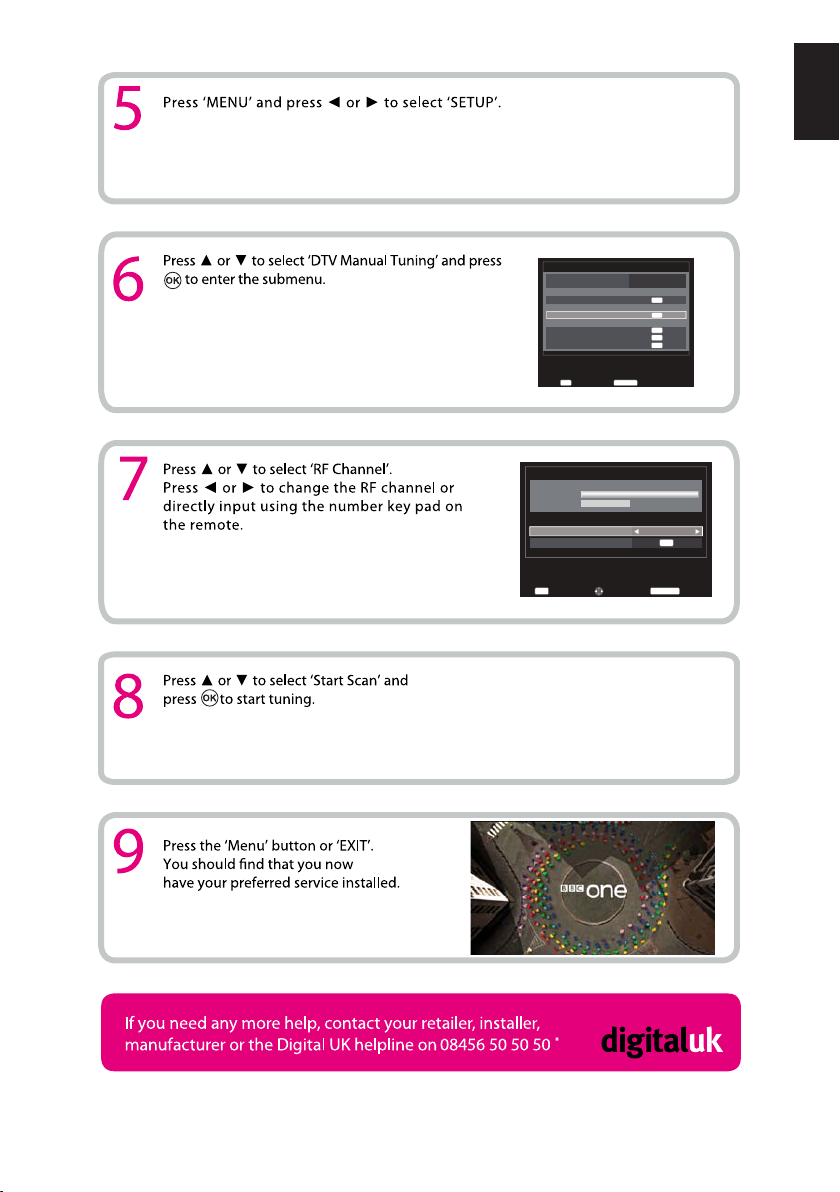
Once you have entered your address details, the next page gives you an indication of
which TV services you should receive, based on your most likely transmitter. You may
2
be able to receive television services from more than one transmitter and you can
check alternatives, where available.
On the results page click on the pink button to see
your full reception forecast and channel information
for switchover.
*
and ask for manual re-tune
Please note:
Every time
you re-tune,
you will need
to go through
this process.
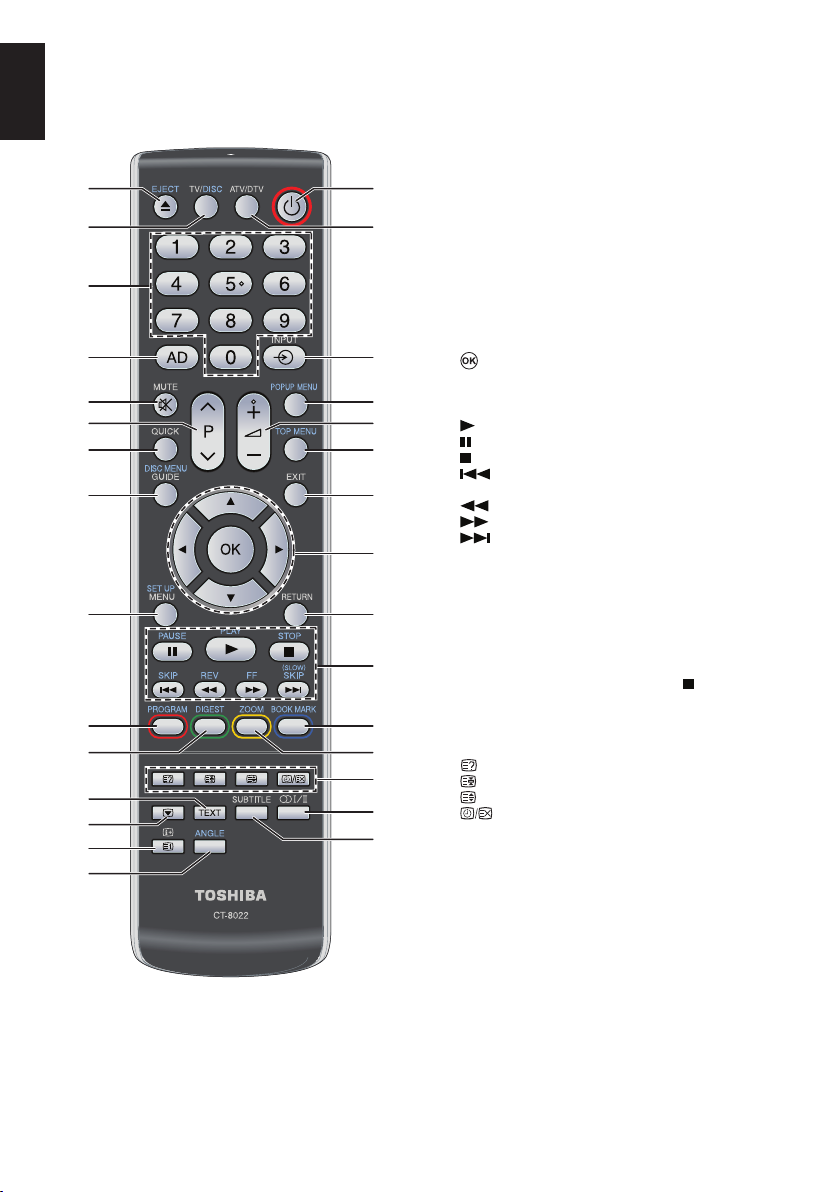
Click on the How do I re-tune? pink banner.
3
Scroll down to the manual re-tune table where
you will see the relevant “RF Channel” numbers
for the digital services that can be received
at your home.
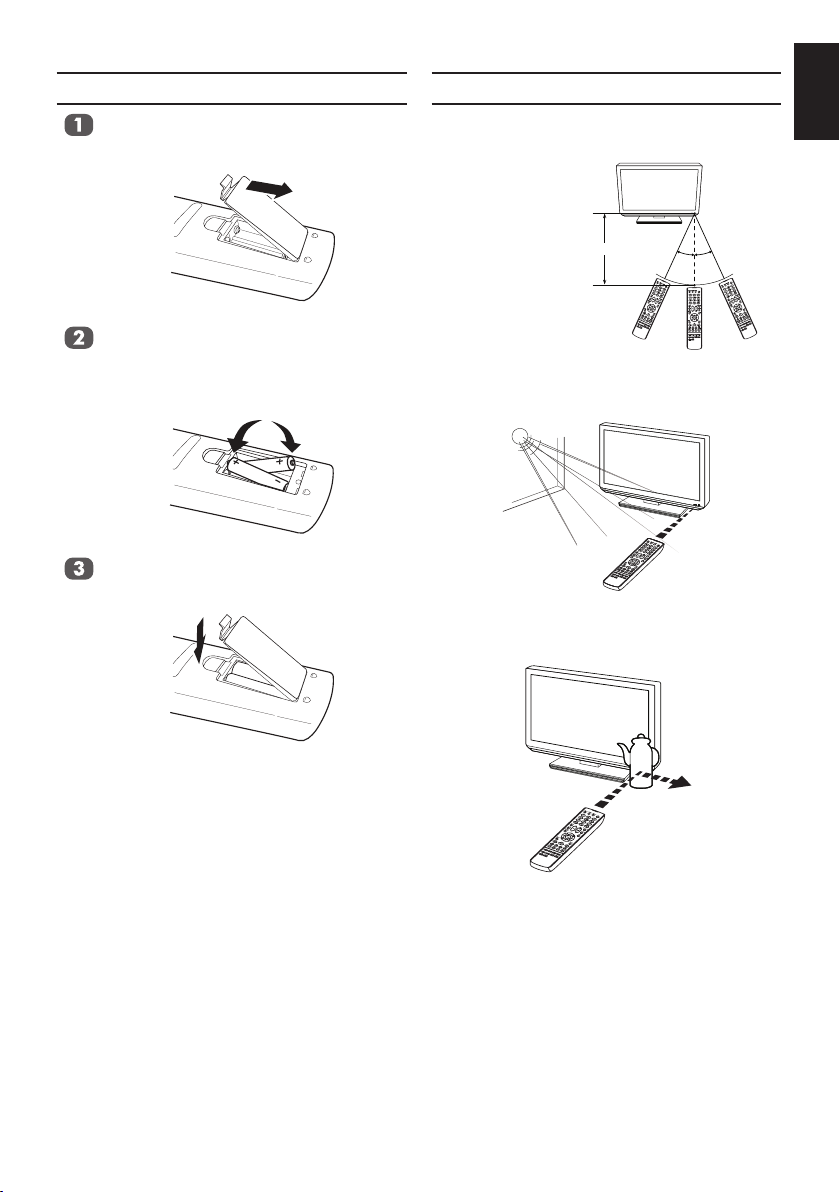
Write down the “RF Channel” numbers
for your transmitter using the Group
4
boxes here:
*Calls are free for BT customers within inclusive calling plans. Call charges from other providers may vary. The standard business hours for Digital UK’s contact centre are 9am to 7pm
Monday to Friday and 10am to 4pm on a Saturday. Opening hours will be extended during switchover in each area. Digital UK, PO Box 26833, Kirkcaldy,KY2 9AG .
**Please note that the Freeview channel line-up is subject to change.
**
Group 1
Group 2
Group 3
Group 4
Group 5
Group 6
10
Page 11
English
Language
Country
Tuner Mode
Auto tuning
ATV Manual Tuning
DTV Manual Tuning
DTV Settings
AV connection
Picture Position
Quick Setup
OK
Enter
DTV Manual Tuning
Weak Average Strong
Signal Strength
Quality
RF Channel
Start Scan
0−9
Poor
1/2SET UP
English
UK
Antenna
OK
OK
OK
OK
OK
RETURN
Back
5
OK
RETURN
EditInput
Back
11
Page 12
English
The Remote Control
Simple at-a-glance reference of your remote control.
2
3
5
6
8
12
14
17 18
20
22
25
26
29
30
1 Toggles between TV ON or Standby
2 Ejects the disc
3 Switches between TV/DISC
4 Switches between ATV and DTV
5 Number buttons
6 Audio Description (in DTV mode)
7 Toggles between external input sources
8 Mutes the sound
9 Displays a popup menu or disc menu
during playback
10 Changes the channel
1
11 Changes the volume
12 Displays the Quick access menu
4
13 Opens Media Center (not during playback)
Displays the top menu during playback
14 In TV mode: Displays EPG (in DTV mode)
In DISC mode: Displays On-Screen
Control menu during playback
15 Exits the menu system
16 Menu navigation: ▲, ▼, ◄, ►
In Text mode: Changes the page
7
Conrms the selection
17 Displays the on-screen menu
18 Goes to the previous level of the menu
9
19 Playback function keys
1110
Starts/resumes playback
Pauses playback to enter still mode
13
Stops playback
Pressing once returns to the beginning
of the current title, chapter, track or le
15
Fast-reverses playback of the disc
Fast-forwards playback of the disc
Press to skip to the next title, chapter,
16
track or le
20 Opens a window to program playback order
during playback
21 During DVD disc playback, press the
BOOK MARK button to add the bookmark;
press and hold for a few seconds to display
the list of bookmark which you added before
on the screen, then you can press the
19
button to select the bookmark or button
to delete the bookmark.
22 Displays thumbnail view of JPEG les
21
(during playback) in loaded media
23 Zoom in/out a picture during playback
23
24 Reveals concealed text
Holds a wanted page
24
Enlarges text display size
Selects a page while viewing a normal
27
picture
28
25 Displays the teletext screen
26 Still Picture
27 In TV mode: Selects the audio
transmissions (Stereo/Bilingual)
In DISC mode: Selects the soundtrack
language
28 Sets the subtitle of a multi-language DVD or
Blu-ray Disc™
29 In TV/DISC mode: Displays on-screen
information
In Text mode: Accesses the index page
30 Selects angles while playing a scene
recorded in multi-angle
NOTE: Colour label denitions:
• Blue - for Disc player
• Grey - for TV
12
Page 13
Inserting Batteries
Remove the battery compartment cover
in the direction of the arrow.
English
Effective Range of the Remote
Aim the remote control directly at the remote
sensor.
Remote sensor
Insert the two supplied “R03/AAA” batteries and make sure the polarities are
matched correctly.
Replace the cover.
NOTE: Do not combine a used, old battery
with a new one or mix battery types.
Remove dead batteries immediately
to prevent acid from leaking into the
battery compartment. Dispose of them
in accordance with instructions on page
100 of this manual.
Warning: Batteries must not be exposed to
excessive heat such as sunlight or
re.
Maximum distance approx. 5m
Transmitter window
30o30
o
The remote control will not work properly in the
following cases:
If bright sunlight directly beams on the front of
the TV.
If an obstacle is placed between the TV and
the remote.
13
Page 14
English
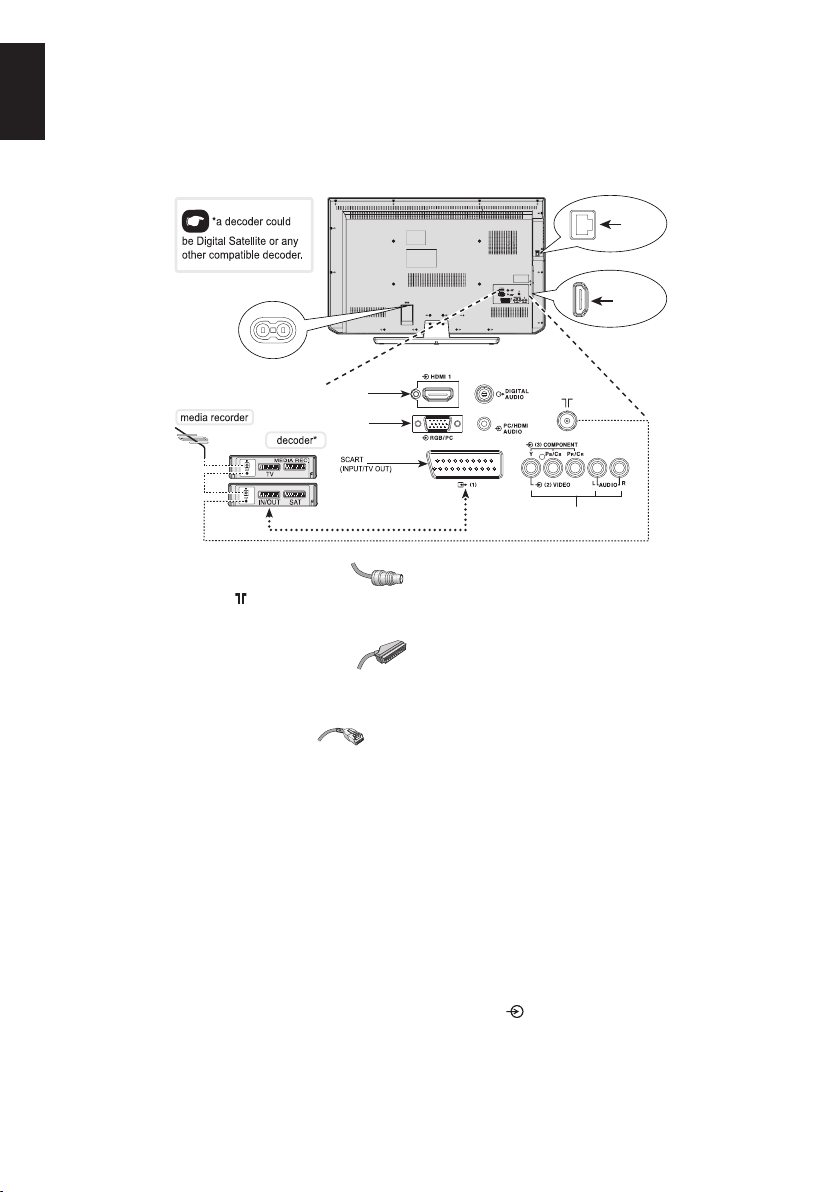
Connecting External Equipment
Before connecting any external equipment, turn off all main power switches. If there is no switch,
remove the mains plug from the wall socket.
Connect the power cord into the AC-IN socket found at the back of the TV.
BD-LIVE™
(LAN jack)
HDMI 2 INPUT
SOCKET
AC−IN
HDMI 1 INPUT
SOCKET
RGB/ PC
Composite INPUT
Aerial cables: - - - - - - - - - - - - - - - - - - Connect the aerial to the (antenna) socket on the rear of the TV.
If you use a decoder and/or media recorder, connect through the decoder and/or media recorder to the
TV.
SCART cables: - - - -- - - - - - - - - - - - - - -
Connect the video recorder IN/OUT or decoder TV socket to the TV. Connect the media player SAT
socket to the decoder MEDIA REC. socket.
LAN jack: - - - -- - - - - - - - - - - - - - Use this to connect to a network with an always-on broadband connection. It is reserved for the usage
of BD-LIVE™.
Before running Auto Tuning put your decoder and media recorder to Standby.
HDMI® (High-Denition Multimedia Interface) is for use with a DVD, decoder or electrical equipment
with digital audio and video output. It is designed for best performance with 1080i high-denition video
signals but will also accept and display 480i, 480p, 576i, 576p, 720p and 1080p. HDMI1 also support
VGA, SVGA, XGA, WXGA and SXGA.
NOTE: Although this TV is able to connect to HDMI equipment, it is possible that some equipment
may not operate correctly.
A wide variety of external equipment can be connected to the back of the TV, therefore the
relevant owners manuals for all additional equipment must be referred to.
If the TV automatically switches over to monitor external equipment, return to normal TV by pressing
the desired channel button. To recall external equipment, press
to select.
14
Page 15
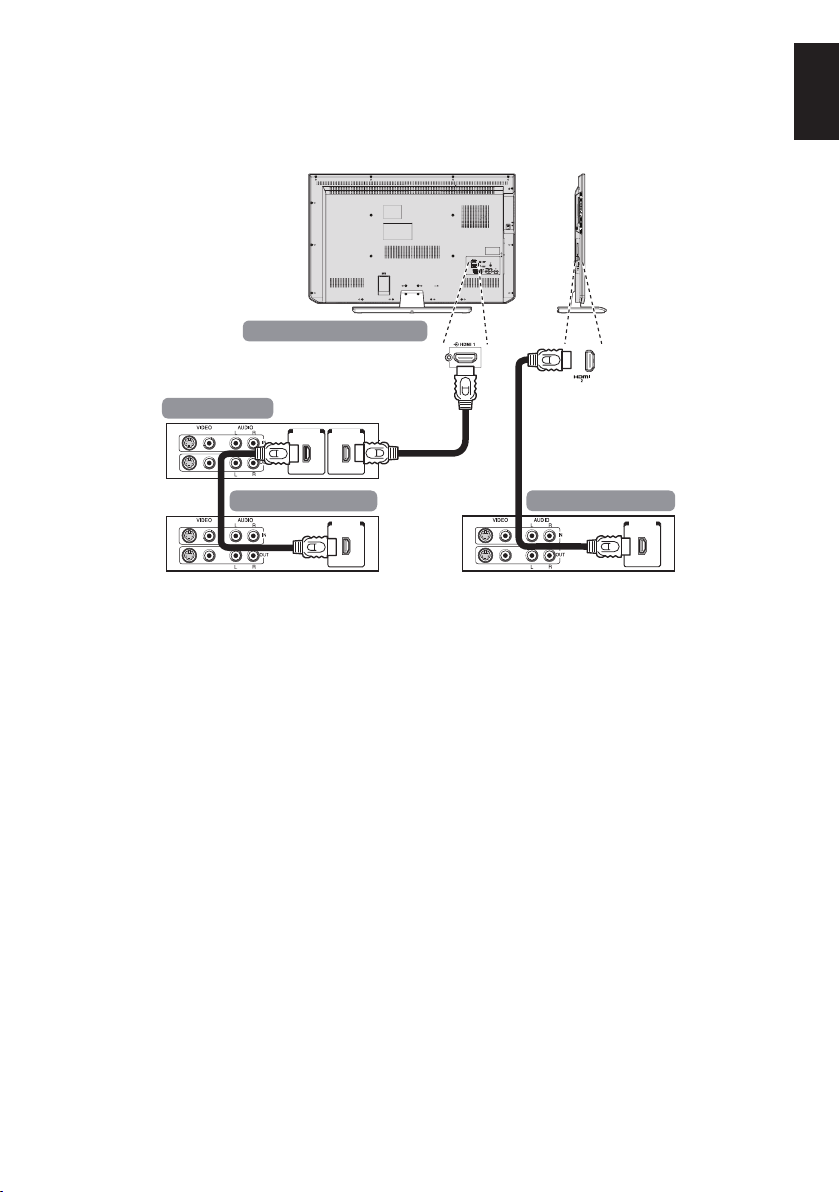
HDMI-LINK Connections
The basic functions of connected audio/video equipment can be controlled using the television’s
remote control if a HDMI-LINK compatible device is connected.
The back of your television
AV amplifier
HDMI outHDMI in
English
Playback equipment
HDMI out
Playback equipment
HDMI out
15
Page 16
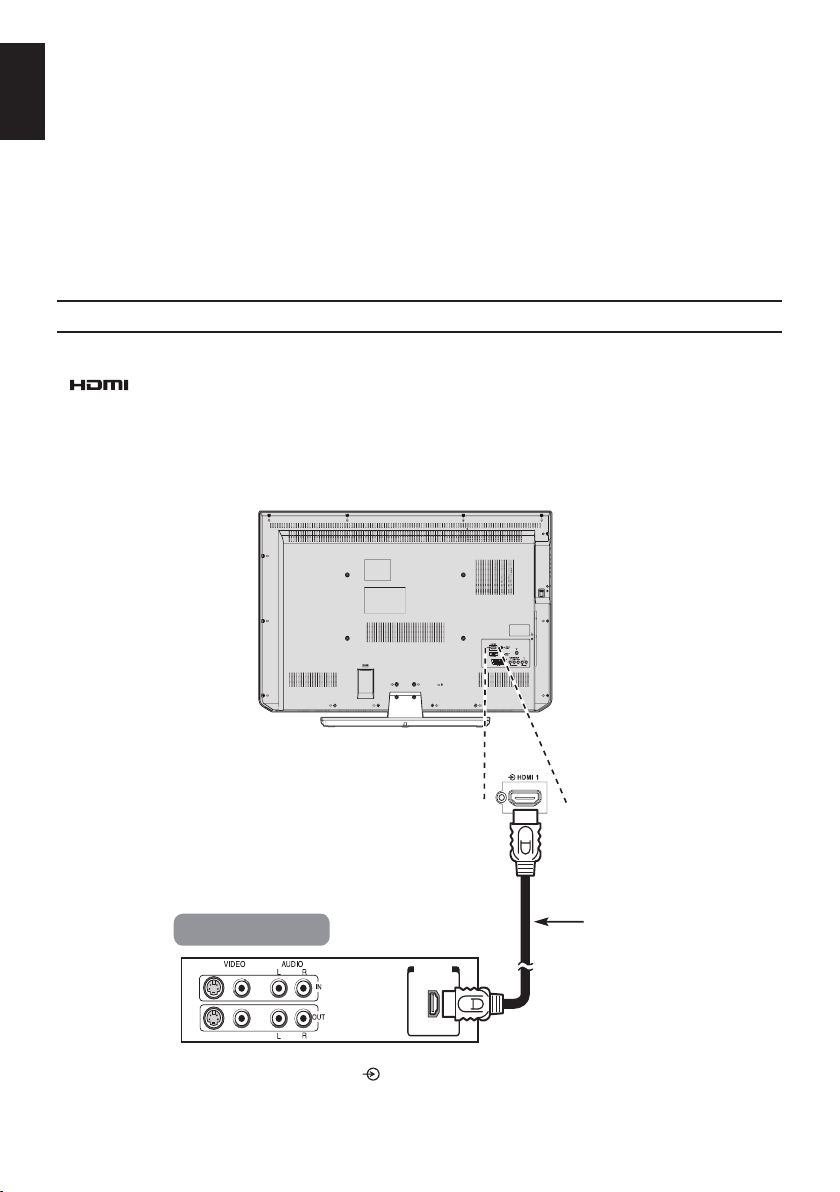
Connecting an HDMI or DVI device to the HDMI input
HDMI
cable
HDMI device
HDMI out
(not supplied)
English
The HDMI input on your television receives digital audio and uncompressed digital video from an
HDMI source device or uncompressed digital video from a DVI (Digital Visual Interface) source device.
This input is designed to accept HDCP (High-Bandwidth Digital-Content Protection) programme material in digital form from EIA/CEA-861-D–compliant [1] consumer electronic devices (such as a set-top
box or DVD player with HDMI or DVI output). For acceptable video signal formats, see page 19.
NOTE:
• Some early HDMI equipment may not work properly with your latest HDMI TV, due to the
adoption of a new standard.
• Supported Audio format: Linear PCM, sampling rate 32/44.1/48kHz.
To connect an HDMI device
Connect an HDMI cable (type A connector) from the device to the HDMI terminal.
For proper operation, it is recommended that you use an HDMI cable with the HDMI Logo
(
• If your HDMI connection is capable of 1080p and/or your television is capable of refresh rates
• HDMI cable transfers both video and audio. Separate analogue audio cables are not required
®
).
greater than 50Hz, you will need a Category 2 cable. Conventional HDMI/DVI cable may not work
properly with this mode.
(see illustration).
To view the HDMI device video, press the button to select HDMI 1 or HDMI 2 mode.
16
Page 17
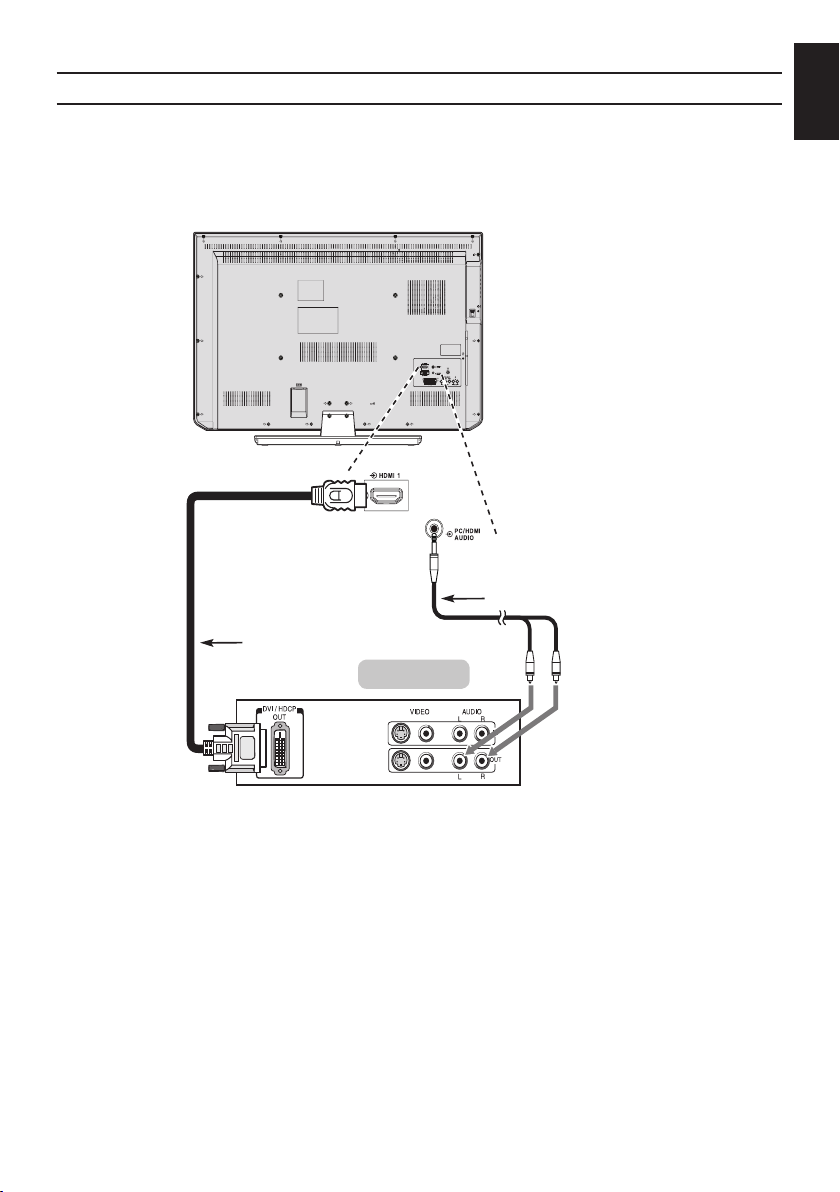
To connect a DVI device
DVI device
HDMI-to-DVI adapter cable
(not supplied)
Audio cable for HDMI
to television connection
(not supplied)
Connect an HDMI-to-DVI adapter cable (HDMI type A connector) to the HDMI 1 terminal and audio
cables to the PC/HDMI (AUDIO) socket (see illustration).
• The recommended HDMI-to-DVI adapter cable length is 2m (6.6ft).
• An HDMI-to-DVI adapter cable transfers video only.
• Separate analogue audio cables are required for audio receivers.
English
To ensure that the HDMI or DVI device is reset properly, it is recommended that you follow these
procedures:
• When turning on your electronic components, turn on the television rst, and then the HDMI or
DVI device.
• When turning off your electronic components, turn off the HDMI or DVI device rst, and then the
television.
[1] EIA/CEA-861-D compliance covers the transmission of uncompressed digital video with high-bandwidth digital content protection,
which is being standardized for reception of high-denition video signals. Because this is an evolving technology, it is possible that
some devices may not operate properly with the television.
HDMI, the HDMI Logo, and High-Denition Multimedia Interface are trademarks or registered trademarks of HDMI Licensing LLC in
the United States and other countries.
17
Page 18
English
the back of your television
HDMI-to-DVI
adapter cable
(not supplied)
2
Computer
Audio cable for PC to television
connection (not supplied)
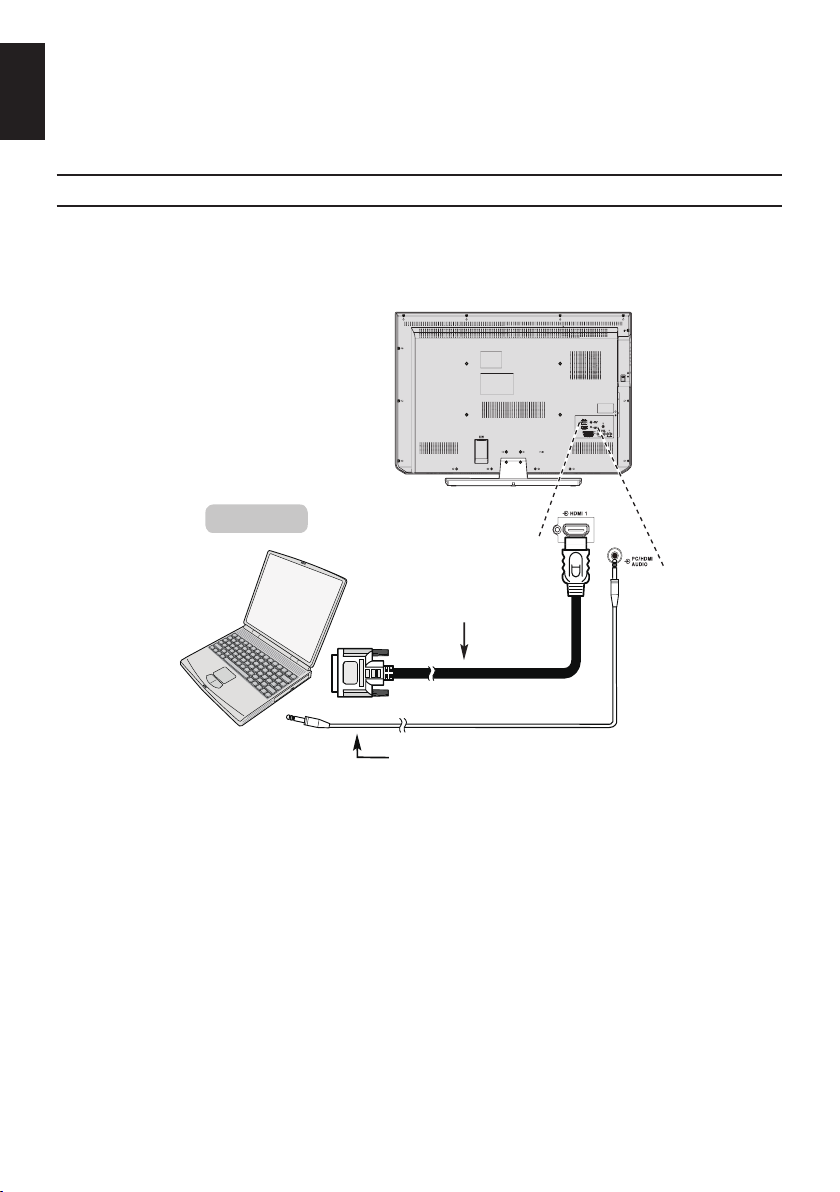
Connecting a Computer
With either an RGB/PC or an HDMI connection, you can watch your computer’s display on the television and hear the sound from the televisions speakers.
To connect a PC to the HDMI terminal
When connecting a PC to the HDMI terminal on the television, use an HDMI-to-DVI adapter cable
and an analogue audio cable.
If connecting a PC with an HDMI terminal, use an HDMI cable (type A connector). A separate analogue cable is not necessary.
For acceptable PC and video signal formats, see page 19.
NOTE:
• The edges of the images may be hidden.
• If connecting a certain PC model with a unique PC signal, the PC signal may not be
detected correctly.
18
Page 19
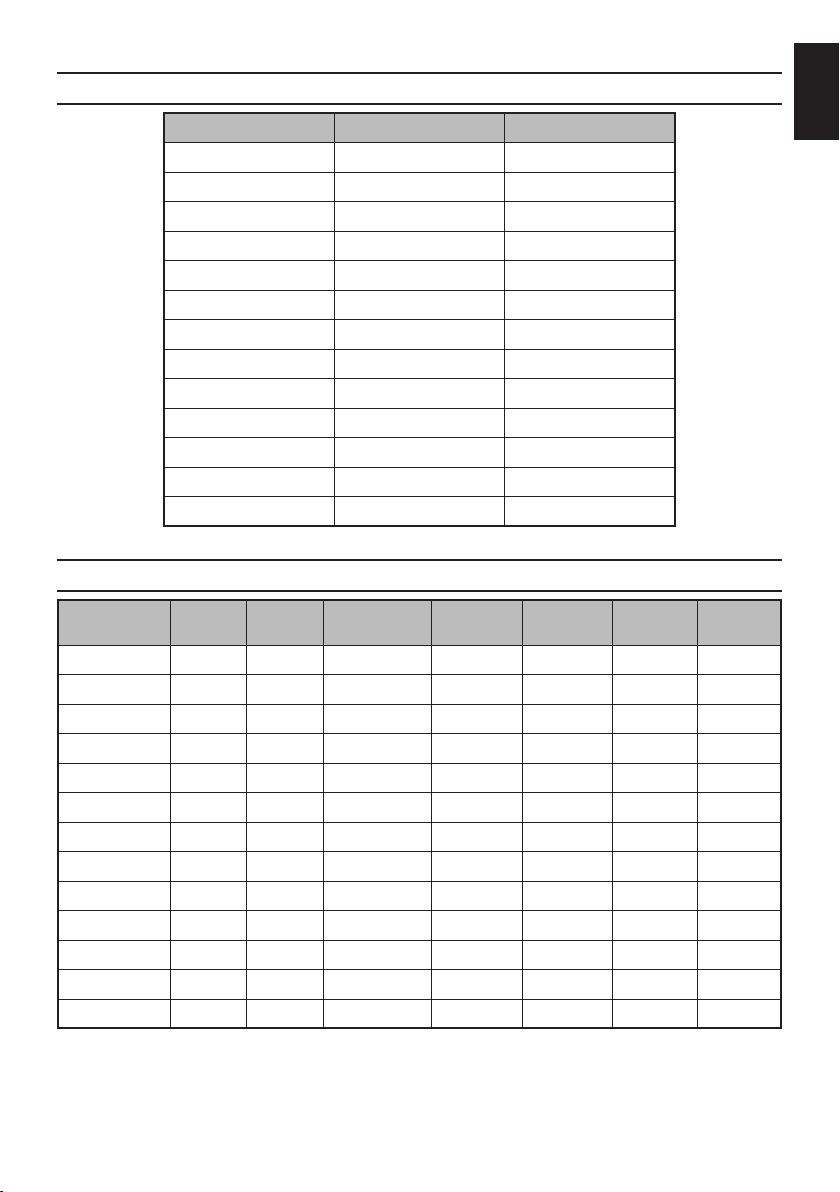
Acceptable Video signals through HDMI terminals
Resolution H. Frequency (kHz) V. Frequency (Hz)
480i 15.734 60.000
480p 31.500 60.000
576i 15.625 50.000
576p 31.250 50.000
720p 37.500 50.000
720p 45.000 60.000
1080i 28.125 50.000
1080i 33.750 60.000
1080p 27.000 24.000
1080p 28.125 25.000
1080p 33.750 30.000
1080p 56.250 50.000
1080p 67.500 60.000
Acceptable PC signals through HDMI terminals
English
Resolution H (kHz) V(Hz)
640 x 480 31.369 59.940 25.175 Negative Negative 800 525
640 x 480 37.861 72.809 31.500 Negative Negative 832 520
640 x 480 37.500 75.000 31.500 Negative Negative 840 500
800 x 600 35.160 56.250 36.000 Positive Positive 1024 625
800 x 600 37.879 60.317 40.000 Positive Positive 1056 628
800 x 600 48.077 72.188 50.000 Positive Positive 1040 666
800 x 600 46.875 75.000 49.500 Positive Positive 1056 625
1024 x 768 48.363 60.004 65.000 Negative Negative 1344 806
1024 x 768 60.023 75.029 78.750 Positive Positive 1312 800
1280 x 768 47.776 59.870 79.500 Negative Positive 1664 798
1360 x 768 47.712 60.015 85.500 Positive Positive 1792 795
1280 x 1024 63.981 60.020 108.000 Positive Positive 1688 1066
1280 x 1024 79.976 75.025 135.000 Positive Positive 1688 1066
Pixel Clock
(MHz)
H-Polarity V-Polarity H-Total V-Total
19
Page 20
Digital On-Screen Information and Programme Guide
English
When viewing in digital mode, the on-screen information and programme guide provide access to
programme details for all available channels.
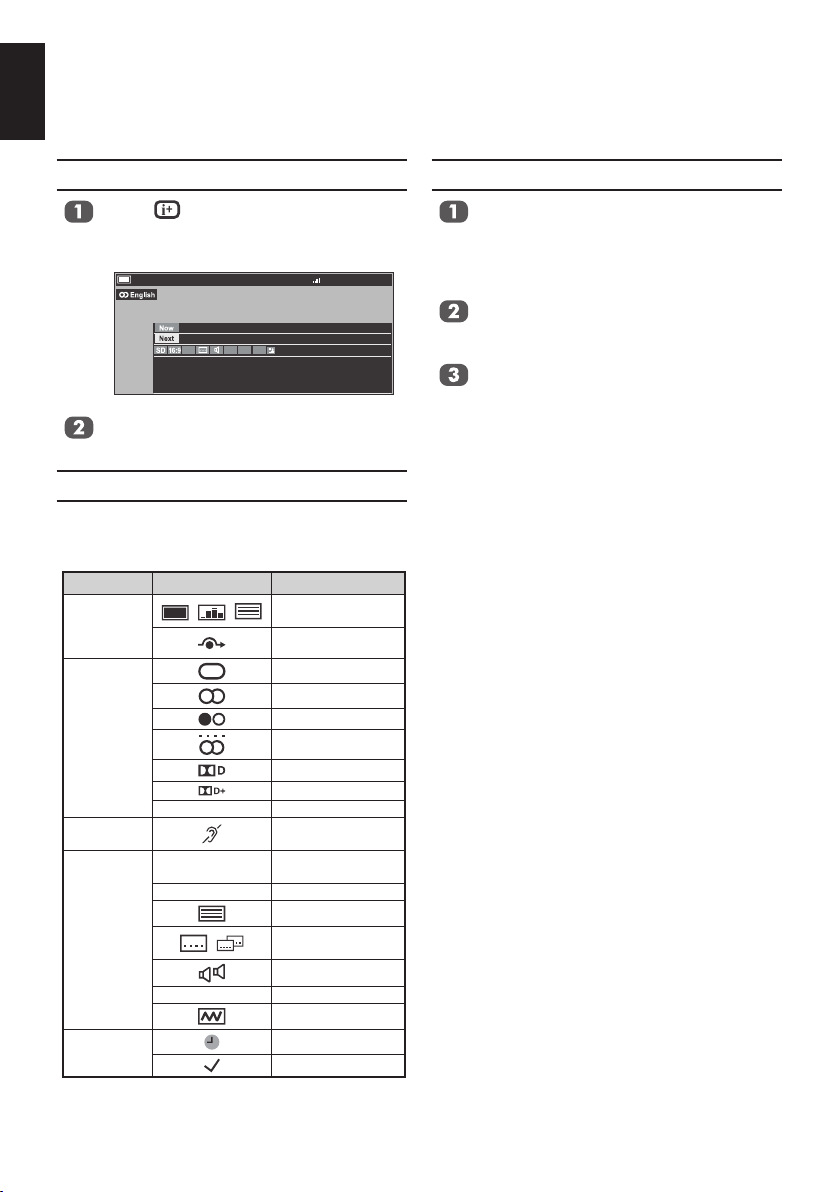
Information
Press and the information screen
will appear giving details of the channel
and programme currently being viewed.
1 BBC Parliament
Westminster Hall
Prime Minister's Questions
Recorded coverage of questions in the House of Commons to Prime
Minister Gordon Brown from Wednesday 26 Novemder.
10:18 Sun, 30 Nov
07:00 − 11:30
News/Current.. 72 Minutes Left
11:30 − 12:00
Press ▲ or ▼ to choose from Now or
Next information guide.
On-Screen Information Icons
Icons will appear on the Information screen giving details about the programmes being broadcast. Details of these icons are listed below:
Icon Description
Service info
Audio info
Audio/
Subtitle info
Event info
Timer info
AD Audio Description
HD, SD
16:9, 4:3 Video Aspect
None or 4 - 18 Parental rating
NOTE: When country setting is France,
Parental rating is 4 -18.
Service type
(TV, Radio, TEXT)
Skip
Mono
Stereo
Dual mono
Multi Channel
Dolby Digital
Dolby Digital+
Hearing Impaired
Video format
(HD, SD)
Teletext
Subtitle
(Single, Multi)
Multi-audio track
Encrypted
Recording
Reminder
Guide
Select the on-screen guide by pressing
GUIDE. The guide screen will appear
highlighting details of the channel and
programme currently being viewed. This
may take a few moments to appear.
Press ◄ or ► for information on other
programmes scheduled for the channel
selected.
For details of other programmes cur-
rently available, press ▲ and ▼ to scroll
up and down the channel list.
NOTE: In order for the recording operation
to work properly, the media recorder
must be set to the same time as the TV.
Regarding the process for recording,
please refer to the owner’s manual of
the recording equipment.
20
Page 21
Frequently Asked Questions
No power.
Q
• Plug in the power cord rmly into a
A
Q
A
Q
A
Q
A
Q
A
wall outlet.
• Unplug the power cord, wait for 5 to
10 seconds, then plug in again.
No picture. No sound.
• Check the power of the connected TV.
• Check connections of devices which
are connected to the TV.
• Check the settings of sound and
audio on the TV.
No picture. Picture is distorted.
Pictures of Blu-ray Disc™ or DVD are
monochrome.
• Picture may be distorted momentarily
after fast forward or fast reverse play.
• This is not a malfunction.
• Check the compatibility of the disc on
page 63.
• Check the region code of the disc on
page 63.
No picture, or suddenly picture gone out
in HDMI connection.
• Connect an HDMI cable rmly.
• HDMI connection may not be veried.
Turn on the power of the TV.
• Is the amplier HDCP compatible?
No Signal!
No TV/DVD video.
Make sure the VCR or DVD player is
connected to the TV, then select the correct input by pressing .
There is a picture, but why is there little
Q
or no colour?
The colour is factory set to Auto to automatically display the best colour system.
When using an external source, if there
A
is little or no colour, improvements may
sometimes be achieved.
To manually change the colour system:
With the external source playing, select
Manual setting in the SETUP menu.
Using ▲ or ▼ choose from Auto, NTSC
4.43, NTSC 3.58, SECAM or PAL .
Manual setting
Colour system: Auto
EXT 1
Select Change Save
What else can cause a poor picture?
Q
Interference or a weak signal. Try a
different TV station. Manual ne tuning
A
may help:
Select the ATV/DTV Manual Tuning in
the SETUP menu.
Highlight the station and press , then
press ◄ or ► to select Manualne
tuning.
1 BG P C69 0
A
OK
ATV Manual Tuning
Manual fine tuning
RETURN
−−−−−
English
Back
21
Select Change Save
Using ▲ or ▼ to adjust to get the best
picture and sound. Press and then
EXIT to exit.
NOTE: For DTV Manual Tuning, please
see page 29 and page 30.
No sound. Sound is interrupted.
Q
• Adjust the sound volume.
• Check the sound has not been muted.
A
• Check the speaker connection.
OK
RETURN
Back
Page 22

English
Playback stops momentarily.
Q
• Discs with scratches or stains such as
A
Q
A
Q
A
Q
A
Q
A
Q
A
Q
A
ngerprints cannot be played properly.
Clean the disc or try other discs.
• The disc may contain error.
Disc does not play.
• Clean the disc.
• Load the disc with label facing forward
into the disc slot.
• Try other discs. If they are played, the
disc may contain error.
• Check the compatibility of the disc on
page 63.
• Is the disc nalized?
Unusual screen remains even after
ejecting a disc.
Internal error may have occurred. Turn
the TV off, wait for a while, then power
on.
The remote control does not work
properly.
• Point the remote control at the remote
sensor of the TV.
• Operate the remote control within
about 5 m (22 feet).
• Replace the batteries.
• Check the polarity of batteries in the
remote control.
Buttons do not work.
Unplug the power cord, wait for 5 to 10
seconds, then plug in.
Text unreadable/garbled.
Good performance of text depends on
a strong broadcast signal. If the text is
unreadable or garbled, check the aerial,
satellite or cable connection. Go to the
main index page of the text service and
look for the User Guide. This will explain
the basic operation of text in some
detail.
Text not visible.
Text has been selected while viewing
an external source. No text will appear
on-screen or a box may appear stating
no information is available. Select a
broadcasting channel and press to
access.
Wrong colours when playing an NTSC
Q
source.
Connect the source via a SCART cable
and play. Select Manual setting from
A
the SETUP menu and set the Colour
System to Auto.
Manual setting
Colour system: Auto
EXT 1
Select Change Save
Operation is rejected while playing a
Q
disc.
The operation may be prohibited by the
A
disc. Refer to description of the disc.
A playable disc cannot be read.
Q
• Moisture condensation may occur in-
side the TV. Keep the TV powered on
A
Q
A
Q
A
Q
A
Q
A
for a while to evaporate the moisture.
• Check the compatibility of the disc on
page 63.
• Clean the disc.
Angle cannot be changed.
Does the disc include multi-angle con-
tent? Angle selection is available only
while playing a multi-angle content.
DivX®/MP3/JPEG les cannot be played.
Check the compatibility of the disc and
le format.
VCR/DVD picture in black and white.
Check whether the correct SCART input
has been chosen: S-VIDEO or AV from
AV connection in the SETUP menu.
A selected title cannot be played.
The parental control of this TV may
prohibit playback of the content.
A
OK
RETURN
Back
22
Page 23

I forgot my password of “Parental
Q
Control”.
Input 1276 as a password. The registered password is cleared. Register your
A
new password from DTV Settings in the
SETUP menu.
NOTE: “TV parental lock function is not
available for UK”, because no
parental lock concept in UK.
Some setting items on “Setup Menu”
Q
cannot be selected.
Settings such as language, audio, subtitles cannot be changed in stop mode
(resuming standby mode) by pressing
STOP once. To change these items,
A
press STOP twice to stop playback
completely, then press SET UP to open
Disc Setup menu.
HDMI devices not operating properly.
Q
Make sure to use cables with the HDMI
logo (
equipment may not work properly with
A
the latest HDMI TV products, due to
adoption of new standards.
Network connection fails.
Q
• Check LAN connection.
• Turn on the power of modem or
router.
• Set “Network” on page 76 correctly.
A
• Check the connection of your network.
• Check “BD-Live Connection” setting
on page 77.
BD-LIVE™ play or data download fails.
Q
• Connect a USB ash drive with an
adequate (more than 1GB) capacity to
A
Q
A
the EXTERNAL connector.
• Check the USB ash drive is con-
nected correctly.
BD-LIVE™ disc cannot play.
Connect a USB ash drive with an adequate (more than 1GB) capacity to the
EXTERNAL connector. BD-LIVE™ disc
may require certain volume of memory
during playback.
®
). Some early HDMI
TV turns off by itself.
Q
After roughly 15 minutes without any
input video signal at TV mode, the TV
A
will turn off to save power if Automatic
Power Down is set to On.
NOTE:
• Certain operating conditions may
prohibit some features. This is not
a defect.
• Some functions may not be avail-
able depending on disc category
and recording condition of content.
English
23
Page 24
English
Using the Controls
While all the necessary adjustments and controls for the television are made using the remote control,
the buttons on the television may be used for some functions.
Power
Channel Up / Programme Up
Disc Slot
C.I. Slot
Channel Down / Programme Down
Volume up
Volume down
Menu
Input
Eject
Media USB Port
HDMI 2 INPUT
SOCKET
USB (BD-LIVE™)
Switching On
If the RED Standby LED is unlit, check that
the plug is connected to the power supply. If
the picture does not appear, press on the
remote control, it may take a few moments.
To put the TV into Standby, press
on the
remote control. To view the TV, press again.
The picture may take a few seconds to appear.
Using the Remote Control
To set up the TV, you will now need to use the
on screen menus. Press MENU on the remote
control to see the menus.
The on-screen menu appears as a list of ve
icons. Each icon can be selected by pressing
◄ or ► on the navigation ring on the remote
control, its respective options will appear right
side.
To use the options, press
menu. Then press ▲ or ▼ on the navigation
ring to move up and down through the menu
and use , ◄ or ► to select the required
choice. Follow the on-screen instructions. The
functions of each menu are described in detail
throughout this manual.
to enter the sub-
GREEN LED − On Timer
RED LED − Standby
GREEN LED − Power on
Using the Side-Key Controls
TV mode:
To change the volume, press
To alter the channel, press
Press MENU,
, or to control the
sound and picture options.
Press MENU to exit.
To select an external input, press
use , or to move through the list
until the appropriate input source is selected.
Disc mode:
To play, press
To eject, press
; to stop, press .
.
Please always refer to the owner’s manual of
the equipment to be connected for full details.
NOTE: Inserting the headphone plug will mute
the sound from all speakers.
.
.
and then
24
Page 25

Tuning the Television
Before switching on the television put your decoder and media recorder to Standby if they are connected.
To set up the television use the buttons on the remote control as detailed on page 12.
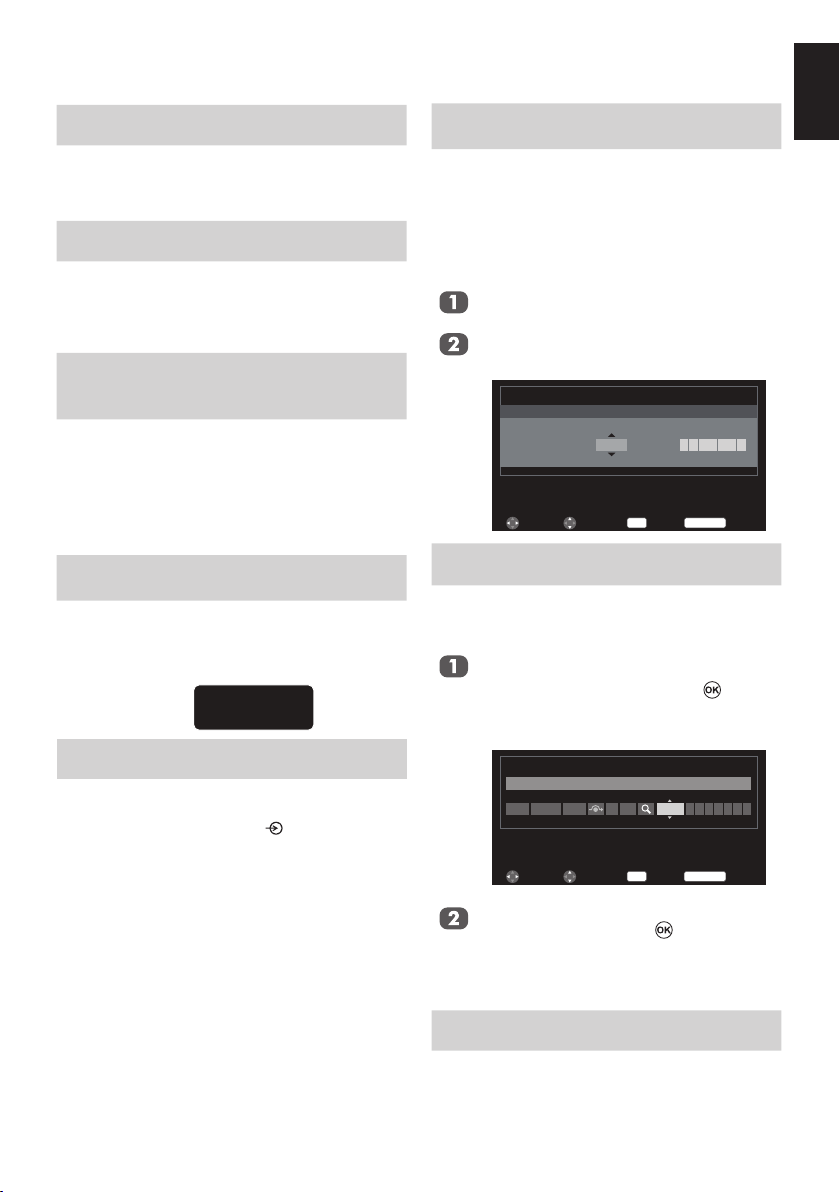
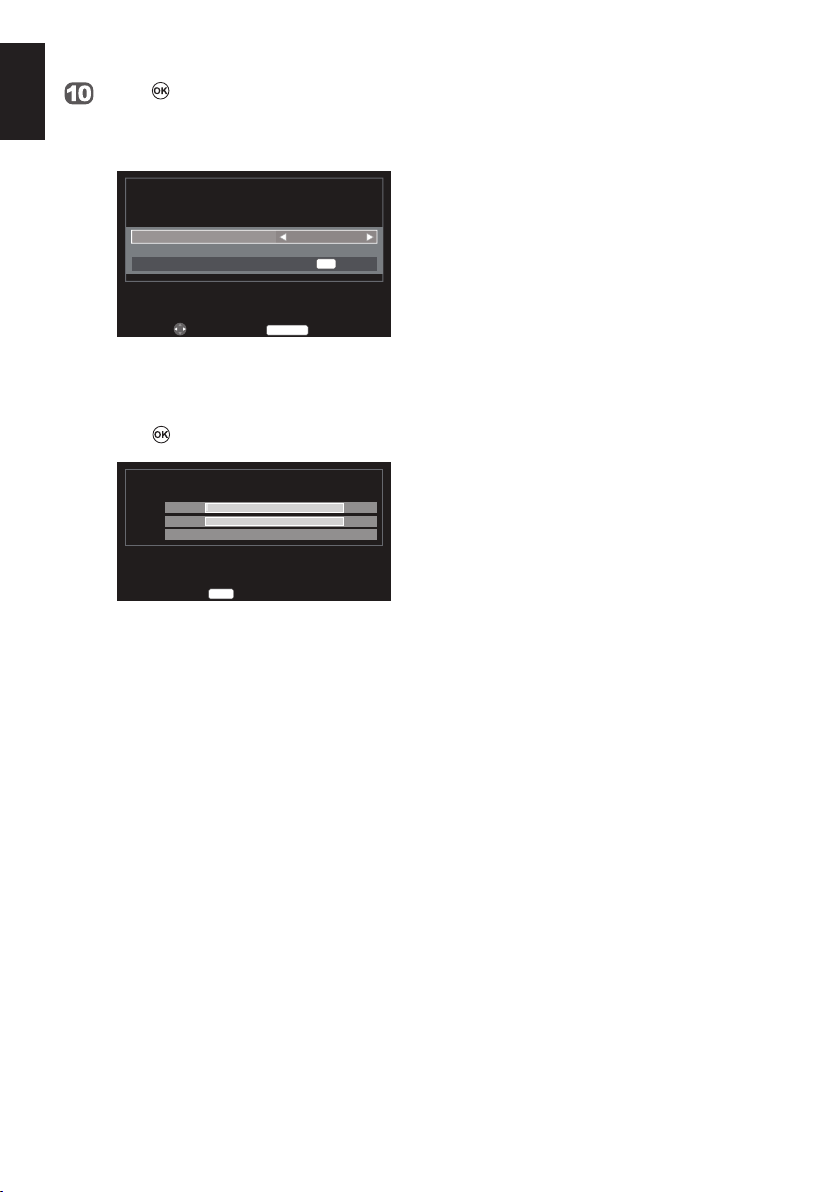
Quick Setup
For rst time use, plug in the TV and
press .
The Quick Setup screen will appear.
Press ▲ or ▼ to select Audio Language 2nd and then press ◄ or ► to
select your preferred language.
Press to select Tuner Mode.
NOTE: This option is based on the
Language
Country
Digital Subtitle Language
Digital Subtitle Language 2nd
Audio Language
Audio Language 2nd
Quick Setup
English
Germany
English
English
English
English
country specied in the Quick
Setup menu.
Tuner Mode
Antenna
English
Select Tuner Mode
OK
NOTE: The Quick Setup menu can also
be accessed in the SETUP menu.
Press ▲ or ▼ to select Language
and then press ◄ or ► to select your
language (English, Français, Deutsch,
Español, Italiano, Português, Nederlands, Svenska, Dansk, Norsk, Suomi,
Polski, Slovenščina, Magyar, Slovensky,
Český, Pyccкий, Românâ, бългapcки,
Srpski, Eλληvıκά, Hrvatski, Türkçe or
Українська).
Press ▲ or ▼ to select Country and
then press ◄ or ► to select your coun-
try (Germany, Denmark, Spain, Finland,
France, Poland, Turkey, Hungary,
Slovenia, Ukraine, Slovakia, Luxembourg, Romaina, UK, Italy, Netherlands,
Sweden, Bulgaria, Greece, Russia, Norway, Ireland, Portugal, Others, Austria,
Belgium, Sweitzerland or Czech).
Press ▲ or ▼ to select Digital Subtitle
Language and then press ◄ or ► to
select your preferred language.
Press ▲ or ▼ to select Digital Subtitle
Language 2nd and then press ◄ or ►
to select your preferred language.
Press ▲ or ▼ to select Audio Language and then press ◄ or ► to select
your preferred language.
Select Location
OK
RETURN
Back
Press ◄ or ► to select Antenna or
Cable.
Press to select Location.
OK
Location
Store
RETURN
Back
To use the TV for the display in a store showroom,
please select [Store].
[Home] mode is recommended for normal use.
Select Auto tuning
Press ◄ or ► to select Home or Store.
When Store is selected, the conrmation window appears.
OK
Location
NO
RETURN
Back
You have selected [Store].
This mode consumes more energy.
Are you sure you want to set to this mode?
Select Auto tuning
Press ◄ or ► to select YES or NO.
25
Page 26
English
Press to enter the Auto tuning menu.
NOTE: Please make sure the aerial is con-
nected to the TV before tuning.
Auto tuning
Tuning Mode
Start Scan
Edit
RETURN
ATV and DTV
OK
Back
Press ▲ or ▼ to select Tuning Mode
and then press ◄ or ► to select ATV ,
DTV or ATV and DTV.
Press ▲ or ▼ to select Start Scan and
press .
Progress
1 %
ATV
0 %
DTV
Channel: C3 Station:
Auto tuning
EXIT
Stop
Found
0
0
The search will begin for all available stations.
The slide bar will move along the line as the
search progresses.
You must allow the TV to complete the
search.
When the search is completed the TV will
automatically select the rst-found channel. This
may not be a clear picture or the signal may
be weak, so the station order can be changed
using ATV/DTV Manual Tuning in the SETUP
menu.
NOTE: The time will be set automatically by
transmission but can be advanced or
decreased by using Local Time Setting
in the DTV Settings screen.
26
Page 27
Setting the Channels
NOTE: When Parental Block is activated, the 4-digit password is needed.
English
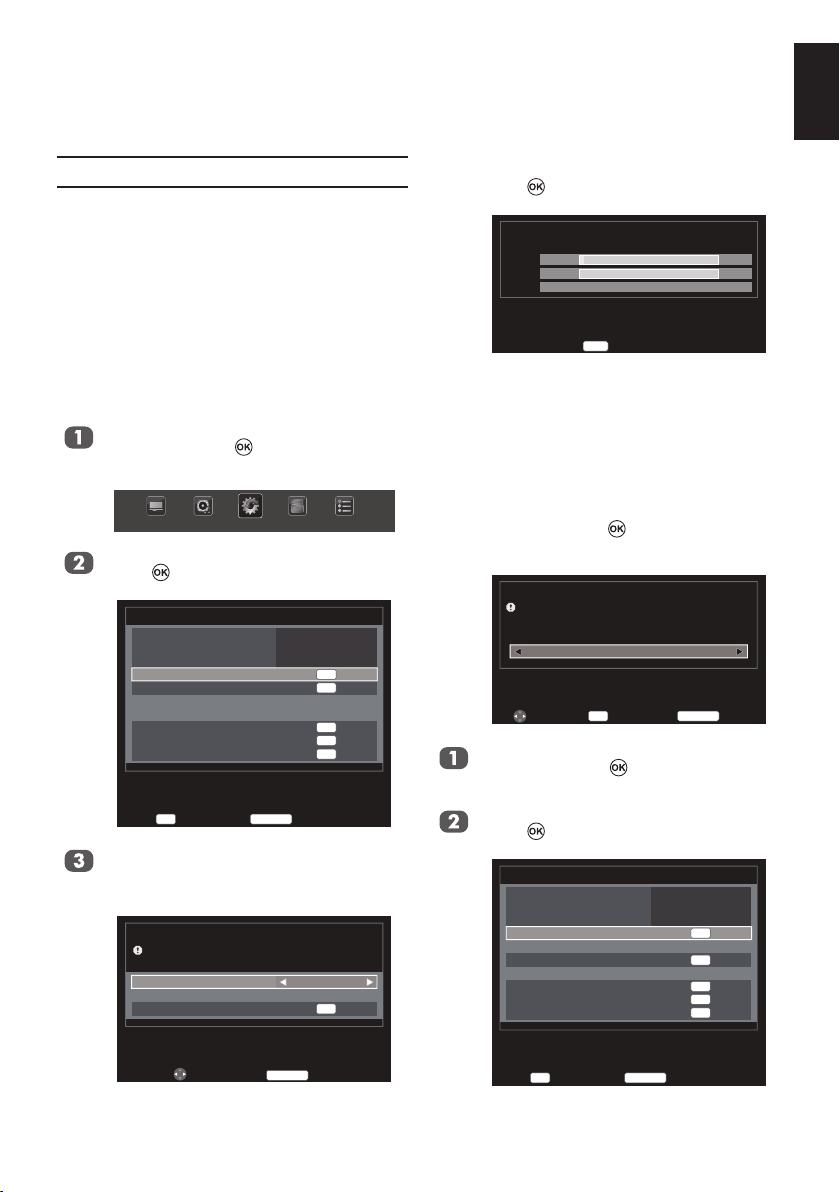
Auto Tuning
The Auto tuning function will completely re-
tune the television and can be used to update
the channel list.
NOTE:
• It is recommended that Auto tuning
is run periodically to ensure that all
new services are added.
• All the current channels and settings,
for example, the locked channels, will
be lost.
Tuner Mode - Antenna
Press MENU. Press ◄ or ► to select
SETUP and press to enter the sub-
menu.
PICTURE SOUND
Press ▲ or ▼ to select Auto tuning, and
press to enter the submenu.
Language
Country
Tuner Mode
Auto tuning
ATV Manual Tuning
DTV Manual Tuning
DTV Settings
AV connection
Picture Position
Quick Setup
OK
Enter
Press ▲ or ▼ to select Tuning Mode
and press ◄ or ► to select ATV , DTV or
ATV and DTV.
Previous settings will be lost !
Press EXIT for no change.
Tuning Mode
Start Scan
SETUP
RETURN
Auto tuning
APPLICATIONS PREFERENCES
English
Germany
Antenna
OK
OK
OK
OK
OK
Back
ATV and DTV
OK
1/2SETUP
Press ▲ or ▼ to select Start Scan and
press to start Auto Tuning.
Progress
2 %
ATV
0 %
DTV
Channel: C4 Station:
Auto tuning
EXIT
Stop
Found
0
0
Tuner Mode - Cable
Switching between tuner modes will change the
features available on your television.
All the current channels and settings, for example, the locked channels, will be lost.
In the SETUP menu, press ▲ or ▼ to select
Tuner Mode and press
.
Press ◄ or ► to select YES or NO.
This may change the features available on your
TV. Continue?
Edit Enter
Tuner Mode
NO
OK
RETURN
Back
Press MENU. Press ◄ or ► to select
SETUP and press to enter the sub-
menu.
Press ▲ or ▼ to select Auto tuning, and
press to enter the submenu.
Language
Country
Tuner Mode
Auto tuning
ATV Manual Tuning
DTV Manual Tuning
DTV Settings
AV connection
Picture Position
Quick Setup
English
Germany
Cable
OK
OK
OK
OK
OK
1/2SETUP
Edit
RETURN
Back
27
OK
Enter
RETURN
Back
Page 28
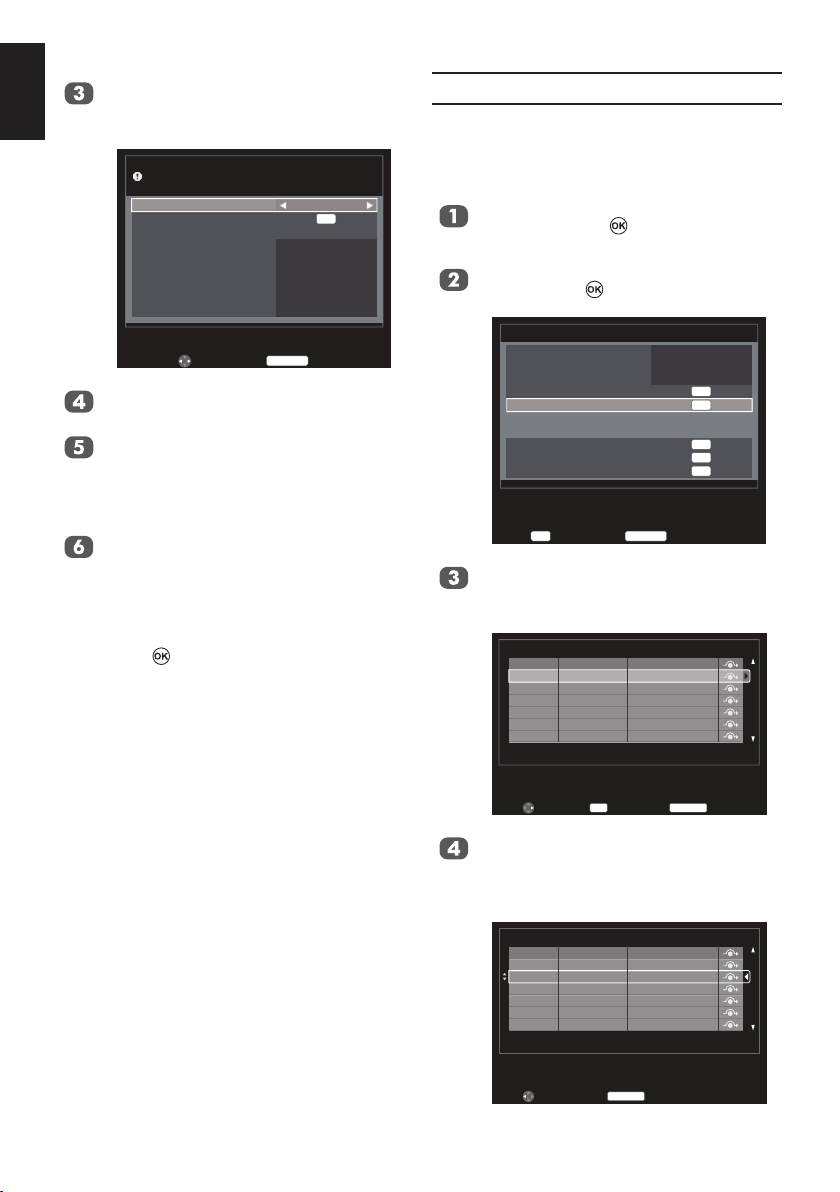
English
Press ▲ or ▼ to select Tuning Mode
and press ◄ or ► to select ATV , DTV or
ATV and DTV.
Edit
Auto tuning
RETURN
ATV and DTV
OK
Quick Scan
Auto
Auto
Auto
Auto
Auto
Back
Previous settings will be lost!
Press EXIT for no change.
Tuning Mode
Start Scan
Operation Selection
Scan type
Start Frequency
End Frequency
Modulation
Symbol Rate
Network ID
Press ▲ or ▼ to select Operator Selection, and press ◄ or ► to select it.
Press ▲ or ▼ to select Scan type, and
press ◄ or ► to select Full Scan or
Quick Scan.
NOTE: Channels with a weak signal may
be missed by Quick Scan.
Press ▲ or ▼ to select Start Frequency, End Frequency, Modulation,
Symbol Rate or Network ID, and use
number key pad on the remote to dene
the information or select Auto for tuning.
Press ▲ or ▼ to select Start Scan and
press
to start tuning.
NOTE:
• The information should be
given by your cable provider.
• Network ID is only available
for Quick Scan.
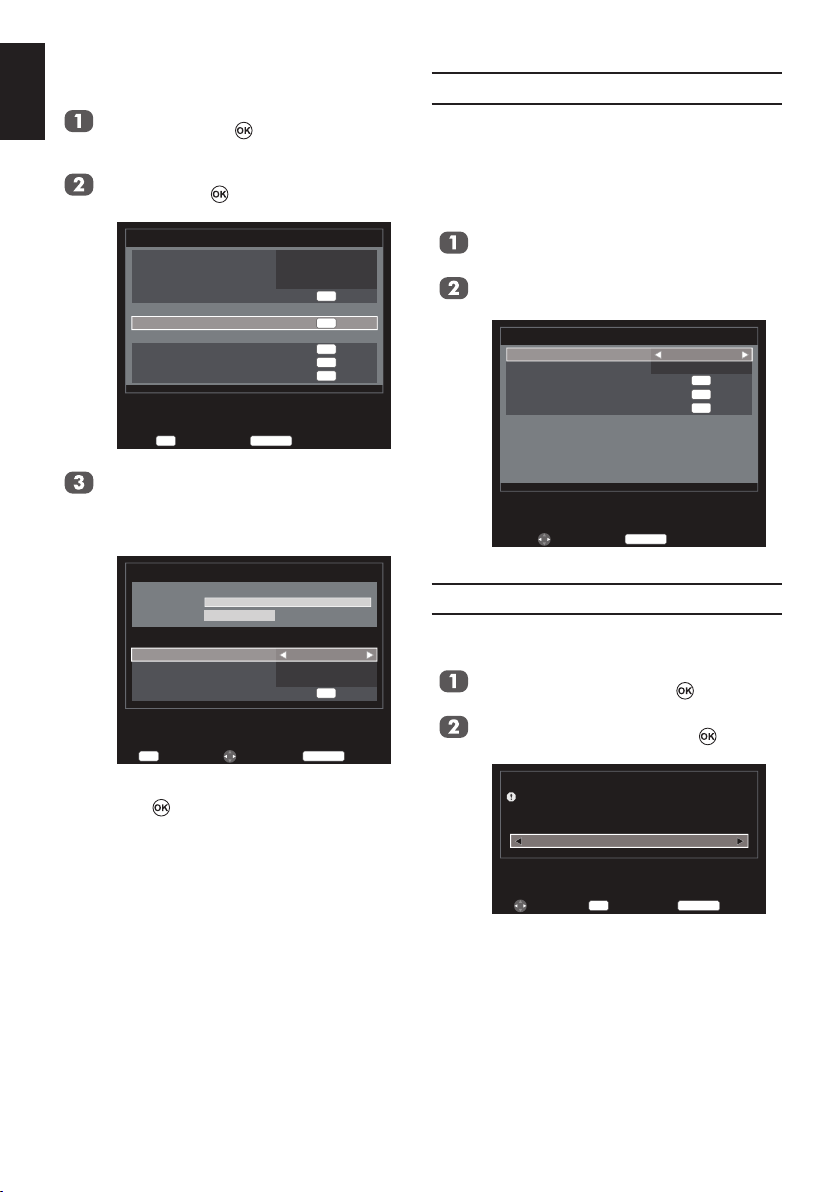
Manual Tuning
There are two TV modes: ATV and DTV that
can be tuned-in manually using Manual Tun-
ing.
ATV mode - Antenna/Cable
Press MENU. Press ◄ or ► to select
SETUP and press to enter the sub-
menu.
Press ▲ or ▼ to select ATV Manual Tun-
ing and press to enter the submenu.
Language
Country
Tuner Mode
Auto tuning
ATV Manual Tuning
DTV Manual Tuning
DTV Settings
AV connection
Picture Position
Quick Setup
OK
Enter
RETURN
Back
Press p or q to select the programme
position you want to arrange and then
press ►.
1
2
3
4
5
6
ATV Manual Tuning
Channel
C1
C2
C3
C4
C5
C6
Station
−−−−−
−−−−−
−−−−−
−−−−−
−−−−−
−−−−−
Position
English
Germany
Antenna
OK
OK
OK
OK
OK
1/2SETUP
28
OK
Sort Enter
RETURN
Back
Press p or q to move through the list to
your preferred position. As you do so the
other stations will move to make room.
Press t to store programme position.
1
2
3
4
5
6
Store
ATV Manual Tuning
Channel
C2
C1
C3
C4
C5
C6
RETURN
Station
−−−−−
−−−−−
−−−−−
−−−−−
−−−−−
−−−−−
Back
Position
Page 29
Press to display the breakdown
menu. Press t or u to select an item,
then press p or q to select the item as
shown below.
ATV Manual Tuning
Manual fine tuning
1 BG P C69 0
Select Change Save
A B C D E F G H I
OK
−−−−−
RETURN
Position Item Description
A Position The number to be pressed on
B System Specic to certain areas
C Colour
system
D Skip
E Signal
Class:
F Channel The channel number on
G Searching Search up and down for a
H Manual
ne tuning
I Station Station identication. Use
the remote control
Factory set to Auto, should
only be changed if problems
are experienced, i.e. NTSC
input from external source
means nothing has been
stored or the facility to skip
the channel is On
The channel classication
which a station is being
broadcast
signal
Turn on to execute ne tune
function. Turn off to execute
manual ne tune function
the p or q and ◄ or ►
buttons to enter up to seven
characters
Back
DTV mode - Antenna
Press MENU. Press ◄ or ► to select
SETUP and press to enter the sub-
menu.
Press ▲ or ▼ to select DTV Manual Tun-
ing and press to enter the submenu.
Language
Country
Tuner Mode
Auto tuning
ATV Manual Tuning
DTV Manual Tuning
DTV Settings
AV connection
Picture Position
Quick Setup
OK
Enter
RETURN
Press ▲ or ▼ to select RF Channel and
press ◄ or ► to select or use number
key pad on the remote to enter a channel.
DTV Manual Tuning
Signal Strength
Quality
RF Channel
Start Scan
0−9
Weak Average Strong
Poor
EditInput
Press ▲ or ▼ to select Start Scan and
press to start tuning.
English
Germany
Antenna
Back
RETURN
English
1/2SETUP
OK
OK
OK
OK
OK
5
OK
Back
Press to save.
29
Page 30
DTV mode - Cable
English
Press MENU. Press ◄ or ► to select
SETUP and press to enter the sub-
menu.
Press ▲ or ▼ to select DTV Manual Tun-
ing and press to enter the submenu.
Language
Country
Tuner Mode
Auto tuning
ATV Manual Tuning
DTV Manual Tuning
DTV Settings
AV connection
Picture Position
Quick Setup
OK
Enter
RETURN
Back
English
Germany
Cable
OK
OK
OK
OK
OK
1/2SETUP
Press ▲ or ▼ to select Frequency,
Modulation or Symbol Rate, and use
number key pad on the remote to dene
the information.
DTV Manual Tuning
Signal Strength
Quality
Frequency
Modulation
Symbol Rate
Start Scan
0−9
Weak Average Strong
Poor
113.000 MHz
QAM 16
4000 KS/s
OK
RETURN
EditInput
Back
Press ▲ or ▼ to select Start Scan and
press to start tuning.
Automatic Power Down
The TV will automatically turn itself off
(standby) within 4 hours, if you do not touch
the control buttons on the remote control or on
the TV control panel. It will also automatically
turn off if no input signal is detected after approximately 15 minutes.
In the SETUP menu, press ▲ or ▼ to
select Automatic Power Down.
Press ◄ or ► to select On or Off.
Automatic Power Down
Location
Software Upgrade
System Information
Reset TV
Edit
RETURN
Back
Off
Home
OK
OK
OK
2/2SETUP
Reset TV
Selecting Reset TV will reset all TV settings to
their original factory values.
In the SETUP menu, press ▲ or ▼ to
select Reset TV and press .
Press ◄ or ► to select YES to conrm
or select NO to exit and press .
Previous settings will be lost !
Press EXIT for no change.
Reset TV
NO
30
Select Enter
OK
RETURN
Back
Page 31

DTV Settings
English
Channels
The channel order may be changed to suit
your personal preference.
NOTE: This function is only available in DTV
mode.
Press MENU. Press ◄ or ► to select
SETUP and press to enter the submenu.
PICTURE SOUND
Press ▲ or ▼ to select DTV Settings and
press to enter the submenu.
Press ▲ or ▼ to select Channels and
press .
Channels
Channel Options
Subtitle And Audio
Password
Parental
Local Time Setting
Common Interface
OK
Select
Press ▲ or ▼ to select Channels.
SETUP
DTV Settings
RETURN
APPLICATIONS PREFERENCES
OK
OK
OK
OK
OK
OK
Back
Re-number
Press PROGRAM on the remote to renumber the highlighted channel.
Edit the channel number using the number
keys on the remote and press .
2
SVT 2 Sverige
SVT 1 Sverige
− −−
Input
Channels
OK
Enter
Name
RETURN
Position
1
0−9
Skip
Press BOOK MARK on the remote. A
icon appears.
1
SVT 1 Sverige
2
SVT 2 Sverige
Re−number Skip
Channels
Name
Position
OK
Sort
RETURN
TV
Back
TV
Back
OK
Position
Sort
1
2
Channels
Name
SVT 1 Sverige
SVT 2 Sverige
Re−number Skip
RETURN
TV
Back
31
Page 32

Sort
English
Press p or q to select the desired
channel and then press . A tick icon
appears.
2
1
OK
Channels
SVT 1 Sverige
SVT 2 Sverige
Store
Name
RETURN
Position
Press p or q to select the channel you
wish to swap with the one selected in Step
8 and then press .
The positions of the two channels are
swapped.
1
2
OK
Channels
SVT 2 Sverige
SVT 1 Sverige
Store
Name
RETURN
Position
Channel Options
This function is to setup the Skip or Lock for
currently watched channel.
Skip Channels
The feature allows you to set channel that will
be skipped when P
tune.
In the DTV Settings menu, press ▲ or
▼ to select Channel Options, and press
to enter the submenu.
Channels
Channel Options
Subtitle And Audio
Password
Parental
Local Time Setting
Common Interface
or P are used to
DTV Settings
Back
Back
Press ◄ or ► to highlight the skip
( ) box.
CH
TV
800
Channel Options
DEEJAY TV
OK
Select Enter
Name
RETURN
TV
Back
Press to select. A tick appears in the
box.
NOTE: Skipped channels cannot be selected
or P but still be accessed by
by P
direct entry (when tuned a icon will
be displayed in the banner to indicate
as a skipped channel).
Parental Control
TV
Locking channels stops the viewing of digital
channels, and they can only be accessed by
entering the password.
In the DTV Settings menu, press ▲ or
▼ to select Channel Options, and press
to enter the submenu.
Press ◄ or ► to highlight the lock
( ) box.
Press to select. A tick appears in the
box.
If the password has already been set,
password entry will be required to set the
locked channels.
800
CH
DEEJAY TV
Channel Options
Name
OK
Select Enter
RETURN
TV
Back
From this point on, when any of the
channels in the Channel Options list
OK
OK
OK
OK
OK
OK
are selected, the password must be
entered before they can be accessed.
OK
Select
RETURN
Back
32
Page 33

Subtitle and Audio
You can choose the Subtitle Type or Audio
Type from Normal or Hearing Impaired. If
the Hearing Impaired is selected, it provides
subtitle services to deaf and hard of hearing
viewers with additional descriptions.
Subtitle Language or Audio Language allow
a programme or lm to be viewed with a choice
of soundtrack language, provided they are currently being broadcast.
In the DTV Settings menu, press ▲
or ▼ to select Subtitle And Audio, and
press to enter the submenu.
Press ▲ or ▼ to select Subtitle Type or
Audio Type and press ◄ or ► to select
Normal or Hearing Impaired.
Press ▲ or ▼ to select Digital Subtitle
Language, Digital Subtitle Language
2nd, Audio Language or Audio Language 2nd and press ◄ or ► to select
your preferred language.
Password
Change the 4-digit parental control password.
In the DTV Settings menu, press ▲ or
▼ to select Password, and press to
enter the submenu.
Select
DTV Settings
RETURN
Channels
Channel Options
Subtitle And Audio
Password
Parental
Local Time Setting
Common Interface
OK
Enter a new 4-digit password, and
re-enter the new password again to
conrm.
New Password
Confirm Password
Password
Back
OK
OK
OK
OK
OK
OK
English
Parental
This function blocks channels or programmes
that you do not want to or that you do not want
your children to watch.
A password is required to access this function.
NOTE: When Password is activated, you will
need to enter the 4-digit password before
you enter the DTV Settings submenu under the SETUP menu. After auto tuning,
all the channel blocks will be cleared.
In the DTV Settings menu, press ▲ or
▼ to select Parental, and press to
enter the submenu.
Enter the 4-digit password.
Press ◄ or ► to set the age rating from
age 4~18 or select None to turn this function off.
NOTE:
• This function is available for pro-
grammes with Age Rating information.
• It doesn’t operate according to the
country setting.
Common Interface
The Common Interface Slot, situated on the
side of the television, enables the insertion of
a CAM (Conditional Access Module) and card.
These are purchased from a service provider
and allow additional subscription broadcasts
to be viewed. For information, see a service
provider.
Insert the CAM and card into the Common
Interface Slot, following the instructions
provided with the CAM. A box will appear
on the screen to conrm that the CAM has
been inserted.
In the DTV Settings menu, press ▲
or ▼ to select Common Interface, and
press to enter the submenu.
Details of the CAM should now be available.
NOTE: The software updating of CI Plus CAM
may be automatically executed. At this
time, any Recording/Reminder programme timer will be cancelled.
33
Page 34

English
General Controls
The General Controls will allow you to select channels and information, use the sound controls, personalise the picture style, and select external equipment.
Selecting Channels
To select a channel use the numbered buttons
on the remote control.
Channels can also be selected using P
and
P .
Stereo and Bilingual
Transmissions
If stereo or dual language broadcasts are
transmitted, the word Stereo or Dual will appear on the screen each time channels are
changed, disappearing after a few seconds. If
the broadcast is not in stereo the word Mono
will appear.
Stereo: Press
to select Stereo or Mono.
Bilingual: If a bilingual programme is offered,
the word Dual will display on screen. To
change between languages, press
to
switch between Dual 1 and Dual 2.
NOTE: In DTV mode, only the icon of the
detected audio type will appear on
screen.
Quick Access Menu
Quick access helps you access some options
quickly such as Picture Size, Picture Mode,
Sleep Timer and System Information. Press
the QUICK button to display the Quick access
menu and use ▲ or ▼ to select the option you
would like to change.
Picture Size
Picture Mode
Sleep Timer
System Information
Quick access
Wide
Standard
00:00
OK
Subtitles
If Subtitles are available for your current programme, pressing the SUBTITLE button will
toggle Subtitles select language or off.
Picture Still
This feature is used to hold a still image on
the screen. Press to hold an image on the
screen, press again to cancel.
Input Selection
Use the Input Selection feature if the TV does
not switch over automatically when using an
external device.
Pressing , a list will appear on-screen showing all external equipment.
Use ▲ or ▼ to highlight and to select.
Inputs
TV
1
2
3C
HDMI1
HDMI2
Disc Player
MEDIA
PC
HDMI® displays equipment connected to
Input HDMI on the back or the side of the
TV. It is designed for best performance with
1080i/1080p high denition signals.
NOTE: Quick access items are different
depending on the current mode.
34
Page 35

Sound Controls
English
Volume Controls and Mute Sound
Volume
Press or to adjust the volume.
Sound Mute
Press
on the remote once to turn the sound
off and again to cancel.
Dual
If a programme or lm is being broadcast with
a soundtrack in more than one language, the
DUAL feature allows selection between them.
Press MENU. Press ◄ or ► to select
SOUND and press to enter the submenu.
PICTURE
Press ▲ or ▼ to select Dual, and press
◄ or ► to choose between Dual1 or
Dual2.
Dual
Bass
Treble
Balance
Stable Sound
Surround Sound
Bass Boost
SPDIF Type
Audio Description
SETUP APPLICATIONS PREFERENCES
SOUND
SOUND
Dual1
0
0
0
Off
Off
Off
PCM
OK
Stable Sound
The Stable Sound feature limits high volume
levels in order to prevent the extreme changes
in volume that can occur when channels are
changed or a programme switches to a commercial.
Press MENU. Press ◄ or ► to select
SOUND and press to enter the submenu.
Press ▲ or ▼ to select Stable Sound,
and press ◄ or ► to select On or Off.
Surround Sound
Surround Sound enhances depth of the
sound.
Press MENU. Press ◄ or ► to select
SOUND and press to enter the submenu.
Press ▲ or ▼ to select Surround Sound,
and press ◄ or ► to select On or Off.
Bass Boost
Bass Boost enhances depth of the sound.
Press MENU. Press ◄ or ► to select
SOUND and press to enter the sub-
menu.
Press ▲ or ▼ to select Bass Boost, and
press ◄ or ► to adjust the setting.
RETURN
Edit
Back
NOTE: Dual is only available in ATV
mode.
Bass, Treble and Balance
The sound controls are accessible in digital
and analogue modes.
Press MENU. Press ◄ or ► to select
SOUND and press to enter the submenu.
Press ▲ or ▼ to select Bass, Treble or
Balance and press ◄ or ► to change the
setting.
SPDIF Type
The feature allows you to select a digital audio
format.
Press MENU and press ◄ or ► to select
SOUND.
Press ▲ or ▼ to select SPDIF Type, and
press ◄ or ► to select PCM or Auto.
35
Page 36

English
Audio Description is an additional narration
Audio Description
describing on-screen action, body language,
expressions and movements for people with
visual disabilities while watching the TV. This
function enables you to choose the type of
narrations.
Press MENU. Press ◄ or ► to select
SOUND and press to enter the submenu.
Press ▲ or ▼ to select Audio Descrip-
tion and press to enter the submenu.
Press ▲ or ▼ to select Audio Descrip-
tion, and press ◄ or ► to select On or
Off.
Audio Description
Mixing Level
Audio Description
Edit Back
RETURN
Press ▲ or ▼ to select Mixing Level, and
press ◄ or ► to change the setting.
NOTE: Mixing Level can only be ad-
justed when Au dio Description
is On.
NOTE: Press the AD button on the
remote control to switch the Audio
Description On or Off.
On
20
36
Page 37

Widescreen viewing
Depending on the type of broadcast being transmitted, programmes can be viewed in a number of
formats.
Use this setting when watching a
widescreen DVD, widescreen video tape
Wide (Expect PC)
Wide (PC only)
or a 16:9 broadcast (when available). Due
to the range of widescreen formats (16:9,
14:9, 20:9 etc.) black bars may be visible
on the top and bottom of the screen.
This setting will show the picture without
over scan and side panel when
watching a PC signal source via HDMI
or PC terminal.
English
4:3
Super Live
Cinema
Subtitle
14:9
Native
Use this setting to view a true 4:3
broadcast.
This setting will enlarge a 4:3 image to
t the screen by stretching the image
horizontally and vertically, holding better
proportions at the centre of the image.
Some distortion may occur.
When watching letterbox format lms/
video tapes, this setting will eliminate or
reduce the black bars at the top and bottom
of the screen by zooming in and selecting
the image without distortion.
When subtitles are included on a letterbox
format broadcast, this setting will raise
the picture to ensure that all the text is
displayed.
Use this setting when watching a 14:9
broadcast.
When using a PC connected via HDMI this
setting will show the picture without over
scan, i.e. WYSIWYG.
This option is only available when
watching video signal source via HDMI.
Subtitle
37
Page 38

English
Normal
Dot by Dot
This setting will show the picture without
over scan, i.e. WYSIWYG.
This option is only available when watching
a PC signal source via HDMI
or PC terminal.
“Dot by Dot” is a non-scaling display.
Depending on the input signal format,
the setting will display the picture with
side panels and/or bars at the top and
bottom (i.e VGA input source).
Press QUICK to display the Quick access
menu. Use ▲ or ▼ to select the Picture Size,
and press ◄ or ► to select the option.
Picture Size
Picture Mode
Sleep Timer
System Information
Quick access
Wide
Standard
00:00
OK
You can choose the picture size from Wide, 4:3, Super Live, Cinema, Subtitle, 14:9, Native, Normal or
Dot by Dot.
Using the special functions to change the size of the displayed image (i.e. changing the height/width
ratio) for the purposes of public display or commercial gain may infringe on copyright laws.
Available Picture Size and Position Control
Wide 4:3
ATV o o o o o o x x x
DTV
Scart o o o o o o x x x
CVBS o o o o o o x x x
YPbPr
HDMI
D-SUB o x x x x x x o o
DVI o x x x x x x o o
DISC o o o o x x x x x
SD o o o o o o x x x
HD o o o o x o o x x
SD o o o o o o x x x
HD o o o o x x x x x
SD o o o o o o o x x
HD o o o o x x o x x
Super
Live
Cinema Subtitle 14:9 Native Normal
Dot by
Dot
38
Page 39

Picture Controls
Most of the picture controls and functions are available in both digital and analogue modes.
NOTE: Features not available will be greyed out.
English
Picture Position
The Picture Position may now be adjusted to suit
personal preference.
Press MENU. Press ◄ or ► to select
SETUP and press to enter the submenu.
PICTURE SOUND
Press ▲ or ▼ to select Picture Position
and press to enter the submenu.
Language
Country
Tuner Mode
Auto tuning
ATV Manual Tuning
DTV Manual Tuning
DTV Settings
AV connection
Picture Position
Quick Setup
OK
Enter
Press ▲ or ▼ to select an option you
want to adjust, and press ◄ or ► to
adjust the settings as required.
Horizontal position
Vertical position
Reset
Picture Position
SETUP
RETURN
APPLICATIONS PREFERENCES
English
Germany
Antenna
OK
OK
OK
OK
OK
Back
0
0
OK
1/2SETUP
Picture Mode
You can adjust the picture appearance by selecting the preset value in picture mode based
on the programme category.
Press MENU. Press ◄ or ► to select
PICTURE and press to enter the
submenu.
SOUND SETUP APPLICATIONS PREFERENCES
PICTURE
Press ▲ or ▼ to select Picture Settings
and press to enter the submenu.
Picture Mode
Back Light
Contrast
Brightness
Colour
Tint
Sharpness
Black/White Level
Cinema Mode
Colour Temperature
Static Gamma
Reset
Press ▲ or ▼ to select Picture Mode and
press◄ or ► to select Dynamic, Stand-
ard, Mild, Movie, Game or User.
NOTE: Game is not available for the TV
Picture Settings
Edit Back
RETURN
input mode.
Standard
70
95
50
50
0
50
Middle
On
Medium
+4
OK
Edit Back
RETURN
Picture Preferences
You can customise current picture mode settings while selecting User.
In the Picture Settings menu, press ▲
or ▼ to select Back Light, Contrast,
Brightness, Colour, Tint, Sharpness.
Press ◄ or ► to suit your preference.
39
Page 40

English
This function increases the strength of dark
Black/White Level
areas of the picture, which improves picture
denition.
In the Picture Settings menu, press ▲
or ▼ to select Black/White Level.
Press ◄ or ► to adjust the level from
Off, Low, Middle to High. The effect
depends on the broadcast and is most
noticeable on dark colours.
Cinema Mode
A movie lm’s picture runs at 24 frames a second, whereas movie software such as
Blu-ray Disc™, DVD, etc., that you enjoy
watching on television at home runs at 30
(NTSC) or 25 (PAL) frames a second. To convert this signal to reproduce a smooth motion
and picture quality, select the Cinema Mode.
In the Picture Settings menu, press ▲
or ▼ to select Cinema Mode.
Press ◄ or ► to select On or Off.
Colour Temperature
Colour Temperature increases the ‘warmth’
or “coolness” of a picture by increasing the red
or blue tint.
In the Picture Settings menu, press ▲
or ▼ to select Colour Temperature.
Press ▲ or ▼ to select Colour Tem-
perature and press ◄ or ► to select
Medium, Cool or Warm to suit your
preference.
Colour Temperature
Red Level
Blue Level
Green Level
Press ▲ or ▼ to select Red Level, Blue
Level or Green Level and press ◄ or ►
to adjust the settings as required.
Colour Temperature
Medium
0
0
0
Static Gamma
The static gamma feature allows you to adjust
the levels of black in the picture.
In the Picture Settings menu, press ▲
or ▼ to select Static Gamma.
Press ◄ or ► to select the number of
Static Gamma (-5~+5).
Reset
This feature resets all picture settings to the
factory settings.
In the Picture Settings menu, press ▲ or ▼
to select Reset and press
to reset settings.
NOTE: If any picture settings have not been
changed, Reset is not available.
Active Backlight
When Active Backlight Control is activated,
it will automatically optimise the backlighting
levels for dark scenes.
Press MENU. Press ◄ or ► to select
PICTURE and press to enter the
submenu.
Press ▲ or ▼ to select Active Backlight
Control.
Press ◄ or ► to select On or Off.
3D Colour Management
When 3D Colour management is set to On it
allows the Base Colour Adjustment feature to
become available.
You can adjust the picture colour quality by selecting from 6 base colour adjustments : Red,
Green, Blue, Yellow, Magenta or Cyan.
In the PICTURE menu, press ▲ or ▼ to
select 3D Colour Management.
Press ◄ or ► to select On or Off.
NOTE: When video content with subtitle is
playing back, Cinema mode may not
work correctly.
40
Page 41

Base Colour Adjustment
The Base Colour Adjustment feature allows
the adjustment of individual colours to suit personal preference. This can be useful when using
an external source. It only can be adjusted when
3D Colour Management is set to On.
In the PICTURE menu, press ▲ or ▼ to
select Base Colour Adjustment and
press to enter the submenu.
Press ▲ or ▼ to select an item you want
to adjust and press .
English
MPEG NR – Noise Reduction
When watching a DVD, the compression may
cause some words or picture elements to
become distorted or pixelated.
Using the MPEG NR feature reduces this effect by smoothing out the edges.
In the PICTURE menu, press ▲ or ▼ to
select MPEG NR.
Press ◄ or ► to select Off, Low, Mid-
dle or High.
Base Colour Adjustment
Red
Green
Blue
Yellow
Magenta
Cyan
Reset
OK
Edit
0
0
0
0
0
0
RETURN
BrightnessHue Saturation
Back
0
0
0
0
0
0
OK
0
0
0
0
0
0
Press ◄ or ► to select Hue, Saturation
or Brightness.
Base Colour Adjustment
Red
0
BrightnessHue Saturation
Press ▲ or ▼ to adjust the settings as
required.
NOTE: In the PC Input mode, this function is
not available.
Digital Noise Reduction
DNR (Digital Noise Reduction) enables you
to “soften” the screen representation of a weak
signal to reduce the noise effect.
In the PICTURE menu, press ▲ or ▼ to
select DNR.
Press ◄ or ► to select Off, Low, Mid-
dle or High.
41
Page 42

English
Enjoy Photos through USB Port
The Photo Viewer allows you to playback image les from a USB ash drive.
Image Photo
JPEG
PNG
BMP 9600x6400 3.66
Base-line
Progressive 1024x768 6.00
non-interface 9600x6400 3.66
interface 1200x800 3.66
Resolution
(Mstat suggest)
15360x8704
(1920x8x1088x8)
IMPORTANT INFORMATION:
You must obtain any required permission from copyright owners to download or use copyrighted content.
Toshiba cannot and does not grant such permission.
NOTE:
• Resolution is a reference design, limited only by DRAM (Dynamic Random Access Memory)
size and performance
• The larger the resolution, the more memory required
• The smaller the resolution, the less performance required (decrease the time required to
display a picture)
• A JPEG decoder is a hardware decoder, with a max resolution of 15360 x 8704
• A PNG/BMP decoder is a software decoder (running on a co-processor), with a max resolu-
tion that depends on DRAM size
• PAUSE, PLAY, STOP, SKIP and REV/FF key not work for Remote control
• Gently insert the USB ash drive into the port and do not remove while viewing Media
• USB ash drive: USB Mass Storage Class device (MSC)
• Connectivity is not guaranteed for all devices
• Connect the USB ash drive to the TV directly
• Non-supported characters will be replaced with a hyphen (-)
• Do not use a USB Hub
• Only limited types of U3 USB drive are supported. Therefore, it is suggested not to use U3
USB for playing Media
Required DRAM size
(Mbytes)
3.96 Depends on RAM size
Remark
42
Page 43

View Photo Files
Insert a USB ash drive and press on
the remote.
Use ▲ or ▼ to select MEDIA and press
.
English
Press MENU to change the settings
when viewing a photo.
Inputs
TV
1
2
3C
HDMI1
HDMI2
Disc Player
MEDIA
PC
Press ◄ or ► to select Photo and press
to enter the submenu.
USB 2.0
Photo MusicMovie
OK
Select
Move
Press ▲, ▼, ◄ or ► to select the folder
you wish to view and press to enter.
Press P
or P to page up or down.
USB:\
Return
P
Move
Page
1 \ 1
OK
RETURN
Select
Back
Press ▲, ▼, ◄ or ► to select the desired photo and press to view.
Off
On
15 sec
788 X 1157
00001 / 00004
0000−1.jpg
−−−−/−−/−− −−:−−
Move
Previous
OK
Select
RETURN
0
Back
Press ◄ or ► to:
•
: Go to the previous photo
•
: Go to the next photo
•
: Select slide show mode
•
: Select repeat mode
•
: Select the desired interval time
•
: Clockwise rotation 90°
•
: Counterclockwise rotation 90°
•
: Show play list
•
: Set the background music
•
: Photo information
and press
to conrm the setting.
Using Slide Show
This view allows you to watch a slide show of
the photos. In this view mode, the only content
that locates on the same directory shall be
played.
Press MENU to change the settings
when viewing a photo.
Press ◄ or ► to select and press
to turn On or Off.
NOTE: Slide show stops at the last photo in
the directory.
Repeat Settings for Slideshow
Press MENU to change the settings
when viewing a photo.
Press ◄ or ► to select and press
to turn On or Off.
43
Page 44

English
0000−1.jpg
jg
Set Interval Time
Press MENU to change the settings
when viewing a photo.
Press ◄ or ► to select and press
to select the desired interval time
(3/5/10/15/30/60/90 Sec).
NOTE: If Repeat is On, slide show starts
photo viewing from the rst photo in the
folder after reaching the nal photo.
Using the Play List
Press MENU to change the settings
when viewing a photo.
Press ◄ or ► to select and press
Press ▲ or ▼ to select a photo and
press to show the photo.
Press RETURN on the remote to collapse the list.
Off
On
15 sec
788 X 1157
00001 / 00004
0000−1.jpg
−−−−/−−/−− −−:−−
P
Page
Move
OK
Select
Background Music
Set the background music when viewing photo.
Press MENU to change the settings
when viewing a photo.
Press ◄ or ► to select and press .
Play List
0000−1.jpg
0000−2.jpg
0000−3.jpg
0000−4.jpg
RETURN
Press ◄ or ► to select and press
Background Music
Play List
Move
0
OK
Select
RETURN
.
Back
Press ▲ or ▼ to select music and press
to play music.
Press RETURN on the remote to collapse the list.
.
1 / 1
0
Back
USB:\
Return
Music
Photo
Video
Move
OK
P
Page
Press ◄ or ► to select and press
to select One or Folder.
Photo Info
Select
RETURN
1 \ 1
Back
Info displays the le status information (content
number, photo title, shooting date and time,
resolution etc.).
Press MENU to change the settings
when viewing a photo.
Press ◄ or ► to select and press .
0000−1.jpg
Resolution:
Off
On
15 sec
788 X 1157
00001 / 00004
0000−1.jpg
−−−−/−−/−− −−:−−
Move
Background Music
OK
Select
RETURN
Off
On
15 sec
788 X 1157
0
Back
00001 / 00004
0000−1.jpg
−−−−/−−/−− −−:−−
788 X1157
Size:
323 KBytes
Date:
−−−−
/ −− /
−−
Time:
: −− :
−−
−−
0
Info
RETURN
Back
The information will be removed by timeout (about 15 sec) or press to exit.
44
Page 45

Enjoy Music through USB Port
The MP3 Player allows you to playback music les from a USB ash drive.
Audio Codec File Extension Bit Rate
English
MPEG1 Layer2 MP3
MPEG1 Layer3 MP3
Play Music Files
Insert a USB ash drive and press on
the remote.
Use ▲ or ▼ to select MEDIA and press
.
Inputs
TV
1
2
3C
HDMI1
HDMI2
Disc Player
MEDIA
PC
Press ◄ or ► to select Music and press
to enter the submenu.
USB 2.0
Photo Music Movie
Move
Press ▲ or ▼ to select the folder you wish
to play and press to enter.
Press P
or P to page up or down.
USB:\
Return
Music
Photo
Video
32kbps~ 448kbps(Bit rate)
32kHz ~ 48kHz(Sampling rate)
32kbps ~ 320kbps(Bit rate)
32kHz ~ 48kHz(Sampling rate)
Press ▲ or ▼ to select the desired
music and press to play.
Play
Folder
00001 / 00003
001.MP3
00:00:02 / 00:02:42 16
Pause
OK
RETURN
Select
Move
Back
When listening music, press ◄ or ► to:
•
/ : Play or pause the selected
music
•
: Rewind the selected music
•
: Fast forward the selected
music
•
: Go to the previous music
•
: Go to the next music
•
: Stop play
•
: Select the desired repeat
interval:
- Repeat Off
- Repeat One: Repeat the selected
OK
Select
music once
- Repeat Folder: Repeat all music
les in the selected folder
•
: Show play list
•
1 \ 1
: Music information
and press
to conrm the setting.
OK
P
Move
Page
Select
RETURN
Back
45
Page 46

English
001
3
Repeat Settings
Press ◄ or ► to select
Press to select Off, One or Folder.
.
Using the Play List
Press ◄ or ► to select and press
Press ▲ or ▼ to select music and press
to play music.
Press RETURN on the remote to collapse the list.
Pause
Folder
00001 / 00003
001.MP3
00:00:02 / 00:02:42 16
P
Move
Page
001.MP3
.MP
002.MP3
003.MP3
1 / 1
Play List
OK
RETURN
Select
Back
Music Info
Info display le status information (content
number, music title, Bit Rate, Artist, Sampling,
Year, and size).
Press ◄ or ► to select and press .
001.MP3
Album:
Music
Title:
01
Bit Rate:
320K
Artist:
Singer
Sampling:
44K
Year:
2010
Size:
Folder
00001 / 00003
001.MP3
00:00:02 / 00:02:42 16
Move
6366 KBytes
Info
OK
RETURN
Select
Back
.
The information will be removed by timeout (about 15 sec) or press to exit.
46
Page 47

Enjoy Videos through USB Port
The Video Viewer allows you to playback video les from a USB ash drive.
File
Extension
dat, mpg,
mpeg
ts, trp, tp,
m2ts
vob MPEG2-PS MPEG2
mp4 AVI, MP4
mkv MKV
avi
Motion JPEG AV I JPEG
Container Video Codec SPEC
MPG,
MPEG
MPEG2-TS
H.264-TS
AVI(1.0, 2.0),
DMF0,1,2
MPEG1, 2
MPEG2, H.264
MPEG4
Xvid 1.00, Xvid
1.01, Xvid 1.02,
Xvid 1.03, Xvid
1.10-beta1/2
H.264
H.264,
MPEG1,2,4
MPEG2, MPEG4
Xvid 1.00, Xvid
1.01, Xvid 1.02,
Xvid 1.03, Xvid
1.10-beta1/2
H.264
1080p@
30fps
1080p@
30fps
1080p@
30fps
1080p@
30fps
1080p@
30fps
1080p@
30fps
640x480
@ 30fps
Bit Rate
(Mbit/sec)
20 Main Prole
20
20 MPEG2: MP@HL
20
20
20
10
H.264: Main Prole and
High Prole @Level 4.0
MPEG2: MP@HL
H.264: Main Prole and
High Prole @Level 4.0
MPEG4: Simple Prole and
Advanced Simple Prole @
H.264: Main Prole and
High Prole @ Level 4.0
MPEG4: Simple Prole and
Advanced Simple Prole @
MPEG2: MP@HL
MPEG4: Simple Prole and
Advanced Simple Prole @
Prole Remark
Level 5
Level 5
Level 5
MP4: GMC
is not sup-
ported
English
47
Page 48

English
Play Video Files
Insert a USB ash drive and press on
the remote.
Use ▲ or ▼ to select MEDIA and press
.
Press MENU to change the settings
when viewing a video.
Play
Inputs
TV
1
2
3C
HDMI1
HDMI2
Disc Player
MEDIA
PC
Press ◄ or ► to select Movie and press
to enter the submenu.
USB 2.0
PhotoMusic Movie
OK
Select
Move
Press ▲ or ▼ to select the folder you wish
to view and press to enter.
Press P
or P to page up or down.
USB:\
Return
Music
Photo
Video
P
Move
Page
1 \ 1
OK
RETURN
Select
Back
Press ▲ or ▼ to select the desired video
and press to play.
Standard
16:9
Folder
00001 / 00001
001.avi
00:00:08 / 00:02:28 16
OK
Move
Press ◄ or ► to:
•
/ : Play or pause the selected
video
•
: Fast back the selected video
•
: Fast forward the selected video
•
: Go to the previous video
•
: Go to the next video
•
: Stop play
•
: Select the desired repeat
interval:
- Repeat Off
- Repeat One: Repeat the selected
video once
- Repeat Folder: Repeat all video
les in the selected folder
•
: Repeat from A to B
- Set A: A-Set
Repeat and Start
- Set B: B-Set
Repeat and repeat from
A to B
•
: Show play list
•
: Video information
•
: Slow forward the selected
video
•
: Step forward the selected video
•
: Aspect Ratio
•
: Picture Mode
•
: Allows you to input a search
time
and press
to conrm the setting.
Select
Pause
RETURN
Back
48
Page 49

Repeat Settings
Press MENU to change the settings
when playing a video.
Press ◄ or ► to select and press
to select Off, One or Folder.
Set
Press MENU to change the settings
when playing a video.
Press ◄ or ► to select and press
to select Set A, Set B or None.
Using the Play List
Press MENU to change the settings
when playing a video.
English
Step Forward
The feature allows you to view a video one
frame at a time.
Press MENU to change the settings
when playing a video.
Press ◄ or ► to select and press
to play step by step.
Video Info
Info display le status information (content
number, video title, audio track, subtitle, program, size, etc.).
Press MENU to change the settings
when playing a video.
Press ◄ or ► to select and press .
Press ◄ or ► to select and press .
Press ▲ or ▼ to select a video and
press to play the video.
Press RETURN on the remote to collapse the list.
Play
Standard
16:9
Folder
00001 / 00001
001.avi
P
00:00:08 / 00:02:28 16
Move
Page
Play List
OK
Select
Slow Forward
The feature changes forward speeds.
Press MENU to change the settings
when playing a video.
Press ◄ or ► to select and press
to select SF2X, SF4X, SF8X, SF16X or
Play.
001.avi
RETURN
Play
Standard
16:9
Folder
00001 / 00001
001.avi
00:00:08 / 00:02:28 16
Move
001.avi
Resolution:
320 x 214
AudioTrack:
Subtitle:
Program:
Size:
Select Back
1 / 1
−−
/ 0
−−
/ 0
1862 KBytes
Close
Info
RETURN
The information will be removed by time-
1 / 1
Back
out (about 15 sec) or press to exit.
Aspect Ratio
Press MENU to change the settings
when playing a video.
Press ◄ or ► to select and press
to select Native, 4:3 or 16:9.
Picture Mode
Press MENU to change the settings
when playing a video.
Press ◄ or ► to select and press
to select Standard, Mild, Movie or
Dynamic.
49
Page 50

English
The feature allows you to view a selected time
Goto Time
during the video.
Press MENU to change the settings
when playing a video.
Press ◄ or ► to select and press .
Use the number key pad on the remote
to enter time. Press to go to the input
time.
Play
Standard
16:9
Folder
00001 / 00001
001.avi
Input search time:
0 0 : 0 0 : 0 0
OK
00:00:08 / 00:02:28 16
Goto Time
OK
RETURN
Select
Move
Back
50
Page 51

HDMI-LINK Controls
This feature uses CEC (Consumer Electronics Control) technology, and allows the control of Toshiba
HDMI-LINK compatible equipment from the television’s remote control.
NOTE: Not all Toshiba products currently support HDMI-LINK.
English
Equipment Control
The HDMI-LINK mode on the television’s
remote control allows the control of connected
HDMI-LINK equipment being watched.
To control the HDMI-LINK input source, rst
select the equipment with HDMI-LINK input
source selection, then switch the mode on the
remote control to HDMI-LINK and press any
buttons.
The available functions are dependent on the
equipment connected. Not all the remote control keys may be available. Please refer to the
operation manual for each piece of equipment
connected.
NOTE: The television features that can be con-
trolled by the connected equipment are:
Standby, Volume and Sound Mute.
Input Source Selection
When any equipment using CEC technology
is connected, the HDMI-LINK icon will appear
in the input source list allowing selection of
individual devices.
Press
modes and all stored external equipment.
. A list will appear on screen showing
Inputs
TV
1
2
3C
HDMI1
HDMI2
Disc Player
MEDIA
PC
51
Page 52

English
HDMI-LINK Menus
By activating the Enable HDMI-LINK feature in the HDMI-LINK setup menu, individual HDMI-LINK
features can then be activated.
One Touch Play
The function of HDMI-LINK will automatically
power on the television that was in standby
mode and switch the television’s input source
to the port connected with the audio/video
equipment by powering-on or playing from the
audio/video equipment.
NOTE: This feature is dependent on the
connected equipment and television
setting.
System Standby
This feature automatically switches the connected equipment into standby when the
television goes into standby and conversely
for the television to switch into standby when
connected equipment goes into standby. It is
selected in the HDMI-LINK setup menu.
NOTE: This feature is dependent on the
connected equipment and television
setting.
System Audio Control
Using the Speaker Preference feature allows
the television’s remote control to adjust the
volume or mute the sound of the speakers con-
nected to the television via an AV amplier.
Ensure that the connected AV amplier and
HDMI-LINK equipment are selected in the
input source selection and that the Speaker
Preference is set to Audio Receiver in the
HDMI-LINK setup menu.
NOTE: When the AV Amplier is switched on,
its input source changed or the volume
adjusted, the sound will be output from
the AV Amplier’s speakers even if TV
speakers has been selected. Turn the
television off then on again to output
the sound from the TV’s speakers.
The full function may not work and is depend-
ent on the amplier being used.
Enable HDMI-LINK
When the Enable HDMI-LINK is set to On, it
allows the other functions to be enabled.
Press MENU. Press ◄ or ► to select
PREFERENCES and press to enter
the submenu.
PICTURE SOUND SETUP APPLICATIONS
PREFERENCES
Press ▲ or ▼ to select HDMI-LINK Setup, and press to enter the submenu.
HDMI−LINK Setup
Teletext
Panel Lock
Auto Format
4:3 Stretch
Blue Screen
Side Panel
OK
Enter
PREFERENCES
RETURN
Back
OK
Auto
Off
On
Off
On
1
Press ▲ or ▼ to select Enable HDMILINK, and press ◄ or ► to select On or
Off.
Enable HDMI−LINK
Auto Power On
Auto Standby
Amplifier Control
Speaker Preference
HDMI-LINK Setup
TV Speakers
Edit Back
RETURN
On
On
On
On
Auto Power On
The Auto Power On setting allows the television to be automatically switched On or Off if a
HDMI-LINK device is turned on or off.
In the HDMI-LINK Setup menu, press ▲
or ▼ to select Auto Power On.
52
Press ◄ or ► to select On or Off.
Page 53

Auto Standby
When the Auto Standby is enabled, switching
off the television will automatically switch off all
connected HDMI-LINK equipment.
In the HDMI-LINK Setup menu, press ▲
or ▼ to select Auto Standby.
Press ◄ or ► to select On or Off.
AmplierControl
In the HDMI-LINK Setup menu, press ▲
or ▼ to select AmplierControl.
Press ◄ or ► to select On or Off.
Speaker Preference
This feature allows the audio output preference
to be set to the TV speakers or AV amplier
speakers. The AV Amplier option lets the
television’s remote control adjust or mute the
volume of the audio.
In the HDMI-LINK Setup menu, press
▲ or ▼ to select Speaker Preference
when AmplierControl is On.
Press ◄ or ► to select TV Speakers or
Amplier.
NOTE: This function is only available when the
TV is connected to audio receivers that
support CEC function.
English
53
Page 54

English
Preference Controls
On Timer
This feature allows you to set the television to
turn on automatically to a preset channel at a
certain time of day or after a certain length of
time. When On timer is set to On, the green
On Timer indicator on the front of the television
is lit.
Press MENU. Press ◄ or ► to select
APPLICATIONS and press to enter
the submenu.
PICTURE SOUND SETUP
Press ▲ or ▼ to select On timer and
press to enter the submenu.
OK
Enter
APPLICATIONS
RETURN
EPG
On timer
Sleep Timer
Press ▲ or ▼ to select Enable On Timer
and press ◄ or ► to select On or Off.
Enable On Timer
Enable DTV Clock
Power On Time
Repeat
Input
Channel
Volume
Time Until Power On
On timer
Edit Back
RETURN
NOTE: The settings are only available
when Enable On Timer is On.
Press ▲ or ▼ to select Enable DTV Clock
and press ◄ or ► to select On or Off.
NOTE: Power On Time and Repeat are
only available when Enable DTV
Clock is On.
APPLICATIONS
Back
PREFERENCES
OK
00:00
On
On
00:00
ONCE
ATV
0
30
00:00
Press ▲ or ▼ to select Power On Time
and press ◄ or ► or use the number
key pad on the remote to enter the time.
Press ▲ or ▼ to select Repeat and
press ◄ or ► to select ONCE, DAILY,
Mon.~Fri., Mon.~Sat. or Sat.~Sun.
Press ▲ or ▼ to select Input and press
◄ or ► to select ATV , EXT 1, EXT 2,
EXT 3, HDMI 1, HDMI 2, PC or DTV.
For DTV, press ▲ or ▼ to select Chan-
nel and press ◄ or ► to change the
channel number.
For ATV, press ▲ or ▼ to select Channel and press ◄ or ► to change the
channel number or use the number key
pad on the remote to enter the channel
number.
NOTE:
• Channel is only available
when the Input is ATV or
DTV.
• Blank screen will appear if not
tuned.
Press ▲ or ▼ to select Volume and
press ◄ or ► to modify the volume, or
use the number key pad on the remote
to enter the volume.
Press ▲ or ▼ to select Time Until
Power On and press ◄ or ► or use the
number key pad on the remote to enter
the time for the TV to turn on automatically.
NOTE: Time Until Power On is only
available when Enable DTV
Clock is Off.
Sleep Timer
The television can be set to turn itself off after
a certain length of time.
Press MENU and press ◄ or ► to select
APPLICATIONS.
Press ▲ or ▼ to select Sleep Timer (Turn
off the TV).
Press ◄ or ► to modify the time the TV
should turn off, or use the number key pad
on the remote to enter the time.
54
Page 55

EPG
e4
e4
EPG (Electronic Programme Guide) supports
9 sets of timers. You can set or cancel a timer
for a selected programme within the guide.
When the TV is on and the timer activates, a
dialogue box is shown informing you that the
programme is about to start. When the TV is in
standby mode and the timer activates, the TV
will wake up with backlight off, speaker mute
on, and change to the channel selected.
You must set the time correctly before using
this function. All set timers are cleared when
performing a new channel scan.
Press GUIDE on the remote to display
the Programme Guide.
Programme Guid
27 Aug 08:54:17 Fri, 27 Aug
4
Rossia K
4
Radio Rossia
5
NTV
6
Rossia 2
7
TRK 5 Kanal
8
Bibigon
9
Service Information..
10
Service Information..
11
SIT 5
Move
09:04−10:58
10:59−11:02
11:02−11:07
11:07−12:29
12:33−12:57
13:00−13:03
13:03−13:07
13:07−13:17
13:18−13:44
More Info Timer List
Deejay Chiama Italia
Deejay Hits
The Club
Deejay Tg
Deejay News Beat
Deejay News Beat
OK
Press ▲ or ▼ to select the desired
channel and press to enter the programme schedule.
Press ▲ or ▼ to select the desired
programme and press to enter the
TIMER menu.
Programme Guid
27 Aug 08:54:17 Fri, 27 Aug
4
Rossia K
Programme Timers
4
Radio Rossia
5
NTV
"Deejay Chiama Italia".
6
Rossia 2
09:04−10:58 27 Aug 2010
7
TRK 5 Kanal
8
Bibigon
Repeat
9
Service Information..
Subtitle
10
Service Information..
11
SIT 5
Edit
4 Rossia K
09:04−10:58
10:59−11:02
11:02−11:07
11:07−12:29
12:33−12:57
13:00−13:03
13:03−13:07
13:07−13:17
13:18−13:44
OK
Save
Deejay Chiama Italia
07:42:12 Fri, 27 Aug
Deejay Hits
The Club
Deejay Tg
ONCE
Deejay News Beat
Deejay News Beat
Press ▲ or ▼ to select Repeat or
Subtitle and press ◄ or ► to adjust the
settings as required.
TIMER
Off
RETURN
Back
RETURN
Rossia K
Back
Rossia K
Press BOOK MARK on the remote to
enter the Timer List menu.
Programme Timers
Channel Date
4
Rossia K
6
Rossia 2
11
SIT 5
Delete
Fri, 27 Aug
Fri, 27 Aug
Fri, 27 Aug
OK
Edit
Press ▲ or ▼ to select the desired
programme and press to edit.
NOTE: Press PROGRAM on the remote
to delete the timer.
Programme Timers
Channel Date
Programme Timers
4
Rossia K
801 Rossia K
6
Rossia 2
11
SIT 5
Channel
Date
Start Time
End Time
Repeat
Subtitle
Edit
Fri, 27 Aug
Fri, 27 Aug
Fri, 27 Aug
801 Rossia K
2010/08/27
08:05
08:35
ONCE
OK
Save
Press ▲ or ▼ to select Channel, Date,
Start Time, End Time, Repeat or
Subtitle and press ◄ or ► to adjust the
settings as required.
Press
to save the settings.
NOTE:
• When the timer is set, the Timer LED
on the front panel lights on.
• After adjustment, the TV clock
may not match the time in the
EPG Programme Guide. The EPG
Programme Guide time follows the
broadcast stream time which can not
be adjusted.
07:42:58 Fri, 27 Aug
07:52−07:58
08:05−08:35
09:45−11:55
RETURN
07:35:39 Fri, 27 Aug
07:52−07:58
08:05−08:35
09:45−11:55
Off
RETURN
Time
Time
Back
Back
Repeat
ONCE
ONCE
ONCE
Repeat
ONCE
ONCE
ONCE
English
Press
to save the settings.
55
Page 56

English
zG
Panel Lock disables the buttons on the televi-
Panel Lock
sion. All buttons on the remote control can still
be used.
Press MENU. Press ◄ or ► to select
PREFERENCES and press to enter
the submenu.
4:3 Stretch
When 4:3 Stretch is activated, this function
will switch 4:3 format programmes into a full
screen picture.
In the PREFERENCES menu, press ▲
or ▼ to select 4:3 Stretch.
Press ◄ or ► to select On or Off.
PICTURE SOUND SETUP APPLICATIONS
PREFERENCES
Press ▲ or ▼ to select Panel Lock and
press ◄ or ► to select On or Off.
HDMI−LINK Setup
Teletext
Panel Lock
Auto Format
4:3 Stretch
Blue Screen
Side Panel
Edit
PREFERENCES
RETURN
Back
OK
Auto
Off
On
Off
On
1
When Panel Lock is On, a reminder will
appear when the buttons on the television
are pressed. If the standby button is pressed
the television will switch off and can only be
brought out of standby by using the remote
control.
Auto Format (Widescreen)
When this television receives a true Widescreen picture and Auto format is On, it will
automatically be displayed in Widescreen
format, irrespective of the television’s previous
setting.
In the PREFERENCES menu, press ▲
or ▼ to select Auto Format.
Press ◄ or ► to select On or Off.
NOTE: In HDMI signal format, this function is
available.
Blue Screen
When Blue Screen is selected, the screen will
turn blue and the sound will be muted when no
signal is received.
In the PREFERENCES menu, press ▲ or
▼ to select Blue Screen.
Press ◄ or ► to select On or Off.
NOTE: This function is not available in DTV
mode.
Side Panel
The Side Panel feature lightens or darkens the
band each side of the screen when in 4:3 or
14:9 format. This helps prevent image retention of the band and can also make viewing in
bright or dark conditions more comfortable.
In the PREFERENCES menu, press ▲ or
▼ to select Side Panel.
Press ◄ or ► to adjust the settings as
required.
System Information
In the SETUP menu, press ▲ or ▼ to select
System Information and press to display
the model information and rmware version.
System Information
TOSHIBA
Enter
2011
Average
RETURN
Strong
ood
Back
Apr 13 2011, 10:54:30, FW: v1.04 (N−Model)
Weak
530 MH
OK
56
Page 57

Software Upgrade
Press MENU. Press ◄ or ► to select
SETUP and press to enter the sub-
menu.
English
PICTURE SOUND
SETUP
APPLICATIONS PREFERENCES
Press ▲ or ▼ to select Software
Upgrade and press to enter the
submenu.
Press ▲ or ▼ to select Auto Upgrade
and press ◄ or ► to select On or Off.
Auto Upgrade
USB Upgrade
Software Upgrade
Edit Back
RETURN
Off
OK
Insert a USB ash drive.
Press ▲ or ▼ to select USB Upgrade
and press
to start upgrading the
rmware.
USB Upgrade
0 %
OK
Enter
RETURN
Back
NOTE: Firmware upgrading is suggested to
be done by the professional service
personnel.
57
Page 58

English
Text Services and Text Information
This television has a multi-page text memory, which takes a few moments to load.
Setting the Modes
In the PREFERENCES menu, press ▲
or ▼ to select Teletext.
HDMI−LINK Setup
Teletext
Panel Lock
Auto Format
4:3 Stretch
Blue Screen
Side Panel
Edit
PREFERENCES
RETURN
Back
OK
Auto
Off
On
Off
On
1
PREFERENCES
Press ◄ or ► to select Auto or LIST.
Navigating Pages using Auto
If Fastext is available, four coloured titles will
appear at the base of the screen.
To access one of the four given subjects, press
the relevant coloured button on the remote control.
For further information on your particular text
system(s), see the broadcast text index page
or, consult your local Toshiba dealer.
Navigating Pages using LIST
If Fastext is available, four coloured titles with
numbers 100, 200, 300 and 400 have been
programmed into the television’s memory.
To view these pages press the relevant coloured buttons.
To change these stored pages press the relevant
coloured button and enter a new 3 digit number.
This number will change in the top left of the
screen and in the coloured highlight. Press
store. The bars at the bottom of the screen will
ash white. Whenever is pressed all four page
numbers showing at the bottom will be stored and
the previous ones will be lost.
If
is not pressed the selection will be forgot-
ten when text is cancelled.
Other pages may be viewed by entering the 3
digit page number – but DO NOT press
these pages will be stored.
to
or
Control Buttons
Below is a guide to the functions of the remote
control text buttons.
Displays the index/initial page:
Press to access the index/initial page. The
page displayed is dependant on the broadcaster.
Reveals concealed text:
To discover the solutions on quiz and joke
pages press the button.
Holds a wanted page:
At times it is convenient to hold a page of text.
Press and will appear in the top left of the
screen. The page will be held on-screen until
the button is pressed again.
Enlarges the text display size:
Press once to enlarge the top half of the
page, press again to enlarge the bottom half of
the page. Press again to revert to normal size.
Selects a page while viewing a normal
picture:
Enter the page number then press , a normal picture will be displayed. The television will
indicate when the page is present by displaying the page number at the top of the screen.
To displaynewsashes:
Select the news ash page for the chosen
text service (see the index page of your text
service).
By pressing , news ashes will be displayed as and when they are broadcast. Press
again to cancel the display.
How to change the page:
Press ▲ or ▼ to change the page.
Press ◄ or ► to change the sub page when a
sub page is available.
The news ash page must be cancelled before
changing channels.
58
Page 59

PC Settings
• Most of the picture controls and functions are available. However features not available will be
greyed out.
• In the PC input mode, the Manual Setting is not displayed.
• First press until the video input mode list appears on the screen, then press ▲ or ▼ and in
order to select the PC input mode.
• This function may not be available for some signal or if no signal is received.
• The optimum points of the clock phase and sampling clock adjustments may be incomprehensible
according to the input signals.
English
Horizontal and Vertical Position
Connect the PC (as shown in the “Connecting
a Computer” section) and ensure that a picture
is showing on the television screen. The
picture position may now be adjusted to suit
personal preference.
Press MENU. Press ◄ or ► to select
SETUP and press to enter the submenu.
PICTURE SOUND
Press ▲ or ▼ to select PC Setting, and
press to enter the submenu.
Language
Country
AV connection
PC Setting
Auto Adjust
Automatic Power Down
Location
Software Upgrade
OK
Enter
Press ▲ or ▼ to select Horizontal Position or Vertical Position and press ◄ or
► to adjust the settings as required.
Horizontal position
Vertical position
Horizontal width
Clock phase
Reset
Edit Back
SETUP
SETUP
RETURN
PC Setting
RETURN
APPLICATIONS PREFERENCES
English
Germany
OK
OK
OK
Off
Home
OK
Back
0
0
0
0
OK
Horizontal Width
In the PC Setting menu, press ▲ or ▼
to select Horizontal width.
Press ◄ or ► to adjust the settings as
required.
Clock Phase
The Clock phase matches the PC signal with
the LCD display.
Adjusting this can clear horizontal stripes and
picture blur.
In the PC Setting menu, press ▲ or ▼
to select Clock phase.
Press ◄ or ► to obtain a clear picture.
Reset
This feature resets all PC settings to the factory settings.
Note: If any PC settings have not been
changed, Reset is not available.
In the PC Setting menu, press ▲ or ▼
to select Reset.
Press .
NOTE:
• When a PC is connected using
HDMI none of these functions will be
available.
• The screen is disrupted momentarily
when adjusting PC setting. This is
not a sign of malfunction.
• The default settings and adjustment
ranges may vary depending on the
input signal format.
59
Page 60

English
Input Selection and AV Connections
Use the Input Selection feature if the television does not switch over automatically when using an
external device.
HDMI1 Audio
If the connected HDMI source does not support digital audio, plug the audio cable into PC/
HDMI (AUDIO) on the back of the television
(as shown in the “Connecting an HDMI or DVI
device to the HDMI input” section), then use
the HDMI 1 Audio setting.
Press MENU. Press ◄ or ► to select
SETUP and press to enter the submenu.
PICTURE SOUND
Press ▲ or ▼ to select AV connection,
and press to enter the submenu.
Press ▲ or ▼ to select HDMI1 audio,
press ◄ or ► to select Auto, Digital or
Analogue.
HDMI1 audio
Lip Sync
EXT1 input
AV connection
Edit Back
NOTE: The Lip Sync function is only available
in HDMI mode.
SETUP
RETURN
APPLICATIONS PREFERENCES
Auto
On
AV
Lip Sync Mode
This option activates an auto audio/video
display timing adjustment function that allows
HDMI source devices to accurately perform
synchronization automatically.
All of the above HDMI settings require a proper
HDMI source device.
If HDMI source products do not support these
functions, the TV may not work properly when
activating these functions.
NOTE:
• In a non-HDMI signal mode, this
function is not available.
• In your HDMI connection is capable
of 1080p and/or your TV is capable
of refresh rates greater than 60Hz or
supports Deep Colour, you will need
a Category2 cable. Conventional
HDMI/DVI cables may not work
properly with this mode.
Input Signal Selection
You can select source of AV or S-VIDEO from
this function.
In the AV connection menu, press ▲ or
▼ to select EXT1 input.
Press ◄ or ► to select AV or S-VIDEO.
60
HDMI1 audio
Lip Sync
EXT1 input
Edit Back
AV connection
RETURN
Auto
On
AV
Page 61

Disc Playback
Blu-ray Disc™ Player functions are described in the following sections: Disc Playback, Playable Discs
and Connecting to Network (For BD-LIVE™).
Wide Playback Compatibility
Play with Various Media
This TV can playback the Blu-ray Disc™, DVD,
and CD.
AVCHD
Supports AVCHD, a new recording format of
high-denition video for use in camcorder.
Blu-ray Disc™ Applications
BD-J
Java applications (BD-J) compatibility of this
TV enables you to play games and interactive content adding to main story view in BD-J
software playback.
PIP (BONUSVIEW™)
In PIP-featured Blu-ray Disc™ software playback, you can enjoy parallel view of primary
video and secondary video at scenes subcontent included.
BD-LIVE™
This TV supports BD-LIVE™. To play
BD-LIVE™, connect this TV to the internet.
(Available BD-LIVE™ content depends on the
Blu-ray Disc™.)
Popup Menu
Popup menus included in some Blu-ray Disc™
software provide various features which can
be operated during playback. (Popup menu
content depends on the disc.)
Press TV/DISC on the remote control to select
Disc mode.
Loading the disc, with label facing forward, into
the disc slot.
The disk is inserted straight to the disc slot.
NOTE:
EJECT
Press EJECT
Remove the disc out of the way by hand.
NOTE:
Loading a Disc
• For a double-sided DVD disc, rotate
the disc so the side you want to view
is facing back into the disc slot.
• Do not use excessive force when
inserting the disc.
• Do not insert more than one disc at
a time.
to eject the disc.
• Please remove the disc after view-
ing.
• Shaking the TV may cause the disc
to fall.
• Do not load a disc which is unplay-
able, or any object other than a
playable disc.
English
61
Page 62

English
Loading a USB Flash Drive
(For BD-LIVE™ Contents)
Check the orientation of connector, then insert
a USB ash drive into the EXTERNAL USB
connector.
To remove, rst stop playback, then pull the
USB ash drive slowly and horizontally.
NOTE:
• Do not connect any USB drive other
than a USB ash drive.
• To play BD-LIVE™ contents, use a
USB ash drive with a capacity of
more than 1GB as temporary local
storage.
• Some USB ash drive may not work
properly even standardized.
MP3, JPEG and DivX® les are stored in folders, in which another folder can be added.
On Handling Discs
• Do not touch the playback side of the disc.
• Hold the edges of a disc as follows.
• Do not stick paper or tape to discs.
• Do not bend or scratch discs.
Notes on Discs
Structure of Content
Contents in Blu-ray Disc™-Video, DVD video,
AVCHD usually consist of several sections
called “title”, which is sub-divided into small
sections called “chapter”. Titles and chapters
are all numbered.
Blu-ray Disc™ / DVD / AVCHD
In audio CD’s, contents usually consist of several tunes or songs, which are called “tracks”,
and are all numbered.
CD-DA (Audio CD)
On Cleaning Discs
• Fingerprints and dust on the disc may cause
picture and/or sound deterioration or prevent
playback. Wipe the disc from the centre
outwards with a soft cloth. Always keep the
disc clean.
• Do not use any type of solvent such as
thinner, benzine, commercially available
cleaners or antistatic spray for vinyl LPs. It
may damage the disc.
On Storing Discs
• Do not store discs in a place subject to
direct sunlight or near heat sources.
• Do not store discs in places subject to mois-
ture and dust such as a bathroom or near a
humidier.
• Store discs vertically in a case. Stacking
or placing objects on discs outside of their
case may cause warping.
62
Page 63

Playable Discs
The formats of the Blu-ray Disc™, DVD, and CD listed here are supported by this TV.
Media
Blu-ray Disc™-Video
(BD=Blu-ray Disc™)
Logo
Mark
Size Content
Commercially available software.
B can be played on *DB833B,N,G,F
12cm (43/4 in.)
single-sided
1-layer, 2-layer
model.
C can be played on *DB833R model.
A,B,C can be played on this TV.
e.g.
English
Marks in this
manual
BD-RE
(Ver.2.1)
BD-R
(Ver.1.1/1.2/1.3)
DVD Video
DVD-RW
DVD-R
DVD-R DL
DVD+R
DVD+RW
CD-DA (Audio CD)
CD-RW
CD-R
12cm (43/4 in.) /
8cm (31/4 in.)
single-sided 1-layer,
single-sided 2-layer
12cm (43/4 in.) /
8cm (31/4 in.)
single-sided 1-layer,
single-sided 2-layer
12cm (43/4 in.)
single-sided
1-layer, 2-layer
8cm (31/4 in.)
single-sided 1-layer
12cm (43/4 in.) /
8cm (31/4 in.)
single-sided 1-layer
12cm (43/4 in.) /
8cm (31/4 in.)
single-sided 1-layer,
single-sided 2-layer
12cm (43/4 in.) /
8cm (31/4 in.)
12cm (43/4 in.) /
8cm (31/4 in.)
Content recorded in BDMV format
Content recorded in BDAV format
®
(video le)
DivX
®
HD
DivX
MP3 (audio le)
JPEG (photo le)
WMA
Commercially available software.
The region 2 can be played
on(*DB833F,B,N,G)
The region code 5 can be played
(*DB833R)
The region all can be played on this
TV
(Video format)
e.g.
Content recorded in Video mode
AVCHD recorded video
DivX
DivX
MP3 (audio le)
JPEG (photo le)
WMA
Music CD(CD-DA format)
DivX
DivX
MP3 (audio le)
JPEG (photo le)
WMA
®
(video le)
®
HD
®
(video le)
®
HD
• Disc other than the above cannot be played.
• Some unnalized BD-Rs may not be played. Unnalized DVD cannot be played.
• Depending on the property and recording conditions, loading or playback of some discs may not
be possible.
• Discs with a region code or number other than those above cannot be played.
• Do not insert a cracked or damaged disc, or any disc with a damaged label.
• Insert ONLY round Blu-ray Disc™ or DVDs. Media of any other shape will damage the TV and
cannot be removed.
63
Page 64

English
Select the Disc Setup Menu, Audio and Sub-
Language Settings
title default language when using the Blu-ray
Disc™ function.
Press SETUP on the remote control,
Disc Setup menu appears.
Press ▲ or ▼ to select Language and
press to enter the setup menu.
Press ▲ or ▼ to select Menu, Audio or
Subtitle and press ► or to enter the
submenu.
System
Language
Playback
Security
Network
Use cursor key to move focus, use "OK" key to select
Menu
Audio
Subtitle
Disc Setup
English
Français
Chinese
Espańol
Deutsch
EXIT
Exit
Playing Discs on the Market
Steps for playing Blu-ray Disc™, DVD, audio CD
discs available on the market.
The procedure described below is an example.
Actual operation may depend on the disc. Refer
to instructions of the disc as well.
Press TV/DISC on the remote control to
select Disc mode.
Load a disc.
Playback starts automatically.
If not, press PLAY .
Top menu operation
A top menu may appear automatically if
contained in the disc.
If you want to display a top menu, press
TOP MENU. Select an item to play by ▲,
▼, ◄ or ► then press .
Press ▲ or ▼ to select your preferred
language and press to conrm.
Disc Setup
System
Language
Playback
Security
Network
Use cursor key to move focus, use "OK" key to select
Menu
Audio
Subtitle
English
Français
Chinese
Espańol
Deutsch
EXIT
Exit
If More is selected, press to show
additional languages
System
Language
Playback
Security
Network
Use cursor key to move focus, use "OK" key to select
.
Disc Setup
Greek, Modern (1453−)
Elamite
English
English, Middle (1100−1500)
RETURN
Return
Press ▲ or ▼ to select your preferred
language and press to conrm.
A top menu can be accessed by pressing
TOP MENU during playback.
Popup menu operation
A popup menu may appear during playback (or beginning of the playback).
To display a popup menu, press POPUP
MENU during playback. Select an item to
play by ▲, ▼, ◄ or ► then press .
e.g.
64
Page 65

Disc menu operation
Menus other than a top menu may be
contained in a disc. To display these
menus, press POPUP MENU during
playback. Operate in the same way as a
top menu. For details on these menus,
refer to description of the disc.
To stop playback, press STOP .
The location where you stopped is
stored in memory temporarily so that you
can resume playback later.
NOTE: Some Blu-ray Disc™ software may
stop automatically during playback.
Such a stop can be released by pressing PLAY
.
BD-LIVE™
This TV supports BD-LIVE™ video. By
connecting this TV to the internet, you can
download additional videos and subtitles, play
interactive games, and access other special
features (depending on the disc).
The procedure described below is an example.
Actual operation may depend on the disc. Follow instructions belonging to disc.
Insert a USB ash drive with an
adequate (more than 1GB) into the
EXTERNAL connector.
Logical format: FAT32/16
USB2.0 Correspondence For Local
Storage
These requirements does not guarantee
compatibility of all USB ash drives.
Some products may not be read on this
TV.
English
Select “BD-LIVE”, then press PLAY
or .
While downloading BD-LIVE™ contents
to the connected USB ash drive, your
operation may be restricted, and if you
power off or power failure occurs downloaded content will be lost. In such a
case you may need to operate again.
NOTE:
• To use BD-LIVE™ feature, connect
this TV to the internet (page 76)
and make the necessary setting
(page 76) on this TV. Broadband
internet connection is recommended.
• Depending on the conditions of your
network, access of this TV to the
internet may take a long time or may
not be possible.
• Some BD-LIVE™ contents may take
longer time to be accessed.
• While playing BD-LIVE™ feature,
an ID of this TV or the disc may
be sent to the content provider. To
restrict BD-LIVE™ access, change
the setting of “BD-Live Connection”
(page 77).
• BD-LIVE™ contents are downloaded
to a USB ash drive inserted into
the EXTERNAL connector. You
may want to increase capacity of
memory. Execute Fmt buda on page
71, to delete the data in the BUDA
folder.
Load a BD-LIVE™-featured disc.
Press POPUP MENU.
A popup menu appears.
65
Page 66

English
Playing BD-R/RE, DVD±R/RW
Steps for playing of the following discs:
BD-R, BD-RE:
Discs recorded on recording devices such as
Blu-ray Disc™ recorders
(Format: BDAV, BDMV)
DVD±R, DVD±RW:
Discs recorded on recording devices such as
DVD recorders
Press TV/DISC on the remote control to
select Disc mode.
Load a disc.
A title list is displayed automatically.
Depending on the disc type, “Folder_1”
may appear. In this case, press .
Date of creation
e.g.
Item num: 1/16
No.
Item name Create timeTotal time
xxxxx
1
xxxxx
2
xxxxx
3
xxxxx
4
xxxxx
5
xxxxx
6
xxxxx
7
xxxxx
8
Title name
2010/03/15
2010/03/22
2010/03/29
2010/04/12
2010/04/19
2010/04/26
2010/05/03
2010/05/10
To tal time
0:45:59
0:46:02
0:46:03
0:46:02
0:46:03
0:46:02
0:46:02
0:46:01
If a list consists of more than one pages,
you can change pages by SKIP or
SKIP (or scroll by ▲ or ▼.)
Press ▲ or ▼ to select a title, then press
. Playback starts from the selected
title.
Format
BDAV
Playback Function
Depending on the disc and conditions, some of
these functions may not be available.
Pausing
Press PAUSE .
• To resume normal playback, press PLAY .
Fast-Forward/Fast-Reverse
During playback, press FF (fast-forward)
or REV (fast-reverse).
/
• Pressing the button repeatedly changes the
speed.
• Sound is muted.
• To resume normal playback, press PLAY .
Frame by Frame playback
During playback, press PAUSE , then press
SKIP .
Slow Motion
During playback, press PAUSE , then press
and hold SKIP for two seconds or more.
• Pressing the button repeatedly changes
speed.
• Sound is muted.
• To resume normal playback, press PLAY .
Returning to a Title List
During playback, press TOP MENU.
To open a title list in stop mode, rst press
PLAY then TOP MENU.
NOTE: To play DVD±R/RW recorded in Video
mode or AVCHD mode, follow the
same step as “Playing Discs on the
Market” (page 64).
Skipping Chapters or Tracks
Press SKIP (forward) or SKIP (reverse) repeatedly.
/
SKIP : to skip to the next chapter/track/le.
SKIP : to return to the beginning of the
current chapter/track/le. To skip to
preceding chapter/track/le, press
this button repeatedly.
66
Page 67

Selecting Camera Angles
English
Selecting Subtitles
While playing a scene recorded with multiple
camera angles, press ANGLE repeatedly to
select the angle.
e.g.
Angle mark
An angle mark appears while playing a scene
recorded with multiple camera angles.
• Angle selection is not available when playing
a scene or disc not recorded with multiple
camera angles.
• After changing the angle, it will take a few
moments to change the angle.
• If you pause a picture immediately after
changing the angle, the resumed playback
picture may not display the new camera
angle.
• Some discs which contain scenes recorded
with multiple camera angle may prohibit
playback variations such as fast or slow
motion.
Selecting Audio Formats
During playback, press repeatedly to
select the sound.
Current audio stream selection
Audio language
e.g.
2/4
English Dolby Digital Stereo
To tal number of audio streams
Audio format
• Some discs allow you to change audio
selections only via the disc menu. In such a
case, press POPUP MENU and choose the
appropriate language from the selections on
the disc menu.
• Audio selection is not available when play-
ing a disc which does not contain several
languages.
During playback, press SUBTITLE repeatedly
to select subtitle language.
Current subtitle selection
Subtitle language
e.g.
2/4
English
To tal number of subtitles
• To disable subtitles, select “Off”.
• Some discs may not include any subtitle
languages.
• Depending on scenes, the subtitles may not
appear immediately after you change the
subtitle language.
• Some discs display subtitles automatically,
and you cannot turn them off even if you set
the subtitle function to off.
• Some discs will allow you to make subtitle
selections and turn subtitles on or off only
via the disc menu.
Zooming a Picture
During playback, press ZOOM.
Pressing repeatedly changes the magnication
level (2, 3, 4, 1/2, 1/3, 1/4, original size).
If you press ▲, ▼, ◄ or ► while viewing an
enlarged picture, the focus point shifts.
• Depending on scenes or disc category,
zooming may be prohibited.
• Zooming does not work on subtitles, marks
or cursor on menus and on-screen displays.
67
Page 68

Playing in a Favourite Order (Program Play)
English
Marking a Desired Scene (Bookmark)
During playback, press PROGRAM.
A programming menu appears.
If it is the rst programming, press .
Press ▲ or ▼ to select a title (“TT”)
number.
e.g.
DVD 16
:
1
TT
CH
002 000
2
-- -- -- --
3
-- -- -- --
4
-- -- -- --
5
-- -- -- --
Title Total:
6
-- -- -- --
7
-- -- -- --
8
-- -- -- --
9
-- -- -- --
10
-- -- -- --
Program
11
-- -- -- --
12
-- -- -- --
13
-- -- -- --
14
-- -- -- --
15
-- -- -- --
Press ► to move the cursor to a chapter
(“CH”), and press ▲ or ▼ to select a
chapter number, then press .
e.g.
6
7
8
9
10
Chapter Total:
-- -- -- --
-- -- -- --
-- -- -- --
-- -- -- --
-- -- -- --
DVD 08
1
TT:CH
002 006
2
-- -- -- --
3
-- -- -- --
4
-- -- -- --
5
-- -- -- --
Program
11
-- -- -- --
12
-- -- -- --
13
-- -- -- --
14
-- -- -- --
15
-- -- -- --
• To add another program, repeat steps
2 to 4.
• To correct the program, select it and
press , then correct the number.
• To delete the program, select it and
press STOP .
• To delete all the programs, press
RETURN.
• When using an audio CD, enter track
numbers.
Press PLAY .
Playback starts in the order you programmed.
• To cancel program play, press STOP
twice.
NOTE: It doesn’t operate by all Blu-ray Disc™.
Registering a Bookmark
At a scene to register, press BOOK MARK.
Up to 12 scenes can be registered. If the
capacity is full, “ ” appears.
Playing from a Bookmark
Press and hold BOOK MARK.
A bookmark list appears.
Press ◄ or ► to select a bookmark to
play, then press .
Playback starts from the bookmark.
To erase a registered bookmark, select it
and press STOP .
NOTE:
• Bookmarks may not be able to be
registered for some discs or scenes.
• A registered bookmark information is
cleared in cases such as when:
- the TV is turned off.
- the disc is ejected.
Buttons
Some Blu-ray Disc™ may allocate special
functions to the colour buttons.
Follow descriptions of discs or on-screen guidance to operate.
Resume Playback Function
The TV memorizes the location where playback is stopped and resumes playback from
the location where you stopped.
If you press PLAY
after stopping playback
by STOP , playback starts from the location
where you stopped.
If you want to return to the beginning of a
disc, press STOP twice. The TV clears the
memory of the location.
• When playing a disc, the TV’s memory will
also be cleared when:
- the disc is ejected.
- “Parental Control” setting is changed.
NOTE:
• There may be a difference in the
location where playback resumes
depending on the disc.
• This function may not be available
on some BD-J discs.
68
Page 69

Playing Music/Video/Picture Files
This TV can play the following formats:
Video le: AVCHD / DivX
Music le: MP3, WMA
Picture le: JPEG
Disc: BD-R, BD-RE
DVD±R, DVD-R DL, DVD±RW
CD-R, CD-RW
• The above is not a guarantee of compat-
ibility of all the les. Depending on the
recording condition or other factors, some
les may not be played.
• Some operations may be prohibited. In
such a case, “
Press TV/DISC on the remote control to
select Disc mode.
Load a disc recorded les.
Press ▲ or ▼ to select a category of le,
then press .
e.g.: When loading a disc, a menu below
appears.
(Actual menu may depend on the
disc category.)
e.g.
0 / 3
Data disc
..
Photo
Music
Video
If you select “ .. ” and press , the media
selection menu (top menu) appears.
1 / 3
Data disc
Playlist
Press ▲ or ▼ to select an item to play,
then press .
• The media selection menu (top
menu) appears also by pressing
TOP MENU.
• To turn it off, press EXIT.
®
” appears.
To play a disc.
Type:Folder
Type:Disc
643.047M
Size:
FS:UDF
English
Select one of the following operation
depending on the le category.
When you select “Photo” and press
:
File names appear, accompanied by
data of a currently selected le.
Press ▲ or ▼ to select a le to play,
then press
.
Slideshow starts from the selected le.
The following operations are available
(depending on the recording conditions
of les).
/
/
retneC aideM:metI
retneC aideM:metI
Pressing in slideshow switches
the interval of photos between 5
speeds.
Pressing in slideshow stops play to
enter still mode.
To resume slideshow, press again.
Pressing in still mode changes the
photo to the next or previous one.
Pressing repeatedly in slideshow
or still mode changes the direction
of the still photo.
►: Rotates 90° clockwise.
◄: Rotates 90° counterclockwise.
▲: Reects up and down.
▼: Reects left and right.
To resume slideshow, press PLAY
.
Pressing in still mode enlarges the
photo.
Further pressing repeatedly
changes the magnication level.
Focusing point can be shifted by
▲, ▼, ◄ or ►.
Only when JPEG is displayed, this
button can be used.
Pressing displays thumbnail view.
• If you select a photo by ▲, ▼,
◄ or ► then press
slideshow starts from the
selected photo.
• To change the page, press
SKIP
• To close thumbnail view, press
DIGEST again.
Picture playback nishes.
or SKIP .
,
69
Page 70

English
When you select “Music” and press :
File names appear, accompanied by
data of a currently selected le.
Press ▲ or ▼ to select a le to play,
then press
.
Playback starts from the selected le.
The following operations are available
(depending on the recording conditions
of les).
Playback stops to enter pause
mode.
If you press again, playback
resumes.
/
/
SKIP : Skips to the next le.
SKIP
Plays fast in reverse or forward
direction.
Pressing repeatedly changes the
speed.
To resume playback, press PLAY
Playback stops.
Pressing STOP
media selection menu.
: Returns back to the
beginning of the current
le. Pressing twice,
skips back to the previ-
ous le.
.
returns to a
When you select “Video” and press :
File names appear, accompanied by
data of a currently selected le.
Press ▲ or ▼ to select a le to play,
then press
.
Playback starts from the selected le.
Depending on the recording conditions,
a le may prohibit some operations. In
this case “
Pressing STOP
” appears.
nishes playback and
returns to the media selection menu.
To turn off the media selection menu,
press EXIT.
NOTE:
• Some media may not be recognized.
• The le size of an image may be
shown fully.
• The number of characters for le or
folder names is limited to 512.
• The characters of le or folder
names may not be fully shown due
to the viewing area.
• A disc containing over 1000 folders
cannot be played.
System Settings
Upgrade
For software upgrades to enhance performance, you can select the following upgrade
method and start to upgrade.
Press SET UP on the remote, the Disc
Setup menu appears.
Press ▲ or ▼ to select System and
press ► or to enter the submenu.
Disc Setup
System
Language
Playback
Security
Network
Use cursor key to move focus, use "OK" key to select
Upgrade
BUDA
Press ▲ or ▼ to select Upgrade and
press ► or to enter the submenu.
System
Language
Playback
Security
Network
Use cursor key to move focus, use "OK" key to select
Upgrade
BUDA
Press ▲ or ▼ to select Disc, USB
Storage or Network and press to
start upgrade.
BUDA
BUDA would be used in BD-Live™ function,
but there is no specic meaning about the word
of BUDA. When you plug in the USB which
has at least 1 GB free space to play BD-Live™
function, the Blu-ray Disc™ system would
make a directory named BUDA automatically.
In the Disc Setup menu, press ▲ or ▼
to select System and press ► or to
enter the submenu.
More...
EXIT
Disc Setup
Disc
USB Storage
Network
EXIT
Exit
Exit
70
Page 71

Press ▲ or ▼ to select BUDA and press
► or to enter the submenu.
Disc Setup
English
Press ▲ or ▼ to select Angle Mark and
press ► or to enter the submenu.
Disc Setup
System
Language
Playback
Security
Network
Use cursor key to move focus, use "OK" key to select
Upgrade
BUDA
BUDA Inform...
EXIT
Exit
Press to select BUDA Information.
Disc Setup
System
Language
Playback
Security
Network
Use cursor key to move focus, use "OK" key to select
Upgrade
BUDA
BUDA Inform...
EXIT
Exit
Press to select Fmt buda, the data in
the BUDA folder will be cleared.
Disc Setup
System
Language
Playback
Security
Network
Use cursor key to move focus, use "OK" key to select
BUDA Information
Fmt buda
RETURN
Return
Playback Settings
Angle Mark
Some Blu-ray™/DVD discs contain the scenes
recorded with multiple angles, which allow you
to enjoy the videos with your desired angles,
therefore the angle mark is displayed only
when the Blu-ray™/DVD disc is supportable for
multi-angles and Angle Mark is set to On.
Press SET UP on the remote, the Disc
Setup Menu appears.
Press ▲ or ▼ to select Playback and
press ► or to enter the submenu.
System
Language
Playback
Security
Network
Use cursor key to move focus, use "OK" key to select
Angle Mark
PIP Mark
Secondary Audio M...
Last Memory
DivX(R) VOD DRM
On
Off
EXIT
Exit
Press ▲ or ▼ to select On or Off and
press to conrm.
PIP Mark
The Picture-In-Picture (PIP) mode displays
two pictures on the TV screen at the same
time. The full screen picture is called the Main
Window and the small inset window is called a
Sub Window. The PIP mark is displayed when
in PIP mode and PIP Mark is set to On.
In the Disc Setup menu, press ▲ or ▼
to select Playback and press ► or to
enter the submenu.
Press ▲ or ▼ to select PIP Mark and
press ► or to enter the submenu.
Press ▲ or ▼ to select On or Off and
press to select.
NOTE: Some PIP settings are only accessible
in the Disc menu.
Secondary Audio Mark
In the Disc Setup menu, press ▲ or ▼
to select Playback and press ► or to
enter the submenu.
Press ▲ or ▼ to select Secondary
Audio Mark and press ► or to enter
the submenu.
Press ▲ or ▼ to select On or Off and
press to select.
71
Page 72

Last Memory
English
If you eject the disc or switch the TV to the
standby state during normal playback, the TV
will memorize the playing point. On restart,
the TV will start playback from the memorized
point.
In the Disc Setup menu, press ▲ or ▼
to select Playback and press ► or to
enter the submenu.
Press ▲ or ▼ to select Last Memory
and press ► or to enter the submenu.
Press ▲ or ▼ to select On or Off and
press to conrm.
NOTE: Not all the Blu-ray™ discs can support
this function.
Security Settings
Parental Control
Restricts access to discs that are unsuitable for
children. These discs must be recorded with
rating.
NOTE: The password is the same as the
parental control password in DTV Set-
tings.
In the Disc Setup menu, press ▲ or ▼
to select Security and press ► or to
enter the submenu.
Press ▲ or ▼ to select Parental Control
and press ► or to enter the submenu.
Use the number keys on the remote to enter
the password, and press to conrm.
System
Language
Playback
Security
Network
Use cursor key to move focus, use "OK" key to select
Parental Control
Enter Password:
_
Disc Setup
RETURN
Return
Press ▲ or ▼ to select the parental
rating level.
Disc Setup
System
Language
Playback
Security
Network
Use cursor key to move focus, use "OK" key to select
Select Level:
Parental Control
Off
KID SAFE
G
RETURN
Return
Level Description
Off No playback restriction
KID SAFE Safe for children
G All children and general guid-
ance
PG Parental guidance
PG-13 Parental guidance for children
under 13
PGR Parental guidance Recom-
mended
R Parental guidance
NC-17 No one 17 and under allowed
ADOULT Adult Only
NOTE:
• Rated discs above the level
you set in Parental Control
require a password to be
entered.
• The ratings are country-
depended.
Country Code
This ensures that you will be able to see the
scenes intended for your current residential
Country/Area.
Press SET UP on the remote, the Disc
Setup menu appears.
Press ▲ or ▼ to select Security and
press ► or to enter the setup menu.
Press ▲ or ▼ to select Country Code
and press ► or to enter the sub-
menu.
72
Page 73

Use the number keys on the remote to enter
the password, and press to conrm.
Disc Setup
System
Language
Playback
Security
Network
Use cursor key to move focus, use "OK" key to select
Country Code
Enter Password:
_
RETURN
Return
Press ▲ or ▼ to select your country/area.
Disc Setup
System
Language
Playback
Security
Network
Use cursor key to move focus, use "OK" key to select
Select Country:
Country Code
United Ki...
United States
United sta...
RETURN
Return
System Information
In the Disc Setup menu, press ▲ or ▼ to select System Information to display the current
software version and MAC address.
Disc Setup
Information on DivX® Video
This product is a DivX® certied device that
supports DivX® le playback.
ABOUT DivX
®
DivX
Inc. This is an ofcial DivX Certied® device
that plays DivX® video. Visit divx.com for more
information and software tools to convert your
les into DivX® video.
ABOUT DivX
This DivX Certied
in order to play purchased DivX Video-on-Demand (VOD) movies. To obtain your registration code, locate the “DivX® VOD DRM” section
in “Disc Setup” > “General Setting” > “Playback”. Go to vod.divx.com for more information
on how to complete your registration.
®
VIDEO:
is a digital video format created by DivX,
®
VIDEO-ON-DEMAND:
®
device must be registered
English
Language
Playback
Security
Network
System Inform
Use cursor key to move focus, use "OK" key to select
Software Version:
TS−SR29A/TOBH 0.23
MAC Address:
00−14−00−00−45−40
EXIT
Exit
73
Page 74

English
Operating On-Screen Control Menu
The On-Screen Control menu is a list of currently available functions.
On this menu, you can perform various operations only by
▲, ▼, ◄ or ► and .
During playback, press DISC MENU.
e.g.
DVD Video
01/24
01/20
00:01:40
TT
Normal
English MPEG
01/01
Title
To scroll, press ▲ or ▼.
Most usual functions and operations are as follows. Actual ones may depend on the category or
recording conditions of disc. Follow the guidance on screen to operate.
Mark Function
File Numberofacurrentle/Totalnumberofplayableles
Title (Title Search) Number of a current title / Total number of titles
Chapter (Chapter
Search)
Time Remaining time of title/chapter / Elapsed time of title/chapter
Mode Playback status
Audio Audio language recorded in a disc
Angle Number of a current angle / Total number of recorded angles
Subtitle Subtitle language
DivX® language DivX® language
Meaning and operation (Select the mark and press
Press ▲ or ▼ to select a number of le to play, then press
Press ▲ or ▼ to select a number of title to play, then press
.
.)
.
Number of a current chapter / Total number of chapters
Press ▲ or ▼ to select a number of chapter to play, then press
.
Press ▲ or ▼ to change the marks.
: Elapsed time of title
: Remaining time of title
: Elapsed time of chapter
: Remaining time of chapter
Press ▲ or ▼ to select the mode, then press
.
Normal: Normal play
Random: Shufing may select a le already played.
Shufe: Each le is played once in shufed order.
Press ▲ or ▼ to select the language, then press
Press ▲ or ▼ to select an angle, then press
.
.
Press ▲ or ▼ to select a subtitle languages from those recorded in a disc, then
press
.
When the DivX
Press ▲ or ▼ to select a type of DivX
®
language is recorded, it is possible to choose.
®
language, then press .
74
Page 75

English
Mark Function
Subtitle Style Additional content
Second Video PIP (Picture In Picture)
Second Audio Secondary audio
Bitrate Bitrate of video and audio
Still Off Select this to release an intentional still mode programmed at certain scenes.
Ins Search
Ins Replay
Search Search title, chapter or time.
Display Display active disc information
Repeat Mode
Repeat A-B Press to set the start-point, press again to set the end-point. The scene will
Meaning and operation (Select the mark and press
If there is no additional content in a playing Blu-ray Disc™, “Off” is displayed.
When the Picture In Picture is recorded, it is possible to choose.
Press ▲ or ▼ to select a secondary video, then press
When the Secondary Audio is recorded, it is possible to choose.
Press ▲ or ▼ to select a secondary audio, then press
Press ▲ or ▼ to select a bitrate to view, then press
: Bitrate of audio
: Bitrate of video
Pressing
Pressing
Press
repeat until you press the third time to cancel this function.
advances about 30 second forward.
goes back about 10 second before.
to select a repeat mode.
: Repeat the active title
: Repeat the active chapter
: Repeat All
.
.
.
.)
• To turn off On-Screen Control menu, press DISC MENU again.
75
Page 76

English
Connecting to Network (For BD-LIVE™)
To play BD-LIVE™, connect this TV to network. For details on BD-LIVE™, see “BD-LIVE™” (page 65).
BD-LIVE™
(LAN jack)
To BD−LIVE™
LAN cable (not supplied)
Internet
back of your TV
Hold down to
pull out.
WAN
WAN
Hub or router
LAN
1 2 3 4 5
To LAN
LAN
Transmitting device
such as modem
LAN
LAN cable (not supplied)
NOTE:
• For details on connection, refer to manual of your network devices.
• After connecting to network, make the settings of “Network” (See below).
• Do not connect anything other than a LAN (straight) cable. Neglecting this may cause
damage to the TV.
• Connect to a router supporting 10BASE-T or 100BASE-TX transmission speed.
(Transmission speed may depend on the network conditions. This requirement is not a
guarantee of capacity and quality of communication.)
• Do not connect this TV directly to a PC. Doing so may cause a malfunction.
• Use of this TV connecting to the internet may require the related contract with your
internet provider.
IP Setting
To enjoy BD-LIVE™ bonus contents, setup the
network connection.
Press SET UP on the remote control.
If no IP address is obtained, select
Manual to input IP address, Subnet
Mask, Default Gateway, DNS, and
press to connect to the network. It will
try to obtain the IP address again.
Disc Setup menu appears.
In the Disc Setup menu, press ▲ or ▼
to select Network and press ► or to
enter the setup menu.
Press ▲ or ▼ to select IP Setting and
press ► or to enter the submenu.
Press ▲ or ▼ to select Auto. An IP
address is obtained automatically.
Disc Setup
Language
Playback
Security
Network
System Inform...
Use cursor key to move focus, use "OK" key to select
Interface
Address Type
IP Address
Subnet Mask
Default Gateway
DNS
NOTE: During Manual mode, if the num-
ber is entered incorrectly, press
▼ to erase the number.
Language
Playback
Security
Network
System Inform...
Use cursor key to move focus, use "OK" key to select
Internet Connection
Connection Test
IP Setting
BD−Live Connection
Proxy Setting
Auto
Manual
EXIT
Exit
Disc Setup
Network Information
Ethernet
Manual
0. 0. 0. 0.
0. 0. 0. 0.
0. 0. 0. 0.
0. 0. 0. 0.
0. 0. 0. 0.
RETURN
Return
76
Page 77

Internet Connection
In the Disc Setup menu, press ▲ or ▼
to select Network and press ► or to
enter the setup menu.
Press ▲ or ▼ to select Internet
Connection and press ► or to enter
the submenu.
Press ▲ or ▼ to select Enable and
press to conrm.
Connection Test
Display network connection status information.
In the Disc Setup menu, press ▲ or ▼
to select Network and press ► or to
enter the setup menu.
Press ▲ or ▼ to select Connection
Test and press ► or to start
connection test.
BD-Live Connection
In the Disc Setup menu, press ▲ or ▼
to select Network and press ► or to
enter the setup menu.
Press ▲ or ▼ to select BD-Live
Connection and press ► or to enter
the submenu.
Press ▲ or ▼ to select Permitted,
Partial Permitted or Prohibited and
press to conrm.
• Permitted – During playback of
BD-LIVE™ disc, the disc may automatically download all information
from appointed network.
• Partial Permitted – During playback
of BD-LIVE™ disc, download of
information is permitted only when the
disc contains certicate issued by the
content provider.
• Prohibited – Disable the TV’s access
to the internet, therefore no information is downloaded.
Proxy Setting
In the Disc Setup menu, press ▲ or ▼
to select Network and press ► or to
enter the setup menu.
Press ▲ or ▼ to select Proxy Setting
and press ► or to enter the submenu.
Press ▲ or ▼ to select Enable or Disable and press to conrm.
NOTE: Proxy Host and Proxy Port are
only available when Proxy Setting is Enable.
Press ▲ or ▼ to select Proxy Host and
press to conrm. Use ▲, ▼, ◄ or ►
to edit Proxy Host.
Disc Setup
Language
Playback
Security
Network
System Inform...
Use cursor key to move focus, use "OK" key to select
Press ▲ or ▼ to select Proxy Port and
press to conrm. Use number keys
on the remote control to edit the Proxy
Port.
Language
Playback
Security
Network
System Inform...
Please enter number by IR.
l
a b c d e 1 2
f g h i j 4 5
k l m n o 7 8 9
p q r s t .@0
uvw x y z !@#$
RETURN
Disc Setup
Change Proxy Port
Please enter the new port:
0 0 0 0 1
RETURN
3
6
ClearBack Space Enter
Return
Return
English
77
Page 78

English
BONUSVIEW ™
Trademarks and License
HDMI, the HDMI logo and High-
Denition Multimedia Interface
are trademarks or registered
trademarks of HDMI Licensing
LLC in the United States and
other countries.
Manufactured under license from
Dolby Laboratories. Dolby and
the double-D symbol are trademarks of Dolby Laboratories.
Manufactured under license
under U.S. Patent #’s: 5,451,942;
5,956,674; 5,974,380; 5,978,762;
6,487,535 & other U.S. and
worldwide patents issued & pending. DTS and the Symbol are registered trademarks, & DTS 2.0+
Digital Out and the DTS logos are
trademarks of DTS, Inc. Product
includes software. © DTS, Inc. All
Rights Reserved.
“x.v.Color” and “x.v.Color” logo
are trademarks of Sony Corporation.
“DVD Video” is a trademark of
DVD Format/Logo Licensing
Corporation.
“AVCHD” and the “AVCHD”
logo are trademarks of Panasonic Corporation and Sony
Corporation.
Oracle and Java are registered
trademarks of Oracle and/or its
afliates. Other names may be
trademarks of their respective
owners.
DivX®, DivX Certied® and associated logos are trademarks
of DivX, Inc. and are used
under license.
Covered by one or more of the
following U.S. patents:
7,295,673; 7,460,668;
7,515,710; 7,519,274
Blu-ray Disc™, Blu-ray™, BD-Live™,
BONUSVIEW™, and the logos are
trademarks of the Blu-ray Disc Association.
78
Page 79

THIS PRODUCT IS LICENSED UNDER THE AVC PATENT PORTFOLIO LICENSE FOR THE PERSONAL AND NON-COMMERCIAL USE OF A CONSUMER TO (i) ENCODE VIDEO IN COMPLIANCE WITH THE AVC STANDARD (“AVC VIDEO”) AND/OR (ii) DECODE AVC VIDEO THAT WAS
ENCODED BY A CONSUMER ENGAGED IN A PERSONAL AND NON-COMMERCIAL ACTIVITY
AND/OR WAS OBTAINED FROM A VIDEO PROVIDER LICENSED TO PROVIDE AVC VIDEO. NO
LICENSE IS GRANTED OR SHALL BE IMPLIED FOR ANY OTHER USE. ADDITIONAL INFORMATION MAY BE OBTAINED FROM MPEG LA, L. L. C. SEE HTTP://WWW.MPEGLA.COM
THIS PRODUCT IS LICENSED UNDER THE VC-1 PATENT PORTFOLIO LICENSE FOR THE
PERSONAL AND NON-COMMERCIAL USE OF A CONSUMER TO (i) ENCODE VIDEO IN
COMPLIANCE WITH THE VC-1 STANDARD (“VC-1 VIDEO”) AND/OR (ii) DECODE VC-1 VIDEO
THAT WAS ENCODED BY A CONSUMER ENGAGED IN A PERSONAL AND NON-COMMERCIAL
ACTIVITY AND/OR WAS OBTAINED FROM A VIDEO PROVIDER LICENSED TO PROVIDE VC-1
VIDEO. NO LICENSE IS GRANTED OR SHALL BE IMPLIED FOR ANY OTHER USE. ADDITIONAL INFORMATION MAY BE OBTAINED FROM MPEG LA, L. L. C. SEE HTTP://WWW.MPEGLA.
COM
MPEG Layer-3 audio coding technology licensed from Fraunhofer IIS and Thomson.
All other brand and product names mentioned in this manual are trademarks and/or registered
trademarks of their respective holders.
Notes on Copyright
The unauthorized recording, use, distribution, or revision of copyrighted materials including, without
limitation, TV programs, videotapes, Blu-ray™ discs and DVDs, is prohibited under the Copyright
Laws of the United States and other countries, and may subject you to civil and criminal liability.
This product incorporates copyright protection technology that is protected by method claims of
certain U.S. patents and other intellectual property rights owned by Rovi Corporation and other
rights owners. Use of this copyright protection technology must be authorized by Rovi Corporation,
and is intended for home and other limited viewing uses only unless otherwise authorized by Rovi
Corporation. Reverse engineering or disassembly is prohibited.
English
79
Page 80

English
SpecicationsandAccessories
• This TV complies with the specication listed below.
• Design and specications are subject to change without notice.
DVB-T Broadcast systems/
channels
UK UHF 21-68 PAL-I UHF UK21-UK69
France VHF 05-10
Germany VHF 05-12
Austria VHF 05-12
Switzerland VHF 05-12
Italia VHF 05-12 (D,E,F,G,H,H1,H2)
Spain UHF 21-69
Nederlands VHF 05-12
Sweden VHF 05-12
Finland VHF 05-12
Greece VHF 05-12
DVB-C
Video Input PAL, SECAM, NTSC 3.58/4.43
External connections
EXT1 Input/Output 21-pin SCART Auto, Mixed, RGB,
EXT2/EXT3 Input RCA jacks
RGB/PC Input D-sub RGB
HDMI 1/2 Input HDMI
PC/HDMI
AUDIO
EXT2/EXT3
Audio
Digital Audio Output
USB Port Interface version:
BD-LIVE™ RJ-45 jack
External
Terminal
(For Memory
Storage)
DiscPlayerSpecication
Blu-ray Disc™
Region Code
DVD-Video
Region Code
(VHF 01-05)
UHF 21-69
UHF 21-69
UHF 21-69
UHF 21-69
UHF 21-69
UHF 21-69
UHF 21-69
UHF 21-69
UHF 21-69
USB Class:
File system:
Model F, G, N, B B
Model F, G, N, B 2
Broadcast systems/channels
PAL-B/G UHF E21-E69
SECAM-L UHF F21-F69
SECAM-D/K UHF R21-R69
RCA jacks
Phone jack Audio L + R
RCA jacks Audio L + R
(S/PDIF)
USB 2.0
USB Flash Drive
FAT32/16
USB Flash Drive
R C
R 5
®
VHF E2-E12, S1-S41
VHF F1-F10, B-Q
VHF R1-R12
Composite, S-Vídeo /
TV Out
(EXT2) Video
(EXT3) Y,
P
, PR/C
B/CB
Coaxial
R
Pickup
Wavelength
Stereo NICAM
Visible Screen
Size (H x V mm)
(approx.)
Display 16:9 (1920 x 1080)
Sound Output
(At 10% Distortion)
Power Consumption
Power source 220-240V AC 50/60Hz
32DB833B
Annual power consumption (approx.) 83.4kWh
On mode power consumption(approx.) 57.1W
Standby power consumption (approx.) < 0.3W
Off mode power consumption (approx.) < 0.3W
42DB833B
Annual power consumption (approx.) 127.3kWh
On mode power consumption(approx.) 87.2W
Standby power consumption (approx.) < 0.3W
Off mode power consumption (approx.) < 0.3W
* Operating 4 hours a day and 365 days a year.
Dimensions
(H x W x D mm)
(approx.)
Weight
(approx.)
Headphone Socket 3.5mm stereo
Operating Conditions Temperature: 5oC - 35oC
Accessories Remote control
CD 785±6nm
DVD 661±4nm
Blu-ray Disc™ 405±5nm
2 Carrier System
Model 32DB833B 698.40 x 392.85
42DB833B 930.24 x 523.26
Model 32DB833B 5W + 5W
42DB833B 7W + 7W
Model 32DB833B
42DB833B
Model 32DB833B
42DB833B
Humidity: 20% - 80%
2 batteries
(AAA, IEC R03 1.5V)
Power cord
Owner’s Manual
Screw (x6)
542 x 770 x 201
677 x 1007 x 238
11.5kg
15.5kg
o
(41
F - 94oF)
(non-condensing)
80
Page 81

English
ECO USE:
• energy efciency reduces power consumption and thus saves money by reducing electricity bills,
• turning the TV off at its mains supply, or un-plugging it, will cut energy use to zero for all TVs, and is
recommended when the TV is not being used for a long time, e.g. when on holiday,
• using the hard off-switch will reduce energy use to near zero (where one is tted),
• putting the TV into standby mode will reduce energy consumption, but will still draw some power,
• reducing the brightness of the screen will reduce energy use.
81
Page 82

License Information on the Software Used in This Product
English
This document is statement purpose only. Not concerned with operation of this
product.
The software pre-installed in this product consists of multiple, independent software components.
Each software component is copyrighted by a third party. This product uses software components that
are distributed as freeware under a third-party end-user license agreement or copyright notice (hereinafter referred to as a “EULA”).
Some EULAs require that the source code of the applicable component be disclosed as the condition
for distributing the software component in executable format. You can check the software components
subject to such EULA requirements on the following e-mail address:
E-mail address: linux@toshiba-dme.co.jp
TOSHIBA provides a warranty for this product you have purchased under conditions set forth by
TOSHIBA. However, some of the software components distributed under an EULA are made available for use by the user on the assumption that they are not copyrighted or warranted by a third party.
These software components are licensed to the user free of charge and therefore not covered by
any warranty within the scope of the applicable laws. These software components are not subject
to any copyrights or other third-party rights and are provided in “as is” condition without any warranty, whether express or implied. “Warranty” here includes, but not limited to, an implied warranty for
marketability or tness for specic uses. All risks associated with the quality or performance of these
software components are assumed by the user. TOSHIBA shall not be liable whatsoever for any cost
of repair or correction or other incidental expense incurred in connection with a defect found in any of
these software components. Unless specied under the applicable laws or in a written agreement, a
party who changes or redistributes the software with consent from the copyright holders or based on
the aforementioned licenses shall not be held liable whatsoever for any loss arising from the use of
or inability to use such software components. The same applies even when the copyright holders or
relevant third parties have been informed of the possibility of such loss. “Loss” here includes normal,
special, incidental and indirect loss (including, but not limited to, the loss of data or its accuracy; loss
incurred by the user or any third party; and interface incompatibility with other software). Please read
each EULA for details on the use conditions and items that must be observed regarding these software components.
The table below lists the software components pre-installed in this product, which are subject to EULAs. The user should read the applicable EULAs carefully before using these software components.
The EULAs are exhibited in their original text (English) as exactly written by the respective parties.
Project name Project license
Linux kernel GPLv2
Busybox GPLv2
U-boot GPLv2
glibc LGPLv2.1
SquashFS GPLv2
International Components for Unicode ICU License
OpenSSL OpenSSL License and SSLeay License
zlib zlib license
FreeType FreeType License
Expat Expat license
CURL curl license
Independent JPEG group IJG license
LIRC GPLv2
82
Page 83

GNU GENERAL PUBLIC LICENSE
Version 2, June 1991
Copyright (C) 1989, 1991 Free Software Foundation, Inc.,
51 Franklin Street, Fifth Floor, Boston, MA 021101301 USA
Everyone is permitted to copy and distribute
verbatim copies
of this license document, but changing it is not
allowed.
Preamble
The licenses for most software are designed to
take away your freedom to share and change it.
By contrast, the GNU General Public License is
intended to guarantee your freedom to share and
change free software--to make sure the software
is free for all its users. This General Public
License applies to most of the Free Software
Foundation’s software and to any other program
whose authors commit to using it. (Some other
Free Software Foundation software is covered by
the GNU Lesser General Public License instead.)
You can apply it to your programs, too.
When we speak of free software, we are referring
to freedom, not price. Our General Public Licenses are designed to make sure that you have
the freedom to distribute copies of free software
(and charge for this service if you wish), that you
receive source code or can get it if you want it,
that you can change the software or use pieces
of it in new free programs; and that you know you
can do these things.
To protect your rights, we need to make restrictions that forbid anyone to deny you these rights
or to ask you to surrender the rights. These
restrictions translate to certain responsibilities for
you if you distribute copies of the software, or if
you modify it.
For example, if you distribute copies of such a
program, whether gratis or for a fee, you must
give the recipients all the rights that you have.
You must make sure that they, too, receive or can
get the source code. And you must show them
these terms so they know their rights.
We protect your rights with two steps: (1) copyright the software, and (2) offer you this license
which gives you legal permission to copy, distribute and/or modify the software.
Also, for each author’s protection and ours, we
want to make certain that everyone understands
that there is no warranty for this free software.
Also, for each author’s protection and ours, we
want to make certain that everyone understands
that there is no warranty for this free software.
If the software is modied by someone else and
English
passed on, we want its recipients to know that
what they have is not the original, so that any
problems introduced by others will not reect on
the original authors’ reputations.
Finally, any free program is threatened constantly
by software patents. We wish to avoid the danger
that redistributors of a free program will individually obtain patent licenses, in effect making the
program proprietary. To prevent this, we have
made it clear that any patent must be licensed for
everyone’s free use or not licensed at all.
The precise terms and conditions for copying,
distribution and modication follow.
GNU GENERAL PUBLIC LICENSE
TERMS AND CONDITIONS FOR COPYING,
DISTRIBUTION AND MODIFICATION
0. This License applies to any program or other
work which contains a notice placed by the
copyright holder saying it may be distributed under the terms of this General Public
License. The “Program”, below, refers to any
such program or work, and a “work based on
the Program” means either the Program or
any derivative work under copyright law: that
is to say, a work containing the Program or a
portion of it, either verbatim or with modications and/or translated into another language. (Hereinafter, translation is included
without limitation in the term “modication”.)
Each licensee is addressed as “you”.
Activities other than copying, distribution
and modication are not covered by this
License; they are outside its scope. The act
of running the Program is not restricted, and
the output from the Program is covered only
if its contents constitute a work based on the
Program (independent of having been made
by running the Program). Whether that is
true depends on what the Program does.
1. You may copy and distribute verbatim copies of the Program’s source code as you
receive it, in any medium, provided that you
conspicuously and appropriately publish on
each copy an appropriate copyright notice
and disclaimer of warranty; keep intact all
the notices that refer to this License and to
the absence of any warranty;and give any
other recipients of the Program a copy of
this License along with the Program.
You may charge a fee for the physical act
of transferring a copy, and you may at your
option offer warranty protection in exchange
for a fee.
83
Page 84

2. You may modify your copy or copies of the
English
Program or any portion of it, thus forming a
work based on the Program, and copy and
distribute such modications or work under
the terms of Section 1 above, provided that
you also meet all of these conditions:
a) You must cause the modied les to
carry prominent notices stating that you
changed the les and the date of any
change.
b) You must cause any work that you dis-
tribute or publish, that in whole or in part
contains or is derived from the Program
or any part thereof, to be licensed as a
whole at no charge to all third parties
under the terms of this License.
c) If the modied program normally reads
commands interactively when run, you
must cause it, when started running for
such interactive use in the most ordinary
way, to print or display an announcement
including an appropriate copyright notice
and a notice that there is no warranty
(or else, saying that you provide a warranty) and that users may redistribute
the program under these conditions, and
telling the user how to view a copy of this
License. (Exception: if the Program itself
is interactive but does not normally print
such an announcement, your work based
on the Program is not required to print an
announcement.)
These requirements apply to the modied
work as a whole.
If identiable sections of that work are not
derived from the Program, and can be reasonably considered independent and separate works in themselves, then this License,
and its terms, do not apply to those sections
when you distribute them as separate works.
But when you distribute the same sections
as part of a whole which is a work based on
the Program, the distribution of the whole
must be on the terms of this License, whose
permissions for other licensees extend to
the entire whole, and thus to each and every
part regardless of who wrote it.
Thus, it is not the intent of this section to
claim rights or contest your rights to work
written entirely by you; rather, the intent is to
exercise the right to control the distribution
of derivative or collective works based on
the Program.
In addition, mere aggregation of another
work not based on the Program with the Pro-
gram (or with a work based on the Program)
on a volume of a storage or distribution
medium does not bring the other work under
the scope of this License.
3. You may copy and distribute the Program (or
a work based on it, under Section 2) in object code or executable form under the terms
of Sections 1 and 2 above provided that you
also do one of the following:
a) Accompany it with the complete cor-
responding machine-readable source
code, which must be distributed under
the terms of Sections 1 and 2 above on
a medium customarily used for software
interchange; or,
b) Accompany it with a written offer, valid for
at least three years, to give any third party, for a charge no more than your cost of
physically performing source distribution,
a complete machine-readable copy of the
corresponding source code, to be distributed under the terms of Sections 1 and 2
above on a medium customarily used for
software interchange; or,
c) Accompany it with the information you
received as to the offer to distribute corresponding source code. (This alternative is allowed only for noncommercial
distribution and only if you received the
program in object code or executable
form with such an offer, in accord with
Subsection b above.)
The source code for a work means the preferred form of the work for making modications to it. For an executable work, complete
source code means all the source code for
all modules it contains, plus any associated
interface denition les, plus the scripts used
to control compilation and installation of the
executable. However, as a special exception, the source code distributed need not
include anything that is normally distributed
(in either source or binary form) with the
major components (compiler, kernel, and so
on) of the operating system on which the executable runs, unless that component itself
accompanies the executable.
If distribution of executable or object code
is made by offering access to copy from a
designated place, then offering equivalent
access to copy the source code from the
same place counts as distribution of the
source code, even though third parties are
not compelled to copy the source along with
the object code.
84
Page 85

4. You may not copy, modify, sublicense, or
distribute the Program except as expressly
provided under this License. Any attempt
otherwise to copy, modify, sublicense or
distribute the Program is void, and will
automatically terminate your rights under
this License.
However, parties who have received copies,
or rights, from you under this License will not
have their licenses terminated so long as
such parties remain in full compliance.
5. You are not required to accept this License,
since you have not signed it. However,
nothing else grants you permission to modify
or distribute the Program or its derivative
works. These actions are prohibited by law
if you do not accept this License. Therefore,
by modifying or distributing the Program (or
any work based on the Program), you indicate your acceptance of this License to do
so, and all its terms and conditions for copying, distributing or modifying the Program or
works based on it.
6. Each time you redistribute the Program (or
any work based on the Program), the recipient automatically receives a license from the
original licensor to copy, distribute or modify
the Program subject to these terms and
conditions. You may not impose any further
restrictions on the recipients’ exercise of the
rights granted herein. You are not responsible for enforcing compliance by third parties
to this License.
7. If, as a consequence of a court judgment or
allegation of patent infringement or for any
other reason (not limited to patent issues),
conditions are imposed on you (whether by
court order, agreement or otherwise) that
contradict the conditions of this License,
they do not excuse you from the conditions
of this License. If you cannot distribute so
as to satisfy simultaneously your obligations
under this License and any other pertinent
obligations, then as a consequence you
may not distribute the Program at all. For
example, if a patent license would not permit
royalty-free redistribution of the Program
by all those who receive copies directly or
indirectly through you, then the only way you
could satisfy both it and this License would
be to refrain entirely from distribution of the
Program.
If any portion of this section is held invalid or unenforceable under any particular
circumstance, the balance of the section is
intended to apply and the section as a whole
is intended to apply in other circumstances.
English
It is not the purpose of this section to induce
you to infringe any patents or other property
right claims or to contest validity of any such
claims; this section has the sole purpose of
protecting the integrity of the free software
distribution system, which is implemented by
public license practices. Many people have
made generous contributions to the wide
range of software distributed through that
system in reliance on consistent application
of that system; it is up to the author/donor
to decide if he or she is willing to distribute
software through any other system and a
licensee cannot impose that choice.
This section is intended to make thoroughly
clear what is believed to be a consequence
of the rest of this License.
8. If the distribution and/or use of the Program
is restricted in certain countries either by
patents or by copyrighted interfaces, the
original copyright holder who places the
Program under this License may add an
explicit geographical distribution limitation
excluding those countries, so that distribution is permitted only in or among countries
not thus excluded. In such case, this License
incorporates the limitation as if written in the
body of this License.
9. The Free Software Foundation may publish
revised and/or new versions of the General
Public License from time to time. Such new
versions will be similar in spirit to the present
version, but may differ in detail to address
new problems or concerns.
Each version is given a distinguishing
version number. If the Program species a
version number of this License which applies
to it and “any later version”, you have the
option of following the terms and conditions
either of that version or of any later version
published by the Free Software Foundation.
If the Program does not specify a version
number of this License, you may choose any
version ever published by the Free Software
Foundation.
10. If you wish to incorporate parts of the
Program into other free programs whose distribution conditions are different, write to the
author to ask for permission. For software
which is copyrighted by the Free Software
Foundation, write to the Free Software
Foundation; we sometimes make exceptions for this. Our decision will be guided by
the two goals of preserving the free status
85
Page 86

of all derivatives of our free software and of
English
promoting the sharing and reuse of software
generally.
NO WARRANTY
11. BECAUSE THE PROGRAM IS LICENSED
FREE OF CHARGE, THERE IS NO WARRANTY FOR THE PROGRAM, TO THE EXTENT PERMITTED BY APPLICABLE LAW.
EXCEPT WHEN OTHERWISE STATED IN
WRITING THE COPYRIGHT HOLDERS
AND/OR OTHER PARTIES PROVIDE THE
PROGRAM “AS IS” WITHOUT WARRANTY
OF ANY KIND, EITHER EXPRESSED OR
IMPLIED, INCLUDING, BUT NOT LIMITED
TO, THE IMPLIED WARRANTIES OF
MERCHANTABILITY AND FITNESS FOR
A PARTICULAR PURPOSE. THE ENTIRE
RISK AS TO THE QUALITY AND PERFORMANCE OF THE PROGRAM IS WITH
YOU. SHOULD THE PROGRAM PROVE
DEFECTIVE, YOU ASSUME THE COST OF
ALL NECESSARY SERVICING, REPAIR
OR CORRECTION.
12. IN NO EVENT UNLESS REQUIRED BY APPLICABLE LAW OR AGREED TO IN WRITING WILL ANY COPYRIGHT HOLDER, OR
ANY OTHER PARTY WHO MAY MODIFY
AND/OR REDISTRIBUTE THE PROGRAM
AS PERMITTED ABOVE, BE LIABLE TO
YOU FOR DAMAGES, INCLUDING ANY
GENERAL, SPECIAL, INCIDENTAL OR
CONSEQUENTIAL DAMAGES ARISING
OUT OF THE USE OR INABILITY TO USE
THE PROGRAM (INCLUDING BUT NOT
LIMITED TO LOSS OF DATA OR DATA
BEING RENDERED INACCURATE OR
LOSSES SUSTAINED BY YOU OR THIRD
PARTIES OR A FAILURE OF THE PROGRAM TO OPERATE WITH ANY OTHER
PROGRAMS), EVEN IF SUCH HOLDER
OR OTHER PARTY HAS BEEN ADVISED
OF THE POSSIBILITY OF SUCH DAMAGES.
END OF TERMS AND CONDITIONS
How to Apply These Terms to Your New Programs
If you develop a new program, and you want it
to be of the greatest possible use to the public,
the best way to achieve this is to make it free
software which everyone can redistribute and
change under these terms.
To do so, attach the following notices to the
program. It is safest to attach them to the start
of each source le to most effectively convey
the exclusion of warranty; and each le should
have at least the “copyright” line and a pointer to
where the full notice is found.
<one line to give the program’s name and a
brief idea of what it does.>
Copyright (C) <year> <name of author>
This program is free software; you can redistribute it and/or modify it under the terms of the
GNU General Public License as published by the
Free Software Foundation; either version 2 of the
License, or (at your option) any later version.
This program is distributed in the hope that it
will be useful, but WITHOUT ANY WARRANTY;
without even the implied warranty of MERCHANTABILITY or FITNESS FOR A PARTICULAR PURPOSE. See the GNU General Public
License for more details.
You should have received a copy of the GNU
General Public License along with this program;
if not, write to the Free Software Foundation,
Inc.,51 Franklin Street, Fifth Floor, Boston, MA
02110-1301 USA.
Also add information on how to contact you by
electronic and paper mail.
If the program is interactive, make it output a
short notice like this when it starts in an interactive mode:
Gnomovision version 69, Copyright (C) year
name of author
Gnomovision comes with ABSOLUTELY NO
WARRANTY; for details type `show w’.
This is free software, and you are welcome
to redistribute it under certain conditions; type
`show c’ for details.
The hypothetical commands `show w’ and `show
c’ should show the appropriate parts of the
General Public License. Of course, the commands you use may be called something other
than `show w’ and `show c’; they could even be
mouse-clicks or menu items--whatever suits your
program.
You should also get your employer (if you work
as a programmer) or your school, if any, to sign a
“copyright disclaimer” for the program, if neces-
sary. Here is a sample; alter the names:
Yoyodyne, Inc., hereby disclaims all copyright
interest in the program ‘Gnomovision’ (which
makes passes at compilers) written by James
Hacker.
<signature of Ty Coon>, 1 April 1989
Ty Coon, President of Vice
This General Public License does not permit
86
Page 87

incorporating your program into proprietary
programs. If your program is a subroutine library,
you may consider it more useful to permit linking
proprietary applications with the library. If this is
what you want to do, use the GNU Lesser General Public License instead of this License.
LGPLv2.1
GNU LESSER GENERAL PUBLIC LICENSE
Version 2.1, February 1999
Copyright (C) 1991, 1999 Free Software Founda-
tion, Inc. 51 Franklin Street, Fifth Floor, Boston,
MA 02110-1301 USA
Everyone is permitted to copy and distribute
verbatim copies of this license document, but
changing it is not allowed.
[This is the rst released version of the Lesser
GPL. It also counts as the successor of the GNU
Library Public License, version 2, hence the version number 2.1.]
Preamble
The licenses for most software are designed to
take away your freedom to share and change it.
By contrast, the GNU General Public Licenses
are intended to guarantee your freedom to share
and change free software--to make sure the
software is free for all its users.
This license, the Lesser General Public License,
applies to some specially designated software
packages--typically libraries--of the Free Software Foundation and other authors who decide
to use it. You can use it too, but we suggest you
rst think carefully about whether this license or
the ordinary General Public License is the better
strategy to use in any particular case, based on
the explanations below.
When we speak of free software, we are referring to freedom of use, not price. Our General
Public Licenses are designed to make sure that
you have the freedom to distribute copies of free
software (and charge for this service if you wish);
that you receive source code or can get it if you
want it; that you can change the software and
use pieces of it in new free programs; and that
you are informed that you can do these things.
To protect your rights, we need to make restrictions that forbid distributors to deny you these
rights or to ask you to surrender these rights.
These restrictions translate to certain responsibilities for you if you distribute copies of the library
or if you modify it.
For example, if you distribute copies of the
library, whether gratis or for a fee, you must give
the recipients all the rights that we gave you. You
must make sure that they, too, receive or can get
English
the source code. If you link other code with the
library, you must provide complete object les to
the recipients, so that they can relink them with
the library after making changes to the library
and recompiling it. And you must show them
these terms so they know their rights.
We protect your rights with a two-step method:
(1) we copyright the library, and (2) we offer you
this license, which gives you legal permission to
copy, distribute and/or modify the library.
To protect each distributor, we want to make it
very clear that there is no warranty for the free
library. Also, if the library is modied by someone
else and passed on, the recipients should know
that what they have is not the original version,
so that the original author’s reputation will not be
affected by problems that might be introduced by
others. Finally, software patents pose a constant
threat to the existence of any free program.
We wish to make sure that a company cannot
effectively restrict the users of a free program
by obtaining a restrictive license from a patent holder. Therefore, we insist that any patent
license obtained for a version of the library must
be consistent with the full freedom of use speci-
ed in this license.
Most GNU software, including some libraries,
is covered by the ordinary GNU General Public
License. This license, the GNU Lesser General
Public License, applies to certain designated
libraries, and is quite different from the ordinary
General Public License. We use this license for
certain libraries in order to permit linking those
libraries into non-free programs.
When a program is linked with a library, whether
statically or using a shared library, the combination of the two is legally speaking a combined
work, a derivative of the original library. The ordinary General Public License therefore permits
such linking only if the entire combination ts its
criteria of freedom. The Lesser General Public
License permits more lax criteria for linking
other code with the library. We call this license
the “Lesser” General Public License because it
does Less to protect the user’s freedom than the
ordinary General Public License. It also provides other free software developers Less of an
advantage over competing non-free programs.
These disadvantages are the reason we use
the ordinary General Public License for many
libraries. However, the Lesser license provides
advantages in certain special circumstances.
For example, on rare occasions, there may be
a special need to encourage the widest possible use of a certain library, so that it becomes
87
Page 88

a de-facto standard. To achieve this, non-free
programs must be allowed to use the library. A
English
more frequent case is that a free library does
the same job as widely used non-free libraries.
In this case, there is little to gain by limiting the
free library to free software only, so we use the
Lesser General Public License. In other cases,
permission to use a particular library in non-free
programs enables a greater number of people to
use a large body of free software. For example,
permission to use the GNU C Library in non-free
programs enables many more people to use the
whole GNU operating system, as well as its variant, the GNU/Linux operating system. Although
the Lesser General Public License is Less
protective of the users’ freedom, it does ensure
that the user of a program that is linked with the
Library has the freedom and the wherewithal to
run that program using a modied version of the
Library. The precise terms and conditions for
copying, distribution and modication follow. Pay
close attention to the difference between a “work
based on the library” and a “work that uses the
library”. The former contains code derived from
the library, whereas the latter must be combined
with the library in order to run.
GNU LESSER GENERAL PULIC LICENSE
TERMS AND CONDITIONS FOR COPYING,
DISTRIBUTION AND MODIFICATION
0. This License Agreement applies to any
software library or other program which
contains a notice placed by the copyright
holder or other authorized party saying it
may be distributed under the terms of this
Lesser General Public License (also called
“this License”).Each licensee is addressed
as “you”. A “library” means a collection of
software functions and/or data prepared so
as to be conveniently linked with application
programs (which use some of those functions and data) to form executables.
The “Library”, below, refers to any such
software library or work which has been
distributed under these terms. A “work based
on the Library” means either the Library or
any derivative work under copyright law: that
is to say, a work containing the Library or a
portion of it, either verbatim or with modications and/or translated straightforwardly into
another language. (Hereinafter, translation is
included without limitation in the term “modi-
cation”.) “Source code” for a work means
the preferred form of the work for making
modications to it. For a library, complete
source code means all the source code for
all modules it contains, plus any associated
interface denition les, plus the scripts used
to control compilation and installation of the
library. Activities other than copying, distribu-
tion and modication are not covered by this
License; they are outside its scope. The act
of running a program using the Library is not
restricted, and output from such a program
is covered only if its contents constitute a
work based on the Library (independent of
the use of the Library in a tool for writing it).
Whether that is true depends on what the
Library does and what the program that uses
the Library does.
1. You may copy and distribute verbatim copies
of the Library’s complete source code as you
receive it, in any medium, provided that you
conspicuously and appropriately publish on
each copy an appropriate copyright notice
and disclaimer of warranty; keep intact all
the notices that refer to this License and to
the absence of any warranty; and distribute
a copy of this License along with the Library.
You may charge a fee for the physical act
of transferring a copy, and you may at your
option offer warranty protection in exchange
for a fee.
2. You may modify your copy or copies of the
Library or any portion of it, thus forming a
work based on the Library, and copy and dis-
tribute such modications or work under the
terms of Section 1 above, provided that you
also meet all of these conditions:
a) The modied work must itself be a soft-
ware library.
b) You must cause the les modied to
carry prominent notices stating that you
changed the les and the date of any
change.
c) You must cause the whole of the work to
be licensed at no charge to all third parties under the terms of this License.
d) If a facility in the modied Library refers
to a function or a table of data to be supplied by an application program that uses
the facility, other than as an argument
passed when the facility is invoked, then
you must make a good faith effort to
ensure that, in the event an application
does not supply such function or table,
the facility still operates, and performs
whatever part of its purpose remains
meaningful.
(For example, a function in a library to
compute square roots has a purpose that
is entirely well-dened independent of
88
Page 89

the application. Therefore, Subsection
2d requires that any application-supplied
function or table used by this function
must be optional: if the application does
not supply it, the square root function
must still compute square roots.) These
requirements apply to the modied work
as a whole. If identiable sections of that
work are not derived from the Library, and
can be reasonably considered independent and separate works in themselves,
then this License, and its terms, do not
apply to those sections when you distribute them as separate works. But when
you distribute the same sections as part
of a whole which is a work based on the
Library, the distribution of the whole must
be on the terms of this License, whose
permissions for other licensees extend
to the entire whole, and thus to each and
every part regardless of who wrote it.
Thus, it is not the intent of this section to
claim rights or contest your rights to work
written entirely by you; rather, the intent
is to exercise the right to control the distribution of derivative or collective works
based on the Library. In addition, mere
aggregation of another work not based
on the Library with the Library (or with a
work based on the Library) on a volume
of a storage or distribution medium does
not bring the other work under the scope
of this License.
3. You may opt to apply the terms of the ordinary GNU General Public License instead of
this License to a given copy of the Library.
To do this, you must alter all the notices that
refer to this License, so that they refer to
the ordinary GNU General Public License,
version 2, instead of to this License. (If a
newer version than version 2 of the ordinary
GNU General Public License has appeared,
then you can specify that version instead if
you wish.) Do not make any other change in
these notices. Once this change is made in
a given copy, it is irreversible for that copy,
so the ordinary GNU General Public License
applies to all subsequent copies and derivative works made from that copy. This option
is useful when you wish to copy part of the
code of the Library into a program that is not
a library.
4. You may copy and distribute the Library (or
a portion or derivative of it, under Section 2)
in object code or executable form under the
terms of Sections 1 and 2 above provided
that you accompany it with the complete cor-
responding machine-readable source code,
English
which must be distributed under the terms
of Sections 1 and 2 above on a medium
customarily used for software interchange.
If distribution of object code is made by
offering access to copy from a designated
place, then offering equivalent access to
copy the source code from the same place
satises the requirement to distribute the
source code, even though third parties are
not compelled to copy the source along with
the object code.
5. A program that contains no derivative of
any portion of the Library, but is designed to
work with the Library by being compiled or
linked with it, is called a “work that uses the
Library”. Such a work, in isolation, is not a
derivative work of the Library, and therefore
falls outside the scope of this License. However, linking a “work that uses the Library”
with the Library creates an executable that
is a derivative of the Library (because it
contains portions of the Library), rather than
a “work that uses the library”. The executable is therefore covered by this License.
Section 6 states terms for distribution of
such executables. When a “work that uses
the Library” uses material from a header le
that is part of the Library, the object code
for the work may be a derivative work of the
Library even though the source code is not.
Whether this is true is especially signicant
if the work can be linked without the Library,
or if the work is itself a library. The threshold
for this to be true is not precisely dened by
law. If such an object le uses only numeri-
cal parameters, data structure layouts and
accessors, and small macros and small
inline functions (ten lines or less in length),
then the use of the object le is unrestricted,
regardless of whether it is legally a derivative
work. (Executables containing this object
code plus portions of the Library will still fall
under Section 6.) Otherwise, if the work is a
derivative of the Library, you may distribute
the object code for the work under the terms
of Section 6.Any executables containing that
work also fall under Section 6, whether or
not they are linked directly with the Library
itself.
6. As an exception to the Sections above, you
may also combine or link a “work that uses
the Library” with the Library to produce a
work containing portions of the Library, and
distribute that work under terms of your
choice, provided that the terms permit modi-
cation of the work for the customer’s own
89
Page 90

English
use and reverse engineering for debugging
such modications.
You must give prominent notice with each
copy of the work that the Library is used in it
and that the Library and its use are covered
by this License. You must supply a copy of
this License. If the work during execution
displays copyright notices, you must include
the copyright notice for the Library among
them, as well as a reference directing the
user to the copy of this License. Also, you
must do one of these things:
a) Accompany the work with the complete
corresponding machine-readable source
code for the Library including whatever
changes were used in the work (which
must be distributed under Sections 1 and
2 above); and, if the work is an executable linked with the Library, with the
complete machine-readable “work that
uses the Library”, as object code and/or
source code, so that the user can modify
the Library and then relink to produce a
modied executable containing the modied Library. (It is understood that the user
who changes the contents of denitions
les in the Library will not necessarily be
able to recompile the application to use
the modied denitions.)
b) Use a suitable shared library mechanism
for linking with the Library. A suitable
mechanism is one that (1) uses at run
time a copy of the library already present
on the user’s computer system, rather
than copying library functions into the
executable, and (2) will operate properly
with a modied version of the library, if
the user installs one, as long as the modi-
ed version is interface-compatible with
the version that the work was made with.
c) Accompany the work with a written offer,
valid for at least three years, to give the
same user the materials specied in
Subsection 6a, above, for a charge no
more than the cost of performing this
distribution.
d) If distribution of the work is made by of-
fering access to copy from a designated
place, offer equivalent access to copy the
above specied materials from the same
place.
e) Verify that the user has already received
a copy of these materials or that you
have already sent this user a copy. For
an executable, the required form of the
“work that uses the Library” must include
any data and utility programs needed
for reproducing the executable from it.
However, as a special exception, the materials to be distributed need not include
anything that is normally distributed (in
either source or binary form) with the major components (compiler, kernel, and so
on) of the operating system on which the
executable runs, unless that component
itself accompanies the executable.
It may happen that this requirement contradicts the license restrictions of other
proprietary libraries that do not normally
accompany the operating system. Such
a contradiction means you cannot use
both them and the Library together in an
executable that you distribute.
7. You may place library facilities that are a
work based on the Library side-by-side in
a single library together with other library
facilities not covered by this License, and
distribute such a combined library, provided
that the separate distribution of the work
based on the Library and of the other library
facilities is otherwise permitted, and provided
that you do these two things:
a) Accompany the combined library with a
copy of the same work based on the Library, uncombined with any other library
facilities. This must be distributed under
the terms of the Sections above.
b) Give prominent notice with the combined
library of the fact that part of it is a work
based on the Library, and explaining
where to nd the accompanying uncombined form of the same work.
8. You may not copy, modify, sublicense, link
with, or distribute the Library except as
expressly provided under this License. Any
attempt otherwise to copy, modify, sublicense, link with, or distribute the Library is
void, and will automatically terminate your
rights under this License. However, parties
who have received copies, or rights, from
you under this License will not have their
licenses terminated so long as such parties
remain in full compliance.
9. You are not required to accept this License,
since you have not signed it. However, nothing else grants you permission to modify or
distribute the Library or its derivative works.
These actions are prohibited by law if you
do not accept this License. Therefore, by
modifying or distributing the Library (or any
90
Page 91

work based on the Library), you indicate
your acceptance of this License to do so,
and all its terms and conditions for copying,
distributing or modifying the Library or works
based on it.
10. Each time you redistribute the Library (or
any work based on the Library), the recipient
automatically receives a license from the
original licensor to copy, distribute, link with
or modify the Library subject to these terms
and conditions. You may not impose any
further restrictions on the recipients’ exercise
of the rights granted herein. You are not
responsible for enforcing compliance by third
parties with this License.
11. If, as a consequence of a court judgment or
allegation of patent infringement or for any
other reason (not limited to patent issues),
conditions are imposed on you (whether by
court order, agreement or otherwise) that
contradict the conditions of this License, they
do not excuse you from the conditions of
this License. If you cannot distribute so as to
satisfy simultaneously your obligations under
this License and any other pertinent obligations, then as a consequence you may not
distribute the Library at all. For example, if a
patent license would not permit royalty-free
redistribution of the Library by all those who
receive copies directly or indirectly through
you, then the only way you could satisfy
both it and this License would be to refrain
entirely from distribution of the Library.
If any portion of this section is held invalid
or unenforceable under any particular circumstance, the balance of the section is intended to apply, and the section as a whole
is intended to apply in other circumstances.
It is not the purpose of this section to induce
you to infringe any patents or other property
right claims or to contest validity of any such
claims; this section has the sole purpose of
protecting the integrity of the free software
distribution system which is implemented by
public license practices. Many people have
made generous contributions to the wide
range of software distributed through that
system in reliance on consistent application
of that system; it is up to the author/donor
to decide if he or she is willing to distribute
software through any other system and a
licensee cannot impose that choice. This
section is intended to make thoroughly clear
what is believed to be a consequence of the
rest of this License.
12. If the distribution and/or use of the Library
is restricted in certain countries either by
English
patents or by copyrighted interfaces, the
original copyright holder who places the
Library under this License may add an
explicit geographical distribution limitation
excluding those countries, so that distribution is permitted only in or among countries
not thus excluded. In such case, this License
incorporates the limitation as if written in the
body of this License.
13. The Free Software Foundation may publish
revised and/or new versions of the Lesser
General Public License from time to time.
Such new versions will be similar in spirit to
the present version, but may differ in detail
to address new problems or concerns.Each
version is given a distinguishing version
number. If the Library species a version
number of this License which applies to it
and “any later version”, you have the option of following the terms and conditions
either of that version or of any later version
published by the Free Software Foundation. If the Library does not specify a license
version number, you may choose any version ever published by the Free Software
Foundation.
14. If you wish to incorporate parts of the Library
into other free programs whose distribution
conditions are incompatible with these, write
to the author to ask for permission. For software which is copyrighted by the Free Software Foundation, write to the Free Software
Foundation; we sometimes make exceptions
for this. Our decision will be guided by the
two goals of preserving the free status of
all derivatives of our free software and of
promoting the sharing and reuse of software
generally.
NO WARRANTY
15. BECAUSE THE LIBRARY IS LICENSED
FREE OF CHARGE, THERE IS NO WARRANTY FOR THE LIBRARY, TO THE EXTENT PERMITTED BY APPLICABLE LAW.
EXCEPT WHEN OTHERWISE STATED IN
WRITING THE COPYRIGHT HOLDERS
AND/OR OTHER PARTIES PROVIDE THE
LIBRARY “AS IS” WITHOUT WARRANTY
OF ANY KIND, EITHER EXPRESSED OR
IMPLIED, INCLUDING, BUT NOT LIMITED
TO, THE IMPLIED WARRANTIES OF
MERCHANTABILITY AND FITNESS FOR
A PARTICULAR PURPOSE. THE ENTIRE
RISK AS TO THE QUALITY AND PERFORMANCE OF THE LIBRARY IS WITH YOU.
SHOULD THE LIBRARY PROVE DEFEC-
91
Page 92

TIVE, YOU ASSUME THE COST OF ALL
English
NECESSARY SERVICING, REPAIR OR
CORRECTION.
16. IN NO EVENT UNLESS REQUIRED BY APPLICABLE LAW OR AGREED TO IN WRITING WILL ANY COPYRIGHT HOLDER, OR
ANY OTHER PARTY WHO MAY MODIFY
AND/OR REDISTRIBUTE THE LIBRARY AS
PERMITTED ABOVE, BE LIABLE TO YOU
FOR DAMAGES, INCLUDING ANY GENERAL, SPECIAL, INCIDENTAL OR CONSEQUENTIAL DAMAGES ARISING OUT OF
THE USE OR INABILITY TO USE THE
LIBRARY (INCLUDING BUT NOT LIMITED
TO LOSS OF DATA OR DATA BEING RENDERED INACCURATE OR LOSSES SUSTAINED BY YOU OR THIRD PARTIES OR A
FAILURE OF THE LIBRARY TO OPERATE
WITH ANY OTHER SOFTWARE), EVEN IF
SUCH HOLDER OR OTHER PARTY HAS
BEEN ADVISED OF THE POSSIBILITY OF
SUCH DAMAGES.
END OF TERMS AND CONDITIONS
How to Apply These Terms to Your New Libraries
If you develop a new library, and you want it to
be of the greatest possible use to the public, we
recommend making it free software that everyone can redistribute and change. You can do so
by permitting redistribution under these terms
(or, alternatively, under the terms of the ordinary
General Public License). To apply these terms,
attach the following notices to the library. It is
safest to attach them to the start of each source
le to most effectively convey the exclusion of
warranty; and each le should have at least the
“copyright” line and a pointer to where the full
notice is found.
<one line to give the library’s name and a brief
idea of what it does.>
Copyright (C) <year> <name of author>
This library is free software; you can redistribute
it and/or modify it under the terms of the GNU
Lesser General Public License as published by
the Free Software Foundation; either version
2.1 of the License, or (at your option) any later
version.
This library is distributed in the hope that it will be
useful, but WITHOUT ANY WARRANTY; without
even the implied warranty of MERCHANTABILITY or FITNESS FOR A PARTICULAR
PURPOSE. See the GNU Lesser General Public
License for more details. You should have received a copy of the GNU Lesser General Public
License along with this library; if not, write to
the Free Software Foundation, Inc., 51 Franklin
Street, Fifth Floor, Boston, MA 02110-1301 USA
Also add information on how to contact you
by electronic and paper mail. You should also
get your employer (if you work as a programmer) or your school, if any, to sign a “copyright
disclaimer” for the library, if necessary. Here is a
sample; alter the names: Yoyodyne, Inc., hereby
disclaims all copyright interest in the library `Frob’
(a library for tweaking knobs) written by James
Random Hacker.
<signature of Ty Coon>, 1 April 1990
Ty Coon, President of Vice
That’s all there is to it!
ICU License - ICU 1.8.1 and later
COPYRIGHT AND PERMISSION NOTICE
Copyright (c) 1995-2009 International Business
Machines Corporation and others
All rights reserved.
Permission is hereby granted, free of charge, to
any person obtaining a copy of this software and
associated documentation les (the “Software”),
to deal in the Software without restriction, including without limitation the rights to use, copy,
modify, merge, publish, distribute, and/or sell
copies of the Software, and to permit persons
to whom the Software is furnished to do so,
provided that the above copyright notice(s) and
this permission notice appear in all copies of
the Software and that both the above copyright
notice(s) and this permission notice appear in
supporting documentation.
THE SOFTWARE IS PROVIDED “AS IS”, WITHOUT WARRANTY OF ANY KIND, EXPRESS
OR IMPLIED, INCLUDING BUT NOT LIMITED
TO THE WARRANTIES OF MERCHANTABILITY, FITNESS FOR A PARTICULAR PURPOSE
AND NONINFRINGEMENT OF THIRD PARTY
RIGHTS. IN NO EVENT SHALL THE COPYRIGHT HOLDER OR HOLDERS INCLUDED IN
THIS NOTICE BE LIABLE FOR ANY CLAIM, OR
ANY SPECIAL INDIRECT OR CONSEQUENTIAL DAMAGES, OR ANY DAMAGES WHATSOEVER RESULTING FROM LOSS OF USE,
DATA OR PROFITS, WHETHER IN AN ACTION
OF CONTRACT, NEGLIGENCE OR OTHER
TORTIOUS ACTION, ARISING OUT OF OR IN
CONNECTION WITH THE USE OR PERFORMANCE OF THIS SOFTWARE.
Except as contained in this notice, the name of a
copyright holder shall not be used in advertising
or otherwise to promote the sale, use or other
dealings in this Software without prior written
authorization of the copyright holder.
92
Page 93

All trademarks and registered trademarks mentioned herein are the property of their respective
owners.
LICENSE ISSUES
LICENSE ISSUES
==============
The OpenSSL toolkit stays under a dual
license, i.e. both the conditions of
the OpenSSL License and the original SSLeay
license apply to the toolkit.
See below for the actual license texts. Actually
both licenses are BSD-style
Open Source licenses. In case of any license
issues related to OpenSSL
please contact openssl-core@openssl.org.
OpenSSL License
---------------
/* ===================================
=================================
* Copyright (c) 1998-2008 The OpenSSL Project. All rights reserved.
*
* Redistribution and use in source and binary
forms, with or without
* modication, are permitted provided that the
following conditions
* are met:
*
* 1. Redistributions of source code must retain
the above copyright
* notice, this list of conditions and the following
disclaimer.
*
* 2. Redistributions in binary form must repro
duce the above copyright
* notice, this list of conditions and the following
disclaimer in
* the documentation and/or other materials
provided with the
* distribution.
*
* 3. All advertising materials mentioning features
or use of this
* software must display the following acknowledgment:
* “This product includes software developed by
the OpenSSL Project
English
* for use in the OpenSSL Toolkit. (http://www.
openssl.org/)”
*
* 4. The names “OpenSSL Toolkit” and “OpenSSL Project” must not be used to
* endorse or promote products derived from this
software without
* prior written permission. For written permission, please contact
* openssl-core@openssl.org.
*
* 5. Products derived from this software may not
be called “OpenSSL”
* nor may “OpenSSL” appear in their names
without prior written
* permission of the OpenSSL Project.
*
* 6. Redistributions of any form whatsoever
must retain the following
* acknowledgment:
* “This product includes software developed by
the OpenSSL Project
* for use in the OpenSSL Toolkit (http://www.
openssl.org/)”
*
* THIS SOFTWARE IS PROVIDED BY THE
OpenSSL PROJECT ``AS IS’’ AND ANY
* EXPRESSED OR IMPLIED WARRANTIES,
INCLUDING, BUT NOT LIMITED TO, THE
* IMPLIED WARRANTIES OF MERCHANTABILITY AND FITNESS FOR A PARTICULAR
* PURPOSE ARE DISCLAIMED. IN NO EVENT
SHALL THE OpenSSL PROJECT OR
* ITS CONTRIBUTORS BE LIABLE FOR ANY
DIRECT, INDIRECT, INCIDENTAL,
* SPECIAL, EXEMPLARY, OR CONSEQUENTIAL DAMAGES (INCLUDING, BUT
* NOT LIMITED TO, PROCUREMENT OF SUB-
STITUTE GOODS OR SERVICES;
* LOSS OF USE, DATA, OR PROFITS; OR
BUSINESS INTERRUPTION)
* HOWEVER CAUSED AND ON ANY THEORY
OF LIABILITY, WHETHER IN CONTRACT,
* STRICT LIABILITY, OR TORT (INCLUDING
NEGLIGENCE OR OTHERWISE)
* ARISING IN ANY WAY OUT OF THE USE OF
THIS SOFTWARE, EVEN IF ADVISED
* OF THE POSSIBILITY OF SUCH DAMAGE.
93
Page 94

* ===================================
=================================
English
*
* This product includes cryptographic software
written by Eric Young
* (eay@cryptsoft.com). This product includes
software written by Tim
* Hudson (tjh@cryptsoft.com).
*
*/
Original SSLeay License
-----------------------
/* Copyright (C) 1995-1998 Eric Young (eay@
cryptsoft.com)
* All rights reserved.
*
* This package is an SSL implementation written
* by Eric Young (eay@cryptsoft.com).
* The implementation was written so as to conform with Netscapes SSL.
*
* This library is free for commercial and noncommercial use as long as
* the following conditions are aheared to. The
following conditions
* apply to all code found in this distribution, be it
the RC4, RSA,
* lhash, DES, etc., code; not just the SSL code.
The SSL documentation
* included with this distribution is covered by the
same copyright terms
* except that the holder is Tim Hudson (tjh@
cryptsoft.com).
*
* Copyright remains Eric Young’s, and as such
any Copyright notices in
* the code are not to be removed.
* If this package is used in a product, Eric Young
should be given attribution
* as the author of the parts of the library used.
* This can be in the form of a textual message
at program startup or
* in documentation (online or textual) provided
with the package.
*
* Redistribution and use in source and binary
forms, with or without
* modication, are permitted provided that the
following conditions
* are met:
* 1. Redistributions of source code must retain
the copyright
* notice, this list of conditions and the following
disclaimer.
* 2. Redistributions in binary form must reproduce the above copyright
* notice, this list of conditions and the following
disclaimer in the
* documentation and/or other materials provided
with the distribution.
* 3. All advertising materials mentioning features
or use of this software
* must display the following acknowledgement:
* “This product includes cryptographic software
written by
* Eric Young (eay@cryptsoft.com)”
* The word ‘cryptographic’ can be left out if the
routines from the library
* being used are not cryptographic related :-).
* 4. If you include any Windows specic code
(or a derivative thereof) from
* the apps directory (application code) you must
include an acknowledgement:
* “This product includes software written by Tim
Hudson (tjh@cryptsoft.com)”
*
* THIS SOFTWARE IS PROVIDED BY ERIC
YOUNG ``AS IS’’ AND
* ANY EXPRESS OR IMPLIED WARRANTIES,
INCLUDING, BUT NOT LIMITED TO, THE
* IMPLIED WARRANTIES OF MERCHANTABILITY AND FITNESS FOR A PARTICULAR
PURPOSE
* ARE DISCLAIMED. IN NO EVENT SHALL
THE AUTHOR OR CONTRIBUTORS BE LIABLE
* FOR ANY DIRECT, INDIRECT, INCIDENTAL,
SPECIAL, EXEMPLARY, OR CONSEQUENTIAL
* DAMAGES (INCLUDING, BUT NOT LIMITED TO, PROCUREMENT OF SUBSTITUTE
GOODS
* OR SERVICES; LOSS OF USE, DATA, OR
PROFITS; OR BUSINESS INTERRUPTION)
* HOWEVER CAUSED AND ON ANY THEORY
OF LIABILITY, WHETHER IN CONTRACT,
STRICT
* LIABILITY, OR TORT (INCLUDING NEGLIGENCE OR OTHERWISE) ARISING IN ANY
94
Page 95

WAY
* OUT OF THE USE OF THIS SOFTWARE,
EVEN IF ADVISED OF THE POSSIBILITY OF
* SUCH DAMAGE.
*
* The licence and distribution terms for any
publically available version or
* derivative of this code cannot be changed. i.e.
this code cannot simply be
* copied and put under another distribution
licence
* [including the GNU Public Licence.]
*/
zlib
/* zlib.h -- interface of the ‘zlib’ general purpose
compression library
version 1.2.3, July 18th, 2005
Copyright (C) 1995-2005 Jean-loup Gailly and
Mark Adler
This software is provided ‘as-is’, without any
express or implied warranty. In no event will the
authors be held liable for any damages arising
from the use of this software.
Permission is granted to anyone to use this
software for any purpose, including commercial
applications, and to alter it and redistribute it
freely, subject to the following restrictions:
1. The origin of this software must not be mis-
represented; you must not claim that you wrote
the original software. If you use this software in
a product, an acknowledgment in the product
documentation would be appreciated but is not
required.
2. Altered source versions must be plainly
marked as such, and must not be misrepresented
as being the original software.
3. This notice may not be removed or altered
from any source distribution.
Jean-loup Gailly jloup@gzip.org
Mark Adler madler@alumni.caltech.edu
*/
The FreeType Project LICENSE
2006-Jan-27
Copyright 1996-2002, 2006 by David Turner,
Robert Wilhelm, and Werner Lemberg
Introduction
============
The FreeType Project is distributed in several
archive packages; some of them may contain, in
English
addition to the FreeType font engine,various tools
and contributions which rely on, or relate to, the
FreeType Project.
This license applies to all les found in
such packages, and which do not fall under
their own explicit license. The license affects thus the FreeType font engine, the test
programs,documentation and makeles, at the
very least.
This license was inspired by the BSD, Artistic,
and IJG (Independent JPEG Group) licenses,
which all encourage inclusion and use of free
software in commercial and freeware products
alike. As a consequence, its main points are that:
We don’t promise that this software works.
However, we will be interested in any kind of bug
reports. (`as is’ distribution)
You can use this software for whatever you
want, in parts or full form, without having to pay
us. (`royalty-free’ usage)
You may not pretend that you wrote this
software. If you use it, or only parts of it, in a program, you must acknowledge somewhere in your
documentation that you have used the FreeType
code. (`credits’)
We specically permit and encourage the inclu-
sion of this software, with or without modica-
tions, in commercial products. We disclaim all
warranties covering The FreeType Project and
assume no liability related to The FreeType
Project.
Finally, many people asked us for a preferred
form for a credit/disclaimer to use in compliance
with this license. We thus encourage you to use
the following text:
“””
Portions of this software are copyright © <year>
The FreeType Project (www.freetype.org). All
rights reserved.
“””
Please replace <year> with the value from the
FreeType version you actually use.
Legal Terms
===========
0. Denitions
Throughout this license, the terms `package’, `FreeType Project’, and `FreeType
archive’ refer to the set of les originally
distributed by the authors (David Turner,
Robert Wilhelm, and Werner Lemberg) as
95
Page 96

English
1. No Warranty
2. Redistribution
the `FreeType Project’, be they named as
alpha, beta or nal release.
`You’ refers to the licensee, or person using
the project, where`using’ is a generic term
including compiling the project’s source code
as well as linking it to form a `program’ or
`executable’.
This program is referred to as `a program
using the FreeType engine’.
This license applies to all les distributed
in the original FreeType Project, including
all source code, binaries and documenta-
tion, unless otherwise stated in the le in its
original, unmodied form as distributed in
the original archive.
If you are unsure whether or not a particu-
lar le is covered by this license, you must
contact us to verify this.
The FreeType Project is copyright (C) 19962000 by David Turner,
Robert Wilhelm, and Werner Lemberg. All
rights reserved except as specied below.
THE FREETYPE PROJECT IS PROVIDED
`AS IS’ WITHOUT WARRANTY OF ANY
KIND , EITHER EXPRESS OR IMPLIED,
INCLUDING, BUT NOT LIMITED TO, WARRANTIES OF MERCHANTABILITY AND
FITNESS FOR A PARTICULAR PURPOSE.
IN NO EVENT WILL ANY OF THE AUTHORS OR COPYRIGHT HOLDERS BE
LIABLE FOR ANY DAMAGES CAUSED BY
THE USE OR THE INABILITY TO USE, OF
THE FREETYPE PROJECT.
This license grants a worldwide, royalty-free,
perpetual and irrevocable right and license
to use, execute, perform, compile,display,
copy, create derivative works of, distribute
and sublicense the FreeType Project (in
both source and object code forms) and
derivative works thereof for any purpose;
and to authorize others to exercise some or
all of the rights granted herein, subject to the
following conditions:
Redistribution of source code must retain
this license le (`FTL.TXT’) unaltered;
any additions, deletions or changes to
the original les must be clearly indicated
in accompanying documentation. The
copyright notices of the unaltered,original
les must be preserved in all copies of
source les.
Redistribution in binary form must
provide a disclaimer that states that the
software is based in part of the work of
the FreeType Team, in the distribution
documentation. We also encourage you
to put an URL to the FreeType web page
in your documentation, though this isn’t
mandatory.
These conditions apply to any software derived from or based on the FreeType Project,
not just the unmodied les. If you use our
work, you must acknowledge us. However,
no fee need be paid to us.
3. Advertising
Neither the FreeType authors and contributors nor you shall use the name of the other
for commercial, advertising, or promotional
purposes without specic prior written permission.
We suggest, but do not require, that you
use one or more of the following phrases to
refer to this software in your documentation
or advertising materials: `FreeType Project’,
`FreeType Engine’, `FreeType library’, or
`FreeType Distribution’.
As you have not signed this license, you are
not required to accept it. However, as the
FreeType Project is copyrighted material,
only this license, or another one contracted
with the authors, grants you the right to use,
distribute, and modify it.
Therefore, by using, distributing, or modifying the FreeType Project, you indicate that
you understand and accept all the terms of
this license.
4. Contacts
There are two mailing lists related to FreeType:
freetype@nongnu.org
Discusses general use and applications
of FreeType, as well as future and wanted
additions to the library and distribution.
If you are looking for support, start in this
list if you haven’t found anything to help
you in the documentation.
freetype-devel@nongnu.org
Discusses bugs, as well as engine
internals, design issues,specic licenses,
porting, etc.
Our home page can be found at
http://www.freetype.org
96
Page 97

Expat
Copyright (c) 1998, 1999, 2000 Thai Open
Source Software Center Ltd and Clark Cooper
Copyright (c) 2001, 2002, 2003, 2004, 2005,
2006 Expat maintainers.
Permission is hereby granted, free of charge, to
any person obtaining a copy of this software and
associated documentation les (the Software), to
deal in the Software without restriction, including
without limitation the rights to use, copy, modify,
merge, publish, distribute, sublicense, and/or sell
copies of the Software, and to permit persons to
whom the Software is furnished to do so, subject
to the following conditions:
The above copyright notice and this permission
notice shall be included in all copies or substantial portions of the Software.
THE SOFTWARE IS PROVIDED “AS IS”, WITHOUT WARRANTY OF ANY KIND, EXPRESS OR
IMPLIED, INCLUDING BUT NOT LIMITED TO
THE WARRANTIES OF MERCHANTABILITY,
FITNESS FOR A PARTICULAR PURPOSE AND
NONINFRINGEMENT. IN NO EVENT SHALL
THE AUTHORS OR COPYRIGHT HOLDERS
BE LIABLE FOR ANY CLAIM, DAMAGES OR
OTHER LIABILITY, WHETHER IN AN ACTION
OF CONTRACT, TORT OR OTHERWISE,
ARISING FROM, OUT OF OR IN CONNECTION WITH THE SOFTWARE OR THE USE OR
OTHER DEALINGS IN THE SOFTWARE.
Curl
COPYRIGHT AND PERMISSION NOTICE
Copyright (c) 1996 - 2008, Daniel Stenberg,
<daniel@haxx.se>.
All rights reserved.
Permission to use, copy, modify, and distribute
this software for any purpose with or without fee
is hereby granted, provided that the above copyright notice and this permission notice appear in
all copies.
THE SOFTWARE IS PROVIDED “AS IS”, WITHOUT WARRANTY OF ANY KIND, EXPRESS
OR IMPLIED, INCLUDING BUT NOT LIMITED
TO THE WARRANTIES OF MERCHANTABILITY, FITNESS FOR A PARTICULAR PURPOSE
AND NONINFRINGEMENT OF THIRD PARTY
RIGHTS. IN NO EVENT SHALL THE AUTHORS
OR COPYRIGHT HOLDERS BE LIABLE FOR
ANY CLAIM, DAMAGES OR OTHER LIABILITY,
WHETHER IN AN ACTION OF CONTRACT,
TORT OR OTHERWISE, ARISING FROM, OUT
OF OR IN CONNECTION WITH THE SOFTWARE OR THE USE OR OTHER DEALINGS IN
THE SOFTWARE.
English
Except as contained in this notice, the name of a
copyright holder shall not be used in advertising
or otherwise to promote the sale, use or other
dealings in this Software without prior written
authorization of the copyright holder.
IJG
1. We don’t promise that this software works.
(But if you nd any bugs,please let us know!)
2. You can use this software for whatever you
want. You don’t have to pay us.
3. You may not pretend that you wrote this
software. If you use it in a program, you must
acknowledge somewhere in your documentation
that you’ve used the IJG code.
In legalese:
The authors make NO WARRANTY or representation, either express or implied,with respect
to this software, its quality, accuracy, merchant-
ability, or tness for a particular purpose. This
software is provided “AS IS”, and you, its user,
assume the entire risk as to its quality and accuracy.
This software is copyright (C) 1991-1998,
Thomas G. Lane.
All Rights Reserved except as specied below.
Permission is hereby granted to use, copy,
modify, and distribute this software (or portions
thereof) for any purpose, without fee, subject to
these conditions:
(1) If any part of the source code for this software
is distributed, then this README le must be
included, with this copyright and no-warranty
notice unaltered; and any additions, deletions,
or changes to the original les must be clearly
indicated in accompanying documentation.
(2) If only executable code is distributed, then the
accompanying documentation must state that
“this software is based in part on the work of the
Independent JPEG Group”.
(3) Permission for use of this software is granted
only if the user accepts full responsibility for any
undesirable consequences; the authors accept
NO LIABILITY for damages of any kind.
These conditions apply to any software derived
from or based on the IJG code, not just to the
unmodied library. If you use our work, you ought
to acknowledge us.
Permission is NOT granted for the use of any IJG
author’s name or company name in advertising
or publicity relating to this software or products
97
Page 98

derived from it. This software may be referred
to only as “the Independent JPEG Group’s
English
software”.
We specically permit and encourage the use of
this software as the basis of commercial products, provided that all warranty or liability claims
are assumed by the product vendor.
ansi2knr.c is included in this distribution by
permission of L. Peter Deutsch, sole proprietor
of its copyright holder, Aladdin Enterprises of
Menlo Park, CA. ansi2knr.c is NOT covered by
the above copyright and conditions, but instead
by the usual distribution terms of the Free
Software Foundation; principally,that you must
include source code if you redistribute it. (See
the le ansi2knr.c for full details.) However, since
ansi2knr.c is not needed as part of any program
generated from the IJG code, this does not limit
you more than the foregoing paragraphs do.
The Unix conguration script “congure” was
produced with GNU Autoconf. It is copyright
by the Free Software Foundation but is freely
distributable. The same holds for its supporting
scripts (cong.guess, cong.sub,ltcong, ltmain.
sh). Another support script, install-sh, is copyright
by M.I.T. but is also freely distributable.
It appears that the arithmetic coding option of
the JPEG spec is covered by patents owned by
IBM, AT&T, and Mitsubishi. Hence arithmetic
coding cannot legally be used without obtaining
one or more licenses. For this reason,support
for arithmetic coding has been removed from the
free JPEG software.
(Since arithmetic coding provides only a marginal
gain over the unpatented Huffman mode, it is unlikely that very many implementations will support
it.) So far as we are aware, there are no patent
restrictions on the remaining code.
The IJG distribution formerly included code to
read and write GIF les. To avoid entanglement
with the Unisys LZW patent, GIF reading support
has been removed altogether, and the GIF writer
has been simplied to produce uncompressed
GIFs. This technique does not use the LZW algo-
rithm; the resulting GIF les are larger than usual,
but are readable by all standard GIF decoders.
We are required to state that “The Graphics Interchange Format(c) is the Copyright property of
CompuServe Incorporated. GIF(sm) is a Service
Mark property of CompuServe Incorporated.”
CharisSIL OFL
SIL OPEN FONT LICENSE Version 1.1 - 26
February 2007
PREAMBLE
The goals of the Open Font License (OFL) are to
stimulate worldwide development of collaborative
font projects, to support the font creation efforts
of academic and linguistic communities, and to
provide a free and open framework in which fonts
may be shared and improved in partnership with
others.
The OFL allows the licensed fonts to be used,
studied, modied and redistributed freely as long
as they are not sold by themselves. The fonts,
including any derivative works, can be bundled,
embedded, redistributed and/or sold with any
software provided that any reserved names are
not used by derivative works. The fonts and
derivatives,however, cannot be released under
any other type of license. The requirement for
fonts to remain under this license does not apply
to any document created using the fonts or their
derivatives.
DEFINITIONS
Font Software refers to the set of les released
by the Copyright Holder(s) under this license and
clearly marked as such. This may include source
les, build scripts and documentation.
Reserved Font Name refers to any names speci-
ed as such after the copyright statement(s).
Original Version refers to the collection of Font
Software components as distributed by the Copyright Holder(s).
Modied Version refers to any derivative made
by adding to, deleting,or substituting -- in part or
in whole -- any of the components of the Original
Version, by changing formats or by porting the
Font Software to a new environment.
Author refers to any designer, engineer, programmer, technical writer or other person who contributed to the Font Software.
PERMISSION & CONDITIONS
Permission is hereby granted, free of charge, to
any person obtaining a copy of the Font Software, to use, study, copy, merge, embed, modify,
redistribute, and sell modied and unmodied
copies of the Font Software, subject to the following conditions:
1) Neither the Font Software nor any of its
individual components,in Original or Modied
Versions, may be sold by itself.
2) Original or Modied Versions of the Font
Software may be bundled,redistributed and/
or sold with any software, provided that each
copy contains the above copyright notice and
this license. These can be included either as
stand-alone text les, human-readable head-
98
Page 99

ers or in the appropriate machine-readable
metadata elds within text or binary les as
long as those elds can be easily viewed by
the user.
3) No Modied Version of the Font Software
may use the Reserved Font Name(s) unless
explicit written permission is granted by the
corresponding Copyright Holder. This restriction only applies to the primary font name as
presented to the users.
4) The name(s) of the Copyright Holder(s) or
the Author(s) of the Font Software shall not
be used to promote, endorse or advertise
any Modied Version, except to acknowledge
the contribution(s) of the Copyright Holder(s)
and the Author(s) or with their explicit written
permission.
5) The Font Software, modied or unmodied,
in part or in whole,must be distributed entirely
under this license, and must not be distributed
under any other license. The requirement for
fonts to remain under this license does not
apply to any document created using the Font
Software.
TERMINATION
This license becomes null and void if any of the
above conditions are not met.
DISCLAIMER
THE FONT SOFTWARE IS PROVIDED
“AS IS”, WITHOUT WARRANTY OF ANY
KIND,EXPRESS OR IMPLIED, INCLUDING BUT
NOT LIMITED TO ANY WARRANTIES OF MERCHANTABILITY, FITNESS FOR A PARTICULAR
PURPOSE AND NONINFRINGEMENT OF COPYRIGHT, PATENT, TRADEMARK, OR OTHER
RIGHT. IN NO EVENT SHALL THE COPYRIGHT
HOLDER BE LIABLE FOR ANY CLAIM, DAMAGES OR OTHER LIABILITY,INCLUDING ANY
GENERAL, SPECIAL, INDIRECT, INCIDENTAL,
OR CONSEQUENTIAL DAMAGES, WHETHER
IN AN ACTION OF CONTRACT, TORT OR OTHERWISE, ARISING FROM, OUT OF THE USE
OR INABILITY TO USE THE FONT SOFTWARE
OR FROM OTHER DEALINGS IN THE FONT
SOFTWARE.
English
99
Page 100

Cleaning the screen and cabinet…
Turn off the power, clean the screen and cabinet with a soft, dry cloth. We recommend that you do
English
not use any proprietary polishes or solvents on the screen or cabinet as this may cause damage.
Disposal…
The following information is only for EU-member states:
Disposal of products
The crossed out wheeled dust bin symbol indicates that products
must be collected and disposed of separately from household waste. Integrated
batteries and accumulators can be disposed of with the product. They will be
separated at the recycling centres.
The black bar indicates that the product was placed on the market after
August 13, 2005. By participating in separate collection of products and batteries, you will help to
assure the proper disposal of products and batteries and thus help to prevent potential negative
consequences for the environment and human health.
For more detailed information about the collection and recycling programmes available in your
country, please contact your local city ofce or the shop where you purchased the product.
Disposal of batteries and/or accumulators.
The crossed out wheeled dust bin symbol indicates that batteries and/or accumulators
must be collected and disposed of separately from household waste.
If the battery or accumulator contains more than the specied values of lead (Pb),
mercury (Hg), and/or cadmium (Cd) dened in the Battery Directive (2006/66/EC),
then the chemical symbols for lead (Pb), mercury (Hg) and/or cadmium (Cd) will
appear below the crossed out wheeled dust bin symbol. By participating in separate
collection of batteries, you will help to assure the proper disposal of products and batteries and
thus help to prevent potential negative consequences for the environment and human health.
For more detailed information about the collection and recycling programmes available in your
country, please contact your local city ofce or the shop where you purchased the product.
DVB is a registered trademark of the DVB Project
HDMI, the HDMI Logo, and High-Denition Multimedia Interface are trademarks or registered
trademarks of HDMI Licensing LLC in the United States and other countries.
Printed on recycled paper. 100% Chlorine free.
© TOSHIBA Television Central Europe Sp. z o.o.
All rights reserved.
Reproduction in whole or part without written permission is strictly prohibited.
TOSHIBA Television Central Europe Sp. z o.o.
ul. Pokoju 1, Biskupice Podgórne, 55-040 Kobierzyce, Poland
Specication is subject to change without notice.
100
 Loading...