

Toshiba ColorStream TP50H60, ColorStream TP55H60, ColorStream TP61H60 Owner's Manual

TOSHIBA
Projection Television
OWNER'S MANUAL
F
TP50H60/TP55H60/TP61H60
Co]orStream TM
r
l
© TOSHIBA CORPORATION, 1998

Dear Customer
Welcome to the high quality picture world created by the TOSHIBA Projection Color
Television.
This manual will help you usethe TV's many exciting and useful features.
Before operating the-TVTplease read all the safety and operating instructions in this manual
thoroughly, and keep the manual for future reference.
Customer's Record
You will find the model number and serial number on the back of the "IV.
Record these numbers in the spaces provided below.
R_er to them whenever you call upon your TOSHIBA dealer regarding this product.
Model Number
Serial Number
Safety Precautions
WARNING:
TO REDUCE THE RISK OF FIRE OR ELECTRIC SHOCK, DO NOT EXPOSE
THIS APPLIANCE TO RAIN OR MOISTURE.
NEPASOUVRIR
WARNING: TO REDUCE THE RISK OF
ELECTRIC SHOCK, DO NOT REMOVE
COVER (OR BACK}. NO USER-
SERVICEABLE PARTS INSIDE. REFER
SERVICING TO QUALIFIED SERVICE
PERSONNEL.
The lightning symbol in the triangle
tells you that the voltage inside this
product may be strongenough to
causean electric shock,
DO NOT TRY TO SERVICETHIS
PRODUCTYOURSELF.
The exclamation point in the.triangle
tells you that important operating and
maintenance instructions follow this
symbol.
CAUTION:
As a safety feature, the AC plug has one prong wider than the other.
It will fit only one way into a standard electrical outlet.
If the plug will not fit into the outlet, try turning it around.
If the plug will not fit either way, the outlet is probably old and
non-standard. You will need to have a new outlet installed by
an electrician.
DO NOT CHANGE THE SAFETY FEATURE OF THE PLUG.
CAUTION:
TO PREVENT ELECTRIC SHOCK, DO NOT USE THIS POLARIZED PLUG WITH AN EXTENSION CORD
RECEPTACLE OR OTHER OUTLET UNLESS THE PRONGS CAN BE FULLY INSERTED INTO THE OUTLET TO
PREVENT ANY EXPOSURE OF THE PRONGS OF THE POLARIZED PLUG.
NOTE TO CATV SYSTEM INSTALLERS IN THE USA:
Tills reminder is provided to call the CATV system installer's attention to Article 820-40 of the NEC that
provides guidelines for proper grounding and, in particular, specifies that the cable ground shall be
connected to the grounding system of the building, as close to the point of cable entry as practical.
2
Table of Contents
INTRODUCTION
Care and Cleaning ........................................................ 4
Installation .................................................................... 5
" - Imm
To install the TV ....................................................... 5
Antenna/Cable TV Connections ......................... :....... 6
To connect a home antenna ................................... 7
To connect a Cable "IV ............................................. 8
To connect an Antenna/Cable TV and VCR ........... 9
Location of Controls ................................................... 11
TV front .................................................................. .11
Remote Control ...................................................... 12
Before Using the Remote Control ............................ 13
introduction and battery installation .................... 13
Using the Remote with VCR or
Cable TV Converter ............................................... 14
VCR and CABLE function buttons ........................ 14
Programming the Remote Control ........................... 15
To program the Remote Control .......................... 15
Quick Reference Menu Guide .................................... 18
Menus and functions ............................................. 18
GETTING STARTED
Turning the TV On/Off ............................................... 20
To turn the TV on/off ............................................. 20
Selecting the Antenna Input ..................................... 21
To select the antenna input .................................. 21
Programming Channel Memory ............................... 22
I'V/CABLE and CH PROGRAM functions .............. 22
ADD/ERASE function ............................................. 23
Aligning the colors ..................................................... 24
To align the colors ................................................. 24
BASIC OPERATION
Watching TV Programs .............................................. 26
To watch a TV program ......................................... 26
Convenient Remote Functions .................................. 27
To use On-screen displays/Sound muting/
Channel return .................................................. 27
Controlling the Picture ............................................... 28
To adjust the picture .............................................. 28
Controlling the Sound ............................................... 30
To adjust the sound ............................................... 30
Selecting_Ste_eo and SAP Broadcasts ..................... 31
To listen to Stereo/SAP broadcasts ...................... 31
ADVANCED OPERATION
Enhancing the Surround Sound Effect ..................... 32
To activate the Surround sound function ............ 32
Operating the Sub-Bass System ............................... 33
To operate the Sub-Bass System ......................... 33
Setting the OFF Timer and the Clock ....................... 34
To set the OFF timer .............................................. 34
To set the clock ...................................................... 35
Watching Picture-in-Picture ...................................... 36
To display a small picture ..................................... 36
To use advanced functions ................................... 37
Multi-Window Function ............................................. 38
To use the PREVIEW/FAVORITE/STROBE
functions ............................................................ 38
Locking Channels ........................................................ 40
To lock out channels .............................................. 40
Labeling Channels ...................................................... 42
To program channel labels ................................... 42
Programming Your Favorite Channels ..................... 44
To program your favorite channels ..................... 44
Flesh Tone/Noise Reduction ............................ ._....... 46
To activate the Flesh Tone and Noise Reduction
Functions ........................................................... 46
Displaying XDS Information ...................................... 47
To display XDS information ................................. 47
Operating the Closed Captioning Feature ............... 48
To display Closed Captioning ............................... 48
To display text information ................................... 49
Changing the On-screen Display Language ............. 50
To select a language for the on-screen
displays ...................................................... _....... 50
_CONNECTING OTHER EQUIPMENT --
Connecting External Equipment .............................. 51
To connect video/audio equipment ..................... 51
Monitor panel ......................................................... 52
To connect a standard VCR ................................... 53
To connect a VCR with an S-video jack ............... 54
To dub/edit video tapes using two VCRs ............. 55
To connect a DVD video player ............................ 56
To connect a video camera ................................... 57
To connect an audio amplifier ................... ,.......... 58
To connect an A/V receiver ................................... 59
ADDITIONAL REFERENCE
I Specifications ............................................................. 60
Before Calling Service Personnel ....................... . ..... 61
Limited United States Warranty ............................... 62.
3

_ INTRODUCTION
Care and Cleaning
Care
Do not stand or climb on the TV.
• The'TV is dangerous if brokenor if it has fallen over.
• Be careful when childrenare present.
Do not remove the back cover and never remodel the cabinet or
components,
• Let only qualified technicians check and adjust your TV.
Do not place containers with liquids such as drinks or cosmetics on the
TV.
If any foreign material or water leaks into the TV, unplug the AC cord
and contact your dealer.
Keep magnets, toys with magnets, electric clocks, speakers, etc.
away from the TV.
Cleaning
Do not use solventssuchas benzine or thinner to cleanthe TV.
These solventsmay distortthe cabinet or damage itsfinish.
m If rubber or vinyl productsremain in contactwith the TV for a long
time, a stain may result.
When the cabinet becomes dirty, clean it with a soft, dry cloth,
When the cabinet is very dirty,
(_) Use a damp cloth to wipe the cabinet clean.
(_) Finish with a dry cloth.
When cleaning the screen:
(_) Turn off the TV.
(_) Clean the screen with a soft, dry cloth.
Mild _e_jent"_-'_d _
4

__[_1 INTRODUCTION
Installation
• Downward spot lights or fluorescent lights in an
overhead "Honeycomb" prevent direct
illumination of the screen.
Usecurtains or
blindsto shutout
direct sunlight.
Covershiny surfaces(floor and walls) with non-
reflective materials (carpet, rugs, wallpaper, etc.).
Where to install
Place the TV on the floor or on a sturdy platform. The mounting
surface should be flat and steady. If you install the TV on a soft
floor, make sure that the floor is not damaged by the weight of
the TV.
Air Circulation
Place the TV far enough away from the walls to allow proper
ventilation. This will prevent the "IV from overheating and avoid
possible damage to the "IV. Avoid dusty places too.
Heat Damage
Damage may occur if you leave the "IV in direct sunlight or near
a heater. Avoid places subject to extremely high temperatures
or humidity, and temperatures of 41°F (5°C) or lower.
Power Supply
Plug the TV into an electrical outlet with standard household
power (120 volt AC, 60 Hz). Do not change the plug's safety
prong.
See page 2.
Moisture Condensation
If the room temperature suddenlyrises (or if the TV is moved
from a cool placeto a hot place), condensation may occur on
the lenses resultingin picturedistortion or color fading: In such
a case,simply wait a while (with the power on) and the
condensationwill evaporate.
Best Viewing
Sit approximately 10-25 feet away from the "IV. Sitting too far to the left or right of the screen will cause the picture to
appear dull as will direct sunlight and room lights. Turn the TV off to check for reflections on the screen. Then remove
the source of any reflections while viewing.
VERTICAL VIEWING HORIZONTAL VIEWING
ANGLE [SIDE VIEW] ANGLE [TOP VIEW] ..'"'"
10 feet
,/
o
O4
BI Viewing Range
II Viewing Range
5

I
INTRODUCTION
Antenna/Cable TV
Connections
* You can use either an indoor or outdoor antenna to receive VHF and UHF channels.
o Channels 2-13 are VHF channels, and channels 14-69 are UHF channels.
• We recommend using an outdoor antenna for better picture quality.
• Y,_u can receive Cable "IV by connecting the cable supplied by your local cable
company.
TV rear
.:. , .,..
Types of antenna cables
Shown below aretwo basictypes of antenna cables.
Signalsfrom a home antenna may be conveyed by either type. Cable"IV
signalsare conveyedby a 75 ohm coaxial cable,
A 75 ohm coaxial cable is generally a round cable with F-type
connectors that can easily be attached to a terminal without tools.
F-type connector (Not supplied)
mmANT(TS_)mm
_ ANT-1
_) A 300 ohm cable is a flat "twin-lead" cable that can be attached to a
terminal usingthe supplied antenna adapter.
c-- iiiiill
Antenna connection panel.
There are two separate 75 ohm F-type connector input terminals and a
converter output terminal as shown at the left.
The ANT-1 and ANT-2 terminals are for connecting a VHF/UHF antenna
or cable TV system. The signal input through ANT-1 is output from the
OUT terminal whenever the RF switch on the "IV is in the ANT-2 position,
You can switch between the ANT-1 and ANT-2 inputs in the ANT 1/2
menu or with the ANT/VIDEO button on the TV. See page 21.
6

, .Single antenna cable
f
VHF, UHF or
VHF/UHF combination
antenna
75 ohm coaxial cable (round)
lmz ANT(7S_)m
ANT-1
OR Antenna adapter
_L (Not supplied) OUT
300 ohm twin-lead cable (flat)
Note:
You can connect another signal source such as a cable TV system or video game to the ANT-2 terminal.
Separate VHF and UHF antenna cables
VHF antenna
UHF antenna
J
_ ANT-2
UlV mixer
-: (Not supplied)
111111117
Note:
You can connect another signal source such as a cable TV system or video game to the ANT-2 terminal.
7

I
INTRODUCTION
Antenna/Cable TV
Connections (continued,
Generally, the cable "IV system can be connected directly to the TV's antenna terminal just like a home antenna.
(A-l)
Some cable companies, however, offer premium pay channels. Since premium pay channel signals are scrambled, a
cable TV converter/decoder is generally provided to subscribers by the cable TV company. This decoder box is
necessary for normal viewing of the scrambled channels. We recommend that you consult your cable TV company for
more specific instructions on installing cable TV. (A-2)
(A- 1) Cable without a decoder box (Unscrambled channels)
ANT(7S_)mm
Cable TV _ _ ANT-1
Note:
You can connect another signal source such as an antenna or video game to the ANT-2 terminal.
(A-2) Cable with a decoder box (Scrambled and Unscrambled channels)
• The unscrambled channels are input through the
ANT-1 terminal whenever the ANT1/2 menu, or the
ANT/VIDEO button on the TV, is in "ANT 1" mode.
See page 21.
• The scrambled channels from the decoding device are
input through the ANT-2 terminal whenever the ANT
1/2 menu, or the ANT/VIDEO button, is in "ANT 2"
mode. Set the TV to channel 3 or 4 to match the
output channel of the decoding device.
_ ANT-2
Cable
TV
IN OUT
Cable TV converter/
decoder
Note:
The decoding device may or may not be a part of the cable converter.
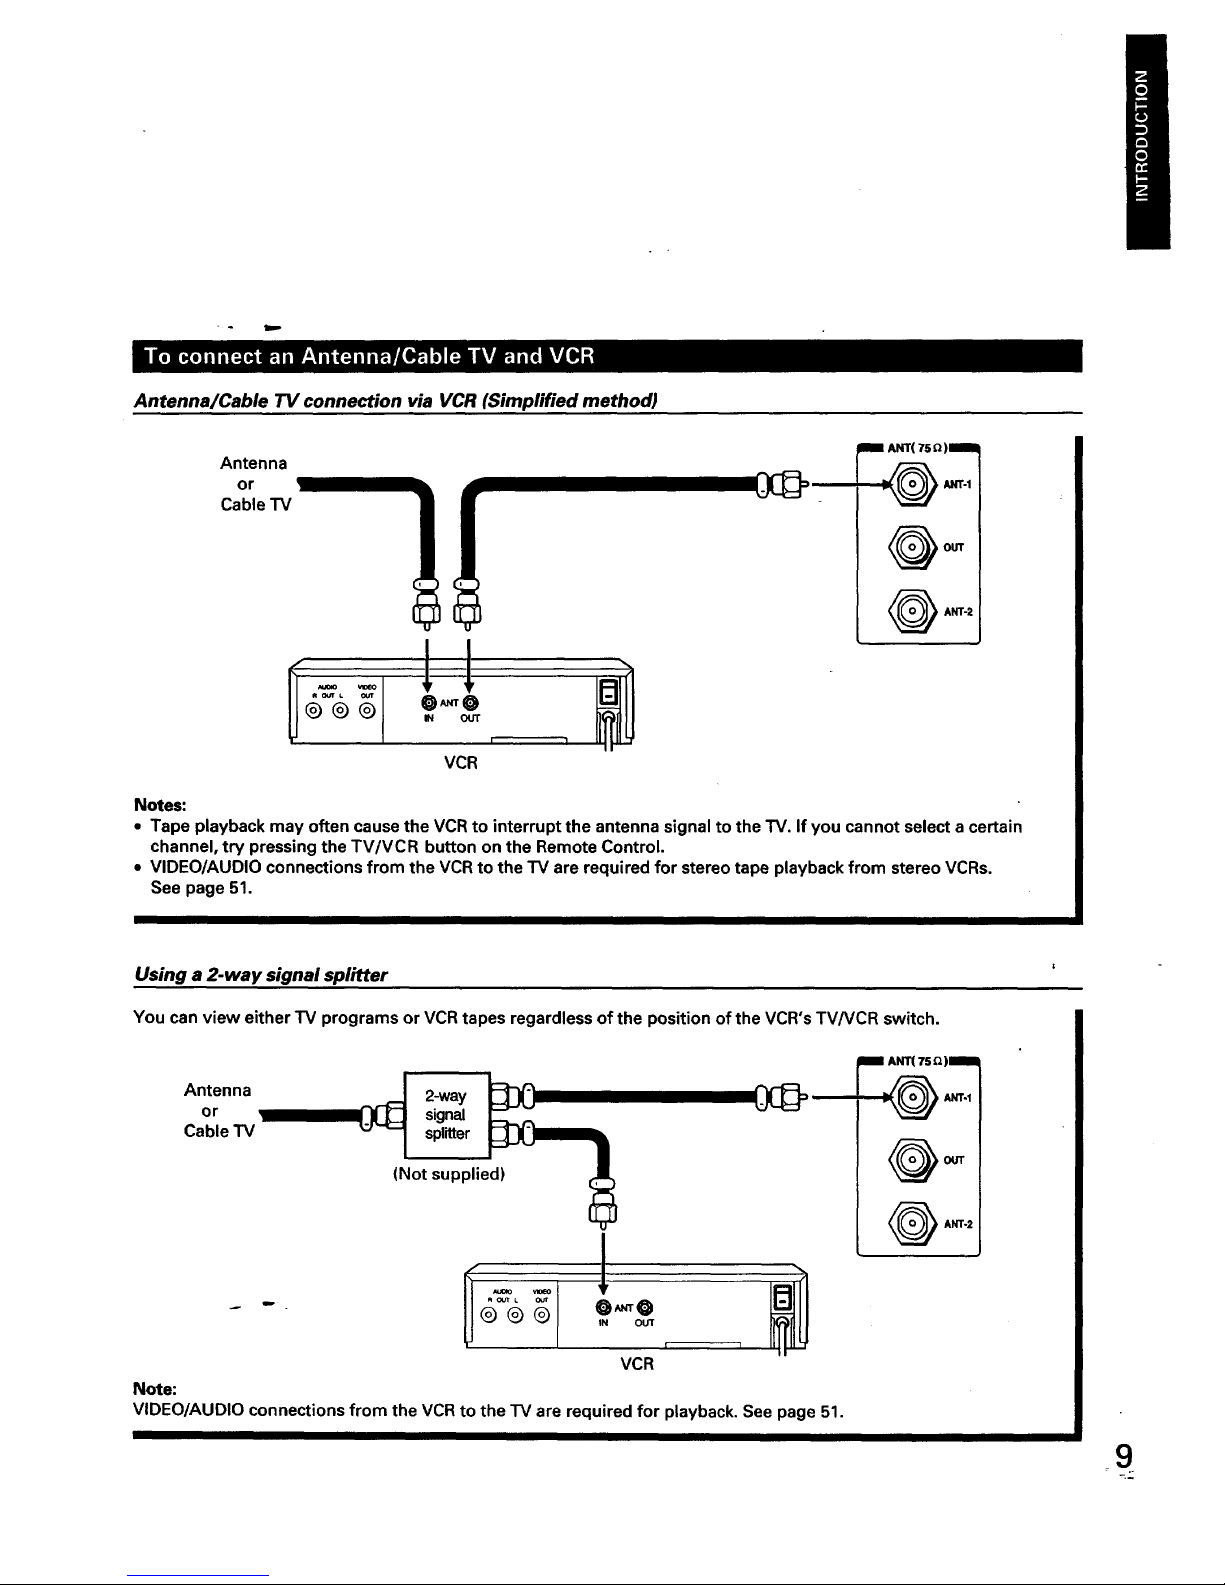
Antenna/Cable TV connection via VCR (Simplified method)
Antenna
or
Cable TV
II
tJ
O,_O
IN OUT
I I
VCR
ANT(7S_)
_ ANT-I
_ ANT-2
Notes:
• Tape playback may often cause the VCR to interrupt the antenna signal to the TV. If you cannot select a certain
channel, try pressing the TV/VCR button on the Remote Control.
• VIDEO/AUDIO connections from the VCR to the TV are required for stereo tape playback from stereo VCRs.
See page 51.
Using a 2-way signal splitter
You can view either'IV programs or VCR tapes regardlessof the positionof the VCR'sTV/VCR switch.
Antenna _.__ 2-way _ 0_
or l_lllll____i signal _:l-,_
Cable TV
"" _ splitter_U_ _
(Not supplied)
w_
.%
_OUTL our
® ® ® O,_O
IN OUT
I i
VCR
Note:
VIDEO/AUDIO connections from the VCR to the "IV are required for playback. See page 51.
m ANT(75_)_
_ ANT-I
_ ANT-2
9
I
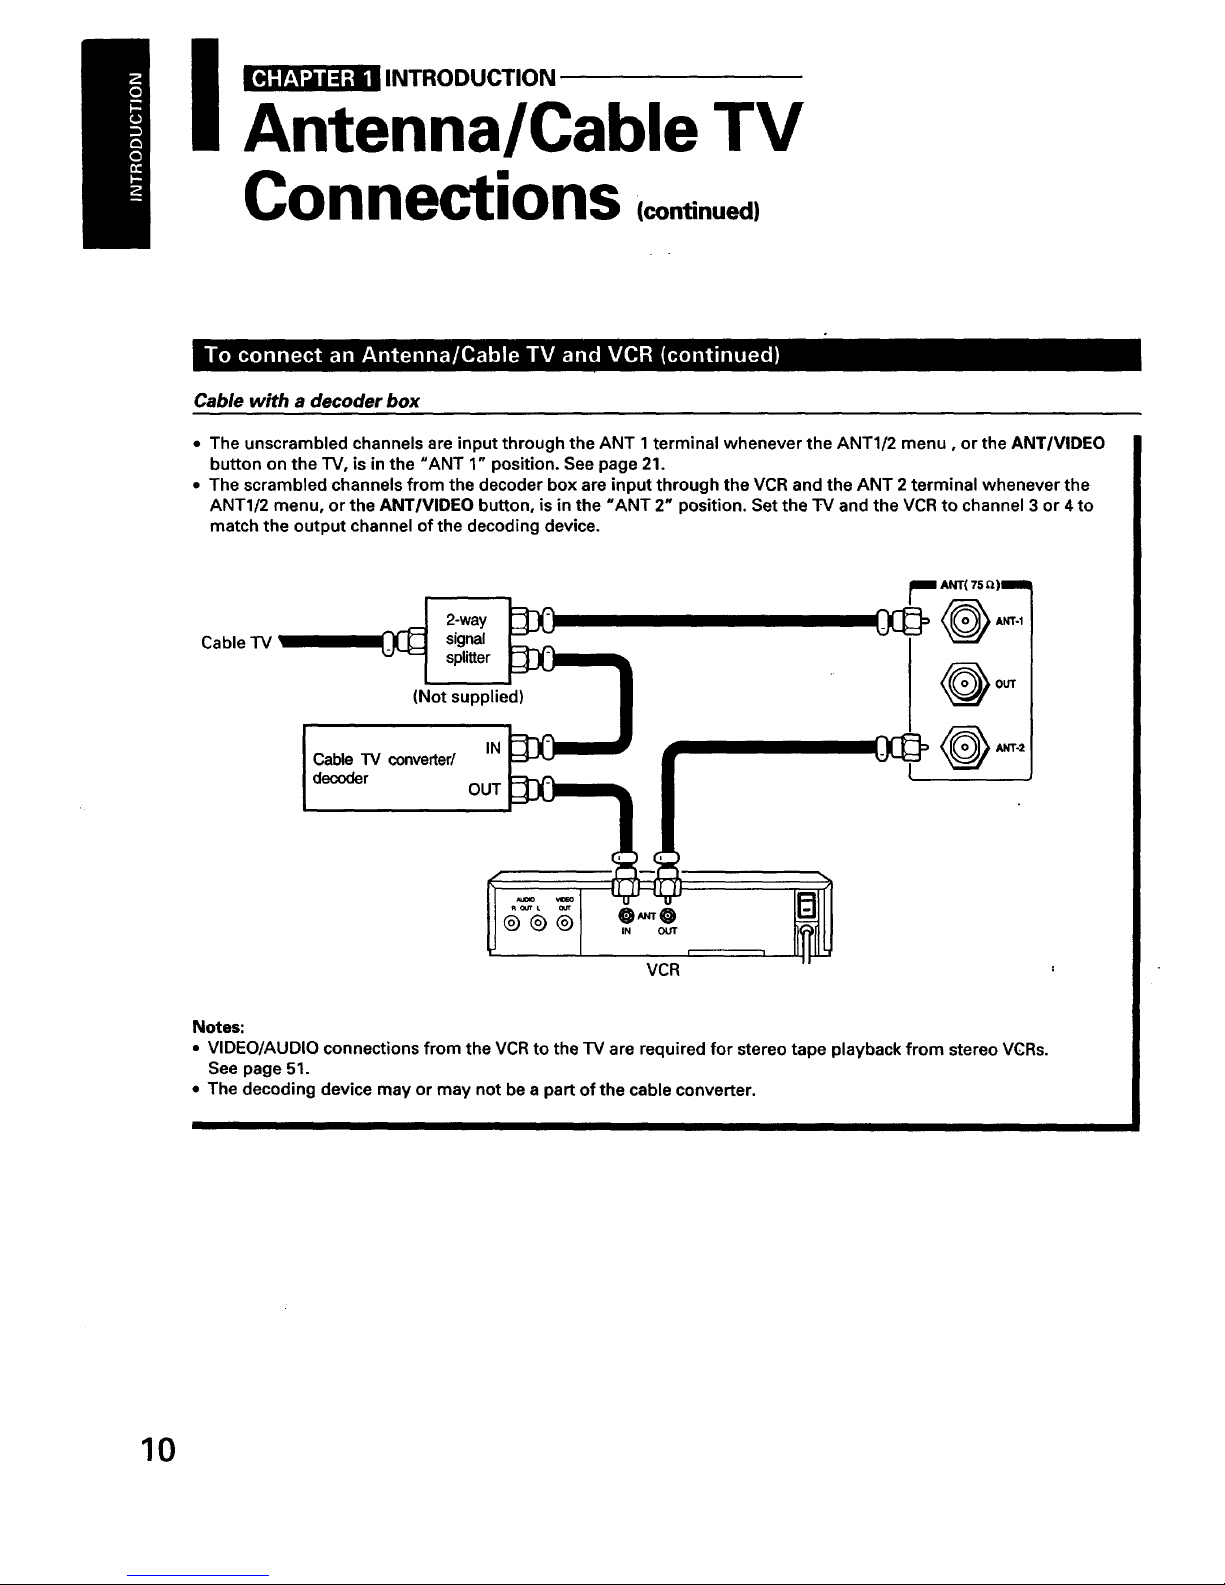
INTRODUCTION
Antenna/Cable TV
Connections , n.nuo.,
Cable with a decoder box
• The unscrambled channels are input through the ANT 1 terminal whenever the ANT1/2 menu, or the ANT/VIDEO
button on the TV, is in the "ANT 1" position. See page 21.
• The scrambled channels from the decoder box are input through the VCR and the ANT 2 terminal whenever the
ANT1/2 menu, or the ANT/VIDEO button, is in the "ANT 2" position. Set the TV and the VCR to channel 3 or 4 to
match the output channel of the decoding device.
2-way
Cable TV signal
splitter
(Not supplied)
IN
CableTV converter/
decoder
OUT
OUT
®
VCR
Notes:
• VIDEO/AUDIO connections from the VCR to the TV are required for stereo tape playback from stereo VC.Rs.
See page 51.
• The decoding device may or may not be a part of the cable converter.
10

_ INTRODUCTION
Location of Controls
• The following describes the functions of each part of the TV and the Remote Control.
For details on the use of each control, refer to the page numbers in brackets.
Illustrations represent TP55H60.
the door.
Behind the door
POWER indicator
POWER
Remote sensor
POWER button [20]
ANT/VIDEO button* [21]
ENTERbutton [19]
IN-VIDEO 3_1_11
VIDEO I-AUDIO"3
I_IMONO R
,@ @ @1
VIDEO 3 INPUTS [57]
ENTER
DEMO MENU ANTi,DEC
MENU button [18]
DEMO button [20]
< >
,_VOLUME,,
,NiD
v ^ 1
_HANNE k
NIQ;
CHANNEL • / • buttons* [261
VIA buttons [181
VOLUME • / • buttons* [26]
</ > buttons [18]
* Dual function buttons
1l
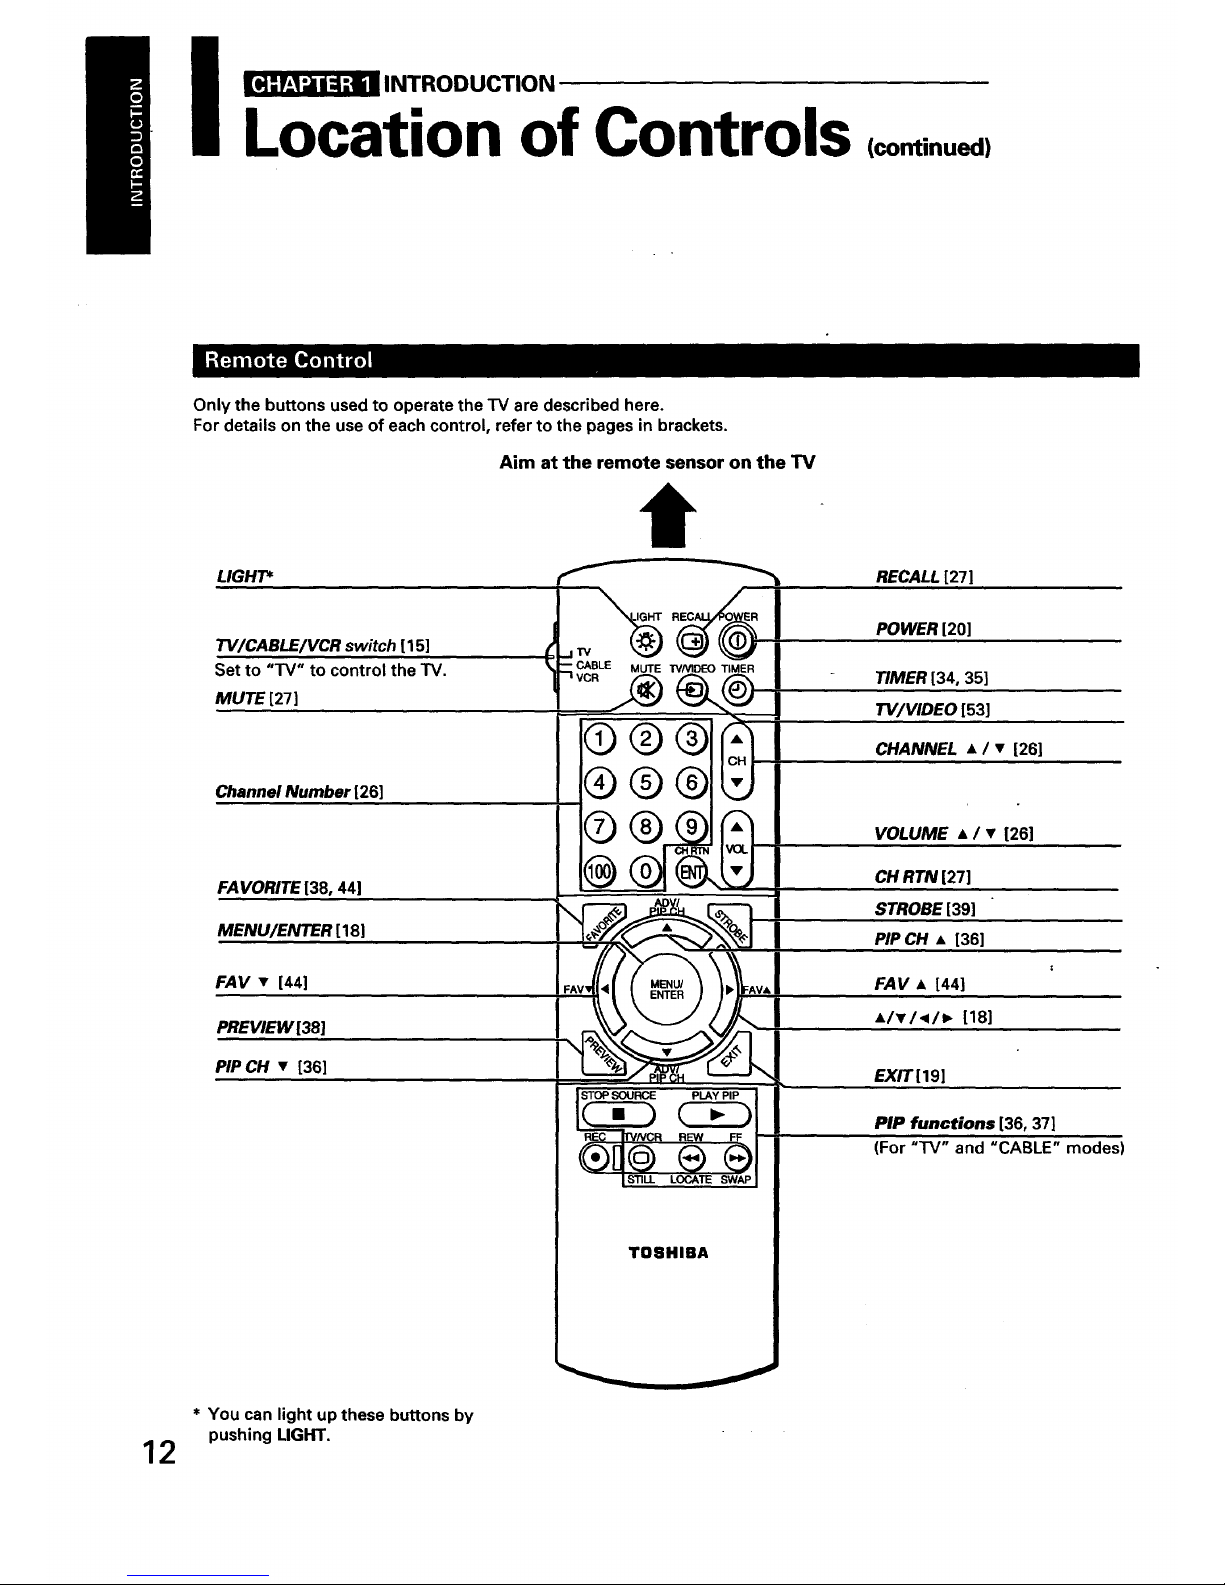
___[]1 INTRODUCTION
Location of Controls
Only the buttons used to operate the TV are described here.
For details on the use of each control, refer to the pages in brackets.
LIGHT*
TV/CABLE/VCR switch [15]
Set to "TV" to control the TV.
MUTE [27]
Channel Number [26]
FAVORITE [38, 44]
MENU/ENTER [18]
FAV • [44]
PREVIEW[38]
PIP CH • [36]
Aim at the remote sensor on the TV
RECALL [27]
POWER [20]
TIMER [34, 35]
W/VIDEO [53]
®®
®
@
CHANNEL • / • [26]
VOLUME • / • [26]
CH RTN [27]
STROBE [39]
PIP CH • [36]
FAV • [44]
Al_rl<l, [18]
STOP SOURCE PLAY PIP
STILL LOCATE SWAP
TOSHIBA
F.X/T[19]
PIP functions [36, 37]
(For "TV" and "CABLE" modes)
12
* You can light up these buttons by
pushingLIGHT.
J
_ INTRODUCTION
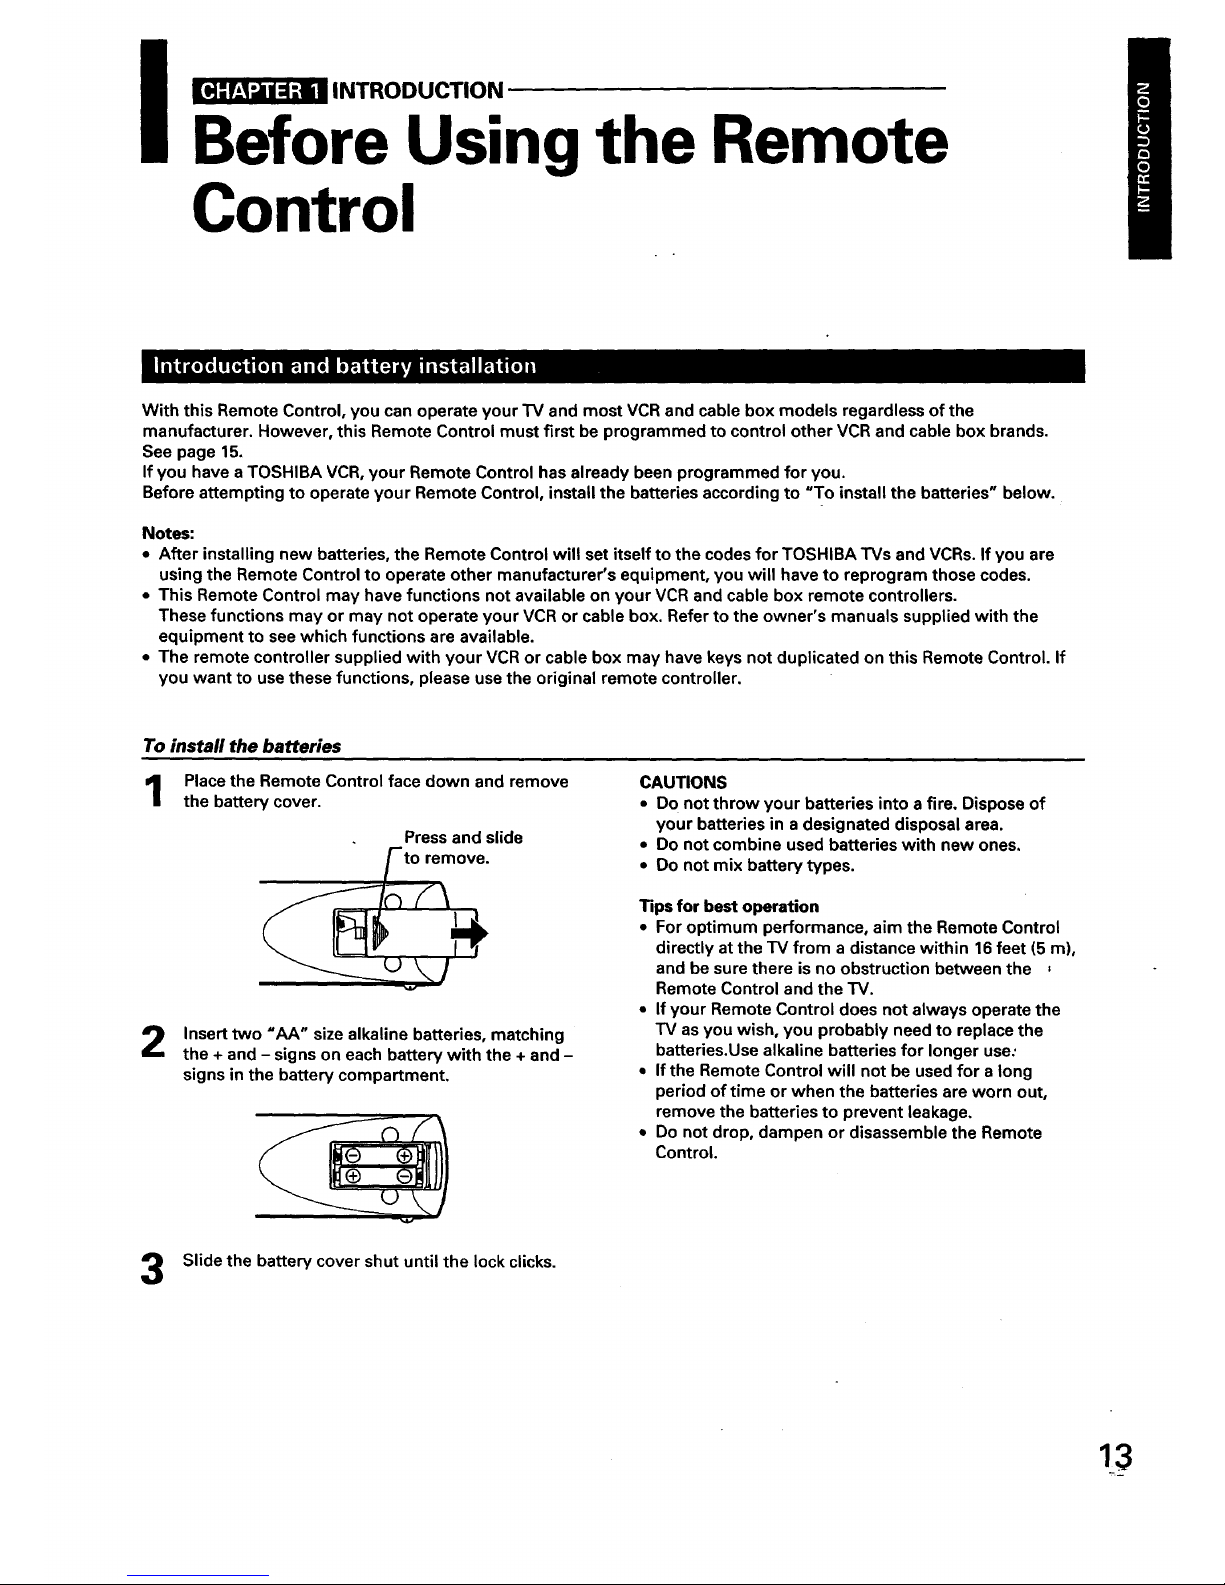
Before Using the Remote
Control
With this Remote Control, you can operate your "IV and most VCR and cable box models regardless of the
manufacturer. However, this Remote Control must first be programmed to control other VCR and cable box brands.
See page 15.
If you have a TOSHIBA VCR, your Remote Control has already been programmed for you.
Before attempting to operate your Remote Control, install the batteries according to "To install the batteries" below.
Notes:
• After installing new batteries, the Remote Control will set itself to the codes for TOSHIBA'I'Vs and VCRs. If you are
using the Remote Control to operate other manufacturer's equipment, you will have to reprogram those codes.
• This Remote Control may have functions not available on your VCR and cable box remote controllers.
These functions may or may not operate your VCR or cable box. Refer to the owner's manuals supplied with the
equipment to see which functions are available.
• The remote controller supplied with your VCR or cable box may have keys not duplicated on this Remote Control. If
you want to use these functions, please use the original remote controller.
To install the batteries
Place the Remote Control face down and remove
the battery cover•
Press and slide
to remove.
Insert two "AA" size alkaline batteries, matching
the + and - signs on each battery with the + and -
signs in the battery compartment.
CAUTIONS
• Donot throw your batteries into a fire. Disposeof
your batteries in a designateddisposal area.
• Donot combine used batteries with new ones,
• Donot mix battery types.
Tips for best operation
• For optimum performance, aim the Remote Control
directly at the TV from a distance within 16 feet (5 m),
and be sure there is no obstruction between the ,
Remote Control and the TV.
• If your Remote Control does not always operate the
IV as you wish, you probably need to replace the
batteries.Use alkaline batteries for longer use:
= If the Remote Control will not be used for a long
period of time or when the batteries are worn out,
remove the batteries to prevent leakage,
• Do not drop, dampen or disassemble the Remote
Control.
Slide the battery cover shut until the lock clicks.
!3

_ INTRODUCTIOI_
Using the Remote with VCR
or Cable TV Converter
• To control a TOSHIBA VCR, first set the TV/CABLF_JVCRswitch to "VCR." The buttons shown below will then control
the VCR. The rest of the buttons operate the TV as usual.
If you have another brand of VCR, you can probably program the Remote Control to control it. Details are on page 15.
• To control a cable TV converter, this Remote Control must be programmed to recognize the brand of your converter.
See page 15. The shaded buttons can be used to control the cable TV converter.
Set the TV/CABLENCR switch to "CABLE" whenever you want to control the (}able TV converter.
Aim at the VCR or cable TV converter
t
14
TV/CABLE/VCR switch
CABLE: To control a cable
"IV converter
VCR: To control a VCR
Channel Number
Press the numbers to select
a channel.
STOP
Pressto stopthe tape.
REC
Press to start recording.
TV/VCR
Press to select the TV mode to
view one program while
recording another program.
TV
CABLE
POWER
Press to turn the VCR (or
cable TV converter) on.
Press again to turn off.
CHANNEL • / •
Press • to select the next
higher channel.
Press • to select the next
lower channel.
ENT
Some VCR's and cable TV
converters require "ENT" to
changechannel number.
PLAY
J Press to begin tape playback.
FF
Press to rapidly advance a tape.
In playback mode, press to view
the picture moving rapidly
forward.
REW
Press to rewind a tape.
In playback mode, press to
view the picture moving
rapidly in reverse. -

_ INTRODUCTION
Programming the Remote
Control
!,
f
--CABLIE _ W_ TIMER
@®
:::g
STOP _ PLAY PIP
C]ED
g g
STILL LOCATE SWAP
"I'08HIBA
For future reference, write the code
number you set.
VCR CODE:
CABLE COl)E:-- :
Note:
You have to reprogram the Remote
Control when you change its batteries.
• This Remote Control is programmed to operate TOSHIBA VCRs.
• To operate VCRs (or Cable converters) other than TOSHIBA models,
perform the following procedures before operating.
Referto the *VCRcode table=(or "Cable TVconvertercode table')
on pages 16 and 17 to find the code number that corresponds to the
brand name of your VCR (or your converter).
If more than one number is listed, try each one separately until you
find the one that works.
Set the TV/CABLE/VCR switch to "VCR" (or "CABLE").
3
4
5
While holding down RECALL, press the Number buttons to enter
the three digit code number for your brand of VCR (or converter).
Point the Remote Control at the VCR (or at the converter) and press
POWER to test the code number.
_lf the number is correct, the VCR should turn on.
_lf the VCR does not respond to the Remote Control, repeat steps
1through 4 with another code number.
Reset the TVICABLE/VCR switch to "'IV" to control the TV.
Notes:
• Some newer VCRs are capable of working on either of two remote '
codes. These VCRs have a switch labeled "VCR 1/VCR 2."
If your VCR has this kind of switch, and does not respond to any of
the code numbers for your VCR brand name, set the switch to the
other position ("VCR 1" or "VCR 2") and reprogram the Remoti_
Control.
• In some rare cases, you may not be able to operate your non-
TOSHIBA equipment with the supplied Remote Control. This is
because your equipment may use a code that is not provided with
this Remote Control. In this case, please use the equipment's own
remote control.
_ INTRODUCTION
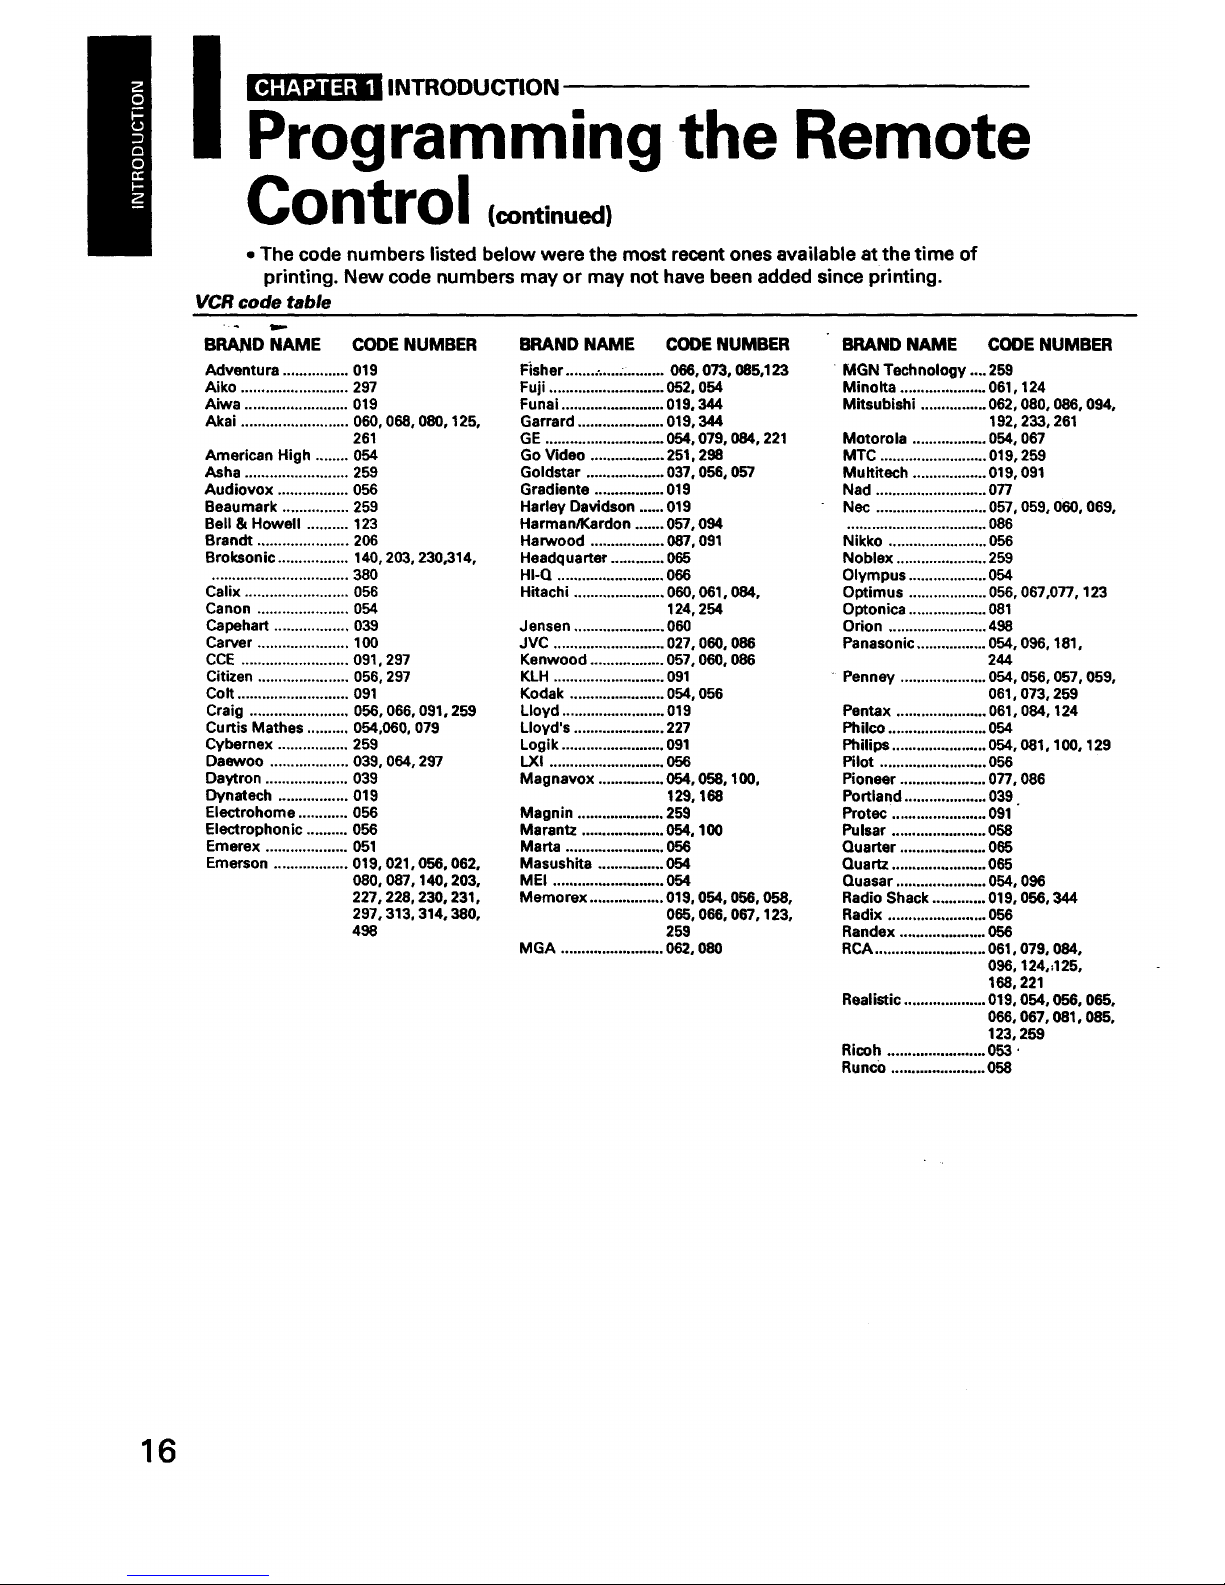
Programming the Remote
Control (continued)
• The code numbers listed below were the most recent ones available at the time of
printing. New code numbers may or may not have been added since printing.
VCR code table
BRAND NAME CODE NUMBER
Adventura ................ 019
Aiko .......................... 297
Aiwa ......................... 019
Akai .......................... 060, 068, 080, 125,
261
American High ........ 054
Asha ......................... 259
Audiovox ................. 056
Beaumark ................ 259
Bell & Howell .......... 123
Brandt ...................... 206
Broksonic ................. 140, 203, 230_314,
................................. 380
Calix ......................... 056
Canon ...................... 054
Capehart .................. 039
Carver ...................... 100
CCE .......................... 091,297
Citizen ...................... 056, 297
Colt ........................... 091
BRAND NAME COOE NUMBER BRAND NAME CODE NUMBER
MGN Technology .... 259
Minolta ..................... 061,124
Mitsubishi ................ 062, 080, 086, 094,
192, 233, 261
Motorola .................. 054, 067
MTC .......................... 019, 259
Multitech .................. 019, 091
Nad ........................... 077
Nec ........................... 057, 059, 060, 069,
.................................. 086
Nikko ........................ 056
Noble)( ...................... 259
Olympus ................... 054
Optimus ................... 056, 067,077, 123
Optonica ................... 081
Orion ........................ 468
Panasonic ................. 054, 096, 181,
244
Penney ..................... 054, 056, 057,059,
061,073, 259
Fisher ....... _.....:.......... 066, 073, 085,123
Fuji ............................ 052, 054
Funai ......................... 019, 344
Garrard ..................... 019, 344
GE ............................. 054, 079, 084, 221
Go Video .................. 251,298
Goldstar ................... 037, 056, 057
Gradiente ................. 019
Harley Davidson ...... 019
Harman/Kardon ....... 057, 094
Harwood .................. 087, 091
Headquarter ............. 065
HI-Q .......................... 066
Hitachi ...................... 060, 061,084,
124, 254
Jensen ...................... 060
JVC ........................... 027, 060, 086
Kenwood .................. 057, 060, 086
KLH ........................... 091
Kodak ....................... 054, 056
Craig ........................ 056, 066, 091,259
Curtis Mathes .......... 054,050, 079
Cybernex ................. 259
Daewoo ................... 039, 054, 297
Daytron .................... 039
Dynatech ................. 019
Electrohome ............ 056
Electrophonic .......... 056
Emerex .................... 051
Emerson .................. 019, 021,056, 062,
080, 087, 140, 203,
227, 228, 230, 231,
297, 313, 314, 380,
498
Lloyd ......................... 019
Lloyd's ...................... 227
Logik ......................... 091
LXI ............................ 056
Magnavox ................ 054, 058, 100,
129, 168
Magnin ..................... 259
Marantz .................... 054, 100
Marta ........................ 056
Masushita ................ 054
M El ........................... 054
Memorex .................. 019, 054, 056, 058,
068, 066, 067, 123,
259
MGA ......................... 062, 080
Pentax ...................... 061,084, 124
Philco ........................ 054
Philips ....................... 054, 081, 100, 129
Pilot .......................... 056
Pioneer ..................... 077, 086
Portland .................... 039
Protec ....................... 091 "
Pu Isar ....................... 058
Quarter ..................... 065
Quartz ....................... 065
Quasar ...................... 054, 096
Radio Shack ............. 019, 056, 344
Radix ........................ 056
Randex ..................... 056
RCA ........................... 061,079, 084,
096, 124,;125,
168, 221
Realistic .................... 019, 054, 056, 065,
066, 067, 081,085,
123, 259
Ricoh ........................ 053 '
Runco ....................... 058
16
BRAND NAME "COOE NUMBER
Sansung ....... _........... 064, 259
Sanky ........................ 058, 067
Sansui ...................... 060, 086
Sanyo ....................... 065, 066, 123, 259
Scott ......................... 062, 064, 140, 203,
229, 230, 231
Sears ........................ 054, 056, 061,065,
066, 073, 085, 123,
124
Sharp ........................ 067,081
Shintom ................... 091
Shogun ..................... 259
Singer ....................... 091
Sony ......................... 051,052,059, 054
STS ........................... 061
Sylvania ................... 019, 054, 062, 100,
129
Symphonic ............... 019, 344
Tatung ...................... 060
Teac .......................... 019, 060
Technics ................... 054, 181
Teknika ..................... 019, 054, 056, 071
Telefunken ............... 060, 206
TMK .......................... 227, 259
Toshiba .................... 062, 064, 085,
229, 231,385
Totevision ................ 056, 259
Unitech ..................... 259
Vector ....................... 064
Vector research ....... 657, 059
Video Concepts ....... 059, 064, 080
Videosonic ............... 259
Wards ....................... 019, 054, 061,066,
067,081,091,168,
231,259
XR-1000 .................... 019, 054, 091
Yamaha .................... 057
Zenith ....................... 052,053, 058
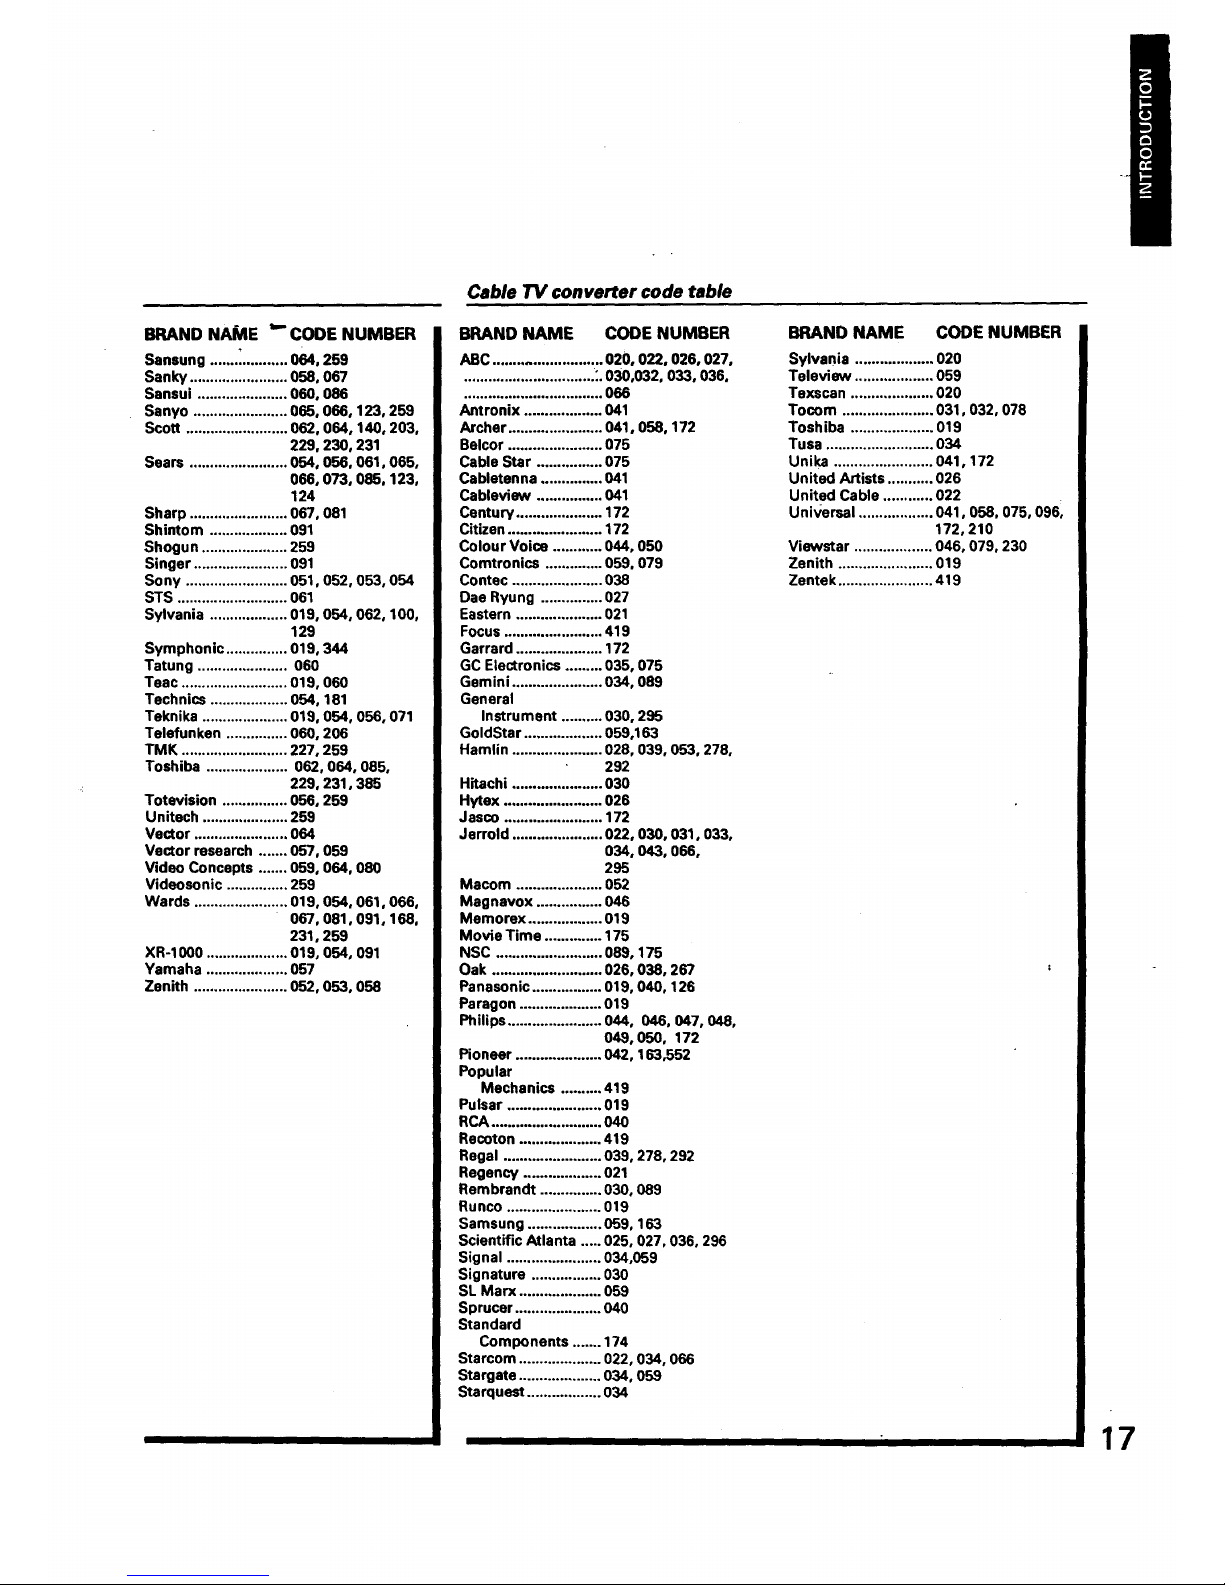
Cable TV converter code table
BRAND NAME CODE NUMBER
ABC .......................... 020, 022, 026, 027,
............................... ._.030,032, 033, 036,
.............. , ...... °.o°, ........ 066
Antronix ................... 041
Archer ....................... 041,058, 172
Belcor ....................... 075
Cable Star ................ 075
Cableten na ............... 041
Cableview ................ 041
Century ..................... 172
Citizen ....................... 172
Colour Voice ............ 044, 050
Comtronics .............. 059. 079
Contec ...................... 038
Oae Ryung ............... 027
Eastern ..................... 021
Focus ........................ 419
Garrard ..................... 172
GC Electronics ......... 035, 075
Gemini ...................... 034, 089
General
Instrument .......... 030, 265
GoldStar ................... 059,163
Hamlin ...................... 028, 039, 053, 278,
292
Hitachi ...................... 030
Hytex ........................ 026
Jasco ........................ 172
Jerrold ...................... 022, 030, 031,033,
034, 043, 066,
295
Macom ..................... 052
Magnavox ................ 046
Memorex .................. 019
Movie Time .............. 175
NSC .......................... 089, 175
Oak ........................... 026, 038, 267
Panasonic ................. 019, 040, 126
Paragon .................... 019
Philips ....................... 044, 046, 047, 048,
049, 050, 172
Pioneer ..................... 042, 163,552
Popular
Mechanics .......... 419
Pulsar ....................... 019
RCA ........................... 040
Recoton .................... 419
Regal ........................ 039, 278, 292
Regency ................... 021
Rembrandt ............... 030, 089
Runco ....................... 019
Samsung .................. 059, 163
Scientific Atlanta ..... 025, 027,036, 296
Signal ....................... 034,659
Signature ................. 030
SL Marx .................... 059
Sprucer ..................... 040
Standard
Components ....... 174
Starcom .................... 022, 034, 066
Stargate .................... 034, 059
Starquest .................. 034
BRAND NAME CODE NUMBER
Sylvania ................... 020
Teleview ................... 059
Texscan .................... 020
Tocom ...................... 031,032,078
Toshiba .................... 019
Tusa .......................... 034
Unika ........................ 041,172
United Artists ........... 026
United Cable ............ 022
Universal .................. 041,068, 075, 096,
172,210
Viewstar ................... 046, 079, 230
Zenith ....................... 019
Zentek ....................... 419
17
I _ INTRODUCTION
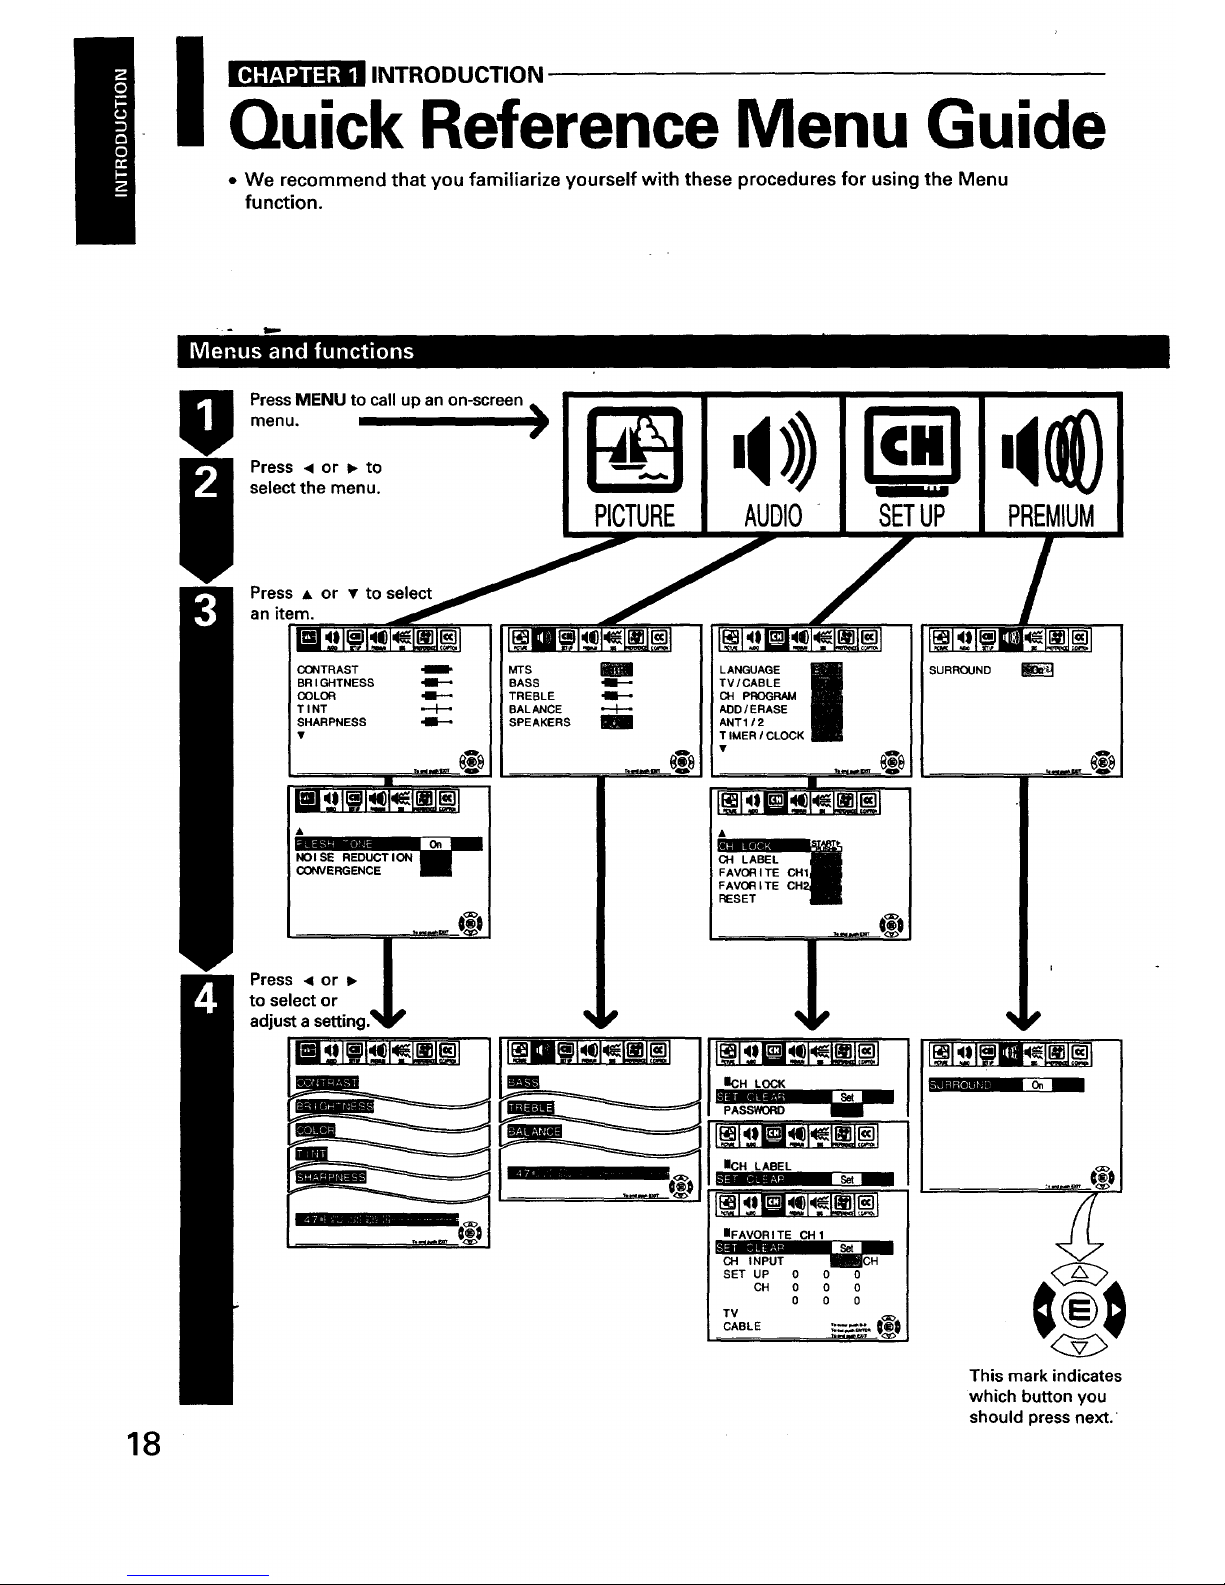
Quick Reference Menu Guide
• We recommend that you familiarize yourself with these procedures for using the Menu
function.
O
Press MENU to call up
menu.
Press < or • to
select the menu.
PICTURE AUDIO- SETUP PREMIUM
18
Press • or • to select
an item.
CONTRAST
BRIGHTNESS
COLOR .B--.
TINT
SHARPNESS
_ @
NOISE REDUCTION
CONVERGENCE
Press < or •
to select or
adjust a setting
I-=iSIWl__l.__=.1
ii
r TS
BASS
I TREBLE
B
,ll---
m
P
I_iil_l_l_l
LANGUAGE /
TV/CABLE
CH PROGRAM
ADD/ERASE
ANTll2
TIMERICLOCK
h_ @
CH LABEL
@
--r
FAVORITE
RESET
I_l"..OB_l_l
IICH LOCK
ICH LABEL
b S_
IIFAVORITE CH 1
,= Set
CH INPUT IBIIBCH
SET UP 0 0 0
CH 0 0 0
0 0 0
TV
CABLE ,.._'_'°_ _
SURROUND
....... --__ On
@
This mark indicates
which button you
should press next."
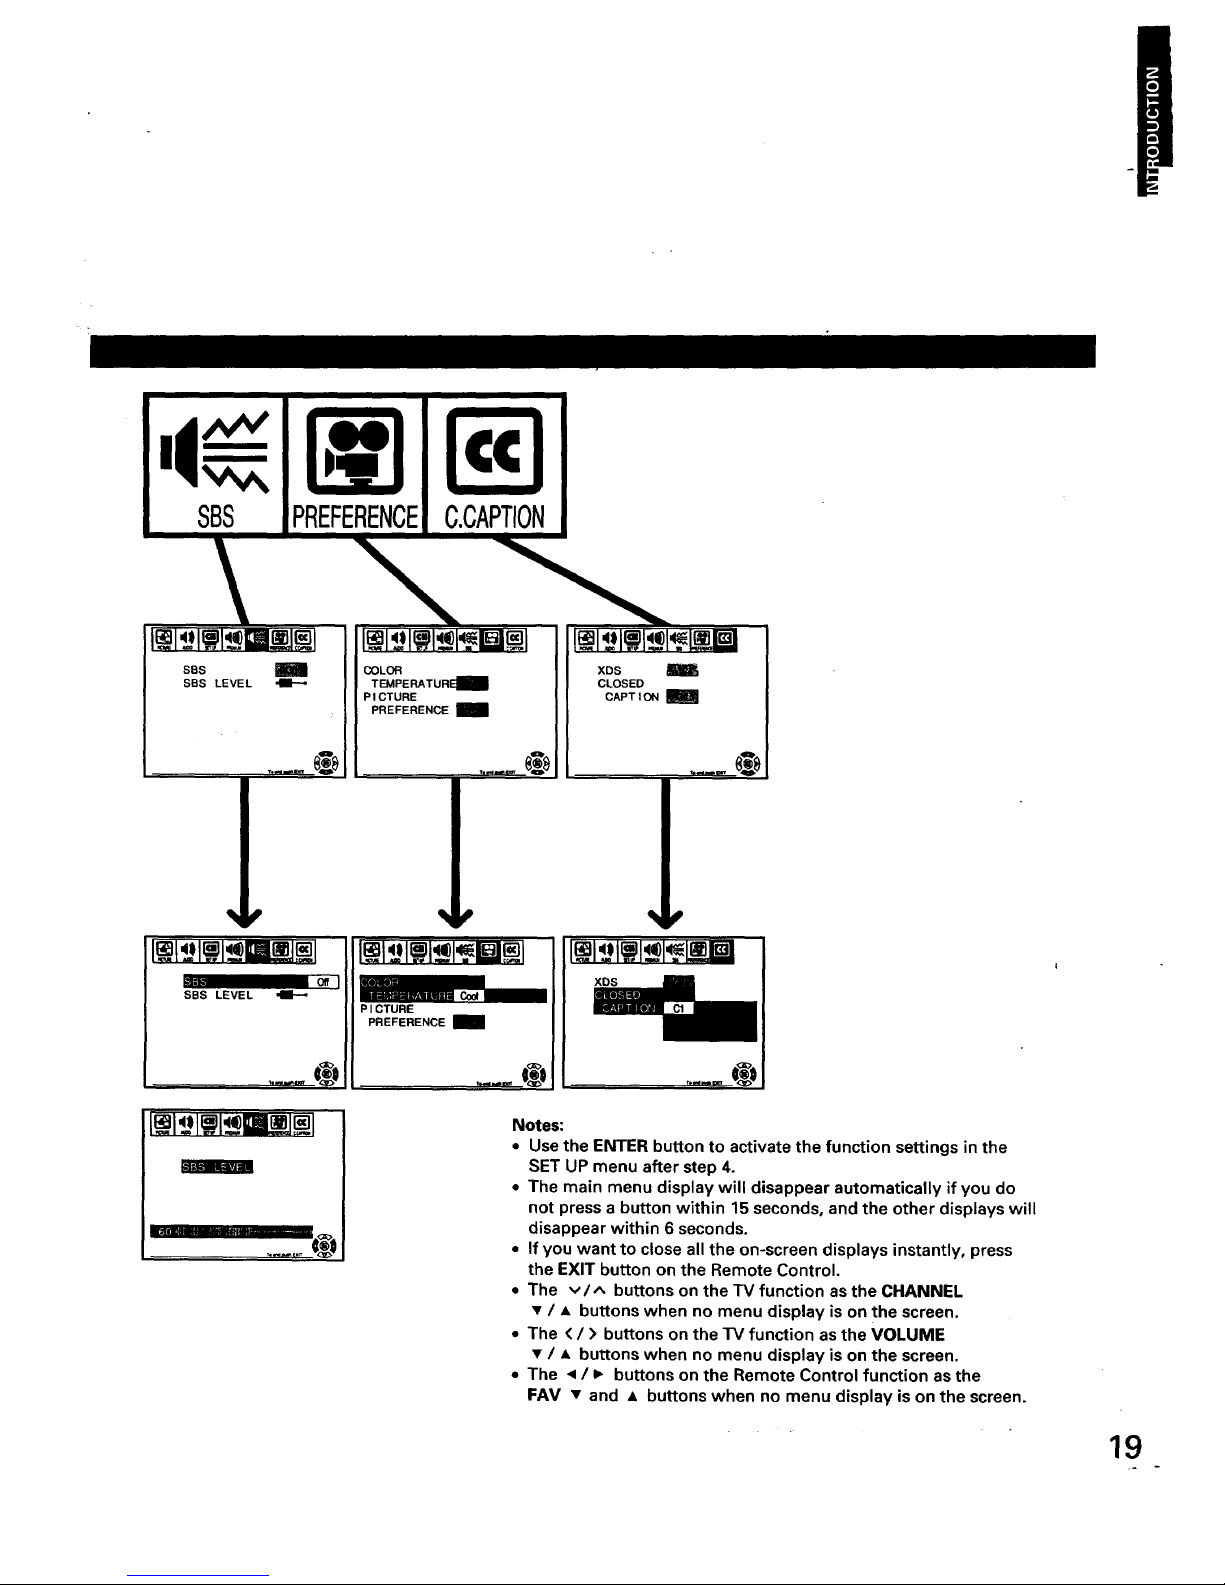
SBS PREFERENCE
C.CAPTION
ses
SSS LEVEL
D
OOLOR
TEMPERATUR_
PI CTURE
PREFERENCE
XDS
CLOSED
CAPTION
P
N, o_1
SBS LEVEL ,Be--.
P I CTURE
PREFERENCE
_.. e 0!
Notes:
Use the ENTER button to activate the function settings in the
SET UP menu after step 4.
The main menu display will disappear automatically if you do
not press a button within 15 seconds, and the other displays will
disappear within 6 seconds.
If you want to close all the on-screen displays instantly, press
the EXIT button on the Remote Control.
The via buttons on the TV function as the CHANNEL
• / • buttons when no menu display is on the screen.
The < / ) buttons on the TV function as the VOLUME
• / • buttons when no menu display is on the screen.
The • / =, buttons on the Remote Control function as the
FAV • and • buttons when no menu display is on the screen.
19
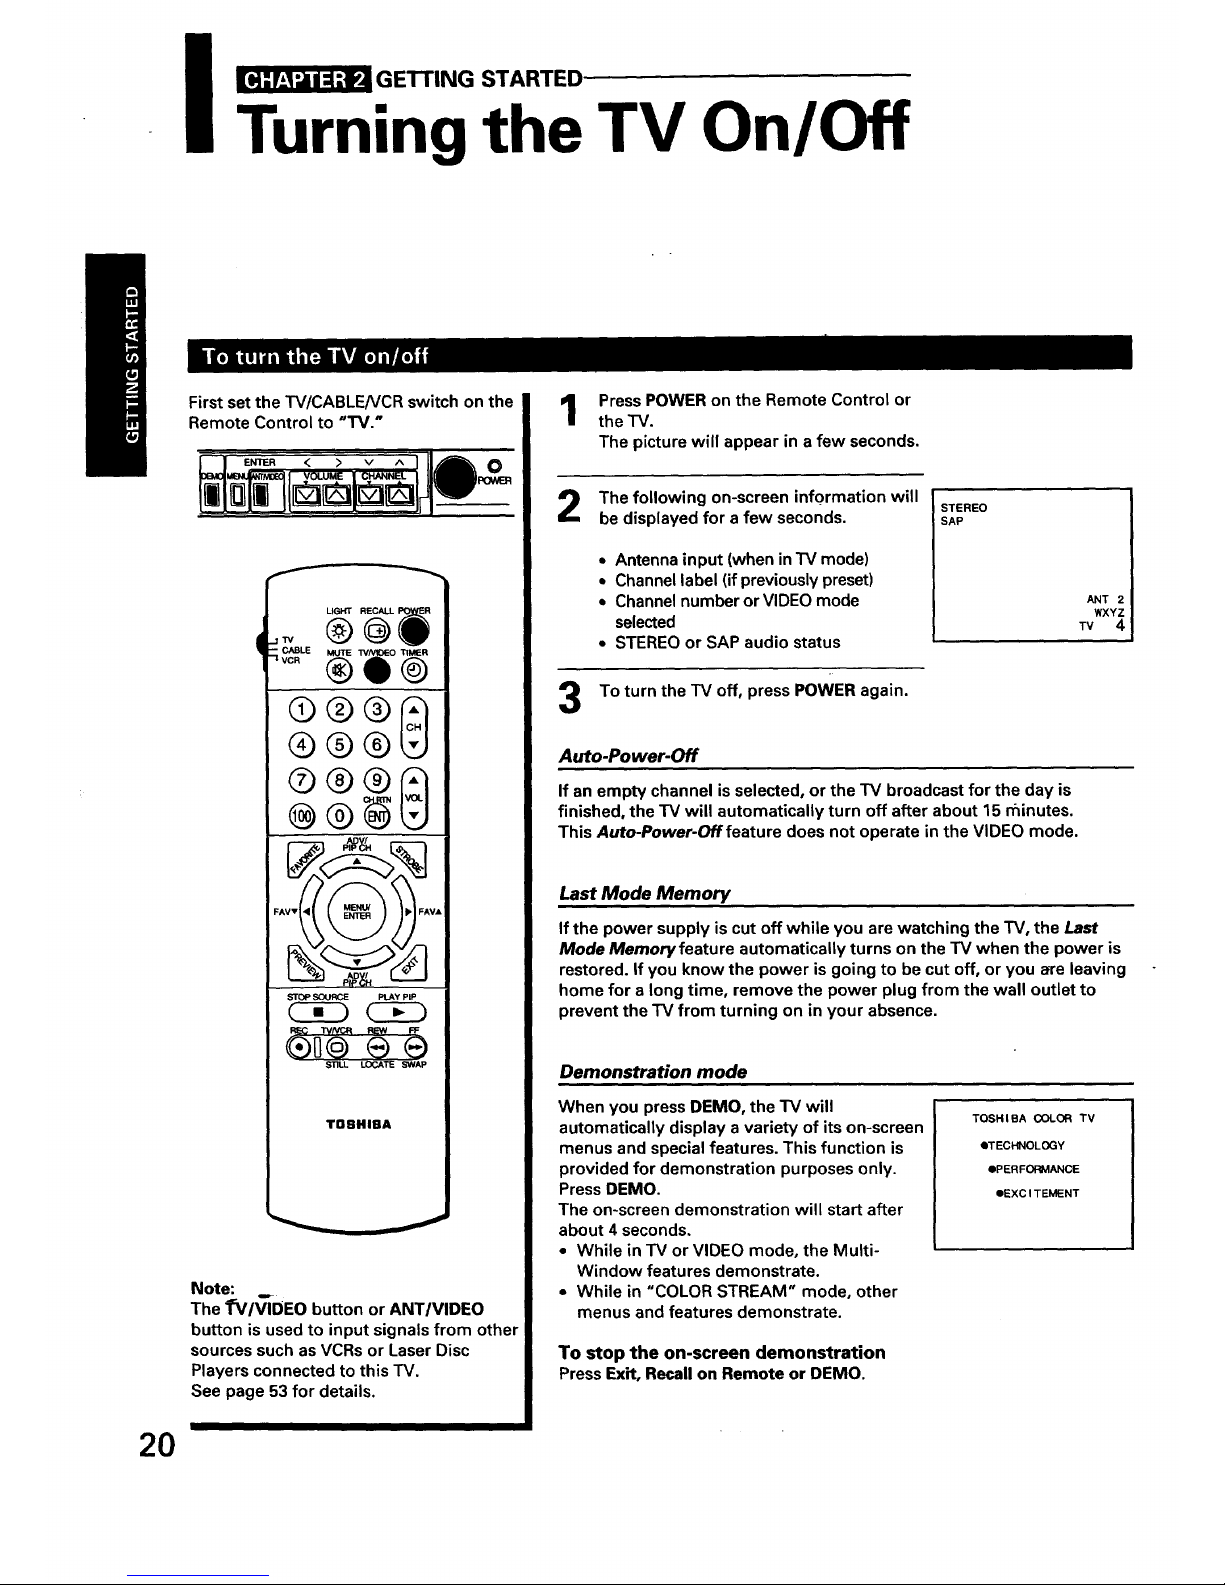
I _]_ GETTING STARTED
Turning the TV On/Off
First set the TV/CABLENCR switch on the
Remote Control to "TM."
LIGHT RECALL j
--' ®ion;
"-t VCR
®®®
®®N
r--Nl P_ [-_--I
FAVV ___ FAVA
STOP SOURCE PLAY PIP
CKD
®0@
TOBHIBA
Note:
The fV/VIDEO button or ANTIVIDEO
button is used to input signals from other
sources such as VCRs or Laser Disc
Players connected to this TV.
See page 53 for details.
Press POWER on the Remote Control or
the TV.
The picture will appear in a few seconds.
The following on-screen information will
be displayed for a few seconds.
• Antenna input (when in TV mode)
• Channel label (if previously preset)
• Channel number or VIDEO mode
selected
• STEREO or SAP audio status
STEREO
SAP
ANT 2
WXYZ
TV 4
To turn the TV off, press POWER again.
Auto-Power-Off
If an empty channel is selected, or the TV broadcast for the day is
finished, the TV will automatically turn off after about 15 n_inutes.
This Auto-Power-Offfeature does not operate in the VIDEO mode.
Last Mode Memory
If the power supply is cut off while you are watching the TV, the Last
Mode Memoryfeature automatically turns on the TV when the power is
restored, if you know the power is going to be cut off, or you are leaving
home for a long time, remove the power plug from the wall outlet to
prevent the TV from turning on in your absence.
Demonstration mode
When you press DEMO, the TV will
automatically display a variety of its on-screen
menus and special features. This function is
provided for demonstration purposes only.
Press DEMO.
The on-screen demonstration will start after
about 4 seconds.
• While in TV or VIDEO mode, the Multi-
Window features demonstrate.
• While in "COLOR STREAM" mode, other
menus and features demonstrate.
TOSHIBA COLOR TV
eTECHNOLOGY
ePERFORMANCE
eEXCITEMENT
To stop the on-screen demonstration
Press Exit, Recall on Remote or DEMO.
2O
 Loading...